

6 Best Free Windows 11/10 Repair Tools
We share the best ones for the job
There are a large number of interconnected components that make up the Windows operating system, and if even just one thing goes wrong, Windows may have issues. The drivers, the system services, a stuck update …the list goes on.
So when your PC starts showing problems, it can be hard to pinpoint the actual cause. This makes manually fixing the issue difficult. Instead, you can use a good Windows 11/10 repair tool that automatically fixes your Windows installation. Which tools, you ask? Here is a list of the best free Windows 11/10 repair apps.

1. Windows Repair
One of the few all-in-one Windows 11/10 repair tools out there, Windows Repair does exactly what it promises – repair Windows 11/10. Be it file permissions, registry errors , or obscure settings, the app takes care of it all.
Since many of its workings can conflict with other apps running in the background, it is recommended to run Windows Repair in safe mode. This ensures that all the tweaks made by the application are applied without any interference, fixing Windows 11/10 on your computer.

The app is free to use for a single computer. For repairing a large number of PCs in a commercial environment, paid versions are also available.
2. Snappy Driver Installer
Nine times out of ten, Windows 11/10 problems are due to incorrect or outdated drivers . While Windows itself does update drivers, it can often fail to provide the most suitable drivers for each piece of hardware.
Snappy Driver Installer is a utility meant to solve this issue. The tool scans your computer and finds the latest drivers to match. You can choose which drivers to update, and the application will download and install the selected drivers.

There is also an SDI Full version that comes with a database of the latest drivers. You can use this version to update drivers without being connected to the internet. Useful when you want to update drivers on a host of computers without having to waste time downloading on each one.
3. AVG TuneUp
AVG TuneUp is another good general-purpose fixing tool for Windows 11/10. Unlike Windows Repair, it focuses more on tuning up performance rather than correcting errors.
The software removes unnecessary programs, deletes leftover cache files, and disables useless startup processes. The result is a computer that runs much more smoothly, with fewer crashes and instability.
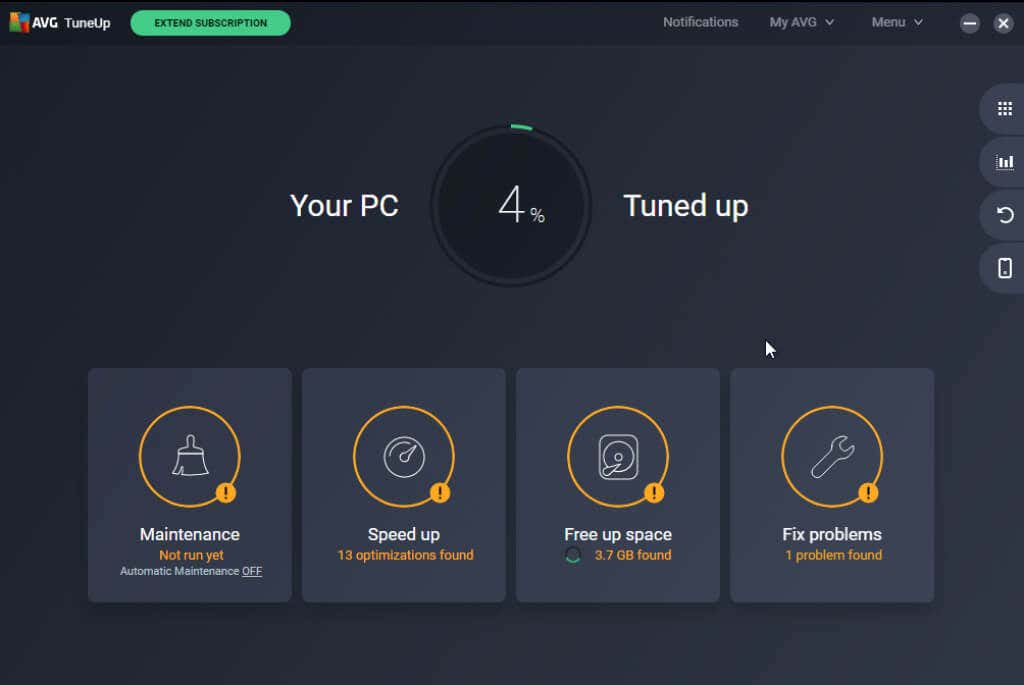
While the app is good at what it does, it isn’t exactly free. It comes with a free trial, but that works for just 30-days. After that, you need to get a paid license to keep using it. Still, you can use the trial version to give your PC a one-time tune-up for sure.
One of the better-known Windows 10 repair tools, FixWin is touted as a complete solution to all Windows issues. Similar to Windows Repair by Tweaking, FixWin is a general-purpose tool that goes over a large number of potential issues and tries to fix them.
System tools, File Explorer, the Recycle Bin… the app tackles an exhaustive list of Windows 10 problems and offers to fix them with the click of a button. To avoid overwhelming you, the fixes are neatly segregated into distinct tabs, with an easy-to-navigate UI.
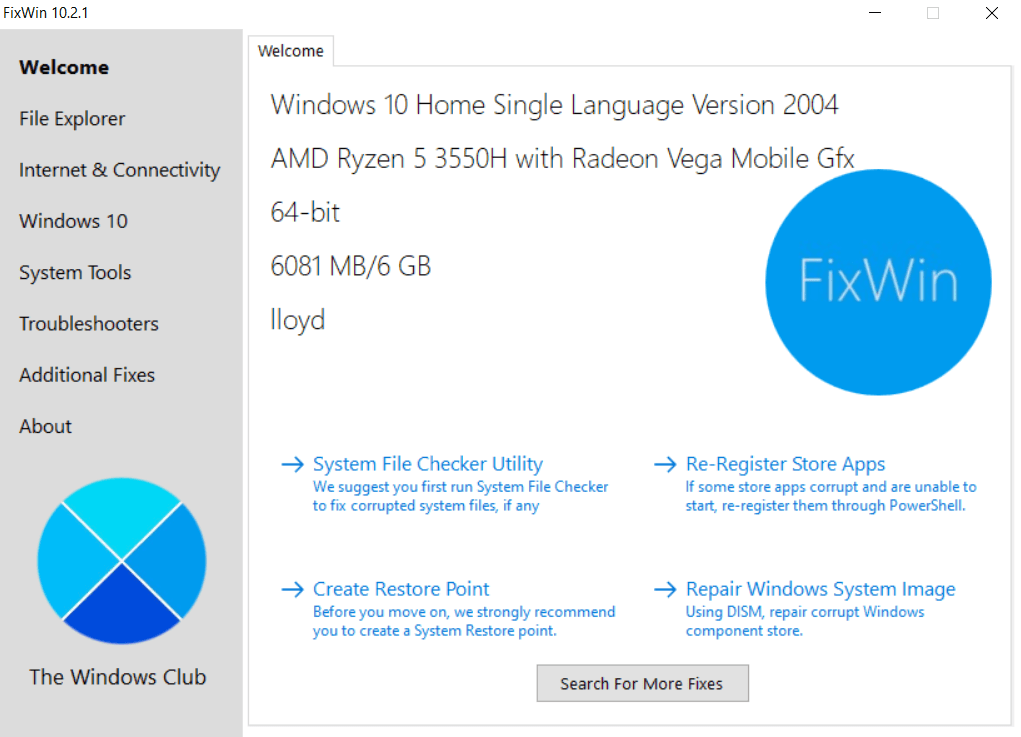
Best of all is that the app is totally free and portable. You can carry it in a USB stick and run it from there, no installation is required.
5. Advanced SystemCare
Like AVG TuneUP, this app is meant for optimizing your PC. Advanced SystemCare will ferret out unneeded files and applications slowing down your computer, allowing you to remove them easily and boost performance.
It can even disable startup applications cluttering your system RAM, speeding up boot times. You can toggle between various automatic modes, or perform a manual scan to find out issues. The UI is slick and modern, unlike many free Windows 11/10 repair tools in this niche.
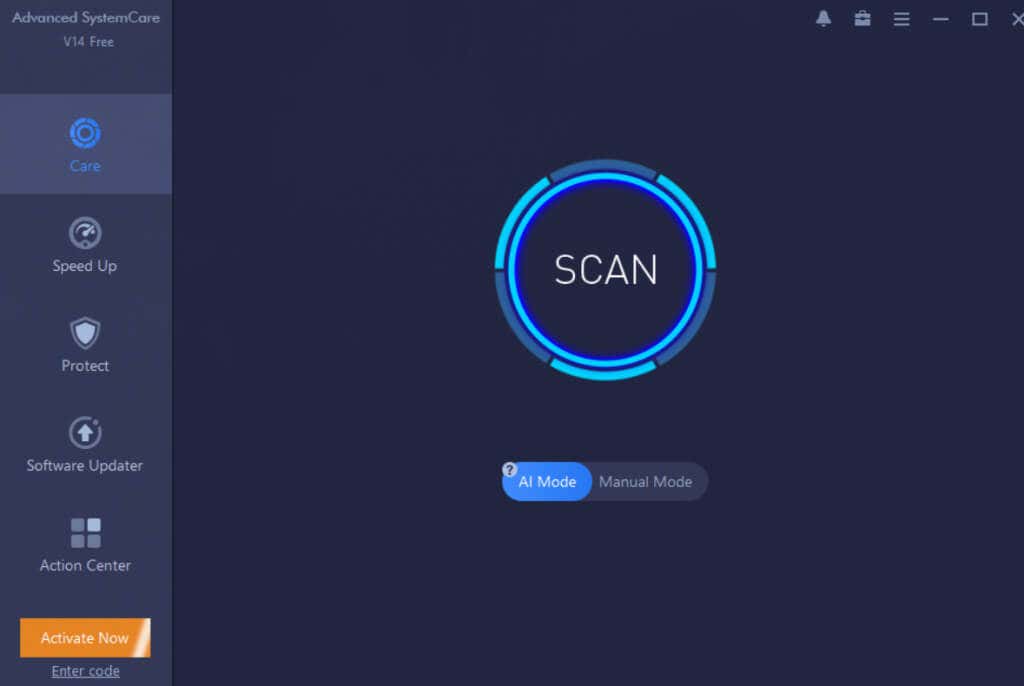
The only drawback is that it doesn’t update drivers. You can use the software updater to find new versions of installed applications, but that’s it. But if all you are looking for is an optimizer to speed up your computer, Advanced SystemCare might be just the thing for you.
6. O&O ShutUp10++
So far we have seen tools that fix outright errors with Windows, such as missing drivers or a slow computer. But what about Microsoft’s own data collecting processes spying on you from the background?
With O&O ShutUp10++ , you can put a stop to such data leaks. The app gives you unprecedented control over your privacy, by allowing you to shut down invasive monitoring from most Windows processes.
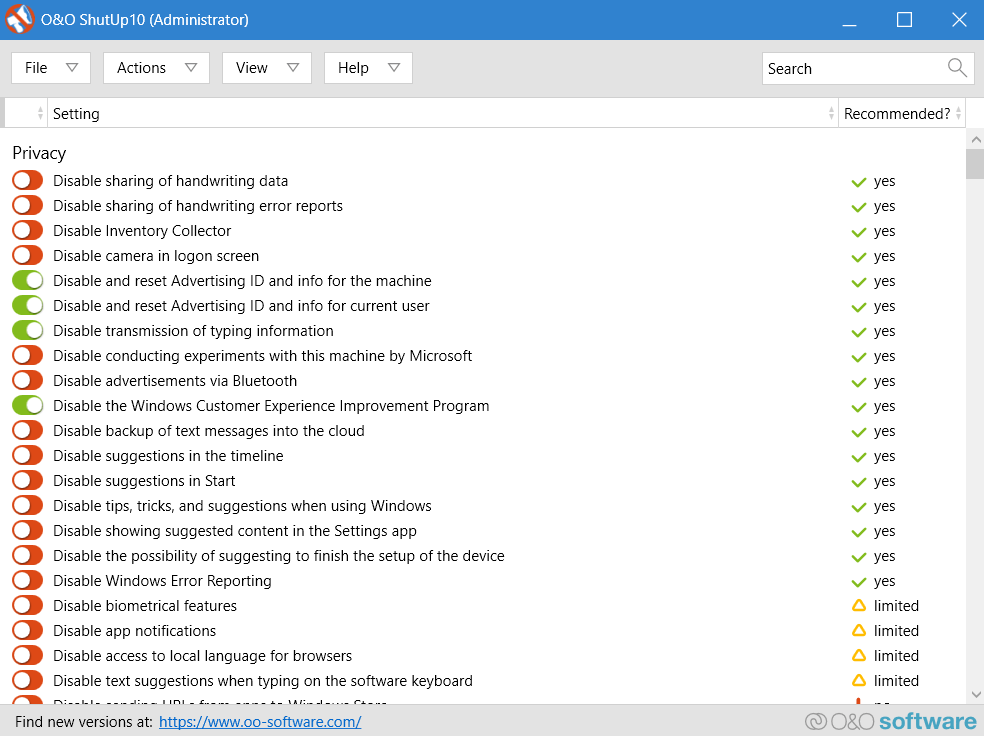
Many of these privacy settings aren’t available from your operating system normally, so this tool comes in very handy. You can easily decide which services are allowed to collect data by toggling a few switches.
What Is the Best Free Windows 11/10 Repair Tool?
There are many great tools out there to repair the most common issues with Windows 11/10. Apps like Windows Repair or FixWin are great when you are not sure of the actual causes behind the errors.
If you are looking to update your drivers, Snappy Driver Installer is a good choice. It can auto-detect driver updates to the hardware components of your PC and install them for you.
Finally, for dealing with privacy-related issues in Windows 11/10, you have O&O ShutUp10++. The app can effectively shut down most Windows settings intruding on your privacy and collecting unnecessary data.
Levin Roy is a software engineer who loves writing about technology. Whether it is Windows tips-and-tricks or in-depth guides about application development, Levin uses his practical experience and technical skills to create articles that can help solve tricky problems. Read Levin's Full Bio
Read More Posts:

- Is a New iPad Pro Coming Soon?
- Get It Now: Spring Tech Deals at Amazon
How to Fix Broken Registry Items in Windows 11
Use Command Prompt to execute the 'sfc /scannow' command, or run Disk Cleanup
:max_bytes(150000):strip_icc():format(webp)/JonMartindaleheadshot2021-145018ccd03741b59f83e20327315e9a.jpeg)
In This Article
Jump to a Section
- Causes of a Broken Registry Item
- Frequently Asked Questions
Registry errors in Windows 11 can be some of the most frustrating problems to deal with, as they can accumulate over time and appear to have no obvious cause. Whether it's just from system clutter, malware, or an incomplete shutdown, however, there are ways you can fix broken Windows Registry items in Windows 11. Here are some of the best.
What Causes Broken Registry Items in Windows 11?
It's not always clear what's behind broken registry items in Windows 11, but it's likely a mixture of a few things. Malware can cause issues with your registry as they attempt to infiltrate and replicate in your system, and problematic Windows updates can occasionally throw a spanner in the works too. It's also possible an incomplete shutdown, like from a power outage, could cause some corruption in registry files, leading to further issues down the line.
Whatever the cause for the registry problems, though, the solutions are the same.
How to Fix a Broken Registry
There are a few different methods you can use for fixing the registry in Windows 11. Here are the best ones, listed from easiest and most likely to work, to the more complicated and time demanding.
Run the sfc /scannow command from an elevated Command Prompt . This system file checker will make sure all of your Windows system files and DLL files are working properly, and if not, it'll attempt to replace them.
Run the DISM (Deployment Image Servicing and Management) command shown below to fix your Windows image if there's a problem with the installation, which should help shore up any problems with your registry.
To do so, open Command Prompt and type the following, followed by Enter to execute it:
Once the scan is completed, restart your PC to see if that fixed the issue.
Clean up the hard drive with the Disk Cleanup tool to remove any unnecessary files that might be causing registry issues.
Run a malware scan to make sure there aren't any viruses or trojans that are causing your registry errors.
Access Advanced Startup Options to run a startup repair. Once you're in the ASO menu , go to Troubleshoot > Advanced options to see the startup repair option.
Revert to a previous Windows restore point that was taken before your registry errors appeared.
If all else fails, reset Windows 11 to its factory defaults . That will no doubt clear out any lingering registry error issues you're facing.
All your files might be removed during this step unless you pick the Keep my files option. Make sure to read through that tutorial carefully.
If for any reason you need to completely restore your Windows registry, you can do so by using a previous backup .
Press the Windows button + S and search for "disk cleanup." Choose the drive you have Windows installed to, then select Clean Up System Files and select the same drive again. Go over the options as they're presented, then select OK to start.
Get the Latest Tech News Delivered Every Day
- How to Fix a Critical Process Died Windows 11 Error
- 15 Ways to Fix It When Windows 11 Folder Thumbnails Aren't Showing Up
- How to Fix Corrupted Files in Windows 11
- Use SFC /Scannow to Repair Windows System Files
- How to Fix Corrupt Registry in Windows 10
- How to Fix Shell32.dll Not Found or Missing Errors
- 9 Ways to Fix DPC Watchdog Violation in Windows 11
- How to Fix Msvcrt.dll Not Found or Missing Errors
- How to Fix Opengl32.dll Is Missing or Not Found Errors
- How to Fix Hid.dll Not Found or Missing Errors
- How to Fix a Computer That Won't Start in Safe Mode
- How to Fix 'Msvbvm50.dll Not Found or Missing' Errors
- How to Fix the 'There Was a Problem Resetting Your PC' Error
- How to Fix a Frozen Windows 10 Taskbar
- Error Code 0xc00000e9: What It Means and How to Fix It
- How to Fix Vbscript.dll Not Found or Missing Errors
- Accessories
- Entertainment
- PCs & Components
- Wi-Fi & Networks
- Newsletters
- Digital Magazine – Subscribe
- Digital Magazine – Log in
- Smart Answers
- Best laptops
- Best antivirus
- Best monitors
- Laptop deals
- Desktop PC deals
When you purchase through links in our articles, we may earn a small commission. This doesn't affect our editorial independence .
How to clean your Windows registry and speed up your PC
Let’s start with a little quiz. I say, “Big, bloated, and full of errors.” What do you say? Right, “Windows Registry.” One more: “Messing with it is risky.” If you guessed the registry again, you pass. While fooling around with your Windows registry does involve some risk, cleaning it out can have a positive impact on your PC’s overall performance.
The Windows registry is a repository for a massive collection of details about your computer—where programs are stored, which helper programs (known as DLLs) are shared among your various applications, listings of all your Start menu shortcuts, and pointers to the programs that fire up when you click on an icon. And that’s just the beginning.
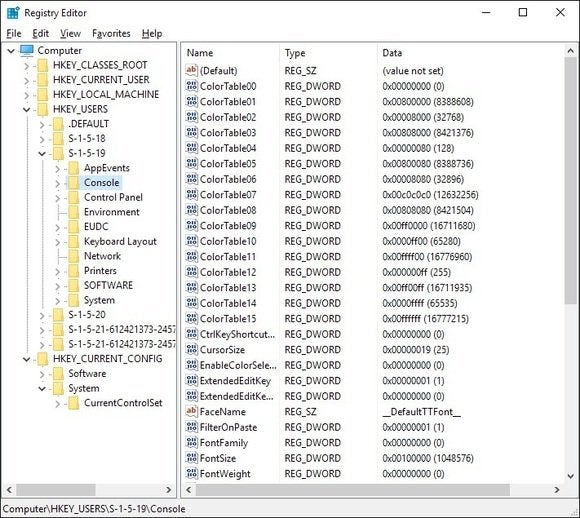
The dark and scary place known as the Windows registry.
Practically everything you do in Windows is recorded in the registry. For instance, the URL for this article probably has an entry now, somewhere. The paths to the last dozen or so images or documents you opened are there, too, as are the details of the programs you have installed or uninstalled.
Here’s the problem: If you pry open the registry, you’ll find it about as cluttered as a teenager’s bedroom. That’s because Windows doesn’t efficiently clean up after itself as it goes about its daily business. It constantly creates new entries, but seldom—if ever—removes old entries after they’re no longer needed.
Compounding this problem is the fact that applications are usually too inept to uninstall all of the registry entries they create. Far too often, program updates and installers leave unneeded pointers in the registry, so the registry becomes bloated with unnecessary entries, slowing down your system.
Registry cleaners: Boon or boondoggle?
The big question we’re asking in this piece is whether a registry cleaner will indeed speed up your PC, making it boot more quickly and run faster. The answer is, emphatically and unequivocally, maybe. That’s right, a big, fat perhaps —because everything depends on the condition of your registry. It also depends on the effectiveness of the registry cleaner you choose, and there are a lot to choose from.
To find out which registry cleaner catches the most errors, is the safest and easiest to use, and (just as important) creates the fewest hassles, we tested five popular registry cleaners, many of which came recommended by PCWorld readers. We examined two free products (Advanced Windows Care and RegSeeker) and three commercial ones (jv16 PowerTools, Registry First Aid, and RegSupreme Pro).
We tried each tool on three computers: a messy work PC using Windows XP SP3, on a pristine Fujitsu Lifebook T-Series laptop running Vista, and on an old ThinkPad laptop.* We ran the registry scan and repair module of each application, rebooted the system, and watched for problems that would indicate that the “cleaning” process broke something. We also tried to determine whether the system seemed friskier post-cleanse. After each test, we restored the systems to their original state of disarray with Acronis TrueImage. (Read a review of Acronis True Image 2015 and download the demo .)
Before we reveal the results, we offer some important tips to keep in mind before, during, and after your forays into the registry. Being prepared for what’s involved and taking the proper precautions are critical to making this a successful undertaking. If you want to skip ahead to the results, you can click the entry for each program in the table of contents on the left.
*All programs were re-tested on a modern, Windows 10 PC to verify compatibility.
Top 10 registry dos (and don’ts)
Messing with the registry—and doing so incorrectly—can destroy Windows and cause you great distress. Seriously. If something goes sideways in the registry you’ll be looking at a full reinstallation of your OS; that’s how dangerous it is to tinker with it. Here are the top 10 tips to keep your system running, and to keep yourself anxiety-free.
1. Back up your data. The best protection from registry hassles, or any computing disaster, is to have a current backup. As in, you ought to do one now while you’re thinking about it. See this article for some guidance.
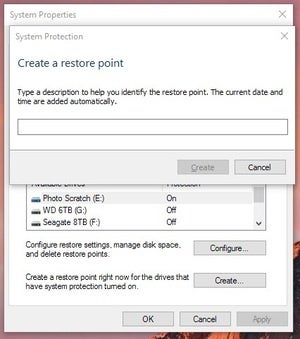
Always create a System Restore Point before you start mucking around with the registry.
2. Back up your registry. Make sure to back up your registry before you open any registry cleaner. This is a bit redundant, since the registry cleaner will back up any changes it makes, but an extra level of security never hurts, and will help greatly if something goes awry. If you’re using an older version of Windows such as XP, you can use ERUNT (the Emergency Recovery Utility NT). If you’re on Windows 7/8/10 you can just create a System Restore Point to accomplish the same thing.
3. Pay attention. In most programs that guide you with wizards it’s no big deal if you don’t pay attention and merely keep clicking the Next button. That isn’t the case with registry cleaners. Stay alert and read whatever the cleaning tool has to say, especially when it’s about to delete files.
4. Minimize conflicts. When you begin scanning, make sure you don’t have any other applications running. It’s also smart to disable/unload any programs running in your system tray because open apps are constantly making registry changes, and you want the registry cleaner to do its work with no interference.
Right-click any icons in your taskbar that are for programs running in the background and quit them before you begin.
5. Use caution. After the scan, the program will let you remove—or in some cases, repair—the registry errors. If you’re given the option, set the registry cleaner to remove errors only at the safest and least-intrusive level. (You can scan with more-aggressive settings later on.) Even using a cautious approach you might still see 1,000 or even 2,000 “safe” entries that need cleaning. For instance, Registry First Aid found 2,161 problems on the work system, of which about 1,900 were deemed safe to alter.
Whatever you do, never choose an “auto clean” option, such as the one in RegSeeker. Ever . They are not to be trusted.
6. Seriously, use caution. Choosing which of the errors to remove or repair can give you a migraine. We scan for things that look familiar. For example, we saw almost 100 registry entries left over from a package of Dell drivers that had been uninstalled months ago, and one registry cleaner spotted invalid paths to dozens of entries for MP3 files that were moved to a new location. Both of those catches were accurate, and gave us a sense that the program’s removal suggestions were accurate.
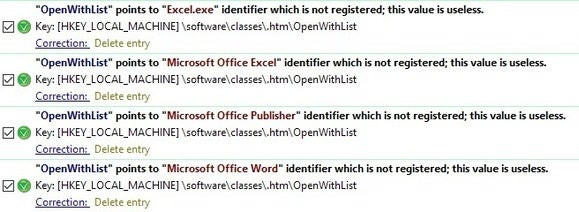
Examine the errors you see and look for familiar programs before moving forward.
After a couple of days, if your PC doesn’t do anything weird, such as showing error messages on boot or when trying to launch a program, try another scan, this time allowing the registry cleaner to scan more aggressively.
Always examine entries marked with “Caution,” “Extreme Caution,” or some other indicator of risk very carefully. Unless you’re an advanced user and can clearly identify the scope of the entry, leave it alone. The reason is that, even if the cleaner offers an option to restore a deleted registry entry, restoring might not be possible if the DLL entry you just deleted is essential for your system to boot. Always be careful when making these decisions and error on the side of caution.

While it’s scanning, take your dog to the beach or go for a walk. Whatever you do, don’t use your computer for a bit.
7. Step away from the PC. Once you give the software the go-ahead and it starts removing registry entries, walk away from your PC. Play with the dog, have some coffee, or watch TV. This is for safety purposes: If you’re fiddling with the PC—moving the mouse, deleting desktop shortcuts, whatever—you’re making changes to the registry while a registry cleaner is working. Not a good idea.
8. Backup to the rescue. If you discover a problem (for instance, maybe Excel no longer launches), don’t panic. And don’t do anything aside from using the registry cleaner’s restore feature, which ensures that only the changes the program just made are reversed. That will usually fix the problem. If not, the next step is to restore the registry with ERUNTor via System Restore (see tip number 2). As a last resort, restore your PC with a backup program—which you certainly have, right? Right!??
9. Maintenance. You needn’t perform a registry scan more than once a month or so, especially if you don’t often make changes to your PC. Scanning more frequently won’t hurt anything, but you’re unlikely to see a significant performance boost if the program isn’t removing a lot of unneeded entries.
10. Come one, come all. Are you a techno-fanatic who needs the registry to be squeaky clean, with absolutely no stray entries and trimmed of all fat? There’s no harm in using multiple freebie registry cleaners—provided you use them one at a time. If you are using a hard drive, you might also want to select a registry cleaner that includes a defragger (such as jv16 PowerTools or Registry First Aid ), or choose a free defragger such as Auslogics registry Defrag .
Registry cleaners: How they fared
If you’re like us and you constantly install and uninstall programs, move files around, and fiddle with I-don’t-know-if-this-will-work freeware, a registry scrubbing will likely help you, if only a little bit. It did for us, though the change wasn’t earth-shattering. Using a stopwatch with our desktop system, we saw 10 seconds shaved off its boot time. Microsoft Word and an image editor also loaded a little faster. Note that this test was done using a spinning platter hard drive, not a solid state drive.
On the other hand, the laptop we tested didn’t show any improvement. That’s because that machine consistently runs the same five programs, with few new ones ever added. Scanning the registry on that lightly used machine showed fewer than 50 problems, and cleaning didn’t make any appreciable difference.
None of the cleaners managed to fix a gnarly problem with spoolsv.exe. (Spoolsv.exe occasionally holds up other programs from loading on our PC.)
Your mileage, undoubtedly, will vary, and you won’t know how effective a registry cleaner is until you give it a whirl. But if nothing else, these programs will at least give you the feeling that you’re taking care of your computer.
In each of the following reviews, you’ll read our curmudgeonly impressions of how the registry cleaners performed. We focused on their ease of use, the number of errors found, and whether they introduced any hazards, such as the lack of automatic backups before making changes.
Some of the tools tested wanted a permanent spot in the system tray, which isn’t necessary since they’re on-demand scanners. Since we don’t need a program running in the background unnecessarily, when a program tried doing it we found the option to disable the setting. And except for Registry First Aid, none of the products would repair faulty entries, but instead just deleted entries that were no longer valid.
Registry First Aid
Registry First Aid is eager to help you fix and tidy your registry—and it does a terrific job, too. You can’t do a whole lot with the trial version, but you can get a good sense of what the program is capable of before paying the $28 fee to unlock all of its capabilities. Of all the programs tested here, this one inspired the most confidence, both from a safety perspective and in the way it handled registry problems. The interface is clean and easy to navigate, and the program includes a registry searching tool, a backup and restore tool, the ability to take snapshots of the registry, and a compression tool. Registry First Aid supports all versions of Windows.
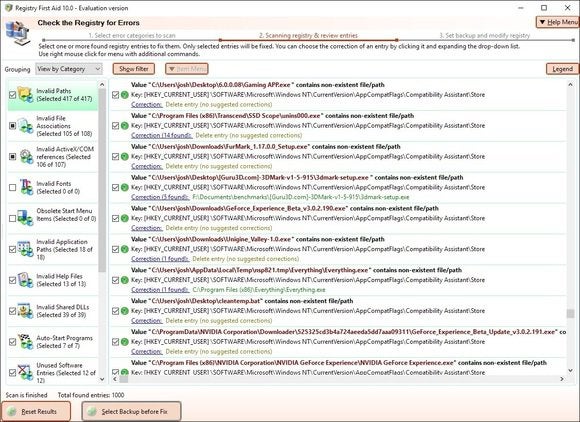
Registry First Aid shows the individual keys that are problematic, which is handy.
Registry First Aid found 2,161 faulty entries in a 20-minute scan, a high number that may be explained by the program’s relatively liberal definition of what constitutes a faulty entry. We were comfortable with the way it listed problems, either by category (such as invalid file or DLL, invalid path, or unused software entries) or by safety level. All of the entry issues that were safe to fix were automatically checkmarked, and we liked having to check the ones labeled “Caution” or “Extreme Caution” manually.
Most problems that Registry First Aid found were marked with a resolution named “Delete the entry,” but some had other choices. We could cut the invalid substring or, in some cases, repair the entry. Unfortunately, the program’s Help function wasn’t too helpful, so we opted to use the default setting.
While the program was scanning, we were able to examine each listing, check or uncheck it, or open the specific entry in the registry.
This program also has one great feature that’s worth the price of admission: With one click, you can open a web search of the entry in question. It’s very cool, and ideal for determining whether a risky entry should be removed, as a lot of scary-sounding entries are actually benign.
One quibble: The tool attempted to find a home in the system tray, unnecessarily adding clutter just so it could regularly check for new versions. We disabled it in the settings.
RegSupreme Pro
RegSupreme Pro , which costs only $20, is a basic, no-frills tool. It includes a registry cleaner as well as a registry compactor along with a few other administrative tools, and is essentially a scaled-down version of its bigger sibling, jv16 PowerTools (see below).
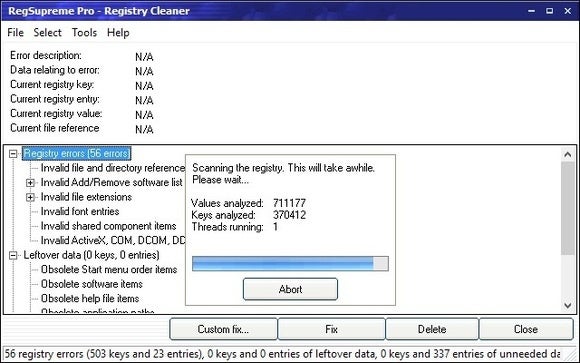
RegSupreme Pro offers an interface that is about as old school as we’ve ever seen.
In RegSupreme Pro you can set it to scan either quickly or safely, or somewhere in between (you slide a bar along a scale). The program also has almost no extras; the only one of value offers a way to search for specific keywords in the registry (say, “RealPlayer”). Like jv16 PowerTools, RegSupreme Pro supports every version of Windows and comes with a full-featured, 30-day trial. When we tested this software in July 2016 it said it didn’t support Windows 10 but the company’s website clearly states it supports Windows 10, 8, 7, XP, 2000 in both 32-bit and 64-bit variants.
RegSeeker
RegSeeker is free for personal use and has a handful of other registry-focused utilities. The tools include a keyword finder; a utility to examine installed application registry entries, assorted histories (for instance, browser and Start-menu items), and Startup entries; and a tool to tweak more settings.

RegSeeker handily makes a backup of your registry files before deleting any of them.
This registry cleaner is confusing because it says “Click OK to proceed” but there’s no OK button. On the same screen, the app presents a dangerous option: Auto Clean, which we encourage you to avoid. The screen provides little help or guidance, though RegSeeker warns that to back up the registry you must make sure to check the “Backup before deletion” option, another oddly labeled feature. The program has no automatic restore function, either; you’ll need to find the saved .reg file yourself and double-click it to restore your registry; a scary prospect for some.
On our work PC, RegSeeker picked up 1,108 problems. Unfortunately, the program offered no assistance in determining which of the errors needed deleting; it also didn’t provide categories, such as invalid path or shared DLL, in order to help us decide whether items were safe to delete. RegSeeker isn’t for novices. It supports Windows XP, Vista, 7, 8, and 10.
Advanced WindowsCare Personal
Advanced WindowsCare is a freebie (beware of Yahoo bloatware during the install though) and comes with other tools besides a registry cleaner. For instance, it claims to deter and remove spyware, optimize your PC, manage your Startup items, and remove junk files. We focused only on the tool’s registry skills, and didn’t try any of those other components.
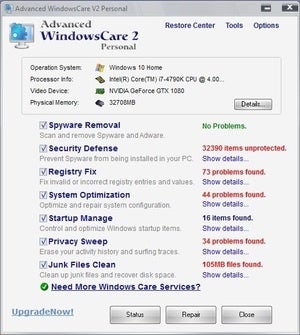
Advanced WindowsCare Personal detected a littany of issues with our test system.
Though Advanced WindowsCare found 323 registry issues, its presentation of the scanning results was pitiful. Unlike other tools that supplied detailed information about each problem, a choice of fixes, or a way to open the registry to see the actual entry, Advanced WindowsCare just showed us a list. The program uses a minimalist approach: Each item sports a cautionary symbol (with no legend), the registry key location and an error description (obsolete software key or missing MUI reference, for instance). And rather than providing a built-in backup module, Advanced WindowsCare simply offers the option to “correct problems.”
One more issue: You’ll need to pay attention when you install Advanced WindowsCare’s free scanner—unless you clear the check boxes, the fool thing will automatically add the Yahoo Toolbar to your system and make Yahoo your web browser’s homepage. Not good.
The program supports Windows 2000, XP, and Vista officially but we had no trouble running it onWindows 10, however we only recommend it to advanced users.
jv16 PowerTools
For $30, you can pick up a copy of jv16 PowerTools (a more-complete sibling to the streamlined RegSupreme Pro listed above). In addition to a registry cleaner and compactor, it has other tools that will tell you all you ever wanted to know about the registry—but you probably wouldn’t use most of them. Among the tools are utilities to manage the registry, find and replace entries, monitor registry changes, take a snapshot, and get registry stats. The collection contains other modules, too, including file finders and cleaners, duplicate finders, and an assortment of system management tools, such as a startup manager and a history cleaner. jv16 PowerTools supports every version of Windows and comes with a full-featured, 30-day trial.
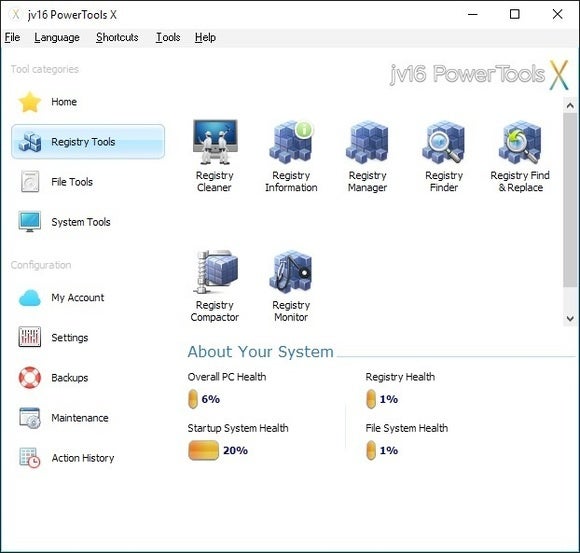
jv16 Power Tools offers several tools for cleaning and managing your system’s registry.
In its aggressive mode, the registry cleaner in jv16 PowerTools found 392 registry problems; in its normal mode, it detected 298 problems. The program gave us two ways to fix the problems. The first option was to back up the registry and let jv16 make all the changes it wanted to—a choice we weren’t happy with and wouldn’t use. On the other hand, when we chose the “Custom fix” alternative, the program forced us to look at each problem one at a time. Other apps, such as Registry First Aid, list all the items and let you select specific entries by checking the boxes beside them, which is much easier. We also wished that the program showed the severity of each problem so as to know which ones were important, but it didn’t.
jv16 PowerTools’ registry Cleaner component includes a slider bar for you to decide how aggressively you want the tool to scan—safe, normal, aggressive, or very aggressive. After the scan, a report shows a list of the categories of errors, from those with the highest (registry errors) to the lowest (log files). The feature is interesting but not terribly valuable, since it doesn’t offer any details about how it’s identifying the problems.
A nice touch, however, is that the opening series of screens provides helpful tips to use the program—we recommend you read them thoroughly.
One final note: Keeping your system free of unwanted applications with a good uninstaller utility will help eliminate the need for a dedicated registry cleaner. For a program that’s proficient at removing applications, we recommend Revo Uninstaller .
- 24/7 Live Chat
- 877 315 1713
+1 877 315 1713
Find anything you need
You have %itemCount% in your cart. Total being %total%
How to Repair and Fix Corrupt Registry in Windows 11/10
Are you facing issues with your Windows 11/10 operating system? Does it slow down or show errors frequently? The problem may lie in the registry of your computer. The registry is a vital component of the Windows operating system. It stores essential settings and information that help your system run smoothly. If it becomes corrupt or damaged, your computer may not function properly.
This article will discuss how to repair or fix a corrupt registry in Windows 11/10. This way, you can easily restore your original registry keys and values and ensure error-free performance.

- Run the Disk Cleanup Tool
- Use Automatic Startup Repair
- Run the System File Checker
- Run the DISM Scan
- Import a Registry Backup
- Run CCleaner Registry Cleaner
- Scan Your System for Malware
- Use a System Restore Point
- Reset Your System
What is the Windows Registry?
The registry is a hierarchical database that contains settings, configurations, and options for Windows and installed software. It is responsible for keeping track of hardware, software, and user preferences.
The registry is organized into five main sections or "hives": HKEY_CLASSES_ROOT, HKEY_CURRENT_USER, HKEY_LOCAL_MACHINE, HKEY_USERS, and HKEY_CURRENT_CONFIG. Each hive contains numerous keys, values, and data entries that are used to configure the operating system and installed software.
By making changes in the Windows Registry, you can customize your system on a new, deeper level. This means you can add or remove certain features, control user access rights, tweak software settings, and so on.
Signs of Registry Issues
A corrupt or damaged registry can cause various problems with your Windows 11/10 operating system. Some of the common signs of registry issues include:
- Slow startup and shutdown times
- Frequent crashes or freezes
- Blue screen errors
- Applications not responding or crashing
- Missing or broken shortcuts
- Strange error messages
If you experience any of these issues, it may be time to repair or fix your registry.
What Causes Broken Registry in Windows?
There are various reasons why registry items can become broken:
- Virus and malware : One of the most common causes of broken registry items is malware infestation, which can corrupt multiple keys and values in the registry, thereby impacting the functioning of settings that rely on them.
- Fragmentation : The registry can become fragmented over time, especially after installing or updating software and services. This fragmentation can lead to certain registry items becoming broken.
- Modifying the Registry : Making improper changes to the registry through the Registry Editor can cause registry items to break. This is especially true when the user lacks sufficient knowledge or information about the changes being made.
- Build-up of items : Over time, the registry can accumulate corrupted, unnecessary, empty, or misplaced items. This can harm functional registry items and slow down and damage the system.
While these are only some of the problems that may lead to broken registry items, they are the most common ones. Being aware of them can help you take preventive measures to ensure the smooth functioning of your operating system.
How to Repair and Fix Corrupt Registry in Windows 11/10?
You can use several methods to repair or fix corrupt registry in Windows 11/10. Here are some of the most effective methods:
1. Run the Disk Cleanup Tool
One of the reasons for a corrupt registry in Windows 11/10 can be due to accumulated junk files, temporary files, and system files. Running the Disk Cleanup Tool can help clean up the system and free up some space on your computer, which could potentially fix registry issues.

- Keep the drive selection “ C: ” and click the OK button to relaunch the Disk Cleanup tool. Wait for the application to scan your system.
2. Use Automatic Startup Repair
Then Automatic Startup Repair can help diagnose and repair registry issues that may be affecting your system. Here's how to use it.
- Open your Start menu and select " Settings " from the available tools. Alternatively, you can open the applet using the Windows + I keyboard shortcut .
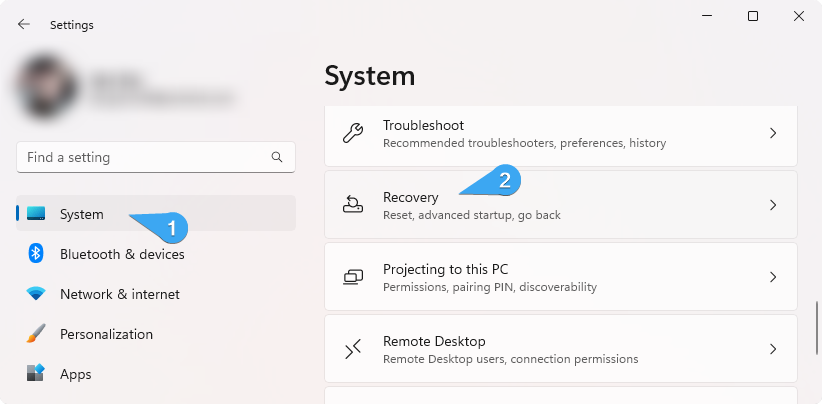
Your computer should restart itself automatically and run the necessary tools to fix your registry. Check out how to fix the "Automatic Startup Repair couldn’t repair your PC" error if you run into it.
3. Run the System File Checker
The System File Checker is a built-in Windows utility that can scan and repair corrupted system files, including those that may be causing issues with the registry. Running this tool can help restore system stability and fix any issues that may be impacting the registry.
- Open the search bar in your taskbar by clicking the magnifying glass icon. Press Windows + S on your keyboard as a shortcut.
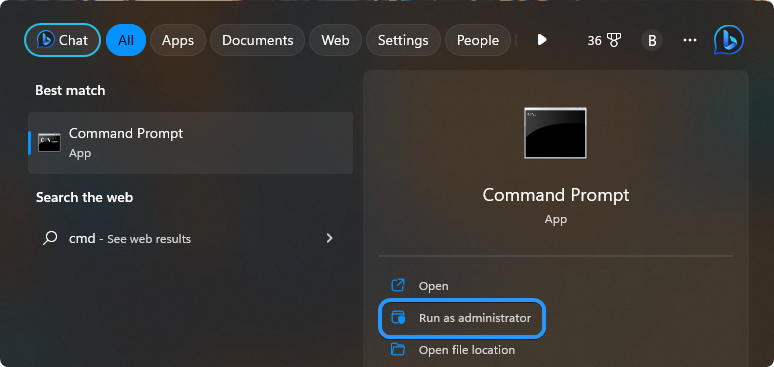
- Wait for the scan to complete.
4. Run the DISM Scan
DISM (Deployment Image Servicing and Management) is another built-in Windows utility that can help repair system files related to the registry. Running a DISM scan can help fix any issues that may be causing your registry to become corrupted.
- Type “ Command Prompt ” in the search box and choose Run as Administrator . When prompted by the User Account Control (UAC), click Yes to allow the app to launch with administrative permissions.
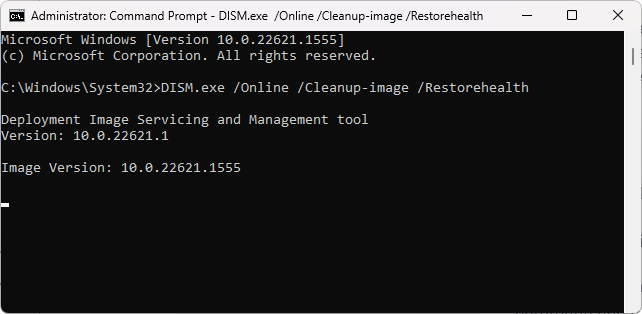
5. Import a Registry Backup
If you have a registry backup saved from when your system was working correctly, importing it can fix any issues you may be experiencing with your current registry. This option is only recommended if you have a recent registry backup.

- Wait for the Registry Editor to import the backup file, then reboot your system.
6. Run CCleaner Registry Cleaner
CCleaner is a popular third-party software tool that can clean up junk files, optimize system performance, and fix registry issues. Running the CCleaner Registry Cleaner can help repair any corrupted or broken entries in the registry.
- Visit the official website of CCleaner and download the latest software version . Once the download is complete, double-click on the setup file and follow the on-screen instructions to install it.

- After the scan is complete, the program will display the results in the main window. Review the list of entries CCleaner found and decide which ones you want to fix.
- Click on the " Review selected Issues " button to fix the issues found during the scan. Before proceeding with any changes, it's recommended to back up your registry. Click “ Yes ” to allow the app to create a backup before making any changes.
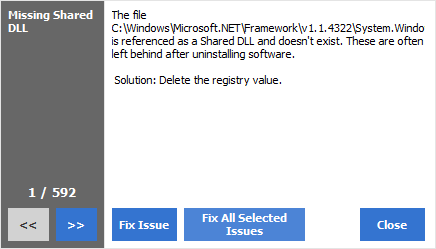
- Repeat the scan and fix process until CCleaner no longer finds any issues. This process may take some time, depending on the size of your registry and the number of issues found.
7. Scan Your System for Malware
Malware infections can also cause registry issues, impacting system stability and performance. Running a full system scan with reputable anti-virus software can help identify and remove any malware causing issues with the registry.
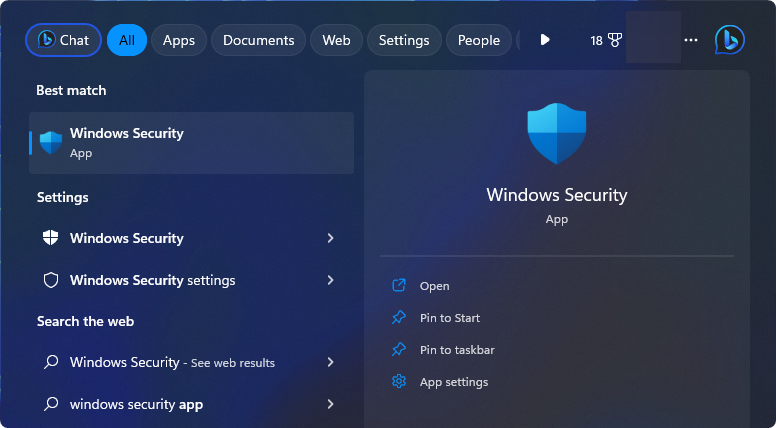
- It’s important to note that this scan may take longer than an hour based on how many files you have stored on the drive. If the scan detects any anomalies and malicious files, it’ll immediately quarantine and disable them.
While third-party apps are convenient, most of them aren't free. However, here at SoftwareKeep, you can get reliable antivirus software at an affordable price . With our premium antivirus solutions, you can rest assured that your system is secure from malicious threats.
8. Use a System Restore Point
If you have a system restore point saved from a time when your system was working correctly, then restoring your system to that point can potentially fix any issues you may be experiencing with your registry. This option is only recommended if you have a recent restore point saved.
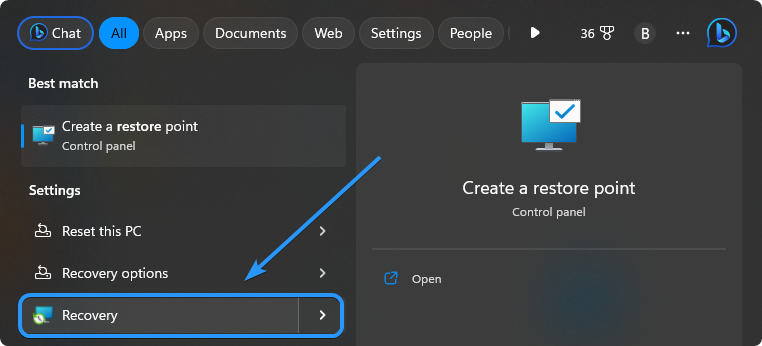
9. Reset Your System
If all else fails, resetting your system can help fix any issues you may be experiencing with the registry. This option will wipe all your data and restore your system to its original state, so it should only be used as a last resort.
- To access the Settings menu, you can either click on the Windows icon located at the bottom-left side of the screen and choose Settings from the Start menu or use the keyboard shortcut Windows + I .
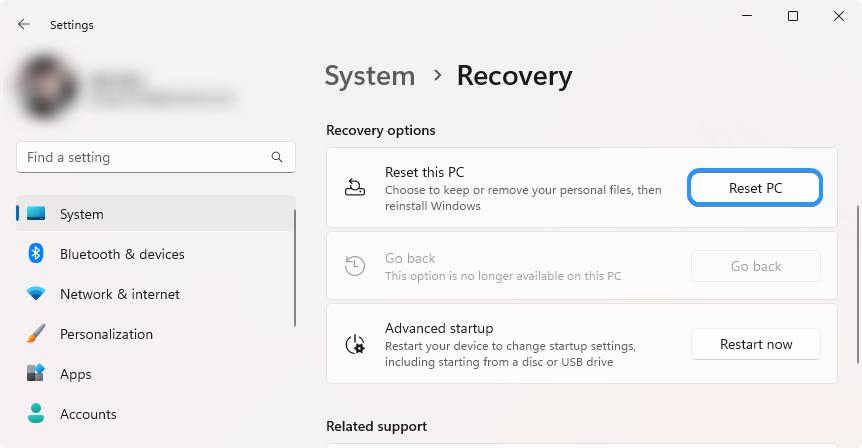
- After making your choice, follow any further on-screen instructions to reset your operating system. Windows will install all the necessary system files, and your computer will reboot with your new, refreshed Windows.
You can also reinstall Windows using bootable media or even reinstall Windows from the cloud .
The Windows Registry is an essential part of the Windows 11/10 operating system. A corrupt registry can cause system instability and performance issues, which is why it’s essential to recognize and fix any issues that may be present. The above methods can help repair or fix corrupt registry items in Windows 11/10. If you're unsure about making changes to the registry, it’s best to contact a professional for assistance.
We hope this article was helpful in explaining how to repair and fix corrupt registry items in Windows 11/10. Good luck!
One More Thing
We’re glad you’ve read this article. :) Thank you for reading.
If you have a second, please share this article on your socials; someone else may benefit too.
Subscribe to our newsletter and be the first to read our future articles, reviews, and blog post right from your inbox. We also offer deals, promotions, and updates on our products and share them via email. You won’t miss one.
Related Articles
» How to disable network access to the Windows Registry on Windows 7 » How To Remove the Activate Windows 10 Watermark » How to Restore Your Previous Version of Windows
1591 Mckenzie Way, point Robets, WA 98281, United Sates
- Terms & Conditions
- Privacy & Cookies
© SoftwareKeep 2023 | All right reserved
Please SAVE to make app work
Sign up for our daily newsletter
- Privacy Policy
- Advertise with Us
Common Windows Registry Errors and How to Fix Them
Windows is a complicated beast. Its timeless interface underpinned by countless processing at any one moment, strange “services” that you had no idea existed until you stumbled upon them that one time in task manager, and registry keys – virtually tons of registry keys.
The registry is a massive database in Windows that contains special binary keys that relate to all the installed applications and settings on your machine. If a registry error occurs, it may stop its associated app from functioning properly or even blue-screen your PC. Here’s our guide on how to deal with registry errors.
Also read: How to Reset/Reinstall Windows Without Losing Your Files
Why Do Registry Errors Occur?
Even your trusty Windows PC isn’t perfect (as any zealous Linux user will regularly remind you), and amid its millions of processes, things are bound to go a little wrong. Registry errors can occur when you’ve uninstalled programs, but some of their information stays in the registry. It could also occur when you have duplicate registry keys, don’t shut down your computer correctly, or, most severely, it could be because of a virus (stressing the importance of having anti-malware protection).
How Do I Detect Registry Errors?
Registry errors can manifest in strange ways, such as by blue-screen crashes or by cryptic error messages occurring when your computer starts up. Sometimes things are a little more obvious, and you’ll get an explicit message when your PC crashes that a registry error has occurred, or upon startup Windows Registry Checker may tell you that “ Windows registry is damaged. “
While the latter problem may be down to defective hardware, registry errors can usually be fixed using several processes on Windows.
Preparation for Fixing Registry Errors
First up, create a system restore point by going to “Control Panel -> System -> Advanced System Settings,” then clicking the “System Protection” tab and selecting “Create.”
Next, you’ll want to back up your registry. Press “Win + R”, then in the Run box type regedit and hit Enter.
In the Registry Editor scroll all the way to the top in the left-hand pane, right-click “Computer” and click “Export.”

Give the backup file a name you’ll remember, and save it in a safe place (cloud storage or a flash drive is a good idea).

How to Fix Your Registry
The first port of call is the System File Checker. To use it, open the command prompt as an administrator, then type sfc /scannow and hit Enter. This will check your drive for registry errors and replace any registries it deems faulty.

If you’re having problems with a particular piece of software, reinstalling it doesn’t seem to help (or indeed, the problems started since reinstalling), and if the above method doesn’t work, I recommend using CCleaner to do the job. This reputable app is a great all-round system cleaner and has a dedicated tool for finding and fixing registry errors.
Once you’ve installed CCleaner, just click Registry on the left-hand side, then “Scan for Issues.” Once it’s discovered all the problems (there will always be some), scroll through the list to see if there’s one relating to the program that’s causing you trouble. Either way, you may as well fix all the issues it’s discovered, so make sure they’re all selected and click “Fix selected issues.”

The registry is a complex and often messy corner of your Windows PC, and it’s worth checking in on it regularly using the above method just to keep it in good shape. Even if you’re not getting registry errors, cleaning the registry regularly can prevent them from occurring as well as tackle them once they do occur.
Our latest tutorials delivered straight to your inbox
Tech writer at Make Tech Easier. Enjoys Android, Windows, and tinkering with retro console emulation to breaking point.

How to Perform Windows Registry Repair: Registry Repair Windows 10
The Windows registry is a database that contains important information about your computer — users, preferences, applications, attached devices and much more. The Windows operating system constantly refers to the registry; for example, to open a program, install new software or change your hardware, Windows must check the values of certain registry keys.
Once you’ve been running the Windows OS for some time — installing and uninstalling programs or swapping in different keyboards and mice — you end up with hundreds or thousands of registry entries that are completely useless. Each one uses very little hard drive space, but the operating system still has to run through all of them, which slows it down over time. By cleaning the registry, you can get rid of those unwanted entries and make your system run faster.
Sometimes, however, it is necessary to fix registry issues instead of just performing cleanup. For example, if you have ever encountered a piece of malware, you know that it can completely mess up your registry and disrupt your work.
You can change the values of registry keys manually using the built-in Windows Registry editor (regedit). But you need to know what you’re doing with this utility or you risk doing serious damage. This article explores how to fix registry issues in Windows 10/11.
Free Guide: Windows Registry Tutorial
Common Windows 10/11 Registry Errors Requiring Windows Registry Repair
First, let’s explore the most common issues with the Windows 10/11 registry and which ones are worth worrying about.
- Orphaned entries. Orphaned entries are small fragments of registry entries that can be left behind when you uninstall software. Registry cleaner software will often claim these are an immediate issue, but in reality, they just use up a few kilobytes of free space on your disk.
- Duplicate keys. Duplicate keys can be made when you reinstall, upgrade or update software on your machine, including the operating system. Registry cleaner software may state that your programs will be confused by the duplicate entries, slowing machine performance, but that is not true.
- Fragmented registry. The registry can become fragmented when software is uninstalled, upgraded or updated. Missing and orphaned files can cause errors.
- System shutdown errors. Each time your Windows 10/11 computer shuts down properly, a copy of the registry is saved to system memory. But if your computer is turned off or crashes without going through the normal shutdown routine, you could experience issues in the future. However, this is unlikely.
- Malware. Many types of malware modify the registry. In particular, by changing the values of startup keys, malware can ensure it is activated each time you restart the machine. Changes to the registry by malware require immediate attention.
- Accumulated junk, temporary files and system files. A registry disk cleanup removes these files to free up space and can potentially repair registry issues, so it’s worth doing on a regular basis.
Important: Back Up the Windows Registry!
Before beginning any registry errors fix, be sure you know what you are doing — and always start by making a registry backup . That way, you can revert to the old version if something goes wrong.
There are several methods for backing up your Windows registry:
- Using regedit
- Using the command prompt
- Using third-party software
How to Back Up and Restore the Windows Registry
How to Uncover and Repair Windows Registry Issues
To uncover issues with your registry that might be affecting your computer, perform a Windows registry scan using the Windows Registry Checker tool. The process will provide detailed data on all the registry errors discovered and how to fix registry errors.
There are several different ways to repair the Windows 10/11registry. Common ways for how to repair Windows 10 registry entries include the following:
- Use automatic repair — Automatic repair will kick in when it experiences an unexpected error that results in your system shutting down. You don’t have to initiate this repair option.
- Restore the Windows registry from Safe Mode — Use this method if you can’t start Windows in normal mode.
- Restore the registry from the command prompt — Reboot in advanced startup mode to restore the registry from its “secret” backup through the command prompt. You can access the command prompt from Safe Mode as well.
- Fix Windows registry errors with System restore — You can use System restore to roll back your system to a time when you didn’t have registry errors. But remember you will lose any changes and new files made since the backup was created.
- Fix broken registry items with System File Checker (SFC) — If you run your antivirus software or other file checker tool and discover you have broken registry items, you can use this method to repair them and get them working correctly again.
- Restore your computer with Reset this PC — Reset this PC is used to repair damaged Windows installations. It can help remove bloatware, which is unneeded software that is pre-installed with Windows. Using it is also a way to permanently remove most types of malware. Using Reset this PC restores Windows to the factory-default settings.
- Repair the registry with the DISM command — If you have problems with images on your computer, use the DISM command to service them.
- Reinstall Windows from scratch — If you can’t get Windows to load without errors or can’t open Safe Mode, reinstalling Windows from scratch may help correct registry issues.
- Use third-party backup and recovery tools — You have the option of using third-party tools to back up and restore your registry. The section below offers some options. It’s wise to choose only Microsoft-approved tools.
Third-Party Software Designed for Cleaning and Fixing Registries
Common registry issues Windows 10 users deal with can be frustrating and lead to a slowcomputer. It’s possible to use apps to clean and repair your Windows registry following a Windows registry scan.
Here are a few registry cleaner and registry repair tools you may want to check out:
- Auslogics Registry Cleaner
- Wise Registry Cleaner
- Argente Utilities
- Glarysoft Registry Repair
- RegSofts Free Window Registry Repair
Editing Your Windows Registry for a Quick Windows 10 Registry Fix
Another option for dealing with a corrupt registry is to edit it directly. Log in as an administrator and then follow these steps for a quick Windows registry fix:
- Press the Ctrl and F keys simultaneously to open the Find dialog. Type the name of the key you want to edit.
- Click Find Next until you locate the key you want. Double-click it.
- Edit the key’s value.
- Click OK to save your changes. Some edits require a Windows restart to take effect.
Alternatively, you can edit the registry with PowerShell .
Cleaning the Windows 10/11 Registry Using the Registry E ditor
Most people find that they’re able to clean their registry with automatic functions or third-party programs. However, you can perform registry cleanup manually using the Windows Registry editor.
It’s worth repeating: Before you begin, make sure you create a registry backup . Making mistakes in the registry can lead to the system becoming corrupted.
Then take the followingsteps:
- Click the Start button and then select Run.. .
- Type regedit in the text box and select Registry editor from the results.
- Delete the keys from applications that have already been uninstalled:
3a. Expand the HKEY_CURRENT_USER section and then expand the Software section.
3b. Look for keys based on the name or vendor of the uninstalled applications and delete them.
4. Remove any duplicate keys that the uninstalled applications might have left behind:
4a. Press Ctrl+F to open the Find dialog box.
4b. Enter the name of the uninstalled application and click OK to search. Each matching key or value will be highlighted.
4c. Remove the highlighted key.
4d. Press F3 to find the next match and delete it. Repeat this step until you have reviewed all highlighted items.
5. Remove unwanted start-up items from the registry:
5a. Navigate to the following location: My ComputerHKEY_LOCAL_MACHINESOFTWAREMicrosoftWindowsCurrent Version
5b. Click Run to list shortcuts to all the executable files that run at startup.
5c. Delete any applications that you don’t want to run at Windows startup. Do an online search to investigate any that are unfamiliar.
5d. Repeat the same task for the following key paths as well:
Conclusion: When and How to Fix Windows Registry Issues
Editing your registry is not likely to improve system speed or PC performance. However, you should make regular backups so you can restore if the installation of a program or device causes issues the computer can’t process.
It is also important to track changes to your registry. In particular, malware often changes registry startup keys so it will start automatically after each reboot. You can learn more in this guide about detecting modifications to startup items in the Windows registry .
How Netwrix Can Help
Netwrix Auditor for Windows Server empowers you with comprehensive visibility and tools you need to safeguard your crucial infrastructure. You can:
- Detect and respond to threats : You can monitor all security and configuration changes across your Windows Servers, including changes to the registry. The solution even provides video recording of user activity to help with investigations.
- Streamline compliance : Simplify audit preparation with built-in reports aligned with PCI DSS, HIPAA, SOX and many other mandates. Use the interactive search to swiftly answer questions from auditors, demonstrating your commitment to compliance.
- Enhance efficiency : Elevate your IT team’s productivity through automated change control and reporting on OS versions, antivirus status, file shares and more.

How to Fix Broken Registry Items in Windows
Without screwing up your computer
The Windows Registry holds important files that are essential for the proper functioning of the Windows operating system, system apps, and processes. The majority of changes made to your computer are stored in keys and entries known as Registry Files.
These files are responsible for the optimal functioning of many system applications and processes. As you use and personalize your computer, Windows creates more and more registry files, most of which aren’t deleted even when they are no longer needed.

The Registry gets bloated with redundant files that eventually get damaged, corrupt, or broken. Factors like power failure, abrupt shutdown, faulty hardware, malware, and viruses can also corrupt some registry items. Consequently, broken registry items clog your PC’s storage, slow down your computer, and sometimes result in startup problems.
Do You Need to Fix Broken Registry Items
You should occasionally confirm that your Windows computer is devoid of broken items in the registry. Doing so will positively impact your PC’s performance , particularly if your computer is running slowly or if some system apps are not working correctly.
The point is: You stand to benefit more from removing or fixing broken registry files than leaving them to bloat the registry.
Windows has a number of built-in tools that can help diagnose issues with registry files. Proceed to the next section to learn how to use these tools to fix broken registry items on a Windows PC .
Note: The Windows Registry is a database of sensitive files and settings. Therefore, it’s important to make a backup of the registry before you attempt to make changes to the registry or fix broken registry items. Damaging any registry file may corrupt the Windows OS and cause your computer to malfunction. Creating a backup serves as your insurance should anything go wrong. This guide on backing up and restoring the Windows Registry has everything you need to know.
1. Perform Disk Cleanup
The Disk Cleanup tool that lets you remove unnecessary files from your computer, this includes broken registry items. To access this tool, type disk cleanup in the Windows Search box and click Disk Cleanup in the results.
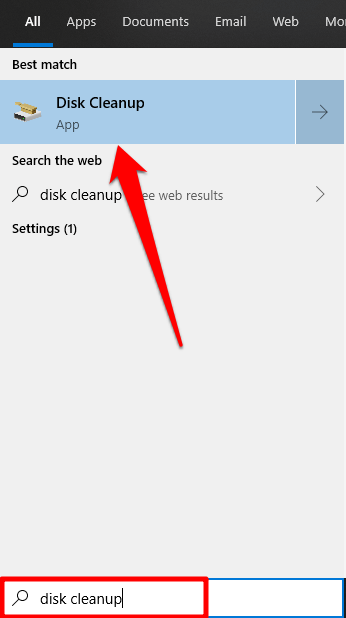
Click the Clean up system files button.
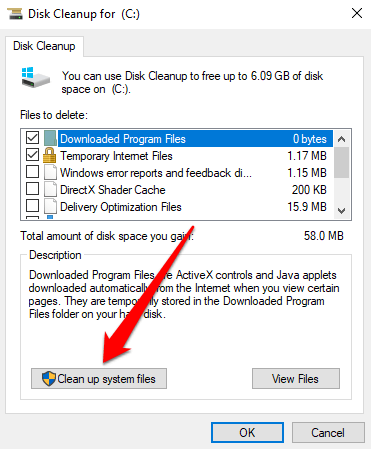
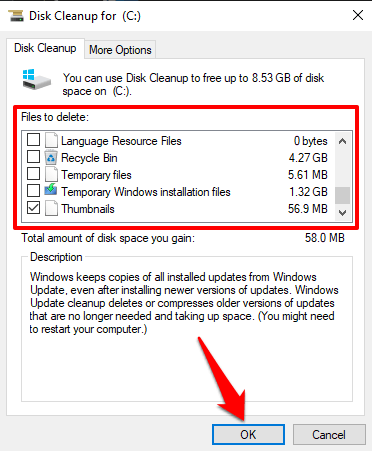
You can check other file options in the “ Files to delete” window. These are redundant temporary files that your computer can do without. You can click on a file type and check the Description section to learn more about the file and what it does. Click OK when you’re done with file selection.
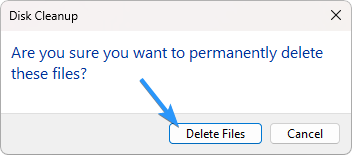
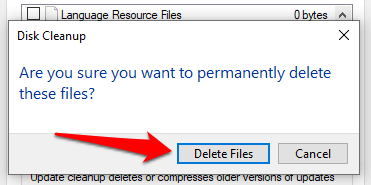
Click Delete File on the confirmation prompt and Windows will permanently delete corrupt registry files and other selected files.
2. Use the System File Checker
The System File Checker (SFC) is another important tool integrated into the Windows operating system. This tool fixes broken registry files using a “repair-or-replace” approach. It scans your computer for corrupt or missing system files. If the tool finds any, it replaces them with a fresh copy. The tool is accessible via the Command Prompt; here’s how to use it:
1. Right-click on the Start Menu or Windows icon and select Command Prompt (Admin) from the Quick Access menu.
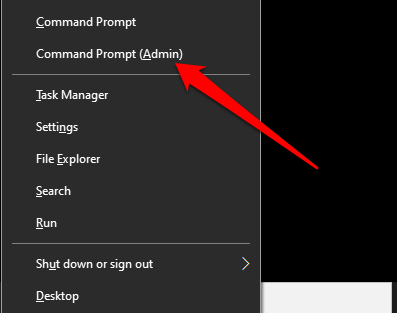
2. Type or paste sfc /scannow and press Enter.
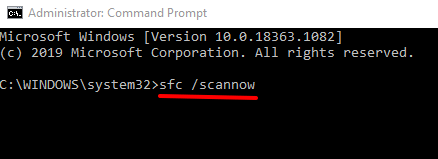
When the SFC utility executes the command (P.S: this might take up to 30 minutes), it’ll let you know if it found or repaired any corrupt files. This makes the utility a good way to confirm if your computer has any broken registry item.
Note: If you get a message that reads “Windows Resource Protection found corrupt files but was unable to fix some of them,” run the SFC command again. If this continues, restart your computer and try again.
3. Run the DISM Tool
You can also use the Deployment Image Servicing and Management (DISM) command to repair broken registry files, particularly if the System File Checker doesn’t find or fix any broken registry file.
Right-click the Start Menu button and select Command Prompt (Admin) . Type or paste DISM /Online /Cleanup-Image /RestoreHealth into the console and press Enter on the keyboard.
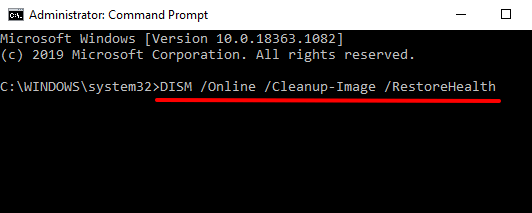
That will prompt the DISM tool to scan your computer for corrupt and broken system files; check the results to confirm if any file was replaced.
4. Repair Install Windows
Another way to fix or replace broken registry items is to reinstall Windows from scratch while preserving your personal files, installed applications, and other system settings. This is known as a repair install (or repair upgrade).
You’d need to download the Windows 10 Disc Image (ISO file) from Microsoft’s website. Double-click the disc image file to commend the repair installation process. Follow the installation prompts and agree to the necessary license/usage terms. On the “Ready to install” page, make sure an option that reads “Keep Windows settings, personal files and apps” is on the screen.
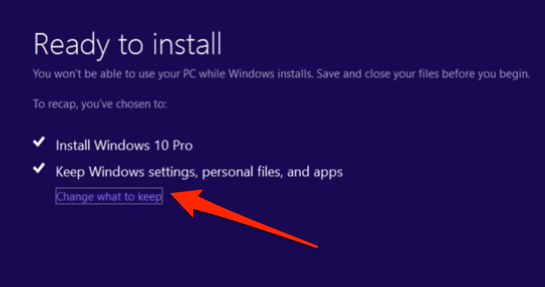
Otherwise, click Change what to keep and select Keep personal files, apps, and Windows settings .
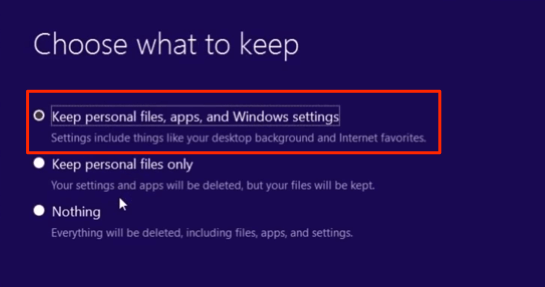
When the installation is complete, your PC will be free of corrupt or broken registry files.
5. Run Automated Repair
The Automated Repair utility is great for foxing startup-related issues on Windows 10 computers. The tool is also equipped to scan and fix problems affecting registry settings as well as other system files and configurations.
1. To access the Automated Repair tool, go to Settings > Updates & Security > Recovery and click Restart now in the “Advanced startup” section.
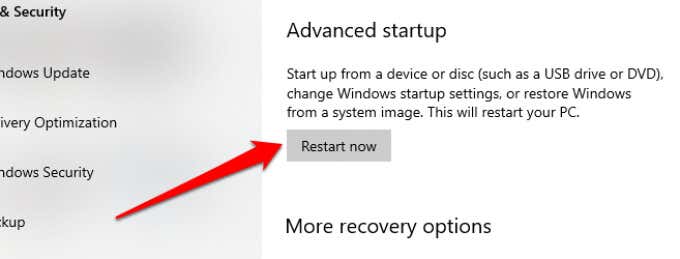
That will reboot your PC into the Advanced Startup Options menu.
2. Select Troubleshoot to proceed.
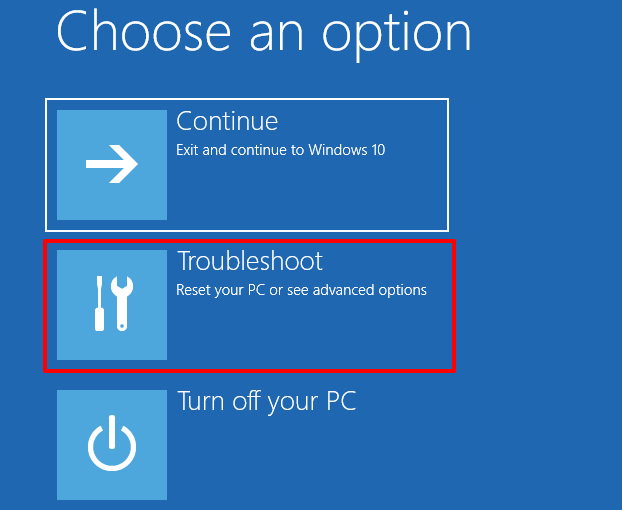
3. Click Advanced options .
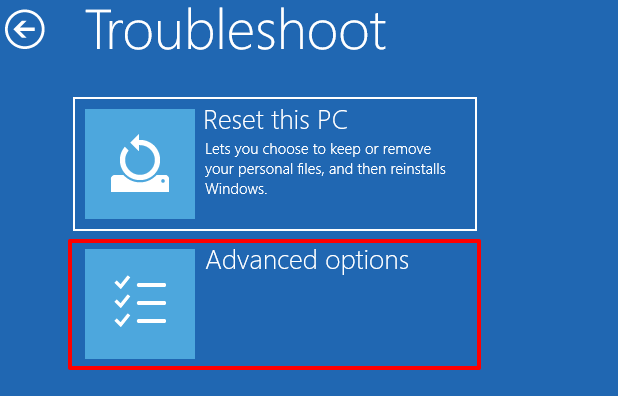
4. Choose Startup Repair from the list of Advanced options.
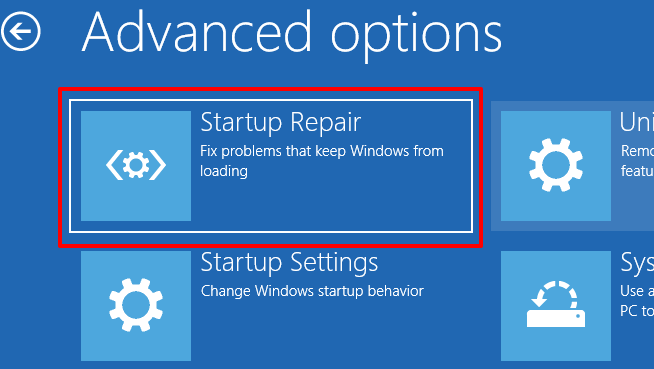
5. Choose your account and enter the profile password to continue. If the account isn’t password-protected, simply click Continue to proceed.
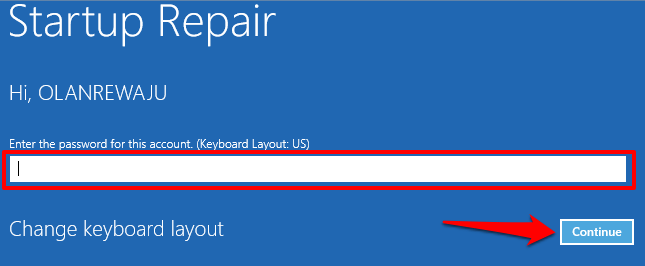
The Automatic (Startup) Repair tool will scan your computer and fix any broken registry file it finds.

6. Use a Registry Scanner
You can also utilize a third-party registry scanner (also called registry optimizers or registry cleaners) to fix broken registry items on your Windows computer. The software will put your PC’s registry back in shape, removing and replacing corrupt and missing files.
Malwarebytes is a trusted and reliable registry cleaning program you can use to fix broken registry items. The problem with these registry cleaners is that they sometimes don’t always fix or replace registry files. A malicious registry scanner may even ruin your PC’s registry. Make sure you read enough reviews before installing a third-party registry scanning tool.
Healthy Registry, Healthy PC
In addition to the solutions highlighted above, you can also fix broken registry items in Windows by reverting your PC to a restore point where registry items were not broken. Another option is to reset your computer (go to Settings > Updates & Security > Recovery > Reset this PC ). Performing a reset will delete all installed applications and system settings (but keep your personal files). So you should only reset your PC as a last resort.
Finally, make sure you scan your PC for malware and viruses causing registry items to become broken or damaged.
Sodiq has written thousands of tutorials, guides, and explainers over the past 4 years to help people solve problems with Android, iOS, Mac, and Windows devices. He also enjoys reviewing consumer tech products (smartphones, smart home devices, accessories, etc.) and binge-watching comedy series in his spare time. Read Sodiq's Full Bio
Read More Posts:


How to fix a corrupt registry in Windows 10 or Windows 11
Shaant Minhas
May 25, 2022

Looking for more How To posts? Check out our How To Page for all the latest tips on Windows, Microsoft Teams, LinkedIn, and more!
In this article
A Registry on Windows is a central, hierarchical database that stores the information and configurations of different files and settings of your computer.
It can get corrupted at times, though. The cause of this corruption can vary everywhere from system files failure to hostile malware attacks. But, what’s clear is that there are certain tricks that can get you out of registry trouble. Let’s go over them one by one.
How to fix a corrupt registry in a Windows PC
Before you get your hands dirty with any of the methods below, it’s imperative that you make sure that the errors you’re facing are really the errors about a corrupt registry.
Here are a few quick giveaways: you’re facing problems is booting up your PC; you’re getting errors like “Windows could not start because the following file is missing or corrupt:\WINNT\SYSTEM32\CONFIG\SYSTEM”, or “System hive error”.
Or, it could be something like this: “Stop 0xc0000218 (0xe11a30e8, 0x00000000, 0x000000000, 0x00000000) UNKNOWN_HARD_ERROR”. In fact, Microsoft has a complete list of these errors that you can have a look at.
If any of the bugs from above is the one that’s giving you the trouble, then you really are dealing with a corrupt registry. But that’s not a reason to worry. Just follow the methods below, and you can get rid of your registry corruption problems in no time. Let’s get started.
1. Run the SFC scan
The System File Checker is a free Windows tool that will check for system file corruption on your PC and then try to restore it. You can run the SFC scan with your Command prompt. Here’s how:
- Head to the Start menu search bar, type in ‘cmd,’ and select the best match.
- In the Command prompt, type in sfc /scannow and hit Enter .

As soon you excuse the above command, a scan will begin weeding out and fixing all the possible errors that might be causing the registry error in your PC.
2. Do a System Restore
A System Restore is a free Windows tools that lets you reverse your PC’s state to a point of time when everything was working smoothly.
In the words of Microsoft itself :
“System Restore takes a “snapshot” of some system files and the Windows registry and saves them as Restore Points. When an installation failure or data corruption occurs, System Restore can return a system to working condition without you having to reinstall the operating system. It repairs the Windows environment by reverting to the files and settings that were saved in the restore point.”
So, it restores everything back to the way it was before things went bust. Naturally, you can use the System Restore to fix your corrupt Windows registry. The only thing you’ll have to be wary of is if you’ve created a System Restore yourself before. Here’s how you can get started:
Head to the Start menu , type in ‘system restore,’ and select the best match. Now, in the System Properties dialog box, select the System Restore… button. From there, select the Restore Point you’d like to restore, and follow the on-screen instructions to complete the process.

Note that if this button is greyed out on your screen, then you probably don’t have a Restore Point on your PC in the first place. Don’t worry, though. If that’s the case, then, you can jump straight to the next method. Also, make sure you create a Restore point for future such incidents beforehand.
3. Run the DISM scan
Similar to the System File Check, DISM can fix your system when things go corrupt. Whereas SFC mainly works to repair your system files, the DISM fixes the errors in your hard drive.
To run the DISM scan, follow the steps below:
Head to the Start menu search bar, type in ‘cmd,’ and launch an elevated Command prompt. There, type in the following command along with relevant parameters as shown below, and hit Enter :
Dism /Online /Cleanup-Image /RestoreHealth

4. System Reset
If none of the methods from above have worked so far, then a complete factory reset is your last resort to fix the corrupt registry. To get started, head to the Start menu search bar, type in ‘factory reset,’ and select the best match.
Head to System > Recovery , and click on Reset PC from there. Now, either pick Keep my files or Remove everything , depending on if you want to keep your Windows files or remove everything.

Either choose from a Local install or Cloud download , do any additional changes you’d like, and finally click on the Next . Click on Reset to complete the process.
Repairing a corrupt registry on Windows 10 or Windows 11
A corrupt Registry is not to be taken lightly. It not only makes running your programs a mess, but at times can also make boot up and shutdown of your PC a drag. We hope one of the method from above did the trick for you, and you’re no longer suffering from a corrupt Registry problem now.
Enjoy these Minecraft freebies to celebrate 5 years of the ever-popular Marketplace
Microsoft’s metaverse rival meta chooses azure as strategic cloud provider.
OnMSFT.com is built on:
Wordpress GeneratePress Azure
Theme thanks to heather.

Home About Contact Us
Join our team, © copyright 2014 - 2024 onmsft.com llc.
The Best Free Windows 10 Repair Tools to Fix Any Problem
If you're running into system problems or rogue settings, you should use these free Windows 10 repair tools to fix your PC.
Windows 10 is actively used in around one billion devices, essentially capturing the biggest share of the operating system market. And it's constantly on improvement as well.
It isn't without fault, though. There are still plenty of issues with Windows 10, and the frequent nature of updates and fixes illustrates that perfectly. However, you can attempt to fix the majority of Windows 10 problems using nothing more than a few free tools. Let's take a look.
First, Ensure Your PC Is Updated
Before you start installing these best programs to fix Windows 10 problems, make sure you have done something vital: update your Windows to the latest version . Yes, we just said updates can introduce unexpected issues. But that isn't always the case. More often than not, Windows updates can obliterate a swath of annoying bugs.
Press Win + I to open the Settings panel and head to Update & Security > Windows Update . If there is an update waiting, save your work, bookmark your browser tabs, and hit Restart now .
Aside from updating your system, you should also check out our list of the best computer security and antivirus tools , closing off another common source of issues when using Windows 10 (i.e. malware).
Now, on to the best programs to fix almost any problem in Windows 10.
1. IOBit Driver Booster
Windows 10 tries to handle driver updates, but it isn't perfect. Sometimes it'll leave some essential driver updates behind. So, when a hardware issue strikes, it's always worth checking if you need to update your drivers.
One of the best ways to check the status of your Windows drivers is by using a free driver update tool, and IOBit Driver Booster is one of the best Windows 10 driver update tools, claiming to fix and update over 1,000,000 drivers.
Follow these steps to install and use the tool:
- Download and install Driver Booster, making sure to deselect any additional software offered to you.
- Open Driver Booster. You'll spot three tabs: Outdated, UpToDate, and Action Center . The first two are fairly self-explanatory, containing the lists of your system drivers and their status. The Action Center tab contains download links for other IOBit utilities.
- Select the Outdated tab. You can choose to Update Now using the big red button, or head down the list and update individual drivers as you see fit. You can also choose to ignore specific drivers, roll them back to their previous state, or uninstall them entirely. Driver Booster automatically downloads and applies the drivers to your system, but you may require a system reboot to finish the installation process.
Driver Booster creates a system restore point before updating your drivers, as well as including options for automatic shutdown or reboot after the driver installation process completes---handy for leaving the tool running just before bed!
Download: IOBit Driver Booster (Free, paid version available)
Alternative: Snappy Driver Installer
Snappy Driver Installer (SDI) is a free and open-source driver updater with a vast driver collection for offline use. Microsoft keeps Windows 10 up-to-date, but sometimes your drivers get left behind—and outdated drivers can often cause weird issues.
Head to the Snappy Driver Installer download page. Download and unzip the SDI Lite version, then run the SDI application. Select Download Indexes Only to let SDI to quickly scan your computer to see which drivers need updating or installing (and then marvel at the "grass" theme, and change it if you see fit!).
After SDI scans your system, it offers a list of potential new drivers. Head down the list and select the drivers you want to install (or click Select all in the left-hand option menu), make sure to select Create a new restore point , then select Install. The download and update process can take a while, depending on how many drivers need updating.
Once the download and installation process completes, restart your system.
Download: Snappy Driver Installer (Free)
2. FixWin 10
FixWin 10 isn't just one of the best Windows 10 repair tools, it's portable! You can use FixWin 10 to repair a huge variety of operating system issues.
The program is divided into six neat sections, each representing problems with a specific component (File Explorer, System Tools, etc.). Each section contains at least ten fixes (see the full list on TheWindowsClub site ). Some fixes may require a reboot, but you'll be informed of this when you click the Fix button.
Fixes vary from common irritants, such as the Recycle Bin icon failing to automatically update after emptying, to more advanced fixes like restoring access to the Registry Editor.
The Additional Fixes section contains novel-but-useful tweaks, such as restoring the Sticky Notes delete warning dialog box, while the Troubleshooters section directs you to the relevant Windows 10 troubleshooter tool on your system. The integrated troubleshooters are sometimes the easiest option, at least before delving into the depths of your system.
Download: FixWin 10 (Free)
3. Ultimate Windows Tweaker
Ultimate Windows Tweaker has the same developer as FixWin10 (The Windows Club). This is immediately evident because both programs share the same easy-to-use interface.
Unlike FixWin 10, which addresses Windows 10 issues and lets you fix them, this program enables you to quickly enable, disable, hide, or remove specific features from Windows.
You can make each change listed in this program using the Windows 10 Settings app, the Registry Editor, or the Group Policy Editor. However, Ultimate Windows Tweaker puts all the options within neat sections that list relevant issues, which you can then address quickly.
Click the Create Restore Point button at the bottom left before you start, tick the changes you want to make, then click Apply at the bottom. The Additional section lets you bring back Windows 7's Windows Photo Viewer with one click.
TheWindowsClub offers over 200 Windows 10 tweaks at the click of a button. Modifying your OS has never been easier.
Download: Ultimate Windows Tweaker (Free)
4. Windows Repair
Windows Repair (All in One) is another free and useful Windows 10 repair tool you can use to repair numerous Windows 10 issues. The Windows Repair developer strongly suggests you should boot your PC in Safe Mode for maximum effect. The Windows Repair tool has its own Reboot to Safe Mode button for a quick reboot.
The repairs cover registry permissions, file permissions, Windows Firewall settings, Winsock and DNS cache fixes, Windows Update issues, and much more. The Windows Repair tool guides you through a fixing process that automates the Windows Check Disk (chkdsk) and System File Checker (sfc) utilities.
If the utilities don't fix your Windows issues or errors —and you know what you're doing and understand the risks—you can head to the Repairs tab. Here you have six options. The Open Repairs button opens the repair panel containing the numerous fixes available. The other options are preset to fix specific issues such as malware cleanup, broken file permissions, and Windows Updates.
Download: Windows Repair (Free)
5. Windows Repair Toolbox
Windows 10 is a great operating system, and despite some well-documented irritations, most users seem to enjoy using it. And while we don't necessarily disagree with the often repeated advice of using specialist tools, there's a case to be made for the ease of usability that an all-in-one tool gives.
Because let's be honest, who has the time and money to go out and look up fixes for every other PC problem that pop-ups—especially when an alternative exists.
With Windows Repair Toolbox , you get a complete package of pretty much all the important repair tools you'll need for your PC. When you open up the application, you'll see a host of other tools on the home screen, arranged in separate sections like Hardware, Repairs, Uninstaller , and more.
So, when you have, say, a PC rife with generic Windows 10 errors, you'll have with you a plethora of useful applications to choose from, available in the Repairs section. To use any of these applications, simply click on one, and it'll be downloaded and ready to use.
The tool has other handy features as well. For instance, the Malware Removal tab offers a multitude of malware scan and removal solutions. RKill, Kaspersky, Microsoft, and even Ccleaner—it's all here. There's also a Run Unattended option that lets you run a scan without downloading any specific tool.
All in all, we believe you won't go wrong with this application as your first choice for a free Windows 10 repair tool.
Download: Windows Repair Toolbox (Free)
6. O&O ShutUp10
Windows 10 has privacy issues, and Microsoft knows it. Windows 10 privacy control has improved slightly since its 2015 release, but the core issues of tracking, telemetry, and data gathering remain.
While some users believe this is a necessary evil for the operating system development to continue with lashings of user-data, you don't have to give up your data. Several tools curtail Microsoft and Windows 10 data gathering tendencies, and O&O ShutUp10 is one of them.
The program has nine sections offering various privacy settings, many of which are not directly available in the operating system. ShutUp10 makes turning off the unseen options as simple as flicking the numerous switches.
Most importantly, each option comes with a brief description, so you know what you're turning off and what functionality it might affect. Unfortunately, there are some downsides to turning everything off, so move slowly and check each option out.
O&O ShutUp10 has a handy Apply only recommended settings option, as well as the Recommended and somewhat recommended settings option that goes even further.
Download: O&O ShutUp10 (free)
You can think of DISM++ as a GUI ( Graphical User Interface ) version of DISM (Deployment Image Servicing and Management)—the free Windows command line utility tool that can help you prepare, modify, and repair system images.
So, DISM++ is the tool you turn to when you’re experiencing crashes or errors on your Windows 10, and all the other tools have been unable to help you.
Since the app doesn’t need to use a command line, all you’ve to do after the installation is complete is launch the app and choose the utility you’d like to use.
For example, if you click the Disk Clean-up option, you can choose various clean-up options. From there, you must click on Clean Up to begin the cleaning-up process. You can then remove everything from download history, search history, and error reports, to your cache files.
Download: DISM++ (Free)
How Do You Fix Windows 10 Problems?
These are some of the best programs that will fix (almost) any problem in your Windows 10. Hopefully, though, you found the one that's most relevant to your needs right now. Of course, there are tons of free and paid programs out there that cater to different Windows problems; be it corruption, data loss, or something else.
But, in some cases, no matter how many tools you try, your Windows just won't work as before. For situations like that, we always recommend more potent solutions like Windows Restore or Factory Reset.
- Services & Software
Four free Registry utilities make Windows faster, safer
The best freeware for Windows' Registry keeps the OS running smoothly.

The last time Windows' System Restore failed on me, I didn't blink an eye. I gave up trusting Microsoft's own Registry safety net a long time ago. And considering the quality Registry freeware available, there's no reason you should rely on Windows to repair and recover from Registry-related problems. These four freebies will keep the Windows engine purring like a kitten.
Clear out the clutter with CCleaner Piriform's popular Windows-optimization utility includes a Registry-scrubbing component that clears out old application paths, ActiveX controls, shared DLLs, fonts, icons, and other Registry detritus. The program gives you the option to fix some or all of the problems it discovers, and before it starts the cleanup you can create a Registry backup so your system can be rolled back if something goes wrong. Two nice extras are CCleaner's options for uninstalling programs on your system, and for clearing the temporary files and recent-file lists from Firefox, Office, Windows Media Player, and other popular apps.
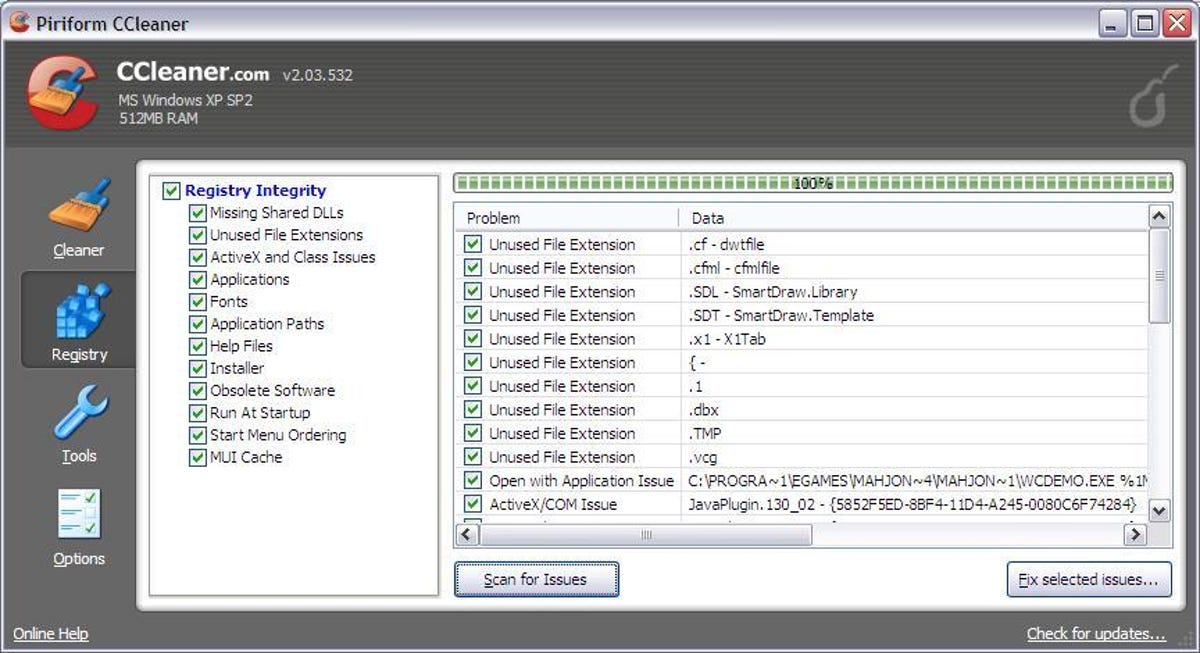
ERUNT out-restores System Restore Windows' built-in Registry backup utility is better than having no Registry backup at all, but just barely. It seems the times I need it most are the times System Restore is most likely to crap out. Lars Hederer's Emergency Recovery Utility NT program has been saving Windows users' bacon for many years. Despite the program's name, it works with Windows 2000, XP, and Vista as well. You can set the program to back up the Registry every time Windows starts, or create backups manually to the folder of your choice. The accompanying Registry optimizer is just as quick and simple to use as the backup program. ERUNT lets you back up the Registry for all users on the system, or selected users, and it even provides command-line switches for automating backups and restores. It works when Windows fails to load, though doing so may require a boot disc (which you can create with the great BartPE freeware).
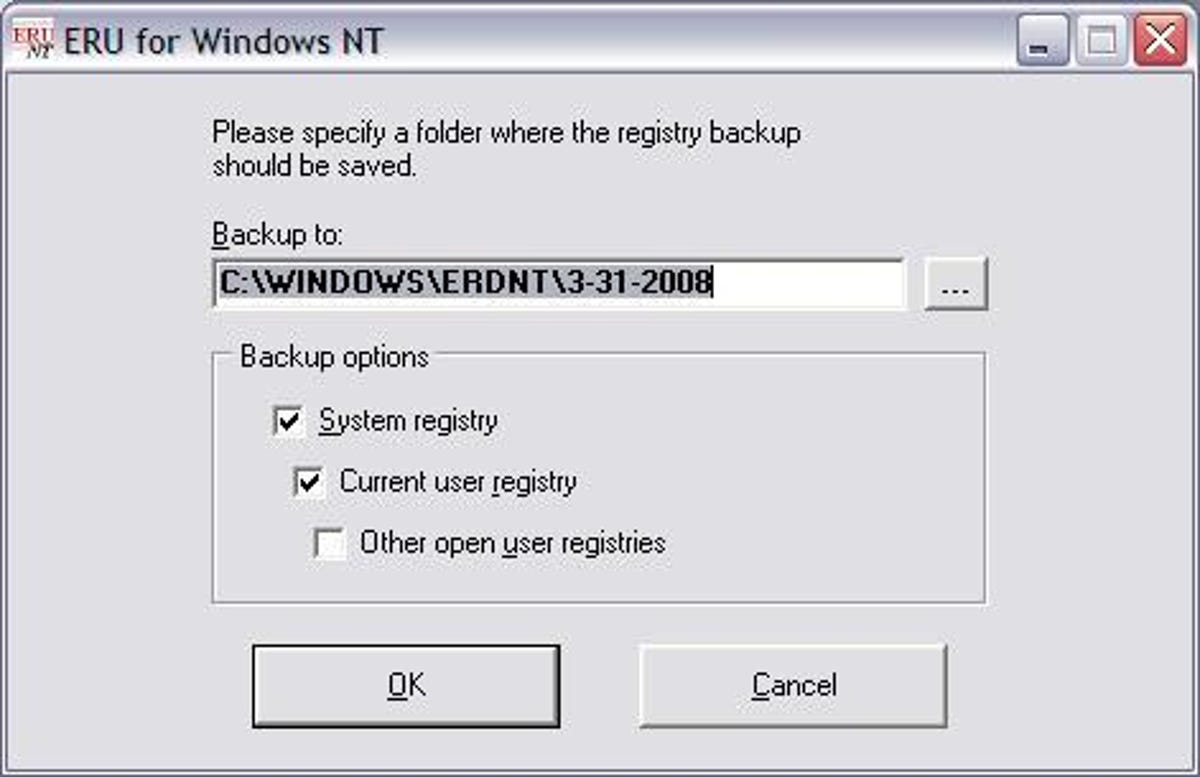
Keep an eye on the Registry with Process Monitor Sysinternals combined its FileMon and RegMon system-monitoring utilities into this program, which gives you a snapshot of your PC's activity in real time. In fact, Process Monitor provides so much information that it's difficult to keep up with the file and program activity it tracks. You can view your system activity in a simple graph, and display a summary of file and Registry accesses. There's even an option to log activity during the next Windows boot to help diagnose startup problems. A geek could easily kill the better part of an afternoon just rambling around the many monitoring options provided, though the program is most valuable when it's used to track down a system problem.
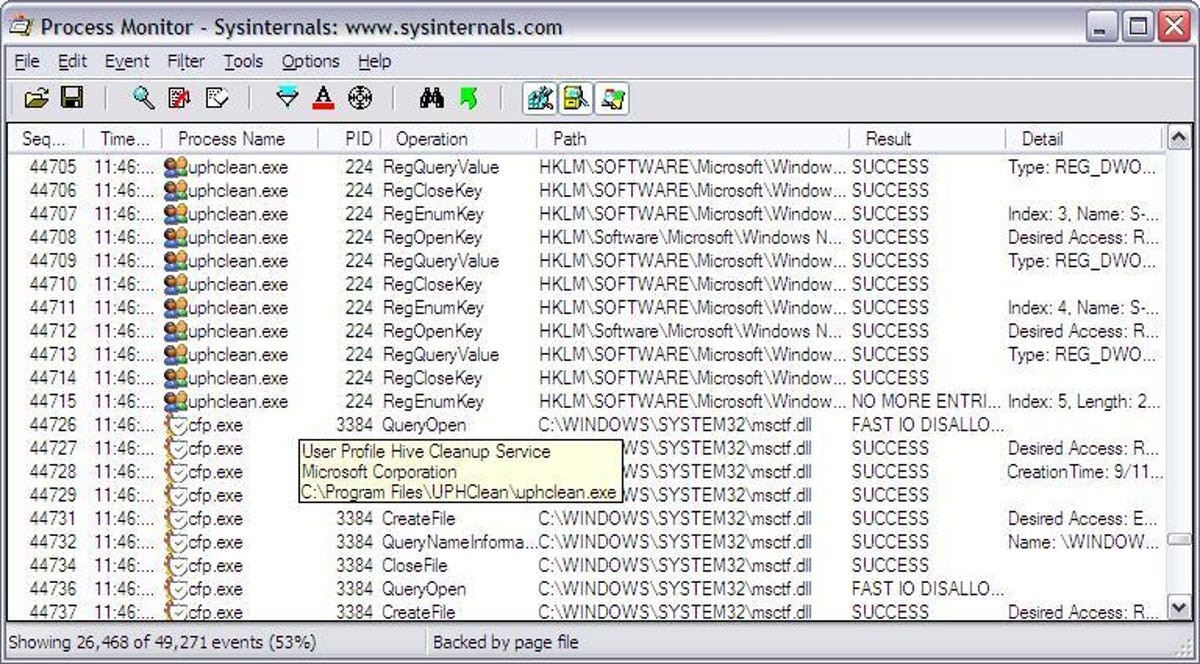
Find your keys faster with RegScanner NiriSoft's Registry-scanning utility makes it easy to navigate to a specific Registry key, and then open it in Windows' Registry Editor by double-clicking the entry, or by clicking File > Open In RegEdit (the keyboard shortcut is Alt-F, R). Other time-saving features let you copy a Registry key to the Clipboard and then open the Registry Editor to that key automatically, and to scan for all keys containing a specific value. You can also search by data length, value type, or date modified.
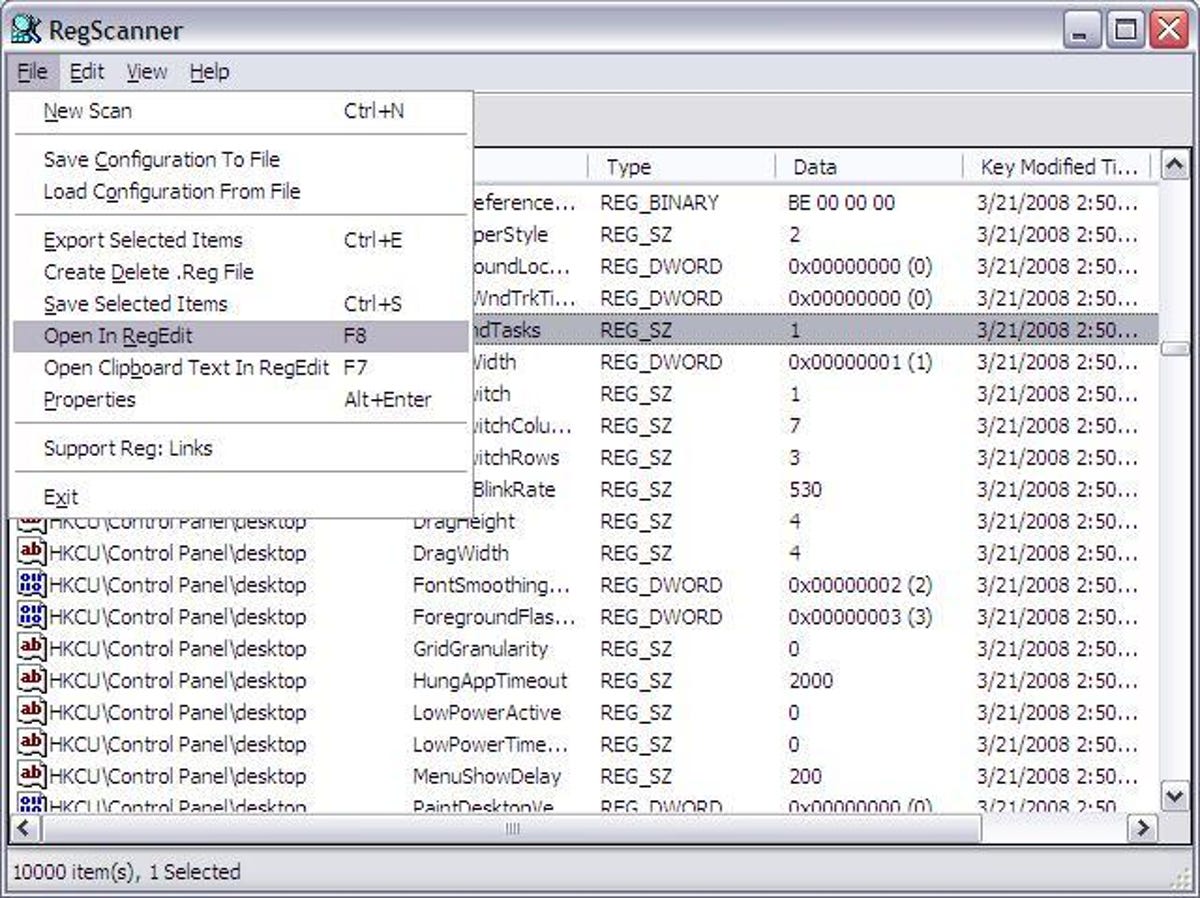
Tomorrow: maximize your Office workspace.
Services and Software Guides
- Best iPhone VPN
- Best Free VPN
- Best Android VPN
- Best Mac VPN
- Best Mobile VPN
- Best VPN for Firestick
- Best VPN for Windows
- Fastest VPN
- Best Cheap VPN
- Best Password Manager
- Best Antivirus
- Best Identity Theft Protection
- Best LastPass Alternative
- Best Live TV Streaming Service
- Best Streaming Service
- Best Free TV Streaming Service
- Best Music Streaming Services
- Best Web Hosting
- Best Minecraft Server Hosting
- Best Website Builder
- Best Dating Sites
- Best Language Learning Apps
- Best Weather App
- Best Stargazing Apps
- Best Cloud Storage
- Best Resume Writing Services
- New Coverage on Operating Systems
- Hostinger Coupon Codes
- HR&R Block Coupons
- ShutterStock Coupon Codes
- FedEx Office Coupons
- Coursera Coupons
- Autodesk Coupons
- Codeacademy Coupon Codes
- iolo Techologies Coupons
- Norton Coupon Codes
Fix the registry – Guide for Windows XP, Vista, 7, 8, 8.1, 10
This guide shows you how to fix a corrupted registry for the following Windows versions: Windows XP, Vista, 7, 8, 8.1, or 10.
Fix a corrupt registry in Windows XP
To fix a corrupt registry on a Windows XP system, follow these instructions:
- Insert the Windows XP setup CD and restart the computer
- Press any key to boot from the CD
- Press R to access Repair Console

Backing up current registry hives

Deleting current registry hives

Restoring registry hives from a repair folder
- Type exit and remove your CD: exit
- Press Enter
- Restart your computer
- Boot into Safe Mode by repeatedly pressing the F8 key after booting until the Startup Options menu appears
- Choose to boot into Safe Mode
- Start Windows Explorer (or open any folder or open My Computer)
- Click Tools
- Click Folder Options
- Go to the View tab
- At the Under hidden files and folders , select Show hidden files and folders and then click the Hide protected operating system files (Recommended) check box to be cleared (unchecked)

Windows XP show hidden files screen
- Go to My Computer > C:\ drive or the drive where you installed your Windows
- Click on the System Volume Information folder.If you receive Access denied , please follow these guidelines to get access to that folder: https://neosmart.net/wiki/how-to-gain-access-to-the-system-v… . You’re most likely to receive Access denied if your Windows XP is on NTFS and not on FAT32. If it’s on FAT32, you can continue the steps below.
- Open any folder that wasn’t created at the current time, e.g. when you logged into the computer at this session.You can check this by right clicking on the first folder and check its date.The title format of these folders is something like this: _restore{87BD36673246476B923FF86E30B3E7F8}
- Open any RP folder in that folder, e.g. RP1, and go to Snapshot .These are called Restore Points. Here is an example of path: C:\System Volume Information\_restore{D86480E373EF47BCA0EBA81BE6EE3ED8}\RP1\Snapshot
- _REGISTRY_MACHINE_SAM
- _REGISTRY_MACHINE_SYSTEM
- _REGISTRY_MACHINE_SOFTWARE
- _REGISTRY_MACHINE_SECURITY
- _REGISTRY_USER_.DEFAULT
- Rename _REGISTRY_USER_.DEFAULT to DEFAULT
- Rename _REGISTRY_MACHINE_SECURITY to SECURITY
- Rename _REGISTRY_MACHINE_SOFTWARE to SOFTWARE
- Rename _REGISTRY_MACHINE_SYSTEM to SYSTEM
- Rename _REGISTRY_MACHINE_SAM to SAM
- Restart your computer and boot from the CD again
- Press R to access Recovery Console

Continue with these commands:

Restoring registry hives from the backup
- Type exit , press Enter , remove your CD: exit
- Click Start
- Go to All Programs
- Select Accessories
- Then select Tools
- Click System Restore
- Follow the System Restore wizard steps
Fix a corrupt registry in Windows Vista
To fix a corrupt registry in Windows Vista, you can try any of the following:
- Run Startup Repair
- Perform an Upgrade Install
- Copy backup files from the RegBack folder using Command Prompt
Startup Repair
To run Startup Repair, follow these steps:
- Insert the original Windows Vista DVD in the disc tray
- Boot from the DVD
- Choose a language and keyboard layout

Windows Vista Repair Your Computer Menu
- Choose your operating system from the list
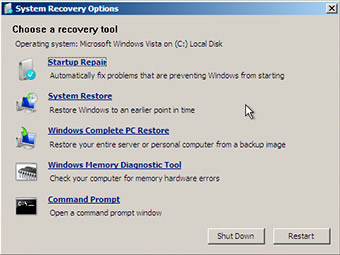
Windows Vista System Recovery Options
- Follow the instructions to complete the process
Upgrade Install
An Upgrade Install may fix a corrupt registry as it will install Windows Vista again without affecting your personal files.
While an Upgrade Install procedure shouldn’t touch your personal files, backup your files before you continue.
Before you continue with the set of instructions below, please note:
- If your Windows Vista has SP1 (Service Pack 1) installed, your original installation DVD also must have SP1.
- If your Windows Vista has SP2 (Service Pack 2) installed, your original installation DVD also must have SP2.
The instructions are:
- Log into Windows Vista as an Administrator
Do not boot from the DVD at boot. You must insert the Windows Vista DVD while you’re logged in as an Administrator in Windows Vista.
- If AutoPlay doesn’t open the DVD automatically, go to My Computer and double-click on the DVD drive
- Select Do no get the latest updates for installation .After you perform the Upgrade Install, you can manually update Windows Vista with the latest updates available.
- Do not type the license key
- Leave the Automatically activate Windows when I’m online option unchecked
- At the Do you want to enter your product key now? question, select No
- Select what type of Windows Vista you purchased and then check the I have selected the edition of Windows that I purchased option
- Click Upgrade
- Follow any instructions left and remove the DVD
After you performed the Upgrade Install, add the license key:
- Boot into Windows Vista
- Open Control Panel
- Go to System
- At the Windows activation section, click Change product key
Command Prompt
To replace the registry in a Windows Vista system, follow these steps:
- Open Command Prompt
- Type C:\ , where C: is the letter of the drive where your Windows Vista is installed: C:\
- Type cd Windows\System32\Config
- Type MD Temp and press Enter

Backing up the registry hives

Renaming the old the registry hives

Restoring the registry hives
Fix a corrupt registry in Windows 7
To fix a corrupt registry in Windows 7, you can try any of the following:
To run Startup Repair, follow these instructions.
- Insert the original Windows 7 installation DVD in the disc tray
- Reboot the computer
- Press any key when it says “Press any key to boot from CD or DVD..”
- Select a language and keyboard option
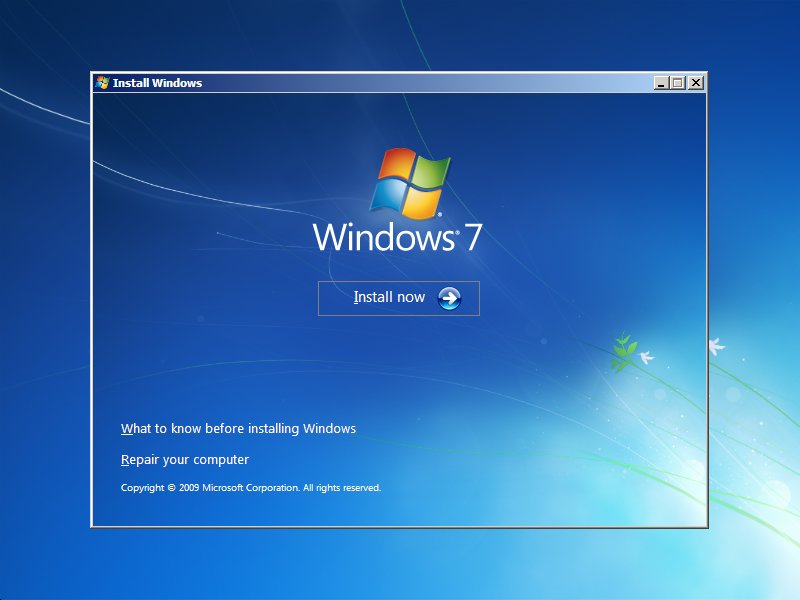
Windows 7 System Recovery Options Screen
- Follow the wizard instructions to complete the procedure
- Press the F8 key several times during booting before the Windows 7 logo appears
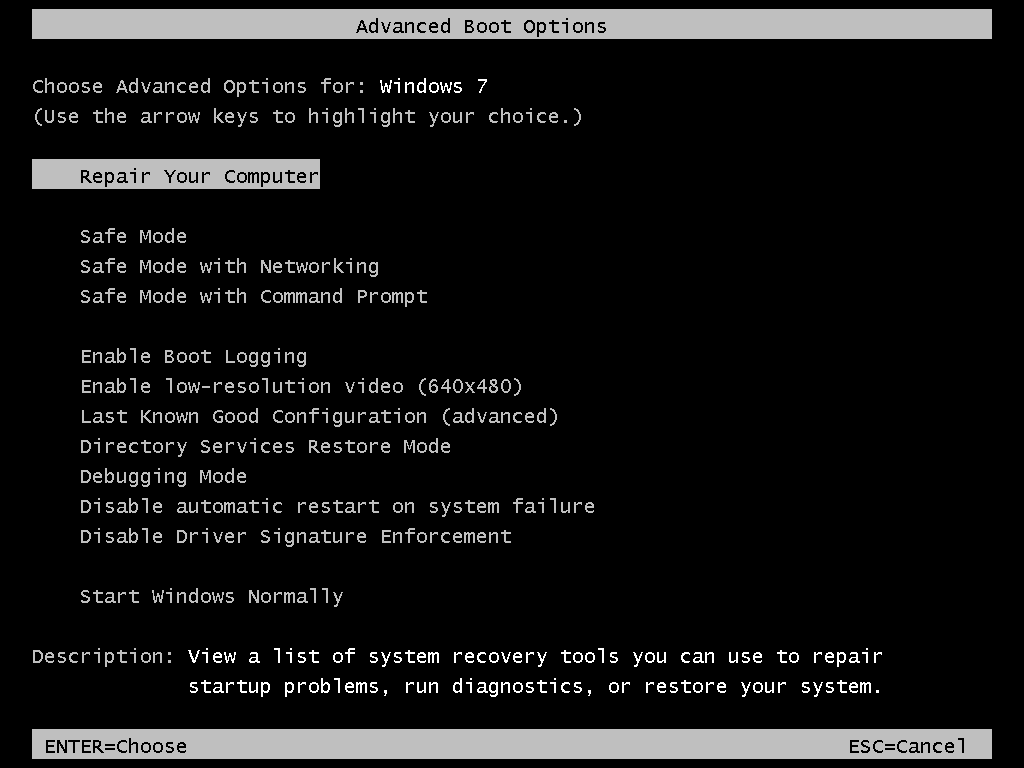
Advanced Boot Options on Windows 7
- Select a keyboard and language
- Follow the wizard instructions to complete the process
An Upgrade Install may fix a corrupt registry as this option will install your Windows 7 again without affecting your personal files.
While Upgrade procedure shouldn’t touch your personal files, backup your files before you continue to make sure.
Important: You need to run the Windows 7 DVD while you’re logged in Windows 7.
- Insert the Windows 7 DVD
- If AutoPlay doesn’t open automatically, open the DVD directly from Computer
- Click Install Now
- Make sure the I want to help make Windows installation better option is unchecked
- Click Go online to get the latest updates for installation
- Accept the license terms
- Uncheck the Automatically activate Windows when I’m online option
- Click Ask me later at the Help protect your computer and improve Windows automatically screen. You can install updates for your Windows 7 once this process is done.
- Continue with the instructions to complete the upgrade
Once this process is done, go and activate your license key:
- Go to Control Panel
To replace the registry in a Windows 7 system, follow these steps:
- Type C:\ , where C: is the letter of the drive where your Windows 7 is installed
Fix a corrupt registry in Windows 8 or 8.1
To repair a corrupt registry in Windows 8 or 8.1, you have these options:
Run Automatic Repair
- Refresh. The Refresh option will not affect your files. Windows 8 will reinstall any applications you installed and create a copy of these applications on your desktop, but backup your data before you do a refresh.
- Reset. A Reset option will remove all your personal files and delete any settings or configuration you did on your computer.
To run Automatic Repair which will attempt to fix a corrupt registry on your Windows 8 or 8.1 system, follow these steps:
- Open the Settings panel
- Go to General

Windows 8 Advanced Startup
- At the Choose an option screen, click Troubleshoot
- At the Advanced Options screen, click Automated Repair
- Choose an account and login, when prompted to do so
- Automatic Repair should now start and your computer may reboot during this process

Windows 8 Advanced Startup screen
To perform a Refresh on your Windows 8 or Windows 8.1 system, follow these steps:
- Go to the Settings panel
- Go to Change PC Settings
- Click Update and recovery
- Click Recovery
- At the Refresh your PC without affecting your files section, click Get started
- Follow the instructions to complete the refresh procedure

Windows 8 Recovery Screen
To do a Reset of your Windows 8 or Windows 8.1 system, follow these steps:
A Reset procedure will erase personal data from your computer. Backup your files before you continue.
- Go to Settings > Change PC Settings
- At the Remove everything and reinstall Windows section, click Get started
Fix a corrupt registry in Windows 10
To repair a corrupt registry in Windows 10, you have these options:
- Refresh. The Refresh option will not affect your files. Windows 10 will reinstall any applications you installed and create a copy of these applications on your desktop, but backup your data before you do a refresh.
To run Automatic Repair which will attempt to fix a corrupt registry on your Windows 10 system, follow these steps:
- Go to Update & Security

Windows 10 Advanced Startup
- Automatic Repair should now start and your computer may reboot during this process’

Windows 10 Advanced Startup screen
To perform a Refresh on your Windows 10 system, follow these steps:
- Go to Update and Security
- Click Get Started
- At the Reset This PC section, click Get started
- Click Keep My Files

Windows 10 Recovery screen
To do a Reset of your Windows 10 system, follow these steps:
- Click Remove Everything
Troubleshooting
Registry permissions in windows xp.
In Windows XP (only the Professional version), the permissions of the registry can block you from editing certain keys.
To unblock this and fix the permissions, follow these steps:
- Type this command: secedit /configure /cfg %windir%\repair\secsetup.inf /db secsetup.sdb /verbose

Fixing permissions with secedit
If Method #1 doesn’t work to fix the permissions, try these steps instead:
- Download SubInACL Tool from Microsoft directly: http://www.microsoft.com/en-us/download/details.aspx?id=2351…
- Run the .exe file
- Type this command and press Enter : cd "%ProgramFiles%\Windows Resource Kits\Tools
- Enter the following commands and press Enter after each: subinacl /subkeyreg HKEY_LOCAL_MACHINE /grant=administrators=f /grant=system=f subinacl /subkeyreg HKEY_CURRENT_USER /grant=administrators=f /grant=system=f subinacl /subkeyreg HKEY_CLASSES_ROOT /grant=administrators=f /grant=system=f subinacl /subdirectories %SystemDrive%\ /grant=administrators=f /grant=system=f
- Restart the computer

Fixing permissions with SubInAcl
More Information
Support links.
- The NeoSmart Support Forums , member-to-member technical support and troubleshooting.
- Get a discounted price on replacement setup and installation discs: Windows XP , Windows Vista , Windows 7 , Windows 8 , Windows 10 .
Applicable Systems
This Windows-related knowledgebase article applies to the following operating systems:
- Windows XP (all editions)
- Windows Vista (all editions)
- Windows 7 (all editions)
- Windows 8 (all editions)
- Windows 8.1 (all editions)
- Windows 10 (all editions)
Propose an edit
Related Articles
Disable legacy boot mode and enable uefi, how to reinstall windows 10, remove dual boot menu – fix for windows, windows won’t start – guide for windows xp, vista, 7, 8, 10, fix slow boot – guide for windows xp, vista, 7, 8, 10, how to reset pc bios/cmos, new fix boot errors with our recovery disk.
Download Easy Recovery Essentials
- Using Windows 10? Download recovery disk for Windows 10 (free)
- Using Windows 8? Download recovery disk for Windows 8
- Using Windows 7? Download recovery disk for Windows 7
- Using Windows Vista? Download recovery disk for Windows Vista
Fix guides for common boot errors
Startup blue screens ✓
Disk corruption ✓
Registry failure ✓
Virus infections ✓
Bootloader issues ✓
And more! ✓
- Startup Repair Infinite Loop
- Fix the MBR
- Your PC needs to be repaired
- Restore To Factory Settings

Use Registry Recycler to:
- Repair and Fix Registry Errors
- Remove Redundant Data in Registry
- Maximize PC Performance
- Defrag and Optimize Registry
- Prevent PC Crashes and Fixes
- User Friendly Interface
- Free of Cost & Totally Safe
What is Registry Recycler?
Registry Recycler is the answer to your each question, if you are in search of a tool that has the ability to keep your system fast and lag free by frequently identifying the broken threads within your registry database and renovating them. Registry Recycler is a free registry cleaner that scans the registry against corrupt, damaged, and invalid registry entries. There are unserviceable entries that play role in slackening your PC operations. The utility aims to repair your registry against bad registry data and threatening errors. It deeply scans the registry to find and fix errors in missing reference entries.
Why Use Registry Recycler?
- Scan, Repair, and Defrag Windows Registry
- Limiting programs for a quick Startup
- Automatic backup at each registry repair
- Troubleshoot crashing or non-loading applications
- Optimize and speed up system performance
- Find and Fix registry errors in depth
- Facilitating PCs for gaming purposes
- Serving free of cost registry cleaner
- Terms of Use
- Privacy Policy
© Registry Recycler, All Rights Reserved.

Contribute to the Windows forum! Click HERE to learn more 💡
March 14, 2024
Contribute to the Windows forum!
Click HERE to learn more 💡
Top Contributors in Windows 7: Bill Smithers - Canadian Tech - LemP ✅
March 11, 2024
Top Contributors in Windows 7:
Bill Smithers - Canadian Tech - LemP ✅
- Search the community and support articles
- Search Community member
Ask a new question
How do I detect and fix registry errors?
How can I view, detect errors, and repair the registry?
Report abuse
- Article Author
Hi, You can fix the issues caused by any error using many different methods. Most errors are not simply registry errors. Do not buy into using Registry Cleaners or System Optimizers which are overly hyped and wil fix little while causing many issues. Consider such programs as snake-oil. If you have a system error come here and detail the issue and we can usually help you solve them. Specific errors might need a particular corrective measure. Below are a lot of the general methods to help determine and/or correct issues. In the next message will be a fairly complete general performance troubelshooter to help if ever needed (of course it includes many of the below). ------------------------------------------------------------------------------------
Some general methods to correct a lot of System issues include : System Restore - use if you can go back to before an issue occured - except for malware which most often needs to be removed before using System Restore as that might help spread the infection. How to Create a System Restore Point in Windows 7 http://www.sevenforums.com/tutorials/697-system-restore-point-create.html How to Do a System Restore in Windows 7 http://www.sevenforums.com/tutorials/700-system-restore.html -------------- For correcting many problems caused by StartUp programs, drivers, and services. How to troubleshoot a problem by performing a clean boot in Windows Vista or Windows 7 http://support.microsoft.com/kb/929135 How to Change, Add, or Remove Startup Programs in Windows 7 http://www.sevenforums.com/tutorials/1401-startup-programs-change.html Autoruns - Free - See what programs are configured to startup automatically when your system boots and you login. Autoruns also shows you the full list of Registry and file locations where applications can configure auto-start settings. http://technet.microsoft.com/en-us/sysinternals/bb963902.aspx ------------- Try these to clear corruption and repair/replace damaged/missing system files. Run DiskCleanup - Start - All Programs - Accessories - System Tools - Disk Cleanup Start - type in Search box - COMMAND find at top of list - RIGHT CLICK - RUN AS ADMIN sfc /scannow How to Repair Windows 7 System Files with System File Checker http://www.sevenforums.com/tutorials/1538-sfc-scannow-command-system-file-checker.html Then run checkdisk (chkdsk). How to Run Disk Check in Windows 7 http://www.sevenforums.com/tutorials/433-disk-check.html -------------- A Repair Installation allows you to keep the programs and data though redundant backups are always a good idea. How to Do a Repair Install to Fix Windows 7 http://www.sevenforums.com/tutorials/3413-repair-install.html --------------- Other helpful methods include StartUp Repair (best from a Windows Installation or Repair Disk. StartUp Repair often works from a Windows 7 Installation Disk or Windows 7 Repair Disk when it does not from Recovery or a Recovery Disk. If needed how to make a Windows 7 Repair Disk is below. A Repair Disk can be made on any computer with a CD burner running XP, Vista, or Window 7 as it uses no files from the Host computer.
You can try some of these in Safe Mode - repeatedly tap F8 as you boot.
If you do not have a Windows 7 disk you can borrow a friends as they are not copy protected. Your System maker will also sell the physical DVD cheap since you already own Windows. Also you can make a repair disk on another computer.
Try Startup Repair - (If at ANY point you gain some but not full access to Windows come back and try Startup Repair again.)
How to Boot to the System Recovery Options in Windows 7 http://www.sevenforums.com/tutorials/668-system-recovery-options.html What are the system recovery options in Windows 7? http://windows.microsoft.com/en-us/windows7/What-are-the-system-recovery-options-in-Windows-7
Try StartUp Repair from Recovery Options or Windows 7 disk.
How to Run a Startup Repair in Windows 7 http://www.sevenforums.com/tutorials/681-startup-repair.html
Also from the COMMAND PROMPT of Recovery Console (if possible) or a Windows 7 disk Start - type in Search box - COMMAND find at top of list - RIGHT CLICK - RUN AS ADMIN sfc /scannow How to Repair Windows 7 System Files with System File Checker http://www.sevenforums.com/tutorials/1538-sfc-scannow-command-system-file-checker.html Then run checkdisk (chkdsk). How to Run Disk Check in Windows 7 http://www.sevenforums.com/tutorials/433-disk-check.html
Retry Startup Repair after Chkdsk. If needed after those you can try System Restore from Safe Mode or the Recovery or Windows 7 disk. How to Do a System Restore in Windows 7 http://www.sevenforums.com/tutorials/700-system-restore.html -------------------------------------------------------------------- If you need to make repair disks - these help repair Windows not re-install. Often a Repair Disk will help when the Recovery Disk does not - Use OPTION 2 to make the disk. How to Create a Windows 7 System Repair Disc - Use OPTION 2 to make the disk. http://www.sevenforums.com/tutorials/2083-system-repair-disc-create.html ====================================== If needed :
What to do if Windows won't start correctly http://windows.microsoft.com/en-us/windows-vista/What-to-do-if-Windows-wont-start-correctly
How to Boot to the System Recovery Options in Windows 7 http://www.sevenforums.com/tutorials/668-system-recovery-options.html What are the system recovery options in Windows 7? http://windows.microsoft.com/en-us/windows7/What-are-the-system-recovery-options-in-Windows-7 How to Do a Repair Install to Fix Windows 7 http://www.sevenforums.com/tutorials/3413-repair-install.html Hope this helps.
Rob Brown - Microsoft MVP <- profile - Windows Expert - Consumer : Bicycle - Mark Twain said it right.
14 people found this reply helpful
Was this reply helpful? Yes No
Sorry this didn't help.
Great! Thanks for your feedback.
How satisfied are you with this reply?
Thanks for your feedback, it helps us improve the site.
Thanks for your feedback.
Replies (13)
Question info.
- Performance & system failures
- Norsk Bokmål
- Ελληνικά
- Русский
- עברית
- العربية
- ไทย
- 한국어
- 中文(简体)
- 中文(繁體)
- 日本語

How to Fix a "Stuck in Automatic Repair" Loop in Windows 10
I f you ever encountered an error and don't know what to do, Windows 10 comes equipped with troubleshooting tools to fix it for you. One of those convenient tools is the automatic repair tool. It is a handy repair feature that can troubleshoot issues that stop you from booting correctly.
But, what do you do when the tool itself is the cause of the error? If your PC is stuck in an automatic repair loop, we have devised a list of solutions to fix your error.
What Is an Automatic Repair Loop, and What Causes It?
An automatic repair loop is an error that occurs when Windows 10 tries to boot and fails, then forcefully boots up the automatic repair tool and tries to repair itself. When Windows can’t repair itself, it reboots and repeats itself in an endless cycle.
There isn’t a single cause for a Windows 10 automatic repair loop, and they can be hard to figure out. The most common cause tends to be missing or corrupted system files, in which Windows can’t boot or repair itself because these essential files it needs to run aren’t available.
FREE CHEAT SHEET: The Ultimate List of Helpful Windows Alt Codes
Missing device drivers can also be one of the biggest causes of the error. If you have recently upgraded your PC, your new components will need device drivers to allow Windows to use them. If the drivers are missing, out-of-date, or not supported, they could cause a repair loop. New peripherals can also cause this error if their drivers aren't installed correctly.
Other possible causes tend to be related to faulty components, malware infections, corrupted system registries, and even broken installation files. But, there is no need to worry as our solutions will work for most causes of a Windows 10 automatic repair loop.
1. Run Fixboot and Chkdsk Commands
If you can’t identify any cause of a Windows 10 automatic repair loop, you can use some system repair tools to try to fix it. The chkdsk command starts a low-level check of your system drive for errors using the Check Disk utility. If it detects errors, it will automatically repair them.
While Windows can’t boot, you can still force Windows to boot to a Command Prompt window using the Advanced options menu screen.
To do this:
- Restart your PC and press the F8 key on your keyboard before the Windows logo and spinning icon appear. This will cause the Windows boot troubleshooting menu to appear. Select See advanced repair options to begin.
- From the Choose an option screen, select Troubleshoot > Advanced options > Command Prompt.
- In the Command Prompt window, type the following command and press Enter : chkdsk c: /r
- If the chkdsk command fails, you can also try using the Fixboot command. In the same Command Prompt window, enter the following command and press Enter : fixboot c:
- Once you are finished, close the Command Prompt window and restart your PC.
2. Perform a System Scan in Safe Mode
If system repair tools find corrupted files, Windows replaces those files with the local image. However, if this image itself has become corrupted, Windows can’t repair itself and causes the previous commands to fail. To repair this, we can use the DISM (Deployment Image Servicing and Management) tool.
To use this tool, we first must enable Safe Mode . This loads a basic version of Windows without any third-party programs to help you fix your start-up errors.
- The first step, like before, is to restart your PC and press the F8 key while booting to open the Windows boot troubleshooting menu.
- Select See advanced repair options > Troubleshoot > Advanced options > Startup Settings > Restart.
- Now, you will see a list of various restart options. Choose Enable Safe Mode with Networking by selecting F5 on your keyboard.
- Once Windows boots up in Safe Mode, right-click the Start menu and select Windows PowerShell (Admin) .
- In the PowerShell window, type the following command and press Enter : DISM /Online /Cleanup-Image /RestoreHealth
- This will take some time to finish. When the DISM tool finishes running, reboot your PC and follow the above steps to open the PowerShell window in Safe Mode again.
- This time, type the following command and press Enter : sfc /scannow
- This will check the integrity of Windows system files and allow us to verify if Windows is fully repaired.
3. Restore the Windows Registry
Sometimes, malware infections or disk issues can also end up corrupting the registry files. As such, you need to head into the Windows registry and tweak some values there to get things working once more.
To fix registry issues, you can restore it with the following steps:
- Open the Windows boot troubleshooting menu.
- Select See advanced repair options > Troubleshoot > Advanced options > Command Prompt .
- Type the following command and press Enter : C:\Windows\System32\config\\rregback* C:\Windows\System32\config\
- If you are asked to overwrite files, type All and press Enter .
- Once you are finished, restart your PC.
4. Disable the Automatic Repair Tool
If you believe that your Windows is functional, you can try to disable the automatic startup repair system. This should allow you to boot into Windows without the repair loop taking place. However, this will only work if your Windows system is working properly. You can use it to determine if your Windows is really at fault.
To disable Windows 10 automatic repair tool, follow these steps:
- Select See advanced repair options > Troubleshoot > Advanced options > Command Prompt.
- Type the following command and press Enter : bcdedit
- Check the values for identifier and recoveryenabled . The identifier value should be {default} and recoveryenabled should be yes .
- Now, type this command and press Enter : bcdedit / set { default } recoveryenabled no
- This will disable the automatic boot repair. If the command doesn't work, try the following command: bcdedit / set { current } recoveryenabled no
5. Disable Early Launch Anti-Malware
The Early Launch Anti-malware (ELAM) program protects computers from threats that start up with the computer. It begins working prior to any boot-up drivers to analyze them and assists Windows Kernel in deciding if it is safe to launch the drivers.
Although it typically works fine, sometimes it can incorrectly classify critical boot drivers as malicious because of false alarms, which can then result in errors like the one under consideration.
Follow these steps to disable ELAM:
- Launch the Windows troubleshooting menu and navigate to Advanced options > Startup Settings .
- To disable the early launch anti-malware protection feature, press 5 or F5 on your keyboard and then restart your PC.
If ELAM was causing the issue, disabling it should do the trick for you.
6. Perform a Hard Reboot
If your system is not responding to any commands, you can also force shut it down using the power button, and then turn it back on. This method is referred to as a hard reboot, and here is how you can perform it:
- Press and hold the power button till your computer shuts down completely.
- Once the computer has shut down, unplug all the external peripherals and if you are using a laptop with a detachable battery, remove the battery.
- Wait for a few seconds before placing the battery back and use the power button to restart the device.
Hopefully, you will not experience the automatic repair loop this time.
7. Reset Your Windows 10 Device
The last resort for a computer stuck in an automatic repair boot loop is resetting Windows 10. You don't have to worry about losing your files and data as you have the option to proceed with either a clean reset (deleting everything) or preserve your files.
To reset a Windows 10 PC, open the Windows boot troubleshooting menu and select Troubleshoot > Reset this PC . Our detailed guide on factory resetting Windows 10 explains this process in detail, so make sure to check it out.
Dealing With the Automatic Repair Loop
It can be frustrating to deal with a never-ending loop due to a tool meant to resolve your problems. It can be difficult to diagnose and understand, but our solutions will be sure to help you out and return your PC to normal.


- Category: Games
No Man’s Sky Orbital Update Introduces Space Station Overhaul, Ship Customization, and More
- No Man’s Sky free Orbital Update available to download today.
- Space stations are now vast and varied in the all-new Orbital update for No Man’s Sky .
- No Man’s Sky players on Xbox can now customize their starships.
Editor’s Note (March 29, 2024): Hello Games is still in the process of getting No Man’s Sky’s Orbital update available for gamers on Xbox. We expect this to arrive early next week.
Last month, all Xbox owners were able to try No Man’s Sky ’s free Omega expedition whether they owned No Man’s Sky or not. We were thrilled to welcome so many new Travellers into our friendly community. This month, we’re excited to show all those new players what veteran players have come to expect by way of regular updates as we unveil the Orbital update, free for existing owners to download today.
Orbital focusses on an area of the game which has remained largely unchanged since No Man’s Sky launched on Xbox five years ago. It’s an aspect which every player encounters almost every time they embark on a new adventure – the ever-present space stations!

Space stations have always been a vibrant and much-frequented feature of every No Man’s Sky star system and are a bustling destination for trade, equipment upgrades, missions, fast travel around the universe and endearing yourself to the locals.
The first thing to strike you about these news stations is their vastness. They loom ever larger upon your starship as you approach the docking entrance. Secondly, their procedurally-generated exteriors mean that you rarely encounter the same form twice. Upon initiating the docking sequence, the large, cavernous landing strip you traverse hints towards a much larger interior than previous, again with a wide variety of layouts.

One of the new additions to the space station map which Travellers will no doubt race towards is the Ship Fabricator. For a while now, players have dreamed of the ability to create their own starships in their dream configuration. This new function enables you to combine parts of salvaged ships together in a near-limitless array of permutations to create brand new form factors. You may still need to scour the universe for that perfect S-Class though!
The envoys from the three universe guilds – Merchant, Mercenary, Explorer – frequent the new space stations and it’s always worth paying them a visit. Your standing with the guilds can be increased with donations of interesting artefacts from your travels, and a higher standing unlocks ever-higher gifts, cheap supplies and discounts, anything from free ammo and fuel to powerful equipment upgrades.

Orbital also ushers in the concept of “Intervention Events” as part of freighter expeditions. Frigates that you have dispatched to the far-flung corners of the universe on lucrative missions can now call upon further instruction mid-voyage or even ask you to come to where they are to assist them in their objective.
As with all No Man’s Sky free updates, Orbital features a whole host of other additions and improvements, large and small. It is available to download from today, free for all existing Xbox and Game Pass owners. Our journey continues.

No Man's Sky
Hello Games
- 343 Industries
- Age of Empires
- The Coalition
- Compulsion Games
- Double Fine
- The Initiative
- inXile Entertainment
- Mojang Studios
- Ninja Theory Ltd
- Obsidian Entertainment
- Playground Games
- Turn 10 Studios
- Undead Labs
- World’s Edge
- Xbox Wire DACH
- Xbox Wire en Español
- Xbox Wire en Francais
- Xbox Wire em Português
- Xbox Wire Japan
© 2023 Microsoft
- Media Assets
- Photosensitive Seizure Warning
- Privacy & Cookies
- Terms of Use
- Code of Conduct
- Manage Consent
- Consumer Health Privacy

COMMENTS
Run the SFC /scannow command. Enter this command in the Command Prompt to scan for corrupted Windows system files and repair them. Use a Registry cleaner program. These types of programs can fix Registry problems the built-in Windows tools cannot. End all processes before shutting down.
Restore Your Registry From The Backup Or Restore Point. To do this, go back to the Run window (right-click Start>Run) and type regedit. Press OK or hit Enter. In the Registry Editor, click File>Import. In the Import Registry File popup, select where you saved the backup, click on the file and click Open.
1. Windows Repair. One of the few all-in-one Windows 11/10 repair tools out there, Windows Repair does exactly what it promises - repair Windows 11/10. Be it file permissions, registry errors, or obscure settings, the app takes care of it all. Since many of its workings can conflict with other apps running in the background, it is recommended to run Windows Repair in safe mode.
Registry errors in Windows 11 can be some of the most frustrating problems to deal with, as they can accumulate over time and appear to have no obvious cause. Whether it's just from system clutter, malware, or an incomplete shutdown, however, there are ways you can fix broken Windows Registry items in Windows 11. Here are some of the best.
5. Use caution. After the scan, the program will let you remove—or in some cases, repair—the registry errors. If you're given the option, set the registry cleaner to remove errors only at ...
Open the search bar in your taskbar by clicking the magnifying glass icon. Press Windows + S on your keyboard as a shortcut. Type "Command Prompt" in the search box and choose Run as Administrator. When prompted by the User Account Control (UAC), click Yes to allow the app to launch with administrative permissions.
Press Win + R and type regedit to open Registry Editor. Select the "File" menu and choose "Export.". Select a location and a name for your file. Also, select "All" for your export range to back up the entire registry. If you're changing a specific branch, you can just make a backup that branch.
Input regedit in the Start Menu search box, and select the Best Match. Head to File > Import. Browse to the location of your Windows Registry backup and select Open. Barring any outrageous, unaccountable errors to your system, you should now be able to back up and restore the Windows Registry.
First up, create a system restore point by going to "Control Panel -> System -> Advanced System Settings," then clicking the "System Protection" tab and selecting "Create.". Next, you'll want to back up your registry. Press "Win + R", then in the Run box type regedit and hit Enter.
Editing Your Windows Registry for a Quick Windows 10 Registry Fix. Another option for dealing with a corrupt registry is to edit it directly. Log in as an administrator and then follow these steps for a quick Windows registry fix: Press the Ctrl and F keys simultaneously to open the Find dialog.
So, if you ever need to repair a corrupted or damaged registry in Windows, you can try any of the following recommended methods: Perform SFC scan. Perform DISM scan. Perform System Restore. Reset ...
Repeat the following steps: Press Win + R to launch the Run command box. Type cleanmgr in the text input box and press the enter key. Disk Cleanup tool will launch. Select the C drive and click on the OK button. Navigate down and click on the Clean up system files button. The Disk Cleanup tool will launch again.
1. Perform Disk Cleanup. The Disk Cleanup tool that lets you remove unnecessary files from your computer, this includes broken registry items. To access this tool, type disk cleanup in the Windows Search box and click Disk Cleanup in the results. Click the Clean up system files button.
Here's how: Head to the Start menu search bar, type in 'cmd,' and select the best match. In the Command prompt, type in sfc /scannow and hit Enter. As soon you excuse the above command, a ...
Download: Ultimate Windows Tweaker (Free) 4. Windows Repair. Windows Repair (All in One) is another free and useful Windows 10 repair tool you can use to repair numerous Windows 10 issues. The Windows Repair developer strongly suggests you should boot your PC in Safe Mode for maximum effect.
From the Registry tab, select the items you want to check for, then press the Scan for Issues option. Once the scan is complete, review the items and select any you wish to remove by pressing the ...
Get a real-time view of your system's file and process activity with Sysinternals' free Process Monitor utility. Sysinternals. Find your keys faster with RegScanner NiriSoft's Registry-scanning ...
Step 1: Go to the search box on the taskbar -> type in "Security," and you will get the Windows security window as shown below. Step 2: Click on Virus & Threat Protection option and select Scan options. Step 3: Select the Microsoft Defender Antivirus (Offline scan) and click on the Scan Now button.
To run Automatic Repair which will attempt to fix a corrupt registry on your Windows 8 or 8.1 system, follow these steps: Open the Settings panel. Go to General. At the Advanced Startup panel, click Restart now. Windows 8 Advanced Startup. At the Choose an option screen, click Troubleshoot.
Registry Recycler is a free registry cleaner that scans the registry against corrupt, damaged, and invalid registry entries. There are unserviceable entries that play role in slackening your PC operations. The utility aims to repair your registry against bad registry data and threatening errors. It deeply scans the registry to find and fix ...
Method 1: Run System File Checker (SFC) Scan. The native System File Checker is designed specially to fix broken missing system files, including those in the registry. Here's how to make use of it: Press Start, type cmd, right-click on the Command Prompt, and select Run as administrator.
If needed how to make a Windows 7 Repair Disk is below. A Repair Disk can be made on any computer with a CD burner running XP, Vista, or Window 7 as it uses no files from the Host computer. You can try some of these in Safe Mode - repeatedly tap F8 as you boot. If you do not have a Windows 7 disk you can borrow a friends as they are not copy ...
To fix registry issues, you can restore it with the following steps: Open the Windows boot troubleshooting menu. Select See advanced repair options > Troubleshoot > Advanced options > Command Prompt .
Last month, all Xbox owners were able to try No Man's Sky's free Omega expedition whether they owned No Man's Sky or not. We were thrilled to welcome so many new Travellers into our friendly community. This month, we're excited to show all those new players what veteran players have come to expect by way of regular updates as we unveil the Orbital update, free for existing owners to ...