- PRO Courses Guides New Tech Help Pro Expert Videos About wikiHow Pro Upgrade Sign In
- EDIT Edit this Article
- EXPLORE Tech Help Pro About Us Random Article Quizzes Request a New Article Community Dashboard This Or That Game Popular Categories Arts and Entertainment Artwork Books Movies Computers and Electronics Computers Phone Skills Technology Hacks Health Men's Health Mental Health Women's Health Relationships Dating Love Relationship Issues Hobbies and Crafts Crafts Drawing Games Education & Communication Communication Skills Personal Development Studying Personal Care and Style Fashion Hair Care Personal Hygiene Youth Personal Care School Stuff Dating All Categories Arts and Entertainment Finance and Business Home and Garden Relationship Quizzes Cars & Other Vehicles Food and Entertaining Personal Care and Style Sports and Fitness Computers and Electronics Health Pets and Animals Travel Education & Communication Hobbies and Crafts Philosophy and Religion Work World Family Life Holidays and Traditions Relationships Youth
- Browse Articles
- Learn Something New
- Quizzes Hot
- This Or That Game New
- Train Your Brain
- Explore More
- Support wikiHow
- About wikiHow
- Log in / Sign up
- Hobbies and Crafts
- Craft for Kids

How to Make a Pencil Case
Last Updated: September 15, 2023 Tested
This article was co-authored by wikiHow Staff . Our trained team of editors and researchers validate articles for accuracy and comprehensiveness. wikiHow's Content Management Team carefully monitors the work from our editorial staff to ensure that each article is backed by trusted research and meets our high quality standards. There are 11 references cited in this article, which can be found at the bottom of the page. The wikiHow Video Team also followed the article's instructions and verified that they work. This article has been viewed 334,504 times. Learn more...
Making your own pencil case can be fun way to end up with a unique, personalized pencil case that you'll be happy to carry around. Best of all, there are lots of different ways to make a pencil case to meet your needs. Once you know the basics of making a pencil case, you can customize it to your heart's content!
Using a Paper Towel Tube

- If you want a smaller pencil case, you can use an empty toilet paper tube instead. You will only be able to keep small items in it, like erasers or crayons, however.
- Choose a zipper color that matches or contrasts with your fabric.
- The zipper tape should be touching the cardboard, and the zipper teeth should be between the cut edges. You want to be able to open and close the tube with the zipper.
- If the zipper is too long, cut it from the top, then cover the cut ends with hot glue so that the zipper head doesn't slide off.
- Leave at least 1 inch (2.5 cm) between the circles so that you can add the seams later.
- Canvas fabric will work the best, but you can use cotton too.
- You can use solid-colored or patterned fabric. If you use light-colored cotton fabric, be aware that the paper towel tube may show through it.

- You won't be sewing the case, but you still need the seam allowances in order to glue the circles down.
- Don't cut past the original circle lines that you drew, otherwise you will end up with holes in your case.
- Repeat this step for the other end of the tube with the other circle.
- Use a low-temp hot glue gun for this step. This way, the glue won't burn you through the fabric.
- Make sure that the front (right side) of the fabric is facing out, and the back (wrong side) is facing into the tube.
- Use the same type of fabric as you did for the ends of the tube. You can use a different color and pattern, however.
- If you want to, you can even make the rectangle a little wider than your tube’s circumference; this will give you more room for error later on.
- if you want, you can iron the edges first in order to have crisper seams. Do this before you hot glue them.
- Consider leaving 1 of the long edges unfolded and unglued. This way, you can adjust it when you wrap the fabric around the tube.
- Make sure that the back (wrong side) of the fabric is facing the tube when you glue it down.
- The narrow side edges of the fabric should be aligned with the top and bottom edges of the tube.
- If you left the other long edge unfolded, be sure to fold it before you glue it down. You may need to fold it more than 1 ⁄ 2 inch (1.3 cm) to ensure a good fit.
Using Ziploc Bags and Duct Tape

- Avoid using a regular, sandwich-sized bag, as it may not be big enough for your pens and pencils.
- For a more durable bag, overlap the strips by about 1 ⁄ 8 to 1 ⁄ 2 inch (0.32 to 1.27 cm). [11] X Research source
- Make sure that the strips are centered. You want to have about 1 inch (2.5 cm) of duct tape hanging off of the side edges.
- The duct tape can be solid-colored or patterned.
- Do not cut the excess duct tape off. You want it to wrap around the side seams on the bag. This will make it stronger.
- If you overlapped the tape for the front of the bag, you should overlap it by the same amount on the back too.
- It does not have to be exactly 1 inch (2.5 cm). It can be a little less than 1 inch (2.5 cm), but it shouldn’t be more.
- If you see any gaps, lay a strip of duct tape across the front and back of the bag, aligning the bottom edges.
- If there is any excess duct tape hanging over the side edges, cut it off.
- If you used patterned duct tape for the body of the bag, consider using a solid color for the trim.
- If you used solid-colored duct tape for the body, you can use a contrasting color for the trim, or a nice pattern instead.
- For a fancier bag, you can decorate it with shapes cut from duct tape.
- Make the rectangle about 1 to 2 inches (2.5 to 5.1 cm) longer and wider than your ID card.
- Cut the rectangle from another plastic Ziploc bag. Don't use a solid-colored trash bag or grocery bag.
- If your pencil case is too short to fit all 3 holes, make just 2 holes.
Sewing a Pencil Case
- For example, you can cut 2 dark blue pieces for the outside and 2 light blue pieces for the inside. You can also use patterned or solid-colored fabric.
- Canvas fabric will work great, because it is nice and durable, but you can use cotton too.
- The zipper can be the same color as your fabric, or it can be a contrasting color. Use a dress or garment zipper, not a separating zipper.
- You will end up with the zipper sandwiched between 2 pieces of fabric. The right sides of the fabric should be facing in, and the wrong sides should be facing out.
- If you do not have a zipper foot, sew halfway across the edge, stop, move the zipper to the other end of the tape, and finish sewing.
- A backstitch is where you reverse the sewing machine for a few stitches. It prevents the thread from unraveling.
- Use a heat setting suitable for the fabric that you are working with. In most cases, this will be the "cotton" setting.
- Fold the fabric enough so that it lines up with the stitching.
- This will also help prevent the fabric from bunching up and accidentally getting caught in the zipper.
- Fold your seam allowance and zipper tape against the lining fabric.
- Leave the zipper open halfway. This is very important, otherwise you won't be able to turn the bag right-side-out all the way.
- Remember to backstitch when you start and finish sewing, and the remove the pins.
- Change the thread and bobbin color as needed in order to match it to the outer and lining fabric.
- The 3 in (7.6 cm) gap is important, because you'll need it in order to turn the bag right-side-out.
- You will be left with a bag that is 1 color to 1 side of the zipper and a second color to the other side.
- If you need to, use a pencil, chopstick, or knitting needle to push the corners out further. This will make them nice and crisp.
Community Q&A
- You can make the pencil cases shorter to fit smaller items, such as crayons. You can also make them bigger to fit longer items, such as rulers. Thanks Helpful 6 Not Helpful 3
- Don't get cardboard or duct tape pencil cases wet, or they will fall apart. Thanks Helpful 6 Not Helpful 4
- Decorate your pencil case with stickers, patches, or doodles to make it more personal. Thanks Helpful 5 Not Helpful 4

Things You'll Need
- Empty paper towel tube
- Canvas or cotton fabric
- 10 to 11 in (25 to 28 cm) zipper
- Hot glue gun (low-temp)
- Hot glue sticks (low-temp)
- Pen or pencil
- 1-quart (0.95 L) plastic Ziploc bag
- Hole puncher
- Stickers (optional)
- Cotton or canvas fabric, 1 to 2 colors
- 10 in (25 cm) zipper
- Sewing pins
- Sewing machine
- Zipper foot
- Fabric scissors
You Might Also Like

- ↑ https://www.youtube.com/watch?v=yD_zEM3QqDg&feature=youtu.be&t=30s
- ↑ https://www.youtube.com/watch?v=yD_zEM3QqDg&feature=youtu.be&t=38s
- ↑ https://www.youtube.com/watch?v=yD_zEM3QqDg&feature=youtu.be&t=1m
- ↑ https://www.youtube.com/watch?v=yD_zEM3QqDg&feature=youtu.be&t=1m10s
- ↑ https://www.youtube.com/watch?v=yD_zEM3QqDg&feature=youtu.be&t=1m17s
- ↑ https://www.youtube.com/watch?v=yD_zEM3QqDg&feature=youtu.be&t=1m38s
- ↑ https://www.youtube.com/watch?v=yD_zEM3QqDg&feature=youtu.be&t=2m3s
- ↑ https://www.youtube.com/watch?v=yD_zEM3QqDg&feature=youtu.be&t=2m30s
- ↑ https://www.frugalcouponliving.com/diy-pencil-case/
- ↑ https://hip2save.com/2014/08/05/duct-tape-pencil-pouches-easy-back-to-school-craft/
- ↑ https://thediydreamer.com/sewing/diy-pencil-case-with-lining/
About This Article

To make a pencil case, start by cutting an empty paper towel roll from top to bottom so you can open it into a flat sheet. Then, get a zipper, and glue one half to one of the cut edges on the paper towel roll and the other half on the other cut edge. Next, cut out a piece of fabric that's slightly bigger than the flattened paper towel roll, as well as 2 circles of fabric for the ends of your case. Finally, hot glue the fabric to the paper towel roll, and then hot glue the circles over the ends. To learn how to make a pencil case using plastic bags and duct tape, scroll down! Did this summary help you? Yes No
- Send fan mail to authors
Reader Success Stories
Symthanda Kunene
Aug 2, 2017
Did this article help you?
Jul 20, 2016
Oct 12, 2016
May 31, 2017
Nov 30, 2016

Featured Articles

Trending Articles

Watch Articles

- Terms of Use
- Privacy Policy
- Do Not Sell or Share My Info
- Not Selling Info
Get all the best how-tos!
Sign up for wikiHow's weekly email newsletter
- Skip to main content
- Skip to primary sidebar
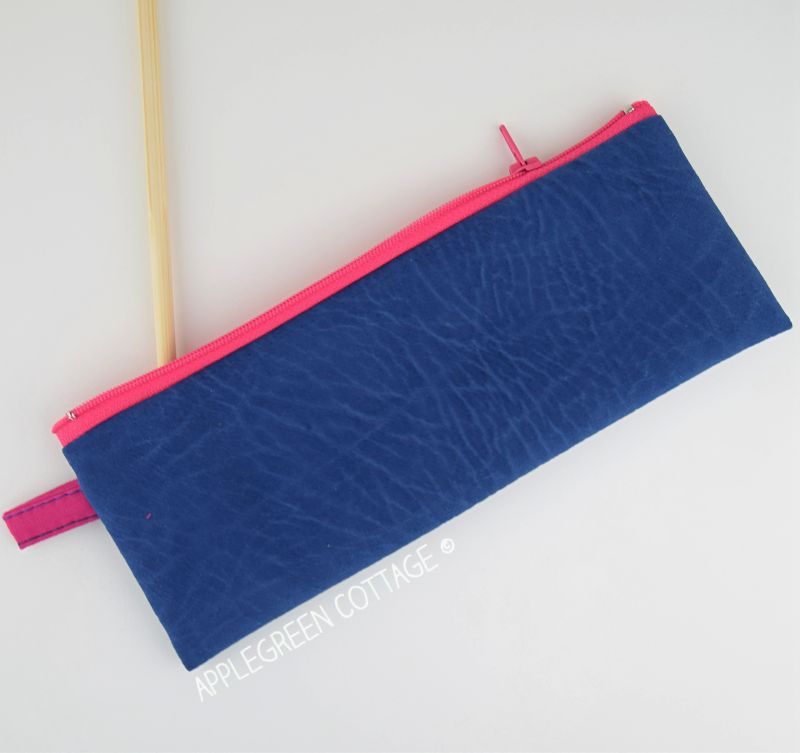
Diy Pencil Case - Easy And Quick!
By Damjana Jakos • Updated on Dec 28, 2022
Sew a cute diy pencil case using this super easy tutorial. Who couldn't use a fun pencil case?! Fill it with a few cute sharpies or pencils, and you've got a great diy back-to-school gift ! See how to make one in 10 minutes - or less !

Do you want an ad-free, printable copy of this online tutorial? Find it here for just $3 . You won’t need to access the internet every time you want to make it. ------ Or get the BUNDLE with ALL the Printable Tutorials - current and future ones!

This post contains affiliate links. Thanks for your support.
With the new school year nearly here, I am making a few easy pencil cases. More than easy. I'll show you how to make the QUICKEST, SIMPLEST pencil case I've ever sewn. One you can whip up in minutes, and are cute, practical and make a great back-to-school gift. How cool is that!
If you like this pencil case tutorial, check out these other posts too:
- this COOL dice bag pattern - and it's FREE
- 20+ Super Easy Sewing Projects
- 7 Easy Crafts To Make And Sell
- 10+ Cool Gifts For Kids You Can Sew
Diy Pencil Case

Simple, slim, and stylish. A great diy gift for so many occasions! Think teenagers, back to college, teachers, office workers, someone who likes cute things (me! you!), in short, nearly everyone.
I love making a matching pencil case when sewing a diy backpack (ideas? this one !) A great gift set for teenagers too!
The finished size of this unlined zipper pouch is 8 ½" by 3 ½" (21 x 9 cm)
Diy Pencil Case Tutorial
This is an unlined zipper pouch. It should take you less than 10 minutes once you've selected your fabric. Let's do it! Let's get our sewing machines ready for a few stitching lines.

This is what you'll need:
- a 7" by 9" (18 x 23cm) piece of medium to heavy-weight material (preferably non-fraying), see below
- optional: a 3 ½" by 1 ½" scrap piece for pull tab (9 x 4cm)
- a standard 8" (20cm) nylon-coil zipper size #3
- matching thread, sewing machine, scissors and sewing clips
MATERIAL RECOMMENDATIONS
I used this microsuede upholstery fabric , it has a very smooth suede surface and is perfect for upholstery. Instead of redoing my chairs, I've been sewing these zipper wallets and these bags from it. It's a perfect, soft-to-the-touch, easy cleaning material that's way easier to sew with than faux leather or vinyl! (And now you know my little secret, lol!) But basically,
- anything that's heavier than quilting cotton .
- Ideal case, also something that won't fray if the edges are left unfinished. (non-fraying upholstery fabric or faux leather )
- if it frays, say, if you use denim or home-decor fabric , just zigzag around the main piece first.

Diy Pencil Case - Sewing Steps
You won't need a pencil case pattern, just these cutting instructions:
Step 1 - Cut 2 Rectangles
Cut two rectangles: one 7" by 9" (18 x 23cm) and the other 3 ½" by 1 ½" (9 x 4cm). The length of the large piece should be equal to the total length of your zipper (incl. zipper tape). NOTE: If your material frays, run a zigzag stitch all around the larger piece.

Step 2 - Add Zipper To one Side

How to sew a zipper : Place your main piece right-side-up and place the zipper right-side-down, along the top long edge. Attach sewing clips to hold in place and stitch.
Flip the sewn zipper right-side-up.

Step 3 - Attach zipper to the other side of the diy pencil pouch

Place the other zipper edge along the remaining long fabric edge, so they are right-sides-together again. Then, stitch along the zipper tape:

Step 4 - Open the zipper

What you'll get a tube-like structure, make sure to unzip it at least half-way. Very important!
Step 5 - How To Add A Pull
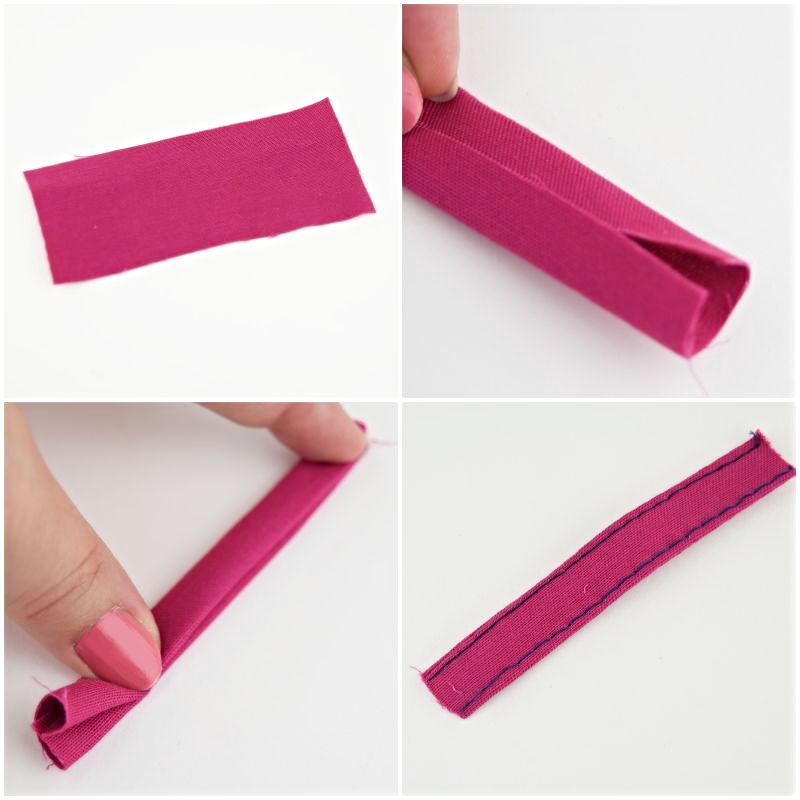
Now, make the (optional) pull tab. Fold the two long edges of the small piece towards the right side, and then fold again along the center. Then topstitch along each edge - see the photos below.
Fold the pull tab in half and slide it between the right sides of the main piece, half an inch or so below the zipper line. NOTE: the loop should face inwards.
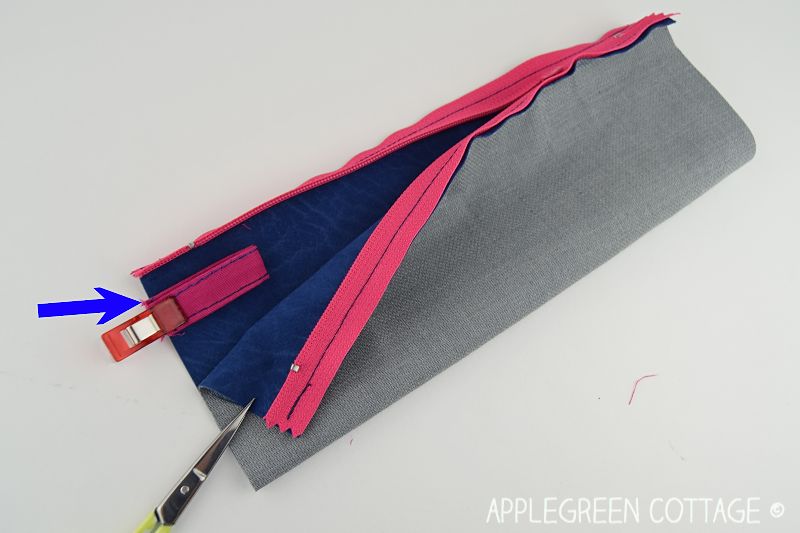
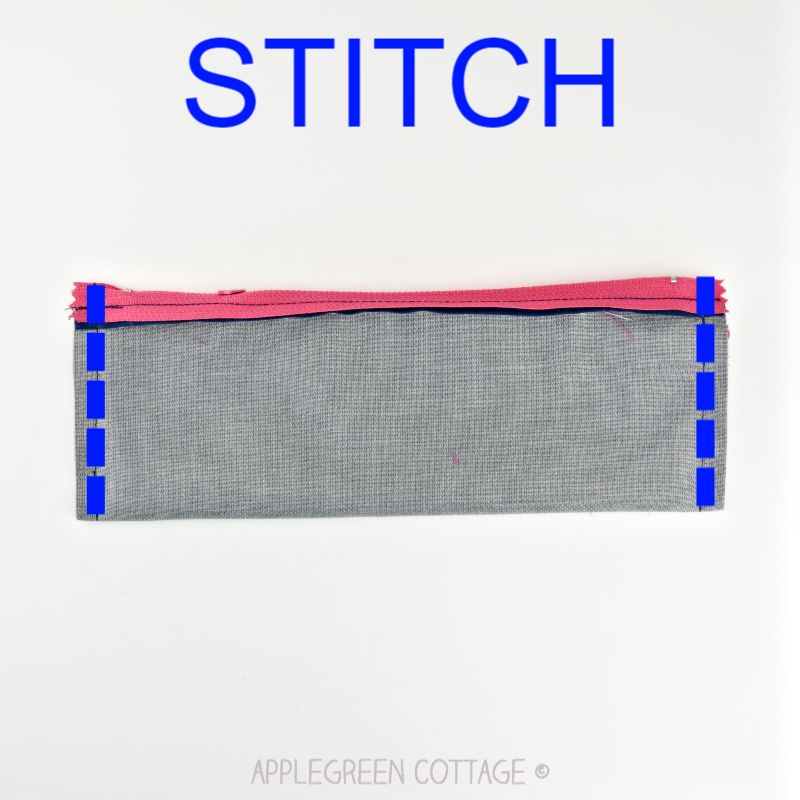
step 6 - Sew The Sides
Fold the sides so the zipper is on top. You've only got two stitching lines to do on each side, but first, see the detail below: to avoid pinched zipper ends, pin the zipper tape so it is facing AWAY from the fabric. Like this:
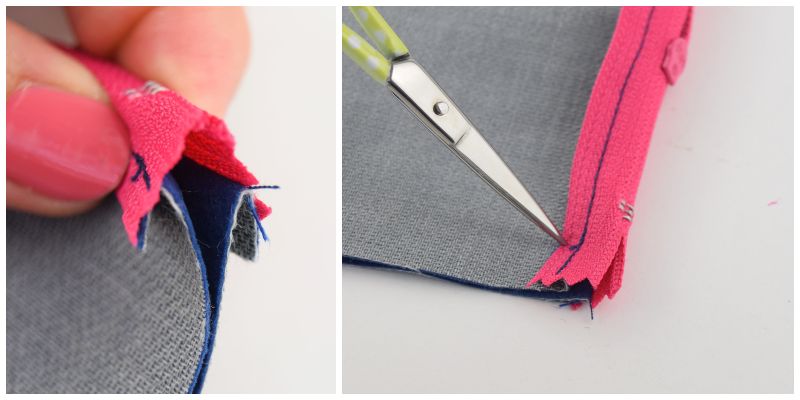
Stitch the sides closed, securing the stitches at beginning and end. (I usually backstitch, just a little)
Step 7 - Turn and use!
Turn right-side-out through the half-way open zipper. To push the corners out, you can use a knitting needle or a chopstick. Done!
Now, that was easy, wasn't it! You've made a cute slim pencil pouch, and now you can sew up a few more as back-to-school gifts , or teacher appreciation gifts. Or, if you're like me and fall in love with every little zipper pouch you spot, make tons of them so you get to keep at least a few to yourself!
This is a great scrap buster project. These slim and stylish diy pencil cases can be used for everything! It will fit a few pens, or a small pack of tissues plus lipgloss and a key, you can even make a set of them, connect them using a keyholder ring and fill them with little toys and games for the next road trip with kids.
Save this project for later:

If you liked this tutorial, make sure to check out 20 more back to school projects I've got for you here on the blog. And 9 of them are brand new sewing tutorials and free patterns, posted on the same day as these diy pencil cases, all by my friends, fellow sewing bloggers - we've decided to make your back-to-school fun and easy!

WANT MORE FREE TUTORIALS AND PATTERNS?
Get email updates and never miss out on new patterns, printables, and tutorials:
Or …check out the NEA Small Crossbody Bag pattern in our shop. This bag skyrocketed to the top of our best-sellers in less than a week after it was released:

More Free Sewing Patterns

Reader Interactions
September 22, 2023 at 10:41 pm
This pencil case came together so quickly. I was in a pinch for a birthday present and thought I would give your pattern a try. It is so cute. I'll definitely be making more.
November 29, 2022 at 6:48 pm
Absolutely no experience on sewing machine and this was my first project. Very straight forward. Looking forward to making more
vicky myers
July 24, 2019 at 7:09 pm
I am loving the microsuede fabric, i've never sewn with it - time to treat myself I think!!
July 31, 2019 at 6:40 am
Vicky, you're right! And you'll love it! xoxo,
November 11, 2023 at 11:16 pm
So I mashed your zipper pouch (the one with the middle zipper for sewing clips) and the pencil case and added FOE to the back for a pencil case that can go on a notebook! I love ALL your patterns. And I'm addicted to the French seam, which I used here. Thank you, Damjana!!
Leave a Reply Cancel reply
Your email address will not be published. Required fields are marked *
Save my name, email, and website in this browser for the next time I comment.
- Skip to primary navigation
- Skip to main content
- Skip to primary sidebar
DIY Pencil Case Tutorial - 3 Easy Styles
Sharing is caring!
This tutorial will show you 3 DIY pencil case styles so you can go back to school in style. Back to school! Those words are music to your ears if you have school-going children. A DIY pencil pouch is a very important piece of equipment in every school bag.

DIY Pencil Case Tutorial
A DIY pencil case full of all the right pens is a perfect gift. A personalized DIY pencil pouch is fun to make and will make your little ones smile. There are three simple pencil case sewing pattern styles set out in this tutorial.
- Lined DIY Pencil Case
- Unlined DIY Pencil Case
- Boxy DIY Pencil Case
Supplies Needed:
- FABRIC - Something strong and sturdy. Medium-weight cotton or faux leather would be a good choice. Use a fabric with substance or line the fabric and use fusible interfacing for stiffening.
- RIBBON - 2.5" (4cm) of ribbon or tape for the pull on the side. The width should be around 1" wide (2.5cm).
- THREAD - A cotton thread in a matching or contrasting color.
- ZIPPER - The zipper tape should be the same length as your fabric rectangles (8" (20.3cm) for the lined and unlined style and 10" (25cm) for the boxy style.)
- FEET - Zipper foot and an all-purpose presser foot. The zipper foot allows the machine to sew right next to the desired seam allowance. An all-purpose presser foot helps maintain stability on the layers of fabric.
- SEWING BASICS - Sewing machine, scissors or rotary cutter and cutting mat, iron and ironing board, tape measure, pins, or clips.
Style 1 - DIY Pencil Case with Lining
Let's start off with a simple lined zipper pouch. When you are all organized with your fabrics and basic sewing tools , you are ready to start.
Here is how to sew a pencil case that is flat with a zipper at the top:
Step 1 - Cut the Fabric
Cut 4 pieces of fabric 8 x 5 inches (20.5x13cm) - 2 for the outside and 2 for the lining. You will need a 7-inch zipper with an 8-inch zipper tape.
If you plan on making a longer DIY pen pouch, just make sure that the fabric is 1 inch (2.5cm) longer than the teeth (not the tape) of the zipper. The zipper tape will be the same length as the fabric. You can easily adjust the height of the fabric.

Step 2 - Sew the Zipper
- Place the zipper with the right side facing one of the outside pieces. The head of the zipper should be down and on the left side.
- Then add the lining piece to the zipper and lay it down on the right side, touching the zipper.
- Stitch along the edge of the zipper using a zipper foot to get as close to the zipper as possible.
- Press the fabric away from the zipper. This will enclose the zipper on both sides. Watch out for plastic zippers that may melt under a hot iron.
- Once the fabric has been pressed, top stitch across the seam, including all layers of fabric and the zip.
Here’s a little tip: If the zipper head is too bulky, sew at a point 2 inches (5cm) past the head while the zipper is closed. Then go back and open the zipper and sew the top part.

Step 3 - Sew the Zipper to the Other Side
You are ready to attach the zipper to the other side of the DIY pencil case.
- Place the lining right sides up under the zipper and the top fabric right sides together with the lining.
- Sandwich the zipper between the lining and the top piece.
- Stitch as close to the zipper as possible.
- Topstitch along the edge of the zipper.
Step 4 - Sew the Seams of the DIY Pencil Pouch
- Start by undoing the zipper about ¾ of the way across. This is important. Otherwise, it will be very difficult to turn the DIY pencil case the right way out.
- Put the lining and the outside pieces right sides together.
- At the point where the outside and the lining meet, put the side of the zipper towards the lining and the seam towards the main outside fabric.
- Fold the ribbon in half and insert it into the side seam of the outside.
- Stitch all the way around the edge with a ⅜” seam or 1cm seam.
- Leave a gap in the bottom lining and backstitch your seam at the beginning and the end.
- Hand-turn your machine wheel over the zipper ends if the bulk of the fabric may break the needle. The raw edges of the seam do not need neatening because they are enclosed in the lining of the pouch.

Step 5 - Turn Right Way Out
- Clip the corners.
- Turn the pouch the right way out.
- Stitch the opening at the bottom by hand to close the gap.
Step 6 - Finishing
Finish off by pushing the lining back into the pouch and giving it a good press. Now you have made a basic DIY pencil case. At this point, you may like to decorate the pouch.
Here are some decorative suggestions: Add a bow, fabric flower , and monogram letters for initials, attach a wrist strap or add sequins and a tassel or two. Ric-rac is a great way to add color and texture to your pencil case. Try out Yo-yo flowers and even use up scraps to make a patchwork effect.

Style 2 - DIY Pencil Case Without Lining
Try a DIY pencil case without lining. Choose a firm weight of fabric for this project, like denim or corduroy and even faux leather. Look for something that will not fray or a stronger fabric that you can zigzag around the edges.
Here is how to make a pen case that is flat:
- Cut 1 rectangle measuring 8 by 10 inches (20.5x25cm).

Step 2 - Sew the DIY Pencil Bag Zipper
- Place the zipper along the top of the fabric (the 8-inch edge) with the right sides together. Use clips or pins while you machine sew along the edge of the zipper with a zipper foot.
- Turn the zipper over and press the fabric.
- Turn the bottom of the fabric up to meet the edge of the zipper and put the right sides together. Stitch along the zipper on the other side.

Step 3 - Add the Pull Tab
- Undo the zipper halfway across.
- Fold the pull tab in half and slide it between the side of the fabric on the pencil case. Make sure the loop faces in towards the inside of the pencil case.
Step 4 - Fold and Stitch
- Fold the pencil case in half ready to sew the sides. The zipper must be on the top.
- Then stitch the sides making sure you backstitch well.

Step 5 - Turn
- Turn the pencil case right sides out through the opening you left in the zipper at the top.
And there you have it, a very quick and easy DIY pencil case with a zipper and pull tab. You can adjust the width of the case by measuring the zipper and cutting the rectangle to fit.

Style 3 - Boxy DIY Pencil Case
Now you have mastered a simple, straightforward DIY pencil case with a zipper and pull tab, how about trying the boxy-style pencil case. It is a little more advanced but has the advantage of standing alone and giving more depth to the shape of the pencil case.
This is still a simple project, but the overall finish is more sophisticated, and with a stretch of your imagination, it could be more than just a pencil case. The box pouch or boxy pencil case could double as a travel bag, a make-up bag, or with plastic lining, a wash bag.
Here are the instructions for a boxy DIY pencil case:
- Cut 4 rectangles of fabric - 2 for outside and 2 for lining 10x6 inches (25x15cm)

- Lay the zipper right sides together on one of the main fabric pieces.
- Place the lining fabric right side down on top of the zipper.
- Stitch along the edge with a zipper foot.
- Open the seam and press.

- Repeat this sewing step on the other side of the zipper.
- Topstitch the seams with a zipper foot.

Step 3 - Sew the Pencil Pouch Sides
- Now lay out the fabric so the right sides of the main pieces are together and the right sides of the lining are together.
- Stitch along the raw edges at the top and bottom of the pencil case. Notice how the sides are left open.
- Turn the DIY pencil case through the side so that the lining is over the main fabric. See how the zipper is exposed in the center and the main fabric is right sides together inside.

Step 4 - Sew the Bottom
- Fold the DIY pencil case with the zipper in the center. Check that all the layers on the inside are smooth.
- Unzip the zipper to about halfway across.
- Fold the ribbon in half and insert it in one end underneath the zipper.
- Now you will sew the two short sides. Go carefully because you will sew through the zipper edges, which can be quite thick.
- If your fabric frays a lot, you can zig-zag these ends or place bias tape over the raw edges. I left mine raw since they will be hidden inside the pencil case.
Step 5 - Box Corners
The box corners are sewn in at this stage.
- Take hold of one of the four corners and pinch it to form a triangle.
- The raw edges of the seam should run through the center of the triangle.
- Sew along the top of the triangle 1 inch (2.5cm) from the tip.
- Trim the pointed piece off.
- Repeat this process for each of the four corners.

Step 6 - Turn the DIY Pencil Bag the Right Way
Pull the pencil case to the right side and push out the corners with a pointed object like a knitting needle. Your boxy DIY pencil case is now ready to use.

DIY Pencil Case - In Conclusion
Now when school goes back to face a new term, your child will be equipped with a special DIY pencil case to contain all practical pieces of stationery. This little case is such fun to make and uses very little fabric. You may enjoy making little DIY pencil cases for all sorts of sensible reasons. Practical pencil case sewing patterns are definitely top of the class at school.
More Clutches

DIY Pencil Case Pattern
- Sewing Basics
- Fabric - Main and Lining
Instructions

More Free Sewing Patterns & Tutorials

Reader Interactions
JUDE GREBEL
March 06, 2023 at 9:55 pm
Loved your method of boxy pencil case. Turned out perfect!
Leave a Reply
Your email address will not be published. Required fields are marked *
GET FREE NEWSLETTER
DIY Pencil case tutorials (4 very easy ones including Zipper pencil pouch)
When you are in school or college there is always writing – and then more writing and then some more. For all that you need countless pens, highlighters, pencils, gel pens, sketch pens and then there are so many accompaniments to this like erasers, post-its, mini stapler, and other knick-knacks or just about anything that you need to carry to school/college – coins, keys, lip balm and hand sanitizer comes to my mind.
And you are always in need of pencil pouches to carry all these.
Here are 4 very easy to make pencil pouches for all that. All easy sewing tutorials that even beginners can use and make cute pouches for all that they need to carry.
DIY PENCIL CASES
Table of Contents
1. Zipper pencil pouch

This is a boxy pencil box- just right to carry a lot of pens and pencils. Increase dimensions if you want a bigger size.
You can use fabric or faux leather to make it – you need a heavyweight fabric or use double layers of medium weight fabric or interface your fabric.
How to make this pencil case
Step 1 Cut out a 10 inch square fabric piece.

Step 2 Keep the fabric right side up in front of you. Keep the zipper face down along one edge of the fabric. Sew in place.

Step 3 Fold the fabric and join the remaining zipper edge to the other edge of the fabric as in the picture below.

Step 4 Keep the tube you have now flattened and arrange the zipper to the center. Stitch the side edges closed.

Clip the corners

Step 5 Pinch one of the corners and sew across one inch from the corner. Remember to keep the seam allowance open as you sew.

Do this for all the corners.

That is it. Turn your pencil box right side out. Now you can stuff the pencil pouch with anything you have a mind to. You can use tack stitches to keep the inside corner neat and tidy – they do give some sturdiness to the pouch so you may not want to trim it out.

2 Simple flat zipper pouch

This is a compact flat pencil case which will easily fit into your bag/backpack/purse etc. Make two or more to keep different types of pens separately organized
How to make this pencil pouch.
Step 1 Cut out fabric pieces – 2 for outer pouch and 2 for lining with the same dimensions – 10 inch by 5 inch. Use a coordinating zipper.

Step 2 Keep one of the lining fabric face up on table. Keep the zipper face up along the long edge. Place the outer fabric face down on top of this. Refer picture below.

When you stitch the edge and turn the zipper out – you will get one side of the pouch ready

Step 3 Now to join the other side fabric pieces – Place the other remaining lining piece face up on the table. Keep the already prepared pouch piece with zipper attached on top of this, face up as in the picture below.

Now keep the other outer pouch fabric piece face down on top of all this. Refer picture below.

Stitch along the edge joining the zipper edge to the lining and outer pieces.

You get the zipper in the middle and the outer fabric and lining fabric to either side of it.

Step 4 You may want to add a small strap to the purse for ease of carrying the pouch around. Cut out a 4 inch piece of webbing or ribbon or make on with fabric
Turn the fabric pieces so that the outer fabrics are on one side and lining pieces are on the other side of the zipper. Refer picture below

Keep the strap folded inside the two outer pouch pieces.

Stitch along the outer edge leaving a 2 inch unstitched

Step 5 Get the bag out of the lining through the hole in lining – remember to clip the corners before doing this – if you want sharp corners. Stitch the hole closed after everything is as it should be.

3. Small Pencil Case Pattern

Another zipper pencil pouch. This is a similar pouch as the boxy one – just that it is smaller and the construction is a little different. There is no bulk inside.
Step 1. Cut out a square fabric piece of 7 inches

Cut out the fabric as per the pattern

Step 2 Join the zipper to both edges

Attach the zipper to either side of the fabric edges as done in the first pouch

Keep the zipper open as you pin the zipper to the other side.

Step 3 Bring the zipper to the middle and join the sides. The size of the sides are not the same but join as much is there.

Step 4 Pinch the corner openings and stitch.

Finish the edges. Bring the pouch right side out.

4. Felt Pouch
If you are really in a hurry and your kid needs a pencil pouch super fast you can make a simple pouch with felt this way.
How to make the felt fabric pencil pouch
Step 1 Simply cut out a shape from felt – get two pieces for front and back and a z ipper

Step 2 Cut out a window for the zipper on the back piece.

Step 3 Keep the zipper to the inside and stitch along the edge. Cut out the extra tail of zipper.

Step 4 Join the two pieces of felt by topstitching along the edge. Make a decorative stitch if you want a fancy pouch.

If you want to check out other types of pouches which are similar but different check out these posts : Make a make up pouch : 2 types ; Make a zippered pouch

Make a phone pouch : 3 easy ways

Hand sew a Leather Pouch

How did you like this post?
Click on a star to rate it!
Average rating 5 / 5. Vote count: 2
No votes so far! Be the first to rate this post.
Subscribe to get weekly notifications of posts in your email

Author: Sarina Tariq
16 thoughts on “DIY Pencil case tutorials (4 very easy ones including Zipper pencil pouch)”
Love the easy heart shaped one. Could make any shape! Great for kids. Thank you!
Hello, am very attracted by your post, thank you. I am a total beginner (& haven’t done zips before), can you clarify please what length zipper to use for box pouch No 1 – also 10” as the fabric? Thank you, sorry for silly question.
The zipper should be the same size or slightly bigger than the fabric side.
how to sew pouches for friends
Hi Samra Here are some pouch tutorials : Zippered pouch ; Makeup pouch ; Phone pouch
Excellent job thanks for letting me know☺☺☺
This is really helpful as I can’t go out to buy a purse I can make mine.
very helpful
these pencil pouch ideas are great! they are very useful for school
send me on appp number 0026776095159
Thank you for sharing these patterns. My daughter and I made the first pencil case. We lined it and hand sewed it so it took nearer 6 hours to make! Your instructions and pictures were clear and easy to follow. Thanks very much.
Hi Sally & Sofia So nice to know that you used my instructions to make the pencil case with your daughter. Thanks for writing the comment Sarina
love it helped me a lot saved more money
Will definitely make some of these for our Christmas charity stall. .
This is indeed an interesting piece. Will try it out
- Skip to primary navigation
- Skip to main content
- Skip to primary sidebar
- Crochet Patterns
- Sewing Patterns
- DIY Projects
- Pallet Projects
- Home Organization
- Kids Crafts
- Drawing Ideas
- Fashion & Beauty
- DIY Cat Projects
- DIY Dog Projects
- DIY Wedding Projects
- Jewelry Making Ideas
- Inspiration
- Parenting Tips
25 DIY Pencil Case Ideas and Pencil Pouch Designs
Making your very own 25 DIY pencil case or pencil pouch can be a rewarding project, injecting a bit of personal flair into your everyday school or office supplies. If you’ve ever wanted a unique place to store your writing instruments, this guide is perfect for you. We provide a step-by-step guide, helping you to make something truly special that stands out. This process not only allows for an expression of creativity but also ensures that what you make is perfectly tailored to your needs.
Customization of your DIY pencil case is part of the fun, offering limitless possibilities in design and function. Whether you choose to hand sew or utilize more advanced techniques, our guide covers all the essential materials and tools you’ll need to get started. We’ll also dive into troubleshooting common issues and offer up upcycling tips to make your project as eco-friendly as possible.
Get ready to transform simple materials into a masterpiece of convenience and style, and discover the satisfaction of making something both beautiful and practical. Let’s explore how you can turn basic materials into a personalized statement piece.

How to Make a Pencil Case – Step by Step Guide
Making a spacious and practical pencil case can be a fun and rewarding DIY project. This tutorial will guide you through the process of making a large-capacity stationery pouch with three zippers, as demonstrated in the sewingtimes YouTube tutorial. Follow these steps for an easy-to-understand and reliable guide to crafting your very own triple zipper pencil case.
Materials You’ll Need:
- Outer Fabric:
- 2 pieces of 24cm x 10.5cm (9* ½″ x 4⅛″)
- 2 pieces of 32cm x 4cm (12* ¾″ x 1½″)
- 1 piece of 31cm x 7cm (12* ¼″ x 2¾″)
- 2 pieces of 21cm x 3cm (8* ¼″ x 1¼″)
- Lining Fabric:
- 6 pieces of 24cm x 10.5cm (9* ½″ x 4⅛″)
- 1 piece of 24cm x 6.5cm (9* ½″ x 2⅝″)
- 1 piece of 15cm x 10.5cm (6″ x 4⅛″)
- 1 piece of 30cm (12″)
- 2 pieces of 40cm (16″)
Tools Required:
- Sewing Machine (Recommended sewing machine: Amazon Link)
- Pins or clips
- Fabric marker
Instructions:
- Prepare the Fabric:
- Begin by cutting all pieces of the outer and lining fabric according to the measurements provided.
- Iron fusible fleece (Pellon 987F, Amazon Link) onto the wrong side of the outer fabric pieces to give the pouch some structure. Follow the manufacturer’s instructions for application.
- Sew the Outer Shell:
- Take the outer fabric pieces and arrange them in order. Sew the sides together to form the exterior of the pencil case. Use a 1/4-inch seam allowance for a neat finish.
- Attach the zipper between the top edges of the front and back pieces of the outer shell. Ensure that the zipper opens and closes smoothly.
- Sew the Lining:
- Similarly, arrange and sew the lining pieces together. Remember to leave an opening in one side for turning the case right side out later.
- Attach the remaining zippers to the lining in the same manner as the outer shell.
- Joining the Outer Shell and Lining:
- With the right sides together, insert the outer shell into the lining. Ensure the zippers are aligned.
- Sew around the perimeter, leaving the previously mentioned opening in the lining.
- Carefully turn the pencil case right side out through the opening. Iron flat and sew the opening closed.
- Finishing Touches:
- Close the zippers and align any remaining edges. Give your pencil case a final press with the iron to sharpen the edges and corners.
- Optionally, you can topstitch along the edges for added durability and a professional finish.
Video Tutorial
For a visual guide to complement this written tutorial, watch the DIY Triple Zipper Pencil Case | Large capacity stationery pouch Tutorial by sewingtimes on YouTube.
It pairs well with this written guide, offering an engaging way to follow along with each step.
Crafting a triple zipper pencil case is a fun way to customize your stationery and improve your sewing skills. Making one for school or as a gift is easy with these simple steps.
Customization Ideas for Your DIY Pencil Case
Making a DIY pencil case is not just about storing your stationery; it’s an opportunity to express your personality and style. Here are some fun and easy customization ideas that will make your pencil case truly one-of-a-kind:
- Choose Your Fabric : Start by selecting a fabric that speaks to you. Whether it’s a vibrant print, a soft denim, or even a repurposed old t-shirt, the fabric of your pencil case sets the tone for your creation.
- Add Some Color : Use fabric paints or markers to add your own designs. From simple polka dots to intricate mandalas, let your creativity flow onto the fabric.
- Iron-On Patches : Iron-on patches are a quick way to add flair. Choose from countless designs like your favorite bands, animals, or quotes, and iron them on for instant character.
- Embroidery : If you’re up for a bit of a challenge, try embroidering your initials or a small design. Embroidery adds a handmade touch that’s both personal and stylish.
- Zipper Charms : Attach charms or beads to your zipper for a fun detail that’s also functional. Every time you reach for a pen, you’ll have a little sparkle to brighten your day.
- Inside Pockets : Customize the inside of your pencil case with pockets sized for specific items. A small pocket for erasers or a loop for a ruler can add organization and practicality.
- Personalized Labels : Make a label with your name or a motivational quote. It’s a lovely reminder that this pencil case is uniquely yours.
The best part about DIY is making something that represents you. So, have fun, experiment, and make a pencil case that you’ll be proud to show off!
Troubleshooting Common Issues
When crafting your DIY pencil case, you might encounter a few hiccups along the way. Don’t worry; it’s all part of the creative process! Here are some common issues and how to solve them:
Problem: Fabric Fraying
- Solution : Before you start sewing, apply a small amount of clear nail polish or fabric glue along the edges of the cut fabric. This will seal the edges and prevent fraying.
Problem: Zipper Not Functioning Smoothly
- Solution : Rub a graphite pencil or a bar of soap along the teeth of the zipper. This acts as a lubricant and should help your zipper glide more easily.
Problem: Uneven Stitches
- Solution : Practice makes perfect. Try sewing on scrap fabric first. Remember to keep a consistent speed and guide the fabric gently through the machine.
Problem: Difficulty Turning the Case Inside Out
- Solution : Make sure the corners are not too tight. You can clip the corners diagonally before turning the case inside out to make smoother edges.
Problem: Pencil Case Lacks Structure
- Solution : Use interfacing or a thicker lining to give your pencil case more form. This will help it stand up on its own and protect your stationery.
Problem: Decorations Peeling Off
- Solution : If you’re using iron-on patches or stickers, make sure to apply enough heat according to the instructions. For painted designs, use a sealant spray to lock in your artwork.
By anticipating these issues and knowing how to address them, you’ll be well on your way to making a beautiful, functional pencil case. Remember, patience and persistence are key.
Upcycling Tips for Your DIY Pencil Case
Upcycling is a fantastic way to give old materials new life, especially when it comes to crafting your own pencil case. Here are some tips to help you make an eco-friendly case that’s both stylish and functional:
- Repurpose Old Clothing : Look through your wardrobe for any clothes that are no longer in use. A colorful shirt or an old pair of jeans can provide excellent fabric for your project.
- Reuse Packaging Materials : Cardboard from boxes or thick paper from shopping bags can be used to add structure to your pencil case. Cut them to size and sew them between layers of fabric.
- Old Books and Magazines : Use pages from outdated publications to make a collage on your pencil case. Coat with clear glue or decoupage medium to seal your design.
- Fabric Scraps : If you have leftover fabric from other projects, mix and match pieces to make a patchwork effect. This is a great way to use up small scraps that might otherwise be thrown away.
- Buttons and Beads : Decorate your pencil case with buttons and beads from old jewelry or clothing. They can add a unique touch and are easy to sew on.
- Ribbons and Laces : Ribbons from gift wrapping or laces from worn-out shoes can be repurposed as decorative elements or handles for your pencil case.
By incorporating these upcycling tips, you not only make a one-of-a-kind pencil case but also contribute to a more sustainable environment.
Maintenance and Care for Your DIY Pencil Case
Taking care of your DIY pencil case will ensure it stays clean, functional, and beautiful for a long time. Here’s how you can maintain your pencil case with ease:
- Regular Cleaning : Depending on the material, gently wipe your pencil case with a damp cloth to remove dust and stains. If it’s made of fabric, you can hand wash it with mild soap and water.
- Stain Removal : For ink or other tough stains, use a stain remover suitable for the case’s material. Apply it to the stain, let it sit for a few minutes, then wash as usual.
- Avoid Overloading : To maintain the shape of your pencil case, avoid stuffing it with too many items. This will prevent the seams from stretching or breaking.
- Zipper Care : Keep the zipper working smoothly by occasionally running a wax paper or a dry soap bar along its teeth. This will help prevent it from getting stuck.
- Storage : When not in use, store your pencil case in a dry place away from direct sunlight to prevent fading and material degradation.
- Repairs : If a seam comes undone or a button falls off, repair it promptly to prevent further damage. A small sewing kit can be handy for quick fixes.
By following these simple maintenance tips, your DIY pencil case will remain a trusty companion for all your creative endeavors.
FAQs About DIY Pencil Cases
Here are some common questions and answers to help you with your DIY pencil case project:
What materials do I need to make a pencil case?
You’ll need fabric, a zipper, thread, scissors, and a sewing machine or needle. Optional items include interfacing for structure and decorations like patches or beads.
Can I hand sew my pencil case if I don’t have a sewing machine?
Yes, you can! It might take longer, but hand sewing can be just as sturdy. Use a backstitch for strength.
How do I choose the right fabric?
Consider durability and how easy it is to clean. Cotton is a popular choice, but you can also use canvas, denim, or even leather.
What’s the best way to add a personal touch to my pencil case?
Personalize it with fabric paint, embroidery, iron-on patches, or by sewing on buttons and charms.
How do I install a zipper?
Pin the zipper in place between the fabric layers, then stitch along the edges using a zipper foot or carefully by hand.
My fabric is fraying, what can I do?
Apply a small amount of clear nail polish or fabric glue to the edges, or use a zigzag stitch to prevent further fraying.
How can I make my pencil case more eco-friendly?
Upcycle materials like old clothes or packaging, and choose natural or recycled fabrics.
How do I clean my pencil case?
If it’s fabric, turn it inside out and wash by hand with mild soap. Let it air dry.
The zipper is stuck, how can I fix it?
Rub a pencil tip or a bar of soap along the teeth of the zipper to help it slide smoothly.
Can I make a pencil case without a zipper?
Absolutely! Consider using buttons, snaps, or a fold-over flap with Velcro as alternatives.
How do I make sure my pencil case is the right size?
Measure your longest stationery item and add an inch or two for seam allowance and extra space.
By keeping these FAQs in mind, you’ll be well-equipped to tackle your DIY pencil case project with confidence.
Frequently Asked Questions About DIY Pencil Cases
Discover creative DIY pencil case ideas and pencil pouch designs in our collection of 25 projects. Make your own stylish pencil storage solutions today!
1. How to Sew Zipper Pencil Pouch

If you’re keen on organizing your stationery in style, Positively Splendid provides an easy-to-follow DIY Zipper Pencil Pouch sewing tutorial. Amy from Positively Splendid guides you through each step, from selecting fabric to adding a personal touch with a decorative charm. This sewing project is perfect for utilizing fabric scraps and adding a custom flair to your school or office supplies. With a clear layout and helpful instructions, crafting your own pencil pouch is made simple and enjoyable, ensuring a polished result that’s both functional and chic.
2. Homemade Flamingo Pencil Pouch

Ready to add a splash of creativity to your back-to-school essentials? Morena’s Corner offers a fantastic DIY tutorial on crafting a vibrant flamingo pencil pouch. Using DecoArt stencils and homemade fabric paint, this project allows for a personal touch on a practical item. Simply gather your fabric pouch, an array of colorful paints, and a fabric medium to ensure a soft and durable finish.
Follow the step-by-step guide to stencil a charming flamingo design, embellish with floral patterns, and make a gradient effect that’s sure to stand out. Perfect for keeping school supplies organized or even as a travel companion for important documents, this handmade pouch combines functionality with a burst of personality. Dive into this engaging craft and make a statement with your school gear!
3. DIY Felt Kitty Pencil Case for Kids

Get ready for back-to-school with a fun DIY project from Lia Griffith . Making personalized felt pencil pouches adds a touch of uniqueness to your child’s school supplies. With an easy-to-follow tutorial, these charming zippered pouches, available in designs like a cute kitty or a playful three-eyed monster, are perfect for keeping writing utensils organized.
To ensure durability throughout the school year, high-quality felt is recommended, and a sewing machine can be utilized for assembly. However, hand-sewing is also an option. Just download the provided PDF template, select your felt colors and a sturdy zipper, and you’re set to craft a delightful addition to your child’s school gear. Engage in this engaging craft activity that not only fosters creativity but also results in a practical item for daily use.
4. Make Your Own Pencil Pouch

Ready to add a touch of handmade to your school or office supplies? Alice and Lois offer a simple DIY pencil pouch tutorial that’s perfect for sewing novices and takes just 15 minutes to complete. With straightforward instructions, you’ll measure, cut, and attach fabric and interfacing, followed by sewing a zipper and finishing touches like a chic suede cord for the pull. Not only will you end up with a functional item crafted by your own hands, but you’ll also gain the satisfaction of making something unique. Dive into this engaging project and craft a custom pencil pouch that’s both stylish and useful.
5. Handmade Box Pencil Case

Looking to keep your essential items neatly stored and within easy reach? Gathered Threads offers a fantastic DIY guide on crafting a box pencil case that can double as a compact oil bag or makeup pouch for daily use. Janice shares a clear, step-by-step process for making a stylish and functional purse using two contrasting fabrics and a zip.
With simple sewing techniques, a splash of creativity, and basic crafting tools, you can produce a personalized case that’s perfect for school supplies or organizing those ‘on the go’ oils. The instructions are easy to follow, making it a rewarding project for anyone with an interest in sewing. Get your materials ready and enjoy making a practical accessory that adds a touch of handmade charm to your everyday essentials.
6. How to Make a Pencil Pouch

Get ready to craft a charming pencil case with the pattern provided by Crazy Little Projects ! Perfect for tucking away school supplies, this sewing project is ideal for all ages and skill levels. The instructions are clear, offering an easy-to-follow guide that includes adding a zipper, which is often considered a tricky step in sewing.
With the option to choose from a variety of fun fabrics, this pencil case can be personalized for both boys and girls. This pattern not only offers a practical storage solution but also a chance to make something special with your own hands. Enjoy making this cute accessory that’s sure to be a hit with the kids!
7. DIY Embroidered Unicorn Pencil Case

Add a touch of magic to your school supplies with Mad in Crafts ‘ embroidered unicorn pencil pouch guide. Using the Bucilla Fashion Embroidery kit, you can make a whimsical and unique accessory that’s sure to stand out. Start by tracing the adorable unicorn and “I’m magical” designs onto your pouch with a water-soluble pen. The kit provides various stitch instructions, allowing you to practice and perfect your embroidery skills.
The back stitch and fishbone stitch come in handy for this craft. Though it may take an afternoon to complete, the result is a charming and personalized pencil pouch that brings a sprinkle of enchantment to your daily routine. With helpful instructions and all the necessary materials included, your crafting experience will be as enjoyable as it is rewarding.
8. Make a Geometric Zipper Pencil Case

If you’re captivated by the bold and vibrant essence of the Memphis design movement from the 80s and 90s, the Easy Memphis Design Zippered Pouch DIY from Fox + Hazel is a creative project you’ll adore. This step-by-step guide empowers you to transform a plain white canvas pouch into a geometric masterpiece with just a few supplies, such as DecoArt SoSoft fabric paints and basic painting tools.
Not only does the tutorial offer practical tips for achieving crisp, clean lines, but it also encourages you to inject your personality into your creation with unique squiggles and patterns. Perfect for housing art supplies or serving as a quirky makeup bag, this DIY zippered pouch is both a fun crafting experience and a stylish accessory. Dive into this instructive and engaging guide and bring a touch of retro flair to your accessories collection.
9. How to Make Stamped Pencil Cases

Looking to add a personalized touch to your stationery essentials? Almost Makes Perfect offers an engaging tutorial on making your own stamped pencil pouches, a craft that’s not only fun but functional throughout the entire year. The DIY guide is clear and simple, requiring just a few materials such as blank canvas pouches, adhesive-backed craft foam, cork board, fabric paint, and a foam brush.
With an easy-to-follow process that includes doubling up the foam for thickness, cutting out custom shapes, and testing your stamp before applying it to the fabric, you’ll be able to make unique and versatile pouches that can serve as makeup bags or even clutches. Dive into crafting with this instructive guide that promises a satisfying and creative experience.
10. Make a Palm Leaf Pencil Pouch

Add a splash of tropical charm to your daily essentials with a DIY palm leaf pencil pouch. Persia Lou offers an engaging and helpful tutorial that guides you through the process of transforming a blank zipper pouch into a vibrant accessory perfect for holding school supplies or makeup.
You’ll learn how to make a stencil, apply multi-surface paint for a durable finish, and even add a handmade tassel for a unique touch. The instructions are clear, making it easy to follow along and achieve impressive results. Dive into this crafting adventure and give your items a personalized, summery twist!
11. Making a Pencil Pouch With Bow

Embrace your crafty side with a charming DIY pencil pouch featuring a stylish bow, perfect for organizing stationery or cosmetics. With back-to-school season upon us, this sewing project from See Kate Sew is both timely and fun, allowing you to personalize it with character fabrics or chic designs.
The tutorial simplifies the process, even including a zipper installation, making it accessible for sewers to make a handy and adorable accessory. Just gather your materials, including fabric, a zipper, and basic sewing tools, and follow the step-by-step instructions to construct your own unique pencil pouch. Keep your pencils and small items neatly tucked away in a handmade pouch that’s as functional as it is cute!
12. Back to School Pencil Case With Lining

Get ready for school by engaging in a fun, crafty activity with your kids! At The DIY Dreamer , discover a step-by-step tutorial on how to sew a personalized pencil case with a lining. Ideal for injecting excitement into the back-to-school preparations, this project allows you and your children to make something functional and stylish. Learn how to select fabric, sew in a zipper, and add those finishing touches for a homemade pencil case that stands out.
This guide is perfect for spending quality time together while fostering your child’s creativity and sewing skills. Plus, find out how to use Mabel’s Labels for a personalized touch on all school supplies, ensuring your kids’ items are easily identifiable and less likely to get lost. With detailed instructions and helpful tips, making a DIY pencil case can be a rewarding experience that adds a personal flair to your child’s school gear.
13. How to Sew Unicorn Pencil Pouch

Get ready to add a sprinkle of magic to your crafting repertoire with the “Unicorns Are Awesome” pencil pouch sewing project from Hello Creative Family . Ideal for keeping your writing tools or small essentials organized, this enchanting DIY guide provides a step-by-step tutorial complete with photos, ensuring your sewing journey is as smooth as possible.
By incorporating a pretty fabric lining, this pouch doesn’t just promise utility but also a delightful surprise each time you unzip it. Tailor it to your taste with a selection of glitter iron-ons and discover how the Cricut Maker and Easy Press can elevate your crafting experience, offering precision and ease. Sew this charming accessory for yourself or gift it to someone special, and revel in the joy of crafting something unique and functional.
14. Sew a Pencil Pouch for Back to School

Making a unique pencil pouch for school or work is a fun and practical project that adds a personal touch to your stationery essentials. The Polka Dot Chair offers a straightforward DIY pencil pouch pattern, perfect for those keen on sewing their own accessories. With easy-to-follow instructions and a simple list of supplies including fabric, a zipper, and a zipper foot, this tutorial guides you through the process of making a stylish and functional pencil case.
Customizing your pencil pouch is a breeze; pick your favorite fabric to craft an item that truly reflects your personality. The resulting boxy, rounded pencil pouch not only keeps your writing tools organized but also showcases your crafting skills. Follow these steps to make a handy pouch that’s as unique as it is useful.
15. Easy DIY Photo Pencil Pouch

For those who adore personalized items and crafting, Old Salt Farm presents an engaging and helpful guide to making your own photo pencil pouch. This DIY project combines practicality with a touch of sentimentality, perfect for gifting or personal use. Using Adobe Photoshop Elements 15, you can apply an eye-catching Effects Collage to your favorite photos, giving them a unique, filtered look before transferring them onto a canvas pouch.
The process is straightforward, requiring a simple iron-on technique that ensures your images are vividly showcased on the fabric. Remember to mirror your image if necessary, to ensure it appears correctly on the pouch. Dive into this creative endeavor, and in under 30 minutes, you’ll have a charming and functional pencil pouch that proudly displays your cherished memories.
16. Scalloped Pencil Pouch for Back to School

Craft your own stylish clear scalloped pencil pouch with ease using this tutorial from Sarah Hearts . Holly Wade guides you through the simple sewing process, helping you make a personalized accessory perfect for organizing pencils, art supplies, or even makeup. This project requires medium-weight clear vinyl, a fashion zipper, and basic sewing essentials.
With a scalloped paint detail added for charm, you’ll have a unique pouch ready in under 30 minutes. Remember to switch to a plastic foot or use tape on your sewing machine to prevent the vinyl from sticking, ensuring a smooth sewing experience. This DIY is a practical and fun way to keep your essentials in one place, adding a touch of personality to your everyday carry items.
17. Pretty DIY Watercolor Floral Pencil Pouch

Make a unique and personalized watercolor floral pencil pouch with this engaging DIY guide from Oh So Beautiful Paper . Perfect for organizing school supplies or even as a charming makeup case, this project is a delightful way to add a splash of color to your everyday essentials. The instructions are simple and clear, making it an ideal craft for a cozy afternoon. Get ready to elevate your accessory game with just a few supplies: a printable pattern, a blank zipper pouch, iron-on transfer sheets, scissors, and an iron. Embrace your artistic side and enjoy crafting a piece that’s both functional and stylish.
18. How to Make a Zipper Pencil Case

Make a personalized zipper pencil case with ease by following the step-by-step tutorial provided by Cassie May on Little Red Window . This DIY project is perfect for organizing drawing tools and can be tailored with your favorite fabrics. The instructions are clear, complete with photos to guide you through each stage the process.
With materials such as fabric, a zipper, and batting, you’ll be able to craft a durable and charming pencil case that reflects your style. Ideal for artists, students, or anyone in need of a neat storage solution, this guide simplifies the task, making it accessible and enjoyable. Get ready to sew a custom accessory that’s both functional and stylish.
19. Duck Tape Pennant Pencil Pouch

Make your very own Duck Tape pennant pencil pouch with Persia Lou ‘s easy-to-follow guide! Ideal for students and craft enthusiasts, this project infuses personal style into everyday school supplies. With a variety of vibrant Duck Tape colors and patterns to choose from, you can design a pouch that’s uniquely yours.
You’ll need only a few basic tools and materials, such as Duck Tape, a cutting mat, a craft knife, and adhesive hook and loop closures. This DIY is perfect for organizing pencils and adds a fun, creative touch to your stationery collection. Learn how to cut, assemble, and customize your pencil pouch for a durable and charming addition to your school gear.
20. Kiddo Personalized Pencil Case Using Paint

Make a charming Kiddo Personalized Pencil Case with Delineate Your Dwelling ‘s easy-to-follow guide. Gather your child’s favorite colors in acrylic paint, canvas bags, die-cut letters or stickers, Elmer’s Glue, and plenty of glitter for a fun crafting session. This engaging activity not only allows your little one to express their creativity but also results in a unique and practical item for school.
Step by step, learn how to transform a simple canvas bag into a vibrant and sparkling accessory that will make your child’s school supplies stand out. Keep some Wet Ones handy for easy cleanup after your artistic adventure. With a personalized touch, your kiddo’s pencil case will be a treasure they’re proud to show off.
21. Pencil Pouch From Cardboard Tubes

Transform empty toilet paper rolls into a stylish, compact pencil case with a DIY project from Moms & Crafters . This clever craft repurposes common household waste into a functional item for storing writing utensils. The tutorial is easy to follow, requiring only a few materials like duct tape, a craft knife, scissors, a zipper, and some glue.
Perfect for artists, students, or anyone who likes to keep their stationery organized, this pencil pouch is not only eco-friendly but also has a polished look with a washable surface. Learn how to make your own pencil case with this engaging and helpful guide, and carry your favorite pens and pencils in a unique, handmade accessory.
22. How to Make Your Own Pencil Case

Get ready for the new school year in Australia by making a charming, homemade pencil case with a tutorial from A Spoonful of Sugar . Ideal for using up fabric scraps, this easy-to-follow guide will help you craft a zippered patchwork pencil case that’s not only functional but also a stylish addition to your school supplies.
Measuring 3 1/2 x 6 3/4 inches, the pencil case is the perfect size for holding pens, a small notebook, or other essentials. The instructive guide provides a list of materials, precise cutting and sewing directions, and helpful photographs to ensure your project is successful. Engage in this enjoyable crafting activity and make something practical and personalized for the school year ahead.
23. DIY Stenciled Pencil Pouch at Home

Discover a charming way to organize and transport your coloring essentials with the stenciled pencil pouch DIY guide from All Things Target . In this instructive post, Analisa shares a simple and creative craft that transforms a plain canvas makeup bag into a personalized accessory for your colored pencils.
Utilizing adhesive letters and fabric paint, the technique involves reverse stenciling to achieve a unique, handcrafted look. Ideal for art enthusiasts and crafters, this project is not only engaging but also offers a practical solution to keep your coloring tools in order. The step-by-step instructions are easy to understand, ensuring a helpful and enjoyable crafting experience.
24. Felt Pencil Pouch With Details Instructions

Get ready to add a personal touch to your school essentials with a DIY Felt Pencil Pouch. Craft Box Girls provides an easy-to-follow tutorial for making a custom pencil pouch, perfect for students and stationery lovers. This craft project requires no sewing skills, making it accessible to crafters of all levels.
Using simple materials like felt, scissors, Velcro, and a hot glue gun, you’ll be able to fashion a functional and stylish pencil case. Not only is this a practical item for keeping your writing tools organized, but it also allows you to express your creativity and stand out from the crowd. Follow these steps and fill your pouch with your favorite school supplies for a fun and unique back-to-school accessory.
25. How to Do You Make a Pencil Case

Discover a straightforward and enjoyable way to craft your own pencil case with our engaging tutorial. If the hassle of zippers and buttons has you searching for a simpler solution, look no further. Our guide utilizes two strips of tape measure to make a snap-shut design that’s perfect for students or anyone on the go. Say goodbye to the frustration of digging through a backpack for writing tools – these handmade pencil cases open and close quickly and quietly.
They make for thoughtful, personalized gifts and are fantastic project ideas for the holiday season. Dive into the process with us, and delight in the satisfaction of making a practical, stylish accessory. Join us on the Therm o Web blog for step-by-step instructions to make your crafting experience a breeze. A Bright Corner
Related DIY Projects and Ideas
Back to School Projects: From science experiments to fun art projects, these cool DIY back to school projects will surely make your elementary schoolers happy.
Chore Chart Ideas for Kids: If your little one is determined to do their chores by themselves, then have no fear! This list of simple DIY chore charts is full of ideas for making chore time fun and educational.
Mouse Pad Ideas: Try these easy DIY mouse pad ideas and make a unique gift for your friends and family. These mouse pads are perfect for kids, adults, and anyone who loves to be creative.
Crafts to Do When Bored: These fun crafts to do when bored include a variety of activities, including making paper flower crafts, origami, and constructing a paper hat.
Mason Jar Gifts in a Jar: Looking for the perfect homemade gift idea? These lovely DIY mason jar gifts in a jar will save you time and effort on a day to day basis.
Perler Bead Patterns: Make your own jewelry with these free perler bead patterns . Find out how you can make a creative craft, or use them as inspiration for your own designs.
Earbud Holder Ideas: Learn how to make earbud holder with these clever DIY earbud holder ideas that are a great way to keep your earbuds clean and in good condition.
Conclusion:
Wrapping up, our guide on 25 DIY pencil case ideas and pencil pouch designs has equipped you with all the necessary steps, materials, and tips to craft your very own unique storage solution. From choosing the right fabric to troubleshooting common issues, we’ve covered essential aspects to help you make a pencil case that’s not only functional but also reflects your personal style. Remember, adding customization to your DIY pencil case can elevate its appeal and make your crafting journey even more rewarding. So, grab your materials and let your creativity lead the way in bringing these ideas to life.
Related DIY Ideas to Try:

Easy Pencil Case DIY
- Feb 10, 2024
Make your own personal Pencil Case DIY by following along with these easy step by step instructions and video tutorial! All you need is felt and glue. No sewing!
This Pencil Case DIY, a Felt Craft Tutorial , has bright colors and a summer theme just like these Felt Strawberry Coasters . This Back to School Craft is easy to personalize, requires no sewing and looks so whimsical and cute!

disclaimer: Affiliate links have been used. This means that if you make a purchase I might earn a small commission at no extra charge to you.
Pencil Case DIY Video Tutorial!
On my Youtube Channel, you can follow along the step by step tutorial to make a Pencil Case DIY of your own. Click the video box below or watch here –> https://youtu.be/66w23o_bUs4
Subscribe to my YouTube Channel
How do you make a no sew pencil case?
Today’s Pencil Case DIY is super simple because we are not sewing! Thats right- no sewing machine or hand sewing. Instead I’m glueing all the felt with hot glue to make this quick.
There are no zippers to figure out either- instead we’ll make an easy flap that closes securely!
DIY pencil case no zipper Step by step:
This project was inspired by something I saw in a magazine a long time ago. It looked so simple that I had to try making my own!
Cut out the Pattern Pieces:
To make this Pencil Case, you will need some felt , scissors, hot glue , and a square ruler
First, cut out the pattern pieces: Back (12 by 3.5 inches), Front (8.5 by 3.5 inches) and Strap (0.5 by 8 inches). You will need two of each piece, one for the outside and one for the inside. I am using a Pink felt for the outside and a Yellow felt for the inside.
Next, apply hot glue to adhere both the Front pieces together. Similarly, apply hot glue to adhere both of the Back pieces together as seen below. This just creates a sturdier reinforced piece of felt that will make our Pencil Case DIY last longer.

You should now have just two pieces, a longer Back piece and a shorter Front piece as seen below.

Glue them together.
Now glue the Front and Back pieces together to create a pocket. First apply a little glue to the bottom edge and just a bit of both sides of the inside of the Front piece. (image 3). Then quickly place the Back piece on top (with the inside facing down) align the bottom edge and press down firmly (image 4). Next, apply more hot glue along the sides of the Front piece (image 5) and press down firmly to create a pocket (image 6)

Attach the strap.
Close the Back onto the Front of the pencil case and place strap in position (image 8). Carefully flip over, and apply hot glue to the back of the strap on either side, fold and press into place. And voila, the flap now fits under the strap and will be securely held in place.

Finish it off with some cute embellishments!
The beauty of this Pencil Case DIY is that you can make it in any color you want and embellish it on top with anything of your choice! The possibilities are endless.

pencil case DIY no sewing no zipper no hot glue
If you want to avoid using hot glue, no worries, I have you covered! I show you how with a felt glue project here –> How to get felt to stick together! The best glue that works
- Laura from Me and My INKlings has created a set of hand drawn and water colored Back-to-School Lunchbox Notes that are available to download for FREE!
- Shani from Sunshine and Munchkins is sharing the CUTEST Back-to-School Pencil Wreath created from yarn. Fun for the classroom door!
- Download and print a set of Lunchbox Notes to inspire the kiddos during back-to-school time. Head over to Laura’s blog Laura’s Crafty Life to get the Free Printable.
- Justine from Little Dove has created the cutest DIY Apple Garland from book paper. What a cute way to decorate the classroom for back-to-school.
- Make a fun Friendship Bracelet Style Bookmark for your bestie with this step-by-step tutorial from Erica of 5 Little Monsters .
- Kelsey of Poofy Cheeks is sharing a fun DIY Pencil Sign with the FREE SVG Cut File . The perfect back-to-school teacher gift.
- Make sure to keep all the kids school supplies organized with Personalized Notebooks . Get the editable sublimation files from Katie over on the Crafty Blog Stalker .
- Chelly from We Can Make That is sharing the cutest SVG Cut File to create a Home Sweet Classroom Clipboard for that special teacher.
- Create a fabulous back-to-school gift for your new teachers with Lindsay’s Resin Pencil Keychain tutorial over on her blog Artsy Fartsy Mama . Makes the perfect backpack charm too!
- Beth from Creatively Beth is channeling her inner Dad Jokes with a set of Punny Lunch Notes to keep the kiddos in stitches.
- Hydration is super important, so do it in style with Personalized Water Bottles . Marissa of Rae Gunn Ramblings has the full tutorial on her blog.

More Felt Tutorials:
- How To Make Felt Coasters
- How to Make Felt Trays
- Donut Notebook Cover
- How to Make a Unicorn Book Cover
- Even More Felt Tutorials For You To Try!
Conclusion:
I love notebooks and pens, Back to School Season is my favorite season of all! Making this easy Felt Pencil Case DIY was a fun project that made me super happy. The steps are pretty easy and anybody can make one!
You can also add some fun embellishments to make your pencil case more unique. Try adding a zipper pocket, a magnetic closure, or even a button.

Thank you for stopping by today friend. Follow me on social media to see my latest posts!
Tag @smithakatti #smithakatti on social media!
YOU MIGHT ALSO LIKE

How To Make A Flower Wreath With Paper

12 Notebook Cover Ideas: How To Make Your Book Special

20+ Easy DIY Bookmark Ideas To Make At Home!

How To Use The Cricut EasyPress Mini For Best Results
One comment.
Adorable pencil case
Leave a Comment Cancel reply
Grab a copy of our FREE Handbag eBook!

F REE HANDBAG EBOOK! Get your copy! >
How to Make a Beginner Pencil Case

I love pens and pencils and by extension pencil cases. I found this terrific pattern on Sewing Times on YouTube and had to share it with you. This beginner pencil case is just too cute not to make. It is a fun and functional beginner sewing project that anyone with basic sewing skills can make in no time at all. I love the red and white stripes used in this project. It is so fun. Of course you could sue any colors you like but I found these colors particularly fun and bold.
What you will Need: How to Make a Beginner Pencil Case
- Pattern you can get by clicking on this link
- 1/4 yd exterior fabric and lining fabric — I used red and white stripe and red and white polka dot
- Contrasting scrap of fabric for top of case — I used white
- Coordinating scrap of fabric for snaps — I used red
- 2 Kam Snaps — I used white
- 1/4 yd fusible fleece like TP971F
- Standard Sewing Supplies

Step 1: Cut Your Fabrics
Using the pattern piece cut the fusible fleece. Cut one piece each of the outer fabric and lining fabric that measure 10 3/8″ x 9 3/8″. Cut two contrasting pieces that measure 8 3/4″ x 3 1/8″ and finally measure tow coordinating fabric pieces that measure 1 3/4″ x 4″. Measure another piece of fleece 8″ x 2 3/8″.
Step 2: Fuse the Fleece
Fuse the fleece to the wrong side of the outer fabric piece so that it is centered following the manufacturer’s instructions. Round the corners of the 8″ x 2 3/8″ piece of fleece and fuse it to the wrong side of one of the contrasting pieces.

Step 3: Cut the outer and lining pieces
Place the outer piece on top of the lining piece right sides together. Trim the pieces around the fleece allowing for a 3/8″ seam allowance as shown.

Step 4: create the top
Place the two contrasting pieces right sides together. Stitch along the edge of the fleece. Trim the fabric to match the rounded corners. Notch the corners. Turn right sides out and press. Top stitch around the sides and bottom.

Step 5: Create the straps
Take the coordinating fabric pieces. Fold them in half lengthwise and stitch using a 1/4″ seam allowance. Press the seam open so that it is in the center of the strip. On the bottom of each strip mark a curve and stitch using a 1/4″ seam allowance. Slightly trim the curve. Turn right sides out. Press.

Step 6: Add the Straps
Find the center of the top you just made. Measure 3 3/8″ on each side of the center and mark. Place the straps on these marks, Stitch them to the top down both sides and along the bottom. **** Sewing Tip: Because these are contrasting fabrics use a different color in the bobbin then on the top of your machine. In my case I used red on top and white in the bobbin so that the red would not show up on the other side of my top. ***** Add one half of the Kam Snap at the bottom of each of the strips. If you are not sure how to insert the Kam Snaps check out this video.

Step 7: Add the top to the Body and create the body
Find the center of the outer fabric piece and the center of the top and mark them. Place the top right sides together with the top of the outer bag and clip. Stitch using a 1/4″ seam allowance. Fold the bottom of the outer bag to meet the top so that the body is right sides together. Stitch along both sides using a 3/8″ seam allowance. Repeat for the lining piece as well.

Step 8: Box the Corners
You will notice that there is a hole in bottom of the outer bag and the lining bag. To box the corners pinch the bottom with the sides and clip. Repeat for both outer corner and both lining corners. Stitch along the corners using a 3/8″ seam allowance. Trim the seam allowance.

Step 9: Finish the Beginner Pencil Case
Turn the outer bag right sides out. Place it inside the lining bag so that they are right sides together and the top is inside the bag. Match the seams. Stitch around the top of the bag leaving an opening at the front of the bag for turning. Turn the bag right sides out through the opening. Push the lining into the bag and press. Top stitch all the way around the pencil case making sure that you do not catch the top but you close the opening in the front. Add the other half of the Kam Snaps. The best way to do this is by folding the top down and marking where the first snaps land. Once you have inserted the snaps you have finished your Beginner pencil case.

I hope you enjoyed this project. If you would like more sewing and crafting projects sign up for our newsletter and receive your free eBook of 15 handbag patterns and tutorials taken from the blog
If you would like video tutorials of some of sew very crafty’s most popular posts subscribe to our free youtube channel here. .

SIGN UP TO RECEIVE THE LATEST FROM SEW VERY CRAFTY !
We don’t spam! Read our privacy policy for more info.
Check your inbox or spam folder to confirm your subscription.
Share this:
- Click to share on Facebook (Opens in new window)
- Click to share on Pinterest (Opens in new window)
- Click to share on Twitter (Opens in new window)
- Click to email a link to a friend (Opens in new window)
- Click to print (Opens in new window)

Hi, Welcome to Sew Very Crafty a place for beginner and intermediate sewists and crafters to learn and create. Here at SVC we create simple and fun projects that anyone with basic to intermediate skills can create and grow with. My name is Diana and I am a lifelong learner, sewing enthusiast, parent, spouse, lawyer, and die hard St. Louis Cardinals fan. I live in California with my husband. I love God and my country but am proud of my Irish heritage. I enjoy sharing my creativity and the things that I love with others.
Similar Posts

How to Make a Quilted Sewing Machine Cover

Boxy Zippered Pouch

How to Make a Tie-Up Fabric Basket

How to Make a Patchwork Fabric Ornament

How to Make a Basic Zipper Pouch

DIY Appliqued Bath Towels
Looking forward to reading your thoughts on this project cancel reply.
This site uses Akismet to reduce spam. Learn how your comment data is processed .
Privacy Overview
Select your language
Follow bernina on, bernina newsletter, bernina links.
- BERNINA.com
- Store locator
Share this page on

Creative articles about sewing
How to make a fabric pencil case.
Hi there! Today I want to share with you how you can easily make a fabric pencil case for your kids using felted fabric.
It’s also a really great way to repurpose old woolen fabric scraps.

Materials and equipment:
- Sewing machine (I use a Bernina 475 QE)
- Two pieces of felted fabric 29 cm by 21 cm
- Elastic 28 cm long and 2 cm wide
- Two pieces of thin cord 25 cm long each
- Sewing thread
Grab all your materials and choose the colors of your fabrics. This pencil case is for my daughter and she likes bright colors, so I have chosen a bright pink elastic and a contrasting blue base fabric.
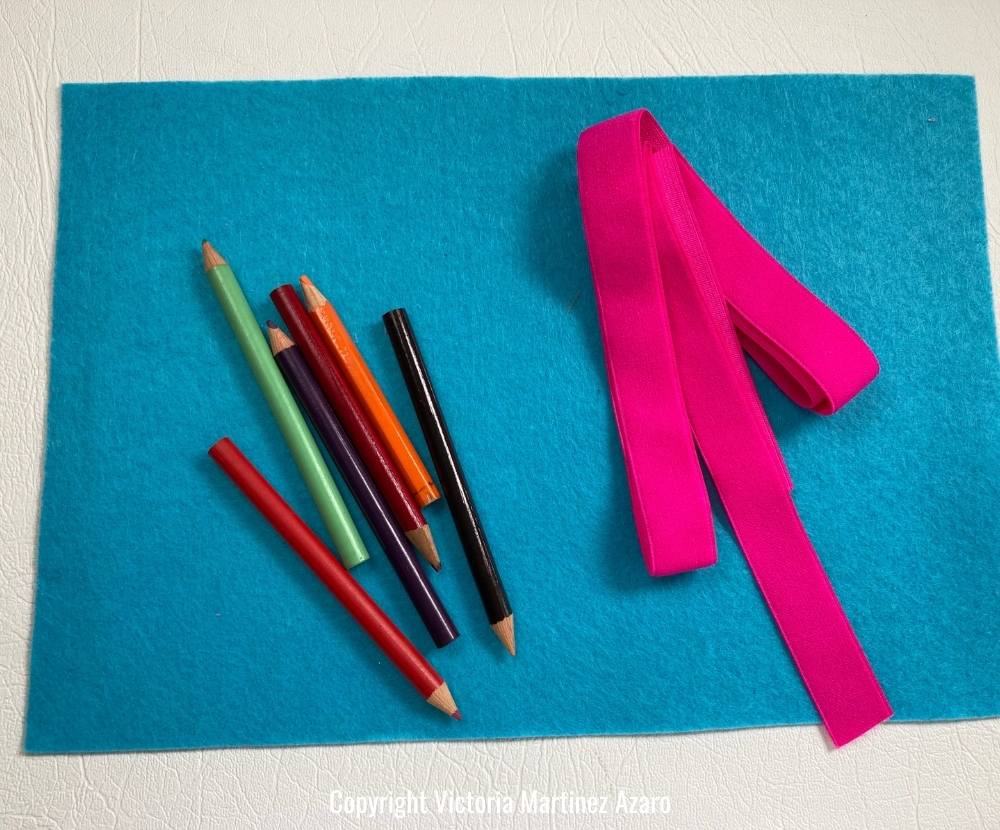
Place the fabric on your working surface. Place the elastic on the middle section of the fabric.
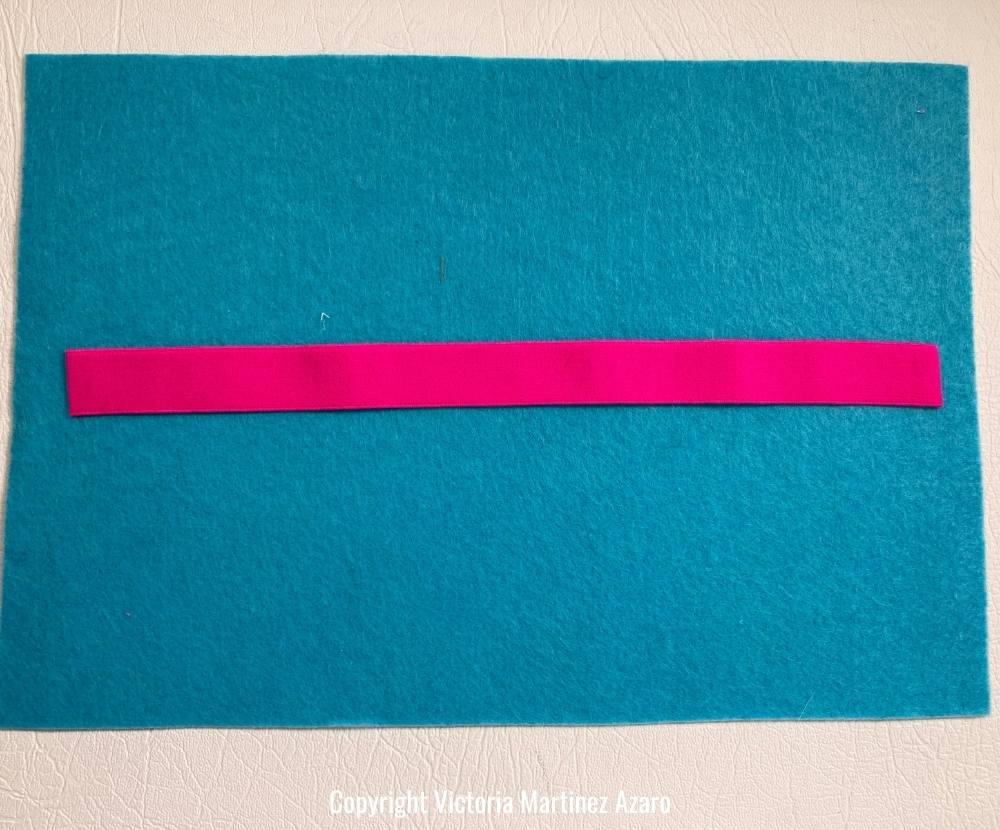
Pin it in place to secure it to the base fabric.
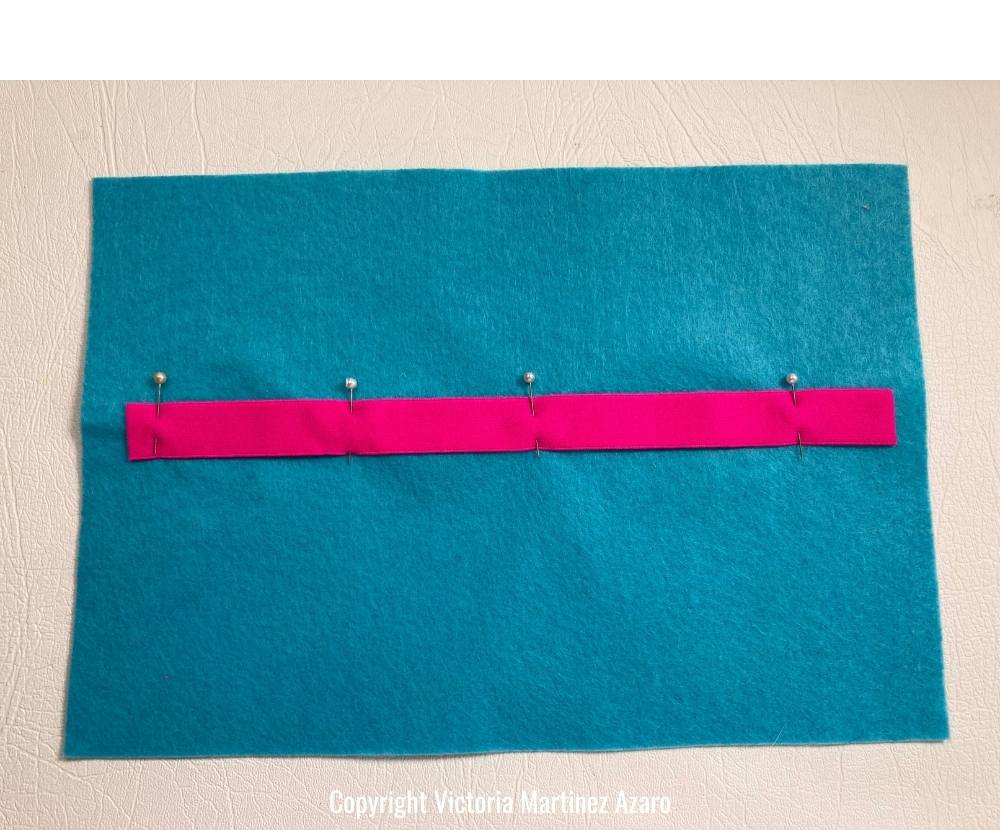
Think about how many pencils or pens you want to insert in the pencil case.
Also consider sewing spaces for a pair of scissors, a glue stick or a rubber.
Sew the divisions in place by running your sewing machine through the elastic as shown in photo below.
Once you finish sewing the divisions place your items through the elastic divisions to make sure that everything fits nicely.
Place the fabric with the elastic on top of the other piece of felted fabric.

Pin in place.
Place one of the cords in between the 2 layers of fabric.
The cord needs to be placed on the same line as the elastic.
Sew around the edges with a decorative stitch to add some embellishment.
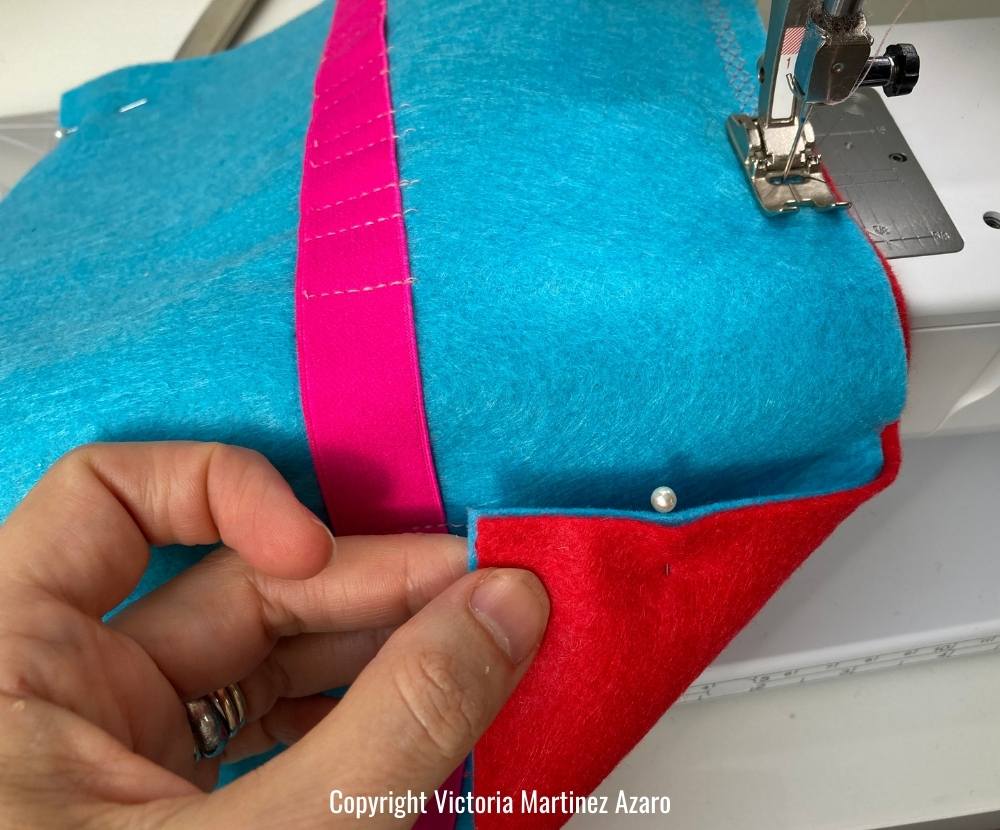
Once you have sewn all around the case, you need to sew the second piece of cord to the outside of the case.
To calculate where to sew it I like to roll the case and close it and mark the exact position where the cord should be sewn.
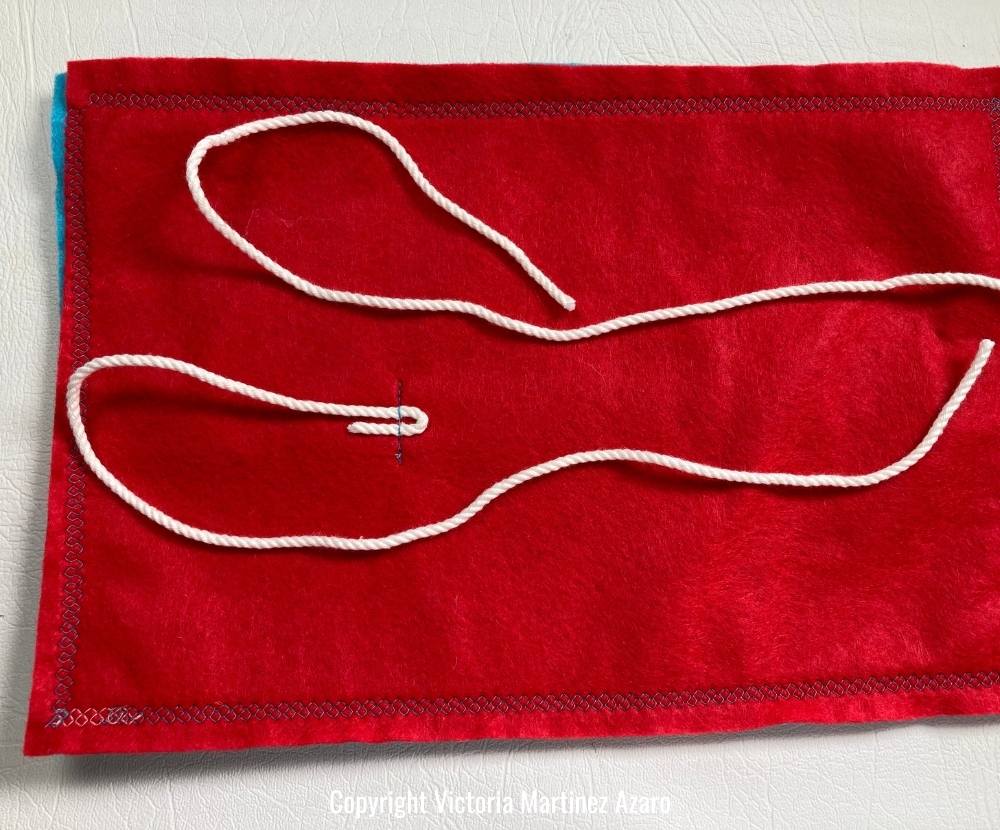
Sew through the layers so that the seam coincides with one of the seams on the elastic tape. This will avoid having a random seam on the pencil case side.
This is the pencil case completed and closed.
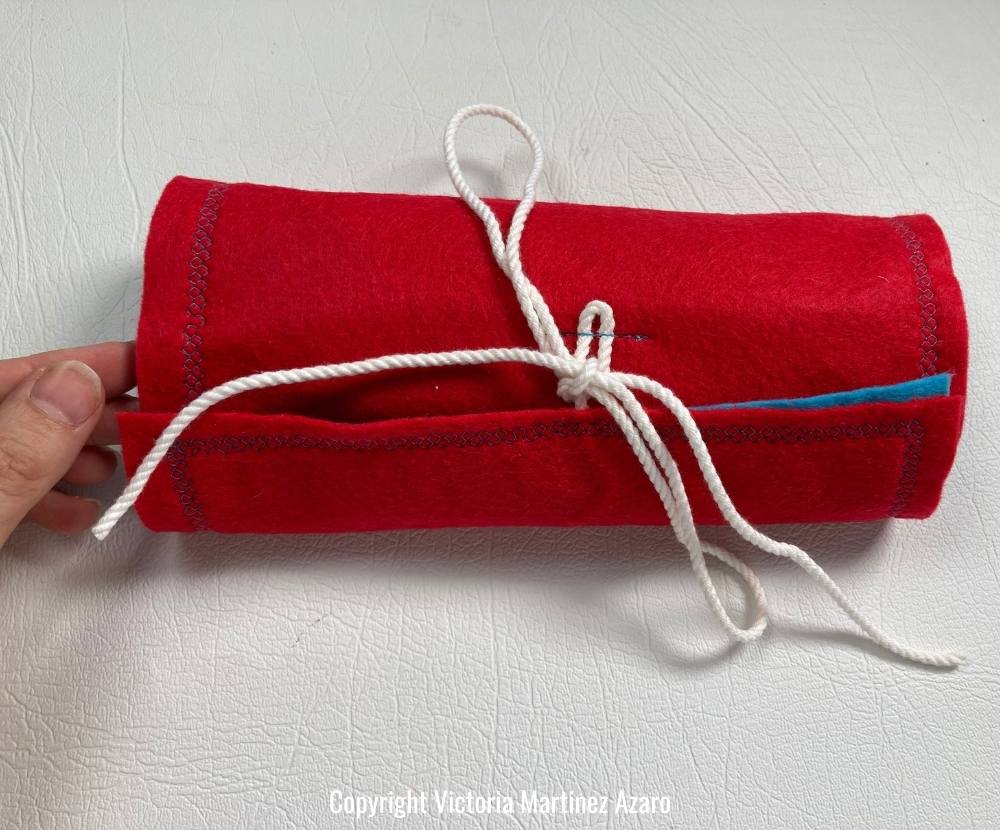
I made a book strap to go with it. Check out the tutorial for the book strap here.
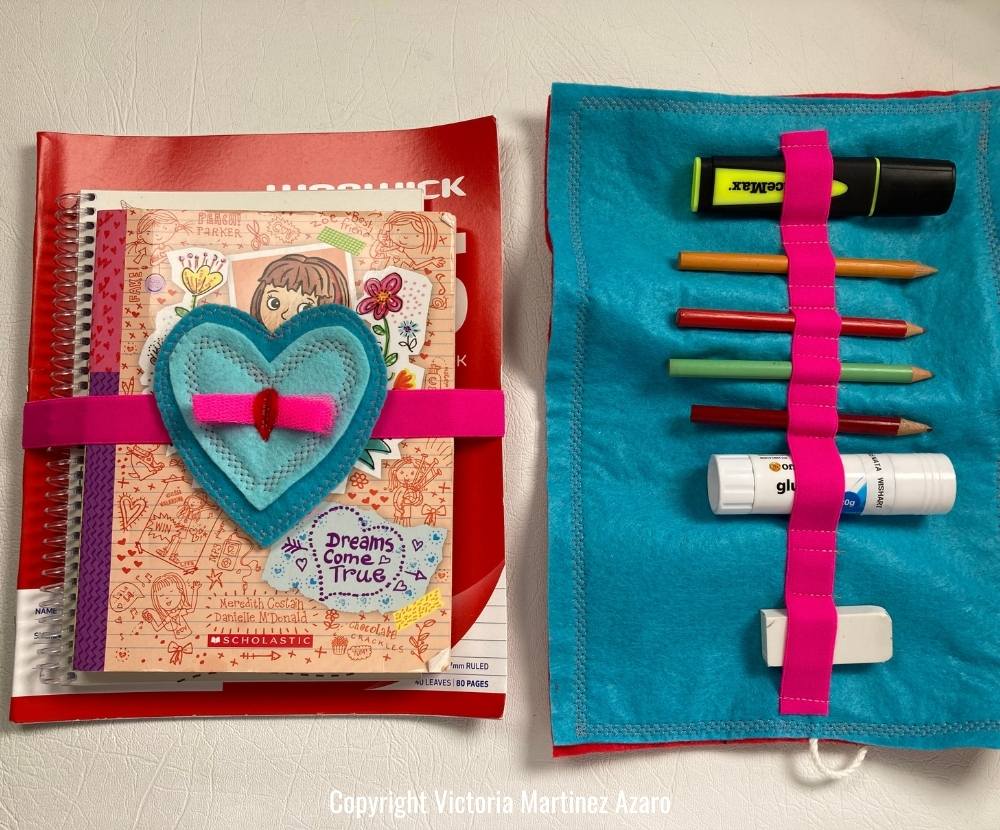
Related content you may be interested in
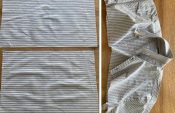
How to repurpose a man’s shirt
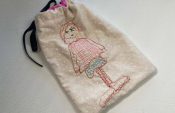
How to sew a gift bag

How to upcycle fabric scraps into beautiful fabric collages

How to upcycle fabric scraps into a quilt block
Comments of this post, 0 responses, leave a reply cancel reply.
Your email address will not be published.
Required fields are marked *
First Name *
Last Name *
Save my name, email, and website in this browser for the next time I comment.
I understand that BERNINA will process my comments as well as my first and last name for publication and direct marketing purposes and link these to information collected by BERNINA for direct marketing purposes or information derived from the comments (such as captions, tags). I can view additional information in the Data Privacy Statement . I can revoke my consent to the promotional use of my data at any time and at no cost. *
I understand that my inquiries may be answered by email.
Dear BERNINA Blog readers,
if you want to publish pictures via the comment function, please log in to the blog first. Click here to sign in.
You haven't registered for the BERNINA blog yet? Click here to create your free account.
Thank you very much
Your BERNINA Blog Team
- Competitions
- Newsletters
- Our Insiders
- How to knit
- The Knitter
- Simply Knitting
- How to crochet
- Simply Crochet
- Product Reviews
- Simply Sewing
- How to quilt
- Quilting templates
- Love Patchwork & Quilting
- Today's Quilter
- Calligraphy
- Printmaking
- Kid's crafts
- How to cross stitch
- Animal cross stitch patterns
- Christmas cross stitch patterns
- World of Cross Stitching
- How to embroider
- Free embroidery patterns
- Love Embroidery
- How to make cards
- Card making downloads
- Patterned papers
- Scrapbooking
- Home repairs
- Interior decor
- Outdoor decor
- Magazine Offers
How to make a pencil case
Get that back-to-school feeling by stitching your own pencil case! This simple sewing project is easy enough for beginners to make
Jessica Entwistle
This simple pencil case is an ideal gift for a child and can be made in an afternoon. Why not personalise it by adding an initial using these free templates?
Alternatively, you can change the fabric and pick more grown-up colours to make this pencil case for an adult, or try our other free pencil case sewing pattern that you'll find at the end of this tutorial.
Read on to learn how to make a pencil case with Jessica's handy guide.
If you're new to sewing, check out our how to use a sewing machine guide , beginners guide to sewing and sewing patterns for beginners .
Fabrics used
The fabrics used are from the Les Petits collection by Amy Sinibaldi .
- Main fabric: Petits Strokes, Coral.
- Contrast fabric: Petits Checks, Sky.
Use a 1cm ( 3 ⁄ 8 in) seam allowance.
You will need:
- Main fabric (24x24cm (9 1/2x9 1/2in))
- Contrasting fabric (64x64cm (26x26in))
- Iron-on interfacing (24x34cm: (10x14in))
- Zip (35cm (14in))
- Matching sewing kit
- Basic sewing kit
Cutting out
From the contrast fabric cut: Lining: 24x24cm (9 1 ⁄ 2 x9 1 ⁄ 2 in). Ends: four 10x10cm (4x4in).
Press interfacing onto the wrong side (WS) of the main fabric and two of the contrast fabric ends.
Draw a 9cm (3 5 ⁄ 8 in) diameter circle on paper and cut it out, then trace around it in the centre of each of four contrast fabric ends and cut out.
Making the main body
With the interfaced main body right side (RS) up, pin the zip centrally along the top edge with the teeth facing down.

Using a zip foot, sew into place. Press and then topstitch along the joined fabric edge close to the zip.
Wrap the main body to the other side. Sew on the zip and topstitch as before.

With the zip slider in the centre of the fabric, sew the zip teeth closed by backstitching over them and then cut off the excess zip.
Take the two interfaced ends and mark their quarter points. Mark the quarter points on the ends of the main body piece.
Place the ends and body pieces RS together, matching the markings, and pin.

Sew the ends into place and then clip the curves.
Adding the lining
Fold the lining in half RS facing and sew it together with a wide stitch length. Press the seam open.
Stitch the non interfaced circular ends in place as before.
Undo the long stitched seam and remove any loose threads.
Turn the lining RS out and place the pencil case outer inside it so they are WS facing.
Slip stitch the lining to the zip tape so your stitches can’t be seen from the front.

That’s your pencil case finished! Now that you know how to sew a pencil case, why not try this free pencil case sewing pattern.
Free pencil case sewing pattern

Raid your stash for a pretty fat quarter and sew up this handy zip case with neat box corners by Jennie Jones.
You will need
- 1 fat quarter
- Zip: 10in (25cm)
- Ribbon scrap
Sweet Notes from the Cotton Candy range by Susan Driscoll for Dashwood Studio.
Designer Jennie says: “For this handy box case, you’ll make the outer and the lining separately for a nice, neat, seam-free finish."

How to sew a pencil case
Step one: Cut the fat quarter into four pieces, each measuring 17x27cm (6 1 ⁄ 2 x101/2in). Two pieces are used for the pencil case outer and two pieces for the lining.
Inserting the zip
Step one: Place one piece of fabric right side (RS) up then place the zip centrally across the top length RS down, matching the raw long edge of the fabric to the edge of the zip tape.

[pullquote quote="Top tip: if you’re using a different lining fabric, make sure it is of a lighter weight than the outer." /]
Step two: Stitch the zip into place along this pinned edge using a zip foot.
Step three: Take another piece of fabric and repeat to pin and stitch the other side of the zip tape RS together to this fabric.
Sewing the side seams
Step one: Place the two fabric pieces with the zip attached RS together along the bottom long edge and stitch together. Press the joined fabric pieces flat, matching up the zip with the bottom seam.

Step two: Sew both short ends and over the zip ends in the centre. Turn RS out and press.

Making the box corners
Step one: Turn the pencil case wrong sides (WS) out and pinch one corner as shown so the seam runs up the centre to form a triangle.
Step two: Measure 3cm (1 1 ⁄ 4 in) up from the point of the triangle and sew right across the corner at this point to make a box corner.

Step three: Trim the excess fabric off outside the line of stitching.
Step four: Repeat this to make three more box corners on your pencil case.
Making the lining
Step one: The remaining two pieces of fabric are used to make the lining. Turn one long edge of one piece under by 1cm ( 3 ⁄ 8 in) to the WS and press. Repeat on one long edge of the other piece of fabric.
Step two: Place these two fabric pieces RS together along the bottom long edge and stitch together. Press flat, matching up the turned-under edges with the bottom seam.
Step three: Box the corners of the lining in the same way as the pencil case outer.
Joining it together
Step one: Pin the lining inside the outer with WS facing and topstitch together along the zip edge to hold the lining in place and neaten.

Step two: Loop a scrap of ribbon through the zip pull to finish.

Share this article

Designer and Maker

- Terms & Conditions
- Privacy policy
- Code of conduct
- Complaints escalation
- Manage preferences
- Skip to primary navigation
- Skip to main content
- Skip to primary sidebar
- Kids Crafts
- DIY Projects
- Woodworking
- Paper Crafts
- Coloring Pages
DIY Pencil Case: (25 Free Patterns and Ideas)
Making my own DIY pencil case was a fun project I started last weekend. I wanted something unique and personalized to keep my art supplies. So, I went online, found some free patterns and ideas, and picked one that caught my eye. It was simple, with clear instructions, perfect for someone like me who enjoys creating but isn’t an expert sewer.
The process was surprisingly straightforward and relaxing. I chose fabric designs that matched my personality, which added an extra layer of enjoyment. By the end of it, not only did I have a cool, customized pencil case, but I also felt proud of making something from scratch. It reminded me that with a little patience and the right resources, I can make useful and lovely items for my everyday use.

I’m here to help guide you through making your own DIY pencil case . These 25 free patterns and ideas I’ve found are a great place to start. They will help spark your creativity and show you how simple it is to makesomething both beautiful and functional. Let’s get started, and soon you’ll have a unique pencil case that’s all your own.
1. DIY Pencil Pouch in 15 Minute

Making a DIY pencil pouch in just 15 minutes is perfect for those last-minute school supply needs. It’s quick, easy, and you can personalize it with fabric choices, making studying a bit more fun.
2. Notebook Pencil Pouch Pattern

The notebook pencil pouch pattern seamlessly integrates with your notebooks, ensuring all your writing tools are at hand. Its clever design makes it a staple for organized students and professionals alike.
3. Cute Photo Pencil Pouch Tutorial

Dive into creativity with a cute photo pencil pouch tutorial . This project is fantastic for adding a personal touch to school supplies, allowing you to flaunt your favorite memories while staying organized.
4. Stand Up Slide Down Pencil Pouch

The stand-up slide-down pencil pouch not only stores your pens and pencils but also transforms into a stand, making tool selection during work or study effortlessly efficient and stylish.
5. No Sew Print Pencil Case

For those who prefer not to sew, the no-sew print pencil case is a brilliant solution. It relies on simple folding and adhesive techniques, showcasing your style through unique prints and patterns.
6. How to Sew A Round Pencil Case

Learning how to sew a round pencil case introduces you to crafting cylindrical storage solutions. It’s a chic option for those who love to add a touch of sophistication to their desk or bag.
7. DIY Zippered Pencil Case

Making a DIY zippered pencil case offers a secure and stylish way to organize your writing instruments. The zipper closure ensures your pens stay put, whether you’re at school or on the go.
8. Big Pencil Case Sewing Pattern

A big pencil case sewing pattern is perfect for artists or students who carry a wide range of tools. Its generous size ensures everything you need is easily accessible, promoting creativity and productivity.
9. DIY Roll Up Pencil Case

The DIY roll-up pencil case is not only practical but also compact. Rolling out to reveal your collection and rolling up for easy storage , it’s ideal for artists and students who appreciate functionality and style.
10. How to Make Zipper Pencil Pouch

Mastering how to make a zipper pencil pouch enables you to make a customized case that’s both functional and fashionable. The addition of a zipper ensures your pens and pencils are secure, wherever you go.
11. Small No Sew Pencil Pouch

A small no-sew pencil pouch can be a quick and delightful project, perfect for those who need a compact solution for carrying essentials. Its simplicity is its charm, suitable for every age and taste.
12. DIY Liquid Pencil Case

The DIY liquid pencil case is a unique and fun project that stands out. Filled with liquid glitter, it turns a simple storage solution into a mesmerizing accessory, sparking joy with every use.
13. Pencil Case Out of Toilet Rolls

Utilizing toilet rolls to craft a pencil case is not only inventive but also eco-friendly. This project breathes new life into everyday items, offering a sustainable and creative way to organize your pens.
14. Vinyl Pencil Pouch Tutorial

A vinyl pencil pouch tutorial lets you explore the durable and clear qualities of vinyl, making a case that’s both sturdy and allows you to see all your tools at a glance, perfect for quick access.
15. Upcycled Soda Bottle Pen and Pencil Case

Upcycling a soda bottle into a pen and pencil case is an ingenious way to repurpose plastic. It’s a creative and environmentally friendly solution for organizing your writing tools with a personal touch.
16. Simple Patchwork Pencil Case

A simple patchwork pencil case gives you a fantastic way to reuse fabric scraps while making something charming and distinctive. These cases are fabulous for organizing your stationery in a personalized manner, and the patchwork adds a cozy, handmade touch which is both practical and stylish.
17. DIY Leather Pencil Case

Making a DIY leather pencil case is an elegant way to keep your writing tools in order. Leather is durable and ages beautifully, offering a classic look that stands the test of time. This project is perfect for those who appreciate craftsmanship and the tactile feel of genuine leather.
18. Bedazzled Pencil Cases

Bedazzled pencil cases are all about adding that sparkle and personal flair to your school or office supplies. Using sequins, gems, or glitter, you can transform a simple case into a dazzling accessory. This is a fun way to express your individual style and make everyday items extraordinary.
19. Make Your Own Pencil Case

Making your own pencil case can be a rewarding project that lets you express your creativity. With endless possibilities in design, fabric, and shape, this is your chance to make something that perfectly fits your needs and showcases your personal style.
20. Felt Pencil Pouches for Girls

Felt pencil pouches for girls offer a soft, durable option for keeping stationery secure. Available in a variety of colors and often decorated with cute designs , they’re perfect for adding a touch of fun and personality to your school gear.
21. Fluffy Pencil Case for Kids

A fluffy pencil case for kids isn’t just practical; it’s also a delightful companion throughout their school day. With its soft texture and playful appearance, it makes organizing pencils and pens an enjoyable activity for children, encouraging them to keep their supplies in order.
22. 3 Ring Binder Pencil Case

The 3 ring binder pencil case is a brilliant solution for students who like to keep their supplies and notes consolidated. Easily snapping into a binder, it ensures pencils, erasers, and other tools are handy when switching between classes, making organization a breeze.
23. DIY Fabric Pencil Case for School

The DIY fabric pencil case for school lets students showcase their style and creativity. By selecting their favorite fabrics and patterns, they can make a case that’s not just functional but also a reflection of their personality, making school supplies fun and personalized.
24. Cool Zipper Pencil Case for Boys

Cool zipper pencil cases for boys are designed with both form and function in mind. Featuring durable materials and awesome graphics, they’re perfect for keeping pens and pencils secure while adding an edge to school essentials.
25. Pencil Case with Nature Prints

A pencil case with nature prints brings a piece of the outdoors into your daily routine. Ideal for those who appreciate the beauty of the natural world, these cases often feature stunning prints of flora and fauna, making them a stylish statement piece that’s also incredibly functional.
Remember, making your DIY pencil case is not just about the end product but also about enjoying the process. These patterns and ideas are your first steps toward making something special. So, grab some fabric, and let’s make something amazing together.
- Home →
- Projects & Tutorials
- → DIY Sliding Pencil Case with Free Pattern [Stand up Pen Pouch VIDEO]

DIY Sliding Pencil Case with Free Pattern [Stand up Pen Pouch VIDEO]
The sliding pen pouch (pop up pencil case or vertical pencil case) is great for keeping your marker pens and other pens together in an upright position with a zip closure at the top. The top slides down so you can easily select the color you want without having to scratch though the interior of a rectangular pencil case where the pens lie on top of each other.

The sliding pencil case makes a perfect gift for all ages, particularly teens and tweens who love stationery! Once you have mastered the method of making these by following our visuals and step by step instructions you will be ready to raid your stash and make loads of them. They work best as a plain and print combo where you can pick up one of the colors of a print with a plain color for a coordinated look. Try to use a silky fabric or a thin cotton for the lining so it slides down easily. The stand up pencil case is an ideal way to create something beautiful and useful from your leftover fabric.

Below you will find my step by step written tutorial how to make a slider pencil case with VIDEO instructions for all the visual learners.
We occasionally link to goods offered by vendors to help the reader find relevant products. Some of the links may be affiliate meaning we earn a small commission if an item is purchased.
How to Make a Sliding Pencil Case

Slide Pen Case Supplies and tools

- fabric (outer – plain) cotton
- fabric (outer – patterned) – cotton canvas
- fabric (lining) – cotton
- stiff fusible interfacing
- zipper – 8″ (20cm)
- matching thread
- scissors (or rotary cutter and a cutting mat )
- ruler or measuring tape
- iron and ironing board
- sewing clips or pins
DOWNLOAD: sliding pencil case pattern (Free PDF file)
- ALTERNATIVE DOWNLOAD LINK:
sliding pencil case template
How to Sew a Slider Pencil Case
Watch the diy slide pencil case video first and then follow the written step by step instructions below. Please enjoy and don’t forget to Like and SUBSCRIBE over on YouTube to be kept up to date with new videos as they come out.
Sliding pen pouch VIDEO TUTORIAL
DIY Sliding Pen Pouch Materials
You will need:
Outer layer (plain cotton canvas)
- 2 pieces of 7 x 9 7/8-inch (18 x 25 cm) cotton canvas fabric for the exterior of the slide pen pouch.
- 1 piece of plain 4 x 2 ¾ inch (10 x 7 cm) plain fabric for the pull tabs on the sliding section
Outer – Contrast color fabric
- 1 piece of print fabric 13 ½ x 8 ¾ ( 34 x 22 cm) to make the sliding collar for the pouch
- 1 piece of print fabric 2 x 2 ¾ inch (5 x 7 cm) to make the zipper pull tag
Lining fabric
- 2 pieces of 7 x 9 7/8-inch (18 x 25 cm) light cotton print fabric for the lining of the slide pen pouch.
INTERFACING
- 2 pieces stiff interfacing 7 x 6 ¼ inch (18 x 15.5)
- 1-piece mid-weight interfacing 12 ½ x 8 ( 32 x 20 cm)
1 zipper 8″ (20 cm) to match the color of the outer fabric.
INSTRUCTIONS how to make the sliding pencil case:
Step 1: prepare the slide pencil pouch pattern.
You can either download our free slide pencil pouch pattern (above) or draw your own pattern (see instructions below).

For those who have our printed out our slide pencil pouch pattern you can proceed with the next step.
For those who don’t have a printer you will need to measure as follows. Making your own template
- Take a piece of paper 7 x 9 7/8-inch (18 x 25 cm) and place it with the short side facing the bottom of the worktop
- Along the base measure 4 inches (10 cm) that is 2 inches (5 cm) from the center point on each side) and make a mark on either side.
- Along the sides measure upwards 1 1/8 inch (3cm) and make a mark, then join the marks on either side with a light line. Extend the base marks upward to intersect the new line at right angles.
- Next to the 1 1/8-inch (3cm) mark make a new mark 3/8 inch (1 cm) in from the edge on either side.
- Use a ruler to make a slightly diagonal line from the top corner of the fabric to the new mark.
- Below the 1 1/8-inch (3cm) mark make a new mark 0.08 inch (0.2 cm) on the edge of both sides of the cotton canvas fabric and repeat with the second piece.
- Join that mark to the corner where the line coming up from the base and the line across meet.
- Cut out the corners marked and cut off the tapered bit.
STEP 2: Fuse interfacing to the outer pieces
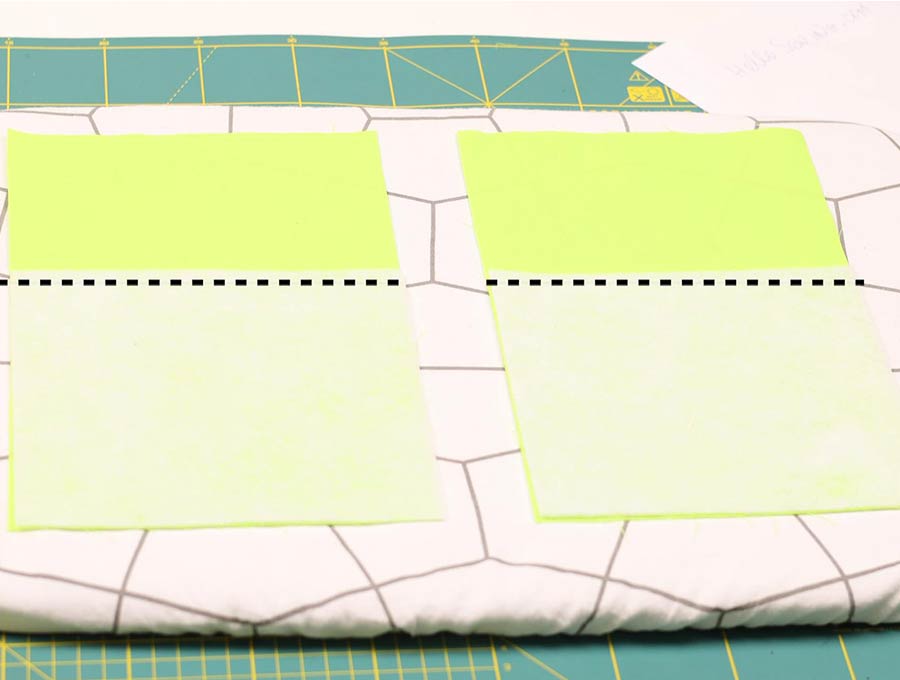
Place both pieces of your cotton canvas measuring 7 x 9 7/8 inch (18 x 25 cm) on your worktop with the wrong side facing upwards. The short side should face the base of the worktop.
Place the interfacing pieces on the two cotton canvas pieces, lining up the short side with the bases. The interfacing will reach around halfway up the cotton canvas – this is so the top can later slide down. Fuse the interfacing as per the manufacturer’s instructions with an iron.
Stitch along the top of the interfacing.
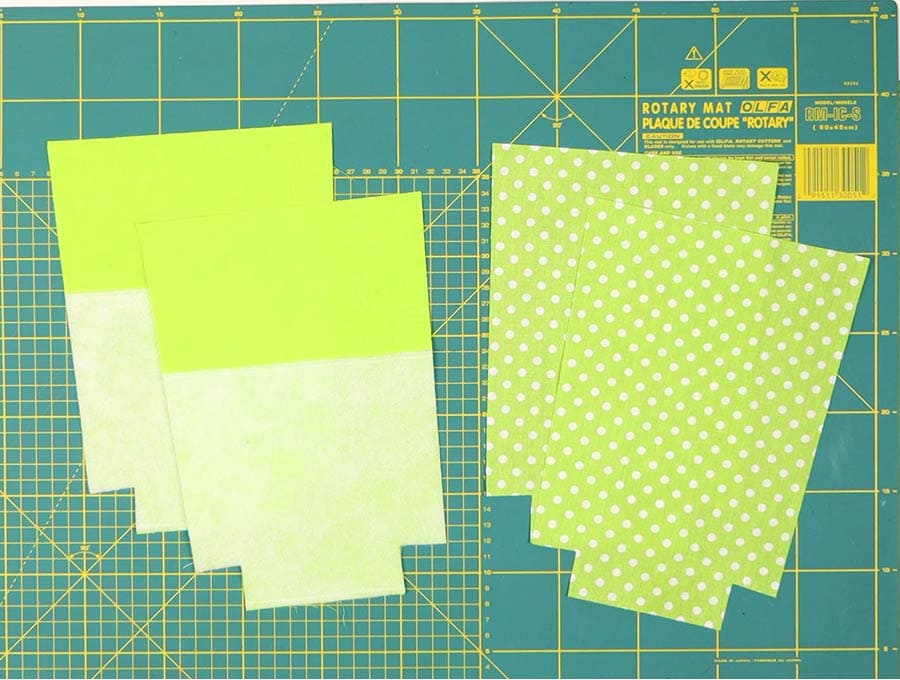
Cut out the main outer fabric pieces and the lining pieces according to the pattern (4 pieces total)
Take one outer piece and one lining piece.
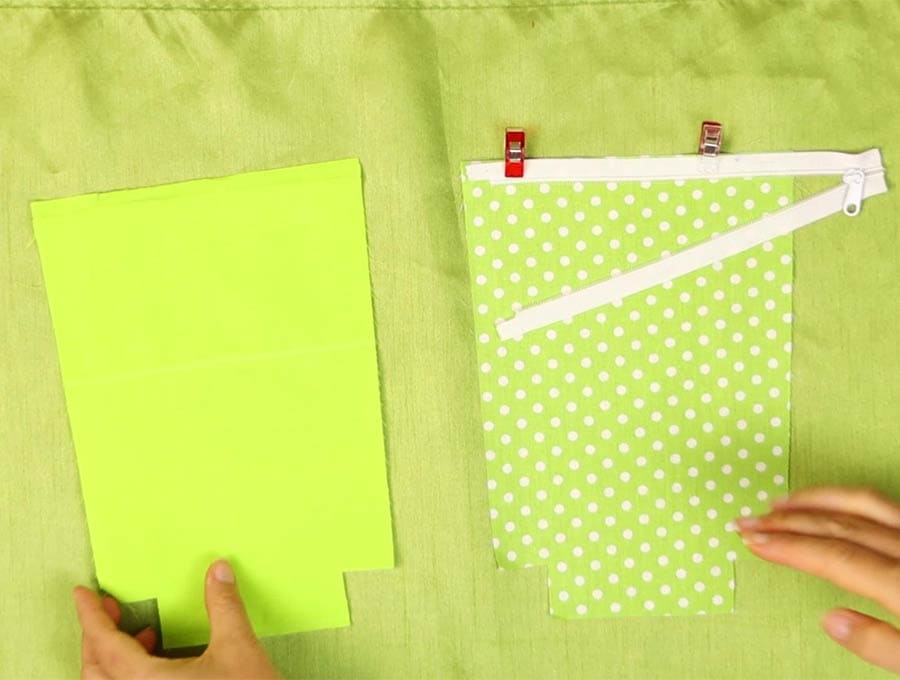
To attach the zipper, place the end where the zipper closes at the edge of the fabric lining piece that is right side up with the zipper pull side upwards too, and line the edge up neatly with the edge of the lining fabric. You will notice there is as extra piece of the zipper extending beyond the fabric on the right-hand side – this is fine as it will be utilized later. Open the zipper and pin the top half in place, making sure to fold in the little rough edge at the end underneath. It will be a short distance in from the edge but this is fine as the seam allowance will take up that gap.
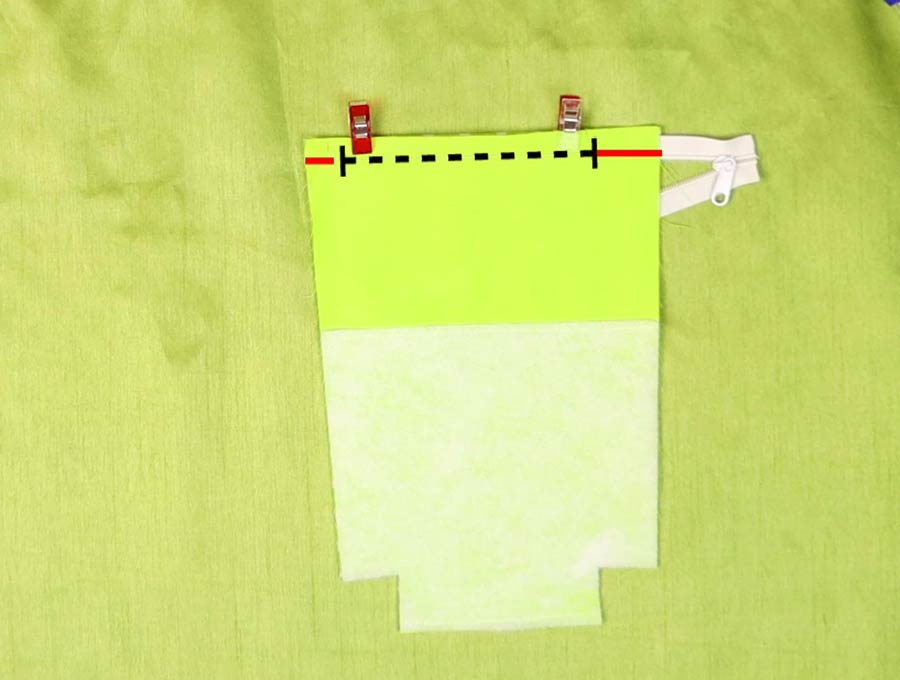
Place the cotton canvas fabric with the edge that doesn’t have the interlining attached right side to right side of the lining fabric and line it up with the edge of the lining fabric, over the zipper piece. Clip in place. Measure 1 inch (2.5 cm) in from the right-hand side edge where the extra piece of zipper sticks out and make a mark. Measure 3/8″ (1cm) from the left-hand side and make a second mark.
Stitch between the marks you made, close to the zipper teeth.
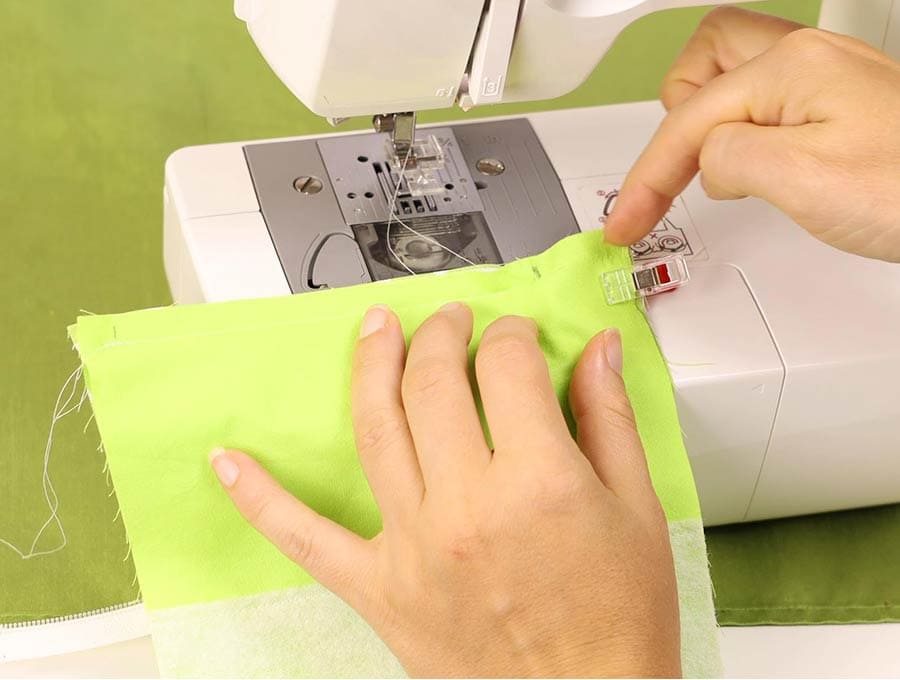
Open out the fabric and move the extra edge of the zipper out of the way before replacing the fabric and stitch that 1-inch (2.5 cm) piece at the end closed.

To secure the other side of the zipper for the slider pen pouch repeat steps 5 to 7.
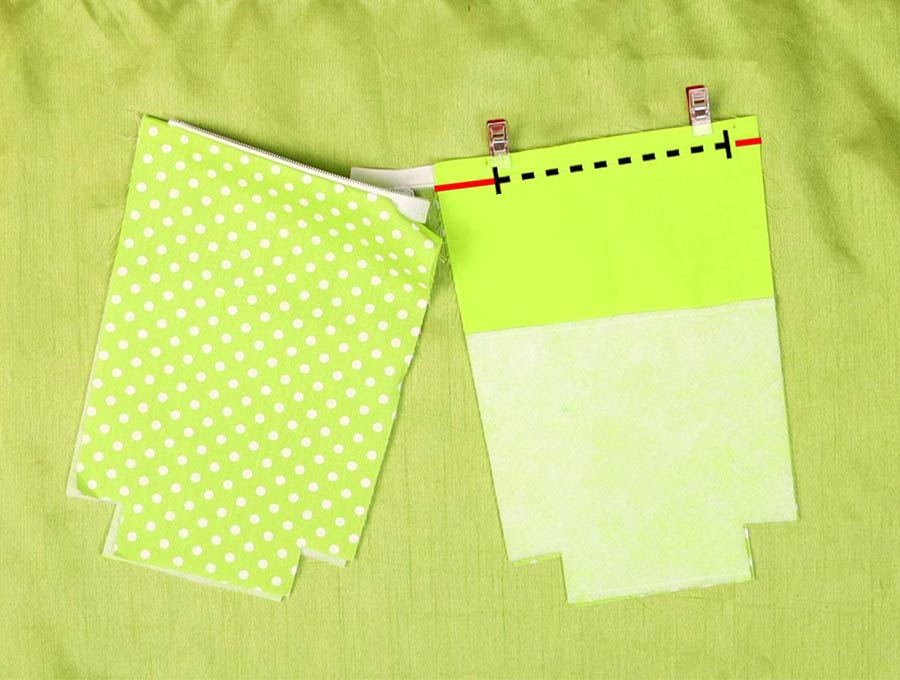
Close the zipper halfway and open out the fabric with the wrong sides facing each other and press the fabric flat on either side of the zipper.
Open out the fabric so this time the right sides are facing each other and pine up the edges of the cotton canvas fabric with the interlining and clip in place. Where the zipper closes fold the edges to the left and clip in place, then where the extra piece of zipper extends, fold that out of the way so the machine does not catch it, then clip the ends of the fabric in place. Clip or pin the lining pieces so they line up neatly.
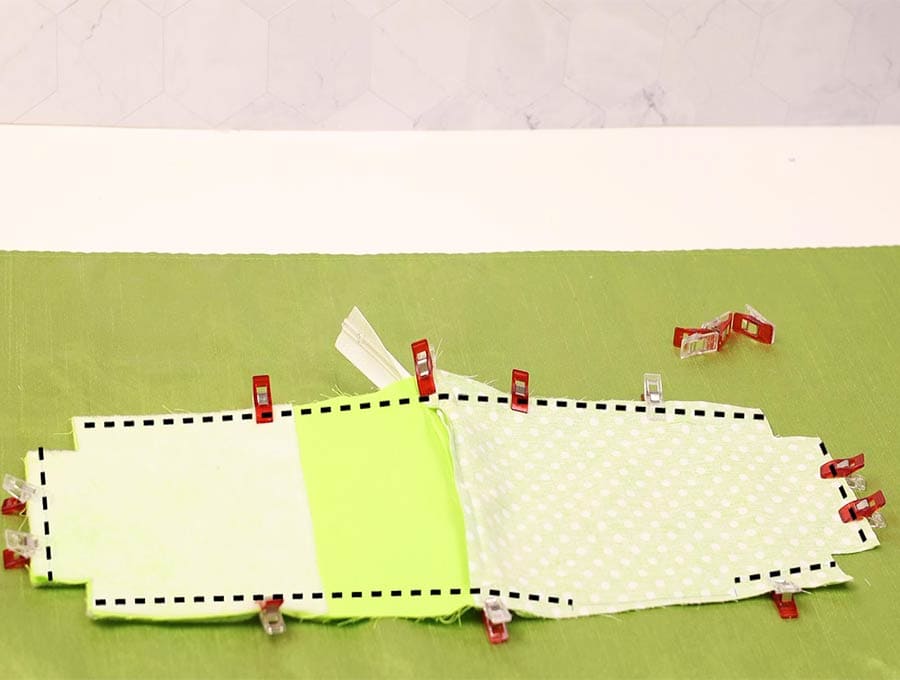
Stitch around the edge of the sliding pen pouch (3/8 inches) 1 cm from the edge, leaving a gap of around 4 inches (10 cm) on one side of the lining fabric. This gap is where you will pull through the fabric to turn the pouch the right way out. Do not stitch into the cut-out corners – only the base and sides of the fabric.
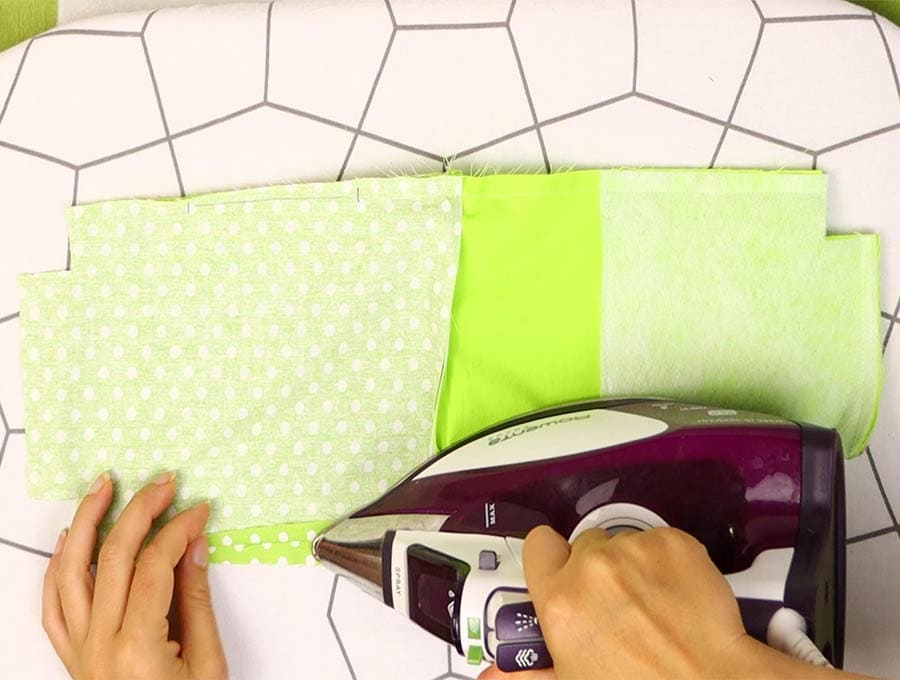
Open out all the seams you have stitched and press them flat with an iron.
Once you have done this pull the four cut out corners you did not stitch and line up the opened-out seams before clipping in place.
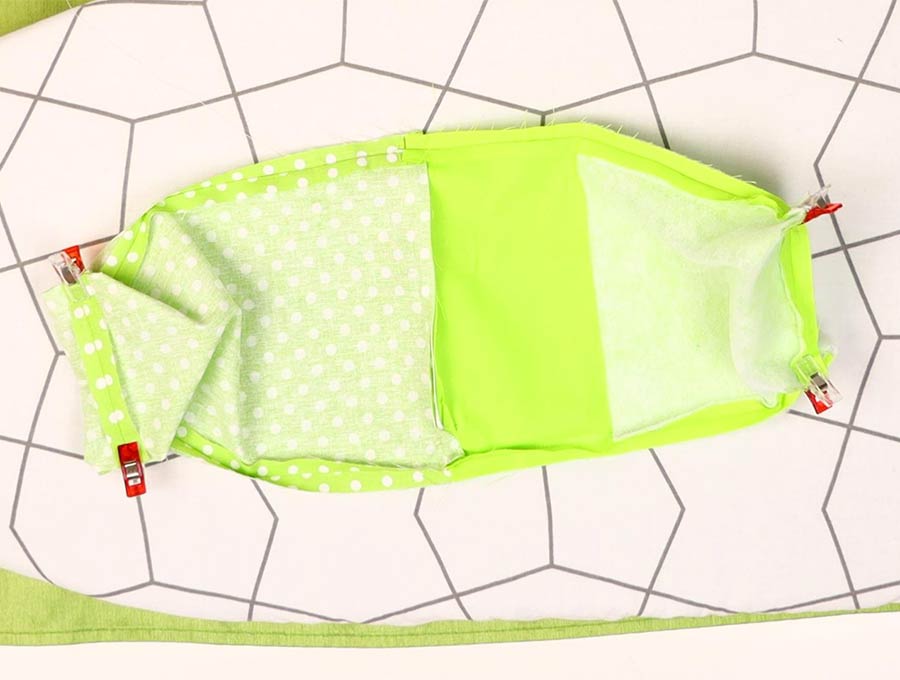
Stitch across the cut-out corners.
Turn the fabric right way out through the gap you left in the lining, working carefully as the interlining fabric will make it quite stiff to work with. Poke out the corners neatly.
The edges of the gap for turning the fabric can be lined up neatly and blind stitched closed.
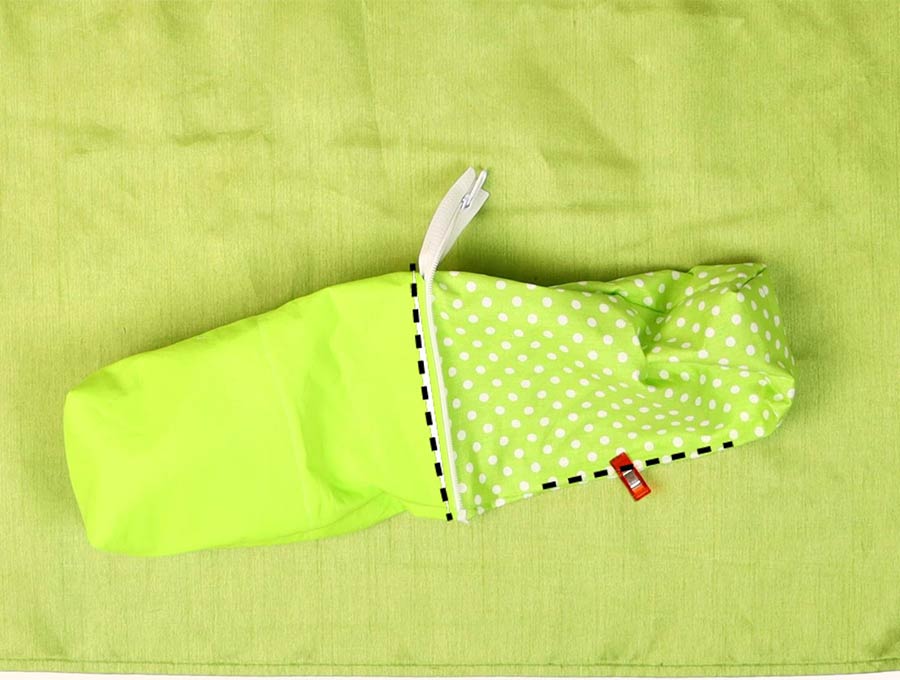
Top stitch neatly around the edge of the top of the pouch next to the zipper.
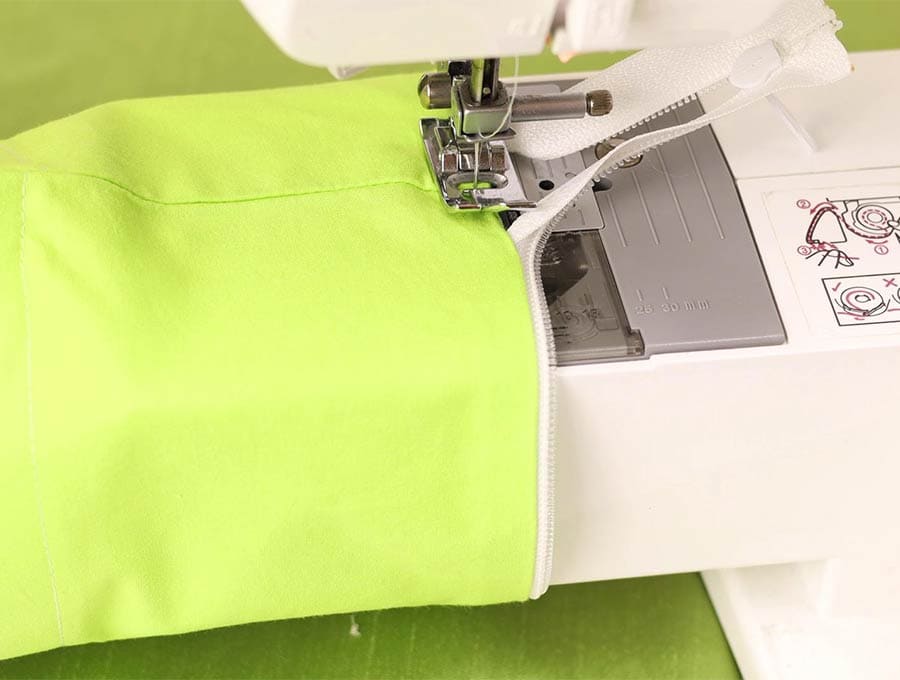
Take the printed outer piece that is 13 ½ x 8 ¾ ( 34 x 22 cm) and apply the interfacing to the wrong side of the fabric according to the manufacturer’s instructions.
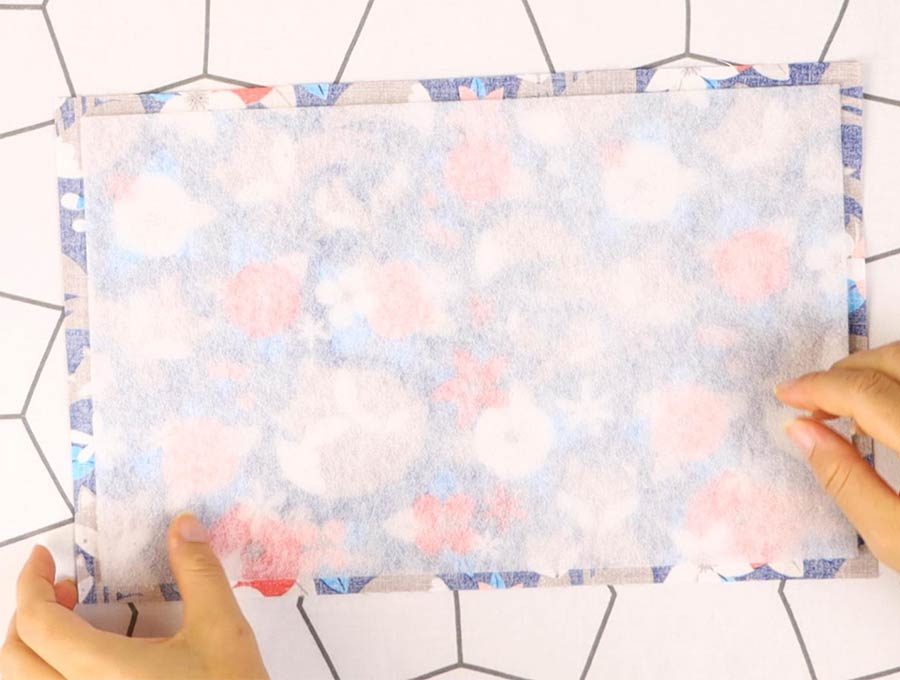
Fold the short side across to the other short side and line up the edge before clipping in place.
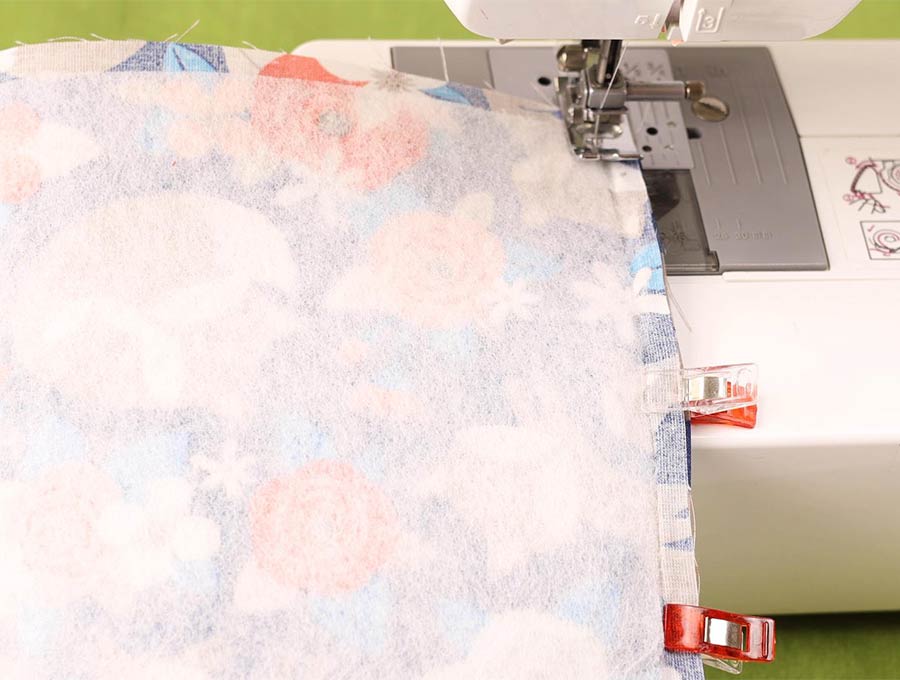
Stitch the seam to form a cylinder.
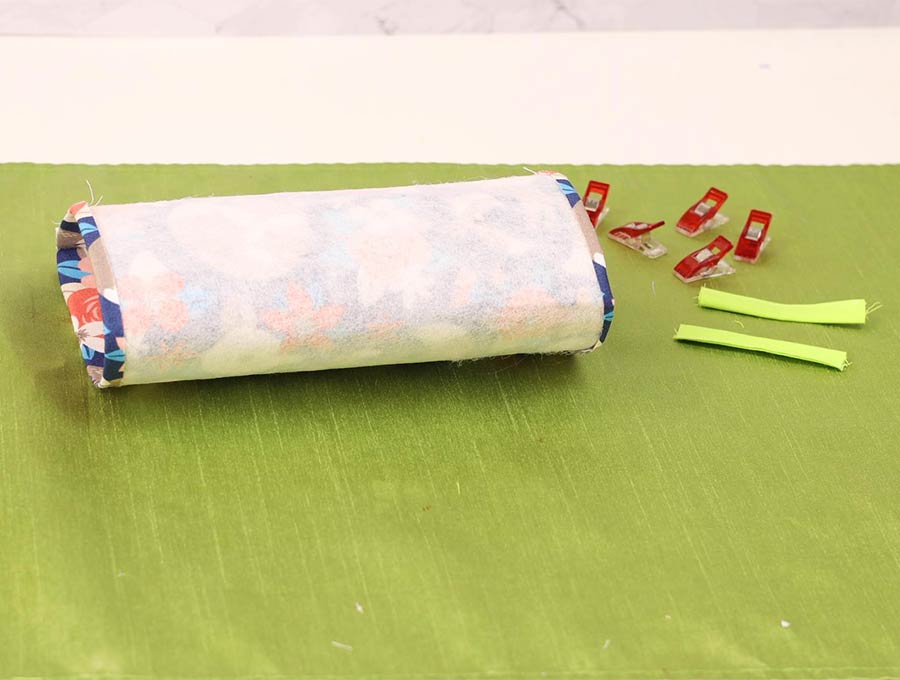
Press open the seam, then fold over 3/8 inch (1 cm) all the way around the top pressing place, and repeat for the bottom of the cylinder-shaped fabric. Now fold the top down to meet the bottom and line up the edges, then clip in place
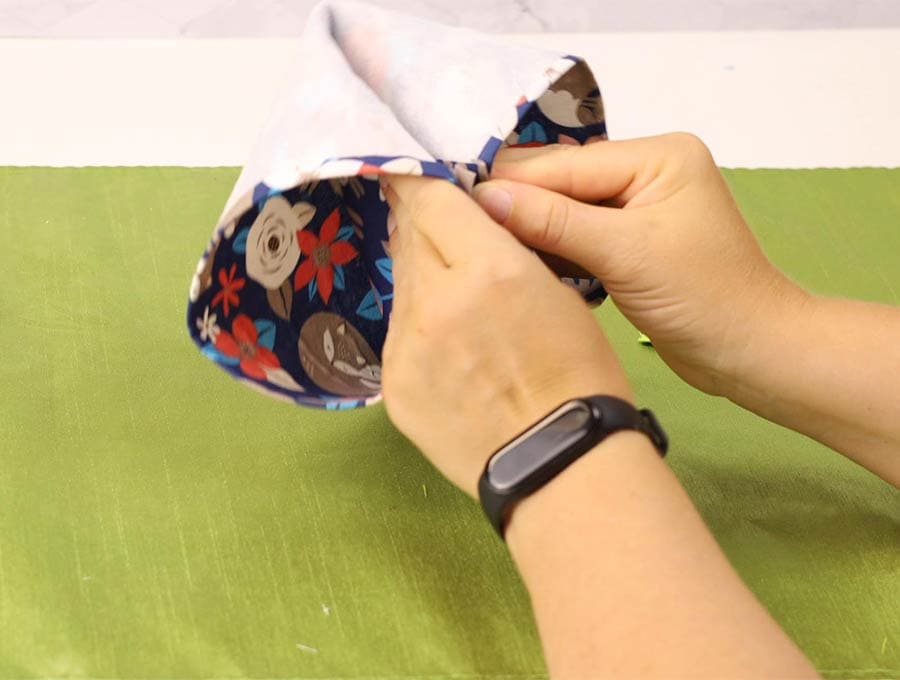
Top stitch all the way around the top leaving a 1 5/8-inch (4 cm) gap at the seam, and one on the opposite side to the seam, as this is where you will insert the tabs for sliding the pen pouch down.
Create the tabs by taking the 4 x 2 ¾ inch (10 x 7 cm) plain fabric, and cutting in half on the longer side so you have two pieces 2 x 2 ¾ inches (5 x 7 cm).
Fold them bias style: fold in half along the length and press flat with an iron. Open up and fold each raw edge towards the middle crease and press. Fold again along the middle crease and clip
Repeat with the other piece.
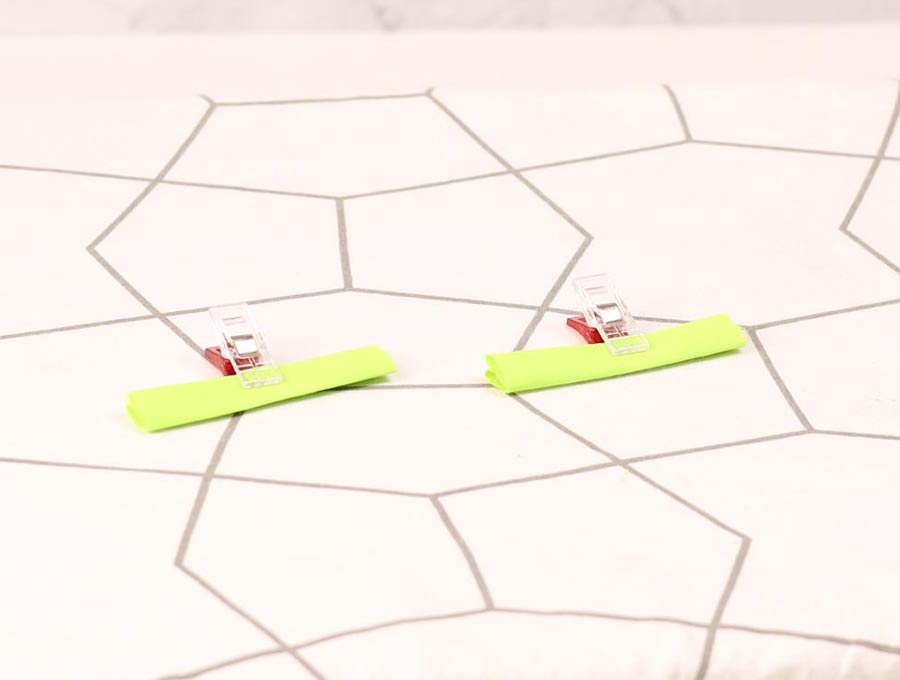
Insert the tabs into the sliding collar you made in Step 22, ensuring they are exactly in the middle of the seam and exactly on the halfway mark opposite the seam. Stitch in place back tacking at start and finish.
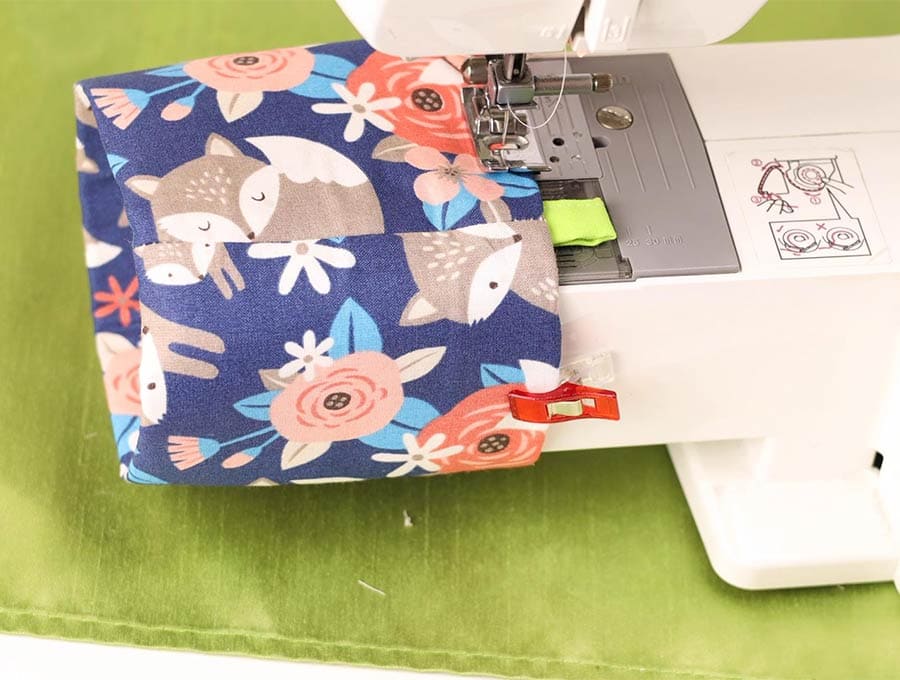
Take the collar with the tabs you have just added facing downward and slide it over the outside of the pen pouch lining up the top of the collar just below the top stitching at the zip edge. Pin in place making sure the tabs are in line with the side seams on the sliding pen pouch and clip in place ready to sew.
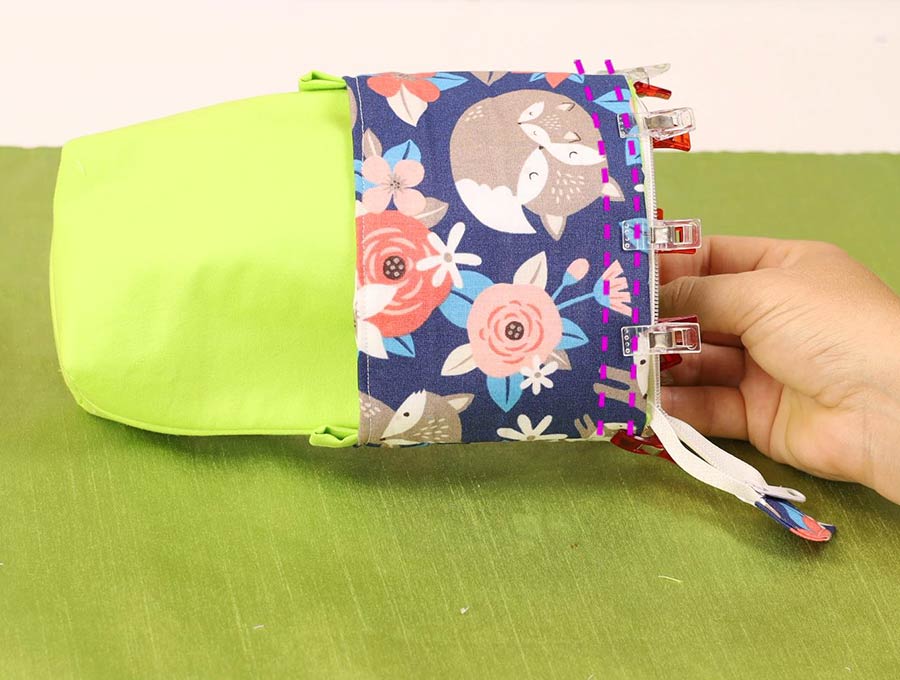
Stitch around the top of the collar with two rows of stitching 3/8 inches (1 cm) apart.
Create a tab for the raw edge of the zipper by taking the 2 x 2 ¾ inch (5 x 7 cm) piece of fabric and folding in all four edges and pressing in place before folding in half and placing over the end of the zipper to cover the raw edge where the zipper ends. Make sure the tab lines up neatly and pin in place on the edge of the zipper.
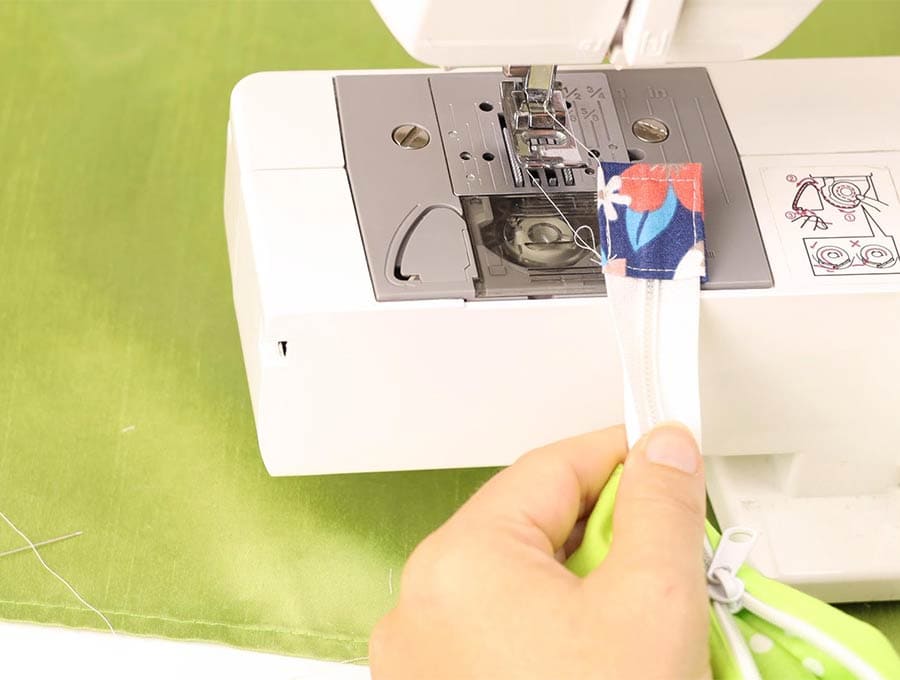
Stitch around three sides of the zipper tab (not the folded edge) to ensure that it sits securely at the end and finishes off the sliding pen pouch neatly.

To use the sliding pen pouch fill with pens, pencils and markers, standing with the points upright, and zip closed. When you want to see what you have, open the zipper, pull the side tabs of the collar downwards and you can see exactly which colors you want to use. The interfacing makes this quite firm and sturdy for keeping pencil tips safe from harm.
We do admit it takes longer to explain the steps than to actually make this sliding pen pouch. Once you have made one you will be able to turn out these sliding pen pouches quite quickly. If you enjoyed this tutorial then hit the subscribe button to have more neat ideas delivered straight to your inbox.
Do you like this? Pin for later:
Wanna be friends? Click HERE and follow me on Pinterest
Related Posts
Free Hat Sewing Patterns – Easy DIY Projects for Stylish Headwear
26+ Free Coin Purse Patterns [Simple Coin Pouches to Sew]
DIY Casserole Carrier (Insulated Food Carrier) with Free Pattern
21+ Free Heart Quilt Patterns and Heart Quilt Blocks
I can’t seem to find the free pattern download for the sliding pencil case. I’ll make one from the video demo but thought you’d want to know – at least I can’t find it, that is. Love your stuff!
Leave a reply:
Save my name, email, and website in this browser for the next time I comment.
Hi Barbara, Thanks for letting me know – I’ve just uploaded the slider pouch pattern
I want to download and print the pattern but I can’t find the link anywhere. Help!
Hi Cathy, I’m working on the pattern right now, I’ll upload it soon UPDATE: The pattern is available now. Happy stitching
Very cute project – I love the mix of fabrics. #MMBC
This is so cute and perfect for this time of year with the back to school planning.
What a fab idea! Perfect for our homeschooling trips. #MMBC
I took pics of the one I made but I don’t know how to show you…Can I reply via your e-mail?
Sure, not a problem. You can send them by email, add them to our facebook page https://www.facebook.com/hellosewing or share them in pinterest
So pretty and functional!
That’s a clever design!
What a fun project! Your video is easy to follow, too. Thanks for sharing with us at Creatively Crafty #ccbg 🙂
LOVE THIS! We will be featuring you starting Wednesday at the Creative Crafts Linky Party! Creatively, Beth
That’s awesome. Thank you, Beth
Nice looking bag! I’m featuring you this week at the Home Matters Party. Thanks for sharing and I hope you have time to stop by! I’ll be sharing your bag on social media next week. I’d love for you to follow along!
This is a really cool. I could use one of these for my Prismacolors at church. Love the pop up idea, and that it all gets zipped in.
I doubt I would ever make one, but I love the idea of it, and that you’ve shown us step by step how it’s made.
Thank you for sharing this at the Homestead Blog Hop!
Leave a Reply:
DIY Pencil Case

Introduction: DIY Pencil Case

This is a DIY Pencil Case which you can make easily with a few materials. With the supplies accessible at home, follow the steps below. You can do it!
-Stickers/Color Pencils (Optional)
Step 1: Step 1: Cut the Box

Pencil case needs a strong foundation as it keeps stationary. Make sure to cut the box with consideration of width, length, and height. The width, length, and height depend on your preferences. If you want to make the shape the same with my pencil case, follow the ratio. Width:Length:Height=21(cm):10(cm):3.5(cm). Be careful when you cut the box with a knife.
Step 2: Step 2: Stick the Pieces

Stick each piece that you cut with tape. The base should have three pillars, as shown in the photo. Another base is supposed to be the cap part of the pencil case. Make sure to stick the pieces for the pillars carefully because it serves as a supporter for the pencil case.
Step 3: Step 3: Draw Your Piece

Draw your piece for the surface of your pencil case. The length of each piece on paper should be exactly the same with the pieces from the box so that you can stick the papers onto the box pieces.
Step 4: Step 4: Cut the Paper

Cut the paper based on your drawings on the paper. And stick them onto the appropriate box pieces.
Step 5: Step 5: Enjoy Your Pencil Case!

You can put everything inside your pencil case. It will be helpful when you store your stationery.
Recommendations

All Things Pi Contest

Fix It Contest

Make it Resilient

Watch Cooking Around London on YouTube »
Make and Share Craft Tutorials
Sign up or log in using, log in to an existing account, need a new account.
- Desserts & Sweets
- Drinks & Cocktails
- Sauces, Dips & Spreads
- Meals & Snacks
- Bread, Buns & Bagels
- Hair Styling
- Nail Painting
- Home Accessories
- Accessories
- Hats & Headwear
- Hair Accessories
- Brooches & Pins
- Face & Body
- Models & Sculptures
- Photography
- Mixed Media
- Drawings & Paintings
- Object Plushies
- Rag Dolls & People Plushies
- Animal Plushies
- Character Plushies
- Food Plushies
- Shape Plushies
Diy Denim Pencil Case

Recycle an old pair of jeans while you're at it! I had lost my pencil pouch so I decided to make a new one. I don't have much fabric so I came up with the idea of using denim from a old pair of jeans. If there's anything that's unclear for you (Hopefully there aren't many complicated explanations, but this is my first how-to!), feel free to comment. ;)
- Clothes & Accessories

You Will Need

Gather your materials. (By the way, you can use a sewing machine if you have one, but I don't so it's not listed in the materials section.)

Cut out two rectangles from your jeans (I used the legs part) and two from the fabric you want for the lining. I wanted my pencil pouch to be 9" x 5" so I cut the rectangles around 9.5" x 5.5". Later, I decided that I wanted a bottom with rounded corners so I cut corners a bit (see step 6).

Take one denim rectangle and one rectangle of your lining fabric. First, put the denim on your work area so that the outside part (the darker side) faces up. Then grab your zipper and place it on top of the denim so that the two top edges match up. The flat bottom of the zipper head faces up. Next, take your lining rectangle and place it on top of your denim and zipper so that the non-patterned side faces up. You should end up with a sandwich with your zipper in the middle and the two patterned sides of the fabric faces each other. When you open your "sandwich", it should look like the picture.
Now sew all the layers together. Make sure that you're sewing as close to the zipper as you want (you don't have to sew just on the edge of the sandwich).

Repeat step 3 and 4, sewing the last two rectangles onto the other side of the zipper. Sandwich: Denim - face up Zipper - lined up to top edge of denim, flat bottom of the zipper head faces up Lining fabric - design faces down Make sure the end result looks like the picture (the lining fabric is under the denim).

Unzip your zipper. Then line up the fabric rectangles like in the picture (the denim rectangles face each other; ditto for the lining fabric). Sew on the black and white lines in the picture. Make sure that you leave a hole for the lining fabric (indicated by the red circle). You need the hole for turning whole thing inside out.

Now, from the hole you left in step 6, turn the soon-to-be pouch inside out. Slowly pull the denim part through the hole...

Keep pulling...

Done flipping! (circled part: hole from which you pulled)

Close the hole however you want. I just pinched the two sides together, making sure the raw edges were folded inward, and pushed the needle through the layers along the hole.

Push the lining fabric into the denim part, and YOU'RE DONE! Time to show off your new pencil case to hordes of jealous admirers...

Optional: You can choose to sew around the zipper (white line in picture) so that the two parts (lining and the denim outside) don't come apart or get stuck to the zipper. I did this step because the lining fabric was a bit close to the zipper and kept getting caught.

♥ Chart

- See all popular projects »
More Projects

Mini Pokédex Notebook
Scallop Medallions In Open Ravioli.
Halloween Cake
Magic Catalog
Currywurst "german way"
How To Fix A Lounge Chair
A Planter Made From Recycled Materials
Diy Lamp With Recycled Material
Saved! How To Repair A Scandinavian Style Chair
A Basket Made By Recycling Paper Rolls
Hot Chocolate Pencil Case
Fairycore Jewelry
Helluva Boss Stationary
Teriyaki Street Fajitas
Fidget Journal
A Diy Embroidery Hoop
Once Upon A Dream
Bag Recycling
Gifts from the Village Of Shadows Bracelet
Cake Decoration : A Camping In The Forest
Harry Potter Inspired stationary
Necklace With A Kanzashi Flower
Fae Miraculous Collection
Acorn Necklaces
Hobbit House
Pop Up House
Fidget Spinner Ring
Perfume Pen
Lollipop Push Pencil
Treasure Coin Map
Shaker Pens
Pencil Book Box
Fantasy Glasses Cases
Pop It Bracelet
Charming Mechanical Pencil
Pop It Gotchi
Ribbon Card Holder
Chocolate Bar Pencil
Magical Invite Pencil Case
IMAGES
VIDEO
COMMENTS
Cut a rectangle from a plastic bag. Cut a 1 in (2.5 cm) wide strip of duct tape, and fold it over 1 of the long edges. This will give you a nice time and make it more durable. Next, cut 1⁄2 in (1.3 cm) wide strips of duct tape, and use them to secure the remaining 3 edges of the rectangle to the front of your bag.
Diy Pencil Case - Sewing Steps. You won't need a pencil case pattern, just these cutting instructions: Step 1 - Cut 2 Rectangles. Cut two rectangles: one 7" by 9" (18 x 23cm) and the other 3 ½" by 1 ½" (9 x 4cm). The length of the large piece should be equal to the total length of your zipper (incl. zipper tape).
Step 1 - Cut the Fabric. Cut 4 pieces of fabric 8 x 5 inches (20.5x13cm) - 2 for the outside and 2 for the lining. You will need a 7-inch zipper with an 8-inch zipper tape. If you plan on making a longer DIY pen pouch, just make sure that the fabric is 1 inch (2.5cm) longer than the teeth (not the tape) of the zipper.
How to make this pencil case. Step 1 Cut out a 10 inch square fabric piece. Step 2 Keep the fabric right side up in front of you. Keep the zipper face down along one edge of the fabric. Sew in place. Step 3 Fold the fabric and join the remaining zipper edge to the other edge of the fabric as in the picture below.
Take the outer fabric pieces and arrange them in order. Sew the sides together to form the exterior of the pencil case. Use a 1/4-inch seam allowance for a neat finish. Attach the zipper between the top edges of the front and back pieces of the outer shell. Ensure that the zipper opens and closes smoothly.
STEP 4: Create the pull tab (optional) Creating the pull tab. Take the 1.5 x 3.5 inch piece of fabric and fold in half along the length so you have a piece that is .75 inches by 3.5. Press the fold into place with an iron. Open out the small piece of fabric and fold each long side to the central fold, and press in place.
Pencil case sewing steps. 1. Draw a rectangle on your paper measuring 23cm x 12.5cm / 5'' x 9''. Cut this paper out and pin to your fabric. 2. Cut out 4 identical rectangles of fabric: 2 from your lining fabric and 2 from your outer fabric. 3. Place a lining rectangle right side up and lay the zip along one edge.
Cut out the Pattern Pieces: To make this Pencil Case, you will need some felt, scissors, hot glue, and a square ruler. First, cut out the pattern pieces: Back (12 by 3.5 inches), Front (8.5 by 3.5 inches) and Strap (0.5 by 8 inches). You will need two of each piece, one for the outside and one for the inside.
Follow our super easy step-by-step guide to sewing a fashionable DIY pencil case that can be used at school, at home, or even when you are travelling, to kee...
Stitch using a 1/4″ seam allowance. Fold the bottom of the outer bag to meet the top so that the body is right sides together. Stitch along both sides using a 3/8″ seam allowance. Repeat for the lining piece as well. Add the top to the body. Fold up the bottom.
Step 2: Create the Main Shape. First, find the shape you want your case to be. I've chosen it to be a 40x40mm square with 3 rounded edges to make it feel good in the hand but to still have space in the case. Then use extrude and choose the height you want the case to be.
Pencil Case Tutorial Step By Step | The Sewing Room Channel This pencil case tutorial will show you how to make an elastic pencil case step by step.Zipper Po...
How to CUT pieces for a pen case: https://www.applegreencottage.com/easy-pen-case-with-elastic/Make a super easy pencil pouch - in minutes! SUBSCRIBE to App...
Step 1: Make a quilt sandwich and quilt the pencil case. Lay down the color B square (right side down), then the batting, and finally the color A square (right side up). Pin together using basting pins. You basically want to make a quilt sandwich, like you would when basting a quilt (but on a much smaller scale).
Step 2: Place the fabric on your working surface. Place the elastic on the middle section of the fabric. Pin it in place to secure it to the base fabric. Think about how many pencils or pens you want to insert in the pencil case. Also consider sewing spaces for a pair of scissors, a glue stick or a rubber. Sew the divisions in place by running ...
1.-. Length 8cm and height 4cm (bottom part of the pencil case) 2.-Length 19cm and height 3cm (you will need to create two of this parts because this will be the sides of the pencil case) 3.-Length 16cm and height 7.5cm (front part of the pencil case) 4.-Length 19cm and height 7.5cm (part from the back of the pencil case)
Learn how to sew a pencil case using this easy sewing pattern for beginners created by Jessica Entwistle.
Let's get started, and soon you'll have a unique pencil case that's all your own. 1. DIY Pencil Pouch in 15 Minute. Making a DIY pencil pouch in just 15 minutes is perfect for those last-minute school supply needs. It's quick, easy, and you can personalize it with fabric choices, making studying a bit more fun. 2.
Step 1: Materials. What you need to make the pencil case:-A piece of leather (at least 20 cm²)-A zipper (30 cm)-A needle to sew trough leather-A wire (around 4 meter)-A cutter and a lath. ... The radius is free to choose. Step 3: Connect the Zipper to the Leather.
Snip off any loose threads and trim the corners. Trim any bulky seam allowance at the zipper ends. Turn the pencil case the right way round by putting your hand through the gap and pulling the fabric through the right way. Use a pencil or knitting needle to poke the corners into a nice square point.
You will need: Outer layer (plain cotton canvas) 2 pieces of 7 x 9 7/8-inch (18 x 25 cm) cotton canvas fabric for the exterior of the slide pen pouch. 1 piece of plain 4 x 2 ¾ inch (10 x 7 cm) plain fabric for the pull tabs on the sliding section. Outer - Contrast color fabric. 1 piece of print fabric 13 ½ x 8 ¾ ( 34 x 22 cm) to make the ...
Step 1: Step 1: Cut the Box. Pencil case needs a strong foundation as it keeps stationary. Make sure to cut the box with consideration of width, length, and height. The width, length, and height depend on your preferences. If you want to make the shape the same with my pencil case, follow the ratio. Width:Length:Height=21 (cm):10 (cm):3.5 (cm).
Jessica M. added Diy Denim Pencil Case to Sewing 14 May 17:03; Key West Witch favorited Diy Denim Pencil Case 02 Aug 13:55; Tierra T. favorited Diy Denim Pencil Case 26 Oct 19:15; Ana M. favorited Diy Denim Pencil Case 01 Jun 11:08; Violet B. added Diy Denim Pencil Case to try later 27 Mar 23:06; Ezni I. favorited Diy Denim Pencil Case 22 Mar 08:02