
Search Utah State University:
View instructor's powerpoint notes on ipad.
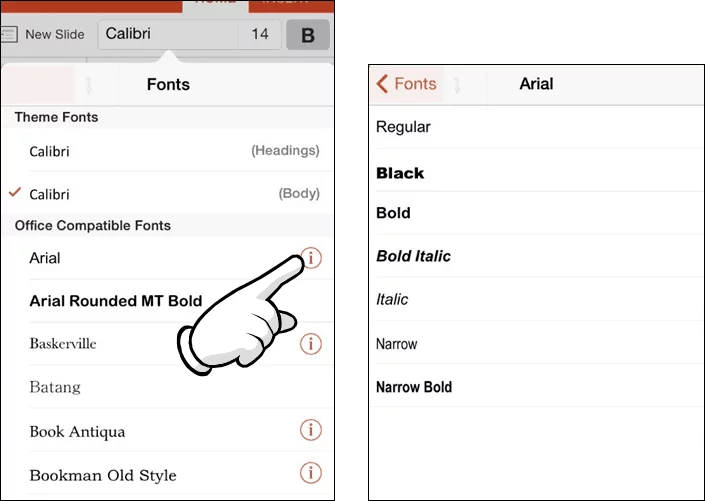
Download the slides by tapping on the download icon next to the file

Tap Download

Open the downloaded file, then tap Open In... in the bottom right corner

Select PowerPoint

Tap Notes in the bottom right corner

The Notes panel will appear

How-To Geek
How to use speaker notes in powerpoint.
If you're worried about forgetting important points during your presentation, jot down some speaker notes. Here's how to prepare and use them.
Quick Links
Add speaker notes in powerpoint, use speaker notes during a powerpoint presentation.
Adding speaker notes to a PowerPoint presentation provides reference material for the speaker when they're presenting a slideshow, allowing them to stay on track without forgetting key message points. Here’s how to add and use speaker notes.
To add speaker notes in PowerPoint, you’ll first need to be in the Normal view. If you’re not already there, you can switch to Normal view by going to the “View” tab and then selecting “Normal” in the “Presentation Views” group.
Next, in the pane on left, select the slide where you'd like to add speaker notes.
Next, click the “Notes” button at the bottom of the window.
A small box reading “Tap to Add Notes” will appear beneath the slide. For Mac users, this will say “Click to Add Notes.”
Now, simply type the speaker notes for that slide. Repeat this process for each slide you'd like to add notes to.
There are two ways to use speaker notes during a presentation: by presenting on a secondary monitor or by printing out the speaker notes .
Using a Secondary Monitor
It’s safe to assume that most presentations will be presented on a secondary monitor. If this is the case for you, there’s not a whole lot you really need to do.
Related: How to Add an Extra Monitor to Your Laptop
The first thing you need to do is change the view to Slide Show. You can do this by selecting the Slide Show icon at the bottom-right corner of the window.
In this view, the audience will see only the slides as you’re going through the presentation. However, on your primary monitor, you’ll see the current slide, a preview of the upcoming slide, and your speaker notes for the current slide.
This is a convenient way to have a virtual copy of the speaker notes while you’re giving a presentation, but it never hurts to have a hard copy.
Printing the Speaker Notes
To print the speaker notes of your presentation, first select the “File” tab in the Ribbon.
Related: How to Print Multiple PowerPoint Slides to Each Piece of Paper
In the pane on left, select the “Print" button.
In the “Settings” group, select the option that says “Full Page Slides.”
A drop-down menu will appear. Here, select “Notes Pages” in the “Print Layout” group.
Finally, click “Print.”
You’ll now have a physical copy of your speaker notes.
Critical PowerPoint Shortcuts – Claim Your FREE Training Module and Get Your Time Back!
PowerPoint for iPad: A Visual Guide
- PowerPoint Tutorials
- Miscellaneous
- October 29, 2017
In this first ever visual guide for the iPad version of Microsoft PowerPoint (iPad PPT), we show you step-by-step how to use the app, as well as all of the nitty gritty details behind it that you likely don’t know.
We highlight those “little hiccups” that will drive you up the wall (it’s still not the same experience as your desktop version), and we’ve done our best to show you the workarounds, if and when they exist.
Make sure to note the orange boxes we’ve sprinkled through the guide with pro tips and tricks based on years of experience building PowerPoint presentations…ignore them at your own peril
We will do our best to keep this guide up to date with each new Microsoft update. If you see something that we’ve missed, PLEASE let us know and we’ll do our best to update this guide ASAP.
Don’t have the PowerPoint app on your iPad yet? Download it by clicking here .
Things that go well with your iPad
Here are some useful resources for working with PowerPoint for the iPad:
Microsoft apps for the iPad
If you want to edit or display your Microsoft documents in their native environments on your iPad or iPhone, you’ll need to download the Microsoft PowerPoint, Word, Excel, OneNote, and OneDrive apps on your iPad and iPhone through the iTunes store. Find them here .
Microsoft Office 365
Get automatic upgrades and unlimited storage by signing up for the Microsoft 365 subscription model. Check out the latest of version of Microsoft Office here .
Lightning to VGA adapter
If you’re giving presentations with your iPad, don’t assume the meeting room will have the right adapters for you. So make sure you always bring one with you. I like apple’s adapters as they’re sleek and are 100% compatible with your device.
Bluetooth speaker
Again, if you’re giving a presentation in a meeting room and need to play music/video, be aware that your ipad’s speakers will probably not be strong enough to fill the whole room. This super compact wireless speaker hooks up incredibly easily to your ipad or iphone with no software or app necessary, and provides really high quality sound for the price.
iPhone/iPad stand
Although the iphone and ipad are designed to be light and portable, carrying them around throughout a presentation, especially if you’re moving around a room, can be a bit cumbersome. Keep your device upright and in front of you with this no-frills stand. It will fit just about any device.
Disclosure: please note that some of the links below are affiliate links, and at no additional cost to you, we will earn a commission if you decide to make a purchase. Please understand that we have experience with all of these companies, and we recommend them because they are helpful and useful, not because of the small commissions we make if you decide to buy something. Please do not spend any money on these products unless you feel you need them or that they will help you achieve your goals.
FINALLY…PowerPoint on our tablet! Down with the laptop and the desktop! Not so fast…
Although it is EXCITING to finally have PowerPoint on the iPad….there are MANY more versions to come before it can replace the desktop PowerPoint environment.
Until then, PowerPoint on your iPad is best thought of as an “extension” of the desktop experience, not as a replacement.
Yes, with each new PowerPoint for iPad update, you do get some new features, but the vast majority of REAL work that you do in PowerPoint (in our humble opinion) should still be done on your desktop.
Why? Because it’s just plain faster!
Yes, we are biased…we live, die and breath shortcuts on our keyboard AND we use LOTS of tips and tricks that haven’t come onto the iPad (yet)….so it’s okay to disagree with us.
With all that said, this is a GREAT step forward and we are PSYCHED for all the future updates and the new Office 2015.
We hope this guides helps make PowerPoint on your iPad a little bit, if not A LOT, easier for you to figure out.
This guide is organized according to the different Views in the app, and then according to each element within those Views. You can access all of these pieces using the tables of contents bar on the left.
If you want a fast way to find a command, simply hit Ctrl + F on your keyboard to search this page.
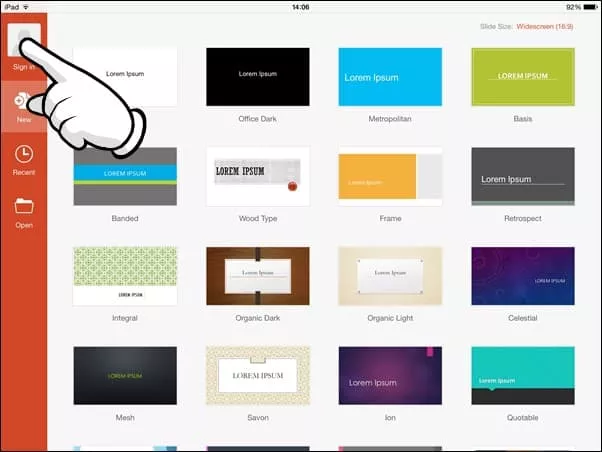
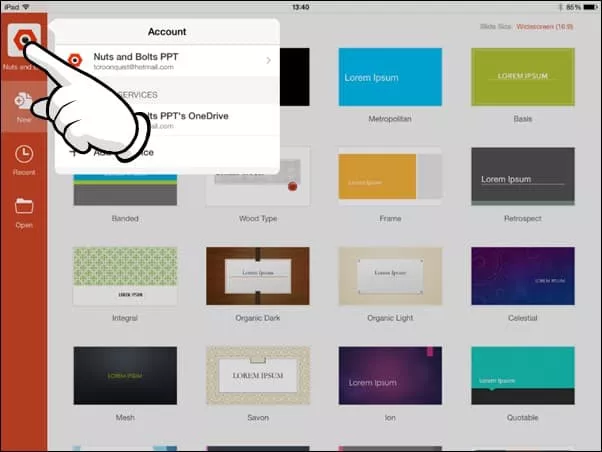
Account Settings
In this section, we look at the different things you can do in the Account Settings, such as signing out, signing in, and how to add multiple OneDrive accounts. To do any of these, you’ll have to go into the File View. In the top left hand corner, you have your Account Settings icon (with or without your account picture).

Signing out

Pro Tip: Instead of signing out of your account, you can add multiple OneDrive services to the same account so that you can access your business and personal files.
If you accidentally get signed out, here’s a step-by-step guide for how to sign back into your account. To sign into your account, follow these 4 steps (click to open gallery & instructions):
Microsoft Account: Sign in with the account you use for OneDrive, Xbox, LIVE, Outlook.com or other Microsoft services.
Organizational Account: Sign in with the account provided by your work, school or university.
Adding a service
Pro Tip: Your Office 365 account starts with a OneDrive service attached to it (whether or not you have anything in it). If you have multiple OneDrive accounts, you can add them to your account (home or office accounts), allowing you to access those files directly on your iPad.
Note: Only Microsoft OneDrive, SharePoint, and Dropbox are currently supported on Office for iPad.
In this section, you will learn how to create a new file/presentation, from scratch, as well as some key tips to keep in mind. To create a new presentation, follow these 2 steps (click to open gallery & instructions):

Recent files
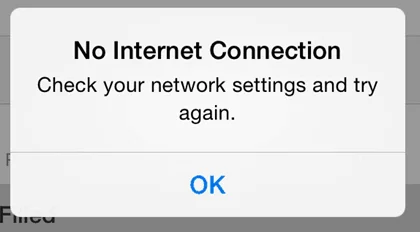
- If you have an internet connection, the most recent version of the file will be downloaded from your OneDrive and will open on your iPad.
- If you do not have an internet connection BUT have previously opened the document on your iPad before, the document will open, but it will not reflect any recent changes made to the version on your OneDrive (if you’ve made any changes from your desktop).
- If you do not have an internet connection and have never opened the document before on your iPad. You will receive a ‘No Internet Connection’ dialog box (below).
- Email as Link: Creates a “View Only” link or a “View and Edit” link of your file and launches the Mail App.
- Email as Attachment: Attaches the presentation to an email, the recipient can open and edit the document natively.
- Copy Link: Creates a “View Only” link or a “View and Edit” link of your file that you can paste into other documents or emails.
Move to Cloud: Allows you to move a presentation stored locally on your iPad onto your OneDrive. This option is only available when working with a file that is stored locally on your iPad.
Remove from Recent: Removes a file from this Recent menu here on your iPad AND on your desktop. This is not the same as deleting a file, it merely removes it from the Recent files list. To delete a file, you’ll have to go into Properties in the Open menu.
Discard Changes: Still not really clear what this does. If you figure it out, let us know.
Properties: Shows you additional properties about your file including filename, location, type, size, author, created, last modified, modified by and company.
Note: You can only create links for files stored on your OneDrive. If you have a locally stored file that you want to share a link to, you first need to move it to your OneDrive before you can create and share a link.
Note: You cannot edit any of these properties from your iPad, you must do so from your desktop version of PowerPoint. However, there are work arounds that will allow you to change the file name from your iPad. To see how that works, check out the section on renaming and duplicating your files.
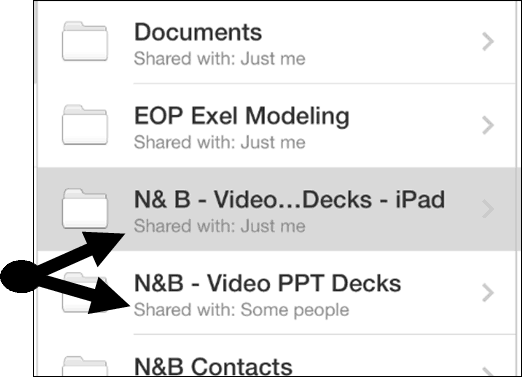
Sharing: Below the file name, you can see if the document is being shared with anyone else.
Reloading Your Files: If you don’t see a file that you have recently saved to the OneDrive, push and drag down with your finger to reload the file menu. Sometimes there is some lag time depending on the speed of your internet connection.
- To Pin a file: Simply select a non-colored pin
- To Unpin a file: Simply reselect the colored pin

Pro Tip: Keep in mind that pinned documents’ names do not update in this recent list if you change their file name. If you try and open a pinned file that has been renamed, you will receive an error message. So if you pin files and rename them, you will need to do some pin-maintenance either on your iPad or desktop version of PowerPoint.
The ‘Open’ area of the File View is where you will find all of the documents on your OneDrive services, as well as those saved on your iPad. So in this section, we’ll cover how to go about opening your files, as well as some EXTREMELY handy Pro Tips about sharing your documents and editing their properties.

- Email as Link: Creates a “View Only” link or a “View and Edit” link of your file and launches the Mail App.
- Email as Attachment: Attaches the presentation to an email, the recipient can open and edit the document natively.
- Copy Link: Creates a “View Only” link or a “View and Edit” link of your file that you can paste into other documents or emails.
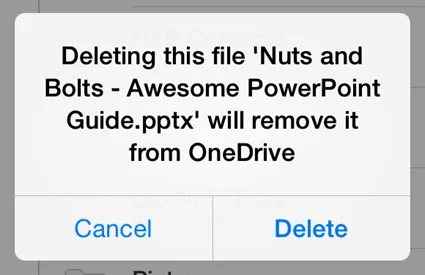
Delete: This is the only place where you can delete files from your different OneDrive accounts or from your iPad.
Properties: Shows you additional properties about your file, including: filename, location, type, size, author, created, last modified, modified by and company.
The Normal View

Navigation buttons

1. Back Button

The undo and redo commands are the iPad keyboard of the CTRL + Z and CTRL + Y keyboard shortcuts on the desktop version of PowerPoint. Similar to the desktop version, you are given 15 commands in both directions, you can undo undo up to 15 actions, or redo 15 actions.
Note: The Navigation Bar is fixed as is. You currently cannot add other commands to it like you can on a Windows based version of PowerPoint with the Quick Access Toolbar. We hope to see this updated in a later version!
4. Autosave
The AutoSave command controls whether or not changes to your presentation are automatically saved and synced with OneDrive. By default, PowerPoint for your iPad is set to AutoSave, which occurs:
- Periodically as you are working within your presentation
- Immediately when you hit the back button to return to the file menu view
Don’t make the same mistake I made – save your presentation!

This might sound obvious, but before closing PowerPoint on your iPad, hit the Back Button to return to the file menu view to ensure that the latest edits to your presentation are saved.
If you close the PowerPoint app by double-clicking the Apple button and swiping up (thus closing the app), you can lose the latest changes to your presentation…not fun!
So to ensure you save your latest changes, hit the button BEFORE closing the PowerPoint app.

If you choose this mode, to save your presentation, you need to either:
- Open the file menu and hit the green save button
- Hit the back button to return to file menu view to launch the Save dialog box
The Name command allows you to edit the name of a newly created AND unsaved PowerPoint presentation. As 90% of the presentations you work on your iPad will not be newly created or unsaved, this option will likely always be greyed out.
For example, if you create a new presentation on your iPad and have not saved it, the name command option is available. That said, as soon as you save the file with a name, this option becomes greyed out (forever).
How do you rename a file on your iPad?
To rename a presentation (or other office file) on your iPad, you either have to:
#1: Duplicate the presentation and save it with a new name. This will create a brand new document, so if you don’t want the older document, you will need to navigate to where it is saved on your iPad, or on your OneDrive and delete it. Painful, I know!
#2: Use the OneDrive app to rename your document (see our blog post on how to rename files in your OneDrive app).
6. Duplicate
The duplicate command creates a new copy of your current presentation and takes you to the File Menu View to rename your presentation (the same is true for the other Microsoft Office apps on your iPad). This is the Save As equivalent, or F12 keyboard shortcut on your desktop version of PowerPoint.
Note: Duplicating a presentation will not overwrite the original presentation, it will only create a new presentation with the new name you give it.
How to move my Presentation from OneDrive to my iPad:
To move a file from OneDrive to your iPad, you need to open the file, duplicate it and then select your iPad as the storage device. There is currently not a “move to iPad” command like there is a “move to cloud” command.
Note: Files stored on your iPad open faster than their OneDrive equivalents as they do not need to download the latest version.

The restore command gives you a options for reverting back to an earlier version of your PowerPoint presentation.
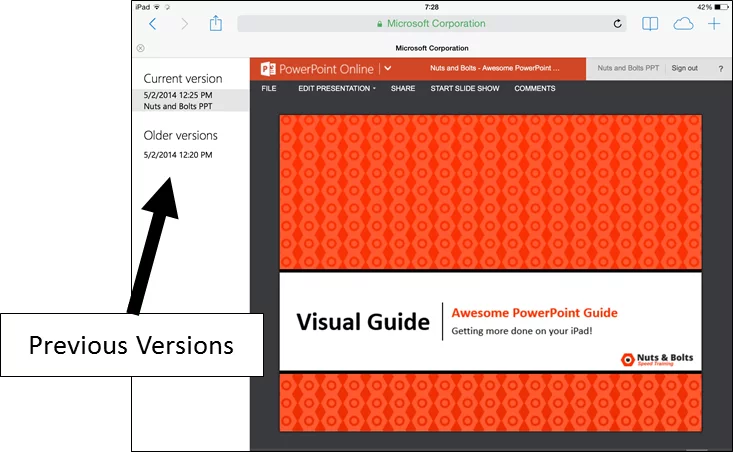
You can either:
- Back to the original you started with: Revert back to when it was last opened (PowerPoint will give you the specific time that it was opened). Doing so you get a warning indicating at what time the file was opened, so you get a sense of how far back you are going. Note: If this option is greyed out, it means there is currently nothing to revert back to.
- Back to an online saved version of your presentation: Can revert back to an online saved version of your presentation. This option assumes that the file is saved on OneDrive and that you have an internet connection. Selecting this option launches safari and takes you to OneDrive. Log in with your Microsoft account and you will see all of the previous versions of your file by date on the left (assuming you have some) and allows you to revert back to that specific date.
9. Properties
Shows you the properties of your PowerPoint presentation including:
- Last modified
- Modified by
Note: File Properties (other than Name) are only editable on the desktop version of PowerPoint. To modify a presentation’s name, you can duplicate the presentation and save it as a new name, or use the OneDrive app for PowerPoint to edit the presentation’s name on your OneDrive. To learn more about this, check out our article on using the OneDrive App .
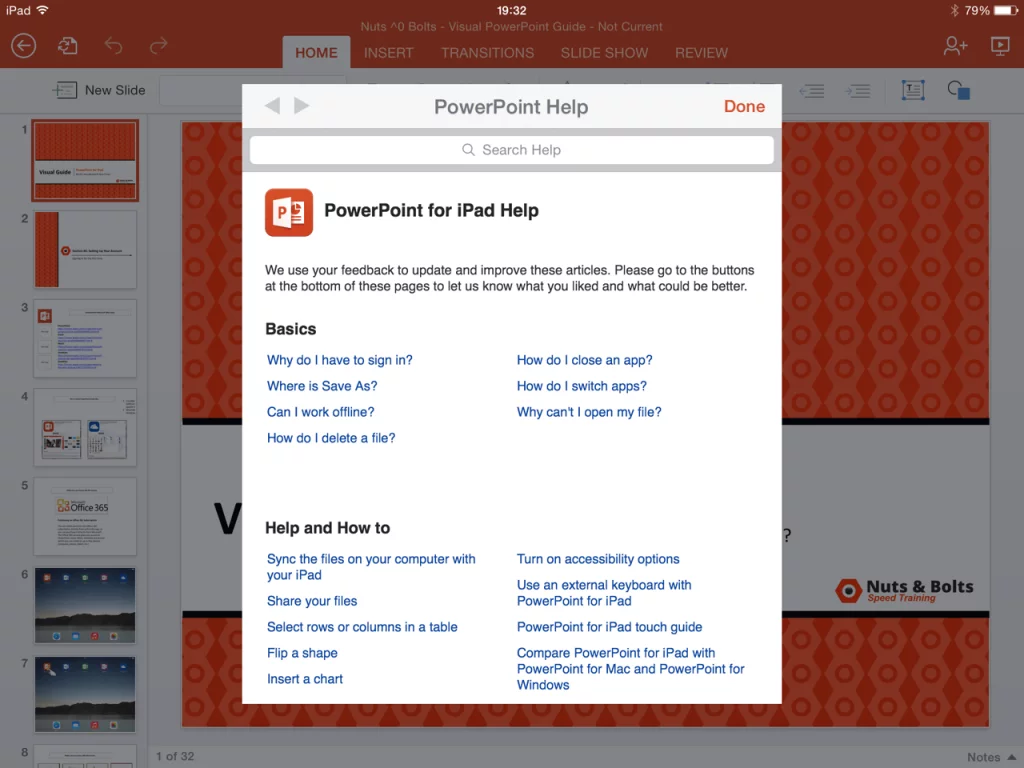
The Help and Support button launches basic help, support and tutorials for PowerPoint on your iPad. This menu is not extensive, but does offer solutions to simple questions you might have.
Note: You do need an internet connection to launch this dialog box.
The Home tab
1. New slide

This opens the PowerPoint slide gallery and allows you to pick from the available layouts within your presentation.
The five slide layouts shown in the picture are the standard layouts we use at Nuts & Bolts Speed Training for 99% of all of our PowerPoint presentations, you might have more or less slides layouts depending on your setup.
The Price of iPad Portability
Limited to Inserting Slides Only: You are limited to inserting slides layouts on your iPad. The Slide Master View is currently unavailable for PowerPoint on your iPad.
Changing a Slide’s Layout: You are limited to inserting new slides on your iPad, you cannot push a layout onto an existing slide.
To move an existing slide onto an new layout, you either need to wait until you are on your desktop version of PowerPoint, or insert a new slide layout, and copy and paste the different objects onto the new slide layout….kind of sucks, but that’s the price of portability.
2. Font styles
Copying and Pasting Style: If you are simply trying to match the font style of an object, it is often faster to copy and paste the font style you are trying to match, rather than identifying the font style, and then changing the font elsewhere
Microsoft Account: Sign in with the account you use for OneDrive, Xbox, LIVE, Outlook.com or other Microsoft services.
3. Font size

The font size dropdown in PowerPoint for iPad gives you three different ways to change the font size of your text:
#1 Pre-set Sizes: Select a preset size in the dropdown menu
#2 Clicker: You can use the plus and minus signs to select a font size
#3 Manually: You can double-tab the number between the plus sign and minus sign, and manually type in your desired font size
4. Bold / italics / underline
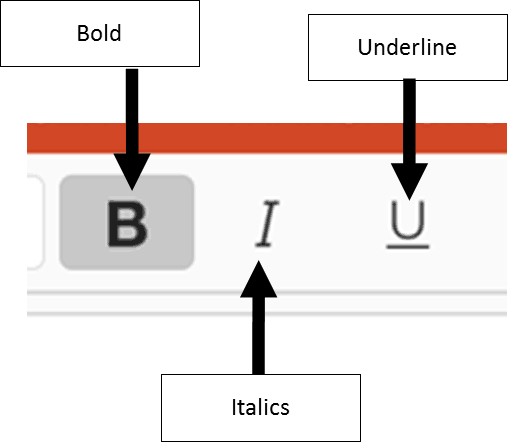
- Bold: Creates bold text for highlighting information, often used in titles.
- Italics: Creates italicized text for highlighting information, often used in subtitles and quotes.
- Underline : Creates an underline text for highlight information, often used in titles and subtitles.
Note: There is no way to make a double underline in PowerPoint for your iPad. Pro Tip: Don’t overdo it
If everything is important, nothing is important. Use text highlighting sparingly to better emphasize your points.
5. Formatting

- Strikethrough: Creates a strikethrough effect to emphasize that something should be removed
- Subscript & Superscript : Creates the -25% offset subscript and +30% offset superscript formatting. These are typically used in formulas, mathematical expressions and specifications for chemicals and isotopes

Includes the basic theme colors for your PowerPoint presentation, and their resulting gradients (which you cannot manually set).
Automatic: The automatic color is determined by the “Windows Text” color set in Control Panel Display Appearance. Changing this color will affect text color in all Windows applications.
Editing Your Presentation’s Theme: Currently you are not allowed to change or edit your PowerPoint presentation’s theme on your iPad. All theme editing or updating must be done on your desktop version of PowerPoint.
Setting Your Presentation’s Defaults on Your Desktop: You can set the default formatting for your objects on your desktop version of PowerPoint and those defaults will carry over into PowerPoint for your iPad.
6b. More colors

#1 More Colors: Selecting more colors gives you a dialog box with standard colors to choose from.
#2 Recent Colors: If you use the Custom Color option to create your own colors within your presentation, this second row of recent colors populates.
#3 Custom Color: Allows you to select your own color from a color grid (which is not very useful as you cannot get a precise color).
Advanced Color Formatting: Currently there are no options to input RGB or HSL codes to create specific custom colors or apply transparencies in PowerPoint for your iPad. The eyedropper tool is also not available.
To copy a custom color style (font color, shape fill or shape outline) into your recent colors to reuse somewhere else, see our blog post on using custom colors in PowerPoint on your iPad. 7. Text styles

Includes standard WordArt styles you can apply to highlight your message.
Style Note: WordArt is often distracting and hard to read and should be used sparingly if at all. See the example of Aqua, Accent 1, Reflection below the font styles gallery I created.
Note: You do not have the Text Fill, Text Outline and Text Effect options that you have on your desktop version of PowerPoint. You are currently limited to these 20 styles.
Left / Center / Right / Justify: Dictates the horizontal text alignment for text within a given PowerPoint object.
Top / Middle / Bottom: Dictates vertical text alignment for text within a given PowerPoint object.
Horizontal / Rotate Clockwise / Rotate Counterclockwise / Stacked: Dictates the rotation of your text within a given PowerPoint object. See next page for examples of each.
Columns: Controls how many columns of text are within an object. This is often used for objects with lots of text to visually break up the text.
Note: Notice that the alignment drop down stays open so that you can make multiple selections at the same time while working in your presentation…very handy!

Allows you to select bullet and numbers options for your lists in PowerPoint, but there are number of limitations that you should be aware of:
Limitation #1 : The Ruler – As you cannot access the ruler in PowerPoint for your iPad, you are stuck with the default bullet and numbering tab spacing
Limitation #2: Custom Bullets – You cannot create custom bullets like you can on your desktop version. That said, custom bullets and numbering created on the desktop version of PowerPoint does carry over into PowerPoint for your iPad, but you are not allowed to use it outside of the shape that it is currently set in.
Limitation #3: Numbers Start at 1 – All numbers on the iPad start at 1. You cannot adjust the starting number.
10. List level increase / list level decrease

Decrease List Level: SHIFT + TAB equivalent on the desktop version of PowerPoint. Moves a bullet or numbering backwards one indent level
Increase List Level: TAB equivalent on the desktop version of PowerPoint. Moves a bullet or numbering forward one indent level.
11. Text box
Inserts a text box into the middle of your PowerPoint slide.
Note: All inserted objects always start in the middle of your slide. There is currently no setting to manually place/draw your objects in after you have selected them.
12. Shapes gallery

Opens the shapes gallery and allows you to pick a shape to insert into the middle of your PowerPoint slide.
Shapes Always Default to the Center of Your Slide: Whenever you insert an object, it always defaults to the center of your slide.
You will need to manually drag it around and position it. To make sure your shapes are the same size, either copy and paste an existing shape on your slide, or line it up next to your shape, and resize it using your SmartGuides.
The Insert tab
Inserting a table immediately gives you a default 3 by 3 table in the center of your PowerPoint slide and opens the Table Tab on the Ribbon. See Table Tab for Table Options.
3. Pictures

Selecting pictures opens the Photo Gallery. Currently, you are only allowed to insert pictures that are stored locally on your iPad (in your Camera Roll, Photo Streams, etc.).
If you have company pictures on your computer that you want to access on your iPad, you can share those pictures wireless through the iCloud service so that you can access them in PowerPoint on your iPad.
Check out Apple’s step-by-step walk-through of the iCloud service .

Opens the shapes gallery and adds the Shape Tab on the Ribbon.
Default Your Shapes on Your Desktop: To avoid clumsy formatting in PowerPoint for your iPad, I highly recommend setting default formatting on the desktop version of PowerPoint for your specific decks as it carries over onto your iPad.
To set the default formatting on your desktop version of PowerPoint, simply right-click the shape you want to default the formatting for, and in the right-click menu, select set as default shape (line or text box, depending on what you are defaulting).
5. Text boxes

Inserts a text box into the middle of your PowerPoint slide and opens the Shapes tab on the Ribbon.
Pro Tip: Insert rectangles instead of text boxes to avoid the default “resize shape to fit text” setting. All text boxes start with this default setting and there is no way to un-select or change this formatting option in PowerPoint for your iPad.
The Transitions tab
1. Transition effect
Represents the 39 different types of transitions you can apply to your PowerPoint slides on your iPad.

32 of the 39 transition effects have effect options associated with them which changes the direction of the transition. These variations are often from left to right, or from top to bottom. For the style effects to be active, a transition with effects has to first be applied to a slide.
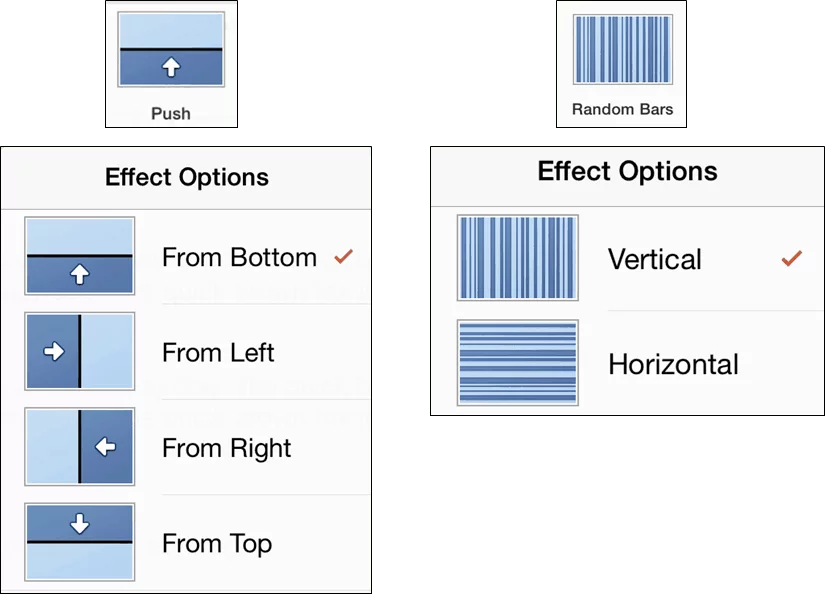
To change the effect options, simply select the alternative transition effect you would like for your slide.
Style Note: As transitions are often distracting when giving a presentation, I highly recommend using them sparingly (if at all) within your presentations.

Previewing a Transition: To preview your transition, hit the “from current” icon in the upper right hand corner of your screen to start the presentation form the current slide. Once in presentation mode, swipe right once to move to the previous slide, and then swipe left to preview the transition you just set for your slide.
Transitions without effects:
- The Flash, Curtains

3. Apply to all styles

The Review tab
1. Show comments

Allows you to turn comments on or off in your PowerPoint presentation. Comments appear either in the upper left hand corner of the slide, or on the specific objects they have been added to.
Note: Comments can be only be viewed on the iPad, there is currently no support for editing, adding or removing comments from a presentation.

2. Previous

Cycles backwards to the previous com ment within your presentation, starting from your current slide

The Picture tab
1. Picture styles
Represents the 28 different preset picture styles you can apply to your pictures in PowerPoint.

2. Picture shadows
Represents the 23 different preset picture shadows you can apply to your pictures in PowerPoint.

4. Re-order
All objects on a PowerPoint slide exist in a stacking or layering order based on when they were inserted onto the slide.

- Bring Forward: Brings an object forward, one layer.
- Bring to Front: Brings an object to the front layer of all the other objects on the slide
- Send Backward: Sends an object backwards one layer.
- Send to Back: Sends an object all the way to the back layer behind all the other objects on the slide.
Pro Tip 2: The Bring to Front and Send to Back commands are the fastest and easiest commands to use, as you know exactly where your objects will go. Best practice is to use these first, and then readjust any other objects that you want behind or in front of your other objects.
Note: More than one object has to be present on the slide for this command to be active.
The Shapes tab

1. Text Styles

The Text Styles gallery includes the 20 standard WordArt text styles that you can use to bring emphasis to or highlight the text within your presentation.
Are text styles worth using? Typically not, but it really depends on what you are trying to accomplish.
For example, for corporate presentations, WordArt is distracting and hard to read and should be used sparingly, if at all. That said, if you are using PowerPoint as a medium for creating a poster or a graphic for a website, the WordArt text styles could be useful.
Missing Text Styles Options: In PowerPoint for your iPad, the Text Fill, Text Outline and Text Effect formatting options are not available, you can currently only play with these options on your desktop version of PowerPoint.
2. Shape Styles

The Shapes Styles represent the 42 different default shape formatting styles you can apply to your shapes in PowerPoint. Now although these are tempting to use, keep in mind that anyone who has PowerPoint has access to these shape styles, so simply using these default formatting styles will result in a very default looking PowerPoint presentation.
Can I change the default shapes styles in the gallery? Yes, the shape styles are dictated by your PowerPoint theme settings, so manipulating or building a corporate theme will change these default formatting styles.
3. Shape fill
Allows you to change the shape outline color in PowerPoint.

- Bring Forward: Brings an object forward, one layer
- Bring to Front: Brings an object to the front layer of all the other objects on the slide
- Send Backward: Sends an object backwards one layer
- Send to Back: Sends an object all the way to the back layer behind all the other objects on the slide

The Table tab
- Single tap a table: Get the standard object edit menu.
- Double tap a cell within a table: Get the table specific edit menu.
- Cut: Cuts the text out of the selected cell.
- Copy: Copies the text in the selected cell.
- Paste: Pastes in your last copied text or object. Note that you cannot copy and paste formatting between tables.
- Clear: Clears the contents of the cell.
- Delete: Opens an additional menu allowing you to either delete the column or row you are currently in.
- Insert: Allows you to insert a column to the left of the current cell, or a row above your current cell.
- AutoFit: Collapses the column width to fit the text within it.

- Header Row: Formats the first row in your table as a header row
- Total Row: Formats the last row in your table as a total
- Banded Row: Adds a rotating fill color to the horizontal rows of your table
- First Column: Highlights the first column in a table
- Last Column: Highlights the last column in a table
- Banded Columns: Adds a rotating fill color to the vertical columns of your table

Note: As you make table selections, the style gallery will populate with a live preview of those options for the different table styles.
2. Table styles

From a formatting perspective, I highly recommend starting with a pre-formatted table style that gets you closest to your end result, and then manually tweaking the table from there.
Lists the different default table styles you can apply to your tables in PowerPoint.
Note: The Styles Options (discussed above) that you have selected, will be shown within the Table Styles Gallery making it easier to pick the default style that get you closest to your end goal.
Style Note: Use the formatting / highlighting sparing to increase the effectiveness of your table.
Tapping the fill colors opens the theme colors drop down, which you can use to manually override any of the Table Styles you have already applied to your table.

Pro Tip: To reverse the banding of your rows or columns, first, manually format the first row or column with a fill color, and then toggle on or off the header row option or the first column option.
Note: You are not able to change the outline weights or colors of a table or cells within a table in PowerPoint on your iPad. All table border formatting will have to wait until you are on your desktop of PowerPoint.
Gives you options to insert rows above or below the current cell you have selected within your table, or columns to the left or right of the current cell you have selected.

How can I insert multiple rows or columns at the same time? To insert multiple rows or columns within your table, first select multiple rows or columns within your table. With multiple rows or columns selected, when you click insert, the same number of rows or columns will be added to your table.
Deletes the row, column or table that you currently have selected.

How do I AutoFit multiple columns at the same time? First select the individual columns (or the entire table) before selecting AutoFit.
7. Alignment

The Text Alignment command changes the horizontal text alignment (Left, Center, Right) or the vertical text alignment (Top, Middle, Bottom) of a cell within the selected cell in your table (similar to using the Text Alignment tool on your shapes or other PowerPoint objects).
The Reorder command allows you to change the layering of the objects on your PowerPoint Slide. All objects on your slide exist in a stacking or layering order (one on top of the other) based on when they were inserted on to the slide.
- Bring Forward: Brings an object forward, one layer
- Bring to Front: Brings an object to the front layer of all the other objects on the slide
- Send Backward: Sends an object backward one layer
- Send to Back: Sends an object all the way to the back layer behind all the other objects on the slide

Pro Tip: When using the reorder command on a busy PowerPoint slide with lots of objects, the Bring to Front and Send to Back commands are the fastest and easiest to use, as you know exactly where your objects will end up.
Why is the reorder command grayed out? More than one PowerPoint object has to be present on your slide for the Reorder command to be active.
The Notes pane
1. Opening the Notes pane To open the Notes Pane, tap in the lower right-hand corner of your screen where it says ‘Notes’.

How do I best use the Notes pane on your iPad? I find the notes pane useful for quickly reviewing notes prior to your presentation, as the automatic full screen mode makes it easy to both review the notes for a particulate slide, and see the thumbnail of that particular slide, outlined in orange on the left side of the screen. The notes pane will also conveniently stay open on your iPad until you manually close it.
2. Closing the Notes pane
To close the Notes Pane in PowerPoint on your iPad, simply click the notes icon in in the upper right-hand corner of the slide, and you will return to the Normal View of your presentation.

Share & Slide Show View
These are the options for sharing your documents:
- Email as Link: Creates a “View Only” link or a “View and Edit” link of your file and launches the Mail App.
- Email as Attachment: Attaches the presentation to an email, the recipient can open and edit the document natively.
- Copy Link: Creates a “View Only” link or a “View and Edit” link of your file that you can paste into other documents or emails.
The Slide Show icon starts your presentation in slide show mode starting form the current slide. Besides running your presentation, this is great for spot checking your content and for reviewing any transitions you have applied as there is no “live preview” for them on your iPad.
The Slide Show icon is the equivalent of hitting the F5 keyboard shortcut on your desktop version of PowerPoint.
Help us keep this article updated
We hope you’ve found this PowerPoint for iPad guide helpful.
If you’ve see something that we’ve missed, PLEASE let us know and we’ll do our best to update this guide ASAP.
Oh, and we hope you’ve paid special attention to the pro tips and tricks we’ve sprinkled through the guide to help you avoid major errors, or to help you troubleshoot issues.
What’s next?
Related articles.
- PowerPoint settings: program level vs. presentation level
- Set Up Slide Show: Customize how your PPT presentations run
- What is the Popup Toolbar in PowerPoint?
- Strikethrough Shortcut (l̶i̶k̶e̶ ̶t̶h̶i̶s̶) for Word, Excel & PowerPoint
- How to hyperlink in PowerPoint (best practices)
About The Author

Popular Tutorials
- How to Strikethrough Text (l̶i̶k̶e̶ ̶t̶h̶i̶s̶) in Word, Excel & PowerPoint
- How to Make Animated Fireworks in PowerPoint (Step-by-Step)
- How to Create a Flash Card Memory Game in PowerPoint (Like Jeopardy)
- Keyboard Shortcuts Not Working: Solved
PowerPoint Tutorial Categories
- Strategies & Opinions
- Shortcuts & Hacks
- Presentation Design
- Pictures, Icons, Videos, Etc.
- New Features
- Charts & Data Viz
We help busy professionals save hours and gain peace of mind, with corporate workshops, self-paced courses and tutorials for PowerPoint and Word.
Work With Us
- Corporate Training
- Presentation & Template Design
- Courses & Downloads
- PowerPoint Articles
- Word Articles
- Productivity Resources
Find a Tutorial
- Free Training
- For Businesses
We help busy office workers save hours and gain peace of mind, with tips, training and tutorials for Microsoft PowerPoint and Word.
Master Critical PowerPoint Shortcuts – Secure Your FREE Training Module and Save Valuable Time!
⌛ Master time-saving expert techniques.
🔥 Create powerful presentations.
🚀 Propel your career to new heights.
We value your privacy – we keep your info safe.
Discover PowerPoint Hacks Loved by Industry Giants - KKR, AmEx, HSBC!
Over 114,880 professionals in finance, marketing and sales have revolutionized their PPT skills with our proven methods.
Gain FREE access to a full module of our premium PowerPoint training program – Get started today!
We hate spam too and promise to keep your information safe.
You are currently viewing a placeholder content from Facebook . To access the actual content, click the button below. Please note that doing so will share data with third-party providers.
How to View Notes in PowerPoint While Presenting With One Monitor

Presenting a PowerPoint is a great way to engage and inform an audience, but it can be challenging to keep track of your notes while you’re presenting. Fortunately, PowerPoint includes a feature that allows you to view your speaker notes on one monitor while your audience sees the presentation on another. This makes it much easier to stay on track and deliver your message effectively. In this guide, we’ll take a detailed look at how to view notes in PowerPoint while presenting with one monitor, as well as some tips for getting the most out of this feature.
Table of Contents
Why Viewing Notes While Presenting is Important
When giving a presentation, it’s important to have access to your notes to stay on track and avoid missing important points. Viewing your notes while presenting can also help you remember key details and ensure that you’re delivering the information in an organized and effective manner. This can be especially important if you’re presenting complex or technical information. By having access to your notes, you can make sure you’re covering all the necessary points and answering any questions that might come up.
Another benefit of viewing your notes while presenting is that it can help you feel more confident and prepared. Knowing that you have your notes to refer to can alleviate any anxiety or nervousness you may feel about presenting. It can also give you a sense of security, knowing that you have all the information you need at your fingertips. By feeling more confident and prepared, you’re more likely to deliver a successful presentation that engages your audience and effectively conveys your message.
Understanding the Need for One Monitor
Using Presenter View in PowerPoint allows you to view your notes on your laptop or primary monitor while the audience sees only the presentation on the projected screen, even if you only have one monitor. This feature is particularly useful when you don’t have a dual-monitor setup. Presenter View provides a separate interface for the presenter that includes the current slide, speaker notes, and upcoming slides, ensuring that you can deliver your presentation smoothly without revealing your notes to the audience.
How to Access Notes in PowerPoint
Accessing your notes in PowerPoint while presenting on a single monitor is straightforward with Presenter View. To use Presenter View, start your PowerPoint presentation and go to the “Slide Show” tab in the ribbon menu. Then, check the “Use Presenter View” box. When you start the slideshow, your presentation will appear on the projected screen, while your notes and controls appear on your primary monitor. This allows you to reference your notes discreetly during the presentation.
Step-by-Step Guide to Viewing Notes in PowerPoint
Here’s a step-by-step guide to viewing your notes in PowerPoint using Presenter View:
- Open your PowerPoint presentation.
- Navigate to the slide on which you wish to start presenting.
- Select the “Slide Show” tab in the ribbon menu.
- Check the “Use Presenter View” box.
- Start your presentation by clicking on “From Beginning” or “From Current Slide.”
- Your notes will appear on your primary monitor, while the audience will see only the slides on the presentation screen.
Remember, your audience will not see your notes, allowing you to discreetly reference them during your presentation.
Tips for Presenting With One Monitor
Here are some tips for presenting with one monitor:
- Practice your presentation beforehand to make sure you’re comfortable with the software and know how to access Presenter View.
- Use the Presenter View to keep track of key points and ensure that you’re covering all the necessary information.
- Put your notes in bullet-point format to make them easy to follow and read while presenting.
- Use concise language and avoid excessive text on your slides.
- Maintain eye contact with your audience as much as possible, even when referencing your notes.
How to Customize Your Notes View in PowerPoint
PowerPoint allows you to customize your notes view to suit your preferences. To do so, enter Presenter View and hover over the notes section. You can then adjust the font size and formatting to make your notes easier to read. Additionally, you can rearrange the on-screen elements in Presenter View to suit your presenting style.
Shortcut Keys for Easy Navigation Through Notes
PowerPoint includes a number of keyboard shortcuts that can help you navigate through your presentation easily. Here are some of the most useful ones:
- Use the “N” key or the right arrow to move forward one slide at a time.
- Use the “P” key or the left arrow to move backward one slide at a time.
- Press “Ctrl” + “S” to access the “All Slides” view, where you can select a specific slide to jump to.
Troubleshooting Common Issues When Viewing Notes
If you’re having trouble viewing your notes in PowerPoint using Presenter View, ensure that Presenter View is enabled in the “Slide Show” tab. If the notes are not appearing, try restarting PowerPoint or your computer to resolve any temporary glitches. Additionally, check that your screen resolution and display settings are correctly configured to support Presenter View.
Alternative Methods for Viewing Notes While Presenting
If you prefer not to use Presenter View or encounter difficulties, you can print out your notes and refer to them as needed. Another option is to split your screen, displaying the presentation in a window on one half and a document with your notes on the other half. This method requires you to manually scroll your notes, but it can be a useful alternative.
Best Practices for Using Notes During a Presentation
Here are some best practices for using notes during a presentation:
- Don’t rely too heavily on your notes–practice your presentation beforehand and aim to deliver your message in a natural, conversational tone.
- Use your notes as a guide rather than a script.
- Keep your notes organized and easy to follow.
- Make sure to address any questions or concerns that come up during the presentation.
- Try to engage with your audience and create a rapport with them.
Benefits of Using One Monitor While Presenting
Using one monitor while presenting with Presenter View has several benefits. It allows you to reference your notes discreetly, helps you stay organized and on track, and enables you to maintain better eye contact with your audience. This setup can also simplify your presentation space and reduce the risk of technical issues.
Advanced Techniques for Managing Your Presentation and Notes on One Monitor
As you become more comfortable with Presenter View, you can explore additional features such as the thumbnail strip to preview upcoming slides, the timer to keep track of your speaking duration, and the ability to zoom into a particular slide detail during your presentation.
How to Switch Between Different Views During Presentation Mode
To switch between different views during presentation mode, you can use the following methods:
- To access Presenter View, start your slideshow and press the “Alt” + “F5” keys.
- To exit Presenter View and return to the normal view, press the “Esc” key.
- To black out the screen during the presentation, press the “B” or period key.
How to Control Slides, Animations and Media During the Presentation with One Monitor
During your presentation, you can control slides, animations, and media with the following actions:
- To advance to the next slide or animation, press the right arrow key or click the left mouse button.
- To return to the previous slide or animation, press the left arrow key.
- To play a video or audio file, click on it directly or use the media controls in Presenter View.
- To pause or stop the media, use the media controls in Presenter View.
With these tips and techniques in mind, you should now be well-equipped to view your notes in PowerPoint while presenting with one monitor. Remember to practice beforehand and experiment with different techniques to find the ones that work best for you. With a little bit of preparation and practice, you can deliver a confident and effective presentation that engages and informs your audience.
By humans, for humans - Best rated articles:
Excel report templates: build better reports faster, top 9 power bi dashboard examples, excel waterfall charts: how to create one that doesn't suck, beyond ai - discover our handpicked bi resources.
Explore Zebra BI's expert-selected resources combining technology and insight for practical, in-depth BI strategies.

We’ve been experimenting with AI-generated content, and sometimes it gets carried away. Give us a feedback and help us learn and improve! 🤍
Note: This is an experimental AI-generated article. Your help is welcome. Share your feedback with us and help us improve.

- Start the presentation and see your notes in Presenter view Article
- Add speaker notes to your slides Article
- Rehearse and time the delivery of a presentation Article
- Record a slide show with narration and slide timings Article
- Print your PowerPoint slides, handouts, or notes Article
- Create a self-running presentation Article

Add speaker notes to your slides
When you're creating a presentation, you can add speaker notes to refer to later while delivering the slide show in front of an audience.
During your presentation, the speaker notes are visible on your monitor, but aren't visible to the audience. So the Notes pane is the place to store talking points that you want to mention when you give your presentation.

Add notes while creating your presentation
The Notes pane is a box that appears below each slide. (It is outlined in magenta in the picture below.) An empty Notes pane will prompt you with text that says, Click to add notes . Type your speaker notes there. If you don’t see the Notes pane or it is completely minimized, click Notes on the task bar across the bottom of the PowerPoint window (also marked in magenta in the picture below).

If your notes exceed the allotted length of the Notes pane, a vertical scroll bar appears on the side of the pane. You can also enlarge the Notes pane by pointing your mouse at the top line of the pane and then dragging upward after the pointer turns into a double-headed arrow.
What the notes look like in Presenter view
Tip: You can add notes either while you’re presenting, directly from Presenter view, or as you’re editing your presentation. For information on how to add speaker notes to while editing your presentation, see Add speaker notes to your slides.

The notes appear in a pane on the right. If you need to add or delete something, simply click in the text box to edit it. The text wraps automatically, and a vertical scroll bar appears if necessary. You can also change the size of the text in the Notes pane by using the two buttons at the lower left corner of the Notes pane:

Presenter view isn't something you have to create. PowerPoint assembles it for you by gathering the notes you've typed for each slide and pairing them with a set of controls for navigating through your presentation.
By default, PowerPoint is set to use Presenter view when you run a slide show. You can change this setting on the Slide Show tab of the PowerPoint ribbon:

Read Start the presentation and see your notes in Presenter view for more details about how to see and use Presenter view.
Print speaker notes
See Print slides with or without speaker notes .
Print slides with or without speaker notes
Start the presentation and see your notes in Presenter view
Transfer slides from one presentation to another
Add notes to your slides
To add notes to your slides, do the following:
On the View menu, click Normal .
Select the thumbnail of the slide you want to add notes to.

The notes pane will appear beneath your slide. Click where it says Click to add notes and type whatever notes you'd like to add.

View your notes while you present
If you want to view your notes while you're presenting but make sure your audience only sees what you've put on the slide itself, use presenter view. Here's how:
On the View menu, click Presenter View .
You'll see the main slide that you're presenting, a preview of the next slide, and any notes you've added for the current slide below the preview of the next slide.

Your audience will only the slides that you're presenting in your presentation, and not your notes.
Print your slides and handouts
PowerPoint for the web lets you create speaker notes, but it doesn't have the ability to show you the notes while you're presenting your slide show.
Create speaker notes

The pane appears across the bottom portion of the PowerPoint window, with the cursor blinking, ready for you to begin typing.

If you're a Microsoft 365 business subscriber and your presentation is stored on OneDrive for work or school or SharePoint in Microsoft 365, you can print your speaker notes. See Print your PowerPoint slides, handouts, or notes for more information.
See speaker notes while presenting
Currently you must use a desktop version of PowerPoint to see speaker notes while you're presenting.

Need more help?
Want more options.
Explore subscription benefits, browse training courses, learn how to secure your device, and more.

Microsoft 365 subscription benefits

Microsoft 365 training

Microsoft security

Accessibility center
Communities help you ask and answer questions, give feedback, and hear from experts with rich knowledge.

Ask the Microsoft Community

Microsoft Tech Community

Windows Insiders
Microsoft 365 Insiders
Was this information helpful?
Thank you for your feedback.

May 9, 2022
Edit your notes in Presenter view in PowerPoint
Victoria Tran
- Add our blog to your RSS feed reader" href="/rss/blog.xml" data-bi-name="RSS Subscription" data-bi-id="rss_feed" data-bi-bhvr="120" data-bi-socchn="RSSSubscription" title="Microsoft 365 Insider Blog RSS" target="blank" class="d-inline-block">
Hey, Officer Insiders! My name is Victoria Tran, and I’m a Program Manager on the PowerPoint team. I’m thrilled to share that you can now edit notes in Presenter view in PowerPoint for Windows. No more switching to Editor view to type or change your notes, even during a presentation!
Edit notes in Presenter view
Accessing and editing your slide content whenever the need arises is a key part of the PowerPoint workflow. Whether you’re making an important edit to your speaker notes during a presentation rehearsal or jotting down feedback during your presentation, the ability to edit notes in Presenter view increases your productivity and eliminates the need to toggle between views.
We are excited to add this highly requested feature and expand the use of PowerPoint notes. In the future, we’ll continue to add support for editing notes in other views, such as Teleprompter view.
How it works
Ready to edit notes in Presenter view?

NOTE: You can also press the F6 key to select the Notes pane in Presenter view. When a white outline appears around the pane, press Enter and start typing to make any updates you want.
Known issues
Presenter view currently only allows basic formatting of notes, such as bold, italics, and underlining (via keyboard shortcuts). Formatting such as text color, highlighting, and other options aren’t yet available.
Tips and tricks
- If you are using keyboard commands to navigate through your slides during a presentation, make sure the text insertion point is not showing in the Notes pane. If it is, the arrow keys will move the insertion point around in the pane instead of navigating the slides.
- If you have two monitors, a full-screen slide will show on one monitor and Presenter view on the other monitor, featuring a view of the next slide, your speaker notes, a timer, and more. If you have just one monitor, you can press Alt + F5 to try out Presenter view.
Availability
We will be rolling the edit notes in Presenter view feature out to Office Insiders running Beta Channel Version 2204 (Build 15225.20000) or later.
Don’t have it yet? It’s probably us, not you.
Features are released over some time to ensure things are working smoothly. We highlight features that you may not have because they’re slowly releasing to larger numbers of Insiders. Sometimes we remove elements to further improve them based on your feedback. Though this is rare, we also reserve the option to pull a feature entirely out of the product, even if you, as an Insider, have had the opportunity to try it.
We want to hear from you! Please click Help > Feedback to submit your feedback about this feature.
Learn what other information you should include in your feedback to ensure it’s actionable and reaches the right people. We’re excited to hear from you!
Sign up for the Office Insider newsletter and get the latest information about Insider features in your inbox once a month!
Sorry, JavaScript must be enabled to use this app.
How to See Notes on PowerPoint on the Laptop: A Step-by-Step Guide
Seeing notes on a PowerPoint presentation on your laptop can be quite handy, especially when you’re presenting or rehearsing. To do this, all you need to do is open your PowerPoint file, go to the ‘View’ tab, and select ‘Notes’ to toggle the visibility of your speaker notes. It’s that simple!
After completing this action, you will be able to view your presentation slides alongside any notes you’ve added for each slide. This helps you to stay on track during a presentation and remember key points without the audience seeing your notes.
Introduction
Have you ever been in the middle of a PowerPoint presentation and suddenly forgotten your next talking point? It’s happened to the best of us. That’s where speaker notes come in – they’re the secret weapon for a smooth and professional presentation. But do you know how to see these notes on your laptop while you’re presenting? Fear not, this guide will walk you through the process.
Speaker notes in PowerPoint are a feature that allows presenters to add reminders, additional information, or cues that are not visible to the audience but can be seen by the presenter on their laptop. This feature is particularly important for educators, business professionals, and anyone who relies on presentations to communicate information effectively. It allows for better preparation, reduces the likelihood of missing key points, and boosts confidence during a presentation.
Step by Step Tutorial: How to See Notes on PowerPoint on the Laptop
Before diving into the steps, let’s understand what we aim to achieve. By enabling the notes view in PowerPoint, we ensure that you can see your notes on your laptop while the audience only sees the slides.
Step 1: Open your PowerPoint presentation
Open the PowerPoint file that contains the presentation you wish to work with.
The first thing you need to do is to make sure that your presentation is open on your laptop. It can be a presentation you’re working on or one that you’re about to present.
Step 2: Go to the ‘View’ tab
In the PowerPoint ribbon, click on the ‘View’ tab to see the various view options available.
The ‘View’ tab is where you can change how you view your presentation while you’re editing it. This is where you can switch to the notes view.
Step 3: Select ‘Notes’
Click on the ‘Notes’ option to toggle the visibility of the speaker notes for your presentation.
Once you select ‘Notes’, you will see a section appear at the bottom of each slide where you can view and edit your speaking notes.
Additional Information
Besides knowing how to view notes, there are a few additional tips worth mentioning. First, practice using the notes effectively so that you’re not constantly reading from them; they should serve as prompts rather than a script. Also, consider the size and font of your notes – they should be easily readable at a glance.
Moreover, if you’re using multiple monitors, PowerPoint has a ‘Presenter View’ that can show you the notes on one screen while the audience views the slides on another. Lastly, remember that your notes are for your eyes only, so feel free to include any personal reminders that will help you during your presentation.
- Open your PowerPoint presentation.
- Click on the ‘View’ tab in the ribbon.
- Select the ‘Notes’ option to view your speaker notes.
Frequently Asked Questions
Can i print my powerpoint slides with notes.
Yes, you can print your slides with notes by choosing ‘Print’ and selecting ‘Notes Pages’ under ‘Settings.’
Can I view my notes in PowerPoint online?
Yes, the online version of PowerPoint also lets you view and edit notes.
What should I do if I can’t see my notes in PowerPoint?
Make sure you are in ‘Notes’ view. If the problem persists, try restarting PowerPoint or checking for updates.
Is there a shortcut to view notes in PowerPoint?
Yes, you can press ‘Alt+S’ followed by ‘N’ to switch to Notes view quickly.
Can I use notes during a PowerPoint presentation?
Yes, you can use notes during your presentation by using ‘Presenter View’ or simply toggling the ‘Notes’ view on your laptop.
In the world of presentations, being able to see notes on PowerPoint on your laptop is a game-changer. It’s a feature that equips you with a hidden guide, ensuring your presentation is as effective and engaging as possible. So, whether you’re a teacher, a student, or a professional, mastering this skill can make a substantial difference in your presentation game. Remember, the goal here is not to memorize your notes but to use them as a tool to enhance your delivery and keep your audience captivated. Happy presenting!

Matthew Burleigh has been writing tech tutorials since 2008. His writing has appeared on dozens of different websites and been read over 50 million times.
After receiving his Bachelor’s and Master’s degrees in Computer Science he spent several years working in IT management for small businesses. However, he now works full time writing content online and creating websites.
His main writing topics include iPhones, Microsoft Office, Google Apps, Android, and Photoshop, but he has also written about many other tech topics as well.
Read his full bio here.
Share this:
Join our free newsletter.
Featured guides and deals
You may opt out at any time. Read our Privacy Policy
Related posts:
- How to Save Powerpoint as PDF with Notes
- How to Show Speaker Notes in Google Slides
- Can I Convert My Powerpoint to Google Slides?
- How to Set Time for Slides in Powerpoint
- How to Check Word Count on Powerpoint 2010
- How Do I Print Just the Notes in Powerpoint 2010?
- How to Make a Powerpoint Slide Vertical in Powerpoint 2013
- How to Unhide a Slide in Powerpoint 2013
- How to Change Line Spacing in Powerpoint for Every Slide at Once
- How to Loop a Slideshow on Powerpoint 2013
- How to Change the Font on All Slides in Google Slides
- How to Show or Hide the Speaker Notes in Powerpoint 2013
- How to Convert a PowerPoint to Word and Edit with Ease
- How to Change Hyperlink Color in Powerpoint 2010 (An Easy 5 Step Guide)
- How to Insert Slides from Another Presentation in Powerpoint 2010
- How to: Effortlessly Create PowerPoint Looping Presentations
- How to Delete Multiple Slides in Google Slides
- What Are Benefits of PowerPoint? A Comprehensive Guide
- How to Print with Speaker’s Notes in Powerpoint 2013
- How to Add Page Numbers in Powerpoint 2010
Tap To Continue
Productivity on the go
How To Put PowerPoint Slides Into OneNote For iPad (SOLVED)
The launch of the iPad revolutionized the way we work on the go. You no longer have to carry a laptop or notebook computer with you as you travel or commute. And yet you sacrifice some power for that mobility as most iPad apps are not as powerful as their desktop counterparts. But many things can still be done, like inserting PowerPoint slides into OneNote. Let’s show you how!
There are two simple ways to insert PowerPoint slides into OneNote. The first is by converting your slides into a PDF and importing it into OneNote, which will allow you to take notes on the slides. The other method involves embedding the PowerPoint file into a OneNote notebook from cloud storage.
These methods are both simple and easy to master, and the one you use will depend on your needs. Most people usually want to put the slides into OneNote so they can take notes on them, rather than just embedding the PowerPoint file, so this is what we will look at first. But we also have to ensure that your system meets all the requirements before we can do that.

Requirements For OneNote, PowerPoint On iPad
This may seem obvious, but if your iPad is unable to run the required software, then it is pointless to go into the detail of putting PowerPoint slides into OneNote. The system requirements are as follows:
- You need an iPad that runs at least iOS 8. This includes the original iPad Mini, iPad Air, iPad 2, or newer models.
- The appropriate Microsoft iPad apps. This will be either the iOS versions of PowerPoint and OneNote or you can also install the complete Microsoft Office app for iOS.
- A stylus or Apple Pen is recommended as it will make your life easier, especially when you’re taking notes, but it’s not an absolute requirement.
If you have all of the required hardware and apps, you are ready to get your PowerPoint slides into OneNote.
If you want to keep your iPad’s Screen clean and great for presentations we have a ton of tips and suggestions on how exactly to do that in our articled titled “ How To Protect Your iPad Screen From Fingerprints “.
Method 1: Slide Printout For Taking Notes In OneNote
This is the preferred method since most people want to import PowerPoint slides into OneNote to take notes on the slides. It is useful when attending lectures or conferences if the presenter makes the PowerPoint file available to attendees. This is also where a stylus or Apple Pen will come in handy since taking notes is much easier that way.
There are also two options to this method. We will start with the most straightforward option. To put your PowerPoint slides into OneNote on your iPad, simply follow these steps:
- Open the PowerPoint file in the PowerPoint or Microsoft Office for iOS app.
- Once the file is open, you should see a triangle with three dots in the upper right-hand corner of the app. This is the File icon. Tap that icon.
- In the File Options screen, choose Export, and then select “PDF” format.
- Select the storage location where you want to save the file. Ideally, this should be somewhere on the iPad itself, but iCloud is also not a bad option if you have an internet or data connection.
- Now open the OneNote app on your iPad.
- Create a new OneNote notebook, or open an existing notebook to where you want to insert the PowerPoint slides.
- Choose the Insert button in OneNote.
- Select the “PDF Printout” option.
- Now find the location where you saved the file, and select the PDF file.
- Your PowerPoint slides should now be visible in OneNote and ready for you to take notes.
Alternatively, if, for whatever reason, the steps above do not work for you, you can try to do it this way:
- Open the OneNote app and load the notebook where you want to load the slides.
- While keeping OneNote open in the background, open the PowerPoint app on your iPad as well.
- Open the PowerPoint presentation file in the PowerPoint app.
- Tap the button that looks like a triangle with three dots (the File icon).
- Select the “Print” option.
- Now select “Open in Another App.”
- Select “OneNote.”
- You can add a title to the notes and indicate where in OneNote you want to save the slides.
- You should see an icon of the PDF logo in the notebook you have opened in OneNote.
- Tap on this icon and choose “Printout.” This will load the slides ready for you to take notes.

Method 2: Embedding A PowerPoint Slideshow
This is not what most people refer to when they say they want to add PowerPoint slides to OneNote, but it is definitely worth mentioning. This method will not allow you to take notes on the slides, but it is a convenient way to keep all slideshows and files from a conference conveniently together in one place where you can easily reaccess it all at a later time.
The requirements for this second method are the same as mentioned above, but with the added requirement that you need a cloud storage app installed on your iPad as well. Almost any cloud storage will do, including OneDrive or DropBox. To embed your PowerPoint slideshow into OneNote, simply follow these steps:
- Ensure that your PowerPoint file is saved somewhere on cloud storage. This could be any cloud storage with an app installed on your iPad, including iCloud Drive.
- In the OneNote app, go to the notebook and page where you want to insert the PowerPoint file.
- Tap on any blank space on the page.
- Select “Insert.”
- Choose “File” from the list of options available to you.
- Select the source of the file location on the left, for example, “iCloud Drive” or “OneDrive.” If you cannot find the location source, tap on the “Edit” option located above the “Locations” list, and set the cloud storage option that you want to use to the “On” position. When you go back, you should be able to select the source.
- Browse to the folder containing the file that you want to insert.
- Tap on the PowerPoint slideshow file.
- The file should now be linked on your OneNote page, and you can easily open it by tapping on its icon in OneNote.
It is just as simple as that. Thanks to the nifty convergence trend and how Microsoft apps are built to integrate with one another, it’s never been easier to move files from one place to another. Putting PowerPoint slides into OneNote may be more complicated on an iPad than on a Windows PC, but once you see how easy it still is, you will wonder why you ever found it challenging.
Related posts:

Amazing Article: I run my business exclusively on an iPad! This is how I do it!
How to scan documents on your iPhone or iPad
You can use the Notes app to scan documents and add signatures on your iPhone or iPad.
Scan a document
Open Notes and select a note or create a new one.
Place your document in view of the camera.
Tap Save or add additional scans to the document.

Learn how to use the Continuity Camera to scan notes from your iPhone or iPad to your Mac .
Sign a document
Open Notes, then tap the document in the note.
To manually sign your document, follow steps 1-2, then select a tool to use and sign the document with your finger or an Apple Pencil with a compatible iPad .
Do more with Notes
Learn more about Notes on your iPhone or iPad .
Explore Apple Support Community
Find what’s been asked and answered by Apple customers.
Contact Apple Support
Need more help? Save time by starting your support request online and we'll connect you to an expert.
Contribute to the Microsoft 365 and Office forum! Click HERE to learn more 💡
March 14, 2024
Contribute to the Microsoft 365 and Office forum!
Click HERE to learn more 💡
Top Contributors in PowerPoint: Steve Rindsberg - Jim_ Gordon - John Korchok ✅
March 11, 2024
Top Contributors in PowerPoint:
Steve Rindsberg - Jim_ Gordon - John Korchok ✅
- Search the community and support articles
- Microsoft 365 and Office
- Search Community member
Ask a new question
How to see my notes while recording narrations in PowerPoint
Report abuse, replies (13) .
* Please try a lower page number.
* Please enter only numbers.
Let me help you to see the Narration while recording.
Refer to the sections Record a narration before or during a slide show and Preview a narration in the following link and check if it helps:
http://office.microsoft.com/en-us/powerpoint-help/record-and-add-narration-and-timings-to-a-slide-show-HA102749693.aspx
Let us know if the steps mentioned in the link were helpful to you.
Thank you.
2 people found this reply helpful
Was this reply helpful? Yes No
Sorry this didn't help.
Great! Thanks for your feedback.
How satisfied are you with this reply?
Thanks for your feedback, it helps us improve the site.
Thanks for your feedback.
Thanks for your reply.
I can see narrations recording on the screen but I still can't see my notes that are my narrations. Do I have to memorize them all?
The step 3 in the "Record comments on a slide" article said that I can see "record" but there is no "record" in the dialog. And can't record comments either on a slide.
By the way, I have Surface Pro with windows8.1 installed Office 365 home premium.
Thanks for your help.
4 people found this reply helpful
Hi, everybody out there, who are wondering why we can't see the notes while recording. No we can't. Because it does not have the function for it. That's why Microsoft Support Team wasn't reply to my question here, I guess or because I haven't paid enough for the software.
I think that PowerPoint doesn't have this functions yet. I maybe wrong but I couldn't get any reply from Microsoft Support Team but I figured out how to see the notes for my narrations during recording. There is a way to see them I found. I had to use the dual monitor configuration and run the slideshow. That case I can see the presenter screen on my PC and the slideshow on the another monitor. Again, this is not for building the presentation. It's only for the record of the voice for the slideshow we are running.
I think that it's for our boss to see if we did right while we were doing the presentation correct on the end of the day. If we have done OK for our work, we can use it again with the recorded one on the next show.
So, we have to look for an alternate and a better one if we like to have this function, I guess. Or add on, such as an articulate.com. I probably haven't paid enough for Microsoft but I've paid whatever they required, but yes, they said it's without any support. And they said to me if you wanted any support, you should pay more. I just couldn't afford to pay more than $300.00 to find out "Sorry, you can't!"
I was looking for the solution including "Sorry, you can't" or "There is a way but you have to pay for it."
I just wanted to find out if I could do it or not.
THAT'S THE ANSWER FOR THIS QUESTION. THANKS. PLEASE REPLY IF I'M WRONG.
67 people found this reply helpful
I'm still having very hard time to record voices on the slides and playback. I figured out this MS Powerpoint doesn't have a function to record voices while building a presentation although we can record our voice while presenting but it's not easy and controllable.
When I go on the menu on top,
SLIDE SHOW
Record Slide Show (Both Checked)
MY Slide Show is launched and the presenter slide show with note displays on my Surface Pro and the presentation displays on the another monitor since I have dual monitor configuration. I also see recording diagram with elapsed time on the presenting monitor.
Then, I pressed Enter key to move the next slide, the recording diagram will disappear. It works on the another monitor and on my Surface Pro screen but either slide sample on the left nor notes on the presenter screen. When I hit enter key again, the new slide will insert on the presenter PC.
In this same operation it works sometimes as I expected. That is moving the next slide and notes as well by pressing enter key.
Rehearse Timing in the menu does the same.
And no selection available if I have custom slide shows. The recording slide show will be only the first one in the custom slide show list.No chance to pick up other ones.
Am I missing something to do?
Thanks for your help.
36 people found this reply helpful
- Article Author |
- Volunteer Moderator
If you don't need the sound to be continuous from one slide to the next, you could record your narration in a sound editor like Audacity (free), which'll give you FAR better control over the sound quality and allow you to edit out any oopsies. Save each slide's sound to a file as you finish recording it, then insert it on the slide (Insert | Audio).
Or you can Insert | Audio | Record Audio to record and insert the audio using PPT's default settings.
You can then either have the audio start when clicked (the default) or you can select it, then Animations | add a PLAY animation, change timing to Start: With Previous to have the sound play automatically.
You can do all of this in normal view, where you can see your slide notes.
Or you could print your notes. To dead trees, or save them as PDF and open the PDF and PPT (in windowed view) and record your narration.
10 people found this reply helpful
That link is similar to the answer found in the PowerPoint ? icon. However, it does not show you how to set a mode in which you can see your notes and record your voice at the same time. This is frustrating.
My solution: Copy & paste my notes into Note Pad and start my narration for each slide. I think that the notes in PowerPoint were developed to be viewed only for live presentations--not voice recordings.
It would be a wonderful upgrade if we could record narration and see our notes at the same time. ;-)
15 people found this reply helpful
- Volunteer Moderator |
- Article Author
1 person found this reply helpful
I agree with you, that this would be a great feature.
And I agree with John; his suggestion is the best way of getting your request in front of the developers who add features to PPT.
Meanwhile, here's a bit of VBA that'll automatically export your notes text to a file and open the file. Saves all that wrist-wearying select/copy/paste stuff.
Export the notes text of a presentation
I could not find the VBA for exporting notes to another file. That would have been helpful.
I fail to see why MS has not corrected the problem of why one feature (recording) turns off another related feature (presenter mode). It would seem that Steve as an authorized moderator could count how many people over what period of time want this corrected rather than direct us to have to log it into a list of requested enhancements.
And, BTW, this thread was about the 10th item list from the Google search on "cannot see speaker notes when recording in powerpoint" --so some would have gotten fed up by the 5th on the list.
12 people found this reply helpful
Question Info
- Norsk Bokmål
- Ελληνικά
- Русский
- עברית
- العربية
- ไทย
- 한국어
- 中文(简体)
- 中文(繁體)
- 日本語
IMAGES
VIDEO
COMMENTS
If you want to add notes in PowerPoint in iPad, you may click Notes in the lower right coiner. Then, it will show the Notes panel. You are able to tap to add notes there. If you want to add or view the notes in presenter view, you may click the icon in upper right corner like below: Regards, Zixuan. 10 people found this reply helpful.
Start presenting. On the Slide Show tab, in the Start Slide Show group, select From Beginning. Now, if you are working with PowerPoint on a single monitor and you want to display Presenter view, in Slide Show view, on the control bar at the bottom left, select , and then Show Presenter View.
Step by Step Tutorial on How to Play a PowerPoint Presentation on an iPad. Playing a PowerPoint presentation on an iPad involves a few simple steps that will get your slides up and ready for viewing. Let's dive in! Step 1: Download the PowerPoint app. First thing's first - download the PowerPoint app from the Apple App Store.
View Instructor's PowerPoint Notes on iPad. 1. Download the slides by tapping on the download icon next to the file. 2. Tap Download. 3. Open the downloaded file, then tap Open In... in the bottom right corner. 4. Select PowerPoint.
The notes appear only on your device, so only you can see them. You can also view presenter notes when you rehearse your presentation. Tap , then tap . Tap "Current and Notes" or "Next and Notes." Do any of the following to change how the presenter notes look: Change the size of the font: Tap to make the font larger, or tap to make it ...
If you want to customize your Presenter View experience, follow these steps: On the 'Slide Show' tab, click 'Set Up Slide Show.'. Under 'Multiple Monitors,' select the 'Use Presenter View' checkbox. If you're using a single monitor, select the 'Display slide show on' option and choose your primary monitor.
Next, in the pane on left, select the slide where you'd like to add speaker notes. Next, click the "Notes" button at the bottom of the window. A small box reading "Tap to Add Notes" will appear beneath the slide. For Mac users, this will say "Click to Add Notes.". Now, simply type the speaker notes for that slide.
Pro Tip 1: All of the pre-set templates follow the "click to add text" approach.If you have your own company template you want to use, see our section on opening a file. Pro Tip 2: These templates are slightly different from those in the desktop version of PowerPoint.Pro Tip 3: All new presentations will by default, be saved locally on your iPad.
Select the "Slide Show" tab in the ribbon menu. Check the "Use Presenter View" box. Start your presentation by clicking on "From Beginning" or "From Current Slide.". Your notes will appear on your primary monitor, while the audience will see only the slides on the presentation screen. Remember, your audience will not see your ...
The Notes pane is a box that appears below each slide. (It is outlined in magenta in the picture below.) An empty Notes pane will prompt you with text that says, Click to add notes. Type your speaker notes there. If you don't see the Notes pane or it is completely minimized, click Notes on the task bar across the bottom of the PowerPoint ...
You can also increase the font of the text. Sometimes when you transfer it to the iPad or if you print the handout, some of the words are small. 5. We are going to convert the power point into an outline. In the toolbar, select "File" > print or (command + print). 6. Click on "layout" > handouts (3 slides per page).
Launch PowerPoint. Look for Slide Show tab. When found, click it and select From Beginning visible under Start Slide Show group. If you are working with PowerPoint on a single monitor and still ...
Step 2: Enable Presenter View. In PowerPoint, click on the 'Slide Show' tab and check the 'Use Presenter View' box. Enabling Presenter View is the key action that hides your notes from the audience. This option is usually found in the 'Monitors' group on the 'Slide Show' tab.
2. Move back and forth in your presentation. To start presenting in slideshow mode, click the little Slide Show icon at the top right corner or click the "Slide Show" tab and select "From Start" or "From Current". To move forward in the presentation swipe from right to left, to move back swipe from left to right.
To open Presenter view in PowerPoint, click the Slide Show tab and select the Use Presenter View check box. 2. Start your slide show. 3. Click the Notes pane in the lower right corner of the PowerPoint window, then start typing. NOTE: You can also press the F6 key to select the Notes pane in Presenter view. When a white outline appears around ...
The notes appear only on your device, so only you can see them. You can also view presenter notes when you rehearse your presentation. Tap , then tap . Tap "Current and Notes" or "Next and Notes." Do any of the following to change how the presenter notes look: Change the size of the font: Tap to make the font larger or tap to make it ...
Step 2: Go to the 'View' tab. In the PowerPoint ribbon, click on the 'View' tab to see the various view options available. The 'View' tab is where you can change how you view your presentation while you're editing it. This is where you can switch to the notes view.
To put your PowerPoint slides into OneNote on your iPad, simply follow these steps: Open the PowerPoint file in the PowerPoint or Microsoft Office for iOS app. Once the file is open, you should see a triangle with three dots in the upper right-hand corner of the app. This is the File icon. Tap that icon. In the File Options screen, choose ...
Tap the Camera button , then tap Scan Documents . Place your document in view of the camera. If your device is in Auto mode, your document will automatically scan. If you need to manually capture a scan, tap the Shutter button or press one of the Volume buttons. Then drag the corners to adjust the scan to fit the page, then tap Keep Scan.
My solution: Copy & paste my notes into Note Pad and start my narration for each slide. I think that the notes in PowerPoint were developed to be viewed only for live presentations--not voice recordings. It would be a wonderful upgrade if we could record narration and see our notes at the same time. ;-) Report abuse.