- Use Presenter View Video
- Add speaker notes Video
- Practice and time your presentation Video
- Record a presentation Video
- Print a presentation Video


Use Presenter View

PowerPoint Presenter View shows you the current slide, the next slide, and your speaker notes, to help you focus while presenting and connect with your audience.
Select the Slide Show tab.
Select the Use Presenter View checkbox.

Select which monitor to display Presenter View on.

In Presenter View , you can:
See your current slide, next slide, and speaker notes.
Select the arrows next to the slide number to go between slides.
Select the pause button or reset button to pause or reset the slide timer in the upper left.
See the current time to help you pace your presentation.
Select the font icons to make the speaker notes larger or smaller.
Select the annotations pen icon to draw on the screen in real time, or select a laser pointer.
Select the thumbnail icon to see all the slides in your presentation and quickly jump to another slide.
Select the magnifying glass icon to zoom in on a particular part of a slide.
The screen icon let's you make the screen temporarily black to focus the attention on you.
Select END SLIDESHOW when you're done presenting.
Start the presentation and see your notes in Presenter view

Need more help?
Want more options.
Explore subscription benefits, browse training courses, learn how to secure your device, and more.

Microsoft 365 subscription benefits

Microsoft 365 training

Microsoft security

Accessibility center
Communities help you ask and answer questions, give feedback, and hear from experts with rich knowledge.

Ask the Microsoft Community

Microsoft Tech Community

Windows Insiders
Microsoft 365 Insiders
Was this information helpful?
Thank you for your feedback.
Understanding Presenter View in PowerPoint: A Deep Dive Guide

Origin and Evolution of Presenter View
Why presenter view is a game-changer for professionals, activating and customizing presenter view in powerpoint, in-depth features of the presenter view, common mistakes and how to avoid them, advanced tips for a power presentation, final tips for enhancing your presentation game, introduction to presenter view.
Have you ever found yourself awkwardly toggling between slides and speaker notes during a presentation? Or wished you could preview the next slide without your audience seeing? Enter Presenter View in PowerPoint, a feature designed to make presenting smoother and more professional.
In essence, Presenter View is a special mode in PowerPoint that allows the presenter to see their speaker notes on one screen, while the audience views the note-free presentation on another screen. This dual-screen setup means you can have your notes, upcoming slides, and timer conveniently on one screen while your audience remains blissfully unaware.
“Presenter View is the unseen ally behind many successful PowerPoint presentations.”
Microsoft’s PowerPoint, with its roots tracing back to the late 1980s, has undergone several metamorphoses. Over the years, as technology improved and presentation dynamics changed, Microsoft introduced new features to make the software more user-friendly and versatile. One such innovation is the Presenter View.
Back in the early days of PowerPoint, presenters had to rely on printouts or separate documents for their speaker notes. The advent of Presenter View in the early 2000s was a game-changer. It allowed presenters to merge their slides and speaker notes into one cohesive presentation experience.
The beauty of Presenter View lies not just in its conception but in its evolution. Over different versions of PowerPoint:
- 2003 : Introduction of a basic Presenter View with slides and notes.
- 2007 : Enhanced screen setup with better dual-monitor support.
- 2010 : Introduction of slide zoom and laser pointer features.
- 2013 & Beyond : Integration with touch features, improved UI, and annotations.
Each version brought refinements, making it more intuitive and packed with features, tailoring to the evolving needs of presenters globally.
Fun Fact : Presenter View wasn’t initially as popular as it is today. It took a few iterations and user feedback loops for Microsoft to perfect the balance between utility and user experience.
The Core Components of Presenter View
Presenter View in PowerPoint is like the cockpit for pilots: it’s where all the essential controls and information are at the presenter’s fingertips. Whether you’re a newbie to PowerPoint or a seasoned professional, understanding these components can transform your presentation experience.
- This provides a glance at your current, previous, and upcoming slides. It ensures you’re always prepared for what’s coming next and can seamlessly transition between points.
- The soul of your presentation, speaker notes, are discreetly placed at the bottom or side, only visible to you. These notes can be elaborate explanations, quick pointers, or even personal reminders. They’re like your secret cheat sheet!
- Ever worried about running over time? This feature shows the elapsed time since you began the presentation and, in some versions, allows you to set a countdown. Stay on track and manage your pace efficiently.
- Interactive features that allow you to draw on slides or use a virtual laser pointer. These are especially helpful when you want to emphasize or explain specific points visually.
- Navigate between slides effortlessly and zoom into specific parts of a slide to draw attention or elaborate on details.
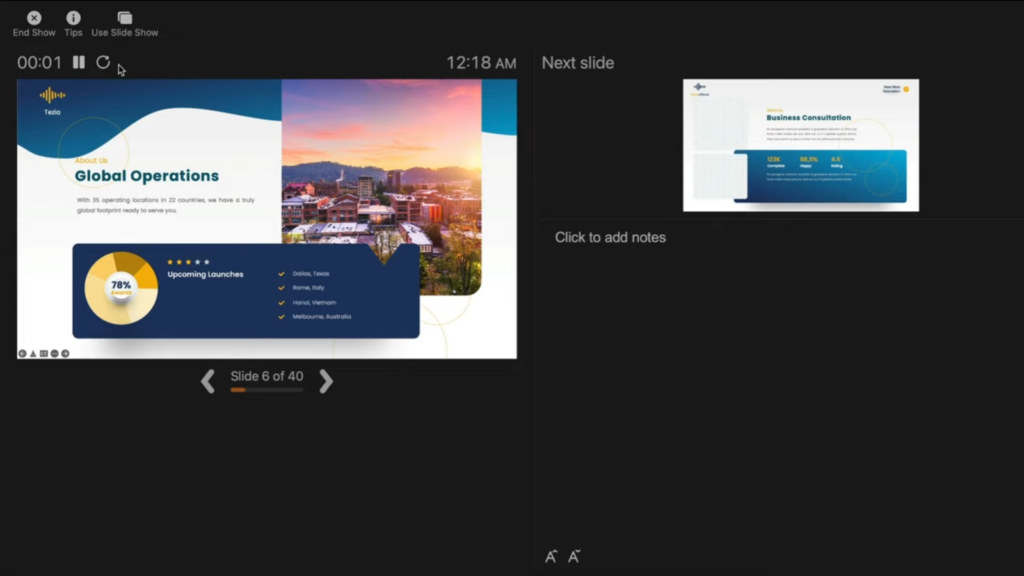
Table: Core Components Overview
Quote : “Presenter View is to a presenter what a dashboard is to a driver. It empowers, directs, and enhances the journey of your narrative.” – Jane Harris, Lead PowerPoint Expert – Powerbacks team
Understanding these components is one thing, but leveraging them effectively during a presentation can make a significant difference. Let’s delve into the ‘why’ behind the significance of Presenter View.
Stepping onto the stage or presenting in a boardroom can often be an overwhelming experience. The constant juggle between capturing the audience’s attention and keeping track of your slides can lead to nervousness. But what if there was a way to have everything you need right in front of you, ensuring smooth sailing through your presentation? Enter Presenter View.
- Having a preview of the upcoming slides and personal notes right in front of you can be a massive boost to confidence. You’re always one step ahead, knowing exactly what’s coming next.
- Instead of turning back to view the screen repeatedly, Presenter View lets you face your audience directly. This creates a more engaging and personal interaction.
- Gone are the days when you’d hold a bunch of cue cards or sheets of paper. With digital speaker notes, you have a cleaner, more organized setup.
- Using the annotation tools and laser pointer, you can make your presentation more interactive, leading to better retention and engagement from your audience.
- There’s no denying that seamlessly transitioning between slides, using interactive tools, and having no physical notes gives a more polished and professional look.
Table: Benefits of Using Presenter View
Quote : “Embracing the Presenter View is not just about leveraging a tool; it’s about amplifying your message and connecting more profoundly with your audience.”
It’s evident that the Presenter View has undeniable advantages for professionals. But how do you activate it and customize it to suit your needs? Let’s walk through the steps.
Starting with PowerPoint 2013, Microsoft enhanced the Presenter View to ensure that it’s both intuitive and user-friendly. Activating it and making it work for you is simple, as outlined in the following steps:
Step-by-Step Guide to Activate Presenter View :
- Start by opening your PowerPoint presentation. This will be the one you intend to deliver.
- At the top, you’ll notice several tabs. Click on the one labeled ‘Slide Show’.
- Within the Slide Show tab, you’ll spot a checkbox labeled ‘Use Presenter View’. Ensure that it’s ticked. If it’s not, simply click on it.
- If you’re using an external projector or display, make sure it’s connected. PowerPoint will automatically detect it and use the Presenter View on your primary display, showing the main presentation on the external one.
- Start your presentation by either pressing F5 on your keyboard or clicking on ‘From Beginning’ in the Slide Show tab.
- Next Slide Preview : Gives a preview of what’s coming next.
- Speaker Notes : Displays your notes for the current slide.
- Slide Navigation : Use this to jump to a specific slide.
- Annotation Tools : Highlight or draw on your slides in real-time.
- Timer : Keeps track of how long you’ve been presenting.
- You can move around the different elements, increase font size of your notes for better readability, or even hide specific components if they’re not required.
Table: Quick Access Tools in Presenter View
Quote : “The beauty of PowerPoint’s Presenter View is the control and flexibility it offers. It’s like having a personal assistant during your presentations.” – Linda Green, Presentation Expert
Now that we know how to activate and customize the Presenter View let’s delve deeper into its features and tools for maximum efficiency during presentations. Shall we proceed?
PowerPoint’s Presenter View is not just a simple “next slide” preview; it’s a hub of tools and functionalities designed to make the presenter’s job easier and the presentation more engaging.
H3: Slide Preview This is arguably the most straightforward feature but also the most helpful. At a glance, you can see what’s coming up, ensuring that you’re always prepared for the next topic or section.
- Smooth Transitions : Eliminates awkward pauses between slides.
- Improved Pacing : Know when to speed up or slow down based on upcoming content.
- Reduced Anxiety : No unpleasant surprises during your presentation.
H3: Speaker Notes For those who don’t rely on pure memory, speaker notes are a lifesaver. They’re your secret weapon, visible only to you, that provides additional context or reminders about what to say.
- Bold the crucial points to ensure they stand out.
- Use concise bullet points for easier and quicker reading.
- Add time cues if you’re aiming to cover specific points within certain timeframes.
H3: Slide Navigation While it’s always best to move sequentially through your slides, there might be instances when you need to skip ahead or return to a previous point. With the slide navigation tool, you can effortlessly hop around your presentation.
- Case Study : During a corporate presentation, John, a sales manager, was posed with a sudden question about Q2 performance. Thanks to slide navigation, he quickly reverted to the relevant slide, addressed the query, and resumed without any hiccups.
H3: Annotation Tools Engage your audience by turning your presentation into an interactive canvas. Whether you’re highlighting an essential statistic or drawing a quick graph, these tools can make a significant impact.
- Use contrasting colors to ensure visibility.
- Don’t overdo it; the aim is to emphasize, not to overwhelm.
- Practice beforehand to ensure you’re comfortable with these tools during the presentation.
H3: Timer It’s easy to lose track of time during a presentation. With Presenter View’s timer, you can keep tabs on the elapsed time, helping you manage the pace and duration of your talk.
- Tip : Always allocate a buffer period. If you’re presenting for 30 minutes, aim to finish in 25. This allows for Q&A or any unexpected delays.
Quote : “PowerPoint’s Presenter View is like a dashboard for presenters. It provides every tool one might need, all within arm’s reach, ensuring a seamless and interactive presentation experience.” – Michael Roberts, Tech Analyst
Understanding the features of the Presenter View is the key to unlocking its potential. With practice and familiarity, it becomes an extension of the presenter, leading to more confident and impactful presentations.
Making the Most of Presenter View
If you’ve ever wanted to feel like a presentation Jedi, mastering the Presenter View is your path to the force. But having the tool isn’t enough – it’s about leveraging its features optimally. Here’s a detailed guide on maximizing the benefits of the Presenter View:
H3: Setup and Access Before harnessing its power, you need to ensure you can access Presenter View without hitches.
- Connect your computer to the projector or external display.
- Launch PowerPoint and open your presentation.
- Go to the Slide Show tab and select Set Up Slide Show .
- In the pop-up, ensure Browsed by an individual (window) is selected.
- Start the slide show. Presenter View should appear on your computer, while the audience sees only the slides.
H3: Customize the Display Remember, it’s your dashboard; make it as comfortable and efficient for you as possible.
- Within Presenter View, hover over the bottom to reveal the toolbar.
- Click on the gear icon to adjust settings.
- Reorder tools based on your preference or hide those you don’t need.
H3: Practice, Practice, Practice The tool’s efficiency relies heavily on your familiarity with it. Do dry runs to ensure you know where everything is and how each feature works.
- Pro Tip : Mimic the presentation environment during practice. If you’re presenting in a large hall, practice with the same setup.
H3: Seamlessly Integrate Other Media If your presentation includes videos, animations, or other media, ensure they play seamlessly in Presenter View.
- Deep Dive : Always embed media within the presentation. Relying on external links or files can disrupt the Presenter View experience.
H3: Engage the Audience Use the tools not just to aid your presentation but to engage your audience. Pose questions, use the pen tool to sketch quick diagrams based on audience inputs, and make it interactive.
- Table of Engagement Techniques :
H3: Master the Art of Transitions Smooth transitions are key to maintaining audience attention. With a preview of the next slide, prepare your narrative to flow seamlessly.
Even with the most powerful tools, human error can play a spoilsport. The Presenter View, as intuitive as it may be, has its quirks. Here’s a list of common pitfalls users face and ways to steer clear of them:
H3: Not Checking Hardware Setup Before you even start the presentation, ensure your hardware is correctly set up. This includes checking the display connection, ensuring the projector or external monitor is detected, and setting up the correct display settings.
- Pro Tip : Always keep a spare HDMI or VGA cable. Technical glitches often come from the most unexpected sources.
H3: Overlooking Speaker Notes Having made the effort of adding speaker notes to your slides, it would be a shame not to use them. They serve as a discreet prompt, ensuring you don’t miss any critical points.
- Fact : According to a study, presenters who actively used speaker notes were 25% more consistent in delivering their core messages.
H3: Ignoring the Timer Time management is crucial. If you have a fixed time slot, exceeding it can inconvenience others and may appear unprofessional. Conversely, finishing too early can leave your audience unsatisfied.
- Actionable Advice : Always have a buffer. If your slot is 30 minutes, aim for a 25-minute presentation, leaving room for Q&A or unexpected delays.
H3: Relying Exclusively on Presenter View Despite its usefulness, never be wholly dependent on Presenter View. Technical glitches happen, and the ability to continue smoothly without it showcases professionalism.
- Case Study : At a major tech conference in 2018, a renowned speaker’s Presenter View malfunctioned. Instead of panicking, he smoothly transitioned to the standard view, using his printed notes as a backup. The audience lauded his adaptability, and his message wasn’t overshadowed by the hiccup.
H3: Not Adapting to Audience Feedback The tools in Presenter View, like slide navigation, are meant to enhance adaptability. If you sense your audience resonating more with a particular topic, don’t be afraid to dwell on it a bit longer or even revisit slides.
By sidestepping these common mistakes, you not only harness the full potential of Presenter View but also project confidence and control. Next, we’ll explore some advanced features to elevate your presentation game even further.
Mastering Presenter View basics can tremendously improve your presentation skills. But if you’re looking to elevate your game and leave a lasting impression, dive into these advanced features:
H3: Seamless Transition Between Slides The art of a great presentation lies not just in the content but also in the delivery. A choppy slide transition can disrupt the flow. PowerPoint offers a plethora of transition effects — from subtle fades to dynamic 3D effects.
- Go to the Transitions tab.
- Browse and select your preferred effect.
- Adjust the transition duration if needed.
- Click Apply To All to maintain uniformity.
H3: Use Zoom to Focus on Details Occasionally, you might want to draw attention to specific details on a slide. Instead of making your audience squint, use the in-built Zoom feature.
- Tip : Combine zoom with a laser pointer or pen tool for emphasis.
H3: Ink Annotations Annotating directly on your slides can be beneficial for interactive sessions or workshops. PowerPoint’s “Ink” feature allows you to do just that.
- Did You Know? : Ink annotations made during a presentation can be saved for future reference!
H3: Embed Multimedia for a Rich Experience Modern presentations often go beyond static slides. Consider embedding videos, audio clips, or even live web content to keep your audience engaged.
- Navigate to the Insert tab.
- Choose Video or Audio and select your file.
- Adjust playback settings under the Playback tab.
H3: Custom Slide Show Sometimes, different segments of your audience require varied content. Instead of having multiple PPT files, create a custom slideshow within the same presentation.
PowerPoint’s Presenter View is akin to a secret weapon, waiting in the wings, ready to empower speakers, educators, and presenters globally. Whether you’re a novice taking your first steps into the world of presentations or a seasoned speaker aiming to refine your skills, the Presenter View, along with the myriad features PowerPoint offers, ensures your content shines in the best light.
Remember, a successful presentation doesn’t merely rely on flashy slides or multimedia elements. It’s the seamless blend of content, delivery, and engagement. And with tools like Presenter View, you’re equipped to handle the technical aspects, allowing you to focus on what truly matters – connecting with your audience.
As Bill Gates once said:
“If you think the PowerPoint presentation is there for you as the presenter, you’re wrong. It’s there for the audience.”
So, the next time you’re gearing up for that crucial pitch, workshop, or lecture, take a moment to familiarize yourself with Presenter View. Your audience — and your confidence — will thank you for it.
Happy presenting!
Save my name, email, and website in this browser for the next time I comment.
Present Better with PowerPoint Presenter View: Tips & Tricks
The PowerPoint presenter view is the ideal tool for your presentation. The PowerPoint presenter view is the ideal tool for your presentation. It allows you to display your speaker notes and slides on your computer while presenting. Meanwhile, your audience will see the presentation without your notes on another screen or projector.
What is PowerPoint presenter view?
The PowerPoint presenter view is a presentation mode that allows presenters to see a preview of the next slides as well as their speaker notes. The advantage of this mode is that your audience will only see the current slide and nothing else.
PowerPoint presenter view: advantages

Presenter view offers a number of features that can help you streamline and improve the flow of your presentations:
1. You can add notes to each slide. This gives you more freedom and you won’t have to struggle with clumsy index cards. You can individually design the notes for each slide and, when you switch slides, you’ll see that slide’s notes as well.
2. You always see the current slide number (e.g., slide 5 of 13). That way, you can begin preparing for the next slide. You receive an overview of the entire presentation throughout.
3. A preview image on the side of your presentation always shows you the next slide.
4. A timer notifies you of how much time has elapsed. This is especially helpful if you have a limited amount of time to present.
5. You can use the pen tools to mark, highlight and augment your slide content . These freehand markups can even be saved afterwards.
6. You can view a thumbnail overview of all your presentation slides. This lets you choose slides freely and jump from slide to slide.
7. You can use the magnifying glass to enlarge individual sections of the current slide. The virtual laser pointer allows you to highlight specific points .
8. During breaks and discussions, you can fade to a black screen and don’t have to turn off the projector. This allows you to restart the presentation in less time.
How to set up PowerPoint presenter view with a projector
PowerPoint presenter view requires two separate monitors. This often includes a projector. Here’s how to properly set up a projector:
1. Connect your laptop to the projector. Make sure the laptop isn’t switched on.
2. When you turn on the laptop, the projector will recognize it as a second screen.
3. When you start Microsoft PowerPoint, you should see the same image on both screens.
4. Now press the Windows + P key combination and then select Extend . Click on the check mark to the right of Presenter View in the Slide Show tab.

5. You’ll now see the different views on your two monitors. As the presenter, you’ll see the presenter view while your audience will see the current slide.
6. Normally, presenter view is automatically displayed on the correct monitor (namely, yours). If it still appears on the audience screen, set it to Primary Monitor in the Monitor drop-down menu. Presenter view should now run on your monitor.

How to disable PowerPoint presenter view
To disable presenter view during your presentation, simply uncheck the Presenter View box in the Slide Show tab.
Tips for optimal use of the PowerPoint speaker view
1. practicing the presentation in advance.
If you want to use this tool effectively, you should be confident in using it . Therefore, test it extensively beforehand to be able to confidently operate the tool when it matters. In addition, also go through your presentation whilst projecting the speaker view. This way you can guarantee a more fluent presentation and fill in missing or insufficient notes.
2. Designing effective presentation notes
To ensure your notes are effective, keep them concise and to the point so you can access them quickly and easily during the presentation. Avoid long paragraphs and instead focus on bullet points that summarize the main ideas and important details .
By highlighting key terms or using abbreviations , you can make your notes easier to read. Your notes should also be large enough. To adjust the size of notes and previews, simply drag the edges of the relevant elements until they reach the desired size.
Be sure to structure your notes well to support the flow of your presentation and ensure a smooth transition between slides.
3. Managing time and breaks during the presentation
The integrated timeline allows you to always keep track of time during the presentation. To make the best use of your time, it is important to plan your presentation carefully and include breaks, if necessary, to give your audience time to process the information.
Be sure to use pauses deliberately, for example, to answer questions or emphasize important points. Also use the time display to keep track of your presentation speed so you don’t speak too fast or too slow to keep your audience’s attention.
This way, you guarantee a well-structured and engaging presentation that is both informative and enjoyable for your audience.
4. Integration of interactive elements
It’s no secret that interactivity in presentations helps keep the audience’s attention . Speaker View in PowerPoint offers the possibility to insert media and interactive elements into your presentation to make it more visually appealing and interesting.
For example, you can integrate videos, audio clips, animations, and interactive polls . Use the Speaker View to control the flow of media playback and make sure everything works smoothly.
For more ideas on how to make your presentations interactive, see the article “ Interactive presentations “.
5. Updating slides
PowerPoint presenter view allows you to update slides during your presentation. Dies This is really useful if you’ re in a team working on your presentation and changes are still being made, possibly right up to the last minute. To activate this setting, go to Set Up Slide Show from the Slide Show tab and select Keep slides updated .

Pro tip: Use shortcuts during your presentation
Shortcuts are keyboard combinations that allow you to quickly access certain PowerPoint functions. Here are five useful shortcuts which can simplify your presentations, especially in presenter view:
- Fade to the next slide by pressing the Enter key or the right or down arrow keys .
- To go back to the previous slide, press either the up or left arrow key .
- To jump to the last slide of your presentation, press the End key .
- If you want to skip slides during your presentation, press the slide number on your keyboard + Enter .
- To make your screen appear white or black, select either W or the comma key for a white screen and B or the period key for a black screen . These functions can be especially helpful when you want to make sure that the audience’s entire attention is on you and not the screen.
For more useful shortcuts to make working with PowerPoint easier, feel free to check out our blog .
Use PowerPoint presenter view for better presentations
Presenter view makes it much easier for you to present and navigate your presentation. Thanks to many useful features, you can make your presentation more fluid and hold your audience’s attention.
Feel free to contact us at [email protected] with any questions about presenter view and PowerPoint in general. We’ll help you out.
Are you looking for visually supportive and professionally designed slide templates? Feel free to have a look around our store. Here we have numerous slides prepared for you to download on a wide variety of (business) topics. Take a look today! ► To the store
Share this post
- share
- save

Design Thinking: Problem Solving with a Difference

Why Corporate Mission Statements Are So Important

7 Tips & Learnings from the Apple Keynote
Home Blog PowerPoint Tutorials How to Work with Presenter View in PowerPoint
How to Work with Presenter View in PowerPoint

Not all presenters have excellent memory recall or the ability to speak flawlessly to the audience without any cues. However, many of them are good at hiding it by using Presenter View in PowerPoint. It is a presentation mode that enables the presenter to hide speaker notes and presentation controls from the audience while leveraging the various handy features offered by PowerPoint.
How to Use Presenter View in PowerPoint
To start using Presenter View, ensure it’s enabled before you begin your slideshow. If you are new to this feature, we recommend using this option to familiarize yourself with the various navigation options for this presentation mode. This might also be helpful if the PowerPoint templates you are accustomed to using might have animations that you might want to preview in this mode to understand when to give the next visual cue.
How to Enable Presenter View in PowerPoint
To enable PowerPoint presenter view, go to the SlideShow tab and make sure the Use Presenter View option is enabled. This will ensure that you can access Presenter View when you switch your slides to SlideShow mode.

Adjust Display Settings
You can swap between the presenter view and slideshow mode or duplicate the slideshow to exit the Presenter View from the Display Settings menu from the top toolbar.

Navigate Slides in Presenter View
Like any standard PowerPoint presentation in SlideShow mode, you can navigate between slides by using the arrow keys or with a presentation remote. Presenter View also provides slide navigation buttons to move the slides back and forth.

View Taskbar in Presenter View
The Show Taskbar option at the top enables viewing the taskbar. This can be helpful if you require using the taskbar, such as to view your battery charge, see the time, enable or disable another app from the taskbar menu, etc.

Reset or Pause the Timer
Once you start your presentation in Presenter View, a timer starts showing how much time you have spent in slideshow mode. This is an excellent way to understand how much time you have consumed for your session and to keep an eye out for good timekeeping. You can also hit Pause or reset the timer anytime.

Change the Size of the Speaker Notes
How to view notes in PowerPoint while presenting? If you have any speaker notes added to your slides, they will appear in Presenter View on your screen. You can increase or reduce the size of the text via the two options at the bottom of the speaker notes pane.

Using Annotation Tools in Presenter View
PowerPoint annotation tools can be accessed from the bottom toolbar in Presenter View. The Pen and Laser Pointer Tools button gives you access to the pen, ink colors, laser pointer, and eraser and also allows you to show or hide the mouse pointer via Arrow Options .

View All Slides in Presenter View
If you need to go back and forth to find a relevant slide for an ongoing discussion or query during your presentation, you can view all slides in Presenter View via the See all slides option.

Zoom Slides using Presenter View
PowerPoint’s Zoom feature lets presenters quickly pick a portion of the slide to zoom into. Presenter View allows you to leverage this feature by instantly selecting a portion of the slide to enlarge it after selecting Zoom into the slide option. To exit the Zoom mode or hit the Esc key.

Black or Unblack SlideShow
Sometimes, you might want to turn the screen blank for a while, such as during a mid-presentation break. The Black or Unblack SlideShow option blanks the slides for your audience while continuing to show you all navigation options via Presenter View.

Toggle Subtitles in Presenter View
One of the most revolutionary features introduced by Microsoft for PowerPoint over the past decade has been Live captions. This feature enables subtitles by converting speech to text as you present. You can toggle Live subtitles on or off while in presenter view to help your audience read what you speak.

Toggle Camera in Presenter View
Like subtitles, you can also toggle the camera on or off in Presenter View.

End Slideshow in Presenter View
There are different ways to end or exit a SlideShow from Presenter View. You can hit the Esc key or click End Slide Show . Similarly, you can click the three dots at the bottom and select End Show .

More Slideshow Options
Other than the various visibility prominent menus available to navigate, annotate, and present your slides, you can also find a few additional options via More slideshow options , which are accessible via the three dots at the bottom toolbar. These include adjusting the position of the subtitles, turning your screen white or black, ending the slideshow, etc.

How to Use Presenter View on a Single Screen
While Presenter View can be enabled to work with dual monitors, you can also use Presenter View on a single monitor with remote meeting apps like Zoom. A simple method for switching to Presenter View on a single monitor is to click the three dots ( More slideshow options ) at the bottom in SlideShow mode and select Show Presenter View .

You can also switch to Presenter View on a single monitor anytime using the ALT+F5 hotkey.

The presenter can easily manage a PPT in presentation mode, with the utility to view speaker notes, annotate or zoom slides, toggle subtitles or camera on or off, and keep your audience engaged via better slideshow management. However, if you’re new to this presentation mode, a bit of practice might help you avoid confusion when presenting before an audience in Presenter View for the first few times.

Like this article? Please share
PowerPoint Tools, Presentation Skills Filed under PowerPoint Tutorials
Related Articles

Filed under PowerPoint Tutorials • April 2nd, 2024
How to Round Corners in PowerPoint
Learn how to add rounded corners to shapes and images in PowerPoint. Elevate your presentations with sleek designs. Expert tips and step-by-step guides.

Filed under PowerPoint Tutorials • March 26th, 2024
How to Translate in PowerPoint
Unlock the experience of PowerPoint translation! Learn methods, tools, and expert tips for smooth Spanish conversions. Make your presentations global.

Filed under PowerPoint Tutorials • March 19th, 2024
How to Change Line Spacing in PowerPoint
Adjust text formatting by learning how to change line spacing in PowerPoint. Instructions for paragraph indenting included.
Leave a Reply
- Skill Assessments
- AI Course Builder
- Free Courses
- PowerPoint 2019 Basic
Presenter View in PowerPoint

Start Free Trial
Or log in with:
How to Use Presenter View in PowerPoint

- You can use thumbnails to select slides out of sequence and create a customized presentation for your audience.
- Preview text shows you what your next click will add to the screen, such as a new slide or the next bullet in a list.
- Speaker’s notes are shown in large, clear type so that you can use them as a script for your presentation.
- You can temporarily black out the screen during a presentation and then resume where you left off. This can come in handy during breaks or question and answer periods.
Start Presenter View
- Click the Options button.

The Presenter view fills the screen. The same presentation tools are available below the slide, and it also shows the current time and a thumbnail of the upcoming slide. At the bottom of the screen, use the arrows to move forward or backward in the presentation.
Command Buttons
At the top of the Presenter view, there are command buttons.
- Show Taskbar : Show or hide the Windows taskbar.
- Display Settings : When projecting, swap which display shows the presenter view or duplicate the slide show on both screens.
- End the Slide Show : Return to Normal view.

The timer is located at the top-left corner of the current slide. It keeps track of how long Presenter view has been running.
- Click the Pause button to temporarily stop the timer.

The Notes pane gives you a large look at any notes added to the slide. In Presenter view, you have the flexibility to change the display size.

End Presenter View
You can close Presenter view without ending the presentation entirely.
- Click the Options menu.

You return to the regular slide show view.
To close Presenter View and end the presentation, just press Esc .

FREE Quick Reference
Free to distribute with our compliments; we hope you will consider our paid training.
- LinkedIn-ready certificate
- Skill assessments
- Bite-sized, interactive lessons
- Saved progress
How to Enable Presenter View in Powerpoint: 2024 Guide
Enabling Presenter View in PowerPoint is a fantastic way to ensure your presentation goes smoothly. It allows you to see your notes, the upcoming slide, and a timer while the audience only sees the current slide. You can control the presentation flow without revealing what’s coming up next. Let’s dive in and learn how to turn on this nifty feature!
Step by Step Tutorial: Enabling Presenter View in PowerPoint
Before diving into the specifics, let’s understand what we’re aiming for. By the end of these steps, you’ll be able to present like a pro, with all the tools you need right at your fingertips, without your audience being any the wiser.
Step 1: Open Your PowerPoint Presentation
Open your PowerPoint presentation where you want to use Presenter View.
When you open your presentation, make sure it’s the final version. You don’t want to be making last-minute changes in Presenter View!
Step 2: Click on the ‘Slide Show’ Tab
Go to the ‘Slide Show’ tab in the PowerPoint ribbon.
This tab has all the settings you need for presenting. It’s like the command center for your presentation.
Step 3: Check the ‘Use Presenter View’ Box
Find and check the ‘Use Presenter View’ box in the ‘Monitors’ group.
This is the magic button that brings Presenter View to life. Make sure your computer is connected to a projector or second monitor for this to work.
Step 4: Select the Monitor for Presenter View
Choose which monitor you want to display Presenter View on.
If you’re connected to more than one monitor, you’ll have to tell PowerPoint where you want to see your notes and timer.
Step 5: Start Your Presentation
Start your presentation as usual, and Presenter View will automatically appear on your selected monitor.
Now you’re ready to rock your presentation with all your notes and controls right where you need them.
After completing these steps, you’ll be in control of your presentation with Presenter View. It’s like having a secret weapon that only you know about. Your audience will see a seamless presentation, and you’ll have all your notes and controls out of sight.
Tips for Using Presenter View in PowerPoint
- Always double-check your monitor setup before presenting to avoid any technical glitches.
- Familiarize yourself with Presenter View’s tools, like the pen and highlighter, to enhance your presentation.
- Use the timer to keep track of your presentation’s pace and stay on schedule.
- Customize your notes’ font size in Presenter View so they’re easy to read at a glance.
- Practice using Presenter View before your actual presentation to become comfortable with the layout and functionality.
Frequently Asked Questions
What if i can’t see presenter view on my monitor.
If Presenter View isn’t showing up, make sure you’ve selected the correct monitor and that your computer recognizes the projector or second monitor.
Can I use Presenter View without a projector?
Yes, you can use Presenter View with a second monitor if you don’t have a projector handy.
How do I advance slides in Presenter View?
Use the arrow keys or the controls within Presenter View to move between slides.
Can I see my notes in Presenter View while the audience sees the slides?
Absolutely, that’s the primary purpose of Presenter View. Your notes are only visible to you.
What should I do if Presenter View stops working during my presentation?
Try disconnecting and reconnecting your monitor or projector, and ensure ‘Use Presenter View’ is still checked in PowerPoint.
- Open your PowerPoint presentation.
- Click on the ‘Slide Show’ tab.
- Check the ‘Use Presenter View’ box.
- Select the monitor for Presenter View.
- Start your presentation.
So there you have it, folks. Enabling Presenter View in PowerPoint is as easy as pie and can significantly boost your presentation skills. With this powerful tool, you can keep your notes, upcoming slides, and a timer discreetly within reach, giving you the confidence to deliver a knockout presentation every time. Remember, practice makes perfect. Don’t wait until the last minute to familiarize yourself with Presenter View. Take it for a test drive, get comfortable with its features, and you’ll be commanding the room like a seasoned pro. Always remember to check your equipment before the big day to avoid any technical hiccups. Happy presenting!

Matt Jacobs has been working as an IT consultant for small businesses since receiving his Master’s degree in 2003. While he still does some consulting work, his primary focus now is on creating technology support content for SupportYourTech.com.
His work can be found on many websites and focuses on topics such as Microsoft Office, Apple devices, Android devices, Photoshop, and more.
Share this:
- Click to share on Twitter (Opens in new window)
- Click to share on Facebook (Opens in new window)
Related Posts
- How to Set an Apple Podcast Sleep Timer
- How to Show or Hide the Speaker Notes in Powerpoint 2013: A Guide
- How to Download a Google Slides Presentation as a Powerpoint File
- How to Show Speaker Notes in Google Slides: A Step-by-Step Guide
- How to Rotate a Powerpoint Slide Presentation
- How to Hide the Speaker Notes in Google Slides: A Step-by-Step Guide
- How to Print with Speaker’s Notes in Powerpoint 2013: A Step-by-Step Guide
- How to Save Powerpoint as PDF with Notes: A Step-by-Step Guide
- How Do I Print Just the Notes in Powerpoint 2010: A Step-by-Step Guide
- How to Set an iPhone 14 Sleep Timer: A Step-by-Step Guide
- How to Do a Powerpoint Google Slides Presentation Conversion
- How to End Powerpoint on Last Slide in Powerpoint 2010: A Step-by-Step Guide
- How to Delete a Slide in Powerpoint 2010: Step-by-Step Guide
- How to Make Google Slides Vertical (5 Quick Steps)
- How to Make a Powerpoint Slide Vertical in Powerpoint 2013: A Step-by-Step Guide
- How to Add a New Slide in Google Slides: A Step-by-Step Guide
- How to Hide a Slide in Powerpoint 2010: A Step-by-Step Guide
- How to Fix an iPhone Timer Not Going Off: Quick Solutions
- How to Delete Multiple Slides in Google Slides: A Step-by-Step Guide
- How to Change Slide Size in Powerpoint 2016
Get Our Free Newsletter
How-to guides and tech deals
You may opt out at any time. Read our Privacy Policy

Share control of a powerpoint presentation anywhere in the world, instantly.
Nextslide will be available for select customers soon, which best describes you, professional, i’m interested in the free tier.
- Unlimited Presenters
- Password Protection
- Presenter View w/Slide Notes
- Clicker Mode
I’m interested in the standard tier
- No Watermark
I’m interested in the professional tier
Full ppt support, presenter control, confidence monitor mode, slide notes, video support, and so much more...
Say hello: [email protected]
PowerPoint: How to Add Audio to Powerpoint on Windows 10 and Mac
Last Updated Thursday, August 31, 2023, at 5:00 am
Known Issue (August 14, 2023):
Some Windows 11 users are experiencing issues with PowerPoint exports when they are turned into .mp4 files. Visuals within the exported PowerPoint are appearing as flipped, or upside down. We are working with Microsoft to find a solution.
As a workaround, please convert the file as a .WMV file option and save it in My Media. The following are directions on how to convert a PowerPoint Presentation with audio to a .WMV file . For more support or to help troubleshoot issues, please reach out to the LTS Help Desk at [email protected] .
Microsoft PowerPoint offers features to record audio narration and export it as a video. PowerPoint records audio slide-by-slide rather than in one continuous file, allowing creators to easily re-record a slide if they make a mistake or need to change something later. Exporting as a video and uploading to Kaltura or Canvas for streaming is advantageous since it standardizes file types, doesn't require a download to view, is in a format that can be captioned, and allows viewers to navigate more efficiently.
A recent update has made the process comparable on a Mac, but the specifics vary. Windows 10 instructions follow; Mac users can click the link below to jump to the appropriate instructions.
- Instructions for Mac users
Windows 10 Instructions:
The following instructions explain how to add audio to your PowerPoint presentation on Windows 10 and export that PowerPoint as an MP4. The text instructions cover the same information as the embedded video below.
NOTE: If you have an older version of PowerPoint, you may need to update it to access the features described below. If you do not have PowerPoint, you can download it and other Microsoft Office products for free by going to office365.uwec.edu. If you have questions about updating or installing PowerPoint, contact the LTS Help Desk at [email protected] or 715-836-5711.
- Design your PowerPoint TIP: Use images and limit text to better engage viewers/listeners.
- Click Record Slide Show NOTE: Audio may start recording automatically if you have an older version of PowerPoint. It will still work, but this version offers reduced functionality.
- Record narration and avoid reading text on the slide out loud to viewers. Click the blue Replay button to listen to the recorded audio and ensure it was recording.
- Press [Escape] or the ‘X’ button located in the top right of the screen when the audio recordings are finished. You will see a speaker icon on slides that have audio.
- Select Export (steps 10-14 are shown in screenshot below).
- Select Create a Video .
- Optional: Select Full HD (1080p) for the video quality; it is unlikely a higher quality is needed.
- Select Use Recorded Timings and Narrations.
- Follow prompt/pop-up window to save the video in a memorable location.
- How to upload and share with Kaltura (Instructors should use Kaltura. Students will need to use it if the file is over 500 MB, which a PowerPoint probably won't be and they can use Canvas.)
- How to upload and share in a Canvas assignment (students)
- How to upload and share in a Canvas discussion (students) - the instructions refer to the "rich content editor" which is just the features in the top of the discussion post reply.
Elaboration on the Recording Features:
- Timing Feature – there is a rolling time feature for the individual slide and the overall presentation. Allows the speaker/presenter to monitor how long they are talking.
- Microphone Feature - Click on Settings and select Microphone and then the specific device to set up before recording.
- Replay Feature - Use to check that the audio is recording properly before starting additional slides.
- Clear Feature - Select Clear to delete/re-record audio.
- Don’t set the camera to record - Make sure this button has a diagonal slash through it to avoid the problem.
Mac Instructions:
The following instructions will teach you how to add audio to your PowerPoint presentation on a Mac and export that PowerPoint as an MP4. The text instructions cover the same information as the video embedded below.
NOTE: It is essential to have the Office 365 version of PowerPoint or you will not be able to save your PowerPoint as a video. If necessary, you can download it and other Microsoft Office products for free by going to office365.uwec.edu. If you have questions about updating or installing PowerPoint, contact the LTS Help Desk at [email protected] or 715-836-5711.
- TIP: Use images and limit text to better engage viewers/listeners.
- Click Record Slide Show
- TIP: Before you begin recording your full presentation, do a practice recording to verify your microphone and other settings are correct.
- NOTE: Avoid reading the text written directly on the slide; use the slide to elaborate on the material being presented.
- Stop speaking for a second to prevent the audio from cutting out as slides change. Resume speaking when the time starts moving again under the Current slide timing feature to the left of the recording button.
- Click Stop or Pause at the top of the screen and then End Show in the top left corner when all the audio recordings have been finished.
- Check the audio by clicking on Play from Start under the Slide Show tab or the presenter mode icon at the bottom of the screen.
- Edit the name of the file and where you would like to save the video following PowerPoint's prompts.
- Click Export
- Upload your mp4 video to Kaltura or Canvas to share it:
- How to upload and share to My Media (Instructors should use My Media. Students will need to use it if the file is over 500 MB, which a PowerPoint probably won't be and they can use Canvas.)
- How to upload and share in a Canvas discussion (students) - the instructions refer to the "rich content editor" which is the tool at the top of the discussion post reply.
Additional Video Tool Options
For more information about recording options available, click here to view a comparison of each tool's features.
- Data, AI, & Machine Learning
- Managing Technology
- Social Responsibility
- Workplace, Teams, & Culture
- AI & Machine Learning
- Diversity & Inclusion
- Big ideas Research Projects
- Artificial Intelligence and Business Strategy
- Responsible AI
- Future of the Workforce
- Future of Leadership
- All Research Projects
- AI in Action
- Most Popular
- The Truth Behind the Nursing Crisis
- Work/23: The Big Shift
- Coaching for the Future-Forward Leader
- Measuring Culture

The spring 2024 issue’s special report looks at how to take advantage of market opportunities in the digital space, and provides advice on building culture and friendships at work; maximizing the benefits of LLMs, corporate venture capital initiatives, and innovation contests; and scaling automation and digital health platform.
- Past Issues
- Upcoming Events
- Video Archive
- Me, Myself, and AI
- Three Big Points
How to Create Slides That Suit Your Superiors: 11 Tips
When you’re pitching ideas or budgets to execs in your organization, you need to deliver slides that fit those particular people just right. This checklist identifies the key considerations.

- Workplace, Teams, & Culture
- Leadership Skills

Carolyn Geason-Beissel/MIT SMR | Getty Images
I recently interviewed 20 of my customers, all in senior roles at Fortune 100 companies, and asked them their biggest pain point in presenting to higher-ups and even colleagues. What I heard consistently was that it can feel like Goldilocks bouncing from one option to the next, testing to figure out what’s “just right.” Does the audience want deep reports? Sparse slides? Something in between? Like … what?
Teams often come to presentation meetings with vast amounts of backup content just in case an exec wants to take a deep dive on any given point. There’s often a struggle to anticipate every direction attendees might want to go. It’s frustrating, and it’s not efficient.
Get Updates on Transformative Leadership
Evidence-based resources that can help you lead your team more effectively, delivered to your inbox monthly.
Please enter a valid email address
Thank you for signing up
Privacy Policy
There are many ways to build slides. I’m not just talking about crafting them well versus poorly. I’m talking about all of the important decisions regarding how to organize them, how much text to use, when to lean into a chart, the best ways to use bullets and color, and whether to include an appendix with additional information. Before you make your next proposal or request of the executive team, use this list of 11 tips for your next set of slides as a guide.
Four Things You Must Have in Every Exec’s Slides
Before we drill down into the harder aspects, the ones where your executives’ tastes may vary widely, let’s quickly cover four aspects that you can consider the building blocks — the basics you should never proceed without.
Start with an executive summary. Begin the slide deck with a tight executive summary that follows a three-act structure. First, start with stating the current realities. Second, clearly state the problem or opportunity your idea addresses and its potential impact. Third, explain how your recommendation solves the problem or exploits the opportunity and the next steps you’re proposing.
Have a logical organization. The arc of the deck — the package from beginning to end — should make sense. If your audience reads only the headline of every slide, the order should be coherent and make most of the case for you. The content below each slide’s headline must support the statement made in the title. Remove everything that doesn’t support your point; as writers will tell you, you sometimes need to “kill your darlings” when you’re editing.
Begin the slide deck with a tight executive summary that follows a three-act structure.
Make it skimmable. Help your audience to quickly grasp the point without getting bogged down in details. Create a clear visual hierarchy. Guide the reader’s eye through the content: Use bold headings, bullet points, and numbered lists to break down information into digestible pieces. Highlight key takeaways or conclusions in a different color or font size to draw attention to these critical points.
Focus on concise insights. Succinct statements with clear insights are everyone’s jam. Every slide should serve a purpose and contribute directly to the decision-making process. Distill complex information. Don’t use 100 words when 20 words will nail it. If you’re having difficulty trimming, consider using company-approved AI tools to help you take out the fluff.
Five Preferences to Confirm With the Person You Want to Reach
Now we’ll delve into what your particular audience does and does not want. If you haven’t yet, start by asking the person you’re presenting to what they generally prefer. They probably know themselves well but have not been asked to articulate how they like to receive information.
Ask how dense is too dense. Some executives prefer detailed slides with comprehensive data. Others favor a more high-level approach. You’re weighing how to balance informative content with readability, ensuring that slides are not overloaded yet are sufficiently detailed to support decision-making.
Confirm the delivery format and timing. Some execs like information presented to them. Others prefer a pre-read of the material followed by a discussion. I always recommend our tool Slidedocs (I’ve written a free e-book on them), which are visual documents using both words and images. The templates help presenters organize their thoughts into a document for a pre-read or a read-along. They are designed to be skimmable and able to travel through your organization without the help of a presenter.
I’m a huge fan of pre-reads and prefer to use my time in meetings to ask questions and build alignment. If your audience didn’t review your material in advance, ask at the top of the meeting whether they would like you to present it or would prefer to read through it and then discuss it.
Find out how much data visualization they prefer. Charts, graphs, photos, and illustrations often communicate complex data more clearly than words alone. When execs can see what you’re saying, they often can better understand the impact of your idea. Does the exec want to understand exact numbers? Bar charts allow them to move their eyes across a series of specifics. Does the exec want to know the shape of a trend over time? Line charts can show the pattern. (See “Classic Charts Communicate Data Quickly.”) Some prefer charts with annotations that draw attention to what you think is the most important point. Others want to make their own conclusions from the data.
One of my clients, the CEO of a massive commercial real estate company, doesn’t want anything visualized. He prefers numbers, only in a table, and only in two colors — black and red. You might think this is archaic. But the fact that he’s clear to his teams about what he wants takes all the mystery out of how to communicate with him.
When the stakes are high, have a conceptual thinker help with diagrams and concepts. If you don’t have one on your team, and when it’s high stakes, find an internal designer to help you or hire one. You can’t afford to have the baby (your idea) thrown out with the bathwater (terrible slides).
Identify which details need spelling out. How well do the people you’re presenting to know the landscape and function of the company and products you’re talking about? For example, if your engineering team threw a slide into a deck about an issue that requires executive approval, do the execs all speak geek? Or do you need to explain the technology so that they will really understand the ask? Either eliminate internal jargon and acronyms or unpack those bits, especially if your proposal deeply involves expertise outside of the executives’ domain.
Ask whether appendices will be useful. When you’re organizing a presentation, you often troll data, read through complicated reports, and even hire external experts to figure out what’s best for the company. Do your execs want access to that supporting data? You can add a document to the end of the presentation as an appendix to show all of the data and source material. This allows the main content of the slides to remain focused and accessible while still providing comprehensive background information for those who want more.
Two Tips to Improve Your Presentation Skills
Getting materials in place is the biggest step. They will be your best tools for selling your ideas. But there are two extra areas to pay attention to as a presenter: how you handle questions and how you use every experience to improve.
Anticipate questions, and practice your answers. Before you have your meeting, gather a small team to challenge every point you make. Invite colleagues you trust to role-play as “a rapidly inquisitive exec” or “the doubting naysayer exec” so you are prepared to present your idea well. They’re gonna grill you, and practicing will help you remain unruffled when it happens.
Related Articles
Ask for feedback after the presentation. Establish a feedback loop with those you presented to. Ask what worked well and how you can improve. If attendees don’t have the time, find people who have had their ideas funded and talk to them about what they did that worked. Advice and some perspective will help you nail your performance even better next time.
Empathetically understanding your audience members and how they process information, whether it’s executives or peers, sets up your ideas for success. Clarity creates efficiency. When a presentation fits just right, you’ve given your great thinking the best chance of moving through your organization and having maximum impact.
About the Author
Nancy Duarte is CEO of Duarte Inc. , a communication company in the Silicon Valley. She’s the author of six books, including DataStory: Explain Data and Inspire Action Through Story (Ideapress Publishing, 2019).
More Like This
Add a comment cancel reply.
You must sign in to post a comment. First time here? Sign up for a free account : Comment on articles and get access to many more articles.
Android Police
How to curve text in google slides.
Grab everyone's attention with curved text in presentation slides
Google Slides offers formatting options to tweak text, photos, videos, and other elements in a presentation. However, it lacks a few important add-ons. For instance, unlike PowerPoint, there isn't a built-in way to curve text in Google Slides. If you want to make your presentation stand out among the rest, use the tricks below to curve text in Google Slides.
Adding curved text is a neat way to elevate your presentation. Still, don't go overboard with curve text in Google Slides. It may create unnecessary distractions and make it hard for your audience to read a slide. Instead, highlight a few headings or text you want to separate from the other paragraphs.
Although Google Slides is available on mobile platforms like iPhone and Android phones , we focus on the web version in the steps below.
Curve text in Google Slides using PowerPoint
There are a couple of ways to curve text in Google Slides. If you have a Microsoft 365 subscription plan, use the PowerPoint desktop app to curve text and copy it into Google Slides. In another trick, you can use a web tool like Canva or InkPx to get the job done. Let's start with PowerPoint.
- Open Microsoft PowerPoint on Windows or Mac.
- Create a new presentation and go to any slide.
- Resize a text box and enter the text you want to add in Google Slides.
- Expand the text effects icon and click Transform .
- Check your curved text in action. Drag the white dots around the text box to resize it.
- Open a presentation in Google Slides and select a slide where you want to add curve text.
PowerPoint offers dozens of curved text styles. You'll have no trouble finding a style that matches your presentation tone and theme.
How to delete a text box in Google Slides
Use an online tool to curve text in google slides.
PowerPoint requires a paid Microsoft 365 plan. If you don't have a subscription, use the tools below to generate and upload curved text in Google Slides.
Curve text using Canva
Canva is one of the best graphic design tools available. The web app offers several editing tools to create curved text in a design. You can download the image with a transparent background and upload it to Google Slides. Follow the steps below.
- Use the top menu to tweak text style, color, size, and more.
The ability to download an image with a transparent background requires a Canva Pro subscription.
How to add transparency to an image in Google Slides
Curve text using inkpx.
InkPx is a web tool for creating curved text. You can make one and upload it on Google Slides.
- Visit InkPx .
- Enter text and pick a color, style, and size. Then, tweak the radius, spacing, and other details.
- Pick a PNG or JPG image type and save the image.
- Launch a presentation in Google Slides.
- Select your image and open it in Google Slides.
Unlike Microsoft PowerPoint and Canva, InkPx is free to download and use. And unlike other web tools, you don't need to create an account to use the service.
Make your presentation stand out
Aside from curve text, there are other ways to make an interesting pitch. However, creating an engaging presentation from scratch can be time-consuming. Check the top Google Slides templates to get started and complete an applaud-worthy presentation in no time.
- Office Products
- Office Electronics
- Presentation Products
- Presentation Remotes
Enjoy fast, free delivery, exclusive deals, and award-winning movies & TV shows with Prime Try Prime and start saving today with fast, free delivery
Amazon Prime includes:
Fast, FREE Delivery is available to Prime members. To join, select "Try Amazon Prime and start saving today with Fast, FREE Delivery" below the Add to Cart button.
- Cardmembers earn 5% Back at Amazon.com with a Prime Credit Card.
- Unlimited Free Two-Day Delivery
- Streaming of thousands of movies and TV shows with limited ads on Prime Video.
- A Kindle book to borrow for free each month - with no due dates
- Listen to over 2 million songs and hundreds of playlists
- Unlimited photo storage with anywhere access
Important: Your credit card will NOT be charged when you start your free trial or if you cancel during the trial period. If you're happy with Amazon Prime, do nothing. At the end of the free trial, your membership will automatically upgrade to a monthly membership.
Return this item for free
Free returns are available for the shipping address you chose. You can return the item for any reason in new and unused condition: no shipping charges
- Go to your orders and start the return
- Select the return method

Image Unavailable

- To view this video download Flash Player
Physical and Digital Pointer Presentation Clicker for Powerpoint Presentations,2 in 1 USB A and USB C Wireless Presenter Remote with Highlighting Magnifier for LED LCD Screen
Air Mouse Version
Classic Version
Digital&Physical Laser
Green Laser
Purchase options and add-ons
About this item.
- 【Physical and Digital Laser Pointer for Presentations】The presentation presenter combines physical and digital laser pointer in one clicker,it can clearly present on a traditional projection screen or LCD/TV screen.
- 【USB A and Type C in One Presentation Remote】 USB A & Type C receiver combine in a presenter remote, you can freely switch between different port devices such as Mac, laoptop and pc, one for multiple computers.The receiver placed inside the back of the clicker, conveniently to store when not in use. (Powered by 2pcs AAA Battery are not included).
- 【Multi-function Remote Clicker for Presentations】①Basic funstions of the slide advancer meet your daily presentations:Physical Laser,Page forward/ backward,Black/Full screen/Volume Control;②More advanced functions make rich content interaction during your presentations: Digital Laser,Highlight, Magnify,E-Mark/Eraser,etc.
- 【Wide Compatibility & Easy to Carry】The remote slide advancer supports systems: Windows 8/10 or later version,Mac OS 10.10 0r later version.Lightweight and compact design is easy to fit into the pocket.
Consider a similar item

Buy it with

Similar items that may ship from close to you

Compare with similar items
Product description.

Looking for specific info?
Product information, warranty & support, customer reviews.
Customer Reviews, including Product Star Ratings help customers to learn more about the product and decide whether it is the right product for them.
To calculate the overall star rating and percentage breakdown by star, we don’t use a simple average. Instead, our system considers things like how recent a review is and if the reviewer bought the item on Amazon. It also analyzed reviews to verify trustworthiness.
Customers say
Customers like the quality, performance, value, and ease of use of the remote control. For example, they mention it works well as a presentation pointer and as an air mouse, it's built much better with fewer moving parts, and it works seamlessly on their Mac. That said, some appreciate the ease of setup and the fact that it'll just plug and play.
AI-generated from the text of customer reviews
Customers like the performance of the remote control. For example, they say it works well, seamlessly on their Mac, and with PowerPoint. Some mention it has handy functions and allows movement in the area without missing the action. Overall, most are happy with the product's performance and recommend it for classroom use.
"...Fantastic for the price point. Good range, solid connection, no issues ." Read more
" Great product does the work perfectly and affordable price." Read more
"I use this every week and every week it works great . The laser is bright. No delay when advancing slides...." Read more
"This has a good range and works with M1 iMacs ...." Read more
Customers like the ease of use of the remote control. They mention that it has an easy interface and setup, it just plugs and plays, and that it saves them so much time. They also appreciate the compartment making it easy to keep track of.
"If you're looking for a basic slides remote, this one is great. no setup required , good weight and feel in your hand...." Read more
"... Easy to use so far . The air mouse could definitely be better. Finding out that slow movement is key...." Read more
"The item is not as easy to use as expected but much better than others I ordered and tried. It is a keeper because it does the basics I need...." Read more
"...It is easy to set up and easy to use. I took one star off because my laser pointer feature stopped working after only 2 weeks...." Read more
Customers are satisfied with the quality of the remote control. They mention that it works well as a presentation pointer and as an air mouse. The laser pointer is a nice touch and works well for basic functions. The mouse is hard to learn but works well to select URL links in a PowerPoint presentation.
"...This model is built much better as there are fewer "moving" parts...." Read more
"I use this every week and every week it works great. The laser is bright . No delay when advancing slides...." Read more
"This works well as a presentation pointer (clicker) and as an air mouse so I don’t have to go to the laptop to click on links during a presentation...." Read more
"Works well for basic functions, laser pointer is a nice touch , usb adapter fits inside battery compartment making it easy to keep track of, air..." Read more
Customers appreciate the value of the remote control. They say it's a simple, affordable slide advancer.
"... Fantastic for the price point . Good range, solid connection, no issues." Read more
"Great product does the work perfectly and affordable price ." Read more
"... Not bad for the price ." Read more
"It’s a simple affordable slide advancer ...." Read more
Customers like the comfort of the remote control. They mention it has a good weight and feel in their hand, and is ergonomically designed.
"...no setup required, good weight and feel in your hand . Only a 4 because the extra functionality isn't quite intuitive...." Read more
"Very easy to use. Good size, ergonomically . Good value for the $$...." Read more
"Great looking and feeling . Great price. I bought 8 for a training and no issues with any of them" Read more
Reviews with images

- Sort reviews by Top reviews Most recent Top reviews
Top reviews from the United States
There was a problem filtering reviews right now. please try again later..

- Amazon Newsletter
- About Amazon
- Accessibility
- Sustainability
- Press Center
- Investor Relations
- Amazon Devices
- Amazon Science
- Start Selling with Amazon
- Sell apps on Amazon
- Supply to Amazon
- Protect & Build Your Brand
- Become an Affiliate
- Become a Delivery Driver
- Start a Package Delivery Business
- Advertise Your Products
- Self-Publish with Us
- Host an Amazon Hub
- › See More Ways to Make Money
- Amazon Visa
- Amazon Store Card
- Amazon Secured Card
- Amazon Business Card
- Shop with Points
- Credit Card Marketplace
- Reload Your Balance
- Amazon Currency Converter
- Your Account
- Your Orders
- Shipping Rates & Policies
- Amazon Prime
- Returns & Replacements
- Manage Your Content and Devices
- Recalls and Product Safety Alerts
- Conditions of Use
- Privacy Notice
- Consumer Health Data Privacy Disclosure
- Your Ads Privacy Choices
IMAGES
VIDEO
COMMENTS
Select the Slide Show tab. Select the Use Presenter View checkbox. Select which monitor to display Presenter View on. Select From Beginning or press F5. In Presenter View, you can: See your current slide, next slide, and speaker notes. Select the arrows next to the slide number to go between slides. Select the pause button or reset button to ...
In Presenter View, you'll have your own private screen with tools like a next slide preview, timekeeper, and drawing tools.. This is a view that you'll see on your own screen while giving a presentation using PowerPoint. While the audience will see the presentation on the projector or big screen, you'll have your own private view on a second monitor.
Check the box beside the "Use Presenter View." Select from the "Start Slide Show" section to start your presentation "From the Beginning." Click the three dots menu on your full-screen slideshow view and select "Show Presenter View." When your presentation displays "Presenter View," you can scroll and use it for your speech.
In-depth Features of the Presenter View. PowerPoint's Presenter View is not just a simple "next slide" preview; it's a hub of tools and functionalities designed to make the presenter's job easier and the presentation more engaging. H3: Slide Preview This is arguably the most straightforward feature but also the most helpful.
Take advantage of the PowerPoint Presenter View to practice and present your PowerPoint speaker notes. This view also helps you as a presenter by showing you...
3. When you start Microsoft PowerPoint, you should see the same image on both screens. 4. Now press the Windows + P key combination and then select Extend. Click on the check mark to the right of Presenter View in the Slide Show tab. 5. You'll now see the different views on your two monitors.
A simple method for switching to Presenter View on a single monitor is to click the three dots ( More slideshow options) at the bottom in SlideShow mode and select Show Presenter View. You can also switch to Presenter View on a single monitor anytime using the ALT+F5 hotkey. The presenter can easily manage a PPT in presentation mode, with the ...
To see the full course that this video came from, go here: ️https://www.simonsezit.com/courses/microsoft/powerpoint-2021-online-course/In this Microsoft Pow...
Use thumbnail view to jump to any slide. Presenter View offers you the opportunity to see thumbnails of all of your slides without the audience seeing the thumbnails. Click on the thumbnail button below the current slide in Presenter View to enter this mode.
The PowerPoint Presenter view is an expanded view to make giving presentations easier. The view allows orators to see their own notes and a preview of the next slide.This additional information is only visible to the presenter but not the audience.
Start Presenter View. Click the Options button. Select Show Presenter View . The Presenter view fills the screen. The same presentation tools are available below the slide, and it also shows the current time and a thumbnail of the upcoming slide. At the bottom of the screen, use the arrows to move forward or backward in the presentation.
Training: PowerPoint Presenter View shows you the current slide, the next slide, and your speaker notes, to help you focus while presenting and connect with your audience. Watch this video to see how. Related topics. ×. Present slideshows Use Presenter View Video;
Open your PowerPoint presentation where you want to use Presenter View. When you open your presentation, make sure it's the final version. You don't want to be making last-minute changes in Presenter View! Step 2: Click on the 'Slide Show' Tab. Go to the 'Slide Show' tab in the PowerPoint ribbon.
Share control of a powerpoint presentation anywhere in the world, instantly. Play Video. ... Presenter View w/Slide Notes; Clicker Mode; Watermark; I'm interested in the standard tier. ... Set uploaded videos to loop or go to next slide when complete. And So Much More.. Hide/Delete slides, Custom Views, and much more will be available soon ...
PowerPoint Presentation Author: Joanna Chow Created Date: 3/29/2024 12:37:43 PM ...
3. Select any text area and tap the Bulleted list icon at the top. 4. Tap Return to continue adding items to the list. 5. Tap Return and tap the indent icon next to the bullet point to add a ...
Click the Slide Show tab. NOTE: Do not add audio under Insert and Record Audio; this method will not allow you to save your PowerPoint as a video since it does not synchronize timings to automatically move the slides with the audio. Click Record Slide Show. Review the narration setup and navigation before recording.
Next, navigate to the specific slide you wish to share. Then, right-click on the desired slide and a shortcut menu pops up. From this menu, select the option "Link To This Slide" to generate a direct link to the chosen slide within your presentation. Selecting "Share Link To This Slide," will prompt you to upload your presentation to ...
Start with an executive summary. Begin the slide deck with a tight executive summary that follows a three-act structure. First, start with stating the current realities. Second, clearly state the problem or opportunity your idea addresses and its potential impact.
Open Microsoft PowerPoint on Windows or Mac. Create a new presentation and go to any slide. Select Insert at the top and click Text box . Resize a text box and enter the text you want to add in ...
Buy Physical and Digital Pointer Presentation Clicker for Powerpoint Presentations,2 in 1 USB A and USB C Wireless Presenter Remote with Highlighting Magnifier for LED LCD Screen: ... Rechargeable USB Presentation Clicker PPT Pointer RF 2.4GZ PowerPoint Clicker Slide Advancer for Computer Laptop Mac. ... Next page. Compare with similar items.