If you see No Service, Searching or SOS on your iPhone or iPad
If you see No Service or Searching in the status bar on your iPhone or iPad (Wi-Fi + Cellular), your device isn't connected to a mobile network. If you see SOS or "SOS only" in the status bar, your device can still make emergency calls.

Check your coverage area
- Make sure you're in an area with mobile network coverage.
- Turn mobile data off and then back on again. Go to Settings, then tap Cellular or Mobile Data. If you're using an iPad, you may see Settings > Mobile Data.

If you see SOS or SOS only
If you see SOS or "SOS only" in the status bar, your device isn't connected to a network, but you can still make emergency calls. This feature is available in Australia, Canada and the United States.

If you're on AT&T's 3G network
AT&T is phasing out their 3G network. If you see No Service in the status bar of your device and you have an iPhone 5s, iPhone 5c or earlier, or an iPad 2 Wi-Fi + Cellular or earlier, contact your network provider to discuss your options. If you have an iPhone 6 or later or an iPad (3rd generation) or later, follow these steps:
- Update your iPhone or iPad to the latest version of iOS or iPadOS .
- For iPhone, tap Mobile Data Options, then turn on Enable LTE.
- For iPad, turn on LTE.
If you still see No Service after following these steps, contact your network provider.
iPhone and iPad devices that support 5G networks are not affected by the phasing out of 3G networks.
Restart your iPhone or iPad
Restart your device. If you're not sure how to do this, follow these steps to restart your iPhone or restart your iPad .
Check for a Network Provider Settings update
To manually check for and install a network provider settings update :
- Make sure your device is connected to a Wi-Fi or mobile network.
- Tap Settings > General > About. If an update is available, you'll see an option to update your network provider settings.
- To see the version of network provider settings installed on your device, tap Settings > General > About and look next to Network Provider.
If you insert a new SIM card into your iPhone or iPad, you will need to download the network provider settings for your new network provider.
Turn your mobile line off and back on
Go to Settings > Mobile Data and check if your mobile line is turned on. If your mobile line is turned off, turn it back on. Then check if you have service.
If you can't see your mobile line in Settings > Mobile Data, you should set up an eSIM or insert a physical SIM card. If you're using a physical SIM card, remove the SIM card and put it back in.
If your SIM card is damaged, doesn't fit in the SIM tray or you've transferred your physical SIM card from another device, ask your network provider for a new SIM card.
Find out more about removing your iPhone SIM card or iPad SIM card .
Reset your Network Settings
Go to Settings > General > Transfer or Reset [Device] > Reset > Reset Network Settings. This will also reset Wi-Fi networks and passwords, mobile data settings, and VPN and APN settings that you've used before.
Update your iPhone or iPad
Update your iPhone or iPad to the latest version of iOS or iPadOS .
Contact your network provider
Issues with your network provider or account may affect your service. Contact your network provider to:
- Verify that your account is active and in good standing.
- Make sure there are no outages in your area.
- Check that your device hasn't been blocked from receiving mobile data services and that it has been set up with the right data plan.
Only your wireless network provider can access and manage details about your account:
- iPhone wireless network providers
- iPad wireless network providers
Get more help
If your network provider confirms that there's no issue with your account or network, but you still can't connect to a mobile network, contact Apple Support .
If you see an alert next to No Service, find out what you can do .
How To Connect Xbox Controller To iPhone Or iPad
How to refresh airtag location for improved tracking, iphone unavailable error here’s how to fix it, when did the iphone 15 come out.
- Zip-rar tool
- Zip browser
12 Step Ultimate Guide For Solving All iPhone Network Issues
This is your super guide for solving all iPhone network issues in 2019. In this article we have looked at all possible problems that iPhone users regularly face when it comes to network connectivity and have given proven strategies that can be immensely helpful in fixing the network problems on iOS devices.
This super guide will help you in solving your cellular and Wi-Fi network problems no matter if you have an iPhone XS, iPhone XS Max, iPhone XR, iPhone 8, iPhone 7, iPhone 6s or iPhone 6. The W-Fi section of this comprehensive guide will also help iPad and iPod touch users.
This us an up to date guide and works with all versions of iOS including iOS 7, iOS 8, iOS 9, iOS 10, iOS 11, iOS 12 and iOS 13.
What Are iPhone Network Issues?
iPhone network issues are caused when your device is not able to connect to your cellular network or Wi-Fi network. An iPhone will give you No Service or Searching error when it is having cellular connectivity problems. Such issues can be very frustrating for the user as they are not able to make any phone calls or connect to the cellular Internet.
There are many ways that allow you to solve all iPhone network issues that you are facing with your device, and restore the cellular and Wi-Fi network of your smartphone. In this guide we will show you all the ways that can be beneficial in activating your cellular connectivity. In the second part of this article you will learn how you can solve the Wi-Fi issues with your iPhone, iPad or iPod touch.
The solutions
- Toggle Airplane Mode
- Reboot your iPhone
- Update your Carrier Settings
- Eject and reinsert your SIM card
- Reset your Network Settings
- Update to latest iOS version
- Check if your iPhone is carrier locked
- Toggle Wi-Fi Off And On
- Check if you have Internet Connectivity and Restart Router
- Remove Wi-Fi Network and add again
- Reset your Network Settings (Wi-Fi)
- Enable Auto-Join for your Wi-Fi network
Part 1: Solving Cellular Network Issues with iPhone
In this section of our ultimate guide for solving all iPhone network issues we will be fixing cellular network issues with your iPhone. Follow each of the steps detailed below and hopefully by the end of this guide you will have an iPhone that lets you connect to your cellular network.
With these steps you will be able to solve SIM not working with iPhone issues, connection drops, iPhone not able to make or receive phone calls, No Service errors, iPhone Searching for network issues and more.
1. Toggle Airplane Mode
The first and easiest thing that you should do, which could result in restoring your iPhone’s network connectivity and solving No Service iPhone problem is toggling the Airplane Mode on and off. When you turn on the Airplane mode of your iPhone its radio-frequency signal transmission is suspended. So when you turn it back off your iPhone will turn on its radio-frequency signal transmission and look for cellular signals again. This could result in connecting your iPhone to its network. You can quickly toggle the Airplane mode on your iPhone by accessing the Control Center (swipe down from top right corner of the screen) and then tapping on the ‘Airplane’ button.
Toggling Airplane mode can also be helpful when your iPhone is not giving full signal. When you turn it on and back off your iPhone can get a better reception.
2. Reboot your iPhone
If toggling Airplane mode does not activate cellular network on your iPhone, then don’t worry as rebooting it might be more helpful. Simply restart your iPhone by long pressing the Power and Volume Up buttons and then slide to power off. Once the device has turned off completely you can reboot it by pressing and holding the power button. If your iPhone’s power button is not working, then you can also go to Settings > General and scroll all the way down to tap on the ‘Shut Down’ button.
You also have the option to force reboot your iPhone in case normal shut down methods are not working or your device is stuck or frozen. You can force reboot a modern iPhone by following the simple steps below.
- Press and release the Volume Up button.
- Then press and release the Volume Down button.
- Now press and hold the Power/Lock button .
- Keep the power button pressed until you see the Apple logo.
For older models that have a home button, you can follow this guide to force reboot your iPhone 8, 7 or 6s .
3. Update Your Carrier Settings
Another and possibly more effective way to solve iPhone No Service or Searching errors is by updating your carrier settings. Most carriers change their settings and automatically push them to your iPhone, however sometimes settings are not automatically pushed to your device and you are left with connectivity issues. You can solve such problems by updating your carrier settings manually. To do so, simply open Settings > General And go to About page. As soon as you access the About page iPhone will prompt you about updating your carrier settings. Simply tap on ‘Update’ option and iPhone will update your carrier settings for you.
4. Eject and reinsert your SIM card
This might sound like a simple solution but it is also one of the most effective. Go ahead and eject your SIM card from iPhone’s SIM tray and insert it back in. When you do make sure you are placing the SIM card on the SIM tray properly and then put the SIM card back into your iPhone. If you have a dual-SIM iPhone XS Max , then make sure you insert the SIM card even more carefully, exposing the golden part of the SIM on both top and bottom sides of the tray. Your iPhone should detect the SIM card as soon as you place it inside the iPhone and connect to your network right away.
5. Reset your Network settings
Next thing you should try to solve No Service errors on your iPhone is resetting its network settings. Doing so will restore iPhone’s network settings to their original configuration and hopefully end up solving any connectivity issues that may be caused due to wrong settings. You can reset your iPhone’s network settings by going to Settings > General > Reset and from there tapping on the ‘Reset Network Settings’ option. You will be asked to enter your iPhone’s passcode before you can proceed to reset your network settings.
6. Update to latest iOS version
Updating to latest version of iOS is perhaps the most underrated troubleshooting technique out there. Apple regularly releases new software updates for all its devices, and these new releases often contain bug fixes for various iPhone functions. Make sure your iPhone is running the latest available iOS version to make sure all the bugs are fixed on it. You can check your iPhone’s current iOS version by opening Settings > General > About. There you will the ‘Software Version’ for your device. If your device needs to be updated, then you can update your device to the latest version by going to Settings > General > Software Update.
7. Check if your iPhone is carrier locked
If you have got a new iPhone that was resold to you or given away by a relative, then chances are the device may be carrier locked. When an iPhone is carrier locked you are only able to use the SIM card from a particular network with it. All other networks simply don’t work with that particular device, as opposed to a factory unlocked iPhone, which works with all networks worldwide.
The easiest and simplest way of checking whether your iPhone is carrier locked according to MacWorld is by going to Settings and then to Mobile Data. If on Mobile Data screen you get the option saying Mobile Data Network, then your iPhone is most probably factory unlocked, as this option is only available on unlocked iPhones. If the device does not have this option then chances are your iPhone will only work with its original network provider, unless you get it unlocked by paying that network’s fees.
Note : If you have an iPhone 7, then it is a good idea to check with Apple if your device falls into their iPhone 7 repair program for “no service” issues program. You can check eligible iPhone 7 models and have yours repaired free from Apple Store or Apple’s Authorized Service Providers.
By following these steps you should be able to fix no service on iPhone, and gotten rid of iPhone searching for networks constantly. Feel free to use the comments section below to let us know if you have any questions.
Part 2: Fixing Wi-Fi Connectivity Issues
Having Wi-Fi network problems on an iPhone, iPad or iPod touch can be equally annoying for iOS users. Not having Wi-Fi connectivity on your iOS device renders it almost useless since most apps and things we do on our iOS devices requires a Wi-Fi network. Thankfully fixing Wi-Fi issues on an iPhone or iPad is relatively easy, and that is exactly what we are going to demonstrate to you in this second part of our ultimate guide for solving iPhone network issues in 2019.
With these steps you will be able to solve issues such as iPhone Wi-Fi not working, Wi-Fi connected but websites won’t load, iPhone disconnecting from Wi-Fi and more.
8. Toggle Wi-Fi Off and On
The simplest yet most effective way to restore Wi-Fi connection on any device including an iPhone or iPad is simply turning off Wi-Fi and then turning it back on. You can quickly turn off Wi-Fi network on your device by access the Wi-Fi toggle from the Control Center (Swipe down from top right corner of the screen). When you turn off your Wi-Fi network it instantly disconnects from any Wi-Fi networks it is connected to and then reconnects as soon as you turn it back on. Doing this can effectively solve Wi-Fi connection problems and bring back your precious Internet connectivity.
9. Check if you have Internet Connectivity and Restart Router
While you are baffled by Wi-Fi not working on your iPhone or iPad, the problem might not be related to your iOS device at all. It is advisable to check if you have Internet connectivity available on your Wi-Fi network in the first place. You can do so by checking the Internet light on your router or accessing the same network with some other device such as another iPhone or your computer. If your Internet is not working on other devices as well, then you need to contact your service provider to have your Internet connection restored.
10. Remove Wi-Fi Network and add again
Sometimes Wi-Fi network stops working on iPhone or iPad due to configuration issues. You can solve them by simply removing the Wi-Fi network from your device, and then adding it back again using a few simple steps. To remove a Wi-Fi network from your iOS device simply go to Settings and then to Wi-Fi. From there look for your Wi-Fi network and tap on the ‘i’ button located next to its name. Finally tap on Forget This Network option in order to remove the network from your device.
Once you have removed the Wi-Fi network, you can connect to it again from the Wi-Fi settings page. You will need to enter the Wi-Fi password again in order to connect to this network.
11. Reset your Network Settings
We have also recommended resetting your iPhone’s network settings in first part of this guide, and will recommend it again for troubleshooting Wi-Fi issues with an iPhone or iPad, as doing so can effectively solve Wi-Fi network issues for iPhone users. You can reset your iPhone’s network settings by going to Settings > General > Reset, and from there tap on the ‘Reset Network Settings’ option. Your iPhone will ask you to confirm this action by entering your device’s passcode. Enter the passcode in order to reset the iPhone’s network settings. Afterwards connect to your Wi-Fi network to see if it has started working again or not.
12. Enable Auto-Join for your Wi-Fi network
Wi-Fi connectivity issues are certainly not limited to Wi-Fi not working as users also face problems when their device constantly disconnects from their Wi-Fi network, forcing them to reconnect to it again and again. This problem can be solved by enabling the Auto-Join feature that is offered on the Wi-Fi settings page. When this feature is enabled your iPhone will automatically connect to the said Wi-Fi network without requiring any effort from your end. You can enable Auto-Join feature by going to Settings > Wi-Fi and tapping on the ‘i’ button for your Wi-Fi network. Then from your Wi-Fi’s settings page turn on the toggle for Auto-Join.
There you go folks, this was our 12 step ultimate guide for solving Cellular network and Wi-Fi issues with your iPhone, iPad and iPod touch. If you have any questions, then feel free to use the comments section below.
- Cellular Network
- Compatibility list
- iPhone tips
- troubleshooting

Leave a Reply Cancel reply
Your email address will not be published. Required fields are marked *
Notify me of follow-up comments by email.
Notify me of new posts by email.
This site uses Akismet to reduce spam. Learn how your comment data is processed .
Sign Up for Our Newsletters
Related posts, forgot apple id password here’s how to find it it on iphone, ipad and mac.
- GTA 5 Cheats
- What is Discord?
- Find a Lost Phone
- Upcoming Movies
- Nintendo Switch 2
- Best YouTube TV Alternatives
- How to Recall an Email in Outlook
Common iPhone 6 and 6 Plus problems, and how to fix them

- Problem: iPhone shuts down on its own, or awful battery life
In 2016, Apple started a free battery-replacement program for iPhone 6S units that would shut down unexpectedly. People had complained that their iPhones would just turn off if they dipped below 30 percent battery life.
Issue: iPhone is slow or lagging
Glitch: gps not working, problem: iphone screen freezes.
- Problem: Can’t send or receive iMessages and texts
- Problem: Unable to update to iOS 11
Problem: Red screen
Glitch: enlarged image or icons filling screen.
- Issue: Can’t hear during calls
- Problem: iPhone 6 won’t charge
Glitch: No SIM card error
Problem: bent iphone 6 plus, issue: cracked screen, bug: touch id not working, glitch: bluetooth not working.
- Issue: Unresponsive touchscreen
Problem: Camera not working
Bug: random crashing, and boot loop, problem: dye coloring the plastic strips, issue: headphones crackling or odd behavior, issue: overheating iphone.
- Problem: iPhone won’t turn on
- Issue: Won’t connect to Wi-Fi or drops
Problem: iTunes restore error 53
Glitch: email not updating, issue: no alert sound for incoming messages.
- iPhone 16: news, rumored price, release date, and more
- This is our best look yet at the iPhone 16’s big design changes
- The most common iPhone 15 problems and how to solve them
Apple hasn’t announced any such recall for the iPhone 6, but an increasing number of people have been complaining about their iPhone 6 smartphones shutting down on their own after dipping below 40 percent. Others have complained about very bad battery life.
Potential solutions:
- If you’re experiencing bad battery life, we recommend that you follow our iPhone battery tips to make your iPhone battery last longer.
- If you’re one of the unlucky owners of an iPhone 6 who is experiencing shutdowns, we are sorry to say that there is no replacement program for the iPhone 6, as there is for the iPhone 6S. We recommend that you visit your local Apple retail store or contact Apple directly on the phone. You may have a hardware issue.
- Battery performance will deteriorate over time, so it may be worth looking into getting a battery replacement. Apple offers a replacement service for $79.
There have been a few reports of iPhone 6 and 6 Plus handsets becoming sluggish, particularly after receiving an update. If you find that there are delays when tapping or swiping, or perhaps apps take a few seconds longer to open than they once did, then there are a few things you can try.
Potential solutions :
- Begin by restarting your iPhone. Press and hold the Sleep/Wake and Home buttons simultaneously, until you see the Apple logo.
- If that doesn’t help, then try performing a factory reset and restoring your device from a backup.
Quite a few people have run into an issue with the GPS function in the iPhone 6. They might be using Apple Maps, Google Maps, or any other app that employs the GPS, but find that it’s inaccurate or very slow to update. That said, it may still work fine when they’re connected to Wi-Fi.
- Check in Settings > Privacy > Location Services and make sure Location Services is toggled on at the top. Then, check the rest of the settings and ensure nothing important has been toggled off.
- If you have a case on your iPhone, then remove it and test the GPS again.
- You may want to try resetting your network settings via Settings > General > Reset > Reset Network Settings . Keep in mind, however, that you will have to re-enter some passwords and set up your network connections again after this.
- There’s a chance that your hardware is failing, in which case replacing the antenna or the cable connecting it to the logic board will resolve the issue. This has worked for some people, but not everyone.
- You could try going into an Apple Store, but the employees may suggest that you buy a new iPhone.
Some iPhone 6 and 6 Plus users have found that their device’s display becomes unresponsive when using apps. The problem has been reported on the Apple forums many times, and we’ve seen the same issue reported back in iOS 9.3.1 . The issue has been known to occur multiple times in a single day.
Workarounds:
- Use the lock button to turn the screen off and on again.
- Hold down the Sleep/Wake and Home buttons until you see the Apple logo appear to reset your iPhone.
- Factory reset and restore your device as a new phone, or restore it from a backup.
- If none of the aforementioned workarounds fixes the problem, consider contacting Apple or going to an Apple Store. The problem may be with the hardware, not the software.
Problem: Can’t send or receive iMessages and texts
Some users are struggling with an issue where a contact or multiple contacts are unable to receive iMessages and texts from an iPhone 6 or iPhone 6 Plus user, though they can still receive texts from other contacts. Some people are unable to send text messages, and for others , iMessages don’t appear to go through properly. This problem has cropped up in various versions of iOS, including iOS 10.
- Turn iMessage off and back on, or turn iMessage off to see if texts can be sent and received.
- Make sure the contact is not on your block list. To do so, go to Settings > Phone > Call Blocking & Identification , and confirm that the user is not on any block list.
- If you have an old iPhone or another iOS device that you sometimes use for iMessages, try toggling iMessages off there and sign out of your Apple account. You can sign out by going to Settings > Messages > Send & Receive and tapping on your Apple ID, then choose Sign Out .
- Delete your current conversation with the problem contact(s) and start a new one.
- Delete and re-enter said contact(s).
- Simultaneously hold the Sleep/Wake and Home buttons to reset your device.
- Try going to Settings > General > Reset > Reset Network Settings . You will have to re-enter some passwords and set network connections up again after this.
- You could try a factory reset of your iPhone .
- Contact Apple Support, or take your device to an Apple Store to get it checked out.
Problem: Unable to update to iOS 11
Every time a new iOS version rolls out, some users have trouble with the update, as discussed on this thread in the Apple forums.
- If you’re doing an OTA (Over The Air) update through WiFi, you will need around 1.5GB of free storage on your device. If you’re having issues with the OTA update, check out Apple’s over-the-air help page for more information.
- Make sure that Wi-Fi is on and go to Settings > General > Software Update on your iPhone.
- If you can’t update directly on your iPhone, then try plugging into your PC or laptop. Make sure you’re using the latest version of iTunes, which is 12.7 at the time of writing.
- If it doesn’t work, then hold down the Sleep/Wake and Home buttons together on your iPhone 6 while it’s still connected to your computer. Wait until you see the recovery screen — you should see the Apple logo and then the iTunes icon with the cable. Choose the Update option on your computer when it appears.
- If met with an error code, check Apple’s detailed support page on what the different error codes mean and what to do.
- Contact Apple Support, or take your device to an Apple Store.
Problems with red screen flashing, hearing calls, and more
A number of iPhone 6 and 6 Plus owners have reported a problem in which their iPhone’s display goes — or flashes — red before showing the Apple logo. Sometimes the problem goes away on its own and returns later, and sometimes it sticks around and the display refuses to turn off.
Workaround :
- Try simultaneously holding down the Sleep/Wake button and the Home button for 10 seconds, or until you see the Apple logo. In some cases, the iPhone will restart normally, but the problem might come back.
- There’s a possibility that this is a software issue, perhaps pertaining to a corrupted backup. You can try the restore process to fix it. Hold down the Sleep/Wake button to turn your iPhone 6 off. Make sure that your computer is running the latest version of iTunes and plug your iPhone in with a USB cable. Now, simultaneously hold down the Sleep/Wake and Home buttons for a few seconds, and when the device comes on, let go of the Sleep/Wake button while continuing to hold down the Home button. You should get the Connect to iTunes screen and you can let go of the Home button. Then, follow the restore procedure through iTunes.
- It’s also possible that this is a hardware failure of some kind, and in that case, you’re going to have to contact Apple or visit an Apple Store and arrange a replacement. It might be a good idea to record the red screen using another device, just in case your iPhone 6 works normally when you take it in for an assessment.
It’s fairly common to hear reports about enlarged images or icons on the iPhone screen making it difficult for people to see properly or navigate. There’s a good chance that this has been caused by the accessibility feature, Zoom , and it’s easy to fix.
- Hold three fingers together and double tap the screen and you should see things return to normal.
- To make sure that it doesn’t happen again go to Settings > General > Accessibility and turn Zoom off.
Issue: Can’t hear during calls
Quite a few people have run into an annoying issue where they can’t hear the other caller during a phone call. They can make and receive calls as normal, but they can’t hear the person on the line, or they sound muffled even when the volume is turned up.
- Try using the Volume up button and make sure that the ringer volume appears on screen when you press it and not headphones.
- Make sure that nothing is covering the speaker. A screen protector, a case, or even dust can have a big impact. Use a brush or blow gently into the speaker to make sure it’s free of any blockages.
- Make sure that you don’t have anything plugged into the headphone port. It can be worth plugging in headphones and taking them out again just to test if that helps.
- Try turning Bluetooth off via Settings to make sure that you aren’t connected to a headset or car system. If you regularly use a Bluetooth device try connecting to it and then disconnecting to see if it makes a difference.
- You could try going into Settings > General > Accessibility and make sure that Phone Noise Cancelation is turned off, some people have found that this helped.
- Try toggling speakerphone on during a call and see if the issue persists.
- After you’ve tried the solutions above, hold down Sleep/Wake and Home together for 10 seconds until you see the Apple logo to reset the iPhone 6.
- If you’re still having the problem after trying all of these potential solutions then it’s time to talk to Apple and/or your carrier.
Problem: iPhone 6 won’t charge
We’ve heard a few iPhone 6 owners complaining that they are unable to charge their device up. They plug it in as normal and nothing happens or it will only charge so far.
- Make sure that you are using the cable and wall charger that came with your iPhone 6 or iPhone 6 Plus. If the charger or cable you’re trying to use isn’t Apple certified, then that could be your problem right there.
- Try using a different wall socket, a different cable, and a different charger.
- Take a look at the connector on your cable and the port on your iPhone. Make sure that they’re clean and free of dust. You can blow into the port to clean it out or use a brush with soft bristles.
- There are reports that if you keep your Lightning cable in a humid or wet environment the connector can get corroded. If it’s wet then you should never plug it in because you could also damage the port on the iPhone. If it looks corroded or there’s something on the connectors that you can’t remove with a microfiber cloth, then it’s worth taking the cable into an Apple Store to show them, they may just give you a replacement.
- Try resetting your device while it’s plugged into the charger by holding down the Sleep/Wake and Home buttons for 10 seconds or so until the Apple logo appears.
- There’s a chance that your battery is on its last legs. Take your iPhone into an Apple Store and ask them to take a look.
A few people have run into a glitch where the iPhone 6 keeps complaining about the SIM card. It might say “Invalid SIM” or “No SIM card installed.” There are a few things worth trying.
- Try toggling Airplane mode on and off again.
- Restart your iPhone by turning it off and on again.
- If you recently inserted the SIM card and started getting the error, then there’s a chance it’s damaged or dirty. Try popping it out and taking a look. You can use a pencil eraser to clean the gold contacts and then blow away the debris before putting it back on your iPhone.
- If you’ve dropped your iPhone 6, or it was damaged somehow, then there’s a chance the SIM tray is loose. Some people have had success by putting a small, thin piece of packing tape on the back of the SIM card and then re-inserting it.
- Make sure that your software is fully up to date via Settings > General > About .
- Try the SIM card on another device if you have a compatible device, or try a different SIM card in your iPhone 6.
- If the problem persists then contact your carrier or Apple.
Problems with bent iPhones, cracked screens, and more
The bent iPhone 6 Plus problem has stirred up a storm of coverage online, but Apple claims it’s not common and that only nine people have actually contacted the company to complain about a bent iPhone 6 Plus. We suspect there will be more in the coming weeks. The thin design and larger body obviously make it a lot more likely to bend than last year’s model, but if you look after it and don’t try to bend it, then it’s not likely to happen to you. Whether you believe it’s a big issue or not, there’s only one thing to do if it happens to you.
- If the iPhone is only slightly bent and there are no other issues, a good case can help with the rigidity of the iPhone 6. Check out our picks for the best cases for the iPhone 6 and the iPhone 6 Plus.
- Again, if your iPhone 6 is only slightly bent, and there are no other issues, you can stop it from getting worse by being more careful about how you carry your smartphone. If you carry your smartphone inside very tight jeans or in a back pocket that may be the reason it is bent.
- Contact Apple or take it into an Apple Store and they’ll inspect it and decide whether to offer you a free replacement.
A lot of people report that the iPhone 6 and the iPhone 6 Plus are easy to damage when dropped. There’s always a risk when you drop your smartphone that the screen is going to crack. That’s why it’s a good idea to invest in a protective case. If you’ve got a broken iPhone 6 screen, then here’s what to do:
- Run through our guide on how to repair your smartphone for DIY advice, repair shops, and services.
- Go directly to Apple where an iPhone 6 screen repair will cost you $109, or $129 for the iPhone 6 Plus.
We’ve seen thread after thread on the Apple forums about iPhone 6 owners being unable to use Touch ID. It sometimes stops working after a software update and occasionally attempting to remove and re-add fingerprints can lead to a situation in which Touch ID setup fails over and over.
- Hold the Sleep/Wake and Home buttons to trigger a forced restart (the Apple logo will appear).
- Clean the area around the iPhone’s Home button with a soft, microfiber cloth.
- Go to Settings > Touch ID & Passcode, delete your fingerprints, and tap Turn Passcode Off . Turn your iPhone off and back on again, then go back to Settings > Touch ID & Passcode and set it up afresh.
- Create a backup using iTunes and restore your device using that backup. If the problem persists, try a factory reset, but don’t restore the backup. Set it up and test to see if Touch ID works correctly.
- If you’re still having problems it’s time to contact Apple.
A lot of new iPhone 6 or iPhone 6 Plus owners are having trouble connecting with Bluetooth devices, particularly systems in cars . Some people can’t get the in-car system to work, while others are having trouble establishing any connection at all. It doesn’t seem limited to any specific manufacturer. We’ve seen reports about a wide range of car models, including Toyota, Mercedes-Benz, Nissan, Honda, Acura, BMW, Jeep, and more. There are reports that the connection works fine with older models of iPhone.
- You should delete all pairings from your car or another Bluetooth device. Now go to Settings > General > Reset > Reset Network Settings on your iPhone. Now hold down the Sleep/Wake and Home buttons together until you see the Apple logo on your iPhone. Make sure your car or device is discoverable, and try setting up the connection from scratch.
- Some people reported success after a factory reset. Check out how to factory reset an iPhone .
Issue: Unresponsive touchscreen
A few people have been complaining that the touchscreen on their new iPhone 6 is randomly unresponsive. This seems to manifest as a keyboard problem where it’s sluggish and certain keys don’t seem to work in portrait mode, but some reports talk about the whole side of the screen being unresponsive. In some cases, it’s accompanied by a gray flickering bar at the top of the screen.
- The first thing to try is restarting your iPhone 6 by holding down the Sleep/Wake button and the Home button together until you see the Apple logo. The problem might return.
- Some owners had success after trying Settings > General > Reset > Reset All Settings (you’ll need to re-enter passwords, change the wallpaper, set up Touch ID again, but it won’t delete your data).
- Others report success after a factory reset, but you’ll lose everything if you do this, so backup first. You may need to set up your iPhone 6 as a new phone rather than restoring, a few people found that restoring from an iTunes or iCloud backup brought the problem back again.
- There’s also a possibility that this is being caused by a hardware fault and there’s a problem with some of the connections inside the iPhone. If that’s the case, you’ll need to seek a repair. It might be worth taking your iPhone into an Apple Store and asking them to take a look.
Problems with the camera, random crashing, and more
There seems to be more than one problem with the iPhone 6 camera. Tom’s Guide ran a piece about purple tinges and possible chromatic aberration, though that appears to be software related as it happens on the iPhone 5S with iOS 8, as well. We’ve seen a few reports of people starting up the camera app on the iPhone 6 and 6 Plus only to find a black screen. We’ve also seen reports of photographs being rotated to the wrong orientation.
- A reset could temporarily get rid of the problem. Hold down the Sleep/Wake button and the Home button together until you see the Apple logo.
- Try going to Settings > General > Reset > Reset All Settings and see if that makes a difference. You will need to set up some bits and pieces again after, but it won’t delete any files or photos.
- Some owners found it was caused by an old backup. If you are restoring from a backup you made with an older iPhone, that could be the problem. Try setting the iPhone 6 up as new, factory reset it, and then put everything on it manually, and you might find that the problem is gone.
- If it persists, then you may have a hardware fault and you should contact Apple or head into an Apple Store to get it looked at. They should replace it for free if there’s a problem.
A few iPhone 6 and 6 Plus owners have run into an issue where their iPhone repeatedly crashes or shuts down without any apparent reason. For some people, the iPhone 6 is then getting stuck in a boot loop where it repeatedly turns itself off and on again. It might happen when launching an app and it might display a blue or red screen.
- It could be a software problem. Check in Settings > General > Software Update and tap Download and Install when you see a new update. Apple says iOS 10.2.1 resolves the issue.
- If you keep encountering this issue with a specific app, then try deleting it and reinstalling it.
- There’s a chance that this is down to old settings or specific apps. You could try a factory reset and then set the iPhone up as new and reinstall apps selectively, but that’s quite a radical step and there’s no guarantee it will work.
- If this is genuinely a hardware problem, then you’re going to need to get a replacement handset from Apple. Take it into an Apple Store if possible and they’ll probably try a restore. If the problem persists they should offer you a replacement.
The iPhone 6 and iPhone 6 Plus have plastic strips in the svelte body to ensure that the antennas can hold a signal. Unfortunately, they are a necessary evil, though plenty of people find them ugly. Some owners have found that slipping the phone into a tight jeans pocket results in some of the dye sticking to the white plastic on the gold model and discoloring it. This has happened with many other smartphones in the past (like the white HTC One X), so it’s not a new or exclusive problem.
- Put a case on your iPhone, it’s a fragile device that’s going to break easily if you drop it, so it’s worth considering a case anyway and it should prevent this problem or hide it.
- Wear white jeans (just kidding … although it would work).
- A pencil eraser proved effective for some people.
- Start with a damp cloth and work your way up the cleaning products until you manage to remove the marks. Just be careful not to get any cleaning fluid on the screen or the rest of the iPhone body.
Quite a few people have had trouble getting their headphones to work perfectly with their new iPhone 6. It seems that there are a couple of different issues here. One relates to the headphones poking out the top and crackling noises. The other concerns Siri auto-launching and other strange behavior like music stopping or volume controls on the headset not working.
- Start by blowing into the headphone port and clean the headphone jack to make sure there’s no dust or dirt causing this problem.
- If you’re using the headphones that came with the iPhone 6 or another official Apple set and you’re getting crackling, then check to see that they’re properly plugged all the way in. There shouldn’t be any metal visible at the top. It may feel tight, but it should snap all the way in.
- People using third-party headphones, especially if they have a microphone, seem to be inadvertently triggering Siri or experiencing frequent cut-outs. This could be because the metal at the top of the plug is touching the iPhone body. Some people report success by using scotch tape, plastic, or even dental floss wrapped around the top of the headphone jack. Just make sure you don’t use something that could get stuck in the port.
- If the problem persists, there’s a chance it’s a hardware fault. Go to Apple and have them take a look. If they can’t resolve the issue, then you should be able to get a replacement handset.
Smartphones get warm to the touch when charging, or if you’re playing a graphically intensive game, but they should never get burning hot. There are some reports the iPhone 6 and 6 Plus can get especially hot, and not under the conditions mentioned above. Areas of concern include the rear panel, particularly near the volume controls.
Workarounds :
- A restart should help it cool down, but it may overheat again in future. Hold down the Sleep/Wake button and the Home button together until you see the Apple logo.
- If you use a case try removing it.
- A problem app or something in your backup file could be causing your issue. Try a factory reset and don’t restore a backup, set it up as new instead and test to see if the overheating is gone. Reinstall apps one by one and watch out for the problem returning.
- If your iPhone is so hot you risk burning yourself, then you need to take it back to Apple. Make an appointment with the Genius Bar at your local Apple Store.
Problems with booting, Wi-Fi, iTunes, and email
Problem: iphone won’t turn on.
You might find that your iPhone 6 sometimes refuses to turn on when you press the Sleep/Wake button. Perhaps it unexpectedly turned off and now seems to be unresponsive , or you’ve just reached for it only to find that it won’t wake up . Here’s what to do:
- Start by holding down the Sleep/Wake and Home buttons together. Keep holding them down, for up to 30 seconds. It might feel like a long time, but keep holding them. The Apple logo should eventually appear. Check our guide on how to reset an iPhone .
- There could be a problem with the Sleep/Wake button itself, but you should be able to feel or see the fault. You’ll obviously need a repair it if it seems to be damaged.
- If that doesn’t work, then the battery is probably dead. Plug your iPhone into the charger and leave it for half an hour, before trying to turn it on again.
- If it still doesn’t respond, then try plugging your iPhone into your computer and launching iTunes. You may find it recognizes your iPhone and indicates that it’s in recovery mode. If so, you should try restoring it.
- If nothing works, then it’s time to visit an Apple Store or contact Apple regarding a repair.
Issue: Won’t connect to Wi-Fi or drops
A lot of people have had trouble with their Wi-Fi connections on the iPhone 6 or 6 Plus. If you find that you can’t connect to a Wi-Fi network, or that your connection frequently drops or slows down, then there are lots of things you can try.
- Toggle Wi-Fi/Airplane mode : You might find that it temporarily comes back if you toggle Wi-Fi off and then on again. Alternatively, you could switch Airplane mode on and then turn it off again. Swipe up from the bottom to open the Control Center and toggle these settings.
- Reboot : Some people report temporary success by switching the device off and on again. Press and hold the Sleep/Wake button and the Home button for 10 seconds or so, until you see the Apple logo. Your Wi-Fi may work again for a while.
- Set up the connection again : Go to Settings > Wi-Fi and tap on the problem network, then select Forget this Network and tap Forget . If you go back to the Wi-Fi page, you should now be able to choose your network and set up a fresh connection.
- Reset Network Settings : Try going to Settings > General > Reset and tap Reset Network Settings . This has worked for a few people, but the problem might return.
- Turn off Wi-Fi Networking : Try going to Settings > Privacy > Location Services and under System Services you need to toggle off Wi-Fi Networking .
- Turn off Wi-Fi Assist : It’s designed to switch you to your mobile data network when Wi-Fi is patchy, but it could be causing your problems. Go to Settings > Cellular and scroll down to toggle Wi-Fi Assist .
- Toggle 2.4/5GHz : If you have a two-channel router, then try changing from 5GHz to 2.4GHz. Generally speaking, 5GHz is faster, but with a shorter range. Some people report a better connection on 2.4GHz and a few find an improvement by switching the other way.
- Change router channel : You could also try changing the channel on your router. You’ll need to put your router’s IP into your browser and login to change settings. Refer to your ISP for instructions.
- Switch DNS to Google : Some people report success after switching DNS to use Google servers. You can do this via Settings > Wi-Fi then tap the ”i” icon next to your router, scroll down to DNS and tap the numbers and enter “8.8.8.8”. You might have to restart your device for this to take effect.
- Turn off MAC Filtering on your router : It’s possible to add your iOS 9 device’s MAC address, but due to Apple’s MAC randomization there’s a good chance it’s going to change and refuse to connect the next time you try. The simplest solution is just to turn MAC filtering off altogether.
- Update your router firmware : You may need to check with your ISP or the router manufacturer.
- Factory Reset : It’s a drastic step with no guarantee of success, but you could try a factory reset. Here’s how to factory reset an iPhone .
A number of iPhone 6 and iPhone 6 Plus owners have encountered error 53 upon plugging the iPhone into a PC or Mac and attempting to restore through iTunes. It effectively leaves your iPhone in a reboot loop where it goes into recovery mode, prompting you to plug it in, and then iTunes says, “The iPhone could not be restored. An unknown error occurred (53).”
Apple admitted that the “Error 53” was their mistake and rereleased a patched version of iOS 9.2.1 that fixed this issue.
- Update to the latest version of iOS via iTunes.
Some iPhone owners have been having trouble with their email accounts not updating. New emails are not coming into the inbox, or perhaps they’re only coming in when the Mail app is opened.
- The first thing to do is go into Settings > Accounts & Passwords > Fetch New Data and take a look at your settings. If you want emails to come in as soon as they arrive, then make sure that Push is turned on. Otherwise, you can set the frequency that your iPhone checks for new email under Fetch .
- It’s worth checking that there’s nothing in your outbox. If there’s an email that’s failing to send and repeatedly trying, it could be causing your issues.
- Try switching Airplane mode on and off.
- Try deleting the email account via Settings > Accounts & Passwords , and then add it fresh.
- Go to Settings > General > Reset and try Reset Network Settings . You’ll have to set up your network connections again, but it can help with email issues.
If you find that you aren’t hearing any alert sound when a new message comes in, or perhaps you’re only getting alerts intermittently, then you aren’t alone. This is quite a commonly reported problem.
- Start by checking the obvious things: Turn the volume up, check that the mute switch isn’t on, and take a look under Settings > Do Not Disturb . Bear in mind that it’s possible to have Do Not Disturb turned on for specific contacts, in which case you’ll see a half moon icon next to the contact. Check the Details on any incoming message that you didn’t hear an alert for to make sure that’s not your problem.
- Go to Settings > Notifications and try toggling them on or off. Now, reboot the device and go back into turning them on again.
- You could also try Settings > General > Reset > Reset All Settings , but it means re-entering a lot of your settings afterward.
Update: We refreshed some of the solutions here and added a problem with the iPhone shutting down due to the battery.
Editors' Recommendations
- The best iPhone 15 Pro Max cases in 2024: the 20 best ones
- The best iPhone 15 Pro cases in 2024: our 21 favorites
- We now know when Apple is adding RCS to the iPhone
- The best iPhone keyboard apps in 2024: our 12 favorites
- Does the iPhone 15 have an overheating problem? Here’s what we know
- Apple iPhone

Apple has just released a new security update, iOS 17.4.1. This comes a little over two weeks after iOS 17.4, which was a big update. iOS 17.4.1 doesn't add any new features, but it's still an important update you'll want to download as soon as you can.
With iOS 17.4.1, Apple states that the update “provides important bug fixes and security updates and is recommended for all users.” Apple doesn’t mention any specifics of these bug fixes, but more details on what this security update addresses may be revealed at a later date.
Apple iPhone 14 Pro (left) and iPhone 15 Pro Max Andy Boxall / Digital Trends
If you're reading this article, chances are you have an iPhone. It's also quite likely that your friends and family members also use an iPhone. The iPhone is the smartphone of choice for millions of people in the U.S., and now, the Department of Justice (DOJ) is suing Apple over the iPhone monopoly it has established over the years.
The desirability and high value of iPhones and other Apple devices make the gear a popular target for criminals looking to make a fast buck.
In the latest such case, a now former UPS employee is accused of stealing more than $1.3 million worth of Apple iPhones and laptops from the shipping company’s warehouse in Winnipeg, Canada, before selling them in an operation that continued for seven months, the Winnipeg Free Press reported this week.
We explain and teach technology, solve tech problems and help you make gadget buying decisions.
Top 12 Ways to Fix iPhone Keeps Losing Network Connection
Most modern smartphones come with superior cameras, fast charging, high-refresh-rate folding panels, and many other features. However, phones failing at basics like calling and messaging can defeat the purpose of using one in the first place. Many users complain about network connection issues on their iPhones. Here are the best ways to fix iPhone keeps losing network connection.
You can always connect to a reliable Wi-Fi network to use your favorite apps. But you may miss regular texts and calls due to network connection problems. Besides, you may not be around a home, office, or public Wi-Fi all the time. Before the situation leads to more confusion and errors, use the solutions below to troubleshoot iPhone dropping signal randomly.
1. Restart iPhone
Rebooting the iPhone is an effective way to fix common network issues. While there’s no guarantee of it certainly fixing the problem, but you’d be surprised how often it works. If you have an iPhone X or a newer model, use the steps below.
Step 1: Keep pressing the power and volume down buttons simultaneously until the power off slider appears.
Step 2: Use the slider to turn off the device. Wait for 30 seconds and press the power button again to switch on the iPhone.
If you have an old iPhone model with the home button, use the official guide to restart it.
2. Enable and Disable Airplane Mode
The Airplane mode turns off all the radio signals including cellular, Wi-Fi, Bluetooth, and even GPS on an iPhone. You can try out the Airplane mode to temporarily disconnect your iPhone from the network to take it offline and reconnect it again by disabling the mode.
Step 1: Swipe down from the top-right corner and enable the Airplane mode.
Step 2: Disable it after 10 seconds.

3. Check Carrier Outage
If your preferred carrier is facing a service outage, your iPhone may keep losing network connection. You can visit the Downdetector and search for a local carrier. You can check user comments to confirm the outage.
While these things won’t fix the problem on your iPhone, but you’ll get a fair idea that your cellular service provider needs to fix its woes to deliver better network experience.
4. Reset Network Settings
Usually, we set the cellular network and Wi-Fi details very few times a year. But, when nothing seems to help, you may consider resetting network settings to fix network glitches on iPhone. Of course, that means you’ll have to add Wi-Fi and Bluetooth details again. However, your iPhone will automatically fetch mobile data details from the cellular network.
Step 1: Open the Settings app on your iPhone. Scroll to General and open Transfer or Reset iPhone.

Step 2: Tap Reset and select Reset Network Settings.

You can refer to our dedicated post to reset network settings on your iPhone.
5. Use 4G or 3G Network
While 5G offers faster internet speeds on your iPhone, the latest technology may not be available across different areas. You can temporarily switch to LTE to regain network connection on your iPhone. If you’re far off from the populated areas, you may consider switching to the 3G network on your iPhone.
Step 1: Open the Settings app on iPhone and select Mobile data. Open your SIM settings.

Step 2: Tap Voice & Data.
Step 3: Select 4G LTE or 3G.

6. Enable Roaming
If your iPhone keeps losing network connection in another state or region, you may require to enable roaming for your subscription, especially when you’re traveling to different state or country. Here’s how to do that on your iPhone.
Step 1: Open the Settings app and head to Mobile Data on your iPhone.
Step 2: Select your SIM card and enable Roaming.

After that, your iPhone should sustain a network connection while traveling.
7. Reinsert SIM
While the latest iPhone models have moved to e-SIM, millions still use a physical SIM. Pick your SIM ejector tool and remove it from your phone. Wait for at least 30 seconds and insert it again to check for a network connection.
If you have an old SIM, you may need to switch it with a new one from the carrier.
8. Check for Hardware Damage
Did you accidentally drop your iPhone on a hard floor? You may have damaged your phone’s modem. If there is significant damage to your phone, book an appointment at the nearest service center.
9. Update Carrier Firmware
If your iPhone network connection is still acting up, use the steps below to update carrier firmware.
Step 1: Launch the Settings app and tap General on iPhone.
Step 2: Select About. Scroll to Network.

Tap on Network Provider to fetch install the latest firmware, if available. The trick is quite handy if you have bought an iPhone from another country and try to use it in your home region.
10. Check Carrier Plan
Did you forget to pay for the postpaid bill? The carrier may disable network services on your phone. You need to pay your dues or switch to another plan.
11. Update iPhone
Carriers usually bundle firmware updates with iOS builds. You can update iOS to the latest version to fix random network drops. Connect your iPhone to a high-speed Wi-Fi network and use the steps below.
Step 2: Select Software Update and download the pending iOS build on your phone.

12. Reset iPhone
When none of the tricks resolve network issues on iPhone, reset it and set it up as new. You need to first back up your iPhone to iCloud or PC (using iTunes).
Step 1: Open the Settings app, tap General and choose ‘Transfer or Reset iPhone’ ion iPhone.
Step 2: Select ‘Erase All Content and Settings.’

Follow the on-screen instructions to complete the process.
Enjoy Solid Network Reception on iPhone
iPhone losing network connection can spoil your ideal experience in no time. The tricks above should help you regain the network connection. Which tip worked for you? Share your findings with others in the comments below.
Was this helpful?
Last updated on 19 February, 2024
The above article may contain affiliate links which help support Guiding Tech. However, it does not affect our editorial integrity. The content remains unbiased and authentic.
Leave a Reply Cancel reply
Your email address will not be published. Required fields are marked *

The article above may contain affiliate links which help support Guiding Tech. The content remains unbiased and authentic and will never affect our editorial integrity.
DID YOU KNOW

Parth Shah is an evergreen freelance writer covering how-tos, app guides, comparisons, listicles, and troubleshooting guides on Android, iOS, Windows, Mac, and smart TV platforms. He has over five years of experience and has covered 1,500+ articles on GuidingTech and Android Police. In his free time, you will see him binge-watching Netflix shows, reading books, and traveling.
More in iOS

How to Change Phone Number Associated With Apple ID

6 Ways to Fix iPhone Battery Draining While Charging
Join the newsletter.
Get Guiding Tech articles delivered to your inbox.
How To Fix iPhone 6 / 6s No Service Issue
Here’s how to fix iPhone 6 or iPhone 6s No Service network issue on T-Mobile, Sprint, Verizon or just about any carrier.
Smartphones are an expensive luxury that most of us choose to have in our lives. Most of the time, that luxury works perfectly well and actually improves our existence giving us instant communication, access to an endless amount of hilarious memes, and take-out food when we want it. However, when things don’t go smoothly, such as when non-iPhone 7 owners keeping getting an annoying “No Service” error, things aren’t quite as worry-free.
Error messages are typically very annoying to device owners but at least some of them actually give you the reason why they are happening, which means that they can more often than not be put right if you have the reason why they are being shown in the first place. However, if you are simply given a “No Service” error, with no additional information, and no ability to connect to the network, then it can increasingly be frustrating. Now if you have an iPhone 7, on some models Apple says it’s a hardware defect and they are going to do free repair for it. You can learn more about it here . But if you have an iPhone 6 or 6s, then check out the steps below for one method that’s been proven to work to fix this issue.
Step 1: First and foremost, like most journeys of this nature, we are going to start in the native Settings app. Launch the app in the first instance.
Step 2: Once Settings is launched, navigate to Privacy and check that Location Services is switched On .
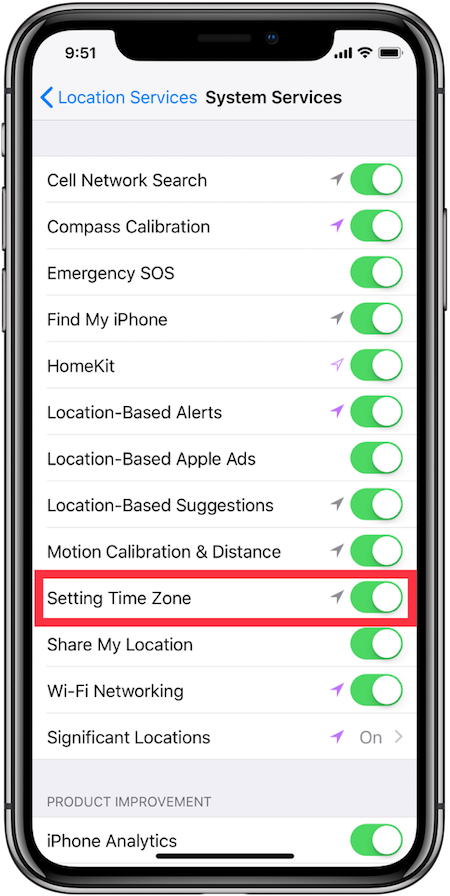
Step 3: Now, still in the Location Services option, select System Services and then check that the Setting Time Zone option is toggled into the On position. If it’s already On , then toggle it Off / On .
Step 4: Fully restart the iPhone 6s/6 and wait for it to reboot. Your “ No Service ” issue should hopefully be fixed.
As we should all know by now, where smartphones and carriers are concerned, there are multiple reasons why a device like iPhone may be showing No Service or is unable to access the network. This is generally a temporary issue and will rectify itself by jumping onto a different cell tower or when a specific network issue in that area is fixed. However, when the issues like this consistently persist, and when it seems to be related to a specific device type, there’s further exploration to be had.
Hopefully, the above steps and process will work for you and get rid of that pesky error message immediately.
You may also like to check out:
- Kodi On Apple TV 4K: Here’s How To Sideload Install It [Guide]
- Instagram++ iOS 11 IPA Download On iPhone [No Jailbreak Required]
- How To Boost iPhone Signal Strength The Easy Way
- iOS 12 Beta Download, Rumors, Features, Release Date [Everything We Know So Far]
- Download iOS 11.2.5 Final IPSW Links, OTA Update For Your iPhone, iPad, iPod touch
- Downgrade iOS 11.2.5 To iOS 11.2.2 For Potential Future Jailbreak, Here’s How
- Jailbreak iOS 11.2.5 / 11.2.2 / 11.2.1 On iPhone And iPad [Status Update]
- Jailbreak iOS 11 / 11.1.2 On iPhone X, 8, 7, iPad Using LiberiOS [Updated]
You can follow us on Twitter , add us to your circle on Google+ or like our Facebook page to keep yourself updated on all the latest from Microsoft, Google, Apple and the Web.

- Hot Tech Deals at Target Right Now
- The Best Noise-Canceling Headphones to Buy
How to Reset Network Settings on Your iPhone
Learn what network settings do and how to reset them
:max_bytes(150000):strip_icc():format(webp)/awolber-2018-5b5889d7c9e77c00712b3fa5-ffe87725fc3a449ca7a1ec1312f9314d.jpeg "how to fix network problem iphone 6")
- Southern Methodist University
- Spring Arbor University
In This Article
Jump to a Section
- Step-by-Step: Reset iPhone Network Settings
What Happens When You Reset Network Settings
- Toggle Airplane Mode
- Power the iPhone Off and On
- Forget and Reconnect to a Network
What to Know
- Go to Settings > General > Reset > Reset Network Settings . Enter your passcode if prompted.
- After a reset, your iPhone reconnects to your carrier, and you must manually reconfigure the Wi-Fi and VPN settings.
- Alternatively, toggle Airplane Mode, restart your device, then reconnect to the network to see if it fixes your problem.
This article explains how to reset the network settings on an iPhone. The information applies to iPhone 12 through iPhone 6 with iOS 14 to iOS 8.
How to Reset Network Settings on iPhone
Take the following steps to reset the network settings on your iPhone:
On your iPhone, open the Settings app.
Tap General .
Scroll to the bottom of the screen and tap Reset .
Tap Reset Network Settings .
If prompted, enter your passcode.
Your iPhone resets its network settings and then restarts, which takes a minute or so. When you can use your phone again, enter your passcode. Your phone should automatically reconnect to your cellular provider. If your iPhone doesn't auto-connect to your mobile network, contact your carrier or Apple for support.
You also need to rejoin Wi-Fi networks. Tap Settings > Wi-Fi and then tap the name of the network you want to join. If prompted, enter the network password and then tap Join .
If you use a VPN, obtain and follow instructions from your VPN provider to reconfigure its app and settings on your device.
When you reset the network settings, the configurations for Wi-Fi and cellular networks return to the default settings. A reset also clears virtual private network (VPN) configurations. After a reset, your iPhone reconnects to your carrier, and you'll need to reconfigure the Wi-Fi and VPN settings manually.
Before you reset your network settings, you can try the following tips when you experience a network connection problem with your iPhone. They are quicker than going through resetting your network, and they often solve the problem.
Tip: Toggle Airplane Mode
Put your phone in Airplane Mode for a minute or so.
Tap Settings on your iPhone. Move the slider next to Airplane Mode to the right, so you can see green, indicating Airplane Mode is on and Wi-Fi is off.
Wait a minute and then move the slider next to Airplane Mode to the left to turn Airplane Mode off and Wi-Fi on again.
Check to see if your connections work.
Tip: Power Off and Power On
If toggling Airplane Mode doesn't work, turn your iPhone off and back on.
Hold down the Power button on the iPhone for a few seconds. On some phones, you hold down the Power button and a volume button to turn off the iPhone.
Move the Slide to power off slider to the right to power off the phone.
Wait for the phone to power down and then hold down the power button for a few seconds until the Apple logo appears to turn your phone back on. You need to enter your passcode to sign in when your device starts.
Tip: Forget and Reconnect to Your Wi-Fi Network
If you still can't connect, remove and then reconnect your Wi-Fi network.
Open Settings and tap Wi-Fi to open the Wi-Fi settings screen. The name of the network your device is connected to displays beneath Wi-Fi and the on/off slider near the top of the screen.
Tap the i within the circle to the right of the current network name.
Tap Forget This Network and confirm by tapping Forget .
Forgetting a network forces your iPhone to disconnect from the network and returns you to the screen that shows the available wireless networks.
Tap the name of the network you want to join. Enter the network password and tap Join .
Get the Latest Tech News Delivered Every Day
- How to Fix It When Mobile Data Is Not Working
- How to Reset Network Settings on Mac
- How to Fix It When Facebook Messenger Isn’t Sending Messages
- How to Fix It When You're Not Receiving Texts on Android
- How to Reset Network Settings in Windows 11
- How to Fix the 'No SIM Card Installed' Error on iPhone
- What to Do When Windows 11 Can't Connect to a Network
- What Does ‘Reset Network Settings’ Do?
- How to Reset Network Settings in Windows 10
- How to Fix an iPad That Won't Connect to Wi-Fi
- How to Fix Grayed-Out Wi-Fi on an iPhone
- How to Reset an iPhone to Factory Settings
- How to Fix It When ‘Move to iOS’ Isn't Working
- How to Make Wi-Fi Calls on Your iPhone
- How to Fix Wi-Fi Calling Not Working on Android
- 9 Ways to Fix It When an iPhone Isn't Receiving Texts from Android Phones
How to Fix iPhone Network Connection Issues

Table of Contents
Are you experiencing network connectivity issues on your iPhone? Are you noticing cellular signal drops or unable to connect to Wi-Fi or mobile data? Have you seen the “No Service” error message on your device? Don’t worry, we’ve got you covered with some solutions that could you help fix such issues.
In this post, we’ll take a look at some tips to help you troubleshoot and fix any network connectivity issues on your iPhone series. With these solutions, you can ensure that your device stays connected to the internet and you can use it without any interruptions.
Tips to Fix iPhone Network Connection Issues
1. toggle airplane mode on and off.
The Airplane mode trick basically works by turning Airplane Mode on for a few seconds and then turning off again. This action resets all wireless features on your device and thereby eliminating any existing flaws in the device’s network system.
To perform Airplane Mode trick, go to phone’s Settings -> Airplane Mode option and then toggle the Airplane Mode switch to turn the feature on for a few seconds and then turn it off again.
2. Forget and reconnect to network
This is another simple procedure that can clear any network settings error. When you forget and reconnect to a network, you are re-configuring the network settings from start and thereby removing any configuration error in the previous settings.
Here’s how to forget and reconnect to network:
- Open Settings
- Tap on Wi-Fi
- Tap on Forget This Network
- Tap Forget to forget the network
Now go back to Settings -> Wi-Fi and reconnect to network to check if the problem is resolved.
3. Try turning 5G off
The problem can happen if you are with a carrier or in a region where 5G is not available but your phone is still trying to connect to 5G network. Try turning 5G off and see if that helps.
To disable 5G, follow the steps below.
- Go to Settings
- Tap on Cellular
- Tap on Cellular Data Options
- Tap on Voice & Data
- Select LTE to use LTE mode instead of 5G
4. Reboot your phone and router
Sometimes the problem can be caused by random software glitches in the phone or router. This can cause the network to freeze. Doing a simple reboot of your phone or router can help fix the problem. This action will clear the software glitches and restart all network services back again.
To restart your iPhone, perform the following steps:
- Press the Volume Up button and then quickly release it.
- Press the Volume Down button and then quickly release it.
- Press and hold the power button until you see the Apple logo appearing on your phone’s screen.
- Once the logo appears, release the Power button and wait until the phone restarts.
To restart your router, unplug the power cord from the WiFi router/modem, then wait 10-20 seconds, then plug it back in again to power up the router/modem.
5. Reset network settings
A network reset deletes all existing network settings on the phone including Wi-Fi network, Cellular data and Bluetooth connections. Hence, performing this action will restore all network settings back to their original configuration. This can remove any error in the network settings that may cause network connectivity issues.
Here’s how to reset network settings on iPhone:
- Tap on General
- Tap on Reset network settings
- Type in your passcode if prompted
- Then confirm the action in the popup
6. Update iOS software
Sometimes a bug in the software can also cause network issue. Make sure your iPhone has the latest software installed that may have fixes for the problem. To check and install latest iOS firmware, perform the following procedures.
- Tap on Software update
- Then tap on Download and install to download and install the update
7. Reset the iPhone
You may try this option as the last resort if the previous solutions do not work. Factory reset will restore your iPhone back to its default configuration. Do back up your important files and data before proceeding as the procedure will erase them completely.
- Tap on Reset
- Tap on Erase All Content and Settings
Sign up for our daily newsletter
- Privacy Policy
- Advertise with Us
Wi-Fi Not Working on iPhone? How to Fix It

Wi-Fi’s invisible nature often makes it a mysterious and unpredictable companion: strong and steady one minute, elusive the next. If you’re dealing with Wi-Fi not working on your iPhone, we have you covered. This article breaks down why this happens and how to fix it so that you can get back online without the headache. Let’s tackle those Wi-Fi woes together!
Common Signs of Wi-Fi Not Working Correctly
How to fix wi-fi not working on iphone, wi-fi works on other devices, but not on your iphone.
Recognizing the telltale signs of Wi-Fi not working correctly on your iPhone is the first step to fixing this annoying problem. Here’s what to look for:
- Unstable connection : if your Wi-Fi keeps dropping, or you’re experiencing a rollercoaster of speed – blazing fast one moment and snail-paced the next – chances are your Wi-Fi connection is unstable.
- Inability to connect : you try to connect, but your iPhone just won’t latch onto the Wi-Fi network. Or, maybe it connects but with a weak signal, despite being close to the router.
- Wi-Fi icon is nowhere to be found : when your iPhone is connected to a Wi-Fi network, there should be a Wi-Fi icon in the top-right corner. If you can’t see it, then something isn’t right.
- Slow Internet speed : Even when connected, your Internet speed may crawl at a painfully slow pace. This lag can disrupt streaming, browsing, and even simple tasks, like sending an email.
- You’re asked to enter your password over and over again : frequent prompts to re-enter your Wi-Fi password are a sign of a network issue that prevents your iPhone from being authenticated correctly.
Regardless of how exactly your Wi-Fi issues manifest, their causes are almost always the same. Next, we’ll take a look at how to address them.
Now that we’ve pinpointed the common signs of a Wi-Fi hiccup on your iPhone, it’s time to roll up our sleeves and take a look at the fixes. We recommend you start from the top, and work your way down – often, the simplest fix does the trick!
Tip : make sure your iPhone has all the latest updates installed. Software updates often include fixes for known bugs, including Wi-Fi issues. To check for updates, go to Settings -> General -> Software Update . After updating, give your iPhone a fresh start by restarting it.
1. Turn Off Airplane Mode
Sometimes, the solution to Wi-Fi troubles on your iPhone is as simple as ensuring Airplane Mode is turned off. When Airplane Mode is activated, it disables all wireless connections, including Wi-Fi. To check whether it’s on, open the Settings app and look for the Airplane Mode option near the top.

Make sure the toggle is in the off position. If it isn’t, then tap on it, and wait a short while for your iPhone’s network connectivity to spring back to life.
2. Turn On Wi-Fi Connectivity
The next step is to check whether your iPhone’s Wi-Fi is actually turned on. It may sound obvious, but sometimes the simplest solutions can be overlooked. There are times when Wi-Fi may be accidentally switched off, either through a previous setting change or a software glitch.
To turn on Wi-Fi, head to the Settings app on your iPhone. Look for the Wi-Fi section, and tap on it. You’ll see a toggle next to Wi-Fi; make sure it’s in the on position.

Once you’ve turned the toggle on, your iPhone will start searching for available networks, and you can reconnect to your preferred Wi-Fi network.
3. Reconnect to Your Network
If your Wi-Fi is active but still not functioning as it should, the next step is to try reconnecting to your network. This can help refresh the connection and resolve any minor glitches that may be causing the issue.
To reconnect, go to the Settings app, and select Wi-Fi to see a list of available networks. Tap on your network. If your iPhone is already connected to it, tap Forget This Network to remove it from your device’s memory.

Don’t worry, you can reconnect right away. Once you’ve forgotten the network, find it again in the list, and tap on it to reconnect. You’ll be prompted to enter the network’s password.
4. Remove Your iPhone Case

Believe it or not, your iPhone case could be responsible for Wi-Fi not working well on your device. Why? Because all cases block radio frequency (RF) signals , which include Wi-Fi signals, to some extent.
Metal cases are especially notorious for this. They can significantly weaken the Wi-Fi signal by creating a sort of shield around your iPhone, which hinders the wireless signal’s ability to penetrate. This shielding effect can lead to slower Internet speeds, poor connectivity, and in some cases, prevent your iPhone from connecting to a Wi-Fi network altogether.
The fix is simple: remove your iPhone from its metal case and try connecting to the Wi-Fi network again. If you still want to protect your device, we recommend using a case made of plastic, silicone, or some other non-metallic material.
5. Reset Your Network Settings
If the above steps haven’t solved the issue, it’s time to consider resetting your network settings. This will erase all previously saved Wi-Fi networks, Bluetooth connections, and other network preferences. If there are any configuration problems, they will be cleared out.
To reset your network settings, navigate to the Settings app on your iPhone. Scroll down and tap on General . From there, select Transfer or Reset iPhone , then Reset . A pop-up menu will appear, and you’ll see an option labeled Reset Network Settings – this is the one you want.

Tap on it, and you may be asked to enter your passcode. Once confirmed, your iPhone will take a moment to reset all network settings.
6. Restart Your Wi-Fi Router

The issue with Wi-Fi not working on your iPhone may not be the phone; it could be the Wi-Fi router. Just like our smartphones, routers can get overwhelmed and need a reboot.
First, turn the power button or switch off on your router, then unplug it from the power source. (If there’s no power switch, you can just unplug it.) Wait for about a minute. This pause allows the router to shut down and reset completely. After the minute has passed, plug the router back in and turn it on. It may take a short while for the router to boot up and start broadcasting the Wi-Fi signal again.
Once your router is back up and running, give your iPhone a moment to reconnect to the network. If it doesn’t automatically reconnect, go back to your iPhone’s Wi-Fi settings , and select your network to connect manually.
7. Improve Wi-Fi Signal Strength
Even after trying all these fixes, if your iPhone’s Wi-Fi is still patchy, it may be time to look at the strength of your Wi-Fi signal. A weak signal can lead to many of the issues we’ve covered.
Checking your Wi-Fi signal strength on an iPhone is straightforward. Simply look at the Wi-Fi icon in the top-right corner of your screen. The more filled-in bars you see, the stronger your signal. However, for a more detailed analysis, consider using an app like NetSpot . Available on the App Store, NetSpot is a Wi-Fi heat mapping tool that visualizes your Wi-Fi coverage on a map, helping you pinpoint areas with weak signals.

To actually boost your weak Wi-Fi signal, you can do the following:
- Place your router in a central location in your home, away from walls and obstructions.
- Keep your router away from devices that can cause interference, like microwaves and cordless phones.
- Check the manufacturer’s website for firmware updates to ensure your router is running at its best.
- If your home has areas where the Wi-Fi signal is consistently weak, purchase and install a Wi-Fi extender .
- Change the channel on your router to reduce interference from other nearby networks.
By following these tips, you should see a noticeable improvement in your Wi-Fi signal strength, leading to a more reliable and faster connection on your iPhone.
If you’ve noticed that Wi-Fi works fine on other devices but not on your iPhone, then you may be dealing with a hardware issue, such as a problem with your iPhone’s Wi-Fi antenna or other internal components related to wireless connectivity. These components can be affected by physical damage, such as a drop or liquid exposure, or they can malfunction due to manufacturing defects.
In such cases, the best course of action is to seek professional assistance. Take your iPhone to a local Apple Store or an authorized Apple service provider. They have the necessary tools and expertise to diagnose hardware issues accurately. It’s also a good idea to check whether your device is still under warranty or covered by AppleCare+ . This could potentially save you from incurring high repair costs.
In conclusion, dealing with Wi-Fi not working on your iPhone can be daunting, but with these troubleshooting steps, you’re well-equipped to tackle this problem. If you’re considering upgrading your home network for even better performance, exploring the best Wi-Fi 6 Routers could be your next step. Wi-Fi 6 offers faster speeds, increased capacity, and better performance when it’s handling many connected devices.
Image credit: DALL·E 3. All screenshots by David Morelo.
Our latest tutorials delivered straight to your inbox

David Morelo is a professional content writer in the technology niche, covering everything from consumer products to emerging technologies and their cross-industry application. His interest in technology started at an early age and has only grown stronger over the years.

Apple iPhone Troubleshooting: Fix Common Problems
The first step towards a working Apple iPhone is identifying the problem. Select one of our preferred guides below to diagnose and solve Apple iPhone common issues.

iPhone Battery Draining Fast
Has your iPhone battery suddenly started draining rapidly? Are you charging your phone multiple times in a day? Try some of these fixes!
iPhone Home Button Not Working
Your iPhone home button is not working, it does not vibrate when pressed, your home button is broken or does not click.

iPhone is Charging but Won't Turn On
What to do when your iPhone doesn't power on at all, even when plugged in and charging? Try these fixes first.

iPhone Randomly Shuts Off
Does your iPhone randomly shut off, keep turning off or repeatedly goes off and comes back on? Follow these fixes and keep your phone running.

Liquid Detected in Lightning Connector
Is your iPhone warning you that you’ve got liquid in the Lightning port? Is it blocking you from charging or connecting other accessories? Try these solutions!

iPhone Not Charging
Use this page to troubleshoot why your iPhone might turn on, but won't hold a charge.

iPhone Keeps Restarting
Your iPhone will not boot properly due to constant restarts, is boot looping, restarts shortly after boot or reboots at random.

iPhone Invalid or No SIM
Is your iPhone not detecting your SIM card? Does it say "No SIM" or warn the SIM is invalid? Have a look at these fixes.

iPhone Touch Screen Not Working
The touch screen on your iPhone is not responding, is not accepting touch input, seems frozen or is unresponsive in certain places.

iPhone Volume Buttons Not Working
Consult this page if your iPhones volume buttons do not respond to being pressed, feel mushy, don’t click, are stuck, or are all around not working.

iPhone Won't Turn On
If you're experiencing problems with your iPhone not turning on or displaying anything on screen when the power button is held, use this problem page to diagnose the problem figure out the solution.

iPhone Lines on Screen
Does your iPhone have lines on the display? Are you having issues making out the image because of vertical or horizontal lines? Have a look at these fixes!

iPhone Slow Charge
Is your iPhone taking ages to charge? Are you losing patience while waiting to get enough juice to unplug? Give these fixes a try.

iPhone Ghost Touch
Your iPhone experiences unexpected touch input. It swipes to other screens, or selects items without your interaction. iPhone has phantom touch input, or ghost touch.

iPhone Won't Connect to WiFi
Your iPhone is not connecting to WiFi or will not stay connected to WiFi. Your iPhone has a grayed out WiFi switch or the WiFi toggle cannot be enabled. Your iPhone is not connecting to the network.

iPhone Black Screen
Does your phone seem like it's powered up, but there’s nothing on screen? Can you hear incoming notifications, but not see them on the display? Try these fixes!

iPhone Stuck on Apple Logo
Your iPhone hangs on the Apple logo when trying to boot, or is stuck on the Apple logo while performing a software update. May or may not have a progress bar underneath.

iPhone Blurry Camera
iPhone camera won’t focus? Having a hard time getting a good picture? Does your camera vibrate constantly? Try these fixes!

iPhone Camera Black Screen
Consult this page if your iPhone camera is not working or does not work after a drop. It may only show a black screen, or the camera app may be crashing.

iPhone No Sound
Your iPhone isn't emitting sounds, may not being ringing when there are incoming calls, or you cannot hear when listening to music with the built in speakers.

iPhone Overheating
iPhone is too hot, has a temperature warning on screen, got hot and won't turn on, or gets hot while charging.

iPhone Bluetooth Not Working
Consult this page if your Bluetooth devices will not connect to your iPhone, Bluetooth is unavailable or grayed out, Bluetooth hangs when trying to connect or connect drops frequently.

iPhone Backlight Not Working
Is your iPhone backlight not working? Learn about the common causes and solutions of iPhone backlight failure.

iPhone Frozen Screen
Is your iPhone stuck on the same screen and won't respond? Is your iPhone frozen and won't turn off? Have a look at these fixes!

iPhone Touch ID Not Working
Consult this page if your iPhone indicates Touch ID is not available, will not read your fingerprint, or fails to function.

Apps Not Downloading on iPhone
Consult this page if your iPhone will not download apps, apps will not install or you are unable to get apps to update.
Didn't see your problem? The iFixit Community has answers.
Browse the most common questions asked by our members to see more solutions. Still no luck? You can always ask for help!

iPhone stuck on red battery logo screen

Will changing the motherboard remove iCloud lock?
Why does my phone rattle when it vibrates.

iPhone XS automatically shuts down once plugged to charger

How to remove round camera lens protector
iPhone 12 Pro Max
Is it possible to unlock Icloud locked iPhone?

Restarts every 3 minutes because of thermalmonitord

Dark spot on camera
iPhone 12 Pro
How-To Geek
Iphone troubleshooting tips to fix all kinds of problems.
Get your iPhone working again.
Quick Links
Check your iphone's battery health, force quit apps that have crashed, restart your phone to fix a huge range of problems, update apps to solve software problems, update ios to solve bigger problems, consdier resetting network settings, reset all settings to wipe the slate clean, erase your iphone and restore a backup, dfu reset and restore a backup, erase and set up as new.
Despite being one of the top names in the smartphone market, even iPhones can run into problems. Since each issue has its own fix, finding the right solution can feel like searching for a needle in a haystack. Today we'll take a look at some iPhone troubleshooting tips to fix all kinds of problems.
One of the most common problems you might experience with your iPhone is that its battery doesn't last because it has degraded. When this happens, you'll end up charging your iPhone more often because the battery can't hold a sufficient charge to last a day. You may also experience unexpected shutdowns and reduced performance.
To check your iPhone battery, launch Settings and head to Battery > Battery Health & Charging. If your battery health has dropped below 80%, consider a battery replacement . If you see anything other than "Peak Performance Capability" then your iPhone has reduced performance to accommodate a failing battery.
While it's normal for iPhone battery health to decline over time, rapid degradation could be due to using a non-MFi-certified charger or cable. Using non-certified charging accessories may damage the battery due to heat build-up and may also take longer to charge your iPhone. To prevent this, you should always stick to MFi-certified chargers .
Another issue you might encounter is your iPhone completely failing to charge. This is often caused by dirt in the charging port. To check, shine a flashlight into the port. If you see any dirt or debris, carefully remove it with a wooden toothpick . Don't forget to wipe your charging cable down too.
If an app isn't working properly or responding on your iPhone, you can force quit it and then relaunch it to fix the issue. To do this on iPhone X or later, swipe up from the bottom of the screen and pause in the middle for a moment to open the app switcher. Then, find the app that's not responding and then swipe it up to close it.
To force quit an app on iPhone SE, iPhone 8, or earlier models, open the app switcher by double-pressing the Home button. Then, swipe to the unresponsive app and swipe it up to close it. After that, relaunch the app, and you should no longer face the issue.
You can solve a huge number of iPhone problems by simply restarting your iPhone . When you opt for restart, your iPhone shuts down all the running apps and background processes. This allows it to free up system resources, clear temporary files, and eliminate any bugs and glitches that might be causing the issue.
To restart your iPhone, open the Settings app and tap "General."
Tap on the "Shut Down" option.
Move the slider to the right to turn off your iPhone.
After that, wait a few seconds, and then long-press the power button to turn on your iPhone. Upon restart, you should no longer face the problem you had before. You can also press and hold the side button and volume up button, or ask Siri to restart your iPhone.
If your iPhone isn't responding at all, and you can't even use its touch screen or buttons, you'll need to force restart your iPhone .
If an app is acting up, won't open, some features are broken, or it frequently crashes, consider updating it. Developers often fix problems with new versions of the app, so grabbing the latest build might just solve your issue.
Let's say you're having trouble with LinkedIn on your iPhone. Then, to update it, open the App Store and search for "LinkedIn."
If an update is available, an "Update" button will appear next to the LinkedIn logo. Tap it to start the update process.
Similarly, you can download updates for any other app installed on your iPhone. You can do this by launching the App Store, tapping on your profile picture, then hitting the "Update All" button.
Sometimes updating apps isn't enough, you also need to update the operating system too . You can update iOS under Settings > General > Software Update.
Updating your iPhone to the latest version of iOS will not only ensure that any ongoing issue with your iPhone is resolved but will also add new features and the latest security patches. Your iPhone will restart once the update is complete.
If your device isn't connecting to the internet, you're not receiving calls, or you're experiencing other network issues, resetting your network settings might help. Be aware that resetting network settings will wipe out all saved Wi-Fi passwords so make sure that have the password for your primary Wi-Fi network so you can easily reconnect after the reset.
To reset your network settings, open the Settings app and tap "General." Then, select "Transfer Or Reset iPhone."
Tap "Reset."
Choose "Reset Network Settings."
Enter your device passcode and tap "Reset Network Settings" again.
The Apple logo will appear with a progress bar. Once the reset is complete, your device will automatically restart. Hopefully, your network issues will be resolved!
Your iPhone has a helpful "Reset All Settings" option that can be useful in various situations. This option restores all your customized settings to their default values, including network settings, location settings, privacy settings, and Apple Pay cards.
This option is useful if you're having problems with your iPhone, such as unexpected behavior, sluggish performance, or connection problems. To use the "Reset All Settings" option, open the Settings app on your iPhone and navigate to General > Transfer or Reset iPhone > Reset > Reset All Settings.
Type your device passcode and then tap "Reset All Settings" again.
You'll see the Apple logo and the progress bar indicating the process has begun. Once it's complete, your iPhone will restart automatically.
If you're still facing issues, it might be worth creating a backup of your iPhone and then erasing everything. You can create an iCloud backup under Settings > [Your Name] > iCloud > iCloud Backup > Back Up Now or by connecting to a Mac or Windows PC running iTunes.
You should only erase your iPhone if you're confident you have a backup that you can easily restore. Be warned that all of your data will be deleted if you proceed.
To erase data from your iPhone, open the Settings app and navigate to General > Transfer Or Reset iPhone > Erase All Content and Settings.
Tap "Continue."
Enter your device passcode. Then, tap the "Erase iPhone" option.
After that, the iPhone will start erasing all the data of your iPhone. Once the process is complete, restart your iPhone. Upon restart, you'll be given choices on how to restore the backup on your iPhone to access all personal data.
Most problems you encounter with your iPhone can be fixed with a few simple tricks. However, if none of the solutions work or your iPhone has become completely unresponsive, you may need to reinstall the firmware using DFU mode.
Device Firmware Update (DFU) is an advanced recovery mode that can fix problems directly with your iPhone's firmware. While in DFU mode, your iPhone will be powered on, but the operating system won't load. Remember that using DFU mode will erase all your data, so we strongly recommend creating a backup of your iPhone before proceeding.
The specific steps for entering DFU mode and reinstalling the firmware vary depending on your iPhone model. However, the general process involves connecting your iPhone to your Mac or Windows computer. Then, you'll need to perform a specific sequence of button presses to put your iPhone into DFU mode. Once Finder or iTunes recognizes your device, you can follow the on-screen instructions to reinstall the firmware.
Is your iPhone issue still happening even after you erased everything and restored the backup? It may be worth erasing everything again and setting up your device as new . If the problem disappears, this will confirm that the issue was something in the backup state.
In that case, you'll need to restore to an older backup. iCloud may allow you to restore a previous version, so you could use one of those (not the most recent) to fix the issue. If you make frequent local backups on your Mac or Windows machine then you might want to try one of those too. You'll lose any data added to your iPhone after that backup was created.
Unfortunately, there's no way around it. You'll have to sacrifice some data to get your iPhone back in working order.
Hopefully these fixes can resolve any issues you have with your iPhone. If you're still having trouble, we recommend taking your iPhone to Apple or an authorized service center for further help.
Data Management
D-Back for iOS/Win/Mac - Data Recovery HOT
Recover Deleted Data from iOS/Win/Mac
Data Recovery
D-Back Hard Drive Recovery - Hard Drive Data Recovery
Recover Deleted Data from PC/Mac
Windows/Mac Data Recovery
ChatsBack for WhatsApp - WhatsApp Recovery
Recover Deleted WhatsApp Messages
WhatsApp Messages Recovery
ChatsBack for LINE - LINE Recovery
Recover Deleted LINE Messages
LINE Messages Recovery
iMyTrans - Apps Data Transfer HOT
Transfer, Export, Backup, Restore WhatsApp Data with Ease
WhatsApp Data Transfer Tool
iTransor for LINE
Transfer, Export, Backup, Restore LINE Data with Ease
LINE Data Transfer Tool
Umate Pro - Secure iOS Data Eraser
Permanently Erase iPhone/iPad/iPod Data to Secure your privacy
iPhone Data Eraser
AllDrive - Multiple Cloud Storage Manager NEW
Manage All Cloud Drive Accounts in One Place
Multiple Cloud Storage Manager
AnyTo - Location Changer HOT
Best iOS/Android Location Changer
iOS/Android Location Changer
MirrorTo - Screen Mirror
Professional iOS/Android Screen Mirror
iOS/Android Screen Mirror
LockWiper for iOS - iPhone Passcode Unlocker HOT
Remove iPhone/iPad/iPod touch Password
iPhone Passcode Unlocker
LockWiper for Android - Android Passcode Unlocker
Unlock Android FRP Lock & All Screen Locks
Android Passcode Unlocker
Fixppo for iOS - iPhone System Repair HOT
Fix your iPhone/iPad/iPod touch/Apple TV without losing data
iPhone System Repair Tool
iBypasser - iCloud Activation Lock Bypasser
Bypass iCloud Activation Lock & Sim Lock
iCloud Activation Lock Bypasser
UltraRepair - File Repair
Fix damaged and corrupted videos/photos/files/audio
Repair Corrupt Video/Photo/File
Passper - Password Recovery Expert
Recover password for Excel/Word/PPT/PDF/RAR/ZIP/Windows
Office/Files/Windows Unlocker
FamiGuard - Reliable Parental Control App
Remotely Monitor Your Kid's Device and Activity
Reliable Parental Control App
VoxNote - AI Vocie Notes NEW
Transcribe real-time & recorded audio into text
Voice Notes with AI Summaries
Novi AI - AI Story-to-Video Generator NEW
Convert Your Story & Novel to Original Video Easily
Convert Story & Novel to Video
RewriteX - Al rewriter for anywhere NEW
Make Your Words Mistake-free And Clear
Mistake-free And Clear
EasifyAI - Life-Changing AI Toolkit NEW
Innovative AI Toolbox to Take All The Heavy Lifting Off
Innovative AI Toolbox
LokShorts - Locate best drama & short film NEW
Online Watching 1-minute Short Drama
Filme - The Best Video Editor
Video Editor and Fast Slide Show Maker
MagicMic - Real-Time Voice Changer HOT
Change Your Voice in Real-Time Easily
Real-Time Voice Changer
MarkGo - Effective Watermark Remover
Manage Your Video & Image Watermark Easily
Effective Watermark Remover
V2Audio - Video Convertor
Super Video Converter Makes Everything Easier
Super Video Converter

VoxBox - Ai Text-to-Speech Generator
Make Voiceover Easily with Cloning & TTS
Text-to-Speech Voice Generator

AnySmall - Video Compressor NEW
One Click to Compress Videos While Keeping High Quality
One-click Video Compressor
TopClipper - Video Downloader
Download Any Videos You Like from Any Platforms
Video Downloader from Any Platforms
TopMediai - Online AI Tools Collection
Discover how AI Transforms Image & audio editing
Online AI Tools Collection
MagicPic - AI Background Remover & Changer NEW
Remove and Change your Photo Background with Single Click
AI Background Remover & Changer
MusicAI - AI Music Generator NEW
All-in-one generator to make AI songs
AI Music Generator
Productivity
ChatArt : Chatbot & AI Writer HOT
Generate AI Painting, Write AI Article and Marketing Copy Easily
Chatbot & AI Writer
ZoeAI - Chat With Any PDF Document NEW
Start AI Conversation With PDF With One Click
The Best PDF AI Chat Assistant
FigCube - Free Website Builder
Create A Blog Website Within Minutes
Free Website Builder
PromptWink - AI Prompt Marketplace NEW
Get 1,000+ quality AI prompts from top prompt engineers
AI Prompt Marketplace
AI Tools : Complete Resource of AI Tools
Find The Exact AI Tool For Your Needs
AI Tools Navigation Page
iMyWork - Personal AI Work Assistant App NEW
Provide professional work advise and support
AI Work Assistant
QRShow - Professional QR Code Generator NEW
Create various static and dynamic QR codes for free
QR Code Generator
Support Center
Licenses, FAQs
Pre-Sales Inquiry, etc.
How-to Guides
Mobile/PC Issues Solutions
Product Center
iMyFone Products Free Trial
[Fixed Issue] iPhone Network Not Available
- [2024] 9 Ways to Fix TikTok Search Bar Not Working
- What Causes iPhone Echoing and How Do I Stop It?
- [Solved] Sent Mail Not Showing in Sent Folder in iOS 17
- No Sound on iPad/iPhone Games after iOS 17/15/14, How to Fix?
- Why isn't My Fitbit Screen Not Working? How to Fix It?
In the absence of a reliable WiFi connection, we all tend to use cellular data on our iPhone. In fact, using own cellular data is a safer approach rather than connecting to a random WiFi connection.
However, some users come across “iPhone network not available” situations which can be really annoying. Well, what can you do if the iPhone network is not available? Can it be fixed? If so, how? Let’s find it out!
- Part 1: 10 Common Ways to Fix iPhone Network not Available Issue
Part 2: Advanced Way to Fix iPhone Network Not Available
Part 1: 10 common ways to fix iphone network not available.
In fact, in most of the cases, “iPhone network not available” issue can be resolved just with a couple of taps. Listed below are 10 of those simple remedies for the reference of our readers.
Way 1. Turn off & on Cellular Data
This is the simplest of all the remedies you can try in order to rectify potential errors associated with cellular data. Follow the steps mentioned below to do it.
Step 1: Go to Settings app on your iPhone and tap on Mobile Data.
Step 2: Tap on the switch that is located right next to this option to switch it off.
Step 3: Wait for a couple of seconds and then tap on the same switch to turn on cellular data.

Way 2. Restart Your Device
If turning on and off cellular data doesn’t work for you, it is better to give your device a restart. In fact, a restart can fix many of the basic glitches associated with your iOS. Let’s see how to do it.
If you have an iPhone X or later version, you should follow the steps below:
Step 1: Press and hold the Side button and either volume button until the slider appears.
Step 2: Drag the slider to turn your device completely off.
Step 3: After your device turns off, press and hold the Side button again until you see the Apple logo.
If you have an iPhone 8 or earlier version, you should follow the steps below:
Step 1: Press and hold Top/Side button to see the slider
Step 2: Once appeared, drag this slider and turn the device off. Once the device is turned off, wait for a minute or so.
Step 3: Press the Top/Side button and hold it once again to see the Apple logo.

Way 3. Update iOS Version
If both of the above options fail, you should try a somewhat advanced method. That means, you will have to update the iOS version. Here’s how to do it.
Step 1: First, plug the iPhone into power and then connect it to your WiFi network.
Step 2: Go to Settings app and then go to General option.
Step 3: Tap on the option Software Update.
Step 4: You should then tap on Download and install.
Step 5: Tap on Install to update. If prompted, you should enter the passcode of the device.

Way 4. Check Carrier Update
Your cellular data may not work if you haven’t carried out a carrier update recently. You can contact your carrier and get to know how to perform an update if updates are available. If there is an update, you will also be notified with an “OK” button.

Way 5. Switch Airplane Mode on & off
This is another basic remedy you can use in order to fix cellular network.
Step 1: Open Control Center of the device and tap on the icon that resembles an Airplane. Or you can simply go to Settings app and select Airplane Mode to turn it on.
Step 2: Wait for a couple of seconds and tap on the same airplane button to turn it off.

Way 6. Reset Network Settings
Another not-so-difficult method to fix network issues is resetting the network settings of your device. Let’s see how to do it.
Step 1: Go to Settings app and tap on General.
Step 2: Then, select the option labelled Reset and then go to Reset Network settings.

Please take a note that this option resets all the Wi-Fi networks, VPN, Bluetooth and APN settings in addition to your cellular settings. So, back up or write passwords down before performing this option.
Way 7. Reset All Settings
If you are yet to find luck with fixing cellular data issue, you may opt to reset all the settings on your iPhone. Here’s how to do it.
Step 1. First, go to Settings on the home screen of the iPhone and tap on the option called General.
Step 2: Press the option “Reset” which is located towards the bottom.
Step 3: Choose the option “Reset All Settings” (enter the passcode when prompted).

Way 8. Disable LTE
Disabling LTE is another option for those who experience issues with their cellular data connections. Just like with many other options in this list, disabling LTE is a pretty easy process.
Step 1: Go to the Settings app on the home screen and tap on Cellular on your iPhone.
Step 2: You should see options like Cellular Data, LTE and Data Roaming.
Step 3: Tap on the slider labelled “Enable LTE” and you should see that it has turned into white.

If you need to access internet faster, you should have this option switched on.
Way 9. Toggle Voice Roaming off and back on
Switching Voice Roaming off and turning it on once again may fix some of the minor glitches associated with your cellular network. Here’s how to do it.
Step 1: Go to the Settings icon on home screen and select Cellular and then go to Cellular Data Options.
Step 2: Tap on the option labeled Roaming.
Step 3: You should tap on the option Voice Roaming switch so it will be turned off.
Step 4: Wait for a couple of seconds and tap the same switch to turn it on.

Way 10. Check Data Roaming
If your cellular data network doesn’t work when you are in another country, it is better to check Data Roaming.
Step 1: Go to Settings app and select the option Cellular.
Step 2: Then go to Cellular Data Options and check if it is switched on.
Step 3: If not, you can switch on it and see if it works.

If none of the above options work, the problem might be somewhat serious than you think. But you don’t need to panic. Instead, you can seek the assistance of a professional software like iMyFone Fixppo.
iMyFone Fixppo comes with a range of features in addition to recovering lost data off iPhone. You can use this impressive software even to fix various glitches associated with iOS system.
For instance, it can fix issues like iPhone stuck in recovery mode, iPhone stuck in spinning circle, iPhone stuck on Apple logo, white screen of death, black screen of death and etc. So, fixing cellular network issues can be done with this tool conveniently. It is also trusted by many professional websites.

Steps to Fix iPhone Network Not Available without Data Loss
Here are the steps you should consider in order to fix Family Member Not Showing in Screen Time. You can fix this issue using the standard mode of this software.
Step 1 – Download and install iMyFone Fixppo on your computer, launch the program and connect your iPhone to the computer using a USB cable.

Limited Time 10% OFF Coupon Code: FARTT91
Step 2 – Click the " Start Repair " button and choose " Standard Mode ".

Step 3 – Enter Recovery Mode or DFU Mode.
Connect your iPhone to the computer using a USB cable. Follow the on-screen instructions to put your iPhone into DFU or Recovery mode.

Step 6 – After the repair is complete, your iPhone will restart. Check if the iPhone network not available is resolved.

You may want to know: [2023] Top 12 Ways to Fix iPhone Not Ringing Issue in iOS 17
We expect you to carefully go through the options we have presented in this article. You can then opt to a method that suits your requirement. Be sure that you select the option that is reliable and safe. Also, we appreciate if you can leave us a comment about your experience in fixing the cellular network issue.
Melvin Cooper
(Click to rate this post)
Generally rated 4.9 ( 256 participated)
Rated successfully!
You have already rated this article, please do not repeat scoring!
More Resources
- Unlock iPhone
- Transfer WhatsApp
- iPhone Issues
- iOS Data Recovery
- Change Location
Home > iPhone Issues > [Fixed Issue] iPhone Network Not Available
- Entertainment
- Beebom Gadgets
App Store Not Working? Try These 8 Fixes
- If the App Store isn't working on your iPhone, iPad, or Mac, you must check your device's internet connection.
- On some rare occasions, App Store servers might be down for repair or maintenance purposes. When this happens, the App Store won't work for anyone.
- You can restart your iPhone, update software, check date & time, or reset network settings to fix common App Store problems.
Method 1: Check your Internet Connection
How to fix wi-fi issues on an iphone.
Some of the most common ways to troubleshoot Wi-Fi issues on an iPhone, iPad, or Mac include:
- Turn off the Wi-Fi on your device, wait for a few seconds, and turn it back on.
- Restart the Wi-Fi router.
- Reboot your Apple device.
- Update software on your iPhone, iPad, or Mac.
- Forget and reconnect to the Wi-Fi network.
- Reset network settings.
How to Fix Mobile Data Issues on an iPhone
- Toggle the Mobile Data option on your iPhone/iPad.
- Toggle Airplane mode.
- Make sure you have an active data plan.
- There could be some temporary data or network issues. To verify, ask a family member or friend (who is on the same network) if they can use mobile data. If the concern is mutual, wait for some time or contact your network provider.
Method 2: Check Apple’s System Status Page

Method 3: Restart your Apple device
It may sound obvious, but sometimes we might absolutely forget about some simple hacks that may do wonders. One such hack is restarting your iPhone which often solves a lot of problems. When you restart your iPhone, it will give a fresh start to the RAM and wipe off any minor network connectivity issues that might be responsible for why you can’t connect to the App Store.
Method 4: Check Date & Time Settings
- On your iPhone or iPad, open the Settings app and navigate to the General section.
- Here, tap on Date & Time and make sure to turn on the Set Automatically toggle.

On Macs, open the System Setting from the Dock and click General in the sidebar. Now, click Date & Time and turn on the Set Date and time automatically toggle.

Method 5: Update Software
- On your iPhone, iPad, or Mac, head to Settings > General > Software Update .
- If a more recent software update is available, download and install that update.

Method 6: Reset Network Settings
On your iPhone, go to Settings -> General -> Transfer or Reset iPhone -> Reset -> Reset Network Settings.

Method 7: Sign In to Apple ID Again
- On your iPhone or iPad, open the Settings app and tap on [Your name] at the top.
- Next, tap on Sign Out from the bottom, then enter your Apple ID password and hit the Turn Off button.

- Now, follow the on-screen instructions to sign out of your Apple ID.
- Before you sign in again, it’s better to restart your iPhone to ensure that all the issues are cleared out properly.
- Once your device boots up, launch the Settings app and sign in with your Apple ID.
Tip: If the Sign-Out option is disabled or greyed out on your iPhone, you must check and remove Screen Time settings.
Method 8: Contact Apple
Also, it’s common for Apple to freeze Apple IDs that haven’t been used for a long time to make purchases. To start using it, you will have to get your ID re-enabled. Although it isn’t a complex or lengthy process, it can only be done at Apple’s end. So, it’s worth paying a visit to the nearest Apple Store.

Kanika Gogia
Kanika has been a loyal iPhone user since 2014 and loves everything Apple. With a Master’s in Computer Applications, passion for technology, and over five years of experience in writing, she landed at Beebom as an Apple Ecosystem Writer. She specializes in writing How To’s, troubleshooting guides, App features, and roundups for Apple users to help them make the best use of their gadgets. When not writing, she loves to try out new recipes and enjoy some family time.
Add new comment

- Compare Providers
- Review Providers
8 Reasons Why Your Internet is Slow (and How to Fix It)
Expert tips to banish slow internet speeds

You can generally fix a slow internet connection if the issue is on your end, but the solution depends on what’s causing the slowdowns. Speed bottlenecks happen for a number of reasons: a slow internet plan, Wi-Fi interference, outdated or malfunctioning equipment, the list goes on.
You can easily lose an afternoon troubleshooting internet issues, but we have a quicker way to get things back up to speed. We put together a list of the eight most common reasons for a slow internet connection; chances are, one of these fixes will solve your issue. Before resigning to a lengthy troubleshooting session or an expensive technician appointment, we recommend you run through the list and save yourself some hassle.
Fed up with slow internet? Check out your other options.
Enter your zip code below to see if a faster plan is available in your area.
Jump to: Why is your internet so slow? | How to fix your slow internet connection | Other reasons your internet is slow | More ways to speed up slow internet | FAQ
Why is your internet so slow?
We provide more detail on each of these potential internet slowdown causes further down the page. Click on an issue to auto-scroll to the solution.
Here are the most common reasons for a slow internet connection:
1. You need to restart your modem and router Equipment restarts are hands down the most effective internet troubleshooting solution. This should always be your first step.
2. Your home network is congested Congestion happens when you overload your internet connection with more traffic than it can handle. To fix it, you can either lower your internet usage or upgrade to a faster plan.
3. Your provider’s network is congested Provider networks can get overloaded the same way your home network can: too much traffic and not enough bandwidth.
4. You need a stronger Wi-Fi signal You experience a weak Wi-Fi signal when you’re too far from your router, when the signal is forced to pass through obstructive materials, or when other Wi-Fi networks and electronic devices introduce interference. You can fix it by extending your Wi-Fi range, choosing a better spot for your router, or adjusting your router’s settings.
5. You exceeded your data cap Many internet providers limit how much data you can use per month. When you go over your limit, your ISP may slow your connection. You can avoid exceeding your data cap by keeping track of your data usage or by purchasing more data.
6. You have high latency High latency causes your internet to feel sluggish and is particularly frustrating with highly time-sensitive activities like gaming and video calls.
7. You have slow or outdated devices It’s not always your internet connection that’s causing the slowdowns, it could be one or more of your devices. If your slowdowns are limited to certain devices, you should start your troubleshooting efforts with those devices rather than your internet connection; sometimes, they just need a simple restart.
8. Your provider is throttling your connection Your ISP may be intentionally slowing down your connection for a number of reasons.
How much speed do you need?
What’s the perfect internet speed for you? Check out our How Much Speed Do You Need tool.

How to fix a slow internet connection
1. you need to restart your modem and router.
As the golden rule of internet troubleshooting, an equipment restart should always be your first step. It’s quick, easy, and effective.
The restart process is the same for a modem, router, or gateway (modem/router combo unit):
Step 1: Unplug the power cable from the back of the modem, router, or gateway.
Step 2: Wait 60 seconds.
Step 3: Plug the power cable back into the back of the equipment.
Step 4: Wait for the equipment to reboot (this can take up to 20 minutes).
2. Your home network is congested
Your slow speeds might be the result of trying to do too much at once on your internet connection. Think of your internet connection as a road directly to your house. One car’s worth of people (or internet data) can reach your house at a time. If there are three cars trying to get there, they have to line up to get to your house. And if more cars arrive as the others are waiting to reach your house, you get a traffic jam.
Here’s how you can tell if you need to upgrade your internet plan:
Use our internet speed test to see if you’re getting the speed advertised by your ISP. If your results are close to your plan speed, consider upgrading.
Download speed 000 Mbps
Upload speed 000 Mbps
Latency (ping) 00 ms
Jitter 00 ms

You can also fix home network congestion by dialing back your internet usage. Thankfully, there are severa l easy ways to do this that don’t include yelling at everyone to get off the internet so you can attend a Zoom meeting.
Here are a few tips on how to manage your home network traffic:
Use QoS settings to prioritize certain online activities
Many routers have a quality of service (or QoS) component that allows you to prioritize certain types of traffic on your home network. For example, you can make sure your streaming data always gets first access to available bandwidth for smooth playback.
Not all routers have adjustable QoS, but if your router does, you’ll find the controls in your router’s web interface. If you need help accessing your router’s settings see our guide on how log into your router .
Prune your internet connections
There may be some devices connected to your network that you rarely use—if at all. Even if you’re not actively using these devices, it still uses bandwidth for updates and other background services. Your router may even have a limited number of devices it can connect to simultaneously, and start kicking some of them off the network when you go over the limit.
One simple way to take stock of all the devices using your network is to load your router’s web interface and view the network map. You will see all connected devices, whether they’re active or not, so you can block the ones you never use. Some routers have an app you can use instead of a web interface.
Another method is to change the Wi-Fi password, but that only applies to wireless devices . Once you do , you must manually reconnect every device .
Stagger bandwidth-hogging activities
If your connection can’t handle everyone online at once, stagger your internet activities so everyone gets a chance at an uninterrupted connection.
Also, make sure to schedule big downloads (like computer and game updates) during times when other people won’t be online.
Put visitors on a guest network
You can create a second guest network using your router’s web interface or mobile app. A guest network allows you to limit how much bandwidth guests can use, and what services and websites they can access . It also provides improved security by preventing guests’ devices from mingling with your devices, so there’s no worry about guests spreading malware to everything you use. Our guide on how to set up guest Wi-Fi covers a few different ways to establish a second network.
3. Your provider’s network is congested
Your ISP is also susceptible to network congestion. It’s similar to congestion on your home network but on a larger scale.
If the congestion gets particularly bad, your internet provider may throttle internet speeds in your area to reduce traffic for the network.
Unfortunately, large-scale network congestion is out of your control, but you can try to work around it by s cheduling big downloads during non-peak hours, like in the middle of the night.
When dealing with heavy ISP slowdowns that don’t resolve, the only real fix is switch ISPs. Luckily, there are lots of new services available, like 5G home internet, Satellite, and new fiber developments. If you’re craving a shiny new ISP, run your zip code in the search bar below; chances are you have some new ISP options.
4. You need a stronger Wi-Fi signal
Walls, distance, and interference from other Wi-Fi networks can weaken your Wi-Fi signal. Weaker Wi-Fi signals mean slower speeds and frequent disconnects .
You can tell if signal interference and weak Wi-Fi signals are your issue by looking at your devices Wi-Fi meter . For fast connection, we recommend ensuring you have at least three bars of signal strength.
To fix weak Wi-Fi, first, check your router’s placement. Y ou want to make sure your router is in a central and elevated location and away from things that can affect your Wi-Fi signals (like walls, Bluetooth speakers, etc.). Sometimes, even moving your router a few feet can make a big difference. See our guide on choosing the best spot for your router . We also have a walkthrough on how to move your router to another room , which may be required to get adequate Wi-Fi coverage throughout your home.
If that doesn’t work, you might need to replace your router with one designed for longer ranges or better coverage—or you can add an extender to your network to stretch Wi-Fi signals into a previously unreachable area .
Check out our guides on how to extend your Wi-Fi range and long-range routers if you need better Wi-Fi coverage.
5. You exceeded your data cap
Many internet providers have data caps, and some slow your speeds to a crawl once you exceed your plan’s data limit. You can usually check to see how much data you’ve used on your online account or through your ISP’s app. Providers like Xfinity give customers very high data caps—1.2 TB for this example—and shouldn’t cause too many issues for most households.
Satellite internet providers charge for internet use by data rather than by internet speed. It’s similar to how cell phone plans usually work: once you use up your data allowance for the month , your internet speeds are throttled.
Hughesnet customers can see speeds drop to 1–3 Mbps. Viasat customers can expect all their internet traffic to be deprioritized, meaning that their data gets pushed to the back of the line of all Viasat customers’ data.
Many DSL, cable, and fiber internet companies are discontinuing data limits , but there are many others that continue to keep them in place . Look to see if your internet service has a data cap in our guide to ISP data caps .
6. You have high latency
Latency is the time data takes to make a round trip from your device to the destination and back. A high latency creates noticeable lag: an extended duration between your physical actions and the results displayed on your screen. This can be particularly frustrating with online gaming or video calls.
High latency is difficult to work around. It depends partially on your physical distance from internet servers, network congestion between you and the servers , and your internet provider’s infrastructure—things that are mostly beyond your control. Internet type can also play into latency as well.
For example, satellite internet has high latency because all your data must travel to space and back, both coming and going to your device. Newer types of internet, including fiber and 5G mmWave , have lower latency because they can handle faster signals.
If you’re looking to lower your latency for a better connection, check out our report on the fastest ISPs . It dives into which internet services have the best tested speeds and lowest average latency.
7. You have slow or outdated devices
The problem might not be with your internet connection—it might be with the device you use . Your computer, tablet, phone, or gaming console could be outdated and not capable of processing today’s Wi-Fi speeds.
For example, the old (but much loved) PlayStation Vita handheld console supports up to 150 Mbps per second because it uses a Wi-Fi 4 radio. That speed can decrease based on the router it connects to and the security protocol it uses. The Vita will never see speeds beyond that 150 Mbps limit.
If you have speed issues on a desktop or laptop, try power cycling the device. This clears the memory of any junk, refreshes your connection, and cleans out unnecessary processes and temporary files. Speed issues tend to happen due to an overworked processor, and a quick power cycle—shutting it down completely for 30 seconds—will “clear its head.”
Other things that can slow down your devices include the following:
- Too many open applications
- Too many open browser tabs
- Outdated software
- Outdated drivers
- The operating system needs to reboot to install updates
- Patch downloads
- App downloads
Avoid overwhelming your computer’s CPU by closing unused applications and browser windows. Keep your device’s operating system up to date by allowing auto-updates, and keep your antivirus definitions current.
8. ISP throttling
Internet providers can throttle your speeds, causing a slow connection . We’ll go over throttling briefly here, but you can get a more in-depth look at the subject in our guide to network throttling .
We’ve already discussed a few circumstances where a provider might throttle your speeds—like if you go over your data cap or if there’s too much congestion in the network. But your provider might also slow you down if it flags your internet activity as potentially illegal or if it generally doesn’t want you to do a specific type of activity (like torrenting).
To see if your provider is throttling your internet, run a speed test normally and then run it again using a VPN. If your speeds improve with the VPN, congratulations! You’re throttled.
Other factors that affect your speed
Your internet plan’s maximum speed.
Internet speeds are measured in megabits per second (Mbps) . This refers to your connection’s total bandwidth, not the actual time data uses to make a round trip to a website and back—that’s called latency.
Providers usually advertise their internet speeds as “up to” a certain number of megabits per second, and there’s usually some fine print that says those speeds are not guaranteed. Internet providers are mostly in the clear legally if your internet doesn’t actually perform up to the highest advertised bandwidth.
Realistically, you may pay for 400 Mbps per month, but you may not see that maximum due to hardware issues between your internet provider’s operator—a device that communicates with multiple modems—and your physical internet connection. Utility pole connections, your buried cable, and so on all play a major factor in how your connection performs.
If you need a refresher on internet speeds and what they mean, check out our guide to internet speeds .
Your upload and download speeds
You upload and download data every day, whether you’re on a smartphone or a laptop. For instance, when you access a website, you upload a request to that website and then download temporary files from the site to view it in your browser.
If you don’t have issues with streaming on Netflix or downloading files but are still experiencing some symptoms of slow internet speeds, your issue might actually be with your upload speed.
Cable, DSL, and satellite providers give customers way less upload bandwidth than download bandwidth because most people request much more information from the internet than they send. Upload speed is typically an issue for heavy uploaders—like Twitch streamers , people who work with video or audio , or those who often have to share large files.
The best way to improve upload speeds is to switch to a fiber plan. Fiber-optic internet connections often give customers upload speeds equal to their download speeds. If you don’t know what kind of speeds you really need , check out our recommendations for upload and download speeds .
Your internet connection type
There are a few different technologies internet providers use to deliver your connection, like cable, fiber, satellite, or DSL. Your internet connection type p lays a huge factor in your overall speeds.
Satellite internet transfers internet signals from a base station to a satellite to a receiver at your home. Because all your information must travel such a long distance both ways, satellite internet can have very high latency compared to other types of internet, which slows things down.
DSL internet uses phone lines to carry data. It can’t handle the same amount of bandwidth as cable or fiber. DSL internet tops out at just over 100 Mbps, and its electrical signals tend to degrade in quality over long distances.
Cable internet is faster than DSL because it uses coaxial cables that have a higher bandwidth than phone cables . Speeds can reach up to 1,200 Mbps.
Fiber-optic internet is one of the newest types of internet, and it’s the best wired connection you can get. Fiber uses light pulses to send your internet data, so it has lower latency than other internet types as a whole. It can also carry much more bandwidth than cable or DSL, offering speeds up to 5 ,000 Mbps. It’s less prone to network congestion and offers equally high download and upload speeds.
Overall, DSL and cable are the most common internet types while fiber is newer but scarce. Satellite is best for rural areas where the other three types can’t reach.
More ways to speed up a slow internet connection
We provide some quick tips below to help speed up your internet connection. But if you’re ready to get to the bottom of your internet speed issues with some thorough troubleshooting, see our internet troubleshooting guide .
First, know your plan speed
You need to know how much speed you pay for each month and compare that number against the speed you’re actually getting now . Look on your paper bill or log in to your online account to see your plan’s advertised maximum speed.
Next, run a speed test and compare
Running a series of speed tests while connected to different points in your network can help you figure out where your speeds are slowing down. We’ll break the testing process down into two sections.
Part 1: Test the modem
Your first speed test is to see if you’re getting the correct speeds to your home compared with what you’re supposed to get from your internet provider . To get the most accurate results for your initial speed test, unplug your router from the modem and connect a computer to the same port on the modem using an Ethernet cable. If you have a wireless gateway, just plug it into one of the Ethernet ports.
Warning: We don’t recommend browsing the internet for extended periods of time without using a router. Your router has some excellent built-in security features that protect your network from viruses and malware.
This first test should give you results that are close to the speeds promoted with your plan. If not, try to track this issue over multiple days and times of day to establish a pattern. Contact your internet provider to talk about why you’re not getting the correct speeds if you continue to see lower than expected results .

Part 2: Test the router
If your modem isn’t the issue, the next step is to test the router. Plug the router back into the modem and run multiple speed tests using your wireless devices, and wired devices plugged into the router’s Ethernet ports.
If you see a vast difference between the modem and router tests, then your router is causing your connection slowdowns—or the Ethernet cable tethering your router to the modem.
Keep in mind that not all wireless devices experience identical speeds. Their connections depend on the hardware inside no matter what router you use, so a budget Samsung phone will have slower Wi-Fi speeds than an expensive wireless card plugged into your desktop.
To troubleshoot router problems, follow these steps:
Step 1: Unplug the router’s power , wait 30 seconds, and then plug it back in.
Step 2: Make sure all cables are connected securely and that all ports work.
Step 3: Update your router’s firmware. You can do this by logging in to your router’s web interface or mobile app . (Your ISP likely does this automatically, but it’s worth checking.)
Step 4: Reposition your router .
Step 5: Move wireless connections to the best Wi-Fi band .
Step 6: Change Wi-Fi channels in your router’s interface to find one that’s less crowded.
Step 7: Try a factory reset by pressing the reset button located on the back of your router.
If none of these steps work, you may need to upgrade to a newer or more powerful router. Internet tech advances rather quickly, and if your router is more than a few years old, it might be time to get yourself something more modern . If you’re looking for router-buying guidance, we have recommendations for the best long-range routers , the best modem and router combos , and the best routers for Xfinity .
Check for Wi-Fi dead zones
Wi-Fi problems can stem from multiple factors . It could be your router’s range, a crowded frequency channel or band, or signal interference caused by physical obstructions and other electronics.
You already know that you should place your router at a central and elevated location for the best coverage, so we’ll assume that you’ve already done that and pointed your antennas in the right direction.
Go to different areas of your house with a computer or smartphone and watch the Wi-Fi signal strength indicator. If you notice a lot of dead zones, you may need to move your router again (if they happen in areas where you normally need Wi-Fi) or invest in something to boost your Wi-Fi signal to that particular area. You can also make a Wi-Fi heatmap if you want to get more precise with it.
If you have more than a couple of issues with Wi-Fi dead zones, we recommend upgrading to a mesh networking kit . They usually ship with at least two nodes—one that connects to your modem and another that communicates directly with the first unit—to create a ”blanket” of coverage. There’s no centralized point, and you can easily add more nodes to extend coverage. Moreover, devices seamlessly switch between nodes as you move about the home or office.
If you prefer to stick with the traditional router, you could add a Wi-Fi extender or powerline adapter , However, we still prefer mesh router kits versus the router/extender setup .
Reorganize your Wi-Fi connections
If you’ve already pruned your Wi-Fi connections of unnecessary devices , it’s time to make sure all active connections are on the correct Wi-Fi band.
Most modern routers offer two Wi-Fi bands, which each create their own visible Wi-Fi network. By default, these are usually labeled with their frequency bands, but it might be different if you’ve changed your Wi-Fi network’s name.
These bands operate on two different frequencies: 2.4 GHz and 5 GHz. The 2.4 GHz frequency band has a better range, but it’s slower and more susceptible to signal interference from other electronics. The 5 GHz band is faster but can’t travel as far.
Basically, you want to use the 5 GHz band for most bandwidth-heavy applications like streaming or gaming. Devices that don’t need that much speed—like smart home devices— should use the 2.4 GHz band instead .
Typically, you can change the Wi-Fi band each device uses by logging in to the correct Wi-Fi network on each device. However, some routers broadcast only one network name and automatically selects the best frequency band for your device. This can be problematic if you really need the faster 5 GHz connection, but the router forces your device to use the 2.4 GHz band.
Change your Wi-Fi band’s channel
Changing your router’s channel is a standard troubleshooting suggestion, but it may not work, and here’s why.
All three frequency bands are divided into small 20 MHz channels, and routers combine these channels to make larger ones. Most modern Wi-Fi 5 and Wi-Fi 6 devices use 80 MHz channels when they connect to the 5 GHz band for the most speed, so routers use these by default.
The thing is, routers only list the smaller channels, so you may run a Wi-Fi diagnostics app and see that channel 36 is clear for you to use, but in reality, it’s probably being used by a neighboring network that, like yours, combines channels 36, 40, 44, and 48 to create one 80 MHz channel.
If that’s the case, your best bet is to select one of the higher 5 GHz channels (if they’re available to you) and hope for the best. Most standalone routers allow you to change the channel in the web interface or mobile app, but you usually can’t change the channel on a mesh system.
Check connected devices
As we mentioned before, sometimes the issue isn’t with your internet connection— it’s with the smartphone, computer, or tablet you’re using to access the internet . It may need a reboot, it may be outdated, or you have too many apps and programs open, bogging down the device’s processor.
Manage your network
If you’ve made it this far and you’re still experiencing problems with slow internet speeds, run through the tips in the home network traffic section of this post if you haven’t already.
Your speed issues most likely stem from your internet provider’s reliability or the traffic on your own home network. Even if you’ve organized and trimmed down your number of connected devices, you could still not have enough bandwidth at certain times of day to cover everything your network has to handle. The only solution to this is to either use the internet less or get a faster internet plan.
Check out every provider and plan in your area to see if you can get better speeds for a better deal.
Quick fixes for slow internet speeds (and why they work)
Before we dive in, download our internet speed test. Measuring your internet speed and knowing how it compares to the speeds you pay for is an important part of diagnosing a slow connection.
Fix #1: Power cycle your modem and router (or wireless gateway)
Your modem and router work hard , and sometimes they need to refresh with a quick power cycle. Simply pull the plug on both units, wait 30 seconds, and then plug the modem back into the wall outlet. Once it properly boots, do the same with the router.
In the case of a wireless gateway, pull the plug, wait, and plug it back in.
Draining both units of power allows them to clear the system memory, clear up any local communication issues, and reestablish fresh connections. Moreover, a power cycle allows the modem to resync with your internet provider’s operator—a device that communicates with multiple modems. It also refreshes your router’s public IP address.
Overall, a power cycle can really give your internet speeds a boost on your side of the modem.
Fix #2: Move your router to another location
Many people hide their routers or wireless gateways in closets, behind furniture , or down in basement s . Don’t be one of those people unless you want excessively bad Wi-Fi.
Instead , put as few physical barriers between your router and your devices as possible. Walls, floors, ceilings , doors, large furniture, and similar obstructions can barricade your Wi-Fi signals and reduce connection speeds , especially over longer distances.
Certain signals from other devices can also interfere with your wireless speeds. These include microwaves, Bluetooth speakers, baby monitors, and cordless phones.
For the best Wi-Fi coverage, place your router in a central, elevated location, or at a location where you use Wi-Fi the most, like in a home office .
Be sure to use your router’s external antennas ( if present ) to get better Wi-Fi coverage. Most router antennas broadcast Wi-Fi signals in an outward circle perpendicular to the antenna’s position . For instance, if the antennas are positioned vertically, the Wi-Fi signals broadcast horizontally in all directions.
That said, if you live in a one-story house, keep the antennas vertical. If you live in a multistory house, position at least one antenna horizontally so the Wi-Fi signals reach the additional floors.
Fix #3: Use the internet during off-peak hours
If you know there’s a big download in your future— the latest version of macOS or a 100 GB update for an Xbox Series X game—you might want to schedule a time when you don’t need to do anything else online. The early morning hours are ideal when everyone is asleep and no other downloads currently hog your bandwidth.
Operating systems tend to wait until the early morning hours when you’re fast asleep. Game updates, meanwhile, typically require you to manually start the download. Other updates aren’t quite so accommodating with your schedule.
If your internet gets too slow to stream during certain peak hours, download the content earlier in the day (or again, in the middle of the night) so you’ll be ready to binge watch all of Avatar: The Last Airbender without buffering -related interruptions.
Fix #4: Upgrade your internet plan
You may need a faster plan if more people live with you now, if you transitioned to working from home, or if you generally use the internet more than you did before. Enter your zip code below to find a speedier plan that’s available in your area .
How do I know if I need a faster internet plan?
What is type of internet plan is the fastest.
Fiber internet is the fastest type of internet connection you can get. Many residential fiber-optic internet plans offer speeds up to 5,000 Mbps. There are even some fiber plans that offer 10,000 Mbps of bandwidth. Additionally, fiber internet offers symmetrical speeds, meaning your upload speeds are just as fast as your download speeds—a handy feature for activities like zoom calls, twitch streaming, and uploading large files.
Read page in Spanish
Author - Austin Aguirre
Austin worked as a broadband technician installing and troubleshooting countless home internet networks for some of the largest ISPs in the U.S. He became a freelance writer in 2020 specializing in software guides. After graduating with a BS in technical communication from Arizona State University, he joined the team at HighSpeedInternet.com where he focuses on home network improvement and troubleshooting.
Editor - Cara Haynes
Cara Haynes has been editing and writing in the digital space for seven years, and she's edited all things internet for HighSpeedInternet.com for five years. She graduated with a BA in English and a minor in editing from Brigham Young University. When she's not editing, she makes tech accessible through her freelance writing for brands like Pluralsight. She believes no one should feel lost in internet land and that a good internet connection significantly extends your life span.
Related Posts

- Generative AI
- Office Suites
- Collaboration Software
- Productivity Software
- Augmented Reality
- Emerging Technology
- Remote Work
- Artificial Intelligence
- Operating Systems
- IT Leadership
- IT Management
- IT Operations
- Cloud Computing
- Computers and Peripherals
- Data Center
- Enterprise Applications
- Vendors and Providers
- United States
- Netherlands
- United Kingdom
- New Zealand
- Newsletters
- Foundry Careers
- Terms of Service
- Privacy Policy
- Cookie Policy
- Copyright Notice
- Member Preferences
- About AdChoices
- E-commerce Affiliate Relationships
- Your California Privacy Rights
Our Network
- Network World
The evolution of Apple’s iPhone
As the iphone ages, let's look at how the now-iconic device has matured since its arrival in 2007..
![Computerworld > The Evolution of the iPhone [cover]](https://www.computerworld.com/wp-content/uploads/2024/03/cw_evolution_of_the_iphone_01-100771459-orig.jpg?quality=50&strip=all&w=1024 "how to fix network problem iphone 6")
The iPhone has come a long way since its arrival in 2007. Here’s our look at every iPhone that Apple has released since the original iconic iPhone arrived in 2007.
Every iPhone model from 2007 to 2023
The original iphone (2007), the iphone 3g (2008), the iphone 3gs (2009), the iphone 4 (2010), the iphone 4s (2011), the iphone 5 (2012), the iphone 5s and 5c (2013), the iphone 6 and 6 plus (2014), the iphone 6s and 6s plus (2015), the iphone 7 and 7 plus (2016), the iphone 8 and 8 plus (2017), the iphone x (2017), the iphone xr (2018), the iphone xs and xs max (2018), the iphone 11 (2019), the iphone 11 pro and pro max (2019), the iphone 12 and 12 mini (2020), the iphone 12 pro and pro max (2020), the iphone 13 and 13 mini (2021), the iphone 13 pro and pro max (2021), the iphone 14 and 14 plus (2022), the iphone 14 pro and pro max (2022), the iphone 15 and 15 plus (2023), the iphone 15 pro and pro max (2023), first iphone.

Apple’s first iPhone arrived in June 2007.
After months of rumors and speculation, Apple CEO Steve Jobs unveiled the first iPhone on Jan. 9, 2007. The device, which didn’t actually go on sale until June, started at $499 for a 4GB model, $599 for the 8GB version (with a two-year contract). It offered a 3.5-in. screen, a 2-megapixel camera and won plaudits for the then-new multitouch features. Critics, however, said the phone was too expensive to do well in the market. (See iPhone launch story.)

Apple’s iPhone 3G arrived in July 2008
On June 9, 2008, a year after the original iPhone went on sale, Apple rolled out its successor, the iPhone 3G . The new model could connect to faster 3G-based networks, included built-in GPS, offered more storage and was cheaper. Selling for $199 for the 8GB model, $299 for the 16GB version, the iPhone 3G was available on July 11, and offered something called location services. “Location services is going to be a really big deal on the iPhone,” said CEO Steve Jobs. “It’s going to explode.” (See launch story.)

Apple’s iPhone 3Gs arrived in June 2009.
Again at WWDC, Apple’s Steve Jobs announced the next iPhone, a faster version called the iPhone 3GS . Although the form factor was unchanged from the previous version, the new iPhone was twice as fast as its predecessor and ran iPhone 3.0 (an early version of iOS 8, due out later this month). The 32GB iPhone 3G S sold for $299; a 16GB model went for $199. An 8GB iPhone 3G was also offered for $99. The iPhone 3GS was available June 19, 2009. (See launch story.)

Apple’s iPhone 4 arrived in June 2010.
The redesigned iPhone 4 arrived on June 7, 2010 in tandem with the newly-renamed iOS 4, and marked the arrival of FaceTime video chat. Prices remained unchanged: $199 for a 16GB model and $299 for the 32GB version. It went on sale on June 24, and heralded the arrival of the first high-resolution “Retina” screen. “Once you use a Retina Display, you can’t go back,” said Steve Jobs. (See launch story.)

Apple’s iPhone 4S arrived in October 2011.
In a change of pace, Apple unveiled the iPhone 4S on Oct. 4, 2011, a few weeks after Steve Jobs stepped down because of health issues. New CEO Tim Cook talked up the new phone’s dual-core processor (the same used in the iPad 2), and said the 4S would go on sale Oct. 14. In addition to the usual 16GB and 32GB models, Apple also unveiled a 64GB version that sold for $399. (See launch story.)

Apple’s iPhone 5 arrived in September 2012.
The iPhone 5, the first version to have a 4-in. screen, arrived on Sept. 12, 2012, as CEO Tim Cook touted the faster, slimmer upgrade to the iPhone 4S during a 90-minute presentation in San Francisco. “This is the biggest thing to happen to iPhone since the [original] iPhone,” he said, referring to the first-gen smartphone Steve Jobs had launched in 2007. The iPhone 5 hit the streets on Sept. 21; prices for the 16GB, 32GB and 64GB models were unchanged. (See launch story.)
iPhone 5S and 5C

Apple’s iPhone 5s and 5c arrived in September 2013.
On Sept. 10, 2013, Apple CEO Tim Cook rolled out not one, but two iPhones: the upscale iPhone 5S (now in gold, in addition to the usual white and black), and the colorful, less-expensive iPhone 5C. (The iPhone 5C was basically a reskinned iPhone 5.) The iPhone 5S got a faster, 64-bit A7 SoC (system on a chip), Touch ID, and a new motion data processor touted as the foundation for a new wave of health and fitness apps. The iPhone 5C started at $99 for a $16GB model; the iPhone 5S started at $199 for the same amount of storage. Both went on sale Sept. 20. (See launch story.)
iPhone 6 and 6 Plus

Apple’s iPhone 6 and 6 Plus arrived in September 2014.
For the second year in a row, Apple unveiled two iPhones in 2014: the iPhone 6 , which has a 4.7-in. screen, and the iPhone 6 Plus , with a 5.5-in. screen. Both iPhones sported new A8 processors that were faster and more efficient than the previous year’s models. Both also had upgraded cameras and were NFC-ready for access to the new Apple Pay network that rolled out in October. Although the iPhone 6 was priced the same as 2013’s iPhone 5S, the Plus model was $100 more. (See launch story.)
iPhone 6S and 6S Plus

Apple’s iPhone 6s and 6s Plus arrived in September 2015.
Apple’s iPhone 6S and 6S Plus represented meaty upgrades to the 2014 models on which they were based. The 6S and 6S plus got new force touch technology called 3D Touch, as well as a beefed up 12-megapixel iSight camera that shot 4K video. (The 5-megapixel FaceTime camera was also new, and was designed to take better selfies.) Both phones ran on a faster A9 chip, and came in a new color for 2015: rose gold. (See launch story.)
iPhone 7 and 7 Plus

Apple’s iPhone 7 and 7 Plus were released in September 2016.
The iPhone 7 and 7 Plus looked much like the 2015 models, with three major exceptions: Apple eliminated the audio jack, changed the home button into a haptic-based virtual button, and added a dual-camera setup in the 7S. The loss of the audio jack, a somewhat controversial move, meant users had to rely on the Apple-supplied earbuds or use their old headphones with the included adapter. Both phones ran on a quad-core A10 Fusion chip, and came in two new colors: Black (a matte-finish charcoal color) and the super shiny Jet Black. (See launch story launch story.)
iPhone 8/8 Plus

Apple’s iPhone 8 and 8 Plus were released in September 2017.
Apple introduced the iPhone 8 and 8 Plus with a new glass and aluminium enclosure, Retina HD display, A11 Bionic Chip, and wireless charging on Sept. 12, 2017. The front and back glass enclosure, which Apple said was the most durable glass ever in a smartphone, was reminiscent of the design of the iPhone 4 and 4s. True Tone technology adjusted the white balance of the display to match the surrounding light. Redesigned stereo speakers were 25% louder and delivered deeper bass.
Apple called the A11 Bionic chip “the most powerful and smartest chip ever in a smartphone.” It featured a six-core CPU with two performance cores and four efficiency cores, which were 25% and 70% faster than the A10 Fusion chip, respectively. The new iPhones included an Apple-designed GPU that delivered up to 30% faster graphics than in 2016’s iPhone 7.
Each model featured an improved 12-megapixel camera with a larger (and faster) sensor, a new color filter, deeper pixels, and capabilities for 4K video up to 60fps and 1080p slo-mo up to 240fps. ARKit in iOS 11 allowed developers to create AR games and apps offering immersive and fluid experiences. Color variations included space gray, silver, and a new version of gold.

Apple’s iPhone X arrived in November 2017.
To commemorate a decade of iPhones, Apple ended its September event with “one more thing,” the iPhone X (“ten”). Starting at $999 for 64GB and $1,149 for 256GB, it was Apple’s most expensive iPhone to date. It included a redesigned glass and stainless steel enclosure, wireless charging, and dual cameras. Its flagship feature was an edge-to-edge “Super Retina display” — a 5.8-in. OLED display that supports Dolby Vision and HDR 10. It had a pixel resolution of 458ppi, a 1 million-to-1 contrast ratio, and True Tone.
Touch ID and the Home button were removed in favor of a new biometric security feature: Face ID. Face ID uses a TrueDepth camera system made up of a dot projector, infrared camera and flood illuminator. The A11 Bionic chip works in tandem with advanced depth-sensing technologies to map and recognize a user’s face to securely unlock the iPhone or make a transaction with Apple Pay. Face ID only works when a user looks at the iPhone X directly and is designed to prevent spoofing by photos and masks.
The 7-megapixel TrueDepth front-facing camera that enables Face ID also included auto image stabilization and delivered Portrait mode for better selfies with a depth-of-field effect. The TrueDepth camera also could animate emoji, which Apple playfully calls Animoji. The dual 12-megapixel rear camera included dual optical image stabilization, and an improved f/2.4 aperature on the telephoto lens.
According to Apple, the A11 Bionic neural engine performed up to 600 billion operations per second and was designed for specific machine learning algorithms, enabling Face ID, Animoji, and other features. Colors included silver and space gray.

Apple’s iPhone Xr arrived in October 2018.
The Xr had an aluminum-and-glass design in six finishes, with improved water resistance and a 6.1-in. “Liquid Retina” display. Available in 64GB, 128GB and 256GB models and starting at $749, it featured Apple’s A12 Bionic Chip with second-generation Neural Engine — the first 7-nanometer chip in a smartphone.
Portrait mode with depth control was available on the TrueDepth camera for selfies, which included support for Memoji and face tracking for Face ID authentication, while the 12-megapixel camera with an f/1.8-aperture wide-angle lens featured a new sensor and improved software algorithms for faster focusing and enhanced portraiture with depth control. Established iPhone gestures were supported, and haptic touch controls could be used to instantly launch the camera or flashlight from the home screen.
iPhone Xs and Xs Max

Apple’s iPhone Xs and Xs Max arrived in September 2018.
Featuring 5.8- and 6.5-in. all-screen designs and improved scratch- and water-resistance, Apple’s iPhone Xs and Xs Max both offered Super Retina OLED displays that supported Dolby Vision and HDR10 and had iOS system-wide color management; the Xs Max had the largest iPhone display to date, with more than 3 million pixels, and the biggest battery — promising up to an hour and a half more battery life than the iPhone X.
The 12-megapixel dual-camera system offered advanced depth segmentation in Portrait mode with the ability to adjust depth of field both in preview and post-capture for precise control in portrait creation; the system allowed for faster face tracking for Face ID, Memoji, and third-party ARKit apps. Low-light performance and image stabilization were enhanced for both still photography and video capture, in addition to an extended dynamic range for better highlight and shadow detail. Four built-in mics could record stereo sound.
These models were the first to include Apple’s A12 Bionic Chip with second-generation Neural Engine. The chip design was capable of completing up to 5 trillion operations per second (compared with 600 billion in its predecessor). Models in 64GB, 256GB and 512GB configurations started at $999 and $1,099 for the Xs and Xs Max, respectively.

The iPhone 11 arrived in September 2019.
The iPhone 11, which succeeded 2018’s iPhone XR, got a $50 price cut (to $699), a new color (purple), a redesigned two-camera system, and a number of under-the-hood technology upgrades. The screen is a 6.1-in. Liquid Retina HD display, storage comes in 64GB, 128GB or 256GB options, and the phone uses Apple’s new A13 “Bionic” processor.
The camera system features an ultra-wide camera that captures more than four times the scenery and 4K video at up to 60 frames per second. It also features audio zoom, so if you zoom in on video, the audio does, too. The front-facing camera is a 12-megapixel model that allows for slow-motion selfies, which Apple dubbed “slofies.” The camera system also offers a new “night mode” for better images in low-light conditions. According to Apple, the A13 bionic chip allows for an extra hour of use compared to the 2018 models.
iPhone 11 Pro and 11 Pro Max

The iPhone 11 Pro and Pro Max arrived in September 2019.
The iPhone 11 Pro and Pro Max succeeded 2018’s iPhone XS and XS Max, and started at $999. The phones come in four colors, including a new one (Midnight Green), and feature a wholly new three-camera system and a variety of under-the-hood technology upgrades. The screen is either a 5.8-in. or 6.5-in. Super Retina XDR display, storage cames in 64GB, 128GB or 256GB options, and the phone uses Apple’s new A13 “Bionic” processor.
The camera system features an ultra-wide camera that captures more than four times the scenery and 4K video at up to 60 frames per second. It also features audio zoom, so if you zoom in on video, the audio does too. The front-facing camera is a 12-megapixel model that allows for slow-motion selfies, which Apple dubbed “slofies.” The camera system offers a “night mode” for better images in low-light conditions.
According to Apple, the A13 bionic chip and the third-generation Neural Engine run more efficiently, allowing for up to four or five hours of additional use compared to the previous year’s models.
iPhone 12 and 12 mini

The iPhone 12 and 12 mini arrived in October and November, 2020.
The iPhone 12 took over for the iPhone 11, as Apple expanded its OLED displays across its smartphone lineup and rolled out a new 5.4-in. iPhone mini. Prices started at $699 for the mini ($100 more for the larger iPhone 12), with storage options of 64GB, 128GB, and 256GB. The new Super Retina XDR displays are built with what Apple calls “Ceramic Shield” for four times better resistance to breaking if dropped.
All iPhone 12 models use the A14 Bionic chip and offered 5G networking — both the sub-6GHz and mmWave varieties. Both models offer a dual 12MP camera system with Ultra Wide and Wide cameras that include Night Mode for better photos in low-light conditions. 4K video recording can be done at 24 fps, 30 fps, or 60 fps and HDR video recording with Dolby Vision is available at up to 30 fps.
iPhone 12 Pro and 12 Pro Max

Apple’s iPhone 12 Pro and Pro Max arrived in October and November, 2020.
The iPhone 12 Pro got an even larger big brother with the 6.7-in. iPhone 12 Pro Max. Prices started at $999 for the iPhone 12 Pro ($100 more for the Pro Max), with storage options of 128GB, 256GB and 512GB. The Super Retina XDR OLED displays are built with what Apple calls “Ceramic Shield” for four times better resistance to breaking if dropped.
Both Pro models use the A14 Bionic chip and offered 5G networking — both the sub-6GHz and mmWave varieties. The three-lens Pro 12MP camera system includes either a 4X or 5X optical zoom range, Night Mode for better photos in low-light conditions, and LiDAR sensors for faster focus and improved AR/VR. 4K video recording can be done at 24 fps, 30 fps, or 60 fps and HDR video recording with Dolby Vision is available at up to 60 fps.
iPhone 13 and 13 mini

The iPhone 13 and 13 mini arrived in September 2021.
The iPhone 13 and 13 mini picked up where the previous year’s models left off: they have the same form factor and price range as in 2020, plus a new processor and better battery life. Prices started at $699 for the mini ($100 more for the larger iPhone 13), with storage options of 128GB (twice the base amount offered last year), 256GB, and 512GB. Both models sport Apple’s Super Retina XDR displays and run on the new A15 Bionic chip.
Both also feature a 12MP dual-camera system with Ultra Wide and Wide cameras, sensor‑shift optical image stabilization for sharper photos, and “cinematic mode” for video. 4K video can be shot at 24 fps, 25 fps, 30 fps, or 60 fps and HDR video recording with Dolby Vision is available at up to 60 fps. Both have larger batteries for up to 2.5 hours more battery life in the iPhone 13 (1.5 hours more in the mini).
iPhone 13 Pro and Pro Max

The Apple iPhone 13 Pro and Pro Max arrived in September 2021.
The iPhone 13 Pro and Pro Max are virtually identical to their predecessors (though slightly thicker and heavier). They got Apple’s newest A15 bionic processor and delivered better battery life. Prices again started at $999 (for the iPhone 13 Pro) and $1099 (for the iPhone 13 Pro Max), with storage options ranging from 128GB to a whopping 1TB. Both models again use Apple’s Super Retina XDR displays, with the Pro models getting ProMotion screens for smoother on-screen graphics.
Both feature a 12MP triple-camera system with revamped Ultra Wide and Wide cameras, “cinematic mode” for video, and macro photography. 4K video can be shot at 24 fps, 25 fps, 30 fps, or 60 fps and HDR video recording with Dolby Vision is available at up to 60 fps. A larger battery means up to 2.5 hours more battery life in the iPhone 13 Pro Max (1.5 hours more in the 13 Pro).
iPhone 14 and 14 Plus

The Apple iPhone 14 and 14 Plus arrived in September and October 2022, respectively.
The iPhone 14 and new 14 Plus have the same form factor and price range as the previous year, with the larger Plus model replacing the discontinued iPhone 13 mini. Both use an updated version of the Bionic A15 processor — the same chip used in the 2021 models — and offer better battery life. Prices start at $799 for the iPhone 14 and $899 for the larger 14 Plus, with storage options of 128GB, 256GB, and 512GB.
Both models use Apple’s Super Retina XDR displays with the iPhone 14 having a 6.1-in. screen and the 14 Plus model sporting a 6.7-in. display. (Unlike the Pro models, these versions of the iPhone do not have an always-on display or any changes to the screen “notch.”) Both feature a 12MP dual-camera system with Ultra Wide and Wide cameras, sensor‑shift optical image stabilization, and cinematic and action modes for video. 4K video can be shot at 24 fps, 25 fps, 30 fps, or 60 fps and HDR video recording with Dolby Vision is available at up to 60 fps. Pre-orders began Sept. 7, with the phones available in stores on Sept. 16 (iPhone 14) and Oct. 7 (iPhone 14 Plus).
iPhone 14 Pro and Pro Max

The Apple iPhone 14 Pro and Pro Max arrived in September 2022.
The iPhone 14 Pro and Pro Max look similar to last year’s models, but get noteworthy new features, including the new A16 processor and a more powerful 48MP rear camera system. Prices are unchanged from 2021, storage options range between 128GB and 1TB, and this year brings a new “Deep Purple” color as an option. Both models again use Apple’s Super Retina XDR displays, but this year get an always-on display. (The screen dims when not in use to save on battery life, but can display as much as 2000 nits of brightness outdoors.)
Both feature a 48MP triple-camera system with tweaked Ultra Wide and Wide cameras, and the same 3X optical zoom in/2X optical zoom out as last year. 4K video can be shot at 24 fps, 25 fps, 30 fps, or 60 fps, HDR video recording with Dolby Vision is available at up to 60 fps, and cinematic video stabilization is available in 4K, 1080p and 720p.) Gone this year are SIM cards, which Apple has replaced with eSIMs. Pre-orders began Sept. 7, with the phones available in stores on Sept. 16.
iPhone 15 and 15 Plus

The Apple iPhone 15 and 15 Plus were released in September 2023.
The iPhone 15 and new 15 Plus look much like their 2022 predecessors (with prices in the same range), but offer design tweaks that include an aluminum and color-infused glass combo and new colors. Both use the Bionic A16 processor — the same chip used in the 2022 Pro models — and get USB-C charging for the first time. Prices again start at $799 for the iPhone 15 and $899 for the larger 15 Plus, with storage options remaining unchanged at 128GB, 256GB, and 512GB.
Both models continue to feature Apple’s Super Retina XDR display; the iPhone 15 has a 6.1-in. screen, the 15 Plus model has a 6.7-in. display — and both get the Dynamic Island feature at the top of the screen for more interactivity with various apps. The iPhone 15 now features a revamped camera system that includes a 48-megapixel main camera, a 26 mm ƒ/1.6 aperture, sensor‑shift optical image stabilization with support for super-high-resolution photos, and a 4x optical optical zoom range. Both models now get Roadside assistance via satellite through AAA.
Pre-orders begin Sept. 15, with the phones available in stores on Sept. 22.
iPhone 15 Pro and Pro Max

The Apple iPhone 15 Pro and Pro Max were released in September 2023.
The big change for the iPhone 15 Pro and Pro Max this year involves a new Titanium-based design that cuts 19 grams of weight and allows for thinner bezels around both models’ screens. Inside, both run Apple’s new A17 Pro processor (with 6 cores) and get a tweaked 48MP rear camera system. The main difference between the two camera systems: the Pro Max version gets a 12-megapixel 5x Telephoto feature at 120 mm with an ƒ/2.8 aperture; 3D sensor‑shift optical image stabilization and autofocus, and a new tetraprism design; the smaller Pro version features a 12-megapixel 3x Telephoto at 77 mm with an ƒ/2.8 aperture. Coming later this year on Pro models: the ability to capture spatial video for playback on Apple’s upcoming Vision Pro device.
For connectivity, the Pro models move to USB-C, with USB 3 support and Wi-Fi 6E for faster wireless speeds. Screen sizes remain the same as last year — 6.1-in. and 6.7-in. — but thinner bezels allow for a slightly smaller overall size. The mute button has been replaced with a programmable “Action” button similar to the one that debuted in 2022 on the Apple Watch Ultra. And Find My Friends gets more powerful “Precision Finding.” Storage options start at 128GB for the Pro model, 256GB for Pro Max version, and range up to 1TB.
As with the regular iPhone 15, pre-orders for the Pro models begin Sept. 15, with the phones available in stores on Sept. 22.
Related content
Windows 11: a guide to the updates, windows 10: a guide to the updates, intel unveils its ai roadmap, chips to rival nvidia, windows 11 insider previews: what’s in the latest build, from our editors straight to your inbox.
Ken Mingis is Executive Editor at Computerworld and oversees the day-to-day operation of, and strategic planning for, our website.
More from this author
Macintosh highlights from around the web (march 2003), macintosh highlights from around the web (april 2003), brief: hp reports q2 revenue of $17.98 billion, second look: apple’s dual 2-ghz g5 by the numbers, most popular authors.

- Howard Wen Contributing Writer
Show me more
Google sheets power tips: how to use dropdown lists.

Office 365: A guide to the updates
Yes, Apple’s Vision Pro is an enterprise product

Voice cloning, song creation via AI gets even scarier

The link between smartphones and social media addiction

Sam Bankman-Fried gets 25 years in prison

IMAGES
VIDEO
COMMENTS
If you have an iPhone 6 or later or an iPad (3rd generation) or later, follow these steps: Update your iPhone or iPad to the latest version of iOS or iPadOS. Go to Settings > Cellular. Then: For iPhone, tap Cellular Data Options, then turn on Enable LTE. For iPad, turn on LTE. If you still see No Service after following these steps, contact ...
Update your iPhone or iPad to the latest version of iOS or iPadOS. Go to Settings > Mobile Data. Then: For iPhone, tap Mobile Data Options, then turn on Enable LTE. For iPad, turn on LTE. If you still see No Service after following these steps, contact your network provider. iPhone and iPad devices that support 5G networks are not affected by ...
Try Ejecting The SIM Card. One simple step that can fix the No Service problem on an iPhone 6 is to eject the SIM card. Your iPhone's SIM card is what connects it to your wireless carrier's network. Sometimes ejecting and reinserting the SIM card can reset that connection and fix the problem. First, grab a SIM card ejector tool or a ...
You can solve such problems by updating your carrier settings manually. To do so, simply open Settings > General And go to About page. As soon as you access the About page iPhone will prompt you about updating your carrier settings. Simply tap on 'Update' option and iPhone will update your carrier settings for you. 4.
Use your finger to swipe the red power icon across the screen from left to right. Use your finger to swipe the. red power icon. across the screen from left to right. Wait for your iPhone to turn all the way off. This may take up to 30 seconds.
Hold the Sleep/Wake and Home buttons to trigger a forced restart (the Apple logo will appear). Clean the area around the iPhone's Home button with a soft, microfiber cloth. Go to Settings ...
First, try resetting all of your iPhone 6's network settings. Go to Settings > General > Reset > Reset Network Settings. This should only take a few moments. If that doesn't work, try ...
Step 1: Launch the Settings app and tap General on iPhone. Step 2: Select Software Update and download the pending iOS build on your phone. 12. Reset iPhone. When none of the tricks resolve ...
If the phone does not charge when connected, the phone likely has a dead battery or a bad charging port. Replace the battery ( using this guide here) with a partially charged one and see if it will turn on. If not, then it can be a power button or logic board issue. If it does turn on, plug it in and see if the charging indication comes on.
The iPhone 6 says searching problem might occur if you have left 'Airplane Mode' on by mistake. Here are the steps to fix it - ... 6. Reset Network Settings. To fix theiPhone 6 searching for network, here are the steps for resetting network settings. Browse 'Settings' > 'General' > 'Reset' > 'Reset Network Settings'.
Step 3: Now, still in the Location Services option, select System Services and then check that the Setting Time Zone option is toggled into the On position. If it's already On, then toggle it Off / On. Step 4: Fully restart the iPhone 6s/6 and wait for it to reboot. Your " No Service " issue should hopefully be fixed.
On your iPhone, open the Settings app. Tap General . Scroll to the bottom of the screen and tap Reset . Tap Reset Network Settings . If prompted, enter your passcode. Tap Reset Network Settings . Your iPhone resets its network settings and then restarts, which takes a minute or so. When you can use your phone again, enter your passcode.
Resetting network settings can solve some network issues such as sim card not detecting your carrier, showing no service or constantly searching for a networ...
Go to Settings. Tap on General. Tap on Reset network settings. Type in your passcode if prompted. Then confirm the action in the popup. 6. Update iOS software. Sometimes a bug in the software can also cause network issue. Make sure your iPhone has the latest software installed that may have fixes for the problem.
To turn on Wi-Fi, head to the Settings app on your iPhone. Look for the Wi-Fi section, and tap on it. You'll see a toggle next to Wi-Fi; make sure it's in the on position. Once you've turned the toggle on, your iPhone will start searching for available networks, and you can reconnect to your preferred Wi-Fi network. 3.
View common problems and explore potential solutions. Learn the steps you can take to troubleshoot and fix the problem yourself. Cancel. Fix Your Stuff. Repair Guides. ... Apple iPhone Troubleshooting: Fix Common Problems. ... Your iPhone is not connecting to the network. Connection. Apple iPhone. iPhone Black Screen.
How to fix network problems on iPhone, all iPhones. These are a few tips that will help you fix network issues in your iPhone like emergency calls only, no s...
To use the "Reset All Settings" option, open the Settings app on your iPhone and navigate to General > Transfer or Reset iPhone > Reset > Reset All Settings. Type your device passcode and then tap "Reset All Settings" again. You'll see the Apple logo and the progress bar indicating the process has begun.
See how you can fix the signal dropping / No Service / SOS only / searching problem on the iPhone 6. Depend what causes the problem in the first place, you c...
Step 1: Open the Settings app and go to the General section. First, find and open the Settings app on your iPhone. In the Settings, scroll down until you see " General " and then tap on it. This section includes various options, such as Siri settings, updating apps in the background, and setting the Date and time.
Way 6. Reset Network Settings . Another not-so-difficult method to fix network issues is resetting the network settings of your device. Let's see how to do it. Step 1: Go to Settings app and tap on General. Step 2: Then, select the option labelled Reset and then go to Reset Network settings.
Method 1: Check your Internet Connection. If the App Store isn't working on your iPhone, the first thing you need to do is to make sure that your device has a stable internet connection. Your iPhone, iPad, or Mac should have a Wi-Fi or Mobile Data connection to access the App Store. Sometimes, it seems that your device is connected to the ...
How to Fix iPhone 6s showing No Service or Searching Network error prompt [Effective Solutions and Trick]To reset your network settings, go to Settings- Gene...
Step 2: Wait 60 seconds. Step 3: Plug the power cable back into the back of the equipment. Step 4: Wait for the equipment to reboot (this can take up to 20 minutes). 2. Your home network is congested. Your slow speeds might be the result of trying to do too much at once on your internet connection.
First, try restarting your iPhone. If that doesn't improve the app's performance, you'll want to check the App Store for an update. Developers are still pushing iOS 16 support updates and ...
The iPhone 5S got a faster, 64-bit A7 SoC (system on a chip), Touch ID, and a new motion data processor touted as the foundation for a new wave of health and fitness apps. The iPhone 5C started at ...
This video is only for knowledge , don't follow these step without any Experience .iPhone 6 Baseband CPU | how to repair network problemhi, My name is Punee...
Press and hold the side button and a volume button until the power-off slider appears. Drag the slider and wait 30 seconds for your device to turn off. Press and hold the side button to turn your ...