- PRO Courses Guides New Tech Help Pro Expert Videos About wikiHow Pro Upgrade Sign In
- EDIT Edit this Article
- EXPLORE Tech Help Pro About Us Random Article Quizzes Request a New Article Community Dashboard This Or That Game Popular Categories Arts and Entertainment Artwork Books Movies Computers and Electronics Computers Phone Skills Technology Hacks Health Men's Health Mental Health Women's Health Relationships Dating Love Relationship Issues Hobbies and Crafts Crafts Drawing Games Education & Communication Communication Skills Personal Development Studying Personal Care and Style Fashion Hair Care Personal Hygiene Youth Personal Care School Stuff Dating All Categories Arts and Entertainment Finance and Business Home and Garden Relationship Quizzes Cars & Other Vehicles Food and Entertaining Personal Care and Style Sports and Fitness Computers and Electronics Health Pets and Animals Travel Education & Communication Hobbies and Crafts Philosophy and Religion Work World Family Life Holidays and Traditions Relationships Youth
- Browse Articles
- Learn Something New
- Quizzes Hot
- This Or That Game New
- Train Your Brain
- Explore More
- Support wikiHow
- About wikiHow
- Log in / Sign up
- Hobbies and Crafts
- Drawing Text and Lettering

How to Draw 3D Block Letters
Last Updated: September 22, 2023 Approved
This article was co-authored by wikiHow Staff . Our trained team of editors and researchers validate articles for accuracy and comprehensiveness. wikiHow's Content Management Team carefully monitors the work from our editorial staff to ensure that each article is backed by trusted research and meets our high quality standards. wikiHow marks an article as reader-approved once it receives enough positive feedback. In this case, 83% of readers who voted found the article helpful, earning it our reader-approved status. This article has been viewed 1,176,530 times. Learn more...
3D block letters are great for headings, posters, and birthday cards. They’re not too tricky to learn how to draw yourself. Draw block letters by making rectangular outlines around regular letters. Make them 3D by adding perspective with diagonal lines, and then add shadows to make your letters really pop.
Sample Alphabets

Drawing Block Letters

- It may be easier to practice on graph paper. Following the lines printed on the graph paper can help you create nice, even lines for your letters.
- Be sure to leave more space than you usually would between the letters so that you will have room to outline them.

- For letters with curves, like “C,” try to draw a smooth curve and make the letter the same width as the straight-edged letters.
- Don’t forget to outline the inside of holes in letters like “R” and “A.”

- Wait for the ink to dry before erasing your pencil marks so that you don’t smudge the ink.

- Clear away the eraser shavings so that they don’t get in the way.
Adding 3D Perspective

- Your vantage point will determine the direction you draw your diagonal lines in the next step.

- Practice drawing these lines in different directions until you figure out what you like.
- Most people draw their block letters viewed from above.

- Think of it like drawing a cube , where you first draw a square, then small diagonal lines, and then connect the lines in another square. It’s just like that, except the shapes are letters instead of squares.
Filling in the Shadows

- It may help to lightly draw a little shining sun in one of the top corners of the page to help you remember. You can erase it later.
- Most light sources are from above, like the sun, the moon, and overhead lighting, so that will look the most normal. But, you can have the light source be on the bottom if you want the letters to look like they’re behind stage lights.

- If your light source is in the upper left corner of your page, all the right hand surfaces of your letters will be dark.

- If you’re adding cast shadow, make sure to also add in cast shadows in holes in the letters. For example, in the letter “R,” one part of the top bit of the letter would cast a shadow on the other bit.

Community Q&A
- Start drawing your letters with a pencil and only trace over them with a pen when you feel confident. Thanks Helpful 0 Not Helpful 0
- If your letters will be shown on a computer display, the light source should be on the upper left. This is the convention that most computer fonts try to observe. Thanks Helpful 0 Not Helpful 0

You Might Also Like

- ↑ https://www.mybluprint.com/article/drawing-block-letters-is-so-easy-you-may-never-buy-another-birthday-card-again
- ↑ https://youtu.be/ZaWH_DuIw-8?t=27
- ↑ http://www.drawingteachers.com/how-to-draw-3d-letters.html
- ↑ https://www.drawinghowtodraw.com/stepbystepdrawinglessons/2016/04/draw-3d-block-letters-drawing-3-dimensional-letters-casting-shadows-tutorial/
About This Article

To draw 3D block letters, start by sketching out thick lettering in the center of your paper using pencil. Next, mark an “X” in the left or right upper corner of the paper. Then, sketch lines from the edges of your letters to the “X” mark and don’t forget to draw lines to the far corners of your letters as well. After you’ve drawn the lines, use them as a guide to create thick dimension on each letter. Finally, erase the pencil lines and outline the final drawing in black pen or marker so it stands out. For tips on how to draw pyramid letters, read on! Did this summary help you? Yes No
- Send fan mail to authors
Reader Success Stories
Jun 22, 2016
Did this article help you?
Dec 31, 2016
Kifer Bingo
Mar 29, 2017
Feb 22, 2017

Featured Articles

Trending Articles

Watch Articles

- Terms of Use
- Privacy Policy
- Do Not Sell or Share My Info
- Not Selling Info
wikiHow Tech Help Pro:
Level up your tech skills and stay ahead of the curve
How To Draw 3D Letters (+FREE Worksheet)
This post and the photos within it may contain affiliate links. If you purchase something through the link, I may receive a commission at no extra charge to you.
In this tutorial, I will teach you how to draw 3D letters step by step.
3D letters may seem complicated at first, but with a bit of theory and some practice, you’ll learn it in no time.
So even if you are a complete beginner with no experience, you’ll learn how to draw basic 3D letters after following this tutorial.
Before we begin, here is a quick overview of this tutorial –
Tools needed to draw 3D letters
- The basics of 3D. What are 3D letters?
- How to draw 3D letters – A step by step process
- 3D letters alphabet template + FREE printable 3D letters worksheet
- Extra tips for 3D letters
- Final words.
Without any further delays, let’s get started.
If you prefer to watch, I also made a video tutorial –
For this tutorial, you’ll need just a few basic lettering tools.
These are the tools that I’m using (links to Amazon) –
- A ruler (I use the rolling ruler – super helpful!)

If you wish to add colors to your 3D letters you can also use these other tools –
- Colored pencils
- Watercolors
Ok, with that in mind, let’s proceed to the next section of this tutorial.
The basics of 3D. What are 3D letters?
Instead of just giving you a premade template for you to copy from, I think it’s crucial to have a basic understanding of what 3D letters are.
I believe it will provide you with a strong foundation, and all the practice you’ll do later on will be much more effective.
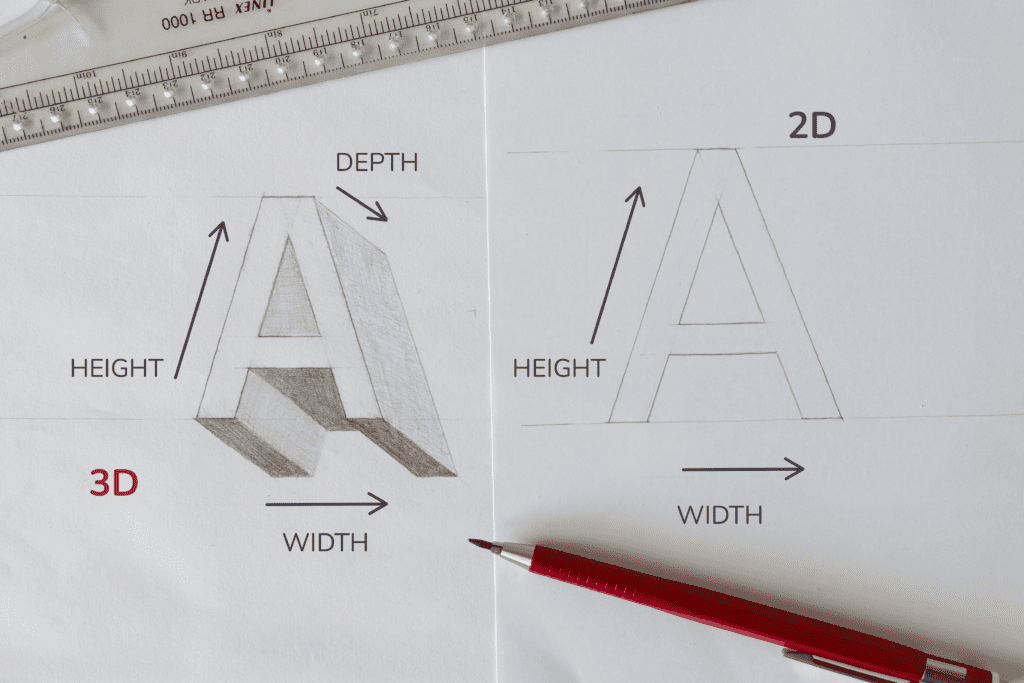
Without getting all scientific in this artsy lettering tutorial, here is a very basic and boiled down definition of what 3D is –
3D is an object with height, width, and depth (or length).
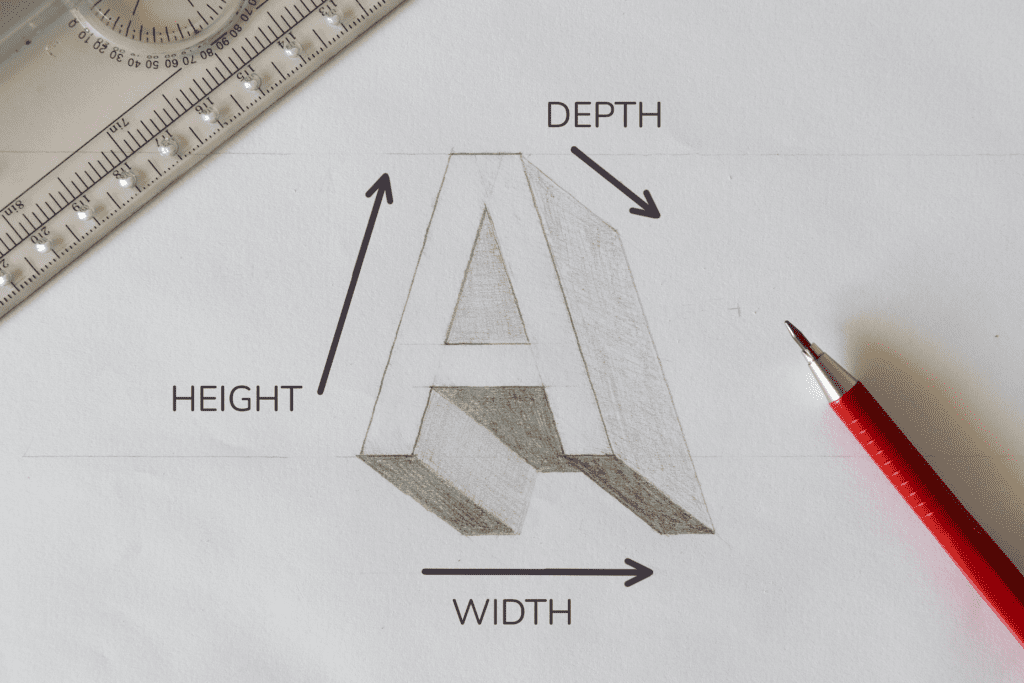
We are basically adding an extra dimension to the flat 2D letterforms we usually create.
IMPORTANT NOTE –
I often see that people refer to 3D as shadows or shading.
However, it’s not the same thing. In short, shadows are a dark area or shape produced by a body coming between rays of light and a surface.
I think that these two terms get confused and used interchangeably because they seem similar at first.
Here is one good tip on how to recognize a 3D letter from a shaded letter.
We have a shaded letter and a 3D letter next to each other.
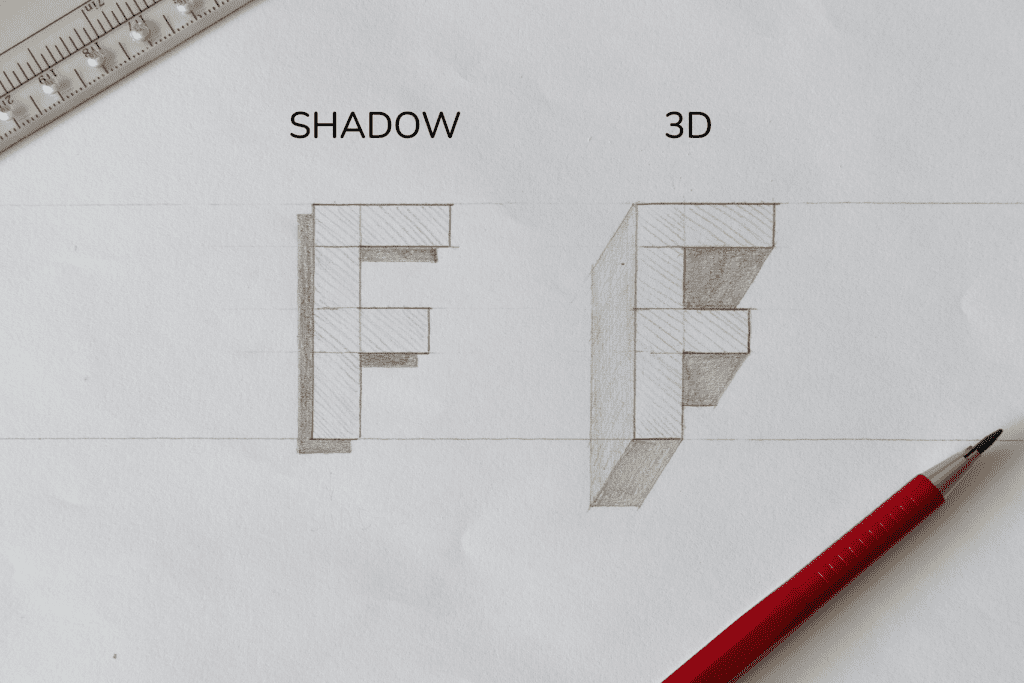
If you look at it closely, you’ll see that all the corners completely connect a 3D letter. On the other hand, the shaded letters are not connected and thus give the impression of them being cast behind the letter.
We can also apply various shading to our 3D letters to make them look even better.
But more on that later on in this tutorial.
Let’s proceed to the next section.
How to draw 3D letters – A step by step process
I’m not sure if this method has a particular name to it, but I call it – the equal distance 3D method.
I call it this way because well, the 3D extends equally everywhere.
The equal distance method is fairly simple.
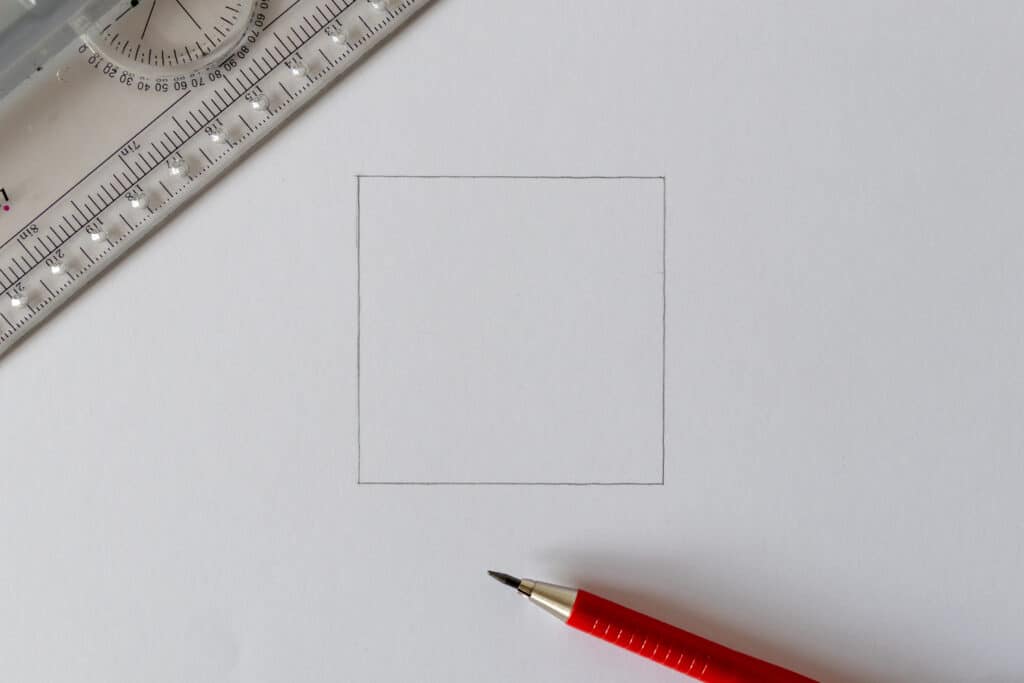
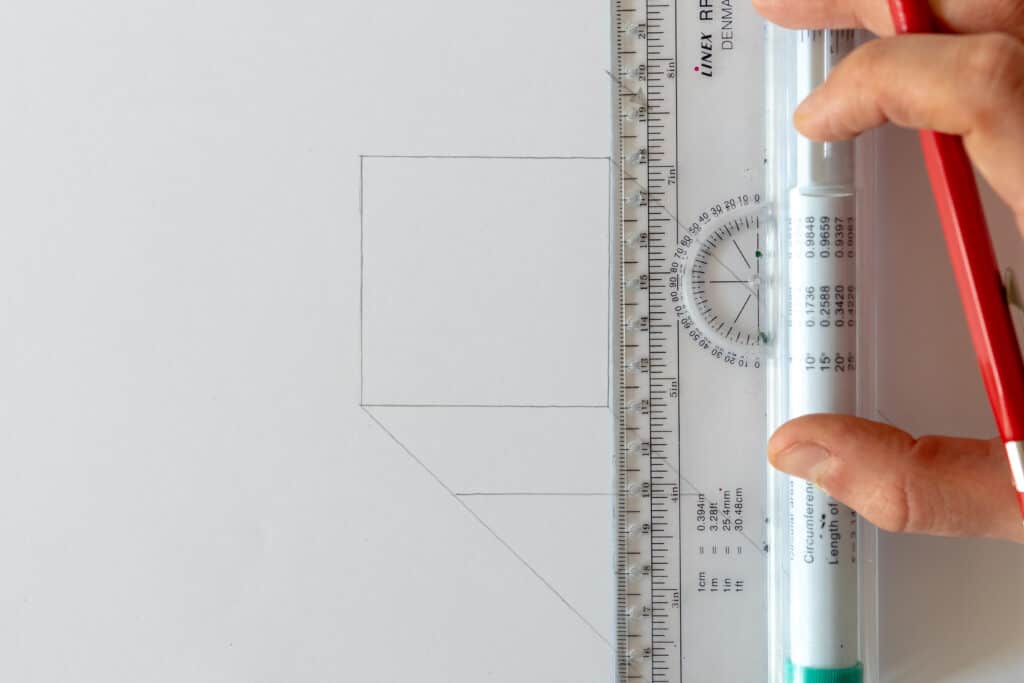
Before I start showing you how to apply this effect to letters and words, let’s take a step back and try with a simpler shape – a square.
You probably remember this from your geometry class.
Draw a simple square on a piece of paper using a pencil (it can also be a rectangle, it doesn’t matter).
Once you’ve done that, you need to determine the direction of the 3D.
Where will it extend?
The choice is totally up to you.
It can come from any direction, and for this example, I’ll extend it to the bottom right side.
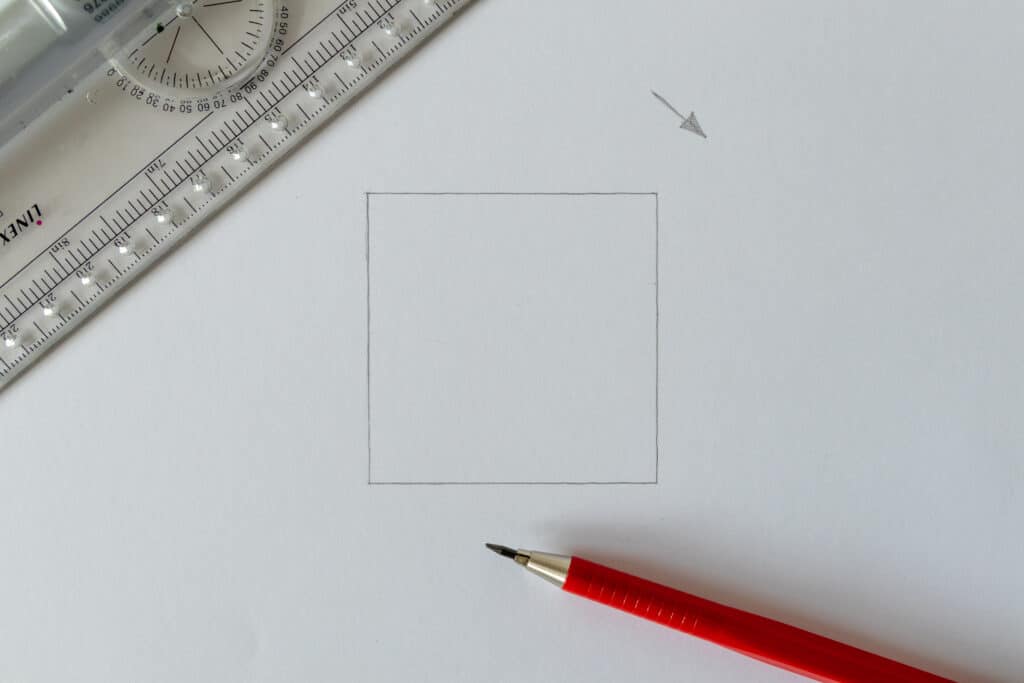
I’ll take my ruler, I’ll place it on the corner and I’ll draw my first line.
Every other corner should have a line extending in the same direction.
Feel free to make these lines a bit longer, and what doesn’t get used will be erased later on.
Once you are done you should have something that looks like this –
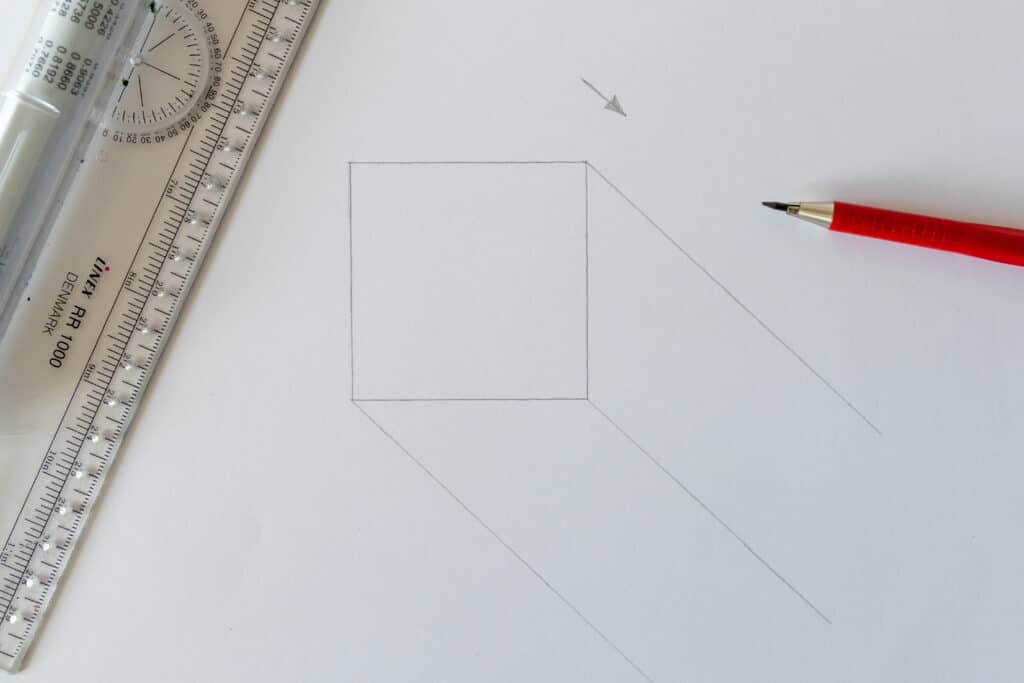
Notice that I didn’t add a line on the top left corner.
That is because that line would go “through” the square.
If I decided to point the 3D in the bottom left side, then I wouldn’t have added a line on the top right corner.
Just remember that if a 3D line goes “through” the letter (or object) you can skip it.
The next step is to determine how deep our 3D goes, and again, it’s totally up to you.
The first line that you draw will determine the depth and it will be the same everywhere else.
You can start either at the bottom or at the side. I prefer doing it from the bottom.
So I align my ruler with the bottom line of the square, and I slide it a bit lower like this.

The crucial step here is that the closing line of the 3D shape follows exactly the direction of the original shape.
Once I’ve closed the bottom line, all I have to do is flip the ruler vertically, and align to the side of the square.
Now I slide the ruler to the corner created by the previous bottom line.
This way both my bottom and side have the same distance.
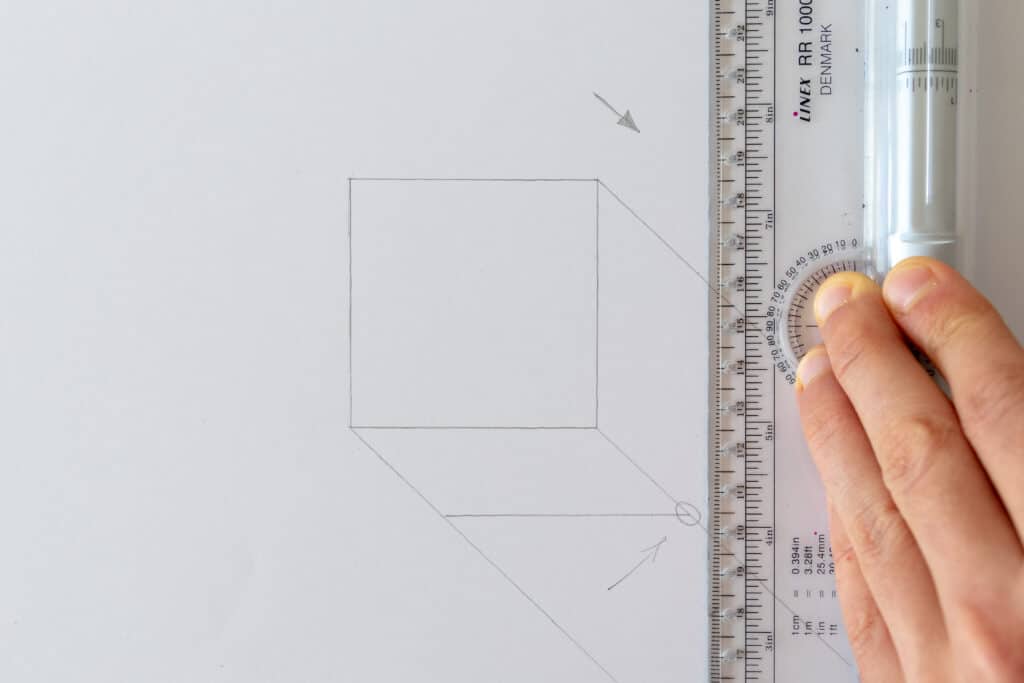
All that is left to do is deleting the lines that extend over our closed 3D shape.
And that’s it!

Following this technique we just saw on the simple square shape example, we can easily apply it to other objects (letters).
After all, what are letters if not more complex geometrical objects 😀
Good, let’s get started on our letters!
I mportant note – For beginners, it’s best to start learning 3D on block letters. Once you’ve understood how to apply it properly on block letters, it will be much easier to create different lettering styles with a 3D effect.
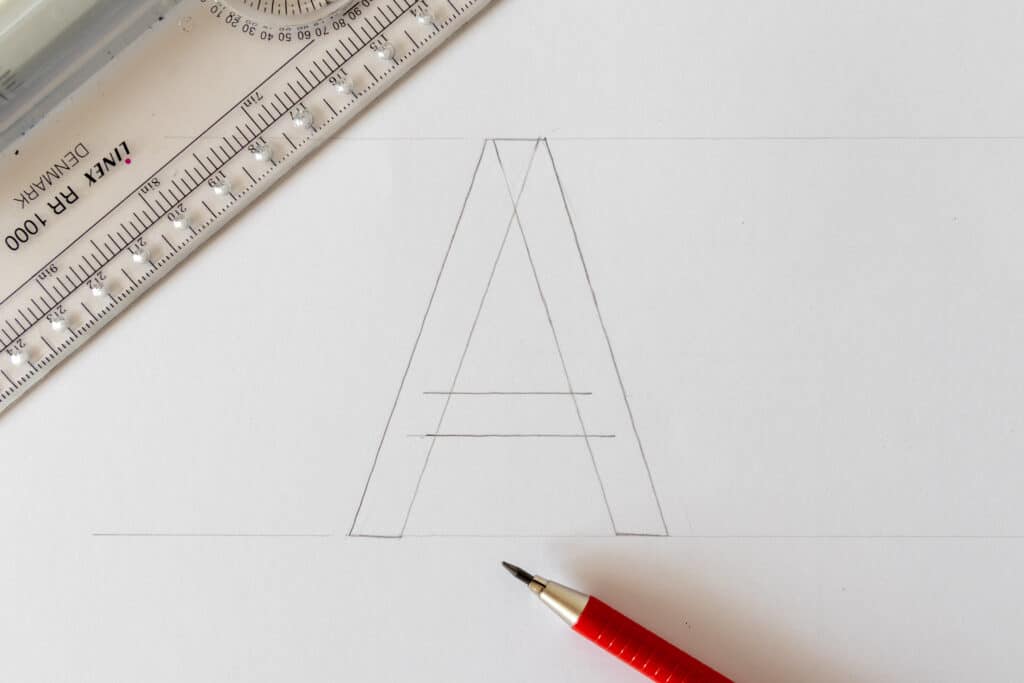
Step 1 – draw the letter.
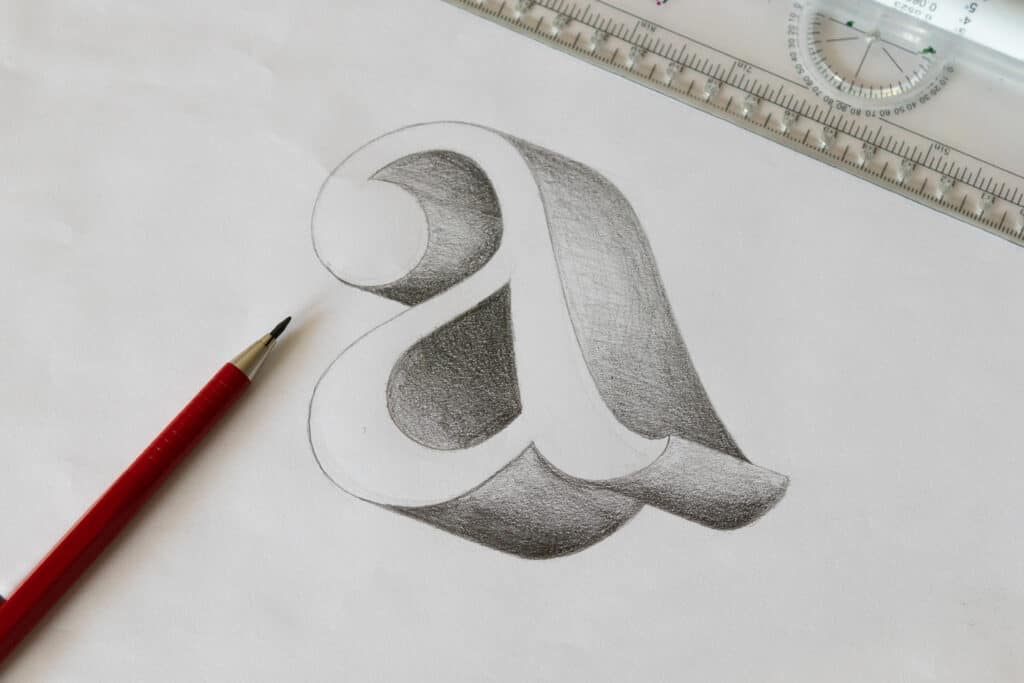
For this example, I’ll go with a basic sans serif block letter A.
I’ll draw it using the wooden board technique.
If you are not familiar with it, I talk more about it in my hand lettering tutorial for beginners.
In short, the wooden board technique teaches you to divide and draw the letter into individual parts.
This method allows you to create better, more consistent, and more balanced letterforms.
Step 2 – determine the direction of the 3D
As I mentioned earlier, the letter’s 3D (or the depth) can extend in multiple directions.
Most commonly, it is either bottom left or bottom right.
You can do it top left and top right as well.
I would just avoid doing the 3D completely vertical or horizontal because then the effect isn’t that noticeable.
This time I went for the bottom right 3D.
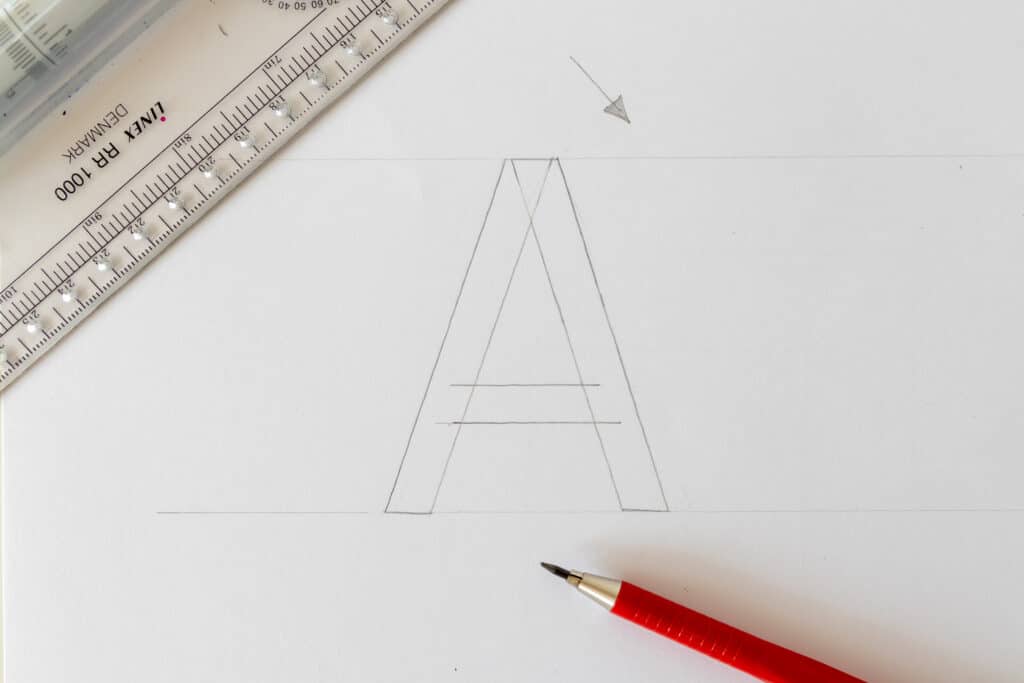
Before you draw your lines, try to identify all of your corners so as not to miss any.
I’ve done this so often that I know where to place my lines, but if you are just getting started and feel overwhelmed, this will help you out.
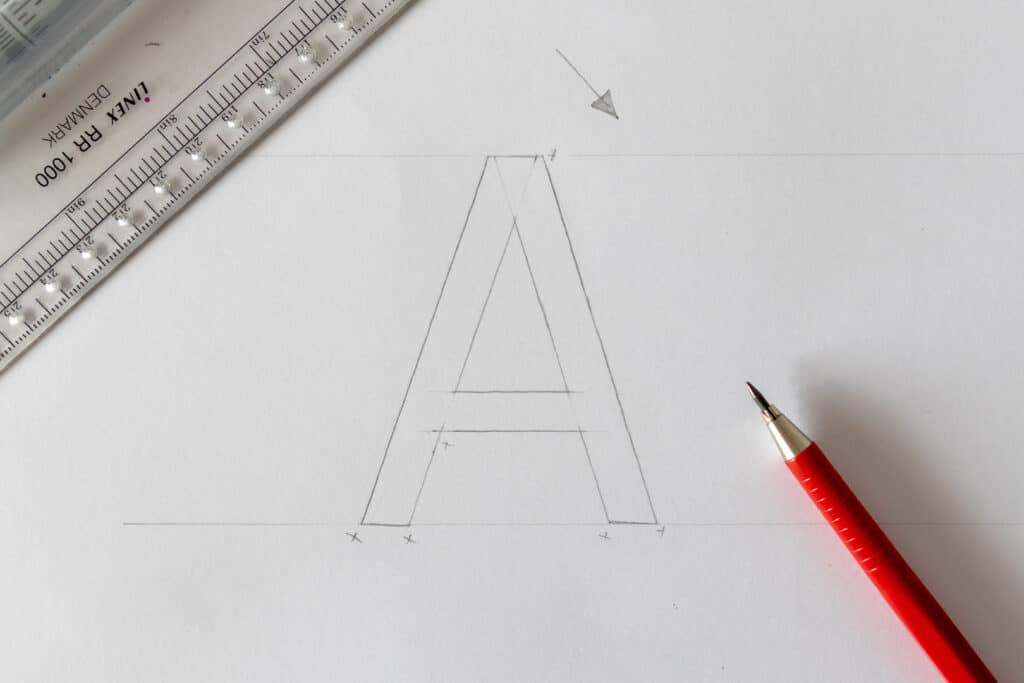
Notice once again that I haven’t marked the corners where the lines would move “through” the letter.
I did the same thing with the square example.
Step 3 – draw the lines.
Ok, so I drew my first line from this corner.
Now, every other corner should have a line that extends in the same direction.
You can make these lines a bit bigger, and what doesn’t get used will be deleted later on.
Good, once you’ve drawn all the lines, it should look like this –

As you can see, we work with a lot of parallel lines here, and it’s precisely the reason I love using my rolling ruler for this.
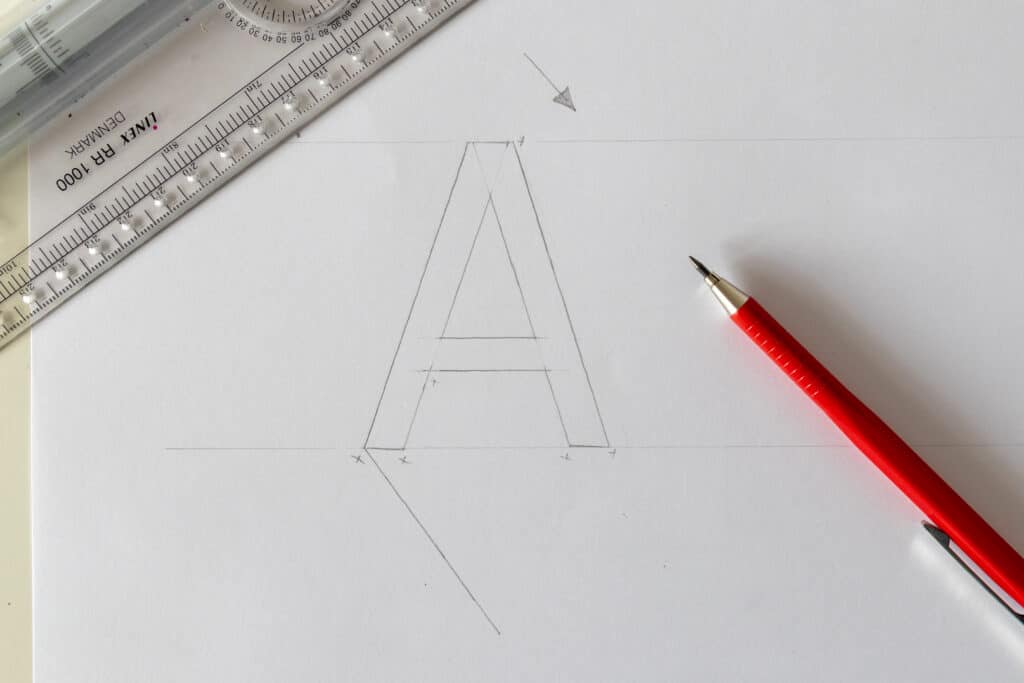
Step 4 – Closing the shape.
We have our lines extended from each corner, and now we just need to close the shape to get our 3D letter.
With the first closing line, you determine the length (the depth) of the 3D.
This part is totally up to you.
You can start closing your shape either from the bottom or from the side.
I prefer doing it from the bottom.
I’ll begin by closing up the lowest points of the letter A which are these two lines here.

The next thing I have to close is the first (inner) side of the letter.
I grab my ruler, align it to the side of the letter A and slide it to the corner I’ve created in the previous step.
This little corner tells me how far I have to go with my 3D.
In this way, I maintain an equal distance of the 3D from every side.
By closing this side I have yet another point that tells me where to close the crossbar.
So I align my ruler with the crossbar of the A, and I slide it to that corner and close the line.

Finally, I just need to connect the remaining side, and again, I have this little corner at the bottom that tells me how far I have to go.
Once I’m done with connecting all the lines, all I have to do is erase all the extras that extend beyond our 3D.
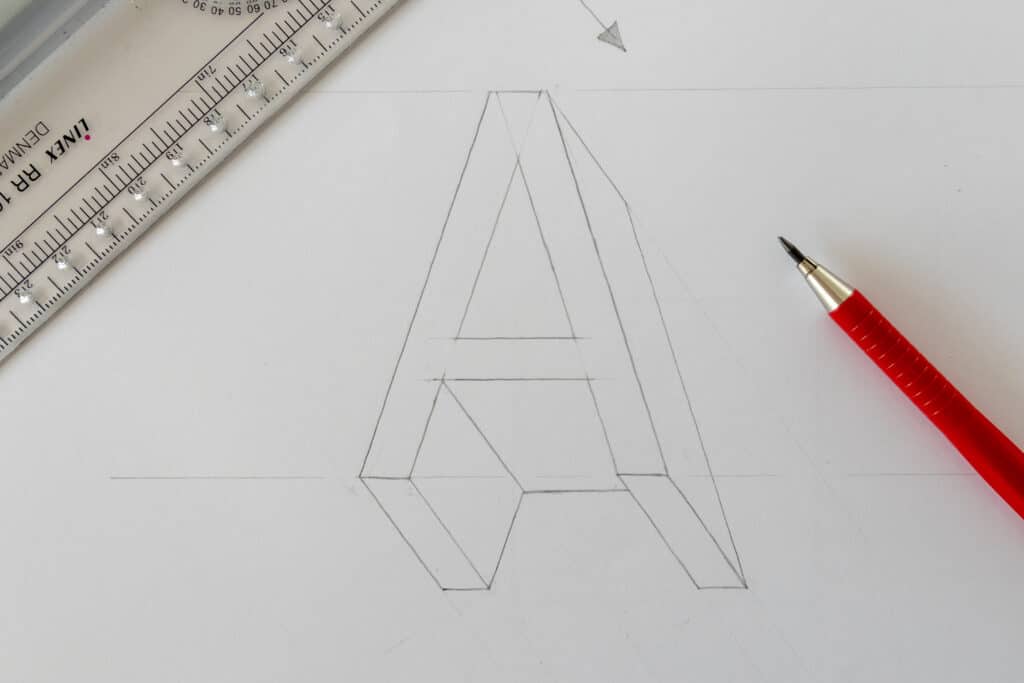
And there you have it, friends.
You’ve successfully created your first 3D letter!
We can, of course, further style our 3D letter, but I’ll cover that in the “Extra Tips” section.
Right now, we are just focusing on understanding the basics of 3D letters.
As always, it’s best to move gradually from easier to more complex elements.
What about rounded 3D shapes and letters?
Applying a 3D effect to rounded shapes can be a bit trickier than straight lines and edges.
Don’t worry. It’s nothing too complicated, but it does take a bit of practice.
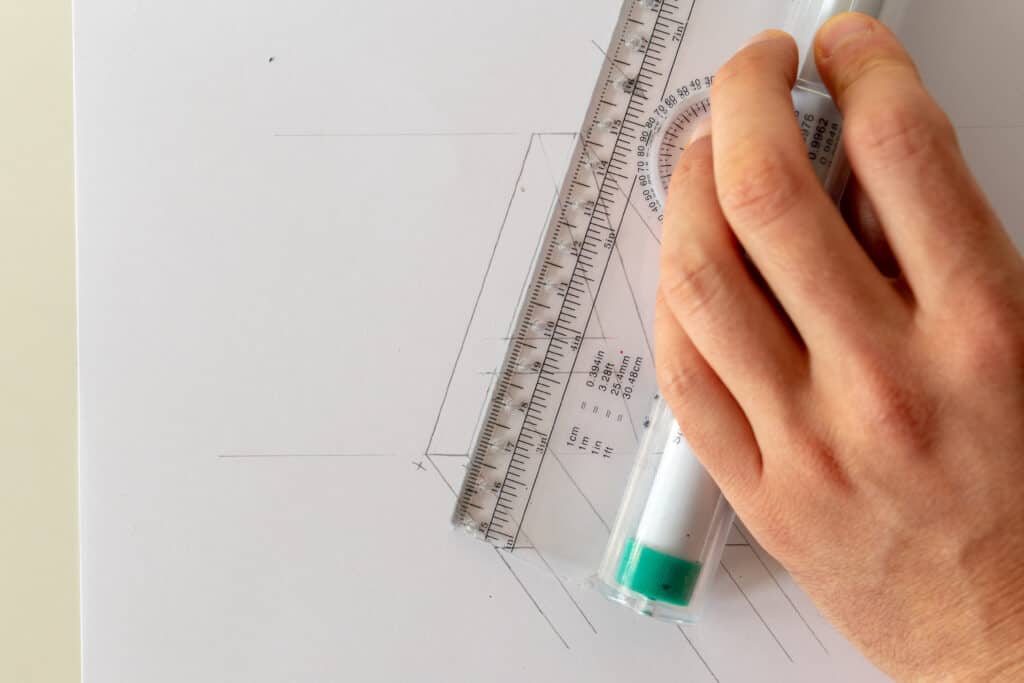
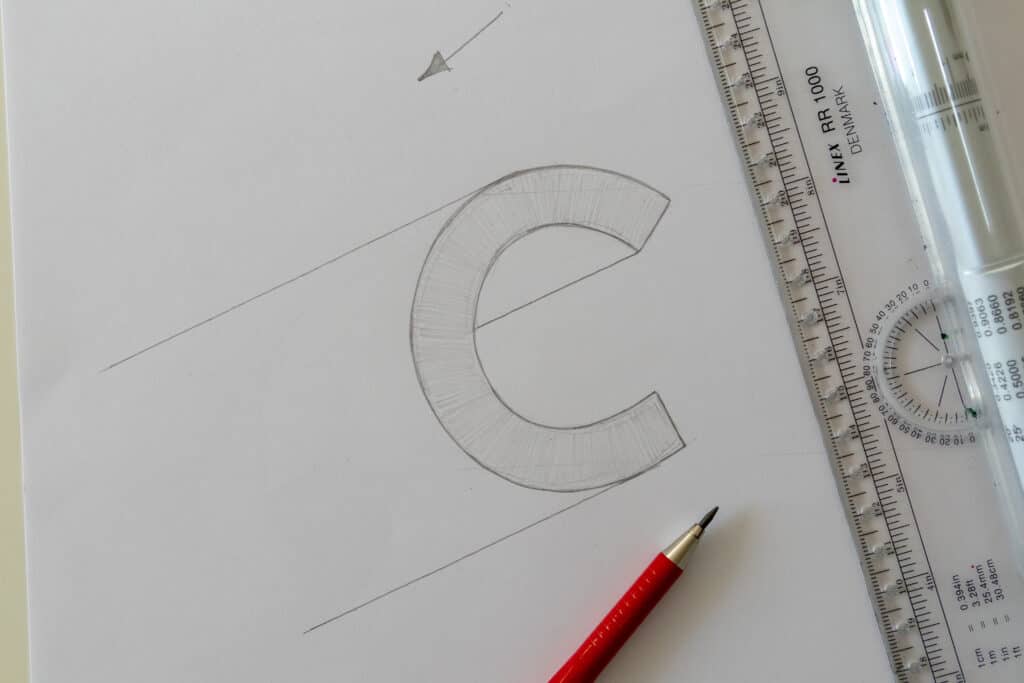
Let’s see an example using the letter C.
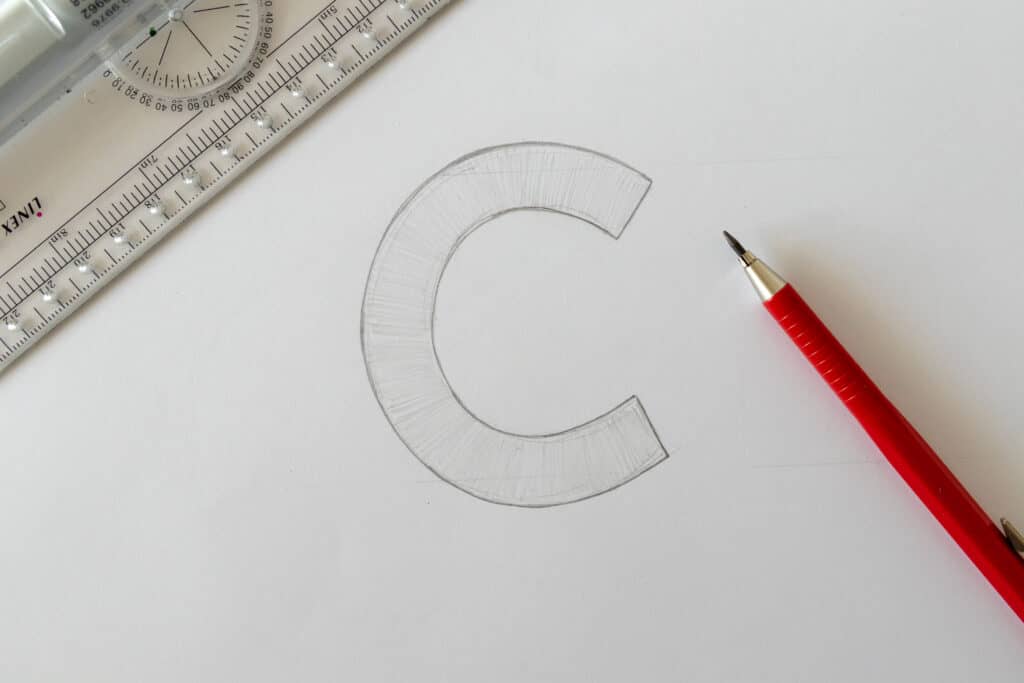
Once you’ve drawn your letter C, determine the direction of the 3D.
Here I’ll go bottom left.
I’ll start with this line inside since it has a corner.
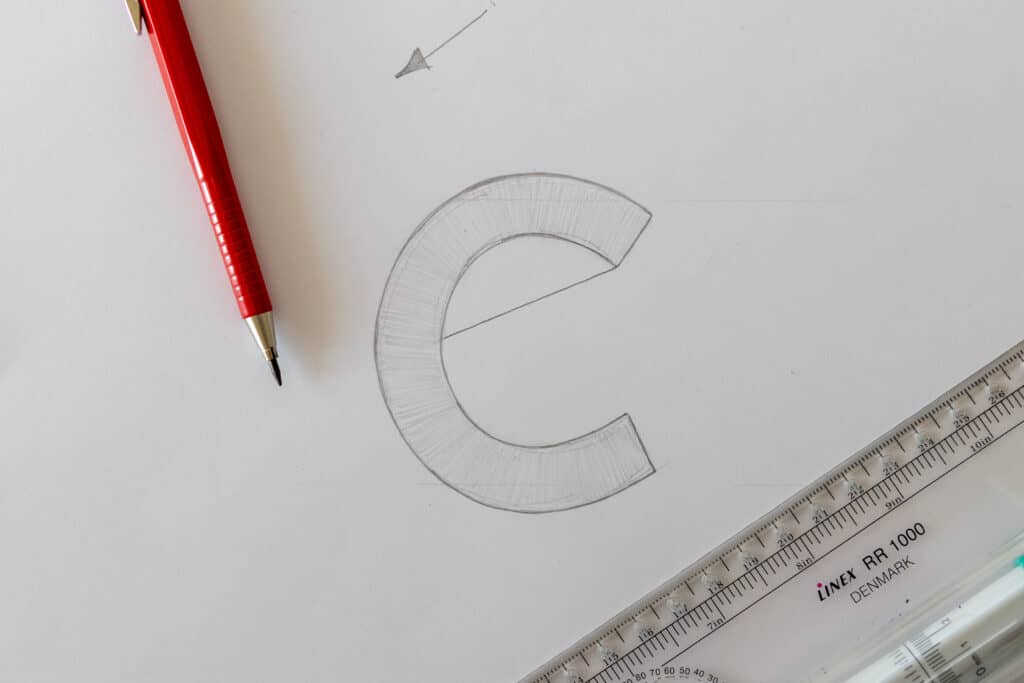
Now, I’ll move down with my ruler to the furthest point of the letter C.
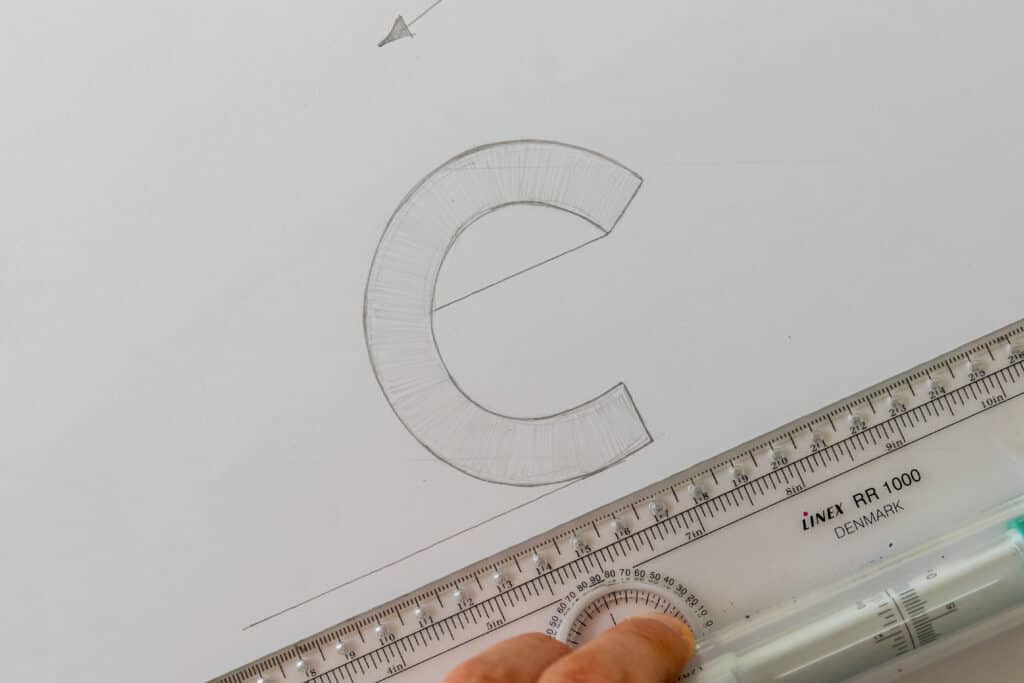
I’ll do the same for the top side.
What matters the most here is that you locate that furthest edge of the rounded letter.
Once you have all the lines it should look like this –
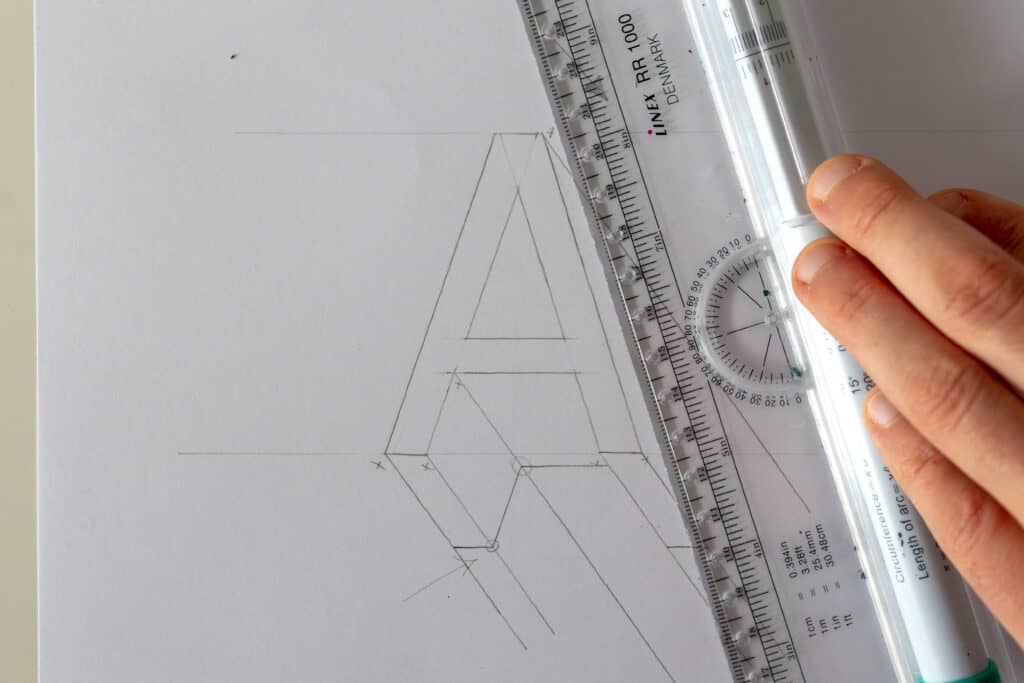
Now i just need to determine how deep my 3D will extend, and then just close the lines.
I need to close the line by following the exact shape of the letter.
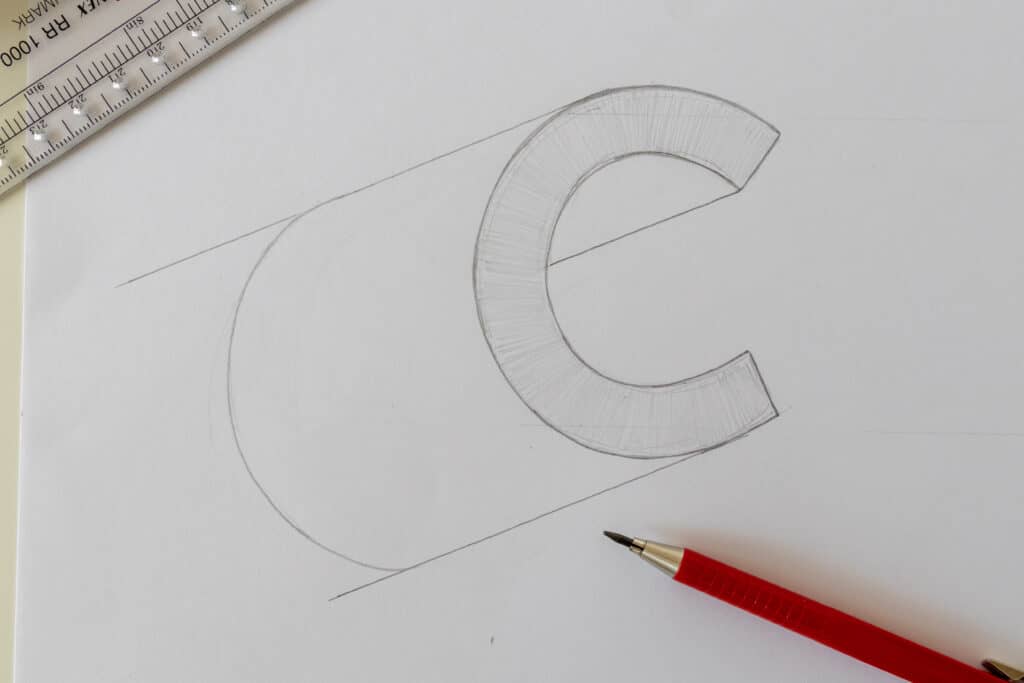
This is the reason why these rounded letters are a bit more challenging.
You have to eyeball these closing shapes, and it’s fine if it’s not 100% the same as the original line of the letter.
Here is how it should look like once you’re done.
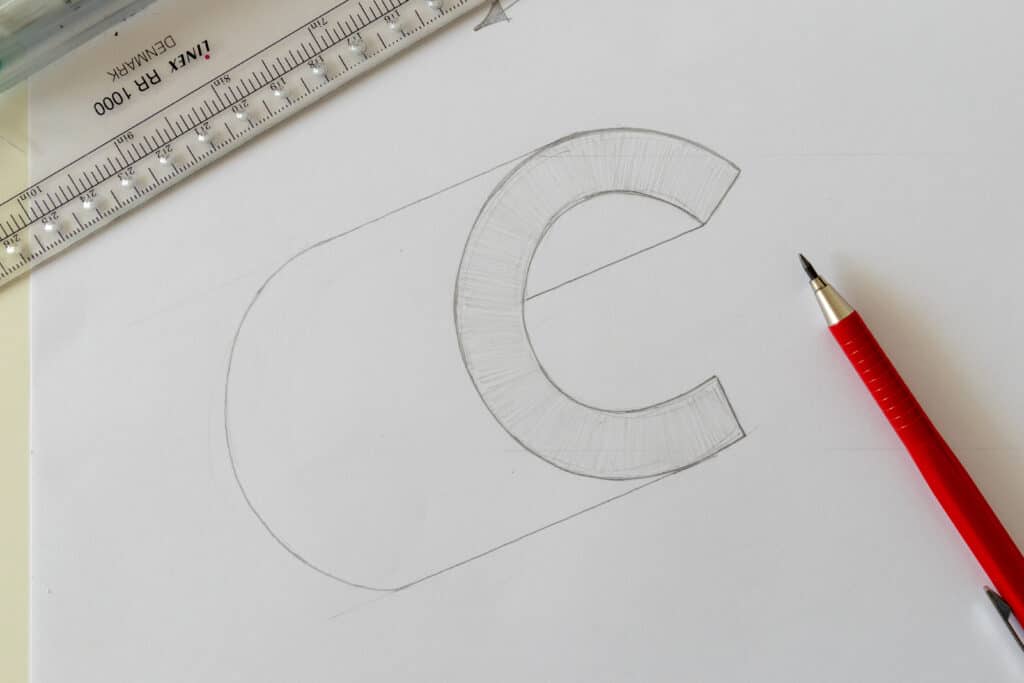
And that’s pretty much it!
Now you know how to create 3D letters using the equal distance method.
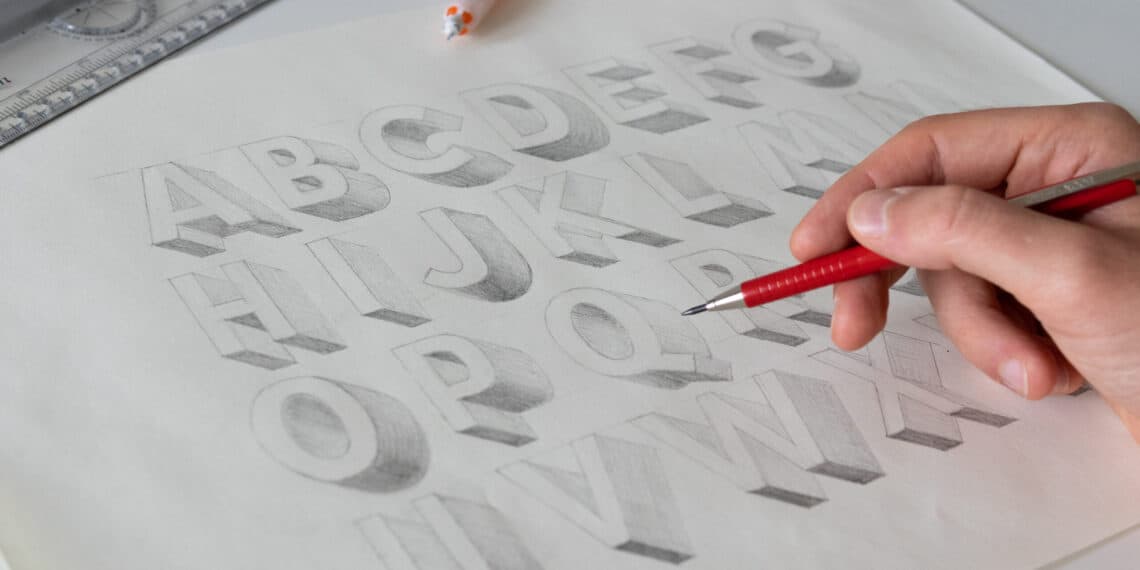
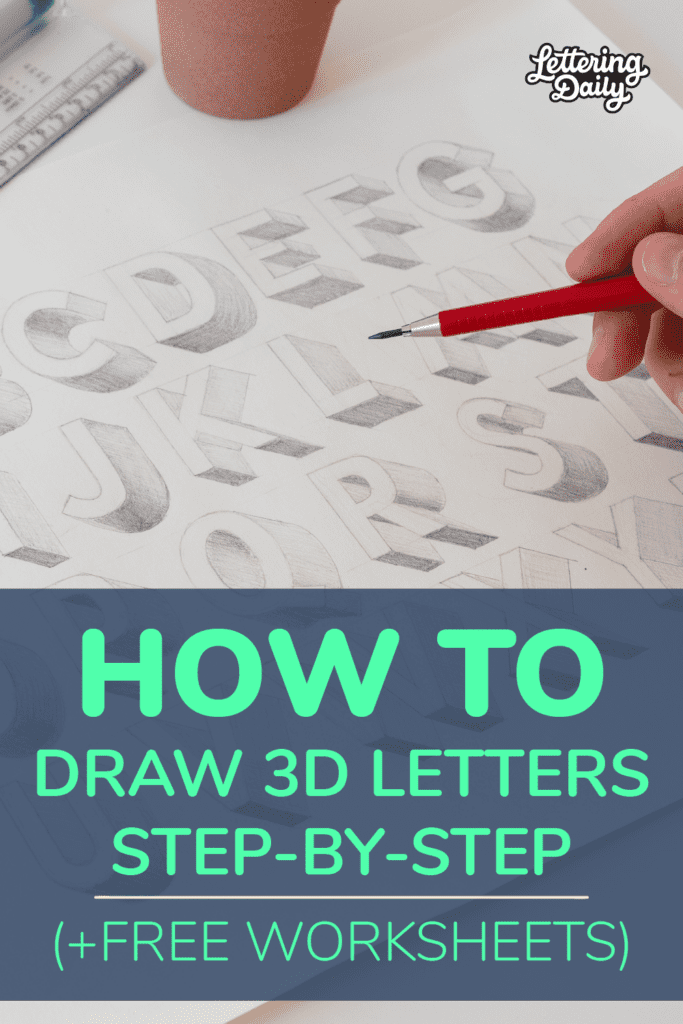
3D letters alphabet template
Following this method, you can add a 3D effect to the whole alphabet as I did here.
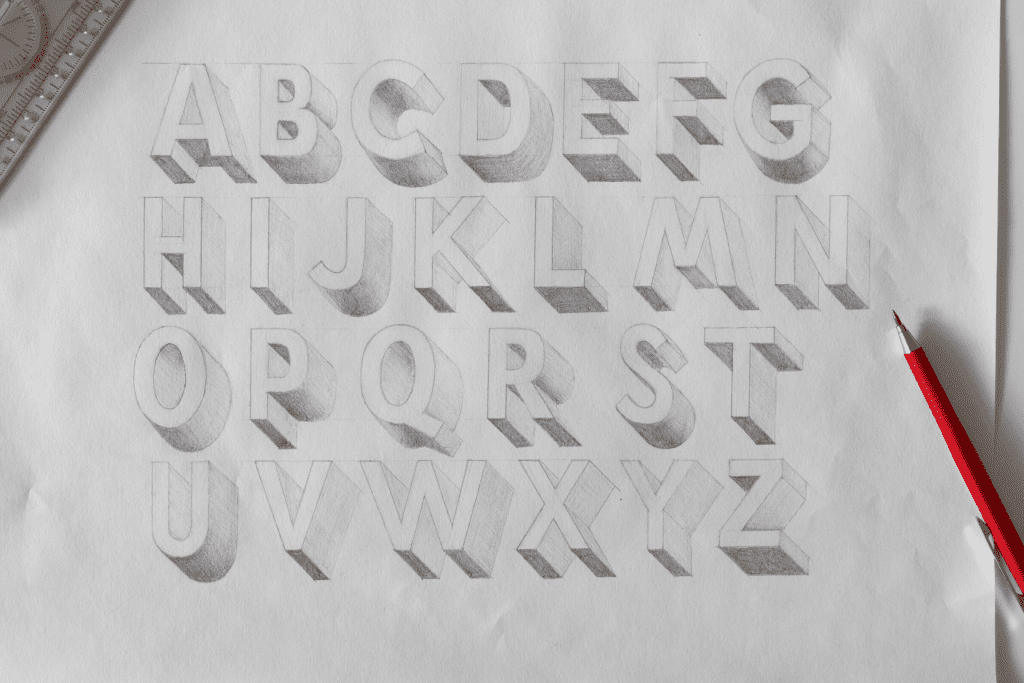
I also made a separate timelapse video where I add a 3D effect to every letter of the alphabet.
You can watch it here –

Although we covered several examples in the step-by-step processes above, you might get stuck on certain letters.
If that happens, just come to this section and look at these references.
After doing the whole alphabet a couple of times, you’ll already start to feel much more confident in creating 3D letters.
Believe me,
It won’t take much for you to start drawing 3D letters without a reference.
3D letters alphabet template worksheets
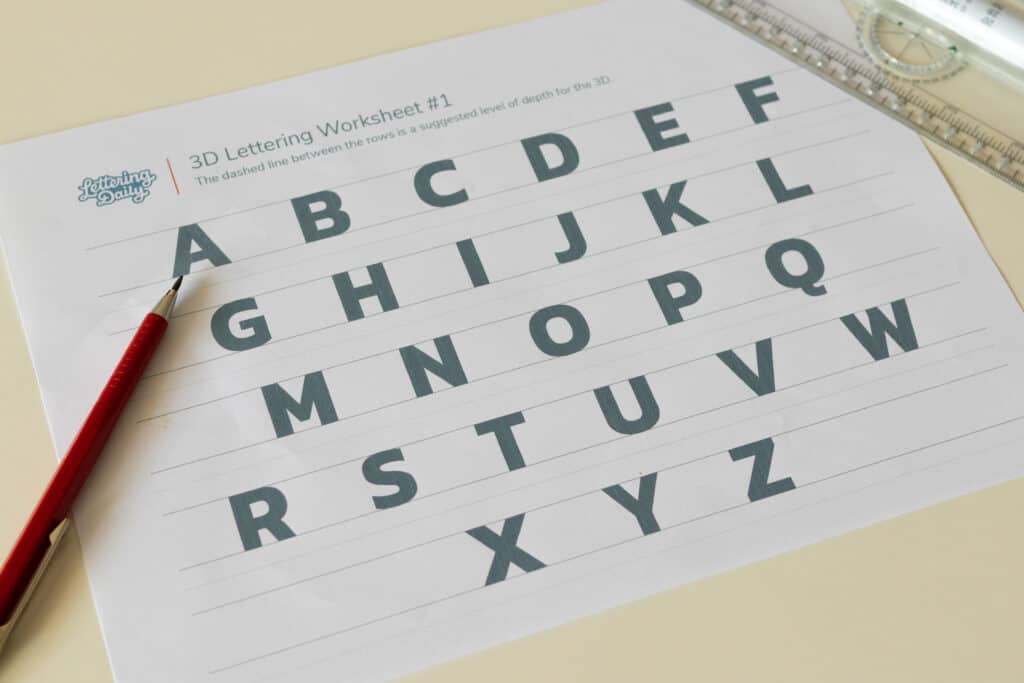
To help you practice, I created 2 block letter alphabet templates where you can practice adding a 3D effect.
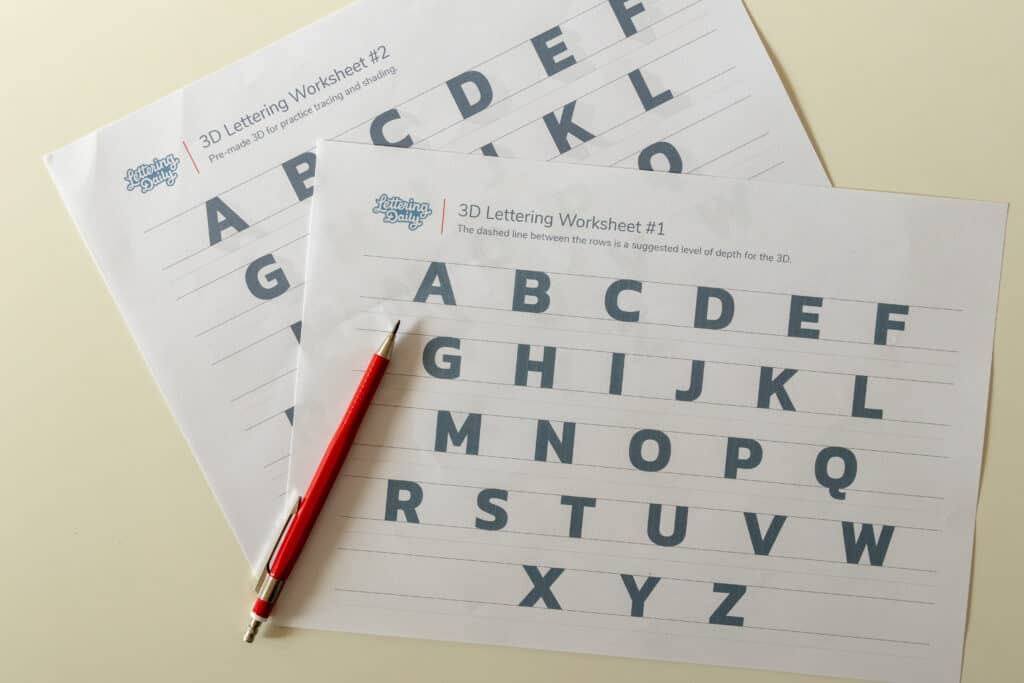
- Page 1 – Is totally empty so you can start applying the 3D effect using a ruler
- Page 2 – Has a barely visible 3D effect already applied to it so you can just trace it over.
You can download these free worksheets (along with every other freebie) straight from the Lettering Crate.
To get instant access to the Lettering Crate, just drop your email below and follow the instructions.
You’ll receive a welcome email containing a link and a password.

Stay updated with my tutorials and get instant access to the Lettering Crate –
A growing library of free lettering & calligraphy resources that includes –.
- Calligraphy practice sheets
- Procreate brushes
- The 30-day lettering planner
- Printables, and more!
Extra tips for 3D letters
Ok, now that we have the basics covered, we can start looking at different ways to style our 3D letters.
In this section, I’ll mention a couple of different things you can try out.
The first thing we’re starting with is shadows.
Adding shadows to your 3D letters
Shading your 3D letters is probably one of the best and easiest ways you can style your letters.
It gives more depth to the letter, and it just looks so much better with it.
To apply the shades, we just need to determine our light source.
Shades are usually applied on the opposite side of the light source.
If you are just getting started, keep things simple and shade only the lower parts of the 3D.
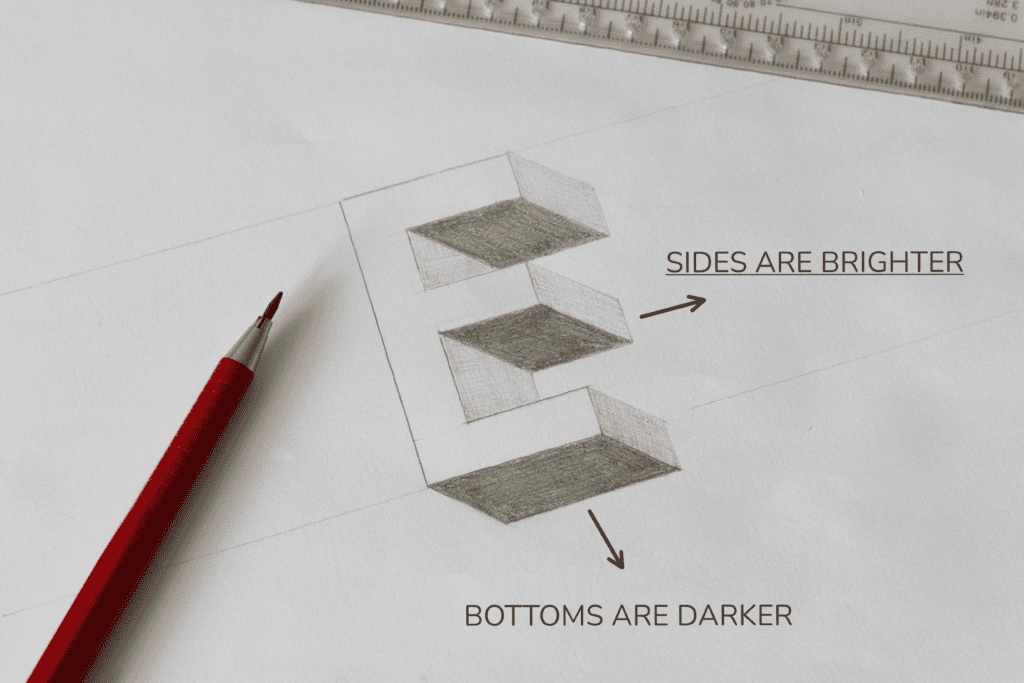
With rounded letters, you can try to create more of a gradient look.
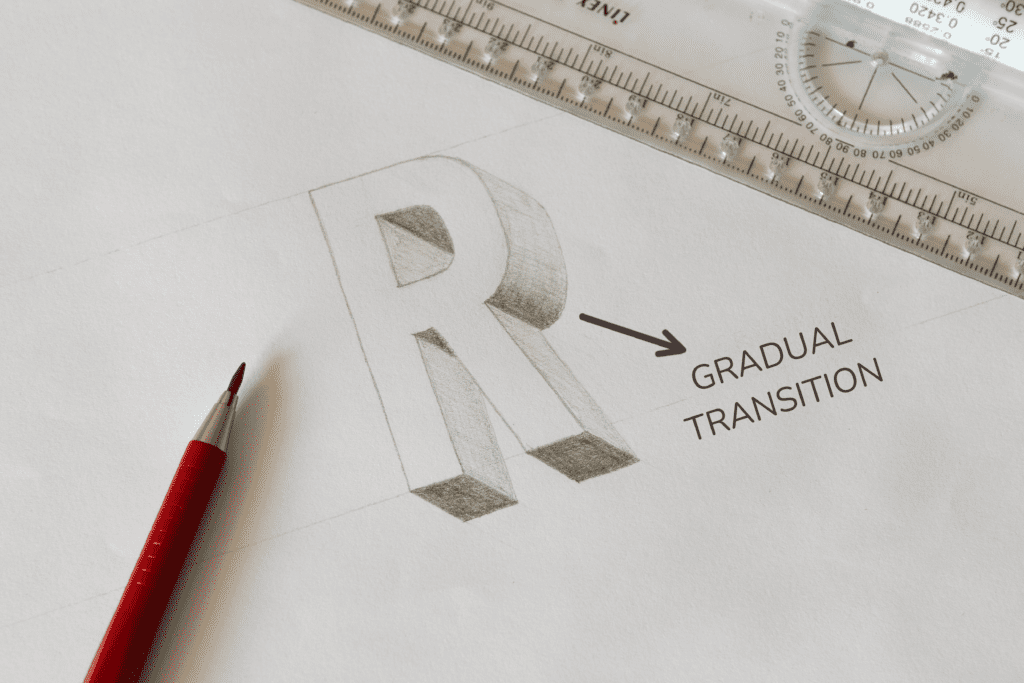
As it goes from the bottom, it’s darker, and as it moves towards the side, it gets brighter.
Once you get comfortable with a basic form of shading, you can start adding more detail to make it look even better.
Keep in mind that understanding shading takes quite some practice.
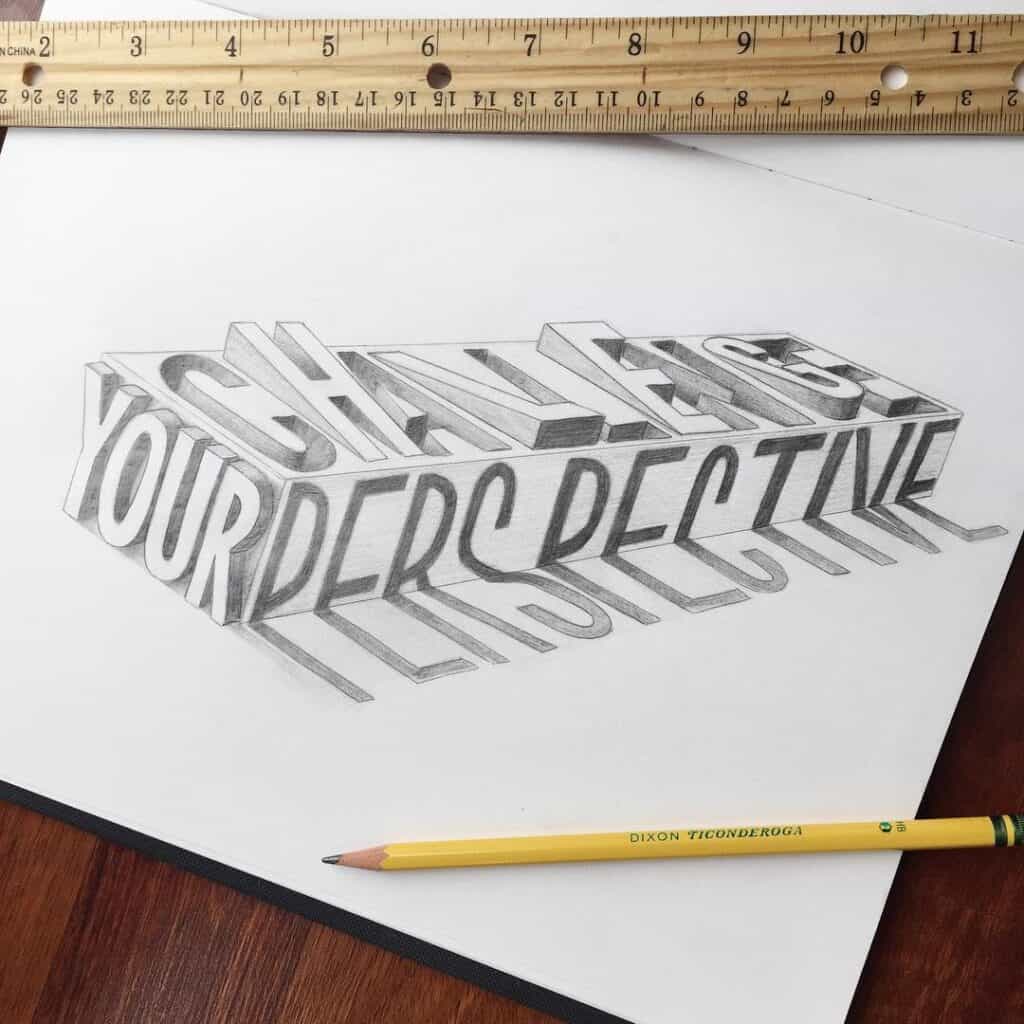
Playing with the direction of the 3D
Another cool thing you can do when doing 3D letters is playing with the direction of it.
Let’s say that if you have two words, you can point their 3D’s in the opposite direction.
You could also incline your letters and shoot the 3D in the opposite direction.
There are a bunch of different combos you can play with.
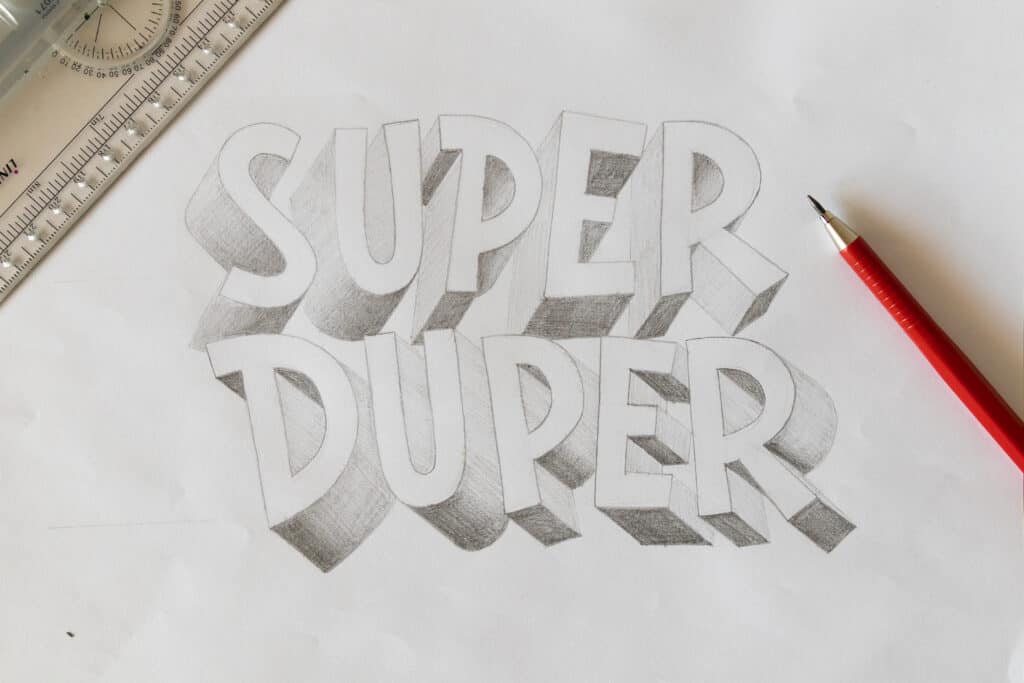
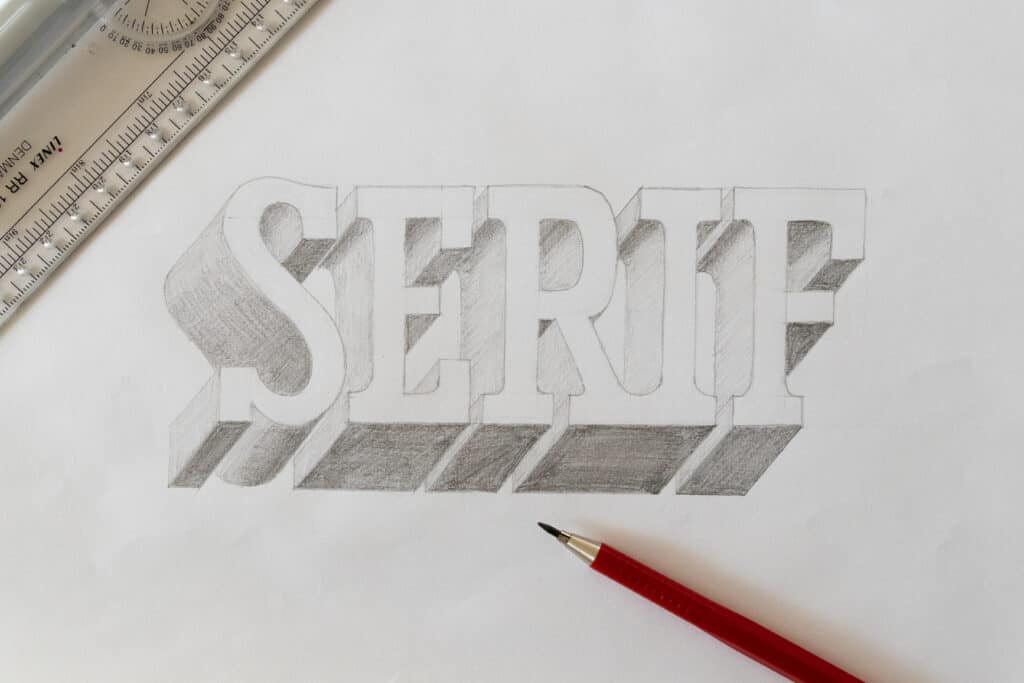
Applying the 3D effect to different lettering styles
As mentioned at the beginning of this tutorial, it’s best to start learning 3D on basic block letters.
Obviously, doing just basic block letters can quickly get boring.
Once you’ve learned how to apply a 3D effect to block letters correctly, you can start experimenting with different lettering styles.
Here is an example of a 3D effect applied on serif lettering –
Here you can see another example of a 3D effect applied to script lettering.
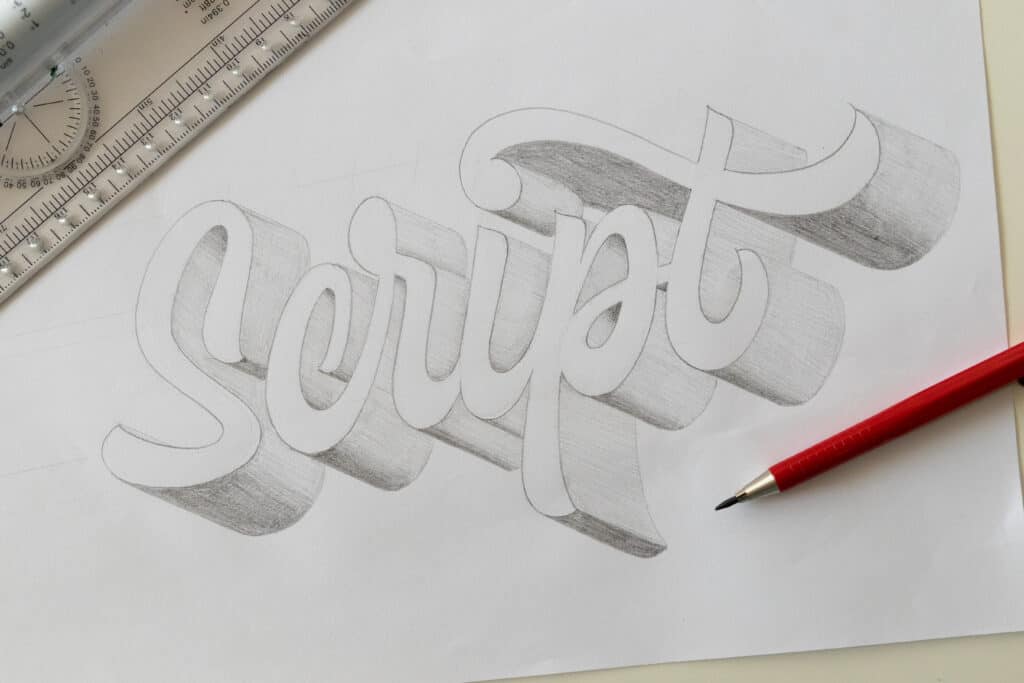
Script lettering is maybe a bit more challenging since most of the shapes are rounded.
However, I’m sure that with a bit of practice you’ll be able to do any style you wish.
Learn how to create a 2 point perspective lettering piece.
You thought a 1 point perspective lettering looked cool?
Well then, let me introduce you to 2 point perspective lettering!
My friend Selina wrote an in-depth, step-by-step tutorial that will teach you how to create exactly that!
Check it out here.
Final words
And there you have it, my friends!
I hope this tutorial will help you start practicing 3D letters.
The more you do it, the better you will get at it.
After a couple of times, you will understand how to draw a 3D effect on any object, and you won’t have to use any references at all.
Take it slow, don’t rush it, and as I always say, move gradually from easy to more challenging elements.
A house is only as strong as its foundations.
What lettering effect or style would you like to learn next?
Let me know by dropping a comment below.
Also, feel free to drop a comment if you have any wishes or suggestions for future tutorials.
Thank you for reading and until the next one,
Stay AWESOME!
About the author

Meet Max Juric, a dedicated calligraphy and hand lettering artist with over a decade of experience. His artistic journey is deeply rooted in a passion for lettering and a commitment to continuous growth. Max’s extensive experience spans several years as a full-time lettering artist, collaborating with clients from around the globe. Over the past five years, Max has actively shared his expertise, reaching more than 100,000 individuals monthly through a rich array of educational resources. These resources include tutorials, interviews, articles, and podcasts. Max’s practical experience, combined with his unwavering dedication to his craft, sets him apart in the realm of hand lettering and calligraphy. With an educational platform offering over 100 long-form resources, Max aims to guide artists and enthusiasts in enhancing their hand lettering and calligraphy skills. Welcome to Lettering Daily, where artistic expression and learning beautifully intersect.
8 thoughts on “How To Draw 3D Letters (+FREE Worksheet)”

You did a great job explaining.I have been struggling with the 3d art And now I know why thank you very much
Awesome! Thank you for letting me know, Stacy. Im so glad and i really appreciate your kind comment.

A great video clip taking the artist through the steps. Very encouraging for the beginner or someone who may need to brush up on their technique.
Thank you, Lorraine! Im really glad to hear that you liked it 🙂

Hi, Max; nice tutorial. We need to understand these technicalities before going anywhere with lettering! Thank you muchly!
Awesome! Thank you, Linda. Im glad you liked this tutorial 🙂

Thanks so much for the tutorial!
I really appreciate that you offer both video and written versions. I understand reading and looking at pictures better than watching a video.
Thank you, Patti! Im glad you like that 🙂 That’s exactly why. I realized that for some video is better but others prefer reading.
Leave a Comment Cancel Reply
Your email address will not be published. Required fields are marked *
Save my name, email, and website in this browser for the next time I comment.
This site uses Akismet to reduce spam. Learn how your comment data is processed .
The place where hobby artists grow
How to Draw 3D Letters Step by Step Art Tutorial
Drawing letters in 3d.
However, it’s much more difficult when working with letters that are rounded, such as with bubble letters. It works much better with block or graffiti style letters.
Let’s begin by gathering up some supplies that we’ll be using in today’s drawing lesson.
* Some of the links in this post may be affiliate links. This means I receive small commissions for purchases made through these links at no extra cost to you.
Art Supplies
- Cardstock or sketchbook
- Click eraser
- Pink pearl eraser
- Pitt Artist pen
- Bic Intensity markers
- White Gelly Roll pen
FREE Graffiti Drawing Guide
3d letters drawing.
The first thing you need to do is to draw your lettering . To do this you need to decide on a word or name, what style letters you want to use, and how you want your layout.
We have a lesson that helps with those things at, How to Draw Graffiti Style Letters for Beginners .
I’ve been using the word “Dream” in my letter art for many years now. So that’s the word I’ll be using in this example. However, you can use whatever word you want. The technique is the same for each letter and can be applied to any word.
Go ahead and get your word sketched out. If you need help with drawing your own lettering, take a look at How to Draw Stylized Letters .

Or, if you want a more basic lettering style, take a look at How to Draw Block Letters .
Draw Letters in 3D
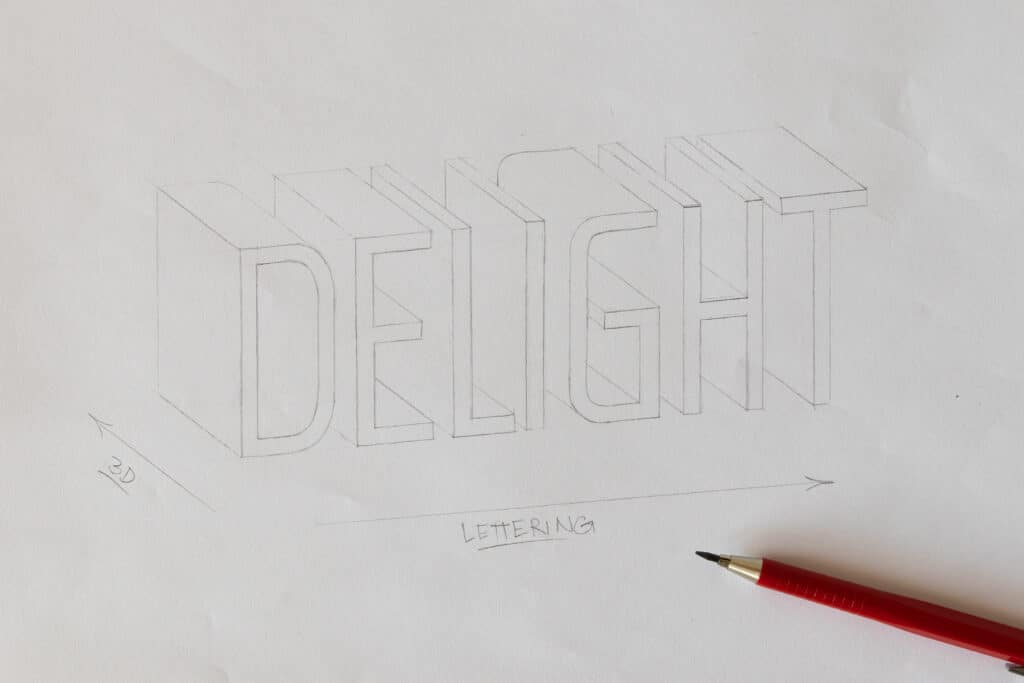
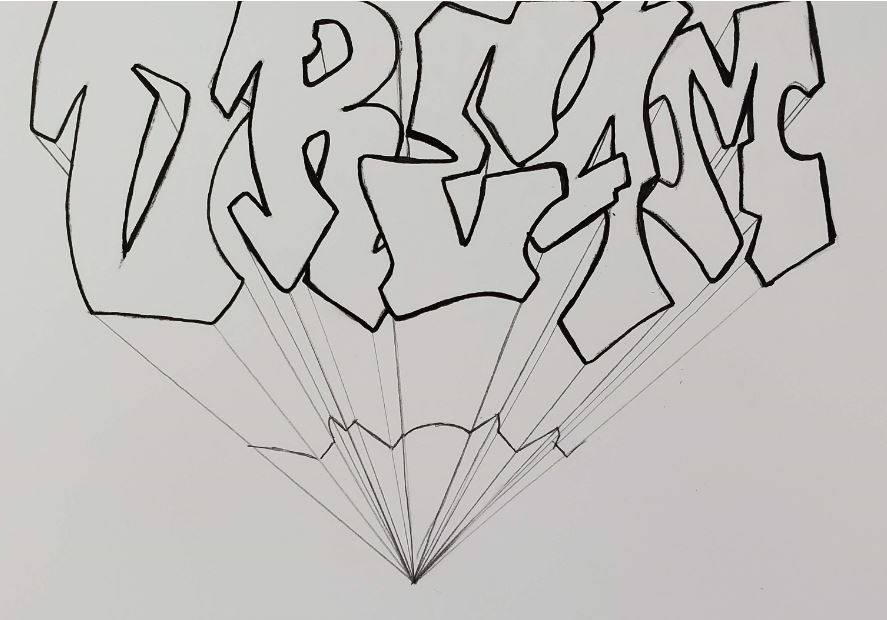
Now let’s look at how we can make our letters look 3 dimensional. There is a technical drawing method called one-point perspective.
This is the method we are going to be using today. One point perspective means your drawing has one vanishing point where all of your lines meet.
Choose a spot on your paper either above or below your letters. For this example we’ll be drawing below our letters. Make a small dot on your paper.

It can be anywhere on your paper, it doesn’t have to be directly in the center. Don’t make it too close to your letters though. You need a little bit of room to work. And you can always make your 3D effect shorter after it’s drawn.
When drawing the 3D part of your letters, you can start on the left, right, or somewhere in the middle. It’s best to avoid jumping around though.
You can use a ruler to make your lines, or you can draw them free hand. This is a personal preference and each method will have a slightly different final look to your drawing.
But it’s probably best if you use a ruler or a straight edge. I’m using a piece of cardstock that I cut using a paper trimmer . It’s less bulky than a ruler and I find it easier to use.
How to Draw 3D Letters in One Point Perspective
Draw your lines from each corner of your letter, down to your vanishing point. I like to start with my middle letter and work my way out. But you can start wherever you’d like.
Draw a straight line from each corner of your letter. Mine is the letter E, so I’ll need to make two lines on the bottom of the letter.
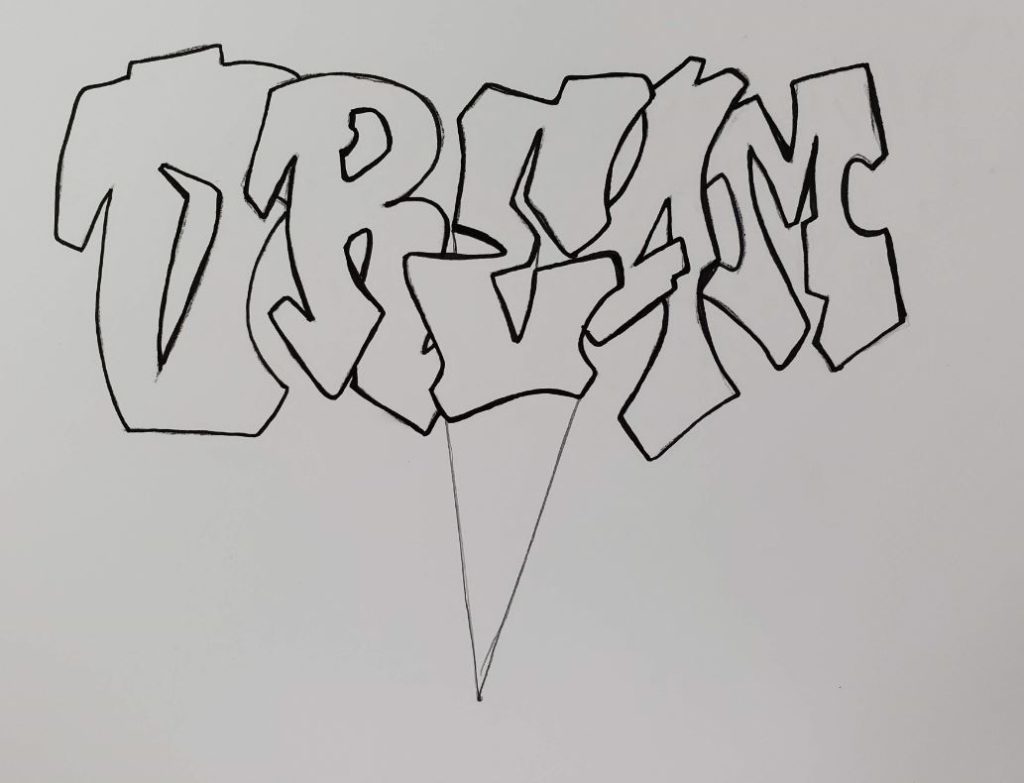
You’ll also need to draw lines for the rest of the corners as well.
Next, I’ll do the letter A. This letter is a bit more complex to draw because there are more corners. But don’t let that intimidate you. Just follow the same process.

Don’t forget to do the insides of your letters too.
Now we’ll move onto the M. Again follow the same process. When drawing your lines for the top or the insides of your letters, stop your line when it reaches the body of the letter.
Next, we’ll work on the letters to the left if the E. So let’s draw our 3D lines for the letter R.
When adding depth to rounded areas of letters, it can get a little tricky. You have to get the right spot to bring your line down from for it to look right.

It might take you a couple of tries to get something that you like. And most of the time it still doesn’t look exactly right.
Finish up your 3D lines by working on the letter D.

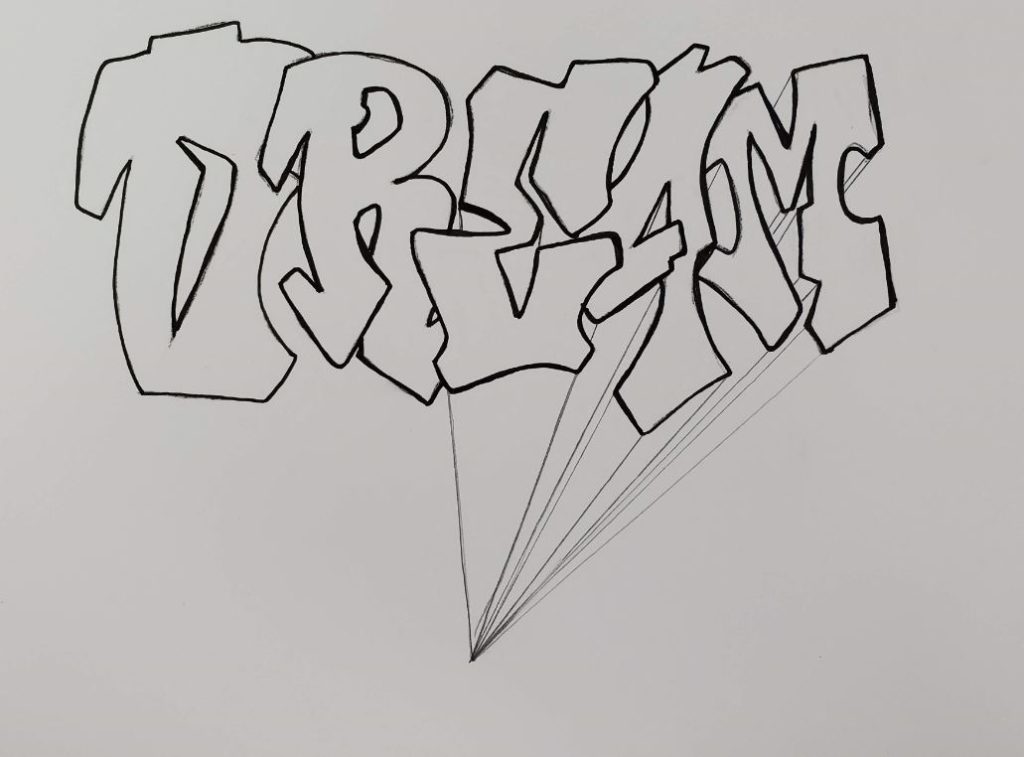
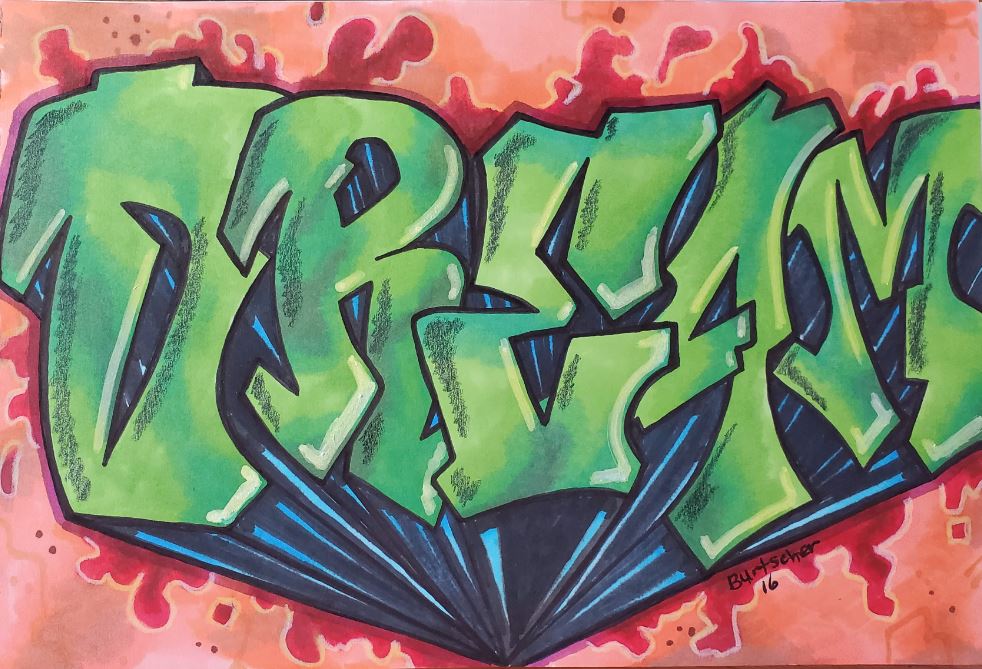
Depth of Letters
So now you have to decide how much depth you want your letters to have. You can make them very shallow or very deep. Or something in between. It all depends on the look you’re going for.
To do this, draw lines that are parallel with the bottom of your letters. If you want more depth, draw those lines further from your letters. Again, let’s start with the middle letter.
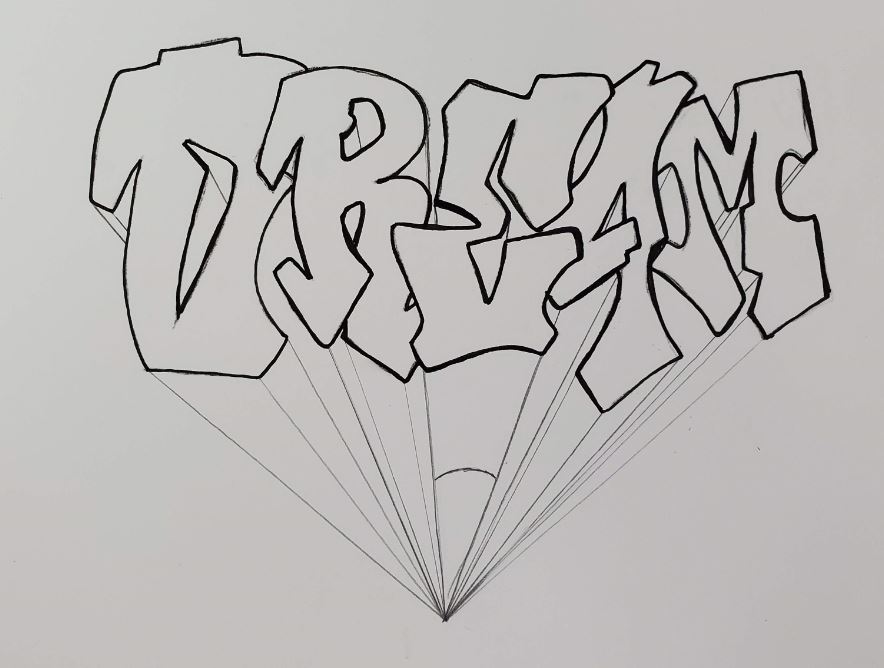
If you want less depth, draw them closer to your letters.
Continue working your way through each letter. Notice how they are all connected and follow the same shape as the bottom of the letters.
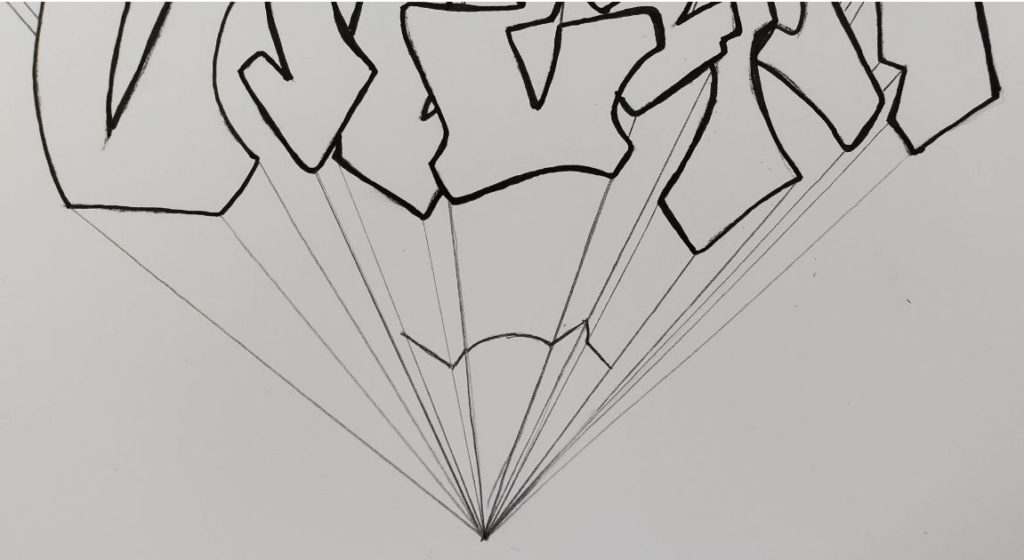
When you’re done with the bottom part of your 3D lettering, move onto the next step.
Finishing your 3D Lettering Drawing
When you are happy with your drawing you need to clean it up and add some color. How you do this will depend on your artistic style.
When I do my graffiti drawings, I use a Pitt Artist pen for the outline. I’ll typically make the outline fairly thick.

After you have outlined all of the lines you are keeping, go in with a Pink Pearl eraser and remove all the remaining pencil lines.

Add Color to Your 3D Letter Drawing
Then I use Bic Intensity markers for the color. There are lots of different brands and types of markers you can use. And a lot of different media as well.
But for the money I prefer the Bic markers.
When adding color be sure to follow a color scheme. Learning color theory will help you with this so you’ll know which color go together. The drawing below uses complimentary colors (red and green).
After I’ve gotten my drawing all colored in, I’ll sometimes go in with black and white colored pencils to add in some shadows and highlights.
Prismacolor colored pencils are my preferred pencil to use in my artwork. But again there are lots of options out there.
If you want to get some really bright white highlights, then you will love the Gelly Roll pens . And they go over the marker very nicely.
This finished drawing is one I did a few year ago, and it shows what the letters look like with a little more depth to them. It really just depends on the look you are going for in your finished piece of art.
That’s it for our lesson on how to draw 3D letters. The only thing you have left to do is to practice. The more you practice, the better you will get. When drawing your letters you can change the direction of the vanishing point, as well as the placement of it.
Placing your vanishing point in the center of the letters will give you a pretty interesting result. Give it a try and draw out some 3D letters.
Let us know how your artistic journey is going in the comments. We’d love to hear from you.
Grab your FREE Graffiti Guide
More Post Like 3D Letters Drawing
- Drawing Bubble Letters
- Block Lettering How To
- Graffiti Drawing Beginners Guide
- How to Blend Markers

Roshanda is an art education blogger who is on a mission to coach and encourage as many aspiring artists as possible through the use of her blog. Learn more about her on the About Me page and connect with her on Facebook , Twitter , and Instagram .
4 thoughts on “How to Draw 3D Letters Step by Step Art Tutorial”

So glad you liked it

helped lots
That’s great! I’m glad you found it helpful.
Leave a Comment Cancel Reply
Your email address will not be published. Required fields are marked *
Privacy Overview
Easy Step-by-Step Guide: How to Draw 3D Letters
Are you interested in learning how to draw 3D letters step by step easy? Whether you’re a beginner or an experienced artist, creating 3D letters can be a fun and rewarding activity. With the right techniques and tools, you can make your letters pop off the page and impress your friends and family.
In this article, we will guide you through the process of drawing 3D letters step by step easy. We will provide you with different methods and techniques to create stunning 3D letters that are sure to grab attention. From basic block letters to more complex designs, we’ve got you covered. So, grab your pencil and let’s get started!
Table of Contents
Materials Needed
To get started with drawing 3D letters, you will need a few materials. Here is a list of items that you will need to have on hand:
You will need a good quality paper that can handle the pressure of drawing and erasing. It is recommended to use a thicker paper, such as cardstock or sketch paper. This will prevent the paper from wrinkling or tearing as you draw.
A pencil is the most important tool for drawing 3D letters. It is recommended to use a mechanical pencil with a 0.5mm lead. This will allow you to draw precise lines and details.
You will need a good quality eraser to remove any mistakes or unwanted lines. A kneaded eraser is a great option as it can be shaped to fit any area and does not leave any residue.
A ruler will help you draw straight lines and keep your letters uniform. It is recommended to use a clear ruler so that you can see the lines underneath.
A protractor is an essential tool for drawing angles and curves. It will help you create the 3D effect in your letters.
A compass is another tool that you can use to create curves and circles in your letters. It is recommended to use a compass with a lead that is not too sharp to prevent damaging the paper.
Colored Pencils or Markers
Once you have drawn your 3D letters, you can add color to make them stand out. Colored pencils or markers are a great option to add depth and dimension to your letters.
By having these materials on hand, you will be able to easily draw 3D letters step by step with ease.
Choosing a Font
When it comes to drawing 3D letters, choosing the right font is essential. The font you choose will determine the overall look and feel of your letters. Here are some tips to help you choose the perfect font for your 3D lettering project.
Serif Fonts
Serif fonts are a popular choice for 3D lettering because they have small lines or flourishes at the end of each letter stroke. These small lines can add depth and dimension to your letters, making them appear more 3D. Some popular serif fonts for 3D lettering include Times New Roman, Georgia, and Baskerville.
Sans-Serif Fonts
Sans-serif fonts are another popular choice for 3D lettering. These fonts do not have the small lines or flourishes at the end of each letter stroke, which can make them appear more modern and sleek. Some popular sans-serif fonts for 3D lettering include Helvetica, Arial, and Futura.
Script Fonts
Script fonts can add a touch of elegance and sophistication to your 3D lettering project. These fonts have a handwritten or calligraphic style, which can make your letters appear more fluid and organic. Some popular script fonts for 3D lettering include Brush Script, Edwardian Script, and Lucida Calligraphy.
When choosing a font for your 3D lettering project, it’s important to consider the overall style and feel you want to achieve. Think about the message you want to convey with your letters and choose a font that complements that message. Additionally, consider the size and spacing of your letters, as well as the color and texture of your background, to ensure that your 3D lettering stands out and makes an impact.
Sketching the Letters
To draw 3D letters, you need to start with a basic sketch. This will help you create a solid foundation for your letters. Here are the steps you need to follow to sketch your 3D letters.
Creating the Basic Shape
To create the basic shape of your letters, you need to start by drawing the outline of each letter. Use a pencil and paper to sketch each letter. Make sure you draw each letter in the same size and style.
Once you have sketched the outline of each letter, it’s time to add some thickness. Draw a line around each letter, about 1/8 inch from the edge. This will create the illusion of depth and make your letters look 3D.
Adding Depth
Now that you have the basic shape of your letters, it’s time to add some depth. To do this, you need to create the illusion of shadows. Imagine that the light is coming from one direction, and shade the opposite side of each letter.
To create the shadows, draw diagonal lines on the opposite side of each letter. Make sure the lines are all going in the same direction. This will create the illusion of shadows and make your letters look 3D.
Adding Shadows
To make your letters look even more 3D, you can add some shading. Shade the side of each letter that is facing away from the light source. Use a darker pencil or shading tool to create the shadows.
You can also add highlights to the side of each letter that is facing the light source. Use a lighter pencil or shading tool to create the highlights.
By following these steps, you can create 3D letters that look amazing. Keep practicing and experimenting with different techniques to improve your skills.
Inking the Letters
Once you have sketched your 3D letters, it’s time to ink them. Inking is the process of outlining your letters with a pen or marker to make them stand out and look more polished. Here are some tips to help you ink your letters like a pro:
Choose the Right Pen or Marker
The type of pen or marker you use for inking can make a big difference in the final result. You want to choose a pen or marker that has a fine tip and is waterproof. A fineliner pen or a brush pen with a fine tip are good choices. You can also use a traditional calligraphy pen with a nib if you have experience with it.
Start with the Outlines
When inking your letters, start with the outlines. Use a steady hand to draw a thin line along the edges of your letters. You can use a ruler or a straight edge to help you keep your lines straight and even. Once you have outlined all of your letters, go back and fill them in with ink.
Add Shading and Details
To make your 3D letters look more realistic, you can add shading and details. Use a pen or marker with a thicker tip to add shadows to the sides of your letters. You can also add highlights to the top of your letters to make them look like they are catching the light. Experiment with different shading techniques to find the one that works best for you.
Practice Makes Perfect
Inking your 3D letters can be challenging, especially if you are new to drawing. Don’t be discouraged if your first attempts don’t turn out perfectly. Keep practicing and experimenting with different pens, markers, and shading techniques until you find the ones that work best for you. With time and practice, you’ll be able to create stunning 3D lettering that will impress everyone who sees it.
In conclusion, inking your 3D letters is an important step in the process of creating polished and professional-looking lettering. By following these tips and practicing regularly, you can master the art of inking and create beautiful 3D letters that will make your artwork stand out.
Erasing Guidelines and Adding Details
Once you have drawn the basic 3D block letters, it’s time to add some extra details to make them pop even more. But before doing that, it’s important to erase any unnecessary guidelines that you may have drawn in the previous steps. Use a good quality eraser to remove any unwanted lines. Be careful not to erase the main lines of your letters.
After erasing the guidelines, you can start adding details to your 3D letters. Here are some tips to help you:
Use shading to create the illusion of depth. Start by identifying the light source in your drawing. Then shade the areas that are furthest from the light source. Use a pencil or a shading tool to blend the shadows and create a smooth transition between light and dark areas.
Add highlights to make your letters look shiny and reflective. Use a white pencil or a white gel pen to add highlights to the areas that are closest to the light source. This will create the illusion of a shiny surface.
Use color to make your letters stand out. You can use colored pencils, markers, or paints to add color to your 3D letters. Choose colors that complement each other and make your letters look vibrant.
Add texture to create a realistic look. Use different shading techniques to create the illusion of texture. For example, you can use cross-hatching to create a rough texture, or stippling to create a smooth texture.
Remember, adding details to your 3D letters is all about experimenting and finding what works best for you. Don’t be afraid to try different techniques and styles until you find the one that suits you.
Coloring the Letters
Once you have drawn your 3D letters, you can color them in to make them more visually appealing. Here are a few tips to help you color your letters:
1. Choose Your Colors
Before you start coloring, decide on the colors you want to use. You can use any colors you like, but it’s best to choose colors that complement each other. You can use a color wheel to help you choose complementary colors. If you’re not sure which colors to use, you can search for color palettes online.
2. Use Different Shades
Using different shades of the same color can add depth and dimension to your letters. Start with a base color and then add lighter and darker shades to create highlights and shadows.
3. Blend Your Colors
Blending colors can create a smooth transition between two colors. To blend colors, start with one color and then add a small amount of the second color. Use a blending tool, such as a blending stump or your finger, to blend the colors together.
4. Use Patterns
You can add patterns or textures to your letters to make them more interesting. You can use a variety of patterns, such as stripes, dots, or swirls. You can also use different textures, such as wood grain or stone.
5. Add Details
Adding details, such as highlights and shadows, can make your letters look more realistic. You can use a white or light-colored pencil to add highlights and a black or dark-colored pencil to add shadows.
With these tips, you can color your 3D letters and make them stand out. Remember to have fun and experiment with different colors and techniques.
Final Touches
Congratulations! You have successfully drawn your 3D letters. Now it’s time to add some final touches to make them look even better. Here are a few tips to help you do just that:
Add Shadows
One way to make your 3D letters look more realistic is by adding shadows. Shadows can give your letters depth and make them appear as if they are popping off the page. You can use a pencil or marker to add shadows to your letters. Simply shade the areas that would be darker if a light source were shining on your letters from a particular direction.
Clean Up Your Lines
Now that you have finished drawing your 3D letters, it’s time to clean up your lines. Go over your letters with a pen or marker to finalize them. Make sure to erase any stray pencil marks or smudges. If you used a ruler to draw your lines, make sure to go over them again to make them more defined.
Adding color to your 3D letters can make them look even more eye-catching. You can use markers, colored pencils, or paint to add color to your letters. Make sure to choose colors that complement each other and that are easy to read. You can also use shading techniques to make your colors look more realistic.
Experiment with Different Styles
Once you have mastered the basics of drawing 3D letters, try experimenting with different styles. You can try adding patterns, textures, or even different fonts to your letters. Don’t be afraid to get creative and have fun with it!
By following these final touches, you can take your 3D letters to the next level and create stunning works of art. Keep practicing, and soon you’ll be able to draw 3D letters with ease.
Related posts:
- How Much for a 3D Printer: A Pricing Guide for Beginners
- How to Use Crest 3D White Strips: A Step-by-Step Guide
- What Can You Make with a 3D Printer: A Comprehensive Guide
- Create Stunning 3D Models: A Step-by-Step Guide
Recent Posts
- 3D Guides 1,766
- Components 4
- Electronics 20
There’s no content to show here yet.
IMAGES
VIDEO
COMMENTS
Draw the lines to the right if you want your letter facing left and to the right if you want them facing right. [5] Practice drawing these lines in different directions until you figure out what you like. Most people draw their block letters viewed from above. 3. Connect the ends of the diagonal lines together.
Just remember that if a 3D line goes “through” the letter (or object) you can skip it. The next step is to determine how deep our 3D goes, and again, it’s totally up to you. The first line that you draw will determine the depth and it will be the same everywhere else. You can start either at the bottom or at the side.
Do you want to learn how to draw 3D letters? Well, my friend, you've come to the right place! In this video, I will teach you everything you need to know to ...
Step Four – Create Your Highlights. Now it’s time to lighten up – literally! Take your white pen and find the upper left-hand corner of each of your letters. Close to the edge of each letter, draw a short white line. The thickness of this line will depend upon how thick your letters were to begin with. And Voila!
In this easy step-by-step tutorial learn how to draw 3D letters on paper! Practice with your name as you learn simple methods to use every time for quick lar...
How to Draw 3D Letters Step by Step. Time needed: 30 minutes. How to Draw 3D Letters. Draw the block letter first. Add diagonal lines, all going in the same direction. Connect the diagonal ends as shown.
When drawing your lines for the top or the insides of your letters, stop your line when it reaches the body of the letter. Next, we’ll work on the letters to the left if the E. So let’s draw our 3D lines for the letter R. When adding depth to rounded areas of letters, it can get a little tricky.
Holly, an elementary art teacher teaches you how to draw various types of 3-D letters. One point perspective lettering is also featured and demonstrated. *...
Make sure you draw each letter in the same size and style. Once you have sketched the outline of each letter, it’s time to add some thickness. Draw a line around each letter, about 1/8 inch from the edge. This will create the illusion of depth and make your letters look 3D.
Then, draw along the edge of the ruler to make a pencil line that extends 3/16″ (~ 5mm) from the corner of the letter. I find it easiest to draw 3D letters with a parallel glider (a.k.a. “rolling ruler”) because you can line up the ruler with a diagonal line and easily roll it forward or backward. Identify the remaining corners of your ...