Documents that say it all. Beautifully.
Pages is a powerful word processor that lets you create stunning documents, and comes included with most Apple devices. And with real-time collaboration, your team can work together from anywhere, whether they’re on Mac, iPad, iPhone, or a PC.
See what’s new in Pages

Creative writing. Or designing.
Pages puts all the right tools in all the right places, so it’s easy to choose a look, customize fonts, personalize text styles, and add beautiful graphics. And everyone collaborating on a document has access to the same powerful features.
Start with something beautiful.
Choose from over 90 beautiful Apple‑designed templates, and customize your reports, letters, and other documents any way you like. And if you’ve ever dreamed of writing a novel, or just a fairy tale, it’s easy to create interactive digital books right inside Pages.
Make progress you can see.
Track changes, add highlights, and have threaded conversations with your team. Your edits are saved automatically.
Stunning results. Effortlessly.
Liven up your text by filling it with color gradients or images. And take the entire page to the next level by adding photos, galleries, audio clips, video, math equations, charts, or more than 700 customizable shapes.
Work seamlessly from any device.
Jumping from your Mac to your iPad to your iPhone is no problem with Pages. And with Screen View on iPhone, your content will be optimized to fit the screen — making reading and editing on the go a breeze.
What’s new in Pages.
Learn about everything you can do in Pages
Get the updates. Then get in touch.
Stay up to date when people join, edit, or comment in collaborative documents and easily get in touch with your team using Messages and FaceTime.
Get more done on iPad.
Quickly insert objects, find settings, and get to your favorite tools with the customizable toolbar. And Stage Manager makes it easy to multitask across multiple documents and apps at the same time. 1
Jump-start your designs with new templates.
Create invitations for your next big event with colorful photo card templates, or reward your students with a new coding certificate.
Batch mailing made easy.
With mail merge, you can create a letter, card, or envelope in Pages, and then insert a personalized greeting or address from the Contacts app or a Numbers spreadsheet.
An optimal view for your documents on iPhone.
Screen View makes it even easier to read and edit your docs on iPhone. Turn it on and text, images, and tables are optimized to fit your screen. Turn it off to see the full layout.
Quickly translate text.
Instantly view a translation of any selected text — you can even replace it with a tap if you like. 2 Perfect for foreign language classes, businesses, and more when you need a quick in-document translation.
Turn handwriting into text. Magically.
With Scribble for iPadOS and Apple Pencil, your handwritten words will automatically be converted to typed text. Take notes, write a book, or annotate a paper quickly and easily.
Write reports easier.
With report templates, there’s no staring at a blank page. Jump-start an essay, research paper, or school report by choosing one of the beautifully designed templates.
Skim through in style.
On your iPhone and iPad, you can read through your document, zoom in and out, and interact with it — without accidentally changing anything.
Play videos right in your documents.
Play YouTube and Vimeo videos right in Pages, without the need to open a web browser. Simply add a link, and play your web video inside your document or book.
Any document. Any device. Anytime.
You don’t work in one place on just one device. The same goes for Pages. Work seamlessly across all your Apple devices. The documents you create using a Mac or iPad will look the same on an iPhone or web browser — and vice versa. And with Screen View, it’ll be easier than ever to work on your iPhone.
You can also work on documents stored on iCloud or Box using a PC.
Start using Pages at iCloud.com
Collaborate with anyone. Anywhere.
Work together in the same document, from across town or across the world. You can see your team’s edits as they make them — and they can watch as you make yours, too. You can even get notifications when people join, edit, or comment. Just click or tap the Share button and invite people to join.
Use Apple Pencil when inspiration strikes.
Use Apple Pencil on your iPad to sketch, illustrate, and create documents. Draw and fine-tune your idea, then press play to watch each stroke animate onto the page. And with Smart Annotation, your edits stay with the marked-up text, making it easy for you and your team to incorporate changes.
Plays well with Office.
Teaming up with someone who uses Microsoft Word? Pages makes it simple. You can save Pages documents as Word files. Or import and edit Word documents right in Pages.
Learn more about Microsoft Word compatibility
See everything that’s new in Pages
- What's new in Pages for iPhone and iPad
- What’s new in Pages for Mac
- Pages for iCloud release notes
Additional Resources
- Get Pages support
- Learn about Microsoft Office compatibility
- Learn about collaboration for Pages, Numbers, and Keynote
- Learn more about writing and publishing books with Pages
Pages User Guides
- Pages User Guide for Mac
- Pages User Guide for iPad
- Pages User Guide for iPhone
- Pages User Guide for Web
Build spreadsheets that are bottom-line brilliant.
Design stunning, memorable presentations.
How to Create Documents on the iPad

You can create documents in many common formats using the iPad, including Microsoft Office and Apple iWork compatible documents, PDFs, plain text and rich text files. The iPad's only native document creation app is "Notes," which allows you to create plain text documents that can be exchanged through email. Creating any other document format requires finding the appropriate app and using that app's interface to create your documents. There are often several apps that can create each document type, so check the specifications of each relevant app on the iTunes App Store before you purchase one.
Advertisement
Connect your iPad to the Internet. Wi-Fi connections will be faster than 3-G for browsing the App Store and downloading apps, so connect through Wi-Fi if you can. Manage your wireless connections by tapping "Settings" and selecting "Wi-Fi" or "Cellular data" and choosing your preferred network. Also, make sure the "Airplane" setting is off.
Video of the Day
Press the "Home" button to return from the Settings app, and then tap the "App Store" app.
Browse for an app that will create the type of document you need. Apple's "Pages" app is a full word processing application with the ability to add photos, rich formatting, and work with both Pages and MS Word files, as well as save to PDF. If you need a full suite of MS Office-compatible document creation, Documents To Go and Quickoffice Connect both offer different levels of Word, Excel and PowerPoint document creation. Both feature rich formatting and file sharing support. Quickoffice Connect also supports tables in your documents, which Documents To Go does not. However, the latter features a flexible word count option not found in Quickoffice. For plain text and PDF documents, plenty of options are available. Browse the App Store's "Productivity" category to find the best app for your needs.
Tap the price button on the app you choose, and then enter your iTunes password to confirm the purchase. The app will download to your iPad.
Locate the new app icon on your home screen and tap it after the download is complete. You can tell the download is finished when the progress bar disappears from under the app.
Read the "Getting started" or "Help" file that comes with most apps. If yours does not have one, simply experiment with gestures and typing until you are comfortable with the app.
Type your document using the iPad's virtual keyboard or an external keyboard connected through the docking port or Bluetooth.
Edit your typing using the features within the app, such as text formatting, font choices or layout options. In most apps, you can double-tap a word to select it, and then drag the selection pane to cover any amount of text you want to select. Press and hold your finger on a text area to bring up the magnifier for precise cursor placement.
Save your file before closing the app. Some apps, such as Pages, save automatically, so there is no "Save" button. Others have a "File" menu, which may be hidden under any number of icon images, so keep trying the icons until you find the correct one.
- Macworld: iWork for iPad; Dan Miller; April 6, 2010
- Tablet Legal: MS Word Compatibility Shootout for Tracked Changes; Josh Barrett; July 9, 2010
Report an Issue
Screenshot loading...
Type on PDFs using an iPad - a simple tutorial.

Fill out forms and add comments to PDFs on your iPad. Learn how you can put text on PDF documents directly on an iPad.
These days, many of us use iPads to get work done on the go, whether for school or professionally. Much of this work is done with PDF documents. However, iPads have limited support for even basic PDF editing tasks, such as typing on PDFs.
The good news is that you can use Adobe Acrobat online services to easily write on PDFs to complete forms and add text comments. This tutorial teaches you how to type on a PDF on your iPad.
Write text on any PDF document using your iPad.
Go to Edit PDFs with comments in Acrobat online services.
- Select a PDF to edit by clicking the “Select a file” button, or drag and drop a file into the drop zone.
- Once the file is uploaded, sign in to add your comments.
- Use the toolbar to add sticky notes, highlights, drawings, text, and more.
- Download the annotated file or get a link to share it.
You can also download the free Acrobat Reader app to fill and sign documents.
- Download the PDF to your device.
- Open Acrobat Reader and press the plus (+) sign at the bottom of the screen.
- Select the Edit PDF option and navigate to the form you want.
- Tap the pencil icon at the bottom of the screen, then select Edit PDF.
- Fill in the form and tap Done when finished.
How to make a PDF fillable on iPad.
You can easily draw on and sign a PDF from your iPad.
- Download the PDF to your iPad.
- Open the Files app.
- Search for and choose the PDF in the Files viewer.
- To show smaller thumbnail versions of each page in the PDF, swipe over from the left side of the screen.
- Select a page you want to fill out or sign.
- Choose the pen icon to make edits to your document.
- Choose the plus icon for more tools.
- If you wish to type anywhere on the document, select the text tool.
- Select the Signature tool to sign anywhere on the document.
- Tap pencils or pens to draw on the document.
- Select Done when complete.
Edit your PDFs directly on your iPad.
Now that you know how to write on PDFs on an iPad, you can explore other options to get more out of your documents. Easily add sticky notes and annotations, mark up text, convert PDFs to other file formats ( like PDF to JPG ), and much more.
Discover everything you can get done with Acrobat online services today.
How-To Geek
How to take handwritten notes on your ipad using the apple pencil.
Purchased an Apple Pencil with your new iPad? Forget your notebooks and take digital handwritten notes right on your iPad. Here's how.
Quick Links
Apple pencil compatibility, how to take handwritten notes on ipad using notes app, alternative note app options.
The Apple Pencil is a versatile tool for your iPad. Not only can you use it for (virtual) drawing, painting, or coloring, you can also take notes and doodle. Here's how to take handwritten notes on your iPad.
Apple Pencil is available in two different models. The first-generation Apple Pencil comes in a round shape and was first introduced with the original iPad Pro. It also includes a Lightning connector under a cap for charging.
Here's a list of all iPads that support the first-generation Apple Pencil at the time of writing:
- iPad Air (3rd generation)
- iPad mini (5th generation)
- iPad Pro 12.9-inch (1st or 2nd generation)
- iPad Pro 10.5-inch
- iPad Pro 9.7-inch
- iPad (6th generation)
- iPad 10.2 inch (7th generation)
The second-generation Apple Pencil is quite a bit smaller, with a single flat edge. It now magnetically latches on to the edge of the iPad Pro and charges wirelessly.
The accessory is only supported on the following iPad Pro models with Face ID (again, at the time of writing):
- iPad Pro 11-inch (2018 and 2020 models)
- iPad Pro 12.9 inch (2018 and 2020 models)
It's quite easy to get started taking notes on your iPad as you don't even have to download an app. Simply use the built-in Notes app on your iPad.
Open the "Notes" app on your iPad and create a new note. From there, tap on the Expand button to make the note full-screen.
Now, you can tap the tip of your Apple Pencil on the screen to enter the handwritten notes mode. You'll see drawing tools appear at the bottom of the screen.
The canvas is now yours. You can doodle, write, or type anything in the note. When you're taking notes with the Apple Pencil, use your finger to swipe up and down.
From the drawing tools, the first is the Pen tool. Tap on it to see the option for the thickness of the nib and the transparency. You can do the same thing for the next two tools which are Marker and Pencil.
If you have the second-generation Apple Pencil , you can double-tap on the Action button to switch to the Eraser. You can also customize the Action button to switch to the last used tool instead.
Related: How to Change the Double-Tap Action on Apple Pencil for iPad Pro
The fourth tool is the Eraser. Tap on it to turn your Apple Pencil into an eraser. Move your Apple Pencil over anything that you want to erase.
The fifth tool is a Lasso-style selection tool. (Photoshop users might be familiar with it.) Once the tool is selected, you can circle over elements to select them. Once selected, you can use your finger to move them around. This can be a good way for you to move a doodle to a different place.
The last tool in the set is the Ruler. After you select it, you'll see a large ruler show up in the note area. You can use two fingers to move the Ruler and to change the angle.
Move your fingers around and you'll see that the ruler snaps to certain angles like 45 degrees, 90 degrees, and so on. Once you've used the ruler, tap on the icon again to get rid of it.
On the right edge, you'll see a color picker. You'll see five common colors that you can pick from, or you can tap on the color picker icon to choose from all available shades.
Now that you know all the tools, go ahead and start writing using your Apple Pencil.
Once you're finished writing, there's a nice hidden gem for you to discover. Apple Notes app has a handwriting recognition feature built-in. So, as long as your handwriting is legible, Apple should be able to recognize and index them.
This means that you can search for text inside your handwritten notes. To test it out, go to the "Search" field, and try to find something from your handwritten note.
Plus, you don't even need to unlock your iPad to start taking handwritten notes. Just tap on your iPad's lock screen with your Apple Pencil. This will create a new blank note that you can start writing in. Later, you can unlock your iPad to save the note.
You can customize the feature in the Settings app by going to Notes > Access Notes From Lock Screen section.
Write Neatly Using Lines and Grids
When you start using the Notes app to take handwritten notes, you'll realize that your handwritten notes are quite haphazard. There's one way to make things neat and tidy. When you first create a blank note, tap on the Share button. It will show a single "Lines & Grids" option. (You'll also find the option in the Share sheet. )
From the pop-up, select the kind of lines or grid layout that you want.
This will now become the background of your note, making it much easier to write in straight lines.
The Apple Notes app is a good place to get started with handwritten notes on the iPad, but if you want more features, you'll have to look at one of the many third-party apps on the App Store. Here are our recommendations.
GoodNotes 5 ($7.99)
GoodNotes 5 is the most versatile notetaking app when it comes to Apple Pencil. You can customize virtually every single part of the handwritten notetaking interface. You can switch between different pen styles and scrolling direction. You can add shapes, images, and text to the note. The app comes with a myriad of templates, and there's a feature that lets you zoom in to a particular part of the page.
Notability ($8.99)
Notability is a popular notetaking app among students. It lets you record audio, type out notes, and take handwritten notes, all in a single interface. Plus, it can sync audio along with your notes, which is handy during revision time. You can also import and annotate PDFs and work on two notes side-by-side.
If you have an iPad Pro and a newer Mac, you can connect your iPad to your Mac and turn it into a fully functional secondary display and drawing tablet (with Apple Pencil support) using the new Sidecar feature in macOS Catalina and iPadOS.
Related: How to Use Your iPad as an External Mac Display With Sidecar
- Tech Deals at Target Right Now!
- The Electric Grill You Need This Year
Can You Do Word Processing on the iPad?
Yes, but you'll want a Bluetooth keyboard and the right word processing app
:max_bytes(150000):strip_icc():format(webp)/image-5e6611aebe974bb7886a24b5070c834f.jpg "how to write documents in ipad")
Can you do word processing on an iPad? Yes, indeed, if you have the right app, a Bluetooth keyboard, and an iPad with a large display.
Uses for iPads
There are many possible uses for the iPad. It is great for watching movies and listening to music. It is also a capable e-book reader. As downloadable apps for the iPad have expanded its abilities, iPads are showing up increasingly in offices and with remote workers. Despite this, although the iPad comes with a virtual keyboard, it isn't exactly word processing-friendly out of the box.
Justin Sullivan / Getty Images News / Getty Images
Word Processing Apps
The iPad doesn't have any built-in apps for word processing. The closest you'll get is the Notes app . However, it is possible to download word processors from the App Store.
Apple's Pages is a free word-processing download that is compatible with documents that you create on your computer. It lets you open and edit Microsoft Word documents. The program saves (and lets you share) documents in Pages, Word (.doc), and PDF formats. The iWork Pages iPad app offers a nice set of features for a mobile app. However, advanced users will find the app overly simplistic and limited.
Advanced users may prefer to use Microsoft Word for the iPad, which is compatible with Word on the computer and offers familiar features and menus along with sharing capability. Although the download is free, the app works best with an Office 365 subscription.
For people who want a word processing solution that's available from any device, Google Docs provides a robust option for the iPad. This free download makes it simple for coworkers to sync, edit, collaborate, and share documents.
The App Store contains other apps for specialized word processing tasks, including Ulysses and Textilus .
A Keyboard Is a Necessity
The iPad was not designed for prolonged typing. The virtual keyboard's buttons are relatively large, but you can't rest your fingers on the screen, which makes touch typing impossible. Ergonomically, it leaves something to be desired.
Buy a Bluetooth keyboard if you plan to do much word processing. Most modern iPads support the addition of a keyboard, which makes it easier for you to compose and edit documents on the iPad.
Bigger Is Better
If you plan to do a lot of word processing on your iPad, go for one of the larger 11-inch or 12.9-inch models, such as the iPad Pro . Their displays may not be as large as a laptop, but they are crystal clear and large enough to make using word processing apps painless.
Even though you can set up an iPad for word processing, don't expect it to replace your laptop or desktop computer just yet, although there are rumors of upgraded iPads that may make some MacBooks obsolete.
Get the Latest Tech News Delivered Every Day
- The 10 Best Word Processing Apps for iPad in 2024
- The Best Mac Shortcuts in 2024
- The 11 Best Note-Taking Apps for iPad and iPad Pro in 2024
- The 8 Best iPad Pro Apps of 2024
- Should You Buy an iPad Keyboard? 3 Reasons Why You Might Want To
- The Best iPad Pro Keyboards of 2024
- The 10 Best Writing Apps of 2024
- Word Processing Apps for Android Phones and Tablets
- The Best iPad Cases of 2024
- The 20 Best Free iPad Apps of 2024
- 5 Best Free Online Word Processors for 2024
- How to Control F on iPad
- The 8 Best Android Productivity Apps of 2024
- How to Open a Pages File on PC
- Amazon Fire Tablet vs. iPad: Which Is Right for You?
- iPad Pro vs. Surface Pro: What's the Difference?
A practical guide to writing on the iPad
Apple didn't design the original iPad for writing. It was a device for reading or viewing media, not creating it. Over the years it has become a great portable writing tool. Many writers find it is better than a laptop.
Here we look at why the iPad could be the best option for you. We examine which iPad or keyboard to choose and outline the best iPad writing app.
On this page:
Why is the ipad a great writing tool, which ipad should you choose for writing, ipad keyboards, magic keyboard, smart keyboard folio, magic keyboard folio, smart keyboard for ipad, writing on an ipad with apple pencil, pencil-based note taking apps, goodnotes 5, keyboard-based writing apps, apple pages, microsoft word for ipad, microsoft word for the web, google docs, collabora office, markdown editors, recommendations: ipad writing apps.
From the outset it was clear the iPad could do more than display media.
It has evolved to the point where it can do everything a laptop can. Today’s iPads can be better than laptops for many creative tasks.
The iPad has clear advantages for people who need to write:
Long battery life . Sure, you can find laptops that will go the best part of a day between charges. Apple's MacBooks with the M1 or M2 processor sip electricity. You'll struggle to find a Windows laptop which beats an iPad for battery life.
Measure-for-measure, an iPad will last longer between charges than a conventional computer.
Focus . While you can now open side-by-side screens or use Stage Manager, iPadOS lends itself to doing one thing at a time. There is no clutter. With the iPad you can focus on writing without other apps distracting you. Turning off notifications and concentrating is easier. This is why you can see the iPad as the closest modern equal to a portable typewriter.
Portable . The iPad is more portable than any laptop. It can go places laptops don’t. The iPad Air weighs in at 460 grams. It will fit in a large pocket. The iPad Mini weighs 300 grams and is smaller again.
Robust . There are no moving parts on an iPad. No hinges. This makes it more robust than a laptop.
Work while standing . You can work on an iPad when you are standing. It is possible to type on the screen keyboard using your thumbs. I’ve done this at stand up press conferences and while waiting in queues to board planes. This means you can write in more places, more often. Yes, you can do that on a phone, but it’s not the best writing experience. It is not easy to write standing up with a laptop. The same applies if, say, you are sitting in a cramped cramped on a crowded flight or in a train. At a pinch you can tap out words holding the iPad in vertical or portrait mode when there’s no room for a keyboard. Being able to use the taller portrait orientation is an overlooked bonus. There are subtle ergonomic problems with writing across a wide screen. A wider column makes errors harder to spot. A narrow width is easier to proof-read. If you write words to print on paper, the display mirrors how your words will look on the finished document. In my experience, the smaller iPads work better when you are standing, the 12.9-inch iPad Pro is more unwieldy.
Great screens . iPads have glorious, well-lit high resolution screens. Higher resolution means your eyes don’t tire as fast. You can work for longer stretches and concentrate for longer. Y
No waiting . An iPad is always ready to go the moment you switch on. Yes, modern laptops can do the same, but you can always start writing in seconds on an iPad.
You don’t need a high-end iPad for writing. Apple sells the 9th generation iPad with a 10.2 inch screen for NZ$649. It has everything you need to write. It is powerful enough to handle almost every writing app and has a screen you’ll have no trouble living with.
Likewise, the iPad mini, New Zealand prices start at NZ$1000, will fit in a pocket and can handle basic writing tasks. An iPad mini is realistically the smallest practical device for serious writing while on the move.
Writing on an iPad Pro with a suitable keyboard is not that different from writing on a laptop. The larger screen is easier to read than other iPads, especially if you have poor eyesight, but they all display your text clearly.
If writing is your focus, your model choice will determine which keyboards you can use. If use an Apple Pencil for note-taking, the iPad model determines your choices.
iPads come with a range of storage options. Upgrading storage isn't practical, which means you need to be careful when buying.
Base level iPad storage options start at 64GB. Smaller models can store up to 256GB, although the iPad Pro goes all the way to 2TB of storage.
By 2023 standards, 64GB is not a lot of storage. You can get by, but the moment you decide to keep music or video libraries on your iPad you'll bump up against limits.
Go with the 256GB model if your budget can stretch that far. At the time of writing that will add NZ$300 to the device price. Often you'd do better trading down to an iPad with more storage than buying a more powerful device that runs out of storage.
It's easy to overbuy storage on an iPad Pro. You are unlikely to need 2TB unless you need to keep vast amounts of video and audio files with you all the time. A 512GB model will be enough for most iPad Pro buyers. Remember, you can offload rarely used files to cloud services.
Consider other tasks when choosing Given you can use every iPad for writing, let the other tasks you plan for the device determine your choice.
Even when you add a keyboard, iPads are smaller, lighter and more portable than most laptops. Apple’s MacBook Air gets close. The nearest non-Apple competitor would be a Microsoft Surface tablet.
If money is no object, you can choose the iPad that you find comfortable to read. If it is an object, pick the iPad you can afford.
Do I need a Sim-card iPad?
Few writers need Sim-card equipped iPads that can connect to cellular networks.
You’ll find Wi-Fi is available in many of the places where you will want to write. Where it isn’t, you can tether your iPad to your phone and connect that way.
Tethering works with both iPhones and Android phones. The experience is better and smoother if you have an iPhone, but don’t get hung up on this point, it isn’t a deal breaker. Android phones work fine.
Cellular adds around NZ$220 to the price of a Wi-Fi iPad. Spend the money saved on storage or a better keyboard.
A keyboard isn’t essential if you own an iPad. You can do a lot without one and there is always the Apple Pencil and handwriting recognition . Apple’s new Scribble feature can change the way you think about your iPad .
But this post is about writing on an iPad. A keyboard makes that easier.
There is no shortage of iPad keyboards to choose from. Any iPad will work with any Bluetooth keyboard, but only a handful of keyboards are made to fit exactly to each iPad model.
When you buy an iPad, chances are someone will attempt to sell you a keyboard as an add-on. It makes sense to buy the keyboard at the same time. If the salesperson is knowledgeable, they can help you get the right keyboard for your iPad. They can also help you get the one that suits you best and let you look closer at your options.
Apple keyboards are the obvious choice. But not always and not for everyone. Choose the keyboard you feel comfortable with. That’s from both an ergonomic point of view and from a budget point of view.
Whether you choose an Apple keyboard or an alternative, match it with your iPad. Keyboards double up as protective covers. A better fit means better protection. This sounds obvious, but I've come across people who run into trouble with the wrong iPad keyboard.
The other thing to watch is that not every Apple iPad keyboard is available for every model. Buying at the same time as the iPad from a retailer who knows what they are doing can save you problems later.

At NZ$620 a pop, Apple’s Magic Keyboard is an expensive, Rolls Royce option. You can use it for writing on an iPad Air or an iPad Pro. It doesn't fit the less expensive iPad models.
It’s a good keyboard but it is not perfect.
You might expect that when you use it at a desk or on a flat surface it differs from the laptop keyboard experience.
That's not the case. The top part, that's the iPad, is heavier than the keyboard. Together, the iPad plus Magic Keyboard, weigh more than a MacBook Air .
There are two hinges, the second one allows you to adjust the viewing angle.
The keys are excellent for typing. I'm a touch typist and can run into problems with some tablet keyboards. This one is touch-typeable from the moment it's opened. Keys are backlit, something that doesn't happen on the less expensive Apple keyboards. And there is a touchpad, which works exactly as you'd expect.

The Apple Smart Keyboard Folio is a less expensive alternative. There are models for iPad Pros and iPad Airs. Prices start at NZ$390.
This is the keyboard I choose when I’m on the move. It has the best balance of function and price. Again, it gives the iPad a laptop feel. Yet it is more flexible and feels less robust than the Magic Keyboard.
It doesn't offer backlighting and there is no trackpad. My Smart Keyboard Folio is now coming up to four years old and is showing signs of wear and tear. It doesn't last anything like as long as the iPad.

If you have a 10th generation iPad, not the Pro, not the Air, then the NZ$530 Magic Keyboard Folio is the top choice. It's not as flexible for positioning as the iPad Magic Keyboard, but the keys and the trackpad are as good. I found it easy to touch type.

Apple's Smart Keyboard is compatible with the iPad, 3rd generation iPad Air and 10.5 inch iPad Pro. Prices start at $320. It's the most basic Apple iPad keyboard, but covers all the bases and gets the job done. I found it harder to adapt my touch-typing technique to the Smart Keyboard, but got there soon enough.
Not all Apple keyboards are available for all iPads. If you buy a more expensive iPad, you'll need a more expensive Apple keyboard.
A word of warning. Apple iPad keyboards flex more than you might expect if you are typing on your lap. When used this way they are not as solid as laptops.
Logitech iPad keyboards

Beyond Apple's own keyboards, Logitech is the best alternative. You could argue some models are better than their Apple equivalents.
There's a wide range to choose from. Again, different keyboards work with different iPad versions. The difference between Apple and Logitech keyboards is price. You can save up to a third of the price for similar functionality.
On the whole Logitech keyboards work as well as Apple models. All keyboards mentioned here double as protective covers for iPad screens. Logitech keyboards do this a little better than Apple's keyboards. The Logitech keyboard plus iPad combinations are thicker than the Apple ones and the function keys differ.
Brydge makes hard shell keyboards that turn your iPad into a laptop. You end up with something that feels like a MacBook. I haven't seen the recent Bridge keyboards, but when I borrowed one for review, it was heavier than Apple's. The keys were smaller. Of all the keyboards mentioned here I found the Brydge keyboards harder to type on. Yet they could be perfect for you.
All keyboards designed to work with iPads offer a degree of protection. That’s important if you are mobile. iPads are not fragile. Yet once you start moving the potential for dropping them or other damage increases.
Sometimes I use a first generation Apple Bluetooth keyboard and a mStand tablet from Rain Design to hold the iPad. It’s a simple and elegant approach. There are many other options. Any store that sells iPads will have a selection.
As mentioned earlier, you can write on an iPad using an Apple Pencil and handwriting recognition. There are two Pencils, Apple calls them the first and second generation models.
Which one you can use depends on your iPad model. Each iPad only supports one Pencil generation. The first generation Pencil costs NZ$200 and the second costs $280.
The main difference between generations is how the Pencil charges. The second generation Pencil is flat and magnetised on one side. It connects to the side of the iPad for charging.
First generation Pencil charge through the blunt end, which looks clumsy, but works fine in practice. On the down side, you have to remove the cap and it is easy to lose that cap. The older Pencil was round, which means it can roll off a table or desktop, the flat side on the second generation Pencil stops that from happening

Apple's free Notes app comes with every iPad. It's great for taking short handwritten notes and has text recognition built in. It's a good place to try the Pencil before spending money on a third-party app.
To use immediate handwriting recognition in Notes chose the pencil tool marked with an A.
The alternative is use another pencil tool, then highlight and choose to convert the word.
Both approaches are fast on even a modest iPad. The technology is forgiving, I have terrible handwriting and it gets about 95 per cent of what I write.

GoodNotes is a great third-part alternative to Apple Notes. It uses a notebook metaphor. You can write a limited number of notes in one of three "notebooks" for free, then you need to pay a one-off US$15 for unlimited use. Paying also unlocks the handwriting recognition feature.
Text recognition is as fast as on Apple Notes and, without extensive testing, the accuracy appears to be on a par with Apple's.
GoodNotes is a better choice than Notes if you plan to use your iPad more for handwriting than typing. There's a strong search feature and note organisation and sharing is a strength. It won the Apple 2022 iPad App of the Year award.

GoodNote's main competitor is Notability from Ginger Labs. You can download the app for free but that doesn't include handwriting recognition and only allows a limited number of edits. To get the full app you need to buy an annual subscription.
Ginger Labs is coy about the price of the subscription, you don't get to see the price until you install the app. I don't like that.
The price appears to change from country to country. When I checked on my iPad, the subscription was $21, although it isn't clear if that is NZ dollars or US dollars. Either way that makes Notability more expensive than Goodnotes. The price is hard to justify.

Noteful is like Goodnotes and Notability, but doesn't have handwriting recognition.
In use, there's a delicious minimal user interface. The app uses the notebook metaphor. It offers something called "layers". That's an idea familiar to people who use photo editing or graphic design software. Searching for notes is harder work in Noteful than in its rivals.
Like Ginger Labs, the company is coy about disclosing its price until you have the app loaded on your iPad. You need to pay a one-off US$5 to unlock all the features, which is reasonable, but transparent pricing would be better.
If you have a Microsoft Office subscription, OneNote is an option. It has good basic handwriting recognition. But it is more clumsy than the alternatives and impractical for anything more than the shortest phrases.
There's a wide range of word processors, text editors and other writing apps for iPad. You'll recognise the names of a few, they are iPad versions of popular apps for PCs and Macs. This guide is not comprehensive, but it covers the important options and the ones you are likely to come across.

Pages is not the best-known, the most popular or the perfect writing tool, but comes free with every iPad and Mac. It's the iPad writing app you'll see first.
It is part of Apple's own productivity software suite: iWorks. Alongside Pages, iWorks includes Numbers, a spreadsheet and Keynote, a presentation manager.
Apple and everyone else describes Pages as a word-processor, which is true. Yet unlike other word-processors, Pages focuses on page design.
In a sense it sits somewhere between Microsoft Word and Adobe InDesign although it has far fewer features than both. That said, you could write and layout a print magazine or a book with Pages.
Page design works better than you might expect on an iPad. While you'll get better results with a large screen iPad Pro, working on an 10-inch iPad is possible. Pages is ideal, a better bet than Word or Docs, if you plan to create Apple Books or PDFs.
Apple's Pages could be all the word processor you need. It will open documents created with Word or Google Docs and you can send Pages documents in the Word format. Round trips work fine almost all the time. I've seen problems with earlier versions of Pages, not with the current Pages 12.
You can deal with corrections and Track Changes between Word and Pages documents.
Presenter mode
There’s one Pages feature I love, even if it is not my first choice for writing on the iPad. Presenter Mode turns the iPad into an autocue. When I’m on a long radio broadcast, presenting live or doing similar work I use it as a prompt.
Pages has better cloud support than Word, but you will need an Apple iCloud account to make use of this. While Pages' online collaboration is superior to Word, Google Docs is better again.
Apple's Pages templates are better than Microsoft's basic Word templates. If you are new to word processing, Pages is easier to learn and master. That said, if you have learned Word elsewhere, there may be some unlearning to do before you get on top of Pages.
Pages isn't the best writing tool for everyone. Yet it is a solid option that is free and simple. At the very least, you should give it a try before spending money on another iPad writing app.

Microsoft's Word is good on an iPad. If you know Word from a laptop or desktop, Windows or MacOS, you'll be immediately at home.
All the important features for everyday folk are here. The app is the most feature rich iPad word processor. Word power users might miss advanced features, they are not the target market.
Add a decent keyboard to your iPad and the Word experience is on a par with that laptop or desktop. I'd argue the experience is better. Because there are fewer features the user interface is less cluttered, easier to navigate.
While the interface will be familiar and easy to use if you know Word, it won't challenge newcomers. There are points where it doesn't act like other iPad apps, especially when storing or retrieving files. Then there are the needy messages from Microsoft
Microsoft designed Word on the iPad to work with its own OneDrive cloud service. The chances are you'll need a Microsoft subscription to use the app and storage comes as part of that subscription. It's possible to access files stored on the iPad or in iCloud direct from Word, but that's not the first choice. Microsoft has added an impressive array of alternative cloud storage choices.
Another way Word departs from the standard iPad user interface is the way it relates to the keyboard. There are keyboard shortcuts you may know from the Mac or PC that work, others don't. You'll find out with practice.
Word remains the most feature rich and complete iPad word processor. If you use Word on a laptop or desktop it will be familiar. The interface doesn't always act like a standard iPad app, but there's nothing that is likely to be a barrier for most people.
The app is a free download. The software remains free if your iPad's screen is smaller than 10.1 inches. Beyond that you'll need a Microsoft 365 licence. A one person licence is NZ$120 a year, prices are different overseas. It covers you on up to five devices including tablets and conventional computers. The 365 Family licence at $165 a year means up to six people can use the software.
If you need Word to work on your iPad at home, check if your employer or place of study has a licence you can use.
Word isn't the right iPad writing app for everyone. If you already use it or know it, it can make sense to stick with what you know. For many users it offers far more than you might need or want to pay for.

If you love Office or Word, but are on a tight budget, there's a free web version of Office that works fine on an iPad. It's had other names over the years. These days Microsoft calls it ' Office '.
There are ways the web version of Office is like Google Docs. Like Google Docs, it stores your finished documents online. In this case Office uses Microsoft OneDrive, not Google's cloud storage. Microsoft Office online can't handle files larger than 2GB. This is not going to trouble anyone unless documents contain embedded media.
Microsoft's web version of Office has fewer features than the PC or Mac version. It is closer to the iPad version. The user interface is distinct from both the PC and the iPad versions. You will need a live and consistent internet connection to use the online app. In practice you'll notice more lag than when writing on the other Word apps. This has little to do with connection speed. I tested on a gigabit fibre connection and the latency was the same as on a slower connection.
The online version will open any file format supported by the desktop Word app. Saving to the OneDrive cloud is automatic. There are tools for sharing documents with colleagues. If sharing is important to you, Google Docs does this better.

You can use Google Docs two ways on the iPad. It will work as a web app in your iPad's Safari browser or you can download and install the free iPad app. You'll get a better experience using the browser version, you need a decent internet connection for that. If you want to use Google Docs offline there is an iPad app, but it's mediocre compared with the other options on this page.
The free online version of Google Docs is almost identical to the version in the paid-for Google Workspace. New Zealand prices for Google Workspace start at NZ$9 a month for a plan with 30 GB of storage. A version with 2 TB of storage is a heft NZ$18 a month. This is more expensive than Microsoft Office. The most noticeable difference between the free and paid versions of Google Docs is that it is harder to create templates in the free version.
Google built Docs for online work. It is the best option if you collaborate on documents with remote colleagues. It's less powerful than Office and has fewer features than most of the other choices listed on this page. Getting started is easier, but you can rub up against limitations.
Things get tricky when you have large documents. The app is fine for up to a couple of thousand words. It starts to slow down as the file grows and would be slow if you were editing an entire book.
One downside is there can be problems if you lose your internet connection or you want to work offline, say while on a flight. The Google Docs iPad app helps, it can store documents in the iPad's memory. You have to sign into a Google account before using the app online or offline. This can be tricky, in the past I've found myself logged out while offline and unable to use the app.
I recommend using Google Docs if you already use the app elsewhere or if you work with others using the app. Otherwise you can do better elsewhere.

Collabora Office is a promising mobile open source document editing suite based on LibreOffice . It's compatible with Microsoft Office and works with the Open Document Format. There's iPad app and an online version. The app is free for "testing", a subscription std US$20 a year.
My 2021 Collabora Office review warns the software wasn't ready for everyday use and that it jars with iOS. Both remain true. There are fewer bugs and the software is more stable, but it is hard going. You'd need to be an open source devotee to choose it, and people who feel that way are less inclined to use an iPad.
Markdown is a markup (yes that does sound odd) language used to format text with simple codes. Type a single hash # character at the start of the line for a top level head, two hashes means second level head and so on. It takes seconds to learn, a day to master.
This approach leaves formatting that is easy for humans to read. You can create Markdown using a text editor. Markdown editors will show you how your formatting looks in a finished document. You can send finished Markdown documents direct to WordPress or Ghost blogs. Markdown editors usually let you convert them into other word processor formats.
It's possible to start writing on your iPad using IA Writer, make edits on an iPhone using a text editor and finish on, say, a desktop using Byword.

On one level there is nothing fancy or complicated about IA Writer . That's its attraction. You can start laying down words within minutes.
In recent years the app's developers have added more features. Yet it retains its simple user interface. It hides that added complexity from sight until you need it. Many users never will.
The minimal interface lets you focus on putting words on the screen. Coupled with the iPadOS, it becomes the closest thing you can get to an old school typewriter and paper.
One feature you may find useful is the style checker which helps improve your writing. It looks for clichés, fillers or redundancies but leaves it up to you to do anything about them.
In the past Writer forced you to store documents in an iCloud or Dropbox account. Now you can save them on your iPad, a better idea if you ever work away from an internet connection.
IA Writer’s price continues to climb faster than inflation. When I first bought the software I paid NZ$3. It was a promotional price when the app was in its infancy. Today the software costs NZ$50. If you buy the iPad version, you can use it on an iPhone at no extra cost. Buying the MacOS version will set you back another $50. It remains good value, but is no longer something you can afford and then discard if it doesn't work for you. Luckily there are free trial versions.

Byword is a great alternative to IA Writer on the iPad. It has a much lower NZ$10 price, which makes it a bargain. Byword has the same minimalist user interface.
Like IA Writer, Byword co-operates with blogs like WordPress or Medium and plays nice with Evernote. If anything Byword is simpler to use and easier to learn than its main rival.
Byword can look better on an iPad screen than IA Writer. You can choose the font and the size of your type.
Unlike IA Writer, which gets constant attention and new features, Byword has changed little in close to a decade. This doesn't have to be a bad thing, the app is stable and does what it sets out to do without fuss.

Scrivener (NZ$24 in the App Store) sits at the opposite end of the writing app spectrum from Markdown editors like IA Writer or Byword.
Markdown editors hide complexity. Scrivener is about providing the all the complexity a writer needs in one place.
In a sense, Microsoft Word is a more appropriate point of comparison. Although in practice the gulf between Scrivener and Word is as wide as the gulf between it and IA Writer.
In a sense, Microsoft Word is a more appropriate point of comparison than the Markdown editors. Although in practice the gulf between Scrivener and Word is as wide as the gulf between it and IA Writer.
If anything Word requires even more work to master than Scrivener. People don't notice that effort because they pick up the complexity of Word almost by osmosis. It can take years, often starting at school.
Switching to Scrivener means doing all that learning in a matter of days or weeks. It's a steep learning curve. You may find it rewarding if your brain thinks in the right way. I'm afraid it doesn't work for me.
Literature and Latte, the company behind Scrivener, built it for ambitious writing jobs. There are tools to help, such as a cork board for keeping notes. You can attach the parts of your project to a single file and even colour code them making them easier to navigate.
Because Scrivener is complex, users tend to have a few windows open as they work. This lends itself to a large screen on the desktop. No doubt there will be Scrivener fans reading this who love the app running on a small MacBook. Yet, I'd argue the app works best with a larger screen.
Which brings up to the iPad version of Scrivener. Why might you choose it? The iPad app is feature rich although it doesn't include everything in the desktop version, although it does include the cork board.
Literature & Latte's marketing suggests the iPad app complements the desktop app. You might use it when working away from your desk or in the field researching. It allows you to push on while on an airplane flight or a train journey. To this end, everything you do on the iPad syncs with your desktop project.
I suspect, but don't know, that few people use the iPad app without also using Scrivener on the desktop. If it sounds like something you need, try the free desktop download first before buying the app.

Ulysses uses the same Markdown formatting as iA Writer and Byword. It adds more word processor-like features. This sounds contradictory. Yet it marries a minimalist look and feel with background complexity. You’ll either love it or it will bewilder you.
Like Scrivener, Ulysses - the company shares the app's name - pitches its software at people working on complex projects. And like Scrivener it also caters for people writing smaller articles. It has tools to help you publish direct to popular blog sites.
The Markdown in Ulysses is somewhat non-standard. You may struggle at first moving to the app after using another Markdown editor. If you haven't used Markdown before, this won't be an issue.
At first look, Ulysses is pretty where Scrivener's cluttered look is ugly. It doesn't take long before Ulysses can become as cluttered.
Tools like the goal display telling you how many words you still need to write can be both a distraction and a source of demotivation.
The elephant in the room with Ulysses is its price. The app is a free download. A subscription costs NZ$11 a month or $75 a year which is expensive for what is, at core, a Markdown editor with trimmings.
Most apps with a similar functionality have a one-off price. The desktop version of Scrivener has a one-off price of NZ$100.
A family licence for Microsoft Office that includes Word, other apps and storage for up to six people is NZ$165. You can run the software on iPads, laptops, desktops or phones.
The NZ$75 Ulysses subscription allows you to use both the desktop and iPad versions
If Ulysses is right for you and gels with your thought processes, the price is a bargain. You'll recover it in no time. Otherwise, do your wallet a favour and consider everything else first.
Other writing apps
Wordprocessors, Markdown editors and text editors are not your only options. A handful of iPad users choose to write documents using Bear . It's a flexible note-taking app that blurs the distinction between a notes app and an editor. Another option is Evernote , although it is more about note-taking, less about writing. Simplenote is a free alternative.
- Take the path of least resistance. If your employer or school pays for a Microsoft Office or Google Workspace account, use it. You won't have to pay anything, there should be support and you won't have to learn how to use an alternative.
- Otherwise, look at Apple Pages first. It's free, works well on the iPad's touch screen and Apple designed it with the entire ecosystem in mind. It should have all the features you need. Best of all, you can start writing in Pages on your iPad and switch to working on an iPhone or Mac without missing a beat.
- If you are coming from another writing tool, take time to adjust to Pages. It's worth the effort and you'll save money that might be better spent elsewhere.
- An alternative strategy is to choose radical simplicity. Markdown editors like IA Writer or Byword let you focus on your words in the most efficient way possible. Disclosure: this is what I do.
- Invest time and money finding the keyboard that works best for you. While it's easy to buy devices online, it pays to go to a store and try keyboard options before parting with any cash.
You might also like...
Blue bubbles feature in apple us antitrust case, taylor’s scientific management, ai and knowledge work, waymo luddites, the right to disconnect, nz streaming, consumers pay for gmail, apple m3 chips widen gap with intel, testing apple’s finewoven material the kiwi way, member discussion.
The 10 Best Word Processing Apps for Your iPad
You can use your iPad to edit documents, compile notes, or even crack out a novel. Here are the best iPad word processors for the job.
If you plan to use your iPad to replace a computer, you'll want to use the best word processing app on it. There are plenty of options available, including both free and premium word processing apps, so we've compared all the worthy choices below.
You can use any of these iPad word processors to edit documents, compile notes, or even crack out a novel. Many of them even offer wide file compatibility, so you can keep working with other people no matter what device or app they use.
Pages is Apple's word processor for its devices that's available for free on the App Store. In case you didn't know, you can also download Numbers and Keynote for free and use the entire Apple iWork suite. Some users might even find that Apple Pages is better than Microsoft Word for them.
With full iCloud support, Pages syncs documents across all your Apple devices. Besides using the Pages app, you can sign in to iCloud.com to work on Pages documents through a web browser.
Pages makes it easy to create beautiful documents. It gives you full control over the layout of text boxes, images, and shapes. You can even use free templates to create digital books, newsletters, reports, and more.
The range of word processing tools you can use from your iPad is powerful: footnotes, lists, word count, charts, images, and other formatting tools. It also supports collaboration. So you can work with other people on the same document, tracking whatever changes they make.
Pages might be the best free word processor to use on your iPad, but it is let down by a lack of third-party cloud storage support for collaborative work. You can only collaborate over iCloud from your iPad, not over Dropbox, Google Drive, or other cloud storage services.
Download: Pages (Free)
2. Microsoft Word
Microsoft Word for iPad is a mobile-friendly version of the desktop app. It supports images, tables, charts, footnotes, equations, and more. You can access documents through OneDrive, iCloud Drive, Google Drive, and other cloud storage services.
You can also collaborate with others and track the changes they make, just like Pages lets you do. A big difference is that more of your colleagues are likely to use Microsoft Word than Pages. So, you'll have a larger pool of people to collaborate with.
If you already have a Microsoft 365 subscription , Microsoft Word is one of the best word processing apps you can take advantage of. Since it is the go-to app for so many people, Microsoft Word is the best option for sharing work with others.
Download: Microsoft Word (Free, subscription available)
3. Google Docs
Google Docs makes it easy to write, edit, share, and collaborate on important documents. You can use it wherever you are, on any device, making it one of the best apps for writing on an iPhone as well. Like other Google products, it's completely free.
Download Google Docs on your Apple or Android device so you can use this word processor wherever you are. Alternatively, you can always access Google Docs from your Mac or Windows PC using a web browser.
Work with in-line images and a range of formatting options to create your resume, report, letter, or other important documents. You can even take advantage of Google's range of stylish templates to speed up the process.
Collaboration is at the heart of Google Docs. As your collaborators make changes to a shared document, their names appear onscreen. Choose to make documents public to everyone or private to a select group, and even choose editing privileges for your team members.
Google Docs is compatible with DOC and DOCX files, so you can open or export Word files for other people to use. This makes Google Docs one of the better free word processors for your iPad when not everyone uses Word.
Download: Google Docs (Free)
4. WPS Office
WPS Office includes a suite of free business-oriented tools for iPad, Mac, Android, Windows, and Linux. The package lets you create documents, presentations, spreadsheets, memos, and PDFs with a range of templates available to get you started.
You can also share documents in a variety of formats, including DOC and DOCX, so other people can open your reports in whatever app they choose to use.
WPS Office values simplicity across everything from the design to the user interface. This makes it a snappy word processor that's a breeze to start using on your iPad. A premium subscription is available for $29.99 per year. This removes ads and unlocks the ability to edit PDFs, gives you 20GB of cloud storage, and more.
Download: WPS Office (Free, subscription available)
5. Notes Writer
As you may have guessed from the name, Notes Writer is primarily for taking notes rather than producing polished documents. It's perfect for capturing your thoughts during a lecture, meeting, or brainstorming session. You can type out your ideas or use an Apple Pencil to write them by hand instead.
Notes Writer allows you to draw pictures, annotate PDFs, fill in forms, sign documents, insert clipart, and more. Once you complete your notes, you can share them across a range of cloud storage services. There are plenty of other bells and whistles as well. These include distraction-free mode, live counters for tracking document length, find and replace, and dark mode.
While you can download and use Notes Writer for free, a Pro version of the app is also available for the iPad, which removes ads, gives you an unlimited number of notebooks, and adds password protection.
Despite being designed for notes, this app still lets you format text and export various files. However, there's no support for DOC or DOCX files. But at least you can sync to a wide range of cloud storage services.
Download: Notes Writer (Free)
Download: Notes Writer Pro ($5.99)
Much like Notes Writer, Bear is designed around keeping organized notes. But its simplistic design and easy organization make it another one of the best word processors to use on your iPad.
Bear is ideal for everything from short notes to long essays. It offers a variety of formatting tools, in-line image support, links, checklists, and more. Keep your writing organized using the folders in the sidebar, which you can customize with different icons for quick navigation.
Best of all, Bear is completely free to use on your iPhone, iPad, and Mac. However, to sync your notes across other devices, you need to sign up to Bear Pro for $2.99 per month or $29.99 per year. This premium subscription also unlocks themes and more exporting options. So, if you're looking for the best looking word processor for notetaking on your iPad , Bear is probably it.
Download: Bear (Free, subscription available)
7. Werdsmith
With the aim of being a portable writing studio, Werdsmith is available for your iPad, iPhone, and even your Apple Watch. The app is almost free, but there's a limit on how many documents you can work on at the same time. To bypass this restriction, you need to pay for a subscription.
Aimed at authors, Werdsmith comes with templates for writing stories, blogs, poems, and screenplays. It's a great place to keep notes, organize ideas, or work towards the final draft of a big project.
Werdsmith lacks the rich editing features of other apps on this list, such as image or table support. Instead, it opts for motivation-based features like writing rituals and word goals to help keep you working on your stories every day.
If you want a customizable word processor that focuses on content above all else, give Werdsmith a shot. You can even use the dedicated cloud service to back up your work and protect everything with Face ID or Touch ID.
Download: Werdsmith (Free, subscription available)
8. iA Writer
Apple has made iA Writer an "App of the Year" on several occasions, and it's easy to see why. Behind the slightly startling entry fee is a powerful word processor with an elegant environment in which to get serious work done.
This app uses markdown language to format text , which is worth learning for any serious writer. It also places your document library a swipe away to the right, with a document preview tucked away to the left. Rearrange the keyboard to personalize your writing experience, then use Focus Mode to concentrate on your words. When you're finished, back up everything for safekeeping. You can even publish straight to WordPress.
iA Writer is a word processor for iPad that focuses on the words above all else. But it still offers a heap of features with full-on markdown support.
Download: iA Writer ($49.99)
Ulysses is another mainstay of the word processing world and can easily slot into your workflow with apps for iPad, Mac, and iPhone. It's great for students, novelists, bloggers, and every other writing fanatic. Ulysses is not cheap, but it's packed with features.
At the heart of Ulysses is a simple yet powerful markup-based text editor with a wide toolset. Enable distraction-free mode, and the user interface melts away, allowing you to focus on just the words. Store all your writing within the library, which syncs via iCloud to your other Apple devices.
Drop into typewriter mode to focus on one line at a time. Add attachments for research notes, images, keywords, and PDFs. You can export to PDF, WEB, EPUB, DOC, RTF, and plain text files. You can even publish your work straight to WordPress and Medium.
You can take advantage of the free trial Ulysses offers or get a premium subscription for $29.99 per year. It might be one of the most expensive iPad word processing apps available, but it's also one of the best. If you own a Mac, know that Ulysses is also one of the best writing apps for macOS .
Download: Ulysses (Subscription required, free trial available)
10. Scrivener
Scrivener is a writing tool for larger writing projects. If you're working on a screenplay, film, or stage production, Scrivener is one of the best iPad word processors for the job.
Scrivener puts an emphasis on organization, letting you group documents together, store images and PDFs as research material, rearrange your content with ease, and search across the entire project. All of this makes it a must-have app for those undertaking larger writing projects.
A huge range of features is on offer with this premium app:
- Export a variety of formats for Word, PDF, Final Draft, or plain text apps
- Convert your work to markdown
- Zip your project into a compressed folder
- Take snapshots to save previous versions of your draft
Scrivener isn't cheap, but it might be the best iPad word processor for any budding novelist. When you're ready to share your work with the world, you can try some of the best self-publishing platforms .
Download: Scrivener ($23.99)
Pick the Best Writing App for the Job
These are all the best word processor apps to use on your iPad. Each offers something different, which is why it's important to pick the right tool for you. Whether you're looking for a powerful scratchpad like iA Writer or a capable editor like Ulysses, you should find what you need above.
Of course, you won't always have your iPad on you when you need to work on new documents. And that's why an online word processor would be an ideal choice in most cases.
- PRO Courses Guides New Tech Help Pro Expert Videos About wikiHow Pro Upgrade Sign In
- EDIT Edit this Article
- EXPLORE Tech Help Pro About Us Random Article Quizzes Request a New Article Community Dashboard This Or That Game Popular Categories Arts and Entertainment Artwork Books Movies Computers and Electronics Computers Phone Skills Technology Hacks Health Men's Health Mental Health Women's Health Relationships Dating Love Relationship Issues Hobbies and Crafts Crafts Drawing Games Education & Communication Communication Skills Personal Development Studying Personal Care and Style Fashion Hair Care Personal Hygiene Youth Personal Care School Stuff Dating All Categories Arts and Entertainment Finance and Business Home and Garden Relationship Quizzes Cars & Other Vehicles Food and Entertaining Personal Care and Style Sports and Fitness Computers and Electronics Health Pets and Animals Travel Education & Communication Hobbies and Crafts Philosophy and Religion Work World Family Life Holidays and Traditions Relationships Youth
- Browse Articles
- Learn Something New
- Quizzes Hot
- This Or That Game New
- Train Your Brain
- Explore More
- Support wikiHow
- About wikiHow
- Log in / Sign up
- Computers and Electronics
- Adobe Software
- Portable Document Format (PDF)
How to Edit a PDF on an iPad
Last Updated: February 28, 2024 Fact Checked
This article was co-authored by wikiHow staff writer, Nicole Levine, MFA . Nicole Levine is a Technology Writer and Editor for wikiHow. She has more than 20 years of experience creating technical documentation and leading support teams at major web hosting and software companies. Nicole also holds an MFA in Creative Writing from Portland State University and teaches composition, fiction-writing, and zine-making at various institutions. This article has been fact-checked, ensuring the accuracy of any cited facts and confirming the authority of its sources. This article has been viewed 119,280 times. Learn more...
Your iPad comes with many tools for editing PDF files when you're on the go. Thanks to helpful tools like Markup and the latest features in the Files app, you can easily fill out and sign important documents, draw, type, highlight text, and even add, remove, or rotate pages. This wikiHow article will teach you everything you need to know about editing PDF files for free on your iPad, iPad Pro, or iPad Air.
Filling Out PDF Forms

- If the PDF you want to edit was emailed to you or you found it on the web, tap the link to open it.
- Tap the Share icon (the square with an up-arrow) or select Open in .
- Tap Save to Files to save it to the Files app. [1] X Research source
- Choose a folder to save the file in.

- Tap Text on the Markup menu. This places a text box on the page.
- Type some text into the box.
- Drag the text box to the appropriate location on the PDF.
- Tap the color options to change the font color, or aA to change the text size.
- Resize the text box by dragging inward or outward from any of its corners.

- The first time you tap this option, you'll be asked to draw your signature. You can use your finger or Apple Pencil to do so.
- Once a signature is in place, tap and drag it over to the area you want to sign.

- To share the PDF, tap the blue square with an upward-pointing arrow at the bottom-left corner, and then choose an app to share with.
Rotating, Adding, and Removing PDF Pages

- Tap Save to Files to save it to the Files app. [8] X Research source

- Tap and hold the thumbnail of the page in the left panel.
- Tap Rotate Left or Rotate Right as needed.

- Find the page you want to delete in the thumbnails on the left side of the screen.
- Tap and hold the page that you want to appear before the one you're inserting now. For example, if you want to insert a new 5th page after the current 4th page, tap and hold the current 4th page.
- Select Insert Blank Page for a blank page, Insert from File to add a new PDF, file, or photo, or Scan Pages to scan a new page from a physical document.

- Tap and hold the thumbnail of the page you want to delete.
- Tap Delete and then confirm.

Expert Q&A
You might also like.

- ↑ https://support.apple.com/en-us/HT205751
- ↑ https://support.apple.com/en-us/102570
- ↑ https://support.apple.com/en-us/HT206885
- ↑ https://support.apple.com/en-us/HT206885#tool
- ↑ https://support.apple.com/guide/ipad/work-with-pdfs-ipad6c8f7f84/ipados
About This Article

1. Save the PDF to your iPad. 2. Open the PDF in the Files app. 3. Tap the page you want to edit. 4. Tap the Markup icon. 5. Tap the + . 6. Add text or a signature. 7. Tap Done to save. Did this summary help you? Yes No
- Send fan mail to authors
Is this article up to date?

Featured Articles

Trending Articles

Watch Articles

- Terms of Use
- Privacy Policy
- Do Not Sell or Share My Info
- Not Selling Info
wikiHow Tech Help Pro:
Level up your tech skills and stay ahead of the curve
Search for: Search Button
Handwrite into docs on Office apps for iPad
Handwrite direct into Office apps for iPad, converting your writing into text right away, courtesy of the iOS Scribble fea ture. What you’ll need, how to setup and the new thing to look for on the Draw tab of the Word, Excel and PowerPoint apps.
Microsoft has integrated the Scribble feature into some Office for iPad apps (Word, Excel, PowerPoint and Outlook, so far with OneNote promised soon). That means you’re able to write (with Apple Pencil or similar) direct onto the screen and have it immediately translated into text in a document, sheet, slide or message.
The ‘digital ink’ to text conversion is done by Apple’s technology in iOS, not Microsoft.
Office Watch for Apple
Keep up with the latest Microsoft Office news and tips specifically for Mac computers (M1 and Intel) iPad and iPhone . The same independent help, tips and money saving advice we’ve given in Office Watch for over two decades. Click here to get the next, free, issue
About Scribble on iPad
Scribble is the ‘ink to text’ feature in iOS 14 and 15, appearing in most modern iPads. You’ll also need an Apple Pencil or a compatible third-party ‘pen’. The easy way to know if you have Scribble is going to Settings | Apple Pencil, look for Scribble.

With Scribble you can ‘write’ in the text field of any compatible app. The iPad will convert what you write into text. Try out Scribble in Settings (Apple Pencil | Try Scribble) or use the Apple Notes app.
If Scribble is available, there’ll be an icon or other indication. In Apple Notes, Scribble is activated from an icon at top-right, then the draw toolbar appears at the bottom.
Like many Apple features, that indication is maybe too subtle or missing completely. Office-Watch.com will go into detail about how to find and use Scribble in Office Mobile apps.
Each iPad app has to be made Scribble compatible. Only now is Microsoft doing that for the Office mobile apps for iPad.
In the Office apps, look on the Draw tab. If Scribble is available a digital pen will appear with a letter A on it …

How Scribble works with Word mobile for iPad
In Word for iPad, go to the Draw tab, tap on the text pen (with the letter A) and a Scribble button appears at the bottom of the screen when you start writing on the screen.
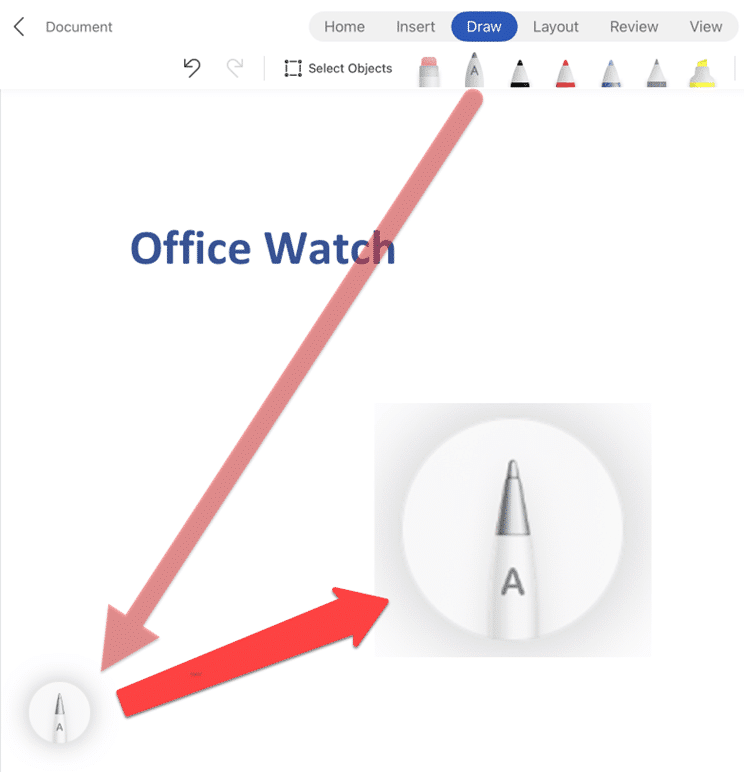
Scribble icon appears bottom left, shown here with an enlargement of the icon.
Tap on that icon to see the full Scribble toolbar in Word.

Up close the Scribble toolbar looks like this.
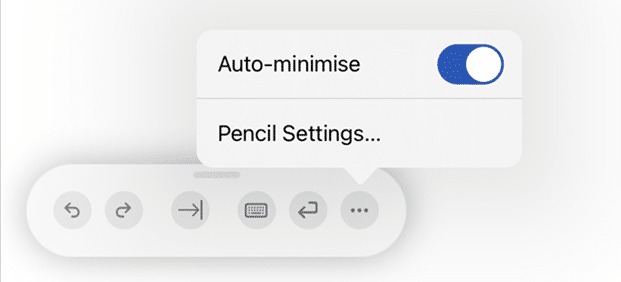
On that toolbar are:
On-Screen keyboard – a tiny keyboard that can move around the screen. Tap the button again to make it disappear.
Enter / Return
Auto-minimise … the toolbar will revert to the single icon.
Pencil settings … opens the iPad settings app.
Word Headers/Footers don’t support Scribble.
Discover Scribble
There are special gestures in Scribble to select/delete text. join/split words, insert new text between words.
Settings | Apple Pencil | Scribble | Try Scribble will demonstrate and let you test for yourself.
Excel with Scribble
In the Excel app for iPad, the same Scribble pen appears on the Draw tab. Microsoft is a little cheeky with their intro tooltip, making it look like a Microsoft feature when it’s really Apple’s iOS doing the hard work.
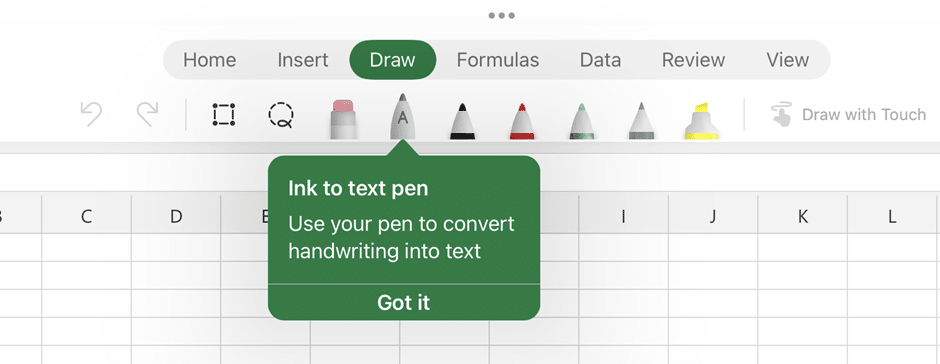
But there’s no icon or toolbar like in Word. Just choose a cell then write on the screen or write on the screen and Excel will choose the cell based on where you’ve written.
Scribble only works entering text into cells, not making or editing formulas.
Outlook message with Scribble
There’s no visible indicator but our public release Outlook mobile app for iPad (v 4.2232.0) supports Scribble for writing messages. Start writing on the message window and Scribble starts working with the same toolbar that’s in the Word app.
PowerPoint with Scribble
Microsoft says Scribble is available in the PowerPoint app but it’s not showing up on our test iPads. Based on their description, there’s a Scribble ‘pen’ on the Draw tab. Writing on a slide creates a new text box with the converted text inside.
There is an “Ink to Text” option in PowerPoint app but it’s not as simple or elegant as Scribble.
OneNote with Scribble
A little surprising that the OneNote app doesn’t have Scribble yet. We’re told OneNote will get Scribble ‘in a few weeks’, so probably sometime in September 2022.
Who gets it?
Scribble is currently in the beta releases of Word, Excel and PowerPoint for iPad. Office Insiders v2.64 build 22080100 or later. It will gradually roll out to public releases.
Get ready now . If you have an Apple Pencil or equivalent, enable Scribble in Settings. Then just wait until the new pen appears on the Draw tab in Word, Excel or PowerPoint apps … the one with the letter A on it, as shown above.
Scribble requirements
Aside from the Office apps, Scribble has its own requirements, in short.
- iOS 14 or later
- A compatible iPad
- Apple Pencil (either version) or one of the few compatible third-party digital pens.
The Apple Pencil is expensive, no question. However, it’s very good and certainly the best digital pen/stylus we’ve ever used. If you’re wary of the cost (understandable) either head to an Apple Store to give it a try before purchase or buy a second-hand model. Used Apple Pencils won’t have the long battery life of a new one, but should work well enough. Note carefully which ‘generation’ of Apple Pencil your iPad supports.
Scribble is available in Chinese, English, French, German, Italian, Portuguese and Spanish.
Draw with Touch in OneNote Web Add the missing Draw with Touch option to Office Action Pen is editing by drawing in Microsoft Word Drawing in all sorts of places Microsoft Office apps
About this author

Office-Watch.com
Office 2021 - all you need to know . Facts & prices for the new Microsoft Office. Do you need it? Office LTSC is the enterprise licence version of Office 2021.
Office 2024 what's known so far plus educated guesses. Microsoft Office upcoming support end date checklist.
Latest from Office Watch
- Credit Card 💳 symbol in Word, Excel, PowerPoint and Outlook
- Yes, there will be a new version of Microsoft Office
- All about Office 2024 for Windows and Mac (so far)
- In person vs virtual event option coming to Outlook
- Checklists now in Microsoft Word
- Start Grouping in Excel for better looking sheets
- Three more Word features reach the web version
- Web link previews in Word for web
- Turn Excel into an AI / LLM wonder
- Don’t trust any text message
- New Outlook does NOT block Exchange Server mailboxes
- How the change to new Outlook for Windows will work
- Digging deeper into the Outlook (new) timetable
- Copilot appears in Word whether you like it or not
- Too many Microsoft Outlook's - we explain them all
- Discover the Edit Points bug in Word
- Spreadsheets are a warning about the future of AI
- Five fast Clear options in Excel
- PowerPoint - switch away from Aptos fonts
- Copilot in Office mobile apps for some
7 best apps for writing documents on iPad
Super-clean writing space with a lot of configurability that stays out of sight when you don’t need it.
- Gorgeous writing space
- Silky-smooth typing
- Deep personalization (Pro)
- Markdown or Plain Text
- Syncs with iCloud
- Writes and edits texts with ChatGPT AI
- Publishes drafts to Medium, WordPress, or Ghost
- Exports to PDF, HTML, RTF, DOCX, image, or clipboard
- Works seamlessly across your iPhone, iPad, and Mac
Create documents, make impact. When your work needs to wow, Craft gives you the tools to make it magnificent.
Don't just process words - build documents
Craft brings structure to your documents - and gives you the tools and freedom to do it your way. Seamlessly combine images, text, media or tables for the perfect experience. Drive deep understanding and engagement by allowing the reader to consume your document just as they would a website. Add your brand and personal touches on top for the prefect document.
Big on impact, teensy weensy on effort
Organizing your workflow, writing your report, creating your code or mapping your masterplan; whatever you’re doing, the freedom to do it your way matters. Tables, toggles, markdown and blocks, back-linking, forward-thinking, in, out and shake it all about - Craft’s ingeniously rich feature-set gives you endless possibilities to love how you work. Just click and create for amazingly beautiful docs in minutes, then bring it all together in your own unique way.
One beautiful experience. All of your devices.
At your desk, on the go, on or offline, enjoy Craft’s powerful performance and legendary UI across your entire toolkit, courtesy of the native app experience. Lose the lag and fall in love with instant sync; quickly jump into any document on any device; and free your creativity with the same beautiful experience whatever device you’re on. We’ve even got a web-based app so you’ll never drop the ball again.
And plenty of ways to share the love
Why keep your brilliant work to yourself when we’ve made it really simple to share? Secret Linking, shared spaces, external guests, and fast, easy export; inspire action across teams, clients, and everyone who’s anyone with the kind of content that’ll make you look way more wow than yet another Google Doc. Or Word doc. Or (insert app you’re using here).
Scrivener takes tools familiar to writers everywhere and integrates them in new and exciting ways.
For writing. And writing. And writing.
Scrivener is the go-to app for writers of all kinds, used every day by best-selling novelists, screenwriters, non-fiction writers, students, academics, lawyers, journalists, translators and more. Scrivener won't tell you how to write—it simply provides everything you need to start writing and keep writing.
Grow your manuscript your way
Tailor-made for long writing projects, Scrivener banishes page fright by allowing you to compose your text in any order, in sections as large or small as you like. Got a great idea but don't know where it fits? Write when inspiration strikes and find its place later. Grow your manuscript organically, idea by idea.
See the forest or the trees
Whether you plan or plunge, Scrivener works your way: hammer out every last detail before typing a word, or carve out a draft and restructure later. Or mix your methods and do a bit of both. In Scrivener, everything you write is integrated into an easy-to-use project outline. So working with an overview of your manuscript is only ever a click away, and turning Chapter Four into Chapter One is as simple as drag and drop.
Research within reach
Need to refer to research? In Scrivener, your background material is always at hand, and you can open it right next to your work. Write a description based on a photograph. Transcribe an interview. Take notes about a PDF file or web page. Or check for consistency by referencing an earlier chapter alongside the one in progress.
Getting it out there
Once you're ready to share your work with the world, compile everything into a single document for printing, self-publishing, or exporting to popular formats such as Word, PDF, Final Draft or plain text. You can even share using different formatting, so that you can write in your favorite font and still satisfy those submission guidelines.
Get focused. iA Writer offers a unique writing experience that lets you concentrate and clarify your message. Used by half a million people worldwide, its powerful interface is crafted to cut out noise, let you focus on what you want to say, and help you structure and trim your text. Available for Mac, iOS, Windows, and Android.
Simple and Powerful
No rulers, no formatting bars. iA Writer provides the crisp, uncluttered environment you need to write well, supported by discrete, powerful features, from Content Blocks, to Syntax Highlighting.
Focus and Flow
Focus is the key to good writing, and the guiding principle behind iA Writer. With shortcuts and simplified settings, you can keep your hands on the keyboard and your mind in the text.
Ownership and Control
We think every craftsperson should own their own tools, so when you download iA Writer, you own it. No forced subscriptions, microtransactions, or compatibility concerns. Your work, your files, your app.
Hack Your Syntax
Highlight parts of speech to improve your writing. Spot superfluous adjectives, weak verbs, and unwanted repetitions. Developers have long used syntax highlighting to improve their code. Now you can hack your text.
Power of Style Check
Style Check is like having a personal editor-in-chief on your device, carefully reviewing your text for redundancies, clichés and filler words as you type. It’s simple, different, and powerful.
The Original Focus Mode
Focus only on the sentence or paragraph that you’re working on. Introduced in 2010 with the original iA Writer, Focus Mode has since been copied by many writing apps. This is the original, and still (we think) the best.
Flexible Content Blocks
Swap sections around, add media, and construct your content with flexible building blocks of text, .csv tables and image files. Stitch separate chapters together into one master file. Express yourself through experimentation.
Optimized Typeface
We have created an innovative typeface for iA Writer, specifically designed to enhance the writing experience. The family comes in three flavors: classic Mono, Duo for larger screens, and Quattro for small devices.
Parallel PDF Preview
iA Writer now offers a live, paginated PDF preview, parallel to the text you are editing. Instantly see how your document translates into PDF pages, as you edit.
Advanced Markdown to Word Export
iA Writer features one of the most advanced Markdown-to-Word export functions available anywhere. Quickly export your Markdown documents to MS Word (and back too!). Includes support for tables, images and footnotes.
The Ultimate Writing App for Mac, iPad and iPhone. Powerful features and a pleasant, focused writing experience combined in one tool, made for people who love to write and write a lot — this is Ulysses.
Like 12 Fingers, 25 Hours a Day
Some things simply work better when you’ve got the right tool. Ulysses’ well thought-out features boost your productivity through the entire writing process; its distraction-free interface keeps you in the flow so you can get things done.
Projects Cannot Get Too Big
Be it college essays, blog posts, or the next Great American Novel: No matter what you’re working on, Ulysses is equipped for managing writing projects of all sizes and ambitions.
Built-In Proofreader and Editing Assistant
Write with confidence: Ulysses’ built-in grammar and style check helps you avoid mistakes and meet the right tone. Available for over 20 languages, it offers suggestions for capitalization, punctuation, semantics, redundancy, style and more.
Let Your Words Shine
After you’re done writing, Ulysses can turn your texts into beautiful PDFs, Word documents, ebooks and even blog posts. Everything is just a click away, with on-the-fly switching of styles and a live preview built right in.
Powerful, beautiful Markdown editor for iOS. 1Writer combines all the basic text editing features you would expect with all the advanced features you will ever need. Use 1Writer to write, research, revise, and share your ideas with maximum efficiency.
1Writer provides a distraction free writing environment. You can create and edit plain text or Markdown files. It does have many features including inline Markdown preview, word count, dark theme, TextExpander support, insert photo, an extra keyboard row, and many more. See the formatted results with inline Markdown preview while you write and a full, rich-text preview when you're done.
Pick and choose existing Dropbox or WebDAV folders you want to sync or sync them all. Work offline and your changes will be synced next time you connect to the Internet. It also supports iCloud Drive - start a new document on your Mac and continue editing it in 1Writer, and vice versa. You can send text to 1Writer from Safari and other apps via the Share extension or 1Writer URL scheme.
1Writer has a powerful action system. It comes with a ton of built-in actions. Generate a link to share your document in plain text or PDF. Email your document in plain text, formatted text or PDF, and much more.
You can create even more powerful custom actions using URL scheme or JavaScript - text manipulation, replace the clipboard contents, perform a find & replace, insert a document template, look up synonyms - the possibilities are endless.
iWriter Pro
iWriter Pro is elegant and minimalist text editor with built-in MultiMarkdown support.
Clean and Simple
iWriter Pro is designed to be easy yet powerful text editing app. It provides distraction-free writing experience with a bunch of handy features.
Markdown Highlighting
Markdown is a good way to format your text, apply styles, insert lists and block quotes. iWriter Pro automatically highlights text as you type.
iCloud Support
Use iCloud to store your documents. You can easily create, view and edit your files on Mac, iPad and iPhone devices.
How Easy Is It to Write Letters on the iPad? A Comprehensive Guide
Writing letters on your iPad can be as easy as tapping your fingers on the screen. With a variety of apps and tools available, you can quickly draft, edit, and send out letters from anywhere. After completing the task, you’ll have a digital copy of your letter that can be saved, printed, or shared with others.
Introduction
Long gone are the days of pen and ink when it came to writing letters. In this digital age, the iPad has become one of the most versatile tools for composing letters, whether they be personal or professional. But how easy is it really to write letters on the iPad? This is a question that crosses the minds of many iPad owners who might be accustomed to traditional methods or are new to the world of touchscreen devices.
Writing letters on the iPad is relevant to anyone who wants to stay connected with friends and family, or needs to maintain professional correspondence without being tethered to a computer. The iPad offers the convenience of portability, coupled with advanced writing tools that can make your letters look as polished and professional as if they were typed on a computer. In this article, we’ll dive into the step-by-step process of writing letters on an iPad and discuss the pros and cons of using this modern device for an age-old task.
Step by Step Tutorial: Writing Letters on the iPad
Before we get into the steps, let’s talk about what we’ll achieve. By following these instructions, you’ll learn how to use your iPad to create, edit, and send letters. You’ll also discover different methods and apps you can use to make the process even easier.
Step 1: Choose a Writing App
Download and open a writing app like Apple’s Pages or Microsoft Word from the App Store.
Choosing the right app is crucial for a good writing experience on the iPad. Apple’s Pages is free and already integrated with your device, making it an easy choice for many users. Microsoft Word, on the other hand, might be more familiar if you’re used to working on a PC or laptop.
Step 2: Set Up the Document
Create a new document and choose a template or set up your own format.
The great thing about writing apps is that they often come with pre-designed templates for letters. This can save you time on formatting and ensure your letter has a professional look. If you prefer to customize the format, you can easily adjust the font type, size, and line spacing.
Step 3: Write Your Letter
Use the on-screen keyboard, connect an external keyboard, or handwrite with the Apple Pencil to draft your letter.
The flexibility in input methods is one of the iPad’s strengths. If you’re not a fan of the on-screen keyboard, pairing an external keyboard can make typing more comfortable. For a more personal touch, you can even handwrite your letter with the Apple Pencil and convert your handwriting to text.
Step 4: Edit and Format
Go through your letter, making any necessary edits or formatting adjustments.
Editing on the iPad is a breeze, and most writing apps come with powerful editing tools. You can track changes, add comments, and use the find-and-replace function to make sure your letter is error-free and polished.
Step 5: Save and Share
Save your letter to the iPad or cloud storage, and share it through email, print it out, or export it in various formats.
After your letter is complete, it’s important to save your work. Storing it in the cloud means you’ll have access to it from any device. You can then easily share your letter via email or export it as a PDF, Word document, or other formats.
Additional Information
When it comes to writing letters on the iPad, the possibilities are nearly endless. You can choose from a variety of apps, each with its own set of features and tools. Some apps even offer collaboration features, allowing others to contribute to your letter in real-time.
Remember, while the on-screen keyboard is convenient, an external keyboard can provide a more traditional typing experience. Also, don’t forget about the Apple Pencil which can take your handwritten notes and seamlessly convert them to text.
Another tip is to use cloud services like iCloud, Dropbox, or Google Drive to store your letters. This way, you’ll always have a backup and can access them from any device. Finally, if you’re worried about eye strain, many iPads feature True Tone technology which adjusts the screen’s warmth to the ambient light, making it easier on the eyes during extended writing sessions.
- Download a writing app
- Set up your document
- Draft your letter
- Edit and format
- Save and share
Frequently Asked Questions
Can i print my letter directly from my ipad.
Yes, if you have a compatible AirPrint printer, you can print your letter directly from the iPad without needing to transfer it to a computer first.
Is it easy to switch between typing and handwriting on the iPad?
Absolutely, most writing apps will allow you to quickly switch between input methods, making it seamless to add a handwritten signature or note to your typed letter.
Do I need to pay for a writing app on the iPad?
Not necessarily. While some apps do have a cost associated with them, apps like Apple’s Pages are free and come pre-installed on most iPads.
Can I use my iPad to write a letter if I don’t have an Apple Pencil?
Yes, you can use the on-screen keyboard or connect an external keyboard to type your letter. Handwriting is just an additional input option for those who prefer it.
Can I password-protect my letters on the iPad?
Many writing apps offer the option to password-protect your documents, adding an extra layer of security to your personal or professional letters.
Writing letters on the iPad is not just easy; it’s an innovative and flexible way to maintain the art of letter writing in the digital age. With the right app and a few simple steps, anyone can compose, edit, and send a letter from just about anywhere.
Whether you’re a business professional, a student, or someone who enjoys sending handwritten notes to loved ones, the iPad is a powerful tool that can cater to all your letter-writing needs. Give it a try, and you might just find yourself leaving the pen and paper behind for good.

Matthew Burleigh has been writing tech tutorials since 2008. His writing has appeared on dozens of different websites and been read over 50 million times.
After receiving his Bachelor’s and Master’s degrees in Computer Science he spent several years working in IT management for small businesses. However, he now works full time writing content online and creating websites.
His main writing topics include iPhones, Microsoft Office, Google Apps, Android, and Photoshop, but he has also written about many other tech topics as well.
Read his full bio here.
Share this:
Join our free newsletter.
Featured guides and deals
You may opt out at any time. Read our Privacy Policy
Related posts:
- How to Delete Apps on iPad 6th Generation
- How to Make All Columns the Same Width in Excel 2013
- How to Silence Apple Watch
- How to Update Multiple iPad Apps at Once
- How to Turn Off Lowercase Letters on iPhone iOS 9 Keyboard
- How to Format a Professional Business Letter in Word: A Step-by-Step Guide
- How to Delete Apps on Firestick (6 Quick Steps)
- How to Transfer Apps From an iPhone to an iPad: A Step-by-Step Guide
- How to Delete Apps on iPhone 8
- How to Put an iPad in Sleep Mode
- How to Add a New Keyboard on an iPhone 7
- How to Record a Video on the iPad 2
- How to Add the Pinyin Chinese Keyboard on an iPhone
- How Do You Scan a QR Code with an iPad?
- How to Wipe an iPad to Factory Settings Without a Passcode: A Step-by-Step Guide
- How to Unlock an iPad Without a Passcode: A Step-by-Step Guide
- How to Use the AutoFit Excel Shortcut for Columns and Rows
- How to Sign Out of iPhone 13 in iOS 15
- How to Find a Stolen iPad: Tips and Tricks for Recovery
- How to Insert Symbols Above Letters With the Keyboard: A Step-by-Step Guide
How to edit PDFs on iPhone and iPad
Learn how to edit PDFs on iPhone and iPad to start adding notes, signatures and more to digital documents

If you learn how to edit PDFs on iPhone and iPad with this guide, then you won't get caught out the next time you need to modify or sign a PDF document. As PDFs can't be edited by normal word processing apps, you may feel like you're stuck. But lucky for you iOS 15 and iPadOS 15 come with all the regular PDF tools built-in.
Some of these tools definitely work better on the larger iPad display than on an iPhone. Being able to sign a document with an Apple Pencil feels a whole lot better than trying to estimate your signature by drawing with your finger. However it's still good to know these options are there.
Below we'll take you through the steps for how to find these PDF tools and then give a brief description of what you can do with them. Just make sure your iPhone or iPad is up to date and let's go!
In all of our process images below, we've included iPhone screenshots on the left and iPad screenshots on the right.
1. First, you need to find your PDFs . These will quite likely be in the Downloads folder of the Files app (the one with the blue folder icon), but through Files you can check other locations like local or iCloud folders. Once you have found the PDF file you want to edit, tap to open it .

2. Here in the preview screen, swipe up and down to navigate the different pages in your PDF. On an iPhone, swipe in from the left to see all the pages in your PDF, and scroll up and down if needed.

The page outline view automatically shows up on the iPad version.
Sign up to get the BEST of Tom’s Guide direct to your inbox.
Upgrade your life with a daily dose of the biggest tech news, lifestyle hacks and our curated analysis. Be the first to know about cutting-edge gadgets and the hottest deals.

3. To make page-related edits, tap the three dots icon on the page you want to edit, or tap and hold to bring up the menu for a currently unselected page. From here, rotate the page, delete it, add new blank or scanned pages or scan a new one immediately .

4. For in-page edits, use the Markup tools , which you access by tapping the pencil icon in the top right corner.

5. From here, you have a toolbar on the bottom of your screen. The toolbar is fixed in place on the iPhone, but on the iPad simply swipe or drag it towards a side of the screen to position it on that side. Likewise, swipe or drag it towards a corner to minimize the toolbar into that corner.

6. Using your finger (or an Apple Pencil, if you're on an iPad), draw using the pen, pencil or highlighter tools (with the color selected from the wheel on the right of the toolbox). Use the toolbar to switch to eraser, lasso select or ruler . Tap again on these tools when selected for other options like transparency and thickness. With the ruler selected, drag with one finger to move it across the page. Two-finger pinch and twist to rotate the ruler.
7. Tap the + button for extra tools on top of this. This menu lets you add a text box, a signature, a magnifying loupe to read small text and some pre-defined shapes.

That's your crash course in editing PDFs on iPhone and iPad! Pretty easy, right? Now you can learn how to edit a PDF on Mac in just a few steps.
There are plenty of other iPhone and iPad tips to learn about when you've mastered PDF editing. First off, make sure you know how to screenshot a full page on iPhone and iPad without needing to stitch multiple screengrabs together, how to block websites on iPhone and iPad for added security when surfing, and how to stop spam texts on iPhone and how to remove badges on iPhone to cut down on irritating messages and notifications.
If you want some more advanced stuff, we can tell you how to edit photos on iPhone , so you can give your snaps a professional edge, how to identify plants on iPhone so you can increase your botany trivia, or how to use Hide My Email in iOS 15 to avoid even more inbox spam. We also have a guide on what to do when AirDrop isn't working and, if you're due an Apple tablet upgrade soon, how to transfer data from iPad to iPad .

Richard is based in London, covering news, reviews and how-tos for phones, tablets, gaming, and whatever else people need advice on. Following on from his MA in Magazine Journalism at the University of Sheffield, he's also written for WIRED U.K., The Register and Creative Bloq. When not at work, he's likely thinking about how to brew the perfect cup of specialty coffee.
This is the tablet I'd buy — our favorite Android pad just hit its lowest price ever at Amazon
iPad Pro 2024 vs iPad Pro 2022: Biggest expected upgrades
This nasty Android banking trojan lets hackers completely hijack your phone — how to stay safe
Most Popular
By Lee Bell March 29, 2024
By Cynthia Lawrence March 28, 2024
By Christoph Schwaiger March 27, 2024
By Camilla Sharman March 27, 2024
By John Velasco March 27, 2024
By Cynthia Lawrence March 26, 2024
By Camilla Sharman March 25, 2024
By Camilla Sharman March 24, 2024
By Cynthia Lawrence March 24, 2024
By Camilla Sharman March 23, 2024
By Cynthia Lawrence March 23, 2024
- 2 Apple patent reveals ultimate MagSafe accessory — here’s everything it could do
- 3 Epic TV deal knocks $552 off Samsung's 2024 The Frame 4K TV
- 4 One of my favorite action movies just crashed the Netflix top 10 — and it’s 92% on Rotten Tomatoes
- 5 The worst thing about the Galaxy S24 is coming back for the Galaxy S25
How To Write With Apple Pencil On Google Docs

- How-To Guides
- Software Tutorials

Getting Started with Apple Pencil
If you want to elevate your writing experience on Google Docs to a whole new level, using an Apple Pencil with your iPad can make all the difference. Apple Pencil offers a seamless and intuitive way to write and create content digitally, with precision and responsiveness that mimics the feel of using a traditional pen or pencil. Here’s how you can get started with Apple Pencil on Google Docs:
To begin, ensure that your iPad is compatible with the Apple Pencil. Currently, Apple Pencil works with the iPad Air (3rd generation), iPad mini (5th generation), iPad Pro 12.9-inch (1st and 2nd generation), iPad Pro 10.5-inch, and iPad Pro 9.7-inch.
To pair your Apple Pencil with your iPad, simply attach it magnetically to the side of your iPad or plug it into the Lightning connector on your device. Once connected, follow the on-screen prompts to pair your Apple Pencil with your iPad. This step is crucial to ensure that your Apple Pencil functions properly and is recognized by your device.
Now that your Apple Pencil is paired with your iPad, open the Google Docs app from your home screen. If you don’t have the app installed, you can download it for free from the App Store. Make sure you are signed in to your Google account to access and create your documents.
Upon opening Google Docs, you will be presented with a list of your existing documents, or you can choose to create a new document by tapping the “+” button at the bottom right corner of the screen.
Once you have opened a document or created a new one, you can now start writing with your Apple Pencil. Simply tap on the blank space and begin writing or sketching your ideas. The Apple Pencil’s pressure sensitivity allows you to vary the thickness and darkness of your strokes, resulting in a more natural and expressive writing experience.
Moreover, you can easily select and highlight text using your Apple Pencil. To do this, press and hold the tip of your Apple Pencil on the start of the text you want to select, and then drag it to the end of the desired text. You will notice that the text is now highlighted. Release your Apple Pencil to complete the selection.
To format text with Apple Pencil, you can use the formatting options available on the toolbar at the top of the screen. This includes changing the font, font size, text alignment, and more. Simply tap on the formatting option you want to apply and then start writing or editing your document with Apple Pencil.
In addition to text formatting, you can also easily add bulleted or numbered lists to your document using Apple Pencil. Simply tap on the “Bulleted list” or “Numbered list” icon on the toolbar while writing, and a bullet or number will automatically be added to the beginning of each new line.
While writing with Apple Pencil, you may want to insert images or tables into your document. To do this, tap on the “+” button on the toolbar, and a menu will appear with various options. Choose “Image” to insert an image from your device’s photo library or “Table” to add a table to your document. You can then resize or customize these elements as needed.
If you are collaborating with others on a document, you can still use Apple Pencil to contribute. Changes made with Apple Pencil will sync in real-time, allowing you to seamlessly work together with colleagues and editors.
Lastly, it is essential to save and share your document to ensure that your work is safe and accessible. Google Docs automatically saves your changes as you write, but you can manually save the document by tapping on the checkmark icon in the top left corner. To share your document, tap on the share button on the top right corner, and choose the desired sharing options.
Now that you know how to get started with Apple Pencil on Google Docs, you are ready to unleash your creativity and productivity in your digital writing endeavors. Enjoy the fluidity and precision that Apple Pencil brings to your writing experience, making your work standout on Google Docs.
Pairing Apple Pencil with your iPad
To make the most of your Apple Pencil and unlock its full functionality on your iPad, you first need to pair the two devices. The pairing process is straightforward and requires just a few simple steps. Here’s how you can pair your Apple Pencil with your iPad:
1. Ensure that your iPad is compatible with Apple Pencil . As of now, Apple Pencil works with the iPad Air (3rd generation), iPad mini (5th generation), iPad Pro 12.9-inch (1st and 2nd generation), iPad Pro 10.5-inch, and iPad Pro 9.7-inch. Check the Apple website or product documentation if you are unsure about compatibility.
2. Remove the cap at the end of your Apple Pencil to reveal the Lightning connector. This connector allows you to connect your Apple Pencil to your iPad for pairing and charging purposes.
3. Plug the Lightning connector of your Apple Pencil into the Lightning port on your iPad. The iPad will display an on-screen notification indicating that it has detected the Apple Pencil.
4. Follow the on-screen instructions to complete the pairing process. This may include tapping on the Pair button or enabling Bluetooth if prompted. Ensure that your iPad is connected to the internet during this process, as it may require downloading the necessary software or firmware updates.
5. Once the pairing is complete, your Apple Pencil will be ready to use with your iPad. You can start writing, drawing, or navigating the interface using the Apple Pencil’s precise and responsive tip.
If you encounter any issues while pairing your Apple Pencil with your iPad, here are a few troubleshooting tips:
- Make sure your Apple Pencil is fully charged. A low battery level can cause connectivity issues. To charge your Apple Pencil, plug it into the Lightning port on your iPad or use the included Lightning adapter.
- Check that your iPad’s Bluetooth is turned on. To do this, navigate to the Settings app on your iPad, then tap on Bluetooth. If it’s already turned on, try turning it off and then back on again.
- Restart your iPad and try pairing again. Sometimes, a simple restart can resolve connectivity issues.
- If you are still having trouble, visit the Apple Support website or contact Apple Support directly for further assistance.
Once you have successfully paired your Apple Pencil with your iPad, you can enjoy the seamless integration and enhanced productivity that it brings to your digital writing and creative tasks. The precise control and pressure sensitivity of the Apple Pencil make it a valuable tool for artists, designers, students, and anyone looking to elevate their iPad experience.
Opening Google Docs on your iPad
To begin using Google Docs with your Apple Pencil on your iPad, you’ll first need to open the Google Docs app. The Google Docs app allows you to create, edit, and collaborate on documents seamlessly. Here’s how you can open Google Docs on your iPad:
1. Check if you have the Google Docs app installed on your iPad. If not, head to the App Store and search for “Google Docs.” Tap on the “Get” or “Install” button to download and install the app onto your device. The Google Docs app is available for free.
2. Once the Google Docs app is installed, locate its icon on your home screen or in your app library. It features the Google Docs logo, which is a blue document with a white pen icon in the corner. Tap on the icon to launch the app.
3. If you haven’t signed in to your Google account on the app, you’ll be prompted to do so. Enter your username and password and tap “Sign in.” If you have multiple Google accounts, select the one you want to use with Google Docs.
4. After signing in, you’ll be taken to the main screen of the Google Docs app. Here, you’ll see a list of your existing documents and folders if you have any. If this is your first time using Google Docs, the list may be empty.
5. To create a new document, tap on the “+” (plus) button at the bottom right corner of the screen. This will open a blank document for you to start writing with your Apple Pencil.
6. If you already have existing documents that you want to access, simply tap on the document’s name in the list to open it. The document will load, and you can start editing or reading it using your Apple Pencil.
It’s worth noting that the Google Docs app requires an internet connection to function. Ensure that your iPad is connected to Wi-Fi or cellular data to access your documents and collaborate with others in real time.
Should you encounter any issues opening Google Docs on your iPad, here are a few troubleshooting tips:
- Make sure that you have a stable internet connection. Check your Wi-Fi or cellular data settings and try reconnecting if necessary.
- If the app is not loading or responding, try force quitting the Google Docs app and relaunching it. To force quit an app on your iPad, swipe up from the bottom of the screen and pause slightly in the middle. Then, swipe left or right to find the Google Docs app preview and swipe it up to close it.
- Ensure that you have the latest version of the Google Docs app installed on your iPad. Updates often contain bug fixes and performance improvements, which can help resolve any issues you may encounter.
- If all else fails, try deleting the app and reinstalling it from the App Store. This can sometimes fix any underlying software issues that may be causing problems.
Now that you know how to open Google Docs on your iPad, you’re ready to start writing, editing, and collaborating on your documents using the power of your Apple Pencil.
Creating a New Document
Creating a new document in Google Docs using your iPad and Apple Pencil is a straightforward process that allows you to start writing or sketching your ideas in no time. Here’s how you can create a new document:
1. Open the Google Docs app on your iPad. If you don’t have the app installed, you can download it for free from the App Store. Sign in to your Google account if prompted.
2. Once you’re in the Google Docs app, you’ll see a list of your existing documents. To create a new document, tap on the “+” (plus) button at the bottom right corner of the screen. This will open a blank document for you to start working on.
3. The blank document will appear on your screen, ready for you to add content. You can now use your Apple Pencil to write, draw, or sketch directly on the canvas. The Apple Pencil’s precision and responsiveness make it feel like you’re writing with a real pen or pencil.
4. Simply tap on the blank space within the document and start writing with your Apple Pencil. As you write, your strokes will instantly appear on the screen, allowing you to see your work in real time.
5. If you need to switch between writing and typing, you can also use the on-screen keyboard. Tap on the spot where you want to start typing, and the keyboard will appear. To go back to writing with your Apple Pencil, tap anywhere outside the keyboard area.
6. As you create your document, Google Docs will automatically save your changes in real time. This eliminates the need for manual saving and ensures that your work is always up to date. You can also save the document manually by tapping on the checkmark icon in the top left corner.
7. To exit the document and return to the main screen of the Google Docs app, tap the back arrow icon in the top left corner or swipe right from the left edge of the screen. Your document will be saved, and you can easily find it later in the list of documents.
Creating a new document in Google Docs with your iPad and Apple Pencil gives you the flexibility to work on the go and capture your ideas as they come to you. Whether you’re taking notes, brainstorming, or working on a project, the combination of Apple Pencil and Google Docs provides a seamless and convenient way to bring your thoughts to life.
Writing with Apple Pencil on Google Docs
Writing with Apple Pencil on Google Docs combines the precision and fluidity of digital writing with the convenience and power of a cloud-based document editor. Whether you’re taking notes, drafting a document, or working on a creative project, here’s how you can make the most of writing with Apple Pencil on Google Docs:
To start writing, open Google Docs on your iPad and create a new document or open an existing one. Once you’re in the document, tap on the blank space or anywhere you want to add text. This will activate the document for writing, and the on-screen keyboard will appear.
Now, with Apple Pencil, you have the versatility to write directly on the screen. Simply pick up your Apple Pencil and start writing on the canvas. The Apple Pencil’s precise tip and pressure sensitivity allow you to create smooth and natural strokes, making your digital writing experience feel like using a traditional pen or pencil on paper.
As you write with Apple Pencil , your strokes will be instantly displayed on the screen, allowing you to see and edit your work in real time. This immediate feedback ensures a seamless and fluid writing experience, enabling you to focus on your ideas and thoughts without interruption.
In addition to writing, Google Docs supports a variety of editing features that can enhance your writing process. You can easily select and highlight text using your Apple Pencil. To do this, press and hold the tip of your Apple Pencil on the start of the text you want to select, and then drag it to the end of the desired text. You will notice that the text is now highlighted. Release your Apple Pencil to complete the selection.
To format text with Apple Pencil, you can utilize the formatting options available on the toolbar at the top of the screen. This includes changing the font, font size, text color, text alignment, and more. Simply tap on the formatting option you want to apply, and then start writing or editing your document with Apple Pencil.
In addition to text formatting, you can also add bulleted or numbered lists to your document using Apple Pencil. Simply tap on the “Bulleted list” or “Numbered list” button on the toolbar while writing, and a bullet or number will automatically be added to the beginning of each new line.
To navigate and scroll through your document while writing, you can use two-finger gestures on the screen. Place two fingers on the screen and move them up, down, left, or right to scroll through your document effortlessly.
Furthermore, Google Docs offers real-time collaboration, allowing you to work together with others on the same document simultaneously. This collaborative feature is particularly useful for team projects, group brainstorming sessions, or editing sessions with colleagues. Each person’s changes made with Apple Pencil will be visible to all collaborators in real time.
No matter the size of your writing project, Google Docs ensures that your work is automatically saved as you write. This auto-save feature ensures that your progress is never lost, providing peace of mind and allowing you to focus solely on your writing.
Writing with Apple Pencil on Google Docs provides an efficient and seamless experience that empowers you to transform your ideas into polished documents. The combination of Apple Pencil’s precision and Google Docs’ powerful editing features makes it an ideal choice for writers, students, professionals, and anyone looking to enhance their digital writing experience.
Selecting and Highlighting Text
When using Apple Pencil on Google Docs, selecting and highlighting text is a breeze and allows you to easily edit and organize your document. Here’s how you can select and highlight text with Apple Pencil:
To begin, open your document in the Google Docs app on your iPad. Tap and hold the tip of your Apple Pencil on the starting point of the text you want to select. Then, drag your Apple Pencil across the screen to highlight the desired text. As you drag, you’ll see the text being highlighted in a different color, indicating that it has been selected.
If you want to select a specific word, double-tap on it with the tip of your Apple Pencil. Google Docs will recognize this action and select the entire word. Alternatively, you can triple-tap to select an entire paragraph. This feature makes selecting text more precise and efficient, especially when working with larger documents.
Once the text is selected, you can perform various actions on it. For instance, you can copy the selected text by tapping on the “Copy” button that appears above the selection. This makes it easy to duplicate text or move it to another location within the document or to a different application.
If you want to highlight text with a specific color, you can tap on the “Highlight” button that appears above the selected text. This will display a palette of colors to choose from. Simply tap on the desired color, and the selected text will be highlighted accordingly. Highlighting specific sections of your document is useful for emphasizing important points, categorizing information, or making specific text stand out.
Moreover, you can also apply text formatting options to the selected text. Google Docs provides a formatting toolbar at the top of the screen, where you can change the font, font size, font color, style, and more. When you select a portion of text with Apple Pencil, the formatting toolbar automatically updates to reflect the formatting options applicable to the selected text. Simply tap on the desired formatting option to apply it to the selected text.
In addition to highlighting and formatting, you can also delete or replace the selected text. Once the text is selected, simply tap on the “Delete” key on the on-screen keyboard to remove the selected text. Alternatively, you can start typing, and the selected text will be replaced with the new input.
It’s worth noting that the actions mentioned above apply to both text and images within the document. You can easily select, highlight, and modify images using Apple Pencil, allowing you to arrange and adjust visual elements within your document with precision and ease.
Being able to select and highlight text using Apple Pencil on Google Docs enhances your document editing and organization capabilities. It provides a seamless and efficient approach to working with text and images, allowing you to create and refine your document with precision and ease.
Formatting Text with Apple Pencil
When using Apple Pencil on Google Docs, you have the ability to format text with precision, allowing you to create visually appealing and well-structured documents. Here’s how you can format text with Apple Pencil on Google Docs:
After opening your document in the Google Docs app on your iPad, simply tap and hold the tip of your Apple Pencil on the desired section of text that you want to format. A toolbar with formatting options will appear at the top of the screen, allowing you to customize the appearance of the selected text.
One of the fundamental formatting options available is changing the font style and size. You can tap on the “Font” option in the toolbar and select from a variety of font styles available. Additionally, you can adjust the font size by selecting the “Size” option and choosing your preferred size from the dropdown menu.
If you want to make the selected text bold, italicized, or underlined, you can tap on the corresponding buttons in the formatting toolbar. These styling options are useful for adding emphasis, indicating importance, or distinguishing specific sections within your document.
Furthermore, you can change the color of the selected text by tapping on the “Text color” option in the formatting toolbar. This will open a palette of colors from which you can choose to apply to the selected text. Customizing the text color can help differentiate sections, highlight keywords, or enhance the overall visual appeal of your document.
Alignment is another essential aspect of text formatting. Google Docs provides options for left aligning, centering, right aligning, and justifying text. To change the alignment of the selected text, tap on the corresponding alignment button in the toolbar. This allows you to create a visually consistent and organized document layout.
In addition to the basic formatting options, you can also create bulleted or numbered lists with your Apple Pencil. When creating a new line in your document, if you want to add a bullet or a number to the line, simply tap on the “Bulleted list” or “Numbered list” button in the formatting toolbar. Each new line will automatically begin with a bullet point or number, helping you organize information and create easy-to-read lists.
If you are looking to add a hyperlink to the selected text, tap on the “Insert link” option in the toolbar. This will allow you to enter the desired URL and assign it to the selected text. By inserting hyperlinks, you can provide references, direct readers to external resources, or link to specific sections within your document.
Lastly, if you make a mistake while formatting text, you can easily undo or redo your changes. Simply tap on the “Undo” or “Redo” buttons in the toolbar, respectively, to reverse or reapply the most recent formatting action.
Remember, as you format text with Apple Pencil, Google Docs automatically saves your changes. This ensures that your formatting remains intact, even if you close the document or switch to a different device.
Formatting text with Apple Pencil on Google Docs allows you to personalize and enhance the visual appearance of your documents. Utilizing the various formatting options ensures that your text is presented in a clear, organized, and aesthetically pleasing manner, making your documents stand out and engage your readers.
Adding Bulleted or Numbered Lists
Creating bullet or numbered lists with Apple Pencil on Google Docs is a useful formatting option that enhances the readability and organization of your documents. Whether you want to create a to-do list, outline key points, or present information in a structured manner, here’s how you can add bulleted or numbered lists:
Begin by opening your document in the Google Docs app on your iPad. If you’re creating a new document, tap the “+” (plus) button to start a new blank document.
To add a bulleted list, position your cursor or tap on the desired location within the document with your Apple Pencil. Then, tap on the “Bulleted list” button in the formatting toolbar located at the top of the screen. Each time you press Enter or begin a new line, a bullet point will automatically be added.
If you prefer a numbered list, follow the same steps as above but tap on the “Numbered list” button instead. This will create a list where each new line is preceded by a number.
To indent or create sub-items within your list, position your cursor at the beginning of the line you want to indent and tap on the “Increase indent” button in the formatting toolbar. This will move the line further to the right, creating a sub-item within your list. To decrease the indent, tap on the “Decrease indent” button.
If you want to return to regular text formatting outside of the list, simply tap the “Bulleted list” or “Numbered list” button again to disable the list format. You can then continue writing without bullet points or numbers.
Google Docs also allows you to customize the appearance of your bullet or number style. To do this, tap on the “More options” button (represented by three dots) next to the “Bulleted list” or “Numbered list” button. A menu will appear with various bullet or numbering styles to choose from. Select the style that best fits your document’s aesthetic or purpose.
When collaborating with others on a Google Docs document, any changes made to the bulleted or numbered lists with Apple Pencil will be instantly visible to all collaborators in real time. This feature allows for efficient teamwork and seamless coordination.
Remember, Google Docs automatically saves your changes as you type or edit, including the formatting of your lists. This saves you the hassle of manual saving and ensures that your document is always up to date.
By incorporating bulleted or numbered lists into your documents with Apple Pencil on Google Docs, you can present information in a clear, concise, and organized manner. Whether you’re creating outlines, educational materials, or project plans, bullet and numbered lists add structure and improve readability, helping your audience better understand and engage with your content.
Inserting Images and Tables
Adding images and tables to your documents can greatly enhance the visual appeal and presentation of your content. With Apple Pencil on Google Docs, you can easily insert images and tables to create engaging and organized documents. Here’s how you can do it:
To begin, open your document in the Google Docs app on your iPad. If you’re starting a new document, tap the “+” (plus) button to create a blank document.
Inserting an image is as simple as tapping on the spot within the document where you want the image to appear. Then, tap the “+” (plus) button in the toolbar to open the insert menu. From the options provided, choose “Image.” This will allow you to select an image from your device’s photo library. You can browse through your photos and select the image you want to insert. Once selected, the image will be placed in your document, and you can resize or reposition it as needed.
If you want to insert a table into your document, follow a similar process. Tap on the spot within the document where you want the table to be inserted, then tap the “+” (plus) button in the toolbar. From the insert menu, select “Table.” This will open a grid-like interface where you can specify the number of rows and columns for your table. Simply tap on the desired number of rows and columns, and the table will be added to your document. You can then populate the table with text, numbers, or additional content.
To resize an image or table, tap on the item to select it. You’ll notice resizing handles appear at the corners and sides. Simply tap and drag these handles to increase or decrease the size of the image or table. This allows you to adjust the dimensions of the image or table to fit your document layout and design.
If you need to adjust the position of the image or table, tap and hold on it with your Apple Pencil. Then, drag it to the desired location within your document. This flexibility allows you to arrange and organize your content in a way that best suits your needs.
When collaborating with others on a document, any images or tables added with Apple Pencil will be visible to all collaborators in real time. This real-time collaboration ensures seamless teamwork and facilitates efficient communication.
It’s important to note that Google Docs automatically saves your changes, including images and tables, as you work. This ensures that your document is continuously updated and can be accessed from any device with an internet connection.
By leveraging the power of Apple Pencil on Google Docs, you can easily incorporate images and tables into your documents, bringing visual appeal and organization to your content. Whether you’re creating reports, presentations, or educational materials, images and tables provide an effective means of visually conveying information and enhancing the overall quality of your documents.
Collaborating with Others
Collaboration is a key aspect of document creation, and with Google Docs and Apple Pencil, working with others becomes effortless. Collaborating with colleagues or team members on a document ensures that everyone’s input is incorporated, resulting in a more comprehensive and polished final product. Here’s how you can collaborate with others using Apple Pencil on Google Docs:
To begin, open your document in the Google Docs app on your iPad. Ensure that you are signed in to your Google account to access the collaboration features.
When collaborating on a document with others, you can view who else is active in the document by looking at the top-right corner of the screen. You’ll see the profile pictures of any collaborators currently viewing or editing the document.
Collaborators can contribute to the document simultaneously, making real-time changes that are visible to all participants. If someone is using Apple Pencil, their edits and additions will instantly appear on the screen for everyone to see.
You can communicate and share ideas with collaborators through the built-in chat feature in Google Docs. Tap on the chat icon in the top-right corner, and a chat window will appear. You can then type and send messages to your collaborators, discussing specific sections of the document or clarifying any questions or concerns.
Collaborators can also leave comments on specific parts of the document using Apple Pencil. To do this, select the text or image that you want to comment on and tap on the “Comment” icon that appears. This will open a sidebar where you can enter your comment. Collaborators can then reply to the comment, creating a threaded conversation for easy reference and discussion.
If you want to assign specific tasks or request input from a particular collaborator, you can use the “Assign action item” feature. To do this, select the text or section in the document that needs attention, tap on the “+ ” icon in the toolbar, and choose “Action items.” Enter the collaborator’s name or email address and add a description of the assigned task. This feature helps streamline collaboration and keeps track of individual responsibilities.
When collaborating on a document, it’s important to note that Google Docs automatically saves changes made by each collaborator in real time. This ensures that everyone’s contributions and edits are captured, and no information is lost. You can see the real-time updates as each change is made, providing a cohesive and synchronized workflow for all collaborators.
Collaboration extends beyond Apple Pencil and the Google Docs app. You and your collaborators can access and work on the document from multiple devices, including laptops, desktop computers, and other tablets. This allows for seamless collaboration, enabling you to continue working on the document regardless of your location or device.
With Apple Pencil on Google Docs, collaborating with others becomes a dynamic and efficient process. The smooth integration of real-time editing, commenting, task assignment, and communication features facilitates seamless teamwork and brings out the best in collaborative document creation.
Saving and Sharing your Document
Saving and sharing your document is essential to ensure that your work is secure, accessible, and can be easily shared with others. With Apple Pencil on Google Docs, saving and sharing your document is a seamless process. Here’s how you can do it:
When working on your document in the Google Docs app on your iPad, your changes are automatically saved in real time. This means that you don’t have to worry about manually saving your work. Google Docs continuously saves each edit, ensuring that all the updates are captured and preserved.
To ensure that your document is saved and up to date, you can manually save it by tapping on the checkmark icon in the top left corner of the screen. This action will trigger an immediate save of your document, providing an additional level of assurance that your progress is securely stored.
Sharing your document is effortless with Google Docs. Tap on the share button located in the top right corner of the screen. This will open a menu where you can specify the sharing settings and invite others to collaborate on or simply view your document.
In the sharing menu, enter the email addresses or names of the people you want to share the document with. You can also adjust the sharing permissions, granting them the ability to edit, comment, or only view the document. Additionally, you can generate a link to the document and share it via email or messaging apps. This allows recipients to access the document without needing explicit permission.
Furthermore, you can choose whether collaborators need to sign in with a Google account to access the document or if it can be accessed by anyone with the link. These flexible sharing options give you complete control over who can view and edit your document, ensuring the privacy and security of your work.
Collaborators who have access to your document can open it on their own devices using the Google Docs app or any compatible web browser. They can continue working on the document, making edits, adding comments, and contributing to the collaborative process.
Google Docs also provides the option to make your document available offline. This feature allows you to access and work on your document even when you don’t have an internet connection. Any changes made while offline will be synced back to the cloud when you regain internet access, ensuring that your work is always up to date.
If you want to export your document in a different format, such as a PDF or Microsoft Word document, you can do so from the Google Docs app. Tap on the three dots icon in the top right corner of the screen, then select “Export.” Choose the desired format, and Google Docs will create a downloadable file for you to save or share.
Saving and sharing your document with Apple Pencil on Google Docs is a seamless process that allows you to protect your work, collaborate with others, and share your ideas with ease. The automatic saving, flexible sharing options, and offline accessibility ensure that your document remains secure, accessible, and ready to be shared with others.
Troubleshooting Common Issues
While using Apple Pencil on Google Docs is generally a smooth and hassle-free experience, you may occasionally encounter some common issues. Here are a few troubleshooting tips to help you resolve these problems:
1. Connectivity issues: If your Apple Pencil is not connecting or pairing properly with your iPad, ensure that Bluetooth is enabled on your iPad. You can check this by going to the Settings app and navigating to Bluetooth. If it’s already enabled, try turning it off and then back on again. Additionally, make sure your Apple Pencil is fully charged, as a low battery level can cause connectivity issues. Simply connect your Apple Pencil to your iPad and let it charge for a while.
2. App not responding: If the Google Docs app becomes unresponsive or freezes, try force quitting the app and then relaunching it. To force quit an app on your iPad, swipe up from the bottom of the screen and pause slightly in the middle. Then, swipe left or right to find the Google Docs app preview and swipe it up to close it. Once closed, reopen the Google Docs app and check if it functions properly.
3. Outdated app version: Ensure that you have the latest version of the Google Docs app installed on your iPad. App updates often include bug fixes and performance improvements, which can help resolve any issues you may be experiencing. To check for updates, open the App Store, go to the Updates tab, and see if there is an available update for the Google Docs app. If an update is available, tap on the “Update” button to install it.
4. Poor internet connection: If you’re experiencing slow speeds or intermittent internet connection, it can impact the performance of Google Docs and Apple Pencil on your iPad. Make sure that you are connected to a stable and reliable Wi-Fi network. If you’re using cellular data, check your signal strength and consider moving to a location with better reception. A strong and stable internet connection will ensure a seamless experience while using Apple Pencil on Google Docs.
5. Unresponsive or laggy writing: If you notice that your writing with Apple Pencil is unresponsive or laggy, try restarting your iPad. Sometimes, temporary glitches or memory-related issues can affect the performance of Apple Pencil. Simply turn off your iPad, wait a few seconds, and then turn it back on. This can often resolve any performance issues and restore smooth functionality.
6. Seek further assistance: If you have tried the above troubleshooting steps and are still experiencing issues, consider visiting the Apple Support website or contacting Apple Support directly. They can provide further guidance and assistance to address any specific issues you may be facing with Apple Pencil or the Google Docs app on your iPad.
By following these troubleshooting tips, you can overcome common issues and enjoy a seamless experience while using Apple Pencil on Google Docs. Don’t let technical difficulties hinder your creativity and productivity; instead, tackle them head-on and continue to create and collaborate with ease.
Using Apple Pencil on Google Docs opens up a world of possibilities for digital writing and collaboration. The seamless integration of Apple Pencil’s precise and responsive capabilities with the powerful features of Google Docs allows you to elevate your writing experience to new heights. Whether you’re a student, professional, or creative individual, Apple Pencil on Google Docs offers a range of benefits.
With Apple Pencil, you can write, sketch, highlight, and format text with ease, bringing a natural and intuitive feel to your digital writing. The pressure sensitivity and precise tip allow for a seamless transition from pen and paper to the digital realm, making your writing experience more comfortable and engaging.
Google Docs on your iPad provides a robust platform for document creation and collaboration. With real-time editing, comments, chat functionality, and task assignments, working together with colleagues or classmates has never been easier. Apple Pencil enhances this collaborative experience, empowering you to make edits, leave comments, and contribute to the document with precision and ease.
By inserting images and tables, you can further enhance the visual appeal and organization of your documents. Capture ideas with sketches or diagrams, present information in a structured format, and create polished documents that engage and inform your audience.
Remember to save and share your documents to ensure accessibility and collaboration. Google Docs’s auto-save feature eliminates the fear of losing your work, while its flexible sharing options allow you to collaborate with others seamlessly. Whether you’re coediting a document or presenting your work, Apple Pencil and Google Docs provide a streamlined platform for communication and sharing.
Should you encounter any issues, such as connectivity, app responsiveness, or writing delay, use the provided troubleshooting tips to overcome them. Apple Support and the Google Docs Help Center are also valuable resources for more specific guidance.
In conclusion, Apple Pencil on Google Docs unlocks a new level of creativity and productivity. Seamlessly integrating digital writing, collaboration, and document creation, this powerful combination empowers you to bring your ideas to life with precision and style. Embrace the fluidity of Apple Pencil and the versatility of Google Docs to elevate your digital writing experience and create impactful documents that stand out.
Leave a Reply Cancel reply
Your email address will not be published. Required fields are marked *
Save my name, email, and website in this browser for the next time I comment.
- Crowdfunding
- Cryptocurrency
- Digital Banking
- Digital Payments
- Investments
- Console Gaming
- Mobile Gaming
- VR/AR Gaming
- Gadget Usage
- Gaming Tips
- Online Safety
- Tech Setup & Troubleshooting
- Buyer’s Guides
- Comparative Analysis
- Gadget Reviews
- Service Reviews
- Software Reviews
- Mobile Devices
- PCs & Laptops
- Smart Home Gadgets
- Content Creation Tools
- Digital Photography
- Video & Music Streaming
- Online Security
- Online Services
- Web Hosting
- WiFi & Ethernet
- Browsers & Extensions
- Communication Platforms
- Operating Systems
- Productivity Tools
- AI & Machine Learning
- Cybersecurity
- Emerging Tech
- IoT & Smart Devices
- Virtual & Augmented Reality
- Latest News
- AI Developments
- Fintech Updates
- Gaming News
- New Product Launches
- AI Writing How Its Changing the Way We Create Content
- How to Find the Best Midjourney Alternative in 2024 A Guide to AI Anime Generators
Related Post
Ai writing: how it’s changing the way we create content, unleashing young geniuses: how lingokids makes learning a blast, 10 best ai math solvers for instant homework solutions, 10 best ai homework helper tools to get instant homework help, 10 best ai humanizers to humanize ai text with ease, sla network: benefits, advantages, satisfaction of both parties to the contract, related posts.

How To Type An Exponent On A Chromebook

What Tablet Should I Buy For College

Which Tablet Is Best For Taking Notes

What Is The Best Tablet For Writing Notes

What Tablet Has Microsoft Word

Which Tablet Has Microsoft Office

What Is The Most Expensive Tablet

How To Write On Pdf On Ipad With Apple Pencil
Recent stories.

How to Find the Best Midjourney Alternative in 2024: A Guide to AI Anime Generators

How to Know When it’s the Right Time to Buy Bitcoin

How to Sell Counter-Strike 2 Skins Instantly? A Comprehensive Guide

10 Proven Ways For Online Gamers To Avoid Cyber Attacks And Scams

- Privacy Overview
- Strictly Necessary Cookies
This website uses cookies so that we can provide you with the best user experience possible. Cookie information is stored in your browser and performs functions such as recognising you when you return to our website and helping our team to understand which sections of the website you find most interesting and useful.
Strictly Necessary Cookie should be enabled at all times so that we can save your preferences for cookie settings.
If you disable this cookie, we will not be able to save your preferences. This means that every time you visit this website you will need to enable or disable cookies again.

How To Get The Most Out Of The Files App On Your iPhone And iPad
T he Files app on your iPhone and iPad lets you quickly view and effectively manage documents stored on your device and on online cloud services like Google Drive, Dropbox, iCloud, and more. The app has revolutionized how iOS users, from students to professionals, access their documents and data.
But people often don't recognize that the Files app can do a lot more than just serve as a document viewer. From compressing files to editing documents and images via the built-in tools, Files supports a range of functions that can simplify your digital tasks.
Whether you're a seasoned iOS user who hasn't explored the myriad capabilities of the Files app or you've just made the shift to the iOS ecosystem from Android and would like to get the most of this app from the get-go, exploring the functions of this powerful tool can help you use your iPhone or iPad as a hub for pretty much all your digital productivity needs.
Read more: The 20 Best Mac Apps That Will Improve Your Apple Experience
Find And Manage Files
One of the key (and most widely recognized) capabilities of the Files app is that it helps you access documents and images on your device, as well as on iCloud . All you need to do to find a file on your iPad or iPhone is launch the Files app and type the file name (or even a word from the name) in the search bar.
This will initiate the search across all possible locations and pull up relevant search results.
Additionally, there are plenty of file management functions available within the Files app that help you organize your documents. For instance, if you want to access these files quicker next time, you can add them to a new folder.
The folder can be accessed by tapping the Browse icon on your Files app. You can also tap the file to view when it was created and modified.
Tapping a document or image in this folder will also let you rename, duplicate, move, and share it via instant messaging platforms or even AirDrop. You can even add tags to your documents and images for easy categorization.
Edit And Delete Documents And Images
Thanks to the capabilities of the Files app, you can edit your documents and images through the app without having to rely on additional editing software or apps . Some editing capabilities include the option to rotate your image, convert your image into a different format (like, say, JPEG to PNG), and remove the background.
To access these features, navigate to the Files app, long-press the document or image, and select Quick Actions from the drop-down menu — you'll be able to see all the editing tools.
Additionally, the app provides built-in tools to add text overlays or signatures, annotate or highlight parts of the document or image, erase unwanted elements, and even magnify the text or image for better readability. These features can also come in handy if you need to fill out or edit forms.
To use these tools, you'll need to launch the Files app, open a document or image, and tap the Markup button (which you'll see in one of the corners indicated by a pen icon). Doing this will bring up the markup toolbar. Select the appropriate tool based on what you want to do, and click Done at the end to save the changes.
If you don't need a file anymore, you can even delete it from the Files app. Keep in mind that deleted documents and images remain in Recently Deleted for 30 days. After this, the files are permanently removed.
Scan Documents
If you've been using a third-party app to scan your documents, you'll be pleased to know that you no longer have to rely on external scanning applications . With the built-in scanner, you get a user-friendly tool that will allow you to scan sensitive documents securely and manage your scanned documents all in one place.
By using Apple's native document scanner, which is available in the Files app on both your iPhone and iPad, you'll be able to scan documents and images and save them to Files to access at a later point in time.
To scan a document on your iPhone or iPad, all you need to do is launch Files, click the ellipsis icon at the top, and select Scan Documents. Once that's done, point the camera at the document you want to scan and drag the corners to adjust the dimensions. You can choose to save the scanned image on your device or retake the scan.
Connect To External Storage Or NAS
While you can access files stored on cloud storage services like DropBox and Google Drive, did you know the Files app also allows you to access data stored on USB sticks, SD cards, and external hard drives?
You'll need a compatible adapter and cable to connect your external storage devices to your iPhone or iPad and access the data. Once this is done, the Files app will identify the storage devices and let you access the content stored on the drive through Files. Keep in mind, though, that a hard drive may require power from an external source when used with an iPhone.
Alternatively, if you have a NAS, you can establish a connection to it using Files and proceed with accessing the data. To set up this connection, launch Files on your iPhone or iPad, tap the three ellipses at the top of the screen and select Connect to Server.
In the pop-up box that opens, type either the IP address or the name of the server. You'll now need to indicate if you're connecting as a guest or a registered user (in the case of the latter, key in your name and password).
Compress And Uncompress Files
If you're trying to share a number of files with someone, you can compress them via Files before you send them. Not only does this reduce the overall file size, but it also makes storing a lot of data on your phone or iPad easier since zipped files don't take up as much space. Additionally, it's a great solution if you're looking to share data privately with another person.
To compress a file, open the Files app, long-press the folder you want to zip, and select Compress from the drop-down menu. Files will create a zipped folder that you can then share via mail, messaging apps, or AirDrop . You can even upload the folder to an online cloud service.
If you're trying to zip a series of individual documents or images, click the ellipses icon, tap Select, and start selecting all the documents you want to compress. Then, select the ellipses icon at the bottom and tap Compress.
If you just received a zipped folder, you can uncompress it using Files as well. Again, to do so, you'll need to navigate to the Files app, long-press the folder, and select Uncompress when the drop-down menu appears. Before you unzip a folder, however, make sure you have adequate space on your device.
Read the original article on SlashGear .

CNN values your feedback
The christian reaction to trump’s bible endorsement goes deeper than you think.

Former President Donald Trump is officially selling a patriotic copy of the Christian Bible themed to Lee Greenwood’s famous song, “God Bless the USA.”
“Happy Holy Week!” Trump announced on social media Tuesday, during the most solemn period of the Christian calendar, the last week of the Lenten season marking the suffering and death of Jesus. “As we lead into Good Friday and Easter, I encourage you to get a copy of the God Bless The USA Bible.”
The concept of a Bible covered in the American flag, as well as a former president’s endorsement of a text Christians consider to be sacred, has raised concern among religious circles. It’s also raised questions about Trump’s motivations, as the former president finds himself in the middle of several expensive legal battles.
‘Sacrilege,’ theology, and the shadow of Christian nationalism
The $59.99 Bible, which was first published in 2021, features an American flag and the words “God Bless the USA” printed on the cover. Inside, it has the words to “God Bless the USA” and the text of The Declaration of Independence, the Pledge of Allegiance and other historic American documents. Promotional material for the Bible shows the former president alongside country singer Lee Greenwood.
Responses to Trump’s social media announcement called the endorsement “ sacrilege ,” “ heresy ” and “ borderline offensive ” and cite lessons directly from the Bible that suggest taking advantage of people’s faith for money should be condemned.
“It is a bankrupt Christianity that sees a demagogue co-opting our faith and even our holy scriptures for the sake of his own pursuit of power and praise him for it rather than insist that we refuse to allow our sacred faith and scriptures to become a mouthpiece for an empire,” said Rev. Benjamin Cremer on X.
Jason Cornwall, a pastor from South Carolina , said on X that Trump’s Bible endorsement was a violation of one of the Ten Commandments of the Hebrew Testament that forbids taking God’s name in vain.
However, the criticism doesn’t end with whether or not Trump’s endorsement is un-Christian or not. In fact, it’s just the beginning.
Historian and author Jemar Tisby says the whole project echoes the values of Christian nationalism — the idea that America was founded as a Christian nation and the government should work to sanction Christianity on a national scale. The tenets of Christian nationalism are historically tied to prejudice, nativism and white supremacy.
“There’s a very long tradition of what is included and what is not included in the Bible,” Tisby told CNN.
“What has caused outrage with this Bible is that it includes the Declaration of Independence, US Constitution, and even the lyrics to a Lee Greenwood song. So it’s adding to the Bible, and it’s adding specific political documents to the Bible that completely erase the separation of church and state.”
Tisby, who holds a Master of Divinity Degree from Reformed Theological Seminary in Jackson, Mississippi, has written about the dangers of Christian nationalism — both for the country and the Christian faith.
“What’s so pernicious about this is it plays on people’s devotion to God and their love of country, either of which by themselves could be innocuous or even good,” he said.
“But in this effort, it is blending the two. And with Trump as the spokesperson, is conveying a very clear message about what kind of Christianity and what kind of love of nation (he is) promoting.”

When Guthrie Graves-Fitzsimmons, communications director for the Baptist Joint Committee for Religious Liberty, saw Trump’s Bible endorsement, he said he saw a politician using fears rooted in racism and prejudice to promote a specific Christian ideology.
“When I hear ‘Make America Pray Again,’ I hear Christian nationalist promises that we are going to somehow ‘restore’ Christianity in this country. And if authoritarianism does come to the United States, it’s all but guaranteed it will be done in the name of Christianity, which is a very scary thought.”
Graves-Fitzsimmons holds a Master of Divinity degree from Union Theological Seminary in New York City and also works with the group Christians Against Christian Nationalism . He says things like the “God Bless America” Bible overlook the many, many Christians who do not agree with Trump’s politics or the blending of patriotism with faith.
“There is a diversity within American Christianity that gets overlooked whenever politics and religion intersect,” he told CNN. “There’s this false notion that most American Christians are pushing for anti-abortion restrictions , and are anti-LGBTQ, and the opposite is actually true . Christians, I would argue, are the ones who are most concerned about the effects of Christian nationalism in this country.”
This version of the Bible has drawn controversy before
The “God Bless the USA” Bible drew controversy from community members and publishers when it was published in 2021. It was originally supposed to be published by HarperCollins Christian Publishing, but the company passed on the deal.
HarperCollins said in 2021 that pushback to the concept was not a factor in their decision. (Eagle-eyed Bible buffs will note this is why the Trump-backed tome uses the King James Version of the text, which is in the public domain. ( HarperCollins holds US publishing rights to the bestselling New International Version translation of the Bible.)
Tisby has published three books under Zondervan, the HarperCollins imprint specializing in religious publications. He was among the imprint’s writers who tried to discourage them from publishing the “God Bless the USA” Bible when the idea was first introduced.
“We did not want to be associated with a publisher who’s going to publish a Bible like this,” he said. “And I think it took on an elevated sense of urgency because we’re not just talking about someone’s book. We’re talking about the sacred text of the Bible.”

While there are innumerable versions of the Bible — ranging widely in price, theme, and additions like indices, references, maps and graphs — this particular combination of the Bible and a beloved patriotic song is especially potent.
Such a notion doesn’t come as a surprise to David W. Peters , an Anglican vicar in Pflugerville, Texas. Peters served as an enlisted Marine Corps and Army Chaplain and was deployed to Iraq in 2005.
“I am reminded of how we closed every Marine Corps boot camp chapel service with Lee Greenwood’s ‘God Bless the USA’,” he told CNN. “We’d all sing and cry. The only emotional release in the week.”
He says the range of reactions to something like a patriotic Bible shows just how different American Christianity can be, depending on the denomination or community.
“I think the essence of liberal progressive faith is compassion, so it is mind boggling (to such people) how someone could say they were a Christian and follow a guy who is very much not compassionate.”
For people who view Christianity differently, or who are already unshakeable supporters of Trump, Peters says he doubts this latest incident will do anything to shake their faith.
“I think it will confirm (to them) that their critics are out of touch,” he said. “Why would anyone object to a Bible?”
It’s not clear where proceeds from the Bible’s sales will go
In addition to the multitude of theological questions it raises, Trump’s endorsement of the “God Bless the USA” Bible coincides with several legal battles that could put the presumptive Republican nominee for president on the line for hundreds of millions of dollars.
The FAQ section of the “God Bless America” Bible website clarifies that no proceeds from the sales of the Bible will go towards Trump’s presidential campaign. However, there is no mention of whether any proceeds could be put toward his personal legal troubles.

“No, GodBlessTheUSABible.com is not political and has nothing to do with any political campaign. GodBlessTheUSABible.com is not owned, managed or controlled by Donald J. Trump, The Trump Organization, CIC Ventures LLC or any of their respective principals or affiliates,” the site reads.
However, it goes on to say Trump’s name, likeness and image are under “paid license from CIC Ventures LLC.” CIC Ventures is directly linked to Trump in his 2023 public financial disclosures.
CNN has reached out to EliteSource Pro, the marketing company behind the “God Bless the USA” Bible, for more information.
Trump has been criticized before for his use of the Bible in public settings. In 2020, religious leaders from several Christian denominations condemned his display of the Bible in a “photo-op” in front of an Episcopal church near the White House as racial justice protests raged around the country.
“You just don’t do that, Mr. President,” televangelist and vocal Trump supporter Pat Robertson said of the incident. “It isn’t cool!”
In 2015, Trump also called the Bible his favorite book, but famously declined to share a favorite verse.
Show all
'.concat(e,"
'.concat(i,"
\n Find more topics that matter to you on your Follow page. Browse, add, or remove topics for a\n personalized experience.\n
",16,{name:"compare",hash:{},data:o,blockParams:r,loc:{start:{line:12,column:78},end:{line:13,column:31}}}),{name:"if",hash:{},fn:l.program(3,o,0,r,t),inverse:l.noop,data:o,blockParams:r,loc:{start:{line:12,column:72},end:{line:13,column:81}}}))?c:"")+'">'+s(i(null!=(c=r[0][0])?u(c,"label"):c,a))+"
\n ').concat(n,'\n.
\n ').concat(t,'\n
This page will automatically redirect in 5 seconds...
').concat(o).concat(n,"
\n \n '+i((c=null!=(c=p(e,"title")||(null!=n?p(n,"title"):n))?c:r,(0,_typeof2.default)(c)===s?c.call(u,{name:"title",hash:{},data:t,loc:{start:{line:12,column:73},end:{line:12,column:82}}}):c))+" \n "+i((c=null!=(c=p(e,"subtext")||(null!=n?p(n,"subtext"):n))?c:r,(0,_typeof2.default)(c)===s?c.call(u,{name:"subtext",hash:{},data:t,loc:{start:{line:13,column:24},end:{line:13,column:35}}}):c))+"\n \n
\n '+(null!=(o=p(e,"if").call(u,null!=n?p(n,"cta2PreText"):n,{name:"if",hash:{},fn:l.program(5,t,0),inverse:l.noop,data:t,loc:{start:{line:20,column:16},end:{line:20,column:57}}}))?o:"")+"\n"+(null!=(o=(p(e,"ifAll")||n&&p(n,"ifAll")||r).call(u,null!=n?p(n,"cta2Text"):n,null!=n?p(n,"cta2Link"):n,{name:"ifAll",hash:{},fn:l.program(7,t,0),inverse:l.noop,data:t,loc:{start:{line:21,column:16},end:{line:26,column:26}}}))?o:"")+"
Content Warning

- ㅇㅅㅇ - E3 85 87 E3 85 85 E3 85 87 00
- ⊙▃⊙ - E2 8A 99 E2 96 83 E2 8A 99 00
- ⊙д⊙ - E2 8A 99 D0 B4 E2 8A 99 00
- ⊙︿⊙ - E2 8A 99 EF B8 BF E2 8A 99 00
- ♀⌒♀ - E2 99 80 E2 8C 92 E2 99 80 00
- ●ᴥ● - E2 97 8F E1 B4 A5 E2 97 8F 00
- ≧ヮ≦ - E2 89 A7 E3 83 AE E2 89 A6 00
- •ω• - E2 80 A2 CF 89 E2 80 A2 00
- °д° - C2 B0 D0 B4 C2 B0 00
- óωò - C3 B3 CF 89 C3 B2 00
- ⓿_⓿ - E2 93 BF 5F E2 93 BF 00
- ☯ - E2 98 AF
- ♡ - E2 99 A1
- ♥ - E2 99 A5
- ♦ - E2 99 A6
- ★ - E2 98 85
- ◉ - E2 97 89
- ▣ - E2 96 A3
- ▬ - E2 96 AC
- ☖ - E2 98 96
- ⚠ - E2 9A A0

Change how text looks in Pages on Mac, iPhone, or iPad
Change the color, alignment, and spacing of text in your Pages document.
Change how text looks in Pages on Mac
Select text, then change its color, alignment, and spacing. You can also select and format noncontiguous ranges of text: press and hold the Command key on your keyboard, then select the text.
Change the color of text
Select the text.
Click the Style button in the sidebar. If the text is in a text box, table, or shape, first click the Text tab at the top of the sidebar, then click the Style button.
Click the pop-up menu below the Font section, choose Text Color, then choose an option to pick your color:
To pick a color that coordinates with your template, click the color well, then choose a color.
To pick any color, click the color wheel, then choose a color from one of the color palettes.
You can also fill text with a gradient or an image, and change the text color for your comments and tracked changes .
Alignment determines how the edges of the text appear in your document. You can align text in paragraphs, text boxes, shapes, or table cells.
Choose the text you want to align:
To align all the text in a particular paragraph, click anywhere in the paragraph.
To align all the text in multiple paragraphs, select the paragraphs.
To align text in a text box or shape, click the text box or a shape.
To align text in a table, select the cells, rows, or columns.
For text in a text box, table, or shape, first click the Text tab at the top of the sidebar, then click the Style button.
Click the alignment buttons to horizontally align your text:
Change the spacing of text
You can change the amount of space between lines of text and the amount of space before or after a paragraph.
Select any portion of the text you want to align, click a text box or a shape with text, or click a table cell or select a row or column if you’re working in a table.
If the text is in a text box, table, or shape, first click the Text tab at the top of the sidebar, then click the Style button.
To change the amount of space between lines of text, click the Spacing pop-up menu, then choose an option.
To change the amount of space before or after a selected paragraph, click the arrows for Before Paragraph and After Paragraph.
Advanced text styling options
You can also adjust the spacing between individual characters and raise and lower text in relation to adjacent text . When you’re finished styling your text, you can save that look as a custom character style so that you can easily apply it to other text in your document.
Change how text looks in Pages on iPhone or iPad
Select text, then change its color, alignment, and spacing. And if you have an external keyboard and mouse or trackpad connected to your iPad, you can select and format noncontiguous ranges of text: press and hold the Command key on your keyboard, then select the text with the mouse or trackpad.
If the Edit button appears in the toolbar when you open the document, make sure to tap it so you can edit the document.
For text in a text box, table, or shape, tap Text.
Tap the Text Color button, tap Preset or Color, then tap a color.
Tap Gradient or Image to fill text with gradients or images .
Tap Text to set other text options like font type, font size, and more.
To align all the text in a particular paragraph, tap anywhere in the paragraph.
To align text in a text box or shape, tap the text box or a shape.
To align text in a table, tap a table cell or select a row or column.
Select any portion of the text you want to align, tap a text box or a shape with text, or tap a table cell or select a row or column if you’re working in a table.
Tap Line Spacing.
To change the spacing between lines, tap the plus or minus buttons for Spacing.
To change the amount of space before or after a selected paragraph, tap the plus or minus buttons for Before or After.
Set paper size, page orientation, and margins in Pages
Add page numbers and text to headers and footers in Pages
Change the font, size, style, or color of text in Pages for iCloud
Adjust alignment and spacing in Pages for iCloud
Pages User Guide for Mac
Pages User Guide for iPhone
Pages User Guide for iPad
Pages User Guide for iCloud
Explore Apple Support Community
Find what’s been asked and answered by Apple customers.
Contact Apple Support
Need more help? Save time by starting your support request online and we'll connect you to an expert.
IMAGES
VIDEO
COMMENTS
Tap the Document tab, turn off Document Body, then tap Convert in the dialog. You can use this method to convert any word-processing template to a page layout template. Tap the document page to close the controls. To add a text box, tap at the top of the screen, tap , then in the Basic category, tap Text. A text box is added to the page.
Unlocking iPad's Writing Potential 👉 iPad Writing Tools 👉 Discover how to write on documents using an iPad's built-in Markup tool or third-party apps like ...
Pages lets you create stunning documents on a Mac, iPad, or iPhone — or on a PC using iWork for iCloud. And it's compatible with Apple Pencil. ... templates, and customize your reports, letters, and other documents any way you like. And if you've ever dreamed of writing a novel, or just a fairy tale, it's easy to create interactive ...
Fill out forms and add signatures. Tap the file to open the document. If prompted, open the document in the Files app , then tap Save. Tap , then tap a blank field to enter text using the onscreen keyboard. To fill out another field, tap it, then enter text. Add text: Tap Add Text Form Box, drag the text box where you want it on the form, then ...
You can use your Apple Pencil in Pages on iPad to write, create drawings, annotate documents, and select and scroll as you would with your finger. By default, when you use Apple Pencil in Pages, you enter a view to write, draw, or annotate. If you want to use Apple Pencil for scrolling and selecting objects instead, you can change its default ...
Step 3. Browse for an app that will create the type of document you need. Apple's "Pages" app is a full word processing application with the ability to add photos, rich formatting, and work with both Pages and MS Word files, as well as save to PDF. If you need a full suite of MS Office-compatible document creation, Documents To Go and ...
Write text on any PDF document using your iPad. Go to Edit PDFs with comments in Acrobat online services. Select a PDF to edit by clicking the "Select a file" button, or drag and drop a file into the drop zone. Once the file is uploaded, sign in to add your comments. Use the toolbar to add sticky notes, highlights, drawings, text, and more.
Open the "Notes" app on your iPad and create a new note. From there, tap on the Expand button to make the note full-screen. Now, you can tap the tip of your Apple Pencil on the screen to enter the handwritten notes mode. You'll see drawing tools appear at the bottom of the screen. The canvas is now yours.
Step 2: Open the Document. Open the document you wish to edit. This might involve importing it from an email, cloud storage, or another app. Once the document is open in your chosen app, you're ready to start making changes. Make sure you have a stable internet connection if you're working with cloud-based documents.
The iPad doesn't have any built-in apps for word processing. The closest you'll get is the Notes app. However, it is possible to download word processors from the App Store. Apple's Pages is a free word-processing download that is compatible with documents that you create on your computer. It lets you open and edit Microsoft Word documents.
A wider column makes errors harder to spot. A narrow width is easier to proof-read. If you write words to print on paper, the display mirrors how your words will look on the finished document. In my experience, the smaller iPads work better when you are standing, the 12.9-inch iPad Pro is more unwieldy.
Google Docs is compatible with DOC and DOCX files, so you can open or export Word files for other people to use. This makes Google Docs one of the better free word processors for your iPad when not everyone uses Word. Download: Google Docs (Free) 4. WPS Office.
Tap Text on the Markup menu. This places a text box on the page. Type some text into the box. Drag the text box to the appropriate location on the PDF. Tap the color options to change the font color, or aA to change the text size. Resize the text box by dragging inward or outward from any of its corners. 9.
How Scribble works with Word mobile for iPad. In Word for iPad, go to the Draw tab, tap on the text pen (with the letter A) and a Scribble button appears at the bottom of the screen when you start writing on the screen. Scribble icon appears bottom left, shown here with an enlargement of the icon. Tap on that icon to see the full Scribble ...
This video shows you how to edit PDFs on any iPad, allowing you to write on it and then send the changes to anyone. It's especially useful for school work th...
Choose the tool that best suits your annotation needs. If you want to write directly on the PDF, select the pen tool. Start annotating: Use your Apple Pencil to write, highlight, or draw on the PDF. If you want to underline or highlight text, simply draw a line or use the highlighter tool to mark the desired text.
1Writer provides a distraction free writing environment. You can create and edit plain text or Markdown files. It does have many features including inline Markdown preview, word count, dark theme, TextExpander support, insert photo, an extra keyboard row, and many more.
Step 1: Choose a Writing App. Download and open a writing app like Apple's Pages or Microsoft Word from the App Store. Choosing the right app is crucial for a good writing experience on the iPad. Apple's Pages is free and already integrated with your device, making it an easy choice for many users.
If you don't see the document you want to copy, try searching for it, or tap Browse or Recents at the bottom of the screen. For more information, see Find a document . See also Send a document in Pages on iPad Move a Pages document on iPad Restore an earlier document version in Pages on iPad Use iCloud Drive with Pages on iPad
Once you have found the PDF file you want to edit, tap to open it. (Image credit: Tom's Guide) 2. Here in the preview screen, swipe up and down to navigate the different pages in your PDF. On an ...
To start writing, open Google Docs on your iPad and create a new document or open an existing one. Once you're in the document, tap on the blank space or anywhere you want to add text. This will activate the document for writing, and the on-screen keyboard will appear. Now, with Apple Pencil, you have the versatility to write directly on the ...
T he Files app on your iPhone and iPad lets you quickly view and effectively manage documents stored on your device and on online cloud services like Google Drive, Dropbox, iCloud, and more. The ...
Open an existing document in Pages. Open Pages, and if a document is already open, tap Documents in the top-left corner to see all your documents. Tap a thumbnail to open a document. If you don't see the document you want to open, try searching for it or tap the link in the top-left corner to browse Recents or a different location.
Former President Donald Trump is officially selling a patriotic copy of the Christian Bible themed to Lee Greenwood's famous song, "God Bless the USA.". "Happy Holy Week!". Trump ...
1. Regular reviews and updates. Markets shift, consumer behavior changes, and your business will grow. Your plan must evolve with these factors, which makes regular reviews and updates a must-do ...
In Pages on iPhone or iPad, the document opens in reading view. Send a copy of a Pages document in another format With the document open, tap in the toolbar, then tap Export and Send.
LOUIS - As the dust settles from Tuesday's races in the Missouri General Municipal Election, there's been a rise in the trend of write-in candidates from races big to small. "We had 20 ...
Go to the windows search bar and type in Registry Editor, open it up. Right click on the field starting with "FaceText_h" and click Modify... Then pick a preferred face from the below section, make note of its hexadecimal string. Click OK in the binary editor. Then join the lobby and your face should be updated!
Tap the Camera button , then tap Scan Documents . Place your document in view of the camera. If your device is in Auto mode, your document will automatically scan. If you need to manually capture a scan, tap the Shutter button or press one of the Volume buttons. Then drag the corners to adjust the scan to fit the page, then tap Keep Scan.
If the Edit button appears in the toolbar when you open the document, make sure to tap it so you can edit the document. Change the color of text. Select the text. Tap the Format button in the toolbar. For text in a text box, table, or shape, tap Text. Tap the Text Color button, tap Preset or Color, then tap a color.