This browser is no longer supported.
Upgrade to Microsoft Edge to take advantage of the latest features, security updates, and technical support.

Export reports from Power BI to PDF
- 6 contributors
You can export your Power BI reports to PDF easily, both from the Power BI service and from Power BI Desktop. Exporting to PDF is one way to share or print reports.
When you export to PDF, each page in the Power BI report becomes an individual page in your PDF document.
If your report has a sensitivity label, the label and any encryption settings carry over to the exported file, ensuring that your data remains protected even after it leaves Power BI.
In Desktop, sensitivity label inheritance by the PDF is a preview feature that is on by default. You can turn off sensitivity label inheritance in PDF export in Desktop by going to File > Options and settings > Options > Preview features , and unchecking Enable setting sensitivity label on exported PDF .
- Power BI service
- Power BI Desktop
Export to PDF from the Power BI service
In the service, select a report to display it on the canvas. You can select a report from your Home page, Apps , or any other container from the nav pane.
In the Power BI service, select Export > PDF from the menu bar.

A pop-up appears where you can select Current values or Default values . Current values exports the report in the current state, which includes the active changes you made to slicer and filter values. Most users select this option. Alternatively, selecting Default values exports the report in its original state, as the designer shared it, and doesn't reflect any changes you made to that original state.
Additionally, there's a check box to select whether or not to export the hidden tabs of a report. Select this check box if you want to export only report tabs that are visible to you in your browser. If you prefer to get all the hidden tabs as part of your export, you can leave this check box cleared. If the check box is grayed out, there are no hidden tabs in the report. After you make your selections, select Export to continue.
You may also choose to export only the current page you're viewing in a report by checking the Only export current page option. By default, this option is unchecked and all pages are exported from your report.
A progress bar displays in the upper-right corner. Exporting might take a few minutes. You can continue to work in the Power BI service while the report is being exported.

After the Power BI service finishes the export process, the notification banner changes to let you know. In Microsoft Edge, you are prompted to save or open the PDF.

In Google Chrome, the file options display in the lower left corner of the browser.

If you make no selection, by default, the PDF is saved in your Downloads folder.
Export to PDF from Power BI Desktop
In Desktop, open the .pbix file that contains the report you want to export.
After the report opens, select File > Export > Export to PDF .

Report pages that are currently not visible, such as any tooltips or hidden pages, aren't exported to the PDF file.
While the export is being processed, a dialog appears that lets you know that the export process is underway. The dialog remains on the screen until the export process completes. During the export process, all interaction with the report being exported is disabled. The only way to interact with the report is to wait until the export process completes, or to cancel the export.
The exported PDF displays in your default PDF viewer (typically Adobe Acrobat Reader or a browser).
If the PDF file is encrypted, to display it:
- The PDF viewer must support Microsoft Purview Information Protection. For more information, see Which PDF readers are supported for protected PDFs? and PDF reader in Microsoft Edge .
- The credentials used to sign into the PDF viewer must have sufficient permissions under the file's encryption settings to open the file.
Considerations and limitations
There are a few considerations and limitations to keep in mind when you work with the Export to PDF feature.
If you don't see the Export option
- Make sure that you're viewing a report (not a dashboard).
- It's possible that your administrator disabled this feature. Contact your administrator for details. Administrators: See Export reports as PowerPoint presentations or PDF documents .
Visuals that aren't supported
The following aren't supported for Export to PDF . Either the PDF export option is grayed out or isn't listed at all on the Export dropdown. In some cases, such as for R visuals, the report exports but the visual renders as a gray box with an error message.
- Power BI custom visuals . The exception is those Power BI custom visuals that are certified
- ESRI ArcGIS visuals
- Power Apps visuals
- Python visuals
- Power Automate visuals
- The Paginated report visual
- Visio visuals
- Visual displayed as a Data point table or displayed with "Show data point as a table," can't be exported to PDF.
Reports that can't be exported
- Power BI reports with more than 50 report pages currently can't be exported. Paginated reports don't have this limitation. See Print a paginated report for details.
- Reports larger than 500 MB.
- Reports that are owned by a user outside your Power BI tenant domain, such as a report owned by someone outside your organization and shared with you, can't be published to PDF.
- You can share a dashboard with someone outside of your organization--someone who isn't in your Power BI tenant. However, that user can't export the shared dashboard's associated reports to PDF. For example, if you're [email protected], you can share with [email protected]. But [email protected] can't export the associated reports to PDF.
Export to PDF isn't supported when the admin setting Azure private link > Block public internet access is enabled in Power BI. In this case, the export fails. The export might also fail if the admin setting Azure private link is on and Block public internet access is off.
Semantic model refresh operations using an XMLA endpoint.
In the Power BI service, URL filters aren't currently respected when you choose Current Values for your export.
Visuals displayed as a Data table or displayed with "Show as a table" are included in the export, but the visual displays in its default state, without the table.
The process of exporting the report to PDF might take a few minutes to complete, so be patient. Factors that can affect the time required include the structure of the report and the current load on the Power BI service or Power BI Desktop.
Background images are cropped with the visualization's bounding area. Also, when you export to PDF with reports that contain a background image, you might see a distorted image in the export if you use the Normal or Fill options for the Page Background . For best results, use the Fit option to avoid issues with your exported document. Or, remove backgrounds before exporting.
Reports with unusual custom page sizes may experience issues in export scenarios. For best results, consider switching to a standard page size for your report.
Reports using themes with custom fonts will have the custom font replaced with a default font.
While we look to provide a consistent experience, we can't guarantee the exported PDF from the Power BI service will always match the exported PDF from a local Power BI Desktop file.
We can't guarantee precise fidelity for Power BI reports. The resolution of exported report pages is 1,280 pixels x 720 pixels.
Visuals with scrollbars are exported in their default state. The visual displays all possible rows, starting with the first row. Even if you have the visual scrolled down, when exported, the visual displays unscrolled.
Export to PDF supports Unicode 6 and earlier. If for example, Unicode 7 is used, Power BI export displays that image as a blank box.

Visuals in a drilled down state are exported in their default state.
The feature doesn't export any wallpaper you apply to the report. Since wallpaper isn't exported to the PDF, you should pay special attention to reports that use dark wallpaper. If the text in your report is light or white, it is difficult to read in the export to PDF process since the dark wallpaper isn't exported with the rest of the report.
All Power BI reports have a page margin when exported to PDF. That is, there is a band of white space at the top and bottom of the exported file.
Export to PDF isn't currently supported for tenants in the China North region.
Related content
- Print a report .
Was this page helpful?
Coming soon: Throughout 2024 we will be phasing out GitHub Issues as the feedback mechanism for content and replacing it with a new feedback system. For more information see: https://aka.ms/ContentUserFeedback .
Submit and view feedback for
Additional resources
Knowledge Base Zebra BI for Power BI
- Zebra BI Knowledge Base
- Zebra BI for Power BI
- Sharing and Publishing
Export your Power BI reports as PDF documents
Table of Contents
- Export to PDF from Power BI Desktop
- Export to PDF or PowerPoint from the Power BI Service (cloud)
Power BI supports exporting your reports as a PDF file, which makes it even more accessible to everyone within your company and audience. It also makes it more convenient when archiving yearly reports. We’ll show you how you can do this in just a few clicks.
Depending on whether you use Power BI Desktop or Power BI service (cloud), there are different methods of achieving this. Since the Zebra BI visuals have been certified by Microsoft in February 2020, you don’t have to fear if our visuals will be exported along with your reports and you can also export them directly as a PowerPoint presentation .
Watch a video tutorial how to export your reports as PDF documents.
Export to PDF from Power BI Desktop #
To create a PDF document from Power BI Desktop, simply navigate to File > Export > Export to PDF menu item:
A progress notification will keep you updated with the progress of the file exporting. Depending on your hardware, this can take a couple of minutes. A PDF document will be generated, containing all the pages from your Power BI report, but any hidden pages in your reports will not be exported to the PDF.

The quality of the generated PDF is excellent. For example, you can compare a sample published Power BI report and compare it to its PDF export .
Export to PDF or PowerPoint from the Power BI Service (cloud) #
To export to PDF or PowerPoint from the Power BI service, simply open your report, click Export and choose your preferred export format:

You will be prompted with multiple choices about your export. Here you can customize values , decide if you want your PDF file to include hidden report tabs and, if you are interested in only one particular page, export only the page you are currently on .

For more details about exporting the PDF file, especially from the cloud service, you can visit Microsoft’s page. Enjoy creating your reports!
Was this article helpful?
Embed Power BI in updatable PowerPoint slides
Exporting power bi reports to powerpoint slides.
How to Export Power BI Reports to PDF?
This Power BI tutorial will help you work with the Export Power BI Reports to PDF .
Recently, I was working on a Power BI report. I needed to share the sample report with the client, but there was a problem: the client didn’t have an account on Power BI Desktop or Power BI Service. In this situation, exporting to PDF is one way to share or print reports.
In this tutorial, I will explain Power BI reports export to PDF, how to export the Power BI Reports to PDF from the Power BI Desktop, how to export Power BI Reports to PDF from Power BI Online or Service, how to export to PDF only one page in Power BI, how to export to PDF without scrollbars Power BI.
Also, we will discuss how to export to PDF with multiple pages in the Power BI service, how to export to PDF page size in the Power BI Service, and some limitations in Power BI Export to PDF; Power BI export to PDF does not show all data.
Table of Contents
Export Power BI Reports to PDF
In Power BI, exporting a report to PDF means saving a copy of the report in a format that can be easily shared or printed. Instead of just viewing the report online, you create a file that looks like a printed version, which you can send to others or keep for your records.
It’s like taking a snapshot of the report in a format that anyone can open and view, even if they don’t have access to Power BI.

You can export the Power BI Reports to PDF in two approaches:
Export Power BI Reports to PDF from Power BI Desktop
- Export Power BI Reports to PDF from Power BI Online or Service
I will explain how to export the Power BI report to PDF from the Power BI desktop.
NOTE: Before exporting Power BI to Excel, it’s essential to create a report in Power BI. If you’re new to Power BI, consider reading a detailed guide on how to create a report in Power BI Desktop ?
Here is the report I’m using for this example. I highly recommend creating a report before proceeding further. Check the screenshot below:

Follow the below steps to export Power BI Desktop to PDF:
1 . Open the Power BI report you created before in Power BI Desktop.

2 . Click on the “File” tab in the top ribbon.

3 . Then click the Export button -> Select Export to PDF . Check the screenshot below.

Once you click Export to PDF , it will take a few seconds to generate the PDF of your report. In my case, it was generated in Microsoft Edge . Check the screenshot below.

After that, you can save it using the above option and share it with anyone.
In the same way, if you have multiple pages in Power BI Desktop, you can easily export them into PDF.
Export Power BI Reports to PDF from Power BI Service
Now, let’s look at how to export data from the Power BI service to PDF.
Open your Power BI Online Page ( powerbi.com ), Sign in, go to the My workspace , and Select your existing report from the Report section that you want to export to PDF.
1 . Navigate to the specific dashboard you wish to export. Check in the screenshot below.

2 . Expand the File tab from the left top of the page and click on the PDF option.

3 . Select Current or Default Values with which you want to Export . If you want to hide the report tabs, check on the Exclude hidden report tabs, and if you want to export only this page, you can check Only export current page checkbox and click on the Export option, as shown below.

4 . Generating the PDF in Power BI will take a few minutes. Then, the PDF file is automatically downloaded to your local system. After that, open it.

This way, you can export Power BI reports to PDF from Power BI Online.
Power BI Export to PDF Multiple Pages
Now we see how to export to PDF with multiple pages in the Power BI service.
1 . Open the Power BI service, which has multiple pages. Check in the screenshot below.

3 . Select Current or Default Values with which you want to Export . If you want to hide the report tabs, check on the Exclude hidden report tabs , but do not check Only export current page checkbox and click on the Export option.

This way, you can easily export to PDF with multiple pages in the Power BI service.
Power BI Export to PDF Page Size
Now we see how to export to PDF page size in Power BI Service.
1 . Go to the Power BI service and select the Page Report to convert to a PDF file with page size.

2 . Expand the File tab and choose the Print this page .

3 . Choose the destination as Save as PDF or Microsoft Print to PDF from the document. Expand More settings , and in the Page size section, choose the page size as required(In my case, A4). Then click on the Print option.

4 . Select where you want to save the PDF file. Enter the file name and choose the file type as a PDF document. Then, click on the “Save” button. The PDF file will then be automatically saved to your local machine.

5 . After that, open the PDF file in any browser.

This way, you can export to PDF page size in Power BI.
Power BI Export to PDF Only One Page
If you have multiple pages in the Power BI service and you want to export to PDF only one page, here’s how you can do it:
1 . In the Power BI service, navigate to the page you wish to export to PDF. Expand the Export option, then select PDF .

2 . To export only one page , check the Only export current page checkbox and select the Export option.

3 . Generating the PDF in Power BI will take a few minutes. Then, the PDF file is automatically downloaded to your local system. After that, open it in your browser.
Then you see only one page export in to PDF.

This way, you can export one page to PDF in Power BI service, but we can do it in Power BI Desktop.
Power BI Export to PDF Not Showing All Data
If your Power BI report is not showing all data when exported to PDF, there could be several reasons for this issue.
- Power BI may not export all data if your report has large data. To overcome this, reduce your report’s data by applying filters.
- If the report layout is too large or complex, Power BI may not be able to export all content to the PDF. To overcome this, adjust the layout and page size to fit the content within a single page.
- If your report has multiple pages, ensure that when you export in Power BI service, do not check the Only export current page checkbox.
- If your report relies on live data connections. The exported PDF may not include the latest data if the data is not refreshed.
Power BI Export to PDF Without Scrollbars
- It’s impossible to display the exported Power BI PDF file without scrollbars, as all report pages generate it by default.
- One possible way is to export Power BI reports to PDFs that adjust the page size and report layout to fit within the confines of a single page.
- Ensure that none of your visuals overflow beyond the page boundaries. Any overflow may cause scrollbars to appear in the exported PDF.
- Remove any unnecessary elements from your report, such as blank spaces or unnecessary visuals, to optimize the layout for PDF export.

Power BI Export to PDF Limitations
Next, I will explain some limitations of exporting to PDF in Power BI.
- Once exported to PDF, we lose the interactive elements like filters, slicers, and drill-down capabilities in Power BI.
- The PDF may not perfectly match the layout of your report due to differences in screen size and formatting.
- Exporting to PDF from the Power BI service requires a Power BI Pro or Premium subscription.
- We can’t customize the appearance of the exported PDF beyond basic options like page size and orientation.
Now know that exporting Power BI reports to PDF. It is convenient to share them with individuals who may not have access to the Power BI Desktop or the Power BI service.
This tutorial taught us to export to PDF in Power BI reports , export the Power BI Reports to PDF from the Power BI Desktop, and export Power BI Reports to PDF from Power BI Online or Service, how to export to PDF only one page in Power BI, how to export to PDF without scrollbars Power BI.
Additionally, we covered how to export to PDF with multiple pages in the Power BI service, export to PDF page size in the Power BI Service, and some limitations in Power BI Export to PDF; Power BI export to PDF does not show all data.
You may also like:
- Power BI Bookmarks
- How to Export Power BI Report to Excel?
- Convert Date to Text in Power BI
- Power BI Group by Column

I am Bijay a Microsoft MVP (10 times – My MVP Profile ) in SharePoint and have more than 17 years of expertise in SharePoint Online Office 365, SharePoint subscription edition, and SharePoint 2019/2016/2013. Currently working in my own venture TSInfo Technologies a SharePoint development, consulting, and training company. I also run the popular SharePoint website EnjoySharePoint.com
Session expired
Please log in again. The login page will open in a new tab. After logging in you can close it and return to this page.
Microsoft Power BI Blog
- Announcements
Export to PDF and On-Demand E-Mail Subscriptions Now Available

For the second week in a row, we’re continuing to build on the capabilities we’d promised to deliver in the October blog post around managed distribution of content. These two new features are both rolling out now across the globe, and you should see them available in your tenant by Feb 10th.
Export to PDF
The first new feature is one that has long been a top customer ask – the ability to export your Power BI report as a PDF document. Now all users will have the ability to export their reports to either a PowerPoint presentation or PDF document.
To get started, locate the File menu from any of your reports and open the dropdown. You’ll see the option to Export to PDF just after the Export to PowerPoint option.

Once you select it, the PDF will be generated and be downloaded for you. When you open the downloaded file, each tab in your report will be a different page in your PDF document. Unlike the experience in Export to PowerPoint, however, there is no “title slide” added, and the text you’ve exported is available for you to copy to your clipboard.
One item of note – many, many users have been asking when the filters/slicers/bookmarks they’ve selected will be respected when they export to either a PowerPoint or PDF. While that isn’t the case yet, that capability is coming in very short order, so keep watching the Power BI blog for an announcement around that feature in the not too distant future.
On-Demand E-Mail Subscriptions
Additionally, we have another enhancement available for e-mail subscriptions shipping this week as well – the ability to run any subscription you want on-demand. Now, with any of your e-mail subscriptions, if you need to run it and send an e-mail right away, you can do just that. Just click the “Run Now” button that appears next to the name of your subscription, and it’ll be sent to you and/or any other users you’ve subscribed to that content.

This is a great way to quickly send a one-off to all your subscribers of the latest view of your report or dashboard, or simply test your subscription after setting it up. You can do it as often you’d like for any of your subscriptions, so give it a try today!
We’re really excited to hear your thoughts about these new capabilities, so be sure to review the documentation for additional details and leave us your feedback in the comments below. Thanks for reading!
- Email Subscriptions
- Power BI Reports
Software + Imagination
How to Export Power BI Reports to PDF and PowerPoint
Power BI has an option to export reports to PDF and PowerPoint, which is very useful if you would like to share the reports in a static way with other people.
To export a Power BI report to PDF or PowerPoint, first open the Power BI Report in the Power BI Service:
Next, click File and choose Export to PDF:
You will see the window:
With options Current Values (exports the report in the current state with the filters selected etc) and Default Values (the original report):
Click Export. You may see the message:
A file will be downloaded:
Opening this, we see one PDF page per report page:
Now let’s export to PowerPoint. Select Export to PowerPoint:
We get the same options:
And message:
The file will download:
Opening the file, we see there is also 10 slides, but also a welcome slide with a link to the Power BI report:
From Power BI Desktop, select File->Export to PDF:
You will see the message, with Power BI Desktop cycling through each report page:
And the report will be generated:
I AM SPENDING MORE TIME THESE DAYS CREATING YOUTUBE VIDEOS TO HELP PEOPLE LEARN THE MICROSOFT POWER PLATFORM.
IF YOU WOULD LIKE TO SEE HOW I BUILD APPS, OR FIND SOMETHING USEFUL READING MY BLOG, I WOULD REALLY APPRECIATE YOU SUBSCRIBING TO MY YOUTUBE CHANNEL .
THANK YOU, AND LET'S KEEP LEARNING TOGETHER.
https://www.youtube.com/carldesouza
Carl de Souza is a developer and architect focusing on Microsoft Dynamics 365, Power BI, Azure, and AI.
Related Posts:
- How to Export and Import Canvas Apps MSAPP and ZIP Formats
- Embedding a Dataverse Canvas App Inside Power BI Reports
- Embedding a Dataverse Power Automate Flow Inside Power BI
One Response to How to Export Power BI Reports to PDF and PowerPoint
Hello, There are two pages in a report and I want the pdf output of a page. What should I do in this situation?
Leave a Reply Cancel reply
Your email address will not be published. Required fields are marked *
- SQL Server training
- Write for us!

Importing data from a PDF file in Power BI Desktop
Power BI Desktop is a useful reporting and analytical tool to represent data in various formats. These presentations help us to quickly understand information and circulate it to stakeholders in a visual fashion.
We can connect Power BI Desktop to disparate data sources including multiple relational and non-relation databases, Cloud, SharePoint, and Microsoft Exchange etc. In the real world, we use various file formats to represent our documents.
In Power BI, we can get data from below file formats
- SharePoint Folder

Although popular as an export format, you cannot easily modify a PDF document, and it can contain the text, images, tables, and charts in PDF document.
In Power BI Desktop, we cannot get data from PDF documents directly. Also, we do not have any option to use PDF as a data source. But suppose we want to extract a table from the PDF file and prepare visualizations on it. We can import data from PDF with following methods.
- Convert the PDF file to a Microsoft Word or HTML document and copy the table in an appropriate data source such as Microsoft Excel. It is a lengthy process and if we have to do the same process repeatedly, it quickly becomes cumbersome
- We can also use programming languages such as R to extract the required data from a PDF file. It requires extensive technical knowledge of a machine language such as R to work with these PDF files. If the format of the PDF files changes or we need to import a table from another PDF file, we require a change in the programming code. So this again creates organizational friction to contact developers and ask for the code
In both approaches, we require extra overhead to prepare PDF reports in Power BI. In this article, we will show how import data from a PDF file easily and without any coding.
Power BI PDF Connector
The Power BI Desktop contains many preview features. These features are not enabled by default. We can use the PDF Connector preview feature in Power BI to use a PDF file as a data source.
Launch the Power BI and go to the File menu. In the File menu, go to Options and settings and click on Options .

It opens various Power BI configuration options. We can configure various options such as Data load, Power BI Query, R scripting, security, Report settings. We need to click on the Preview features menu option to use the PDF connector in Power BI Desktop data source.

It opens the various preview features in the Power BI Desktop.

Note: This preview list is updated regularly. Some of the preview features might move to general availability. We will also get new features with the new release of Power BI Desktop.
In the preview feature list, enable Get Data from PDF files . We can also read the documentation from the Learn more . It opens a web page for Microsoft Docs. You should have an active internet connection to go through these documentations.
Click on the checkbox in front of Get data from PDF files and click Ok . We need to restart Power BI to enable the preview feature. Close Power BI Desktop and re-open it.

Once we relaunch Power BI Desktop, go to Get Data->More again from the menu bar. In the following screenshot, you can get a new option under ‘File’. We get the option ‘PDF (Beta) to use as a data source.

Click on PDF (Beta) connector and connect. We again get a warning message that this PDF connector is still under development. Since it is still a preview version, it might have a few bugs that will be resolved before the general availability of this feature.

Click on Continue . If we do not want this message, then you can put a check on Don’t warn me again for this connector .
In this article, we are going to import a sample PDF file that contains the Monthly sales analysis. We can see the text, images along with data table in this PDF file. We need to import table from the following PDF file. We can prepare Power BI Reports using this data.

Once you click on Connect and provide path of this PDF file from a local directory.

It connects to PDF file and opens a Navigator . It lists out the table from PDF and a list of all pages. If we select the page, it shows the complete page content in the Navigator preview window.

We need to get data from this table, therefore, put a check in front of the table, and it shows the table on the right-hand side page.

You can see a table from our PDF file. In this preview, we need to make a few changes to display the table contents in a proper format. We can make the changes as well in data imported from the PDF file. Click on Edit .
It opens a Power Query Editor. Power Query Editor helps to make the changes in table format, add or remove any column, row, split column etc.

In this Power Query Editor, you can see that the fourth row contains the column names. We do not want to have the top three rows in our table. Therefore, we need to remove these three rows from the top.

We need to open the list of options for Remove Rows . In the options list, click on Remove Top Rows. It opens a pop-up box to specify the number of rows from the top we want to remove. We want to remove the top three rows from the top, therefore, enter the value and click OK .

It removes the number of rows specified from the top (in our case three rows) as shown in below image.

Now the top row in this table contains the column list. Currently, we do not have any column name defined for the table. We want the top row to represent the column names, therefore, click on the Use First Row as Headers as shown in the image above. It uses the top row as a header of the table. Once we clicked on the Use First Rows as Headers , we can see the column name in our data table.

We might do further filtering in our data. We do not want any NULL values to be there in a table for the location column. Click on the location column, remove the checkbox from the NULL value, and click OK .

It removes Null values from the table, and you can see data in the tabular format now. You can match this data with the PDF file to have validation.

We need to click on the Close & Apply from the menu bar to save the changes. It makes all required changes and we can see table fields in the FIELDS section. It identifies the data type accurately, and we can use this data for the reporting purpose easily.

We can choose the required fields from this data set and create a Power BI Visualization.

We can view data as well from the ‘Data’ tab on the left-hand side.

In this article, we explored the quick and easy way to get the data from a PDF data source. It is an exciting enhancement to Power BI Desktop functionality.
Table of contents
- Recent Posts

- How to install PostgreSQL on Ubuntu - July 13, 2023
- How to use the CROSSTAB function in PostgreSQL - February 17, 2023
- Learn the PostgreSQL COALESCE command - January 19, 2023
Related posts:
- How to create a Word Cloud generator in Power BI Desktop
- Enlighten World Flag Slicer in Power BI Desktop
- Power BI Desktop Pie Chart Tree
- Power BI desktop Mekko Charts
- How to create geographic maps in Power BI using R
Read and Import Data from PDF Files using Power BI
By: Siddharth Mehta | Comments | Related: > Power BI
Data arguably exists as much in stand-alone files as much in database systems. The need to source, link and use this data in different systems is immense. Apart from Microsoft Office file formats, PDF is one of the de-facto standards for publishing files in a standard portable format. The challenge with PDF files is that it can have a variety of content ranging from text, tables, images, hyperlinks etc. Editable PDF files can also have forms which can be used as data submission system for applications that process these files. There are programming frameworks which have libraries that can be used for extracting data from these files. But this again poses the challenge for a non-technical user to simple source data in Power BI reports from his/her PDF file that one would have published typically on a collaboration medium or personal data repository. In this tip, we will look at one of the easiest methods of importing data from PDF files in Power BI Reports.
The new PDF Connector in Power BI enables users to source data from PDF Files.
In this tip, we will go through a series of steps to enable the PDF Connector in Power BI, which is not enabled by default, and then we will read a PDF file and import the data in the report.
The PDF Connector in Power BI is a preview feature as of the publishing of this tip and preview features are not enabled by default, so you may not see the PDF file connector in your data sources list. To verify this, Open the Power BI Desktop, navigate to the Home Menu , and open the Get Data option as shown below.

Click on More and a new dialog with appear. Click on the File option and you would be able to see all the file connectors as shown below. If you have a default installation of Power BI and have not enabled preview features, you will not have any PDF connectors in your list, until this connector becomes a standard feature of Power BI.

So, to enable this connector, we must enable the preview settings for Power BI Desktop. Click on the File menu, click on Options and Settings menu and select Options menu item as shown below.

You will find diverse options in the options dialog box. Click on the preview features menu item, and you will find all the preview features listed here. This list keeps changing and items that are either dropped or promoted as a standard feature may get moved out of this list.

Click on the checkbox item Get Data from PDF Files . You can also click on the hyperlink to read the documentation about this preview feature. Now click the OK button, and you would be presented with an informational dialog that says that you need to restart Power BI to enable this feature. Click the OK button to close this dialog, and then close Power BI and re-open it.

Once you re-open Power BI, repeat the same steps that we did earlier. Check the list of supported File Connectors from the Get Data menu, and this time you should be able to see the PDF File connector (which is in beta as of the publishing of this tip) in the list. This means that we can now use this connector to start reading PDF files and sourcing data from it.

Before we can start using this connector, we need to have a sample file with some text, some tables and may be some other content of interest. In this tip, our focus is to read a PDF file and import a table at a minimum so that we can use this data for analytics and reporting purposes. Once such sample file is available online from here . Let's look at this file. Open the URL in the browser, and you would find that it has 2 pages and has 3 tables in total as shown below.

Let's say that we are interested in the table on Page 2 of this file, which has a list of cars with related attributes. If we can import this table as-is in the Power BI Report, we can use it for different purposes like creating charts / graphs or aggregating / filtering data, etc. So, let's go ahead and start using our PDF connector to source data from this file.

In Power BI, click on Get Data Menu item, and select the PDF File Connector. You will be provided with an informational warning that it's a preview feature. For now, click Continue button.

Now it would prompt you to select the PDF file path. Provide this sample file URL mentioned above as shown below and click on the Open button.

Once this connector processes the file, you would find a navigator screen as shown below. On the left side you will find 5 options. The PDF connector detected all the 3 tables in our sample PDF file, so it provides an option to import specific tables. This is a great option for those who are interested in a specific piece of data from the PDF file. If you analyze carefully, it also tells you which table is on which page. The rest of the two options are at the bottom of the list, provides an option to read the entire page. There is 1 table (item) created per page. Click on Table002 as shown below and you will be able to see the same table that we saw earlier in the PDF file. Click on Load button to add this table to the report.

Once the model is loaded, you will be able to see the fields added to the report as shown below.

Click on all the fields and all these fields will get added to a table as shown below. Also, if you carefully analyze, the connector was able to detect the data types correctly, and it identified the Date field to be of date data type and Power BI automatically dissected various parts of the date in the table. Once the data and fields are in this format, it can be easily used for analytics and reporting.

Let's say we want to read the entire file contents of any given page, follow the steps mentioned above until you reach the navigator screen. Click on Page001 and you should be able to preview the page. All the contents of the page are divided into different fields based on how the connector was able to parse the data. This can be used in the file if the intention is to source the entire content of the page typically to present textual narratives in a report.

In this way, one can easily source data from PDF files without any coding. Another option to source data from PDF files is by using R Scripts, but that would require installation of some external packages on an R server as well as few lines of code. The method presented here is much easier and can be easily used by a non-technical user or someone who does not know R.
- Consider using the Power BI PDF File connector on different types of PDF files having different types of content and analyze the resulting interpretation of the file by the PDF file connector.
Learn more about Power BI in this 3 hour training course.

About the author

Comments For This Article

Related Content
Implement Incremental Refresh for non-Query Folding sources in Power BI within a Datamart
Analyzing Multiple Pages of UK Petition Data Using Power BI
DAX CASE Statement Functionality with IF, SWITCH and SWITCH True
Create Calendar Table Using Power Query M Language
Power BI Workspace Permissions and Roles
Dynamically Create Tables in Power BI with DAX Functions
Getting Started with Microsoft Power BI Training
Related Categories
Power BI Charts
Power BI Formatting
Development
Date Functions
System Functions
JOIN Tables
SQL Server Management Studio
Database Administration
Performance
Performance Tuning
Locking and Blocking
Data Analytics \ ETL
Microsoft Fabric
Azure Data Factory
Integration Services
Popular Articles
SQL Date Format Options with SQL CONVERT Function
SQL Date Format examples using SQL FORMAT Function
SQL Server CROSS APPLY and OUTER APPLY
DROP TABLE IF EXISTS Examples for SQL Server
SQL Server Cursor Example
SQL CASE Statement in Where Clause to Filter Based on a Condition or Expression
Rolling up multiple rows into a single row and column for SQL Server data
SQL Convert Date to YYYYMMDD
SQL NOT IN Operator
Resolving could not open a connection to SQL Server errors
Format numbers in SQL Server
SQL Server PIVOT and UNPIVOT Examples
Script to retrieve SQL Server database backup history and no backups
How to install SQL Server 2022 step by step
An Introduction to SQL Triggers
Using MERGE in SQL Server to insert, update and delete at the same time
List SQL Server Login and User Permissions with fn_my_permissions
SQL Server Loop through Table Rows without Cursor
How to monitor backup and restore progress in SQL Server
SQL Server Database Stuck in Restoring State
404 Not found
Exporting Power BI to PDF
Try tiiny.host
How do i get power bi for my windows computer, importing data into power bi, the power bi desktop visualization interface, visualizing your data, what are filters, final steps before exporting power bi reports as pdf, how to share your pdf online.
Power BI is a Microsoft business intelligence and information visualization tool. Exporting Power BI visualizations to PDF is an easy task once you have imported your data and created the visualizations you want.
To immediately skip ahead to the PDF exporting feature description, scroll down to the Exporting Power BI to PDF subheading below.
But first, I’ll describe how to get Power BI, what it does, and how you can use and share the visualizations and reports it generates.
Power BI Desktop is available for Windows computers. At this time, there is no Macintosh version available. However, you can run the Windows version of Power BI desktop on a Mac with a Windows emulator program such as Parallels.
Power BI Desktop is a free application. Here is the main download page for Power BI Tools and Apps . You can download Power BI Desktop directly by searching for it in the Microsoft Store.
Power BI is also available as a service. A Microsoft business account is required for service access.
After installation, import your tabular data and turn it into attractive presentations.
Get data from:
- Excel workbooks
- Power BI datasets
- SharePoint folders
- Oracle/MySQL/PostgreSQL databases
- Google/Adobe Analytics
- QuickBooks Online
- SQL Server databases
- Azure Analysis Services databases
- Text/CSV files
- OData feeds
- Blank queries
- And many more…
Of course, you know best what data sources you must import and visualize. A “Get Data” dialog box is available with over 150+ data source types. Odds are, you’ll find the data connection you need
The Power BI desktop interface is divided into three distinct action panels, plus the visual report canvas.
1. Fields, which give you access to your data source fields (this example uses sample data already imported).

2. Visualizations, which display your data in various graphic formats.

3. Filters, which let you search and format your visualizations and data.

Please refer back to these images for the following descriptions.
As you can see from the above images, there are many chart types available to help you display your data visually. Note also that advanced users and programmers can apply R and Python scripts to their data to create custom reporting features.
To visualize a specific set of fields, use the Fields action panel to choose records from the data fields by selecting them with the checkboxes.
As you select data fields, a chart is generated in the Visualization Canvas. As you add or subtract fields or change the chart type, the result is updated in the new graphic.
The graphics generated on the Canvas are interactive. You can click on them to highlight specific bars or lines on the chart. Also, popup fields give you numeric information on the field clicked or hovered over.
Filters give you control over every display detail, such as:
- Text font and color
- Headers and Footers
- Backgrounds
Filters also let you search and select specific information to create new visualizations.
There are almost limitless variations on display and data filtering available through the Power BI Desktop interface. I can’t cover them all here. Download and play around with the application locally on your computer. Once imported, your original data is safe and will not be edited or deleted. You can experiment freely without worrying that you’ll lose crucial data.
You may have one or many visualizations on your canvas. Click and drag each to align them on the canvas as you want them to appear in your PDF report. Like many graphics programs, there are helper guides for aligning the individual graphs on the page. The guides show up as thin red lines and indicate whether the top, sides, center, or bottom of the charts are aligned.
When you are satisfied with your visual presentation, you can export and share it in a couple of ways, including PDF.
Just like importing or getting data, there are choices in how to export and share your Power BI report . In fact, there are only two choices, making export to PDF quite simple.
Choose File>Export>Export to PDF .

The only other choice is Power BI Template, if you wish to save your current report as a starting point for future reports.
The report will be exported directly without a “Save…” dialog box. I view this as an inconvenience because you may wish to change the location to which you save your PDF. Power BI provides detailed Options and Settings, but I couldn’t find an editable setting for the output path for exporting. Perhaps this is just an oversight.
Tiiny.host is the easiest and quickest way to share your PDF s online, whether created by Power BI or any other PDF generator.

Making your PDF live on the web takes only a minute or so.
The three-step process is this:
- Provide a link-name for the PDF’s web address. The final URL will be link-name.tiiny.host.
- Choose the PDF option and upload your PDF to Tiiny.host using either drag and drop or using the upload file button.
- Click the big, blue Upload button, and you’re done.
That’s it! You can host and share your PDF for free.

To share your PDF indefinitely, you can upgrade to a Solo or Pro account. Added features with all paid subscriptions include password protection, site visitor statistics, and more.
Visit Tiiny.host to share your PDF for free and to learn more about available options. You can contact Tiiny.host’s awesome customer service at Tiiny.host/help. Reach them through either chat or email today.

Pandoc Markdown to PDF
An introductory guide to eleventy.

Upcoming webinar on 'Inforiver Charts : The fastest way to deliver stories in Power BI', Aug 29th , Monday, 10.30 AM CST. Register Now
Formatted Export to PDF in Power BI
Perform formatted exports to PDF from your Power BI reports.
1. Export only select columns and measures from your tabular and matrix reports
Export the entire table/matrix or select specific columns using the ‘Selected Columns’ option in the toolbar. In the following example, only the last three quarters are exported to the PDF file.

2. Retain expand/collapse status of rows and columns as you export to PDF
Notice that the rows under the Home Appliances and Camera and Camcorders categories are hidden in the PDF file, while other categories are expanded.

3. Preserve a variety of table and measure layouts
Successfully export a variety of table layouts (hierarchy, table, stepped, and drill down) and measure layouts (measures in rows and columns) to the exported PDF file. The following example shows a stepped layout with measures in columns.

4. Retain the number formatting and scaling
Retain scaling, decimal places, prefix/suffix items as you export to PDF. Observe how the table header shows values in thousands, and notice the prefix ($) and suffix (/unit) in some of the values

5. Export to PDF with font styles, background, and alignment
The example below shows a sales report with different background colors for column groups, borders, background, and font colors. Also, notice the tilted measure headers.

6. Export with conditional formatting
Export reports along with conditional formatting to PDF file. The image below shows data bars (Sales column), color scales for the background (PY Sales), ABC classification (Margin), and semantic formatting (Margin %).

7. Export with visual-level filters
The advanced and nested (and/or) filters applied to the table are retained when exporting to a PDF file. The image below shows only the products with sales above 100k and positive margin% in the United States.

8. Export manual and calculated rows & columns inserted by the user
Manual data entry and calculated columns, measures, and rows created by the user in the visual can be exported to the PDF file.

9. Export with custom header
Export report headers with charts, KPI cards, and images seamlessly to the PDF file.

10. Export the table/matrix with notes
Export inline notes, footnotes and dedicated notes columns to the PDF file. Observe footnote and dedicated notes column exported to PDF below.

11. Export the table/matrix with multi-line comments
Export Power BI reports with threaded conversations to the PDF file.

12. Adjust page view
Configure properties such as font, page size, page orientation, scaling, margin, etc that will impact the settings of the exported PDF file.

13. Send the exported PDF file as an ad-hoc email
Send an ad-hoc email with the PDF attached. External email addresses are also supported. This feature is available in Inforiver Enterprise.

14. Send periodic emails with PDF attachments
With Inforiver Enterprise, you can also send PDF files periodically to users in your organization. Users can receive the PDF file in an email based on schedule frequency. Different categories can also be sent to different users using filters/bookmarks.

Here is a brief video outlining formatted Export to PDF using Inforiver in Power BI.
Visit our documentation page to learn more about Export to PDF.
Share this on:
Get inforiver brochure, other products, other products, headquarters.
About Inforiver!
Gantt Chart
Performance flow.
Inforiver is the fastest way to do everything in Power BI. It enables citizen developer productivity and unleashes true self-service with our intuitive and interactive no-code data app suite for Microsoft Power BI. The product is developed by Lumel Technologies Inc, who are #1 Power BI Visuals AppSource Partner serving over 3,000+ customers worldwide with their xViz, Inforiver, and ValQ offerings.

Join our webinar to explore how dual and multiple axis charts streamline complex data, unveiling insights and correlations effortlessly.
- Convert to PDF
- HTML to PDF
- Word to PDF
- Excel to PDF
- Email to PDF
- Email with Attachments
- Image to PDF
- SharePoint File to PDF
- SharePoint List to PDF
- SharePoint Page to PDF
- Wiki Page to PDF
- Microsoft Forms to PDF
- Microsoft Forms to Word
- Text to PDF
- Visio to PDF
- InfoPath to PDF
- InfoPath to Word
- InfoPath to Excel
- XLS to XLSX
- CSV to Excel
- Excel to CSV
- Form to Email
- BI Reports to PDF
- Nintex Form to PDF
- Table of Contents
- Troubleshooting
- Knowledge Base
Power BI Automated Export to PDF Using Power Automate
In this guide, you’ll convert a Power BI report to PDF using Power Automate and Muhimbi PDF Connector. This specific example shows how to create a flow that runs once a day and automates the process of delivering a PDF version of Power BI reports.
This example uses Power Automate to convert a Power BI report to PDF in SharePoint. However, you can save your PDF file to Dropbox, Google Drive, OneDrive, or any platform supported by Power Automate. You can also extend our example by adding additional automation, such as sending the converted PDF as an email.
Prerequisites
Before starting, ensure all prerequisites are in place:
- Working knowledge of how to use Power Automate
- A full, free, or trial subscription to Muhimbi PDF Converter
- Permissions to publish Power BI reports
- Appropriate privileges to create flows
Publishing Power BI Reports to a Web URL
- Navigate to a report in your workspace that you can edit, and select File > Publish to web .

- Review the content in the dialog, and click Create embed code .

- Review the warning, which is shown in image below. It ensures you're aware that proceeding with this action will publish data in the public domain. If you agree with this, click Publish . Otherwise, click Close .

- If you clicked Publish , you'll be given a public URL. You can copy the topmost URL, which will be the public URL that you'll use later in the flow

You have now successfully published the Power BI report to a web URL.
Using Power Automate to Convert Power BI Reports to PDF
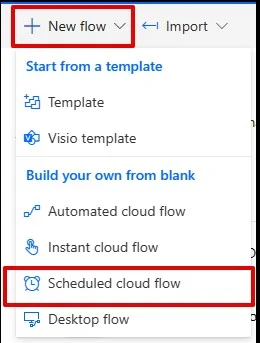
- Log in to Power Automate and select the My Flows tab. Navigate to New flow > Scheduled cloud flow .
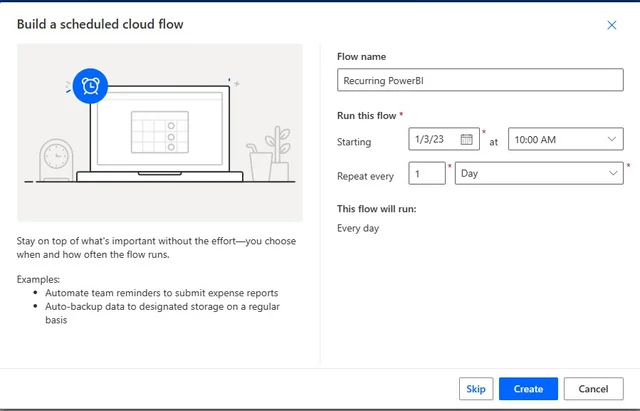
- In the Build a scheduled cloud flow field, enter a name in the Flow name field, and specify a suitable starting date and time. In the Repeat every box, specify how often you want the flow to run. For example, specify 1 as the interval and Day as the frequency if you want the flow to run every day. Then, click Create .
A new flow will be created. Select + New step and add an action, and then type Muhimbi into the search box to search for all actions related to Muhimbi PDF Converter. Select the Convert HTML to PDF action.
Configure the Convert HTML to PDF action by pasting the URL obtained from the previous section. Update the other parameters as shown in the screenshot below.

- Select + New step and choose the Office 365 Outlook – Send an email (V2) action. Configure this as shown in the screenshot below.

Publish and test the flow by clicking Test .
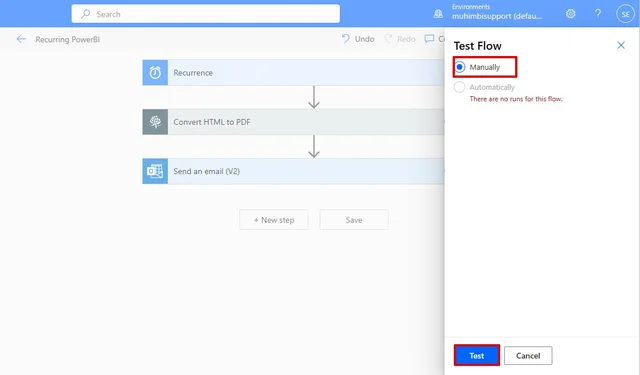
You should now receive an email with a Power BI report as a PDF attachment.

Frequently Asked Questions
- When you use Publish to web , can the report or visual be viewed by anyone on the internet?
Yes, anyone on the internet can view the report, as no authentication is used when viewing these reports. Only use Publish to web with reports and data that anyone on the internet (unauthenticated members of the public) should be able to see. This includes detail level data that's aggregated in your reports. Before publishing a report, ensure you have the right to share the data and visualizations publicly. Do not publish confidential or proprietary information. If in doubt, check your organization’s policies before publishing.
Workaround: The generated URL cannot be guessed unless it's physically shared.
- My report has multiple pages. Which page does it convert?
It converts the first (default) page.
Workaround: If you want to convert a different page, then append &pageName=ReportSection2 to the end of the URL, where 2 is the page number. For more details, refer to this issue .
- Does the PDF capture refreshed data?
Yes, it captures refreshed data. Data refreshes are automatically reflected in your embedded report or visual. It can take approximately 1 hour for refreshed data to be visible. You can disable automatic refresh by selecting the option not to refresh on the schedule for the data set used by the report.
Have a Question? We’re Always Happy to Help.
Pdf converter.
- For SharePoint
- For Power Automate
- API and SDK Services
OCR and PDF/A
- Case Studies
- Contact Support
- Our Commitments
- Terms and Conditions
- Privacy Policy
Sign up to receive the latest tips via email.
We have the answers to your questions! - Don't miss our next open house about the data universe!
Exporting data from a Power BI dashboard or report to Excel is not always easy. Find out how to transfer datasets between the two Microsoft applications, and how to take a training course to master Power BI completely.
Importing data from Microsoft Excel is a very common task for Power BI users. Once imported into the Business Intelligence platform, the data can be analysed to generate reports and dashboards.
However, it is sometimes necessary to export a dataset from Power BI to Excel. This can be a complex process for a beginner, but there are several very effective methods.
What is Power BI?
Power BI is Microsoft’s Business Intelligence platform , which has been named a Leader in its category in the Gartner Magic Quadrant Report for 15 consecutive years.
This tool collects, analyses and transforms data into usable information. This information can then be presented in the form of easily understandable graphs and diagrams, enabling faster decision-making within the company.
The Power BI application is available on PC, mobile and via the cloud. It can be used from anywhere in the world to harness business intelligence.
This software suite enables data to be analysed and information to be shared in the form of visualisations. It offers a host of useful features, including dataset filtration, DataViz, interactive dashboards, AI-enhanced analysis, natural language queries, connection to a wide range of sources, and data export to Excel.
💡Related articles:
Who can export Power BI datasets to Excel?

How do I export a dataset from Power BI?
The permissions set by the owner or creator of a dataset determine whether you can download it from a Power BI report or dashboard.
This task is therefore straightforward for the owner of the dataset via Power BI Desktop. On the other hand, users must contact the owner to ask them to configure export permissions or to send them the dataset.
Exporting Power BI data: what are the limits?
To prevent this from happening, report creators and Power BI administrators can set up data sharing protocols. The aim is to restrict the way in which individuals or groups can share their data.
If you are unable to obtain editing privileges for your data, or can only export certain visuals or dashboard elements, you can contact your Power BI moderator.
However, other factors may prevent a Power BI table from being exported to Excel. These may include the permissions set by the user, the type or content of the data, or the name given to the fields by the designer. Before exporting data from a Power BI visual, make sure you have the necessary permissions.
In addition, bear in mind that the export limit is set at 30,000 rows for a .csv file on Power BI Desktop and Power BI Service. Check that the table you wish to export to Excel does not exceed this limit.
Power BI applications can export a maximum of 150,000 rows to an .xlsx file. This number can be further reduced by query limits and the type of visuals.
The maximum volume that Power BI can export with DirectQuery is 16MB of uncompressed data. This may be less than the limit of 150,000 table rows if there are many columns, or if the data types are difficult to compress.
Related articles

Chaos Engineering: What is it?

What is Google Analytics? Complete guide to the tool
Backtracking: What is it? How do I use it?

GCP Storage: How to simplify your cloud storage?
Get monthly insider insights from experts directly in your mailbox
Chris Webb's BI Blog
Microsoft Fabric, Power BI, Analysis Services, DAX, M, MDX, Power Query, Power Pivot and Excel
Power BI Paginated Reports That Connect To Web Services And Excel
By far the most exciting announcement for me this week was the new release of Power BI Report Builder that has Power Query built in, allowing you to connect to far more data sources in paginated reports than you ever could before. There’s a very detailed blog post and video showing you how this new functionality works here:
https://powerbi.microsoft.com/en-us/blog/get-data-with-power-query-available-in-power-bi-report-builder-preview
The main justification for building this feature was to allow customer to build paginated reports on sources like Snowflake or BigQuery, something which had only been possible before if you used an ODBC connection via a gateway or built a semantic model in between – neither of which are an ideal solution. However it also opens up a lot of other possibilities too.
For example, you can now build paginated reports on web services (with some limitations ). I frequently get asked about building regular Power BI reports that get data from web services on demand – something which isn’t possible, as I explained here . To test using paginated reports on a web service I registered for Transport for London’s APIs and built a simple report on top of their Journey Planner API (Transport for London are the organisation that manages public transport in London). This report allows you to enter a journey starting point and ending point anywhere in or around London, calls the API and returns a table with different routes from the start to the destination, along with timings and instructions for each route. Here’s the report showing different routes for a journey from 10 Downing Street in London to Buckingham Palace:
You can also build paginated reports that connect to Excel workbooks that are stored in OneDrive or OneLake , meaning that changes made in the Excel workbook show up in the report as soon as the workbook is saved and closed:
So. Much. Fun. I’ll probably develop a presentation for user groups explaining how I built these reports soon.
And yes, if you need to export data to Excel on a schedule, paginated reports are now an even better choice. You know your users want this.

Share this:

Published by Chris Webb
My name is Chris Webb, and I work on the Fabric CAT team at Microsoft. I blog about Power BI, Power Query, SQL Server Analysis Services, Azure Analysis Services and Excel. View all posts by Chris Webb
2 thoughts on “ Power BI Paginated Reports That Connect To Web Services And Excel ”
Agreed it’s awesome! I did find a bug (mentioned on the blog post comments too) that ignoring privacy levels when combining different sources doesn’t seem to be remembered once the power query window is closed, and there doesn’t seem to be any way to set privacy levels either.
- Pingback: Power BI Paginated Reports over Excel and Web Services – Curated SQL
Leave a Reply Cancel reply
Discover more from chris webb's bi blog.
Subscribe now to keep reading and get access to the full archive.
Type your email…
{{#message}}{{{message}}}{{/message}}{{^message}}Your submission failed. The server responded with {{status_text}} (code {{status_code}}). Please contact the developer of this form processor to improve this message. Learn More {{/message}}
{{#message}}{{{message}}}{{/message}}{{^message}}It appears your submission was successful. Even though the server responded OK, it is possible the submission was not processed. Please contact the developer of this form processor to improve this message. Learn More {{/message}}
Submitting…
Continue reading
- Power BI forums
- News & Announcements
- Get Help with Power BI
- Report Server
- Power Query
- Mobile Apps
- DAX Commands and Tips
- Custom Visuals Development Discussion
- Health and Life Sciences
- Power BI Spanish forums
- Translated Spanish Desktop
- Power Platform Integration - Better Together!
- Power Platform Integrations
- Power Platform and Dynamics 365 Integrations
- Training and Consulting
- Instructor Led Training
- Dashboard in a Day for Women, by Women
- Community Connections & How-To Videos
- COVID-19 Data Stories Gallery
- Themes Gallery
- Data Stories Gallery
- R Script Showcase
- Webinars and Video Gallery
- Quick Measures Gallery
- 2021 MSBizAppsSummit Gallery
- 2020 MSBizAppsSummit Gallery
- 2019 MSBizAppsSummit Gallery
- Custom Visuals Ideas
- Upcoming Events
- Community Blog
- Power BI Community Blog
- Custom Visuals Community Blog
- Community Support
- Community Accounts & Registration
- Using the Community
- Community Feedback
Earn the coveted Fabric Analytics Engineer certification. 100% off your exam for a limited time only!
- Question about Viewing PDF in Power BI without co...
- Subscribe to RSS Feed
- Mark Topic as New
- Mark Topic as Read
- Float this Topic for Current User
- Printer Friendly Page
- All forum topics
- Previous Topic

- Mark as New
- Report Inappropriate Content
Question about Viewing PDF in Power BI without converting it to base64
Solved! Go to Solution.

View solution in original post

Helpful resources

Microsoft Fabric AMA Livestream
Join us Tuesday, April 09, 9:00 – 10:00 AM PST for a live, expert-led Q&A session on all things Microsoft Fabric!
How to Get Your Question Answered Quickly

IMAGES
VIDEO
COMMENTS
Export to PDF from the Power BI service. In the service, select a report to display it on the canvas. You can select a report from your Home page, Apps, or any other container from the nav pane. In the Power BI service, select Export > PDF from the menu bar. A pop-up appears where you can select Current values or Default values.
To create a PDF document from Power BI Desktop, simply navigate to File > Export > Export to PDF menu item: A progress notification will keep you updated with the progress of the file exporting. Depending on your hardware, this can take a couple of minutes. A PDF document will be generated, containing all the pages from your Power BI report ...
Check the screenshot below: Follow the below steps to export Power BI Desktop to PDF: 1. Open the Power BI report you created before in Power BI Desktop. 2. Click on the "File" tab in the top ribbon. 3. Then click the Export button -> Select Export to PDF. Check the screenshot below.
Power BI Tutorial for beginners on how to export a power bi report or dashboard into a PDF Document.Dataset Link - https://tinyurl.com/yd65vnf3(within datase...
To export a single visual or page in Power BI, follow these steps: Right-click on the visual or page you want to export. Select the Export data option from the context menu. Choose the desired export format (Excel, CSV, PDF). Choose the location where you want to save the file.
Export to PDF. The first new feature is one that has long been a top customer ask - the ability to export your Power BI report as a PDF document. Now all users will have the ability to export their reports to either a PowerPoint presentation or PDF document. To get started, locate the File menu from any of your reports and open the dropdown.
To export a Power BI report to PDF or PowerPoint, first open the Power BI Report in the Power BI Service: Next, click File and choose Export to PDF: You will see the window: With options Current Values (exports the report in the current state with the filters selected etc) and Default Values (the original report): Click Export.
Close Power BI Desktop and re-open it. Once we relaunch Power BI Desktop, go to Get Data->More again from the menu bar. In the following screenshot, you can get a new option under 'File'. We get the option 'PDF (Beta) to use as a data source. Click on PDF (Beta) connector and connect.
In Power BI, click on Get Data Menu item, and select the PDF File Connector. You will be provided with an informational warning that it's a preview feature. For now, click Continue button. Now it would prompt you to select the PDF file path.
Authority Bi export to pdf. Let states see steps that how we can export the Power BI reports to the Pdf register, To create a pdf document file away the Strength BI reports, select aforementioned File option from the ribbon-> Foreign -> Export to PDF.
Just like importing or getting data, there are choices in how to export and share your Power BI report. In fact, there are only two choices, making export to PDF quite simple. Choose File>Export>Export to PDF. The only other choice is Power BI Template, if you wish to save your current report as a starting point for future reports.
Perform formatted exports to PDF from your Power BI reports. 1. Export only select columns and measures from your tabular and matrix reports Export the entire table/matrix or select specific columns using the 'Selected Columns' option in the toolbar. In the following example, only the last three quarters are exported to the PDF file.
Interactive mode: End users interact with a report and export their own view of the data. Non-interactive mode: Offline generation of snapshots distributed to different people in the organization. The following capabilities will be supported: Export report for both Power BI and non-Power BI users (SaaS and PaaS embed scenarios)
Hi, I'm trying to export a report into PDF file from Power BI service. The report is only one page and contains a table with multiple rows that needs me to scroll down to view the full content. However, when I try to export, the PDF file looks like a simple screen shot of the top page, cutting all o...
Using Power Automate to Convert Power BI Reports to PDF. Log in to Power Automate and select the My Flows tab. Navigate to New flow > Scheduled cloud flow. In the Build a scheduled cloud flow field, enter a name in the Flow name field, and specify a suitable starting date and time. In the Repeat every box, specify how often you want the flow to ...
Power BI is designed as a self-service tool, accessible to all members of an organisation. However, not everyone is necessarily authorised to export data from the platform. By default, Power BI reserves the export of the underlying dataset to administrators and report creators. If the owner of the dataset does not define specific export permissions, ordinary users cannot export data from a ...
Here's the report showing different routes for a journey from 10 Downing Street in London to Buckingham Palace: You can also build paginated reports that connect to Excel workbooks that are stored in OneDrive or OneLake, meaning that changes made in the Excel workbook show up in the report as soon as the workbook is saved and closed: So. Much ...
2. 3. 4. Basically, make visual show PDF of Branch's layout regarding to Branch Number in slicer that was selected. My database is in Sharepoint Library / Onedrive folder that contain PDF files named according to the Branch Number. I searched about my problem in this forum and found that I need to either use 3rd party visual or convert to ...