Critical PowerPoint Shortcuts – Claim Your FREE Training Module and Get Your Time Back!

PowerPoint Graphics: How to Improve Your Presentations w/ Graphics
- PowerPoint Tutorials
- Pictures, Icons, Videos, Etc.
- Presentation Design
- August 21, 2018
If you’ve ever touched a PowerPoint slide, chances are that you’ve already used PowerPoint graphics already.
But you may have questions: How do you find good graphics? How do you manipulate them correctly? And how do you customize them?
That’s what this article will answer for you.
What is a PowerPoint graphic?
There seems to be a wide range of things that people label as a graphic for PowerPoint.
Here at Nuts & Bolts, we define a graphic in PowerPoint as any image that is not a picture. This includes SmartArt, which is a type of native PowerPoint graphic and has special attributes.
A PowerPoint graphic most typically refers to a grouping of shapes into an image, commonly referred to as vectors.
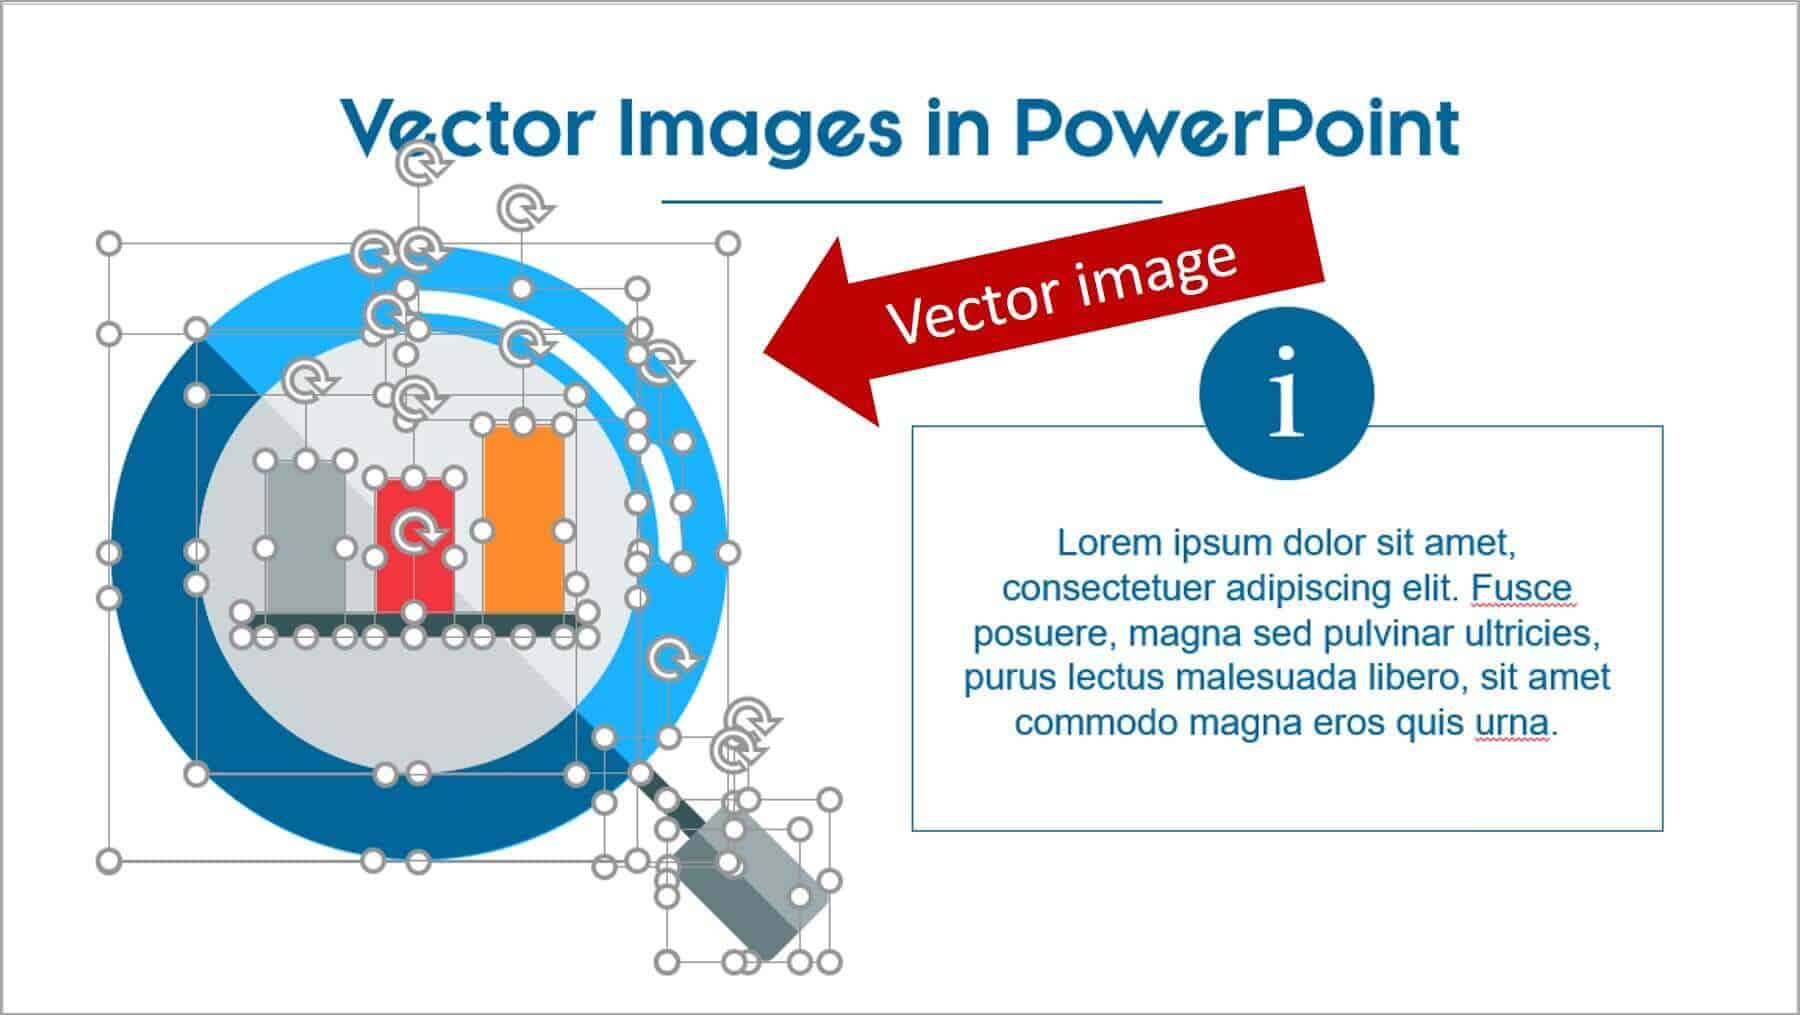
From PowerPoint’s perspective, vectors are considered to be shapes – and that means that you can customize them as you would any rectangle, circle, or freeform shape… giving you complete freedom to create the visual you need.
Vector graphics can come in the following file types:
- EPS (Encapsulated PostScript – create by Adobe – this is perhaps the most common vector image format)
However, PowerPoint will only accept certain file types. To see which ones, go to the section on how to use vectors in PowerPoint below.
Why use a graphic in PowerPoint
As the representation of an idea, a graphic is the perfect way to help your audience immediately visualize and grasp a concept you are sharing with them.
On top of that, it’s a great way to add some flair to any presentation and a quick way to take it up a notch.
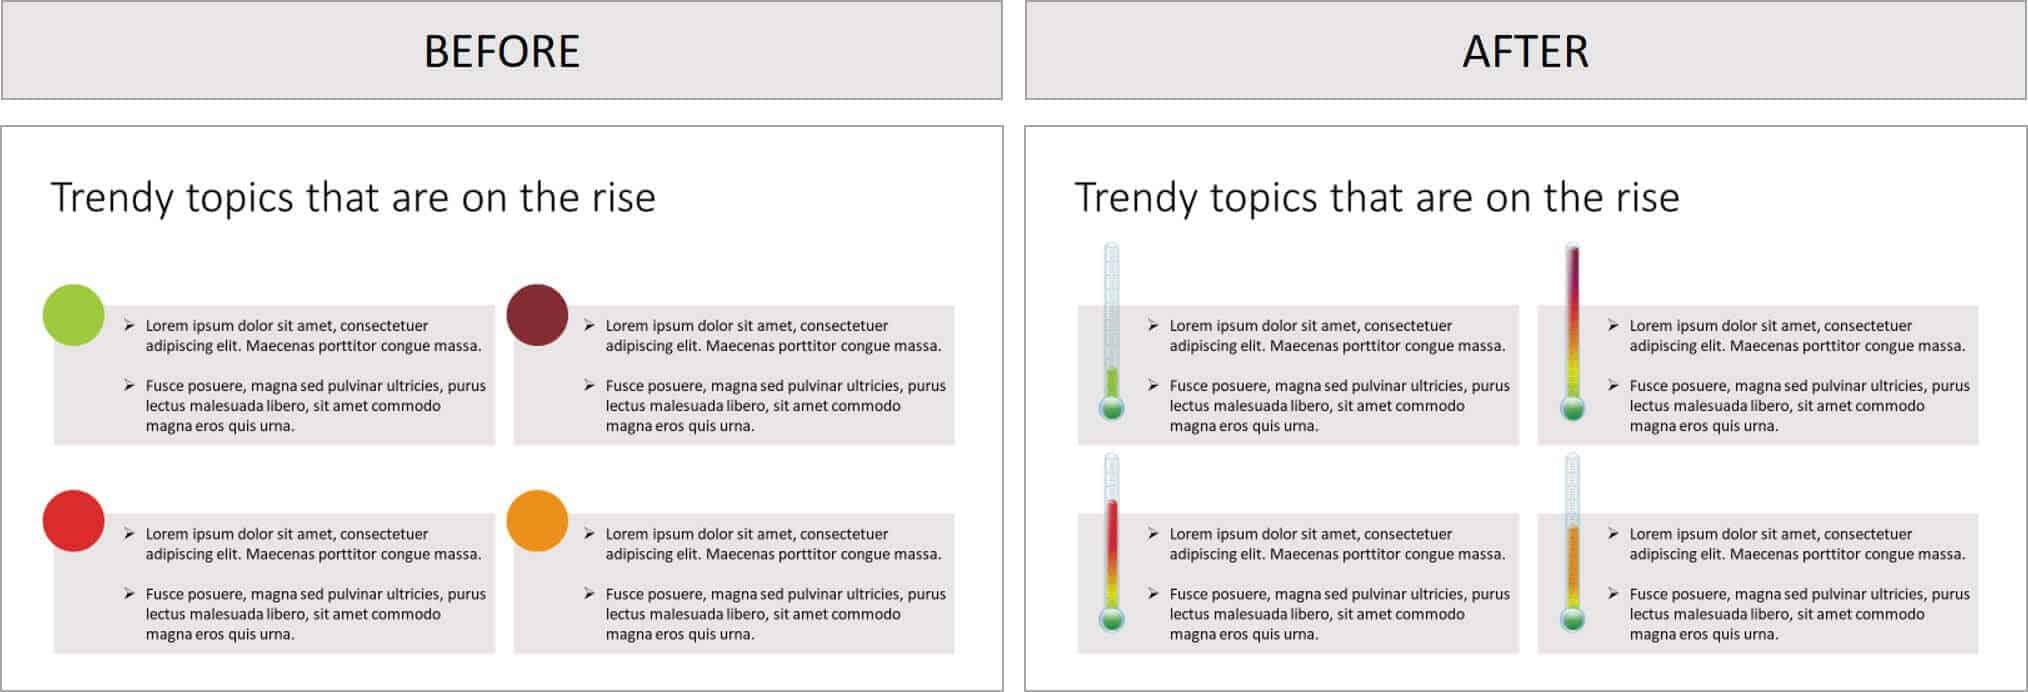
Graphics can be better than pictures in some situations, when you need to be able to edit elements in a visual. For example, maybe you need to remove, add or re-color a certain item.

You cannot do this with pictures – but with the right graphic (and in particular a vector graphic), you could potentially customize it to your heart’s content.
Where to get free graphics for PowerPoint
Getting free graphics for PowerPoint is easy – you just have to know where to look.
Here are our favorite 2 places to find free vector graphics for PowerPoint:
- Freepik – Great database with tons of very high-quality and modern icons, flat icons, vectors, and PSD files to use. Freepik does require you to give them credit if you use their material, but they make it very easy with a simple html code.
- Pixabay – Awesome site for 100% free and Creative Commons CC0 licensed images, illustrations, vectors, and videos.
To learn where to get more free PowerPoint graphics, images, videos, etc. check out this list of our favorite PowerPoint resources . Another way to get free vector graphics is to create them from scratch. There are two tools that can help you do this:
- Text-to-Outline by YouPresent – Allows you to convert text into vectors/shapes, which you can then format any way you like in PowerPoint.
- Vector Magic – Creates a vector out of any image…truly magic!
Keep in mind that because these are all free methods for finding vector graphics for PowerPoint, you will be limited in what you find or create. If you want a very specific and professional-looking vector, you may have to go to a paid service to purchase well-designed graphics that suit your need better.
Where to buy graphics for PowerPoint
By far the easiest way to get professional & unique graphics onto your slides (especially now that ClipArt is gone) is to use a service like GetMyGraphics .
They are custom-built graphics designed for PowerPoint. All you need to do is download and insert them onto your slide and then tweak them like you would SmartArt.
Although this is a paid service, we’ve found that we’ve reused these graphics again and again, so we see it as a good investment in sharper looking slides.
How to use vector graphics in PowerPoint
Using vectors in PowerPoint depends on what file type you have. If you have an older version of PowerPoint (2013 and earlier), you can insert the following vector files types into PowerPoint:
If you have Office 365, you can no longer insert EPS files. However, you can still use EMF files, and you can also insert SVG files (except for on a Mac).
If you have an EPS file and can’t import it into your version of PowerPoint, check out our article on how to import EPS files into PowerPoint .
Note: If you’re trying to use a file type that is not supported by your version of PowerPoint, you can try converting your file into the correct file type.
For a really good tutorial on how to convert vectors into usable PowerPoint objects without Adobe software, check out Microsoft MVP Dave Paradi’s post on finding and using vector images in PowerPoint.
Once you have an SVG file downloaded onto your computer, you’ll want to insert it into your presentation.
There are two ways to insert a vector file onto your PowerPoint slide:
Method #1: Drag the file from wherever it is sitting on your computer and drag it onto your slide.
Method #2: Go to the Insert tab in the Ribbon and select ‘Pictures’ (make sure to select the ‘Pictures’ icon and not the ‘Online Pictures’ icon). Then find your vector file and click on ‘Open.’
Note: If you have PowerPoint 2016 with Office 365, you have a new object class, called Icons. These are also vector files (SVG).
You can insert them by going to the Insert tab in the Ribbon and selecting ‘Icons’ (or using this shortcut: Alt, N, Y1). You can learn more about the icons feature in this Office blog article .
Once you have a vector file inserted on your slide, you can manipulate its various pieces.
To do that, you’ll need to ungroup it twice. To ungroup a vector image, select it and then use one of the following methods:
- Hit the ungroup shortcut: Ctrl + Shift + G
- Right-click the vector and select ‘Group’ and then ‘Ungroup’
- Go to the Drawing Tools > Format tab in the Ribbon, select ‘Group’ and then ‘Ungroup’
A pop-up box will appear, asking you if you want to ungroup it. Click on ‘Yes.’
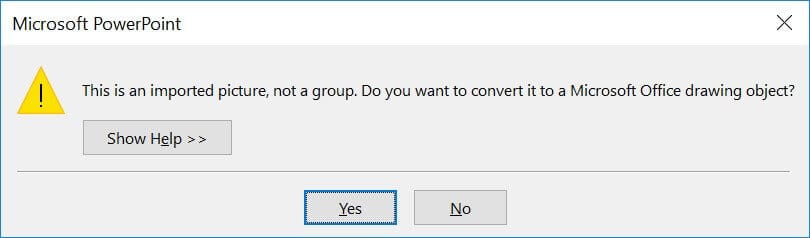
And now you have a series of shapes (instead of a picture) that you can edit and format however you like, just like for regular PowerPoint shapes.
Note: Keep in mind that some things might come out strangely as vectors in PowerPoint:
- Gradients and shadows
- Lines (the lines will likely come out as one object and may lose their original weight)
- Complex artwork, such as sketching and other artistic effects
Some things you can do with your vector images now include:
- Change the fill color
- Add an outline with a custom weight
- Move and resize pieces of the vector
- Edit the points of certain pieces to change even the shape of it
And much more!
What’s next?
Related articles, about the author.

Popular Tutorials
- How to Strikethrough Text (l̶i̶k̶e̶ ̶t̶h̶i̶s̶) in Word, Excel & PowerPoint
- How to Make Animated Fireworks in PowerPoint (Step-by-Step)
- Strikethrough Shortcut (l̶i̶k̶e̶ ̶t̶h̶i̶s̶) for Word, Excel & PowerPoint
- How to Create a Flash Card Memory Game in PowerPoint (Like Jeopardy)
- Keyboard Shortcuts Not Working: Solved
PowerPoint Tutorial Categories
- Strategies & Opinions
- Shortcuts & Hacks
- New Features
- Miscellaneous
- Charts & Data Viz
We help busy professionals save hours and gain peace of mind, with corporate workshops, self-paced courses and tutorials for PowerPoint and Word.
Work With Us
- Corporate Training
- Presentation & Template Design
- Courses & Downloads
- PowerPoint Articles
- Word Articles
- Productivity Resources
Find a Tutorial
- Free Training
- For Businesses
We help busy office workers save hours and gain peace of mind, with tips, training and tutorials for Microsoft PowerPoint and Word.
Master Critical PowerPoint Shortcuts – Secure Your FREE Training Module and Save Valuable Time!
⌛ Master time-saving expert techniques.
🔥 Create powerful presentations.
🚀 Propel your career to new heights.
We value your privacy – we keep your info safe.
Discover PowerPoint Hacks Loved by Industry Giants - KKR, AmEx, HSBC!
Over 114,880 professionals in finance, marketing and sales have revolutionized their PPT skills with our proven methods.
Gain FREE access to a full module of our premium PowerPoint training program – Get started today!
We hate spam too and promise to keep your information safe.
You are currently viewing a placeholder content from Facebook . To access the actual content, click the button below. Please note that doing so will share data with third-party providers.
How-To Geek
8 tips to make the best powerpoint presentations.
Want to make your PowerPoint presentations really shine? Here's how to impress and engage your audience.
Quick Links
Table of contents, start with a goal, less is more, consider your typeface, make bullet points count, limit the use of transitions, skip text where possible, think in color, take a look from the top down, bonus: start with templates.
Slideshows are an intuitive way to share complex ideas with an audience, although they're dull and frustrating when poorly executed. Here are some tips to make your Microsoft PowerPoint presentations sing while avoiding common pitfalls.
It all starts with identifying what we're trying to achieve with the presentation. Is it informative, a showcase of data in an easy-to-understand medium? Or is it more of a pitch, something meant to persuade and convince an audience and lead them to a particular outcome?
It's here where the majority of these presentations go wrong with the inability to identify the talking points that best support our goal. Always start with a goal in mind: to entertain, to inform, or to share data in a way that's easy to understand. Use facts, figures, and images to support your conclusion while keeping structure in mind (Where are we now and where are we going?).
I've found that it's helpful to start with the ending. Once I know how to end a presentation, I know how best to get to that point. I start by identifying the takeaway---that one nugget that I want to implant before thanking everyone for their time---and I work in reverse to figure out how best to get there.
Your mileage, of course, may vary. But it's always going to be a good idea to put in the time in the beginning stages so that you aren't reworking large portions of the presentation later. And that starts with a defined goal.
A slideshow isn't supposed to include everything. It's an introduction to a topic, one that we can elaborate on with speech. Anything unnecessary is a distraction. It makes the presentation less visually appealing and less interesting, and it makes you look bad as a presenter.
This goes for text as well as images. There's nothing worse, in fact, than a series of slides where the presenter just reads them as they appear. Your audience is capable of reading, and chances are they'll be done with the slide, and browsing Reddit, long before you finish. Avoid putting the literal text on the screen, and your audience will thank you.
Related: How to Burn Your PowerPoint to DVD
Right off the bat, we're just going to come out and say that Papyrus and Comic Sans should be banned from all PowerPoint presentations, permanently. Beyond that, it's worth considering the typeface you're using and what it's saying about you, the presenter, and the presentation itself.
Consider choosing readability over aesthetics, and avoid fancy fonts that could prove to be more of a distraction than anything else. A good presentation needs two fonts: a serif and sans-serif. Use one for the headlines and one for body text, lists, and the like. Keep it simple. Veranda, Helvetica, Arial, and even Times New Roman are safe choices. Stick with the classics and it's hard to botch this one too badly.
There reaches a point where bullet points become less of a visual aid and more of a visual examination.
Bullet points should support the speaker, not overwhelm his audience. The best slides have little or no text at all, in fact. As a presenter, it's our job to talk through complex issues, but that doesn't mean that we need to highlight every talking point.
Instead, think about how you can break up large lists into three or four bullet points. Carefully consider whether you need to use more bullet points, or if you can combine multiple topics into a single point instead. And if you can't, remember that there's no one limiting the number of slides you can have in a presentation. It's always possible to break a list of 12 points down into three pages of four points each.
Animation, when used correctly, is a good idea. It breaks up slow-moving parts of a presentation and adds action to elements that require it. But it should be used judiciously.
Adding a transition that wipes left to right between every slide or that animates each bullet point in a list, for example, starts to grow taxing on those forced to endure the presentation. Viewers get bored quickly, and animations that are meant to highlight specific elements quickly become taxing.
That's not to say that you can't use animations and transitions, just that you need to pick your spots. Aim for no more than a handful of these transitions for each presentation. And use them in spots where they'll add to the demonstration, not detract from it.
Sometimes images tell a better story than text can. And as a presenter, your goal is to describe points in detail without making users do a lot of reading. In these cases, a well-designed visual, like a chart, might better convey the information you're trying to share.
The right image adds visual appeal and serves to break up longer, text-heavy sections of the presentation---but only if you're using the right images. A single high-quality image can make all the difference between a success and a dud when you're driving a specific point home.
When considering text, don't think solely in terms of bullet points and paragraphs. Tables, for example, are often unnecessary. Ask yourself whether you could present the same data in a bar or line chart instead.
Color is interesting. It evokes certain feelings and adds visual appeal to your presentation as a whole. Studies show that color also improves interest, comprehension, and retention. It should be a careful consideration, not an afterthought.
You don't have to be a graphic designer to use color well in a presentation. What I do is look for palettes I like, and then find ways to use them in the presentation. There are a number of tools for this, like Adobe Color , Coolors , and ColorHunt , just to name a few. After finding a palette you enjoy, consider how it works with the presentation you're about to give. Pastels, for example, evoke feelings of freedom and light, so they probably aren't the best choice when you're presenting quarterly earnings that missed the mark.
It's also worth mentioning that you don't need to use every color in the palette. Often, you can get by with just two or three, though you should really think through how they all work together and how readable they'll be when layered. A simple rule of thumb here is that contrast is your friend. Dark colors work well on light backgrounds, and light colors work best on dark backgrounds.
Spend some time in the Slide Sorter before you finish your presentation. By clicking the four squares at the bottom left of the presentation, you can take a look at multiple slides at once and consider how each works together. Alternatively, you can click "View" on the ribbon and select "Slide Sorter."
Are you presenting too much text at once? Move an image in. Could a series of slides benefit from a chart or summary before you move on to another point?
It's here that we have the opportunity to view the presentation from beyond the single-slide viewpoint and think in terms of how each slide fits, or if it fits at all. From this view, you can rearrange slides, add additional ones, or delete them entirely if you find that they don't advance the presentation.
The difference between a good presentation and a bad one is really all about preparation and execution. Those that respect the process and plan carefully---not only the presentation as a whole, but each slide within it---are the ones who will succeed.
This brings me to my last (half) point: When in doubt, just buy a template and use it. You can find these all over the web, though Creative Market and GraphicRiver are probably the two most popular marketplaces for this kind of thing. Not all of us are blessed with the skills needed to design and deliver an effective presentation. And while a pre-made PowerPoint template isn't going to make you a better presenter, it will ease the anxiety of creating a visually appealing slide deck.

Tips for creating and delivering an effective presentation
In this article.
Creating an effective presentation
Delivering an effective presentation
Tips for creating an effective presentation
Top of Page
Tips for delivering an effective presentation

Need more help?
Want more options.
Explore subscription benefits, browse training courses, learn how to secure your device, and more.

Microsoft 365 subscription benefits

Microsoft 365 training

Microsoft security

Accessibility center
Communities help you ask and answer questions, give feedback, and hear from experts with rich knowledge.

Ask the Microsoft Community

Microsoft Tech Community

Windows Insiders
Microsoft 365 Insiders
Was this information helpful?
Thank you for your feedback.
Microsoft Office
10 minute read
Top 12 PowerPoint Tips and Hacks for Flawless Presentations

Saikat Basu
Twitter LinkedIn WhatsApp Pocket Email
We’ve all seen our fair share of bad PowerPoint presentations . We can all agree that for a PowerPoint presentation to impress, it needs time and attention to detail.
So how can you ramp up your PowerPoint productivity in the shortest time possible?
That’s where we come in. For starters, follow our proven PowerPoint tips and tricks for business presentations , which are sure to make an impact.
Step up your PowerPoint game
Download our print-ready shortcut cheatsheet for PowerPoint.
1. Keep it simple

Keep your slides simple. It’s the visual backdrop to what you are going to say.
The most recommended PowerPoint tip for your productivity is called simplicity . You may be tempted by the graphical razzmatazz of beautiful images, background, and charts. At the end of the day, PowerPoint is a background visual aid for your talk. It is not the talk.
PowerPoint has lots of bells and whistles. But you don’t have to use them all. For instance, your content may not need the much-maligned bullet points - you can just use one key point per slide instead.
That’s why…
2. Reduce the text

Less is more when it is about the text on your slides.
The average reading speed on a screen is around 100 - 150 words per minute. Too much information on the slide is a distraction and an inattentive audience will lose the message you are trying to convey.
Don’t give them too much to read. Use high-quality pictures and eye-catching graphics instead.
To make information digestible, expert slide designers recommend you write one key idea per slide that is summarized by a clear headline.
Tip: Exploit white space. Create more space between your text, paragraphs, and graphics on your slide.
3. Plan your content first

Think about the message you want to convey and use it to write an outline.
As PowerPoint is such a visual medium, it is easy to get sidetracked with the visuals. So it’s important to chalk out what you want to say and in what order even before you open PowerPoint.
Your slides will come together quickly with the help of PowerPoint design options and you can even choose the right templates if you know your stuff inside out.
Tip: Use brainstorming tools like mind maps, flowcharts, and even storyboards to sketch your content flow.
4. Use PowerPoint Designer for ideas
PowerPoint makes an intelligent guess by looking at the words on your slide and suggests high-quality artwork to complement it. You can pick one of the creative layouts or go back to your own design.
Tip: PowerPoint Designer can also turn lists, processes, or timelines into beautiful graphics too.
5. Use PowerPoint templates

Start with a template to break through any creative blocks.
PowerPoint templates are meant to be the starter plugs when inspiration deserts you or you are design-challenged. PowerPoint ships with a set of readymade templates and there are more available online. Pick one to begin.
Tip: Manpreet Kaur, the head of Corporate Communications at Mercer also suggests you use templates for mining ideas for your own presentation.
Whenever you receive any PowerPoint presentation from any of your clients, business partners, or sellers, make it a point to add them to any folder as a stock for templates for future reference. You can leverage these templates to find inspiration for any icon idea, layout, idea presentation, and number representation on the slides.
6. Edit the Slide Master

To open the Slide Master view, go to the View tab on the Ribbon and select Slide Master .
The first slide on the top is the Slide Master. Any changes to the Slide Master will be applied to all the slides in the presentation.
The Slide Master view also shows all the slide layouts used in PowerPoint. You can also use these Layout Master slides to control the appearance of any group of slides that share a common layout.
Tip: Make changes to the Slide Master before you start filling a presentation with the content.
7. Use PowerPoint Shapes for visuals

PowerPoint Shapes is the most powerful graphical tool in your control.
The multifaceted Shapes feature on the Ribbon gives you infinite ways to use PowerPoint like an illustration program. Look beyond the commonplace rectangle, oval, and rounded rectangle patterns.
Every shape is editable. You can customize any PowerPoint shape and create your own custom designs. They can be formatted with colors, 3-D effects and shadows too.
Tip: Most default shapes are overused. So, you can use your own custom shapes to add interest to a key point or a slide. For instance, you can turn a chevron into a more interesting arrow to illustrate the flow of a process.
8. Choose the right fonts
Choose the right fonts that are modern and pleasing.
It’s well established that fonts have a cognitive impact on how your audience will take in the information.
Sans-serif fonts are preferred for their smooth typefaces. But your typography choices will be influenced by the theme of the content. An artsy presentation can be more liberal with fonts that are decorative.
Also, to create contrast, you can use a technique called font-pairing where two complementary fonts are combined. For instance, use a serif font for titles and pair it with a sans-serif font in the body.
Tip: Want a free font library? Head over to Google Fonts and the collection of 916 free licensed fonts.
9. Use visual metaphors for your data

Visuals help everyone get the context behind data at a faster rate.
Business executives are used to spreadsheets . But that doesn’t mean they will like it in a presentation. Arresting illustrations are far better than bullet points and shoddy SmartArt.
We have talked about shapes and using high-quality photos before. But what if you have to analyze dry data?
Use visual metaphors or analogies to bring out the scale and relationships in the data. Executives can look up numbers, but the right use of an analogy can bring out the context behind it.
For instance, the evolution of man can be used to show the growth of a startup over time.
Tip: When stuck for ideas take inspiration from the best infographics on Slideshare and Pinterest. Infographics are designed to pack a lot of information in a small space.
10. Customize your slides for different audiences

Save yourself a lot of time by reusing your slides for different audiences.
This somewhat lesser-known PowerPoint tip uses a feature called Custom Slideshow to filter what you want your audience to see. Maybe, you want to hide some sensitive information for a lower level of executives while revealing it to those higher up. You do not have to create different slideshows for these two groups.
Create a custom show in five steps.
- On the Ribbon, go to Slide Show > Custom Slide Show , and then select Custom Shows .
- Click the New button in the Custom Shows dialog box.
- In the Define Custom Show box , choose the slides that you want to include in the custom show, and then hit Add .
- You can change the order of the slides with the arrow keys.
- Type a name in the slideshow name box, and then click OK .
Tip: You can also create hyperlinked custom shows that you can jump to from your primary PowerPoint show.
11. Rehearse Your Presentation

Prepare your presentation according to the time allotted.
No PowerPoint tip is useful if you cannot fit the number of slides and the time you take to present them in the schedule. PowerPoint helps you rehearse your presentation before you do it. With the Rehearse Timing feature, you can tweak your delivery according to the time on hand.
A helpful Microsoft Support video walks you through the process.
Tip: Use the timer to check if you're spending too much or too little time on one particular slide. Maybe, explaining the data in a better way can shorten the time.
12. Make your PowerPoint presentations accessible

Go to File > Info > Check for Issues > Check Accessibility
Sharon Rosenblatt, Director of Communications at Accessibility Partners stresses the importance of making presentations more inclusive.
Always use the accessibility checker, and not just if your slideshow is being shared with someone you know has a disability, but you never know where files get sent to.
PowerPoint is all about visuals so it’s more important to finetune the little things that can help make the message easily understood by people who have accessibility challenges.
Tip: Microsoft details the best practices for making all PowerPoint presentations accessible .
The bottom line: Get to the point fast
When you are presenting to busy people, you have to cut the clutter but not lose the message. A successful presentation is about brevity and speed.
A business presentation is also a decision-making tool. So make sure you are presenting the information your audience wants to know. And nothing more.
Yes, they do take some work. But with the help of these PowerPoint tips and tricks, you can start and finish any presentation without losing your sleep.
Want more PowerPoint tips? Then check out these other PowerPoint features that will level up your presentations. Or try taking GoSkills top-rated PowerPoint certification course .
Ready to master Microsoft Office?
Start learning for free with GoSkills courses
Loved this? Subscribe, and join 442,556 others.
Get our latest content before everyone else. Unsubscribe whenever.

Saikat is a writer who hunts for the latest tricks in Microsoft Office and web apps. He doesn't want to get off the learning curve, so a camera and a harmonica claim an equal share of his free time.

Recommended
Should You Switch to Microsoft 365? What You Need to Know in 2024
We break down what Microsoft 365 is, and what makes it different from lifetime licenses.

28 Best Microsoft Office Add Ins in 2024
Supercharge your productivity with our picks of the best Microsoft Office add-ins for Word, Excel, PowerPoint, Outlook and OneNote.

What is Microsoft Teams? Everything You Need to Know in 2024
What is Microsoft Teams? Find out in this introductory guide.
© 2024 GoSkills Ltd. Skills for career advancement
Home Blog Presentation Ideas 23 PowerPoint Presentation Tips for Creating Engaging and Interactive Presentations
23 PowerPoint Presentation Tips for Creating Engaging and Interactive Presentations

PowerPoint presentations are not usually known for being engaging or interactive. That’s often because most people treat their slides as if they are notes to read off and not a tool to help empower their message.
Your presentation slides are there to help bring to life the story you are telling. They are there to provide visuals and empower your speech.
So how do you go about avoiding a presentation “snoozefest” and instead ensure you have an engaging and interactive presentation? By making sure that you use your slides to help YOU tell your story, instead of using them as note cards to read off of.
The key thing to remember is that your presentation is there to compliment your speech, not be its focus.
In this article, we will review several presentation tips and tricks on how to become a storytelling powerhouse by building a powerful and engaging PowerPoint presentation.
Start with writing your speech outline, not with putting together slides
Use more images and less text, use high-quality images, keep the focus on you and your presentation, not the powerpoint, your presentation should be legible from anywhere in the room, use a consistent presentation design, one topic per slide, avoid information overwhelm by using the “rule of three”.
- Display one bullet at a time
Avoid unnecessary animations
- Only add content that supports your main points
Do not use PowerPoint as a teleprompter
- Never Give Out Copies of the Presentation
Re-focus the attention on you by fading into blackness
Change the tone of your voice when presenting, host an expert discussion panel, ask questions, embed videos, use live polling to get instant feedback and engage the audience.
- He kept his slides uncluttered and always strived for simplicity
- He was known to use large font size, the bigger, the better.
- He found made the complex sound simple.
He was known to practice, practice, and keep on practicing.
Summary – how to make your presentation engaging & interactive, fundamental rules to build powerful & engaging presentation slides.
Before we go into tips and tricks on how to add flair to your presentations and create effective presentations, it’s essential to get the fundamentals of your presentation right.
Your PowerPoint presentation is there to compliment your message, and the story you are telling. Before you can even put together slides, you need to identify the goal of your speech, and the key takeaways you want your audience to remember.
YOU and your speech are the focus of this presentation, not the slides – use your PowerPoint to complement your story.
Keep in mind that your slides are there to add to your speech, not distract from it. Using too much text in your slides can be distracting and confusing to your audience. Instead, use a relevant picture with minimal text, “A picture is worth a thousand words.”

This slide is not unusual, but is not a visual aid, it is more like an “eye chart”.
Aim for something simpler, easy to remember and concise, like the slides below.
Keep in mind your audience when designing your presentation, their background and aesthetics sense. You will want to avoid the default clip art and cheesy graphics on your slides.

While presenting make sure to control the presentation and the room by walking around, drawing attention to you and what you are saying. You should occasionally stand still when referencing a slide, but never turn your back to your audience to read your slide.
You and your speech are the presentations; the slides are just there to aid you.
Most season presenters don’t use anything less than twenty-eight point font size, and even Steve Jobs was known to use nothing smaller than forty-point text fonts.
If you can’t comfortably fit all the text on your slide using 28 font size than you’re trying to say and cram too much into the slide, remember tip #1.4 – Use relevant images instead and accompany it with bullets.
Best Practice PowerPoint Presentation Tips
The job of your presentation is to help convey information as efficiently and clearly as possible. By keeping the theme and design consistent, you’re allowing the information and pictures to stand out.
However, by varying the design from slide to slide, you will be causing confusion and distraction from the focus, which is you and the information to be conveyed on the slide.

Technology can also help us in creating a consistent presentation design just by picking a topic and selecting a sample template style. This is possible thanks to the SlideModel’s AI slideshow maker .
Each slide should try to represent one topic or talking point. The goal is to keep the attention focused on your speech, and by using one slide per talking point, you make it easy for you to prepare, as well as easy for your audience to follow along with your speech.
Sometimes when creating our presentation, we can often get in our heads and try to over-explain. A simple way to avoid this is to follow the “ Rule of Three ,” a concept coined by the ancient Greek philosopher Aristotle.
The idea is to stick to only 3 main ideas that will help deliver your point. Each of the ideas can be further broken into 3 parts to explain further. The best modern example of this “Rule of Three” can be derived from the great Apple presentations given by Steve Jobs – they were always structured around the “Rule of Three.”

Display one sentence at a time
If you are planning to include text in your slides, try to avoid bullet lists, and use one slide per sentence. Be short and concise. This best practice focuses on the idea that simple messages are easy to retain in memory. Also, each slide can follow your storytelling path, introducing the audience to each concept while you speak, instead of listing everything beforehand.
Presentation Blunders To Avoid
In reality, there is no need for animations or transitions in your slides.
It’s great to know how to turn your text into fires or how to create a transition with sparkle effects, but the reality is the focus should be on the message. Using basic or no transitions lets the content of your presentation stand out, rather than the graphics.
If you plan to use animations, make sure to use modern and professional animations that helps the audience follow the story you are telling, for example when explaining time series or changing events over time.
Only add engaging content that supports your main points
You might have a great chart, picture or even phrase you want to add, but when creating every slide, it’s crucial to ask yourself the following question.
“Does this slide help support my main point?”
If the answer is no, then remove it. Remember, less is more.
A common crutch for rookie presenters is to use slides as their teleprompter.
First of all, you shouldn’t have that much text on your slides. If you have to read off something, prepare some index cards that fit in your hand but at all costs do not turn your back on your audience and read off of your PowerPoint. The moment you do that, you make the presentation the focus, and lose the audience as the presenter.
Avoid Giving Out Copies of the Presentation
At least not before you deliver a killer presentation; providing copies of your presentation gives your audience a possible distraction where they can flip through the copy and ignore what you are saying.
It’s also easy for them to take your slides out of context without understanding the meaning behind each slide. It’s OK to give a copy of the presentation, but generally it is better to give the copies AFTER you have delivered your speech. If you decide to share a copy of your presentation, the best way to do it is by generating a QR code for it and placing it at the end of your presentation. Those who want a copy can simply scan and download it onto their phones.

Tips To Making Your Presentation More Engaging
The point of your presentation is to help deliver a message.
When expanding on a particularly important topic that requires a lengthy explanation it’s best to fade the slide into black. This removes any distraction from the screen and re-focuses it on you, the present speaker. Some presentation devices have a built-in black screen button, but if they don’t, you can always prepare for this by adding a black side to your presentation at the right moment.
“It’s not what you say, it’s how you say it.”
Part of making your presentation engaging is to use all the tools at your disposal to get your point across. Changing the inflection and tone of your voice as you present helps make the content and the points more memorable and engaging.
One easy and powerful way to make your presentation interactive is experts to discuss a particular topic during your presentation. This helps create a more engaging presentation and gives you the ability to facilitate and lead a discussion around your topic.
It’s best to prepare some questions for your panel but to also field questions from the audience in a question and answer format.
How To Make Your Presentation More Interactive
What happens if I ask you to think about a pink elephant? You probably briefly think about a pink elephant, right?
Asking questions when presenting helps engage the audience, and arouse interest and curiosity. It also has the added benefit of making people pay closer attention, in case they get called on.
So don’t be afraid to ask questions, even if rhetorical; asking a question engages a different part of our brain. It causes us to reflect rather than merely take in the information one way. So ask many of them.
Asking questions can also be an excellent way to build suspense for the next slide.

(Steve Jobs was known to ask questions during his presentations, in this slide he built suspense by asking the audience “Is there space for a device between a cell phone and a laptop?” before revealing the iPad) Source: MacWorld SF 2018
Remember the point of your presentation is to get a message across and although you are the presenter, it is completely fine to use video in your PowerPoint to enhance your presentation. A relevant video can give you some breathing time to prepare the next slides while equally informing the audience on a particular point.
CAUTION: Be sure to test the video beforehand, and that your audience can hear it in the room.
A trending engagement tool among presenters is to use a live polling tool to allow the audience to participate and collect immediate feedback.
Using a live polling tool is a fun and interactive way to engage your audience in real-time and allow them to participate in part of your presentation.

Google Slides has a built-in Q&A feature that allows presenters to make the slide deck more interactive by providing answers to the audience’s questions. By using the Q&A feature in Google Slides, presenters can start a live Q&A session and people can ask questions directly from their devices including mobile and smartphones.
Key Takeaways from one of the best presenters, Steve Jobs
He kept his slides uncluttered and always strove for simplicity.
In this slide, you can easily see he is talking about the battery life, and it uses a simple image and a few words. Learning from Jobs, you can also make a great presentation too. Focus on the core benefit of your product and incorporate great visuals.

Source: Macworld 2008
SlideModel.com can help to reproduce high-impact slides like these, keeping your audience engagement.

He was known to use large font sizes, the bigger, the better
A big font makes it hard to miss the message on the slide, and allows the audience to focus on the presenter while clearing the understanding what the point of the slide is.
He found made the complex sound simple
When explaining a list of features, he used a simple image and lines or simple tables to provide visual cues to his talking points.

(This particular slide is referencing the iMac features)
What made Steve Jobs the master of presentation, was the ritual of practicing with his team, and this is simple yet often overlooked by many presenters. It’s easy to get caught in the trap of thinking you don’t need to practice because you know the material so well.
While all these tips will help you create a truly powerful presentation , it can only achieve if applied correctly.
It’s important to remember when trying to deliver an amazing experience, you should be thoroughly prepared. This way, you can elevate your content presentation, convey your message effectively and captivate your audience.
This includes having your research cited, your presentation rehearsed. Don’t just rehearse your slides, also take time to practice your delivery, and your tone. The more you rehearse, the more relaxed you will be when delivering. The more confident you will feel.
While we can’t help you with the practice of your next presentation, we can help you by making sure you look good, and that you have a great design and cohesiveness.

You focus on the message and content; we’ll focus on making you look good.
Have a tip you would like to include? Be sure to mention it in the comments!

Like this article? Please share
Audience, Engaging, Feedback, Interactive, Poll, Rule of Three, Steve Jobs Filed under Presentation Ideas
Related Articles

Filed under Presentation Ideas • November 29th, 2023
The Power of Audience Engagement: Strategies and Examples
As presenters, captivating the interest of our viewers is the most important thing. Join us to learn all that’s required to boost audience engagement.

Filed under Business • April 30th, 2020
A Manager’s Guide to Interpersonal Communication
People are promoted to management positions for a variety of reasons. For many, they rise to the top because of their knowledge, technical skills, and decision-making capabilities. As a manager, your effectiveness also strongly depends on your ability to communicate well with your team members and other stakeholders. Here is a quick guide on Interpersonal Communication for Managers.

Filed under Business • June 27th, 2019
Using 360 Degree Feedback in Your Organization
Many organizations use 360 degree feedback to provide assessment for employees via multiple sources to analyze the knowledge, skill and behavior of employees. It is also known as multi-rater feedback, multi-source feedback, 360 Degree Review and multi-source assessment, since it is used frequently for assessing the performance of an employee and to determine his/her future […]
2 Responses to “23 PowerPoint Presentation Tips for Creating Engaging and Interactive Presentations”
Very great advices!
Greetings ! A compact composed communication for the host to have an impact -VOICE
Thank You ?
Leave a Reply
27 Super Hidden PowerPoint Tips and Tricks Only The Pros Know!

Ausbert Generoso

Ever felt like your PowerPoint presentations could use a little magic? You’re not alone. Whether you’re a seasoned presenter or just getting started, there’s a world of PowerPoint tips and tricks waiting for you. In this guide, we’re diving into the nitty-gritty of Microsoft PowerPoint to uncover 30 hidden gems that’ll transform the way you create and deliver slides.
From making your designs pop to streamlining your workflow, these PowerPoint hacks are designed for real-world impact. No jargon, just practical insights that’ll have you presenting like a pro in no time.
Let’s cut through the noise and get straight to the good stuff – your next presentation is about to level up. Ready? Let’s get started.
27 PowerPoint Tips and Tricks That Put The Power in PowerPoint

1. Morph Transition for Seamless Animation

What’s it for: Elevate your presentation by seamlessly animating objects and creating smooth transitions between slides. Morph transition is your key to a dynamic and visually engaging storytelling experience, allowing you to captivate your audience effortlessly.
How to do it:
- Position the same object in different parts on multiple slides
- Select all slides, and go to the Transitions tab.
- Choose “Morph” as the transition effect.
2. SVG Image Integration

What’s it for: Did you think SVG’s only work for websites and professional photo editing tools? They do, too, in PowerPoint! Import high-quality Scalable Vector Graphics (SVG). Maintain image clarity, resize without loss, and enhance your presentations with crisp logos and icons.
- Save your chosen SVG on your device.
- Click on the Insert tab.
- Choose “Pictures” and select your SVG file.
- Adjust the size without compromising image quality.
3. Designer Feature for Quick Layouts

What’s it for: Effortlessly create professional-looking slides with the Designer feature. Receive instant layout suggestions based on your content, saving time and ensuring your presentation looks polished.
- Select a slide.
- Go to the Design tab and click Designer on the far right along the ribbon.
- Select through ready-made slide designs for instant layouts.
4. Insert 3D Models

What’s it for: Amp up your presentations with manipulable 3D models, adding a dynamic dimension. Whether it’s showcasing products or visualizing data, 3D models bring your slides to life.
- Click on the “3D Models” dropdown and proceed to Stock 3D Models.
- Search for a 3D model of your choice and insert.
- Manipulate and customize as needed.
5. SmartArt Graphics for Visual Hierarchy

What’s it for: Convey complex ideas with visual hierarchy using SmartArt graphics. These graphics offer a structured and visually appealing way to organize information, making your content more digestible.
- Go to the Insert tab.
- Select “SmartArt” and navigate through the available categories.
- Select a graphic template that fits your presentation needs.
- Enter your content and customize as needed.
6. Eyedropper Tool for Color Matching

What’s it for: Maintain a cohesive design by using the Eyedropper tool to pick colors from images or elements within your presentation. Ensure consistency and professional aesthetics in every slide.
- Select the editable, native PowerPoint object you wish to customize.
- Go to the Shape Format tab and click on the Shape Fill dropdown.
- Select “More Fill Colors…” and click the eyedropper icon to begin color appropriating.
7. Record and Insert Audio

What’s it for: Infuse personality into your presentation by recording audio directly within PowerPoint. Ideal for adding voiceovers, explanations, or personal touches that enhance audience engagement.
- Click on “Audio” and choose “Record Audio.”
- Record your audio and insert it into the slide.
8. Presenter Coach for Rehearsing

What’s it for: Elevate your presentation skills with Presenter Coach. Receive valuable feedback on pacing, filler words, and more, refining your delivery for a confident and impactful performance.
- Click on the Slide Show tab.
- Choose “Rehearse with Coach” to start practicing.
9. Hyperlink Navigation for Seamless Transitions

What’s it for: Streamline your presentation flow by implementing Hyperlink Navigation. This trick allows you to create clickable links within your slides, enabling effortless transitions between related content or external resources, enhancing the overall navigational experience.
- Select the text or object you want to hyperlink.
- Right-click and choose “Hyperlink” or use the Ctrl+K shortcut.
- Specify the destination, whether it’s another slide, a website, or a file, to create a seamless navigational experience.
10. Alt Text for Accessibility

What’s it for: Improve accessibility by adding descriptive alternative text to images and objects. Ensure inclusivity for visually impaired individuals, making your presentation accessible to a wider audience.
- Right-click on the image or object.
- Choose “Edit Alt Text” and enter a descriptive text.
11. Slide Zoom for Dynamic Navigation

What’s it for: Elevate your presentation’s navigation with Slide Zoom, offering the flexibility to jump to specific slides during a presentation without adhering to a linear sequence. This dynamic feature ensures a more engaging and tailored audience experience.
- Set a master slide where you’d like to put your “mini slides” altogether.
- Navigate to the Insert tab > Zoom dropdown > Slide Zoom.
- Select the slides you want to link onto your master slide and insert.
12. Live Captions and Subtitles

What’s it for: Foster inclusivity by enabling live captions and subtitles in multiple languages. This feature enhances accessibility, making your presentation more engaging and comprehensible for a diverse global audience.
- Go to the Slide Show tab.
- Select “Always Use Subtitles” and choose your language.
13. Password Protection for Security

What’s it for: Safeguard your presentation’s sensitive content by adding a password. This security measure ensures that only authorized individuals can access and view the information, adding an extra layer of protection.
- Navigate to the File tab.
- Select “Info” and click on “Protect Presentation.”
- Choose “Encrypt with Password” and set your password.
14. Animation Painter for Consistent Animations

What’s it for: Maintain a polished and consistent look throughout your presentation by using the Animation Painter. Copy and apply animations across different objects with ease, ensuring a cohesive visual experience.
- Select the object with the same, desired animation as the others.
- Go to the Animation tab.
- Click on “Animation Painter” and apply to other objects.
15. Linked Excel Charts for Real-Time Updates

What’s it for: Integrate linked Excel charts for real-time updates in your PowerPoint presentation. Any modifications made to the linked Excel file automatically reflect in your slides, ensuring data accuracy.
- Copy your Excel chart.
- In PowerPoint, use “Paste Special” and choose “Microsoft Excel Worksheet Object.”
16. Custom Slide Sizes

What’s it for: Tailor your presentation to various screen dimensions by customizing slide sizes. This feature, accessible through the Design tab, ensures your content fits seamlessly across different display settings.
- Navigate to the Design tab.
- Click on the “Slide Size” dropdown and choose “Page Setup”.
- Change “Slide sized for” to Custom.
17. Grid and Guidelines for Precision

What’s it for: Achieve precise object alignment with gridlines and guides. This feature, essential for creating visually polished and organized presentations, ensures your content is visually appealing and professionally structured.
- Go to the View tab.
- Check the “Grids” and “Guidelines” toggles for display options and customization.
18. Slide Master for Consistent Design

What’s it for: Establish a cohesive presentation design by utilizing the Slide Master. This time-saving feature enables you to set consistent layouts, fonts, and colors throughout your presentation.
- Click on “Slide Master” to access and customize master slides.
19. Quick Access Toolbar Customization

What’s it for: Streamline your workflow by personalizing the Quick Access Toolbar with your most-used commands. This customization ensures quick access to essential tools, enhancing efficiency during presentation creation.
- Click on the dropdown arrow on the Quick Access Toolbar.
- Select “More Commands” to customize your toolbar.
20. Ink Annotations for Handwriting

What’s it for: Personalize your presentations with a touch-enabled device using ink annotations. This feature allows you to draw or write directly on slides, adding a unique and handwritten touch to your content.
- Go to the Draw tab and click on Draw to begin drawing.
- Choose “Ink to Text” or “Ink to Shape” for handwriting annotations.
21. Crop to Shape for Image Customization

What’s it for: Unleash your creativity by utilizing the Crop to Shape feature, allowing you to create custom image shapes. This adds a distinctive flair to your presentation, providing a visually dynamic and engaging experience.
- Select the image.
- Navigate to the Picture Format tab.
- Click on “Crop” and choose “Crop to Shape.”
- Select the shape you want your image to have as frame.
22. Slide Show Recording with Narration

What’s it for: Capture your entire presentation, including narration and animations, by recording a self-running slideshow. This feature is invaluable for sharing presentations with a wider audience, ensuring a consistent and engaging delivery.
- Click on “Record Slide Show” and choose recording options.
23. Dynamic Color Scheme Switch for Vibrant Slides

What’s it for: Infuse energy into your presentation by dynamically switching color schemes. This handy trick allows you to quickly experiment with various color palettes, giving your slides a vibrant and fresh appearance in just a few clicks.
- Explore different color options by selecting “Colors” and experimenting with the available palettes. Instantly transform the look of your presentation to match your desired mood and style.
24. Smart Alignment and Distribution for Pixel-Perfect Precision

What’s it for: Attain pixel-perfect precision in your presentation design with the Smart Alignment and Distribution trick. This technique allows you to not only align objects with accuracy but also evenly distribute them horizontally, ensuring a polished and visually appealing layout.
- Select the objects you want to align.
- Navigate to the Format tab.
- Click on “Align” to access options like Align Left, Center, or Right for precise alignment.
- Further refine your layout by choosing “Distribute Horizontally,” ensuring equal spacing between objects and achieving a professional design.
25. Insert Online Videos

What’s it for: Seamlessly integrate online videos directly into your presentation. This feature eliminates the need for external players, offering a smooth and immersive viewing experience for your audience.
- Click on the “Video” dropdown and select Online Movie.
- Paste the video link and your video should be embedded onto your PowerPoint slide.
26. Embed Fonts for Portability

What’s it for: Ensure consistent visual appeal on any device by embedding fonts in your presentation. This is particularly useful when sharing your work with others who may not have the same fonts installed, enhancing portability.
- Go to the File tab.
- Select “Options” and go to the Save tab from the window popup.
- Check “Embed fonts in the file” as well as “Embed all characters”.
27. Text Transformation

What’s it for: Uncover the elegance of text transformation with the Shape Format trick. This hack allows you to access a myriad of text transformation designs, offering a swift and sophisticated way to elevate the visual appeal of your presentation.
- Select the text you want to transform.
- Navigate to the Shape Format tab.
- Click on “Text Effects” and explore the “Transform” options for a variety of stylish text designs. Instantly apply a transformation that suits the tone and style of your presentation.
5 Critical Best Practices to Implement These Pro PowerPoint Tips and Tricks for a Technically Proficient Presentation
Enhance the technical brilliance of your presentation by focusing on these crucial best practices:
1. Streamlined Font Selection
- Practice: Limit your font styles to a maximum of three per slide.
- Why: Simplifying fonts enhances readability, maintains visual consistency, and prevents distraction, ensuring your message is clear and impactful.
2. High-Resolution Images
- Practice: Source HD images from reputable free resource websites like Freepik or Unsplash .
- Why: High-resolution images prevent pixelation, ensuring clarity and professionalism. Crisp visuals contribute to a visually appealing presentation.
3. Cohesive Color Palette
- Practice: Stick to a consistent color palette throughout your slides; use the eyedropper tool for precise color matching.
- Why: A unified color scheme enhances visual harmony, reinforces brand identity, and elevates the overall aesthetics of your presentation.
4. Efficient Data Visualization
- Practice: Use charts and graphs for data-driven slides, choosing appropriate chart types for different data sets.
- Why: Visualizing data through charts improves comprehension, making complex information more accessible and engaging for your audience.
5. Transitions with Purpose
- Practice: Apply slide transitions judiciously. Choose transitions that complement the content and avoid excessive animations.
- Why: Subtle transitions maintain audience focus, while excessive animations may distract from the core message.
Final Thoughts
In presentation-making, technical practices harmonized with thoughtful design is the key to delivering an impactful message. Whether it may be as simple as considering font choices, to incorporating high-resolution visuals, you do not only get to enhance the aesthetics but also ensure your audience’s undivided attention.
Remember, a technically proficient presentation is not just a showcase of information, but also one that leaves a rather immersive experience for those who will see. But at the end of the day, it comes down to your delivery. So, no sweat! You’re doing amazing, rockstar!
Find them useful? Save them, or share these PowerPoint tips and tricks with others to make their day!
About Ausbert Generoso
Try classpoint for free.
All-in-one teaching and student engagement in PowerPoint.
Supercharge your PowerPoint. Start today.
500,000+ people like you use ClassPoint to boost student engagement in PowerPoint presentations.
11 Simple Tips to Make Your PowerPoint Presentations More Effective
Written by Jamie Cartwright @cart_writing

After all, the skills needed to create good PowerPoint presentations —strong design, appropriate branding, concise content, well-placed visuals, and proofread copy—are the same skills that make or break a digital marketing campaign. I like to treat Microsoft PowerPoint as a test of basic marketing skills. To create a passing presentation, I need to demonstrate design skills, technical literacy, and a sense of personal style.
If the presentation has a problem (like an unintended font, a broken link, or unreadable text) then I’ve probably failed the test. Even if my spoken presentation is well rehearsed, a bad visual experience can ruin it for the audience. Expertise means nothing without a good presentation to back it up. Strong digital marketing requires a similar kind of attention to multiple forms of communication. Often, we think we need expert designers and writers to present our company in a professional light.
The truth is that PowerPoint enables non-experts to become strong presentation marketers, by providing user-friendly tools with little training needed. All you need is to learn how to let PowerPoint help you. Here are eleven key tips to get started.
No matter your topic, successful PowerPoint shows depend on three main factors: your command of PPT’s design tools , your attention to presentation processes , and your devotion to consistent style . If you can do all three effectively, you’ll find that your PowerPoint presentations won’t be the only pieces of your marketing toolkit improving!
Good style is the hardest and most important skillset to master. It’s more than design; it defines your vision for PowerPoint. Here's how to beef up your styling:
1) Keep a Natural Style
Human eyes aren’t used to seeing brilliant, out-of-this-world visual movement. Good presentations aim to comfort the viewer, not amaze. When you choose an overall style, try to envision your PowerPoint slides as one or many real objects. Imagine canvases, tabletops, landscapes, and shadow boxes. Here is an example of a stylized, blank PowerPoint Slide canvas:

Then, imagine how you would arrange real text within these various media. You don’t need to constrain yourself to two-dimensional space (i.e. surfaces), but just remember, that real people don’t live in outer space… So, don’t take us there unless you need to.
2) Don’t Let PowerPoint Decide How You Use PowerPoint
Microsoft aimed to provide PowerPoint users with a lot of tools. This does not mean you should use them all. For example, professionals should never use PPT’s action sounds (please consider your audience, above personal preference). You should also make sure that preset PPT themes complement your needs before you adopt them. Consider it a mistake if your audience recognizes a PowerPoint theme as a preset. Be creative; don’t be a poser. Here are three key things to look out for:
- PowerPoint makes bulleting automatic, but ask yourself: Are bullets actually appropriate for what you need to do? Sometimes, but not always.
- Recent PPT defaults include a small shadow on all shapes. Remove if not actually needed. Also, don’t leave shapes in their default blue.
- Try to get away from using Microsoft Office’s default fonts, Calibri and Cambria. Using these two typefaces can make the presentation seem underwhelming.
Presentation Process Tips
If you keep good style, then you don’t have to be an expert PPT designer. But you must know how to handle solid presentation process preparation.
3) Embed Your Font Files
One constant problem presenters have with PowerPoint is that fonts seem to change when presenters move from one computer to another. In reality, the fonts are not changing—the presentation computer just doesn’t have the same font files installed. If you’re using a PC and presenting on a PC, then there is a smooth work around for this issue. (When you involve Mac systems, the solution is a bit rougher. See Trick #4.) Here’s the trick. When you save your PowerPoint file (only on a PC), you should click Save Options in the "Save As…" dialog window. Then, select the Embed TrueType fonts check box and press OK. Now, your presentation will keep the font file and your fonts will not change when you move computers (unless you give your presentation on a Mac).
4) Save Your Slides as JPEGs
In PowerPoint for Mac 2011, there is no option to embed fonts within the presentation. Which means that unless you use ubiquitous typefaces like Arial or Tahoma, your PPT is likely going to encounter font changing on different computers.
The most certain way of avoiding this is by saving your final presentation as JPEGs, then inserting these JPEGs onto your slides. If you do not utilize actions in your presentation, then this option works especially well. If you do want action settings, you can also choose save partial portions of your PPT slides as JPEGs and overlay other elements on top.
On a Mac, users can easily drag and drop the JPEGs into PPT with fast load time. The compromising factor here is that if your PPT includes a lot of JPEGs, then the file size will increase, so make sure you can manage!
5) Embed Multimedia
PowerPoint allows you to either link to video/audio files externally or to embed the media directly in your presentation. You should embed these files if you can, but if you use a Mac, you cannot actually embed the video (see note below). For PCs, two great reasons for embedding are:
- Embedding allows you to play media directly in your presentation. It will look much more professional than switching between windows.
- Embedding also means that the file stays within the PowerPoint presentation, so it should play normally without extra work (except on a Mac).
Note : Mac OS users of PowerPoint should be extra careful about using multimedia files.
If you use PowerPoint for Mac, then you always will need to bring the video and/or audio file with you in the same folder as the PowerPoint presentation. It’s best to only insert video or audio files once the presentation and the containing folder have been saved on a portable drive in their permanent folder. Also, if the presentation will be played on a Windows computer, then Mac users need to make sure their multimedia files are in WMV format. This tip gets a bit complicated, so if you want to use PowerPoint effectively, consider using the same operating system, no matter what.
6) Bring Your Own Hardware
Between operating systems, PowerPoint is still a bit jumpy. Even between differing PPT versions, things can change. One way to fix these problems is to make sure that you have the right hardware you need to always use your own portable computer.
7) Use Presenter View
In most presentation situations, there will be both a presenter’s screen and the main projected display for your presentation. PowerPoint has a great tool called Presenter View, which can be found in the Slide Show tab of PowerPoint 2010 (or 2011 for Mac). Included in the Presenter View is an area for notes, a timer/clock, and a presentation display.
For many presenters, this tool can help unify their spoken presentation and their visual aid. You never want to make the PowerPoint seem like a stack of notes that you use a crutch. Use the Presenter View option to help create a more natural presentation:

At the start of the presentation, you should also hit CTRL + H to make the cursor disappear. Hitting the "A" key will bring it back if you need it!
Design Tips
8) utilize the format menus.
Format menus allow you to do fine adjustments that otherwise seem impossible. To do this, right click on an object and select the "Format" option. By doing this, you can fine-tune shadows, adjust shape measurements, create reflections, and much more. Here's the menu that will pop up:

Although the main options can be found on PowerPoint’s format toolbars, look for complete control in the format window menu. Examples include:
- Adjusting text inside a shape.
- Creating a natural perspective shadow behind an object.
- Recoloring photos manually and with automatic options.
- Putting an object in a very precise location when PowerPoint auto-positions an object to align with another object or margin.
9) Use and Change PowerPoint’s Shapes
Many users don’t realize how flexible PowerPoint’s shape tools have become. In combination with the expanded format options released by Microsoft in 2010, the potential for good design with shapes is readily available. Unlike professional design programs like Adobe Creative Suite or Quark, PowerPoint provides the user with a bunch of great shape options, beyond the traditional rectangle, oval, and rounded rectangle patterns.
Today’s shapes include a highly functional Smart Shapes function, which enables you to create diagrams and flow charts in no time. These tools are especially valuable when you consider that PowerPoint is a visual medium. Paragraphing and bullet lists are boring—utilize shapes to help express you message more clearly.
10) Create Custom Shapes
When you create a shape, right-click and press Edit Points. By editing points, you can create custom shapes that fit your specific need. For instance, you can reshape arrows to fit the dimensions you like.
Another option is to combine two shapes together. When selecting two shapes, right-click and go to the Grouping sub-menu to see a variety of options. Combine will create a custom shape that has overlapping portions of the two previous shapes cut out.
Union makes one completely merged shape. Intersect will build a shape of only the overlapping sections of the two previous shapes. Subtract will cut out the overlapping portion of one shape from the other. By using these tools rather than trying to edit points precisely, you can create accurately measured custom shapes.
11) Present Webpages Within PowerPoint
Tradition says that if you want to show a website in a PowerPoint, you should just create link to the page and prompt a browser to open. For PC users, there’s a better option.
Third party software that integrates fully into PowerPoint’s developer tab can used to embed a website directly into your PowerPoint using a normal HTML iframe. One of the best tools is LiveWeb, a third-party software developed independently.
By using LiveWeb, you don’t have to interrupt your PowerPoint, and your presentation will remain fluid and natural. Whether you embed a whole webpage or just a YouTube video, this can be a high-quality third party improvement.
Unfortunately, Mac users don’t have a similar option, so a good second choice is to take screen shots of the website, link in through a browser, or embed media, such as a YouTube video by downloading it to your computer.
With style, design, and presentation processes under your belt, you can do a lot more with PowerPoint than just presentations for your clients. PowerPoint and similar slide applications are flexible tools that should not be forgotten.
For small design jobs not worthy of a graphic designer’s time (e.g. calls-to-action, small web graphics), consider having a free staffer use PowerPoint to do the job. Or if you’re in need of more social media content, try uploading a few good presentations to SlideShare as free resources. With the eleven tips I offer here and a little practice, PowerPoint can be a powerful tool you won’t want to stop using.
Jamie Cartwright is the Inbound Marketing Intern at Weidert Group . A senior at Lawrence University, Jamie studies human communication, anthropology, and social marketing.

Originally published Dec 10, 2013 10:00:00 AM, updated November 07 2023
Don't forget to share this post!
Related articles.
Expand Offer
Download for Later
10 Cool PowerPoint Tips and Tricks You (Probably) Didn’t Know About
PowerPoint is a versatile tool capable of many amazing tasks. It has lots of great features but unfortunately, most users aren’t even utilizing half of the software’s capabilities.
Today, we’re going to change that. In this guide, we share some of the best PowerPoint tips and tricks for doing cool things with the presentation maker.
You’ll learn cool tricks like inserting QR codes in PowerPoint slides, converting presentations to videos, removing the background of images, and much more.
These PowerPoint tips will not only allow you to design presentations more easily but they will also help impress your audience. Let’s dive in.
2 Million+ PowerPoint Templates, Themes, Graphics + More
Download thousands of PowerPoint templates, and many other design elements, with a monthly Envato Elements membership. It starts at $16 per month, and gives you unlimited access to a growing library of over 2,000,000 presentation templates, fonts, photos, graphics, and more.

Animated PPT Templates
Fully animated.

Ciri Template

Maximus Template

Pitch Deck Templates
Startup pitch deck.

Modern PPT Templates
New & innovative.
Explore PowerPoint Templates
Third-Party PowerPoint Templates

We wanted to start the list with a bit of an obvious but important tip: Use third-party PowerPoint templates!
Microsoft PowerPoint comes with a set of default templates pre-packaged with the software. These free templates are pretty good but they have been used by everyone, over and over again, to the point that anyone could immediately recognize which template you’re using by looking at the slide design.
The worst part is that it will allow your audience to tell how little effort you’ve put into designing the presentation.
What most users don’t realize is that you can download templates from third-party marketplaces and use them to create unique presentations. These templates are made by professional designers and they will immediately make your slideshows look ten times better.
You can check out our best PowerPoint template collection for some inspiration.
Use ChatGPT to Write the Slides
ChatGPT is an AI tool that revolutionized the way we work and made our everyday tasks so much easier and simpler. Now, you can use it to write the slides of your presentations. Here’s how it works:
First, go to the ChatGPT website and start a new chat. Create an account if you don’t have one already. It’s free!

Now ask ChatGPT to write the slides of your presentation. Give it as many details as you can. Specify the topic, how many slides your presentation has, ask it to include quotes and statistics, break down information into bullet points, etc.
Once it generates the copy, you can simply copy and paste the text directly into your slideshow. Make any adjustments as necessary.

You can take this a step further and use AI art generators to create unique illustrations, icons, and infographics for your presentation. Midjourney and DALL-E are some of the top tools you can use for this task. Just be mindful of their copyright policies if you plan on using the images for commercial projects.
This tip is not exclusive to PowerPoint. But if designing presentations is part of your job, it will make your life so much easier. Don’t be afraid of the AI tools, learn to take advantage of them.
Experiment With Color Schemes

Colors play a key role in every presentation. It helps set the mood and tone of your slideshow and has a huge impact on the success of your presentation.
As you know, there are psychological effects behind the colors you use. With the right colors, you can evoke emotions in your audience to make each slide in your presentation more impactful.

Experiment with different color schemes for your presentation designs. You can use a tool like Color Hunt to find beautiful color palettes for your slideshows. But always keep in mind to pick colors that are appropriate for your topic, audience, and your brand.
Contrast Is Key

Speaking of colors, you can also use them to create a strong contrast between the content and the background. For example, using a dark color for typography on a light background will highlight the text much more effectively. Or you can use colored shapes to bring attention to specific parts of a slide.
The same can be said about fonts. Using unique fonts will go a long way to help create contrast in your presentation. Check out our guide on choosing fonts for PowerPoint to learn more.
Take Advantage of Add-Ins

PowerPoint has a built-in store full of add-ons (or add-ins as it’s called in the software). And it’s one of the most underused features of PowerPoint.
This store is filled with amazing third-party tools that can supercharge your work and slideshows. There are hundreds of tools in this store you can install and use for free.
Explore the PowerPoint Add-Ins store and see what you can find. One of our favorites is the tool for adding QR codes to slides directly from the slide editor. We’ll explain it more in the next tip.
Add QR Codes In Slides
Using QR codes in PowerPoint presentations has two great benefits. One, it will make things much easier for you to share links, apps, and resources with your entire audience. Two, it will encourage the audience to engage and interact with your presentation.
Normally, you have to use online tools or apps to generate QR codes. But you can use a PowerPoint add-in to create QR codes directly from the slide editor.

Simply go to Insert > Get Add-ins and search for the Personalized QR Code Generator.

After installing the QR code tool, you can instantly generate QR codes and embed them into your slides to share links. The free version of this plugin will leave a small watermark in the QR code but it’s barely visible. Using QR codes is much cooler and more effective than sharing links as plain text.
Design Cool Image & Text Masks

Image masking is a popular effect used in graphic design for making photos and images appear more creative. With image masks, you can give unique shapes to images rather than boring and old square shapes. You can use it to make your slides look more interesting.

We found a simple YouTube tutorial that shows you how to design liquid image masks in PowerPoint.
You can also use text masks to create cool typography effects in PowerPoint. And yes, there’s a YouTube tutorial for that too. Try using these effects in your next presentation.
Instantly Remove Image Backgrounds
Have you been using Photoshop to remove the backgrounds of images? Well, now you don’t have to. Because PowerPoint has a tool that lets you get rid of image backgrounds with just a few clicks. Here’s how it works.

Select an image in your slideshow and go to the Picture Format tab then select the Remove Background option on the top-left side.

This tool will automatically make a selection of the background. If it clips into areas of the main object, use the Mark Areas tool to fix the selection. Then click the Keep All Changes button to finish.

Now you have a PNG-style JPG image without a background.
Design Posters & Flyers

PowerPoint can be used to create many cool things than just presentations. You can use it for simple graphic designs, such as posters and flyers.
You can use pre-made PowerPoint poster templates to easily make posters or flyers in vertical layout using the app. We also have a step-by-step guide on how to make posters in PowerPoint . Check them out to learn more.
This can be a huge money-saver when you have to design a quick poster for a project and don’t have access to software like Photoshop.
Export to Video & PDF
If you want to share your presentation with a wide audience, one of the best ways to do that is to convert your presentation into video format. That way, your audience will be able to watch your presentation even if they don’t have access to Microsoft PowerPoint software.

PowerPoint has a built-in function to help you with that process. Go to the File menu and select Export. From there you can choose the Create a Video option to convert your entire presentation into a video.
It’s perfect for creating video content for YouTube, online courses, and schools too. You can also export your presentation in PDF format or even turn it into a Word document.
In Conclusion
These are just a few of the cool PowerPoint tips and tricks we’ve found to be quite interesting. It’s surprising how much you can do with an app like PowerPoint. If you want to learn more cool PowerPoint tricks, be sure to check out our other guides.
Start with 7 tips for finding the perfect PowerPoint template . Also, read our 10 pro PPT tips guide. And our how to give a fun presentation guide has some useful tips too.
100+ Free PowerPoint Graphics For Better Presentations [Free PPT]
PowerPoint graphics to move your presentation up a level, and plenty of top quality free options.
- Share on Facebook
- Share on Twitter
By Lyudmil Enchev
in Freebies , Insights
4 years ago
Viewed 110,396 times
Spread the word about this article:
![100+ PowerPoint Graphics For Better Presentations [Free PPT]](https://i.graphicmama.com/blog/wp-content/uploads/2020/08/10085624/Free-PowerPoint-Graphics-Free-PPT.png "powerpoint presentation graphics tips")
PowerPoint graphics are a great addition to all PowerPoint presentations no matter what the audience. A Powerpoint simply containing text and bullet points is not going to hold the attention, even with your hot topic content. You run the risk of being dry and dull, and simply put graphics are more visual and therefore more interesting. You know it too if you are happy with your material you feel better and more confident as a speaker. Double plus.
Of course, the quality of your PowerPoint Graphics is important, this isn’t just a case of adding visuals for visual’s sake. High quality, highly appropriate, thoughtful graphics will enhance any presentation and will be a vital tool in getting your message across, succinctly and memorably. Equally poor quality clip art type graphics, blurry, pointless, and inappropriate images may get you to remember as well, but probably not how you would wish.
So let’s look at some great keys ways you can impress with a presentation, it’s not hard but it is effective.
In this article: 1. How to insert graphics into PowerPoint 2. 100+ Free PowerPoint Graphics by GraphicMama 2.1. Free PowerPoint Templates 2.2. Free Arrows, Pointers, Bullets for PowerPoint 2.3. Free Icons for PowerPoint 2.4. Free Stats, Charts, Graphs for PowerPoint 2.5. Free Numbers and Steps Graphics for PowerPoint 2.6. Free Text Section Graphics for PowerPoint 2.7. Free Presentation Graphics for PowerPoint 2.8. Free Speech Bubble Graphics for PowerPoint 2.9. Free Sale Graphics for PowerPoint 2.10. Free Infographic Kit 2.11. Free Infographic Templates 3. More places to find PowerPoint Graphics
In the meanwhile, do you know, that you can use premade infographic templates? Check out our 50 Free Timeline Infographic Templates .
1. How to insert graphics into PowerPoint
Once you’ve created your presentation it’s time to add those all-important PowerPoint Graphics. And it’s easy, easy, easy.
Step 1: Go to the slide and create a space for your graphic Step 2: Go to insert on the toolbar at the top of PowerPoint, click on it Step 3: This will open up insert options depending on your version of PowerPoint ( 2019 reveals online pictures, photo albums, pictures, or screenshots, older versions are similar but replace online pictures with clip art.) Step 4: Choose an image from your files or online through categories or the search bar – filter general images through creative commons only licensed pictures (free to use), select, click on insert. Step 5: Resize and reposition
Alternatively:
Step 1: Select an image, right-click, and copy. (Ctrl+C) Step 2: Right-click and paste on the desired slide. (Ctrl+V)
It really is that easy.
2. 100+ Free PowerPoint Graphics by GraphicMama
One of the best ways to make your presentation look professional is by using professionally designed PowerPoint graphics and one of the best design agencies, Graphic Mama has plenty of options to choose from. As well as paid-for bundles of design icons you can take advantage of a great range of free graphics from sales icons, holiday icons, speech bubbles, people avatars, and many more. These are graphics designed in a vector file format, so the quality will stay as good even when resized. there are free backgrounds, templates, and infographic bundles too. It’s a no-risk option that will certainly add a high-quality, professionally designed look to your slideshow. Just click on the links below and you are almost there.
2.1. Free PowerPoint Templates
A tremendously good way to create a stunning professional look is by using templates for your PowerPoint Design and the good news is there are lots of free options out there just waiting for you to fill with content.

Free Hand-Drawn PowerPoint Presentation
This freebie from Graphic Mamas’s collection of free templates shows off the power of a sketched hand-drawn style in adding a customized look that is both attractive and clear.

Free Corporate Presentation Template
Ideally suited to a business proposal, this free template can be edited and customized for anything that would benefit from fresh, clear colors and fantastically designed and organized slides.

Free Business PowerPoint Presentation Template
Another free business template that benefits from strong structural elements and a great mix of text boxes and images in this modern-looking option. Superb editable infographics to get that all-important message to stand out.

Free Minimalist Presentation Template
This minimalist template broken up into large blocks of strong color is perfect for making a statement. Instant impact and full of confidence.
Take a look at Graphic Mama’s Modern Templates for the New Era of PowerPoint Presentations

2.2. Free Arrows, Pointers, Bullets for PowerPoint
Basic icons such as arrows, bullets, and pointers are so ubiquitous that they are often forgotten about. Big mistake. These free PowerPoint graphics show just how much impact well-designed elements can make and they’re a quick and easy way of raising your presentation to another level, and all for free.
2.3. Free Icons for PowerPoint
The cool, simplicity of these PowerPoint graphic icons can add swagger and style to your show. This completely free bundle gives a great selection all in the same consistent style and multiple usages will hold a presentation together in a subtle way.

2.4. Free Stats, Charts, Graphs for PowerPoint
Powerful infographics give you a great chance to get inventive and creative. Fully customizable, fully editable, and a fantastically varied and imaginative selection of all kinds of charts, graphs, and pictograms. It’s difficult to believe they are free but they really are.

2.5. Free Numbers and Steps Graphics for PowerPoint
You will need numbers, so why not take advantage of this free collection and make the mundane come alive. The key is to keep a consistent design and it will create a magical flow throughout the whole show from beginning to end.

2.6. Free Text Section Graphics for PowerPoint
PowerPoint graphics for text sections do a vital job. It is well known that text-heavy presentations are not popular and therefore less effective but you do need text. A great way of drawing the eye, focusing on text content, and still keeping people awake are these text section graphics. Customizable colors (ideal for branding), all forms and functions, a fully flexible and fully free bundle of creativity.

2.7. Free Presentation Graphics for PowerPoint
PowerPoint Graphics come in all shapes and sizes and illustrate all kinds of ideas. Download this free pack and check out a wide range of options to create visual impact, a professionally customized look, and vitality.

2.8. Free Speech Bubble Graphics
Speech bubble PowerPoint graphics can make your presentation pop, and with this stylish selection, you can’t go wrong. Flat, shaded, angular, rounded, clouds, and all sorts of variations on the theme. Impactful and fun they help create the conversation you want to have.

2.9. Free Sale Graphics
PowerPoint graphics for sales will do the crucial job of getting you and your product noticed. Fit your show with these free high-quality vector graphics and watch the crowds flock in. Once you’ve downloaded the graphics, you are not limited to PowerPoint, use the same images on posters, advertising, social media, etc., and get selling. The vectors’ technique means that there will be no loss of quality whatever the size and function.

2.10. Free Infographic Kit
A fully comprehensive infographic PowerPoint graphic pack that is crammed full of everything you could want to bring your statistics to the audience. Carefully crafted, tremendously varied, customizable, editable, flexible, and all this with the added professional pizzaz of expert design. It’s free and it’s ready to rock.

2.11. 20 Free Infographic Templates
If you want to speed things up, you can try using premade PowerPoint templates for your presentation. In this huge bundle of 539 infographics, you will find 20 free infographic templates. They are made with a lot of graphics, and you can easily grab some of the elements and adapt it to your presentation.
3. More places to find PowerPoint Graphics
Although it’s difficult to believe you haven’t found exactly what you are looking for already in our classic collection, let’s not worry. The one thing we do have now is plenty and plenty of choice. Here are some paid-for possibilities that you may want to jazz up that make or break a presentation.
PresentationPro
For $49.00 you could check out this royalty-free Graphics pack from PresentationPro. This pack contains thousands of graphics, clipart, and illustration in all sorts of categories from geography to calendars, from Scrabble to sport, and in differing styles. The graphics can be used in other formats too so you are not limited to PowerPoint.
GraphicMama
As well as the free offers, already covered Graphic Mama has a top-class selection of paid-for bundles ranging from characters to graphics assets, backgrounds , and templates from a little as $31 per set. This is ideal if you’d like to theme your presentation around a character as there are multiple gestures and poses for each. All are easily customizable, editable, and adaptable to any project and design. A gallery of cartoon characters , including businessmen, animals, robots, superheroes, doctors, ninjas, and more. Graphic Mama also offers custom designs, so you can turn yourself into a caricature and animated puppets to really make waves.
GetMyGraphics
At GetMyGrpahics you can take up a subscription giving you access to over 9,000 professional PowerPoint graphics starting at $49 per month or a Pro package at $99 per month. Obviously, at this price, it is not for a one-off or occasional piece but for professionals it does provide plenty of options. They include infographics and illustrations in a wide range of categories and differing styles.
Final Words
The old PowerPoint presentation. It’s been around for years and it truly isn’t enough to just churn out the old stuff. Vital though they may be, people always expect more, always expect better, and why not? With a little extra effort, you can turn your slideshow presentation into something that isn’t just a time filler but that really makes a difference, communication, and shows you off in the best light. PowerPoint graphics can make all the difference by breathing life and energy into your presentation and consequently your performance. If you feel confident in your material it will help your delivery. Best of all you can step it up for free, so why wouldn’t you?
You may also be interested in some of these related articles:
- The Best Free PowerPoint Templates to Download in 2022
- Need PowerPoint Backgrounds? The Best Places to Check Out [+ Freebies]
- 10 PowerPoint Tutorials to Help You Master PowerPoint

Add some character to your visuals
Cartoon Characters, Design Bundles, Illustrations, Backgrounds and more...
Like us on Facebook
Subscribe to our newsletter
Be the first to know what’s new in the world of graphic design and illustrations.
- [email protected]
Browse High Quality Vector Graphics
E.g.: businessman, lion, girl…
Related Articles
Huion kamvas 22 plus hands-on review, what makes a great school website design [with practical tips and examples], free logo design templates: 100 choices for your company, google slides vs keynote: a battle between equals [full comparison], 100 free cartoon logo templates for fun-tastic projects, 500+ free and paid powerpoint infographic templates:, enjoyed this article.
Don’t forget to share!
- Comments (0)

Lyudmil Enchev
Lyudmil is an avid movie fan which influences his passion for video editing. You will often see him making animations and video tutorials for GraphicMama. Lyudmil is also passionate for photography, video making, and writing scripts.

Thousands of vector graphics for your projects.
Hey! You made it all the way to the bottom!
Here are some other articles we think you may like:

How to Find the Right Website Design Company for Your Project?
by Lyudmil Enchev

Top 30 Illustration Companies: Studios & Agencies for Visual Solutions
by Iveta Pavlova

10 Principles of Design: The Pocket Guide (+ Examples)
by Bilyana Nikolaeva
Looking for Design Bundles or Cartoon Characters?
A source of high-quality vector graphics offering a huge variety of premade character designs, graphic design bundles, Adobe Character Animator puppets, and more.
How To Make a PowerPoint Presentation Attractive? (Tips & Tricks)
Are you looking for ways to make your PowerPoint presentations more attractive and engaging? PowerPoint presentations can be a great way to showcase your ideas in an effective, visual way.
But if you want to make sure that your presentation stands out, you’ll need to go beyond the basics.
In this article, we’ll discuss seven tips and tricks for making your PowerPoint presentations attractive and eye-catching.
From choosing the right color palette and font, to incorporating visuals and media, to creating a cohesive look, and more, you’ll be equipped with the tools you need to make your next presentation a success.
Let’s get started!
Table of Contents
Short Answer
1. Use high-quality images and graphics to make your presentation visually appealing.
2. Use animations and transitions to keep your audience engaged.
3. Incorporate relevant facts and figures to make the presentation informative.
4. Use a clear and concise font that is easy to read.
Choosing a Color Palette and Font
When it comes to creating an attractive PowerPoint presentation, the first step is choosing a color palette and font that will draw attention and create a cohesive look.
To achieve this, it is important to pick a color scheme that is easy to work with and that will not clash with the visuals or text used in the presentation.
When choosing colors, it is best to stick to a limited palette of two to three colors that complement each other, as too many colors can be distracting.
Consider using colors that are associated with the topic of the presentation, such as blue for a corporate presentation, or red and green for a holiday-themed presentation.
In addition to choosing colors, you will also need to pick a font that is easy to read and that will stand out from the background.
It is best to choose a font that is not too small or too large, and to ensure that it is legible.
For a professional presentation, choose a classic font such as Helvetica or Arial, as these are easy to read and will not distract from the content of the presentation.
Incorporating Visuals and Media
When it comes to making a PowerPoint presentation attractive, incorporating high-quality visuals and media is key.
This includes images, videos, audio clips, and even animations.
High-resolution images are a great way to capture the attention of the audience while also conveying the message of the presentation.
Images should be relevant to the content and be chosen wisely.
If possible, make sure to use images that are royalty free or licensed for commercial use.
Videos and audio clips are another way to add interest to the presentation.
They can be used to explain concepts, highlight important points, or provide a visual example of the topic.
Make sure to keep the videos short and to the point, and be sure to include captions or transcripts for any audio clips.
Animations are also a great way to keep the audience engaged.
Animations can be used to transition between slides, to highlight important points, or to draw the audience’s attention to a certain area of the presentation.
Just be sure to not overdo it, as too many animations can be distracting.
By incorporating visuals and media into the presentation, you can create an attractive and engaging presentation that will keep the audience engaged and interested.
Keeping Text Concise and to the Point
When it comes to making a PowerPoint presentation attractive, it is essential to keep the text concise and to the point.
This helps ensure that the content is easy to read and understand, which will keep the audience engaged.
To ensure your text is concise, avoid using long, complex sentences or overly-technical language.
Instead, use short, simple sentences and avoid using overly-technical jargon.
Additionally, make sure that the text is relevant to the topic at hand and that it is organized in a logical, easy-to-follow manner.
This will make it easier for the audience to comprehend the material.
Finally, be sure to double-check your slides for any typos or grammatical errors, as these can be distracting and take away from the overall presentation.
By following these tips, you can make sure that your text is concise, well-organized, and easy to understand, thus creating an attractive PowerPoint presentation.
Creating a Cohesive Look
Creating a cohesive look is a key factor in making a PowerPoint presentation attractive.
First, choose a color palette and font that will draw attention and create a unified theme throughout the presentation.
Choose colors that are complementary and consistent, such as shades of blue, green, or yellow.
When picking fonts, select ones that are easy to read and will stand out from the background.
For a more modern look, consider using sans-serif fonts such as Arial or Calibri.
Once the color palette and font have been chosen, it is important to remain consistent with them throughout the presentation.
This will ensure that the presentation looks unified and professional.
Additionally, make sure to use whitespace to your advantage.
This will allow the important elements of the presentation to stand out and will make it easier for the audience to follow along.
To further enhance the look of the presentation, consider adding shapes, lines, and other graphics to the slides.
This will help to break up the text and will add a visual element to the presentation.
By following these tips, you can create a PowerPoint presentation that is attractive and engaging.
Utilizing a cohesive color palette and font choice will ensure that the presentation stands out and will help to keep the audience engaged.
Additionally, adding shapes, lines, and graphics will help to break up the text and will add an extra visual layer to the presentation.
With these tips, you can make a PowerPoint presentation that is attractive and sure to captivate your audience.
Utilizing High-Resolution Images
When creating a PowerPoint presentation, utilizing high-resolution images is essential for providing an attractive and eye-catching design.
High-resolution images add a professional touch to your presentation and help capture the audiences attention.
When selecting images, be sure to choose ones that are of the highest quality and that are relevant to the topic.
Avoid using low-resolution images as they will appear blurry and may detract from the presentation.
Additionally, pay attention to the size of the image – if it is too large, it may take up too much space and disrupt the flow of the presentation.
Incorporating high-resolution images can also help to break up the text, making it easier to read and understand.
Try to limit the amount of text on each slide, and use images to support the text and draw attention.
For example, if you are discussing a new product, you can include an image of the product to show the audience what it looks like.
Images can also be used to illustrate a point, provide an example, or add visual interest to the presentation.
Finally, be sure to add a caption to each image in order to provide more information and context.
Captions should be brief and to the point, and should include any relevant information about the image.
With high-resolution images and captions, you can create an attractive and engaging PowerPoint presentation.
Adding Videos and Audio Clips
When it comes to making a PowerPoint presentation attractive, videos and audio clips can really take the presentation to the next level.
Not only do they add visual interest, but they also give the audience a break from looking at slides filled with text.
When choosing videos and audio clips, be sure to pick high-quality ones that are relevant to the topic of the presentation.
It also helps to add a bit of humor or something unexpected to keep the audience engaged.
Additionally, you can use the videos and audio clips as a way to introduce a new concept or to emphasize a point.
When using videos and audio clips, make sure that the transitions between each slide are smooth and that the clip has enough time to be heard or seen.
Also, be sure to include captions or subtitles for any videos with dialogue, as this will help those who are hearing impaired.
Including videos and audio clips in your PowerPoint presentation is a great way to make it more attractive and engaging.
By picking high-quality clips that are relevant to the topic, and ensuring that the transitions between slides are smooth, you can create a presentation that is sure to capture the attention of the audience.
Practicing the Presentation
Practicing a presentation is one of the most important steps in creating an attractive and engaging PowerPoint presentation.
Presenting a presentation without practice can be disastrous, leaving the audience confused and disinterested.
To ensure that the presentation flows smoothly and that all transitions are seamless, it is essential to practice beforehand.
When practicing, it is important to use the same equipment that you will be using to present to ensure that the presentation runs without any technical issues.
Additionally, it is a good idea to practice in a similar environment to the one in which the presentation will be given.
This will help to familiarize yourself with the presentation space and allow you to adjust accordingly if needed.
When practicing, it is important to time the presentation, as this will help you keep from running overtime.
It is also important to practice with a friend or colleague who can provide feedback and help you identify any potential issues.
This feedback is invaluable and can help you make adjustments to ensure the presentation is engaging and effective.
Finally, it is important to practice the presentation multiple times before the day of the presentation.
This will allow you to become more comfortable with the material and become confident in your ability to deliver an effective presentation.
By taking the time to practice the presentation beforehand, you can be sure that the presentation will be attractive and engaging.
Final Thoughts
Creating an attractive and engaging PowerPoint presentation doesnt have to be difficult.
By following the tips outlined in this article, you can create a presentation that will captivate your audience.
Start by selecting a color palette and font that will draw attention and create a cohesive look.
Incorporate high-resolution images, videos, and audio clips to further capture the audience’s attention.
Keep the text concise and to the point, ensuring that the content is easy to read and understand.
Finally, practice presenting the presentation beforehand to ensure that the presentation flows smoothly and that all transitions are seamless.
With these tips, you can create an attractive and engaging PowerPoint presentation that will keep your audience engaged.
James Wilson
James Wilson has extensive knowledge in the information technology industry.His second love, besides dealing with computers, is smart home technology. He is continually updating information to better comprehend this problem and has a deep understanding of the apartment’s support system.
Recent Posts
Can You Create a Poll in Microsoft Outlook Email? Here's How!
Do you want to get feedback from your contacts quickly and efficiently? If so, then creating a poll in Microsoft Outlook email is the perfect solution! Polls are a great way to quickly collect data...
How To Fix Microsoft Outlook Cannot Connect To Server? (Here's The Solution)
Have you ever experienced the frustration of not being able to connect to your Microsoft Outlook server? It can be a major inconvenience when you need access to your emails, and it can be hard to...

- Get started with computers
- Learn Microsoft Office
- Apply for a job
- Improve my work skills
- Design nice-looking docs
- Getting Started
- Smartphones & Tablets
- Typing Tutorial
- Online Learning
- Basic Internet Skills
- Online Safety
- Social Media
- Zoom Basics
- Google Docs
- Google Sheets
- Career Planning
- Resume Writing
- Cover Letters
- Job Search and Networking
- Business Communication
- Entrepreneurship 101
- Careers without College
- Job Hunt for Today
- 3D Printing
- Freelancing 101
- Personal Finance
- Sharing Economy
- Decision-Making
- Graphic Design
- Photography
- Image Editing
- Learning WordPress
- Language Learning
- Critical Thinking
- For Educators
- Translations
- Staff Picks
- English expand_more expand_less
PowerPoint Tips - Simple Rules for Better PowerPoint Presentations
Powerpoint tips -, simple rules for better powerpoint presentations, powerpoint tips simple rules for better powerpoint presentations.

PowerPoint Tips: Simple Rules for Better PowerPoint Presentations
Lesson 17: simple rules for better powerpoint presentations.
/en/powerpoint-tips/embed-excel-charts-in-a-slide/content/
Simple rules for better PowerPoint presentations
Have you ever given a PowerPoint presentation and noticed that something about it just seemed a little … off? If you’re unfamiliar with basic PowerPoint design principles, it can be difficult to create a slide show that presents your information in the best light.
Poorly designed presentations can leave an audience feeling confused, bored, and even irritated. Review these tips to make your next presentation more engaging.
Don't read your presentation straight from the slides
If your audience can both read and hear, it’s a waste of time for you to simply read your slides aloud. Your audience will zone out and stop listening to what you’re saying, which means they won’t hear any extra information you include.
Instead of typing out your entire presentation, include only main ideas, keywords, and talking points in your slide show text. Engage your audience by sharing the details out loud.
Follow the 5/5/5 rule
To keep your audience from feeling overwhelmed, you should keep the text on each slide short and to the point. Some experts suggest using the 5/5/5 rule : no more than five words per line of text, five lines of text per slide, or five text-heavy slides in a row.

Don't forget your audience
Who will be watching your presentation? The same goofy effects and funny clip art that would entertain a classroom full of middle-school students might make you look unprofessional in front of business colleagues and clients.
Humor can lighten up a presentation, but if you use it inappropriately your audience might think you don’t know what you’re doing. Know your audience, and tailor your presentation to their tastes and expectations.
Choose readable colors and fonts
Your text should be easy to read and pleasant to look at. Large, simple fonts and theme colors are always your best bet. The best fonts and colors can vary depending on your presentation setting. Presenting in a large room? Make your text larger than usual so people in the back can read it. Presenting with the lights on? Dark text on a light background is your best bet for visibility.

Don't overload your presentation with animations
As anyone who’s sat through a presentation while every letter of every paragraph zoomed across the screen can tell you, being inundated with complicated animations and exciting slide transitions can become irritating.
Before including effects like this in your presentation, ask yourself: Would this moment in the presentation be equally strong without an added effect? Does it unnecessarily delay information? If the answer to either question is yes—or even maybe—leave out the effect.
Use animations sparingly to enhance your presentation
Don’t take the last tip to mean you should avoid animations and other effects entirely. When used sparingly, subtle effects and animations can add to your presentation. For example, having bullet points appear as you address them rather than before can help keep your audience’s attention.
Keep these tips in mind the next time you create a presentation—your audience will thank you. For more detailed information on creating a PowerPoint presentation, visit our Office tutorials .
/en/powerpoint-tips/three-tips-for-beautiful-powerpoint-presentations/content/

- SUGGESTED TOPICS
- The Magazine
- Newsletters
- Managing Yourself
- Managing Teams
- Work-life Balance
- The Big Idea
- Data & Visuals
- Reading Lists
- Case Selections
- HBR Learning
- Topic Feeds
- Account Settings
- Email Preferences
How to Make a “Good” Presentation “Great”
- Guy Kawasaki

Remember: Less is more.
A strong presentation is so much more than information pasted onto a series of slides with fancy backgrounds. Whether you’re pitching an idea, reporting market research, or sharing something else, a great presentation can give you a competitive advantage, and be a powerful tool when aiming to persuade, educate, or inspire others. Here are some unique elements that make a presentation stand out.
- Fonts: Sans Serif fonts such as Helvetica or Arial are preferred for their clean lines, which make them easy to digest at various sizes and distances. Limit the number of font styles to two: one for headings and another for body text, to avoid visual confusion or distractions.
- Colors: Colors can evoke emotions and highlight critical points, but their overuse can lead to a cluttered and confusing presentation. A limited palette of two to three main colors, complemented by a simple background, can help you draw attention to key elements without overwhelming the audience.
- Pictures: Pictures can communicate complex ideas quickly and memorably but choosing the right images is key. Images or pictures should be big (perhaps 20-25% of the page), bold, and have a clear purpose that complements the slide’s text.
- Layout: Don’t overcrowd your slides with too much information. When in doubt, adhere to the principle of simplicity, and aim for a clean and uncluttered layout with plenty of white space around text and images. Think phrases and bullets, not sentences.
As an intern or early career professional, chances are that you’ll be tasked with making or giving a presentation in the near future. Whether you’re pitching an idea, reporting market research, or sharing something else, a great presentation can give you a competitive advantage, and be a powerful tool when aiming to persuade, educate, or inspire others.
- Guy Kawasaki is the chief evangelist at Canva and was the former chief evangelist at Apple. Guy is the author of 16 books including Think Remarkable : 9 Paths to Transform Your Life and Make a Difference.
Partner Center
Suggestions or feedback?
MIT News | Massachusetts Institute of Technology
- Machine learning
- Social justice
- Black holes
- Classes and programs
Departments
- Aeronautics and Astronautics
- Brain and Cognitive Sciences
- Architecture
- Political Science
- Mechanical Engineering
Centers, Labs, & Programs
- Abdul Latif Jameel Poverty Action Lab (J-PAL)
- Picower Institute for Learning and Memory
- Lincoln Laboratory
- School of Architecture + Planning
- School of Engineering
- School of Humanities, Arts, and Social Sciences
- Sloan School of Management
- School of Science
- MIT Schwarzman College of Computing
- Q&A: Tips for viewing the 2024 solar eclipse
Q&A: Tips for viewing the 2024 solar eclipse
Press contact :.

Previous image Next image
On Monday, April 8, the United States will experience a total solar eclipse — a rare astronomical event where the moon passes directly between the sun and the Earth, blocking out the sun’s light almost completely. The last total solar eclipse in the contiguous U.S. was in 2017, and the next one won’t be until 2044.
If the weather cooperates, people across the United States — from northeastern Maine to southwestern Texas — will be able to observe the eclipse using protective eyewear. Those in the path of totality , where the moon entirely covers the sun, will have the best view, but 99% of people in the continental U.S. will be able to see a partial eclipse. Weather permitting, those on the MIT campus and the surrounding area will see 93 percent of the sun covered, with the partial eclipse starting at 2:15 p.m. and reaching its peak around 3:29 p.m. Gatherings are planned at the Kresge Oval and the MIT Museum , and a live NASA stream will be shown in the Building 55 atrium .
Brian Mernoff , manager of the CommLab in the Department of Aeronautics and Astronautics, is an accomplished astrophotographer and science educator. Mernoff is headed to Vermont with his family to experience the totality from the best possible angle — but has offered a few thoughts on how to enjoy the eclipse safely, wherever you are.
Q: What should viewers expect to see and experience with this solar eclipse?
A: When you’re watching TV (the sun) and your toddler, dog, or other large mammal (the moon) blocks your view, you no doubt move over a bit to try to get a partial or full view of the TV. This is exactly how the path of totality works for an eclipse. If you are exactly in line with the moon and sun, it will be completely blocked, but if you start moving away from this path, your view of the sun will start to increase until the moon is not in the way at all.
The closer you are to the path of totality, the more of the sun will be blocked. At MIT, about 93 percent of the sun will be blocked. Those in the area will notice that things around you will get slightly darker, just like when it starts to become overcast. Even so, the sun will remain very bright in the sky and solar glasses will be required to view the entirety of the eclipse. It really goes to show how incredibly bright the sun is!
Within the narrow path of totality, the moon will continue to move across the sun, reaching 100 percent coverage. For this short period of time, you can remove your glasses and see a black disk where the sun should be. Around the disk will be wispy white lines. This is the corona, the outermost part of the sun, which is normally outshone by the sun’s photosphere (surface). Around the edges of the black disk of the moon, right as totality begins and ends, you can also see bright spots around the edges, known as Bailey’s Beads, caused by sunlight shining between mountains and craters on the moon.
But that’s not all! Although you will be tempted to stare up at the sun throughout totality, do not forget to observe the world around you. During totality, it feels like twilight. There is a 360-degree sunset, the temperature changes rapidly, winds change, animals start making different sounds, and shadows start getting weird (look into “shadow bands” if you have a chance).
As soon as totality ends, and you start to see Baily’s Beads again, put your solar glasses back on as it will get very bright again very fast as the moon moves out of the way.
Q: What are the best options for viewing the eclipse safely and to greatest effect?
A: No matter where you are during the eclipse, make sure you have solar glasses. These glasses should be ISO-approved for solar viewing. Do not use glasses with scratches, holes, or other damage.
If you are unable to obtain solar glasses in time, you can safely view the eclipse using a home-made projection method , such as a pinhole camera or even projecting the image of the sun through a colander.
The best view of the eclipse will be from within the path of totality, but even if you are not within it, you should still go outside to experience the partial eclipse. Use the NASA Eclipse Explorer to find the start, maximum, and end times, and then find a nice spot outside — preferably with some shade — put on your glasses, and enjoy the show.
For a closer view of the sun, find a friend that has a telescope with the correct ISO-certified solar filter. This will let you see the photosphere (or chromosphere if it is an H-alpha scope) in a lot more detail. If you do not have access to a telescope, NASA plans to livestream a telescope view throughout the eclipse. [The livestream will be displayed publicly on a large screen in Building 55 at MIT, rain or shine.]
The only time you can look at or image the sun without a filter is during 100 percent totality. As soon as this period is done, glasses and filters must be put back on.
After the eclipse, keep your glasses and filters. You can use them to look at the sun on any day (it took me an embarrassing amount of time to realize that I could use the glasses at any time instead of lugging out a telescope). On a really clear day, you can sometimes see sunspots!
Q: How does eclipse photography work?
A: This year I plan to photograph the eclipse in two ways. The first is using a hydrogen-alpha telescope. This telescope filters out all light except for one wavelength that is given off by hydrogen. Because it blocks out most of the light from the sun’s surface, it allows you to see the turbulent upper atmosphere of the sun, including solar prominences that follow magnetic field lines.
Because this telescope does not allow for imaging during totality as too much light is blocked, I also plan to set up a regular camera with a wide-angle lens to capture the total eclipse with the surrounding environment as context. During the 2017 eclipse, I only captured close-ups of the sun using a regular solar filter and missed the opportunity to capture what was going on around me.
Will it work? That depends on if we get clear skies, and how many pictures of my 1.5-year-old need to be taken (as well as how much chasing needs to be done).
If you would like to take pictures of the eclipse, make sure you protect your camera sensor. The sun can easily damage lenses, sensors, and other components. Here are some examples of solar damaged cameras . The solution is simple, though. If using a camera phone, you can take pictures through an extra pair of solar glasses, or even tape them to the phone. For cameras with larger lenses, you can buy cardboard filters that slide over the front of your camera or even buy ISO-approved solar film and make your own.
Q: Any fun, unique, cool, or interesting science facts about this eclipse to share?
A: If you want to get even more involved with the eclipse, there are many citizen science projects that plan to collect as much data as possible throughout the eclipse.
NASA is planning to run several experiments during the eclipse , and researchers with MIT Haystack Observatory will also be using four different technologies to monitor changes in the upper atmosphere , both locally and across the continent.
If you are interested in learning more about the eclipse, here are two of my favorite videos, one on “ unexpected science from a 0.000001 megapixel home-made telescope ” and one on solar eclipse preparation .
Share this news article on:
Related links.
- Brian Mernoff
- AeroAstro Communication Lab
- Department of Aeronautics and Astronautics
Related Topics
- Space, astronomy and planetary science
- Aeronautical and astronautical engineering
- Earth and atmospheric sciences
- Photography
- Cambridge, Boston and region
- Science communications
Related Articles

MIT Haystack scientists prepare a constellation of instruments to observe the solar eclipse’s effects

Solar eclipse caused bow waves in Earth's atmosphere

Q&A: Richard Binzel on tips for observing the 2017 solar eclipse
Previous item Next item
More MIT News

A biomedical engineer pivots from human movement to women’s health
Read full story →

MIT tops among single-campus universities in US patents granted

A new way to detect radiation involving cheap ceramics

A crossroads for computing at MIT

Growing our donated organ supply

New AI method captures uncertainty in medical images
- More news on MIT News homepage →
Massachusetts Institute of Technology 77 Massachusetts Avenue, Cambridge, MA, USA
- Map (opens in new window)
- Events (opens in new window)
- People (opens in new window)
- Careers (opens in new window)
- Accessibility
- Social Media Hub
- MIT on Facebook
- MIT on YouTube
- MIT on Instagram
IMAGES
VIDEO
COMMENTS
Here's another one of our top PPT tips: tap into Envato Elements' unlimited stock photo library. People are more likely to take you seriously if your presentation is visually appealing. Users view attractive design as more usable. Similarly, they'll view a more attractive PowerPoint as more effective. 11.
After you add a shape, style it with the Drawing Tools > Format menu. Click on a shape, then check out options like Shape Fill, for example. Select a new color to transform the shape on your slide. Choose a new color from the Shape Fill dropdown, for example, to re-style your newly added PowerPoint graphics. That's it!
Getting Started. 1. Open PowerPoint and click 'New.'. If a page with templates doesn't automatically open, go to the top left pane of your screen and click New. If you've already created a presentation, select Open then double-click the icon to open the existing file. Image Source.
Microsoft PowerPoint is a presentation design software that is part of Microsoft 365. This software allows you to design presentations by combining text, images, graphics, video, and animation on slides in a simple and intuitive way. Over time, PowerPoint has evolved and improved its accessibility to users.
Method #1: Drag the file from wherever it is sitting on your computer and drag it onto your slide. Method #2: Go to the Insert tab in the Ribbon and select 'Pictures' (make sure to select the 'Pictures' icon and not the 'Online Pictures' icon). Then find your vector file and click on 'Open.'. Note: If you have PowerPoint 2016 ...
A good presentation needs two fonts: a serif and sans-serif. Use one for the headlines and one for body text, lists, and the like. Keep it simple. Veranda, Helvetica, Arial, and even Times New Roman are safe choices. Stick with the classics and it's hard to botch this one too badly.
Tips for creating an effective presentation. Tip. Details. Choose a font style that your audience can read from a distance. Choosing a simple font style, such as Arial or Calibri, helps to get your message across. Avoid very thin or decorative fonts that might impair readability, especially at small sizes. Choose a font size that your audience ...
1. Start by writing out your talking points. The first thing you need to do, before even considering your presentation design, is to write out your talking points and outline your speech. Pay attention to popular and engaging presentation structures so you know the framework you want to follow throughout your talk.
10 Tips for Effective PowerPoint Presentations. Tip #1: Choose an Interesting Topic. Tip #2: Do Some Deep Research. Tip #3: Use an Amazing Presentation Tool. Tip #4: Pick Out a Presentation Template. Tip #5: Keep Your Audience in Mind. Tip #6: Add Eye-Catching Headings and Text. Tip #7: Keep it Engaging With Animations.
1. Keep it simple. Keep your slides simple. It's the visual backdrop to what you are going to say. The most recommended PowerPoint tip for your productivity is called simplicity. You may be tempted by the graphical razzmatazz of beautiful images, background, and charts. At the end of the day, PowerPoint is a background visual aid for your talk.
Best Practice PowerPoint Presentation Tips. Use A Consistent Presentation Design. One Topic Per Slide. Avoid information overwhelm by using the "Rule of Three". Display one bullet at a time. Presentation Blunders To Avoid. Avoid unnecessary animations. Only add content that supports your main points.
Select "More Fill Colors…" and click the eyedropper icon to begin color appropriating. 7. Record and Insert Audio. What's it for: Infuse personality into your presentation by recording audio directly within PowerPoint. Ideal for adding voiceovers, explanations, or personal touches that enhance audience engagement.
3. Choose the Appropriate View Mode for a Definite Task. It is not a secret that by default, PowerPoint opens a presentation in Normal view. If you save the file of your presentation, next time it will be opened in the view last saved. On the one hand, it is convenient, especially if you want to continue working on it.
As of now, PowerPoint allows to rotate or flip text boxes, Word art, pictures, and shapes. To do this, just click on the object and go to the Shape Format tab. From here, click on "Rotate" to get features like Rotate 90 degrees left/right, flip vertical/horizontal, and more options. 15. Use the New Zoom Feature.
1) Keep a Natural Style. Human eyes aren't used to seeing brilliant, out-of-this-world visual movement. Good presentations aim to comfort the viewer, not amaze. When you choose an overall style, try to envision your PowerPoint slides as one or many real objects. Imagine canvases, tabletops, landscapes, and shadow boxes.
Start with 7 tips for finding the perfect PowerPoint template. Also, read our 10 pro PPT tips guide. And our how to give a fun presentation guide has some useful tips too. PowerPoint Templates. Microsoft PowerPoint (PPT) is the go-to choice for creating presentations.
PowerPoint Shortcuts, Tricks, and Hacks. Power-crop photos with SmartArt. The favorite hack is Power Cropping a bunch of photos in seconds. (1) In PowerPoint select a bunch of odd sized (or shaped) photos. (2) Navigate to the Picture Tools Format Tab.
PowerPoint can be used to create captivating and impactful presentations. However, mastering PowerPoint's vast array of features and tools can be overwhelming. .. . ... 40 PowerPoint tips and tricks - Speed up your workflow, learn new techniques and improve your slides ... Creating social media graphics using Powerpoint can be a cost effective ...
1. How to insert graphics into PowerPoint. Once you've created your presentation it's time to add those all-important PowerPoint Graphics. And it's easy, easy, easy. Step 1: Go to the slide and create a space for your graphic. Step 2: Go to insert on the toolbar at the top of PowerPoint, click on it.
Tips to elevate your PowerPoint presentation and make it look like it was professionally designed. Whether you are informing, educating, convincing, or motivating, PowerPoint design experts will follow these tips and design ideas to elevate your presentations. ... I'm a professional graphic designer and I specialize in PowerPoint ...
Short Answer. 1. Use high-quality images and graphics to make your presentation visually appealing. 2. Use animations and transitions to keep your audience engaged. 3. Incorporate relevant facts and figures to make the presentation informative. 4. Use a clear and concise font that is easy to read.
Use animations sparingly to enhance your presentation. Don't take the last tip to mean you should avoid animations and other effects entirely. When used sparingly, subtle effects and animations can add to your presentation. For example, having bullet points appear as you address them rather than before can help keep your audience's attention.
Here are some unique elements that make a presentation stand out. Fonts: Sans Serif fonts such as Helvetica or Arial are preferred for their clean lines, which make them easy to digest at various ...
Q&A: Richard Binzel on tips for observing the 2017 solar eclipse. Previous item Next item. More MIT News. New AI method captures uncertainty in medical images . By providing plausible label maps for one medical image, the Tyche machine-learning model could help clinicians and researchers capture crucial information.