

Fix sound or audio problems in Windows
If you’re having sound or audio problems, the following suggestions might help. The tips are listed in order, so start with the first one, see if that helps, and then continue to the next one if it doesn’t.
Before you begin
Start by running the automated audio troubleshooter in the Get Help app. Get Help automatically runs diagnostics and takes the correct steps to fix most audio issues.
Open Get Help
If the Get Help app is unable to resolve your sound or audio issue, try the possible solutions listed:
1. Check your speaker output
If multiple audio output devices are available, check that you have the appropriate one selected. Here's how:
Select the Speakers icon on the taskbar.
Next, select the arrow to the right of the speaker volume slider to open a list of audio devices connected to your computer. The tool tip should display as Manage audio devices when hovering over the arrow.
Check that your audio is playing to the audio device you prefer, such as a speaker or headphones.
If this doesn't help, continue to the next tip.
2. Run the audio troubleshooter
The audio troubleshooter might be able to fix audio problems automatically.
To run the troubleshooter:
Go to Search in the taskbar, type audio troubleshooter , and select Find and fix problems with playing sound from the results to launch the troubleshooter.

You can also launch the troubleshooter from audio Settings:
Select Start > Settings > System > Sound > Troubleshoot common sound problems and select Output devices or Input devices .
If running the troubleshooter doesn't help, continue to the next tip.
3. Verify that all Windows Updates are installed
To check for updates:
Select Start > Settings > Windows Update and select Check for updates . Open Windows Update
Do one of the following:
If the status says, "You're up to date," go to the next tip.
If the status says, "Updates are available," select Install now .
Select the updates you want to install, then select Install .
Restart your PC and check if your sound is working properly.
If that didn't solve your problem, continue to the next tip.
4. Check your cables, plugs, jacks, volume, speaker, and headphone connections
Try these steps:
Check your speaker and headphone connections for loose cords or cables. Make sure all cords and cables are plugged in.
If you have multiple 5mm jacks to plug into, especially on a surround sound system, make sure all cords and cables are plugged into the correct jack.

Note: Some systems use a green jack for output and a pink jack for mic input and others will be labeled "headphone" or "microphone."

Make sure the power is turned on.
Make sure the mute setting is not turned on and try turning up all the volume controls.
Note: Some speakers and apps have their own volume controls. Be sure to check them all.
Try connecting your speaker and headphones to a different USB port.
It's possible that your speakers won't work when your headphones are plugged in. Unplug your headphones and see if that helps.
If you're still having audio problems, see the next sections for additional troubleshooting.
5. Check sound settings
Check to make sure your audio devices aren't muted and haven't been disabled.
Select and hold (or right-click) the Speakers icon on the taskbar, and then select Open Volume mixer .
Note: If you don't see Speakers displayed, it may be in the overflow area. Select Show hidden icons to check there.
You’ll see a set of volume controls for your devices. Make sure none of them are muted. If any of them are muted, you’ll see an "x" next to the volume control . To unmute do one of the following:
Select the volume control and adjust to the desired volume level.
Select the Unmute speakers icon .

Check your device properties to make sure that your devices have not been disabled by mistake. Select Start > Settings > System > Sound .

Select your device and then select Properties .

6. Fix your audio drivers
Hardware problems can be caused by outdated or malfunctioning drivers. Make sure your audio driver is up to date and update it if needed. If that doesn't work, try uninstalling the audio driver (it will reinstall automatically). If that doesn't work, try using the generic audio driver that comes with Windows. If you're having audio issues after installing updates, try rolling back your audio driver.
To update your audio driver automatically:
In the search box on the taskbar, type device manager , then select it from the results.
Select the arrow next to Sound, video and game controllers to expand it.

If Windows doesn't find a new driver, look for one on the device manufacturer's website and follow those instructions. If that doesn't work, try uninstalling your audio driver.
To uninstall your audio driver:

Restart your PC.
Note: Be sure to save your documents and any other current work before you restart.
This restart will automatically prompt your PC to reinstall your audio driver.
To restart, select Start > Power > Restart .
If those options didn’t work, try using the generic audio driver that comes with Windows.
To use the generic audio driver that comes with Windows:
Select and hold (or right-click) the listing for your sound card or audio device, then select Update driver > Browse my computer for drivers > Let me pick from a list of available drivers on my computer .

If these steps didn't solve your audio issue, visit your device manufacturer’s website and install the most recent audio/sound drivers for your device. The following is an example of a driver download page for a sound device manufacturer.

If you have audio issues after installing updates
If your audio was working before you ran Windows Update and now isn’t working, try rolling back your audio driver.
To roll back your audio driver:
Select and hold (or right-click) the listing for your sound card or audio device, then select Properties .

Read and follow the instructions and then select Yes if you want to roll back your audio driver.
If rolling back your audio driver didn't work or wasn't an option, you can try to restore your PC from a system restore point.
Restore your PC from a system restore point:
When Microsoft installs updates on your system, we create a system restore point in case problems arise. Try restoring from that point and see if that fixes your sound problems. For more info, see "Restore from a system restore point" in Recovery options in Windows .
7. Set your audio device as the default device
If you're connecting to an audio device—such as headphones or speakers—using USB or HDMI, you might need to set that device as the default audio device. If you’re using an external monitor that doesn’t have built-in speakers, make sure that the monitor isn’t already selected as your default output device. if it is, you won’t have any audio. You can check that when you set your default output audio device. Here’s how:
Select Start > Settings > System > Sound .
In the Output section, select the device you want to use for playback as your output device. When you select this device, you’re also setting it as the default.
If setting your audio device as the default device doesn't help, continue to the next tip for additional troubleshooting.
8. Turn off audio enhancements
Sometimes having audio enhancements on can result in audio issues. Disabling them may resolve your issue.
In the search box on the taskbar, type control panel , then select it from the results.
Select Hardware and Sound from the Control Panel, and then select Sound .
On the Playback tab, select and hold (or right-click) the Default Device , and then select Properties .
Select the Advanced tab and uncheck either the Enable audio enhancements or the Enable sound effects check box (depending on which option you see), select Apply , and try to play your audio device.

If turning off audio enhancements doesn't help, see the next sections for additional troubleshooting.
9. Restart Audio Services
In the search box on the taskbar, type services , then select it from the results.
Select each of the following services, select and hold (or right-click), select Restart , and then select Yes :
Windows Audio
Windows Audio Endpoint Builder

If restarting these services doesn’t resolve your issue, see the next sections for more troubleshooting.
10. Try different audio formats
In the search box on the taskbar, type control panel , and then select it from the results.
On the Playback tab, select and hold (or right-click) Default Device , and then select Properties .

If trying different audio formats doesn't help, see the next sections for additional troubleshooting.
11. Restart to apply installed updates
Many updates require you to restart your device.
To check and see if you have installed updates pending and need to restart:
Save your work and close all open applications.
Select Start > Power . If you have installed updates pending, you’ll see options to Update and restart and Update and shut down .
Select one of those restart options to apply the updates.
Need help with Windows Update? See Troubleshoot problems updating Windows .
If restarting doesn't help, see the next section for additional troubleshooting.
12. Check for IDT High Definition Audio CODEC in Device Manager
Some audio problems might be caused by an issue with the audio system’s IDT High Definition Audio CODEC. This can be fixed with a manual driver update which allows you to choose the sound driver you want to use.
Note: Not all systems will have an IDT High Definition Audio CODEC.
To check and see if you have one, and to manually update the driver:
Look for IDT High Definition Audio CODEC . If it's listed, select and hold (or right-click) it and select Update driver , then select Browse my computer for drivers > Let me pick from a list of available drivers on my computer .
You’ll see a list of pre-installed drivers. Select High Definition Audio Device , and then select Next .
13. If you have microphone issues, make sure your privacy settings are configured properly
Select Start > Settings > Privacy & security.
Under App permissions , select Microphone .
Make sure that the Microphone access and Let apps access your microphone toggles are turned On .
If you’re having this issue with a specific app, scroll down under Let apps access your microphone and make sure that the toggle next to that specific app is turned On as well.
Next, select the arrow to open a list of audio devices connected to your computer.
In the search box on the taskbar, type audio troubleshooter , select Find and fix problems with playing sound from the results, then select Next .

You can also launch the troubleshooter from audio Settings. Select Start > Settings > System > Sound > Troubleshoot .
Select Start > Settings > Update & Security > Windows Update > Check for updates . Open Windows Update
Restart your PC and see if your sound is working properly.

Check your device properties to make sure that your devices have not been disabled by mistake. Select Start > Settings > System > Sound .

Restart your PC.
Note: Be sure to save documents and any other current work before you restart.
Select and hold (or right-click) the listing for your sound card or audio device, then select Update driver > Browse my computer for drivers > Let me pick from a list of device drivers on my computer .
If these steps didn't solve your audio issue, visit your device manufacturer’s website, and install the most recent audio or sound drivers for your device. The following is an example of a driver download page for a sound device manufacturer.
Read and follow the instructions and then select Yes if you want to roll back your audio driver.
If you're connecting to an audio device—such as headphones or speakers—using USB or HDMI, you might need to set that device as the default audio device. If you’re using an external monitor that doesn’t have built-in speakers, make sure that the monitor isn’t already selected as your default output device. If it is, you won’t have any audio. You can check that when you set your default output audio device. Here’s how:

On the Playback tab, select and hold (or right-click) the Default Device , and then select Properties .
On the Enhancements tab, select either the Disable all enhancements or the Disable all sound effects check box (depending on which option you see), select OK , and try to play your audio device.

Select each of the following services, right-click, and then select Restart :
On the Playback tab, select and hold (or right-click) Default Device , and then select Properties .
To check and see if you have installed updates pending and need to restart
Look for IDT High Definition Audio CODEC . If it's listed, select and hold (or right-click) it and select Update driver , then select Browse my computer for drivers > Let me pick from a list of device drivers on my computer .
Select Start > Settings > Privacy , and then select Microphone from the left menu.
Under Allow access to the microphone on this device , select Change . Make sure the toggle is turned On .
If you’re having this issue with a specific app, scroll down to Choose which Microsoft Store apps can access your microphone and make sure that the toggle next to that app is turned On as well.

Need more help?
Want more options.
Explore subscription benefits, browse training courses, learn how to secure your device, and more.

Microsoft 365 subscription benefits

Microsoft 365 training

Microsoft security

Accessibility center
Communities help you ask and answer questions, give feedback, and hear from experts with rich knowledge.

Ask the Microsoft Community

Microsoft Tech Community

Windows Insiders
Microsoft 365 Insiders
Find solutions to common problems or get help from a support agent.

Online support
Was this information helpful?
Thank you for your feedback.
Volume Control Windows 10 | Fix Volume Control Not Working
This post provides some tips for volume control Windows 10, as well as digs out some solutions to fix volume control not working in Windows 10. Check the details below. Some useful tools from MiniTool software are also available, incl. free data recovery software, hard drive partition manager, system backup and restore software, movie maker and video editor, etc.
If you want to manage and adjust volume settings on Windows 10, here are some tips. Still, if you are facing the volume control not working Windows 10 problem, this tutorial also provides some solutions to help you fix this issue. You can check the detailed guide below.
3 Tricks for Volume Control Windows 10
Generally you can easily manage and control volume in Windows 10 from Sound Settings.
Tip 1. Turn up volume in Windows 10
To simply turn up mic volume in Windows 10 or deal with the problem “Windows 10 volume too low”, you can check the related tutorials:
>> How to Turn Up or Boost Mic Volume in Windows 10 .
>> Windows 10 Volume Too Low? Fixed with 6 Tricks .
Tip 2. Manage Windows 10 Speaker and Microphone settings
You can click press Windows + I to open Settings, and click System .
Click Sound in the left panel, you can see the sound Output and Input options in the right window. You can change the default speakers under Choose your output device , and select the microphone under Choose your input device . You can also drag the slider under Volume to control volume in Windows 10.

You can also click the Device properties link under the output or input audio device to open audio device properties window. For instance, there are several tabs in Speakers Properties window.
- General — Enable or disable the speaker and access audio driver information.
- Levels — Adjust master volume and balance settings.
- Enhancements — Enhance audio with special effects.
- Advanced — Change default sample rate and bit depth.
- Spatial sound — Select Windows 10 spatial sound format, “Windows Sonic for Headphones” or “Dolby Atmos for Headphones”.

You can also click the Troubleshoot button under the audio output or input device to run Windows built-in audio troubleshooter to choose one of the speakers or microphones to diagnose and fix audio device problems.

Check how to download and update Dell audio drivers for Windows 10 PC or laptop in this post.
Tip 3. Control other volume options in Windows 10
- You can click Start -> Settings -> System -> Sound, and click App volume and device preferences.
- Then you can control the master volume or adjust the volume of particular app and system sounds.
- In this window, you can also select the default Output and Input audio device.
- If you want to abort all the sound setting changes, you can click Reset button to go back to Microsoft recommended sound settings.

4 Fixes for Volume Control Not Working Windows 10
If you find that Windows 10 volume control is not working, e.g. Windows 10 volume icon not working , Windows volume mixer won’t open, volume control can’t open, keyboard volume control not working Windows 10, volume icon missing Windows 10 , etc. you can try the tips below to fix these issues.
Fix 1. Run audio troubleshooter
Click Start -> Settings -> System -> Sound -> Troubleshoot.
Fix 2. Update audio driver
Press Windows + X to select Device Manager -> Expand Sound, video and game controllers category -> Right-click the target speaker or microphone device and choose Update driver -> Click Search automatically for updated driver software.
You can also choose Uninstall device to remove the audio driver, and restart your computer to automatically reinstall the audio driver.
Fix 3. Restart Windows audio service
Open Windows services -> Find Windows Audio service in the right window, right-click it and click Restart.

Fix 4. Update Windows 10
Click Start -> Settings -> Update & Security -> Windows Update -> Check for updates.
These are what we gathered for volume control Windows 10, and how to fix volume control not working Windows 10 issue. If you have better ideas, please do not hesitate to share with us.
About The Author
Position: Columnist
Audio Not Working in Windows 10? 9 Ways to Fix Sound Problems
Is your audio not working in Windows 10 (or Windows 11)? Here's what to do when you have no sound on your computer.
Suffering from audio not working on your Windows 10 PC? It's quite frustrating to have no sound on your computer, but we're here to help.
Below, we cover quick and easy solutions to fix your sound on Windows when it's not working. While we focus on Windows 10 here, many of these solutions also apply to Windows 11.
1. Check Volume Levels and Muted Outputs
First, you should get the most obvious fix out of the way. If you have no sound on your computer, double-check to make sure that you haven't muted the audio. Click the Volume icon at the bottom-right corner of your computer to check the master volume bar; make sure it's not muted or set at an extremely low level. If it's muted, you'll see an X next to the speaker icon.
After this, right-click on the same volume icon and choose Open Volume mixer to see the current volume level for all apps playing audio. Turn these up as needed, confirming that they aren't muted by mistake or too low to hear. You may need to troubleshoot low audio output in Windows if you hear sound but it's too quiet.
Be sure to check the volume level inside any active apps, games, video players, or similar too. For example, even if you have both the master and browser volume levels turned up at the Windows level, a muted YouTube video will still produce no sound.
On a related note, you should also close any audio-heavy apps you aren't actively using. Some programs can take control of your audio device, so you won't hear anything from other devices. For example, while using Bluetooth headphones, being in a Discord call can prevent you from hearing audio from other apps.
Before moving on, it's also wise to restart your computer at this point. Your sound issue could be temporary, perhaps due to a pending update that has locked audio output.
2. Make Sure You're Using the Right Audio Output
If you have more than one audio output device connected to your computer, it's possible that Windows is playing sound through the wrong one.
To change the device being used for playback, click the Volume icon again. Above the volume slider, you'll see the name of the current device, if you have more than one enabled. Click this to open a menu of all available devices, then select the output that you want to use from the list.
This is just a quick switcher, so it might not show all available devices. To see a full list of audio devices connected to your PC, right-click the Volume icon and choose Open Sound settings . This acts as a shortcut to the Settings > System > Sound menu.
On this page, click Manage sound devices under the Choose your output device heading to see everything that's connected to your computer. Use the Test button for any of the available devices to play a quick tone. After changing output devices, you may need to check the volume levels again, as above.
Check the Disabled section to make sure you haven't turned off the device you want to use. Click an option and hit Enabled to turn it back on, if needed.
If you don't see the audio output you expect, or it doesn't work, continue on with the below steps. Your speakers, headphones, or other audio device needs further troubleshooting.
3. Check All Audio Cables and Wireless Connections
Next, you should check the physical connections of all your audio devices, especially if your desired output didn't show up in the above menus.
Make sure that all audio (and power) cables are firmly plugged into your computer, as well as into the device. It's a good idea to unplug and reconnect everything, just to make sure there are no loose connections. Confirm that you have the audio cables plugged into the right ports. Generally, audio output devices should go into the green port, which sometimes has a headphone icon.
If any cable is frayed, excessively bent, or otherwise damaged, it might be unusable. You may have to jiggle it to get a good connection. If possible, replace any worn-out cables.
For wireless audio devices like headphones, visit Settings > Devices > Bluetooth & other devices and make sure you've paired your device to your computer properly. See how to troubleshoot Bluetooth in Windows 10 for more help with wireless devices.
If you also use those Bluetooth headphones with your phone, tablet, TV, or similar, disconnect them from the other device first, then try connecting them to your Windows PC again. Trying to play audio from your computer to your Bluetooth headphones won't work when those headphones are currently connected to your phone.
Finally, try disconnecting all audio devices from your PC except for the one you want to use, in case there's something interfering with another device.
4. Try the Windows Audio Troubleshooter
Before you go further, it's worth running the built-in audio troubleshooter. This allows Windows 10 to identify and fix issues on its own—sometimes. These Windows troubleshooters don't always fix the problem, but it's worth a shot before you dive in deeper.
Head to Settings > Update & Security > Troubleshoot > Additional troubleshooters and select Playing Audio . Follow the instructions, and hopefully, Windows will correct the problem automatically. You'll see what fixes the troubleshooter applied, if any, when it's done.
(On Windows 11, this tool is under Settings > System > Troubleshoot > Other troubleshooters > Audio .
5. Roll Back or Reinstall Audio Drivers
Drivers usually work well once initially configured, but something going wrong causes annoying issues. Your audio driver could have become corrupted, or maybe it needs an update to resolve problems.
Windows 10 gives a few options to fight a problematic driver. You'll find these in the Device Manager , which you can access from a handy menu by right-clicking the Start button or hitting Win + X .
First, you can try to simply roll the driver back to the last good configuration. To do this, in the Device Manager, expand the Audio inputs and outputs section. Right-click the audio device you're using, select Properties , and browse to the Driver tab.
Press the Roll Back Driver option if available, and Windows 10 will begin the process of using the prior driver version. However, this is only available if there is an older driver to fall back to.
If you can't roll the driver back, you'll need to choose either Update Driver or Uninstall Device .
You can try to update the driver through this menu, though you'll probably need to manually update the driver instead since Windows isn't great at finding unique drivers for your system. Assuming there's no update available, choose Uninstall Device . This will remove the offending driver, so you can reinstall a fresh copy.
Before proceeding with the uninstall, download the latest manufacturer version of the driver, if available. You'll usually be able to download these directly from the hardware issuer's website. Googling the name of your device followed by "driver" should be enough to locate it—don't download drivers from shady third-party websites.
If there's no specific driver available for your device, proceed anyway and Windows will reinstall a generic one upon reboot.
Click Uninstall Device in the Properties window, and you'll see the Confirm Device Uninstall box. Depending on the driver, this window may also contain an option to Delete the driver software for this device . If this is an option, check the box and press OK .
Once you've wiped the drivers, restart your system. If you were able to download a new driver, install it now. Otherwise, Windows should have reinstalled its general driver for your device already.
If doing the above for a specific device doesn't fix the problem, try these steps for the device's entry under the Sound, video, and game controllers category.
6. Update the IDT High Definition Audio CODEC
Some systems may encounter issues with the IDT High Definition Audio CODEC. This can be fixed with a manual driver update, which allows you to choose the sound driver you wish to use.
Visit the Device Manager again, as discussed above. Expand the Sound, video, and game controllers section. If you spot IDT High Definition Audio CODEC , right-click it and select Update driver . You may not see this, depending on your PC. If you don't, continue to the next section.
In the next panel, select Browse my computer for drivers , followed by Let me pick from a list of available drivers on my computer . This allows you to select from any drivers pre-installed on the system.
Make sure Show compatible hardware is checked. Then under Model , select High Definition Audio Device , followed by Next , and finally Yes . You may need to restart your system for the changes to take effect.
If this fixes your audio problem, you might next look at improving the quality of your PC's sound .
7. Fix Realtek High Definition Audio Problems
Depending on your computer manufacturer and hardware, you may have a Realtek audio driver instead of IDT. Realtek drivers also appear frequently in forum posts discussing audio issues on Windows.
First, follow the same IDT process above to check for driver updates for Realtek audio. If this doesn't work, there are a couple of more specific fixes for Realtek audio problems to try.
Refresh Your Wi-Fi Drivers
One common fix when Windows 10 has no sound focuses on disabling Realtek WLAN drivers, uninstalling, and then reinstalling the latest version—even if you already have the latest version installed.
First, head over to the Realtek website and download the latest applicable driver version for your system. Then open the Device Manager again. Browse to your Realtek Wireless LAN drivers: these should be under Network adapters , and will have both Realtek and Wireless in the name.
Right-click the driver and hit Uninstall device . Now head to the new driver file you downloaded, extract its contents , find the setup.exe or similar install file, and follow the instructions. You'll need to reboot your system following the installation.
Disable the Front Panel Audio Jack
This fix could be system-specific, but it's fixed an audio issue for at least one person, so it could solve your problem too.
Reddit user Tiflotin fixed a persistent Realtek audio issue by disabling front jack detection from within Realtek HD Audio Manager. You can open this utility by double-clicking the Realtek speaker icon that appears in the System Tray at the bottom-right corner of your screen. It might appear in the expanded menu that shows when you click the small arrow.
On newer systems, this app has been replaced with Realtek Audio Console, and is available by searching your PC like you would for any other app. Under Device advanced settings , you'll see an option titled Disable front panel jack detection . Try enabling this slider.
If you're already pulling your hair out, this could be worth a try!
8. Disable Windows Audio Enhancements
Next up are Windows 10's audio enhancements . Audio enhancements are built-in Microsoft and third-party packages designed to make your system audio sound better—or at least different—in a variety of ways. However, these "enhancements" could be the cause of your Windows 10 audio issue. Luckily, they're simple to turn off.
To access audio enhancements, right-click on the speaker icon in the System Tray and select Sounds to open the Control Panel's Sound window. Here, switch to the Playback tab and double-click on the audio device you're using.
In the next window, click the Enhancements tab. There, check the box labeled Disable all enhancements if it isn't already, then hit Apply . If you're having audio issues with multiple devices, repeat this process for each one in the Playback list.
While you're here, it's also a good idea to make sure the device you want to use is set as the default. Right-click it and choose Set as Default Device to do this.
9. Restart Windows Audio Services
If you're still having trouble, the reason why sound isn't working on your computer could be a behind-the-scenes Windows problem with services. While audio services should "just work" normally, they can sometimes disable themselves for no reason. If this happens, you'll have no sound.
Type Services into the Start menu to find and open the services manager . Scroll down to Windows Audio . If the service isn't running, your system audio will not function correctly. Start it again by double-clicking and selecting Start .
While you're here, double-check the service's Startup type . Audio services should be set to Automatic by default. If it is anything different— Automatic (Delayed Start) , Manual , or Disabled —change it back.
Check Windows Audio Endpoint Builder in the same way, since audio also relies on this running correctly.
No Sound on Your Computer? Now You Can Hear Clearly
We've covered fixes for Windows 10 (and Windows 11) audio problems. Hopefully, you can hear your computer sound once again.
While not a definitive fix for every issue, Windows 10 seems to prefer that you use the built-in High Definition Audio Driver , and the huge amount of fixes we've read through involve updating, uninstalling, reinstalling, and rolling this driver back.
- PRO Courses Guides New Tech Help Pro Expert Videos About wikiHow Pro Upgrade Sign In
- EXPLORE Tech Help Pro About Us Random Article Quizzes Request a New Article Community Dashboard This Or That Game Popular Categories Arts and Entertainment Artwork Books Movies Computers and Electronics Computers Phone Skills Technology Hacks Health Men's Health Mental Health Women's Health Relationships Dating Love Relationship Issues Hobbies and Crafts Crafts Drawing Games Education & Communication Communication Skills Personal Development Studying Personal Care and Style Fashion Hair Care Personal Hygiene Youth Personal Care School Stuff Dating All Categories Arts and Entertainment Finance and Business Home and Garden Relationship Quizzes Cars & Other Vehicles Food and Entertaining Personal Care and Style Sports and Fitness Computers and Electronics Health Pets and Animals Travel Education & Communication Hobbies and Crafts Philosophy and Religion Work World Family Life Holidays and Traditions Relationships Youth
- Browse Articles
- Learn Something New
- Quizzes Hot
- This Or That Game New
- Train Your Brain
- Explore More
- Support wikiHow
- About wikiHow
- Log in / Sign up
- Computers and Electronics
- Operating Systems
How to Troubleshoot Sound Issues on Your Windows Device
Last Updated: March 30, 2024 Fact Checked
Check the Volume Settings
Run the audio troubleshooter, adjust the speaker properties, restart the audio services, update or replace the sound drivers, update the idt high definition audio codec driver, expert interview.
This article was written by Kevin Burnett and by wikiHow staff writer, Nicole Levine, MFA . Kevin Burnett is a Software Developer with over 20 years of professional experience. He spent the majority of his career at Rosetta Stone, a language-learning software company. He has experience with both front and back-end development and works primarily in Ruby, Python, and JavaScript. This article has been fact-checked, ensuring the accuracy of any cited facts and confirming the authority of its sources. This article has been viewed 2,074,490 times.
If you can't hear music and other sounds coming from your Windows 10 or 11 PC, don't worry—there's usually an easy fix! This wikiHow article will teach you how to fix any Windows audio or speaker problem on your laptop or desktop PC.
Fixing PC Sound Problems
- Check all physical connections, including plugs and jacks. Test any external volume control knobs. Disconnect and reconnect Bluetooth devices.
- Run the audio troubleshooter to identify, diagnose, and fix problems.
- Verify that all Windows Updates are installed. Update the sound driver if necessary.

- If your keyboard has volume buttons, press the Mute button (the speaker with an X—usually F1) to unmute the speaker, or just press the Volume Up button (usually F3) several times until the volume increases.
- You can also increase the volume by clicking the speaker icon and then dragging the corresponding slider up (Windows 10) or to the right (Windows 11).

- If you're using Windows 11, you'll also see a section in the Volume Mixer for "Output device." If you don't see the device you're trying to listen to selected here, click the menu and select it now.

- If the speaker requires a power source, such as being plugged into a wall or USB port, double-check to make sure that it's powered on.
- If your external speaker is a part of a multi-speaker system, double-check that all components are turned on and properly connected.
- Using a Bluetooth speaker ? Try disconnecting from it, placing it back into pairing mode, and then reconnecting.

- If you don't see a Bluetooth speaker or device you're trying to listen through as an option, you may need to reconnect to it .

- Press Windows key + S to activate the search bar.
- Type audio troubleshooter .
- Click Find and fix problems with playing sound . [1] X Research source

- Type control panel .
- Click Control Panel in the search results.

- If this corrected the issue, click OK to save your settings.
- If disabling enhancements doesn't bring back sound, re-enable them continue with this method.

- Repeat the test with each frequency. If you find a frequency that produces audio, you've resolved your computer's audio issues.
- Click OK to close the window when you're finished.

- Type services .
- Click Services in the search results.

- Press Windows key + S to open the search bar.
- Type device manager .
- Click Device Manager in the search results.

- If Windows doesn't find a new sound driver, check your computer manufacturer's website for the most recent drivers.
- If you're still not able to update the audio driver, you'll want to remove it. Click Uninstall Device , check the box next to "Delete the driver software for this device," and then click Uninstall .

- Restart your PC after adding the driver and test your sound.
Community Q&A

You Might Also Like

Thanks for reading our article! If you’d like to learn more about computer programming, check out our in-depth interview with Kevin Burnett .
- ↑ https://support.hp.com/us-en/topic/audio
- ↑ https://support.microsoft.com/en-us/windows/fix-sound-or-audio-problems-in-windows-73025246-b61c-40fb-671a-2535c7cd56c8
- ↑ https://support.microsoft.com/en-us/windows/fix-sound-problems-in-windows-10-73025246-b61c-40fb-671a-2535c7cd56c8
About This Article

1. Make sure the computer isn't muted. 2. Check the headphone or speaker connection. 3. Look for malfunctioning audio devices. 4. Right-click the speaker in the taskbar. 5. Click Open Volume Mixer . 6. Look for sliders turned all the way down. 7. Drag sliders up to increase sound. 8. Click X to close the window. Did this summary help you? Yes No
- Send fan mail to authors
Reader Success Stories
Stefan Dudasko
Dec 10, 2017
Is this article up to date?
Oct 7, 2017
David Buchanan
Dec 30, 2017
Jesse Sunday
Feb 7, 2018
DaVoss Murray
Jul 9, 2016

Featured Articles

Trending Articles

Watch Articles

- Terms of Use
- Privacy Policy
- Do Not Sell or Share My Info
- Not Selling Info
wikiHow Tech Help Pro:
Level up your tech skills and stay ahead of the curve
How To Fix The Most Common Low Volume Problems On Windows

Windows volume issues can seem complex and confusing — especially if you're running late for a Zoom meeting or virtual presentation. Unfortunately, the causes of these problems span a broad spectrum, from physical misconnections to outdated audio drivers. However, on the bright side, most of these issues do not require professional intervention and can be addressed effectively using simple troubleshooting methods.
Identifying what's causing the issue should be your first step, but it's usually the most challenging step too. If you use desktop speakers or headphones as a playback device, your computer may have trouble communicating with the third-party device. On the other hand, if you only experience the audio issue with specific software like Zoom or Chrome, you may need to check the software's settings to figure out what's going on.
Luckily, you don't have to figure it out alone from home. If you can't figure out the source of your problem, you can tap Windows' built-in audio troubleshooter to help you diagnose common glitches that can disrupt audio performance. While this software won't give you the expert advice of a Windows repair shop, it can be a handy tool to help you get started.
How to adjust your volume settings
If you've recently introduced a new pair of speakers or set of headphones into your Windows set-up, it might require a louder system volume level than you're used to.
Fortunately, this is the easiest method to fix low-volume problems, and you can accomplish it in just a few clicks.
- Locate the small speaker icon on the taskbar's right side — it's your access point to volume control.
- Left-click the speaker icon, and a slider will appear for volume adjustments.
- Right-click the same icon if more advanced settings are needed, selecting Open Sound settings from the dropdown.
- In this new window, choose your output device and fine-tune its volume level to your preference.
While adjusting system volume settings, it's crucial to remember that individual software often possesses its own set of volume controls, which could supersede system settings. If your low-volume problems only occur with specific software, you'll likely need to fix the problem from within the respective program.
- Open the volume or sound settings menu within the specific program.
- Make sure the volume output slider is adjusted correctly.
- If that doesn't work, you may need to check whether you selected the correct output device.
Contact the software's support team if you need help finding the volume or sound settings menu.
How to update your audio driver
A crucial element of an operating system's functionality lies in its audio drivers — key components that facilitate the translation of data into sound signals which your hardware can interpret. If these drivers become outdated, they may struggle to communicate effectively with updated system components or audio hardware, leading to potential sound discrepancies such as decreased volume.
To tackle this, a refresh of your audio driver may be necessary.
- Open the Device Manager by typing it into the Windows search bar.
- Look for 'Sound, video, and game controllers' and click it.
- Identify your audio driver, and right-click it. Click Properties and select Update driver.
- Follow the on-screen prompts until Windows has searched for a newly available driver. If there is, choose to install it.
If you cannot find the correct driver in 'Sound, video, and game controller,' you can try to locate it in 'Audio inputs and outputs.' If no driver updates are available or issues persist after an update, it could suggest a different underlying problem. Alternatively, the latest driver may not always be the most suitable — if problems arise after updating, reverting to a previous version could solve the issue.
How to change your audio output device
After checking the audio connections and updating the system's audio drivers, another crucial step is to examine the audio output device. Failing hardware, such as speakers or headphones, can sometimes cause low or fading volume.
If you've just bought a new audio output device like speakers or headphones , the next step is changing your settings to accommodate.
- Navigate to the Windows Settings menu.
- From here, click Devices.
- You should see a list of your existing audio devices.
- If your new device is Bluetooth, click 'Add Bluetooth or other device' to add it.
- Your computer should automatically detect it, but if it doesn't, navigate to the Sound menu and change the output device manually.
It's important to note that you must change the output of any software you use, like Zoom or Microsoft Teams. Sometimes these programs will detect the new audio output devices, but sometimes they won't. You should also ensure you've installed the required audio drivers before switching outputs.
How to use Windows audio troubleshooter
If none of the other solutions helped your problem, you should try Windows' built-in audio troubleshooter before you schedule an appointment with your local tech repair shop. This intuitive tool helps identify and rectify common sound issues automatically, so you can focus on fixing the problems rather than finding them.
- Right-click on the small speaker icon at the right of your taskbar.
- Select Sound settings, and on the next screen, click the Troubleshoot button.
- Follow the on-screen prompts to start the automatic troubleshooting process.
- The program will ask questions about your problem and play a few sounds to test your audio output devices.
- After completing the process, the troubleshooter will provide potential solutions for your situation.
The Windows audio troubleshooter is a powerful tool, but it might not always be able to pinpoint the exact cause if the problem is complex. Multiple fixes may need to be applied. You should contact your local tech expert if that's the case.
Sign up for our daily newsletter
- Privacy Policy
- Advertise with Us
9 Ways to Fix Volume Mixer Not Opening in Windows

The Volume Mixer in Windows allows users to adjust the volume of desired audio sources. Also, this is where you can reduce the volume for a specific application without lowering the whole system volume. But what happens if you suddenly can’t access it? This guide goes through all the possible solutions to fix the Windows Volume Mixer not opening.
Good to know : learn how to safely test your antivirus against real malware .
Basic Troubleshooting
1. run the audio troubleshooter, 2. hardware and devices troubleshooter, 3. restart file explorer, 4. reset sound level settings, 5. check windows audio service, 6. disable exclusive mode, 7. enable the legacy volume control slider, 8. end the volume mixer process, 9. perform a system restore.
Try these simple fixes first before you go on to the more specific solutions below.
- Restart your PC – a simple system restart could solve your problem. Click the Start menu, press the power button icon, then select the Restart option. If the Power menu isn’t showing up for you, learn what to do about it.
- Run SFC and DISM scans – SFC and DISM are built-in Windows utilities that maintain and repair Windows files, including system files and other components. By executing the SFC or DISM commands from the Command Prompt, your system will search for missing or corrupted system files and replace them.
- Update audio drivers – outdated drivers can lead to many problems on your computer. You can update drivers from Windows Update in your Settings menu or via Device Manager, then restart your system once complete.
- Reinstall audio drivers – if the audio drivers have malfunctioned because of a virus or a new update, you’ll need to uninstall and reinstall them, including the Realtek driver.
Windows provides many troubleshooting options to help resolve any issues on your computer, and the Audio Troubleshooter is a crucial solution for fixing the Volume Mixer. It can detect and fix most audio problems in Windows.
Right-click your Start menu, select Settings , then go to System -> Troubleshoot .

Select Other troubleshooters.

Launch the Playing Audio troubleshooter (or Audio in newer Windows 11 versions) by hitting Run .

Allow the troubleshooter to scan your system for issues, follow the instructions to resolve them, then try opening the Volume Mixer again.
On Windows 10, launch this utility by going to Settings -> System -> Sound -> Troubleshoot .
You can also try running the Hardware Devices Troubleshooter to solve your Volume Mixer issue. While Microsoft removed it from Settings, you can still open it using the Windows Terminal.
Right-click the Start menu, and select Windows Terminal (Admin) . Type the following code into PowerShell, and press Enter :

Finally, choose Advanced , check the Apply repairs automatically option, and select Next .

Tip : dealing with File Explorer errors ? Check out our comprehensive post on how to tackle the most common ones.
File Explorer is one of the critical processes in Windows. If it encounters problems, it could result in the Volume Mixer not opening correctly – or even freezing completely. To resolve these issues, restart this process.
Right-click the taskbar, and click the Task Manager option. Click More details at the bottom to see more options.

Go to the Processes tab, right-click Windows Explorer , and select Restart .

A third-party app or another user changing your system’s audio settings may prevent you from opening the Volume Mixer if a third-party app or another user has changed your system’s audio settings. Resetting sound levels to their default settings could be a solution.
Right-click the Start menu, then choose Settings . Select System , then choose Sound from the right menu.

Select Volume Mixer from the Advanced section.

Finally, click Reset next to Reset sound devices and volumes for all apps to the recommended defaults .

Tip : learn how to change the default audio device in Windows .
Windows features a Service app that manages all major processes, including the Audio service. If the Audio service malfunctions, you could encounter issues with the Volume Mixer, making it critical to ensure that it is up and running.
Open your Start menu, type “Services” in the Search bar, and press Enter . Right-click on Windows Audio , and select Properties .

Set the Startup type to Automatic , click the Start button, then press Apply -> OK .

Alternatively, restart the Windows Audio service by right-clicking Windows Audio in the Services window again and selecting Restart .
The Volume Mixer may stop working correctly if a setting called Exclusive Mode is configured. Check whether it was disabled at some point.
Right-click the speaker icon in the system tray, and select Sound settings . Select More sound settings in the Sound panel.

Go to the Playback tab, right-click your audio device, and hit Properties .

Uncheck Allow applications to take exclusive control of this device in the Advanced tab, then click Apply -> OK .

FYI : learn what you can do if you can’t access Task Manager because it was disabled by your system administrator
Switching back to the legacy Volume Control slider that was replaced in Windows 11 by a new unified sound menu could fix your Volume Mixer issue.
Right-click the Start menu and select Run from the list. Type Sndvol.exe into the Run dialog, and hit OK . Next, right-click the Volume Mixer icon in the taskbar, and choose Pin to taskbar .

Access the classic Volume Mixer in its shortcut in the Taskbar whenever you want.
The Volume Mixer’s executable file is “Sndvol.exe.” Ending the process in Task Manager if it’s not responding may solve your issue.
Open Task Manager as instructed above, and click on the More details button. Ensure that the Volume Mixer is also open.

Go to the Processes tab, right-click Volume Mixer – Speakers , and select End Task .

If nothing has worked so far, and you’ve previously created a restore point on your PC, try performing a system restore to revert your Windows installation to a prior state when the error wasn’t an issue.

Try this method, especially if you made many changes to your PC recently. To start a system restore process , check out our guide for the exact steps.
Tip : what happens if System Restore malfunctions on Windows ? We share a list of methods to help you get it working again.
Once you have resolved this issue, you may be interested in learning all about improving sound and microphone quality on Windows . We can also show you how to change the notification sound in Windows .
Image credit: Freepik . All screenshots by Farhad Pashaei.
Our latest tutorials delivered straight to your inbox

As a technophile, Farhad has spent the last decade getting hands-on experience with a variety of electronic devices, including smartphones, laptops, accessories, wearables, printers, and so on. When he isn’t writing, you can bet he’s devouring information on products making their market foray, demonstrating his unquenchable thirst for technology.
HTTA is reader supported. When you buy through links on our site, we may earn an affiliate commission at no extra cost to you. Learn more .
16 Best Ways to Fix Volume keys Not Working on PC Keyboard
Have you tried to adjust the volume on your computer keyboard using the volume keys, but nothing has happened?
It’s especially irritating if you rely on these keys to control your audio output. This problem can be caused by a variety of circumstances.
But don’t worry; in this blog post, we’ll explore the possible causes of your volume keys’ malfunction and provide some workable fixes to assist you.
Thus, whether you’re a gamer, a music fan, or someone who has to attend online meetings, keep reading to find out how to fix this problem and restore your volume keys to their original working condition.
These techniques should assist you in troubleshooting and resolving keyboard issues , whether you’re using a desktop computer or a laptop.
So, if you’re ready to get your volume keys back up again, read on!

Table of Contents
Fix #1: Shut Down or Restart Your Computer to fix the “Volume keys Not Working” Problem
Restarting your computer is one of the most fundamental troubleshooting techniques that can help resolve a variety of software and hardware issues, including malfunctioning volume keys.
Restarting your computer clears its memory and reloads all drivers and system files, which can often address issues caused by software glitches or conflicts.
When your volume controls stop working, there could be a problem with the driver or software that controls them. Restarting your computer allows these drivers and the software responsible for volume control to be reloaded, which may help to resolve the issue.
Furthermore, restarting your computer can assist in resetting any settings that may be causing the issue, such as wrong sound settings or a disabled sound device.
- The steps to restart a Windows PC are simple: Click the “Start” button, select the power icon, and then choose the “Restart” option.
- To restart a Mac PC, click on the Apple icon in the top left corner of the screen, select the “Restart” option, and then confirm by clicking “Restart.”
In some circumstances, restarting your computer may not resolve the problem with your volume controls. If this is the case, you can try some of the other methods described in this blog post.
Fix #2: Confirm Whether It Is a Hardware Problem by testing a different keyboard
It is tempting to begin random fixes without a clear understanding of why the Volume keys are not working. You first need to take the time to determine whether the problem is the keyboard hardware or software. If you make that your starting point, your work will be easier and less frustrating.
The easiest way to confirm if the problem is Hardware related is to try the Volume keys on a different keyboard on the same computer to see if it works. And if it turns out working fine on this other keyboard, it means your keyboard is not in good condition. Some of the guides here may help fix a faulty keyboard.
However, if after trying a different keyboard you see no changes, it means the issue is software related, which we will address here.
Fix #3: Make sure the keyboard is well connected
If you’re using an external keyboard and your volume keys are not working, it’s possible that your keyboard is not properly connected to your computer. This can happen if the keyboard is not plugged in all the way or if the USB port on your computer is not functioning properly.
To address this issue, try the following steps:
- Check the USB connection: check if your keyboard is properly connected to your computer. Make sure that the USB cable is firmly plugged into the USB port on your computer. If your keyboard has a wireless connection, make sure that it’s properly paired with your computer.
- Test another USB port: If your keyboard is properly connected and you’re still having issues, try plugging it into another USB port on your computer. Sometimes, certain USB ports may not work properly, so testing a different port can help identify the issue.
Fix #4: Learn how to use the volume keys properly
It’s possible that you may not know how to properly use the volume keys on your keyboard to adjust the computer’s volume. This can make it seem like the keys are not working when in fact, they’re simply not being used correctly.
On some keyboards, the volume keys are secondary keys, meaning that they require an additional key to be pressed for them to function. This is common on laptop keyboards, where space is limited, and the volume keys share space with other keys.
To properly use the secondary volume keys on your keyboard, follow these steps:
- Locate the volume keys: Locate the volume keys on your keyboard. These keys are usually located on the top row keys and are labeled with volume icons such as speakers or sound waves.
- Locate the FN key: This is the key that needs to be pressed along with the volume key for it to function. This key is labeled with “Fn” and is usually located between the Ctrl and the Windows Logo keys at the bottom left corner of the keyboard.
- Press and hold the FN key, then press the volume up or volume down key. This will increase or decrease the volume as you press these keys.
By following the steps outlined above, you can properly use these keys and adjust the computer’s volume to your desired level.
Fix #5: Check the Mute key/button
If you’re using a computer with a dedicated mute key/button and your volume keys are not working, it’s possible that the mute key is causing the issue.
When the mute key/button is pressed/enabled, it mutes all audio output from your computer, including the volume control. This can make it seem like the volume keys are not working when in fact, they’re simply being overridden by the mute function.
So try to unmute your computer to see if it fixes the problem. If you’ve accidentally pressed the mute key, simply press it again to unmute your computer. Or if there’s a mute button on the keyboard or computer, simply make sure that it is not turned on.
Once the audio output is restored, check if your volume keys are working properly.
Fix #6: Check your computer speakers
If you’re experiencing issues with your keyboard volume keys not working, it’s possible that your computer speakers are faulty or not connected properly. This can cause the sound to be muted as you try to increase the volume, making it seem like the volume keys are not working.
- Check the speaker connection: check if your computer speakers are properly connected to your computer. Make sure that the audio cable is securely plugged into the audio jack on your computer. If you’re using a wireless speaker system, make sure that it’s properly paired with your computer.
- Test the speakers : If your speakers are properly connected, test them by playing audio from another source, such as a smartphone or another computer. If the audio is still not working, it’s likely that the speakers are faulty and need to be replaced.
Faulty or improperly connected speakers can easily make users think their keyboard volume keys are not working. By following the steps outlined above, you can address the issue and get your speakers and volume keys working properly.
Fix #7: Check Your Computer’s Human Interface Device (HID)
Human Interface Device (HID) is a protocol that allows input devices such as keyboards, mice, and game controllers to communicate with your computer. When the HID is not enabled, it can cause issues with input devices, including the keyboard, hence malfunctioning volume keys.
- Check the HID settings: check if the HID is enabled on your computer. You can do this by going to the Services . Just do a simple search for Services and open it up. Look for the “ Human Interface Devices ” section and click on it to see if it is enabled. If it’s not enabled, use the next step to enable it.

- Enable/Restart the HID : Right-click on the HID and click Restart . If the restart is greyed out, select properties. Then go to Startup type: select Automatic, then click Start. Then Restart the computer.

When the HID is not enabled, it can cause issues with input devices, including malfunctioning volume keys on a keyboard. By following the steps outlined above, you can address the issue and get your volume keys working properly.
Fix #8: Work on the Keyboard Drivers and Settings
The Volume keys failure may also be due to driver issues. So, you need to take some time to review or inspect the keyboard drivers and settings.
At times, a typical occurrence is that the driver that helps manage your keyboard may be having issues due to reasons that include:
- The installation of third-party software.
- Switching off your computer without using the recommended shutdown command.
You can start by updating or reinstalling the keyboard driver using these straightforward steps:
- On the Search Bar next to the Windows Icon on the left-hand side of your screen, type “ Device Manager .”
- Click “Device Manager” when it appears among the Options on the Search Results .
- Find Keyboards on the list, then click on the arrow icon, which presents a list of keyboards.
- Select the specific keyboard with an issue and Right Click .
- Tap Uninstall Device .
- Reboot the Computer.
- Windows will then automatically identify the uninstalled keyboard and will, in turn, reinstall the latest driver for that specific keyboard.
Fix #9: Try an Older Version of the Keyboard Driver.
If, after updating or reinstalling the keyboard driver, you are still not able to get the Volume keys working again, the next fix to try is to install an older version of the keyboard driver.
- Press the Windows Key and R at the same time to open the Run box.
- Type “ devmgmt.msc ” and hit Enter.
- Find “ Keyboards ” and click to expand it.
- Right-click on the driver and choose “ Update driver .”
- Choose “ Browse my computer for drivers. “
- Select “ Let me pick from a list of available drivers on my computer .”
- Choose an older driver from the list and click “ Next .”
- Wait for the process to finish, then restart your computer and check if the issue is fixed.
Fix #10: Disable Sticky Keys on Windows
Sticky Keys is a Windows feature that enables users to perform keyboard shortcuts by pressing one key at a time rather than holding down multiple keys simultaneously.
Although this feature can be helpful for individuals who have trouble holding down multiple keys at once, it can cause issues with the Volume keys and other keys on the keyboard.
If you have enabled Sticky Keys on your Windows computer and are experiencing problems with the Volume keys not functioning correctly, this could be due to Sticky Keys intercepting the key press and altering its behavior.
As a modifier key, the Volume keys are sometimes used in combination with other keys to perform various functions such as copying and pasting text. If Sticky Keys is activated, it may interfere with the Volume keys’ functionality and prevent it from working correctly.
To resolve this issue, you can disable Sticky Keys on your computer. Follow these steps to do so:
- On the Search Bar next to the Windows Icon on the left-hand side of your screen, type “Control Panel.”
- Click “Control Panel” when it appears among the Options on the Search Results .
- Select the Ease of Access section.
- Under the Ease of Access Center , tap on “ Change How Your Keyboard Works .”
- Turn off Use Sticky Keys by clicking the Toggle Bar .
Fix #11: Disable Filter Keys on Windows
Filter Keys is an accessibility feature in Windows that helps people who may have difficulty holding down multiple keys at once by making the keyboard more user-friendly.
When the Filter Keys feature is enabled, Windows will ignore brief or repeated keystrokes and will not respond to keystrokes that are held down for too long. This feature can help prevent accidental keystrokes and make it easier for people with motor impairments or disabilities to type on a computer.
So, if you are trying to use the Volume keys with some other key(s) with no success, it means that having the filter keys enabled is one possible reason your Volume keys may have some issues. Follow the steps below to turn off filter keys on your windows:
- Under the Ease of Access Center , tap “ Change How Your Keyboard Works .”
Turn off Use Filter Keys by swiping the Toggle Bar .
Fix #12: Clean Your Keyboard to Remove Accumulated Dust and Debris
When was the last time you cleaned your keyboard? Most times, when Computers experience issues like the Volume keys not working, the first thought is that it may be a hardware problem or something complex.
But it is essential to note that simple things, such as the accumulation of dust or debris over time, can lead to the failure of some parts of a keyboard.
It is typical for dirt to accumulate over time which may easily be due to some of your habits. If you often eat while using your computer, crumbs may fall and find their way into the keyboard, which may cause keyboard issues.
Too much dust or debris may hinder the proper functioning of your keys as they may get clogged over time. Here are some of the ways you can clean your keyboard:
- Using a small brush
- Use a microfiber cloth to wipe the keys and remove any debris gently.
- Spraying a can of compressed air in between the key spaces
- Apply some rubbing alcohol on a soft cloth to remove any dried liquid or dirt stuck on or within the keys on your Computer.
It is recommendable to have a proper Computer maintenance routine to ensure your gadget is in good condition. A Computer in good condition will serve its purpose for an extended period. You can schedule the computer maintenance routine and scatter the dates throughout the year. It could be once in four or six months.
Aside from that, you can also avoid eating while using your computer to avoid the accumulation of dirt under the keys of your computer keyboard .
The Recommendable Way to Clean a Keyboard Without Damaging It
You can follow these steps and guidelines as you clean your Computer to avoid damaging your gadget:
- Ensure you first switch off your Computer and disconnect it from any power source for your safety and that of the computer.
- Flip your Computer so that the keyboard is upside down to make it easy for any debris to fall off. You can also use cleaning slime or the sticky side of the tape to eliminate any additional debris.
- Use a compressed air blower to blow out any dust.
- Apply some rubbing alcohol on a soft cloth and wipe through the entire keyboard. Use a reasonable amount of rubbing alcohol to avoid soaking the keyboard.
- Use a dry cloth once done to give your keyboard a polished look.
- Give the keyboard time to dry before using it again.
If cleaning the keyboard doesn’t solve the problem, explore the next options.
Fix #13: Check for Malware or Virus
Malware and Viruses disrupt the usual functioning of your computer. Your keyboard may be affected as a result. No specific virus may be pointed out as one to cause keyboard failure since a keyboard has no ROM.
If the Volume keys, or some keys or all the keys on the computer keyboard are not working, the root problem could be malware or a virus.
Scanning and eliminating malware or a virus from your Windows PC is possible. You only need to follow these steps:
- On the Search Bar next to the Windows Icon on the bottom left-hand side of your screen, type Windows Security .
- Select Windows Security when it appears among the options presented.
- Click on the Virus and Threat Option.
- Click Windows Defender Offline scan.
- Tap Scan Now to kickstart the process.
The scan may take a few minutes to do a thorough run, so ensure you exercise patience as you await the completion.
After the whole process is done, your Windows PC will restart. The scan will work as needed by detecting and removing any malware or virus.
Thus, if the problem of the Volume keys not working was due to a virus, it should start working again.
Fix #14: Use an External Keyboard
Sometimes fixing something involves having alternative options. Getting an external keyboard should be among the options to consider when the Volume keys on your computer stops working.
An external keyboard will enable you to go about your normal operations or processes as you look for ways to fix the in-built Computer keyboard. It will save you time and agony. Aside from that, it also presents numerous benefits.
Benefits of an External Keyboard
Here are some benefits of an external keyboard:
- Easily Replaceable – An external keyboard is easily replaceable, so you need not worry about your computer keyboard malfunction disrupting your everyday operations. For example, you can immediately replace an external keyboard by ordering online from a well-known platform like Amazon .
- Preserves your inbuilt Laptop keyboard – If you own a Laptop, by using the external keyboard for a while, you are protecting the inbuilt Laptop keyboard from wear and tear. You get to preserve your inbuilt keyboard as you perform all typing tasks on the external keyboard.
- Prevents Wrist Injuries – If you spend a huge chunk of your day typing, there is a risk of developing wrist tendonitis . It is a condition that develops when the tendons in your wrist are in constant motion. The design of an external ergonomic keyboard is intended to provide users with a pleasant typing experience. Your arms, hands, and wrists will not strain as you type.
Fix #15: Fix Volume keys problems with Troubleshooter
Another potential solution to this issue is to run the Hardware and Devices Troubleshooter on your Windows computer. This tool can help to diagnose and fix hardware problems, including issues with the keyboard.
The Hardware and Devices Troubleshooter is a built-in tool that can help diagnose and fix hardware problems on any computer.
If you’re experiencing problems with your keyboard, such as a non-functional Volume keys, running the Hardware and Devices Troubleshooter can be a helpful solution.
Here are the steps to follow:
- Step 1: Open the Settings Menu
Click on the Start menu, and then click on the gear icon to access the Settings menu.
- Step 2: Navigate to the Troubleshoot Settings
In the Settings menu, click on the “Update & Security” option. Then, select “Troubleshoot” from the menu on the left.
- Step 3: Run the Hardware and Devices Troubleshooter (Windows 10)
Under the “Find and fix other problems” section, click on “Hardware and Devices” and then click on “Run the troubleshooter.” Follow the on-screen instructions to diagnose and potentially fix any issues with your keyboard.
In the Settings app, click on the “System” option. Then, select “Troubleshoot” from the menu on the left-hand side. Under the “Other troubleshooters” section, click on the “Run” button next to the Keyboard hardware to start the troubleshooter.
- Step 4: Restart Your Computer
Once the Troubleshooter has completed its diagnostics, restart your computer to apply any necessary changes.
Once the Hardware Troubleshooter has completed its diagnostics, restart your computer to apply any necessary changes.
If the Hardware Troubleshooter does not resolve the issue with your Volume keys, you may need to check our other potential solutions discussed in this post.
Fix #16: Consult a Computer Technician
Consulting a computer should be your last resort when nothing else from the options mentioned works.
The option is recommendable because a professional will inspect and conduct any necessary tests to find reason why your keyboard Volume keys are not working. In the process, a computer technician may find other issues, so by the time they are done, your computer keyboard will be in a good state, and the Volume keys will be up and working again.
A good Computer technician will also advise you on whether to do a repair or a replacement. Their knowledge and expertise make it easy for them to know what would work best for your computer.
When looking for a reliable Computer technician, you should consider the costs involved. Also, seek recommendations from family and friends before settling on a computer technician. You can also look for one online but make sure you do your due diligence.
Benefits of Consulting a Professional Computer Technician
A professional Computer technician will give you relevant advice that may help you maintain your computer for an extended period. You will also get some insights on the most probable cause of the failed keyboard. It would help you avoid some things that lead to failure.
A professional Computer technician will help save you time, mainly if you depend on your computer for essential work. A professional will most likely work with your timelines or give you a period within which they can get the work done.
Some professional Computer technicians offer a warranty period. A warranty period means that if your keyboard malfunctions within that period, the technicians will repair it cost-free. A warranty period will make you less worried because it is a reliable backup plan.
Wrapping Up on Volume keys Not Working
It must be frustrating to open your computer to do some work and discover that the Volume keys are not working. The article guides you on some possible reasons for keyboard failure. You also get a list of ways to fix the issue.
Some of the common problems you may encounter include some or all of the keys of your keyboard not working. It is a normal occurrence, meaning you do not need to panic or think you are out of luck. You only need to realize that it could be a software or hardware issue.
Some significant causes of keyboard failure include physical damage, accumulation of dirt and debris, an outdated driver, or improper settings.
Most issues around Computer keys are fixable, as numerous ways exist to resolve the issue. You can first take up the challenge and start troubleshooting or carry out the above series of activities to help solve the problems.
Leave a Reply Cancel reply
Your email address will not be published. Required fields are marked *
Save my name, email, and website in this browser for the next time I comment.
How to manage sound settings on Windows 11
Best tips to customize the settings for output devices on Windows 11.

- Change default audio output
- Enable spatial sound
- Enable enhanced audio
- Disable audio output
- Check audio driver
- Enable mono audio
- Pair audio output device
- Control system volume
- Rename audio output device
- Test input and output devices
- Manage sound balance
- Fix sound problems
Even though audio devices are virtually plug-and-play on Windows 11 , sometimes, you may still need to manage the settings to ensure that sounds play correctly or as intended, depending on the content.
For example, if you have multiple output devices (such as stereo speakers and gaming headsets ), you can connect both to the system and configure the system to make one of them the default. Spatial sound offers a more immersive audio experience that makes it feel like the sound is playing around you and not directly from the speakers. You can enable mono audio to convert stereo sound into a single channel. You can configure special sound features to improve the audio quality. In addition, you can customize various other settings and fix the most common problems quickly.
This how-to guide will walk you through the steps to manage the sound settings on Windows 11.
How to change default audio output on Windows 11
On Windows 11, you can choose a different set of speakers, headphones, or headsets for the entire system or per application.
Choose default output for system
To change where the computer should play sound on Windows 11, use these steps:
- Open Settings .
- Click on System .
- Click the Sound page on the right side.

- Under the "Output" section, click the "Choose where to play sound" setting.
- Select the speakers, headphones, or headsets you want to use.

Alternatively, you can also change the default output device by opening the "Quick Settings" flyout ( Windows key + A keyboard shortcut), clicking the "Manage audio devices" button next to the volume slider, and selecting the device.
Get the Windows Central Newsletter
All the latest news, reviews, and guides for Windows and Xbox diehards.
Choose default output per application
To set the default output device for a specific application, use these steps:
- Under the "Advanced" section, click the Volume mixer setting.

- Under the "Apps" section, select the app.
- Use the Output device setting to select a different output device.

Once you complete the steps, Windows 11 will output sounds in the device you selected.
How to enable spatial sound on Windows 11
To enable or disable spatial sound, use these steps:
- Under the "Output" section, click the Speakers setting.

- Select the "Windows Sonic for Headphones" option in the "Spatial audio" setting.

- (Optional) Select the Off option for the "Type" setting.
After you complete the steps, you will hear a more immersive sound experience from your computer.
How to enable enhanced audio on Windows 11
Windows 11 provides additional features to improve the sound quality with more bass, virtual surround, room correction, and loudness equalizer.
Enable enhanced audio features
To enable and configure enhanced audio on Windows 11, use these steps:
- Under the "Output settings" section, select the audio profile to use in the "Audio enhancements" setting.

- Click the Back button to open the "Sound" page again.
- Click the "More sound settings" option.

- Select the device from list in the "Playback" tab and click the Properties button.

- Click the Enhancements tab.
- Clear the "Disable all enhancements" option (if applicable).
- Check the sound enhancement feature for Windows 11:
- Bass Boost — Boosts the lowest frequencies that the device can output.
- Virtual Surround — Encodes audio for transfer as stereo output to receivers with a Matrix decoder.
- Room Correction — Compensates for room and speaker characteristics. When selecting this option, you'll need to complete the correction wizard.
- Loudness Equalization — Uses an understanding of human hearing to reduce perceived volume differences.

- Quick note: If you select "Bass Boost" when clicking the Settings button, you can adjust the frequency and boost levels. If you choose "Loudness Equalization," you can change the release time by clicking the Settings button.
- Click the Apply button.
- Click the OK button.
Once you complete the steps, the audio enhancements will improve the audio quality.
These features don't apply to everyone. If they are causing problems, it is best to turn them off with the steps below.
Disable enhanced audio features
To disable enhanced audio settings on Windows 11, use these steps:
- Click the Apply button.
- Click the OK button.
- Under the "Output settings" section, turn off the Audio enhancements toggle switch.

After you complete the steps, all the audio enhancements will turn off immediately.
How to disable audio output on Windows 11
You can enable or disable the system's and apps' access to an output device at any time without disabling the driver.
Disable output device
To disable an output device on Windows 11, use these steps:
- Under the "General" section, click the Don't allow button for the "Audio" setting.

- Click the Don't allow button again.
Once you complete the steps, Windows 11 will no longer play sounds on that specific set of speakers, headsets, or headphones.
Enable output device
To enable an output device on Windows 11, use these steps:
- Under the "General" section, click the Allow button for the "Audio" setting.

After you complete the steps, the output device will again be available on the computer.
How to check audio driver version on Windows 11
To check the audio driver version, use these steps:
- Confirm the output device driver in the top-right corner.

In addition to the version number, the page also shows the driver's date and provider information.
How to enable mono audio on Windows 11
To enable or disable mono audio on Windows 11, use these steps:
- Turn on the Mono audio toggle switch to enable the feature.

- (Optional) Turn off the Mono audio toggle switch to disable the feature.
Once you complete the steps, the stereo sound will be converted into a single channel, letting you hear everything on Windows 11.
How to pair audio output device on Windows 11
To pair a new set of speakers, headphones, or headsets to Windows 11, make the peripheral discoverable, and use these steps:
- Under the "Output" section, click the Add device button for the "Pair a new output device" setting.

- Click the Bluetooth option.

- Select the wireless speakers.

- Continue with the on-screen directions (if applicable).
After you complete the steps, the wireless output device will connect to Windows 11.
How to control system volume on Windows 11
To control the system sounds and apps on Windows 11, use these steps:
- Under the "Output" section, use the volume slider to control the system volume.

- Under the "Apps" section, use the System sounds slider to control the volume for the system sounds.

- Use the slider to increase or decrease the volume for a specific app.
- Quick tip: If you have multiple sets of output or input devices, you can click the app to select which speakers or microphone the app should use.
You can also increase or lower the volume by using the dedicated audio buttons or shortcuts in the keyboard, opening the Quick Settings flyout ( Windows key + A keyboard shortcut), and using the volume slider. Or you can click the speaker icon to mute the system.
How to rename audio output device on Windows 11
To rename an output device on Windows 11, use these steps:

- Click the Rename button in the top-left corner.

- Confirm the new name for the speakers.
- Click the Rename button.
Once you complete the steps, the new name will appear on the device (top-left side of the page).
How to test speakers or headphones on Windows 11
To test speakers, headphones, or headsets on Windows 11, use these steps:
- Under the "Output" section, click the Test button in the "Format" setting.

After you complete the steps, you'll know whether the output device is working or whether troubleshooting is needed.
How to manage sound balance on Windows 11
To adjust the left and right sound balance on Windows 11, use these steps:
- Under the "Advanced" section, click the "More sound settings" option.
- Select the device from list in the "Playback" tab and click the Properties button.
- Click the Levels tab.
- Click the Balance button.
- Change the left and right volume settings (as needed).

Once you complete the steps, the audio should play more balanced in the output device.
How to fix sound problems on Windows 11
To fix the most common sound problems on a laptop or desktop, use these steps:
- Under the "Advanced" section, click the Output devices option for the "Troubleshoot common sound problems" setting.

- Click the Yes button in the "Get Help" app to launch the troubleshooter.

Alternatively, you can also run the sound troubleshooter directly from the Troubleshoot settings page .
More resources
For more helpful articles, coverage, and answers to common questions about Windows 10 and Windows 11, visit the following resources:
- Windows 11 on Windows Central — All you need to know
- Windows 10 on Windows Central — All you need to know

Cutting-edge operating system
A refreshed design in Windows 11 enables you to do what you want effortlessly and safely, with biometric logins for encrypted authentication and advanced antivirus defenses.

Mauro Huculak is technical writer for WindowsCentral.com. His primary focus is to write comprehensive how-tos to help users get the most out of Windows 10 and its many related technologies. He has an IT background with professional certifications from Microsoft, Cisco, and CompTIA, and he's a recognized member of the Microsoft MVP community.
- 2 The Xbox April 2024 update brings improvements to Discord chat for consoles, while the Xbox App on PC gets game hubs
- 3 Electronic Arts' Dead Space horror franchise is reportedly on ice, again
- 4 The 9 Destiny 2 Legend Onslaught builds I'm using to crush Into the Light's horde mode
- 5 Wanted: Dead update lowers combo requirements for troublesome Ramen-eating achievement and overhauls combat
How-To Geek
How to change your sound volume on windows 11.
Turn it up to 11.
Hannah Stryker / How-To Geek
Quick Links
Change system volume with quick settings, change system volume in windows settings, change app volume on windows 11, change system volume using hardware buttons, key takeaways.
- Tap or click the speaker icon on the taskbar to adjust your PC's volume from the desktop, or click the speaker button next to the slider to mute all sounds.
- Adjust PC volume in Windows Settings by navigating to System > Sound. Select the device and adjust the volume slider. Click the speaker icon to mute.
- Change the volume of specific apps by right-clicking the sound icon on the Taskbar and selecting "Sound Mixer". Move the slider to adjust the volume or click the speaker button to mute.
Is the sound coming from your Windows 11 PC's speakers or headphones too loud or too quiet? It's easy to adjust your volume output easily using several different techniques. Here's how.
The quickest way to adjust sound volume within Windows 11 is by using the Quick Settings menu . To do so, click the Quick Settings button in your taskbar (a hidden button located on top of the Wi-Fi, Speaker, and/or Battery icons) in the far-right corner.
When the Quick Settings menu appears, locate the volume slider (with a speaker icon beside it). Tap or click the circle on the slider and drag it right or left to increase or decrease the system volume anywhere from 0 to 100. As you move the slider, notice that the speaker icon changes from more to fewer wave lines (or vice-versa).
You can also quickly mute your Windows 11 sound output completely by clicking the speaker icon beside the volume slider. When muted, the speaker icon will have a small "X" beside it. To unmute, click the icon again.
Once you have the volume how you like it, close Quick Settings by clicking outside the menu. Any time you need to quickly adjust the volume again, just re-open the Quick Settings menu.
You can also change your PC's volume Windows Settings (by pressing Windows+i) and navigating to System > Sound. Alternately, right-click the speaker icon in your taskbar and select "Sound Settings."
In System > Sound, locate the "Output" section and select the device you want to change the sound level for by clicking the circle beside it. After that, adjust the "Volume" slider up or down to make the sound output louder or quieter.
(As with the Quick Settings menu, Windows allows you to click the speaker icon itself to mute the system volume completely.)
You can repeat these steps with any output device recognized by Settings. But you'll only hear sound output through the device that is selected in the "Output" list. When you're finished, close the Settings app.
You can also change the volume of a specific application. Right-click the sound icon on your Task Bar, then select "Sound Mixer."
Scroll down a bit until you see a section titled "Apps." You can adjust the volume of specific apps by moving the slider, or click the speaker button to mute an app completely.
Many Windows tablets (such as the Surface line) include physical hardware volume up and down buttons somewhere on the device — usually on one of the side edges. Sometimes it's just a single button that rocks back and forth for up or down volume adjustment. To adjust the sound volume using those, press the volume up or down buttons until you've reached the volume you'd like.
As you adjust, you'll see a small pop-up display in the upper-left corner of the screen that displays the current system volume.
Also, some keyboards include volume up, volume down, and mute keys or buttons — and some even sport volume knobs. The volume changes you make with these buttons, keys, or knobs will be reflected in Quick Settings and the Settings app just as if you had used the "Volume" sliders in Windows 11. Happy listening!
Solved! Bluetooth Speaker Volume Control Not Working
Under certain circumstances, the Bluetooth speaker or headphones volume control might not work forcing you to use the volume controls on the Bluetooth device itself. This article shows you how to fix the Bluetooth speaker volume control not working problem on Windows 10/11.
There are several reasons why the Windows volume control doesn’t work on Bluetooth speakers. Some of the reasons include but are not limited to problems with Bluetooth service, Windows absolute volume, conflicting default speaker options, etc.
Whatever the reason, follow the steps given below to fix the volume control not working for Bluetooth speakers on Windows 10/11.
Fix Bluetooth speaker volume control not working
When facing problems with volume control when using Bluetooth speakers or headphones, follow these suggestions to fix it:
- Set Bluetooth speaker as the default sound output device
- Restart the Bluetooth support service
- Enable Absolute Volume in Registry
- Re-pair the Bluetooth speaker/headphones
- Update Bluetooth driver
- Run Bluetooth troubleshooter
- Run the DISM RestoreHealth command
Let’s see each step in detail.
1. Set Bluetooth speaker as the default sound output device
Setting your Bluetooth speaker as the default sound output device allows you to control its volume with the Windows volume control slider. Here’s how to set your Bluetooth speakers as the default device.
Step 1: Right-click on the volume icon on the taskbar and choose the “ Sound Settings ” option.

Step 2: In the Sound settings page, scroll down and click/tap on the “ More sound settings ” option. This will open the win32 sound settings window. You can also open it using the “mmsys.cpl” Run (Win + R) command.

Step 3: Click on the “ Playback ” tab, find the Bluetooth device, right-click on it, and choose the “ Set as default ” option.

Step 4: The Bluetooth speaker/headphones are set as default as soon as you select the option. From now on, you can use the Windows volume control to change the Bluetooth speaker volume.

2. Restart the Bluetooth support service
After setting the Bluetooth speaker as the default sound output device, restart the Bluetooth support service. Here’s how.
Step 1: Open the run dialog box with the Windows key + R keyboard shortcut.
Step 2: Type “ services.msc ” in the Run box and click/tap on the “ Ok ” button.

Step 3: Right-click on the “ Bluetooth Support Service ” option and select the “ Restart ” option.

Step 4: After restarting the Bluetooth Support Service, you will be able to use the volume control to change the Bluetooth volume level.
3. Enable Absolute Volume in Registry
If you or some other program disabled the absolute volume feature, it might be the main cause of why you cannot use Windows volume control on your Bluetooth speaker. In that case, you must disable absolute volume. Here’s how.
Step 1: Press the Start key on your keyboard, start typing “ Registry Editor ” and click on the appropriate result to open the Registry Editor application.
Step 2: Paste the “ Computer\HKEY_LOCAL_MACHINE\SYSTEM\ControlSet001\Control\Bluetooth\Audio\AVRCP\CT ” path in the address bar of the Registry Editor and press Enter on your keyboard.
Step 3: Double-click on the “ DisableAbsoluteVolume ” value on the right pane. You can also right-click on the value and select “Modify.”

Step 4: Type “ 0 ” in the Value Data field and click on the “ Ok ” button.

Step 5: Close the Registry Editor and restart the system.
After restarting, the Bluetooth speaker volume control works as expected.
4. Re-pair the Bluetooth speaker/headphones
After setting Bluetooth speakers as the default device and enabling the absolute volume feature, re-pair your Bluetooth speakers/headphones.
Step 1: Launch the Settings app on your Windows 10/11 computer. Next, go to the “ Bluetooth & devices ” page.
Step 2: Click on the “ Devices ” option to open the devices settings page where you can manage all your hardware devices.
Step 3: Click the three dots icon (…) icon next to your Bluetooth device under the Audio section and select the “ Remove device ” option.
Step 4: Click the “ Remove ” or “ Yes ” button to remove the Bluetooth device from your computer.

Step 5: Put your Bluetooth speaker/headphones into pairing mode .
Step 6: Go to the Settings > Bluetooth & Devices page and click the “ Add device ” option.

Step 7: Select the “ Bluetooth ” option and select your Bluetooth speaker/headphones to pair them with Windows.

Step 8: After pairing, the volume control works as it should and you can change Bluetooth speaker volume using the volume slider.
5. Update the Bluetooth driver
You should update the Bluetooth driver to make sure you can use the volume control. Here’s how.
Step 1: Open the Power User menu with the Windows key + X keyboard shortcut.
Step 2: Select the “ Device Manager ” option in the power user menu.
Step 3: Expand the Bluetooth option and it will show all the connected Bluetooth devices.
Step 4: Next, right-click on your Bluetooth speaker/headphones and select the “ Update driver ” option.

Step 5: Click on the “ Search automatically for drivers ” option.

Selecting the option forces Windows searches and update the Bluetooth speaker drivers.
6. Run Bluetooth troubleshooter
When facing Bluetooth device related problems, running the Bluetooth troubleshooter allows you to narrow down and fix the problem. Here’s how.
Step 1: Right-click on the Start icon on the taskbar and select the “ Settings ” option. This will open the Windows 10/11 Settings app.
Step 2: Go to the “ System > Troubleshoot ” page in the Settings app.
Step 3: Go to the “ Other troubleshooters ” page and click on the “ Run ” button next to “ Bluetooth .”

Follow the Bluetooth troubleshooting wizard, answer any question, and Windows will troubleshoot and fix the volume control problem.

7. Run the DISM RestoreHealth command
Running the DISM /RestoreHealth command is quite helpful to fix most Windows problems. Here’s how.
Step 1: Open the Windows Terminal as admin from the Windows key + X (Power user) menu. You must select the “Terminal (Admin)” option.

Step 2: Run the “ DISM /Online /Cleanup-Image /RestoreHealth ” command. It scans and fixes any problems with the system image.

Note: The command might appear stuck or take a bit longer to complete. It is quite normal. Give it some time and the command will be executed successfully.
Step 3: After successfully running the command, close the terminal window and restart the computer .
That is all.
It is that simple to fix the Bluetooth volume control issue on Windows 10/11.
I hope this simple and easy Windows guide helped you.
If you are stuck or need help, send an email, and I will try to help as much as possible.
Leave a Comment Cancel Reply
Your email address will not be published. Required fields are marked *
Save my name, email, and website in this browser for the next time I comment.
Search results for
Affiliate links on Android Authority may earn us a commission. Learn more.
Samsung TV volume not working? Here's how you can try to fix it
Published on December 12, 2023
It’s hard to get any more basic than volume control when it comes to smart TV functions. Unless you’re deaf or hard-of-hearing, after all, you need to strike the right balance between clear audio and blowing out your eardrums. If volume control isn’t working on your Samsung TV, here’s what you can do to fix it.
How to fix volume not working on a Samsung TV

Some of these troubleshooting steps will seem obvious — in which case, they may be things you’ve already tried — but we’re including them here to be thorough, and there are some more advanced options in case the easy answers don’t work. So without further ado:
- Check if your remote’s volume buttons are stuck or broken. It could be that your volume buttons have fallen victim to wear and tear, a defect, or liquids seeping inside. The easiest way to test is by tapping on both volume buttons followed by some of the other buttons on your remote. If the latter are still triggering responses, it could be a volume button issue. You’ll need to do your own repairs or find a replacement (more on that topic further down).
- Check your remote’s batteries. Even if you inserted fresh ones recently, batteries can sometimes die prematurely or fall out of alignment with a remote’s contacts. Remember also that if you’re using rechargeables, the tradeoff is a shorter runtime than alkalines — you just don’t have to buy new ones every time they run dry. Try removing your existing batteries and reinserting them. If that doesn’t accomplish anything, try inserting a fresh set.
- Try a different remote, on-TV controls, or the SmartThings app. This isn’t a solution per se, but if you can still adjust volume using one of the options above, that gives you a fallback and rules out any problems with the TV itself. In fact you’ll need some sort of working control for the following steps.
- Run a sound test on your TV. If your volume isn’t stuck dangerously high, navigate to Settings > Support > Self Diagnosis , then select Sound Test . This will identify any issues Samsung’s software can detect.
- Reset your TV’s sound settings. Whether or not a test detects a problem, it can’t really hurt to reset sound settings. Go to Settings > Sound > Expert Settings and choose Reset Sound . Before you go about customizing options again, check to see if volume control is back for broadcast TV and/or your favorite apps. That way you’ll be able to gauge if it’s a particular setting that’s disrupting output.
- If you’re using external audio gear, doublecheck its connection(s) and onboard volume. It’s entirely possible that there’s a technical glitch, or that a speaker’s onboard volume level is such that remote-based adjustments don’t make a (noticeable) difference. With some speakers it’s possible to accidentally mute them. You may need to experiment with volume settings, your cables, and/or software to get audio going.
- Update your TV’s software. Navigate to Settings > Support > Software Update , then choose Update Now if new software is available. You may want to toggle Auto Update too if isn’t already on. We can’t guarantee new software will solve your audio problems, but you should be updating regularly anyway to fix miscellaneous bugs and/or gain new features.
- All about AI
- Google Bard
- Inflection AI Pi Chatbot
- Anthropic Claude
- Generative AI
- AI Image Generation
- AI Regulation
- AI Research
- Large Language Models (LLM)
- Surface Pro
- Surface Laptop
- Surface Book
- Surface Duo
- Surface Neo
- Surface Studio
- Surface Hub
- Surface Pen
- Surface Headphones
- Surface Earbuds
- About WinBuzzer
- Follow Us: PUSH, Feeds, Social
- Write for Us
- Cookie Policy and Privacy Policy
- Terms of Service
How to Enable or Disable Chrome Volume Control and Hardware Media Key Handling
We show you how to modify your browser's sound settings to adjust Chrome volume control and enable or disable hardware media key handling.

Table of Contents:
Though it wasn’t widely published, Google introduced the ability to enable or disable hardware media keys with Chrome 75. By toggling a Chrome flag, you can determine whether Chrome volume control is affected by your keyboard’s volume up, down, and mute keys. There are a few situations where this can be quite useful. For example, you may like to play music in the background while you work. When you adjust your sound settings in Chrome to disable media keys you can ensure your browser doesn’t hijack those attempted volume increases. Alternatively, you may want the above behavior but find that the volume control for Chrome isn’t working with your media keys. In such cases, you may need to enable the media controls manually. We’ll show you how to do both in today’s tutorial in just a few clicks.
How to Enable Chrome Volume Control and Hardware Media Key Handling
The Google Chrome enable media controls setting can be toggled entirely in the browser with no need to edit config files or install third-party extensions. Here’s how to turn it on so you can adjust your Chrome volume with your keyboard:
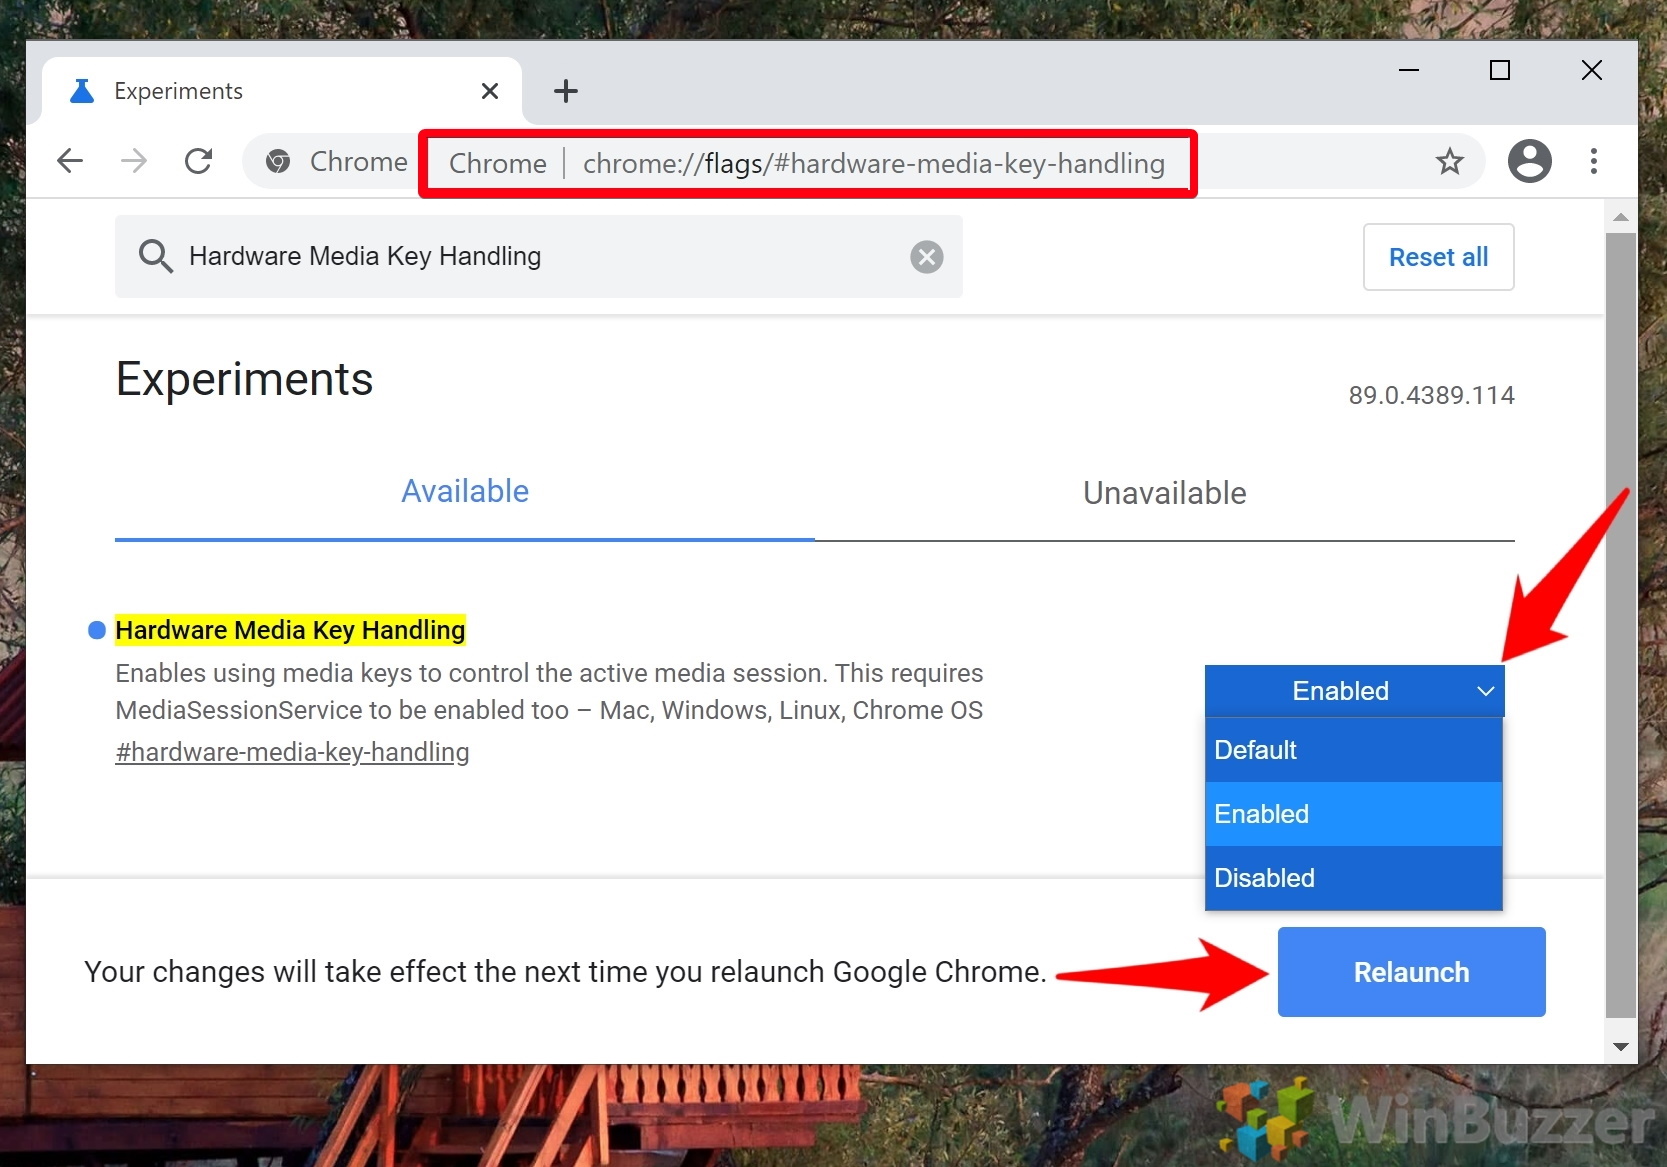
How to Disable Chrome Volume Control and Media Keys Handling
It’s even easier to disable media keys in Chrome. This time, we only need to change one flag, rather than two:
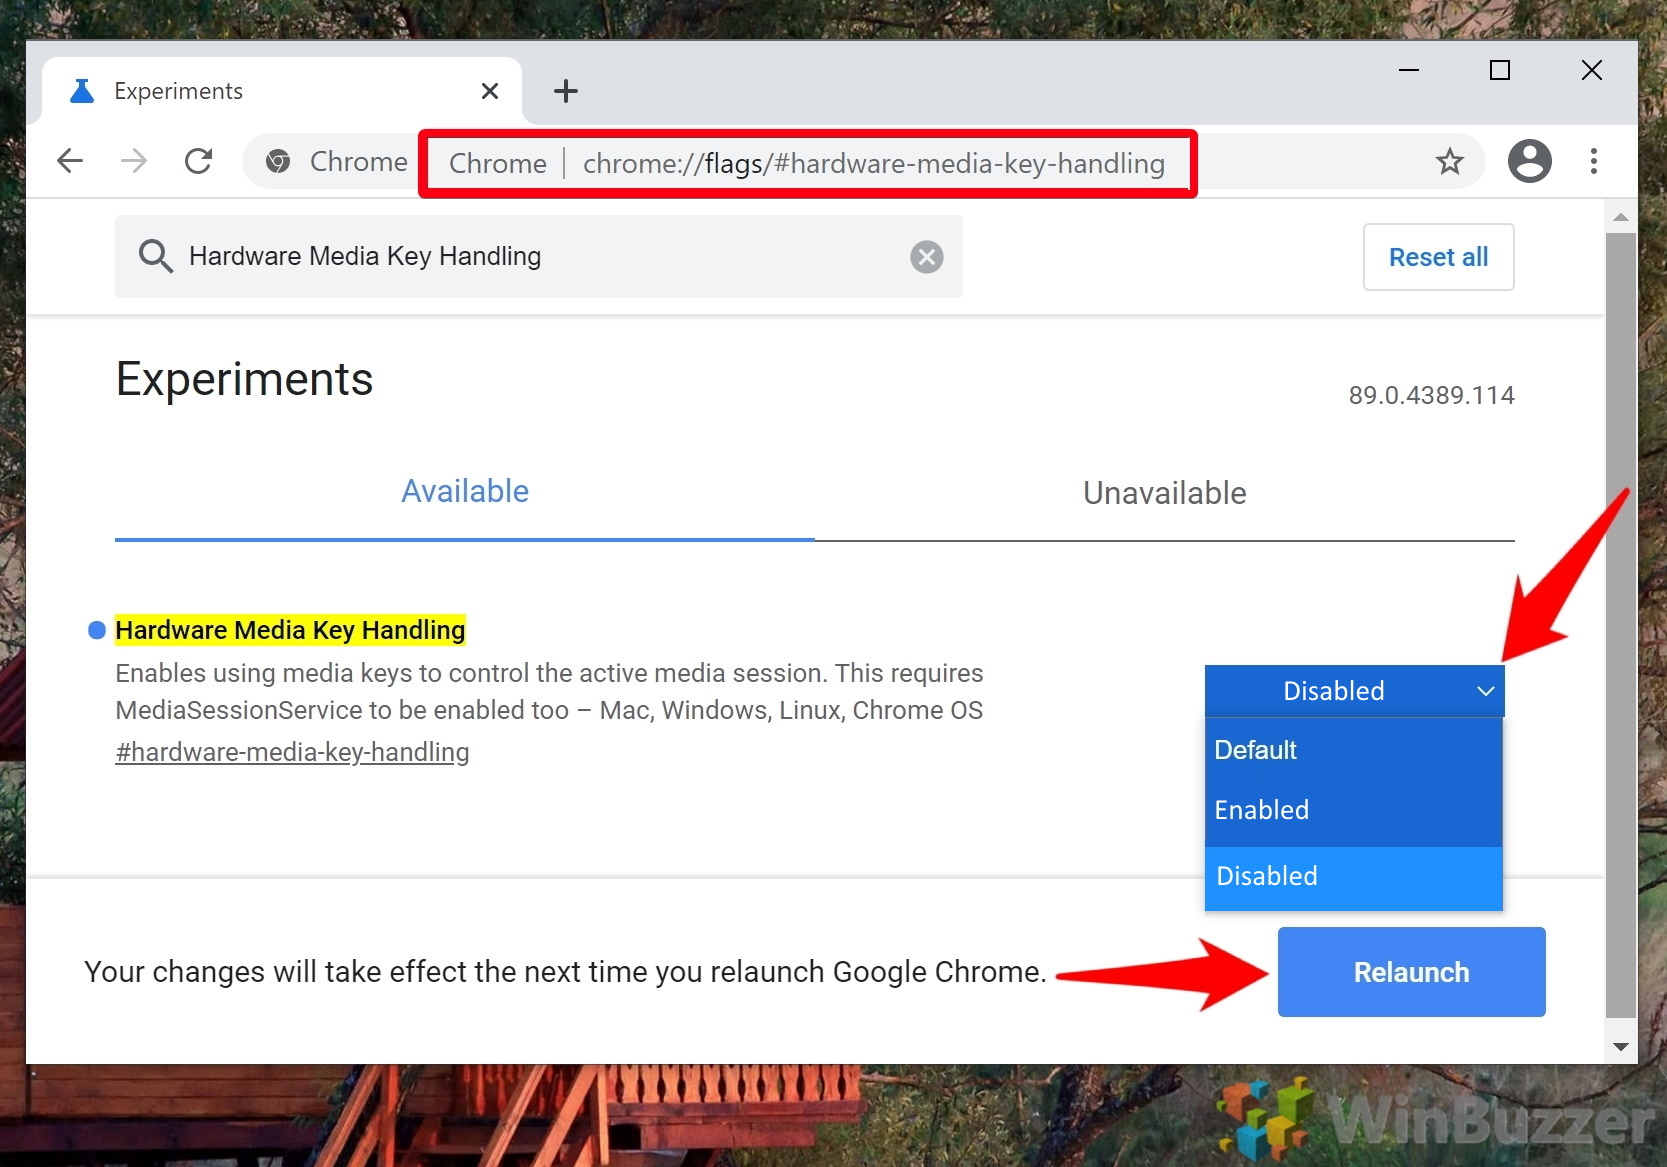
FAQ – Frequently Asked Questions About Chrome Volume Control and Media Keys Handling
Can i control chrome’s volume independently from my system volume.
Directly within Chrome, there isn’t a built-in feature to manage its volume separately from the system volume. However, you can utilize third-party extensions, such as Volume Master , available in the Chrome Web Store. These extensions add a volume slider to individual tabs or the browser itself, allowing you to adjust the volume levels independent of the system settings.
What happens if the media keys do not work after enabling hardware media key handling?
If your media keys don’t respond after enabling hardware media key handling, several factors could be at play. First, check if your keyboard drivers are updated as outdated drivers can cause compatibility issues. Additionally, other applications running in the background might take precedence over Chrome for media key inputs. In this case, closing such applications or adjusting their settings might help. Also, ensure that no Chrome extensions are interfering with the media key functionality by disabling them temporarily to test.
Do these settings affect Chrome on all operating systems?
The settings for volume control and hardware media key handling in Chrome work across various operating systems, including Windows, macOS, and Linux. However, the degree of integration and performance can slightly vary depending on the specific OS, the version in use, and its settings related to hardware media keys.
Will disabling hardware media key handling impact other browsers?
Disabling hardware media key handling in Chrome will not affect the functionality of media keys in other browsers or applications. This setting is specific to Chrome; therefore, media keys will operate according to each application’s settings or the operating system’s default behavior when Chrome is not the active window.
Can I still control playback in Chrome if I disable hardware media key handling?
Yes, even with hardware media key handling disabled in Chrome, you can still control media playback within the browser. You can do this through the media player controls on websites, such as play, pause, and volume sliders found on platforms like YouTube, Spotify’s web player, and others. However, this would require manual interaction with the webpage rather than using keyboard shortcuts.
How do I troubleshoot if Chrome does not remember my settings after relaunch?
If Chrome fails to retain your settings after a relaunch, first, ensure you’re running the latest version of Chrome as updates can fix such issues. If the problem persists, check for any extensions that might alter or reset settings and disable them to test functionality. Clearing Chrome’s cache and cookies or resetting Chrome to its default settings (found under Settings > Advanced) can also help, but note that this will remove your browser data and customizations.
Can these settings affect Chrome’s performance?
Generally, enabling or disabling volume control and hardware media key handling features should not significantly impact Chrome’s overall performance. However, in rare cases, enabling experimental features (flags) might lead to increased memory usage or slight instability. In case you experience performance issues, consider disabling these features or resetting Chrome flags to their default states.
What other Chrome flags might be useful for enhancing media playback?
Aside from the flags mentioned in the tutorial, #autoplay-policy allows you to customize how Chrome handles autoplay videos, which can enhance your browsing experience by preventing unwanted media from playing. The #enable-picture-in-picture flag enables a movable video window to float over tabs and applications, offering a seamless multitasking experience. Another useful flag is #enable-tab-audio-muting , which lets you mute individual tabs directly from the tab bar, providing more control over audio playback.
How do I reset all Chrome flags to their default settings?
To reset all Chrome flags to their default settings, type chrome://flags into your address bar, and on the flags page, you’ll find a button labeled “ Reset all ” at the top. Clicking this will revert all experimental features to their default state. Remember to relaunch the browser to apply these changes, which can help troubleshoot issues or performance problems related to modified flags.
Can I use media keys with Chrome when using an external keyboard?
Yes, enabling hardware media key handling in Chrome allows the use of media keys on both built-in and external keyboards. This integration aims to offer a seamless experience where media playback can be controlled regardless of the type of keyboard you’re using, provided the external keyboard supports media keys function.
Is there a way to enable volume control for specific tabs only?
Chrome itself does not offer a native option to adjust the volume on a per-tab basis. However, third-party extensions like Volume Controller or Volume Master can provide this functionality, allowing you to set different volume levels for individual tabs, which can be particularly useful if you’re listening to music on one tab while watching a video on another.
After enabling these settings, can I control media playback in Chrome using smart devices?
The discussed settings mainly facilitate controlling Chrome’s media playback through hardware media keys on keyboards. Controlling playback via smart devices, such as phones or voice-controlled assistants, typically requires additional setups, such as connecting through specific apps or using browser extensions that support such interactions.
How do I enable or disable autoplay for videos in Chrome?
To manage autoplay settings in Chrome, navigate to Chrome’s settings menu and look for “ Privacy and security “. From there, go to “ Site Settings ” and scroll down to the “ Content ” section, where you’ll find “ Sound ” or “ Additional content settings “. Here, you can customize how Chrome handles autoplay videos, either by enabling them to play automatically or by restricting autoplay to only occur when the video is muted or meets certain conditions.
Does enabling hardware media key handling allow me to use play/pause keys for YouTube videos in Chrome?
Enabling hardware media key handling in Chrome allows you to use your keyboard’s play/pause and other media controls for YouTube videos and multimedia content on other websites within Chrome. This setting creates a direct interaction between your keyboard and the browser, enabling easier control over playback without needing to interact directly with the webpage.
Can enabling the Media Session Service flag affect how media notifications are displayed?
Activating the Media Session Service in Chrome can enhance the way media notifications are shown, incorporating richer media information such as album artwork, titles, and playback controls within the notification area. This feature enhances the integration between Chrome and your operating system, offering a more cohesive and informative media playback experience across various platforms.
Related: How to Stop Google Chrome from Blocking Downloads
Related: how to enable or disable hardware acceleration in chrome.

Related: How to Enable or Disable the Chrome Pop-up Blocker
Related: how to enable and use chrome reading list.
- Chrome sound settings
- Chrome volume control
- Google Chrome
- Web Browsers
Recent News

Microsoft to Power Cloud Software Group’s Future with $1.65 Billion Investment
Microsoft Announces Final Windows 10 Version and Future Windows 11 LTSC...
Subscribe to WinBuzzer on Google News

- Patch Notes
- Hardware and Tech
- PC Invasion Staff
Content Warning: How to fix the audio voice chat bug
Many players who are jumping into Content Warning for the first time are experiencing a strange audio glitch that messes with proximity voice chat. If you’re also suffering from this annoying voice chat bug, we have some possible solutions on how to fix the audio glitch in Content Warning.
How to fix voice chat not working in Content Warning
If your friends can hear you in voice chat but you can’t hear them, you’re not alone. Many Content Warning players on Reddit have been complaining about this issue since there doesn’t seem to be an immediate fix. Here are some common solutions that may help you figure out how to fix this audio voice chat bug in Content Warning.
Focusrite Control
According to this FAQ from one of the developers, a majority of the players having these audio issues also use Focusrite Control . This is an audio program that lets you meticulously control your audio settings.
They linked this article on combining Input 1 and Input 2 , which should help anyone having this issue who also uses this program. Here’s how it’s done:
- Open “ Preferences ” in Focusrite Control 2.
- Select the tick box beside “ Combine Input 1 and Input 2 ” to enable it.

Check system requirements
If you’re sure that you don’t have Focusrite Control and you still experience audio issues, perhaps the problem lies with your PC itself. Make sure to check the minimum and recommended system requirements on Steam for Content Warning.
If your specs are lower than the required or recommended specs, your PC may not be up to par with Content Warning’s requirements. Just make sure that you have good enough specs to properly run this game or else bugs and glitches are bound to happen.
Update audio drivers
Although keeping your graphics driver constantly updated is extremely important, you may also have an old audio driver . These aren’t as easy to keep track of as your graphics driver updates, but maybe see if you need some audio driver updates.
There are specific free programs you can download that identify outdated drivers. They can also update them for you, but that typically requires you to pay a subscription or purchase the software. I’d just get a free program like Driver Easy, see what update you need to download, and search it online to download it yourself.

Verify integrity of game files
Sometimes your game files may just be a little corrupted. If none of these other solutions helped your audio bug, try verifying your game file integrity . Here’s how you can do this through Steam:
- Find Content Warning in your Library and right-click it.
- Select “Properties” and go to the “Installed Files” tab.
- Select “Verify integrity of game files”.
Doing this shouldn’t affect any of your save files so don’t worry about this wiping your progress. It should just fix up any files that may be corrupt. And if none of this works, you can always attempt to uninstall and reinstall Content Warning. It’s not a huge game so it shouldn’t take too long to re-download.
One other reason your audio could be glitching out is due to broken mods being downloaded, such as the mod that allows you to play with more than four players .

IMAGES
VIDEO
COMMENTS
Select the volume control and adjust to the desired volume level. ... In the search box on the taskbar, type audio troubleshooter, select Find and fix problems with playing sound from the results, then select Next. Select the device you want to troubleshoot and then continue through the troubleshooter. ...
Type in and select "Settings". Click Settings in the sidebar. Click Sound in the list of System menu options. Click Choose where to play sound to open a drop down menu of audio output devices. Click your preferred audio output device (for example, "Speakers").
Hit the Windows key, type "Control Panel" in the taskbar's search field, and select the Control Panel desktop app in the results. Next, select "Hardware and Sound" on the main Control Panel menu, followed by "Sound" on the next panel. The Sound pop-up window appears on the screen.
1. Press Windows key+I to open the Settings window. Then, click on " System ". 2. Now, on the right side of the Settings window, under the "Scale and layout " option, click on " Change the size of text, apps and other items " and choose any of the size other than the present one.
Sound Settings in Control Panel. Right-click on your preferred speakers and click on Enable and Set as Default Device. Enable and Set as Default Device options. Right-click on the speakers again and go to Properties. Go to the Levels tab and make sure the volume is at 100. Levels tab in Speakers Properties.
Tip 3. Control other volume options in Windows 10. You can click Start -> Settings -> System -> Sound, and click App volume and device preferences. Then you can control the master volume or adjust the volume of particular app and system sounds. In this window, you can also select the default Output and Input audio device.
Click the Volume icon at the bottom-right corner of your computer to check the master volume bar; make sure it's not muted or set at an extremely low level. If it's muted, you'll see an X next to the speaker icon. After this, right-click on the same volume icon and choose Open Volume mixer to see the current volume level for all apps playing ...
Check the Volume Settings. Download Article. 1. Make sure the volume isn't muted. Locate the speaker icon to the left of the system clock, which is usually at the bottom-right corner of the screen. If you see an X beside it, your PC's volume is muted. If your keyboard has volume buttons, press the Mute button (the speaker with an X—usually F1 ...
Pro Tip: How to Enable Volume System Icon. If the volume slider icon is missing from the Taskbar, follow these steps to enable it: 1. Press Windows + I keys simultaneously to open Settings. 2. Click on Personalization settings, as shown. 3. Go to the Taskbar menu from the left pane. 4.
Open the Device Manager by typing it into the Windows search bar. Look for 'Sound, video, and game controllers' and click it. Identify your audio driver, and right-click it. Click Properties and ...
Right-click the Start menu, then choose Settings. Select System, then choose Sound from the right menu. Select Volume Mixer from the Advanced section. Finally, click Reset next to Reset sound devices and volumes for all apps to the recommended defaults. Tip: learn how to change the default audio device in Windows. 5.
Select the output device you want and click the Set Default button. In Windows 11, go to Settings > System > Sound > All sound devices and make sure the correct output device is selected. (Credit ...
To disconnect and reconnect a Bluetooth audio device on Windows 11, use these steps: Open Settings. Click on Bluetooth & devices. Click the Devices page on the right side. (Image credit: Future ...
Step 3: Run the Hardware and Devices Troubleshooter (Windows 10) Under the "Find and fix other problems" section, click on "Hardware and Devices" and then click on "Run the troubleshooter.". Follow the on-screen instructions to diagnose and potentially fix any issues with your keyboard.
To enable or disable spatial sound, use these steps: Open Settings. Click on System. Click the Sound page on the right side. (Image credit: Future) Under the "Output" section, click the Speakers ...
Change App Volume on Windows 11. You can also change the volume of a specific application. Right-click the sound icon on your Task Bar, then select "Sound Mixer." Scroll down a bit until you see a section titled "Apps." You can adjust the volume of specific apps by moving the slider, or click the speaker button to mute an app completely.
Step 2: Go to the " System > Troubleshoot " page in the Settings app. Step 3: Go to the " Other troubleshooters " page and click on the " Run " button next to " Bluetooth .". Follow the Bluetooth troubleshooting wizard, answer any question, and Windows will troubleshoot and fix the volume control problem. 7.
Check for any physical damage to the remote Volume button. Press the mute button on your TV remote to see if it is muted. Perform a system restart on your Roku device or Roku TV. Press the volume button on your Roku remote, aiming directly at your TV. Also, you can try switching different positions as long as it points to your TV directly.
If your volume isn't stuck dangerously high, navigate to Settings > Support > Self Diagnosis, then select Sound Test. This will identify any issues Samsung's software can detect. Reset your TV ...
This technique repairs poorly operating volume control's in under 1 minute with NO disassembly needed. It also works on amplified speakers. (computer, sound...
When you adjust your sound settings in Chrome to disable media keys you can ensure your browser doesn't hijack those attempted volume increases. Alternatively, you may want the above behavior ...
Find Content Warning in your Library and right-click it. Select "Properties" and go to the "Installed Files" tab. Select "Verify integrity of game files".