

Fix Wi-Fi connection issues in Windows
Troubleshooting network problems in windows.
If you can’t get email, browse the web, or stream music, chances are you’re not connected to your network and can’t get onto the internet. To fix the problem, here are some things you can try.
Things to try first
Try these things first to help you fix or narrow down the connection problem.
Run Get Help to troubleshoot and fix common connection problems. Right click the network icon in the right side of the taskbar and select Diagnose network problems or open Get Help for Network & Internet
Make sure Wi‑Fi is turned on. Select the No internet icon on the right side of the taskbar, and make sure Wi-Fi is turned on. If it isn't, select it to turn it on. Also, make sure Airplane mode is turned off.
Select Manage Wi-Fi connections ( > ) on the Wi-Fi quick setting, see if a Wi-Fi network you recognize and trust appears in the list of networks. If it does, select the Wi-Fi network, and they try to connect to it. If it says Connected underneath the network name, select Disconnect , wait a moment, and then select Connect again.
Try connecting to a network on a different frequency band. Many consumer Wi-Fi routers broadcast at two different network frequency bands: 2.4 GHz and 5 GHz. These will appear as separate networks in the list of available Wi-Fi networks. If your list of available Wi-Fi networks includes both a 2.4 GHz network and a 5 GHz network, try connecting to the other network. To learn more about the differences between 2.4 GHz networks and 5 GHz networks, check out Wi-Fi problems and your home layout .
Make sure the physical Wi‑Fi switch on your laptop is turned on. (An indicator light usually shows when it's on.)
Restart your modem and wireless router. This helps create a new connection to your internet service provider (ISP). When you do this, everyone that is connected to your Wi-Fi network will be temporarily disconnected. The steps you take to restart your modem and router can vary, but here are the general steps.
Note: If you have a cable modem/Wi-Fi router combo device, you only need to follow the steps for the single device.
Unplug the power cable for the router from the power source.
Unplug the power cable for the modem from the power source. Some modems have a backup battery. If you unplug the modem and lights stay on, remove the battery from the modem.
Wait at least 30 seconds or so. If you had to remove the battery from the modem, put it back in.
Plug the modem back into the power source. The lights on the modem will blink. Wait for them to stop blinking.
Plug your router back into the power source. Wait a few minutes for the modem and router to fully power on. You can usually tell when they’re ready by looking at the status lights on the two devices.
On your PC, try to connect again.
Narrow down the source of the problem
Connection problems can be due to a variety of reasons—problems with the website, your device, the Wi-Fi router, modem, or your Internet Service Provider (ISP). Try the following steps to help narrow down the source of the problem.
If the "Wi-Fi connected" icon appears on the right side of the taskbar, visit a different website. If the website opens, there might be a problem with the specific website. If you can't connect to another website, go to the next step.
On another laptop or phone, try to connect to the same network. If you can connect, the source of the problem is likely due to your device—go to the section Network troubleshooting on your device . If you can't connect to the network on any device, continue to the next step.
Check to see if there is a problem with the connection to your Wi-Fi router. Do this by using a ping test.
Select Search on the taskbar, and type command prompt . The Command Prompt button will appear. To the right of it, select Run as administrator > Yes .
At the command prompt, type ipconfig , and then select Enter . Look for the name of your Wi-Fi network within the results, and then find the IP address listed next to Default gateway for that Wi-Fi network. Write down that address if you need to. For example: 192.168.1.1
At the prompt, type ping <DefaultGateway> and then select Enter . For example, type ping 192.168.1.1 and select Enter . The results should be something like this:
Reply from 192.168.1.1: bytes=32 time=5ms TTL=64
Ping statistics for 192.168.1.1: Packets: Sent = 4, Received = 4, Lost = 0 (0% loss), Approximate round trip times in milli-seconds: Minimum = 4ms, Maximum = 5ms, Average = 4ms
If you see results like this and are getting a reply, then you have a connection to your Wi-Fi router, so there might be a problem with your modem or ISP. Contact your ISP or check online on another device (if you can) to see if there's a service outage.
If the results of the ping test indicate that you are not getting a reply from the router, try connecting your PC directly to your modem by using an Ethernet cable (if you can). If you can connect to the internet using an Ethernet cable, it confirms the connection problem is due to the Wi-Fi router. Make sure you've installed the latest firmware and see the documentation for your router.
Network troubleshooting on your device
Run network commands
Try running these network commands to manually reset the TCP/IP stack, release and renew the IP address, and flush and reset the DNS client resolver cache:
At the command prompt, run the following commands in the listed order, and then check to see if that fixes your connection problem:
Type netsh winsock reset and select Enter .
Type netsh int ip reset and select Enter .
Type ipconfig /release and select Enter .
Type ipconfig /renew and select Enter .
Type ipconfig /flushdns and select Enter .
Uninstall the network adapter driver and restart
If the previous steps didn’t work, try to uninstall the network adapter driver, and then restart your computer. Windows will automatically install the latest driver. Consider this approach if your network connection stopped working properly after a recent update.
Before uninstalling, make sure you have drivers available as a backup. Visit the PC manufacturer’s website and download the latest network adapter driver from there. If your PC can't connect to the internet, you'll need to download a driver on a different PC and save it to a USB flash drive so you can install the driver on your PC. You’ll need to know the PC manufacturer and model name or number.
Select Search on the taskbar, type device manager , and then select Device Manager from the list of results.
Expand Network adapters , and locate the network adapter for your device.
Select the network adapter, press and hold (or right-click), and then select Uninstall device > check the Attempt to remove the driver for this device check box > Uninstall .
After uninstalling the driver, select Start > Power > Restart .
After your PC restarts, Windows will automatically look for and install the network adapter driver. Check to see if that fixes your connection problem. If Windows doesn't automatically install a driver, try to install the backup driver you saved before uninstalling.
Check if your network adapter is compatible with the latest Windows Update
If you lost your network connection immediately after upgrading to or updating Windows 11, it's possible that the current driver for your network adapter was designed for a previous version of Windows. To check, try temporarily uninstalling the recent Windows Update:
Select Start > Settings > Windows Update > Update history > Uninstall updates .
Select the most recent update, then select Uninstall .
If uninstalling the most recent update restores your network connection, check to see if an updated driver is available:
Select the network adapter, press and hold (or right-click), then select Update driver > Search automatically for updated driver software , and then follow the instructions.
After installing the updated driver, select Start > Power > Restart if you're asked to restart, and see if that fixes the connection issue.
If Windows can’t find a new driver for your network adapter, visit the PC manufacturer’s website and download the latest network adapter driver from there. You’ll need to know the PC manufacturer and model name or number.
Do one of the following:
If you couldn’t download and install a newer network adapter driver, hide the update that’s causing you to lose your network connection. To learn how to hide updates, see Hide Windows Updates or driver updates .
If you could successfully install updated drivers for your network adapter, then reinstall the latest updates. To do this, select Start > Settings > Windows Update > Check for updates .
Use network reset
Using network reset should be the last step you try. Consider using it if the steps above don’t help to get you connected.
This can help solve connection problems you might have after upgrading from Windows 10 to Windows 11. It can also help to fix the problem where you can connect to the internet, but can't connect to shared network drives. Network reset removes any network adapters you have installed and the settings for them. After your PC restarts, any network adapters are reinstalled, and the settings for them are set to the defaults.
Select Start > Settings > Network & internet > Advanced network settings > Network reset . Open Network & Internet Status settings
On the Network reset screen, select Reset now > Yes to confirm.
Wait for your PC to restart, and see if that fixes the problem.
After using network reset, you might need to reinstall and set up other networking software you might be using, such as VPN client software or virtual switches from Hyper‑V (if you're using that or other network virtualization software).
Network reset might set each one of your known network connections to a public network profile. In a public network profile, your PC is not discoverable to other PCs and devices on the network, which can help make your PC more secure. However, if your PC is used for file or printer sharing, you’ll need to make your PC discoverable again by setting it to use a private network profile. To do this, select Start > Settings > Network & internet > Wi-Fi . On the Wi-Fi screen, select Manage known networks > the network connection you want to change. Under Network profile type , select Private .
Additional troubleshooting steps
Check your Wi-Fi settings
Wi-Fi adapter manufacturers might have different advanced settings you can change based on your network environment or connection preferences.
Check the Wireless Mode setting for your network adapter and make sure it matches the capabilities of the network you’re trying to connect to. If it doesn’t match, you won’t be able to connect, and the network might not appear in the list of available networks. The Wireless Mode will often be set to Auto or something similar by default, which enables connection for every kind of network that’s supported.
To find the wireless mode setting
In Device Manager, select Network adapters , and then double-click the network adapter name.
Select the Advanced tab and look for a Wireless Mode setting. Make sure it’s set to the mode your network is using.
Wi-Fi profile settings
Windows uses the Wi-Fi profile to save the settings that are needed to connect to a Wi-Fi network. These settings include the network security type, key, network name (SSID), and so on. If you can’t connect to a Wi-Fi network that you could connect to before, it’s possible that the network settings might have changed or the profile is corrupted.
To fix this, remove (or "forget") the network connection, then reconnect to the network. When you forget a network connection, it removes the Wi-Fi network profile from your PC.
To forget a network
Select Start > Settings > Network & internet .
Select Wi-Fi , then select Manage known networks .
Select the network you want to forget, then select Forget .
Afterwards, select the Wi-Fi icon on the taskbar and try to reconnect to the network to renew the network connection.
Check your home layout
Your Wi-Fi network might be affected by the network's frequency band, channel congestion, and/or signal strength. For more info, see Wi-Fi problems and your home layout .
Check for additional symptoms for the "No internet connection" icon.
There may be additional troubleshooting steps you can try, depending on which symptoms you're having. To view these steps, check out Wi-Fi connection icons and what they mean .
Related topics
Setting up a wireless network
How to find your wireless network password
Analyze the wireless network report
Wi-Fi tools and apps
Make a Wi-Fi network public or private in Windows

Afterwards, see if a Wi-Fi network you recognize and trust appears in the list of networks. If it does, select the Wi-Fi network, and they try to connect to it. If it says Connected underneath the network name, select Disconnect , wait a moment, and then select Connect again.
Try connecting to a network on a different frequency band. Many consumer Wi-Fi routers broadcast at two different network frequency bands: 2.4 GHz and 5 GHz. These will appear as separate networks in the list of available Wi-Fi networks. If your list of available Wi-Fi networks includes both a 2.4 GHz network and a 5 GHz network, try connecting to the other network. To learn more about the differences between 2.4 GHz networks and 5 GHz networks, check out Wi-Fi problems and your home layout .
Run the Network troubleshooter. The Network troubleshooter can help diagnose and fix common connection problems.
To run the Network troubleshooter
Select the Start button > Settings > Network & Internet > Status . Open Network & Internet Status settings
Under Change your network settings , select Network troubleshooter .
Follow the steps in the troubleshooter, and see if that fixes the problem.
Restart your modem and wireless router. This helps create a new connection to your internet service provider (ISP).
When you do this, everyone that is connected to your Wi-Fi network will be temporarily disconnected. The steps you take to restart your modem and router can vary, but here are the general steps. ( Note : If you have a cable modem/Wi-Fi router combo device, you only need to follow the steps for the single device.)
If the "Wi-Fi connected" icon appears on the right side of the taskbar, visit a different website. If the website opens, there might be a problem with the specific website. If you can't connect to another website, go to the next step.
On another laptop or phone, try to connect to the same network. If you can connect, the source of the problem is likely due to your device—go to the section Network troubleshooting on your device . If you can't connect to the network on any device, continue to the next step.
Check to see if there is a problem with the connection to your Wi-Fi router. Do this by using a ping test.
In the search box on the taskbar, type command prompt . The Command Prompt button will appear. To the right of it, select Run as administrator > Yes .
At the command prompt, type ipconfig , and then select Enter . Look for the name of your Wi-Fi network within the results, and then find the IP address listed next to Default gateway for that Wi-Fi network. Write down that address if you need to. For example: 192.168.1.1
At the prompt, type ping <DefaultGateway> and then select Enter . For example, type ping 192.168.1.1 and select Enter . The results should be something like this:
Type netsh winsock reset and select Enter .
Type netsh int ip reset and select Enter .
Type ipconfig /release and select Enter .
Type ipconfig /renew and select Enter .
Type ipconfig /flushdns and select Enter .
In the search box on the taskbar, type device manager , and then select Device Manager from the list of results.
Expand Network adapters , and locate the network adapter for your device.
Select the network adapter, press and hold (or right-click), and then select Uninstall device > check the Attempt to remove the driver software for this device check box > Uninstall .
After uninstalling the driver, select the Start button > Power > Restart .
If you lost your network connection immediately after upgrading or updating Windows 10, it's possible that the current driver for your network adapter was designed for a previous version of Windows. To check, try temporarily uninstalling the recent Windows Update:
Select the Start button, then select Settings > Update & Security > Windows Update > View update history > Uninstall updates .
Select the most recent update, then select Uninstall .
Select the network adapter, select Update driver > Search automatically for updated driver software , and then follow the instructions.
After installing the updated driver, select the Start button > Power > Restart if you're asked to restart, and see if that fixes the connection issue.
If you couldn’t download and install a newer network adapter driver, hide the update that’s causing you to lose your network connection. To learn how to hide updates, see Hide Windows Updates or driver updates .
If you could successfully install updated drivers for your network adapter, then reinstall the latest updates. To do this, select the Start button, then select Settings > Update & Security > Windows Update > Check for updates .
This can help solve connection problems you might have after upgrading from a previous version of Windows to Windows 10. It can also help to fix the problem where you can connect to the internet, but can't connect to shared network drives. Network reset removes any network adapters you have installed and the settings for them. After your PC restarts, any network adapters are reinstalled, and the settings for them are set to the defaults.
Note: To use network reset, your PC must be running Windows 10 Version 1607 or later. To see which version of Windows 10 your device is currently running, select the Start button, then select Settings > System > About .
Select the Start button, then select Settings > Network & Internet > Status > Network reset . Open Network & Internet Status settings
On the Network reset screen, select Reset now > Yes to confirm.
Network reset might set each one of your known network connections to a public network profile. In a public network profile, your PC is not discoverable to other PCs and devices on the network, which can help make your PC more secure. However, if your PC is used for file or printer sharing, you’ll need to make your PC discoverable again by setting it to use a private network profile. To do this, select the Start button, then select Settings > Network & Internet > Wi-Fi . On the Wi-Fi screen, select Manage known networks > the network connection you want to change > Properties . Under Network profile , select Private .
In Device Manager, select Network adapters , and then double-click the network adapter name.
Select the Advanced tab and look for a Wireless Mode setting. Make sure it’s set to the mode your network is using.
Select the Wi-Fi network icon on the right side of the taskbar, then select Network & Internet settings .
Select Wi-Fi , then select Manage known networks .
Select the network you want to forget, then select Forget .
Afterwards, select the Wi-Fi icon on the taskbar and try to reconnect to the desired network to renew the network connection.
Your Wi-Fi network might be affected by the network's frequency band, channel congestion, and/or signal strength. For more info, see Wi-Fi problems and your home layout .
There may be additional troubleshooting steps you can try, depending on which symptoms you're having. To view these steps, check out Wi-Fi connection icons and what they mean .
Make a Wi-Fi network public or private in Windows 10
Check the basics on your PC
Make sure Wi-Fi is turned on.
Swipe in from the right edge of the screen, select Settings , then select the Network icon.
Turn on Wi-Fi .
Make sure your PC isn’t in airplane mode.
Turn off Airplane mode .
Move closer to the router or access point if you can.
If you don’t see the network name at all, the router or access point might not be set to broadcast the network name. In this case, you’ll need to connect to it manually.
Swipe in from the right edge of the screen, and then select Settings .
Select the Network icon, and then select Hidden network .
Type the network name and select Next .
Type the password and select Next .
Follow any additional instructions to get connected.
The network will be added to your list of networks and will be available to connect to when your computer is in range of the network. To connect to the network, follow these steps:
Open Connect to a Network by selecting the network icon in the notification area.
Select Unnamed Network , select Connect , and then type the network information. The network will be added to your list of networks and will be available to connect to in the future when your computer is in range of the network..
Use the Network Troubleshooter
Let Windows try to help you fix the problem. Try running the Network troubleshooter to see if it can diagnose and fix the problem.
Select the Start button, start typing Network problems , and then select Identify and repair network problems in the list.
Run network commands after using the Network Troubleshooter
The Network Troubleshooter (mentioned above) can help diagnose and fix common connection problems. After using that, try running the network commands below because the combination of doing these two things can help you get connected.
If your problem isn’t fixed after running the Network troubleshooter, try to:
Reset the TCP/IP stack.
Release the IP address.
Renew the IP address.
Flush and reset the DNS client resolver cache.
Here's how to run networking commands in a command prompt:
Select the Start button, start typing cmd , right-click Command Prompt in the list, select Run as Administrator , and then select Yes .
At the command prompt, run the following commands in the listed order and then check to see if that fixes your connection problem:
Type netsh winsock reset and press Enter.
Type netsh int ip reset and press Enter.
Type ipconfig /release and press Enter.
Type ipconfig /renew and press Enter.
Type ipconfig /flushdns and press Enter.
Restart your modem and router
This helps create a new connection to your Internet service provider (ISP). When you do this, everyone that is connected to your Wi-Fi network will be temporarily disconnected.
The steps you take to restart your modem and router can vary, but here are the general steps:
Unplug the power cable for the modem from the power source. Some modems have a backup battery. So if you unplug the modem and lights stay on, remove the battery from the modem.
See if it's a problem with your modem or your ISP
Make sure it’s not a problem with your cable modem or Internet service provider (ISP). If it is, contact your ISP.
At the command prompt, type ipconfig . Look for the IP address listed next to Default gateway . Write down that address if you need to. For example, 192.168.1.1.
At the prompt, type ping <Default gateway> and press Enter . For example, type ping 192.168.1.1 and press Enter . The result should be something like this: Reply from 192.168.1.1: bytes=32 time=5ms TTL=64 Reply from 192.168.1.1: bytes=32 time=5ms TTL=64 Reply from 192.168.1.1: bytes=32 time=5ms TTL=64 Reply from 192.168.1.1: bytes=32 time=5ms TTL=64 Ping statistics for 192.168.1.1: Packets: Sent = 4, Received = 4, Lost = 0 (0% loss), Approximate round trip times in milli-seconds: Minimum = 4ms, Maximum = 5ms, Average = 4ms
If the ping is successful and you see results similar to the results above, but you can’t connect to the Internet on your PC, there may be a problem with your modem or Internet service provider (ISP).
Check your network adapter
If you’re still having trouble connecting to a network, it might be related to your network adapter.
Try using the Network Adapter troubleshooter to automatically find and fix some problems. This troubleshooter will disable and re-enable the adapter, and try some other common repairs. Select the Start button, start typing Troubleshooting , and then select Troubleshooting in the list. Select View all > Network Adapter .
Update the network adapter driver. An outdated or incompatible network adapter driver can cause connection problems. Check to see if an updated driver is available.
Select the Start button, start typing Device Manager , and then select it in the list.
In Device Manager, select Network adapters , right-click your adapter, and then select Properties .
Select the Driver tab, and then select Update Driver .
Select Search automatically for updated driver software .
If Windows can’t find a new driver for your network adapter, visit the PC manufacturer’s website and download the latest network adapter driver from there. If your PC can't connect to the Internet, you'll need to download a driver on a different PC and save it to a USB flash drive so you can install the driver on your PC. You’ll need to know the PC manufacturer and model name or number.
Other steps to try on your router
Here are some things to check and try with your router if you’re at home and having trouble getting connected.
If you don't see the network name, sign in to your router and check to see if it’s set to broadcast the network name.
Connect your PC to your router using an Ethernet cable.
Open your web browser and type the IP address for your wireless router. (For example, 192.168.1.1 or 172.16.0.0—check the documentation for your router to find the default IP address.)
Sign in with your user name and password, then make sure an option labeled Enable SSID Broadcast , Wireless SSID broadcast , or something similar is turned on. This setting is often on a Wireless Settings page.
Check to see if your Wi-Fi network uses Media Access Control (MAC) address filtering for security. If it does, you’ll need to add the MAC address for your PC to the access list on your router before you can connect.
Select the Start button. Start typing cmd and right-click Command Prompt in the list. Select Run as Administrator , and then select Yes .
At the command prompt, type ipconfig /all . Write down the address that appears next to Physical Address for your wireless network adapter. This is the address you’ll need to add to the access list on your router.
To add the MAC address to the access list on your router:
Sign in with your user name and password, then look for a setting that says MAC Address Filter or something similar.
Add the MAC address you wrote down for your PC to the access list and save your changes.
On your PC, try to connect to the Wi-Fi network again.

Look in the Wireless Network section. If Wi-Fi is on, the button should say Turn wireless off .
Check and make sure your PC isn’t in airplane mode.
Select Add , and then select Manually create a network profile .
Type the network information.
If you want Windows to automatically connect when the network is in range, select the Start this connection automatically check box.
Select the Connect even if the network is not broadcasting check box, select Next , and then select Close .
Open the Network troubleshooter by right-clicking the network icon in the notification area and then selecting Troubleshoot problems .

Need more help?
Want more options.
Explore subscription benefits, browse training courses, learn how to secure your device, and more.

Microsoft 365 subscription benefits

Microsoft 365 training

Microsoft security

Accessibility center
Communities help you ask and answer questions, give feedback, and hear from experts with rich knowledge.

Ask the Microsoft Community

Microsoft Tech Community

Windows Insiders
Microsoft 365 Insiders
Find solutions to common problems or get help from a support agent.

Online support
Was this information helpful?
Thank you for your feedback.
- PRO Courses Guides New Tech Help Pro Expert Videos About wikiHow Pro Upgrade Sign In
- EDIT Edit this Article
- EXPLORE Tech Help Pro About Us Random Article Quizzes Request a New Article Community Dashboard This Or That Game Popular Categories Arts and Entertainment Artwork Books Movies Computers and Electronics Computers Phone Skills Technology Hacks Health Men's Health Mental Health Women's Health Relationships Dating Love Relationship Issues Hobbies and Crafts Crafts Drawing Games Education & Communication Communication Skills Personal Development Studying Personal Care and Style Fashion Hair Care Personal Hygiene Youth Personal Care School Stuff Dating All Categories Arts and Entertainment Finance and Business Home and Garden Relationship Quizzes Cars & Other Vehicles Food and Entertaining Personal Care and Style Sports and Fitness Computers and Electronics Health Pets and Animals Travel Education & Communication Hobbies and Crafts Philosophy and Religion Work World Family Life Holidays and Traditions Relationships Youth
- Browse Articles
- Learn Something New
- Quizzes Hot
- This Or That Game New
- Train Your Brain
- Explore More
- Support wikiHow
- About wikiHow
- Log in / Sign up
- Computers and Electronics
- Computer Networking
- Wireless Networking
How to Fix WiFi Connection Issues on a Laptop
Last Updated: January 24, 2024 Fact Checked
This article was written by Luigi Oppido and by wikiHow staff writer, Nicole Levine, MFA . Luigi Oppido is the Owner and Operator of Pleasure Point Computers in Santa Cruz, California. Luigi has over 25 years of experience in general computer repair, data recovery, virus removal, and upgrades. He is also the host of the Computer Man Show! broadcasted on KSQD covering central California for over two years. This article has been fact-checked, ensuring the accuracy of any cited facts and confirming the authority of its sources. This article has been viewed 121,225 times.
Are you trying to figure out why your Windows laptop or MacBook isn't connecting to Wi-Fi? There's nothing more frustrating than not having internet access when you need it. But don't worry—there's usually an easy fix! This wikiHow article will teach you how to troubleshoot and fix your Wi-Fi connection on any PC or Mac laptop.
Windows Laptops

- Click the "No internet access" icon, which looks like a globe, on the taskbar near the clock. [1] X Trustworthy Source Microsoft Support Technical support and product information from Microsoft. Go to source If you don't see it, click the up-arrow to expand the overflow icons.
- If the Wi-Fi tile is gray or deactivated, click it to turn on Wi-Fi.
- While you're here, make sure Airplane Mode is disabled—if the tile is illuminated, click it to turn it off.

- If you're using Windows 11, after clicking the "No internet access" icon, click the right-arrow next to the Wi-Fi tile to bring up the list of networks.
- If you don't see the network you want to connect to, try moving closer to the wireless access point.
- If you are connected to a wireless network but unable to browse the web, click Disconnect on the network name, and then click Connect to reconnect.

- Right-click the "No internet access" icon near the clock and select Network and Internet Settings .
- Click Wi-Fi .
- Click Manage known networks .
- Click Forget on the network you can't connect to.
- Close this window, and then click the "No internet access" icon and try to connect to the network again. You will need to reenter the password.
- Move away from devices that use 2.4GHz or 5.0GHz bandwidths, such as microwaves, cordless phones, baby monitors, 2-way radios, some tablets, Wi-Fi cameras, and unshielded power or video cables.
- Try to minimize physical obstructions as well, especially walls and furniture made of concrete, brick, marble/stone, metal, reflective glass, water, or ceramic tile.

- For example, if your wireless network is called Centurylink1234 5G and you also see Centurylink1234 2.4, disconnect from the 5G network and try connecting to the 2.4 network.
- If you have access to the router, you might want to change the router's channel to a less busy channel.

- Click the Windows Start menu and select Settings (the gear icon).
- Click Network & Internet .
- Click Status .
- Click Network troubleshooter and follow the on-screen instructions.
- Click System .
- Click Troubleshoot .
- Click Other troubleshooters .
- Click Network Adapter .
- Click Run and follow the on-screen instructions to repair issues.
- If the troubleshooter repairs issues, you should be able to connect to Wi-Fi.
- If the troubleshooter doesn't find any issues, restart your PC.

- Unplug the power cable from both the router and modem (if separate).
- If the light on your modem stays on, it probably has battery backup. Remove the battery for now.
- (If you have a separate modem) After 30 seconds, plug the modem back in to the power source and wait for it to boot back up. When the lights stop blinking, continue.
- Plug the router back in and allow it to boot up. This can take several moments.
- Reconnect your laptop to the Wi-Fi network and try to browse the web.
- If other devices (such as your phone or tablet) can connect to this network but your laptop can't, continue with this method. If the network isn't available for any devices, contact your internet provider for troubleshooting.

- Press Windows key + S and type device .
- Click Device Manager in the search results.
- Expand the Network adapters menu and select your Wi-Fi adapter.
- Right-click adapter and select Uninstall device .
- Check the box next to "Attempt to remove the driver software for this device" and click Uninstall .
- Reboot your laptop. When it comes back up, Windows will automatically install a new generic driver for your Wi-Fi card.
- If this resolves your problem, it's possible that a recent Windows Update is incompatible with your Wi-Fi card. [3] X Trustworthy Source Microsoft Support Technical support and product information from Microsoft. Go to source You can try updating the drivers to see if that resolves the issue. If the issue comes back, uninstall the driver again and reboot to use the generic driver until a fix is available.

- Open the Windows Start menu and go to Network & Internet > Status (Windows 10) or Advanced network settings (Windows 11) > Network reset .
- Click Reset now and choose Yes to confirm.
- When your PC restarts, try connecting to the Wi-Fi network again.

- If you can't connect to any Wi-Fi networks, there's likely a hardware issue with your laptop, and you should contact the manufacturer for service.
- If you can connect at a café, try checking for and installing Windows Updates . Then, head home and try connecting to your Wi-Fi again. If you still can't connect, contact your internet provider for assistance.

- When Wi-Fi is on, you'll see a list of all available access points. Click the network you want to join.

- Close all open apps.
- Press and hold the Option key while you click the Wi-Fi icon in the menu bar.
- Click Open Wireless Diagnostics .
- Follow the on-screen instructions to allow your Mac to test your wireless connection.
- If any issues are found, click the small "i" in a circle next to each issue found for instructions on how to proceed.

- Click the Apple menu and select System Preferences .
- Click Network .
- Click your Wi-Fi connection.
- Click Advanced and select TCP/IP .
- Click Renew DHCP Lease .

- Click Advanced .
- Select the Wi-Fi network and click the minus sign.
- Click Remove .
- Close all windows and then try to reconnect to the network. You will need to re-enter the Wi-Fi password if it was previously saved.

- If you can't connect at another location, there's likely a hardware issue with your MacBook, and you should contact Apple for service.
- If you can connect at a café, check for and install any updates . [7] X Research source Then, try to connect to the original network again. If you still can't connect, there's likely an issue with your home Wi-Fi router—contact your internet provider for assistance.
Expert Q&A

You Might Also Like

- ↑ https://support.microsoft.com/en-us/windows/fix-wi-fi-connection-issues-in-windows-9424a1f7-6a3b-65a6-4d78-7f07eee84d2c#WindowsVersion=Windows_11
- ↑ https://www.dell.com/support/kbdoc/en-us/000150359/how-to-identify-and-reduce-wireless-signal-interference
- ↑ https://support.microsoft.com/en-us/windows/fix-wi-fi-connection-issues-in-windows-9424a1f7-6a3b-65a6-4d78-7f07eee84d2c#WindowsVersion=Windows_10
- ↑ https://support.apple.com/en-us/HT211786
- ↑ https://support.apple.com/guide/mac-help/use-wireless-diagnostics-mchlf4de377f/mac
- ↑ https://support.apple.com/guide/mac-help/set-the-date-and-time-mchlp2996/mac
About This Article

1. Check your laptop's Wi-Fi button or switch. 2. Make sure Wi-Fi is turned on. 3. Try disconnecting and reconnecting. 4. Reboot your computer. 5. Turn off your modem and router and turn them back on. 6. Forget and re-add the wireless network. 7. Run the network troubleshooter or wireless diagnostics. Did this summary help you? Yes No
- Send fan mail to authors
Is this article up to date?

Featured Articles

Trending Articles

Watch Articles

- Terms of Use
- Privacy Policy
- Do Not Sell or Share My Info
- Not Selling Info
wikiHow Tech Help Pro:
Level up your tech skills and stay ahead of the curve
- GTA 5 Cheats
- What is Discord?
- Find a Lost Phone
- Upcoming Movies
- Nintendo Switch 2
- Best YouTube TV Alternatives
- How to Recall an Email in Outlook
Digital Trends may earn a commission when you buy through links on our site. Why trust us?
Wi-Fi not working? How to fix the most common problems

Wi-Fi problems can strike anyone at any time, no matter how much networking experience you may have. But if you’ve not come across a particular Wi-Fi issue before, there’s no need to worry if you don’t know how to fix it. All you need are the right tools and a few tips, and you’ll be able to solve your Wi-Fi problem in no time.
Basic Wi-Fi troubleshooting checklist
Quick fixes for common problems, slow or no wi-fi or internet access in certain rooms, slow internet everywhere.
- One device can’t connect to the Wi-Fi
Nothing can connect to Wi-Fi
Connections drop at random times, wi-fi network disappears entirely, unknown devices on my wi-fi network, a recent update broke wi-fi.
- The satellite routers on my mesh network aren’t connecting
- My smart device isn’t connecting to Wi-Fi
- My console can’t connect to Wi-Fi
- Can’t connect to wireless printer
- Can’t connect to a guest Wi-Fi network that I set up
- Wi-Fi 6 or 6E isn’t working, even with a Wi-Fi 6 router
- Can’t find a router with Wi-Fi 7
Whether you’re experiencing problems with slow internet, Wi-Fi signal dropping, or you just can’t connect to Wi-Fi at all, here are some of the quickest and easiest fixes you can try. We’ll also cover some advanced advice on more troubling issues that would definitely result in your Wi-Fi not working at all, or at slower speeds.
If you have a non-specific problem with your Wi-Fi or don’t consider the problem serious enough to investigate more in-depth problems, consider the items on this list as a great way to start fixing your problem.
- Make sure your device’s Wi-Fi is on — Most laptops have a shortcut key that will turn off their Wi-Fi and it can be easy to press accidentally. Similarly, there is a quick toggle on most phones that will turn off the phone’s Wi-Fi capabilities.
- Restart your router — A quick restart of your router (achieved by unplugging it, waiting 30 seconds to 1 minute, and plugging it back in again) can fix many Wi-Fi difficulties.
- Check for an outage — Most ISP’s will have an outage map available on their website. Try using your phone’s data to check and see if an outage is reported in your area.
Forgot the Wi-Fi password
If you really can’t remember your Wi-Fi password, and there are no notes or cards with it written down somewhere, you’ll have to reset your router . Use a paperclip to press the hidden switch in the pinhole on the back of your router for 30 seconds. It should then default to factory settings.
- The 5 best Wi-Fi adapters for PC in 2024
- The most common motherboard problems, and how to fix them
- The most common Quest 3 problems and how to fix them
Use our guide to setting up a wireless router to get everything properly configured.
Wi-Fi connection lost when logging back into the computer
This problem can crop up on Windows 10 due to an issue with Fast Startup. Fast Startup keeps certain processes running so you can log back in very quickly. However, this can sometimes cause a bug with the wireless driver that prevents it from reconnecting to Wi-Fi properly. In the short term, you can turn off Fast Startup to prevent this problem . Search for Power Option s in your Windows 10 or Windows 11 search bar and go to this section of the Control Panel. Select Choose What the Power Button Does on the left-side menu, and then look at the new section Shutdown Settings . Find the option to Turn On Fast Startup and make sure it is deselected.
In the long term, you may need to update the driver for your wireless network adapter to fix any bugs causing this issue. You can follow our guide on how to update Windows 10 drivers for more information.
The network connects, but there’s no internet access
It might sound like a tired tip, but try resetting your modem by unplugging it and plugging it back in. If that’s no good, you can connect a laptop or desktop to your router with an Ethernet cable ( these are the best ones ) to see if it’s the router or your Wi-Fi that’s not working. If this works, then your best bet to get Wi-Fi working again is to reset your router . If there’s still no internet, though, you may have an outage. Contact your ISP.
Router crashes regularly and only restarting it helps
If your router needs to be restarted regularly, you should give your router a full reset . On most routers, you’ll find a Reset button that you can hold down with a paperclip. Do so for 30 seconds, and the router should default from factory settings. Use our guide to setting up a wireless router to get everything properly configured.
If that doesn’t work, your router may be on its way out. Your only real option is to return it if it is within its warranty period or to buy a new one.
Wi-Fi is made up of radio waves, meaning your Wi-Fi router broadcasts in all directions from a central location. If your router is in a far corner of your house, then you’re covering a great deal of the outside world unnecessarily. If you can, move your router to a more centralized location. The closer you can put your router to the center of your coverage area, the better reception will be throughout your home.
If you have external antennas, you can try adjusting those, too. Alternating between fully vertical and fully horizontal positions can help it reach in multiple directions.
If you live in an apartment building, other routers might be interfering with yours. Free software, like NetSpot on Mac, Windows, and Android, or Wi-Fi Analyzer for Android, can show you every wireless network nearby and what channel they’re using. If your router overlaps with nearby networks in particular rooms, consider switching to a less congested channel. If you need help switching, here’s our guide on how to change your Wi-Fi channel .
If none of that helps, your home might be too much for one router to handle. Consider purchasing a wireless repeater or setting up an old router to serve as one to extend the range of your main router. Upgrading to a whole-home mesh wireless system can also help with dead spots in certain areas of your home. Either way, it might be time to go and buy a new router .
If your Wi-Fi speed is slow no matter where you are, try plugging a laptop into your router directly and test your internet speed using one of the best internet speed tests . If speeds are still down, the problem is likely with your internet connection, not your router. Try some of these ways to improve your internet speed and contact your ISP.
If that’s not the issue, it could be that your current wireless channel is overcrowded by your devices or by those of other nearby networks. Consider changing the channel on your router in your router settings, by accessing the admin settings .
If that doesn’t help, performing a factory reset on your router and setting it up again may help. On most routers, there’s a Reset button that you can hold down with a paperclip. Do so for 30 seconds, and the router should default to factory settings. Use our guide to setting up a wireless router to get everything properly configured, and see if that helps.
If none of that works and your internet is fine on a wired connection, your router might be dying. Consider buying a new one: Here are the best routers we’ve reviewed and why they’re great picks. If the router seems fine, then it might instead be your modem, which could suffer connectivity issues if it’s on its way out, too. If you’re looking to upgrade your modem as a fix, we also have a guide on some of the top modem-router combos . Upgrading to a Wi-Fi 6 or Wi-Fi 6E router can also help ease issues with congestion and support faster speeds, provided that your broadband plan is capable of these boosted speeds.
One device can’t connect to the Wi-Fi
Sometimes you run into a Wi-Fi issue with one particular device. It’s probably just a momentary network issue, which is an easy fix. Try turning off the Wi-Fi on your device, then re-enabling it — or unplugging and replugging your Wi-Fi dongle. If that doesn’t work, restart the device and try again. Then try restarting the router itself.
If that doesn’t help, or if the problem reoccurs, consider deleting your current network from the list of saved networks on your device, then reconnect again.
If you’re running Windows 10 or 11, search for “wifi troubleshooting” and open the result, which should be Identify and Repair Network Issues . That will go through a series of diagnostics that may restore connectivity. On MacOS, you can run Wireless Diagnostics . Hold the Options key and click the AirPort (Wi-Fi) icon on the menu bar. Find Open Wireless Diagnostics , and then follow the on-screen instructions.
If you can’t connect to your Wi-Fi at all, plug your laptop into the router directly using an Ethernet cable, and see if you can connect that way. The particular type of Ethernet cable doesn’t matter, but there are some Ethernet cables that are better than others . If that works, your Wi-Fi is the problem and you should try some of the other fixes listed here. If it doesn’t work, then your internet may be down altogether. Check your ISP’s webpage and social accounts, or give them a call to see if they are reporting problems. Sometimes providers can be a little slow to note issues, so you can also check with a monitoring site like Downdetector and see if other users in your region are reporting problems.
Resetting your router can fix a myriad of issues, too, and an inability to connect is one of them. Press the Reset button on the back of the router with a paperclip for 30 seconds, and the router should default to factory settings. Use our guide to setting up a wireless router to get everything properly configured.
If that’s no use, you may need to consider buying a new router.
Is there some sort of pattern? Do connections drop whenever you use the microwave? Have you just installed a fish tank? It may sound weird, but some routers have trouble with these and other home hardware. The 2.5GHz band is readily interfered with by other devices, and 5GHz and 6GHz are notorious for being interrupted by physical objects. It could also be that you’re experiencing interference from other networks or devices. If your neighbors are heavy Wi-Fi users at a particular time each day, this could be slowing you down.
Changing your router’s channel might help. You can use NetSpot on Mac and Windows and Wi-Fi Analyzer for Android to show you every wireless network nearby. If yours overlaps with nearby networks, switching to a less congested channel in your router settings can help. We have a guide that will walk you through changing the channel on your router .
You can also try moving your router to a more accessible location so that there’s less distance (and interfering devices) between you and the router.
If that doesn’t work, try performing a factory reset on your router by pressing a paperclip into the miniature hole on it and following the reset steps as outlined in your manual.
If you lose track of your Wi-Fi network on any device, it’s possible that your router reset itself. Do you see an unprotected network named after your brand of router? That might be yours. Connect a laptop or desktop to it via an Ethernet cable, then use our guide to setting up a wireless router to get everything properly configured again.
If you don’t see such a network, plug your laptop into the router with an Ethernet cable, and see if you get a connection. Use our guide to finding your router’s IP address and login information for more help. Also, if you don’t have a cable, check out our guide on how to choose the right Ethernet cable .
Log into your Wi-Fi app or administrator settings (which you can find by searching your IP address on your browser ). Look for a list of currently connected devices and pinpoint the ones you don’t recognize.
First, make sure these don’t represent connections you didn’t realize you had — each smart device will have its own connection, for example, and they can have some strange titles if you didn’t name them. Game consoles and TVs may also be connected, and if you’ve had friends and family over recently they may have connected with unfamiliar devices.
If you’ve ruled out all familiar devices and there’s still a connection or two you don’t recognize, it’s possible someone else is hijacking your Wi-Fi network. In this case, look in your settings for an option to block these devices on your Wi-Fi and ban their MAC addresses, if possible. Then change your Wi-Fi password, and reboot your router. This may not stop especially determined hackers, but it’s usually enough to kick unwanted guests off your network.
If you want to take more drastic action, here are some steps for how to deal with someone stealing your Wi-Fi .
This can happen with some operating system updates. Windows 10 updates in mid-2020 had bugs that stopped some users from connecting to their Wi-Fi networks or even seeing a Wi-Fi connection at all. Similar updates to iOS, Android, and other platforms also have created bugs in the past that disrupt Wi-Fi connections.
When something like this happens, it’s best to wait for a patch that fixes the problem. In the meantime, remove the update and roll back your system to an earlier version to help get your online connectivity back.
While routers can last for years without needing a replacement, keep in mind that some problems can develop with age — a router may start lacking support for new device updates and similar issues that prevent it from working properly (as seen when Apple discontinued the AirPort Extreme, for example). That’s a sign that it’s time to look for a new router.
The satellite routers on my mesh network aren’t connecting
Make sure that your satellite devices are powered up and turned on. If they are, try unplugging and replugging the problematic device and see if it will connect to your network then. If your router app allows you to restart a Wi-Fi point (Google’s Home app, for example, allows this), then reboot that point and see if this helps, too.
Google also allows you to run a test to make sure the network is set up properly. You can find Wifi points on the Home app, under Test mesh . If the test comes back with a weak or failed connection, you should try repositioning your satellite routers to be closer to your primary router. This also is a good tactic for any mesh system that keeps dropping its satellite points — they could be too far away from the primary point.
You can also double-check to make sure that your satellite router devices have a different SSID than your primary router. If they were accidentally all assigned the same SSID, then the mesh network may not be able to coordinate properly.
If your router still seems unable to connect, then make sure that nothing significant has changed for your network settings. For example, if your ISP WAN (wide-area network) type changed for some reason, you may have to go back into the settings for the router and make sure that the right WAN setting is chosen.
There are additional special cases where certain Wi-Fi technology can interfere with mesh networks, so it’s also a good idea to contact router support directly and explain your situation if nothing is working.
My smart device isn’t connecting to Wi-Fi
First, make sure that your smart device and your router are both updated. Then try resetting your router and rebooting your smart device. You can either unplug and plug in the smart device or check its app for a reboot option — the Google Home app, for example, has a Reboot tool under each device section that you can use.
If the device still isn’t connecting properly, try moving it next to the router and seeing if it connects then — distance and interference can make a difference, especially for smaller smart devices. You should also double-check to make sure that your smart device doesn’t need a Zigbee hub to operate , which is more common among older smart devices but a problem that still occasionally crops up.
If your smart device keeps dropping a Wi-Fi signal, especially during busy times of the day, check to see if your router supports automatic band switching for devices. If it does, try turning this feature off. Sometimes a router will try to switch a smart device to a different band, but the device isn’t ready for that, causing it to lose a connection. There may also be issues with connecting to a mesh router, and you may have to be very specific about your network connection to make smart devices work.
It’s also a good idea to check if your particular device is suffering from temporary bugs that make connecting to Wi-Fi difficult or impossible. Nest minis and HomePod minis have both encountered such errors in the past. In these cases, a fix is usually patched in before too long, so keep making sure that your device is updated. Sometimes operating system updates, like a new iOS patch , also can affect smart device performance.
There are a number of other router settings that may block smart devices, but they are manufacturer dependent. If you can’t find what’s wrong, contact your router manufacturer’s support and explain that you think your router is having trouble connecting.
My console can’t connect to Wi-Fi
Check social media and Downdetector to make sure nothing is wrong with your gaming platform — sometimes your Xbox or PlayStation can get online just fine, but Xbox Live or Playstation Network is down for any number of reasons, but they’re typically back up again after a short period.
If everything looks all right there, reboot both your router and your game console and see if they can successfully connect. This is also a good time to test your internet connection. Major systems like Xbox and PlayStation have an option in their Settings menu to test your internet connection. On PlayStation, head to Settings , then Network , then select Test Internet Connection . On Xbox, go to Profile & System , select Settings , and in the General section, select Network Settings , where you will find an option to Test Network Speed & Statistics . This can provide more information about what’s going wrong and even tips on what you may need to change.
If your console and router seem to be acting properly but Wi-Fi keeps dropping, you may want to try moving the two devices closer to each other to see if the Wi-Fi signal improves. Try to remove any material or objects between the console and router: Placing both in a high, clear location often brings the best results. You can also try reducing the number of other devices on the network, especially if they’re streaming.
Can’t connect to wireless printer
First, make sure you are trying to connect to your Wi-Fi and not via Wi-Fi Direct — they are two different technologies. We also highly suggest the traditional routine of turning everything off and back on again, especially if your printer has connected to Wi-Fi successfully in the past. If your printer is far away from your router and keeps running into Wi-Fi errors, try moving it to a closer position.
If it looks like your printer is connected to Wi-Fi but you can’t get it to work, head into your printer settings on your computer and make sure the correct default printer is selected. Microsoft also has some troubleshooters you can run to see if they pick up on anything obviously awry.
It’s also a good idea to check your router security, firewalls, and VPN security to see if any of them are identifying the printer as a strange device and refusing a wireless connection. You may need to disable certain firewalls or reconfigure security protocols to use your printer successfully. When all else fails, uninstall your printer drivers and reinstall the more recent versions to see if this makes a difference.
And if your printer isn’t wirelessly enabled, consider upgrading to one that is. We have some recommendations for the best printers , laser printers , and multifunction printers that can be used wirelessly and connect to your home network.
Can’t connect to a guest Wi-Fi network that I set up
Guest Wi-Fi networks allow you to share your Wi-Fi with others in a secure way that helps prevent security issues. You’ve probably seen it on business routers, but it can be set up on home routers, too. If someone is having trouble connecting to the guest network but otherwise the Wi-Fi seems to be working, there are a few things you can try.
First, if you just set up your guest network, wait a few minutes. It may take a little time for the network to show up. If the guest network is visible, take a minute to head into your router app and check settings. Settings like Public Wi-Fi Active and Allow Guests to Access My Local Network should always be enabled. If it’s still not working, reset your router and try again.
Keep in mind, some guest networks have a stricter limit on how many devices can use them. If you have over a dozen people already on the guest network, others may not be able to log on.
Wi-Fi 6 or 6E isn’t working, even with a Wi-Fi 6 router
Wi-Fi 6 offers a host of improvements from older Wi-Fi standards, including improved performance, less latency, and better security. But if you don’t think you’re getting Wi-Fi 6 features from a router that supports it, something could be wrong with your setup.
Do you have any extenders on your network? If those aren’t compatible with Wi-Fi 6, you won’t be able to enjoy Wi-Fi 6 speed and features. If your device has picked up the signal from an extender, Wi-Fi 6 benefits may not be making the trip.
Additionally, most devices will need at least partial support for Wi-Fi 6 features to be able to use them. Devices that are several years old may not be compatible with any Wi-Fi 6 changes. That includes your phone and laptop, as well as smart devices that you might be using.
Even desktop computers may struggle with this. Internal Wi-Fi adapters may struggle to pick up on Wi-Fi 6 benefits when you switch to a new router, even if they are technically compatible. You should update your Wi-Fi drivers to fix any potential issues.
Can’t find a router with Wi-Fi 7
Wi-Fi 7 is the next generation of wireless technology, and it’s technical name is 802.11be. It’s the successor to existing Wi-Fi 6 and Wi-Fi 6E routers, and will offer much greater performance, with up to 36 Gbps data transfer rates — that’s more than three times faster than Wi-Fi 6 speeds. It also lets devices use multiple frequencies simultaneously to better utilize available network bandwidth.
The only downside to this is that Wi-Fi 7 routers aren’t yet available at competitive prices. There are some Wi-Fi 7 routers, like the impressive TP-Link Deco BE85 , but that’s a $1,500 mesh router system and complete overkill for just about anyone.
You can expect to see more Wi-Fi 7 routers with more approachable price tags in the coming months.
Editors' Recommendations
- How to change your router’s Wi-Fi password
- The most common GPU problems and how to fix them
- The most common Chromebook problems and how to fix them
- How to get Wi-Fi access anywhere at any time
- The most common Steam Deck problems and how to fix them
- Work From Home

If Slack is your office, not only will you want to know best Slack tips but also how to fix Slack issues. Nobody wants to look like a fool that can't navigate the office software without a tutorial from the manager, after all. And that goes doubly so if you work in tech, where these sorts of things are likely expected of you.
But there's not much to worry about. The program runs smoothly most of the time and we're here to help you for the times it does not. Here are our top tips to get you back in your Slack game and avert troubles. Trouble connecting to Slack
If it's not Slack or Teams, it's likely Google Meet. In today's post pandemic world, you're likely going to be using one of these programs for your next interview, office meeting, or big grant proposal. Getting prepared for these events today requires a lot more than dusting off a suit and picking out the office-suitable makeup. If you're using Google Meet, for example, you'll also want to pick out a professional 360-degree background and check to see that your camera and mic are working appropriately.
What if you do run into problems during your pre-interview checkup; or even worse, during the meeting? We've compiled a list of the most common Google Meet problems to get you looking smooth, professional, and ready to command the appropriate attention you deserve the next time you use Google Meet.
Microsoft Teams was introduced in 2017 as a unified communication and collaboration platform aimed at helping businesses and organizations get things done. Microsoft leveraged the company's existing Office software experience and created a unified experience between Teams, Office 365, and Skype for Business. However, as with all software, things don't always go according to plan. Sometimes you can run into Teams problems.
We're big Teams users here at Digital Trends -- it's our go-to communication and meeting tool -- and we've come across a few issues ourselves over the years. In the event you're having Microsoft Teams issues, here's how to fix some of the most common problems.
TechRepublic
Account information.

Share with Your Friends
How to diagnose and fix Wi-Fi network problems using a Windows 10 PC
Your email has been sent

Good home Wi-Fi is a necessity for the modern professional. With more people working from home than ever before due to the COVID-19 pandemic, Wi-Fi can be the difference between a good day’s work and a frustrating, unproductive few hours.
Unfortunately, Wi-Fi has become the remote professional’s coronavirus paradox: It’s absolutely necessary for work, but more people working from home means more Wi-Fi networks congesting the average neighborhood, more bandwidth being used, and less Wi-Fi reliability.
SEE: Future of 5G: Projections, rollouts, use cases, and more (free PDF) (TechRepublic)
Luckily, some of the most common Wi-Fi problems are easily fixed. Not all of them, of course: If your connection is slow whether you’re wired or wireless, there’s probably too many people using the internet in your area, and no one short of your ISP can resolve that issue.
How to choose the right Windows 10 Wi-Fi analytics tool
Unlike macOS, Windows 10 doesn’t have a built-in wireless diagnostics tool . There are a lot of third-party options to choose from, but when it comes to doing something as sensitive as scanning all of the devices on a network and compiling data about the machine the app is running on you want a trusted program. For that, it’s best to look in the Microsoft Store , where apps have to pass a certification test prior to being published.
For this guide, I’m using one of the most popular wireless diagnostics tools for Windows 10, WiFi Analyzer by Matt Hafner ( Figure A ). WiFi Analyzer is free with premium options available, but all of the essential tools you need to diagnose common Wi-Fi problems are included with the free version.

How to assess your signal strength with WiFi Analyzer
When you open WiFi Analyzer you’ll be greeted with the screen in Figure B , which shows a variety of information about your Wi-Fi connection, like your network, its channel, your device ID, and other details. All of the data presented on this screen is displayed in real time.

At the top of Figure B you’ll notice a circle that reports on the quality of your connection, a bar that shows your RSSI, and four icons. The icons are highlighted orange (from left to right) if WiFi Analyzer thinks you have a bad connection, are on a bad channel, don’t have internet access, or if your connection isn’t secure.
The circle with a percentage in it reflects whether or not your connection can be improved, and is a visual representation of the quality of your connection. If it appears orange (as it does in Figure B ), that’s because one of the four conditions shown in the icons isn’t met, or your RSSI is out of acceptable range.
RSSI is a reading of signal strength measured in dBm, and scales from 0, being the best, to -120, which is the worst. Typically, you’ll find signal ranges in the -80 dBm to -40 dBm. If you get much lower than -80 you’ll probably notice connection problems.
The information displayed on this screen updates in real time, so if you notice that your signal isn’t good try moving closer to your Wi-Fi router. The number on the bar should move toward 0. If your router isn’t in a good spot, and you can’t realistically move your computer, try moving the router to see if your signal strength gets stronger or weaker.
How to figure out what Wi-Fi channel to switch to
Wi-Fi channels are small slices of the overall Wi-Fi frequency band that routers can broadcast and computers can tune in to. Routers can simultaneously operate on the same channel, but the more routers on a single channel the more noise is generated, which can degrade signal strength and make internet connectivity spotty and unreliable.
You may have noticed that the star icon in Figure B was orange, indicating that my Wi-Fi wasn’t on the best channel.
If you click on the Analyze tab in WiFi Analyzer you’ll be shown a graph of all the Wi-Fi channels on your band (2.4GHz or 5GHz), and which networks are using them ( Figure C ).

The Analyze screen is an excellent way to visualize which channels are crowded in your area, and it also recommends which channel to switch to, shown on the bottom of the screen. In Figure C , you can see that my current connection is the strongest on Channel 1, but also that Channel 1 is quite congested, as are channels 6 and 8. WiFi Analyzer recommends switching to channel 11, because even though there are several other networks using that channel their strength is fairly weak, meaning they’re less likely to interfere with my signal.
For this example I’m using a 2.4GHz network because it better illustrates network congestion. If you click on the 5GHz button on the bottom of the screen the view will switch over to nearby 5GHz signals ( Figure D ), but will only give a channel recommendation if you switch to a 5G connection.

If WiFi Analyzer tells you that there’s a better channel to switch to there are two ways to go about doing it.
First, and easiest, is all dependent on the type of Wi-Fi router you have. Some routers are designed to search for the best channel whenever they power up, so the first thing you can try is rebooting your Wi-Fi router and checking to see what WiFi Analyzer says about your connection when it restarts.
SEE: Return to work: What the new normal will look like post-pandemic (free PDF) (TechRepublic)
If your router is configured to automatically search for the best channel you should see it on WiFi Analyzer’s recommended channel, or whichever one the router thinks is best. If a reboot doesn’t change the channel despite WiFi Analyzer showing it to be quite crowded then you probably don’t have automatic channel searching enabled or available on your router.
Without automatic channel finding, you’re stuck changing your router’s channel yourself. The way this is done is to log in to your Wi-Fi router using its IP address or login page URL, both of which vary based on the type of router you have. To find out how to log in to, and change settings on, your Wi-Fi router you’ll need to consult the manufacturer’s website or documentation that came with it.
If you want to learn more about how to read the various bits of information in WiFi Analyzer, be sure to click on the Learn tab, which will direct you to a variety of resources and WiFi Analyzer tutorials from Matt Haffner, who built the app.
Subscribe to the Innovation Insider Newsletter
Catch up on the latest tech innovations that are changing the world, including IoT, 5G, the latest about phones, security, smart cities, AI, robotics, and more. Delivered Tuesdays and Fridays
- How to become a network administrator: A cheat sheet
- 5G: What it means for IoT (free PDF)
- Network security policy
- What is SDN? How software-defined networking changed everything
- The best VPN services for 2020
- 5G: More must-read coverage

Create a TechRepublic Account
Get the web's best business technology news, tutorials, reviews, trends, and analysis—in your inbox. Let's start with the basics.
* - indicates required fields
Sign in to TechRepublic
Lost your password? Request a new password
Reset Password
Please enter your email adress. You will receive an email message with instructions on how to reset your password.
Check your email for a password reset link. If you didn't receive an email don't forgot to check your spam folder, otherwise contact support .
Welcome. Tell us a little bit about you.
This will help us provide you with customized content.
Want to receive more TechRepublic news?
You're all set.
Thanks for signing up! Keep an eye out for a confirmation email from our team. To ensure any newsletters you subscribed to hit your inbox, make sure to add [email protected] to your contacts list.
- Support Home
- Printer Support
- Computer Support
- Poly Collaboration Devices
- Ink & Toner Cartridges
- Software and Drivers
- Printer Diagonostic Tools
- Computer Diagnostic Tools
- Windows Support
- Print and Scan Doctor
- HP PC Hardware Diagnostics
- Create a new case
- Find an existing case
- Manage contracts and warranties
- Register an account
- MyHPSupport Help
- Security Bulletins
- Support Dashboard
- HP Account benefits

HP PCs - Troubleshooting Wireless Network and Internet (Windows 10)
Resolve wireless connectivity or internet issues if your Wi-Fi stops working as expected.

Business computers : Consult your company's IT department or your local IT service before making any environment or security changes.
Wireless printers : For information about wireless printer setup, or if you get an error message when trying to print wirelessly, go to HP Customer Support, enter your printer model, and then search for a document about installing your wireless printer or the displayed error message.
Check the wireless signal
Check the wireless button or key to confirm the wireless signal is on.
Press the button once, wait 10 seconds, and then observe any changes to the wireless connection icon in the notification area and to the LED light on the wireless button or key.
If the button or key does not have a light, hover your mouse over the wireless connection icon in the notification area of the taskbar to see the current connection status.
If the wireless signal turns on : Connect to the internet again.
If the wireless signal is turned off : Press the button or key again, and then try to connect to the internet again.
Update hardware drivers
Use Device Manager to update hardware drivers such as the graphics, audio, wireless, or other drivers for your computer.
In Windows, search for and open Device Manager .
In the list of devices, select Mice and other pointing devices .
Right-click the wireless adapter , select Update driver , and then follow the instructions to install the updated driver.
Restart the computer to complete installation of the updates.
Use wireless troubleshooting tools
Use automatic tools to test and fix a variety of wireless conditions. If one tool does not resolve the issue, use another one.
Run HPSA network diagnostics
Use Network Check in HP Support Assistant to perform network diagnostics for your computer.
Select your computer, and then select HP Network Check under Troubleshooting and Fixes .
If a window displays prompting you for an administrator password or confirmation, type the requested credentials.
Click Next , and then wait for the tool to complete.
If the diagnostic test finds one or more issues, continue with these steps.
Under Possible Root Causes , click the listed possible cause, select a recommended action, and then follow the instructions.
After completing the recommended actions, click Re-check .
Repeat these steps until the network connectivity issue is resolved or all possible root causes and repairs have completed.
Run Windows Network and Internet Troubleshooter
Use the Windows Network and Internet Troubleshooter to test and repair the network connection.
Wait while the Windows Network Diagnostic analyzes the network connection.
If prompted, select the type of network problem, and then follow the instructions to resolve the issue.
Review any information that displays about problems found, what was fixed, or actions you can take to resolve the problems.
Complete any suggested actions.
Reset the wireless router, gateway, or modem
Reset the wireless network hardware.
Turn off your computer.
Disconnect the power cord from the wireless router, gateway, combined modem/router, or broadband modem.
Wait at least 5 seconds, and then reconnect the power cord.
Wait until all the lights turn on, and then review the lights to identify the status of the network connection.
All the lights are off : Check the power source by plugging the power cord into another power outlet. Service or replace your wireless router or broadband modem if it cannot be turned on.
Only the Power light is on and the other lights are off : A network connection might not be detected. Inspect the cable carrying the internet signal for damage, and then make sure the cable is securely connected to the network device.
Only the internet or online lights blink or do not turn on : There might be an issue with your internet service provider. You can wait until service is restored or contact your internet service provider for further assistance.
Turn on your computer, and then wait for computer to connect to the wireless network.
HP PCs - Advanced wireless network and internet troubleshooting (Windows 10)
Resolve wireless connectivity or internet issues if your connection stops working as expected.
Reinstall wireless drivers
Use Device Manager to uninstall, and then reinstall the wireless adapter.
In the list of devices, double-click Network adapters .
Right-click your wireless device, and then select Uninstall device .
When the Uninstall Device screen displays, select Delete the driver software for this device if it displays, and then click Uninstall .
In the Device Manager window, select Network adapters , select Action , and then select Scan for hardware changes .
After the network adapter name displays, close Device Manager, and then restart the computer.
Run Windows Update
Update your Windows 11 or Windows 10 computer using Windows Update.

In Windows, search for and open Check for updates .
If there are any available updates, they begin automatically.
To download and install optional updates, use the following instructions for your operating system:
In Windows 11, select Advanced options > Optional updates , select the updates that you want to install, and then click Download & install .
In Windows 10, select View all optional updates , select the updates that you want to install, and then click Download and install .
After the updates install, restart your computer when prompted.
Manually change network settings
Create a restore point in Windows, and then manually change the network settings.
In Windows, search for and open Create a restore point .
On the System Properties window, click Create .
Type a name for the restore point, and then click Create .
In Windows, search for Command Prompt. In the results list, right-click Command Prompt , and then select Run as administrator .
Type the following commands one at a time, pressing Enter after each one:
netsh int tcp set heuristics disabled
netsh int tcp set global autotuninglevel=disabled
netsh int tcp set global rss=enabled
Type netsh int tcp show global in Command Prompt, and then press Enter to open the TCP Global Settings.
Make sure all settings are disabled except Receive-Side Scaling State .
Close Command Prompt , and then restart the computer.
Restore your computer when Windows starts normally
Restore your computer to a previous point in time.

Save any open files, and then close all open programs.
On the System Protection tab, click System Restore .
In the System Restore window, click Next .
Select the restore point you want to use, and then click Next .
Review your selection, and then click Finish .
Read the warning about not interrupting System Restore, and then click Yes .
Allow System Restore to complete without interruption to avoid corrupting the hard drive or causing additional damage to the computer.
Other things to try
Resolve wireless connectivity or internet issues if your computer cannot connect or the network connection performs poorly.
Change the wireless environment
Changing the wireless environment can greatly impact the effectiveness of your wireless network.
Move the computer and router closer to each other, choosing a location where signal strength is strong.
Move the computer or router to a location where there are fewer solid objects between the router and the computer.
Solid objects, such as walls, metal furniture, and electrical appliances, might decrease the range or block connections.
If possible, remove metal objects that are between the router and computer or nearby.
Limit the number of devices that use the network at the same time, especially when streaming videos from the internet.
If you find that the wireless connection is still weak or has trouble connecting after changing the wireless environment, consider purchasing a different antenna for your router or set up another router as a signal repeater.
Restore BIOS default settings
Restore your computer BIOS to the default settings
Restore default BIOS settings (desktop, all-in-one pcs)
Restore the default BIOS settings for your Desktop or All-in-One computer.
BIOS configurations vary, depending on computer model. For more information about accessing and navigating the BIOS menu, refer to the documentation for your computer model.
Restart your computer.
During startup, press F10 repeatedly until the BIOS menu displays.
In the File tab, select Apply Defaults and Exit .
Select Yes to confirm, and then exit the BIOS.
Restore default BIOS settings (notebook pcs)
Restore the default BIOS settings for your notebook computer.
When the BIOS menu displays, press F9 to restore factory default settings.
Select Yes , and then press F10 to save changes and exit.
Select Yes to confirm.
Change wireless adapter power options
Use Device Manager to change the power management properties for the wireless adapter.
Right-click your wireless device, and then select Properties .
Select the Power Management tab, clear the check box for Allow the computer to turn off this device to save power , and then click OK .
HP PCs - Reset the computer
The Windows 10 reset feature reinstalls the operating system without losing any of your personal data and customizations.
Back up personal files on the PC
Back up the personal files on your Windows 10 computer.

Connect an external drive to the computer.
In Windows, search for and open Backup settings .
Click Add a drive , and then select a drive.
Click More options .
Click Back up now , and then wait for the back up to complete. This might take a few minutes or a few hours, depending on the size of the files.
Reset the PC (Windows 10)
Reset your computer with a fresh installation of Windows 10.
In Windows, search for and open Recovery options .
In the Recovery screen under Reset this PC, click Get started .
Follow the instructions to reset your computer. This might take a few minutes.
Restore personal files on the PC
Restore the personal files on your Windows 10 computer.
Connect an external backup drive to the computer.
Scroll to the bottom of the Backup options screen, and then click Restore files from a current backup .
Select the files you want to restore, click the Restore button, and then wait for Windows to restore your personal files. This might take a few minutes or a few hours, depending on the size of the files.
Additional support options
Enter a topic to search our knowledge library
How to fix any Wi-Fi problems easily on Windows 11
Are you experiencing slow WiFi connection, no internet access, or other problems on Windows 11? Use the network reset feature to fix the problem quickly.

On Windows 11, Wi-Fi connectivity is one of the most common problems. You always come across user reports complaining about slow Wi-Fi speeds, and error messages like “Limited access,” “Unidentified Network,” or no internet access.
If your device has networking issues, Windows 11 has a feature to reset Wi-Fi and Ethernet network adapters to fix the most common connectivity problems, even slow Wi-Fi speeds on Surface and other computers.
The reset feature will remove the existing configurations and restore the factory networking settings, and it’ll reinstall all the network adapter’s drivers. You cannot pick a specific Wi-Fi or Ethernet adapter. This feature will automatically remove and reinstall all of the adapters. After you complete the process, you may need to reinstall or reconfigure other networking software, such as VPN client software.
This guide will teach you the steps to reset the network adapters when the Wi-Fi is not working on Windows 11.
Reset Wi-Fi network adapter to fix problems on Windows 11
To reset the Wi-Fi and any other network adapter settings to fix connection problems, close any running application, and use these steps:
Open Settings on Windows 11.
Click on Network & internet .
Click the Advanced network settings tab on the right side.

Under the “More settings” section, click the Network Reset tab at the bottom of the page.

Click the Reset now button to fix the Wi-Fi problems on Windows 11.

Click Yes to confirm.
Click the Close button.
Restart your computer.
After you complete the steps, reconnect to the wireless network, and then you should once again be able to access the internet.
In addition to resetting the network adapters, consider many factors that can cause networking problems. For instance, it could be a driver issue, misconfiguration, router or access point problem, and many others.

Mauro Huculak is a Windows How-To Expert who started Pureinfotech in 2010 as an independent online publication. He has also been a Windows Central contributor for nearly a decade. Mauro has over 14 years of experience writing comprehensive guides and creating professional videos about Windows and software, including Android and Linux. Before becoming a technology writer, he was an IT administrator for seven years. In total, Mauro has over 20 years of combined experience in technology. Throughout his career, he achieved different professional certifications from Microsoft (MSCA), Cisco (CCNP), VMware (VCP), and CompTIA (A+ and Network+), and he has been recognized as a Microsoft MVP for many years. You can follow him on X (Twitter) , YouTube , LinkedIn and About.me .
- Windows 11 update history tracker
- How to enable Administrator account on Windows 11
We hate spam as much as you! Unsubscribe any time Powered by follow.it ( Privacy ), our Privacy .
Home » Tech Tips » Windows » How to Fix Wi-Fi Disconnecting Problem in Windows 10?
How to Fix Wi-Fi Disconnecting Problem in Windows 10?
Recently we have used the free upgrade offer from Microsoft to upgrade Windows 8 to the latest Windows 10. Well, the installation was quite smooth with few restarts until we struck up with the first issue. The laptop was not able to connect to the wireless (WiFi) network. After fighting hard to install the latest driver files for the network adapter, finally we could able to connect to the internet through WiFi. It did not last long as we struck with the second issue. WiFi was dropping frequently and there were no proper solutions to resolve the issue. In this article we would like to share all those things we tried to resolve the WiFi connection issues in Windows PC.
Check out our other articles if you are looking for fixing Wi-Fi issues in iPhone and MacBook .

Internet Not Connected
When you have problem with wireless connection, first check whether you can connect to internet by opening a website in Edge or other browser you use. If you notice WiFi icon on the system tray shows a warning with limited or no internet connection then check this article on how to fix this issue. Try the following solutions to ensure you have working internet connection.
1. Run Windows Network Diagnostics
Windows 10 offers a handy option to troubleshoot network related issues. Simply right click on the WiFi icon on the taskbar tray and select “Troubleshoot problems” option.

This will open Windows Network Diagnostics and the system will automatically start detecting the network problems on your PC. Most of the time, this will help to fix wireless related issues. You can also view the detailed information to get the troubleshooting report like below.

2. Network Adapter Issue
When you noticed your PC could not connect to wireless after Windows 10 upgrade, the most possible reason is the network adapter . Follow the below steps to fix this issue:
- Right click on the “Start” menu and choose “Device Manager” or use the “Cortana” search box next to “Start” menu and open “Device Manager”.
- Find out the adapter used on your PC under “Network adapters” section.

- In our case it was “Intel(R) PRO/Wireless 3945ABG”. Go to the provider’s site and download the latest driver file for Windows 10.
- Uninstall the old driver and install the newly downloaded one.
- Click on the “Scan for hardware changes” to re-enable the adapter with the newly installed driver.
This should resolve the problem of connecting to the wireless network.
3. Switch Off Airplane Mode
Windows 10 has an option to switch off wireless connection using quick “Airplane Mode”. Click on the WiFi icon on the tray and check your “Airplane Mode” is disabled.

WiFi Connection Frequently Dropping Off
It took few days to realize that the WiFi connection was dropping off frequently due to the problem in laptop. Since we use VPN it was the first suspect and the router being the second one. As the same VPN and router were perfectly working with the iPhone, we were forced to look into the Windows laptop for clue. When looked into the “Events Viewer”, it confirmed that the network was dropped off frequently with the error message “WLAN AutoConfig service failed to connect to a wireless network”.

At beginning we have tried the following steps:
- Restart the laptop, router and reset VPN settings
- Disable and enable wireless connection
- Troubleshoot the wireless connection
- Disable Windows Defender
- Check “Task Manager” to see any programs are causing the issue
None of these worked out and the problem returns back intermittently. It was time to dig the issue deeper and below is the list of options we tried to fix the issue. For us, finally the option 2 worked out and we could successfully connect to WiFi without dropping off.
Option 1 – Disable Network Discovery
Open “Network and Sharing Center” and click on the the wireless internet connection you are using.

Click on the “Wireless Properties” button under “General” section which will take you to the properties of your wireless connection. Disable the option “Look for other wireless networks while connected to this network” under “Connection” tab.
Note: SSID is the name of your wireless connection, ensure to have a unique wireless connection name for your router to avoid confusion.
Option 2 – Adapter Power Management Settings
Open “ Network and Sharing Centre ” and click on your wireless connection name. This time click on the “Properties” button under “Activity” section.

You will be taken to “Wi-Fi Properties” popup and click on the “Configure” button for your wireless router connection. The next popup will show the network connection properties of your wireless router and disable the option “Allow the computer to turn off this device to save power” under “Power Management” tab.
Option 3 – Disable IPv6
IPv6 addresses are introduced with the depletion of IPv4 addresses and currently both IPv4 and IPv6 are used by most of the services. You can give try by disabling IPv6 connection under your “WiFi Properties”.

Warning: Disabling IPv6 will affect accessing certain websites available only through IPv6 and also you may not able to create workgroup.
Option 4 – Restart Computer Browser Service
Right click on the Windows taskbar and click on the “Task Manager” option. By default the “Browser” services will be in a “Running” status which can be seen under “Services” tab. Right click on the “Browser” service and “Restart” it.

Option 5 – Tun Off Bluetooth Discovery Mode
If you have enabled Bluetooth on your laptop, navigate to Bluetooth settings and click on “More Bluetooth options”. Then disable the option “Allow Bluetooth devices to find this PC” under “Discovery” section.

We have looked into all those Microsoft and other popular forums and it is clearly evident that the wireless connectivity problem is something to do with Windows and not related to the router. Unfortunately the issue is not addressed with any appropriate solution. Though option 2 worked for us, you may need to try out different options to make the WiFi connectivity stable.
About Editorial Staff
Editorial Staff at WebNots are team of experts who love to build websites, find tech hacks and share the learning with community.
You also might be interested in

How to Fix Bluetooth Connection Issues in iPhone?
Bluetooth is an unavoidable feature in this fast phased world.[...]

Top 10 International Calling Apps for Android
There was a time mobile phone calls were super expensive[...]

How to Enable Do Not Track in Chrome, Firefox, Safari and Edge?
When surfing the internet, you leave a record of your[...]
44 Comments
Leave your reply..
I have tried all of these and still have intermittent connection. There is no “browser” service in task manager. Could this possibly be a problem? Does it need to be re enabled somehow?
ipv6 cased the problem….. tyvm :)
no, ipv6 didn’t cause the problem (or not alone), but HIBERNATION (maybe sleep too, didn’t try it yet).
My laptop works perfectly in the workplace but is extremely intermittent when working from home. Would you recommend trying any of the fixes or could this hinder how it works at work???
I used to have a tough time connecting my Wi-Fi but now I simply turn on Airplane Mode, connect to the Wi-Fi, and then turn off Airplane mode. It is such a simple algorithm it may sound silly, but it works fine on my laptop (windows 10).
You are genius. This works!
This post contains the best hands-on method to resolving this issue that I’ve come across. It works nicely even with the unpredictable updates popping up now and then on my laptop.
Option #2 worked for me. Thank You
Option 3 – Disable IPv6 worked for me. Thank you for your time and hints.
Nice to see it helped you!!! Be aware of the impact as mentioned in the article and in other comments.
Power management . . . . . . . . my bluetooth mouse would disconnect all the time. Finally figured out it was the power management setting. Now wifi intermittantly goes off. Can’t believe that I did not think to check power management. Thanks for the clue . . . and the solution!
Nice to see it helped you!!!
New PC came with Windows 10 and I’ve been using a wireless dongle. I’ve been experiencing these wretched drop outs as well. Thank you for putting this very helpful list together. I’ve gone through all of them, and now appear to have a stable internet.
Thanks for posting and nice to see it helped you.
I have the same win10 wifi issue with my laptop. I tried all these options but none of them works. Occasionally I found, if I turn on airplane mode for a few seconds and then turn it off, the wifi will work for a relatively long time. Try it if other ways all failed.
just my 2 cents worth
i got a gateway t-series t6815 with the intel pro 3945ABG , the solution for me was TURN OF THE IPV6 ind right away the wire less started and it still works
thank you ,thank you
Thanks for the inputs. Note, IPv6 may impact accessing certain sites and workgroup creation as mentioned in the article.
I have a Toshiba S55 with Windows 10.
After an hour I have booted it, it is impossible to work. Continously disconnects from my local wifi and cannot see mi wifi to reconnect to it. I have to disable/enable the adapter several times to reconnect and keep an stable link.
Meanwhile my cheapest cell phone and other toshiba with Windows 7 that I have, are working perfecly.
In my opinion, it is a bug. I have the lattest drivers, change from DHCP to fixed IP address, execute a lot of network commands, and reinstall W10. Nothing works!!
Did you try turning off ipv6 ?
In this case, the better option is to contact Toshiba support and try to find a solution from them.
Hi, after a month of fighting with dropping wifi, reinstalling system, bios, wifi card etc I solved issue by… installing card driver that had been released on 01.Nov.2017!!! My wifi stopped working on October,12 this year and now it is working. So, my suggestion is. Try to install drivers one by one starting from the newest.
Thanks for reading and your inputs.
Most of these fixes work only if your connection is stable enough that you can complete them before losing the connection. In my case, I have about 5 seconds before the connection is lost again. Can any of these be done in those few seconds that I’m connected? Or is there a way to modify them without the connection being “live”? I have the most recent update for the wireless driver. All my other devices work fine (but they’re all iOS and macOS).
You can try almost all the above fixes without connecting to internet. If the problem persists, it could be on your Windows OS and not on the wireless adapter. So you can contact your computer support or try repairing Windows 10 .
I tried all of these methods and none of them seem to work for me, it doesn’t even decrease the amount of times it drops out. Do you have any other solutions I could try? My laptop is brand new only a few days old and it started happening all of a sudden, I had no issues the first two days.
Try repairing your Windows or contact your laptop support to get it resolved. Sometimes it could be due to the Windows OS.
I need to uninstall and install the driver files, now the connection looks stable.
Most of the time drivers could cause such problems!!!
Good morning Sir,
Thank you for the detailed instructions. Unfortunately, nothing worked for me.
In option 4 the “browser” by default is stopped. Any idea why? When i try to start it, it goes back to stopped after a while.
Go to the command prompt, enter the below command and hit enter.
sc config Browser start= demand
Restart your PC and try it works.
Option 2-power management helped reduce the drops. But new occurrences of dropping have started to show up. My other laptop (win7) stays up, so I am trying turning off IP6 (thanks for the screenshots to get to that rabbit hole). Although I suspect, I need to turn off Bluetooth as well (running WiFi connected to phone).
Thanks for building such a complete list, with thorough instructions.
Thanks for reading, remember disabling IPv6 ill have other impacts like you can’t setup workgroup.
Thanks so much!
My issue related to Bluetooth Discovery Mode – After 3 days of frustration, Wi-Fi has been up for nearly 24 hours now – thanks for your information and help.
Thank you for the complete solutions
I tried to have option 2, but there was no “Power Management” tab
The wireless driver has to be repaired at each restart of the laptop, with the Intel ProSet app. It disappears at each restart. After the repair it works fine, no disconnections. very unique problem. any solutions please?
For such issue, better contact the manufacturer support.
I have installed Intel PROset/Wireless software v. 19.20.00 and after running it to repair driver the wireless showed up again and worked. Only when IU reboot it is back to the same fault, no wireless showing and have to run the repair software again every time before I can have a wireless connection active. Any permanent solutions? This has also started with the installation of the anniversary edition of Windows 10 on a brand new lenovo thinkpad E570 just unpacked. Another issue is the Hello setup, the software opens a small black windows for a couple of seconds and then it fades aways, not allowing me to setup the fingerprint sign in option. Thanks for the help you can provide, if any.
Best regards
You can try uninstalling the device and reinstall the drivers again. For Hello, you can checkout this guide from Microsoft.
Try adjusting Windows power plan settings for the wireless adapter to “Maximum Performance”.
Thanks for your inputs.
Option 2 work for me as well. Thank You.
Your tutorial is very useful and provides another way to fix Windows 10 Wi-Fi issues. As for me, I used a way which is based on a program to repair Wi-Fi stop working on Windows 10.
I followed the steps to update the wireless driver but failed. Then I used Driver Talent to update and I made it. After reboot, the problem was gone. Thank you for your instruction. You listed the detailed guidance with step-by-step. You are so patient. Thank you again.
You are welcome. Nice to see it helped you.
DOWNLOAD EBOOKS
- SEO Guide for Beginners
- WordPress SEO PDF Guide
- Weebly SEO PDF Guide
- Alt Code Emoji Shortcuts PDF
- ALT Code Shortcuts PDF
- View All eBooks
TRENDING TECH ARTICLES
- 600+ Windows Alt Codes for Symbols
- Fix Chrome Resolving Host Problem
- Fix Slow Page Loading Issue in Google Chrome
- View Webpage Source CSS and HTML in Google Chrome
- Fix Safari Slow Loading Pages in macOS
- Fix Windows WiFi Connection Issue
- ROYGBIV or VIBGYOR Rainbow Color Codes
- Fix I’m Not A Robot reCAPTCHA Issue in Google Search
- Structure of HTTP Request and Response
POPULAR WEB TUTORIALS
- Move WordPress Localhost Site to Live Server
- Move Live WordPress Site to Localhost
- Move WordPress Media Folder to Subdomain
- Fix WooCommerce Ajax Loading Issue
- Create a Free Weebly Blog
- Edit Weebly Source Code HTML and CSS
- Add Scroll To Top Button in Weebly
- Add Table in Weebly Site
- How to Add Advanced Data Table Widget in Weebly?
- Up to $500 Free Google Ads Coupon Codes
FREE SEO TOOLS
- Webpage Source Code Viewer
- HTTP Header Checker
- What is My IP Address?
- Google Cache Checker
- Domain Age Checker Tool
- View All Free Web and SEO Tools
© 2024 · WebNots · All Rights Reserved.
Type and press Enter to search
- Insider Reviews
- Tech Buying Guides
- Personal Finance
- Insider Explainers
- Sustainability
- United States
- International
- Deutschland & Österreich
- South Africa

- Home ›
- tech ›
- news »
- Here’s how to fix Wi-Fi connection issues in Windows laptop
Here’s how to fix Wi-Fi connection issues in Windows laptop

- Here are some easy steps you can follow to fix your Wi-Fi connection issues.
- Firstly, you should check if your laptop’s Wi-Fi is turned on.
- Connect other devices to the Wi-Fi network to see if there is a problem with the Wi-Fi network.
Here’s how you can fix the Wi-Fi connection issues in Windows laptop

- Firstly, check if your Wi-Fi is turned on. To make sure, select the “No internet connection” icon at the bottom right of your screen and turn the Wi-Fi on.
- Make sure that the laptop is not in “Airplane mode”. If it is on, turn it off from the same Wi-Fi menu.
- Check the list of Wi-Fi networks and see if your trusted network is visible on the list. If it is, then connect to the network. If it display “Connected” then disconnect it and connect again.
- Try connecting to a different frequency band. Wi-Fi routers with dual-band frequency display two different network names for 2.4GHz and 5GHz bands. If you are connected to one network and there is no internet connection, you can try connecting to the other network.
- Ensure that the Wi‑Fi switch that has an indicator on your laptop is turned on.
- Run the Network troubleshooter. It can help diagnose the problem and fix it.
- Select the Start button and go to Settings > Network & Internet > Status.
- Here under Advanced network settings, select Network troubleshooter.
- Follow the steps in the troubleshooter, and see if that fixes the problem.
- Disconnect the cables of both your modem and router.
- Wait for at least 30 seconds before plugging the modem back into the power source.
- Wait for the lights on the modem to stop blinking.
- Plug your router back into the power source.
- Wait for a few minutes and check if your laptop is connecting to the Wi-Fi.
- Hold the Windows key on your keyboard, and press R simultaneously to open the Run command box.
- Type cmd and press Enter key.
- A black window will appear. Type ipconfig /release and press Enter. Wait for the command to complete.
- Once the command completes, type ipconfig /renew and press Enter. Wait for the command to complete.
- Now Connect your laptop to Wi-Fi and see if it works.
- Hold the Windows logo key, and simultaneously press the Pause button. Or you can go to Control Panel > All Control Panel Items > System
- Select Device Manager.
- From the list of items, double-click on Network adapters. Then right-click on your Wi-Fi driver software and select Uninstall device.
- Then restart your laptop.
- Wait for some time after the boot is complete and try to connect to the Wi-Fi again.

- Current Location in Google
- Hide Whatsapp Messages
- Phone is hacked or not
- Whatsapp Deleted Messages
- Download photos from Whatsapp
- Instagram Messages
- How to lock facebook profile
- Unfollowed on Instagram
- Best printers for Home
- Best Mixer Grinder
- Best wired Earphones
- Best 43 Inch TV in India
- Best Wi Fi Routers
- Best Vacuum Cleaner
- Best Home Theatre in India
- Smart Watch under 5000
- Best Laptops for Education
- Best Laptop for Students

- Advertising
- Write for Us
- Privacy Policy
- Policy News
- Personal Finance News
- Mobile News
- Business News
- Ecommerce News
- Startups News
- Stock Market News
- Finance News
- Entertainment News
- Economy News
- Careers News
- International News
- Politics News
- Education News
- Advertising News
- Health News
- Science News
- Retail News
- Sports News
- Personalities News
- Corporates News
- Environment News
- Top 10 Richest people
- Cibil Score vs Cibil Report
- Top 10 Largest Economies
- Lucky Color for 2023
- How to check pan and Aadhaar
- Deleted Whatsapp Messages
- How to restore deleted messages
- 10 types of Drinks
- Instagram Sad Face Filter
- Unlimited Wifi Plans
- Recover Whatsapp Messages
- Google Meet
- Check Balance in SBI
- How to check Vodafone Balance
- Transfer Whatsapp Message
- NSE Bank Holidays
- Dual Whatsapp on Single phone
- Phone is hacked or Not
- How to Port Airtel to Jio
- Window 10 Screenshot
Copyright © 2024 . Times Internet Limited. All rights reserved.For reprint rights. Times Syndication Service.
How-To Geek
How to fix when wi-fi won't connect.
Get back online with some troubleshooting tips.
Quick Links
Double check the wi-fi password, see if the connection requires a wi-fi login page, restart your connecting device, "forget" the wi-fi network and try again, restart your wi-fi router or access point, no internet access check your modem, make sure wi-fi settings are compatible with your device, try a different frequency band, consider distance and interference; change channel, try a different device or wi-fi adapter, try updating your wi-fi adapter's driver, try a different router.
It's frustrating when a Wi-Fi connection doesn't work, and a lot of things can go wrong. We'll walk you through a few common troubleshooting techniques that can help, starting with the methods you should try first.
To connect to most Wi-Fi routers, you'll need a password . This password is set by the owner of the router or access point. If there's even a one character typo in the password, you won't be able to connect.
Related: How to Find Your Wi-Fi Password
So make sure you have the right Wi-Fi password: Ask for it again, if necessary, to double check, or write it down twice on a piece of paper. Then re-enter it in the Setup or Configuration app of the connecting device and see if that helps. If not, move ahead to another step.
Some businesses (such as hotels, restaurants, airlines, and more) provide an "open" Wi-Fi network that restricts access using a Wi-Fi login page or portal in a web browser . These login pages make you sign in with a special username and password provided by the business.
Related: How to Connect to Starbucks Wi-Fi
If you've connected to a Wi-Fi access point in the settings or configuration app on your device but aren't seeing any internet access, try opening your browser on that device and visiting any website. If the business uses a login page, you'll usually be automatically redirected to the login page where you can enter the credentials properly.
If you're having trouble connecting to a Wi-Fi access point, another easy troubleshooting tip you can perform is to reboot or restart the device you're trying to connect with.
Related: Why Does Rebooting a Computer Fix So Many Problems?
Restarting a gadget solves many problems caused by temporary bugs because it forces the device to reload its software and settings from scratch. After restarting, try to connect via Wi-Fi again. If it works, you're ready to go. If it's still not working, move on to another suggestion below.
We've already mentioned double-checking and re-entering the Wi-Fi password. As a next step, open the configuration app (Settings on iPhone, for example), and tap the name of the Wi-Fi network you're trying to connect to, then select an option to delete or "forget" the saved settings of the Wi-Fi network. How you do this varies by the device you're using. We have instructions about how to forget Wi-Fi networks on iPhone or iPad , Android , Mac , Windows , and Chromebook .
Related: How to Forget a Wi-Fi Network on Android
After that, you can either scan for networks and attempt to connect again or enter the information for the Wi-Fi access point manually. This technique is particularly helpful if the router has changed its Wi-Fi settings but the device you're using to connect is still configured with older settings (such as an older password or different security settings).
If you're still having trouble connecting to your Wi-Fi router---and you have control over the router or access point itself---you can try restarting it to see if that helps clear any temporary bugs or error states that might be making it malfunction. Similar to restarting the connecting device, restarting your router forces it to reload its settings from scratch, which can solve a variety of problems.
Related: How to Make Your Phone Useful When There's No Internet
Just be aware that restarting your router might disrupt other people using the network (perhaps streaming a TV show, doing a backup, gaming, video chatting, or otherwise), so make sure you give them a warning first.
If you're connected to your Wi-Fi access point but you're still not getting internet access, the problem could be with the modem (cable, DSL, wireless, or otherwise) that is feeding the internet connection to your Wi-Fi router.
Related: Why Am I Connected to Wi-Fi But Not the Internet?
First, check with your ISP to see if there is an internet outage in your area. If there isn't an outage, restart your modem (unplug it, wait 30 seconds, then plug back in), and make sure the Ethernet cable (if there is any) between your modem and your router isn't damaged or unplugged.
Related: How to Reboot Your Router and Modem
Many older devices with Wi-Fi don't support modern Wi-Fi security connection standards. So unless you have your router set to a backward-compatible security mode, those older devices won't be able to connect.
Related: The Difference Between WEP, WPA, and WPA2 Wi-Fi Passwords
For example, the Nintendo DS (released in 2004) only supports WEP security and not newer standards like WPA or WPA2. Similarly, some older devices cannot access the newer frequency bands used by some routers, so make sure your router supports legacy bands such as 2.4 GHz if that is the case.
Most modern Wi-Fi routers support connections through at least two different frequency bands, with 2.4 GHz and 5 GHz being the most common.
Related: What's the Difference Between 2.4 and 5 GHz Wi-Fi (and Which Should I Use)?
Some routers will automatically connect compatible devices to the higher-frequency band, but others require you to connect to a different SSID for each frequency.
For troubleshooting, it's important to know that 5 GHz connections offer higher speeds but less range than a 2.4 GHz connection. So if you're having trouble getting a reliable signal on your router's 5 GHz band, try forcing a 2.4 GHz connection instead---or move closer to the router.
Related: 5 GHz Wi-Fi Isn't Always Better Than 2.4 GHz Wi-Fi
Wi-Fi is handy, but it isn't perfect. Wi-Fi's radio signal follows the inverse square law , which means the strength of the signal decreases exponentially (dropping off rapidly) as you increase the distance between yourself and the router. If you do have a signal strength problem, you can move closer to the router or consider installing a larger antenna , more powerful router , or a Wi-Fi repeater or range-extender at some point in your network.
Related: Why Does Running My Microwave Kill My Wi-Fi Connectivity?
Also, you might consider investigating potential radio interference from devices such as microwaves or other gadgets that use similar frequencies (2.5 GHz or 5 GHz in particular). In those cases, you can either disable the interfering devices or route around them with a wired connection to a second Wi-Fi access point on the other side of the interfering device.
If you suspect interference, you can try to set your Wi-Fi to use a different channel , which might avoid certain types of interference---especially with other nearby Wi-Fi networks (run by neighbors or businesses).
Related: How to Find the Best Wi-Fi Channel for Your Router on Any Operating System
At this point, it's a good idea to see if you can connect to the Wi-Fi network using a different device than the one you're having trouble with. If so, the problem is likely with the connecting device itself and not the router. It could also be a problem with the unique combination of your device and the router, which usually comes into play related to your Wi-Fi settings, as we'll address below.
Related: How To Upgrade Or Replace Your PC's Wireless Card
Also, Wi-Fi adapters sometimes go bad or have buggy drivers. If your device supports plugging in other Wi-Fi adapters (such as internal PCe cards or USB adapters ), then you can try to purchase a new Wi-Fi adapter and either replace the one currently in your device or disable the old one and activate the new one. If the new adapter works, then your original Wi-Fi adapter is malfunctioning. If the new adapter doesn't work, then you're looking at a larger problem that other troubleshooting suggestions in this list might help.
If you're using a Windows or Linux PC with a Wi-Fi network adapter (whether built-in or otherwise), it's possible that updating the driver for the Wi-Fi adapter could solve your problem and allow you to connect to the Wi-Fi access point successfully.
Related: How to Update Drivers on Windows 11
To update a driver in Windows, you'll need to find the latest driver for your adapter from the manufacturer's website and follow the instructions in our guides for Windows 10 or Windows 11 . To update a hardware driver in Linux, you'll need to have more technical knowledge, but we've written about that as well. Once you've updated, restart your PC and attempt to connect again. If it works, then you're good to go.
And finally, if nothing else works, your router might be simply bad. If so, you can contact the support staff of the manufacturer and ask for repair or replacement options. Or if the router is older and you're ready to upgrade anyway, it may be time to buy a completely new model. Here's a good all-around model that we've tested from Asus, for example:
ASUS AX6000 WiFi 6 Gaming Router (RT-AX88U) - Dual Band Gigabit Wireless Router, 8 GB Ports, Gaming & Streaming, AiMesh Compatible, Included Lifetime Internet Security, Adaptive QoS, MU-MIMO
A great all-around Wi-Fi router for most people.
If that router doesn't suit you, we've written a review guide to other high-quality routers that you can consider. Whichever one you choose, hopefully it will solve your connection issues. Good luck!
Related: The Best Wi-Fi Routers of 2023
No file downloaded?

Driver Easy
Home › Knowledge Base › Network issues
[SOLVED] WiFi Not Working On Laptop
If your ever run into the WiFi not working on laptop problem, don’t worry. It’s often not hard to fix at all…
Fixes for WiFi not working on laptop
Before your start, please make sure your laptop is within the connection range of the WiFi network.
Then check on other devices that are connected to the same WiFi network to see if they are working properly.
- If these devices cannot be connected to WiFi either , there is probably an issue going on with your WiFi router. You should look into your WiFi router to troubleshoot the issue. Or if it still doesn’t work, please contact your ISP provider for help.
- If these devices work properly , please work your way down the list until the WiFi not working on laptop problem is resolved.
- Update your Wi-Fi driver
- Check if Wi-Fi is enabled
- Reset WLAN AutoConfig
- Change adapter Power Settings
- Renew IP and flush DNS
Fix 1: Update your Wi-Fi driver
This problem may occur when you’re using the wrong WiFi driver or it’s out of date. So you should update your WiFi driver to see if it fixes the problem. If you don’t have the time, patience or computer skills to update the driver manually, you can do it automatically with Driver Easy .
Driver Easy will automatically recognize your system and find the correct drivers for it. You don’t need to know exactly what system your computer is running, you don’t need to be troubled by the wrong driver you would be downloading, and you don’t need to worry about making a mistake when installing. Driver Easy handles it all.
There are two ways you can use Driver Easy to update your WiFi driver:
If you can connect your laptop to a wired network, then choose Option 1 . Otherwise, please choose Option 2 .
Option 1: Update the WiFi driver directly
1) Download and install Driver Easy.
2) Run Driver Easy and click Scan Now . Driver Easy will then scan your computer and detect any problem drivers.

3) Click Update All to automatically download and install the correct version of ALL the drivers that are missing or out of date on your system (this requires the Pro version – you’ll be prompted to upgrade when you click Update All).

4) Restart your computer for the changes to take effect.
5) Check to see if the WiFi not working on laptop issue has been resolved. If yes, then congrats! If the issue remains, please try Fix 2 .
Option 2: Update the WiFi driver with the offline scan feature
1) On a computer with Internet access, download Driver Easy. Then save the setup file of Driver Easy in a USB flash drive and transfer it to the target computer (the computer without Internet connection).
2) On the target computer, run the Driver Easy setup file to install Driver Easy.
3) Run Driver Easy and click Tools in the left pane.

4) Click Offline Scan . Then select Offline Scan (on the computer without Internet access) and click Continue .
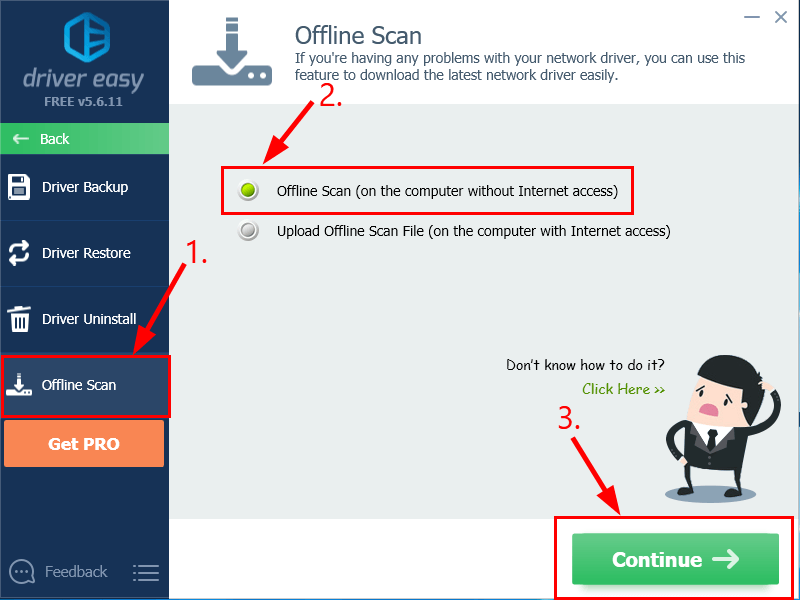
5) Click Browse… , then choose a destination folder in your computer to save the offline scan file. After that, click Offline Scan .
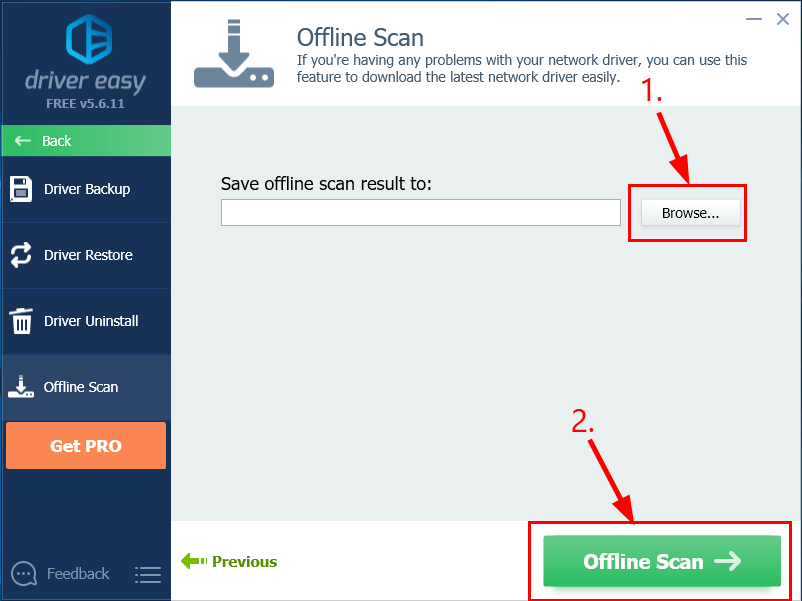
6) A window will pop up telling you that the offline scan file has been saved. Click OK to confirm.
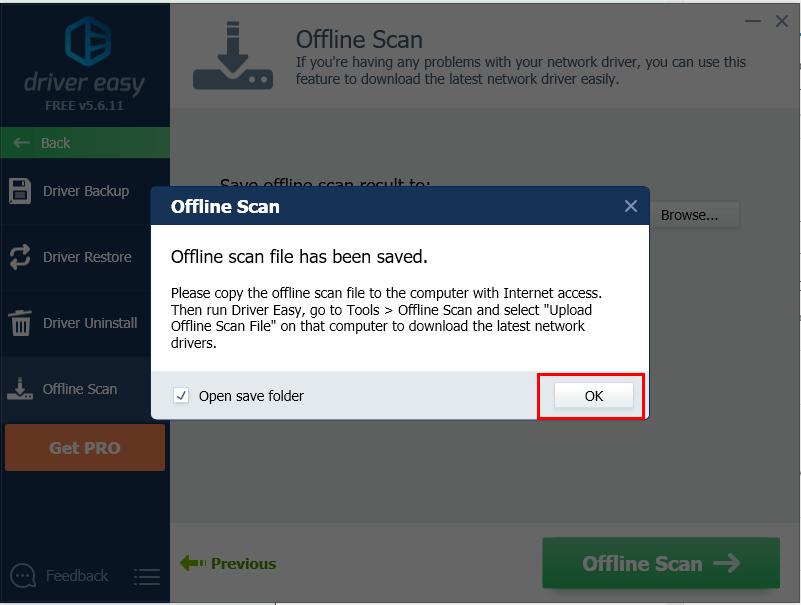
7) Open the folder where you’ve saved the offline scan file. Then save the file in a USB flash drive and transfer it to another computer with Internet connection.
8) On the computer with Internet connection, (download and) install Driver Easy.
9) Run Driver Easy and click Tools in the left pane.
10) Click Offline Scan . Then select Upload Offline Scan File (on the computer with Internet access) and click Continue .
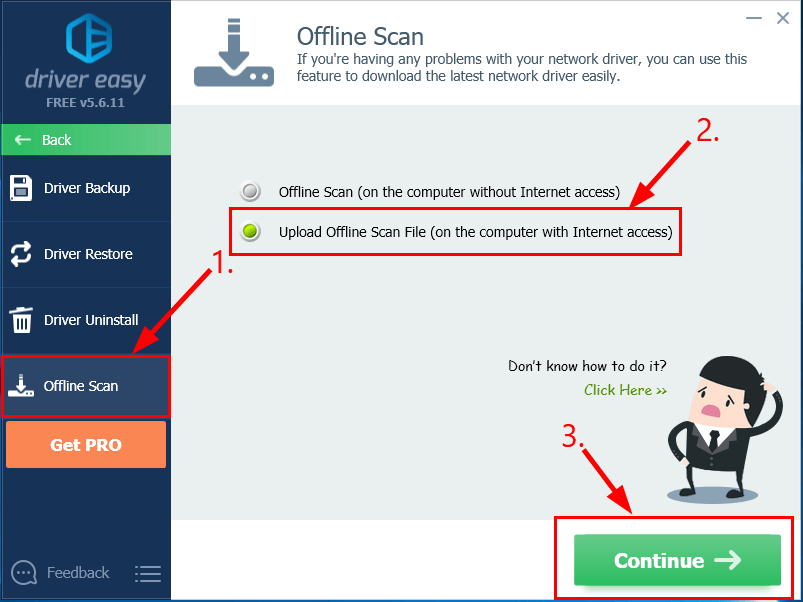
11) Click Browse… to locate the offline scan file. Then click Continue .
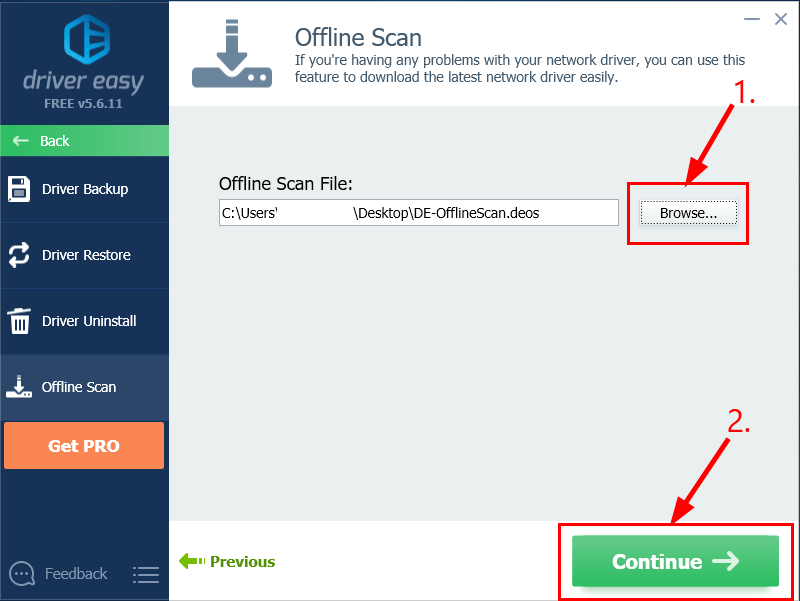
12) Click the Download button next to your wireless driver.

13) Wait until the computer completes. When it does, save the downloaded file to your USB drive and transfer it to the target computer.
14) You can follow Step 3 of Driver Easy Help to manually install your WiFi driver.
15) Restart your computer for the changes to take effect.
16) Check to see if the WiFi not working on laptop issue has been resolved. If yes, then congrats! If the issue remains, please try Fix 2 , below.
Fix 2: Check if Wi-Fi is enabled
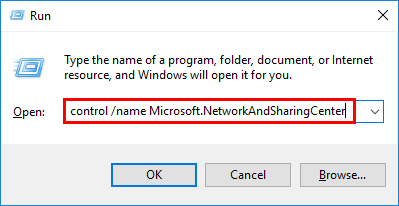
- Check to see if WiFi is working properly on your laptop. If yes, then great! If the problem persists, please try Fix 3 , below.
Fix 3: Reset WLAN AutoConfig
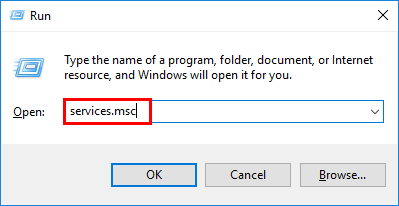
Select Automatic in Startup type and click Start . Then click Apply > OK .

- Check to see if the Wi-Fi not working on laptop problem is resolved.
WiFi still not working? Please try Fix 4 , below.
Fix 4: Change adapter Power Settings

- Click Apply > OK .
- Check if your WifI not working on Windows 10/8/7 problem gets fixed.
Fix 5: Renew IP and flush DNS
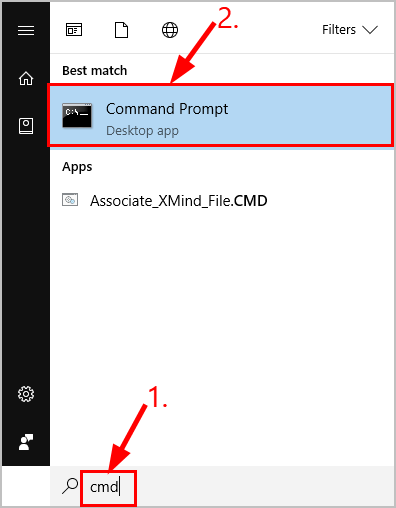
Click Yes when prompted to confirm.
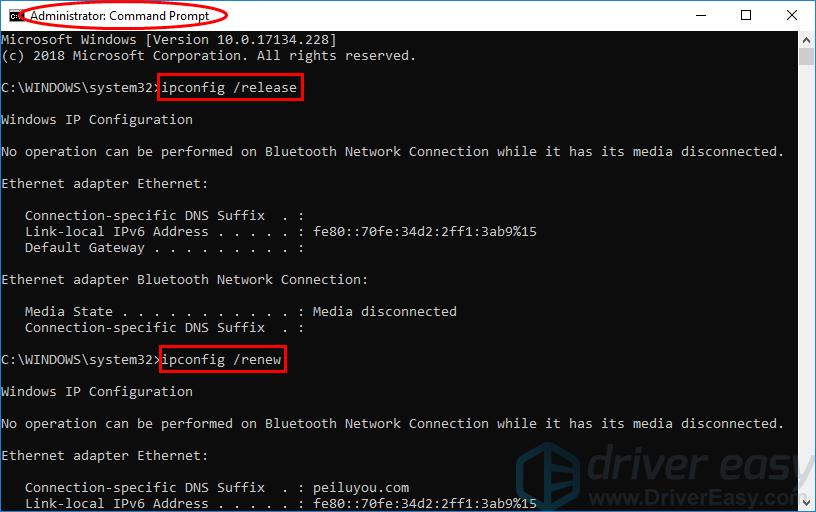
- Wait until the command finishes. Then type ipconfig /flushdns and press Enter .
- Re-connect your laptop to WiFi again and see if it works.
Hopefully you have successfully resolved the WiFi not working on laptop issue by now. If you have any questions, ideas or suggestions, please let me know in the comments. Thanks for reading!

Related Articles
[fixed] network adapter not working on windows (2024), how to fix windows 11 unidentified network, how to fix packet loss in rocket league – 2024 tips, 2024 tips | how to fix diablo immortal connection issues on pc, valorant timeout error [2024 fix], [solved] valheim dedicated server disconnected error in 2024.
Enya is a technical writer and major contributor to the Driver Easy knowledgebase. She genuinely enjoys creating how-to guides, tutorials, fixes for common tech issues, and articles about the latest gadgets and software. What drives her passion? For one, she loves tech itself. But more importantly, Enya derives great satisfaction from helping people solve the technological headaches that frustrate their day-to-day lives. While some writers avoid technical topics, Enya thrives on making the complex clear and accessible. When she's not writing, you can find Enya staying on top of emerging tech trends and mastering new devices and platforms. She knows the obstacles people face because she's experienced them firsthand.
Microsoft 365 Certified: Modern Desktop Administrator Associate
- Tech Gift Ideas for Mom
- Hot Tech Deals at Target Right Now
How to Fix it When Your Wi-Fi Network Is Not Showing Up
Router, ISP, range, or device issues can create problems but it's possible a virus is at fault, too
:max_bytes(150000):strip_icc():format(webp)/TriciaGoss-c6bcd4d050f744c2b13efbf760819c9d.jpg "how to fix wifi connection problem on laptop")
- Pima College
In This Article
Jump to a Section
- Causes of the Problem
- Solutions to Try
- Frequently Asked Questions
When you can't connect to the internet because your Wi-Fi doesn't show up on your device, you have a problem. It helps if you know the cause, but you can take steps to remedy the situation even if you don't.
Causes for 'Wireless Network Not Showing Up' Issues
Problems with your router, ISP, or device could prevent your Wi-Fi network from showing up in the list of available networks. A few of the reasons that cause Wi-Fi connection problems include:
- Device not in router's range : Your device must be within the router's range. In most homes, that can be up to 30 feet from the router. You may be able to connect up to 50 feet away, but the speed is slower, and the connection often drops.
- Router not restored correctly : The router might not have been properly restored after losing power or being unplugged.
- Network adapter turned off/disabled : The Wi-Fi connection problem isn't always caused by the router; your device could be the culprit. If a restart doesn't help, your network adapter could be disabled, or its drivers may need updating.
- Virus : If your device has a virus, it could block your ability to connect to Wi-Fi. A quick virus scan and restart could help.
- Object interference : Large appliances, thick walls, or other wireless devices can interfere with your wireless connection.
Wi-Fi not showing up can be caused by these and more issues. Troubleshooting to find the problem is the key to fixing it.
How to Fix a Wi-Fi Network Not Showing Up
Try these troubleshooting steps in order until you resolve your issue. They are listed from easiest to most complex.
Troubleshoot your wireless connection . Before you begin trying to fix your Wi-Fi, make sure there is no problem with the device you are trying to connect.
If the issue is that your Wi-Fi network is not showing up on your laptop, for example, take a few minutes to make sure everything on the computer is as it should be. Are all cables connected to the device? Are they plugged in to a working outlet? Are you sure the Wi-Fi on the device is turned on? (This could be a physical switch, an internal setting, or both.) Ruling out the basics like this is the first place to start.
Properly restart the modem and router . Power cycling the router and modem can fix internet connectivity issues and resolve problems with wireless connections. It is important to reboot both the modem and the wireless router.
Check your network settings. The network could be hidden. Hiding a wireless network can be an effective way to protect privacy. However, it could result in the Wi-Fi network not showing up on a device. To connect with a hidden network , the SSID and other network details are required.
Access the Wi-Fi settings to add the network.
Look for interference. Interference is one of the many reasons Wi-Fi connections drop . Numerous objects around a home or office can interfere with a wireless router. Check for potential issues, such as appliances, microwaves or fluorescent lights, other wireless devices including wireless video game controllers or security cameras, and thick walls or columns.
Neighboring wireless networks could also interfere with your own. Changing your Wi-Fi channel number could resolve the issue.
Check with your ISP (Internet Service Provider) . If your troubleshooting efforts do not fix the problem, contact your internet service provider. There could be an area-wide issue of which you are unaware, or there might be a defect in the equipment provided by the company.
To fix slow Wi-Fi , close background programs, avoid signal interference, troubleshoot your network equipment, scan for malware, and contact your internet service provider.
To secure your Wi-Fi network , turn on WPA2 encryption, change the network name, create a strong password, turn on your router's firewall, and turn off admin privileges.
If you see the “Wi-Fi Doesn’t Have a Valid IP Configuration” error, restart your router, change the SSID and password, reset the firewall, or perform a network reset .
Get the Latest Tech News Delivered Every Day
- What to Do When Windows 11 Can't Connect to a Network
- How to Fix It When Your PS4 Wi-Fi Is Slow
- How to Fix It When Samsung TV Apps Aren't Working
- How to Fix the PS5 'Cannot Connect to the Wi-Fi Network' Error
- How to Fix an Xbox That Won't Connect to Wi-Fi
- How to Measure Your Wi-Fi Signal Strength
- How to Fix It When Your PS5 Wi-Fi Is Slow
- How to Fix It When There's No Internet Connection
- How to Fix It When PS4 Won't Connect to Wi-Fi
- How to Fix It When Fire Stick Won't Connect to Wi-Fi
- How to Fix a Poor Wi-Fi Signal on Your iPad
- How to Fix Common Xbox 360 Wireless Networking Problems
- How to Fix the PS4 'Cannot Connect to the Wi-Fi Network' Error
- How to Fix It When Nintendo Switch Won't Connect to Wi-Fi
- How to Fix Wi-Fi Authentication Problems on Android
- How to Fix it When a Chromebook Won't Connect to Wi-Fi
BroadbandNow is supported by commissions from some of the providers listed on our site. Learn More
The Ultimate Guide to Troubleshooting Home WiFi and Router Issues
- Tyler Cooper
- Restarting your router is the simplest way to solve Wi-Fi issues.
- Learning your router’s icons will help you diagnose any problems.
- Placing your router in a centralized and open area is essential for the best connection speed and stability.
- Speed tests and other diagnostic programs are useful tools for assessing your network connection.
- The best mesh Wi-Fi networks offer extensive coverage and the quickest speeds for your home.
Ninety-nine percent of home Wi-Fi issues can be fixed by unplugging the router, waiting five seconds, then plugging it back in. This resets the device and frequently improves the speed. But if that doesn’t fix your problem, this guide will provide you a to-the-point reference for dealing with some of the most common home Wi-Fi issues, such as the Wi-Fi not working, slowing down, disappearing, or not connecting with devices.
Keep reading to find out what to do if your connection is running slower than usual, as well as how to troubleshoot a network that won’t connect at all. We’ll also take a look at several tools you can use to help troubleshoot your connection no matter what problems crop up.
Table of Contents
Home wi-fi quick fix, understanding your router’s icons, how to troubleshoot wi-fi, tools for wi-fi troubleshooting, ways to boost your speeds or wi-fi reach, why does my computer keep disconnecting from wi-fi.
- If All Else Fails, Contact Your Service Provider
If your wireless connection suddenly stops working, restart your router before trying anything else. Here’s the process:
- Unplug or power off your router.
- Wait two to five minutes before plugging it back in.
- Wait five more minutes and retry the connection.
In most cases, this should fix your issue and allow you to get back online. If you go through these steps and something still isn’t working, you may need to contact your internet service provider for assistance.
Most routers have a series of icons that illuminate to convey different status messages at a glance. Though these can vary from brand to brand, most manufacturer’s include at least three primary status indicators:
Interpreting the Colors of Your Router’s Lights
Important note : In order to be clear on what your specific device is communicating to you, refer to the user manual for a more detailed explanation.
Pro tip: You can usually find a digital copy of your router’s manual by typing your device model number followed by “user manual” into Google.
If you’ve tried the quick fix above to no success, there are still several other ways you may be able to troubleshoot your Wi-Fi connection. In order to identify the technique most likely to actually help you, let’s break down some common issues:
“I’m experiencing slower-than-normal network speeds.”
Try this: Plug an ethernet cable directly into your router and test your internet speeds using our speed test tool . Next, test your speeds on the Wi-Fi connection. If they’re both slow, the issue is likely with your service provider and not your equipment. Give them a call.
If the hardwired connection is much faster than the wireless one, however, there may be more you can do to optimize your network. Wired connections will usually always be faster than wireless in some capacity, but the difference shouldn’t be so vast that your Wi-Fi is unusable. First, try moving your router to a more central location in your home. If that’s not an option, it may be worth exploring how to extend your Wi-Fi connection to all areas of your home.
Also, you might be encountering interference from networks adjacent to yours. If you think this may be the case, you can try changing the channel your router is broadcasting on. For starters, you’ll want to use the 5 GHz band whenever possible, if your router supports it. These tend to be less congested and therefore better performing than their 2.4 GHz counterparts.
“I have no internet connection at all.”
Try this: Plug an ethernet cable into your router and see if you’re able to get a signal on a desktop or laptop. If you can’t, your access has been cut and you should contact your ISP.
If you’re able to load web pages through a hardwired connection, there’s definitely something wrong with your Wi-Fi network. If restarting the router didn’t fix the issue, you may need to set it up again completely. Most routers have a small “reset” button that needs to be held down with a paperclip or other small object. Doing this will restore the device to factory settings and you’ll be able to go through the first-time setup once again.
If you’ve been through this process and still can’t get connected, you’ll likely need to contact your ISP for help. You could have an unpaid balance that has caused the company to suspend your account, or there might simply be an outage in your area.
“My Wi-Fi network disappeared completely.”
Try this: Check to see where your router is positioned. If it’s somewhere cramped, such as behind a couch or crammed into a storage closet, it might’ve overheated and shut down automatically to prevent any damage.
If you’re able to move your router to a place with more airflow, you should be able to solve the overheating issue. If you feel that your router is positioned in a good location and that overheating isn’t the problem, there are a few other things that could be happening.
For one, your network may have reset itself due to an update. Take a look at the default network name (usually printed somewhere on the router itself) and see if you recognize that network when looking for a connection.
“My phone/laptop/tablet won’t connect even though my other devices are fine.”
Try this: Turn off the offending device and turn it back on. You can also try turning the Wi-Fi off and on again in the settings of your device, just to be thorough.
If this doesn’t help, you may need to delete your network from the device entirely. On an iOS or Android device, you can simply click on the network name and hit “Forget This Network.” This means you’ll have to find the network again and put the password in like you did the first time you set it up, but it should solve any remaining connection issues in the process.
Our speed test tool allows you to see how your current network is performing in terms of both upload and download speeds. You can use this at any time to test the quality of your connection, and if you’re having any issues, you can use it to gauge your progress on getting them resolved. You can also use Speed Test periodically to see if you’re really getting the speeds that you’re paying for (look at your bill for payment info). Just remember that using Wi-Fi will always slow things down a little bit.
You can also run speed tests on different devices and from different locations. If the speed is sluggish on one device or in one location but not the others, that indicates an issue specific to the device or location.
Wireless Diagnostics (Mac)
The network diagnostics tool is a robust program that allows you to get a clear picture of your network health, as well as troubleshoot any issues you may be experiencing. You can find this program by hitting “command” plus “spacebar” and typing “Wireless Diagnostics” into the search bar.
When you first open the program, it will scan your immediate area for any available Wi-Fi networks. Once this is done, you’ll be presented with two options: monitor my Wi-Fi connection and continue to summary. Choose neither of these. Instead, at the top of your screen, select “Scan” from the Window drop-down menu. You will see a list of networks. Select “Scan Now.”
The service will then show you a full list of connections around you, including what channel they are operating on. The program will also show you the best channels for both the 2.4 GHz and 5 GHz bands based on network congestion. In order to actually change the channels your router is operating on, you’ll need to Google search the brand of the device followed by “IP address.” You will then type this in just like you would any regular website.
NirSoft (Windows)
NirSoft functions very similarly to the wireless diagnostics tools for Mac, scanning your Wi-Fi environment and displaying all available networks, as well as a number of useful statistics for each. You’ll still need to log into your router’s control panel to actually change its configuration.
NetSpot (Mac & Windows)
NetSpot is a fantastic alternative to both options above and even features some additional tools that intermediate users may find valuable. Above and beyond being able to view detailed information about your network, NetSpot also allows you to visualize its footprint in your home, showing you any dead zones and weak points that need to be patched up. Available as a free download, you’d be hard-pressed to find a more feature-complete troubleshooting program.
A little more speed or reach makes a big difference. To inject more oomph into your internet, try boosting your Wi-Fi signal and speeds with the following methods:
If your router is in a corner, closet, drawer, or non-central location, move it to a more open, central spot in the home (not the kitchen though. There is too much potential for liquid messes and signal interference from metal appliances). WiFi signals are stronger when they don’t have to travel through walls or floors, and a central location means better access to more devices. If your home is three floors, the central location is the middle of the second floor. Alternatively, adjust the angle of the antenna on your router, and see if that helps. Use compressed air to get gunk off your router, too. For more speed with heavy usage devices such as online gaming consoles and video-streaming laptops, keep them as close as possible to the router.
This method also gives you an idea whether neighbors, visitors, hackers, and others are connected to your network. The main step to see connected devices is to access your router’s admin panel. Another guide we wrote covers how to get into the admin panel. It’s easier than it may seem! Here are some other links that may help:
- Netgear login tutorial
- Linksys login tutorial
- Asus login tutorial
- TP-Link login tutorial
You may see a lot of devices connected to your WiFi, whether they’re on the 2.4GHz or 5GHz band. Smart speakers, smart thermostats, security cameras, and other smart home-type devices tend to be a better fit for 2.4GHz. PCs, laptops, gaming consoles for online gaming, and smart TVs that stream a lot of video should usually go on 5GHz.
2.4GHz band: This band has better range, works well through walls, and tends to be slower than 5GHz. It may slow down noticeably if “cluttered” with too many baby monitors, Bluetooth devices, garage door openers, smart home devices, holiday lights, etc. More than 20 of these devices might be too much, although some WiFi networks can have 200+ devices connected to them and perform just fine. If too many smart devices is an issue for your system:
- Reduce video/picture resolution on doorbell cameras and video devices to speed up the WiFi.
- Use a smart home hub to take traffic off WiFi and Bluetooth, which helps with congestion and speeds.
Routers tend to choose bands automatically depending on how far away the device is when you connect to the network. Reallocating devices to different bands depends on your router. With some routers, you do it through software. Others, you flip a switch on the router. A few, especially some mesh systems, aren’t super user-friendly in this regard. “Trickery” might be necessary. For instance, devices tend to connect to 5GHz as the default. If you want them on the other band and they’re portable (say, a group of smart light bulbs), you could go to the edges of your WiFi coverage, where they “flip” over to 2.4GHz since the range is better. Finish setting up there, then put the devices where they are supposed to be. They will stay on the 2.4GHz band. If the devices are not portable, then temporarily unplug the router closest to the device or separate the router and device as much as you can. These tricks often force the 2.4GHz band to be used.
Wi-Fi extenders work similarly to boosters and repeaters. Basically, they extend or amplify the main Wi-Fi network and create a second network. They’re useful if the main Wi-Fi signal is weak and you have just one dead zone (a mesh system may work better if the home has multiple dead zones). Extenders plug into outlets and resemble air fresheners. Extenders do create second networks, some with different names. It’s not always convenient to connect to two networks from the same house, so look for extenders that use the same network name when rebroadcasting. Also, while extenders extend the reach of your network, speeds may slow a bit. A mesh network enhances range without sacrificing speed and changing network names, so we touch on that in a bit.
It could be time for a change if you lived in a small apartment and took your router along to your new, much larger home. Bigger homes might need mesh routers or routers that can pair with repeaters/extenders to help WiFi signals reach farther. Before upgrading, though, especially if the space to cover has not changed, try moving the router if it’s in a closed location, and blast any dust buildup with compressed air.
>> Related Reading: The Best Wi-Fi Routers, Tested and Reviewed
Upgrading to mesh makes sense if your Wi-Fi connection is strong in some places but weak or dead in others. You may need mesh for coverage in large homes, multistory homes, and garages that are not close to the router. In a mesh network, a primary router and satellite nodes or modules coordinate to deliver speedy, efficient Wi-Fi. You put the nodes in different areas throughout your house, and each node is capable of broadcasting Wi-Fi. Mesh systems have become much more affordable, but you may be disappointed if you go entry-level. Plan to spend about $400 for impressive results. Look for two main features:
- Triband (three bands instead of two): The third band is another 5GHz band, and it’ll speed up communications between the primary router and the satellites.
- Wi-Fi 6: Wi-Fi 6 is more secure, efficient, and speedy compared with Wi-Fi 5. Wi-Fi 6 also handles traffic and congestion better. It has been available for a few years, but nowadays more and more devices support it. There’s also Wi-Fi 6E, which is even newer and stronger. Fewer devices support it, so don’t get your hopes up too much for that just yet (If you’re an avid online gamer, 6E can make a big difference and is worth further investigation).
If you live with a bunch of roommates or relatives who love streaming and gaming, all of you may need to agree on some guidelines or take turns using the internet connection. Of course, first try suggestions such as restarting the router, moving it to a central place, running speed tests, and using an extender for a dead zone. Do avoid putting your router in the kitchen, as microwaves and metal appliances can mess with the signal. So can liquids and food that get spilled on the router. Otherwise, here are ideas for Wi-Fi sharing and communication:
- Limit certain activities to certain times (perhaps downloading online games during the wee hours when everyone is asleep). Be aware that torrenting (while also being illegal) is a huge bandwidth hog.
- Give a heads up before hopping onto Zoom or any high bandwidth activity so that everyone else in the home doesn’t try to Zoom, FaceTime, and livestream classes all at once.
- If you live in a multi-family residence, ask your housemates to not share your Wi-Fi passwords with others in the building.
- Agree to dial back the graphics, for instance, by streaming in standard definition instead of 4K or Ultra HD.
- Pay a bit more money per resident for more bandwidth..
(more common if you’re in an apartment building and experiencing frequent Wi-Fi disconnects or out of range or weak Wi-Fi signals). By default, U.S. routers tend to be automatically set to channels 1, 6, and 11, especially 6. Assume that everyone else in the building is on these channels. Manually adjust your router so it is on channel 1, and retest your WiFi until you find a channel it works well on. Or, use a third-party app that shows the channels around you and helps find a less crowded channel.
If your internet plan has certain limits, then you are unlikely to get more. Say that you’ve been content with web surfing and some video streaming here and there at 25 Mbps max for the past few years. You’ve recently gotten into online gaming, and your new partner and stepchildren, all of whom love streaming movies, moved in. You may need a new plan that can support both online gaming and streaming in 4K, giving you speeds of 50 Mbps to 100 Mbps. Now, if you’re doing a lot of live streaming all of the sudden, perhaps taking online classes live every day or doing Twitch broadcasting, you might need speeds up to 150 Mbps or even 200 Mbps. However, if you cannot afford to upgrade your plan, you may still be able to improve your internet speeds. “If budget is a limiting factor, it’s best to call the service provider to see if there are faster plans that you can upgrade to,” said Mark Chen, founder and CEO of GetBillSmart. “Sometimes you’re stuck on a legacy plan that they can easily upgrade you to. You can also threaten to cancel to get a better deal and use those savings to get faster speeds.”
Once you’ve resolved the issue by following one of the above steps, make sure to secure your wireless home network to prevent hackers or neighbors from accessing your Wi-Fi.
If you find that you are consistently getting booted from your Wi-Fi network, there are a few things that could be happening. We recommend looking for any patterns in the service disruptions. Do they only happen at a certain time of the evening? Maybe it even drops when you pop something into the microwave? Believe it or not, there are many signals from Bluetooth devices, baby monitors, and smart lights constantly flowing through your home that can disrupt your internet connection.
If you’ve ruled out network interference using the tools listed above, you may need to try updating your router’s firmware. This is essentially the device’s “operating system,” and like any other piece of software, it needs to be updated from time to time to keep functioning properly.
If you’ve updated your firmware and are still getting disconnects, you may need to consider replacing the router outright, especially if it’s more than a few years old. Routers are computers, and computers unfortunately do tend to fail after a few years. If you’ve been renting a modem and router from your ISP, it might be better to invest in your own equipment since ISPs tend to rent out old hardware.
Firmware Updates by Brand
How to log into your router’s control panel.
Click on your router’s brand below to see in-depth instructions on how to log in to its configuration area, where you can adjust network passwords and names, as well as change the channels they are operating on.
- NETGEAR login tutorial
If All Else Fails, Contact Your Service Provider.
Though technical support from many companies can be a hit or miss experience, if you’ve tried everything above and nothing seems to be working, it might be best to simply reach out to request a tech to come to your home and sort the issue out directly. This may entail a service fee of some kind, but if it gets you back online, it’ll be worthwhile in the end.
Tech Support Phone Numbers for Common ISPs:
- AT&T Internet tech support: (800) 288-2020
- CenturyLink tech support: (888) 723-8010
- Cox tech support: (800) 234-3993
- Frontier tech support: (888) 884-0504
- HughesNet tech support: (866) 347-3292
- Mediacom Cable tech support: (800) 883-0145
- Rise Broadband tech support: (877) 910-6207
- Spectrum tech support: (855) 757-7328
- Suddenlink Communications tech support: (877) 794-2724
- TDS tech support: (866) 571-6662
- Verizon Fios tech support: (800) 837-4966
- Viasat tech support: (855) 463-9333
- Windstream tech support: (800) 347-1991
- WOW! tech support: (855) 496-9929
- XFINITY tech support: (800) 934-6489
- The Ultimate Guide to Troubleshooting Home Wi-Fi and Router Issues
Offer Detail
- Compare Providers
- Review Providers
No Internet Connection? How to Troubleshoot Internet Issues

It’s incredibly frustrating when your internet isn’t working. Whether you’re hooked up to Wi-Fi but without internet access or you’re having trouble with a wired Ethernet connection, we’ll show you the quickest methods to identify the problem and get back online.
When it comes to internet troubleshooting, you can either methodically work your way through the troubleshooting steps or just start trying fixes until something works. While methodical troubleshooting is better for getting to the bottom of an issue once and for all, sometimes you just need to get back online ASAP. We’ll start with our top five internet quick fixes and then walk you through a more thorough troubleshooting process if you’re still having issues.
Top 5 quick fixes for internet issues
- Is it your internet signal or your Wi-Fi?
- Connected to Wi-Fi but no internet access
Wi-Fi troubleshooting
Advanced troubleshooting.
- Complete list of internet fixes
1. Restart your modem and router or internet gateway (modem/router combo) An equipment restart is the golden rule of internet troubleshooting. This should always be your first step; it’s simple, easy, and incredibly effective. See instructions.
2. Check your wires and cables Loose or damaged cables can cause a wide range of internet issues. Sometimes the fix is as simple as tightening a connection, other times you may need to replace a cable or require the help of a broadband technician. See instructions.
3. Move your router to a better spot If you’re using the internet over Wi-Fi, router placement is crucial. Sometimes moving your router just a few feet or changing the angle of the antennae can make a world of difference. See instructions.
4. Test a different website or online activity The problem may be with the app, service, or website you’re trying to access. If only one website or service is acting up, your connection is probably fine.
5. Check for an outage If the problem is on your internet provider’s end, you can’t do anything to fix it. Make sure to check for outages before getting too deep into your troubleshooting efforts. See instructions.
Internet still down?
It’s time to dig a bit deeper with our troubleshooting guide.
First, we’ll help you diagnose whether you have an internet signal issue or a problem with your Wi-Fi . Once you’ve discovered which type of problem you have, continue to either the internet signal troubleshooting section or the Wi-Fi troubleshooting section . If you’re still stumped, use our advanced troubleshooting section for particularly tricky circumstances.
Lastly, you can jump straight to our complete list of internet fixes and try each one until you’re back online.
Is the problem with your internet signal or your Wi-Fi?
Internet signal issues have different fixes than Wi-Fi issues—so, it’s important to find out which you’re dealing with. Examples of internet signal issues include problems with the signal coming from your ISP, modem issues, and issues with the wiring in and around your home. Wi-Fi issues are problems with your router’s wireless signal, such as interference from obstructions, too much distance between the router and devices, or interference from other networks and electronics.
You can tell an internet signal issue from a Wi-Fi issue with a few key troubleshooting steps.
Check the lights on your equipment
Nearly all modems, routers, and internet gateways have LED status lights. Your equipment may also have just one led light, in which case, the light’s behavior or color is often used to signal different statuses. ISPs usually provide a guide to interpreting the behavior of their rental equipment. If you purchased your own equipment, consult the manual.
Either way, the LED status lights on your equipment are very helpful for quickly diagnosing network problems.
Check the internet signal light
The light for an internet connection is on your modem and is usually labeled WAN, Internet, or with a globe icon, and you can tell the internet is on if the light (usually white or green) is solid.
If the light is red or not on at all, you have an internet signal problem as your modem isn’t successfully connecting to the internet. If this is you, skip ahead to our internet signal troubleshooting section .
Check the Wi-Fi light
The WiFi light(s) will be on your router or somewhere below the internet connection light if you have a modem/router combo unit. Labels for Wi-Fi lights vary but usually will read “2.4G” and “5G,” “WLAN,” or “Wireless.” These lights should be on and are usually blinking. If the Wi-Fi light(s) are off or red, your router isn’t broadcasting a signal. Skip to the Wi-Fi troubleshooting section to begin troubleshooting.
If the equipment lights aren’t revealing your internet issue, read on for the next steps.
A lot of internet issues can be remedied quickly by simply restarting your modem and router. It’s an easy fix that’s always worth a shot.
To restart your modem and router, unplug the power cable for 10 seconds and plug it back in. The equipment will take a few minutes to reboot.
Try using an Ethernet cable to test your connection
If you’re on Wi-Fi, try plugging your computer directly into your router with an Ethernet cable. This is the tried and true way to differentiate signal issues from Wi-Fi issues. Connect the Ethernet cable to the port on your computer, and plug the other end into one of the LAN ports on your router (these are usually yellow). Connecting the computer directly to the single port on a modem bypasses essential security measures built into the router. You need to connect to a router or modem/router combo unit to remain protected online.
If your internet comes back when you use a wired Ethernet connection, then you have a Wi-Fi problem; continue to our Wi-Fi troubleshooting section . If you still don’t have internet, the problem is likely bigger than your Wi-Fi, but it might still just be your device. Try accessing the web on a different device. If you still can’t get online, move on to our internet signal troubleshooting section to solve the problem.
Check for an internet outage
It could be that you’re not the only one whose internet is down. You can find information about internet outages on the website Down Detector , or you can contact your internet service provider (ISP) to investigate.
The site or service you’re trying to access could also be down. Try a few different websites. If they load properly, the original website you went to could be down for all visitors. (You can confirm this by typing in the URL at downforeveryoneorjustme.com .)
If the internet is down in your area, you may be able to use your cell phone as a mobile Wi-Fi hotspot to get online. You can also go outside in search of a public Wi-Fi hotspot to connect to. Take a look at our Wi-Fi hotspot guide for more details.
Wi-Fi connected but no internet?
If you’re connected to your Wi-Fi but still don’t have internet access, there’s probably something wrong with your internet signal. The same is true if you’re unable to access the internet using a wired connection. Try these fixes first.
Restart your modem, router, and device
Restarting your modem and router should be the first thing you do when encountering an internet signal issue. Don’t skip this step! This is almost always what tech support will ask you to try first, as it often solves the problem.
To restart your equipment, unplug the power cable for 60 seconds and plug it back in. The equipment will take a few minutes to reboot. It’s also a good idea to restart the device you’re using.
Check your cables and wires
Wires and cables often become loose or damaged from repeated stress. The cable feeding the internet to your modem is either a coaxial cable (the same used for cable TV), an Ethernet cable, or a phone cable. The best way to troubleshoot cables is to swap them all out, if you have extras.
Otherwise, make sure to connect these cables to both the modem and your wall outlet. Ethernet and phone cables should click when they are fully inserted into a socket. Coaxial cables should be screwed on snugly.
Also, check for damage. See if the cable looks torn or perhaps chewed by a pet. Ethernet and phone cables are especially prone to damage, as the copper wires inside are very thin.
Ethernet cables aren’t all the same, and it’s important to get the right type of Ethernet cable for the job. See our Ethernet cable article to make sure you have the right one.
When should you contact your provider?
It’s a good idea to try some basic troubleshooting before contacting your provider. Restarting your modem and checking wires will likely be the first things tech support asks you to do anyway. But if you can’t solve the problem on your own, it’s time to contact your provider for a little help.
If your ISP isn’t experiencing an outage, it can run a diagnostic on your modem to see if it’s properly communicating with the network. They may discover many possible issues, including a low signal level, device registration issues, obsolete equipment (even if you rent it from the ISP), or a glitch in the system. You may have just forgotten to pay your internet bill.
Most large ISPs also have online/chat support options through their websites and apps, if you’d rather not sit on the phone.
If you’re still having issues after trying these common fixes, move on to our advanced troubleshooting section further down the page.
Fed up with internet problems? Check out your other options.
Enter your zip code below to see all the internet providers available in your area.
You’ve figured out something’s wrong with your Wi-Fi. Wi-Fi gets tricky. It’s radio waves being broadcast by your router and a number of things can interfere with those waves. Try these common fixes first.
Restart your router
This fix works so often that it’s always worth trying first. The process is the same as restarting a modem: unplug the router or gateway, wait 60 seconds, and plug it back in. It will take several minutes to reboot.
Switch Wi-Fi bands (2.4 GHz and 5 GHz)
Your router likely transmits Wi-Fi over two frequency bands: 2.4 GHz and 5 GHz. Try switching from the frequency band you’re on to the other. This helps you avoid temporary interference while also resetting the connection between your device and router. It’s a common convention for the 5 GHz network to have a “5G” label following the network name (i.e., “Jane’s Wi-Fi [5G]). The 2.4 GHz band is commonly labeled with your network name (i.e. “Jane’s Wi-Fi) without a frequency label.
Each frequency band has its strengths and weaknesses. Basically, 5 GHz Wi-Fi is faster but doesn’t travel as far. 2.4 GHz Wi-Fi travels farther but is slower than 5 GHz and more susceptible to radio interference. So, if you’re far from the router try the 2.4 GHz, and if you need more speed and are within range, give the 5 GHz a try.
Test your Wi-Fi on different devices
If you’re on your laptop, use your phone or tablet to see if you can get online over the same Wi-Fi connection. If it connects on one device but not the other, then you know that your internet Wi-Fi is fine and it’s the disconnected device that’s having the problem.
Try a different Ethernet cable
If you have a spare Ethernet cable, swap it out with the one currently plugged into your modem and router and see if it makes a difference. Cables don’t last forever, and it could be that your current Ethernet cable has kicked the bucket and needs to be replaced.
Need a recommendation on a good replacement cable? This Cat-6 Ethernet cable is fast, sturdy, and affordable. You could also check out our article on the best Ethernet cables to learn more.
Amazon.com Price (as of 10/21/2021 10:15 MST). See full disclaimer .
Improve the position of your device and/or router
For router placement, the key factors to consider are distance, elevation, and obstructions. So, when picking a spot for your router, choose somewhere central and elevated relative to your devices. Furthermore, do your best to avoid placing the router near any electronic devices (especially microwaves) or any disruptive surfaces.
Wi-Fi radio waves get weaker the farther they travel. You want to have your device well within your router’s broadcast range. The Wi-Fi signal meter on your device helps you judge the strength of the current Wi-Fi signal.
It’s also important to place the router as high as possible. The router’s signal broadcast isn’t a straight line to your device. The signal shines out like light from a bulb, creating a dome of Wi-Fi. A higher router means a wider broadcast and better coverage of your home.
Certain obstructions and devices can also interfere with Wi-Fi signals. Wi-Fi can easily pass through wood and drywall, but tile, metal, concrete, and especially water are known to interfere with Wi-Fi signals. Microwaves, baby monitors, and cordless phones are also Wi-Fi killers when they’re running.
See our article on where to place your router to learn more about finding that perfect spot for your Wi-Fi machine.
If none of those quick fixes did the trick, there’s still plenty of things to try. Keep in mind that your problem may have more than one cause. That’s why we recommend going through the above steps first, as they are the most common fixes for internet issues.
Below are some of the rarer internet issues. These can be tough to diagnose, so it’s best to just try each one out until something works.
Run the internet troubleshooter (for Windows)
If you’re on Windows, run the built-in troubleshooter program to see if your computer can fix the issue for you. For Windows 10, click to Start > Settings > Update & Security > Troubleshoot, and then select the troubleshooter for Internet Connections.
Run Apple Diagnostics or Apple Hardware Test (for macOS)
Most Mac computers have a built-in diagnostic program that will scan your computer for issues, including problems with Wi-Fi. It’s called Apple Diagnostics on models from 2013 and later and Apple Hardware Test on models from 2012 with at least OS X 10.8.4.
To run Apple Diagnostics, disconnect any Ethernet cables and external drives, hit restart, and hold down the D key as the computer reboots. Pick a language, and then the diagnostic will launch automatically.
You can launch the Apple Hardware Test in a similar way. The only difference is that you should press Return or the right arrow button when the screen for the test appears as your computer is restarting and you’re given the prompt to choose a language.
Clear your DNS cache
The DNS cache is a digital log your browser uses as a shortcut to quickly load web pages you’ve visited before. But your cache can create technical issues if there’s a glitch or online malware has inserted uninvited URLs into your cache.
Here’s how to clear your cache on different devices:
Go to the Command Prompt by doing one of these things:
Option 1: Type “cmd” into the search bar
Option 2: Find the Command Prompt shortcut in the Windows System folder
Option 3: Type “cmd” into the Run window.
Once you’re in the Command Prompt, type in “ipconfig /flushdns.” Hit Enter to flush the cache.
Run the Terminal app. You can find it one of these ways:
Option 1: Open Terminal in the Utilities folder.
Option 2: Search “Terminal” using the Spotlight function.
In the Terminal app, enter the command to flush your cache. The command you’ll type can be slightly different depending on your Mac operating system (OS):
Yosemite and after: sudo killall -HUP mDNSResponder
Yosemite 10.10–10.10.3: sudo discoveryutil mdnsflushcache
Mavericks, Mountain Lion, Lion: sudo killall -HUP mDNSResponder
Snow Leopard: sudo dscacheutil -flushcache
You’ll be prompted to enter in the administrator password for your account. Then your cache is flushed—and hopefully any glitches with it.
Smartphones
On an iPhone or Apple device, there are two easy ways to clear your DNS cache:
Option 1: Switch on and then switch off Airplane Mode.
Option 2: Restart your device.
For Android devices, here’s how you clear your DNS cache:
Step 1: Type “chrome://net-internals/#dns” into the URL bar in Chrome.
Step 2: Tap the DNS menu.
Step 3: Click Clear Host Cache.
After you’ve cleared your cache, test your connection to see if it’s back online.
Is your connection as fast as you need?
You can always download our speed test app to see if your internet speeds match those offered on your monthly internet plan.

You can always take our speed test to see if your internet speeds match those offered on your monthly internet plan.

Scan for viruses and malware
Run a scan to see if malware or a virus is on your computer. Malicious programs can use up a lot of your bandwidth or block your internet connection entirely. McAfee , Norton , and Bitdefender all make quality antivirus software.
Switch off your antivirus software
We definitely recommend keeping antivirus software activated on your computer. However, misconfigured antivirus protections can sometimes interfere with your internet connection, so try turning off your antivirus software or firewall to see if the internet comes back.
Use a different Wi-Fi channel
This is especially important for those living in apartments and other living situations where there are multiple routers in the same area. Routers automatically select a frequency channel on which to broadcast your Wi-Fi. If there are other devices and routers nearby, these channels can become overcrowded.
To assess the best channel for your home, you’ll need to use a Wi-Fi channel analyzer. There are many free Android apps (iOS doesn’t allow it, unfortunately) that can do this. The channel analyzer will tell you what channels are being heavily used. Once you find a relatively open channel, change the channel in your router’s settings. See our article on how to log in to your router if you need some help with this.
See what’s on your Wi-Fi network
There may be a device on your Wi-Fi network that’s hogging the bandwidth or creating other connectivity problems. Your router might also limit how many devices can be connected at once, and it could be kicking devices off the network as a result.
To find out what’s on your network, log in to your router’s interface (use your cell phone if you can’t get Wi-Fi on your computer or connect via Ethernet) and look for a list labeled with a term like “DHCP clients,” “connected devices,” or “attached devices.” Usually, the name of the devices being used are included on the list (example: “Peter’s iPhone,” “Rebecca’s Macbook,” or “Computer 1”).
You can then figure out who’s using the Wi-Fi and ask everyone in your household if they’re doing anything that’s taking up too much internet speed.
Many routers let you kick devices off the Wi-Fi, so go ahead and give a user the boot if you don’t know them or they’re causing problems. You can also change the Wi-Fi password so they can’t get back on.
Internet running slow?
If you’re experiencing repeated slowdowns and outages, you may have an internet plan that’s too slow. Take our “How much speed do I need?” test to see if you’re paying for enough internet bandwidth to deliver the goods.

Make sure you have a working IP address
There’s a chance your computer is having trouble configuring a valid IP address. Your computer needs a unique IP to get on the internet, but you won’t be able to get online if multiple devices are assigned the same IP or if something has prevented your computer from assigning one. It’s not a particularly common issue, but it can happen—especially if you have multiple routers on the same home network.
To ensure you have a valid IP address, use the instructions in our article on how to find your IP address .
Force open the network’s login page (for public Wi-Fi)
Hotels, airports, and cafes often provide free internet—usually, all you have to do is open your browser and sign on to the public Wi-Fi network through a login screen. But what if that login page refuses to load?
You can force open the login page by typing one of these codes into your browser’s address bar:
- 192.168.1.1
- http://localhost
Get fiber internet
Fiber internet is by far the fastest and most reliable internet you can get. So if you can get a fiber internet package for your home, we highly recommend you go for it, since it will vastly reduce the chance of annoying slowdowns and service outages that are more common on other internet connection types.
You can get speeds of anywhere from 100 Mbps to 1,000 Mbps on a fiber connection, giving you ample bandwidth to cover a range of activities and tasks while also supporting many other users on your Wi-Fi. Prices range from $35 per month to $100 per month.
Fiber isn’t available everywhere, unfortunately. But if you frequently have problems with your connection, it could be worth looking into some kind of upgrade or switching providers.
Enter your zip code to see what other internet options are in your area. It may be worth switching internet providers if you experience frequent technical glitches.
Upgrade your equipment
You may experience connection issues if you have outdated equipment that doesn’t match the latest wireless standards: 802.11ac (Wi-Fi 5) or 802.11ax (Wi-Fi 6). You’ll also want to ensure that your modem supports DOCSIS 3.0 protocol or newer (for cable internet).
You may have issues with an older router, computer, or other Wi-Fi device that doesn’t adhere to recent wireless standards. In that case, you may want to invest in a new router. Or your computer may need a new wireless adapter (a device that lets you connect to a Wi-Fi network).
Here’s how to check the wireless standard of your computer:
Step 1: Hold down Option while clicking on the Apple menu in the top left of the screen, then select System Information.
Step 2: Scroll down to Network, click Wi-Fi in the drop-down menu, and look for the readout for Supported PHY Modes. This will tell you what wireless standard your computer is outfitted for.
Step 1: Right-click on the Start menu button and then click the command for Device Manager. (Or type “Device Manager” into the search bar in the Start menu—either way works.)
Step 2: Once you’re in Device Manager, click on the menu titled Network adapters and look for the listing of your wireless adapter and the wireless standard it’s set to.
Reset your equipment to factory settings
If you’ve tried everything else to no avail, it may be time to reset your router or gateway to its factory settings. This is a pretty big step because it will restore the router/gateway to the way it was when you first pulled it out of the box, wiping the slate clean.
Resetting your router will erase your password and issue a default one (which you will then want to change for security reasons). It will also erase any memory of custom features or guest networks you’ve set up through the router, and it will kick off all the devices that were signed onto the network.
Getting everything back up and running again will take a chunk of time out of your day, so this is worth trying only if you have no other options.
Anyway, here’s how you do it. Use a safety pin or paperclip to push the button hidden in the tiny hole at the back of the router. Hold it down for a few moments until the status lights go out and begin to reset.
Even if your internet is working fine, there are always ways to make your Wi-Fi connection even better. Take a look at our tips on how to improve your Wi-Fi bandwidth .
Reset your computer’s network settings (a.k.a. the nuclear option)
If all else fails, it’s time to reset your computer’s network entirely. This changes everything back to default settings. It’s not the most convenient option, but it could be the fix you need to start from scratch and erase the Wi-Fi bugs once and for all.
Keep in mind that this isn’t like turning off the computer and turning it back on. In the same way that resetting your router restores that equipment to factory settings, restoring your network totally wipes out your computer’s Wi-Fi settings, bringing it back to how it was when you were just setting it up for the first time.
Your computer will forget your network settings, including your Wi-Fi network’s name, passwords, and VPN settings. Do this only as a last resort. Make sure you save your passwords and other necessary info before doing the reset.
OK, then. Ready? Alright, here’s how to do it:
How to reset your Wi-Fi network on Mac
Step 1: Click Apple menu > System Preferences > Network.
Step 2: Click on Wi-Fi in the drop-down menu on the left of the screen
Step 3: Hit the minus (-) button to remove it. Then add it again by clicking the plus button (+) and selecting Wi-Fi in the Interface options.
Step 4: Hit Apply and close out of the Network settings.
How to reset your Wi-Fi network on Windows
Step 1: Click to Windows Settings > Network & Internet > Status.
Step 2: Hit the Network reset button.
Step 3: Hit Reset now to confirm.
Step 4: Hit Yes to confirm once again. (This is just for Windows 10. For previous Windows operating systems, see Microsoft’s Support page .)
Step 5: Restart your computer and follow the prompts for Windows to guide you through setting up your new home network. Good luck!
Complete list of fixes if your internet is not working
If you’d rather skip the troubleshooting and just start trying things, have at it. Here are all our internet fixes in a simple list.
1. Restart your equipment
To restart your modem and router or gateway, unplug the power cable and wait 60 seconds before plugging it back in. It will take a few minutes to reboot. Restart your device as well.
2. Connect with an Ethernet cable
Connecting via Ethernet will rule out issues with your Wi-Fi network. If you can get online via Ethernet, there’s something interfering with your Wi-Fi. This fix gets you back online right away, and then you can use our Wi-Fi troubleshooting section to fix the issue.
3. Check for an internet outage
The internet may be down in your area. You can use a site like downdetector.com to see if anyone else is having connection issues in your area. Many ISPs also have outage alerts via their websites and apps. Of course, you could always just call your ISP to find out if there’s an outage.
4. Try using a different device
See if you can get a connection on a different device. The device you’re using might not be connected properly to your router.
5. Check your wires and cables
Your cables and wires could be loose or damaged. Coaxial cables should be screwed on snugly and phone and Ethernet cables should be fully inserted into the sockets. While you’re at it, look for signs of damage in the form of kinks, hard twisting, excessive tension, even chew marks from pets.
You could also try just swapping out cables if you have extras. Start with the Ethernet cable that connects your modem to your router. The copper lines inside the cable or in the connectors could have become severed without any obvious visible signs of damage. The springy clip on the connector could also have worn out, in which case the slightest nudge of the cable could cause your internet to go in and out.
6. Run your computer’s internet troubleshooter
Something may be amiss within your computer’s operating system. Both Mac and PC computers have troubleshooters built into their OS that can solve the problem for you. If you need help, see our instructions on using your computer’s troubleshooter .
7. Reposition your router/gateway
Your router’s placement can make or break your home’s Wi-Fi coverage. The key things to remember when choosing a location are elevation, distance, and obstructions. Elevate your router to provide a wider coverage area. Choose a central location to cover your home as completely as possible. Lastly, be mindful of obstructions like metal, tile, concrete, and water that can hamper Wi-Fi signals.
Alternatively, you could try moving your device closer to your router—somewhere with a clear line of sight to avoid obstructions. See our article on router placement for more information.
8. Update everything
Obviously, you’ll need internet access to update your OS, system firmware, and network software. To do so, you may need to use your mobile phone as a Wi-Fi hotspot, seek out a public Wi-Fi hotspot, or hop on a friend or family member’s internet connection.
It’s important to keep the OS and applications on your devices updated. Be especially mindful of OS updates, firmware updates (particularly network and wireless adapter updates), and antivirus application updates.
9. Ensure your equipment isn’t obsolete
You may be using an obsolete modem, router, or gateway—even if you rent your equipment from your ISP. The provider will usually notify you if you’re renting obsolete equipment, but it’s easy to overlook this alert.
Ensure your modem supports the DOCSIS 3.0 protocol or newer (for cable internet). Your router and device should support the Wi-Fi 5 wireless standard or newer.
The firmware on your equipment is usually updated automatically by the ISP.
10. Check your modem’s signal level
The signal from your ISP to your modem needs to be above a certain strength threshold to function properly. Low signal to the modem could easily result in a slow or completely dead internet connection.
It used to be that only a broadband technician with an expensive meter could tell your signal strength, but now, many routers and even some ISP apps will give you a signal reading. You can also call your ISP to run a diagnostic on your modem. If you have low signal strength to your modem, you probably need a technician to come out and repair the problem.
11. Contact your ISP
Your ISP can help you diagnose connection problems by running a diagnostic on your equipment. Customer service can find and solve all kinds of problems over the phone or through chat support. It’s certainly worth a try. If your issue can’t be solved over the phone, you can set up an appointment with a technician just in case you can’t fix the issue yourself.
12. Turn off your antivirus software
This isn’t something we recommend lightly, but it could do the trick. Turning off your antivirus software makes your system more vulnerable to malicious software and cyber attacks. Still, your antivirus software is a major link between your device and the internet. The possibility of an issue here is often worth exploring after exhausting the likely causes.
If you are able to get online after deactivating your antivirus software, we recommend you either turn it back on and get in touch with your antivirus software’s technical support team or replace the software immediately before browsing the web unprotected.
13. Reset your equipment to factory settings
Resetting your modem and router or gateway reverts all settings to the factory defaults. The most important thing to remember here is that your passwords and networks will all be erased. You’ll have to reset your network name and password and reconnect all your devices.
Additionally, the login credentials used to access and change your equipment’s settings will also switch back to the default username and password (usually printed on a sticker attached to the equipment). This is different from your Wi-Fi name and password. If you don’t know your equipment’s default login credentials, you should call your equipment’s manufacturer or ISP (for rented equipment) before attempting this step. You could end up completely locked out otherwise.
See our instructions above to learn how to reset your equipment.
14. Make sure you have a working IP address
There’s a chance that your computer is having trouble configuring a valid IP address. Your computer needs a unique IP to get on the internet, but you won’t be able to get online if multiple devices are assigned the same IP or if something has prevented your computer from assigning one. It’s not a particularly common issue, but it can happen—especially if you have multiple routers on the same home network.
See our instructions above to learn how to check for a valid IP address on Windows and Mac.
15. Reset your computer’s network settings
Resetting your network settings is similar to resetting your equipment. Your computer’s network settings will revert to their factory defaults, and you’ll need to re-enter your network information again.
See our instructions above to learn how to reset your computer’s network settings.
Still can’t get good Wi-Fi? It may be time to switch internet providers. Type in your zip code to see if you can find a more reliable ISP in your area.
Product prices and availability are accurate as of the date/time indicated and are subject to change. Any price and availability information displayed on Amazon.com at the time of purchase will apply to the purchase of this product. HighSpeedInternet.com utilizes paid Amazon links.
CERTAIN CONTENT THAT APPEARS ON THIS SITE COMES FROM AMAZON. THIS CONTENT IS PROVIDED ‘AS IS’ AND IS SUBJECT TO CHANGE OR REMOVAL AT ANY TIME.
Read page in Spanish
Author - Austin Aguirre
Austin worked as a broadband technician installing and troubleshooting countless home internet networks for some of the largest ISPs in the U.S. He became a freelance writer in 2020 specializing in software guides. After graduating with a BS in technical communication from Arizona State University, he joined the team at HighSpeedInternet.com where he focuses on home network improvement and troubleshooting.
Editor - Rebecca Lee Armstrong
Rebecca Lee Armstrong has more than six years of experience writing about tech and the internet, with a specialty in hands-on testing. She started writing tech product and service reviews while finishing her BFA in creative writing at the University of Evansville and has found her niche writing about home networking, routers, and internet access at HighSpeedInternet.com. Her work has also been featured on Top Ten Reviews, MacSources, Windows Central, Android Central, Best Company, TechnoFAQ, and iMore.
Related Posts


Our expert, award-winning staff selects the products we cover and rigorously researches and tests our top picks. If you buy through our links, we may get a commission. How we test ISPs
- Home Internet
Why Your Internet Is Down and How to Quickly Get Back Online
Internet down again? It's not always your provider's fault. Here's how to identify and rectify the five most common internet connectivity issues.

Losing your internet connection can disrupt your whole day. Here's how to figure out what's going on and fix it.
There's never a good time for your internet to go out, so when it happens, you want to get your home back online as soon as soon as possible. Unless there's a major outage from your internet service provider, identifying the problem and restoring your connection is often quick and easy.
You'll find the most common reasons why your internet might go out below, followed by ways to resolve each issue, if possible. For more Wi-Fi tips, check out why your router may be in the wrong place and how to find free Wi-Fi anywhere in the world .

Common causes of home internet outages
Here are some of the top causes your internet may have dropped -- we'll dive into solutions for each below.
Locating local internet providers
1. Modem/router malfunctions
2. Inadequate speeds or equipment
3. Hacking or network issues
4. Bad weather
5. ISP service outages and network congestion
Narrowing down the exact issue can take a bit of investigating and troubleshooting. Start by verifying that the connection issue isn't specific to a single website, server or device.
If you've lost your Netflix connection halfway through a show, check if other streaming services are still accessible and working. If so, the problem likely lies with Netflix and not your internet connection. If you're having an issue connecting to other streaming services, it could be that the smart TV or streaming device is to blame. Try streaming on another device, if possible, to verify that an internet outage is the culprit.

Modem and router issues
When your home internet connection goes out, it's often due to a hiccup with your modem and/or router. The solution is simple: Restart your equipment by unplugging it, waiting 30 seconds or so, plugging it back in and allowing it to reboot. More often than not, this will resolve your Wi-Fi outage.
When restarting your router, I'd recommend cutting power by unplugging it instead of pressing or holding any buttons on the device itself. Doing so can prompt the device to do a hard reset, returning it to factory settings and erasing your Wi-Fi network settings. Granted, the reset will likely re-establish your internet connection, but you'll also have the extra task of setting up your Wi-Fi again.
Also, keep in mind that your device may have a battery backup. If the lights on your modem or router don't go out when you unplug it from the power source, check to see if there are batteries installed somewhere and temporarily remove them when restarting your device.

Slow speeds or unreliable equipment
Maybe your internet isn't necessarily "out" -- it just can't keep up with what you're trying to do or where you're doing it.
Constant buffering, excessive lagging, Wi-Fi "dead zones" and other connectivity issues could result from insufficient speeds, bandwidth or Wi-Fi coverage to handle all your devices. There are two ways to remedy the situation: Scale back your internet use or make some upgrades.
Consider the internet speeds you need and determine if your current plan can deliver those speeds. If your plan lacks the speeds you need, upgrading to a faster plan (assuming one is available) will be your best option. Many cable and fiber internet providers offer speeds up to 1 gigabit per second or higher , which is plenty of speed for the average home.
On the other hand, if you feel your current plan should meet your needs, it's possible your equipment is to blame. Conduct a few speed tests around your home to gauge what speeds you are getting and where the Wi-Fi signal might not be as strong. Sometimes simply relocating your router to a more efficient spot will improve connection quality and eliminate or at least mitigate any dead zones.
Otherwise, you may want to invest in a better router or Wi-Fi extenders to boost the Wi-Fi signal throughout your home. If you rent equipment from a provider, call to ask about getting a better device .
Try adjusting your router settings
Your router should allow you to steer connected devices to a specific pod or extender, if you have them, and between 2.4GHz and 5GHz bands. You'll get a stronger signal on the 5GHz band, but only if your device is within range (the 5GHz range is shorter than 2.4GHz) and if there aren't too many other devices connected to 5GHz. So, if your connection quality is weak on a particular device, try switching bands on the device or moving some of the other devices off the band you're using.
Use a wired connection
Connecting directly to your modem, router or pods/extenders using an Ethernet cable will be your best bet for establishing and maintaining a strong connection. If possible, use a wired connection for the most bandwidth-hogging devices, like smart TVs and gaming consoles. Not only will this often provide a better, faster connection, but it will also take some of the strain off your Wi-Fi network.

Hacking or malware
A less likely but still possible cause of an internet outage is a compromised network . If hackers gain access to your Wi-Fi network, they could completely restrict your internet access to any or all devices.
If you suspect someone has gained unauthorized access to your network, immediately go to your router settings and recreate your Wi-Fi network with (preferably) a different network name and (definitely) a different password -- one with some complexity or randomness that will make it difficult for a hacker to figure out.
Along with creating a strong password, be sure to keep all firmware on your router and any connected devices up to date to help prevent hacking attempts. Installing antivirus software will also help keep your devices protected. Many ISPs offer virus and malware protection at no extra cost.

Bad weather
Yes, Mother Nature can mess with your internet connection . Some internet connection types are more prone to internet outages than others during bouts of bad weather, but hard rain, a violent thunderstorm or even heavy cloud coverage could interfere with your signal.
Satellite internet is the most vulnerable to internet outages caused by weather, but a power outage can knock any connection type offline. Having a modem and router with a battery backup may help keep you connected during power outages, though they will be useless if the power outage is preventing internet service from reaching your modem in the first place.
If you have satellite internet, a rain guard, snow shield or dish heater can help prevent outages due to bad weather in the immediate area of your home. Signal interference can happen anywhere along the path between the satellite and your dish, however, and heavy cloud coverage or rain could have an impact on your connection even if it's miles away. There's not much you can do about an internet outage in that case, unfortunately; you'll just have to wait for the signal to return.

ISP outages and network congestion
Despite the negative impression many people have about their internet providers , widespread ISP outages are uncommon and outages at a single residence are virtually unheard of (unless, of course, you forgot to pay the bill). Still, it's possible that the provider is having issues.
If your internet is completely out and you've already tried restarting the router, check your provider's social media pages, official website or sources like downdector.com for updates and outage reports. You can also call customer service, but be prepared for a long wait on hold.
Other than confirming your ISP is having problems, there's nothing you can do in such situations other than wait for service to return. Outages are bad publicity , so rest assured your ISP is doing everything in its power to restore service as quickly as possible.
Outages are rare but network congestion could be a much more frequent problem and, while it won't always knock your connection out completely, it can certainly cause slowed speeds. Cable, DSL and satellite internet are vulnerable to network congestion, as is 5G home internet. T-Mobile acknowledges network congestion can lead to slowed speeds, stating that "during congestion, Home Internet customers may notice speeds lower than customers using other T-Mobile services due to data prioritization."
Network congestion means the speeds coming to your home are slowed, so there isn't much you can do about that other than wait for the congestion to clear. You can, however, make the most of the speeds you are getting by placing your router in an optimal location, adjusting your Wi-Fi settings or using an Ethernet connection, as mentioned above.
Internet still out? Here's what else you can do
Aside from the tips listed above, there are a couple of ways you may be able to get back online.
The first is by using your mobile connection. Your phone will likely automatically switch to cellular service if your Wi-Fi goes out, so you'll be able to use your phone just like you would if you were away from home. Keep in mind, however, that doing so will use up your mobile data.
Additionally, some phones, carriers and plans allow you to create a Wi-Fi hotspot. It won't power your home the same as your router, but it will enable you to connect a few devices until your home network comes back.
Second -- and perhaps only applicable for longer outages or urgent internet needs such as submitting a school assignment on time -- would be to find a public Wi-Fi hotspot. Your local public library, coffee shop or restaurant, among many other public places, may offer free Wi-Fi.
Be mindful that using a public Wi-Fi connection is not as secure as your home network, so consider using a VPN or avoid any activity that involves sensitive data (passwords, banking info, doing your taxes, etc.) while on a public network.
Internet outage FAQs
Why does my internet keep going out.
There could be a number of factors that affect your internet connection. First, and most likely, is problems with your equipment. Restarting your modem/router will often resolve the issue.
Other reasons why your internet may keep going out include inadequate speeds, network congestion and inclement weather. It's possible that your provider is experiencing a service outage, but for frequent connection disruptions, I would look to the previously mentioned causes, starting with your router.
Can I get a partial refund for internet provider outages?
Many providers do offer compensation for prolonged or frequent outages. Spectrum, for example, will provide "proportionate credit for those qualifying outages that last for 4 or more consecutive hours." Call to report the outage as soon as possible and monitor how long it lasts before requesting a refund.
Will a power outage knock out my internet service?
Not always, but probably. When the power goes out, it won't necessarily keep internet service from reaching your home, but it can certainly limit your ability to use the internet. Unless your modem and router have a battery backup, a power outage will disable those devices, rendering you unable to connect to the internet.
Home Internet Guides
- Best Internet Providers in Los Angeles
- Best Internet Providers in New York City
- Best Internet Providers in Chicago
- Best Internet Providers in San Francisco
- Best Internet Providers in Seattle
- Best Internet Providers in Houston
- Best Internet Providers in San Diego
- Best Internet Providers in Denver
- Best Internet Providers in Charlotte NC
- Google Fiber Internet Review
- Xfinity vs Verizon Fios
- Verizon 5G vs. T-Mobile Home Internet
- Verizon Internet Review
- Xfinity Internet Review
- Best Rural Internet
- Best Cheap Internet and TV Bundles
- Best Speed Tests
- AT&T Home Internet Review
- Best Satellite Internet
- Verizon 5G Home Internet Review
- T-Mobile Home Internet Review
- Best Internet Providers
- Frontier Internet Review
- Best Mesh Wi-Fi Routers
- Eero 6 Plus Review
- TP-Link Review
- Nest Wi-Fi vs. Google Wi-Fi
- Best Wi-Fi Extender
- Best Wi-Fi 6 Routers
- Best Wi-Fi Routers
- What is 5G Home Internet?
- Home Internet Cheat Sheet
- Your ISP May Be Throttling Your Internet Speed
- How to Switch ISPs
- Internet Connection Types
- Internet for Apartments
- Top 10 Tips for Wi-Fi Security
- How to Save Money on Your Monthly Internet Bill
- How Much Internet Speed Do You Need?
- AT&T Internet Promo Codes
- Verizon Fios Discounts
- Comcast XFINITY Codes
- Accessories
- Entertainment
- PCs & Components
- Wi-Fi & Networks
- Newsletters
- Digital Magazine – Subscribe
- Digital Magazine – Log in
- Smart Answers
- Best laptops
- Best antivirus
- Best monitors
- Laptop deals
- Desktop PC deals
When you purchase through links in our articles, we may earn a small commission. This doesn't affect our editorial independence .
Wi-Fi problems? Here’s how to diagnose your router issues

Whenever someone sends me a question about how to fix their Wi-Fi, I wince. It’s not that I dislike helping people with their router problems. In fact, there are few geeky endeavors I find more rewarding than fixing Wi-Fi connection issues at a friend or family member’s home.
But Wi-Fi has always felt more like a dark art than a science, and it’s an art that’s hard to conjure without being physically present. Potential points of failure are everywhere, and what works well in one home might not in another. Even the reviewers of networking gear can reach drastically different conclusions about the very same product.
Wi-Fi is fundamentally at odds, then, with my desire to answer questions with specific recommendations. The best I can do is walk your through how I diagnose Wi-Fi problems myself. That way, you can make better decisions on whether (and how) to upgrade your own gear.
Further reading: The best mesh Wi-Fi routers
Size up the Wi-Fi problem
The first step to solving Wi-Fi issues is to see if the slowdown is coming from your cable modem (which brings internet service into the home) or from the router (which distributes Wi-Fi connectivity throughout the home).
Start by plugging a computer directly into your modem with an ethernet cable and running a speed test. (The easiest way is to do a Google search for “speed test,” then hit the blue “Run Speed Test” button atop the search results.) A USB-to-Ethernet adapter will be necessary for testing on computers that don’t have an ethernet port, but if that’s too much trouble or you don’t have a proper computer at all, you can also try calling your internet provider and asking them to test your internet speed remotely.

Running speed tests throughout the house can help you figure out where the Wi-Fi trouble spots are.
Jared Newman / Foundry
If wired connection speeds are on par with your internet provider’s advertised speeds, the next step is to start running speed tests throughout the house. Measure speeds around the area where connectivity feels slow, then work your way back to where the router is located, running multiple tests in each area as you go.
The goal here is to figure out where your connection troubles are occurring. Consistently slow speeds throughout the house may be a sign of an outdated router, while dead zones or range issues may require a more powerful router or mesh Wi-Fi system. (More on that shortly.)
Find your Wi-Fi router’s 802.11 version
To figure out whether a router needs replacing, it helps to know how old it is. One way to do this to locate the router’s model number—it’s likely printed on the router itself—then search the web for info about which version of Wi-Fi it supports. Here are the major Wi-Fi versions to know about:
- 802.11a/b/g: Extremely old and almost certainly the source of all your Wi-Fi problems.
- 802.11a/b/g/n (or just 802.11n): Outdated at this point and a solid candidate for replacement. Many of these routers only support a single frequency band that’s slower and more congestion-prone, and “dual-band” variants have limited range on the faster 5 GHz frequency band.
- 802.11ac (also marketed as Wi-Fi 5): Not the latest standard, but still widely available even in some high-performance routers.
- 802.11ax (or Wi-Fi 6): Routers using this standard started shipping in late 2020, so your router is likely quite new.
- Wi-Fi 6E: Congrats, you probably just bought a new router .
Wi-Fi versions alone aren’t an indicator of quality—a cheap Wi-Fi 6 router can be worse than a high-end mesh system with Wi-Fi 5—but each successive version has introduced new features that improve connectivity, and we’ve generally seen a push toward better performance over time.
Try some smaller router fixes
Just to rehash a tip I discussed back in July , sometimes changing your router’s channel and bandwidth settings can work wonders for reducing Wi-Fi interference, especially if you’re seeing inconsistent speeds on devices that aren’t too far from the router. By digging into your router’s settings, you can bypass automatic channel selection and find a channel that might be less congested.
You can also try some other little tweaks, like getting your router off the ground and clearing some space around it—but I wouldn’t start rearranging your room for the router’s sake. Chances are the improvements will be minimal. Of course, moving your router to a more central location in the home can help, but that would likely require having the cable company rewire your home internet connection.
Wi-Fi extenders: a last resort

Because replacing a router is a pain, a lot of folks wonder if they can just solve their problems with a Wi-Fi extender or repeater , which take the wireless signal from a router and rebroadcast it farther away. (“Extender” sometimes refers to a device with a wired connection to the router, though I often see both terms used interchangeably.)
My experience with Wi-Fi extenders is hit or miss. Wireless repeaters will always degrade whatever signal they receive, so the benefits can cancel out if you’re trying to address a dead zone or interference from other nearby wireless devices. The same is true with powerline adapters , which send a wired ethernet connection from your router to another part of the house through your wall outlets. Depending on how your house is wired, this approach can give you a weak connection or not work at all.
I don’t tell people to avoid extenders outright, because they can work in some scenarios, but keep your expectations low and be prepared to return the device if it doesn’t help. Here’s how to set up a Wi-Fi extender if you decide to go that route.
Picking a new Wi-Fi router
Once you’ve concluded that it’s time to replace your router, then what?
our favorite mesh wi-fi system
Netgear orbi home wifi system (rbk50).

A mesh Wi-Fi system will be the surest way to solve your Wi-Fi problems, especially in larger homes or ones with lots of dead zones. These systems let you plug in multiple access points throughout the house, creating one big network. They’re better at managing connections than a router with an extender, and systems advertised as “Tri-Band” can connect each access point without congesting the rest of the network.
Such systems might not be necessary, though. If you haven’t replaced your router in a while, even a new standalone router might be enough to power through dead zones if they’re not too far away. Standalone routers are generally less expensive than mesh systems, and some have features that mesh systems lack, such as USB storage support or a large number of ethernet ports.
A supremely powerful gaming router
Tp-link gx90.

Ultimately, though, there’s no way to tell for sure if a new router will work without trying it yourself. You can read all sorts of reviews—PCWorld reviews both Wi-Fi mesh systems and the latest Wi-Fi 6E routers —but even the best advice isn’t one-size-fits-all. Buying a new router will always involve a leap of faith.
A note on modem/router combos
Finally, there’s one more complicating factor: Although cable companies used to distribute internet modems and routers separately—the former bringing in the internet from outside the house, and the latter to distributing Wi-Fi through the home—it’s increasingly common now to get both functions in one box. That makes installation easier for the cable company, but makes router replacement trickier for you.
If you have a combo box and are paying for it in rental fees, consider replacing it with two devices: A new router and a separate cable modem . But be aware that some companies—particularly fiber-optic internet providers such as AT&T and Verizon—make replacing the modem component difficult or impossible.
If replacing the modem isn’t possible or necessary, you can just disable its Wi-Fi features so they don’t interfere with your new router. The instructions for doing so can vary by provider, so expect to do some Googling of “modem mode” or “bridge mode” plus the name of your internet provider.
And if you’re still having Wi-Fi problems after all that, send me an email and I’ll do my best to help. You can also check out my Advisorator newsletter —where a version of this story first appeared—to get more practical tech advice every week.
Editor’s note: This article has been updated with up-to-date product recommendations.
Author: Jared Newman

Jared Newman has been helping folks make sense of technology for over a decade, writing for PCWorld, TechHive, and elsewhere. He also publishes two newsletters, Advisorator for straightforward tech advice and Cord Cutter Weekly for saving money on TV service.
Recent stories by Jared Newman:
- Wi-Fi 5 vs. Wi-Fi 6 vs. Wi-Fi 6E: Which router should you pick?
If Personal Hotspot is not working on your iPhone or iPad (Wi-Fi + Cellular)
With Personal Hotspot, you can share the cellular data connection of your iPhone or iPad (Wi-Fi + Cellular) with another device. If you need help with Personal Hotspot, follow these steps.
Use these steps first
Try connecting to Personal Hotspot again after each step.
Check that Personal Hotspot is turned on in Settings > Personal Hotspot. If you can't find or turn on Personal Hotspot, check that your wireless carrier enabled it and that your wireless plan supports it.
Restart the iPhone or iPad that provides Personal Hotspot and the other device that needs to connect to Personal Hotspot.
Make sure that you have the latest version of iOS or iPadOS .
On the iPhone or iPad that provides Personal Hotspot, go to Settings > General > Transfer or Reset [Device] > Reset, then tap Reset Network Settings. This also resets Wi-Fi networks and passwords, cellular settings, and VPN and APN settings that you've used before.
Use the following steps for more help with Personal Hotspot over Wi-Fi or USB.
Personal Hotspot with Wi-Fi
Personal Hotspot with USB
If you can't connect to Personal Hotspot with Wi-Fi
On the device that provides Personal Hotspot, go to Settings > Personal Hotspot, then:
Make sure that Allow Others to Join is on.
Remember the device's Wi-Fi network name and password that appear on this screen. If you want to change the Wi-Fi network name, learn how to change your device name .
If you're using an iPhone 12 model or later, iPad Pro 11-inch (3rd generation or later), iPad Pro 12.9-inch (5th generation or later), or iPad mini (6th generation), turn on Maximize Compatibility.* Then try connecting your devices again to your Personal Hotspot.
Stay on this screen until you connect your other device to the Wi-Fi network.
On the device that needs to connect to Personal Hotspot:
Turn Wi-Fi off and back on.
If you see a password error when you try to join Personal Hotspot, check the Wi-Fi password: On the device that provides Personal Hotspot, go to Settings > Personal Hotspot to see the Wi-Fi password.
* When you turn on Maximize Compatibility, internet performance and Wi-Fi security might be reduced for devices connected to the hotspot.
If you can't connect to Personal Hotspot with USB
On your Mac, update macOS .
With a USB cable, connect your Mac to the iPhone or iPad that provides Personal Hotspot. If asked, trust the device .
Make sure that you can locate and view your iPhone or iPad in iTunes or the Finder .
On your Mac, choose Apple menu > System Settings (or System Preferences), then click Network. A list of network services appears, including Wi-Fi.
If iPhone USB doesn't appear in the list of network services, add iPhone USB using the steps to set up a network service . If iPhone USB appears in the list of network services:
macOS Ventura: Click iPhone USB. Click Make Inactive, then click Make Active.
Earlier versions of macOS: Click iPhone USB. Click the More button below the list of services, choose Make Service Inactive, then click Apply. Click the More button again, choose Make Service Active, then click Apply.
To avoid unnecessary data charges, turn off Personal Hotspot when you don't need it. If you don't, every time you plug your iOS device with Personal Hotspot into your computer to charge, your computer might connect to Personal Hotspot.
Get more help
If you still can't connect, contact Apple Support to get help with your iPhone or iPad (Wi-Fi + Cellular).
Information about products not manufactured by Apple, or independent websites not controlled or tested by Apple, is provided without recommendation or endorsement. Apple assumes no responsibility with regard to the selection, performance, or use of third-party websites or products. Apple makes no representations regarding third-party website accuracy or reliability. Contact the vendor for additional information.
Explore Apple Support Community
Find what’s been asked and answered by Apple customers.
Contact Apple Support
Need more help? Save time by starting your support request online and we'll connect you to an expert.
IMAGES
VIDEO
COMMENTS
Right click the network icon in the right side of the taskbar and select Diagnose network problems or open Get Help for Network & Internet. Make sure Wi‑Fi is turned on. Select the No internet icon on the right side of the taskbar, and make sure Wi-Fi is turned on. If it isn't, select it to turn it on. Also, make sure Airplane mode is turned off.
Right-click the "No internet access" icon near the clock and select Network and Internet Settings. Click Wi-Fi. Click Manage known networks. Click Forget on the network you can't connect to. Close this window, and then click the "No internet access" icon and try to connect to the network again.
Turn Off the VPN and Proxy Server. Disconnect Other Wi-Fi Networks. Remove the Data Limit. Run the Network and Internet Troubleshooter. Ensure the IP Address Isn't Invalid. Update the Network Adapter Driver. Perform a Network Reset. Run a Few Commands in the Command Prompt.
Add a new Wi-Fi network, select your home Wi-Fi, and type the correct password to connect. Reboot your Windows laptop or reboot your Mac. You can reboot a Linux laptop from the command line. Change your laptop's Wi-Fi channel. Most users keep their Wi-Fi adapter working on the 2.4 GHz band, but the 5 GHz band may be required to connect to your ...
Key Takeaways. Wi-Fi issues in Windows 11 can usually be resolved by resetting your Wi-Fi. To do so, follow this path: Settings > Network & internet > Advanced Network Settings > Network Reset. Interference from nearby devices like microwave ovens and cordless phones can also cause Wi-Fi problems.
To run the tool, navigate to Settings > Troubleshoot > Other Troubleshooters. Then, next to "Network Adapter," click "Run." On the "Network Adapter" window, select "Wi-Fi" and click "Next." Follow the on-screen instructions, and any issues with your network adapter will be fixed.
Press Windows + R, type services.msc, and click OK. Once the new window pops up, double-click WLAN AutoConfig, choose Automatic from the Startup type menu, click Apply, and then click OK . Try a Windows 10 network reset. This should be your last resort, as it reinstalls every network adapter on your device.
To resolve Wi-Fi issues on Windows 10 automatically, use these steps: Open Settings on Windows 10. Click on Update & Security. Click on Troubleshoot. Click the Additional troubleshooters option. Select the Network Adapter option. Click the "Run the troubleshooter" button. Select the wireless adapter from the list.
Try turning off the Wi-Fi on your device, then re-enabling it — or unplugging and replugging your Wi-Fi dongle. If that doesn't work, restart the device and try again. Then try restarting the ...
If you get much lower than -80 you'll probably notice connection problems. The information displayed on this screen updates in real time, so if you notice that your signal isn't good try ...
Learn how to troubleshoot Wireless Network Connection Problems in Windows 11. If your wireless network is functioning normally but your HP laptop is not connecting to the network, follow the steps in this video to troubleshoot potential issues. ... Use automatic tools to test and fix a variety of wireless conditions. If one tool does not ...
Open Settings on Windows 11. Click on Network & internet. Click the Advanced network settings tab on the right side. Under the "More settings" section, click the Network Reset tab at the bottom of the page. Click the Reset now button to fix the Wi-Fi problems on Windows 11. Click Yes to confirm. Click the Close button. Restart your computer.
Follow the below steps to fix this issue: Right click on the "Start" menu and choose "Device Manager" or use the "Cortana" search box next to "Start" menu and open "Device Manager". Find out the adapter used on your PC under "Network adapters" section. Check Network Adapter in Device Manager. In our case it was "Intel ...
Disconnect the cables of both your modem and router. Wait for at least 30 seconds before plugging the modem back into the power source. Wait for the lights on the modem to stop blinking. Plug your ...
Check Your Modem. Make Sure Wi-Fi Settings are Compatible With Your Device. Try a Different Frequency Band. Consider Distance and Interference; Change Channel. Try a Different Device or Wi-Fi Adapter. Try Updating Your Wi-Fi Adapter's Driver. Try a Different Router. It's frustrating when a Wi-Fi connection doesn't work, and a lot of things can ...
Fix 2: Check if Wi-Fi is enabled. On your keyboard, press the Windows logo key and R at the same time. Then copy & paste control /name Microsoft.NetworkAndSharingCenter into the box and press Enter.. Click Change adapter settings.. Depending on whether Wi-Fi is enabled (icon colored): If yes: then close the windows and jump to Fix 3. If no: then right-click on Wi-Fi and click Enable.
Ruling out the basics like this is the first place to start. Properly restart the modem and router. Power cycling the router and modem can fix internet connectivity issues and resolve problems with wireless connections. It is important to reboot both the modem and the wireless router. Check your network settings.
Here's the process: Unplug or power off your router. Wait five more minutes and retry the connection. In most cases, this should fix your issue and allow you to get back online. If you go through these steps and something still isn't working, you may need to contact your internet service provider for assistance.
4. Test a different website or online activity. The problem may be with the app, service, or website you're trying to access. If only one website or service is acting up, your connection is probably fine. 5. Check for an outage. If the problem is on your internet provider's end, you can't do anything to fix it.
The most common reasons are outdated or corrupted drivers, unstable or weak internet connection, outdated software, etc. To fix this problem, you can power cycle your WiFi router. Also, make sure ...
Constant buffering, excessive lagging, Wi-Fi "dead zones" and other connectivity issues could result from insufficient speeds, bandwidth or Wi-Fi coverage to handle all your devices.
Size up the Wi-Fi problem. The first step to solving Wi-Fi issues is to see if the slowdown is coming from your cable modem (which brings internet service into the home) or from the router (which ...
Stay on this screen until you connect your other device to the Wi-Fi network. On the device that needs to connect to Personal Hotspot: Turn Wi-Fi off and back on. Make sure that you connect to the correct Wi-Fi network. The network name is the same as the iOS device that provides Personal Hotspot and the Personal Hotspot icon might appear next ...