
Fixing Ubuntu 20.04 Network Issues

Network issues can be a real headache, especially when you’re not sure where the problem lies. If you’re using Ubuntu 20.04 and are facing network connectivity issues, this article is for you. We’ll walk you through several troubleshooting steps that can help you identify and resolve the problem.
To fix network issues on Ubuntu 20.04, you can start by checking the network logs, verifying network settings, and updating network drivers. Additionally, try disabling any VPN or firewall software, and check for known issues or bugs in Ubuntu. If none of these steps work, reinstalling the NetworkManager package may help resolve the problem.
Understanding the Problem
Before we dive into the solutions, it’s important to understand the problem. Network issues on Ubuntu can be caused by a variety of factors, from incorrect network settings and outdated drivers to software conflicts and hardware issues. Understanding the nature of the problem can help you identify the most effective solution.
Checking the Network Logs
The first step in diagnosing network issues is to check the network logs. You can do this by running the following command in the terminal:
This command displays the logs related to the NetworkManager, which is responsible for managing network connections on Ubuntu. The -b 0 parameter specifies that we want to view logs from the current boot, and the -u NetworkManager parameter specifies that we want to view logs for the NetworkManager service.
Look for any error messages or warnings in the logs that could indicate what’s causing the network issues.
Verifying Network Settings
Next, you should verify that your network settings are configured correctly. You can access the network settings by clicking on the network icon in the top right corner of the screen and selecting ‘Settings’.
Make sure the correct network interface (e.g., Ethernet or Wi-Fi) is selected and that the settings match your network requirements. For example, if your network uses DHCP (Dynamic Host Configuration Protocol), make sure the ‘DHCP’ option is selected. If your network requires a static IP address, make sure the ‘Manual’ option is selected and that the correct IP address, subnet mask, and gateway are entered.
Updating Network Drivers
Outdated or incompatible network drivers can often cause network issues. If there was a recent kernel update on your Ubuntu system, it’s possible that the network drivers are not compatible with the new kernel. In this case, updating the network drivers to the latest version may resolve the issue.
You can update the network drivers through the package manager by running the following command in the terminal:
This command updates the package list and upgrades all outdated packages, including network drivers.
Disabling VPN or Firewall
If you have any VPN (Virtual Private Network) or firewall software installed on your Ubuntu system, they could be interfering with your network connection. Try disabling them temporarily to see if this resolves the issue.
Checking for Known Issues
Sometimes, network issues can be caused by bugs or issues in Ubuntu itself. It’s a good idea to check online forums and communities, such as the Ubuntu Forums or Ask Ubuntu , to see if other users have reported similar issues. This can help you identify if the problem is widespread and if there are any known solutions or workarounds.
Reinstalling NetworkManager
If none of the above steps resolve the issue, you can try reinstalling the NetworkManager package. This can help reset any misconfigurations or corrupted files related to network management. Run the following command in the terminal to reinstall NetworkManager:
Remember to reboot your system after making any changes to ensure they take effect.
Network issues on Ubuntu 20.04 can be frustrating, but with a little patience and troubleshooting, they can often be resolved. We hope this guide has helped you identify and fix your network issues. If you’re still experiencing problems, don’t hesitate to seek further assistance from the Ubuntu community or the Ubuntu support team.
To check your network interface configuration, click on the network icon in the top right corner of your screen and select ‘Settings’. Make sure the correct network interface (e.g., Ethernet or Wi-Fi) is selected and that the settings match your network requirements.
You can update network drivers on Ubuntu 20.04 by running the command sudo apt-get update && sudo apt-get upgrade in the terminal. This command updates the package list and upgrades all outdated packages, including network drivers.
If you have VPN or firewall software installed on your Ubuntu system and it’s causing network issues, try temporarily disabling them to see if the problem is resolved. You can usually disable VPN or firewall software through their respective settings or by stopping their services.
You can find online forums and communities to seek help for Ubuntu network issues on websites such as the Ubuntu Forums (https://ubuntuforums.org/) and Ask Ubuntu (https://askubuntu.com/). These platforms have a community of Ubuntu users who can provide assistance and share their experiences.
To reinstall NetworkManager on Ubuntu 20.04, you can run the command sudo apt-get install --reinstall network-manager in the terminal. This command reinstalls the NetworkManager package, which can help resolve any misconfigurations or corrupted files related to network management. Remember to reboot your system after reinstalling to ensure the changes take effect.
Related Posts

How To Reinstall Facebook on iPhone

How To Fix Firefox Not Opening on Ubuntu 22.04
How To Fix ‘Activation of Network Connection Failed’ Error on Ubuntu 20.04

How To Watch U-Verse On Computer

What Is the Launcher3 App?

How To Install Killer Network Drivers
About the author, eric buchanan, leave a comment cancel reply.
Your email address will not be published. Required fields are marked *
Save my name, email, and website in this browser for the next time I comment.
Eric is a writer and editor for DeviceTests. His favorite subjects are the how-tos of everyday life: from programming apps to building a gaming computer.

How To See the Card Number on the Chase App

How To Tell if Someone’s Phone Is Off When Texting

How To Fix Invalid Filename Extension Error in Ubuntu's APT Sources List Directory
Security Analyst and Web Developer
How do I troubleshoot network connectivity issues in Ubuntu?
In the dynamic landscape of digital connectivity, Ubuntu stands as a robust and reliable operating system. However, even in the most stalwart environments, network connectivity issues can arise, disrupting the seamless flow of data. This comprehensive guide aims to empower Ubuntu users with the knowledge and tools to troubleshoot network connectivity issues effectively. From diagnosing common problems to implementing targeted solutions, we’ll navigate the intricacies of network troubleshooting with precision and clarity.
1. Understanding Network Connectivity
A. essentiality of connectivity:.
- Network connectivity is the lifeblood of modern computing. It enables communication between devices, access to online resources, and the functionality of essential services. Troubleshooting connectivity issues is paramount for maintaining a seamless user experience.
b. Common Connectivity Challenges:
- Connectivity issues can manifest in various forms, including slow internet speeds, intermittent connections, or the inability to access specific websites or services. Understanding the nature of the problem is the first step in effective troubleshooting.
2. Diagnosing Network Issues in Ubuntu
A. checking physical connections:.
- Ensure that cables, Wi-Fi connections, and physical network devices are properly connected. Physical issues can often be the root cause of connectivity problems.
b. Using Network Manager:
- Ubuntu’s Network Manager provides a graphical interface for manageing network connections. Check the Network Manager applet in the system tray for information on the current connection status.
c. Using the Terminal:
- The terminal provides powerful tools for diagnosing network issues. Commands like ping , traceroute , and ifconfig can offer insights into connectivity problems.
3. Troubleshooting Wired Connections
A. verifying cable connections:.
- For wired connections, check that Ethernet cables are securely connected to both the computer and the router or switch. Damaged cables should be replaced.
b. Checking Network Interface Status:
- Use the ifconfig command to check the status of network interfaces. Ensure that the correct interface is active and has an assigned IP address.
c. Restarting the Network Service:
- Restart the networking service to apply changes and refresh network configurations:
4. Troubleshooting Wireless Connections
A. checking wi-fi signal strength:.
- Use the iwconfig command to check the signal strength of Wi-Fi connections. Weak signals can lead to connectivity issues.
b. Reconnecting to Wi-Fi Networks:
- Use the Network Manager to disconnect and reconnect to Wi-Fi networks. Sometimes, a simple reconnection resolves connectivity problems.
c. Checking Wi-Fi Passwords:
- Ensure that the correct Wi-Fi password is entered. Incorrect passwords can prevent successful connection to secured networks.
5. DNS and Name Resolution Issues
A. verifying dns configuration:.
- Check the DNS configuration in the /etc/resolv.conf file. Ensure that valid DNS server addresses are listed.
b. Testing DNS Resolution:
- Use the ping command to test DNS resolution by pinging a known website or IP address. A lack of response may indicate DNS issues.
c. Flushing DNS Cache:
- Clear the DNS cache using the following command:
6. Firewall and Security Considerations
A. checking firewall status:.
- Confirm the status of the firewall using the ufw (Uncomplicated Firewall) command. Ensure that necessary ports are open for network communication.
b. Disabling the Firewall for Testing:
- Temporarily disable the firewall for testing purposes to determine if it is a factor in connectivity issues:
7. Router and Modem Troubleshooting
A. restarting network devices:.
- Power cycle the router and modem by unplugging them, waiting for a few seconds, and plugging them back in. This can resolve issues related to network device caching.
b. Checking Router Settings:
- Access the router’s web interface to check settings, update firmware, and ensure that DHCP settings are configured correctly.
8. Proxy Server Configurations
A. verifying proxy settings:.
- Check the proxy settings in the system or browser. Misconfigured proxy settings can hinder internet access.
b. Bypassing Proxy for Local Addresses:
- Configure the system to bypass the proxy for local addresses, ensuring that local resources are accessible without proxy interference.
9. Packet Loss and Network Latency
A. using ping for testing:.
- Use the ping command with the -c option to test for packet loss and network latency. Consistently dropped packets may indicate network issues.
b. Traceroute for Network Path Analysis:
- The traceroute command provides insights into the path packets take to reach a destination. Analyse the output for potential bottlenecks or issues.
10. Logs and System Messages
A. reviewing system logs:.
- Check system logs for messages related to network events. The /var/log/syslog file is a valuable resource for diagnosing network-related issues.
b. Using journalctl:
- The journalctl command allows users to view system logs. Use filters to specifically target network-related messages:
11. Conclusion: Navigating the Network Terrain with Confidence
Troubleshooting network connectivity issues in Ubuntu is a journey that demands a combination of technical acumen and systematic problem-solving. By understanding the nuances of wired and wireless connections, delving into DNS configurations, and considering security and hardware aspects, users can navigate the network terrain with confidence. As you embark on this journey of troubleshooting, may your Ubuntu experience be marked by resilience, swift resolution of challenges, and a network landscape that responds seamlessly to your digital endeavours.
Continue your journey…
- How does a proxy firewall differ from a traditional firewall?
- How do I prevent DNS leaks while using a VPN?
- Can I download torrents using a proxy server?
- How do I troubleshoot firewall configuration issues?
- How do I troubleshoot VPN connection issues?
- How do I troubleshoot common VPN connection issues?
- How do I troubleshoot common issues in WordPress?
- How do you troubleshoot common operating system issues?
- How do I troubleshoot common Windows boot issues?
- How do I troubleshoot common issues with Parallels Desktop?
- Accessories
- Entertainment
- PCs & Components
- Wi-Fi & Networks
- Newsletters
- Digital Magazine – Subscribe
- Digital Magazine – Log in
- Smart Answers
- Best laptops
- Best antivirus
- Best monitors
- Laptop deals
- Desktop PC deals
When you purchase through links in our articles, we may earn a small commission. This doesn't affect our editorial independence .
How to fix your Internet connection in Ubuntu Linux

Ubuntu’s included NetworkManager software aims to make your network connections “just work.” Nevertheless, sometimes thing go awry. There are times you have to adjust or change your connection settings, especially when using a laptop— just like in Windows .
Luckily, you won’t have to pull up the terminal and type any arcane commands to make your Internet connection work.
Check the basics first
Before you blame Ubuntu, try connecting to the Internet on other devices. If they’re experiencing the same problem, it isn’t with Ubuntu—it’s with something else. For example, you may need to reboot your router, modem, or both . It’s always worth checking these fundamentals before delving into further troubleshooting.
Some laptops have hardware switches that can be toggled to quickly enable or disable Wi-Fi. If your Wi-Fi doesn’t seem to be working at all, check your laptop’s hardware Wi-Fi switch.
If you’re using a wired connection, ensure the ethernet cable is plugged firmly into both the computer’s ethernet port and the router’s ethernet port. Sure, this may seem a bit obvious, but it’s easy to miss a bumped switch or loose cable.
To fix signal strength problems with Wi-Fi networks, arrange your router, computer, and other objects in your house for the best possible Wi-Fi signal strength .
Configure your connection settings in NetworkManager
NetworkManager connects to Wi-Fi networks and automatically configures wired network connections when you plug in an ethernet cable. Before NetworkManager, you’d have to do this with terminal commands.

The popup menu for NetworkManager appears when you click on the connection icon (either wired or wireless) in Ubuntu’s notification area.
If something isn’t working properly, you may still have to configure NetworkManager. Click the network connection or Wi-Fi icon on the panel at the top-right corner of your screen to access the NetworkManager menu, then choose a network. If you need to view information about your connection for troubleshooting purposes—your computer’s IP address, for example—click Connection Information .
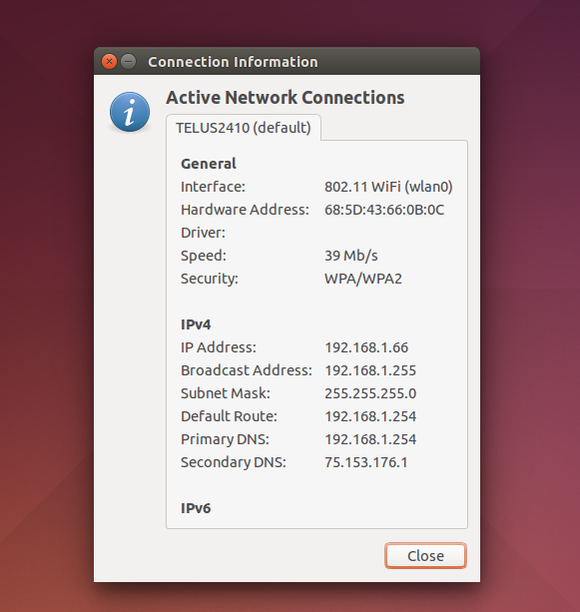
NetworkManager’s Connection Information windows shows all the details about your active connections, including network interface, security, and connection speed as well as your MAC and IP addresses.
If your local network connection isn’t working, ensure the Enable Networking and Enable Wi-Fi options are selected here in the menu. These options let you quickly disable and enable your connections, which is useful for putting your laptop into airplane mode . If you accidentally disabled either, you won’t have an Internet connection until you re-enable them.
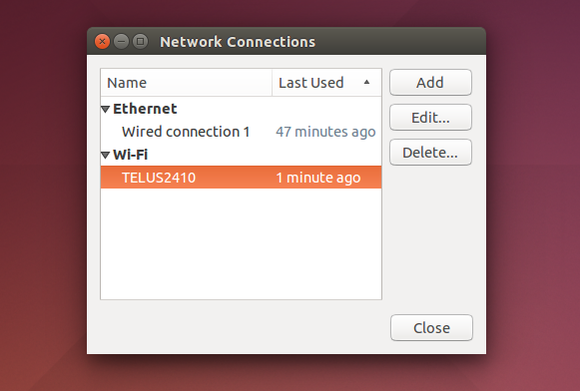
NetworkManager allows you manage several network connections and use different settings for each.
Configure your connections by clicking Edit Connections . You’ll see a window with one or more connections, depending on how many network adapters you have in your computer. Select a connection and click Edit to modify its settings.
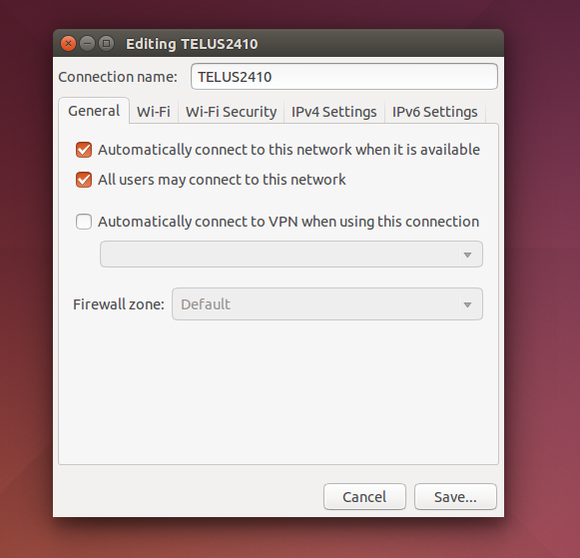
NetworkManager’s Edit Connection dialog lets you set or change all the details about your wired or WiFi connection.
Ensure the ‘Automatically connect to this network when it is available’ option is enabled on the General tab. If it’s disabled, NetworkManager won’t automatically connect to a wired or wireless network when you boot your computer.
NetworkManager uses Dynamic Host Configuration Protocol (DHCP) by default, so your computer will attempt to get connection settings—IP address, DNS servers, and default gateway—automatically from your router or Internet service provider.
For networks that require a static IP configuration , you’ll need to visit either the IPv4 Settings or the IPv6 Settings pane and select the “Manual” method. (If you’re not sure which you’re using, you’re probably still using IPv4.) Enter the details your connection requires here—your ISP or network administrator can tell you what to enter if you don’t know.
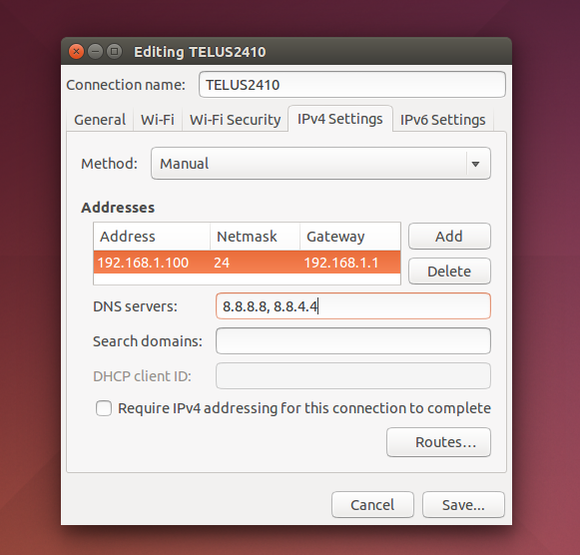
You can easily configure your connection to use manual settings and enter those settings in NetworkManager.
If, for some reason, your network only allows devices with a specific MAC address to connect, click the ethernet tab and enter that information into the ‘Cloned MAC address’ box.
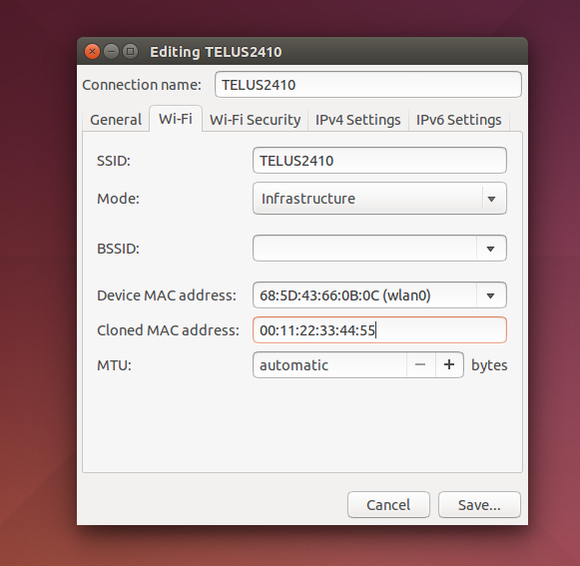
Keep reading for more on checking Wi-Fi drivers and wielding diagnostic tools.
Skip the NetworkManager alternatives
You may be tempted to blame network problems on NetworkManager itself and seek alternative connection tools like Wicd. Wicd was reasonably popular a few years ago, but it hasn’t seen an update since April, 2012. If you’ve gone out of your way to install Wicd or another tool and are experiencing problems with it, you may want to uninstall it and re-enable NetworkManager.
Hardcore Linux geeks may want to ditch NetworkManager and go back to the old-fashioned way of configuring network connections by hand. But even a hardcore, penguin-loving Linux geek can save time with the automatic configuration NetworkManager provides.
Make sure you’re using the right Wi-Fi drivers
Ubuntu and other Linux distributions include a variety of open-source drivers that support most Wi-Fi and wired ethernet hardware built into laptops and desktop PCs. You shouldn’t have to install any drivers in most cases. After installing Ubuntu or even booting up an Ubuntu live CD or USB drive , your hardware should be detected automatically.
Some wireless network hardware still requires a proprietary, closed-source driver provided by its manufacturer, or a special firmware file you’ll have to install. You can check to see if your hardware is supported by the Linux kernel before looking for proprietary drivers. Ubuntu tries to make this easy by providing a driver installation tool that will quickly install and enable these third-party drivers.
If Wi-Fi isn’t working in Ubuntu, click the gear icon at the top-right corner of the desktop, select System Settings , click the Software & Updates icon, and click the Additional Drivers tab.
Ubuntu will scan your system’s hardware and show any alternate drivers you can use. Many of these files come on Ubuntu’s installation media, so they can be installed even if you don’t have an Internet connection.
If that doesn’t work, perform a web search for your computer’s name and model number or your Wi-Fi hardware’s name and “Wi-Fi Ubuntu,” or something similar. You can often find fixes for specific hardware in forums.
USB modems and Wi-Fi dongles can be harder to set up. You may have to search for your specific USB device and see if there are any tweaks or drivers available.
If your computer has both wired ethernet and Wi-Fi, plug an ethernet cable into your computer so you can download any specific drivers you may need. The wired ethernet connection is much more likely to work with the built-in drivers.
Diagnose the problem
Ubuntu includes many standard network troubleshooting tools you can access from the command line, like ping and traceroute. These tools are very useful on Windows, too, where they must be run from a Command Prompt window.
The ping command is probably the most useful. Open a terminal, type the following command, and press Enter:
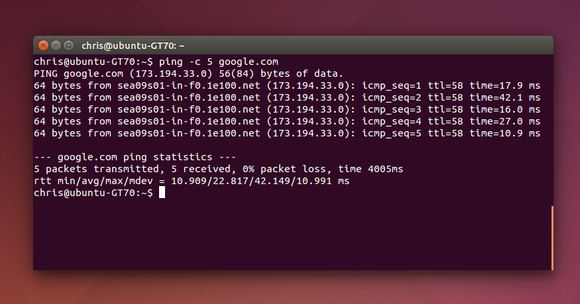
The tried and true console diagnostic for connectivity is the ping command.
This command will send five ICMP echo request packets to google.com. You should see five responses. If you see zero responses, your computer can’t reach google.com—this means Google.com is down or, more likely, your Internet connection isn’t working at all. If you get fewer than five responses, you know that you’re experiencing “packet loss,” which can indicate there’s a problem with Google, your router, your modem, or your Internet service provider.
The ping command can help you see what the problem is—whether you have no Internet connection at all, packet loss, or just extreme latency. Ping is also essential for diagnosing Internet connection problems in Windows .
If you’re new to Ubuntu, don’t want to mess with terminal commands and can get online at another location, you may want to skip the terminal and use a graphical tool instead. Ubuntu used to include this tool, but now you have to install it from the Ubuntu Software Center .
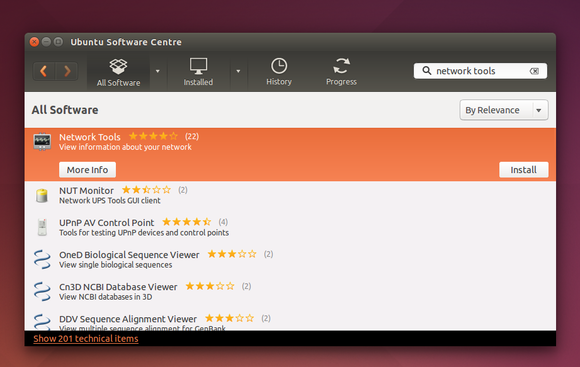
Use Ubuntu’s Software Center to look for Network Tools.
Open the Ubuntu Software Center, search for “Network Tools,” install the Network Tools application, and launch it. The program provides a graphical interface for ping, traceroute, and other network diagnostic commands.
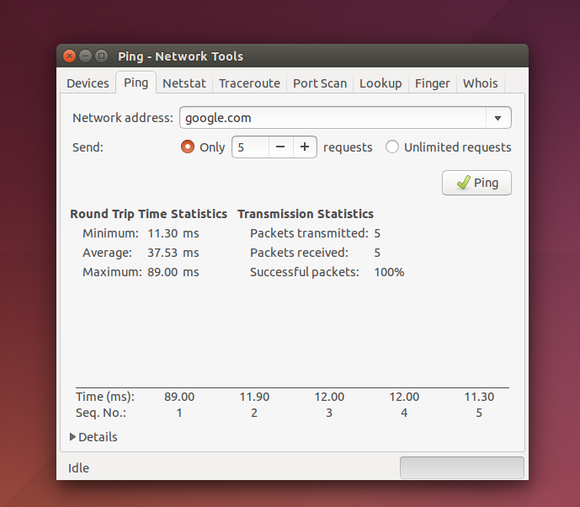
Network Tools offers a GUI for common console network diagnostic tools like ping and traceroute .
Maybe it’s someone else’s fault
Remember, you can’t always solve every Internet connection problem on your own. The problem may be with a remote website, a switch somewhere in the route between you and that website, or your Internet service provider. Ask your neighbors if they’re having problems, or you check with your ISP.
- Articles Automation Career Cloud Containers Kubernetes Linux Programming Security
5 Linux network troubleshooting commands
%t min read | by Ricardo Gerardi (Editorial Team, Sudoer alumni, Red Hat)
Image by Michael Schwarzenberger from Pixabay
Networking configuration and troubleshooting are crucial tasks that sysadmins need to perform regularly. Some of these tasks can be challenging. However, when dealing with connectivity issues, using the right tools will assist you in achieving the results in a faster and consistent way.
The ip command
The ip command is an all-around utility to show and manipulate network objects on your Linux system, including IP addresses, routes, and ARP tables. It's a useful tool to configure the network, as well as to troubleshoot network connectivity issues.
The ip command replaces the functionality of many commands provided with the old net-tools package such as ifconfig , route , and arp , but it adds many other features.
In its most basic form, you can just run ip and provide a network object to manipulate, such as an address, link, or route, and a subcommand to perform an action. If you do not give a subcommand, many objects default to the show subcommand to display information related to that object.
Here is the basic syntax:
For example, to see the link status on all network devices, run ip link show :
Because show is the default subcommand, you can also obtain the same result by running ip link or even ip l (many objects recognize an abbreviation).
The ip command manages many objects. The main ones are:
- link or l - controls the status of network devices
- address or a - manipulates IP addresses on devices
- route or r - handles routing table entries
- neighbor or n - controls ARP table entries
You can see a full list of objects and commands by running ip help .
Some useful examples of the ip command
Show network statistics -s in human readable format -h for a specific network interface:
Show the IP addresses of all interfaces:
Show the IP address of a single interface e.g., enp1s0 :
Add another IP address to an interface (requires sudo or root user):
Display the routing table:
Add a route (default gateway):
The ip command is a lower-level interface to configure network options on your Linux system. While it's useful as a troubleshooting tool, it may be harder to set the network with it. For this reason, many distributions provide a higher-level interface to accomplish the same task. Next, let's take a look at the Network Manager configuration tool nmcli , which provides an integrated way to configure the network.
The nmcli tool
Network Manager is a network configuration application available by default with many Linux distributions, including RHEL and Fedora. Network Manager runs as a daemon, and its goal is to provide a higher-level interface to make network configuration easier and more automated.
It's common for users of desktop Linux or servers with a graphical interface to use Network Manager GUI clients to configure the network. For cases where you work with headless servers or if you want to automate configuration via shell scripts, the nmcli tool comes in handy.
Network Manager and nmcli are a versatile combination that allow you to verify and configure many network options. The basic syntax for nmcli is:
The most common objects are:
- general - shows Network Manager status and permissions
- networking - shows, enables, and disables networking
- radio - shows, enables, and disables WiFi and WWAN
- device - shows and manipulates the status of network devices
- connection - manages Network Manager connection profiles
It's impossible to cover all the options on a single blog post. Let's check some examples of how to use nmcli for common network configurations tasks. For more examples, consult the official nmcli-examples page or the man pages with man nmcli-examples .
Check the status of network devices:
Show all connection profiles:
Show details about a specific connection (e.g., enp1s0 ):
Retrieve specific parameters from a connection (e.g., IP address and DNS):
Modify connection parameters, e.g., switch from DHCP to manual connection:
Restart the connection to enable new options:
Add a new connection profile:
nmcli also allows you to edit a connection profile interactively. This interface provides help and auto-completion via the Tab key, which guides you through the many options available. Activate the editor using nmcli connection edit CONNECTION-NAME :
In the editor, you can define specific parameters with the set command. Use the Tab key auto-completion to see all available options:
Then you can print the current values:
When you finish your changes, save them to the connection and quit to complete the operation:
Finally, restart the connection to make the changes effective.
Network Manager and nmcli are a complete solution for network configuration. If you have never used it before, start with some of the basic commands and gradually move to more complex settings. Consult the man pages and examples to execute specific tasks.
Next, let's review some commands that help you with network troubleshooting, starting with name resolution.
The nslookup command
When managing connectivity issues, DNS name resolution is often a source of headaches. The nslookup utility helps you check and troubleshoot DNS name resolution.
This command is available with the bind-utils package on RHEL8 and Fedora systems. Install it with dnf :
To quickly check the name resolution for a particular host, use nslookup with the hostname as an argument. The command uses the default DNS configuration for the name resolution:
If the name resolution fails, you can use an alternative name server for the resolution by providing its address as the third argument:
This information is useful for troubleshooting as it helps to identify whether the issue is local due to a specific server, or something more extensive.
You can also use it to run reverse DNS queries by providing the IP address instead of a hostname:
The nslookup utility is a useful tool to help troubleshoot network issues related to DNS name resolution. Next, let's take a look at troubleshooting local network sockets.
The ss utility
Another common task when troubleshooting network connectivity issues is determining whether a connection is established or a particular service is available on a server.
The ss command, short for socket statistics , is a convenient tool that displays network socket information. It's the modern replacement for netstat that provides similar functionality, but includes a few extra features.
Use ss with no options to see the complete list of all established network sockets for socket types TCP, UDP, and UNIX.
Since the default command displays all established network connections, this list can be extensive on a busy machine, with over a thousand entries. To help you with troubleshooting, ss provides several filtering options.
You can display socket information for specific socket types with the following command-line parameters: -t for TCP, -u for UDP, and -x for UNIX.
For example, display TCP socket information with ss -t :
You can also filter the list by source or destination hostname or IP address. For example, here is a list of established connections for destination IP address 192.168.122.1:
These commands are useful to troubleshoot network connectivity in general or between specific hosts in the network. Another practical application for ss is to verify whether network services are listening on the local machine with the correct address and port. To verify listening sockets, use the option -l :
You can use the same filtering options described above to filter specific socket types. For example, to list all listening TCP sockets enter:
Instead of displaying the service name, like ssh or hostmon , ss can display port numbers by using the -n option:
Finally, another useful option is -p to display process related information such as user name and process ID (PID). Some services may require elevated privileges via sudo or as root to list process information:
The ss tool is an essential command in the sysadmin toolbox for network troubleshooting tasks. Next, let's take a look at tracepath to trace network connectivity between hosts.
The tracepath command
The tracepath command is a network troubleshooting tool that displays the network connectivity path between the local host and a remote host, identifying all routers used to route the traffic between them.
In case you're unable to connect to a network service in a remote host, tracepath helps you determine where the issue is.
tracepath is a replacement for traceroute , offering similar functionality. The main difference is that tracepath uses random UDP ports instead of the ICMP protocol for the trace, thus not requiring elevated privileges to run.
For the basic usage, provide the hostname or IP address of the destination host. You can also provide the option -n to display IP addresses for the routers instead of their names:
If tracepath cannot connect to a network hop, it displays no reply . By default, the maximum number of hops it tries is 30, which is usually enough. You can change that with the option -m .
Suppose it receives no replies after a particular hop. That is a good indicator where to go next for your troubleshooting task. tracepath information is not definitive, as the traffic could be blocked for several reasons. However, it helps you narrow down the issue and focus on the resolution efforts.
For security reasons, many routers on the Internet block traffic, so tracepath may not be as useful for tracing connectivity with Internet services. It's still useful for local network troubleshooting.
What's next?
In this article, we explored five essential network configuration and troubleshooting tools for Linux systems. These tools are powerful and provide many options that are hard to cover in a single post. We encourage you to check them out and look at documentation and man pages to see how you can incorporate them into your workflow.
There are other useful Linux network tools, such as tcpdump , nmap , and firewall-cmd . These tools are covered in other Enable Sysadmin articles.
[ Network hard to manage? Check out Network Automation for Everyone , a free book from Red Hat. ]

Ricardo Gerardi
Ricardo Gerardi is Technical Community Advocate for Enable Sysadmin and Enable Architect. He was previously a senior consultant at Red Hat Canada, where he specialized in IT automation with Ansible and OpenShift. More about me

Try Red Hat Enterprise Linux
Download it at no charge from the red hat developer program., related content.

The 9 Best Linux Network Troubleshooting Commands
Learn about the most commonly used tools to monitor and troubleshoot networks in Linux.
A network administrator's routine responsibilities like management, monitoring, configuration, and troubleshooting don't require you to learn complicated third-party tools. Instead, you can perform all these tasks with readily available tools that come pre-installed with most Linux distributions.
This article focuses on the network troubleshooting part of a network administrator's responsibilities and covers tools that resolve these issues under different categories. It further covers how these utilities help in practical scenarios.
1. ifconfig
ifconfig is a command-line utility known for interface configuration in Linux/Unix operating systems. Network administrators also use it to query and manage interface parameters with the help of configuration scripts.
It helps you enable or disable a network interface and allows you to assign an IP address and netmask to the selected interface. You can also view all the available interfaces, IP addresses, hardware addresses, and maximum transmission unit size for active interfaces.
You can activate/deactivate any interface by using up/down parameters, as follows:
To assign an IP address to an interface:
However, this utility is not readily available in Linux distributions, and you may receive an error " ifconfig: command not found ". You can resolve the issue by installing the net-tools package using your distribution's package manager.
On Ubuntu/Debian:
On Fedora, CentOS, and other RPM-based distros:
On Arch Linux:
sudo pacman -S net-tools
ip is an alternative to the good old ifconfig . However, the scope of its functionality covers two layers of TCP/IP protocol, the Data Link layer and the Network layer.
It displays network interfaces and configures network devices, just like the ifconfig utility. It also shows and modifies the kernel routing tables with the addition/removal of ARP cache entries.
To display all interfaces and their details:
To add and remove interfaces:
To enable/disable ARP protocol for the interface, use the on/off options:
The ping utility helps you identify the availability of a network and host. It checks if the host is reachable or if a service is running. You can also check for network connectivity issues like high latency and package drop using the ping command.
ping sends ICMP (Internet Control Message Protocol) echo request messages and waits for the ICMP echo reply packets to check host availability. The output contains the total sent and received messages with the time a packet takes to reach its destination.
netstat is a command-line utility that helps discover connected and listening TCP, UDP, and UNIX sockets. It displays information about routing tables, listening ports, and information statistics.
You can list both listening or closed connections by typing:
To list only listening TCP connections:
It also allows you to list the PID of the processes and program names using TCP connections:
host is a minimal yet most powerful CLI utility that performs DNS lookups and resolves hostname to IP addresses and vice versa. In addition to troubleshooting DNS server problems, it also displays and verifies NS and MX DNS record types and ISP DNS servers.
To find NX for the Google website:
You can also find MX records by running:
The arp command manipulates the cache of the system ARP table by adding/deleting addresses and displaying them. ARP stands for Address Resolution Protocol and maps the IP address to the machine's MAC address. Hence, the arp command performs the task and belongs to the tools available inside the net-tools package.
Run the command without any parameters to view the table content:
You can also find the MAC address mapped to a specific IP by providing the IP address:
7. traceroute
Once the ping utility provides information about the network connectivity and the overall time a packet takes to reach the destination, you can use the traceroute command to figure out in-depth detail of the path the packet takes to the destination host and resolve that issue.
The output displays the packet route and all the intermediate hosts between the source and destination with their response time.
For instance, the following command outputs all the hops to the destination host 8.8.8.8 (Google) from the local machine:
The utility uses the time-to-live (TTL) field of the IP packet, which tells about its life in the network as it decreases a digit when the packet reaches the hop.
The utility also uses the concept of round-trip-time (RTT), which ensures that each intermediate node drops the packet and sends back the ICMP error message that helps traceroute in measuring the time a packet takes to reach each hop along the way.
This functionality helps network administrators to identify the root cause of internet connectivity issues and resolve the exact problem in the route.
dig, an acronym for Domain Information Groper gathers DNS-related information and troubleshoots DNS problems.
The dns command output displays information available inside files containing DNS records and helps network administrators verify if the host to IP address name resolution is working fine.
You can perform the DNS lookup query as follows:
Similarly, you can query all types of DNS records associated with a domain with the help of the ANY option:
9. Wireshark
Wireshark is a powerful and versatile open-source packet analyzer tool. It captures the traffic from your selected interface card in real-time. It allows network administrators to capture traffic based on protocol/port for monitoring and troubleshooting purposes.
Other than the capture filter, it also has a display filter with various options that help you view the traffic of concern.
Troubleshooting Networks on Linux
Network troubleshooting is part of the day-to-day activities of a network administrator. Knowing which tool to use in the absence of one or with a broader functionality is equally important for effective troubleshooting of a variety of network conditions.
You can learn more about analyzing network traffic with Wireshark and network connections with the ss command.

How to Fix no Wireless Network Issue in Ubuntu Linux
After dual-booting MacBook Air with Ubuntu, when I logged in to Ubuntu, I found that Ubuntu did not detect any wireless network. Networking was on but it said ‘no network devices available.
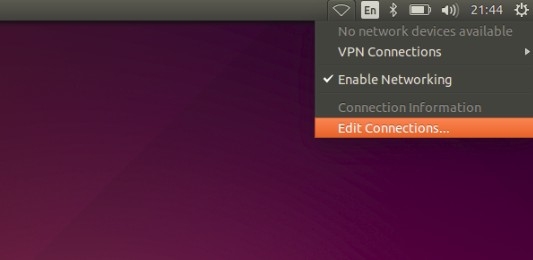
Indeed it is a common issue not only with with Broadcom network adapters but other network adapters as well in Ubuntu Linux.
In this tutorial, I’ll show you a few methods to fix Wi-Fi issues in Ubuntu and other Ubuntu based distributions such as Linux Mint, elementary OS etc.
Fixing no Wi Fi issue in Ubuntu based Linux distributions
Relief is that Ubuntu provides additional drivers specifically for various wireless adapters.
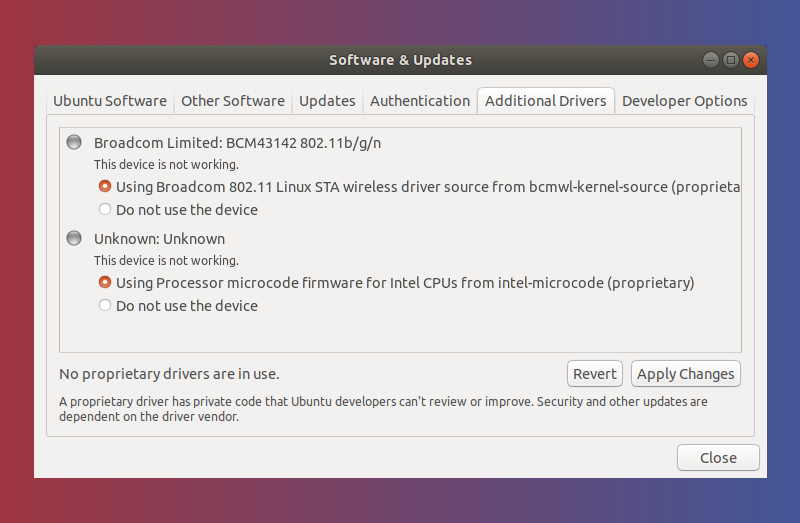
But the issue is that to install additional drivers in Ubuntu you will need a working internet connection.
Here are a couple of ways to connect to the internet without WiFi:
- Check if you can connect to a wired network through an Ethernet cable and install the additional drivers easily.
- Alternatively, you can connect a smartphone via USB and use the USB tethering to connect to the internet. Once connected, install the Wi-Fi drivers easily. Some smartphones also allow you to share the internet connection with other devices over Bluetooth.
Things will be different and a bit difficult if you cannot manage to connect to the internet. In that case, you may try:
- Installing additional drivers from the ISO image of Ubuntu.
- Download the DEB files of the drivers on another internet connected system and transfer the files to Ubuntu via USB.
Now that you know a few approaches to handle this problem, let’s see how to use these methods.
Method 1: Connect to a wired network either through Ethernet, USB tethering or Bluetooth and install additional drivers
If your system has Ethernet port and the possibility to connect to the router via Ethernet, very good. Just connect it. I think you do not need to know the steps for putting in an Ethernet cable.
If you don’t have that, don’t worry. Most likely, you have a smartphone connected to wifi or has mobile data. You can use it to connect your Ubuntu system to the internet.
Your smartphone should be connected to the internet, either via WiFi or using mobile data.
Connect your smartphone to your Linux system via USB. If there is a notification on the phone about accessing data by device, accept it.
While the two devices are connected, go to the USB tethering settings of your smartphone. Most modern phones allow you to search for a specific part of the settings. Search it and go to USB tethering settings and enable it.

You may use Bluetooth tethering as well if your smartphone has this feature.
You’ll see that your Linux system gets connected to the internet immediately and the wired network symbol is displayed.
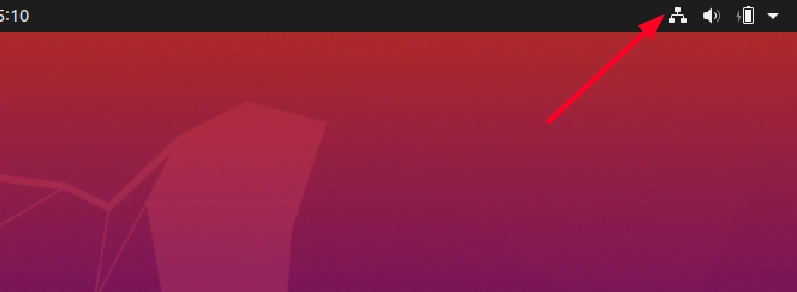
If it’s a freshly installed system, it would be a good idea to update Ubuntu first. You don’t need to install the packages, just the cache with this command:
Super! Now open the Software & Updates application:

Go to Additional Drivers tab and see if it suggests installing wifi drivers. If that’s the case, select the driver and click Apply Changes button.
Wait for a couple of minutes for it to be installed. Go to system settings and see if it shows the wireless connections now.
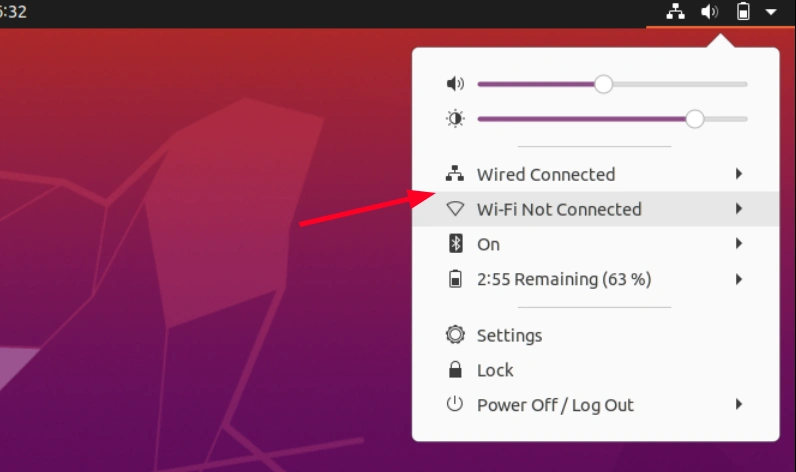
That’s the easiest way. But if you cannot connect to the internet any other way, you may try using the Ubuntu ISO for installing proprietary wifi drivers.
Method 2: Use the ISO image to install additional wifi drivers in Ubuntu
Before you follow the steps, please make sure that your system shows an additional wifi driver available for your system. If it does not show any additional drivers, this method will be of no use.
Check your installed Ubuntu version . Download the ISO image of the same Ubuntu version from Ubuntu website.
If you just had a fresh install, you probably have this ISO image in some other system or same system in another OS in dual boot. Copy it to an external device such as USB or DVD. Just copy the ISO, don’t burn it as bootable USB .
Now boot into Ubuntu and copy this Ubuntu ISO image to your home directory.
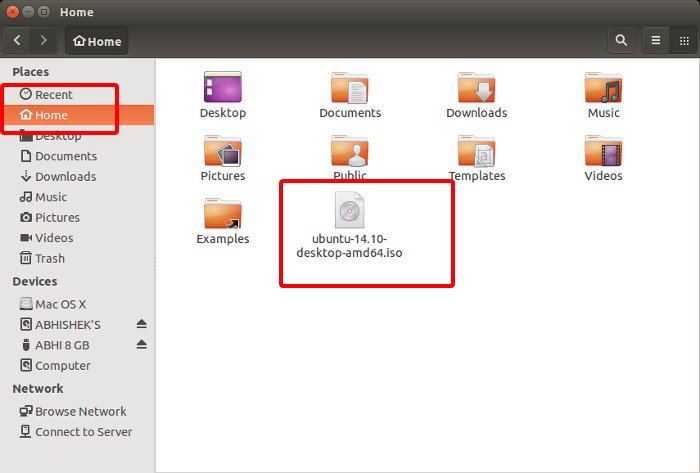
Open a terminal (Ctrl+Alt+T) and use the following commands one by one:
Basically, you just manually mounted the ISO image as if it was a CD.
Go to Software & Updates application. In the first tab Ubuntu Software, check the option of CD Rom with Ubuntu …
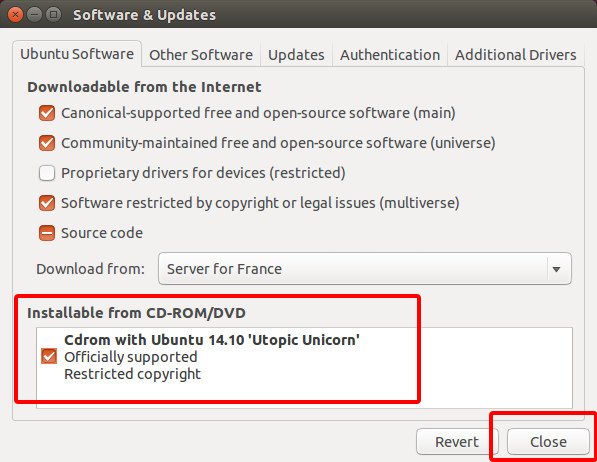
It will ask for your password and reload the software sources. Next is to go in the Additional Drivers tab and select the propriety driver and click on Apply Changes .
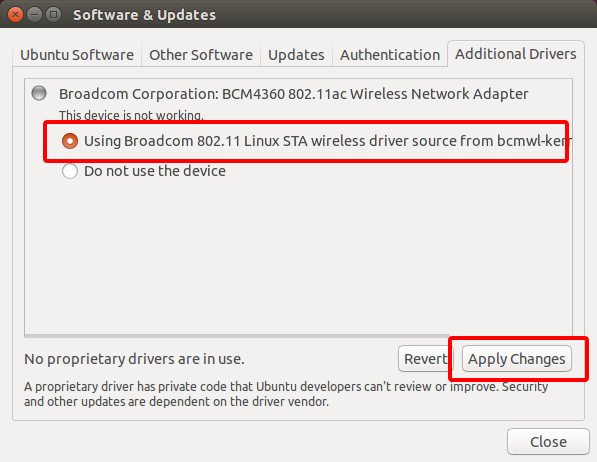
Once the drivers have been installed, you’ll see that Ubuntu now recognizes the wireless networks in range.
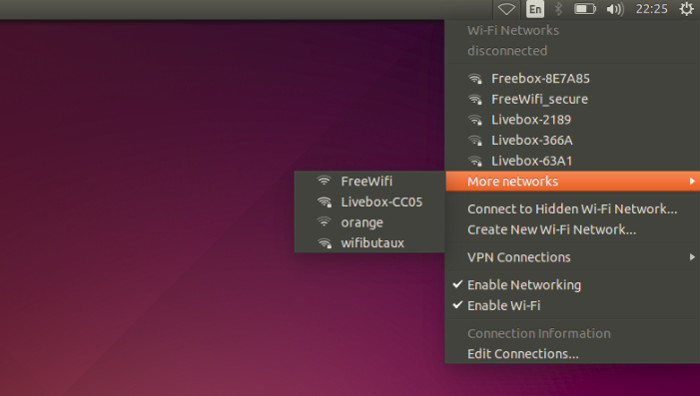
Important : You should uncheck the ‘install from CD ROM’ option in the Software & Updates after this step.
It may happen that Ubuntu doesn’t show additional drivers for your system or you may not be able to install the additional driver. It could also be the case that despite the additional drivers installed, the wifi still doesn’t work.
In that case, you may refer to the next method but keep in mind that it is exclusively for systems with Broadcom wireless adapters.
Method 3: Fix no WiFi in Ubuntu with broadcom wireless adapters
First, find out the network adapter in your system. You can refer to this article to find out the make of wireless network adapter in Linux . This method is exclusively for Broadcom 43 series of wireless adapters. So make sure that you have these adapters by using this command:
If you see a wireless network adapter starting with BCM43, then only you should go ahead with this part of the tutorial.
*-network description: Wireless interface product: BCM4360 802.11ac Wireless Network Adapter vendor: Broadcom Corporation physical id: 0 bus info: pci@0000:03:00.0 logical name: wlan0
The first step is to remove any broadcom drivers already installed on your system. Open a terminal and use the following command:
Step 2: If you are connected to internet via ethernet
If you are connected to internet via LAN/Ethernet cable, you can install different broadcom drivers using this command:
Once the install is finished doing its work, you’ll need to reboot. After you log back in, you’ll be able to see and access your wifi connections.
Step 2: If you don’t have any internet connections
If you don’t have ethernet, you may still be able to pull this off. But you’ll need another system (Linux, Windows or macOS) with active internet connection.
What you are going to do here is to download the driver manually and then transfer it to your problematic Linux system and install it there.
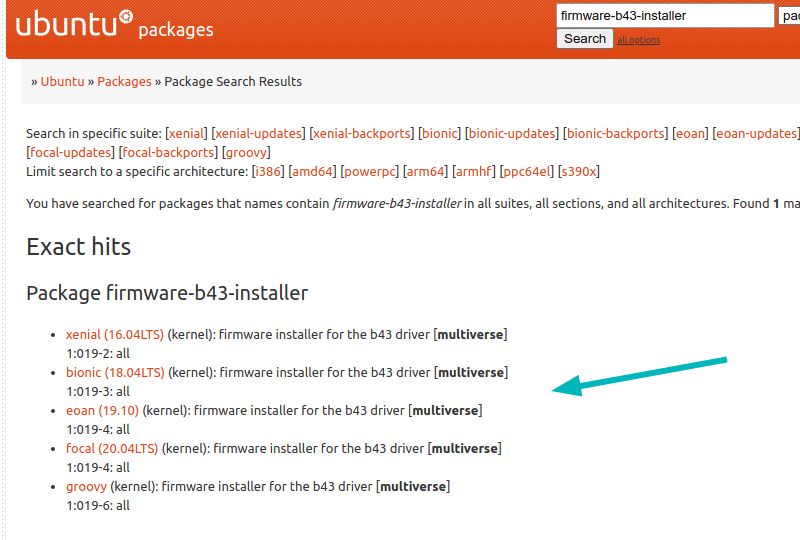
First check which Ubuntu version you are using : Now go to this link to download the WiFi driver for your Ubuntu version.
You should see a screen like this. Click on the link that corresponds to your Ubuntu version:
Now on the next page, click on the ‘all’ link:
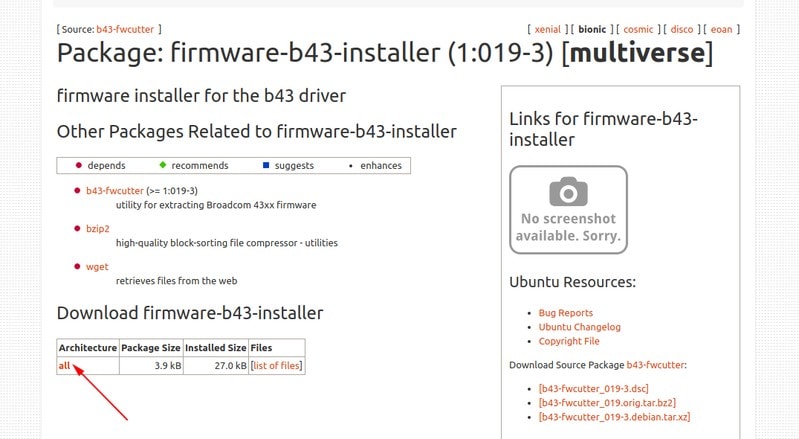
On the next screen, you’ll see a huge number of links. These are various server mirrors and you can click on any of them to download the DEB file of broadcom driver for Ubuntu and Linux Mint.
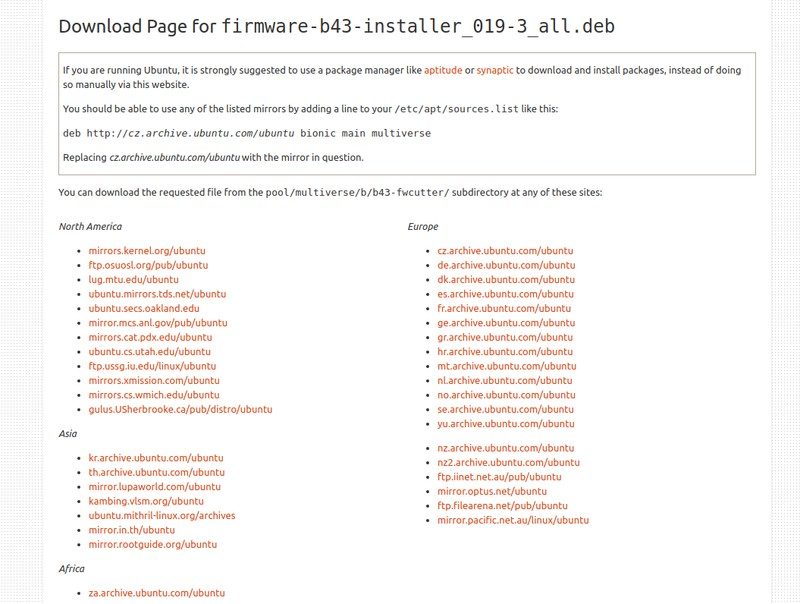
Once you have downloaded the DEB file for the broadcom driver, transfer it to your Ubuntu system that doesn’t have the WiFi. You can use a USB drive to transfer the file.
Once you have copied this DEB file to Linux system with no WiFi, install the drivers from DEB file by double clicking on it .
Alternatively, you can use the dpkg command to install the package from deb file.
Follow the rest of the instructions to install the drivers. Once installed, reboot your system. You should have the WiFi now.
Did it work for you?

Troubleshooting wifi issue could be tricky in Linux. I have encountered an issue where Ubuntu could see the wireless networks but couldn’t connect to it.
I hope this post helped you to fix no wireless network issue in Ubuntu. If you have questions or suggestions, feel free to drop a comment.
Abhishek Prakash
Created It's FOSS 11 years ago to share my Linux adventures. Have a Master's degree in Engineering and years of IT industry experience. Huge fan of Agatha Christie detective mysteries 🕵️♂️
How To Fix Ubuntu Update Error: Problem With MergeList
How to fix "repository is not valid yet" error in ubuntu linux, how to use nightlight feature in linux mint to save your eyes at night, fixing 'shell script opening in text editor' in ubuntu and other linux, enabling bluetooth on arch linux, become a better linux user.
With the FOSS Weekly Newsletter, you learn useful Linux tips, discover applications, explore new distros and stay updated with the latest from Linux world

Great! You’ve successfully signed up.
Welcome back! You've successfully signed in.
You've successfully subscribed to It's FOSS.
Your link has expired.
Success! Check your email for magic link to sign-in.
Success! Your billing info has been updated.
Your billing was not updated.
TechRepublic
Account information.

Share with Your Friends
How to troubleshoot an ethernet interface on a Ubuntu Server with ethtool
Your email has been sent
Ubuntu Server is a powerful, reliable, and flexible platform–there is no end to what you can do with the operating system. For instance, if you like to tweak and tune your network, Ubuntu Server offers plenty of tools. One such networking tool is ethtool.
With this command-line tool, you can query or control your network driver and hardware settings and troubleshoot problematic network hardware. For example, you can change the following and much more:
- Auto-negotiation
- The speed of the device
- Display all NIC settings
- Display auto-negotiation, RX, and TX settings
- Display network statistics for a specific NIC
- Troubleshoot ethernet connections
- Blink the LED of a specific NIC
Let’s explore how to use this must-know tool. Notes: ethtool is not a new tool. Also, ethtool is not specific to Ubuntu, and it can be used on most Linux distributions.
SEE: System Monitoring Policy (Tech Pro Research)
Installing ethtool
Chances are, the release of Ubuntu Server you’re using includes ethtool. To confirm, open a terminal window and issue the command which ethtool, and you’ll know right away if the tool is installed.
If ethtool is not installed, follow these steps.
- Open a terminal window.
- Issue the command sudo apt-get update .
- Install the app with the command sudo apt-get install ethtool .
- Allow the installation to complete.
Using ethtool
You need to know the name of the ethernet device you’ll be working with. To find that out, issue the command ifconfig . The device’s name will be listed in the left column ( Figure A ).
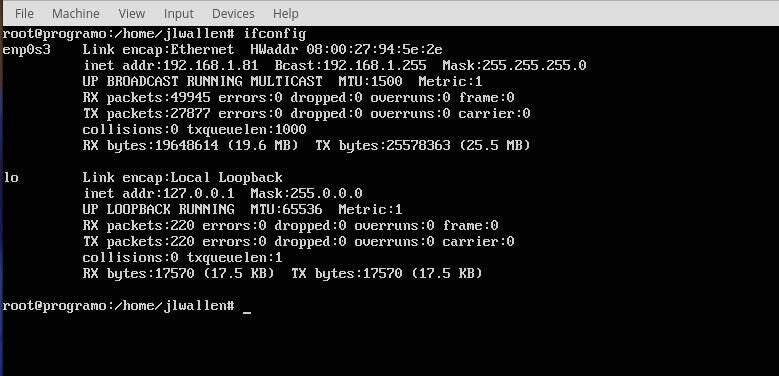
Once you have the device name, issue the command sudo ethtool DEVNAME (DEVNAME is the actual device name). You should see a complete listing of configurations applied to your device ( Figure B ).
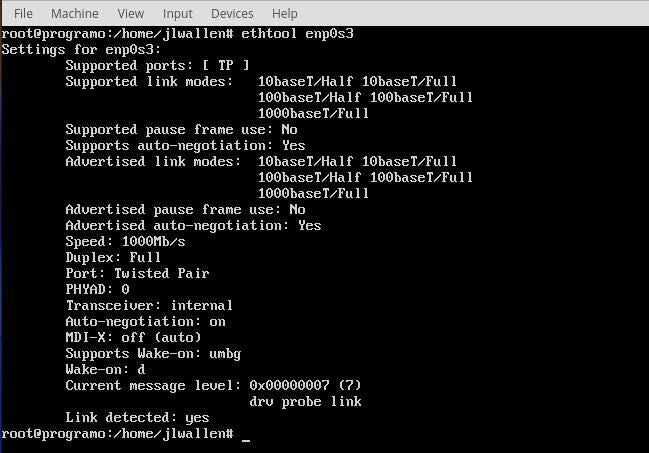
If you want to get statistics about your NIC, issue the command:
sudo ethtool -S DEVNAME
The output from that command will include such things as the following and more:
- Rx_broadcast
- tx_broadcast
- Rx_length_errors
- Rx_over_errors
- Rx_frame_errors
- Rx_no_buffer_count
Using the above command is a great way to troubleshoot issues with a particular NIC. If you find ethtool reporting-specific errors on a card, there’s a problem. The specific errors reported will help you know where to continue your troubleshooting efforts.
Say you want display auto-negotiation and RX/TX information about the card. To do this, issue the command:
sudo ethtool -a DEVNAME
The above command will display the settings for these three particular options ( Figure C ).
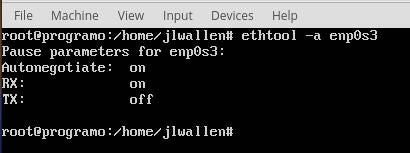
Here are two samples that illustrate how to change these settings. Note: Before making any changes, you must first use the ifdown . To do this, issue the command sudo ifdown DEVNAME (DEVNAME is the actual device name). After making your changes, bring the device back up with the command sudo ifup DEVNAME .
Disable auto-negotiation and enable Half Duplex (DEVNAME is the actual device name):
sudo ethtool -s DEVNAME duplex half autoneg off
Disable auto-negotiation, enable Half Duplex, and set Speed to 1000 Mb/s:
sudo ethtool -s eth1 duplex full speed 1000 autoneg off
Locating a specific NIC
Here’s a really useful trick ethtool offers: You have a server with multiple NICs, and one of them is malfunctioning; you’re not sure which one it is, and you don’t want to go random mode on your server and just start yanking out NICs. You can use ethtool to blink the NIC LED in order to determine which NIC you’re looking to troubleshoot. Say you want to blink the LED of ethernet device enp0s3 for 15 seconds–the command for that would be:
sudo ethtool -p enpS03 15
The LED will begin blinking, so you know which card you’re dealing with.
Testing your NIC
The ethtool command offers a couple of handy tests you can run on a NIC:
- Online – tests nvram and a link test
- Offline – tests register, memory, loopback, interrupt
Let’s run an online test on our NIC. This command looks like:
sudo ethtool -t DEVNAME online
When you run that command, it will seem that ethtool is hanging. Allow the command to complete its test, and it will return the results ( Figure D ).
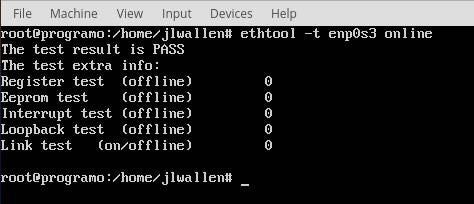
If the test fails, ethtool will report which portion of the test didn’t pass. Note: Some ethernet devices do not support offline testing; if your NIC fails offline testing, it could simply mean it doesn’t support the feature.
Much more to the tool
We’ve only scratched the surface as to what the ethtool command can do. For more information about the tool, issue man ethtool to see every available option you can use.
Subscribe to the Developer Insider Newsletter
From the hottest programming languages to commentary on the Linux OS, get the developer and open source news and tips you need to know. Delivered Tuesdays and Thursdays
- How to avoid public cloud headaches with proper IP address planning
- How to fix the slow apt-get update issue on Linux machines
- How to install and enable memcached on Ubuntu and CentOS
- How to install the Ansible server management system on Ubuntu
- More Linux on my new notebook: Fedora, Linux Mint and Ubuntu
- How Mark Shuttleworth became the first African in space and launched a software revolution
Create a TechRepublic Account
Get the web's best business technology news, tutorials, reviews, trends, and analysis—in your inbox. Let's start with the basics.
* - indicates required fields
Sign in to TechRepublic
Lost your password? Request a new password
Reset Password
Please enter your email adress. You will receive an email message with instructions on how to reset your password.
Check your email for a password reset link. If you didn't receive an email don't forgot to check your spam folder, otherwise contact support .
Welcome. Tell us a little bit about you.
This will help us provide you with customized content.
Want to receive more TechRepublic news?
You're all set.
Thanks for signing up! Keep an eye out for a confirmation email from our team. To ensure any newsletters you subscribed to hit your inbox, make sure to add [email protected] to your contacts list.
Stack Exchange Network
Stack Exchange network consists of 183 Q&A communities including Stack Overflow , the largest, most trusted online community for developers to learn, share their knowledge, and build their careers.
Q&A for work
Connect and share knowledge within a single location that is structured and easy to search.
Ubuntu 22.04: Network connectivity problems
I have a strange behavior, started today, which I can hardly describe. Before , all worked OK!, and there are many more clients and computers on that that network:
A desktop, Ubuntu 22.04 connected using a LAN cable to a router, stopped reaching several internet sites as (not only): YouTube, Twitter, GitHub and so. Among other that connects OK (and not only)- Facebook, Gmail, Google search engine.
Also - VM machines installed on that desktop, sharing its internet connection (Bridge - meaning they get a local IP from the same router), connect to that same unreached sites the same time not going thru the desktop.
And- Connectivity to all other PC and NAS on LAN is reached OK.
To be sure it is not a web browser issue, even pushing to git, using command line, failed.
So what did I do (All yielded same no-success result ):
- Tried to connect using Private Browsing (Fire Fox).
- Cleared all cache and history.
- disabled all browser add-ons.
- Reboot. Disable and re-enable LAN.
- Disable LAN and connect via WiFi.
- Installed Chromium.
- Rebooted router (including telephony company modem).
What DID "solve"?
Connecting to a different network using same cable (reaching same external IP).
This is likely caused by power management or auto-negotiation. If the power management fails to "get it right" then obviously the NIC fails to work for a minute, and if the auto-negotiation gets jacked then you get no connections at all.
Pregame: ip link to get your ethernet interface name. It's usually number two.
Step #1: Make sure the auto-negotiation isn't changing up on you.
sudo ethtool -s eth0 speed 1000 duplex full autoneg off
Obviously, just switch the eth0 to whatever your interface name is. You can get full instructions on the tool with the -h option, which will explain even more settings.
Step #2: Kill the power management.
sudo echo off > /sys/class/net/eth0/power/control
Again, replace eth0 with your interface name. This will disable the power management on this interface until a reboot.
Step #3: Retest.
Run all your programs again.
If you test and want to keep this setting permanently, you will have to put those lines in /etc/rc.local to run after booting.
If neither of these help the likely culprit is probably the actual wire between the computer and the router. It's possible for the little RJ-45 connectors to break internally, or the wires to have been stomped or pierced by another object. This is especially true if you tested the machine somewhere else and it worked.
Hope this helps. -Sean
Add these to /etc/rc.local :
Save the file, and then do: chown root:root /etc/rc.local , and chmod +x /etc/rc.local . It will come up every boot that way after that. Remember to use whatever your network interface name is NOT eth0.
- Before testing: 1) TNX!! 2) why do you think that certain addresses were reached and others didn't ? it is always the same ones. AND - I didn't change the RJ connector on the PC side but, at the router side (2 diff networks a,d routers are located side by side) – guyd Jan 7, 2023 at 19:35
- 1 @guyd might just be coincidental. I'd assure the connection was stable before worrying about anything else. The reason is you aren't seeing the problems on the other machines and you didn't change configuration of the one that had the problem. This sort of "soft eliminates" all of the things except the bits between the machines. The point of doing those commands is to assure there isn't a driver/power problem causing the issue. After you're assured with that you probably are left only with the wires/connectors themselves. – sean Jan 7, 2023 at 21:53
- 1 @guyd The settings I recommended there will assure the stability of the connection, which we didn't know was true before right? There might be messages in journalctl or not, you can have a look for error messages, but sometimes my experience with these things is that don't show in the logs. – sean Jan 7, 2023 at 21:54
- 1 @guyd I've seen some TERRIBLE implementations of autonegotation and firmware that work perfectly on one router or swtich, but as soon as you change the vendor bam it doesn't work... just like that... That's why I suggested to set it. Just get rid of as many problems as possible before you pull your hair out. :D – sean Jan 7, 2023 at 21:56
- sudo ethtool -s eth0 speed 1000 duplex full autoneg off should remain (if it the reason) ? – guyd Jan 8, 2023 at 6:30
You must log in to answer this question.
Not the answer you're looking for browse other questions tagged networking ..
- The Overflow Blog
- Are long context windows the end of RAG?
- Developers with AI assistants need to follow the pair programming model
- Featured on Meta
- New Focus Styles & Updated Styling for Button Groups
- Upcoming initiatives on Stack Overflow and across the Stack Exchange network
- AI-generated content is not permitted on Ask Ubuntu
- Let's organize some chat workshops
Hot Network Questions
- Expired passport and flight tomorrow
- What does Tarski mean when he says "variables do not posses any meaning by themselves"?
- Express Integer as Product Complex Number
- HOA fees before my house is ready
- Fix the addition so that the sum is 1,111
- How will the world learn that Q-Day has arrived?
- How did the sailor survive getting sucked into an engine?
- How can I perform an mDNS lookup on Windows?
- What are ways to better show depth along a 3D curve?
- I want to sum a column in table A when a criteria is met in table B (per row)
- Going to Amsterdam tomorrow. Two months left on passport
- Why does my futuristic society want transparent iPads and computer monitors?
- What do you call a specific 'snapshot' of the way a group of levers, knobs, and buttons are set?
- You're at war with countries X and Y. Does international law say anything about bombing X's embassy in Y (to kill a high-value target)?
- What kind of chart is this and how to read it?
- Expressiveness in arithmetic
- Does the "gradual brain replacement" thought experiment prove consciousness is independent of substrate?
- How should my base molding interface with a stair skirt?
- Photoshop, incline image
- How can single phase induction motor's direction be reversed?
- What is the History, Context, and Implications of the Term "Moonspeak"?
- Reversing the order of function arguments by a replacement rule
- UK visitor visa for an OCI card holder with US passport
- Usage/meaning of ~の半分 vs 半分の~
Troubleshooting network connection failures (1008367)
You are experiencing these issues:
- No network connectivity for a virtual machine
- Cannot connect to the Internet from the guest operating system
- Bridged, Host-only or Network Address Translation (NAT) networking fails
This article helps you to determine the cause of networking problems affecting one or more virtual machines. The steps in this article address whether the networking has been misconfigured on the host operating system, guest operating system or virtual machine.
Each step below provides instructions and a link to a document, for performing the step and taking corrective action as necessary. The steps are ordered in the most appropriate sequence to isolate the issue and to identify the proper resolution. They are also ordered in the most appropriate sequence to minimize data loss. After completing each step, check network connectivity again. Work through each troubleshooting step in order, and do not skip a step.
To troubleshoot a lack of network connectivity in a virtual machine:
- Verify that your virtual machine is using the right type of virtual networking (either Bridged, Host-only, or Network Address Translation (NAT)). For more information, see Understanding networking types in hosted products (1006480) . Note : If a host machine is connected to a network using managed switches or routers, these devices may be configured to block unregistered MAC addresses. In this circumstance, any virtual machine using bridged networking is not able to communicate on the physical network. To resolve the issue, reconfigure the host machine, router, or use NAT networking instead.
- If automatic bridging is enabled in a bridged network, virtual network adapters may be binding to the wrong physical adapter or an adapter that is not connected to a valid network. To resolve the issue, manually assign an active physical network adapter to virtual network adapters. For more information see, Bridged networking does not work when loopback adapter is installed on host (1007250) .
- /usr/bin/vmnet-bridge on Linux hosts using Bridged networking.
- /usr/bin/vmnet-natd and /usr/bin/dhcpd on Linux hosts using NAT networking.
- vmnat.exe and vmnetdhcp.exe on Windows hosts using NAT or Bridged networking.
- Firewalls – Some firewalls may see network traffic from virtual machines as foreign to the host and block the traffic from reaching the physical network. To troubleshoot the connection issue, create exceptions for the virtual machine traffic in the firewall or disable or uninstall it.
- Virtual Private Network (VPN) software – To troubleshoot the connection issue, disable or uninstall it.
- Internet Protocol Security (IPsec) – To troubleshoot the connection issue, disable or uninstall it.
In Windows 8/10 – Click Start > Control Panel > Network and Sharing Center > Change adapter settings .
In Windows Vista/7 – Click Start > Control Panel > Network and Internet > View Network status and tasks > Change adapter settings .
Right-click any network adapter icon and click Properties .
Select VMware Bridge Protocol and click Uninstall .
Click Install .
Select Service and click Add .
Select VMware Bridge Protocol and click OK .
/usr/bin/vmware-config.pl
- If your network does not provide Dynamic Host Configuration Protocol (DHCP), confirm that the static IP settings on the virtual machines are consistent with the addressing scheme on the physical LAN.
- For Workstation, restore the networking defaults. To restore the networking defaults, click Edit > Virtual Network Editor and then click Restore defaults .
- Rebuild your virtual networking stack by reinstalling the VMware product.
If the issue continues to exist after trying the steps in this article:
- Collect the VMware Support information. For more information, see Collecting diagnostic information for VMware Workstation (1346)
- File a support request with VMware Support and quote this Knowledge Base article ID (1008367) in the problem description. For more information, see How to Submit a Support Request .
The Internet connectivity may not work correctly in the virtual machines, if the host machine is set to use static IP address for the DNS servers. Ensure to use the same static DNS server IP on the virtual machine as the host machine.
- VMware Workstation Player
- VMware Workstation
- VMware Server
- VMware Player
How-To Geek
How (and why) to run ubuntu apps on windows 11.
It's easier than you think.
Key Takeaways
- Install WSL2 Kernel, activate Virtual Machine Platform, and make sure you have Admin rights before getting Ubuntu on Windows 11.
- Enable Windows Subsystem for Linux, then download and install Ubuntu for WSL via Microsoft Store to run Linux apps on Windows 11.
Did you know using Ubuntu-exclusive apps doesn't require overwriting your operating system? Unlock the true potential of your Windows desktop by using Ubuntu apps on Windows 11, enhancing your PC experience by blending the power of Linux and Windows.
Why Use Ubuntu Apps on Windows 11?
Adding Ubuntu to Windows 11 enables access to a wide variety of free applications unavailable on Windows alone. These aren't just ordinary programs either; they can accomplish nearly any task on your computer, from enhancing your file management to creative projects. For example, if you're looking for a great photo management tool not found on Windows 11, you might try Shotwell with WSL. Or, if you're not a fan of the email apps available on Windows, you can install the Ubuntu-native Geary email client. There are many great exclusive applications for Ubuntu that can level up your Windows PC.
Furthermore, if you enjoy crafting and coding, the combination of Windows and Ubuntu significantly benefits you. It simplifies the process of working on Linux-oriented projects without the need to leave the Windows environment. This integration reduces complications and amplifies productivity, whether your pursuits involve coding for enjoyment or constructing significant projects.
Imagine you're a developer working on a cross-platform project. Using Ubuntu apps on Windows means you can quickly and effectively test your new project on Linux and Windows with ease. Take it from me: I write programs in the Go programming language, and being able to test out my code and run it on both Ubuntu and Windows 11 seamlessly is very powerful.
Requirements Before You Begin
Before you can start using Ubuntu on your Windows 11 system, a few requirements must be met to ensure a smooth process. During my testing, WSL wouldn't work until I installed the latest WSL2 Kernel package installed on Windows 11. If you're having issues with WSL running on Windows 11 like I did, install this kernel package. It will ensure that WSL v2 operating systems run correctly. You can download and install the EXE file directly from Microsoft .
In addition to the WSL2 Kernel EXE package, you'll need to enable the "Virtual Machine Platform" feature in the "Windows Features" area of Windows 11. WSL runs with the help of virtualization, and this feature is a requirement to get the most out of Ubuntu in Windows 11.
Lastly, ensure you have Administrator rights on your Windows 11 system. Using WSL requires modifying Windows features, and it won't work if you don't have Administrator privileges.
Enabling Windows Subsystem for Linux (WSL)
Windows Subsystem for Linux is not enabled by default on Windows 11. You'll need to activate this feature on Windows before you can use it to run Ubuntu apps on your Windows PC.
To start, open the Windows Start Menu on the desktop. Once it is open, type "Turn Windows Features on or off" into the search box. Launch the icon labeled "Control Panel" beneath it to access the "Add/Remove Features" area of Windows 11.
Inside the "Windows Features" window, scroll down and locate "Windows Subsystem for Linux." After finding it, click on the empty box next to it to activate this feature. Select "OK" after making your selection.
Now that the "OK" button has been selected, Windows 11 will begin setting up WSL on your system. This setup process should take a few minutes to complete. When the setup is complete, you must reboot your Windows PC. Select the "Restart now" button to reboot.
Upon rebooting, log back into your Windows 11 desktop. Once you've logged back in, the Windows Subsystem for Linux will be enabled on Windows 11.
Installing Ubuntu
Ubuntu for WSL is available for Windows 11 via the Microsoft Store, enabling the installation of Ubuntu on your system to run Linux apps within Windows 11.
To initiate the installation of Ubuntu for WSL, open the Microsoft Store from the Windows 11 desktop. Once open, locate the "Search apps, games, movies, and more" box and click on it.
In the search box, type "Ubuntu." Upon entering "Ubuntu," the Microsoft Store will display various versions of the Ubuntu app. Select "Ubuntu 22.04.3 LTS" using the mouse.
After selecting "Ubuntu 22.04.3 LTS," you will be directed to its feature page in the Microsoft Store. Locate the "Get" button and click on it. Selecting the "Get" button will initiate the Ubuntu download for Windows 11.
Downloading Ubuntu 22.04.3 LTS on Windows 11 should be swift, given the program's size is only about 560 MB. Once the download is complete, Ubuntu will be accessible in the Windows Start Menu.
After Ubuntu 22.04.3 LTS has finished installing on Windows 11, access the Windows Start Menu, search for "Ubuntu 22.04.3 LTS," and launch it. Upon its first launch, Ubuntu will automatically configure itself and prepare for use.
Once Ubuntu has finished its setup on Windows 11, you will see an empty terminal window, ready for you to interact with Ubuntu on your Windows 11 system.
Basic Configuration Tips
Here are some basic configuration tips to improve the WSL experience on Windows 11.
Windows and Linux File System Integration
Windows and Linux File System Integration simplifies moving files between your Ubuntu WSL setup and your Windows 11 desktop. Here's how to utilize this feature.
To access your Ubuntu files from Windows 11, begin by opening Windows Explorer. Once opened, locate the "Linux" penguin icon in the sidebar and select it.
Upon selecting "Linux," a folder named "Ubuntu-22.04" will appear. Right-click this folder and choose "Pin to Quick access." This action allows you to effortlessly access your Ubuntu files from Windows.
To access Windows files from Ubuntu, navigate to the /mnt/c folder using the cd command. This method provides interaction with the Windows 11 C:/ drive.
Update your Ubuntu WSL app
It is good practice to update your Ubuntu WSL app from time to time, otherwise programs will stop working. Here's how to do it on Windows 11.
First, open up the Ubuntu app from the Windows Start Menu. Once it is open, run the apt update command to check for Ubuntu software updates.
sudo apt update
When you've finished checking for updates, you can use the apt upgrade command to install them.
sudo apt upgrade
Starting and Using Ubuntu
Ubuntu in Windows 11 has a terminal interface with WSL. WSL is a Linux system layer that is accessible directly from Windows, rather than a Linux desktop on top of the Windows Desktop.
Using Ubuntu means installing packages to use on Windows 11. To start Ubuntu, search for "Ubuntu 22.04.3 LTS" in the Windows Start Menu. Once it is opened, it'll be ready to use.
From here, you can install any app you like. To install an Ubuntu app on your Windows 11 system, start by searching for the name of the app. You can search using the apt search command. For example, to find "wireshark," do:
apt search wireshark
Look through the search results for the program you wish to install. Then, use the "apt install programname" command. To install Wireshark, for example, it's:
sudo apt install wireshark
When your program is installed, you can launch it directly from the terminal with the following command:
nohup program_name & disown
Alternatively, applications can be started from the Windows 11 start menu.
Integration with Windows 11
When apps are installed through WSL, they integrate into Windows 11 quite well by installing themselves into the Windows 11 Start menu. To access your installed WSL programs from Windows 11, look through your programs. Each integrated application will have a Linux icon.
The WSL integration with Windows 11 is quite good. However, keep in mind that not every single application is going to create a desktop icon. Sometimes, you may need to launch your Ubuntu programs directly from the terminal. You typically do this by typing its package name and hitting Enter.
Troubleshooting Common Setup Issues
WSL usually installs without a hitch on Windows 11. However, if you're having issues, there is a quick and easy fix. First, open up PowerShell in Windows 11. Once it is open, use the update command for WSL. Updating WSL will install various patches and fixes that are sure to alleviate the issues you're experiencing.
wsl --update
Alternatively, if updating doesn't help, consider re-installing Ubuntu WSL again by following the installation instructions in the "Setup" portion of this guide.
WSL upgrades your Windows 11 experience by bringing Ubuntu apps to your desktop without the hassle of virtualization. Jump into Ubuntu and WSL to enhance the power of your Windows 11 PC and discover new possibilities in computing.
- Mobile Site
- Staff Directory
- Advertise with Ars
Filter by topic
- Biz & IT
- Gaming & Culture
Front page layout
SUPPLY CHAIN ATTACK —
Backdoor found in widely used linux utility targets encrypted ssh connections, malicious code planted in xz utils has been circulating for more than a month..
Dan Goodin - Mar 29, 2024 6:50 pm UTC

Researchers have found a malicious backdoor in a compression tool that made its way into widely used Linux distributions, including those from Red Hat and Debian.
The compression utility, known as xz Utils , introduced the malicious code in versions 5.6.0 and 5.6.1, according to Andres Freund, the developer who discovered it. There are no known reports of those versions being incorporated into any production releases for major Linux distributions, but both Red Hat and Debian reported that recently published beta releases used at least one of the backdoored versions—specifically, in Fedora Rawhide and Debian testing, unstable and experimental distributions. A stable release of Arch Linux is also affected. That distribution, however, isn't used in production systems.
Because the backdoor was discovered before the malicious versions of xz Utils were added to production versions of Linux, “it's not really affecting anyone in the real world,” Will Dormann, a senior vulnerability analyst at security firm Analygence, said in an online interview. “BUT that's only because it was discovered early due to bad actor sloppiness. Had it not been discovered, it would have been catastrophic to the world.”
Several people, including two Ars readers, reported that the multiple apps included in the HomeBrew package manager for macOS rely on the backdoored 5.6.1 version of xz Utils. HomeBrew has now rolled back the utility to version 5.4.6. Maintainers have more details available here .
Targeting sshd
The first signs of the backdoor were introduced in a February 23 update that added obfuscated code, officials from Red Hat said in an email. An update the following day included a malicious install script that injected itself into functions used by sshd, the binary file that makes SSH work. The malicious code has resided only in the archived releases—known as tarballs—which are released upstream. So-called GIT code available in repositories aren’t affected, although they do contain second-stage artifacts allowing the injection during the build time. In the event the obfuscated code introduced on February 23 is present, the artifacts in the GIT version allow the backdoor to operate.
The malicious changes were submitted by JiaT75, one of the two main xz Utils developers with years of contributions to the project.
“Given the activity over several weeks, the committer is either directly involved or there was some quite severe compromise of their system,” Freund wrote. “Unfortunately the latter looks like the less likely explanation, given they communicated on various lists about the ‘fixes’” provided in recent updates. Those updates and fixes can be found here , here , here , and here .
On Thursday, someone using the developer's name took to a developer site for Ubuntu to ask that the backdoored version 5.6.1 be incorporated into production versions because it fixed bugs that caused a tool known as Valgrind to malfunction.
“This could break build scripts and test pipelines that expect specific output from Valgrind in order to pass,” the person warned, from an account that was created the same day.
One of maintainers for Fedora said Friday that the same developer approached them in recent weeks to ask that Fedora 40, a beta release, incorporate one of the backdoored utility versions.
“We even worked with him to fix the valgrind issue (which it turns out now was caused by the backdoor he had added),” the Ubuntu maintainer said. "He has been part of the xz project for two years, adding all sorts of binary test files, and with this level of sophistication, we would be suspicious of even older versions of xz until proven otherwise."
Maintainers for xz Utils didn’t immediately respond to emails asking questions.
The malicious versions, researchers said, intentionally interfere with authentication performed by SSH, a commonly used protocol for connecting remotely to systems. SSH provides robust encryption to ensure that only authorized parties connect to a remote system. The backdoor is designed to allow a malicious actor to break the authentication and, from there, gain unauthorized access to the entire system. The backdoor works by injecting code during a key phase of the login process.
“I have not yet analyzed precisely what is being checked for in the injected code, to allow unauthorized access,” Freund wrote. “Since this is running in a pre-authentication context, it seems likely to allow some form of access or other form of remote code execution.”
[ Update: Researchers who spent the weekend reverse engineering the updates say that the backdoor injected malicious code during SSH operations, rather than bypassed authenticatiion.]
In some cases, the backdoor has been unable to work as intended. The build environment on Fedora 40, for example, contains incompatibilities that prevent the injection from correctly occurring. Fedora 40 has now reverted to the 5.4.x versions of xz Utils.
Xz Utils is available for most if not all Linux distributions, but not all of them include it by default. Anyone using Linux should check with their distributor immediately to determine if their system is affected. Freund provided a script for detecting if an SSH system is vulnerable.
reader comments
Promoted comments.
Oh, so having one init to rule them all and take over every function of your system was a great idea right?

debian/patches/systemd-readiness.patch · master · Debian SSH Maintainers / openssh · GitLab
debian/patches/systemd-socket-activation.patch · master · Debian SSH Maintainers / openssh · GitLab
While this is particularly pernicious in open source since anybody can see the code, who contributed, etc., I don't believe it would be difficult to do this with corporate code. With a little social engineering you could figure out who works on what bits of Windows and/or OSX. With the right convincing said developer could sneak code into those projects. Particularly if they're messing with macros, changing flags to valgrind or its equivalent, etc.
Channel Ars Technica
- International edition
- Australia edition
- Europe edition

Network Rail to spend £2.8bn to cope with effects of climate crisis
Funding for drains, embankments and other measures is part £45.4bn five-year investment plan
- Business live – latest updates
Network Rail is to spend nearly £3bn to protect the railway from the effects of the climate crisis and extreme weather, as it warned that the country’s network was having to contend with hotter summers and more winter floods.
As part of its new £45.4bn five-year investment plan, the body in charge of Great Britain’s rail network will spend £2.8bn over the next five years on activities and technology to help it cope with the impact of climate change.
Network Rail said millions would be spent on looking after thousands of miles of drains, cuttings and embankments to make them more resilient to issues such as flooding or landslips .
The taxpayer-funded body plans to send key operational staff to its new “weather academy” to make them “amateur meteorologists”, allowing them to interpret forecasts and make better operational decisions.
The rail network has been battered by extreme weather recently, with more than 14 named storms in the past 12 months, which have led to widespread disruption for passengers.
The most high-profile delays took place over Christmas when severe weather and heavy flooding led to delays and cancellations, including on the Eurostar .
The new investment will also go into building or rebuilding more than 600,000 metres of drains and recruiting more than 400 extra drainage engineers, who will boost the amount of maintenance done of drains so they can handle heavier rainfall.
More than 20,000 cuttings and embankments have been targeted for repair work, with more than 300 miles being strengthened.
The investment marks a major increase from the £1bn that Network Rail had initially earmarked for spending on climate change during the five-year period to April 2029, and is nearly six times the £500m in the investment plan that ran from 2019 to 2024.
The £45bn set aside for the latest investment period, known as control period 7, will be an increase of £3bn on the previous period. However, at current prices and factoring in inflation, it equates to a real-terms cut to £42.8bn, down from £43bn in the previous period.
Martin Frobisher, Network Rail’s group safety and engineering director, told Today on BBC Radio 4: “Climate change is happening right now. It’s affecting the railway with flooding in winter and hotter summers than we’ve ever seen before.”
Andrew Haines, the Network Rail chief executive, said: “We can never completely weatherproof our railway but we can be better prepared and mitigate the worst that Mother Nature throws at us, now and into the future, to keep passengers and services safe and moving.”
Network Rail plans to spend £19.3bn on replacing old assets, as well as investing in other projects such as digital signalling.
after newsletter promotion
It will spend £12.6bn on maintenance, £5.3bn on support functions such as timetabling and IT, £4.4bn on operations such as signalling, and £1.8bn will be put in a “risk fund” to be used for unforeseen events.
About 70% of Network Rail’s funding comes from the taxpayer, with 25% coming from the rail operators to use the lines, and 5% from property income.
The majority of Network Rail’s income – nearly £30bn – will come via grants from the UK and Scottish governments. It will receive £13.8bn in track access charges from train operators and £1.7bn in commercial income, such as from retail and property.
Network Rail has set a number of targets to improve train performance and reduce track failures, including replacing and maintaining 5,000km of track and 3,000 sets of points – the part of the rail that moves, allowing trains to switch tracks.
It has also committed to £4bn of efficiencies in operations and maintenance over the five-year programme, including changing the way it manages external contracts and simplifying its technical standards.
- Network Rail
- Rail industry
- Rail transport
- Travel & leisure

New train services between London and Scotland get go-ahead

Siemens to invest £100m in Chippenham rail factory site in Wiltshire

UK ministers look to install highly paid boss to spearhead rail reform plan

£140m rail plan to tackle Elizabeth line and Great Western problems

Draft rail reform bill published ‘fittingly late’, Labour says

Profits of UK’s private train-leasing firms treble in a year

LNER simpler fares trial adds more than £100 to some train journeys

‘Polar express’: passengers hit out at cold conditions on Scottish train line
Most viewed.

IMAGES
VIDEO
COMMENTS
To fix network issues on Ubuntu 20.04, you can start by checking the network logs, verifying network settings, and updating network drivers. Additionally, try disabling any VPN or firewall software, and check for known issues or bugs in Ubuntu. If none of these steps work, reinstalling the NetworkManager package may help resolve the problem.
Network problems. I can't see my wireless network in the list The wireless could be turned off or broken, or you may be trying to connect to a hidden network. My computer connects to the wrong network Edit your connection settings, and remove the unwanted connection option. Other users can't connect to the internet You can save settings ...
1. <code>sudo ufw disable</code>. 7. Router and Modem Troubleshooting. a. Restarting Network Devices: Power cycle the router and modem by unplugging them, waiting for a few seconds, and plugging them back in. This can resolve issues related to network device caching. b.
If Wi-Fi isn't working in Ubuntu, click the gear icon at the top-right corner of the desktop, select System Settings, click the Software & Updates icon, and click the Additional Drivers tab ...
We will proceed through the following steps to get your computer connected to the internet: Performing an initial check. Gathering information about your hardware. Checking your hardware. Attempting to create a connection to your wireless router. Performing a check of your modem and router. To get started, click on the Next link at the top ...
The layers in the TCP/IP network model, in order, include: Layer 5: Application. Layer 4: Transport. Layer 3: Network/Internet. Layer 2: Data Link. Layer 1: Physical. I'll assume that you are familiar with this model, and will proceed by discussing ways to troubleshoot issues at stack Layers 1 through 4.
4. OS: Ubuntu 20.04. Each time that I start the pc and log into my account the ethernet Connection doesn't work and the ethernet icon does not appear in the top-bar. cat /etc/netplan/*.yaml output: # Let NetworkManager manage all devices on this system. network:
The ip command manages many objects. The main ones are: link or l - controls the status of network devices. address or a - manipulates IP addresses on devices. route or r - handles routing table entries. neighbor or n - controls ARP table entries. You can see a full list of objects and commands by running ip help.
Open the system menu from the right side of the top bar and select the Wi-Fi network, then select Wi-Fi Settings. Make sure that the Wi-Fi switch is set to on. You should also check that Airplane Mode is not switched on. Open the Terminal, type nmcli device and press Enter. This will display information about your network interfaces and ...
Ubuntu network problem Normally there is a couple of GUI tools or Terminal commands that Ubuntu experts typically mention first to use to do a first diagnosis of this. What GUI tools (in case the problem is not related to video or limits the user from using the GUI) and Terminal commands (In case GUI is not working) can a user use to diagnose ...
8. dig. dig, an acronym for Domain Information Groper gathers DNS-related information and troubleshoots DNS problems. The dns command output displays information available inside files containing DNS records and helps network administrators verify if the host to IP address name resolution is working fine.
For some reason, ubuntu and my old router does not play along very well with my setup. Fix: You will have to setup a static ip address on your ubuntu laptop. Its pretty simple. Just go to Settings > Network and under "Wired", click the settings icon. Select IPv4 and choose the "manual" option. Then fill in your static ip address.
Problem class. multipass launch fails. go to "Generic networking" section. multipass shell <instance> fails. go to "Network routing" section. multipass shell <instance> works but the instance cannot connect to the internet. go to "DNS" section. extra IPs not reachable between instances. go to "ARP" section.
Even if you see a line stating the IP address, make sure that it is valid for network that you are connected to. Now assuming that you have not assigned an IP address, let's try to get dynamic IP address from the DHCP server. Make sure that eth0 is set for dynamic configuration. You should see line similar to iface eth0 inet dhcp:
First, we will cover the instructions to configure one from GNOME GUI. Start by opening Settings and click on Network menu and hit the gear wheel of the desired network interface. Next, click the IPv4 tab, and then the manual configuration option. Fill out your desired IP address, subnet mask, and default gateway.
Step 3: Go to Software & Updates application. In the first tab Ubuntu Software, check the option of CD Rom with Ubuntu …. It will ask for your password and reload the software sources. Next is to go in the Additional Drivers tab and select the propriety driver and click on Apply Changes.
To confirm, open a terminal window and issue the command which ethtool, and you'll know right away if the tool is installed. If ethtool is not installed, follow these steps. Open a terminal ...
To forget a wireless connection: Open the Activities overview and start typing Wi-Fi. Find the network that you do not want it to keep connecting to. Click the button located next to the network. Click the Forget Connection button. Your computer will not try to connect to that network any more. If you later want to connect to the network that ...
The reason is you aren't seeing the problems on the other machines and you didn't change configuration of the one that had the problem. This sort of "soft eliminates" all of the things except the bits between the machines. The point of doing those commands is to assure there isn't a driver/power problem causing the issue.
Flushing the DNS Cache in Firefox. Open a new tab in Firefox, enter this text in the URL address bar, and hit Enter: about:networking. Click the "DNS" entry in the sidebar. Firefox shows you the most recent entries added to the DNS cache. To clear the cache, click the "Clear DNS Cache" button.
To do this, we will use the -b (boot) option and the number that corresponds to the most recent boot, or -1. You can specify a different number if you want to view the logs for an even older boot. $ journalctl -b -1. You can also use the boot ID to view the logs of a previous boot.
On Windows host machines, reinstall the VMware Bridge Protocol: In Windows 8/10 - Click Start > Control Panel > Network and Sharing Center > Change adapter settings. In Windows Vista/7 - Click Start > Control Panel > Network and Internet > View Network status and tasks > Change adapter settings. Right-click any network adapter icon and ...
Locate the "Get" button and click on it. Selecting the "Get" button will initiate the Ubuntu download for Windows 11. Downloading Ubuntu 22.04.3 LTS on Windows 11 should be swift, given the program's size is only about 560 MB. Once the download is complete, Ubuntu will be accessible in the Windows Start Menu.
231. Researchers have found a malicious backdoor in a compression tool that made its way into widely used Linux distributions, including those from Red Hat and Debian. The compression utility ...
If your issue involves hardware, troubleshooting can even help you save money, so you don't have to buy a whole new computer to fix your issue. Lastly, troubleshooting allows you to learn more about computers and how they work as a whole. You can also use this learned knowledge to help others with their computer issues as well.
As part of its new £45.4bn five-year investment plan, the body in charge of Great Britain's rail network will spend £2.8bn over the next five years on activities and technology to help it cope ...