Understanding Presenter View in PowerPoint: A Deep Dive Guide


Origin and Evolution of Presenter View
Why presenter view is a game-changer for professionals, activating and customizing presenter view in powerpoint, in-depth features of the presenter view, common mistakes and how to avoid them, advanced tips for a power presentation, final tips for enhancing your presentation game, introduction to presenter view.
Have you ever found yourself awkwardly toggling between slides and speaker notes during a presentation? Or wished you could preview the next slide without your audience seeing? Enter Presenter View in PowerPoint, a feature designed to make presenting smoother and more professional.
In essence, Presenter View is a special mode in PowerPoint that allows the presenter to see their speaker notes on one screen, while the audience views the note-free presentation on another screen. This dual-screen setup means you can have your notes, upcoming slides, and timer conveniently on one screen while your audience remains blissfully unaware.
“Presenter View is the unseen ally behind many successful PowerPoint presentations.”
Microsoft’s PowerPoint, with its roots tracing back to the late 1980s, has undergone several metamorphoses. Over the years, as technology improved and presentation dynamics changed, Microsoft introduced new features to make the software more user-friendly and versatile. One such innovation is the Presenter View.
Back in the early days of PowerPoint, presenters had to rely on printouts or separate documents for their speaker notes. The advent of Presenter View in the early 2000s was a game-changer. It allowed presenters to merge their slides and speaker notes into one cohesive presentation experience.
The beauty of Presenter View lies not just in its conception but in its evolution. Over different versions of PowerPoint:
- 2003 : Introduction of a basic Presenter View with slides and notes.
- 2007 : Enhanced screen setup with better dual-monitor support.
- 2010 : Introduction of slide zoom and laser pointer features.
- 2013 & Beyond : Integration with touch features, improved UI, and annotations.
Each version brought refinements, making it more intuitive and packed with features, tailoring to the evolving needs of presenters globally.
Fun Fact : Presenter View wasn’t initially as popular as it is today. It took a few iterations and user feedback loops for Microsoft to perfect the balance between utility and user experience.
The Core Components of Presenter View
Presenter View in PowerPoint is like the cockpit for pilots: it’s where all the essential controls and information are at the presenter’s fingertips. Whether you’re a newbie to PowerPoint or a seasoned professional, understanding these components can transform your presentation experience.
- This provides a glance at your current, previous, and upcoming slides. It ensures you’re always prepared for what’s coming next and can seamlessly transition between points.
- The soul of your presentation, speaker notes, are discreetly placed at the bottom or side, only visible to you. These notes can be elaborate explanations, quick pointers, or even personal reminders. They’re like your secret cheat sheet!
- Ever worried about running over time? This feature shows the elapsed time since you began the presentation and, in some versions, allows you to set a countdown. Stay on track and manage your pace efficiently.
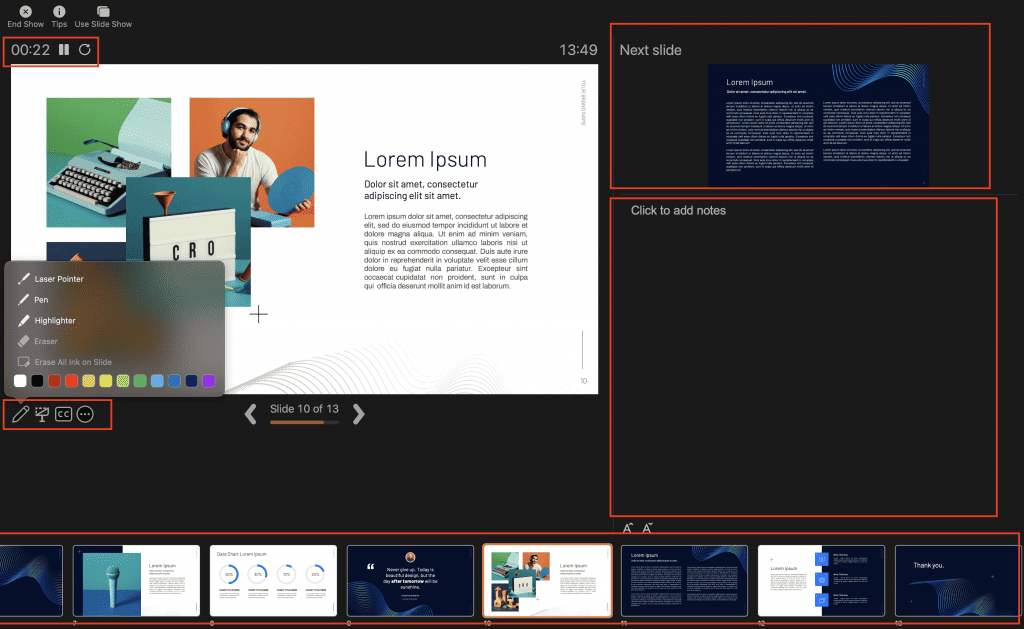
- Interactive features that allow you to draw on slides or use a virtual laser pointer. These are especially helpful when you want to emphasize or explain specific points visually.
- Navigate between slides effortlessly and zoom into specific parts of a slide to draw attention or elaborate on details.
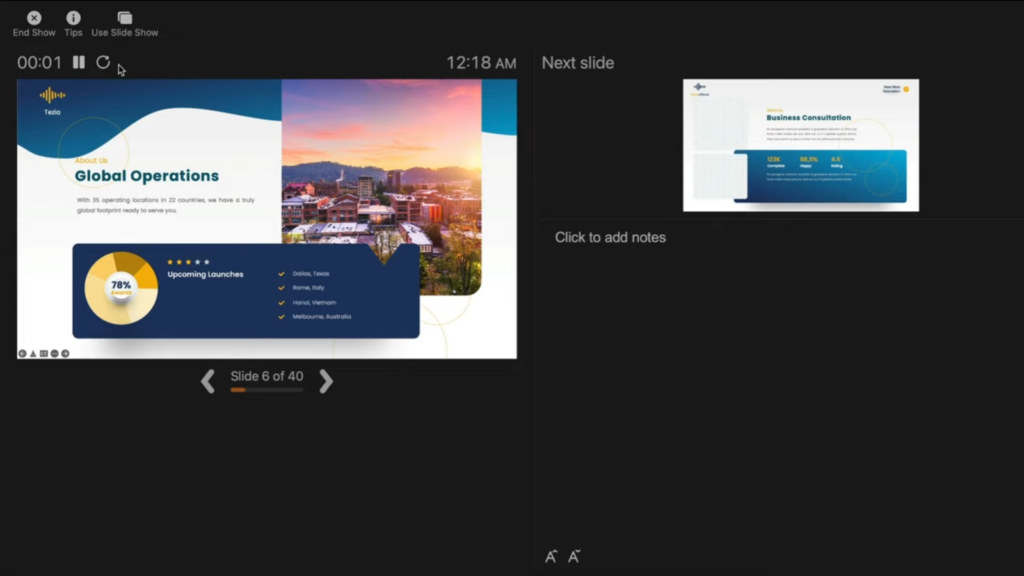
Table: Core Components Overview
Quote : “Presenter View is to a presenter what a dashboard is to a driver. It empowers, directs, and enhances the journey of your narrative.” – Jane Harris, Lead PowerPoint Expert – Powerbacks team
Understanding these components is one thing, but leveraging them effectively during a presentation can make a significant difference. Let’s delve into the ‘why’ behind the significance of Presenter View.
Stepping onto the stage or presenting in a boardroom can often be an overwhelming experience. The constant juggle between capturing the audience’s attention and keeping track of your slides can lead to nervousness. But what if there was a way to have everything you need right in front of you, ensuring smooth sailing through your presentation? Enter Presenter View.
- Having a preview of the upcoming slides and personal notes right in front of you can be a massive boost to confidence. You’re always one step ahead, knowing exactly what’s coming next.
- Instead of turning back to view the screen repeatedly, Presenter View lets you face your audience directly. This creates a more engaging and personal interaction.
- Gone are the days when you’d hold a bunch of cue cards or sheets of paper. With digital speaker notes, you have a cleaner, more organized setup.
- Using the annotation tools and laser pointer, you can make your presentation more interactive, leading to better retention and engagement from your audience.
- There’s no denying that seamlessly transitioning between slides, using interactive tools, and having no physical notes gives a more polished and professional look.
Table: Benefits of Using Presenter View
Quote : “Embracing the Presenter View is not just about leveraging a tool; it’s about amplifying your message and connecting more profoundly with your audience.”
It’s evident that the Presenter View has undeniable advantages for professionals. But how do you activate it and customize it to suit your needs? Let’s walk through the steps.
Starting with PowerPoint 2013, Microsoft enhanced the Presenter View to ensure that it’s both intuitive and user-friendly. Activating it and making it work for you is simple, as outlined in the following steps:
Step-by-Step Guide to Activate Presenter View :
- Start by opening your PowerPoint presentation. This will be the one you intend to deliver.
- At the top, you’ll notice several tabs. Click on the one labeled ‘Slide Show’.
- Within the Slide Show tab, you’ll spot a checkbox labeled ‘Use Presenter View’. Ensure that it’s ticked. If it’s not, simply click on it.
- If you’re using an external projector or display, make sure it’s connected. PowerPoint will automatically detect it and use the Presenter View on your primary display, showing the main presentation on the external one.
- Start your presentation by either pressing F5 on your keyboard or clicking on ‘From Beginning’ in the Slide Show tab.
- Next Slide Preview : Gives a preview of what’s coming next.
- Speaker Notes : Displays your notes for the current slide.
- Slide Navigation : Use this to jump to a specific slide.
- Annotation Tools : Highlight or draw on your slides in real-time.
- Timer : Keeps track of how long you’ve been presenting.
- You can move around the different elements, increase font size of your notes for better readability, or even hide specific components if they’re not required.
Table: Quick Access Tools in Presenter View
Quote : “The beauty of PowerPoint’s Presenter View is the control and flexibility it offers. It’s like having a personal assistant during your presentations.” – Linda Green, Presentation Expert
Now that we know how to activate and customize the Presenter View let’s delve deeper into its features and tools for maximum efficiency during presentations. Shall we proceed?
PowerPoint’s Presenter View is not just a simple “next slide” preview; it’s a hub of tools and functionalities designed to make the presenter’s job easier and the presentation more engaging.
H3: Slide Preview This is arguably the most straightforward feature but also the most helpful. At a glance, you can see what’s coming up, ensuring that you’re always prepared for the next topic or section.
- Smooth Transitions : Eliminates awkward pauses between slides.
- Improved Pacing : Know when to speed up or slow down based on upcoming content.
- Reduced Anxiety : No unpleasant surprises during your presentation.
H3: Speaker Notes For those who don’t rely on pure memory, speaker notes are a lifesaver. They’re your secret weapon, visible only to you, that provides additional context or reminders about what to say.
- Bold the crucial points to ensure they stand out.
- Use concise bullet points for easier and quicker reading.
- Add time cues if you’re aiming to cover specific points within certain timeframes.
H3: Slide Navigation While it’s always best to move sequentially through your slides, there might be instances when you need to skip ahead or return to a previous point. With the slide navigation tool, you can effortlessly hop around your presentation.
- Case Study : During a corporate presentation, John, a sales manager, was posed with a sudden question about Q2 performance. Thanks to slide navigation, he quickly reverted to the relevant slide, addressed the query, and resumed without any hiccups.
H3: Annotation Tools Engage your audience by turning your presentation into an interactive canvas. Whether you’re highlighting an essential statistic or drawing a quick graph, these tools can make a significant impact.
- Use contrasting colors to ensure visibility.
- Don’t overdo it; the aim is to emphasize, not to overwhelm.
- Practice beforehand to ensure you’re comfortable with these tools during the presentation.
H3: Timer It’s easy to lose track of time during a presentation. With Presenter View’s timer, you can keep tabs on the elapsed time, helping you manage the pace and duration of your talk.
- Tip : Always allocate a buffer period. If you’re presenting for 30 minutes, aim to finish in 25. This allows for Q&A or any unexpected delays.
Quote : “PowerPoint’s Presenter View is like a dashboard for presenters. It provides every tool one might need, all within arm’s reach, ensuring a seamless and interactive presentation experience.” – Michael Roberts, Tech Analyst
Understanding the features of the Presenter View is the key to unlocking its potential. With practice and familiarity, it becomes an extension of the presenter, leading to more confident and impactful presentations.
Making the Most of Presenter View
If you’ve ever wanted to feel like a presentation Jedi, mastering the Presenter View is your path to the force. But having the tool isn’t enough – it’s about leveraging its features optimally. Here’s a detailed guide on maximizing the benefits of the Presenter View:
H3: Setup and Access Before harnessing its power, you need to ensure you can access Presenter View without hitches.
- Connect your computer to the projector or external display.
- Launch PowerPoint and open your presentation.
- Go to the Slide Show tab and select Set Up Slide Show .
- In the pop-up, ensure Browsed by an individual (window) is selected.
- Start the slide show. Presenter View should appear on your computer, while the audience sees only the slides.
H3: Customize the Display Remember, it’s your dashboard; make it as comfortable and efficient for you as possible.
- Within Presenter View, hover over the bottom to reveal the toolbar.
- Click on the gear icon to adjust settings.
- Reorder tools based on your preference or hide those you don’t need.
H3: Practice, Practice, Practice The tool’s efficiency relies heavily on your familiarity with it. Do dry runs to ensure you know where everything is and how each feature works.
- Pro Tip : Mimic the presentation environment during practice. If you’re presenting in a large hall, practice with the same setup.
H3: Seamlessly Integrate Other Media If your presentation includes videos, animations, or other media, ensure they play seamlessly in Presenter View.
- Deep Dive : Always embed media within the presentation. Relying on external links or files can disrupt the Presenter View experience.
H3: Engage the Audience Use the tools not just to aid your presentation but to engage your audience. Pose questions, use the pen tool to sketch quick diagrams based on audience inputs, and make it interactive.
- Table of Engagement Techniques :
H3: Master the Art of Transitions Smooth transitions are key to maintaining audience attention. With a preview of the next slide, prepare your narrative to flow seamlessly.
Even with the most powerful tools, human error can play a spoilsport. The Presenter View, as intuitive as it may be, has its quirks. Here’s a list of common pitfalls users face and ways to steer clear of them:
H3: Not Checking Hardware Setup Before you even start the presentation, ensure your hardware is correctly set up. This includes checking the display connection, ensuring the projector or external monitor is detected, and setting up the correct display settings.
- Pro Tip : Always keep a spare HDMI or VGA cable. Technical glitches often come from the most unexpected sources.
H3: Overlooking Speaker Notes Having made the effort of adding speaker notes to your slides, it would be a shame not to use them. They serve as a discreet prompt, ensuring you don’t miss any critical points.
- Fact : According to a study, presenters who actively used speaker notes were 25% more consistent in delivering their core messages.
H3: Ignoring the Timer Time management is crucial. If you have a fixed time slot, exceeding it can inconvenience others and may appear unprofessional. Conversely, finishing too early can leave your audience unsatisfied.
- Actionable Advice : Always have a buffer. If your slot is 30 minutes, aim for a 25-minute presentation, leaving room for Q&A or unexpected delays.
H3: Relying Exclusively on Presenter View Despite its usefulness, never be wholly dependent on Presenter View. Technical glitches happen, and the ability to continue smoothly without it showcases professionalism.
- Case Study : At a major tech conference in 2018, a renowned speaker’s Presenter View malfunctioned. Instead of panicking, he smoothly transitioned to the standard view, using his printed notes as a backup. The audience lauded his adaptability, and his message wasn’t overshadowed by the hiccup.
H3: Not Adapting to Audience Feedback The tools in Presenter View, like slide navigation, are meant to enhance adaptability. If you sense your audience resonating more with a particular topic, don’t be afraid to dwell on it a bit longer or even revisit slides.
By sidestepping these common mistakes, you not only harness the full potential of Presenter View but also project confidence and control. Next, we’ll explore some advanced features to elevate your presentation game even further.
Mastering Presenter View basics can tremendously improve your presentation skills. But if you’re looking to elevate your game and leave a lasting impression, dive into these advanced features:
H3: Seamless Transition Between Slides The art of a great presentation lies not just in the content but also in the delivery. A choppy slide transition can disrupt the flow. PowerPoint offers a plethora of transition effects — from subtle fades to dynamic 3D effects.
- Go to the Transitions tab.
- Browse and select your preferred effect.
- Adjust the transition duration if needed.
- Click Apply To All to maintain uniformity.
H3: Use Zoom to Focus on Details Occasionally, you might want to draw attention to specific details on a slide. Instead of making your audience squint, use the in-built Zoom feature.
- Tip : Combine zoom with a laser pointer or pen tool for emphasis.
H3: Ink Annotations Annotating directly on your slides can be beneficial for interactive sessions or workshops. PowerPoint’s “Ink” feature allows you to do just that.
- Did You Know? : Ink annotations made during a presentation can be saved for future reference!
H3: Embed Multimedia for a Rich Experience Modern presentations often go beyond static slides. Consider embedding videos, audio clips, or even live web content to keep your audience engaged.
- Navigate to the Insert tab.
- Choose Video or Audio and select your file.
- Adjust playback settings under the Playback tab.
H3: Custom Slide Show Sometimes, different segments of your audience require varied content. Instead of having multiple PPT files, create a custom slideshow within the same presentation.
PowerPoint’s Presenter View is akin to a secret weapon, waiting in the wings, ready to empower speakers, educators, and presenters globally. Whether you’re a novice taking your first steps into the world of presentations or a seasoned speaker aiming to refine your skills, the Presenter View, along with the myriad features PowerPoint offers, ensures your content shines in the best light.
Remember, a successful presentation doesn’t merely rely on flashy slides or multimedia elements. It’s the seamless blend of content, delivery, and engagement. And with tools like Presenter View, you’re equipped to handle the technical aspects, allowing you to focus on what truly matters – connecting with your audience.
As Bill Gates once said:
“If you think the PowerPoint presentation is there for you as the presenter, you’re wrong. It’s there for the audience.”
So, the next time you’re gearing up for that crucial pitch, workshop, or lecture, take a moment to familiarize yourself with Presenter View. Your audience — and your confidence — will thank you for it.
Happy presenting!
Save my name, email, and website in this browser for the next time I comment.
Home Blog PowerPoint Tutorials How to Work with Presenter View in PowerPoint
How to Work with Presenter View in PowerPoint

Not all presenters have excellent memory recall or the ability to speak flawlessly to the audience without any cues. However, many of them are good at hiding it by using Presenter View in PowerPoint. It is a presentation mode that enables the presenter to hide speaker notes and presentation controls from the audience while leveraging the various handy features offered by PowerPoint.
How to Use Presenter View in PowerPoint
To start using Presenter View, ensure it’s enabled before you begin your slideshow. If you are new to this feature, we recommend using this option to familiarize yourself with the various navigation options for this presentation mode. This might also be helpful if the PowerPoint templates you are accustomed to using might have animations that you might want to preview in this mode to understand when to give the next visual cue.
How to Enable Presenter View in PowerPoint
To enable PowerPoint presenter view, go to the SlideShow tab and make sure the Use Presenter View option is enabled. This will ensure that you can access Presenter View when you switch your slides to SlideShow mode.

Adjust Display Settings
You can swap between the presenter view and slideshow mode or duplicate the slideshow to exit the Presenter View from the Display Settings menu from the top toolbar.

Navigate Slides in Presenter View
Like any standard PowerPoint presentation in SlideShow mode, you can navigate between slides by using the arrow keys or with a presentation remote. Presenter View also provides slide navigation buttons to move the slides back and forth.

View Taskbar in Presenter View
The Show Taskbar option at the top enables viewing the taskbar. This can be helpful if you require using the taskbar, such as to view your battery charge, see the time, enable or disable another app from the taskbar menu, etc.

Reset or Pause the Timer
Once you start your presentation in Presenter View, a timer starts showing how much time you have spent in slideshow mode. This is an excellent way to understand how much time you have consumed for your session and to keep an eye out for good timekeeping. You can also hit Pause or reset the timer anytime.

Change the Size of the Speaker Notes
How to view notes in PowerPoint while presenting? If you have any speaker notes added to your slides, they will appear in Presenter View on your screen. You can increase or reduce the size of the text via the two options at the bottom of the speaker notes pane.

Using Annotation Tools in Presenter View
PowerPoint annotation tools can be accessed from the bottom toolbar in Presenter View. The Pen and Laser Pointer Tools button gives you access to the pen, ink colors, laser pointer, and eraser and also allows you to show or hide the mouse pointer via Arrow Options .

View All Slides in Presenter View
If you need to go back and forth to find a relevant slide for an ongoing discussion or query during your presentation, you can view all slides in Presenter View via the See all slides option.

Zoom Slides using Presenter View
PowerPoint’s Zoom feature lets presenters quickly pick a portion of the slide to zoom into. Presenter View allows you to leverage this feature by instantly selecting a portion of the slide to enlarge it after selecting Zoom into the slide option. To exit the Zoom mode or hit the Esc key.

Black or Unblack SlideShow
Sometimes, you might want to turn the screen blank for a while, such as during a mid-presentation break. The Black or Unblack SlideShow option blanks the slides for your audience while continuing to show you all navigation options via Presenter View.

Toggle Subtitles in Presenter View
One of the most revolutionary features introduced by Microsoft for PowerPoint over the past decade has been Live captions. This feature enables subtitles by converting speech to text as you present. You can toggle Live subtitles on or off while in presenter view to help your audience read what you speak.

Toggle Camera in Presenter View
Like subtitles, you can also toggle the camera on or off in Presenter View.

End Slideshow in Presenter View
There are different ways to end or exit a SlideShow from Presenter View. You can hit the Esc key or click End Slide Show . Similarly, you can click the three dots at the bottom and select End Show .

More Slideshow Options
Other than the various visibility prominent menus available to navigate, annotate, and present your slides, you can also find a few additional options via More slideshow options , which are accessible via the three dots at the bottom toolbar. These include adjusting the position of the subtitles, turning your screen white or black, ending the slideshow, etc.

How to Use Presenter View on a Single Screen
While Presenter View can be enabled to work with dual monitors, you can also use Presenter View on a single monitor with remote meeting apps like Zoom. A simple method for switching to Presenter View on a single monitor is to click the three dots ( More slideshow options ) at the bottom in SlideShow mode and select Show Presenter View .

You can also switch to Presenter View on a single monitor anytime using the ALT+F5 hotkey.

The presenter can easily manage a PPT in presentation mode, with the utility to view speaker notes, annotate or zoom slides, toggle subtitles or camera on or off, and keep your audience engaged via better slideshow management. However, if you’re new to this presentation mode, a bit of practice might help you avoid confusion when presenting before an audience in Presenter View for the first few times.

Like this article? Please share
PowerPoint Tools, Presentation Skills Filed under PowerPoint Tutorials
Related Articles

Filed under PowerPoint Tutorials • March 26th, 2024
How to Translate in PowerPoint
Unlock the experience of PowerPoint translation! Learn methods, tools, and expert tips for smooth Spanish conversions. Make your presentations global.

Filed under PowerPoint Tutorials • March 19th, 2024
How to Change Line Spacing in PowerPoint
Adjust text formatting by learning how to change line spacing in PowerPoint. Instructions for paragraph indenting included.

Filed under PowerPoint Tutorials • March 15th, 2024
How to Group in PowerPoint
Organize your slides’ content efficiently by mastering how to group in PowerPoint. 3 different approaches to grouping and ungrouping elements.
Leave a Reply
- Use Presenter View Video
- Add speaker notes Video
- Practice and time your presentation Video
- Record a presentation Video
- Print a presentation Video

Use Presenter View

PowerPoint Presenter View shows you the current slide, the next slide, and your speaker notes, to help you focus while presenting and connect with your audience.
Select the Slide Show tab.
Select the Use Presenter View checkbox.

Select which monitor to display Presenter View on.

In Presenter View , you can:
See your current slide, next slide, and speaker notes.
Select the arrows next to the slide number to go between slides.
Select the pause button or reset button to pause or reset the slide timer in the upper left.
See the current time to help you pace your presentation.
Select the font icons to make the speaker notes larger or smaller.
Select the annotations pen icon to draw on the screen in real time, or select a laser pointer.
Select the thumbnail icon to see all the slides in your presentation and quickly jump to another slide.
Select the magnifying glass icon to zoom in on a particular part of a slide.
The screen icon let's you make the screen temporarily black to focus the attention on you.
Select END SLIDESHOW when you're done presenting.
Start the presentation and see your notes in Presenter view

Need more help?
Want more options.
Explore subscription benefits, browse training courses, learn how to secure your device, and more.

Microsoft 365 subscription benefits

Microsoft 365 training

Microsoft security

Accessibility center
Communities help you ask and answer questions, give feedback, and hear from experts with rich knowledge.

Ask the Microsoft Community

Microsoft Tech Community

Windows Insiders
Microsoft 365 Insiders
Was this information helpful?
Thank you for your feedback.
How to use Presenter View in PowerPoint
- Categories: PowerPoint productivity , Presentation skills
- Comments: 1

Think of PowerPoint’s Presenter View like the cockpit of an aeroplane (or airplane for our American readers!). Like an experienced pilot, you have all the controls you need at your fingertips when you’re navigating your slides, whether you’re presenting online or in person, helping you give a seamless presentation and leave your audience seriously impressed.
Presenter View in PowerPoint works best if you have two monitors. On one monitor, you can display your slides for your audience to see. On the other, you have your own private view (which isn’t visible to your audience), where you can see your notes and the upcoming slide while you’re presenting.
How to start using Presenter View in PowerPoint:
– Open your presentation. – Select Slide Show in the top ribbon. – Make sure Presenter View is selected in the Monitors section. – Choose from the dropdown menu which monitor you want your presentation to appear on. (Presenter View will automatically appear on whichever monitor you don’t choose.) – When you’re ready to start presenting, click From Beginning in the Start Slide Show section of the PowerPoint ribbon, or click the Slide Show icon in the bottom right of the screen, or hit the Alt + F5 keys on your keyboard to start your presentation in Presenter View.

PowerPoint Presenter View’s most useful features (by number!):
- This is your current slide. This shows you what your audience can see. This should be the same content that is displayed on your other monitor. The timer in the top-left corner lets you keep an eye on how long you’ve spent on the slide so far, helping you to pace your presentation. You can pause or reset the timer using the icons to the right.
- Here you can see your speaker notes. While we don’t generally recommend that you read out your speaker notes like a script (because it can make you sound like a monotonous robot and make your audience disengage very quickly), it can be useful to have some prompts in the speaker notes so that you know what happens with each mouse click and so that you don’t forget the key points on each slide. You can use the font icons in the bottom left of this panel to make your speaker notes larger or smaller.
- The tracker shows you how far through your presentation you are. Click the forward or back arrows to navigate to your next or previous animation. Hitting the forward or back keys on your keyboard will do the same thing.
- This is a preview of your next animation or next slide. This shows you what’s coming up next, which helps you to transition seamlessly from one slide to another.
- The Pen and laser pointer: This allows you to write on or highlight a particular part of your slide as you present. Adding ink annotations while you’re presenting won’t change your original slides – you can choose whether to keep or discard your annotations when you end your slide show.
- The See all slides tool: Click this to view thumbnails of all the slides in your presentation without your audience seeing. This means you can jump straight to a specific slide without flicking through all the slides in between.
- The Zoom tool: Use this to magnify a specific part of your slide. This is handy if you need to draw your audience’s attention to a particular detail.
- The Black or un-black tool: Use this to blank out the screen the audience sees. This is helpful whenever you want to release your audience’s attention from the slide content and back to you (e.g., during a Q&A). You can choose whether you want the blank screen to be black or white by clicking on the More slide show options icon at the far-right end of the toolbar.
- Toggle subtitles: Use this to turn automated subtitles on or off. You can adjust subtitle settings (such as language and where the subtitles appear on your slide) by clicking on the More slide show options icon.
- Click Show taskbar to open another program on your private monitor. This can be useful if you need to pull up another document without changing what your audience sees.
- Select Display settings to swap the monitors your slides and Presenter View appear on.
- Click End slide show when you’ve finished presenting. Hitting the Esc key on your keyboard will also close Slide Show mode and Presenter View.
And there you have it! Now you know everything there is to know about PowerPoint’s Presenter View. Give it a try next time you present – you might find it helps you to navigate and deliver your slides more confidently.
And for more tips on presenting, check out our ULTIMATE guide to presentation skills .
Related articles
8 steps towards presenting inclusively.
- Presentation skills
The goal of presenting inclusively is to make sure none of your audience are excluded due to their background or abilities. Even if you think you know your audience – many people could be experiencing invisible disabilities or situational limitations that could affect their ability to participate. But taking steps to ensure your presentation is inclusive and accessible is likely to benefit everyone!

5 presentation resolutions for 2024 (with BrightSlide!)
- PowerPoint productivity
Here are five things you should commit to doing this year powered by our productivity and design PowerPoint add-in BrightSlide!

Presentation tips & tricks advent calendar
- Presentation skills / Visual communication
It’s finally here, the holiday season! As the nights grow longer and the air grows colder, we know that all you want to do is settle down near a roaring fire, and snuggle up under the blankets with a good book PowerPoint presentation. Well BrightCarbon are here to help, with our festive presentation advent calendar.

Also you can resize the sections (next slide preview, notes etc) if necessary: https://imgur.com/a/2NnYECf
Leave a Reply Cancel reply
Save my name and email in this browser for the next time I comment.
Join the BrightCarbon mailing list for monthly invites and resources
All of the content I've seen so far has been valuable and definitely worthwhile. The resources are awesome, and you're really crushing it with useful content. Theresa Schuck Thorp Olympic Steel

- Skill Assessments
- AI Course Builder
- Free Courses
- PowerPoint 2019 Basic
Presenter View in PowerPoint

Start Free Trial
Or log in with:
How to Use Presenter View in PowerPoint

- You can use thumbnails to select slides out of sequence and create a customized presentation for your audience.
- Preview text shows you what your next click will add to the screen, such as a new slide or the next bullet in a list.
- Speaker’s notes are shown in large, clear type so that you can use them as a script for your presentation.
- You can temporarily black out the screen during a presentation and then resume where you left off. This can come in handy during breaks or question and answer periods.
Start Presenter View
- Click the Options button.

The Presenter view fills the screen. The same presentation tools are available below the slide, and it also shows the current time and a thumbnail of the upcoming slide. At the bottom of the screen, use the arrows to move forward or backward in the presentation.
Command Buttons
At the top of the Presenter view, there are command buttons.
- Show Taskbar : Show or hide the Windows taskbar.
- Display Settings : When projecting, swap which display shows the presenter view or duplicate the slide show on both screens.
- End the Slide Show : Return to Normal view.

The timer is located at the top-left corner of the current slide. It keeps track of how long Presenter view has been running.
- Click the Pause button to temporarily stop the timer.

The Notes pane gives you a large look at any notes added to the slide. In Presenter view, you have the flexibility to change the display size.

End Presenter View
You can close Presenter view without ending the presentation entirely.
- Click the Options menu.

You return to the regular slide show view.
To close Presenter View and end the presentation, just press Esc .

FREE Quick Reference
Free to distribute with our compliments; we hope you will consider our paid training.
- LinkedIn-ready certificate
- Skill assessments
- Bite-sized, interactive lessons
- Saved progress

Ultimate Guide To Use PowerPoint Presenter View | 2024 Reveals
Jane Ng • 30 Mar 2024 • 5 min read
Have you ever wondered how some presenters make their slideshows look so smooth and engaging? The secret lies in PowerPoint Presenter view – a special feature that gives PowerPoint presenters superpowers during their presentations.
In this guide, we’ll explore how you can use PowerPoint Presenter View and its best alternative to become a confident and captivating presenter, leaving your audience inspired and wanting more. Let’s discover PowerPoint Presenter View together!
Table of Contents
- How to access presenter mode Powerpoint?
- What is PowerPoint Presenter View?
How To Use Powerpoint Presenter View
An alternative for powerpoint presenter view, in summary , frequently asked questions.

Get started in seconds..
Sign up for free and build your interactive PowerPoint from a template.
How to access presenter mode PowerPoint?
What is powerpoint presenter view.
PowerPoint Presenter View is a feature that allows you to view your presentation in a separate window that includes the current slide, the next slide, and your speaker notes.
This feature brings many benefits for a PowerPoint Presenter, making it easier for you to deliver a smooth and professional presentation.
- You can stay organized and on track by seeing the current slide, the next slide, and your speaker notes all in one place.
- You can control the presentation without looking at your computer, which allows you to make eye contact with your audience and deliver a more engaging presentation.
- You can use Presenter View to highlight specific parts of your slides or to provide additional information to your audience.
Step 1: To start, open your PowerPoint presentation.

Step 2: On the Slide Show tab, access Presenter View . You will see a new window that displays:
- Slide Thumbnails: Miniature previews of the slides, you can navigate through the presentation slides effortlessly.
- Notes Page: You can note and view your own notes privately on your screen without revealing them to the audience, ensuring they stay on track and well-prepared.
- Next Slide Preview: This feature displays the upcoming slide, enabling you to anticipate the content and transition seamlessly.
- Elapsed Time: Presenter View shows the time elapsed during the presentation, helping you manage their pacing effectively.
- Tools and Annotations: In some versions of PowerPoint, Presenter View offers annotation tools, such as pens or Laser pointers , Blackout screens , and Subtitles, allowing PowerPoint presenters to emphasize points on their slides during the presentation.

Step 3: To exit Presenter View, click the End Show in the top-right corner of the window.
PowerPoint Presenter View is a handy tool for presenters using dual monitors, but what if you only have a single screen at your disposal? Don’t worry! AhaSlides has got you covered!
- AhaSlides is a cloud-based presentation software , so you can access it from any device with an internet connection. This means that you can use AhaSlides to present your slides even if you don’t have a projector or second monitor.
- AhaSlides also offers a variety of interactive features that you can use to engage and ask your audience to rate your session , such as polls , quizzes , and AhaSlides live Q&A generator . These features can help you to keep your audience’s attention and make your presentation and brainstorming discussion even more interactive.
🎉 Tips: Together with PowerPoint Presenter View, you also should utilise a classroom response system to improve engagement!
How To Use AhaSlides Backstage Feature When Presenting
Step 1: Sign In and Open Your Presentation
- Go to the AhaSlides website and sign in to your account. If you don’t have an account yet, you can create one for free.
- Create a new presentation or upload an existing presentation.
Step 2: Click on Present With AhaSlides Backstage in Present Box
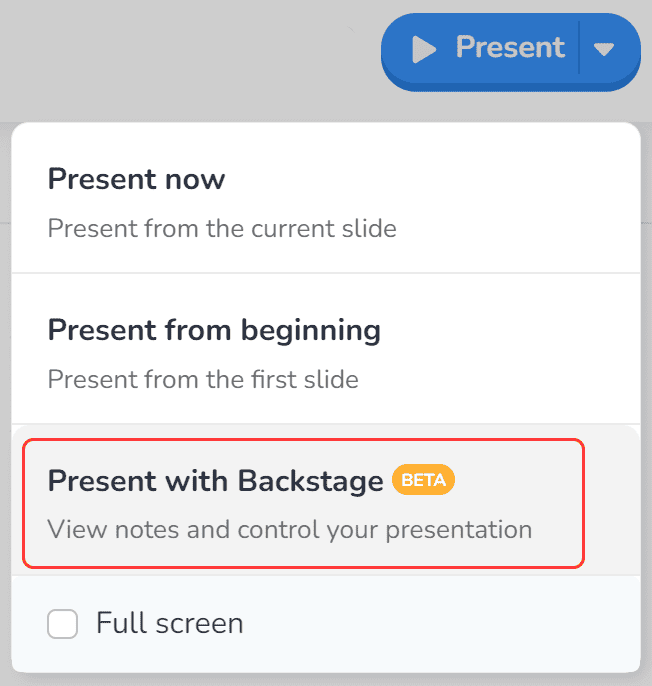
Step 3: Utilizing Backstage Tools
- Private Preview: You’ll have a private preview of your upcoming slides, enabling you to prepare for what’s ahead and stay on top of your presentation flow.
- Slide Notes: Just like PowerPoint Presenter View, Backstage allows you to note your presenter slides, ensuring you never miss a beat during your delivery.
- Seamless Slide Navigation: With intuitive navigation controls, you can effortlessly switch between slides during your presentation, maintaining fluid and polished delivery.

🎊 Follow a simple instruction provided in AhaSlides Backstage Guide .
Tips For Preview and Test Your Presentation With AhaSlides
Before stepping into your presentation, wouldn’t it be great to see how your slides appear on other devices, even without the luxury of an additional monitor?
To utilize AhaSlides’ preview feature effectively, follow these simple steps:
- Create an account on AhaSlides and log in.
- Click on the “Preview” button in the top right corner of the screen.
- This will open a new window where you can see your slides and notes.
- On the right side of the window, you will see a preview of what your audience will see.
By using this feature, you can ensure your presentation looks stunning, guaranteeing a captivating experience for your audience regardless of how they access your content.
Whichever option presenters choose, mastering PowerPoint Presenter View or utilizing AhaSlides’ Backstage, both platforms empower speakers to become confident and captivating presenters, delivering memorable presentations that leave their audience inspired and eager for more.
Who is the person who presents a presentation?
The person who presents a presentation is typically referred to as the “presenter” or “speaker.” They are responsible for delivering the content of the presentation to an audience.
What is a PowerPoint presentation coach?
PowerPoint Presentation Coach is a feature in PowerPoint that helps you to improve your presentation skills. Presentation Coach provides you with feedback on your presentation, such as how long you are spending on each slide, how well you are using your voice, and how engaging your presentation is.
What is PowerPoint presenter view?
PowerPoint Presenter View is a special view in PowerPoint that allows the presenter to see their slides, notes, and a timer while the audience only sees the slides. This is useful for presenters because it allows them to keep track of their presentations and to make sure that they are not going over their time.
Ref: Microsoft Support

A writer who wants to create practical and valuable content for the audience
More from AhaSlides

- Domain Names
- Domain Name Search
- Free Domain Transfer
- .com Domain
- 1 Dollar Domain
- Cheap Domain
- Free Domain
- Buy SSL Certificate
- Website Builder
- Website Platforms
- Website Templates
- Web Design Services
- eCommerce Website Builder
- Local Business Listing
- Web Hosting
- WordPress Hosting
- 1 Dollar Hosting
- Windows Hosting
- Free Website Hosting
- Create Business Email
- HiDrive Cloud Storage
- Microsoft 365 Business
- Cloud Server
- VPS Hosting
- Dedicated Servers
- Rent a Server
- IONOS Cloud
- Business Name Generator
- Logo Creator
- Favicon Generator
- Whois Lookup
- Website Checker
- SSL Checker
- IP Address Check
- Online sales

PowerPoint Presenter view: here’s how to present properly
PowerPoint has become an important tool as part of the modern office environment. The Microsoft software now supports a wide variety of presentations worldwide. But it can be useful for more than showing one slide after another. PowerPoint’s presentation mode includes the option to select Presenter view which provides the presenter with additional information during a speech. Find out all about Presenter view and how to use it in this article.
What is the PowerPoint presentation mode?
Here’s how to set up presenter view, elements of presenter view, using powerpoint presenter view correctly.
The PowerPoint Presenter view is an expanded view to make giving presentations easier. The view allows orators to see their own notes and a preview of the next slide . This additional information is only visible to the presenter but not the audience. This makes it easier to give talks and allows you to focus on what’s important.
PowerPoint is part of the Microsoft Office Suite and one of the most used presentation tools globally. IONOS provides exclusive deals for Microsoft 365 , including regular software updates and individual support and tips through the IONOS Support team.
The PowerPoint Presenter view can be activated via the “Slide Show” tab, by ticking the “Use Presenter View” box.

To use PowerPoint in Presenter view, you will need a second monitor. During official presentations this may take the form of a beamer or a second screen. The following steps ensure that the screen is being detected by your computer:
- Switch on the second monitor.
- Connect the second monitor via HDMI or another cable to your computer.
- Switch on your computer.
- Log in and launch PowerPoint.
- By pressing the Windows key + P you will gain access to the monitor control settings. Select “Expand.” On Mac devices, launch System Preferences, click on “Displays,” select the relevant monitor, and drag it into place as main or side display.
- Activate PowerPoint Presenter view.
- Within Presenter view, click on the display settings option and select “Swap Displays” for the audience to view the presentation.
PowerPoint with Microsoft 365 Business and IONOS!
Use Powepoint to create presentations that stand out using modern designs - included in all Microsoft 365 packages!

Presenter view is structured as follows:
- Menu : The menu pane includes the option to “Show taskbar,” “Display settings,” and “End slide show.” Showing the taskbar can be useful if you need to swap between applications during a presentation.
- Timer & time : The timer shows you how long you have been presenting for. It can be paused and reset. The clock is shown on the right side of the window.
- Current slide : View the currently shown slide here.
- Mark pointer & slides : The pointer lets you point at elements in a slide. You can also mark slides in this way.
- Show all slides : This function allows you to view all sorted slides to jump to the right one quickly.
- Magnify : Use the magnifier to enlarge parts of a slide.
- Black-out screen : This button lets you pause a projection on the second monitor, which is blacked out as a consequence.
- Other options : You can set additional options such as “white screen” (an alternative to the black screen).
- Next slide : In this field, you can view the next slide.
- PowerPoint Notes : PowerPoint provides the option to add individual notes to each slide which help you with your presentation.
- Font : Change the font size of your notes.
Your presentation depends on your preparation . The day before a presentation, you should ensure that the technologies you’re using are working correctly. Always bring along your PowerPoint presentation on a USB stick as a backup.
Save your presentation as a .ppsx file for enhanced compatibility. This ensures that the presentation is automatically launched in presentation mode. For enhanced security, save your presentation as a .pdf file . That is how you can ensure that the layout remains the same and you have guaranteed access to all of your slides. However, effects will be no longer viewable and the audience will see the full slide.
Be careful that you can locate a file quickly and clean up your USB stick and desktop . Sometimes you may need to locate a file during a presentation or need to restart PowerPoint. If you do not blackout or deactivate your screen during this, the audience will get a full view of your PC dashboard.
Other great tools for setting up a presentation include PowerPoint outline view and PowerPoint table of contents .
Related articles

Creating a table of contents in PowerPoint in just a few clicks
Using the popular presentation software Microsoft PowerPoint, you can create professional presentations with a wealth of features. However, as of version 2007, the PowerPoint table of contents, one of the basic elements of a presentation, has only been accessible via indirect means. We will show you how to create one in just a few steps.

The PowerPoint Slide Master in detail
The PowerPoint “Slide Master” view allows you to create what is known as a master slide. This master slide then acts as a template for all the other slides in the presentation. The advantage of this is that all of the items in the template are automatically transferred to all of the other slides, so you don’t need to copy images, logos, designs or font formats onto each slide one by one.

PowerPoint macros: How to automate your everyday work with PowerPoint
PowerPoint is many people’s first choice when preparing a presentation and creating slides. PowerPoint macros can make work considerably easier for anyone who uses the Microsoft application regularly. We will tell you what a PowerPoint macro actually is and also show you what you can create yourself using these mini-programs after a little practice.
The best PowerPoint shortcuts
PowerPoint shortcuts provide the option of viewing features, adding links and utilizing different types of formatting. Keyboard shortcuts are great computer hacks that can make your workflow more efficient. We’ll show you the most important PowerPoint keyboard shortcuts and how they are applied.

PowerPoint Outline View: how to structure your presentations
Microsoft PowerPoint is one of the most popular programs out there for creating presentations. The software offers plenty of useful functions, many of which remain unused. One of these is PowerPoint’s Outline View, which lets users review and optimize the structure of their presentations. In our step-by-step guide, we’ll explain how the outline pane in PowerPoint works.
Build or host a website, launch a server, or store your data and more with our most popular products for less.

Google Slides, like PowerPoint, has different presentation modes that can come in handy when you’re presenting and you want your slideshow to look smooth. Whether you’re looking for slides only, speaker notes or the Q&A feature, in this new Google Slides tutorial, you’ll learn about these and their respective settings. Ready? Then let’s explore the presenter view!
Types of presentation modes in Google Slides
Presenter view, start from beginning, present on another screen.
There are three presentation modes in Google Slides.
If you click the “Slideshow” button or press Ctrl/Cmd + F5, your presentation will start directly without any speaker notes. This is the most widely used and the simplest option.
Next to the “Slideshow” button, there’s a drop-down arrow. Click on it to see the different presentation modes:
In this mode, you’ll be able to see the speaker notes, check the timer and adjust other settings, such as questions from the audience. For more information about the speaker notes, please refer to this Google Slides tutorial .
To view the different tools, after clicking “Presenter View”, move your mouse to the lower left-hand corner of the screen. You’ll see the slide number, previous and next slide arrows and three dots. Click on the dots and here are your options:
Open speaker notes
This enables the speaker notes and makes them visible. If you click this button, you might exit fullscreen mode. To go back to fullscreen, press Ctrl/Cmd + Shift + F or click the “Fullscreen” button. For more information, please refer to this Google Slides tutorial .
Turn on the laser pointer
You’ll see a red dot on the screen, which you can move around to point out any element from your presentation.
Full screen
Click this button (or press Ctrl+Shift+F) to enter or exit fullscreen mode.
Click this button to finish the presentation or just press Esc.
If you click on “Auto-play,” more options will appear: Click “Play” and the slides will advance automatically (by default, every two seconds, but there are other options available. You can also choose to play the slideshow on a loop).
Captions preferences
If you have a mic set up, you can enable captions. Click the drop-down arrow to adjust the size of the text and its position on the screen.
If you click on “more”, you can enable the Audience Q&A panel by clicking on the first option that appears. For more information, please refer to this Google Slides tutorial .
More: Downloads, printing, info and options
Under the “More” tab, you can also choose different download formats for your slideshow or print it out. This tab also contains a handy list of keyboard shortcuts (if you prefer handling keys to using your mouse) and the possibility to report problems.
Your presentation will begin from the first slide (Ctrl/Cmd + Shift + F5).
Your presentation will be shown on a different screen via a media display device, such as Chromecast. This option will be available only if there’s another screen available.

Now you’ve mastered the presenter view in Google Slides, which, with a bit of practice, will be a game-changer! Not only will it make you look like a presentation pro, but it will also streamline the process of nailing those crucial talking points. So go out there and strut your stuff – with presenter view on your side, you are unstoppable! And if you’ve found this tutorial helpful, check out more of them on our blog !
Do you find this article useful?
Related tutorials.

Top 10 tips and tricks for creating a business presentation!
Slidesgo is back with a new post! We want your presentations and oral expositions to never be the same again, but to go to the next level of presentations. Success comes from a combination of two main ingredients: a presentation template suitable for the topic and a correct development of the spoken part. For templates, just take a look at the Slidesgo website, where you are sure to find your ideal design. For tips and tricks on how to make a presentation, our blog contains a lot of information, for example, this post. We have focused these tips on business presentations, so that, no matter what type of company or...

How to present survey results in PowerPoint or Google Slides
A survey is a technique that is applied by conducting a questionnaire to a significant sample of a group of people. When we carry out the survey, we start from a hypothesis and it is this survey activity that will allow us to confirm the hypothesis or to see where the problem and solution of what we are investigating lies.We know: fieldwork is hard work. Many hours collecting data, analyzing and organizing it until we have our survey results.Well, we don't want to discourage you (at Slidesgo we stand for positivism) but this is only 50% of the survey work....

Best 10 tips for webinar presentations
During the last couple of years, the popularity of webinars has skyrocketed. Thousands of people have taken advantage of the shift to online learning and have prepared their own webinars where they have both taught and learned new skills while getting to know more people from their fields. Thanks to online resources like Google Meet and Slidesgo, now you can also prepare your own webinar. Here are 10 webinar presentation tips that will make your speech stand out!

How to create the best presentation for an onboarding process
Slidesgo was once a small project with a handful of people working on it. We’re not making this up! But our passion and effort has brought us to where we are today. In the process, our staff has also grown, and let us tell you: it has grown a lot!Do you remember that time when you were the newly-hired employee? You went to the office and thought that everything was too much for you to handle. Lots of faces you’ve never seen before. Lots of tasks that are suddenly your responsibility. Nearly as much new information as a library could...
Free All-in-One Office Suite with PDF Editor
Edit Word, Excel, and PPT for FREE.
Read, edit, and convert PDFs with the powerful PDF toolkit.
Microsoft-like interface, easy to use.
Windows • MacOS • Linux • iOS • Android

- Articles of PPT
How to Use the PPT Presenter View
The popularity of PowerPoint cannot be undermined when it comes to tools for creating presentations. From advanced features to creative templates, PowerPoint has everything individuals need to ace their presentations.
However, using the PPT Presenter View for a more expansive display is one thing that many individuals struggle with. If you are one of them, you are on the right page! Here we will provide you with all the information you need to use the PPT presenter efficiently. So, let’s delve into it.
What is Presenter View?
Presenter View enables you to run presentations from one device, such as a podium, and display them on another device. This allows you to operate the presentation on your monitor and let your audience view the presentation without notes on a different screen.
While using the Presenter View, you have to make sure the computer you use for presentations supports using multiple monitors simultaneously. If the computer you use has multiple different ports, including HDMI, VGA, DVI, or DisplayPort, it can support more than one monitor. If your computer has one input port only, you will be required to use two video cards to be able to use the Presenter View.
Presenter View is a great tool for presenting information to a large audience. Here is what it has to offer to make your presentations better:
You can set slides in a sequence with the help of thumbnails. This will help you get a tailored presentation per your audience’s interest.
With large icons and buttons, Presenter View enables you to navigate your presentation conveniently.
Presenter View with notes allows the audience to read the speaker’s notes in a larger and clearer type. This feature will also rid you of the need to write a new script for the presentation.
With Presenter View, you can also adjust the brightness of your screen while conducting a presentation. You can also pick up from where you left off. For example, you may not want your audience to see a particular slide for some time and can dim the screen during that duration.
How to Use PPT Presenter View?
Using PPT Presenter View may seem a bit confusing at first. However, you can use it proficiently by following the right steps.
Here is what you need to do to start Presenter View:
Step 1 : Go to your presentation and press the “Options” button.
Step 2 : Select the “Show Presenter View” option,
Now, you can see your presentation in full-screen mode. You can see all of the presentation tools below the slide. Additionally, you can also find the thumbnail of the next slide and the time there. You can move to the next or previous slide with the help of the arrows present at the bottom of your screen.
At the top of the PPT Presenter View, you can also find command buttons. Here is what you can find in the command buttons:
Show Taskbar: You can use this option to hide or display the Windows taskbar.
Display Settings: You can use this option to select slides displayed on both screens.
End Slide Show: This option will take you back to Presenter View not full-screen.
In addition to that, you can also find a timer at the top-left side of your slide. This timer tracks the time of Presenter View. You can “Pause” and “Reset” the time with the help of the options available.
Furthermore, you can get PPT Presenter with notes with the help of the Notes pane. It allows you to have more prominent and clear notes to add as subtitles to the slides. You can also adjust the display size as per your choice.
Here is how you can do it:
Step 1 : Click on the “Increase Font” or “Decrease Font” size option
Step 2 : Now adjust the size of the note that will be displayed on the right side of the slides.
If you want to exit Presenter View, you can do it without having to end the presentation completely with the help of the following steps:
Step 1 : Select the “Options” menu.
Step 2 : Click on “Hide Presentation View”
This will take you back to the PPT presenter, not full-screen mode.
PPT Presenter View Shortcut
One notable feature PPT presenter comes with is keyboard shortcuts. Using these shortcuts with external keyboards provide ample convenience, especially for those with vision or mobility impairments. These shortcuts also come in handy when your device is not equipped with a mouse.
Here are a few of the commonly used Presenter View shortcuts:
F5 : To start the presentation from the start.
Shift + F5 : To start the presentation from the current slide.
Alt5 + F5 : To start the presentation in PPT Presenter View.
N, Enter, Page down, Right arrow key, Down arrow key, Spacebar : To move to the following animation or slide.
P, Page up, Left arrow key, Up arrow key, Backspace : To go back to the previous animation or slide.
Ctrl + H : To hide the navigation buttons and pointer.
B or Period (.) : To get a blank black slide, or go back to your presentation from a blank black slide.
W or Comma (,) : To get a blank white slide, or go back to your presentation from a blank white slide.
Esc or Hyphen (-) : To end the presentation.
Some PPT presenter shortcuts are also used specifically for controlling the slide show more swiftly. These shortcuts include:
Slide number : To view a specific slide.
H : To move to the next slide if it is hidden.
Ctrl + S : To view the “All Slides” dialogue box.
Home or Press and hold the left and right buttons of the mouse for two seconds : To move to the first slide.
End : To move to the last slide.
Ctrl + T : To display your computer’s taskbar.
Shift + F10 or Shift + Windows Key : To view the context menu.
F1 : To view the shortcuts menu.
Tab Key : To move to the following hotspots, including hyperlinks, audio objects, video objects, and animation triggers, of the present slide.
Shift + Tab : To move to the previous hyperlink on the present slide.
Press Enter when a hyperlink is selected : To open the selected hyperlink.
You can also control external media in your presentation with the help of different keyboard shortcuts. However, you have to notice that these shortcuts wouldn't work with any online video file.
Alt + X : To alter the camera source if there will be a cameo.
Alt + P : To pause or play media.
Alt + Q : To stop media playback.
Alt + End : To move to the next bookmark.
Alt + Home : To move to the previous bookmark.
Alt + Up : To increase the volume.
Alt + Down : To decrease the volume.
Alt + U : To mute the sound.
Alt + Shift + Page down : To skip three seconds.
Alt + Shift + Right arrow key : To skip 0.25 seconds and pause.
Alt + J : To hide or show the subtitles and audio menu.
There are shortcuts to make controlling the pointer and using it to create annotations while presenting easier. Here are some of them:
Ctrl + L : Start the laser pointer.
Ctrl + P : To change the pointer into a pen.
Ctrl + A : To change the pointer to an arrow.
Ctrl + E : To change the pen to an eraser.
Ctrl + M : To hide or show the ink markup.
Being nervous while conducting a presentation is normal. However, you can tackle this issue by rehearsing well. There are also some keyboard shortcuts you can make sure of to make your rehearsals convenient, including:
T : To set a new timing.
O : to use original timing.
M : To click to advance with a mouse.
R : to record timing and slide narration.
How to See Your Notes in PPT Presenter View?
When using PPT Presenter View, you can have speaker notes on your screen, while your audience can see slides without them. You can find it on a pane on the right side of the screen. The text is wrapped automatically and comes with a scroll bar.
You can change the size of the text as per your requirement by using these two buttons that you can find on the lower left side of the Notes pane:
You can change the size of the Notes pane by placing the cursor on the vertical line present between the two and then clicking and dragging it.
Here are a few keyboard shortcuts you can use to handle the Notes pane proficiently
Ctrl + Down arrow key : Scroll down a line in the Notes pane.
Ctrl + Up arrow key : Scroll a line in the Notes pane.
Ctrl + Page down : Scroll down a screenful in the Notes pane.
Ctrl + Page up : Scroll down a screenful in the Notes pane.
Alt + A : Go to the following line on the Notes pane.
Alt + Z : Go to the previous line in the Notes pane.
Alt + W : Go to the elapsed time.
How to Use PPT Presenter View without a Full-Screen?
If you don’t prefer using Presenter View with a full-screen, you can also use it without a full-screen. Here is how you can do this:
Step 1 : Go to Slide Show > Set Up Slide Show
Step 2 : Select Browsed by an individual > OK to save the changes.
Step 3 : Start your presentation as you usually do.
Step 4 : Now, you can exit the presentation by using the “Normal” button.
How to Use PPT Presenter View in ZOOM
Zoom has become a staple of online meetings. Hence, learning how to use Presenter View in Zoom is significant. Here are the steps you need to follow:
Step 1 : Connect to a second display option; you can find up to nine options to choose from for a second display and extend the display.
Step 2 : Fix the displays in both PowerPoint and Windows to match their physical setup.
Step 3 : Start PowerPoint Presenter View. Now you can see both the webcam and your notes on the screen.
Step 4 : Open Zoom and start sharing your screen with the slides on.
Step 5 : You can use the PPT presenter in zoom and conduct your presentation.
Alternative Office Software - WPS Office
If you are looking for a tool to elevate your presentation skills, WPS Office is the right option. With its user-friendly interface, built-in spreadsheet and PDF tools, and creative templates, this innovative office suit helps you deliver presentations with ease and convenience. Get this tool to boost your productivity today!
Here are some reasons to choose WPS Office as your next productivity suit in 2023.
Cost-Effectiveness : WPS Office offers a more budget-friendly alternative to Microsoft Office, with a free version with essential features and premium performance at a lower cost than MS Office's subscription plans.
Cross-Platform Compatibility : WPS Office ensures seamless collaboration across different operating systems, including Windows, macOS, Linux, iOS, and Android, allowing users to work on documents from various devices without compatibility issues.
Familiar Interface : WPS Office's interface closely resembles that of MS Office, making it easier for users transitioning from Microsoft's suite to adapt quickly and efficiently.
Lightweight and Speedy : WPS Office is known for its smaller installation size and faster loading times than the more resource-intensive MS Office suite, which can benefit older or less powerful computers.
Use Word, Excel, and PPT for FREE, No Ads.
Edit PDF files with the powerful PDF toolkit.
Microsoft-like interface. Easy to learn. 100% Compatibility.
Boost your productivity with WPS's abundant free Word, Excel, PPT, and CV templates.
1. Does PPT Presenter View present on one monitor only?
No, you can present using PPT Presenter View on two monitors. You can view speaker notes on one monitor and use navigation tools on the other.
2. Can I turn off the presenter view?
You can turn off Presenter View by F5 > Menu bar > Display Settings > Show Presenter View.
3. Can I record my presentation when I use the presenter view?
Yes, you can record your presentation when using the Presenter View with slide timings and voice narration.
Get to the pinnacle of your presentation delivery with PPT Presenter View. Blend speaking points and visuals, improve audience engagement, and tailor sequences with this dual-screen tool. You can consider a great alternative, WPS Office , to enjoy innovative tools and a user-friendly interface.
- 1. How to Use Zoom PowerPoint Presenter View: A Step-by-Step Guide
- 2. How to Add Presenter Notes in WPS Powerpoint for Teaching
- 3. How to Use Teams Presenter Mode for PowerPoint Presentations
- 4. How to Use Page Layout View in Excel (Easy Ways)
- 5. How to Enable Presenter View in WPS Presentation (Easy & Quick)
- 6. How to Add Presenter Notes to Keynote Presentations Easily?

15 years of office industry experience, tech lover and copywriter. Follow me for product reviews, comparisons, and recommendations for new apps and software.

Cloud Storage

Custom Business Email

Video and voice conferencing

Shared Calendars

Word Processing

Spreadsheets
Presentation Builder

Survey builder

Google Workspace
An integrated suit of secure, cloud-native collaboration and productivity apps powered by Google AI.
Tell impactful stories, with Google Slides
Create, present, and collaborate on online presentations in real-time and from any device.
- For my personal use
- For work or my business

Jeffery Clark
T h i s c h a r t h e l p s b r i d g i n g t h e s t o r y !

E s t i m a t e d b u d g e t

Make beautiful presentations, together
Stay in sync in your slides, with easy sharing and real-time editing. Use comments and assign action items to build your ideas together.

Present slideshows with confidence
With easy-to-use presenter view, speaker notes, and live captions, Slides makes presenting your ideas a breeze. You can even present to Google Meet video calls directly from Slides.

Seamlessly connect to your other Google apps
Slides is thoughtfully connected to other Google apps you love, saving you time. Embed charts from Google Sheets or reply to comments directly from Gmail. You can even search the web and Google Drive for relevant content and images directly from Slides.

Extend collaboration and intelligence to PowerPoint files
Easily edit Microsoft PowerPoint presentations online without converting them, and layer on Slides’ enhanced collaborative and assistive features like comments, action items, and Smart Compose.

Work on fresh content
With Slides, everyone’s working on the latest version of a presentation. And with edits automatically saved in version history, it’s easy to track or undo changes.

Make slides faster, with built-in intelligence
Assistive features like Smart Compose and autocorrect help you build slides faster with fewer errors.

Stay productive, even offline
You can access, create, and edit Slides even without an internet connection, helping you stay productive from anywhere.
Security, compliance, and privacy

Secure by default
We use industry-leading security measures to keep your data safe, including advanced malware protections. Slides is also cloud-native, eliminating the need for local files and minimizing risk to your devices.
Encryption in transit and at rest
All files uploaded to Google Drive or created in Slides are encrypted in transit and at rest.
Compliance to support regulatory requirements
Our products, including Slides, regularly undergo independent verification of their security, privacy, and compliance controls .
Private by design
Slides adheres to the same robust privacy commitments and data protections as the rest of Google Cloud’s enterprise services .

You control your data.
We never use your slides content for ad purposes., we never sell your personal information to third parties., find the plan that’s right for you, google slides is a part of google workspace.
Every plan includes

Collaborate from anywhere, on any device
Access, create, and edit your presentations wherever you are — from any mobile device, tablet, or computer — even when offline.

Get a head start with templates
Choose from a variety of presentations, reports, and other professionally-designed templates to kick things off quickly..

Photo Album

Book Report

Visit the Slides Template Gallery for more.
Ready to get started?
Critical PowerPoint Shortcuts – Claim Your FREE Training Module and Get Your Time Back!
The Outline View in PowerPoint (Ultimate Guide)
- PowerPoint Tutorials
- Miscellaneous
- December 5, 2017
This ultimate guide to the Outline View will catch you up to speed on the best ways to use the Outline View in PowerPoint.
There are a variety of different ways you can use the Outline View in PowerPoint to create, review and rearrange your content, all detailed below.
Table of Contents
What is the outline view in powerpoint.
It’s simply a way to view your presentation based solely on the text found within the content placeholders of your slides.
For example, you can see the difference between the views in the SAME deck below – the one on the left is the Normal View (thumbnail view), the one on the right in the Outline View.

And beyond simply showing the outline of your presentation, there are a number of tricks, shortcuts and PowerPoint hacks to BEND the Outline View to do your beck and calling.
You can slowly scroll down the page and soak up all of this PowerPoint goodness, or use the table of contents on the left to jump around to some of the advanced topics.
Switching to the Outline View in PowerPoint
There are three different ways to open (or switch to) the Outline View in PowerPoint, both described below.
Option #1. My favorite way to switch to the Outline View in PowerPoint is the CTRL + SHIFT + TAB keyboard shortcut.
This shortcut opens and/or closes the outline view, displaying either the normal thumbnail view of your slides or the outline view of your content.
Notice how in the outline view (pictured above), instead of seeing the thumbnail preview of the slides (with the respective graphics) you only see the text that is in the content placeholders .
And this makes a BIG difference!
The text you type into normal shapes and text boxes will NEVER show up in the Outline View, only the text that is the content placeholders that are set on the Slide Master.
Open the outline view #2
Another way you can open the outline view is by simply clicking the Normal icon at the bottom of your PowerPoint workspace.
- Clicking the icon once will open the outline view (assuming your notes pane is already open)
- Clicking the icon a second time will close the outline view, returning you to the thumbnail view.
If your notes pane is not open, you will need to click the icon an extra time before moving to the outline or thumbnail view.
Outline View NOT showing text?
Only text that is typed into content placeholders will show up in the outline view.
What’s a content placeholder?
Content placeholders are objects that you (or someone) set on the slide master of your presentation. These are objects like titles, subtitles and any other ‘type to add text here’ type of objects.
These types of placeholders can only be set on the Slide Master, and it’s only the text typed within these placeholders that shows up in the Outline View of your presentation.
So if you move to the Outline View (CTRL + SHIFT + TAB) and don’t see your slide’s text there, it means that your text is not in a content placeholder, it’s likely in a normal shape or text box that has been added to your presentation.
All of the other normal shapes and text boxes that you add to your presentation in the normal view, WILL NOT show up in the outline view of your presentation (no matter what you do).
Drafting an outline in PowerPoint
The MOST IMPORTANT keyboard shortcut to remember when drafting an outline in PowerPoint is:
New Slide Shortcut in PowerPoint, Ctrl plus Enter
Ctrl + Enter
This is your one stop shop for jumping between your content containers (regardless of how many you have) either in the Outline View or the Normal View of your presentation.
In the picture below you can see the different numbers in the Outline View on the left and follow the arrows to the right to see how they line up with the content containers on the right.

CTRL + ENTER allows you to jump between these containers without taking your hands off of the keyboard.
This shortcut works both in the Normal View in PowerPoint – jumping between content containers – and the Outline View in PowerPoint.
Once you run out of content placeholders to type text into, hitting CTRL + ENTER again gives you a new blank slide to work with.
Outline View Keyboard Shortcuts
Besides the CTRL + ENTER keyboard shortcut described above, there are a number of other Outline View shortcuts, most of which involve the ALT + SHIFT keys (making them easier to remember)
When using the Outline View shortcuts, remember that for most of them to work (like collapse groups ALT + SHIFT + 1 and expand groups ALT + SHIFT + 9) you need to rotate to the Outline View to activate it.
To rotate (or activate) the Outline View is to first open the outline view (CTRL + SHIFT + TAB) and then rotate active panes counterclockwise (SHIFT + F6).
If you are brand new to shortcuts, my advice is to just first start with the open/close Outline View shortcut (CTRL + SHIFT + TAB). If you are an intermediate to advanced user and will be frequently using this view, then it’s worthwhile learning how to activate and navigate this view entirely from your keyboard.
Resetting your text formatting
If for whatever reason you forget to paste your content as Text, you can always reset your slide (either in the Normal View or Outline View) to refresh your default formatting.
To do so simply select your text (or slides in the Normal View), navigate to the Home tab, and in the Slide group section select Reset .

Resetting your slides does two things simultaneously:
- It forces all of your content placeholders back into their original position, defined by their position on your Slide Master (this is useful if something accidentally gets moved out of place).
- It forces all of your text back to its original text formatting, as defined by the Slide Master and Theme.
How to print the outline view in PowerPoint
Another overlooked feature of the Outline View is that you can print it.
This is useful when you have a large presentation and you simply want to see what it looks like based on the Titles, sub-titles and other content placeholders….basically your slides minus all of your graphics, pictures, etc.
To print your outline view, simply follow these steps.
1. Navigate to the Print Options
On your keyboard, hit CTRL+P to open up the print options for your presentation.
2. Navigate to the Outline View
Within the print options, select the ‘Full Page Slides’ dropdown (the default setting) and within the menu in the upper right-hand corner, select the Outline View.
Once the outline view is selected, you’ll see a print preview of your slides on the far right.

As shown in the picture above, by default the Outline View is a default blank layout, but you can customize this as I will show you in the next section.
For additional help printing your PowerPoint slides as handouts, check out our guide here .
To learn how to convert your presentation outline into the PDF file format, see our guide here .
Customize the Outline View
If you frequently print the Outline View of your presentation, you can customize it with your own personalized branding (colors, logos, etc.).
This is particularly useful if you plan on sending the print out of the Outline View around. To customize your Outline View, follow these steps.
Step #1. Navigate to the Handout Master
There are two ways to do this:
- From the view tab, select the handout master icon.
- Holding the SHIFT key on your keyboard, click the slide sorter command at the bottom of your screen.

This Shift + Slide Sorter shortcut is a hidden shortcut.
2. Navigate to the Outline View framework
Within the Handout Master view, open up the slides per page drop-down.
So this is where you can select the different formats of your slides when printing them as handouts, depending on how many slides you plan to print per handout.
These options line up directly (plus some like the Notes Page ) with the handout print options available as showing in the picture below.

Within the drop down, simply select the Outline View at the bottom to open up the Outline View format.

3. Customize your Outline View
Just like working with any normal slide, in this Handout Master Outline view, you can add your own personal customizations like your logo, design elements, extra text, etc.
In the example below I’ve added the Nuts & Bolt log in the upper right-hand corner and a simply gradient colored rectangle down the left-side of the page. You don’t have to do anything too fancy…a little effort will go a long way and shock most people.

Using the Outline View in Word and PowerPoint
There are two ways to get an outline from Word into PowerPoint.:
- Import the Outline from PowerPoint which allows you to add the slides to an existing presentation
- Open the Outline directly in PowerPoint creating a brand new presentation
If you are using a Mac, you need to use the Rich Text file Format (.rtf). See instructions for how to do this on Microsoft’s website here .
Import a Word Outline into PowerPOint
Importing your slides like this will add any new slides to the current presentation you are working in. Don’t worry, none of your other slides will be affected.
To learn about the common mistakes that happen when converting Word to PowerPoint, see our post here .
1. Navigate to the ‘Slides from Outline’ command
From within your presentation, navigate to the Home tab, open the New Slide drop down and at the bottom of the dialog select Slides from outline… to open the File Navigation dialog box.

2. Find your Word document
Within the dialog box, find your Word document and select ‘Insert’.

To fix this, you need to use the Title style and Heading 1 styles in Word.

Don’t forget to format your presentation
Importing an outline like this is a great way to jump start your presentation building process, but don’t stop here.
Your outline will always import in the most DEFAULT blank presentation style with only the Title and Content container slide layout.
This default look DOES NOT make for an effective presentation, so you will want to make sure to apply a theme and work on incorporating visuals like charts, tables, pictures, etc. to make your presentation more effective.
Opening an outline in PowerPoint
Instead of importing your outline, you can open your outline directly in PowerPoint to start a brand-new presentation.
To do so, follow these simple steps.
1. Go to the Open File dialog box
Within PowerPoint, either navigate to the File tab, Open and select Computer or on your keyboard simply hit CTRL + F12.

Using either method, the navigation dialog box opens up.
2. Change the file type you are searching for
Within the Open File dialog box, in the lower right-hand corner change the file type you are searching for from PowerPoint files to All Outlines .

3. Find your outline document
Find your outline document (I usually just save mine in Word) and click okay.
Note, if you are using a Mac, you need to save your Word document in the Rich Text File (.rtf) format.
If your outline is formatted correctly, your text will import correctly in the title and content container placeholders. If not formatted correctly, each line of text from your outline will import as its own individual slide.
Final Thoughts
So those are all the different ways you can use the Outline View in PowerPoint to quickly build and edit your PowerPoint presentations.
If you end up using the Outline View a lot, I highly recommend learning the keyboard shortcuts for it. Shortcuts are the fastest way to double your productivity in PowerPoint (no joke). For a full list of our favorite keyboard shortcuts in PowerPoint, read our guide here .
If you enjoyed the depth and detail of this blog post, you can learn more about boosting your PowerPoint skills with us here .
🔒 Unlock the PowerPoint Shortcuts Trusted by Industry Leaders KKR, American Express, HSBC, and More!
Join over 114,880 professionals from diverse fields including consulting, investment banking, advertising, marketing, sales, and business development who have supercharged their PowerPoint game with our proven methods.
✅ Customize compelling presentations effortlessly.
✅ Master time-saving techniques for faster deck creation.
✅ Boost your career prospects with top-notch PowerPoint skills.
Get FREE access to the Critical PowerPoint Shortcuts module of our premium training course by entering your name and email below.
DISCLAIMER: PC Users Only!
We respect your privacy and will keep your info safe and confidential.
Related Articles
About the author.

This Post Has 4 Comments

I apologize if this is obvious and I’m missing it.
But I don’t see anything about the browser-based version of Powerpoint.
Is that because the Outline feature simply does not exist there?

Hi Edward. Yes, unfortunately the Outline View does not exist in the online version of PowerPoint. It’s a very watered down version and I mostly use it to edit existing documents or present, rather that build out a presentation.
Wish I had a better answer for you, but thanks for the question.

I think you meant Ctrl+Shift+Tab rather than Alt+Shift+Tab, in your first mention of that shorcut. Thanks for the helpful article!

Yes, thank you for that (that was a typo on my end)! You are correct, Ctrl+Shift+Tab is the shortcut for the Outline View :). Cheers!
Comments are closed.
Popular Tutorials
- How to Strikethrough Text (l̶i̶k̶e̶ ̶t̶h̶i̶s̶) in Word, Excel & PowerPoint
- How to Make Animated Fireworks in PowerPoint (Step-by-Step)
- Strikethrough Shortcut (l̶i̶k̶e̶ ̶t̶h̶i̶s̶) for Word, Excel & PowerPoint
- How to Create a Flash Card Memory Game in PowerPoint (Like Jeopardy)
- Keyboard Shortcuts Not Working: Solved
PowerPoint Tutorial Categories
- Strategies & Opinions
- Shortcuts & Hacks
- Presentation Design
- Pictures, Icons, Videos, Etc.
- New Features
- Charts & Data Viz
We help busy professionals save hours and gain peace of mind, with corporate workshops, self-paced courses and tutorials for PowerPoint and Word.
Work With Us
- Corporate Training
- Presentation & Template Design
- Courses & Downloads
- PowerPoint Articles
- Word Articles
- Productivity Resources
Find a Tutorial
- Free Training
- For Businesses
We help busy office workers save hours and gain peace of mind, with tips, training and tutorials for Microsoft PowerPoint and Word.
Master Critical PowerPoint Shortcuts – Secure Your FREE Training Module and Save Valuable Time!
⌛ Master time-saving expert techniques.
🔥 Create powerful presentations.
🚀 Propel your career to new heights.
We value your privacy – we keep your info safe.
Discover PowerPoint Hacks Loved by Industry Giants - KKR, AmEx, HSBC!
Over 114,880 professionals in finance, marketing and sales have revolutionized their PPT skills with our proven methods.
Gain FREE access to a full module of our premium PowerPoint training program – Get started today!
We hate spam too and promise to keep your information safe.
You are currently viewing a placeholder content from Facebook . To access the actual content, click the button below. Please note that doing so will share data with third-party providers.
- Share full article
Advertisement
Supported by
The Trumpification of Kristi Noem
The South Dakota governor’s new teeth are just the latest step in a very MAGA makeover.

By Vanessa Friedman
Vanessa Friedman has been chronicling the use of image as a communication device in politics since the Bush v. Gore election of 2000.
Kristi Noem, the governor of South Dakota, is readying for her national close-up. How else to interpret her recent controversial trip to Texas to “fix” her smile, documented in a lengthy video ?
You know, the one she posted on X, Facebook and Instagram, singing the praises of Smile Texas, the cosmetic dental clinic that remedied what she said had been a problem incurred long ago in an accident while bicycling with her children. The one that chronicled her journey to, she said, “a smile that I can be proud of and confident in.”
The result seemed so much like a promotional infomercial that Travelers United, a consumer advocacy group, is suing Ms. Noem for misleading advertising, claiming she was effectively acting as a travel influencer. Vanity Fair wrote that the whole exercise was “blowing up in her face.”
Except for one thing. The teeth story is about a lot more than teeth.
As the race to be Donald J. Trump’s running mate heats up, Ms. Noem’s new smile reflects a tactical move that has as much to do with politics and psychology as it does with appearance.
“It’s all about her appeal to an audience of one,” Ron Bonjean, a Republican strategist, said. “The whole teeth thing almost looks like it was done for Trump to see. She is showing him she works well in front of the camera, that she has that star power he wants onstage with him, while fitting into the mode of women in the Trump universe.”
Mr. Trump was, after all, the president who often identified his staff members, especially members of the military, as coming from “central casting .” He now dresses almost entirely in the colors of the American flag. He reportedly liked women to “dress like women ” — and, as Richard Thompson Ford, a law professor at Stanford University and the author of “Dress Codes: How the Laws of Fashion Made History,” said, “We know what that means to him.” It is reflected in the profile of almost every woman in the Trump orbit, including his family members and his former press secretary Kayleigh McEnany.
In this, Ms. Noem’s dental upgrade is simply the most recent step in what appears to be a yearslong makeover that has transformed her, more than any other woman on Mr. Trump’s shortlist, into what Samantha N. Sheppard, a professor of cinema and media studies at Cornell University, called “the perfect ornament for Trump.” Even beyond her popularity and credentials as a governor, and her MAGA platform, she offers an example of a certain kind of “Miss America-like white femininity,” Ms. Sheppard said, also reflected in Fox News anchors and that involves cascading hair, extensive eyelashes and a blinding smile.
How does Mr. Trump know she’s part of his team? All he has to do is look.
The story is told in the imagery. Back in 2010, when she was first running for Congress, Ms. Noem had a haircut that looked like a cross between “the Rachel,” the layered, straightened haircut Jennifer Aniston made famous on “Friends,” and the power bob favored by Hillary Clinton and Nancy Pelosi. When she won re-election in 2012, she had chopped it into a short look that Ms. Sheppard compared to the signature haircut of Kate Gosselin from “Jon & Kate Plus 8,” albeit slightly more corporatized.
After Mr. Trump won the presidency and the MAGA movement took off, Ms. Noem adopted a new look. Her hair got longer and longer, with tousled waves kissed by the curling iron, her part moved to the center. She began to resemble a doppelgänger for Kimberly Guilfoyle, Donald Trump Jr.’s fiancée. Or a dark-haired version of Lara Trump, Eric Trump’s wife and the new co-chair of the Republican National Committee. Even Ms. Noem’s clothes changed, from the khaki shirtdress she wore to CPAC in 2011 to the bright blue sheath she chose for her State of the State address this year.
There is no better example of her transformation than the cover photo on her new book , “No Going Back: The Truth on What’s Wrong with Politics and How We Move America Forward,” which features a portrait of Ms. Noem with lips glossed, eyelashes thick and one hand seemingly playing with her wavy locks as she sits in her desk chair in a blazer and dress before the American flag.
“She practically looks like a member of the Trump family,” Mr. Bonjean said. “Maybe a cousin.”
And while her Trumpification could be a coincidence, Ms. Noem has revealed herself to be sensitive to the effects and uses of costuming, as seen in recent ads in which she dressed up as a dental hygienist, an electrician and a highway patrolman, the better to convey the idea that “South Dakota is hiring.” (“We have over 20,000 open jobs,” she says in one ad. Plus no individual income tax!)
“It’s absolutely strategic,” Mr. Ford said. Ms. Noem is “signaling that she’s going to be Trump’s kind of woman. And, at the same time, that she isn’t going to challenge him.”
This approach to political image-making has its roots in the pantomimed femininity of Phyllis Schlafly and Sarah Palin, where the promise of a powerful woman was defanged by her participation in the pageantry of traditional gender cosplay.
The teeth simply finish the picture, as does the fact that Ms. Noem used the opportunity to talk up the dentist who did the procedure. If anyone would recognize the value of using power to push product it is Mr. Trump himself. And perhaps, in doing so, recognize a kindred spirit.
The governor may sell herself in part as a grass-roots cowgirl, but Ms. Noem is speaking Mr. Trump’s language, proving that she belongs and that she is all in with his vision. That she is going to “get in line and stay in line,” Ms. Sheppard said. “That she knows how to conduct herself and be who he needs her to be.”
In any case, he has clearly noticed. A few days after the tooth news broke, Ms. Noem joined Mr. Trump at a rally for the Senate candidate Bernie Moreno in Vandalia, Ohio. After she spoke — they were wearing matching MAGA hats — Mr. Trump announced : “You’re not allowed to say it, so I will not. You’re not allowed to say she’s beautiful, so I’m not going to say it.”
What could she do but smile?
Vanessa Friedman has been the fashion director and chief fashion critic for The Times since 2014. More about Vanessa Friedman
Explore Our Style Coverage
The latest in fashion, trends, love and more..
Phoebe Philo Breaks Her Silence: In an exclusive interview, the designer talks about doing things as she wants them done, the weight of expectations and what happens next.
Naked Dressing: Kristen Stewart’s looks during her press tour for “Love Lies Bleeding” have stood out, taking the film’s carnality and covert politics and forcing anybody watching to confront their own preconceptions about women’s bodies and sexuality.
The Most Famous Cowboy Hat: Beyoncé, Shania Twain, Kevin Costner and many reality TV regulars are loyal customers of Kemo Sabe hats. The shop in Aspen can’t believe its luck .
Zendaya Dresses the Part: The actress is known for thematic dressing to promote her movies. After her “Dune” desert epic, comes a tennis love triangle , “Challengers.”
A Shapeshifting Voice: Loren Kramar wowed a fashion set with a recent performance. Now he’s taking his act mainstream.
Fashion Bros in Mourning: Dries Van Noten’s retirement announcement brought in an outpouring of reminiscences, particularly from fashion pros like men’s wear experts.
Find out about insurance programs, pay types, leave options, and retirement planning.
Discover resources to have a balanced career at NIH.
Resources for training to develop your leadership and professional skills.
Access your personnel information and process HR actions through these systems.
Information for managers to support staff including engagement, recognition, and performance.
Discover what’s next at the NIH.
View an Archived Retirement Presentation
If you have retirement questions and want the convenience of viewing a retirement presentation at your leisure, check out a recorded retirement overview presentation , which was conducted by the Office of Personnel Management (OPM).
If you have questions, refer them to your Benefits Contact or [email protected] .
Back to Newsletter
Contact us to ask a question, provide feedback, or report a problem.
Watch CBS News
The legal battle over the abortion pill has reached the Supreme Court. Here's what to know.
By Melissa Quinn
Updated on: March 26, 2024 / 11:25 PM EDT / CBS News
The following preview was published before the Supreme Court heard arguments in the case known as FDA v. Alliance for Hippocratic Medicine. Read coverage of the arguments here .
Washington — Twenty months after the Supreme Court ruled to return abortion policy to the states, the issue will be before the justices again on Tuesday, when they weigh a case that threatens to curtail access to a commonly used drug taken in a medication abortion .
The dispute involves a series of actions that the Food and Drug Administration took beginning in 2016 that made the pill, mifepristone, easier to obtain. A group of medical associations that oppose abortion rights have argued the agency acted unlawfully when it relaxed the rules surrounding mifepristone's use.
The justices will first have to consider a procedural issue — whether the doctors and their associations have legal standing to challenge the FDA's efforts in federal court — before deciding whether the FDA's changes complied with the law.
Hanging in the balance is the availability of the pill nationwide. States that restrict abortion access and those that protect it would all be impacted by a decision that rolls back the FDA's recent moves.
"We know that reversing the changes made in 2016 and 2021 to access mifepristone will make reproductive care more resource-intensive and less safe," said Marsha Henderson, former FDA associate commissioner for women's health, during a call with reporters. "It will also undermine FDA's congressionally granted authority and confuse patients.
Mifepristone, she said, has been regulated "more strictly and studied more intensely" than more other drugs.
The rise of medication abortions

Medication abortions made up more than half of all abortions in the U.S. in 2023, according to new research from the Guttmacher Institute, an organization that supports abortion rights. The group found that abortions done by pills accounted for 63% of all that took place within the health care system last year, a jump from 2020, when more than 5 in 10 abortions were medication abortions.
The increase in medication abortions in the three-year span followed efforts by the FDA to make mifepristone easier to obtain, namely by allowing it to be sent through the mail. The agency temporarily lifted a requirement that the drug be dispensed in-person during the COVID-19 pandemic, and made the change permanent in late 2021.
The Supreme Court is now reviewing whether the FDA acted lawfully when it made that move, along with several other steps the agency took in 2016 surrounding mifepristone's use. As part of the 2016 actions, the FDA allowed mifepristone to be taken later in a pregnancy, increasing the gestational age limit from seven to 10 weeks. It also reduced the number of in-person visits required by a patient undergoing a medication abortion from three to one, and allowed more health care providers to prescribe the drug.
"This isn't just any method of abortion," said Mary Ziegler, a University of California, Davis, law professor who is a leading historian on the abortion debate in the U.S. Not only is it the most popular, but medication abortion is "one that is uniquely important at a time when abortion is a crime in a lot of places," she continued.
Twenty-one states have either banned or restricted abortion since the Supreme Court overturned Roe v. Wade in June 2022.
How the case arrived at the Supreme Court
The FDA first approved mifepristone in 2000. It's taken with a second drug, misoprostol, to terminate an early pregnancy. In the more than 20 years since mifepristone became available in the U.S., more than 5 million women have taken the drug, according to the agency .
Serious adverse events as a result of mifepristone are "exceedingly rare," the FDA said, and studies show that hospitalization of women who have taken the drug occurs in less than 1% of cases.
But in November 2022 — more than two decades after the FDA green-lighted mifepristone — a group of medical associations that oppose abortion rights filed a lawsuit in federal district court in Texas challenging both the 2000 approval and the more recent changes. The organizations claimed the FDA did not have the authority to approve mifepristone for sale and failed to adequately consider the drug's safety and effectiveness.
The federal judge overseeing the case, U.S. District Judge Matthew Kacsmaryk, agreed that the FDA's 2000 approval and subsequent actions were likely unlawful. He blocked the FDA's initial action allowing the drug to be sold in the U.S.
But Kacsmaryk put his ruling on hold for a week, setting off a frenetic series of decisions from a federal appeals court and the Supreme Court. In April 2023, the high court preserved access to mifepristone while legal proceedings continued.
Months after the Supreme Court issued its emergency relief, the U.S. Court of Appeals for the 5th Circuit upheld the FDA's 2000 approval of the abortion pill, but said the agency violated the law with its more recent changes to the rules for its use.
The 5th Circuit made clear that its decision was preempted by the Supreme Court's earlier order protecting access, which remains in effect until the justices issue a ruling in the case.
The Justice Department and Danco Laboratories — the maker of Mifeprex, the brand-name version of mifepristone — asked the Supreme Court to review the 5th Circuit's ruling, and it agreed to do so in December. A ruling is expected by the end of June.
The arguments in the mifepristone case

Before considering whether the FDA went too far with its 2016 and 2021 changes, the Supreme Court will first weigh whether the medical associations and their members sufficiently showed that they may be injured by the agency's actions, and that those alleged injuries can be traced to the FDA's relaxing of the rules for mifepristone.
The Justice Department argued in filings that the doctors involved in the legal challenge do not prescribe the drug and haven't identified a single case where a member has been forced to complete an abortion for a woman who shows up at an emergency room with an ongoing pregnancy.
The associations' theory of how one of their members may be harmed rests on a "long and speculative chain of contingencies," Solicitor General Elizabeth Prelogar wrote. Under their theory, a woman who takes mifepristone must suffer an "exceedingly rare serious adverse event" that requires emergency care. Instead of returning to the provider who prescribed the drug, the woman must then seek care from one of the association members or show up in an emergency room where a member physician is working.
The doctor would only be forced to complete the abortion if another physician wasn't available to help, or if the member couldn't invoke federal conscience protections for some reason, Prelogar reasoned.
But lawyers for the Alliance for Hippocratic Medicine told the court that their members object not only to abortion, but also to "complicity in the process." Even completing a medication abortion when the fetus is no longer alive harms doctors who consider abortion objectionable, said the group, which is represented by the conservative legal organization Alliance Defending Freedom.
"FDA has spent decades directing women harmed by abortion drugs to emergency rooms. Many of them have sought treatment from respondent doctors," the lawyers wrote. "Now that FDA is called to account for the harm caused, the agency cannot insist that the very treatment option it directed is somehow speculative."

If the Supreme Court finds that the doctors failed to show they would suffer a concrete injury, the justices would order the case to be dismissed without deciding whether the FDA acted lawfully when it relaxed the rules for mifepristone's use.
But if they reach the key legal issues in the case, the Justice Department and Danco told the justices that the FDA's changes were lawful.
The agency relied on a "voluminous body of medical evidence" on mifepristone's use over decades when it determined that the 2016 changes would be safe, Prelogar wrote. In any event, the district court was wrong to second-guess the determinations that Congress empowered the FDA to make, she said.
"To the government's knowledge, this case marks the first time any court has restricted access to an FDA-approved drug by second-guessing FDA's expert judgment about the conditions required to assure that drug's safe use," Prelogar wrote.
Lawyers for the physicians countered that the FDA failed to give a "satisfactory explanation" for its decision to lift the in-person dispensing requirement and called the studies the agency relied on "deeply problematic."
Withdrawing the in-person visit requirement in 2021 eliminated the opportunity for health care workers to screen for ectopic pregnancies and other conditions, the associations argued. In 2016, the FDA removed "interrelated safeguards without studies" that examined the changes as a whole, they continued.
Warnings of chaos
The prospect of the Supreme Court allowing the 5th Circuit's decision to stand has raised concerns not only about the impact to medication abortion in the future, but also about what would happen to the mifepristone that's already available.
"One of the possibilities would be that mifepristone access would be limited or potentially eliminated nationwide, and that would create a lot of chaos," Ziegler said. "Even if the court did what the 5th Circuit is doing or wanted to do, that would cause a lot of issues too because all of the mifepristone on the market would be misbranded and mislabeled, and that would require both Danco and the FDA to take steps to comply with whatever the Supreme Court says."
Elisa Wells, the founder of Plan C, a website that provides information about how and where to get abortion pills, agreed that if the doctors prevail, it could cause "chaos, fear and harm" to those seeking medication abortions. But she said international telehealth providers and online vendors could help reduce the impact of a decision that unwinds the FDA's more recent changes.
"There will be an increase in demand and alternate routes of access," she told CBS News.
One of those organizations, Aid Access, is a major telemedicine provider of mifepristone, and has provided the pills to women across the U.S. Its founder, Dr. Rebecca Gomperts, said new shield laws in six states have allowed her group's prescribing to be done by domestic providers.
The shield laws offer protections to licensed health care providers in those states who prescribe and send abortion pills to patients living in states where abortion is restricted or banned.
"Doctors have the right to prescribe medication outside of the label, so in that sense, it really doesn't matter what the Supreme Court says, because that is the discretion of medical providers," Gomperts told CBS News. "We are just going to continue no matter what the decision is. It won't affect our work."
As a backup, Gomperts said Aid Access could always go back to its initial model, in which Gomperts herself prescribed mifepristone remotely from Europe.
"The reality is the pills are not going to go away," she said. "Women will always get them, and we will do whatever it takes to get them to them."
Controversy surrounding the case
Separate from concerns about the ramifications of a decision against the FDA, the dispute over mifepristone has been surrounded by controversy since the Alliance for Hippocratic Medicine brought the case 16 months ago.
The lawsuit was filed in Amarillo, Texas, where Kacsmaryk is the lone district judge and was effectively guaranteed to oversee the case. Appointed to the federal bench by former President Donald Trump in 2019, Kacsmaryk had written critically about abortion and Roe v. Wade.
The decision by the medical groups to file their case in Amarillo sparked accusations they engaged in "forum-shopping," a practice in which a party pursues a claim in the court that's most favorable to them.
The Judicial Conference of the United States, the policy-making arm of the federal judiciary, announced a new practice earlier this month in which civil cases with statewide and nationwide implications will be assigned at random. The change is meant to curb judge-shopping, according to U.S. Senior District Judge Robert Conrad, secretary of the Judicial Conference.
Studies cited by Kacsmaryk and the 5th Circuit in their rulings in favor of the Alliance for Hippocratic Medicine have also faced scrutiny. The American Civil Liberties Union warned the Supreme Court in a filing that the lower court decisions relied on "patently unreliable witnesses" and "ideologically tainted junk science."
The group said doctors who submitted declarations during an earlier stage in the case have been criticized by judges in other cases involving abortion restrictions. Also, one study referenced by Kacsmaryk about the mental health impacts of medication abortion relied on 98 anonymous blog posts from women who shared their purported experiences with medication abortion between 2007 and 2018.
Additionally, the publisher of an academic journal retracted two studies from 2021 and 2022 that were cited by Kacsmaryk after a reader raised concerns about the data and whether the authors' affiliations with organizations that oppose abortion rights presented a conflict of interest.
Two experts reviewed the articles, and they identified issues that "demonstrate a lack of scientific rigor and invalidate the authors' conclusions in whole or in part," according to the publisher, Sage Journals.
Haley Ott contributed to this report.
Melissa Quinn is a politics reporter for CBSNews.com. She has written for outlets including the Washington Examiner, Daily Signal and Alexandria Times. Melissa covers U.S. politics, with a focus on the Supreme Court and federal courts.
More from CBS News

Pete Buttigieg says "we don't fully know" conditions for Baltimore bridge repair

Could House control flip to Democrats? Early resignations leave GOP on edge

Funeral held for longtime Connecticut Sen. Joe Lieberman

Fulton County DA Fani Willis plans to take a lead role in trying Trump case
- Create a presentation Article
- Add and format Article
- Design a presentation Article
- Share and collaborate Article
- Give a presentation Article
- Set up your mobile apps Article
- Learn more Article
Create a presentation
Create a presentation in powerpoint for the web.
With PowerPoint for the web running in your web browser, you can:
Create presentations that include images, videos, transitions, and animations.
Get to your presentations from your computer, tablet, or phone.
Share and work with others, wherever they are.
If you're using the desktop version of PowerPoint on a Windows PC, see the PowerPoint Quick Start .
If you're using the desktop version of PowerPoint on a Mac, see Office for Mac Quick Start Guides and PowerPoint for Mac Help .
Create, open, and name a presentation
Go to powerpoint.office.com .

Select New blank presentation , open a Recent file, select one of the themes , or start with a presentation template .
To name the presentation, select the title at the top and type a name.
If you need to rename the presentation, select the title and retype the name.

Add a slide
Select the slide you want your new slide to follow.
Select Home > New Slide .
Select Layout and the you type want from the drop-down.

When working in PowerPoint for the web, your work is saved every few seconds. You can select File > Save a Copy to create a duplicate copy in another location.
Or choose File > Download As to save a copy to your device.

When you're online, AutoSave is always on and saves your changes as you work. If at any time you lose your Internet connection or turn it off, any pending changes will sync as soon as you’re back online.

Need more help?
Want more options.
Explore subscription benefits, browse training courses, learn how to secure your device, and more.
Microsoft 365 subscription benefits
Microsoft 365 training
Microsoft security
Accessibility center
Communities help you ask and answer questions, give feedback, and hear from experts with rich knowledge.
Ask the Microsoft Community
Microsoft Tech Community
Windows Insiders
Microsoft 365 Insiders
Was this information helpful?
Thank you for your feedback.
VIDEO
COMMENTS
Presenter view lets you view your presentation with your speaker notes on one computer (your laptop, for example), while the audience views the notes-free presentation on a different monitor. Note: PowerPoint only supports the use of two monitors for a presentation. However, you can configure to run a presentation on three or more monitors that ...
In Presenter View, you'll have your own private screen with tools like a next slide preview, timekeeper, and drawing tools.. This is a view that you'll see on your own screen while giving a presentation using PowerPoint. While the audience will see the presentation on the projector or big screen, you'll have your own private view on a second monitor.
In essence, Presenter View is a special mode in PowerPoint that allows the presenter to see their speaker notes on one screen, while the audience views the note-free presentation on another screen. This dual-screen setup means you can have your notes, upcoming slides, and timer conveniently on one screen while your audience remains blissfully ...
The 'Normal View' option is the first option in the 'Presentation Views' section of the 'View' tab. It is the most commonly used viewing option and is also the default slide view for PowerPoint. The slides appear on the left of the PowerPoint window in the 'Slide Navigation' bar. Thumbnails of the slide are represented as boxes in the 'Slide Navigation' bar with its ...
A simple method for switching to Presenter View on a single monitor is to click the three dots ( More slideshow options) at the bottom in SlideShow mode and select Show Presenter View. You can also switch to Presenter View on a single monitor anytime using the ALT+F5 hotkey. The presenter can easily manage a PPT in presentation mode, with the ...
Before you can access the presenter view of Microsoft PowerPoint, you need to follow these steps: Open Microsoft PowerPoint and select an existing presentation. Once the existing presentation opens, go to the Slide show Tab and navigate to the "Monitors" section. Check the box beside the "Use Presenter View." Select from the "Start Slide Show ...
Start Presenter View Preview by pressing Alt+F5. In Zoom, share a portion of the screen from the Advanced sharing options. Make the current slide larger in Presenter View and adjust the sharing rectangle so you just share the current slide portion of the screen in Zoom. Deliver your presentation. Full detailed article.
Training: PowerPoint Presenter View shows you the current slide, the next slide, and your speaker notes, to help you focus while presenting and connect with your audience. Watch this video to see how. ... See the current time to help you pace your presentation. Select the font icons to make the speaker notes larger or smaller.
To change views, find the View button on PowerPoint's ribbon and click on it. Then, find the section on the left labeled Presentation Views. This tutorial will walk you through each of these views and how you can use them. Click on the Views tab on the PowerPoint ribbon to find the option to change presentation views.
How to start using Presenter View in PowerPoint: - Open your presentation. - Select Slide Show in the top ribbon. - Make sure Presenter View is selected in the Monitors section. - Choose from the dropdown menu which monitor you want your presentation to appear on. (Presenter View will automatically appear on whichever monitor you don ...
The presentation view has typically been used with two monitors: one for the presentation notes and slides, and the other for the presentation to the audience. However, with PowerPoint 2013 you ...
Start Presenter View. Click the Options button. Select Show Presenter View . The Presenter view fills the screen. The same presentation tools are available below the slide, and it also shows the current time and a thumbnail of the upcoming slide. At the bottom of the screen, use the arrows to move forward or backward in the presentation.
PowerPoint Presenter View is a feature that allows you to view your presentation in a separate window that includes the current slide, the next slide, and your speaker notes. This feature brings many benefits for a PowerPoint Presenter, making it easier for you to deliver a smooth and professional presentation.
Hover your cursor over the bottom left area of the slide to find seven watermarked navigation icons that you can see in Figure 2 . Click the last icon and from the resultant menu, choose the Show Presenter View option (see Figure 2 again). Figure 2: Show Presenter View option to be selected. This brings up PowerPoint 365's Presenter View, as ...
Presenter view is structured as follows: Menu: The menu pane includes the option to "Show taskbar," "Display settings," and "End slide show."Showing the taskbar can be useful if you need to swap between applications during a presentation. Timer & time: The timer shows you how long you have been presenting for.It can be paused and reset.
If you click the "Slideshow" button or press Ctrl/Cmd + F5, your presentation will start directly without any speaker notes. This is the most widely used and the simplest option. Next to the "Slideshow" button, there's a drop-down arrow. Click on it to see the different presentation modes: Presenter View.
Step 2: Enable Presenter View. Once your dual monitors are set up: Open PowerPoint and your presentation. Go to the "Slide Show" tab. Check the box for "Use Presenter View" ( [3]) Select the monitor to display your speaker notes and controls.
Here is what you need to do to start Presenter View: Step 1: Go to your presentation and press the "Options" button. Step 2: Select the "Show Presenter View" option, Show Presenter View" option. Now, you can see your presentation in full-screen mode. You can see all of the presentation tools below the slide.
Present slideshows with confidence. With easy-to-use presenter view, speaker notes, and live captions, Slides makes presenting your ideas a breeze. You can even present to Google Meet video calls ...
Navigate to the Print Options. On your keyboard, hit CTRL+P to open up the print options for your presentation. 2. Navigate to the Outline View. Within the print options, select the 'Full Page Slides' dropdown (the default setting) and within the menu in the upper right-hand corner, select the Outline View.
After Mr. Trump won the presidency and the MAGA movement took off, Ms. Noem adopted a new look. Her hair got longer and longer, with tousled waves kissed by the curling iron, her part moved to the ...
Views for creating your presentation Normal view. You can get to Normal view from the task bar at the bottom of the slide window, or from the View tab on the ribbon.. Normal view is the editing mode where you'll work most frequently to create your slides. Below, Normal view displays slide thumbnails on the left, a large window showing the current slide, and a section below the current slide ...
View an Archived Retirement Presentation. If you have retirement questions and want the convenience of viewing a retirement presentation at your leisure, check out a recorded retirement overview presentation, which was conducted by the Office of Personnel Management (OPM). If you have questions, refer them to your Benefits Contact or ...
Joe Biden, Barack Obama and Bill Clinton. Sometimes when a president needs a hand, only another president - or another two - will do. President Joe Biden's bid for a second term and ...
It's the first Windows PC with a 114° field of view, captures video in 1440p, and uses AI-powered Windows Studio Effects to ensure that the speaker is in frame and looking their best during video calls. Surface Pro 10 is a Secured-Core PC that delivers the industry-leading security that our business customers need.
Opportunity overview •Replace inefficient and gas-powered appliances and vehicles with efficient electric alternatives •Electric appliances and EVs are available and will
The justices will first have to consider a procedural issue — whether the doctors and their associations have legal standing to challenge the FDA's efforts in federal court — before deciding ...
Select New blank presentation, open a Recent file, select one of the themes, or start with a presentation template. To name the presentation, select the title at the top and type a name. If you need to rename the presentation, select the title and retype the name.