Home Blog PowerPoint Tutorials How To Set Time Duration To Switch Slides in PowerPoint

How To Set Time Duration To Switch Slides in PowerPoint
Usually, presenters use mouse clicks, keys from a keyboard or a remote to switch slides in PowerPoint . However, if you have your presentation well-timed or have to account for every second in a presentation due to time constraints, you might want to make sure that your slides are well-timed. To do this, you can add a time duration to switch your slides. In this tutorial we will show you how to set time duration to switch slides in PowerPoint. For the purpose of this post, we will be using the Financial PowerPoint Template .
Select Your Slides from Slides Pane
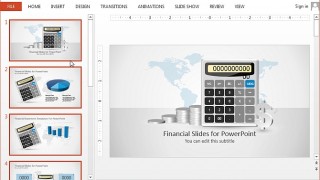
In the first step, click the slide preview for the slide you wish to set time for. In case you want all your slides to switch according to a set time limit (e.g. 10 seconds), select one slide and hit CTRL+A to select all slides.
In case you want to set a different time for each slide, you will have to select each slide one by one and follow the steps shown below.
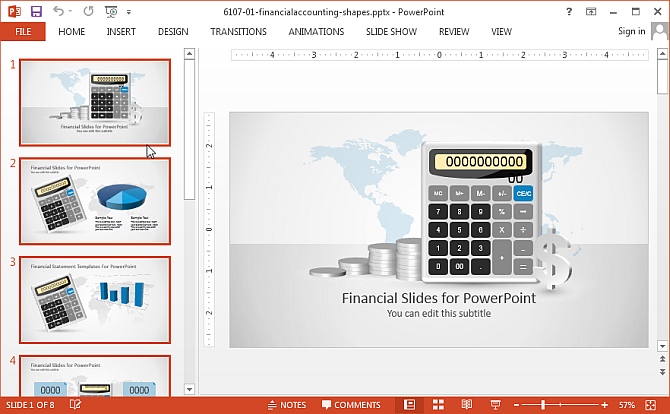
Select a Time Duration for Your Slides from the Transitions Tab
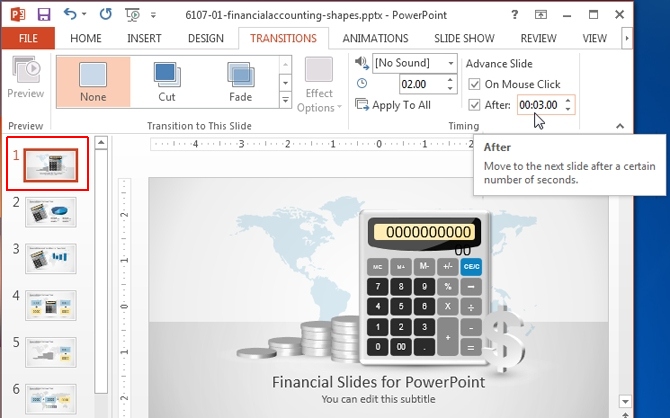
From the Transitions tab, go to ‘After’ and add a time duration after which you wish to switch your slide(s). Also make sure that ‘ On Mouse Click’ is unchecked.
The process for switching slides is similar in various versions across PowerPoint and while we are demonstrating this method using PowerPoint 2013, you will find similar options in older versions (e.g. PowerPoint 2010).
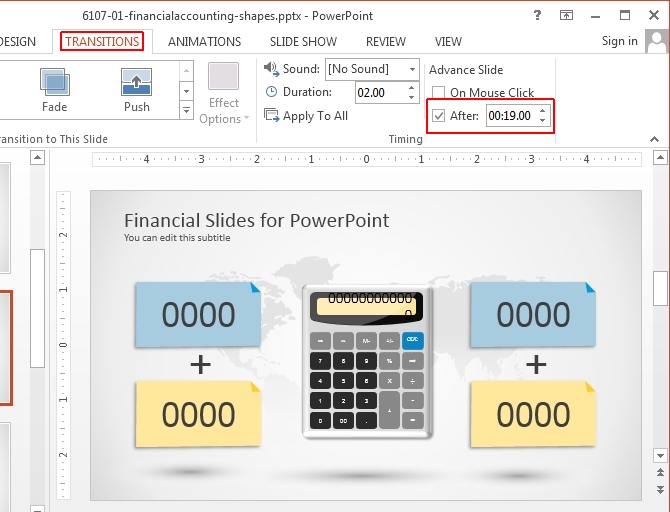
For a Single slide: For a single slide, select the respective slide from the Preview pane and add a time duration for switching the slide.
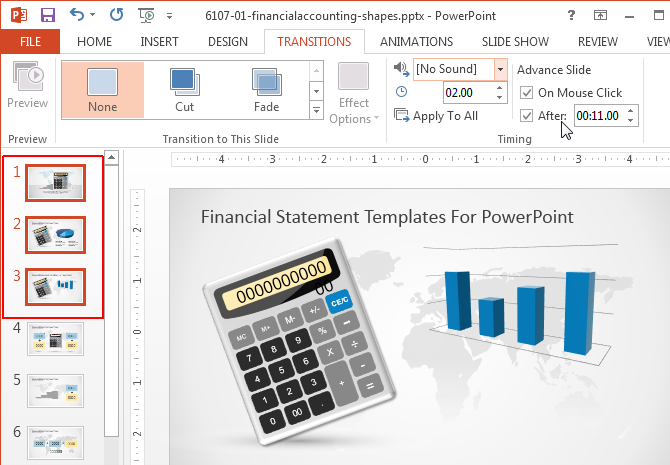
For Multiple Slides: To apply the same time duration to multiple slides, select the slides from the Preview pane using CTRL+Mouse Click, go to the Transitions tab and set a time to switch them. As mentioned earlier, you can also select all slides by clicking a single slide preview, followed by CTRL+A.
In case you have applied slide transitions, you can also set the length of the transitions using the ‘Duration’ option from the same section.
Once you have followed the aforementioned steps, switch to Slide Show mode and your slides will switch according to the set time duration.

While having well-timed slides might help in good time management, you nevertheless need good presentation slides to make an impression on your audience. Slide Model provides High-Quality PowerPoint Templates with editable slide elements which have been designed by expert professionals to give you the imagery that can be attention grabbing and visually appealing. For more details, see our plans and pricing.
Like this article? Please share
PowerPoint 2013, PowerPoint Tips, Presentation, Presentation Tips, Time, Time Management, View Presentation Filed under PowerPoint Tutorials
Related Articles
Filed under PowerPoint Tutorials • March 26th, 2024
How to Translate in PowerPoint
Unlock the experience of PowerPoint translation! Learn methods, tools, and expert tips for smooth Spanish conversions. Make your presentations global.
Filed under Google Slides Tutorials • March 22nd, 2024
How to Share a Google Slides Presentation
Optimize your presentation delivery as we explore how to share a Google Slides presentation. A must-read for traveling presenters.
Filed under PowerPoint Tutorials • March 19th, 2024
How to Change Line Spacing in PowerPoint
Adjust text formatting by learning how to change line spacing in PowerPoint. Instructions for paragraph indenting included.
Leave a Reply

How to Loop a PowerPoint Slide Show to Repeat Automatically

Set up a PowerPoint Presentation That Loops or Repeats Continuously
by Avantix Learning Team | Updated November 12, 2021
Applies to: Microsoft ® PowerPoint ® 2013, 2016, 2019 and 365 (Windows)
You can set up a PowerPoint slide show to loop or repeat automatically. A looping presentation can be used at events, trade shows or even in a reception area in an office. The easiest way to set up a slide show to loop or replay continuously is to apply automatic transitions and then configure Slide Show settings.
Recommended article: 5 PowerPoint Keyboard Shortcuts to Run a Slide Show
Do you want to learn more about PowerPoint? Check out our virtual classroom or in-person PowerPoint courses >
Screenshots in this article are from PowerPoint 365 but are similar in older versions of PowerPoint.
Step 1: Apply transitions to automatically advance slides during a slide show
Transitions occur between slides when you run a slide show.
To apply transitions to automatically advance slides during a slide show:
- In Normal View or Slide Sorter View, display or select a slide.
- Click the Transitions tab in the Ribbon.
- Select a transition in the Transitions gallery (such as Fade).
- Click Effect Options and choose the desired option. Effect Options change depending on the transition you selected.
- In the Timing group, click the arrows beside Duration to set the timing you want (in seconds) for the transition. You may also type a duration.
- In the Timing group, under Advance Slides, deselect or uncheck On mouse click and beside After, select or click the up and down arrows to set the timing to transition to the next slide. You may also type a duration.
- In the Timing group, click Apply to All.
In the Transitions tab in PowerPoint, you can select the type of transition (such as Fade) as well as timing options:

Step 2: Set up a presentation to loop during a slide show
To set up a PowerPoint presentation to loop during a slide show:
- Click the Slide Show tab in the Ribbon and then click Set Up Slide Show. A dialog box appears.
- Under Show type, if you select Presented by a speaker (full screen), the speaker or those watching the slide show will have control over when they advance slides. This is the default setting for slide shows. If you select Browsed by an individual (window), those watching the slide show do NOT have control over when slides advance. If you select Browsed at kiosk (full screen), those watching the slide show do NOT have control over when slides advance and the presentation automatically loops until those watching press Escape (Esc).
- Under Show options, select Loop continuously until 'Esc'. You will be able to select this option if you selected one of the first two options under Show type.
Below is the Set Up Show dialog box with Presented by speaker selected and looping enabled:

If you want to set specific timings for slides to advance or to add narration, check out the article How to Run a PowerPoint Slide Show Automatically (Set Up a Self-Running Presentation) . If you have audio or video in the presentation, you'll need to set the media to play automatically (on the Playback tab in the Ribbon) and animations will also need to be set to run automatically.
Subscribe to get more articles like this one
Did you find this article helpful? If you would like to receive new articles, JOIN our email list.
More resources
How to Embed a YouTube Video in PowerPoint
How to Hide and Unhide Slides in PowerPoint (with Shortcuts)
How to Insert Video in PowerPoint (from a File on Your PC or a Shared Drive)
PowerPoint Keyboard Shortcuts to Play and Control Video During a Slide Show
How to Add Animation in PowerPoint (Animate Images, Text and Other Objects)
Related courses
Microsoft PowerPoint: Intermediate / Advanced
Microsoft PowerPoint: Design for Non-Designers
Microsoft PowerPoint: Animations Bootcamp
Microsoft Excel: Intermediate / Advanced
VIEW MORE COURSES >
Our instructor-led courses are delivered in virtual classroom format or at our downtown Toronto location at 18 King Street East, Suite 1400, Toronto, Ontario, Canada (some in-person classroom courses may also be delivered at an alternate downtown Toronto location). Contact us at [email protected] if you'd like to arrange custom instructor-led virtual classroom or onsite training on a date that's convenient for you.
Copyright 2024 Avantix ® Learning
You may also like

How to Insert or Type E with an Accent Mark in PowerPoint (È, É, Ê, Ë, è, é, ê, or ë)
You can insert or type e with an accent mark in PowerPoint using built-in tools or keyboard shortcuts (including Alt code shortcuts). The letter e can be inserted with an accent in both upper or lower case in text boxes or placeholders on slides, the slide master or layouts. The following are common accents in upper or lower case – È, É, Ê, Ë, è, é, ê, or ë.

How to Fade a Picture or Part of a Picture in PowerPoint (Using a Gradient)
You can fade a picture in PowerPoint by drawing a rectangle shape on top of the picture and then filling the rectangle with a gradient from opaque to transparent. This technique is often used to fade an image into the background of a slide. Since the rectangle is placed on top of the image and then text may be placed on top of the rectangle, you may need to reorder the objects.

How to Lock an Image, Shape or Other Object in PowerPoint
You can now lock an image, shape or other object in PowerPoint. Objects can be locked in Normal View or Slide Master View. Only PowerPoint 365 users can lock objects to prevent moving and resizing. This is helpful if you want to select and move other objects on the slide or prevent others from moving or resizing an object. You can lock items using the context menu or the Selection Pane.
Microsoft, the Microsoft logo, Microsoft Office and related Microsoft applications and logos are registered trademarks of Microsoft Corporation in Canada, US and other countries. All other trademarks are the property of the registered owners.
Avantix Learning |18 King Street East, Suite 1400, Toronto, Ontario, Canada M5C 1C4 | Contact us at [email protected]

Our Courses
Avantix Learning courses are offered online in virtual classroom format or as in-person classroom training. Our hands-on, instructor-led courses are available both as public scheduled courses or on demand as a custom training solution.
All Avantix Learning courses include a comprehensive course manual including tips, tricks and shortcuts as well as sample and exercise files.
VIEW COURSES >
Contact us at [email protected] for more information about any of our courses or to arrange custom training.
Privacy Overview
Pin it on pinterest.
- Print Friendly
Our Recommendations
- Best Small Business Loans for 2024
- Businessloans.com Review
- Biz2Credit Review
- SBG Funding Review
- Rapid Finance Review
- 26 Great Business Ideas for Entrepreneurs
- Startup Costs: How Much Cash Will You Need?
- How to Get a Bank Loan for Your Small Business
- Articles of Incorporation: What New Business Owners Should Know
- How to Choose the Best Legal Structure for Your Business
Small Business Resources
- Business Ideas
- Business Plans
- Startup Basics
- Startup Funding
- Franchising
- Success Stories
- Entrepreneurs
- The Best Credit Card Processors of 2024
- Clover Credit Card Processing Review
- Merchant One Review
- ProMerchant Review
- Stax Review
- How to Conduct a Market Analysis for Your Business
- Local Marketing Strategies for Success
- Tips for Hiring a Marketing Company
- Benefits of CRM Systems
- 10 Employee Recruitment Strategies for Success
- Sales & Marketing
- Social Media
- Best Business Phone Systems of 2024
- The Best PEOs of 2024
- RingCentral Review
- Nextiva Review
- Ooma Review
- Guide to Developing a Training Program for New Employees
- How Does 401(k) Matching Work for Employers?
- Why You Need to Create a Fantastic Workplace Culture
- 16 Cool Job Perks That Keep Employees Happy
- 7 Project Management Styles
- Women in Business
- Personal Growth
- Best Accounting Software and Invoice Generators of 2024
- Best Payroll Services for 2024
- Best POS Systems for 2024
- Best CRM Software of 2024
- Best Call Centers and Answering Services for Busineses for 2024
- Salesforce vs. HubSpot: Which CRM Is Right for Your Business?
- Rippling vs Gusto: An In-Depth Comparison
- RingCentral vs. Ooma Comparison
- Choosing a Business Phone System: A Buyer’s Guide
- Equipment Leasing: A Guide for Business Owners
- HR Solutions
- Financial Solutions
- Marketing Solutions
- Security Solutions
- Retail Solutions
- SMB Solutions

Online only.

How to Create an Auto-Playing PowerPoint Presentation

Table of Contents
Creating a self-running PowerPoint, as Microsoft calls it, can be a great addition to your company’s booth at conventions or industry-wide conferences. By featuring photos, infographics and key points in a continuous loop, PowerPoint becomes an effective communication tool to inform others about your company, its goals, and your products or services.
Auto-playing presentations are also great for employee training, meetings where the speaker is absent, and reaching remote clients or customers. Microsoft provides easy steps to turn your PowerPoint into an autoplay presentation.
Setting up the presentation
There are several options for creating a PowerPoint presentation automatically. All of these can be accessed under the Slide Show tab.
Slide Show > Set Up Slide Show
There are three options under this menu:
- Presented by a speaker : This first option requires the viewer to click through each slide. This is the default setting that most PowerPoint presentations are already in and is the mode with which you’re likely most familiar.
- Browsed by an individual : This option will create a slideshow where the viewer cannot control when slides advance. This is an autoplay feature, but the viewer will still have to hit Play to get it started.
- Browsed at a kiosk . Once selected, this option will loop the slide show until a viewer presses the escape button.
If you don’t want your viewers to have access to when the slideshow starts and stops, select the third option. The Loop Continuously option underneath will be automatically selected.
Experts estimate that there are about 30 million PowerPoint presentations created every day !
Recording slide timing
Before you begin recording your presentation, it’s important to set the slide time using the rehearsal toolbar. This will give you an idea of how long each slide will run before advancing to the next one. It will also allow you to practice your presentation and understand how long the runtime will be. Like setting up the slide show, this window can be accessed via the Slide Show tab.
Slide Show > Rehearse Timings
The recording window allows users to advance to the next slide, pause the presentation, view the current slide’s time, restart the recording for a slide and view the total runtime of the presentation.
After recording the last slide, PowerPoint will ask whether you want to keep the slide timings or not.
Recording your presentation
Once your slide timings are set, you can record your slide show.
Navigate to Slide Show > Record Slide Show to begin your recording. Click End Show and save your file once you are done recording. After saving, your presentation is ready to be sent to clients, customers or played at your convention or conference booth.
Here are some quick tips to check for before recording your presentation:
- Before beginning your recording, make sure you adjust the Play Narrations and the Use Timings checkboxes.
- If you want all narration and slide transitions included, both boxes should be checked.
- To create a silent sequence of slides, make sure the Play Narrations button is deselected.
What is PowerPoint autoplay?
Autoplay allows you to keep a PowerPoint presentation running. In typical PowerPoint presentations, presenters click from slide to slide manually using a clicker or spacebar on a keyboard.
Luckily, PowerPoint autoplay allows users to set up their slides, so they automatically change. That way, they can focus on their presentation without interruptions. There are options to have slides timed to music or voiceovers and make each slide the same length.
You can use autoplay in any number of situations where a continuous, unattended loop is called for, such as photos at an event, displaying information at a trade show booth or using the changing slides as a visual cue while rehearsing a timed presentation.
Why is PowerPoint autoplay beneficial?
Autoplay is great for several uses, from delivering announcements throughout a company’s office or a school, to giving speeches and presentations at conventions or work. Presenters can rehearse the timings of the slides and then present without worry. Here are some of the reasons why someone may use PowerPoint’s autoplay features:
- Rehearsal . Practicing your presentation involves timing, and autoplay can be a great tool for learning how to fill time or keeping it short. For example, many teachers and professors require presentations to fill a certain amount of time for class projects. While rehearsing timings, users can determine how much time to spend on each slide. This keeps presenters on track during their presentations, even when they want to speed up due to nerves or pressure.
- Convention booths and exhibits. Trade shows , conventions and networking events are great for companies and salespeople who want to showcase a variety of products and services. People who walk by can look at the presentation and not have to ask employees for information. In addition, a good PowerPoint presentation with eye-catching visuals and information can attract potential customers and clients, which could turn into sales.
- Music videos and tribute presentations. Whether it is a presentation of family vacation photos to the soundtrack of the summer or a lyric video to your favorite song, autoplay allows users to create appealing presentations and videos. These could even be downloaded into MP4 files to share with family and friends.
- Replay and loop at events or other occasions. This is great for offices that have a slideshow of information for their clients or patients. They can show a variety of pictures, information about services, and even the company’s latest news and contact information. Because of this, employees can set up the presentation, walk away and know that their announcements are being made public without even saying a word.

Building Better Businesses
Insights on business strategy and culture, right to your inbox. Part of the business.com network.
How to play PowerPoint slides automatically without clicking
Master the art of seamless presentations: Learn how to play PowerPoint slides automatically without clicking
Sanskar Tiwari
Step 1: Open your PowerPoint presentation
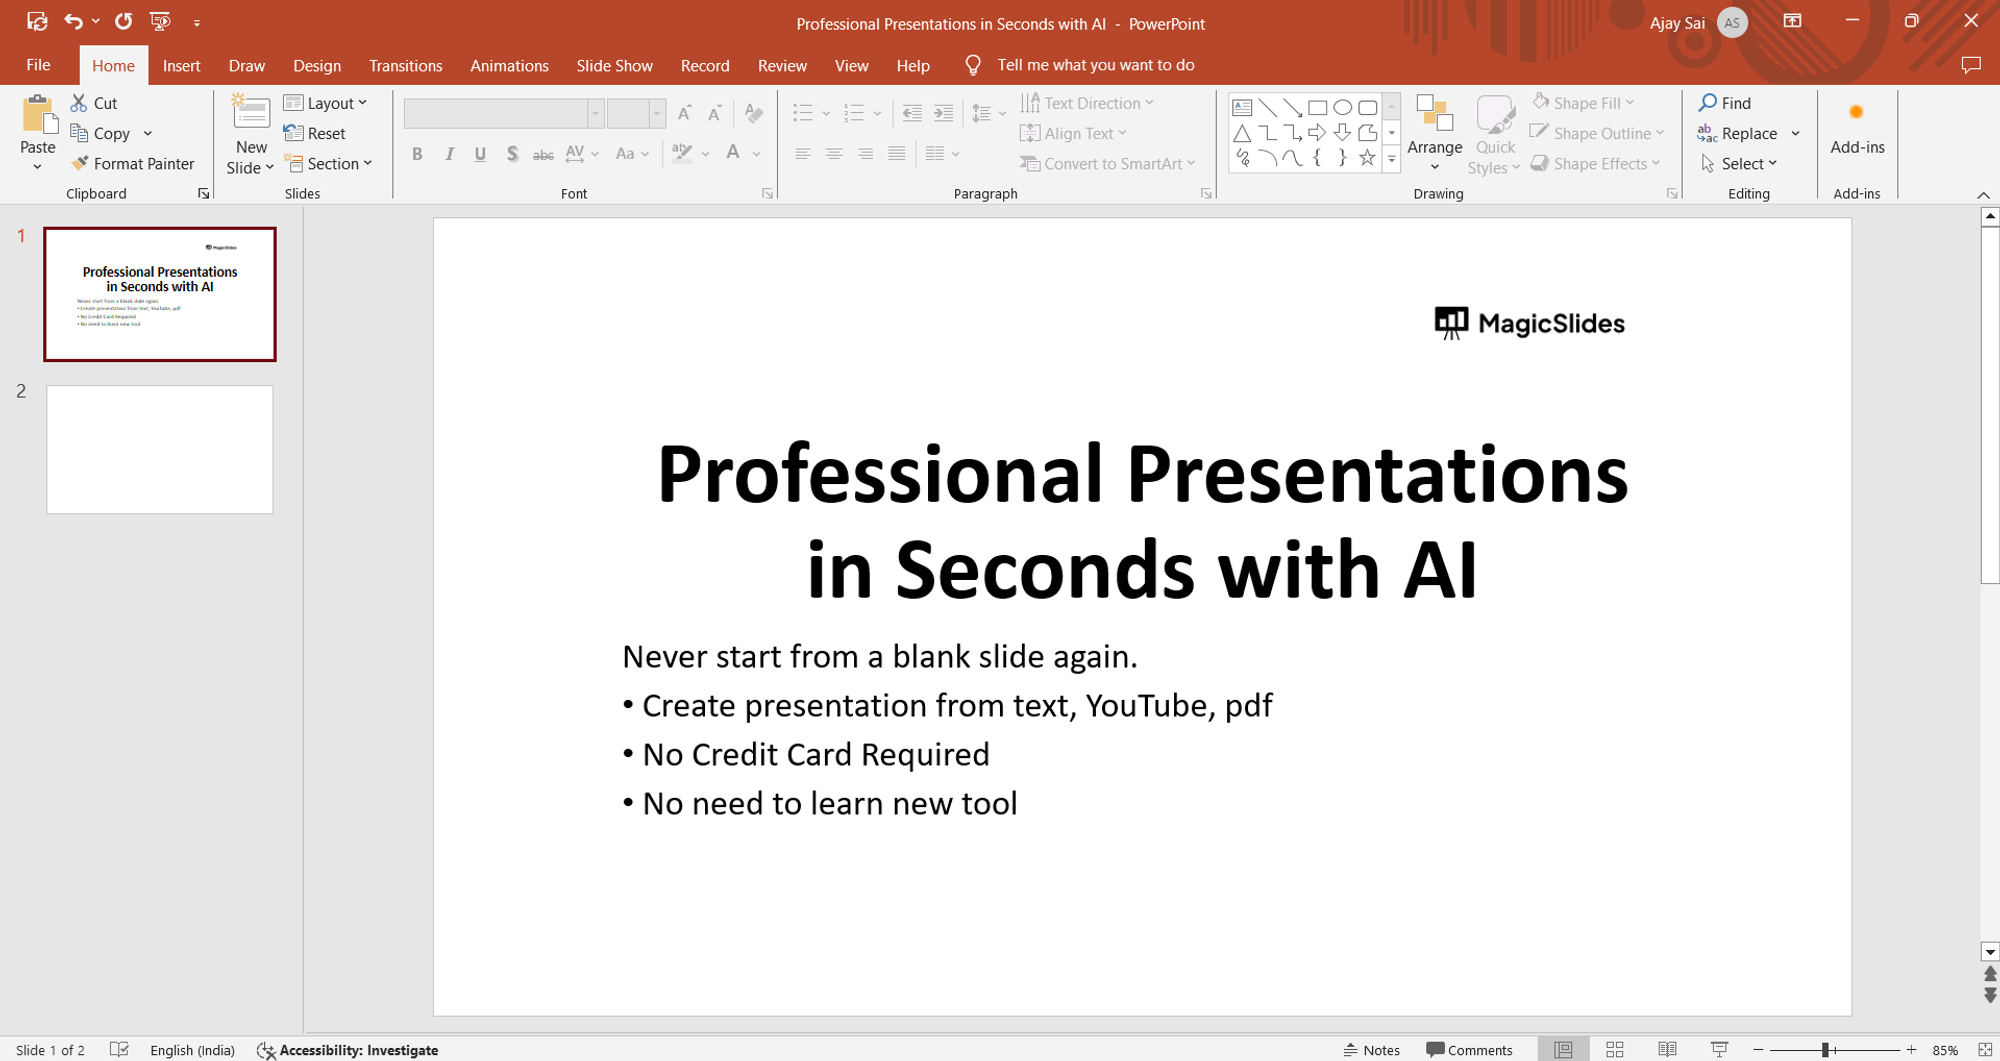
Step 2: Navigate to the "Slide Show" tab

Step 3: Select "Set Up Slide Show"
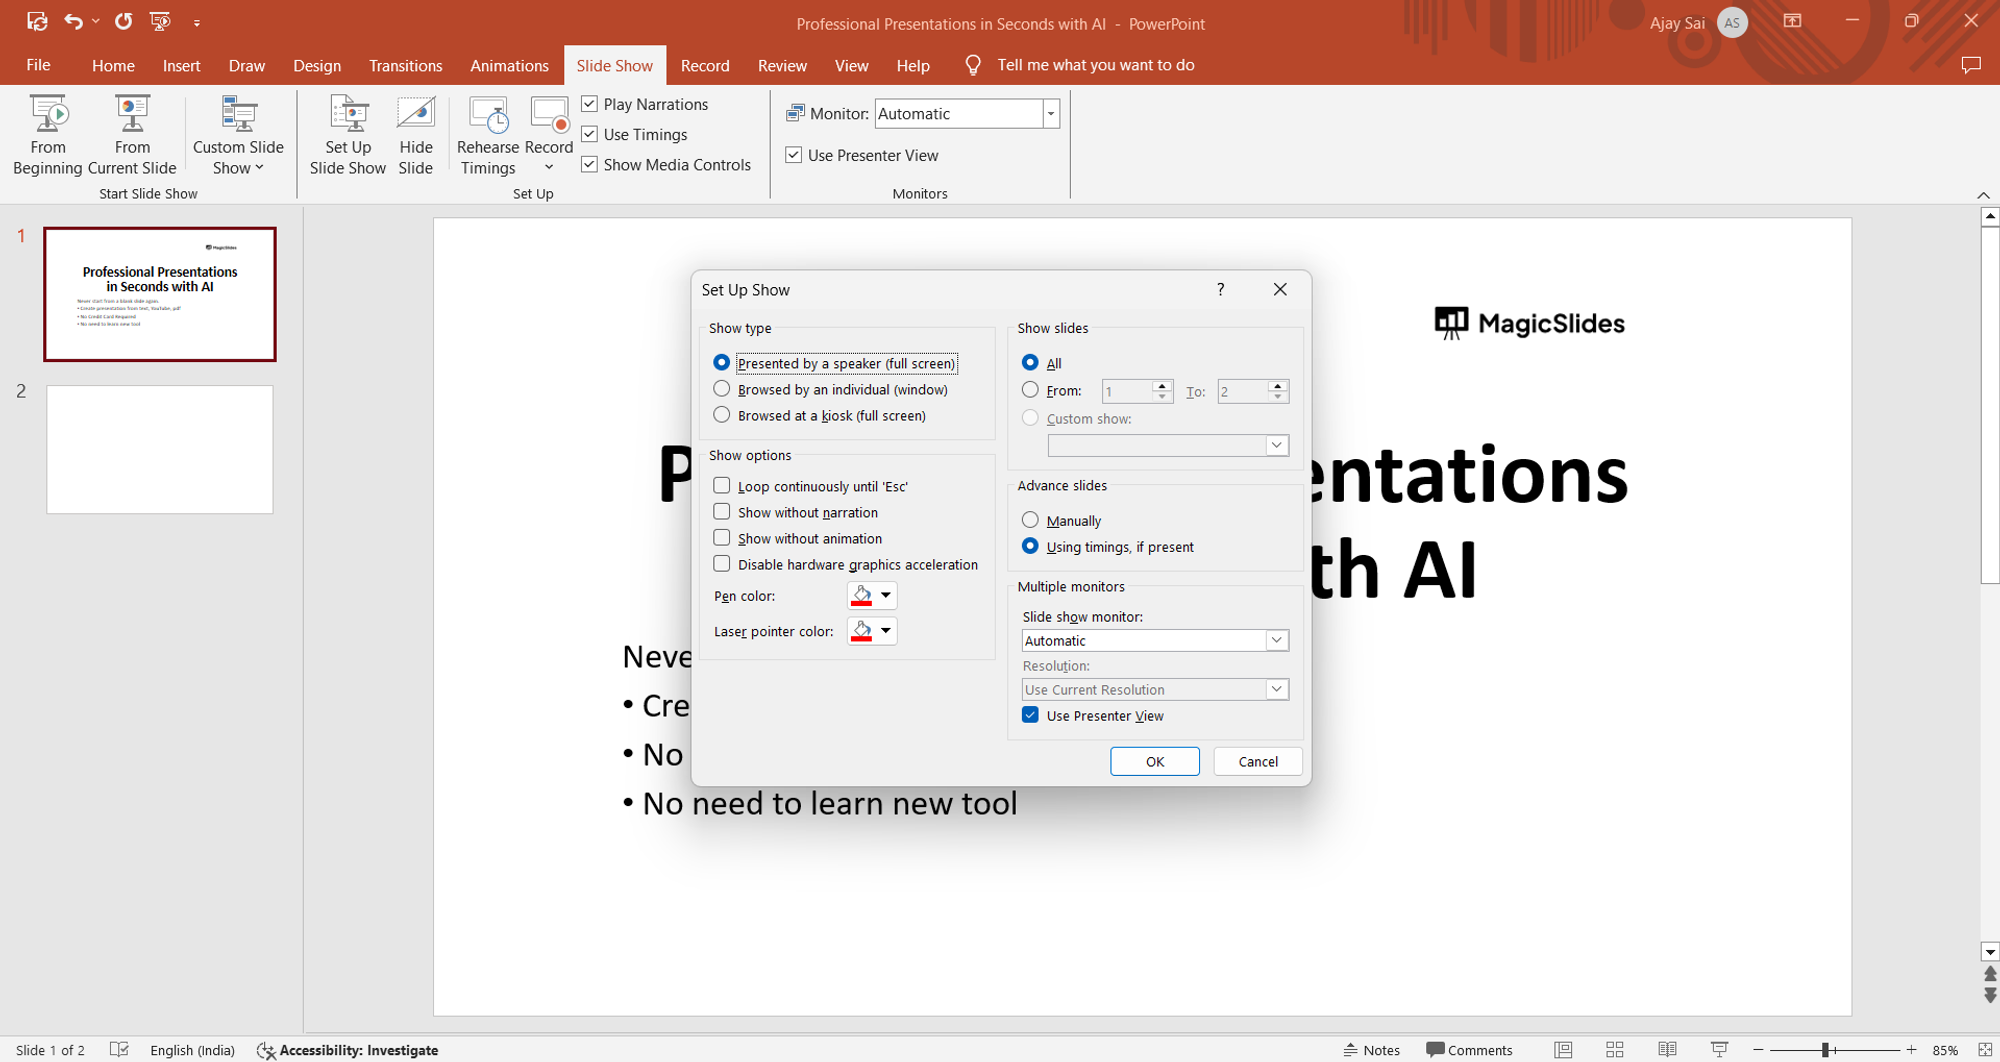
Step 4: Choose the "Advance slides" option
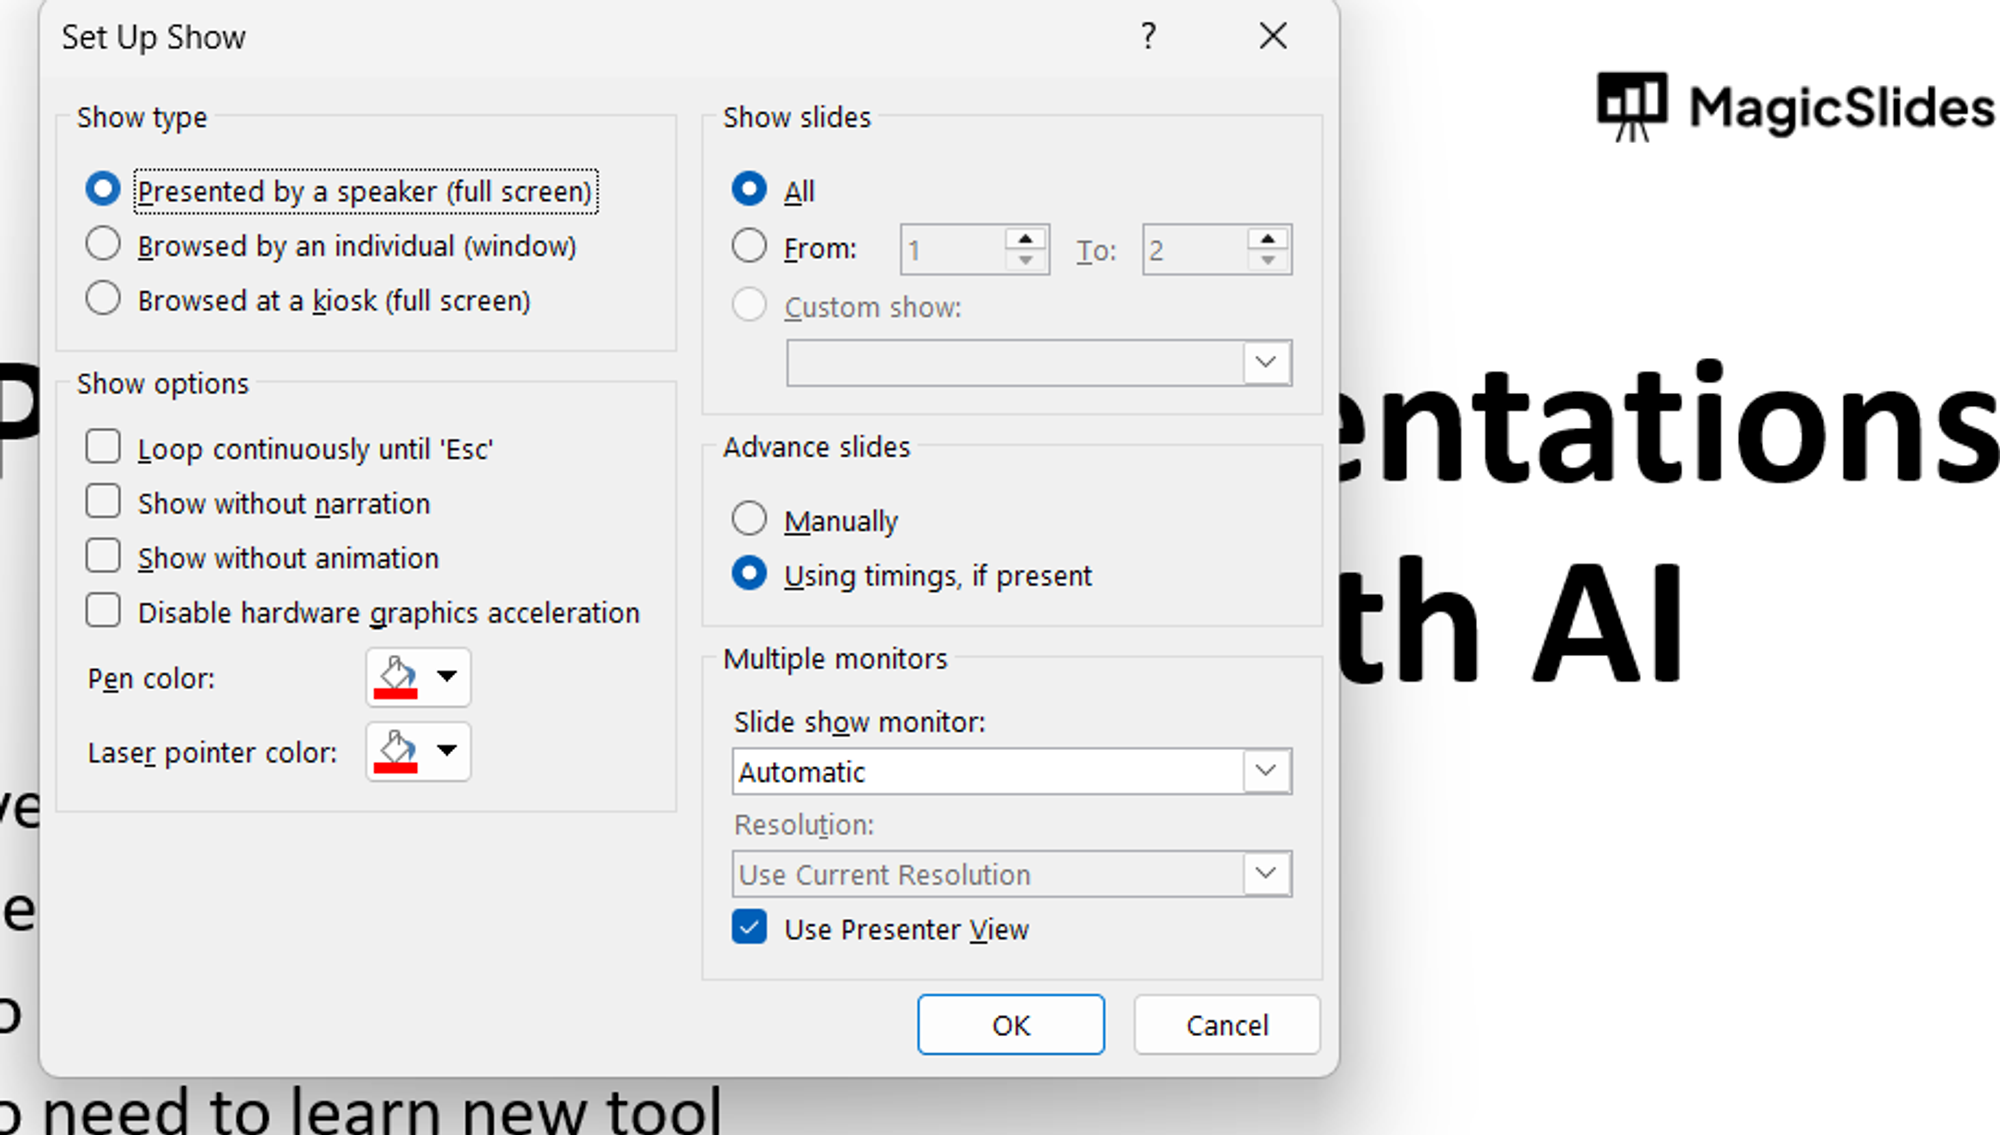
Step 5: Save your settings
Conclusion:, frequently asked questions:, can i still control the slides manually after setting up automatic playback, will the automatic playback feature work on any version of powerpoint, can i customize the duration for each slide to display before automatically transitioning, what if i want to stop the automatic playback midway through the presentation, related blogs, how to change the page color or add a background in google docs, how to undo and redo actions in google docs, how to change the font style and size in google docs, how to edit master slide in powerpoint, how to rotate powerpoint slide, how to change transparency of text in powerpoint, how to do superscript in powerpoint, how to create hyperlinks in google docs, how to insert mathematical equations into google docs, stunning presentations in seconds with ai.
Install MagicSlides app now and start creating beautiful presentations. It's free!

~1M Installs, rated 4.5/5 ⭐️ by 424 reviews
Log in / Sign up
Don't have an account? Sign up --> Forgot Password? --> -->
Already have an account? Log in
Reset Password
How to Make Slides Automatically Transition in PowerPoint: A Comprehensive Guide
Creating an impactful PowerPoint presentation involves not only compelling content but also the seamless transition between slides. Automatic slide transitions play a crucial role in maintaining your audience's focus and engagement. In this comprehensive guide, we'll provide you with a step-by-step approach on how to make slides automatically transition in PowerPoint while ensuring a professional and dynamic presentation.

Understanding Automatic Transitions
Automatic transitions enable your slides to change smoothly from one to another, enhancing the overall flow and impact of your presentation. By mastering this feature, you can elevate your slideshows and deliver a compelling narrative.
Step 1: Open Your PowerPoint Presentation
Begin by launching PowerPoint and opening your presentation. Ensure your slides are properly arranged in the desired order for your presentation.

Step 2: Select the Slide You Want to Modify
Click on the slide where you want to apply the automatic transition. To apply the same transition to multiple slides, hold down the Ctrl key while selecting the slides.
Step 3: Access the Transition Tab
Navigate to the "Transition" tab in the PowerPoint ribbon. Here, you'll find a variety of transition effects to choose from.

Step 4: Choose a Transition Effect
Click on the desired transition effect to see a live preview on the selected slide. Choose an effect that complements the tone and content of your presentation. PowerPoint offers various options, from subtle fades to dynamic flips and spins.
Step 5: Set Transition Options
Customize the transition according to your preference. You can adjust the speed, modify direction, and apply other specific options based on the effect you've chosen.
Step 6: Apply to All Slides (Optional)
To maintain consistency, you can apply the same automatic transition to all slides in your presentation. Click on the "Apply to All" button to ensure a professional look throughout your slideshow.
Step 7: Preview Your Presentation
Before your actual presentation, preview your slides. Click on the "Slide Show" tab and select "From Beginning" to view your presentation as your audience would. This allows you to ensure the transitions are smooth and enhance the overall narrative flow.
Mastering automatic slide transitions in PowerPoint is essential for creating captivating presentations. By following these steps, you can ensure a seamless flow of information, keeping your audience engaged and focused. Practice different transition effects to find the one that best suits your presentation style and message.
_12_11zon_20231018215857A233.webp)
1. Can I customize the duration of each slide's automatic transition?
Yes, you can customize the duration of each slide's automatic transition. In the Transition tab, you'll find options to set specific durations, allowing you to control the pace of your presentation.
2. Are automatic slide transitions supported in PowerPoint Online?
Yes, automatic slide transitions are supported in PowerPoint Online. The process is similar to the desktop version. Open your presentation, access the Transition tab, and follow the steps to apply automatic transitions to your slides.
3. Can I add sound effects to automatic slide transitions?
Certainly. PowerPoint allows you to add sound effects to your slide transitions. In the Transition tab, you'll find an option to add sound. Choose from available sound effects or upload your own audio file to enhance the impact of your transitions.
4. Is it possible to disable automatic transitions for specific slides?
Yes, you can disable automatic transitions for specific slides. Select the slide, go to the Transition tab, and choose the "None" option from the transition effects to disable automatic transitions for that particular slide.
5. What is the ideal duration for automatic slide transitions?
The ideal duration for automatic slide transitions depends on the content and pace of your presentation. Generally, transitions lasting between 1 to 2 seconds work well for most slides. Adjust the timing based on the complexity of the information being presented and your audience's preferences.
Title/Email address/Description is not null!

Start a presentation automatically with a PowerPoint Show
If you’re sending your PowerPoint presentation to colleagues or friends, or if you're running it in a booth or kiosk, you might want people to immediately watch your presentation as a slide show instead of seeing the slides in edit mode. Save your PowerPoint presentation as a PowerPoint Show (a .ppsx file) so it automatically starts the slide show when the file is opened.
Make a slide show that starts automatically when opened
Select File > Save as (or Save a Copy ).
Click More options .
Browse to the folder where you want to save your presentation.
In the File name box, type a name for your presentation.
Under Save as type , select PowerPoint Show .
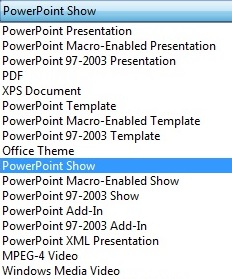
The file is saved as a .ppsx file. When the file is double-clicked, it opens as a slide show.
Edit a .ppsx file
In PowerPoint, click File > Open .
Browse to the .ppsx file, and open it.
In PowerPoint, click File > Save as .
The file is saved as a .ppsx file. Now, when someone double-clicks it in File Explorer (or Windows Explorer), it'll open as a slide show.
Saving a presentation as a PowerPoint Show (.ppsx file) isn't available in PowerPoint for the web.
To start a slide show in PowerPoint for the web , open the file, and on the Slide Show tab of the ribbon, select Play from Beginning .

(If you've turned off the Simplified Ribbon, you don't have a Slide Show tab; instead use the View tab to start Presenter Coach.)
For more details on running a slide show, see Present your slide show in PowerPoint for the web .
Set the speed and timing of transitions
Create a self-running presentation
Record a slide show with narration and slide timings
Turn your presentation into a video

Need more help?
Want more options.
Explore subscription benefits, browse training courses, learn how to secure your device, and more.

Microsoft 365 subscription benefits

Microsoft 365 training

Microsoft security

Accessibility center
Communities help you ask and answer questions, give feedback, and hear from experts with rich knowledge.

Ask the Microsoft Community

Microsoft Tech Community

Windows Insiders
Microsoft 365 Insiders
Was this information helpful?
Thank you for your feedback.

Contribute to the Microsoft 365 and Office forum! Click HERE to learn more 💡
March 14, 2024
Contribute to the Microsoft 365 and Office forum!
Click HERE to learn more 💡
Top Contributors in PowerPoint: Steve Rindsberg - Jim_ Gordon - John Korchok ✅
March 11, 2024
Top Contributors in PowerPoint:
Steve Rindsberg - Jim_ Gordon - John Korchok ✅
- Search the community and support articles
- Microsoft 365 and Office
- Search Community member
Ask a new question
Change powerpoint slides automatically after audio ends in each slide
I have inserted audio to each of my PowerPoint slides and I would like it automatically move to the next slide once the audio ends on each slide. How do I setup this feature in PowerPoint. Appreciate if someone can help. Thanks
Report abuse
Replies (2) .
- Independent Advisor
Hello, I’m an Independent Advisor and Microsoft user like you. Thanks for posting the query here at this forum. Could you please try the 'Transitions' timing option for the slide based on the audio length? https://answers.microsoft.com/en-us/msoffice/forum/all/can-powerpoint-slides-be-advanced-automatically/b3935ba5-8e5d-407b-8f6d-f37bc6edd607#:~:text=Select%20your%20slide%20you%20need,advances%20to%20the%20next%20slide. 1. Select your slide you need for the timing. 2, Go to “Transitions” menu. 3. In the “Advance Slide” area, check the “After” check box, then set the amount of time that should elapse before PowerPoint advances to the next slide. 4. Now your slides should change to the next one automatically. By default the slide should proceed to next one. Could you please check the length of the audio file uploaded in the slide? Hope this information would be useful to you. Please feel free to get back if you need any additional info. Thank you! Ravikumar Help the next person who has this issue by indicating if this reply solved your problem. Click Yes or No below.
2 people found this reply helpful
Was this reply helpful? Yes No
Sorry this didn't help.
Great! Thanks for your feedback.
How satisfied are you with this reply?
Thanks for your feedback, it helps us improve the site.
Thanks for your feedback.
Click Play in background Option or set audio start time and end time for each slide.
Another Option is;
Use ISpringCam tool to record your presentations the audio will be inserted automatically to all the slides.
Question Info
- Norsk Bokmål
- Ελληνικά
- Русский
- עברית
- العربية
- ไทย
- 한국어
- 中文(简体)
- 中文(繁體)
- 日本語
How to Change Slide Size in PowerPoint?

Table of Contents
Sometimes, when you often create presentations, you might find yourself in a situation where you need to prepare your slides on one device but present them on another. This can cause your slides to look different depending on the device.
It’s a good idea to learn how to adjust the slide size or aspect ratio in PowerPoint to avoid any issues during your presentation. You’ve put in a lot of effort into your project, from researching to practicing your speech, so it’s frustrating to encounter problems like mismatched slide sizes that could have easily been avoided.
Understanding PowerPoint Slide Dimensions
When you’re putting together a presentation in PowerPoint, one of the main things to think about is picking the right slide dimensions. These dimensions matter because they affect how your content looks on different screens and devices. Let’s talk about the standard aspect ratios.
1. Modern Widescreen (16:9 & 16:10): These are the most popular choices for presentations today. Selecting a 16:9 or 16:10 aspect ratio ensures your slides will fit perfectly on most modern projectors and screens, making them ideal for contemporary presentations.
2. Standard Format (4:3): This traditional aspect ratio might still be relevant for presentations intended for older projectors or screens that are better suited to a square format. Choosing 4:3 can prevent your slides from appearing stretched or distorted on such devices, ensuring your content remains clear and well-organized.
3. Custom Orientation: For situations where standard options don’t meet your specific needs, PowerPoint offers the flexibility of custom orientation. This feature allows you to tailor the slide size to create unique dimensions that perfectly match your unique scenario.
How to Change the Size of a PPT Slide?
Having the right size for your presentation can make all the difference. Luckily, PowerPoint makes it easy to adjust your slides to fit any screen perfectly. Here’s a straightforward guide to resizing your slides:
Step 1: Finding the Design Tab
First, open your presentation and locate the Design tab on the ribbon at the top of the window. This tab holds all the tools you need to customize the look of your slides, including their size.
Step 2: Choosing Your Slide Size
On the Design tab, find the button labeled Slide Size . Clicking this button will open a menu with different size options for your slides:
- Standard (4:3): This is a traditional layout that works well with older projectors and screens.
- Widescreen (16:9): This is the default and most popular option, perfect for modern displays and projectors.
- Widescreen (16:10): This is another widescreen option (used in MacBooks) with a slightly different aspect ratio, also suitable for modern screens.
- Custom Slide Size: If you have specific size requirements, choose this option. It will open a separate window where you can enter your desired width and height for the slides. Click OK to confirm.
Step 3: Adjusting Your Content
Once you change the slide size, PowerPoint might ask you how you want to handle your existing content. This ensures everything fits well within the new dimensions. You’ll typically have two options:
- Maximize: This option enlarges your content to fill the new size, which is useful if you’re switching to a larger slide format.
- Ensure Fit: This option shrinks your content to make sure everything fits on the new slides, ideal for reducing slide size without losing information.
Important Note: PowerPoint doesn’t allow resizing individual slides within a presentation. All slides will have the same dimensions.
Closing Thoughts
Taking a few minutes to adjust your PowerPoint slide size can prevent major headaches down the road. By understanding the common aspect ratios and following these simple steps, you can ensure your presentation looks its best on any screen, leaving a lasting impression on your audience.
Frequently Asked Questions
Can i change the orientation of individual slides.
No, PowerPoint currently doesn’t allow changing the orientation of individual slides within the same presentation.
What happens to my existing content when I change the slide size?
PowerPoint will attempt to scale your content to fit the new size. However, you might need to adjust the layout, text boxes, and images to ensure everything displays correctly.
How do I avoid pixelation when resizing images in PowerPoint?
To avoid pixelation, use high-resolution images, hold Ctrl while resizing to maintain proportions, choose High fidelity image quality (be mindful of file size), or crop the image instead of resizing. For advanced editing, consider using dedicated photo editing software before inserting the image.
What are some things to consider before changing the slide size?
- Compatibility : Ensure your chosen size is compatible with your presentation equipment (projector, screen).
- Content scaling : Consider how well your existing content adapts to the new size without distortion.
- Audience viewing : Choose a size that allows for clear and comfortable viewing for your audience.
Save Time and Effortlessly Create Presentations with SlidesAI


How to Make Slides Advance Automatically in PowerPoint

PowerPoint presentations are a great way to convey information and engage your audience. One way to enhance your presentation is to use automatic slide advancement, which ensures that your slides advance automatically without requiring any manual intervention. This feature can help you deliver your presentation smoothly and keep your audience engaged throughout. In this article, we will guide you through the process of setting up automatic slide advancement in PowerPoint.
Table of Contents
Understanding the Benefits of Automatic Slide Advancement in PowerPoint
There are several benefits of using automatic slide advancement in PowerPoint. First, it helps you save time and eliminates the need for manual intervention. This means that you can focus on delivering your presentation content with ease. Secondly, it makes your presentation more engaging by keeping your audience focused on your content without any interruptions. Lastly, it offers a professional touch to your presentation as it allows you to move through your slides automatically and smoothly.
In addition to these benefits, automatic slide advancement also helps you maintain a consistent pace throughout your presentation. This is especially useful if you have a limited amount of time to deliver your content. With automatic slide advancement, you can ensure that you cover all the necessary points without rushing or running out of time. Furthermore, it can also help you avoid awkward pauses or moments of confusion when transitioning between slides. Overall, using automatic slide advancement in PowerPoint can greatly enhance the effectiveness and professionalism of your presentations.
The Step-by-Step Guide to Setting Up Automatic Slide Advancement in PowerPoint
Setting up automatic slide advancement in PowerPoint is an easy and straightforward process. Here are the steps that you need to follow:
- Firstly, open your PowerPoint presentation and select the Transitions tab from the ribbon menu.
- Then, click on the Timing section and check the “After” option under Advance Slide. This option will allow you to set the time duration after which the slide will automatically advance to the next one.
- Enter the time duration for each slide, depending on your requirements. You can choose to use the same duration for each slide or customize the time duration for individual slides as per your preference.
- In case you want to have a smooth transition effect between the slides, you can choose any desired transition effect from the Transitions tab.
- Lastly, click on the “Apply to All Slides” option to apply the automatic slide advancement to all the slides in your presentation.
It is important to note that automatic slide advancement can be a useful tool for presentations that are meant to be viewed without a presenter. However, it is important to ensure that the time duration for each slide is appropriate and allows the viewer enough time to read and understand the content on the slide.
Additionally, if you want to add audio or video to your presentation, you can use the “Insert” tab to add these elements to your slides. You can also set the audio or video to play automatically, along with the automatic slide advancement, by selecting the “Play in Background” option under the “Playback” tab.
How to Customize Slide Advance Timing and Transitions in PowerPoint
If you want to customize the timing or transition effects for a specific slide, you can do so by following these steps:
- Select the slide for which you want to customize the timing or transition effects.
- Go to the Transitions tab, select the timing options and transition effects of your choice.
- Click on the “Apply to Selected Slides” option to apply the changes to the selected slide only.
It’s important to note that you can also customize the timing and transition effects for multiple slides at once. To do this, select the slides you want to apply the changes to by holding down the Ctrl key and clicking on each slide. Then, follow the same steps as above to customize the timing and transition effects for all selected slides.
Additionally, if you want to remove a transition effect from a slide, simply select the slide and go to the Transitions tab. Then, click on the “None” option under the Transition Effects section to remove the effect from the slide.
Tips for Creating Effective and Engaging Presentations with Automatic Slide Advancements
Here are some tips to keep in mind while creating effective and engaging presentations with automatic slide advancements:
- Avoid overusing automatic slide advancement as it can be overwhelming for your audience.
- Ensure that your slide content is engaging and informative.
- Pay attention to the timing of each slide to make sure your presentation flows smoothly.
- Use visual aids such as images, videos, and graphs to make your presentation more engaging.
- Practice your presentation beforehand to ensure smooth delivery and avoid any errors.
Another important tip to keep in mind is to use a consistent design throughout your presentation. This means using the same font, color scheme, and layout for each slide. Consistency helps to create a professional and polished look for your presentation, and also makes it easier for your audience to follow along. Additionally, be sure to keep your slides simple and uncluttered, with only the most important information displayed. This will help to keep your audience focused and engaged throughout your presentation.
How to Troubleshoot Issues with Automatic Slide Advancement in PowerPoint
If you encounter any issues with automatic slide advancement in PowerPoint, you can try the following solutions:
- Check the slide timings and make sure they are set correctly.
- Ensure that you have selected the “After” option for slide advance.
- Verify if your system meets the minimum requirements for running PowerPoint.
- Try refreshing your PowerPoint file or restarting your system.
If none of the above solutions work, you can also try disabling any add-ins or plugins that may be interfering with the automatic slide advancement feature. Additionally, you can check if there are any updates available for PowerPoint and install them to ensure that you have the latest version with all the bug fixes. If the issue persists, you may need to reach out to Microsoft support for further assistance.
Using Animation and Multimedia Elements with Automatic Slide Advancements in PowerPoint
If you want to enhance your presentation with multimedia elements such as videos, images, or animations, you can do so while using automatic slide advancement as well. Here are the steps:
- Insert the multimedia element into your slide.
- Set the timing for the multimedia element to start playing at the desired time.
- Select the “Start Automatically” option to ensure that the multimedia element plays automatically in sync with the slide advancement.
It is important to note that while using multimedia elements can enhance your presentation, it is also important to use them sparingly and purposefully. Too many multimedia elements can distract from the content of your presentation and make it difficult for your audience to follow along. When using animations, make sure they are relevant to the content and not just added for the sake of having an animation. By using multimedia elements strategically, you can create a more engaging and effective presentation.
Best Practices for Designing Slides for Automatic Advancement in PowerPoint
Here are some best practices to keep in mind while designing slides for automatic advancement in PowerPoint:
- Keep your slide content simple and concise.
- Use high-quality images and graphics.
- Avoid using too much text on each slide.
- Ensure that your slide content is relevant and aligned with your presentation topic.
- Choose a legible font style and size for better visibility.
Another important best practice is to use consistent formatting throughout your presentation. This includes using the same font style, size, and color scheme on all slides. This helps to create a cohesive and professional-looking presentation.
It’s also a good idea to include visual aids such as charts, graphs, and diagrams to help illustrate your points. These can be especially helpful when presenting complex data or information.
How to Test and Preview Automatic Slide Advancements before Presenting in PowerPoint
If you want to test your presentation before presenting it to your audience, you can do so by following these steps:
- Select the Slide Show tab in the ribbon menu.
- Click on the “From Beginning” or “From Current Slide” option to start the presentation.
- Check the timing of each slide and make sure it advances automatically as per your requirement.
- Verify if the multimedia elements are playing at the desired time.
- Make any necessary changes to your presentation based on your testing.
It is important to note that testing and previewing your presentation can help you avoid any technical difficulties during your actual presentation. By doing so, you can ensure that your presentation runs smoothly and that your audience is able to fully engage with your content. Additionally, testing your presentation beforehand can help you identify any areas that may need improvement, allowing you to make necessary changes and deliver a more polished presentation.
Alternatives to Automatic Slide Advancements in PowerPoint – When and Why to Use Them
While automatic slide advancement in PowerPoint can prove to be beneficial in many ways, there may be instances where you might want to use an alternative approach. For instance, if you wish to give your audience more control over your presentation, you can choose to set manual slide advancement. Similarly, if you want to deliver a more personalized or interactive presentation, you can use interactive tools such as polls or quizzes. Ultimately, your choice of slide advancement will depend on your presentation goals and audience preferences.
Automatic slide advancement in PowerPoint is an excellent way to create engaging and informative presentations. By following the steps mentioned in this article, you can easily set up automatic slide advancement and customize it to your preferences. Incorporate the tips and best practices mentioned here to create captivating presentations that engage your audience and enhance your communication efforts.
Another alternative to automatic slide advancement is to use animations and transitions to control the flow of your presentation. This can be particularly useful when you want to highlight specific points or ideas, or when you want to create a sense of anticipation or surprise. By using animations and transitions strategically, you can keep your audience engaged and interested throughout your presentation.
Finally, you may also want to consider using a combination of different slide advancement techniques, depending on the content and structure of your presentation. For example, you could use automatic slide advancement for the introduction and conclusion of your presentation, while using manual slide advancement for the main body of your presentation. This can help you strike a balance between keeping your audience engaged and in control, while also ensuring that your presentation flows smoothly and effectively.
By humans, for humans - Best rated articles:
Excel report templates: build better reports faster, top 9 power bi dashboard examples, excel waterfall charts: how to create one that doesn't suck, beyond ai - discover our handpicked bi resources.
Explore Zebra BI's expert-selected resources combining technology and insight for practical, in-depth BI strategies.

We’ve been experimenting with AI-generated content, and sometimes it gets carried away. Give us a feedback and help us learn and improve! 🤍
Note: This is an experimental AI-generated article. Your help is welcome. Share your feedback with us and help us improve.


IMAGES
VIDEO
COMMENTS
If you want to learn how to loop your slides in PowerPoint, follow these steps: Go to the Slide Show tab and select Set Up Slide Show. When the Set Up Show window appears, go to the Show options group and tick the Loop continuously until 'Esc' option. Don't forget to click OK to apply the new setup!
Set up slide transitions. If you want a slide show to run automatically at a kiosk, you can control when and how the slides advance. To do this, you can apply the same transition to all slides in the presentation and set the transition to automatically advance after a certain time interval. On the Transitions tab, click the transition that you ...
Here's how: Open your PowerPoint presentation and navigate to the "Transitions" tab on the ribbon. Select the slide or slides you want to apply the transition to. Choose a transition effect from the "Transition to This Slide" section of the ribbon. In the "Timing" section, set the duration of the transition and choose whether you ...
Here's how: Select the slide you want to apply the transition to. Go to the "Transitions" tab on the PowerPoint ribbon at the top of your screen. Choose the transition you want to apply by clicking on the thumbnail image. Select "Apply to All Slides" if you want the transition to apply to all slides in your presentation.
Click OK. To set up a presentation to run automatically, but those watching the slide show do NOT have control over when slides advance: Click the Slide Show tab in the Ribbon and then click Set Up Slide Show. A dialog box appears. Under Show type, select Browsed by an individual (window). Click OK.
Open the presentation file you wish to automate, then select " Home ". Select anywhere in the left " Slides " pane. Select the individual slide you would like to advance automatically. If you want to advance all of the slides for the same amount of time, select one slide in the left pane, then press " Ctrl " + " A " to highlight ...
Select Your Slides from Slides Pane. In the first step, click the slide preview for the slide you wish to set time for. In case you want all your slides to switch according to a set time limit (e.g. 10 seconds), select one slide and hit CTRL+A to select all slides. In case you want to set a different time for each slide, you will have to select ...
Open PowerPoint and create your presentation. Click on the Transitions tab. Select the slide you want to set the transition for. Click on the drop-down list under the Transition to this Slide section and choose the desired transition effect. Set the duration in the Duration field to determine how long the slide will be displayed before ...
In the Timing group, under Advance Slides, deselect or uncheck On mouse click and beside After, select or click the up and down arrows to set the timing to transition to the next slide. You may also type a duration. In the Timing group, click Apply to All. In the Transitions tab in PowerPoint, you can select the type of transition (such as Fade ...
Luckily, PowerPoint autoplay allows users to set up their slides, so they automatically change. That way, they can focus on their presentation without interruptions.
Step 4: Choose the "Advance slides" option. In the "Set Up Show" dialog box, under the "Show options" section, check the box next to "Use timings, if present" and select the radio button for "Automatically after" and input the desired duration for each slide.
This tutorial will demonstrate how to set up a PowerPoint slide show that will automatically transition the slides on a timer. This feature is helpful when y...
Step 4: Choose a Transition Effect. Click on the desired transition effect to see a live preview on the selected slide. Choose an effect that complements the tone and content of your presentation. PowerPoint offers various options, from subtle fades to dynamic flips and spins.
To make the slide advance to the next slide when you click the mouse, select the On Mouse Click check box. To make the slide advance automatically, select the After check box, and then enter the number of minutes or seconds that you want. The timer starts when the final animation or other effect on the slide finishes. ... In PowerPoint for Mac ...
In this Microsoft PowerPoint 2019 tutorial course you are going to learn how to make PowerPoint Slide advance automatically instead / without having to click...
-In today's lesson, we will teach you How to make slides advance automatically in PowerPointOpen the PowerPoint. select the first slide and click on the "Tra...
How do you make a Microsoft PowerPoint application change slides automatically in a timed manner? This thread is locked. You can vote as helpful, but you cannot reply or subscribe to this thread.
To customize automatic slide transitions, open the "Transitions" tab and select the slide that you wish to edit. A range of customization options is available to modify the transition's style, duration, and sound. Additionally, the "Timing" section of the "Transitions" tab will allow you to set the duration of each slide.
Make a slide show that starts automatically when opened. Select File > Save as (or Save a Copy ). Click More options. Browse to the folder where you want to save your presentation. In the File name box, type a name for your presentation. Under Save as type, select PowerPoint Show. The file is saved as a .ppsx file.
Depending on how your presentation is set up, you may be able to simply choose View | Slide Master then select the thumbnail at the very top of the pane on the left and add your text there. If that doesn't work for some slides, it's because their layout isn't following the slide master background; in that case you'll need to select the text you ...
Select your slide you need for the timing. 2, Go to "Transitions" menu. 3. In the "Advance Slide" area, check the "After" check box, then set the amount of time that should elapse before PowerPoint advances to the next slide. 4. Now your slides should change to the next one automatically.
Setting up an automatic slide show in PowerPoint is easy and can be done in just a few steps: Open your PowerPoint presentation. Click on the "Transitions" tab in the ribbon. In the "Timing" section, check "After" and enter the number of seconds you want each slide to appear. Click "Apply to All Slides". Save your presentation.
Step 1: Finding the Design Tab. First, open your presentation and locate the Design tab on the ribbon at the top of the window. This tab holds all the tools you need to customize the look of your slides, including their size. Step 2: Choosing Your Slide Size. On the Design tab, find the button labeled Slide Size.
Select the Slide Show tab in the ribbon menu. Click on the "From Beginning" or "From Current Slide" option to start the presentation. Check the timing of each slide and make sure it advances automatically as per your requirement. Verify if the multimedia elements are playing at the desired time.