

How to Use Laser Pointers for Impactful Zoom Meetings

Loved the read? Please share or comment, and we'll deliver even better content!
What To Know
- Zoom’s built-in laser pointer feature is available during screen-sharing sessions after enabling the Annotation settings in the Zoom web portal.
- For desktop users, activate the laser pointer by sharing your screen, clicking Annotate, then Spotlight ; mobile app users can tap Share, then Pen , and select Spotlight .
- Zoom offers additional annotation tools like text, drawing, and highlighting for more interactive and informative presentations.
In this guide, I will teach you how to use a laser pointer in your Zoom meetings to make your presentations more engaging.
Let’s get started!
Quick Navigation
How to Enable Annotation Tools for Zoom Meetings
For zoom desktop app users (windows and mac), for zoom mobile app users (android and iphone), how to get your mouse cursor back to normal in zoom, are there different annotation tools available in zoom for your presentation, requirements for the laser pointer in zoom.
Zoom has a cool feature that lets you use a laser pointer in your presentations.
But remember, you can only use this feature when you’re sharing your screen with others in the meeting.
So, you’ll need to click on the Share Screen button at the bottom of your Zoom screen to get it going.
Before your meeting, check these requirements to make sure you can use the laser pointer without any hitches:
- The Annotation settings in Zoom must be on. If you’re not sure how to do this, refer to the section “ How to Enable Annotation Tools for Zoom Meetings ” below.
- Make sure you’re using the latest version of the Zoom desktop app. This app should work fine whether you’re using Windows , macOS , or Linux . Note for Linux users: The laser pointer works with X11, but if you’re using Wayland, you can only annotate when you share your entire desktop on a single screen.
- If you’re using Zoom on a mobile device, like a phone or tablet, ensure that you’ve downloaded the latest version of the Zoom mobile app. It’s available for both Android and iOS .
One last thing to keep in mind: The meeting host can turn off attendee annotation. If you don’t see the annotation option, the host might have disabled it.
Getting your annotation tools ready for Zoom meetings is a breeze with just a few steps:
Step 1: Sign into the Zoom web portal right here .

Step 2: Then, head over to the Personal panel and click on Settings .

Step 3: Click on the Meeting tab and select In Meeting (Basic) .

Step 4: Look for the Annotation tab and make sure it’s toggled ON .

If you need more information or get stuck, Zoom’s support article has all the extra details you might need.
How To Use the Laser Pointer in Zoom Meeting Properly
Using the laser pointer in a Zoom meeting is a really handy way to highlight things on the screen, especially when you’re using the Zoom Desktop App on Windows or Mac.
Here’s how you can activate it:
Step 1: Start off by opening the Zoom app. Click on the New Meeting button to begin your meeting.

Step 2: Next, you’ll want to share your screen with the other participants.
There are three methods for screen sharing in Zoom:
Method 1: Click the More icon (it looks like three dots) at the bottom of your screen, and then select Share Screen .

Choose the screen you want to share and click Share .

Method 2: An even quicker way is to directly click the Share Screen button at the bottom. Then just pick the screen tab you want to share.

Method 3: For a super fast method, you can press Alt+S on your keyboard. This shortcut instantly opens up the screen-sharing feature in Zoom.
Step 3: Once you’re sharing your screen, move your mouse to the top of the screen.
This will bring up a new tab. Click on Annotate , and then select the Spotlight button.

Step 4: Click on Spotlight again to finish setting it up.

Now, you’re all set! A dot that looks like a laser pointer will appear on the screen, and you can move it around with your mouse or trackpad.

Everyone in the meeting will be able to see this laser pointer on their screens, making it easier for you to point out important stuff during your presentation or discussion.

Using the laser pointer in Zoom meetings on your phone is a cool way to highlight important points during your presentation.
Whether you’re using an Android or iPhone, here’s how to do it:
Step 1: Start by opening the Zoom app on your phone.

Step 2: Tap the New Meeting button and choose Start a Meeting to begin a new session.

Step 3: Once your meeting is up and running, tap Share at the bottom of the screen and select what you want to share.

For example, I chose to share a photo.

Step 4: Tap the Pen icon on your screen and select Spotlight .

And that’s it! You’ve set up the laser pointer.
Now, you can move it around the screen with your finger.

It’s a great tool to grab attention and the best part? Everyone in the meeting will be able to see the laser pointer on their screens, just like you do.
When you’re in a Zoom meeting and you’ve been using the laser pointer, but now you need your mouse cursor to look normal again, don’t worry, it’s easy.
While you’re sharing your screen, just glance at the screen tab on the left side.
You’ll notice a Mouse icon there.
All you have to do is click on that icon, and like magic, your cursor will go back to its usual look.

Beyond the laser pointer, Zoom offers a range of annotation tools that can make your presentations more interactive and clear.
When you share your screen during a Zoom call, look for the Annotate option in the toolbar. This feature gives you access to several helpful tools.
For example, the Text tool lets you type words directly onto your screen, which is perfect for emphasizing key points or adding additional information.

If you’re explaining a concept or process, the Draw tools are incredibly useful.
They allow you to create shapes or diagrams right on your screen.

For those times when you need to write or draw something quickly, you can use the Pen tool.
And, if you’re focusing on specific details in your presentation, the Highlighter is great for underscoring important numbers or words.
These tools make it much easier for your audience to follow along and grasp the essential parts of your presentation.

Hai Huynh, an Electrical & Electronics Engineering graduate from Ho Chi Minh City University of Technology , is a passionate technical editor . He discovered his love for technology when he started playing Pokemon on a Gameboy as a child. Now, he writes and edits technical articles, focusing on smart TVs and streaming devices, to help readers solve problems.
Related posts:
- 3 Best Digital Laser Pointers For LED/LCD TV Screens: A 2024 Buyer’s Guide
- Will a Laser Pointer Scare Birds? Understanding Why Birds Are Scared of Laser Pointers
- How to Get a Laser Pointer in Microsoft Teams
- How to Use Keynote Laser Pointer on Mac (& iPhone, iPad)
One Comment
I find the laser a useless tool because it is too small, I can’t see how you can increase it’s size. Also when in use I can’t click in/out of documents. Annotation in zoom is quick clunky.
Leave a Reply Cancel reply
Your email address will not be published. Required fields are marked *
Save my name, email, and website in this browser for the next time I comment.
Following the presenter's pointer
When a presenter is sharing a screen that is at a higher resolution than yours, you can automatically follow the presenter’s pointer on your desktop client. This is particularly useful when only a portion of the shared screen is visible to you, helping you to stay focused on the important part of the shared screen.
Prerequisites for following the presenter's pointer during screen share
Windows: 5.3.1 (52877.0927) or higher
macOS: 5.3.1 (52877.0927) or higher
Note : The presenter cannot be sharing content from within a Zoom Rooms meeting.
How to follow the presenter's pointer during screen share
Note : You must be viewing the presentation at 100% (original size) or higher for this feature to work.
To change the presentation's zoom ratio:
- Click on View Options .
- Hover your mouse over Zoom Ratio .
- Select a zoom ratio of 100% (or higher) or higher to view the presentation.
To follow the presenter's pointer during screen sharing:
- Start or join a meeting or webinar on a Zoom desktop client.
- When screen sharing begins, the Follow Presenter’s Pointer option is automatically enabled.
- If you manually move the shared content, you see a message that lets you know that the option to follow the presenter’s pointer has been disabled.
- To re-enable following the presenter’s focus, under View Options , choose the option Follow presenter’s pointer .
404 Not found
Corporate Meeting Help
Following the presenter’s pointer in zoom App
Presenters can automatically follow their pointer on your desktop client when they share a screen with a higher resolution than your own. You can use this method to stay focused on the important part of the shared screen when only a portion of it is visible.
Prerequisites for following the presenter’s pointer during screen share
- Windows: 5.3.1 (52877.0927) or higher
- macOS: 5.3.1 (52877.0927) or higher
In a Zoom Rooms meeting, the presenter cannot share content .
How to follow the presenter’s pointer during screen share
For this feature to work, the presentation must be viewed at 100% (original size).
Zoom ratio of the presentation can be changed as follows:
- Choose View Options from the menu.
- Hover your mouse over Zoom Ratio.
- The presentation can be viewed by zooming in at 100% (or higher).
During screen sharing, follow the presenter’s pointer:
- Zoom desktop client allows you to start or join a meeting or webinar.
- By default, the Follow Presenter’s Pointer option is enabled when screen sharing begins.
- Whenever you move the shared content manually, you see a message informing you that the option to follow the presenter’s pointer has been disabled.
- Choose the option Follow presenter’s pointer under View Options to re-enable following the presenter’s focus.
Related posts:
- Zoom sign-in with face and Google
- How to change the zoom account settings?
- Guidelines to use SMS in zoom app
- Top 20 Zoom resources- All list on One page
- Suppressing background noise for videos in zoom App
- Sharing a whiteboard in zoom App
- Recording highlights in zoom App
- Getting started as a Zoom Events Attendee
- Enabling or disabling call me and invite by phone in zoom App
- Enabling upcoming meeting reminders in zoom App
Similar Posts
What’s new in roomos devices – webex.
It is our intention to forego releasing the software version RoomOS in May of 2023. At the beginning of June, a new software version titled RoomOS June 2023 will be…
Enabling device operation time for Zoom Phone Appliances
Zoom Phone Appliances can be set to operate in power saving mode after business hours by account owners and administrators. Notes: It is impossible to set the device operation time…
Canada GST/HST/PST/QST Tax in zoom App
What is GST (Goods and Services Tax)? There is a 5% sales tax known as the Goods and Services Tax (GST), which is a federal tax on goods and services. …
Getting started with Zoom Rooms Virtual Receptionist
Any entrance to the office or any service area within or around the office can serve as a virtual receptionist to reduce direct contact. In addition to providing a safer…
Storing chat message history in zoom App
Zoom users and administrators can decide how long chat messages are stored in the cloud and on local devices. After the specified time period passes, all messages are deleted. The…
Hybrid Calendar Service with Office 365 integration reference in webex
Summary A collaboration experience that provides a seamless collaboration between Cisco Webex Meetings, the Webex App for Office 365, and Cisco Webex Meetings is provided through the Hybrid Calendar. A…
404 Not found
The Ultimate Guide to Giving Virtual Presentations on Zoom
Part 1: an introduction to giving virtual presentations on zoom.
PART I Introduction 1 – Cool Zoom Features 2 – Virtual Presentation Do’s 3 – Virtual Presentation Don’ts PART II 4 – Presentation Purpose 5 – Structure & Flow 6 – Slide Design PART III 7 – Connect with the audience 8 – Audience Participation 9 – Sharing Content PART IV 10 – Video & Audio Recordings 11 – Post-production 12 – Your Phone as a Webcam PART V 13 – When Things Go Wrong 14 – How to Ground Yourself PART VI 15 – Advanced Techniques 16 – Zoom Webinars vs Meetings 17 – 23 Essential Settings
There are three things I hate about Zoom…
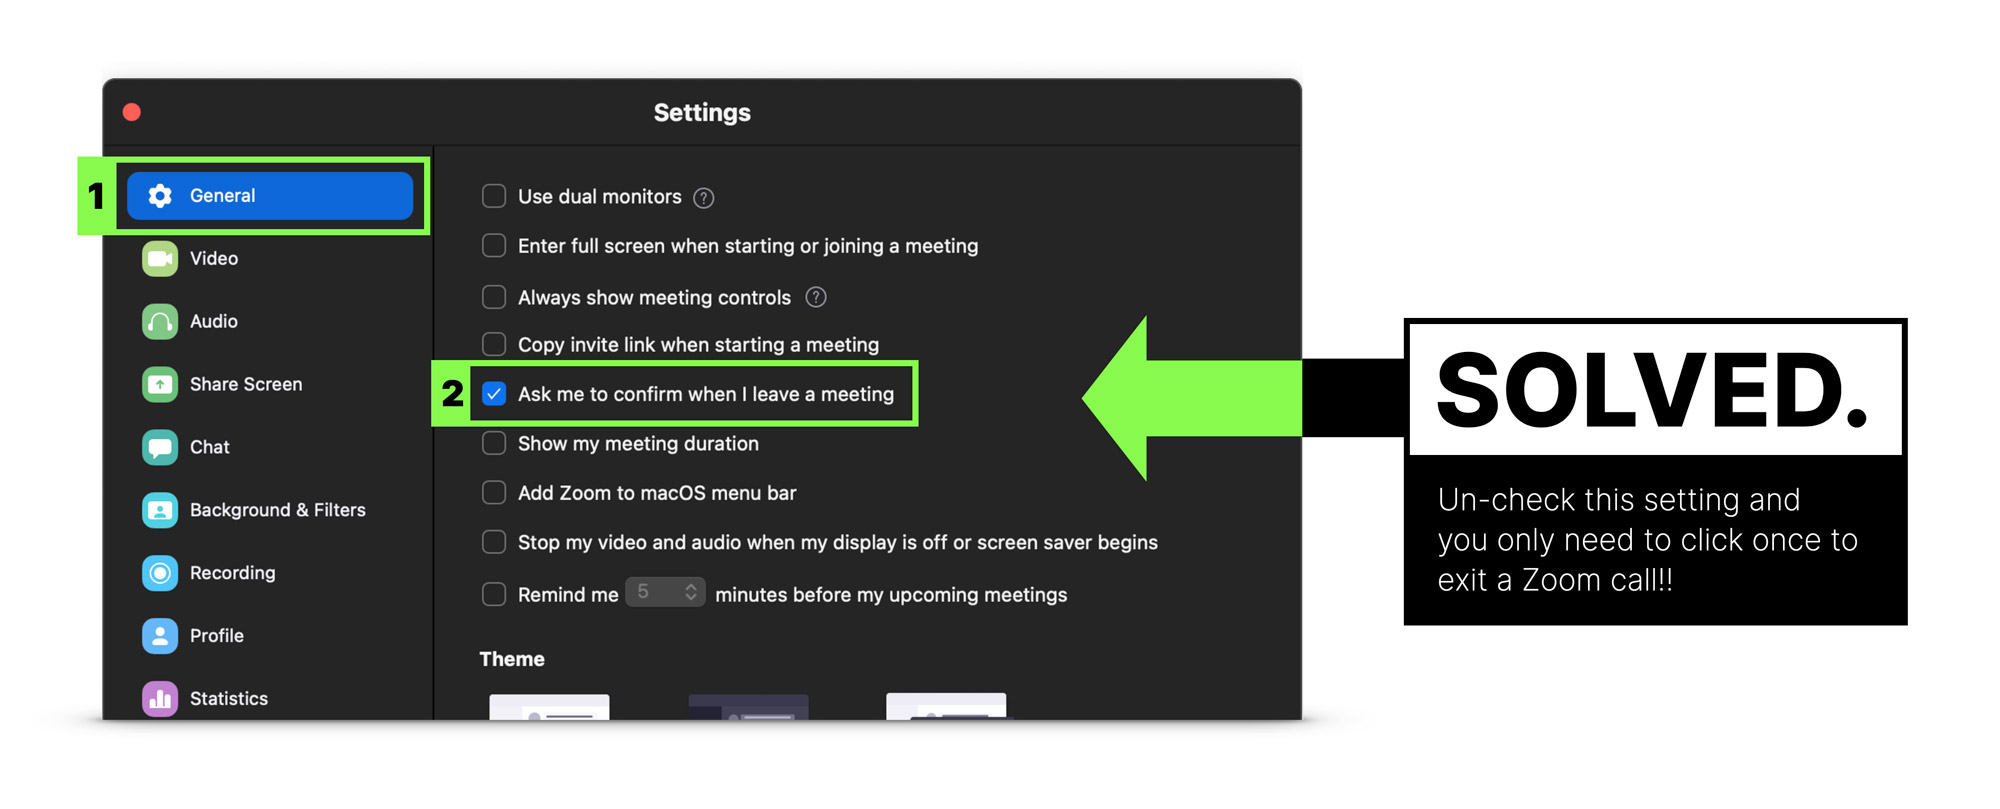
#1 the super awkward must-click-two-buttons-to-leave-the-meeting debacle.
You say goodbye, search the bottom-right corner of the screen for the red button, click the red button, continue to stare awkwardly at the corner of the screen because the call is still open and you need to click a second red button.

Never fear, this can be turned off. In General Preferences simply uncheck the “Ask me to confirm when I leave a meeting” setting and poof! One-click exits. You’re welcome.
#2 Inviting someone and never knowing what the difference is between these two options: “Copy invite link” and “Copy invitation”.
I can sense you nodding along with me.
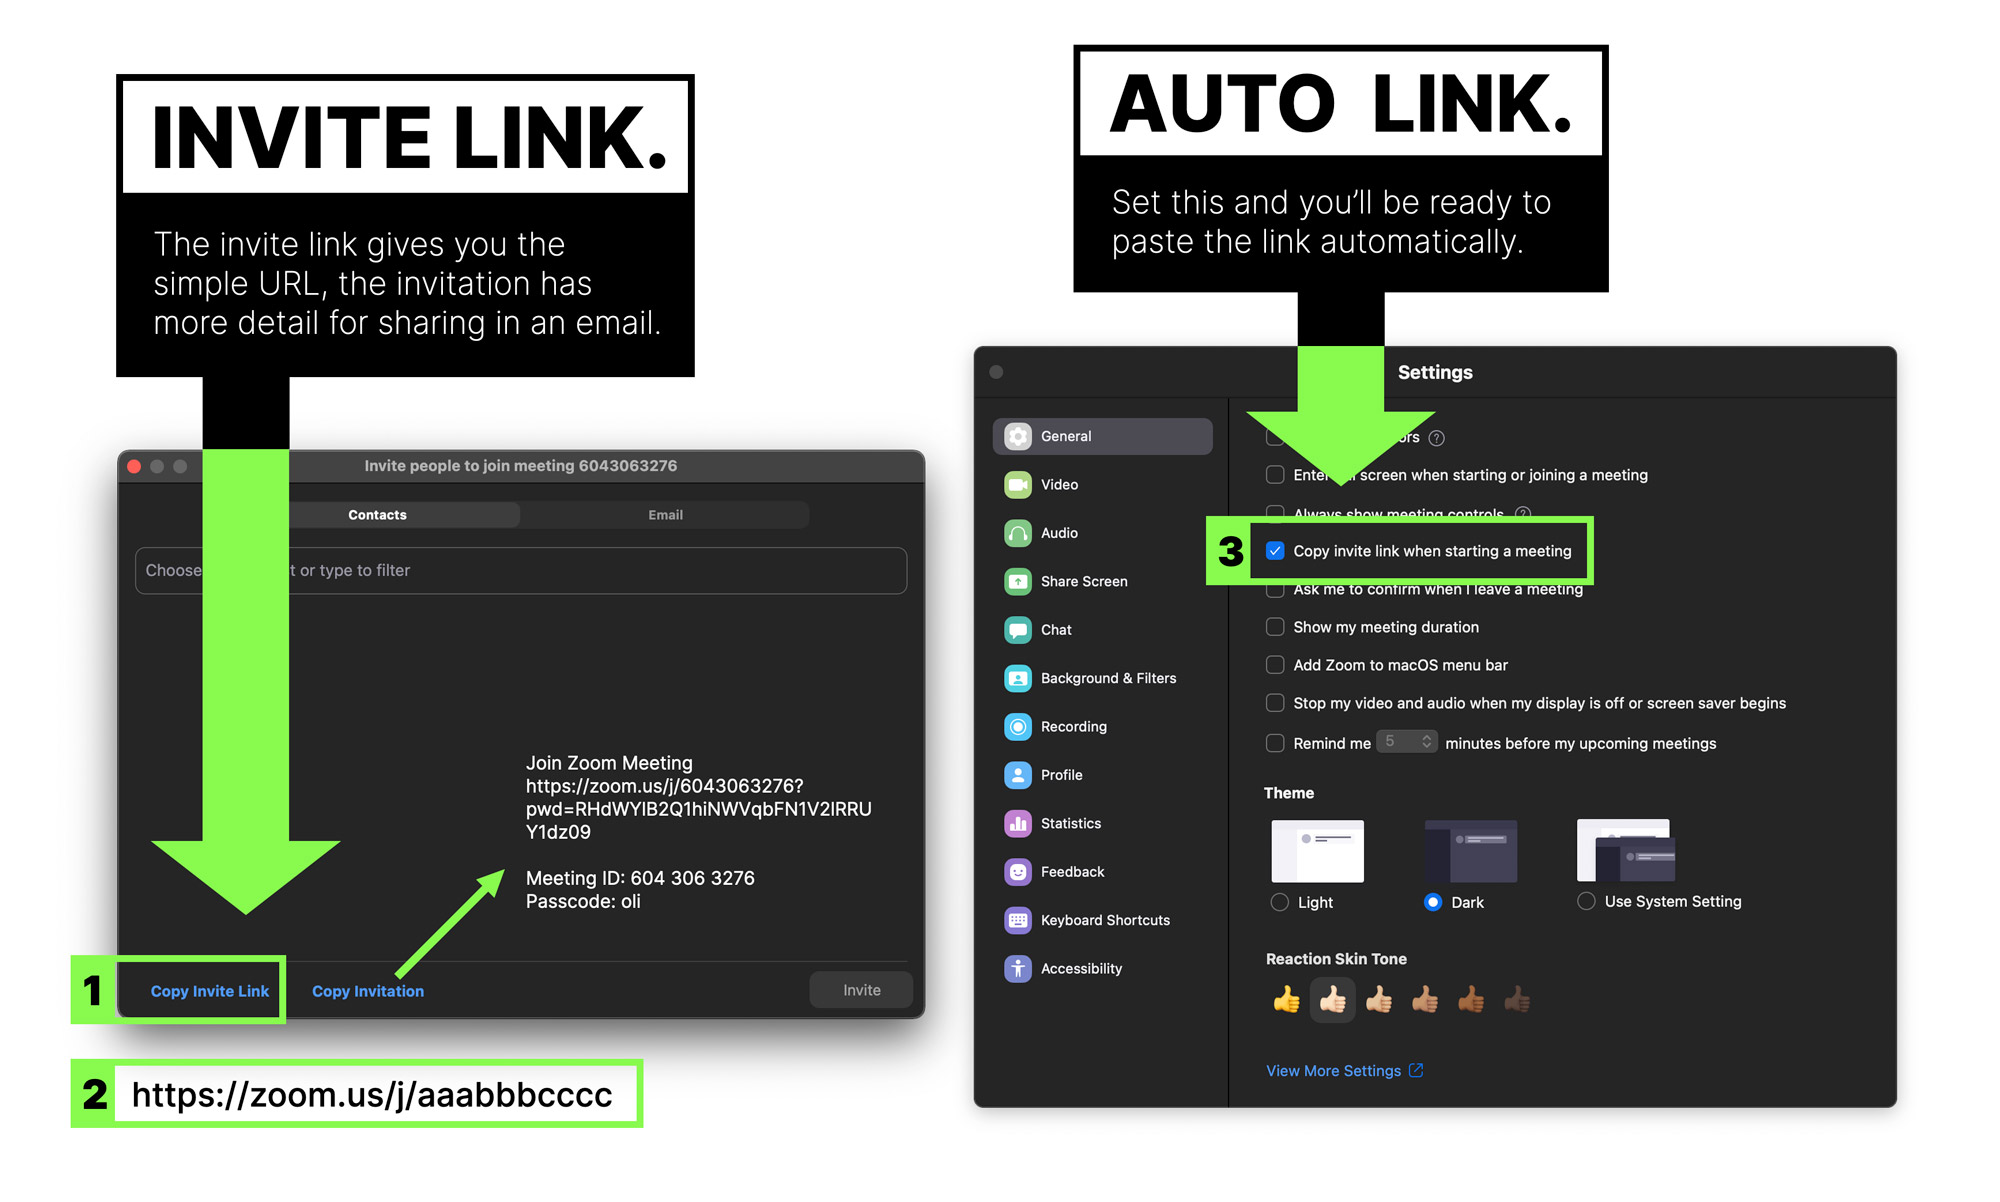
Just remember that it’s “invite link” you want 99% of the time vs “invitation”, and you can set an option that copies the link to your clipboard as soon as you start a meeting.
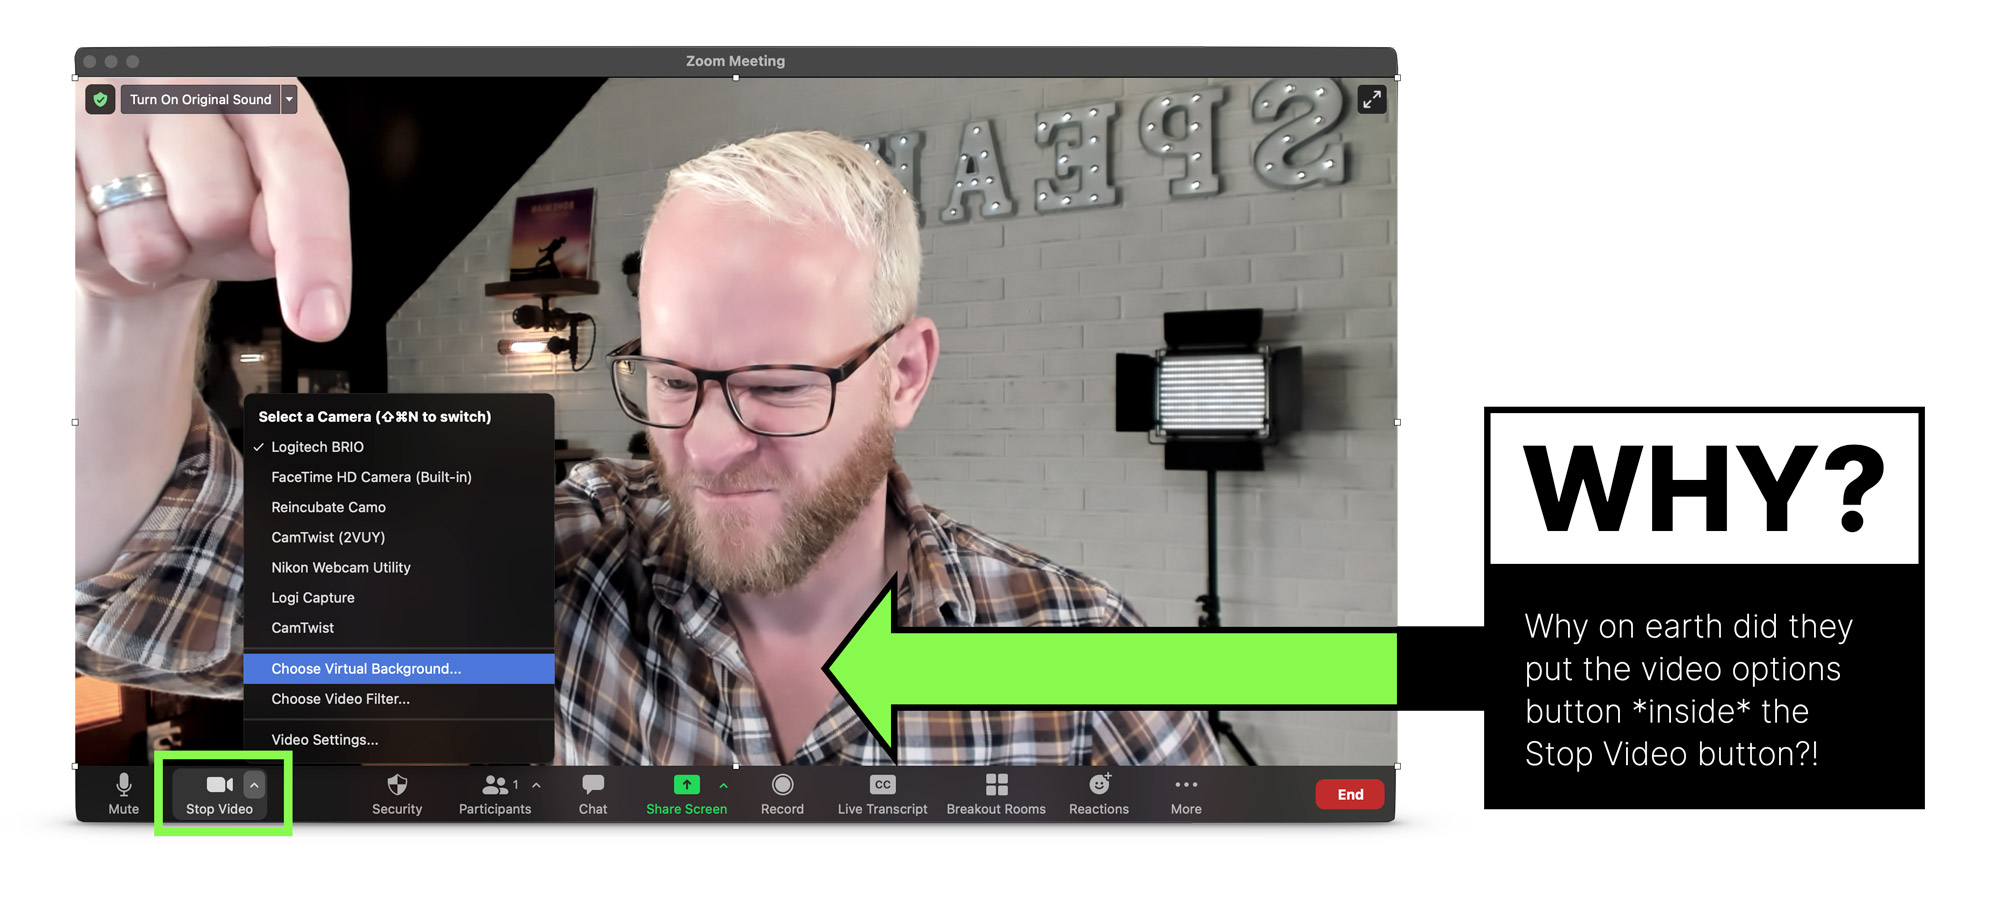
#3 The dropdown to change video settings is part of the “Stop Video” button. What the actual?!
Are you trying to make me screw up my presentation?
I also love Zoom.
Why? Because it works.
A year into our forced isolation, Zoom fatigue has set in. We’re avoiding calls and talking about concepts like Zoom holidays, just to get a break.
But the answer isn’t fewer Zoom calls, it’s better Zoom calls. Almost every Zoom presentation is boring, ugly, terribly structured, poorly executed, and designed to make you fall asleep.
In this guide I’ll show you
- How to create beautiful slides that communicate with clarity and class
- Unknown and awesome features of Zoom that you can use to your advantage
- How to overcome your nerves and survive technical problems
- And how to look like a total pro every time you give a presentation—or run a meeting—on the platform we all love to hate.
Note: for the sake of brevity, unless I’m talking about Zoom-specific functionality, these tips are applicable to any platform that offers meeting and presentation software such as GotoMeeting, Google Meet, Webinar Jam etc.
There are instructional videos throughout the guide to demonstrate the best parts in more depth. You can binge watch the videos on the “Presenting on Zoom” video channel here , or read on for the word and pictures.
If you want to stand out from your peers it’s good to understand the full power of the platform and know the features most people don’t know about.
#1 Set up your own configurable ‘personal meeting room’
It can be really distracting to hear a bunch of people talking over one another when you kick off a meeting. A good solution is to use what’s called a Personal Meeting ID (PID) which gives you control of the Zoom environment right from the start.
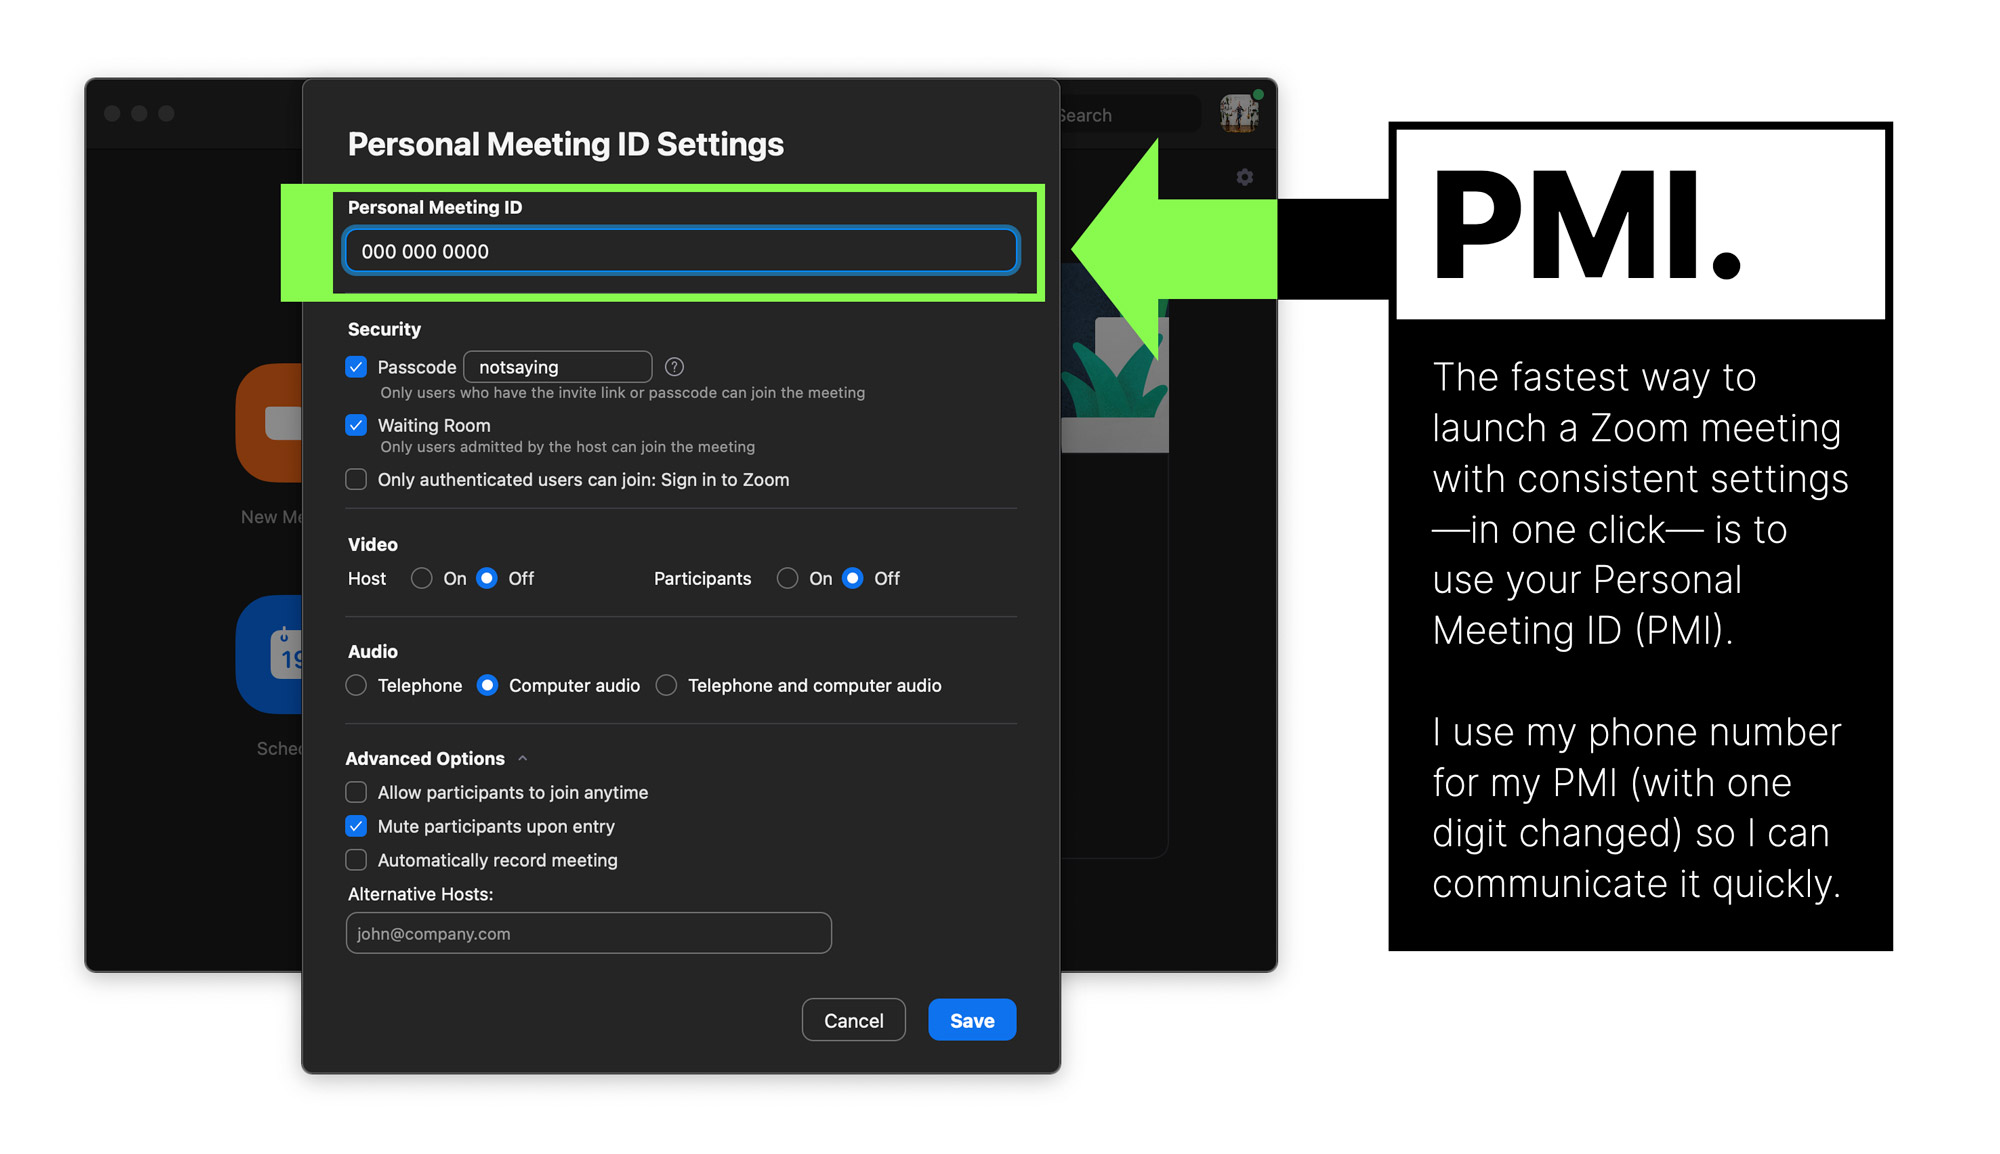
Features of your PID include:
- Using the same invite ID and URL whenever you start a meeting, bypassing the need to repeatedly check the settings. Note: because it’s a permanent URL,you should uncheck the “Allow participants to join anytime” setting to prevent randoms dropping in unannounced.
- Placing participants into a “waiting room” which lets them in when you are ready to begin– either individually or all at once.
- Automatically recording your meetings on your computer. Having a video of your presentation is always a good idea so you can re-use your content.
#2 Press the ‘spacebar to temporarily un-mute yourself’
You can help to ensure a quality audio recording by placing everyone on mute by default. And while this feature is more appropriate for meetings vs. presentations, it’s a great thing to know about – and to tell your audience about. It’s easy to use, hold down the spacebar to un-mute yourself and let it go to turn your audio off again. It prevents people from forgetting to re-mute when they walk off to do something else forcing you to listen to their snoring dog or screaming baby.
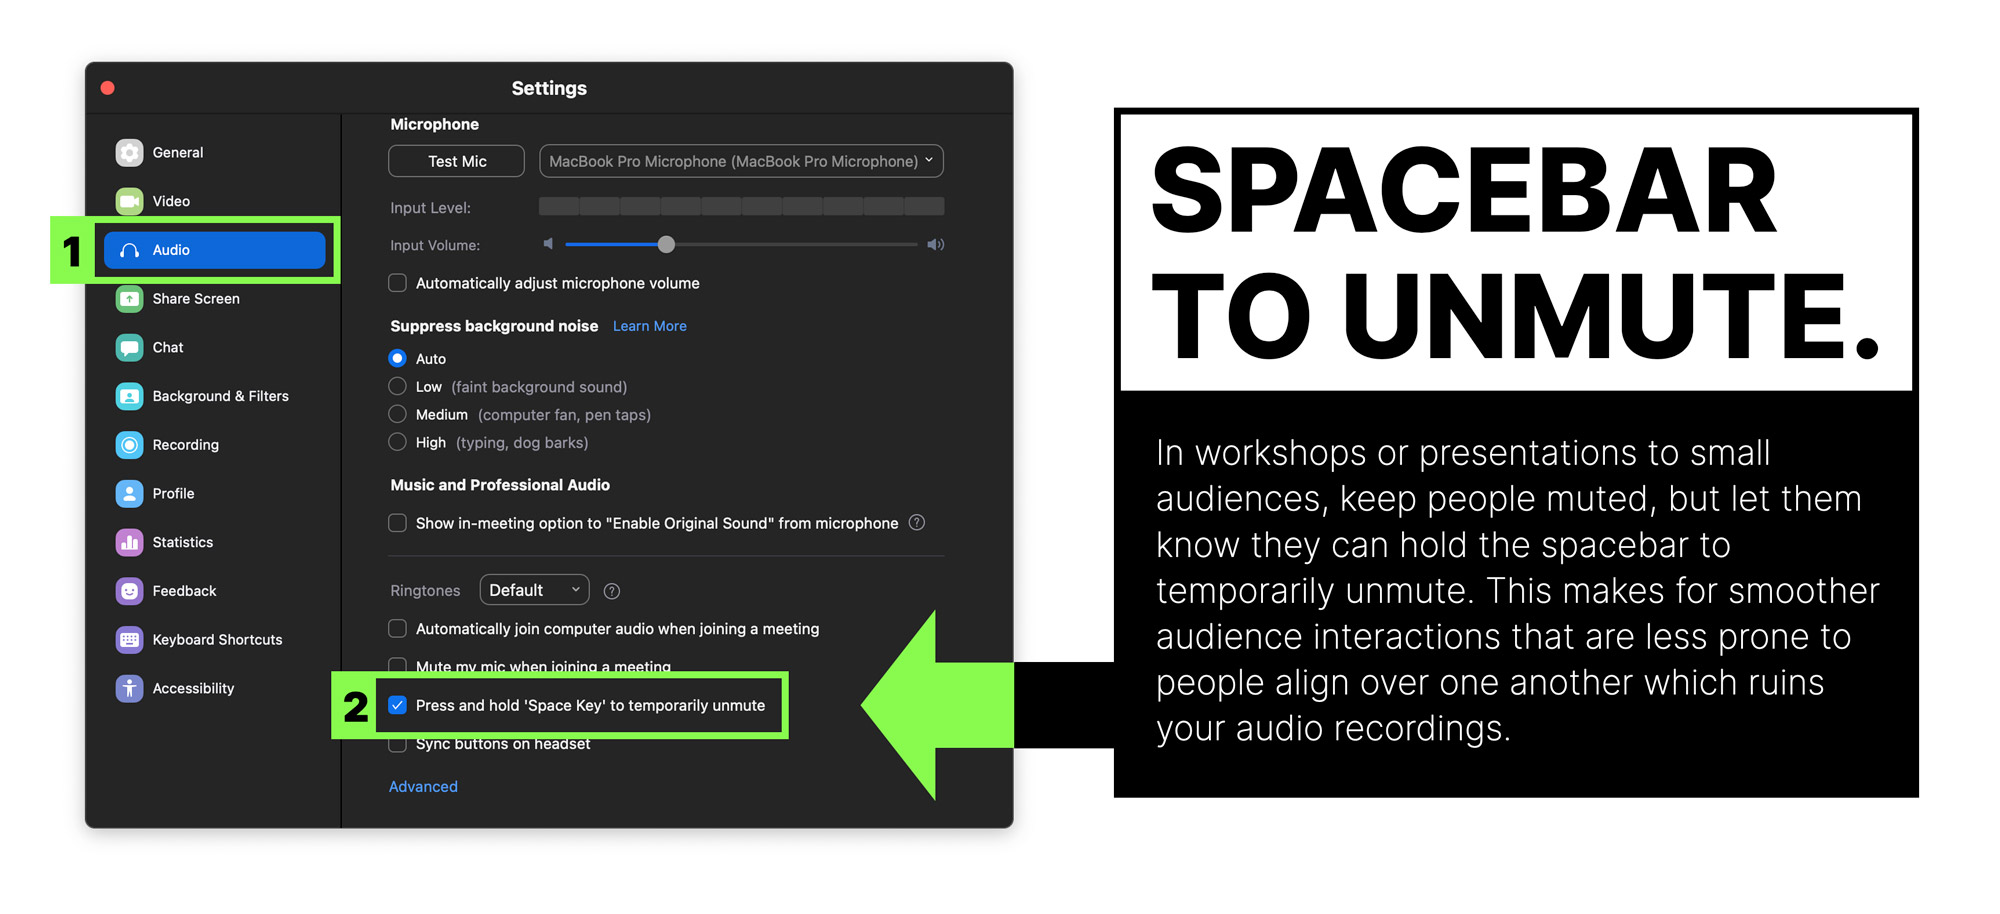
Even if it doesn’t get used during your presentation (unless it’s a workshop you won’t want people to randomly chime in), many of your audience will thank you for learning this tip.
Note: You may need to enable it in your Zoom Preferences.
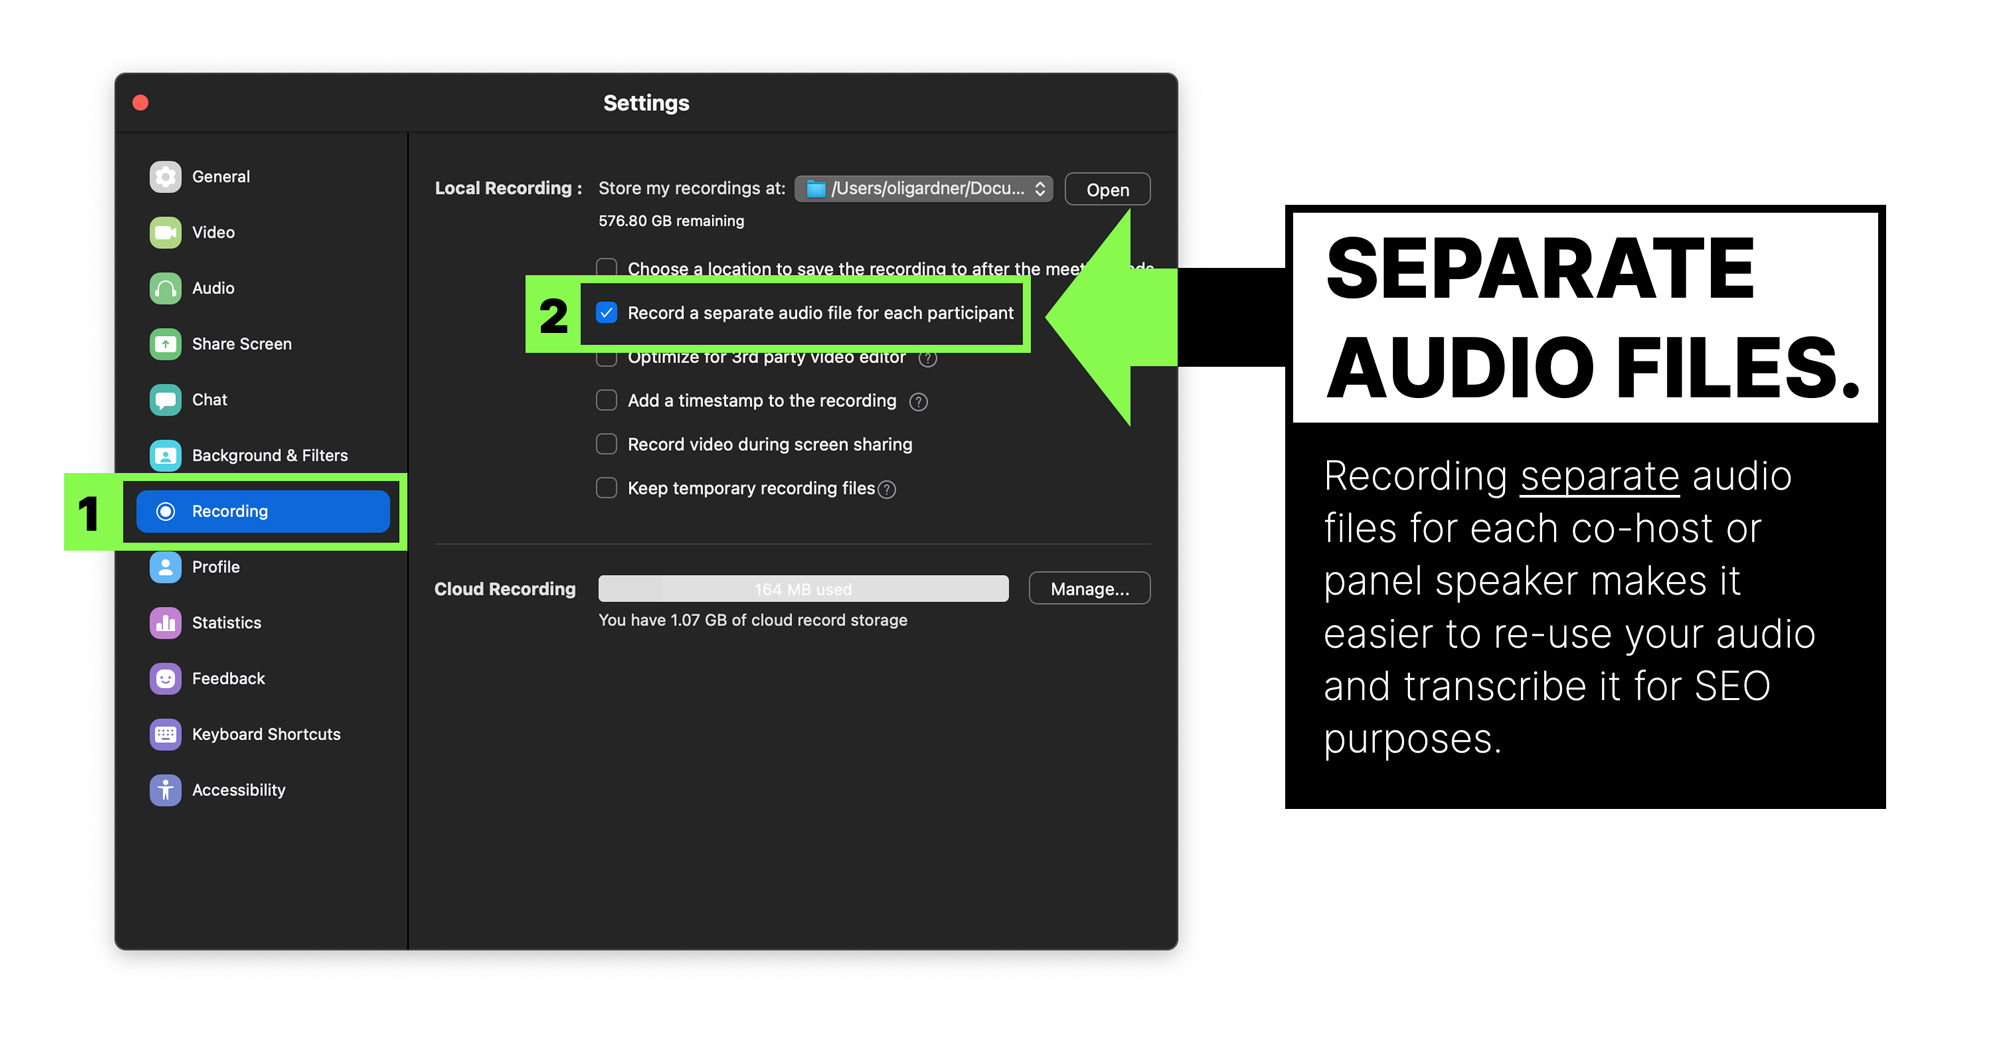
#3 Record ‘separate audio files’ for each speaker, host, or panelist in the presentation
If you have a host or a co-presenter there will be content in the session that’s not yours. Having separate audio recordings lets you use only the audio that was from your part of the presentation.
You can enable this in Preferences > Recording.
#4 Enable the ‘non-verbal feedback’ feature to allow audience interactions
Cool zoom feature #4 – enable non-verbal feedback.
To make your presentations interactive you can enable the non-verbal feedback feature. This allows participants to express reactions to your presentation.
This is not to be confused with ‘meeting reaction emojis’ which are temporary reactions that disappear after 5 seconds. To be honest, it’s hard not to be confused when there are two sets of interactions with different names.
Non-verbal feedback is for direct feedback to the speaker or host that others can agree with by clicking the same icon. The result is that the speaker can see how many people are expressing the feedback.
The options for non-verbal feedback are shown in the image below:
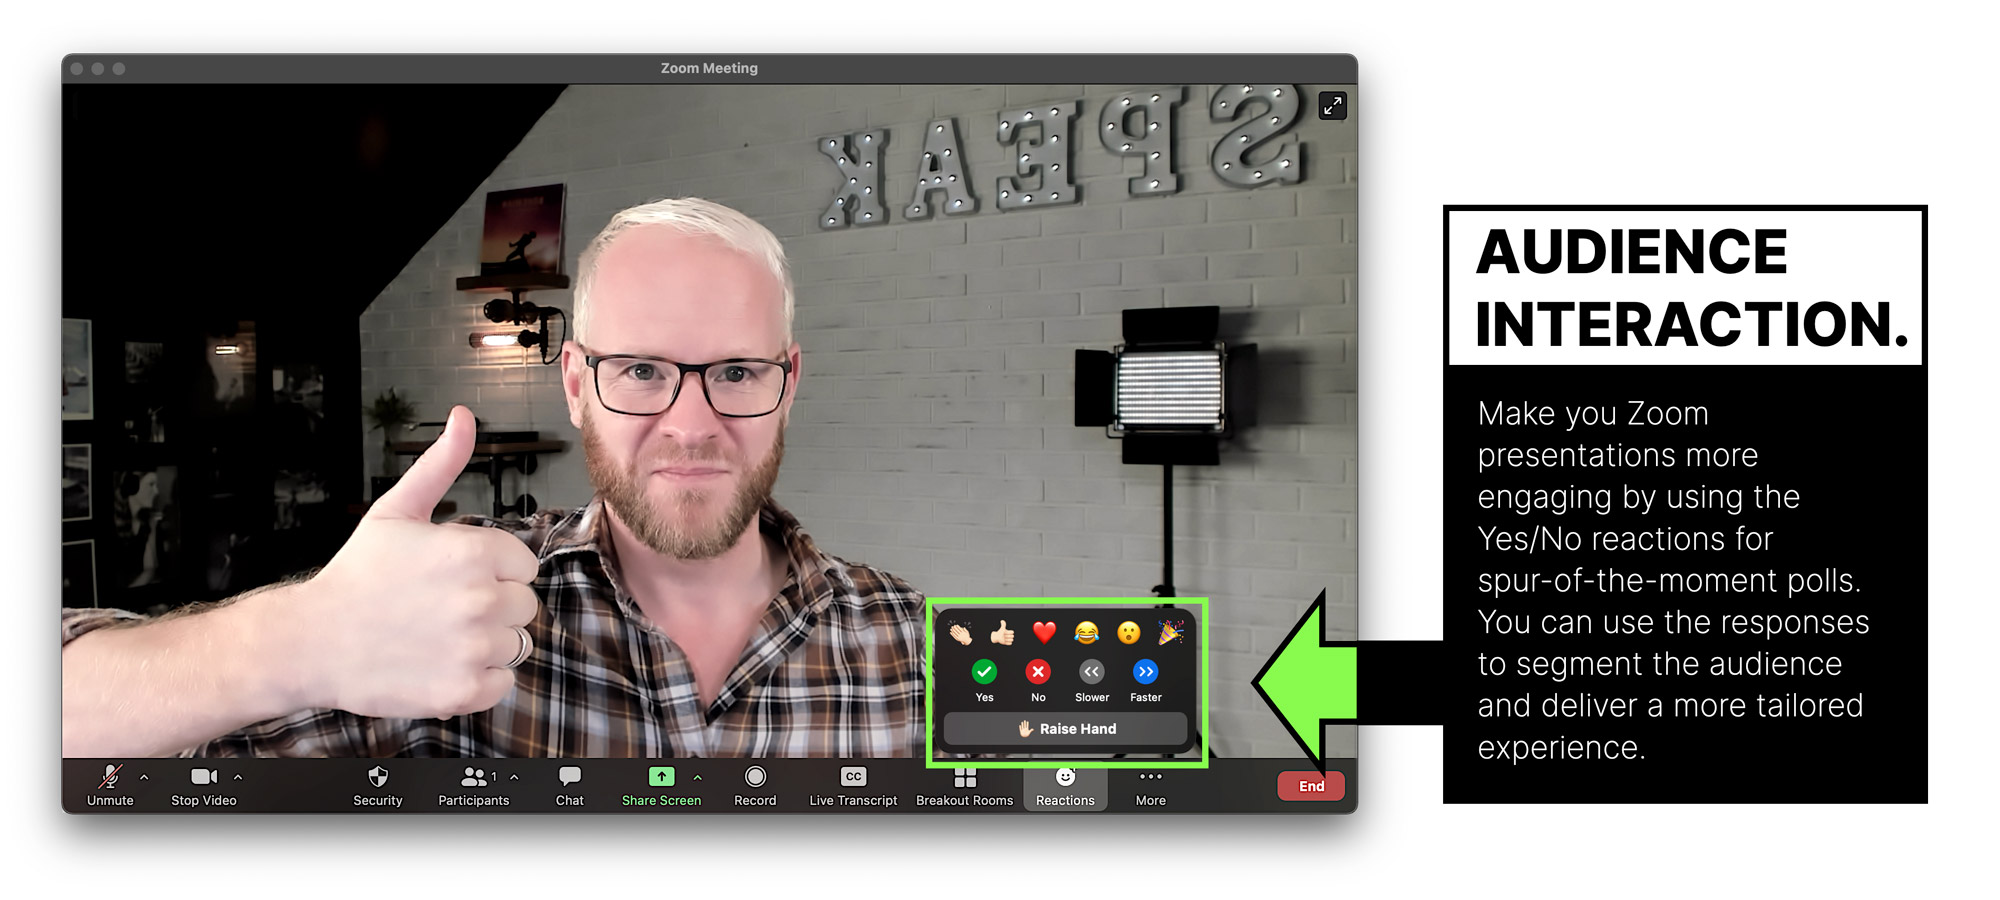
An example of how this would be used in a presentation is to ask the speaker to speed up or slow down. This might seem like a weird thing to be told during your talk, and if it’s just one person asking you’d most likely ignore it. But if 50 people are saying to slow down, that’s a pretty good indication that your current presentation style isn’t working for them.
It provides a pretty amazing insight – something I wish I’d had that feedback during an on-stage talk.
You can also use it to ask binary questions to the audience that they can respond yes or no to – a great way to segment the audience so you can tailor your content based on their responses.
Combine this feature with a QTINTA audience participation question for a really engaging experience. You’ll have to watch the video to know what QTINTA means.
#5 Use the Zoom ‘beauty mode’ to soften your appearance
Zoom includes a “Touch up my appearance” filter in the “Preferences > Video” settings, which gives your skin a softer appearance. There’s a slider that lets you control how much it applies the effect. It can look weird if you crank it too much, but having just a little can really help – especially if you’re looking a big bedraggled.
Settings are maintained when you quit so you can expect to look the same way every time.
#6 Use Zoom ‘video filters’ to add a cinematic high-contrast appearance
We’re all familiar with Zoom backgrounds, but a more impressive feature in my mind are the video filters. You can access them via the “Stop Video” dropdown arrow. Yes, there are some silly ones which can be funny when in a meeting, but for presenting stick to the non-silly ones. They can help improve the quality of your on-camera look. I particularly like the first option “Boost” which kicks your contrast up a notch removing any bland washed out lighting, it also removed some warmer tones which I like as it reduces the redness I often have in my skin.
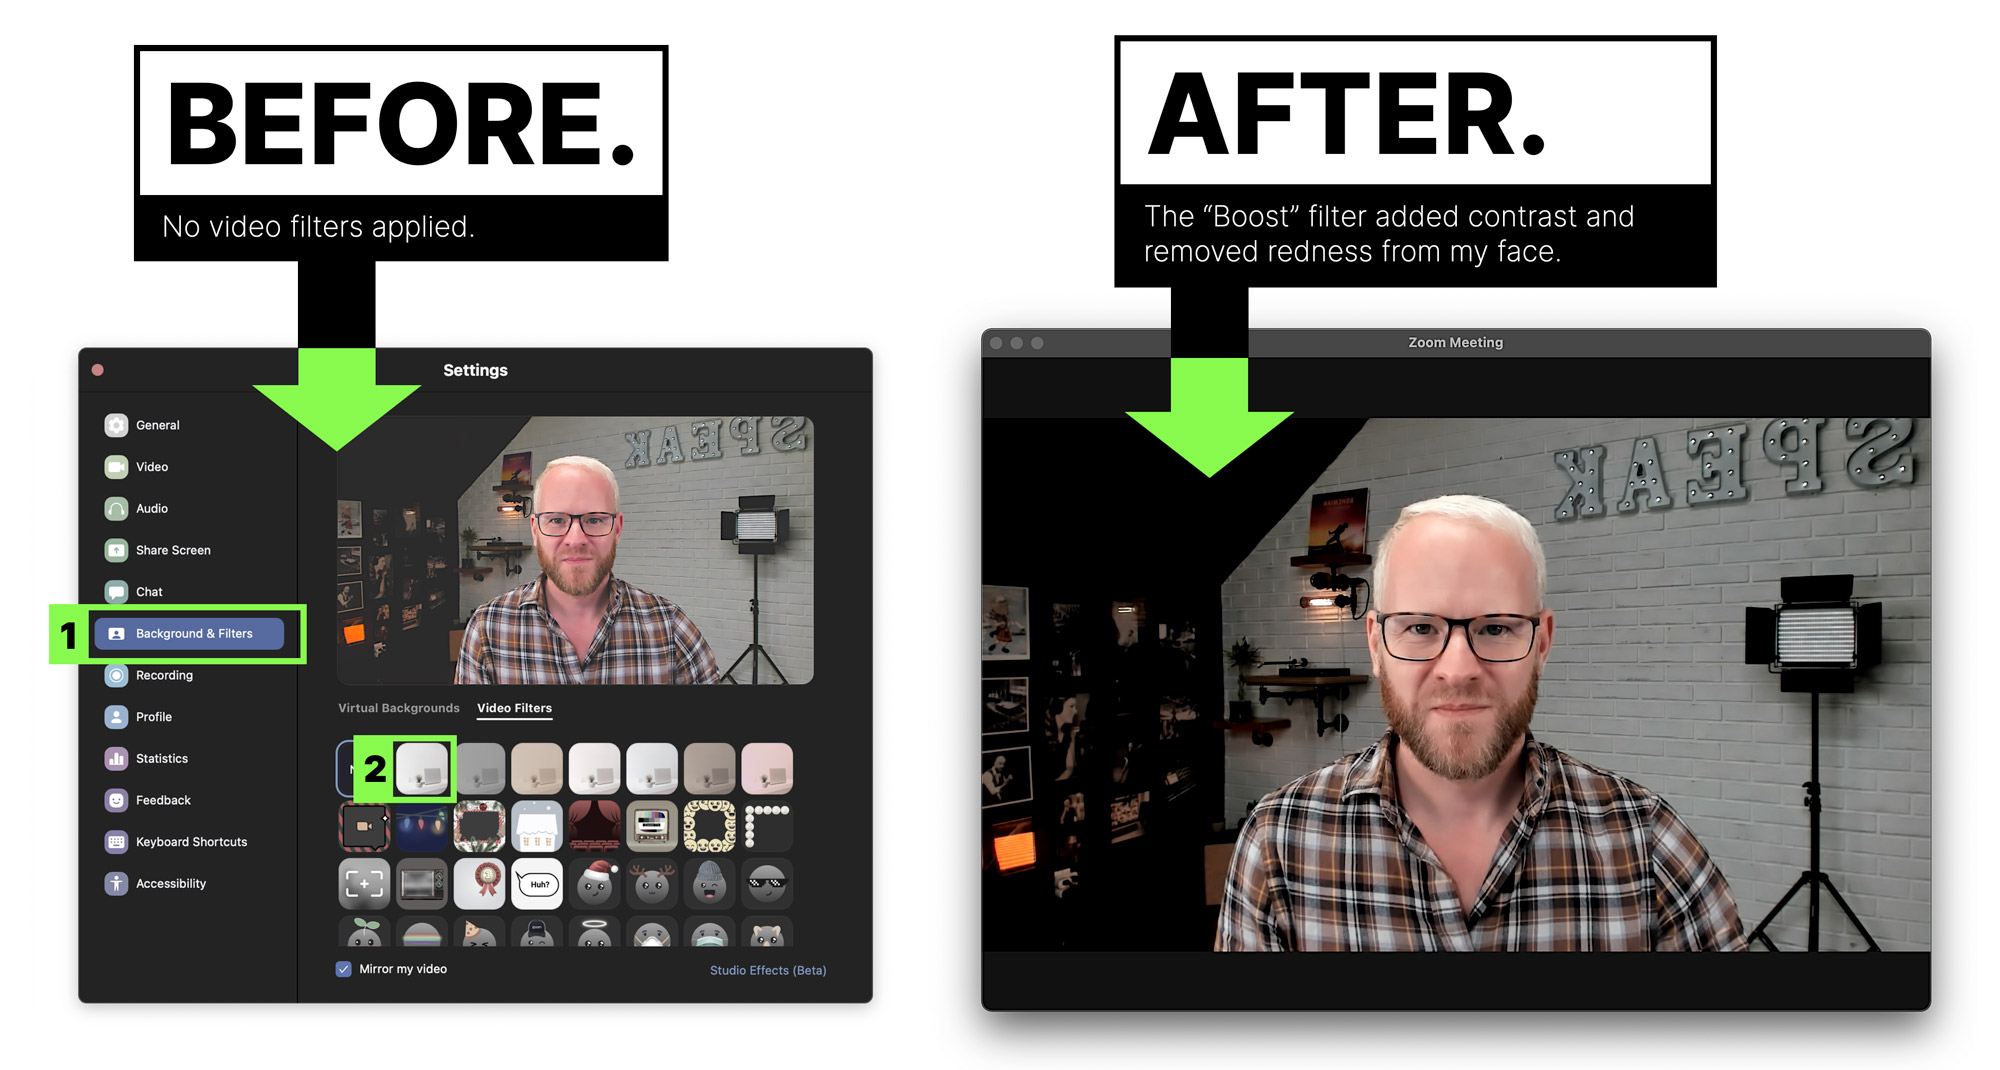
You can see that it increases the contrast but also cuts down on the redness in my face.
Unlike the “Touch up my appearance” feature, your video filter settings are not maintained between sessions, which is a frustrating extra step each time if you found a setting you like.
#7 Encourage attendees to use ‘side-by-side mode’ to view you and your slides
This can be a good setting if you want to make your talk feel more personal. It shows your camera video beside your slides, and viewers can resize the videos as they see fit.
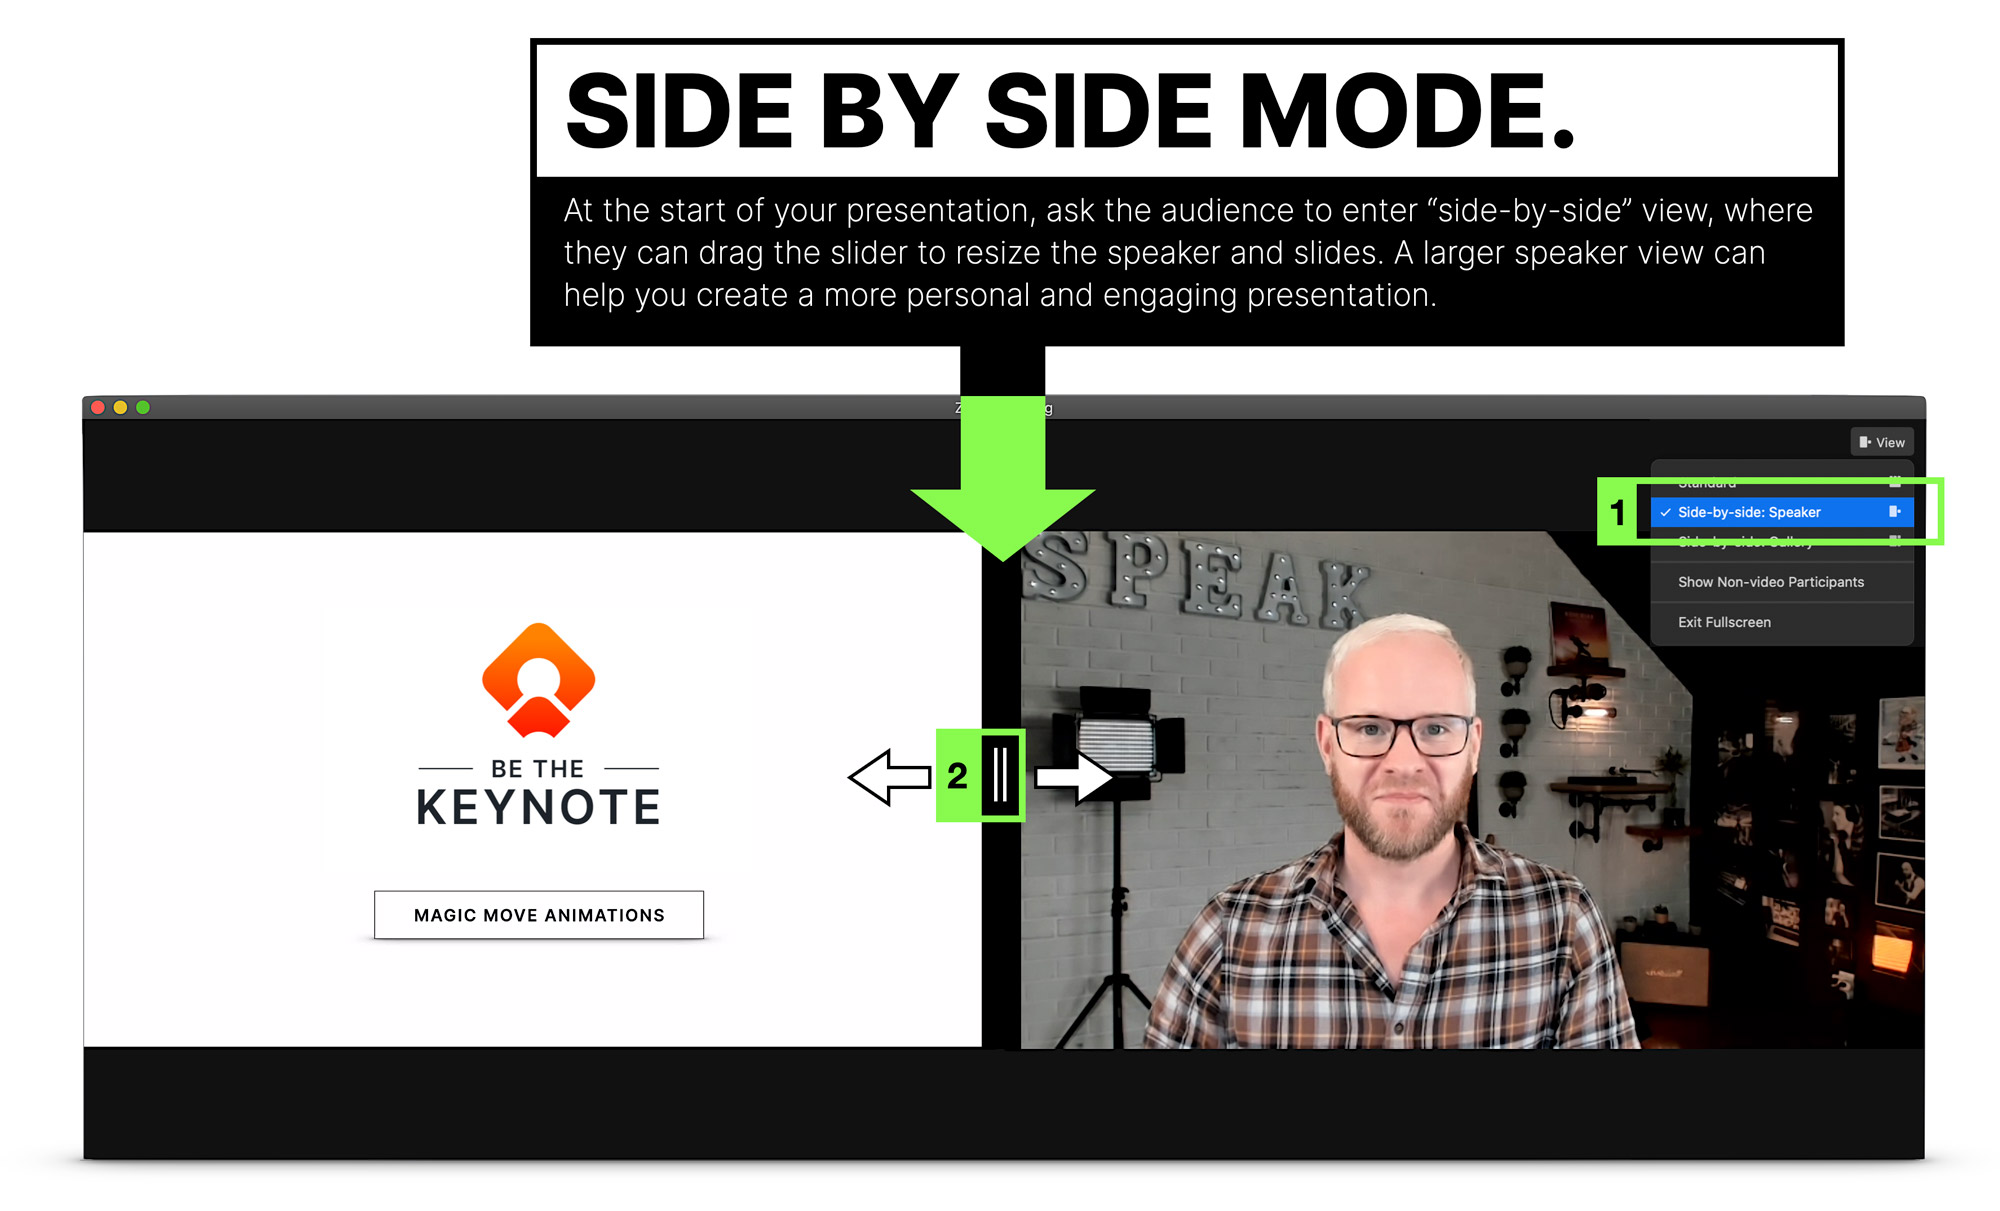
It can be a good idea to point this out as not everyone will know.
E.g. “You should be viewing this presentation in side by side mode so you see me and the slides. If you want to make the slides bigger (or smaller) you can resize them by dragging the slider between my video and the slides.”
#8 Use Zoom ‘annotations’ to mark up your slides live, or a ‘whiteboard’ for a blank canvas
A really cool feature of Zoom is Annotations. This lets you write or draw on top of the screen you are sharing. Once the feature is activated , you can access it from the menu at the top when you are sharing your screen.
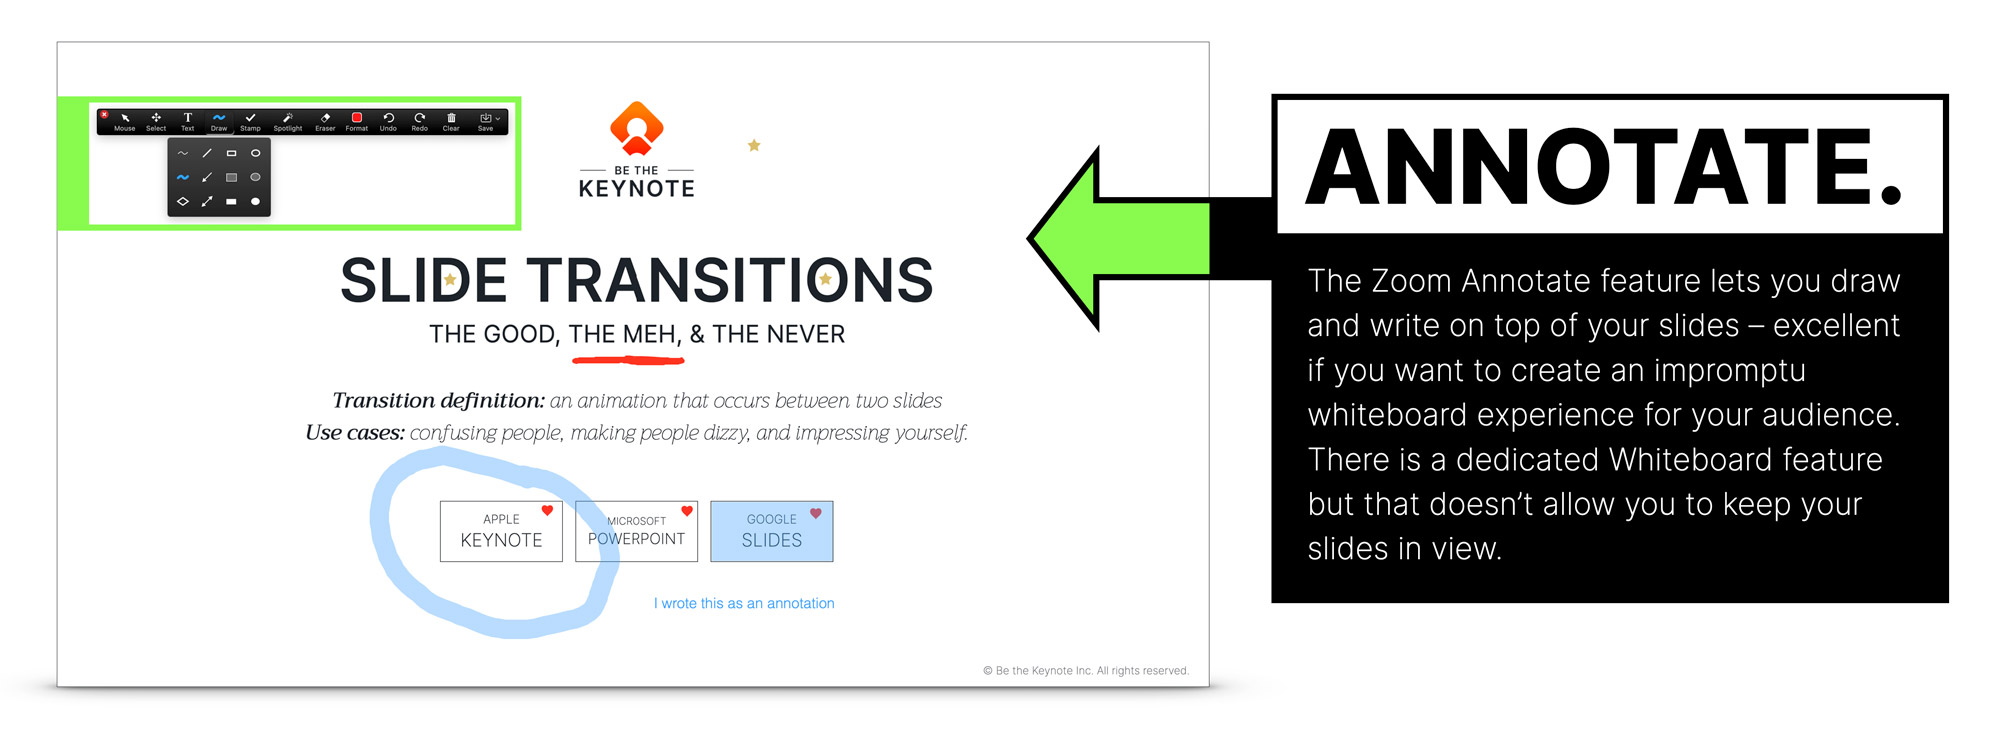
This is really helpful when you have a complex slide and you want to focus people’s attention on different areas of the screen as you talk. When presenting live on a stage you can gesture towards a particular area, but it’s not as easy in a virtual presentation which is why it’s handy.
There is also a Whiteboard feature that gives you, well, a whiteboard. This could be useful if you find that you need to dig into a point you’re making in a more detailed way or discover during your talk that you need a different way to explain it.
You might want to take a quick screenshot when you’re done if you happened to get some interesting ideas marked up.
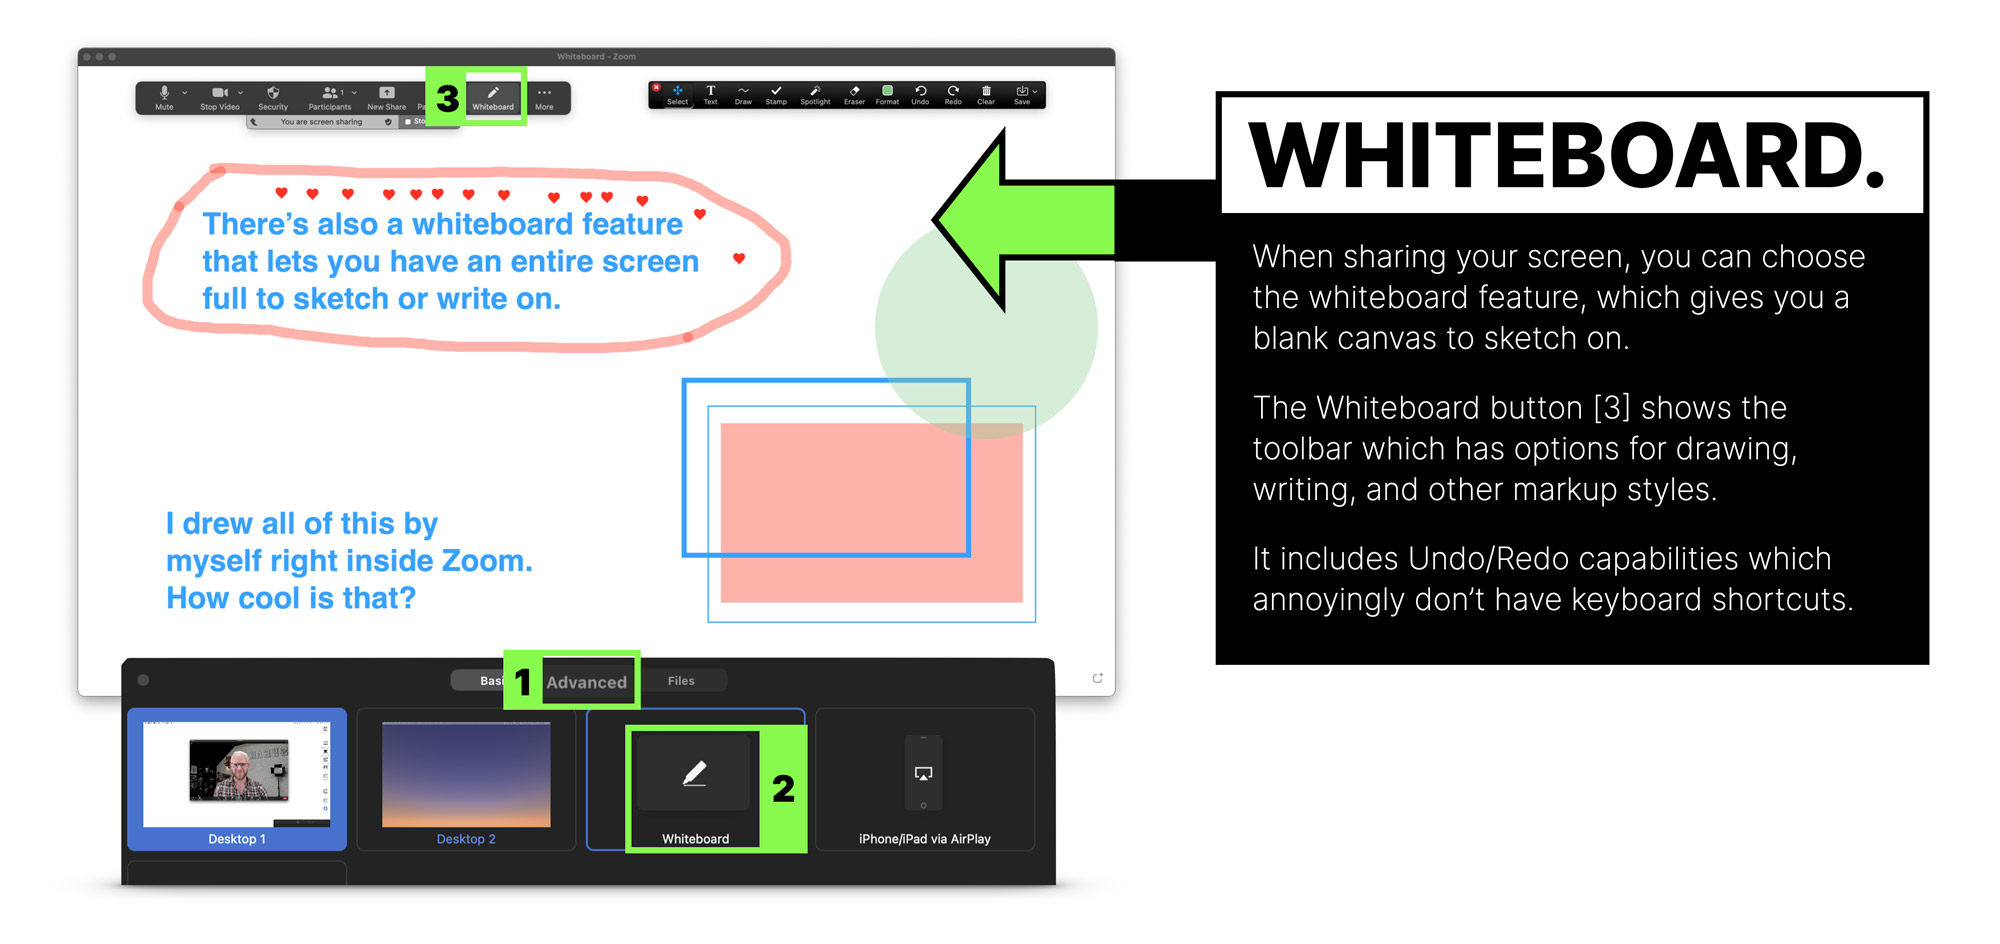
Rock open a whiteboard and sketch a diagram. Having a tablet and pen would be very helpful for this, versus trying to draw with a mouse. It might be wise to use the non-verbal feedback feature to get folks to say “Yes” to a “Let me know if you’re ready to move on” question.
Note, this is a screen sharing feature, so in order to get to the whiteboard, you need to stop sharing your screen, then share once more but choose Whiteboard as the option. Then you’ll have to stop sharing and share your slides again. Make sure you’ve practiced this if you think you’ll be using it.
#9 Use ‘closed captions’ to increase the accessibility of your virtual presentation and video recording
Zoom has transcription features that let you add closed captions to your session. You can do it manually for free, but that means someone will have to type them live, which is a pretty specific skill to have, and requires someone to do it for you.
If you have a paid Zoom account (roughly $20/month) live transcriptions are included. An alternative is to integrate with a platform like Otter.ai, to add closed captions in real time. You can also use Otter for transcribing any other audio or video files you have which makes it a much better value.
There are several reasons why closed captions are a good thing to do.
- No headphones: if an attendee doesn’t have or forgot their headphones and they’re in an environment where they can’t have the volume on, closed captions are a life saver that could be the difference between them staying or leaving.
- Accessibility: Captions allow meetings to be accessible to all. For the deaf, hard of hearing, or non-native speakers, they are an absolute necessity to understand what’s going on.
- Attention and recall: closed captioning can increase the amount of your content that an attendee comprehends and remembers. This is because they are getting it using two senses, and you have to focus more intently when you are reading.
You can check out Otter here to set up live captions.
#10 Use Zoom ‘breakout rooms’ to split workshop participants into groups
Without question, one of the most popular Zoom features is Breakout Rooms. They are exactly as they sound, allowing you to break out attendees into separate rooms. This could be for hosting a multi-track event where there is a speaker in each breakout room, or more commonly it is to allow groups to work together away from the “Main Room” and then come back in to rejoin you as the speaker.
This is a wonderful feature if you are running workshops that require groups to work through some of your worksheets or tasks for example.
There’s a good demo of how to use Zoom breakout rooms here.
#11 Use a Zoom ‘waiting room’ to hold attendees before you let them in at the same time
Nobody shows up at the same time to a presentation, and you don’t always want to start until an acceptable threshold of attendees have arrived. Particularly if the beginning of your talk is fundamental to your big idea.
The waiting room is basically a holding area where attendees are listed as they show up. They get to see a simple welcome screen (annoyingly simple really – I’d much prefer to have the options to have a fully custom slide in there), and you can admit them one by one, or all at once, when you are ready to begin.
It also allows you to block people from entering, although for the most part there’s not much reason to do this when you are presenting to a large audience. Useful if someone becomes disruptive for any reason.
Caution: it’s very easy to forget about the waiting room and have people sitting around unable to get in after you’ve started. I recommend assigning this task to your co-host.
Cool Zoom Feature to Avoid – ‘Present with your PowerPoint or Keynote slides as a virtual background’.
This is an interesting feature that’s worth discussing both for why it’s cool and why it’s uncool.

What it does
Instead of a regular screen share, it takes your slide deck and sets it as the background much like any other Zoom background. As such it places a ‘mini you’ floating on top of the slides in cutout mode which is kinda fun. Kinda.
To access the feature (beta at time of writing) click the “Advanced” tab in the “Share Screen” popup, and select “Slides as Virtual Background”.
This is what it looks like from the attendee’s perspective. And yes, you appear twice on the screen. Once on top of your slides, and again beside them. Silly.
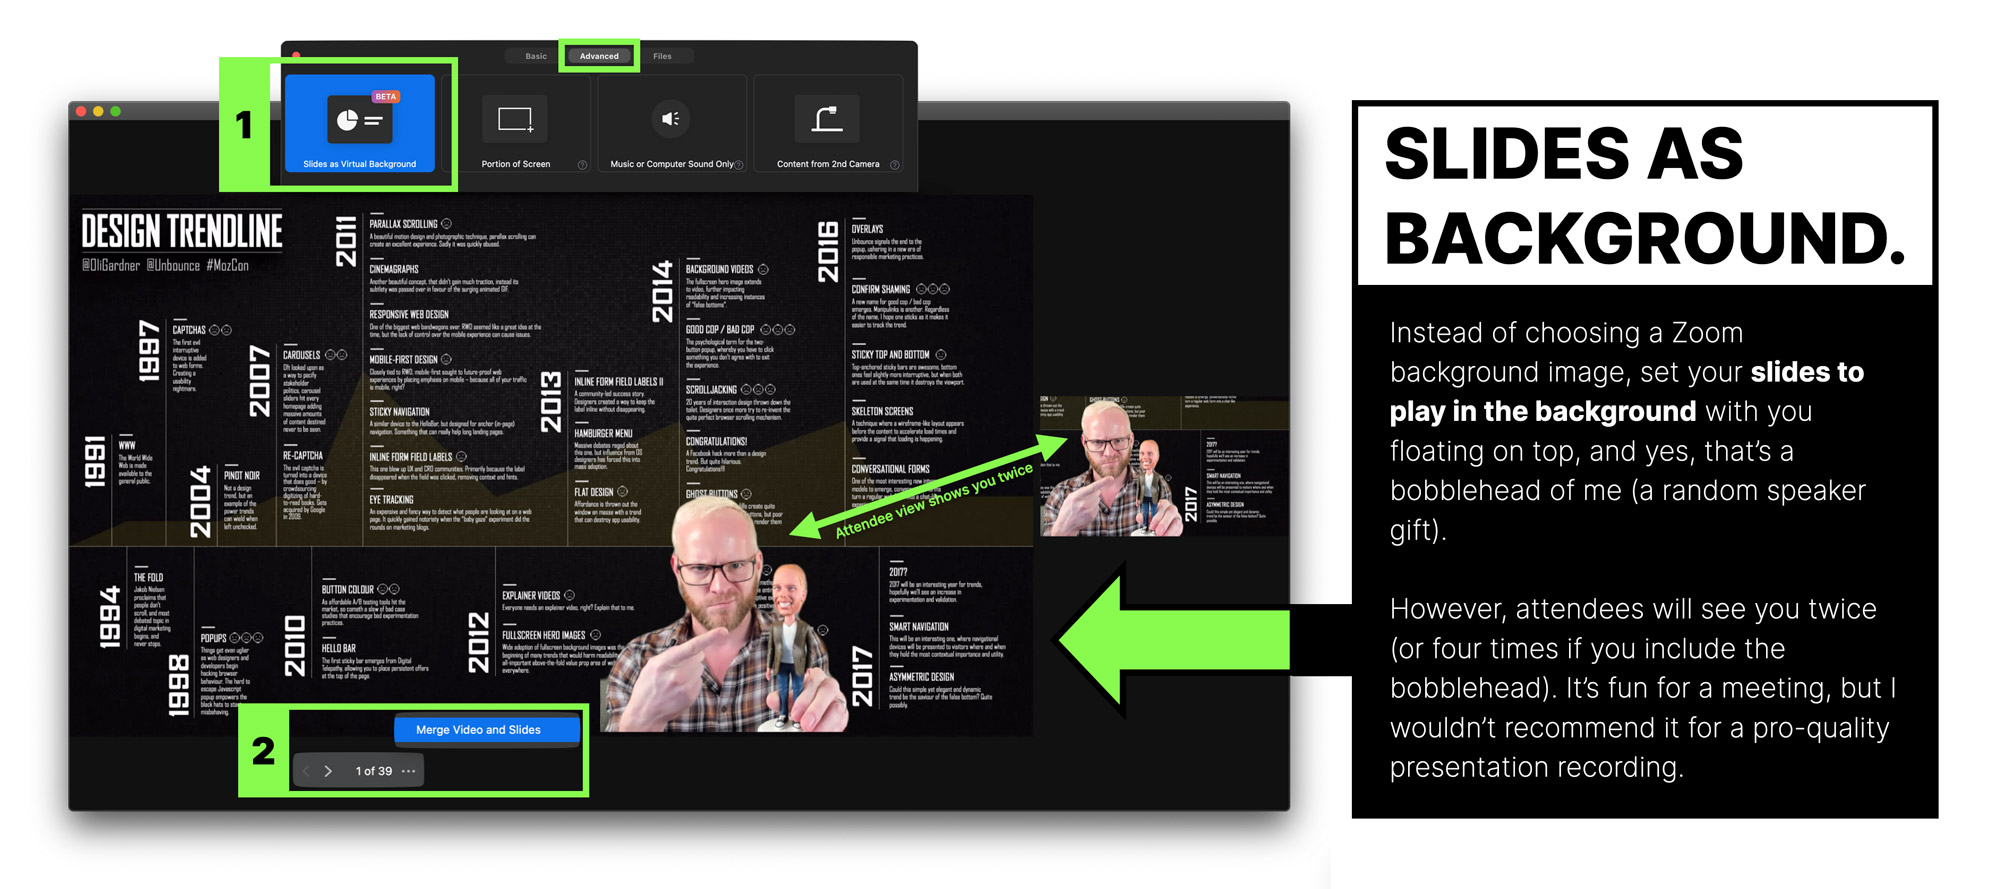
Note: you must download a local copy of your slide deck to your computer as it doesn’t connect to cloud-based slides.
If you have audio and video in your slides, checking the “Share Sound” option at the bottom-left of the share popup should make that transmit to the audience. However, it doesn’t. In fact I couldn’t get any video or audio to play at all.
There’s also a second “Split Video from Slides” option which kinda defeats the purpose. As you can see below, you are back with your regular background in a separate window, and you are only on the screen once.
With the split setting in place, it would be a fair to wonder why you’d use this feature as it looks just the same as the regular view.
There are however, a few key differences.
The major difference is that you don’t need to have your slides in fullscreen mode on your computer. In the screenshot below you’ll see that I’m looking at a Zoom window with my slides inside it. I can now move through my slides while having other windows open such as the chat and participant windows. This is actually pretty great as the audience doesn’t see your layout, they see what they would normally see.
A nice side effect of this setting is the audience won’t see the awkward moment at the start of your talk where your whole screen is visible until you start the slides.
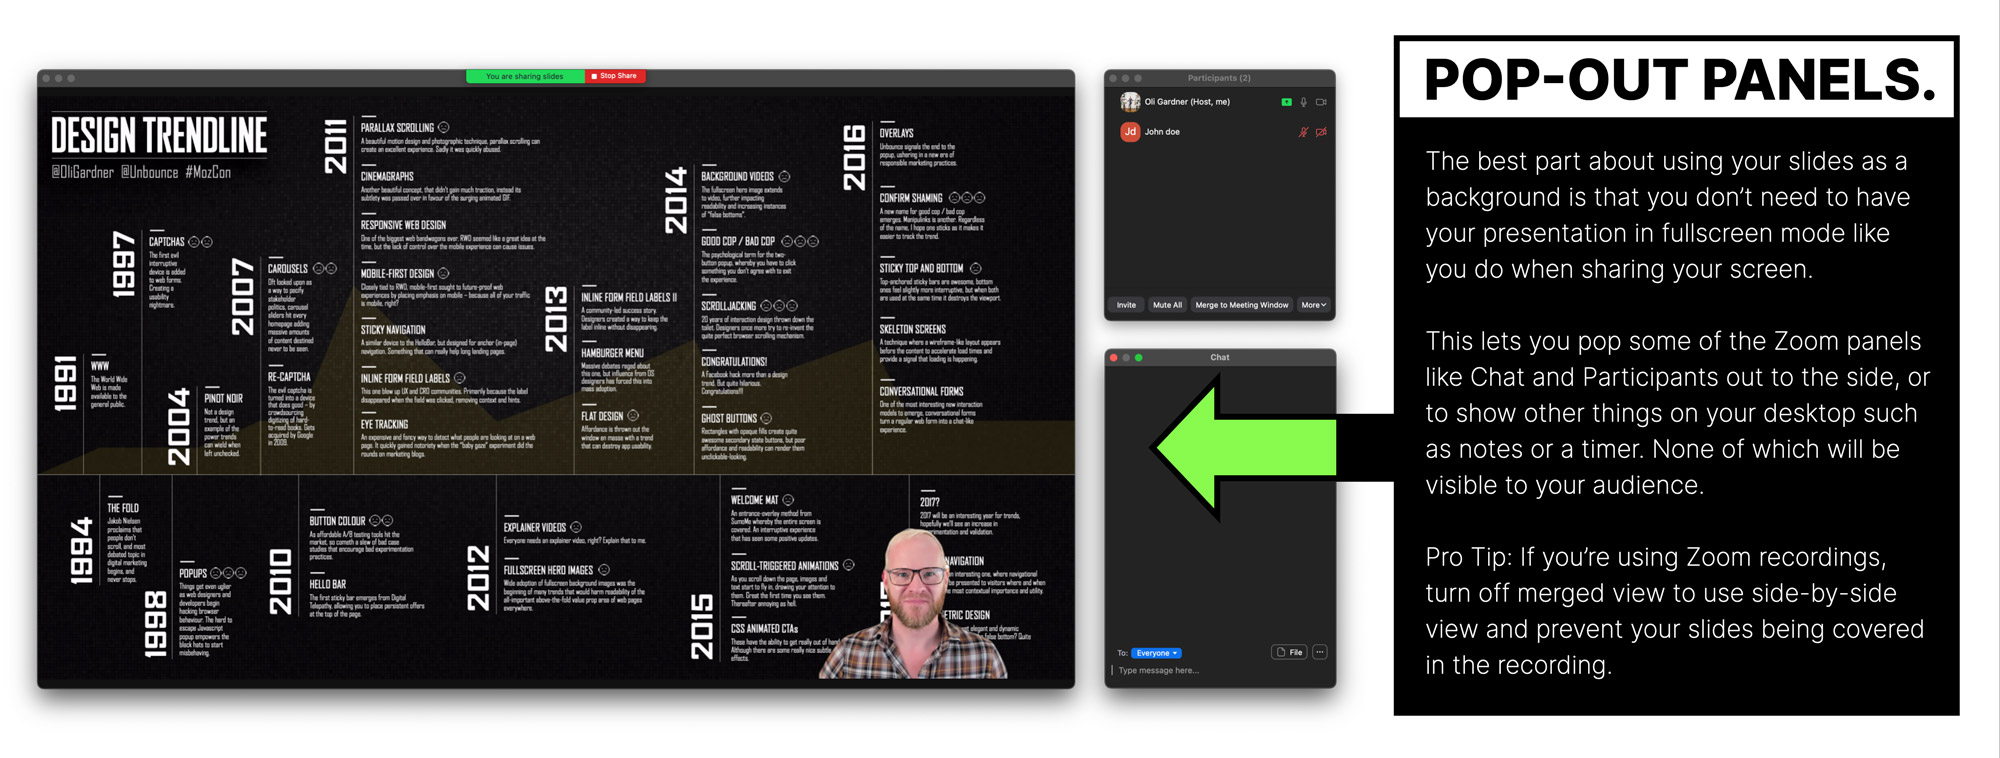
Looking at the main window, you can clean up the view a bit by having attendee video off by un-checking “More > Allow Participants to Start Video” in the Participants panel, and then selecting “Hide non-video participants” from the “…” menu on one of the participant video boxes.
You can take it a step further if you select “Hide self view” from the … on your video thumbnail. This will give you a view of just your slides. As much as the layout annoys me (I’d rather pop the self view out to the side with the chat), it can be important to see yourself to make sure you’re not moving out of frame – particularly if you are speaking standing up.
However, at this point in the beta it’s just not usable enough to be a serious and professional solution because of a few technical failings:
- It’s buggy like most beta features are
- It doesn’t show any animations or slide transitions
- If you are recording the screen, the merge view while fun, is a little unprofessional looking
- Audio and video didn’t work at all for me, despite there being a setting to allow slide audio to work. I think this might be because the videos didn’t play.
- When you start the share it has to process the slides before it starts which causes a delay if you aren’t expecting it.
Overall, it’s a feature with some exciting elements, although to be perfectly honest, the good aspects are nothing to do with the feature itself, but are side effects. I’d prefer to see a new feature that allows you to avoid presenting in fullscreen to allow a much greater degree of presenter screen setup.
The chapter title says it all. Do these things and your virtual presentations will be better. If you don’t, your presentation won’t be better than the last one you did, missing an important opportunity grow your skills as a virtual presenter.
Seriously. Do these things.
#1 Test your slides from the ‘attendee perspective’ using another laptop or tablet
Your slides might look amazing on your retina laptop or 5K monitor, but not all screens are alike, and your super-detailed tiny-text “revolutionary new marketing method” process diagram might look more like a dot-matrix printout to someone with a lesser screen.
Viewing your slides on a smaller or alternative screen isn’t enough. You also need to view them on Zoom on that screen, because virtual presentation software tends to change things you wouldn’t expect.
The golden rule of presentation QA is to run through every slide on the platform you’re going to be delivering on (Zoom, GotoWebinar, etc.) watching out for the things below:
- Any virtual presentation platform will add small visual artifacts to the video stream—they’re imperfect degenerative medium where some quality will be lost in transmission. As a result, your slides will never be quite as sharp as directly viewing your slides.
- If you have audio in your slides, check that the audio levels are balanced and not too loud or quiet. Remember to also test it with headphones on as that’s a common listening scenario for your audience.
- If you have video in your slides it may not come across well when presenting virtually. There’s usually some lag or choppiness that makes it skip frames. This can make the audio look out of sync.
- If you have multiple slides with audio, set them at the exact same level so people don’t get deafened. A common problem in that scenario is that the attendees will turn down their audio if you blast them, and then the next time you have audio it’s too quiet to hear properly. Your presentation software will have a setting for the audio or video volume. The best way to make sure they are the same is to move your slides to be one after the other (you can reorder them afterwards), then step through them to gauge the balance.
- If you have complex animations or transitions, they may render more slowly or less smoothly when piped through Zoom and a wifi connection. If they don’t work the way you want them to, consider simplifying them (fewer animations) or removing them altogether – replacing them with static slides. You can still use a technique like the Progressive Reveal to create a pseudo animation effect.
To prevent an audio feedback loop when testing your audio and video slides, have your partner/friend/colleague be on the viewer/attendee side in another room.
Whatever your specific case is, there’s a good chance that on the viewer’s side it’s not as perfect. So double, triple, and quadruple check.
I guess you should also single check. Why does nobody say that?
“You should single check your work to make sure it’s awesome.”
The best way to QA is to record some video of it from the viewer’s perspective. Have your QA buddy record their screen (with audio). If you don’t have anyone to help you, just set up your extra laptop (hopefully you have one somewhere) in another room and record the screen from there. If you’re using a Mac, Quicktime is an easy way to get a recording. On a PC, you can use PowerPoint to do a screen recording (more on that later), or find some free screen recording software for a test.
If you do have a helper, you can also reverse roles where they present and you observe on their machine. This will give you the truest sense of what might need to be fixed. It’ll no doubt be quite hilarious to watch, unless they turn out to be better at it than you.
#2 Remove all hashtags from your slides
My typical advice regarding hashtags is to make sure you update them to use the current event’s hashtag if you’ve used this slide deck before. If you don’t it looks awful to the audience and makes them feel like you didn’t put in the effort to make a presentation just for them.
However, the main goal of this entire guide —primarily covered in chapters 10 and 11— is to ensure you create a professional-grade recording of your virtual presentation that you can repurpose over and over for multiple virtual events.
If you leave event hashtags in your slides they will be forever embedded in your recording, rendering it useless for re-use. And trust me, once you’ve created a high-resolution awesomely edited recording of your talk, you will feel amazing about it.
It may feel counterintuitive, but you should delete all the hashtags from your slides.
If the event mentions it and asks you why or asks you to include them, just politely let them know your rationale. I’ve found that many virtual events have interactive chat in the interface they use which tends to dilute the number of people hanging out on a Twitter hashtag anyway.
#3 Have a wired Internet connection
If attendees have a poor connection they can always leave and download the video and slides later on.
But the presenter is the one person who absolutely must have a great Internet connection, and the best way to do that is to have directly wired Ethernet.
A side benefit of this is that it will help you end the endless debate over who’s connection is causing the problem. I’m sure you’ve been in a meeting where someone suggests your Internet is slow, and you say yours is fine, and they say that theirs has been working brilliantly all week.
Just say “Yeah, but I have a hardwired Ethernet connection.” End of conversation.
If you don’t have a wired connection, work on getting one set up, and in the meantime tell your eager tech wannabe roommates NOT to reset the ******* wifi while you’re presenting.
#4 Have a backup audio input device
“Is this mic on? Can you hear me at the back?”
Sometimes your mic will stop working, and it’s one of the most uncomfortable panic-ridden things that can happen to a speaker (see When Things Go Wrong ). It could be a dead battery issue, or your headphone cable could be old and the internal wiring failed.
Whatever the cause, you need to have a way to deal with the problem.
If you are using a posh external mic that stops working, ditching it for the internal microphone of your laptop will likely degrade the audio quality significantly, but it’s better than nothing.
In a later chapter I do a deep dive comparison video about microphone options for virtual presenting .
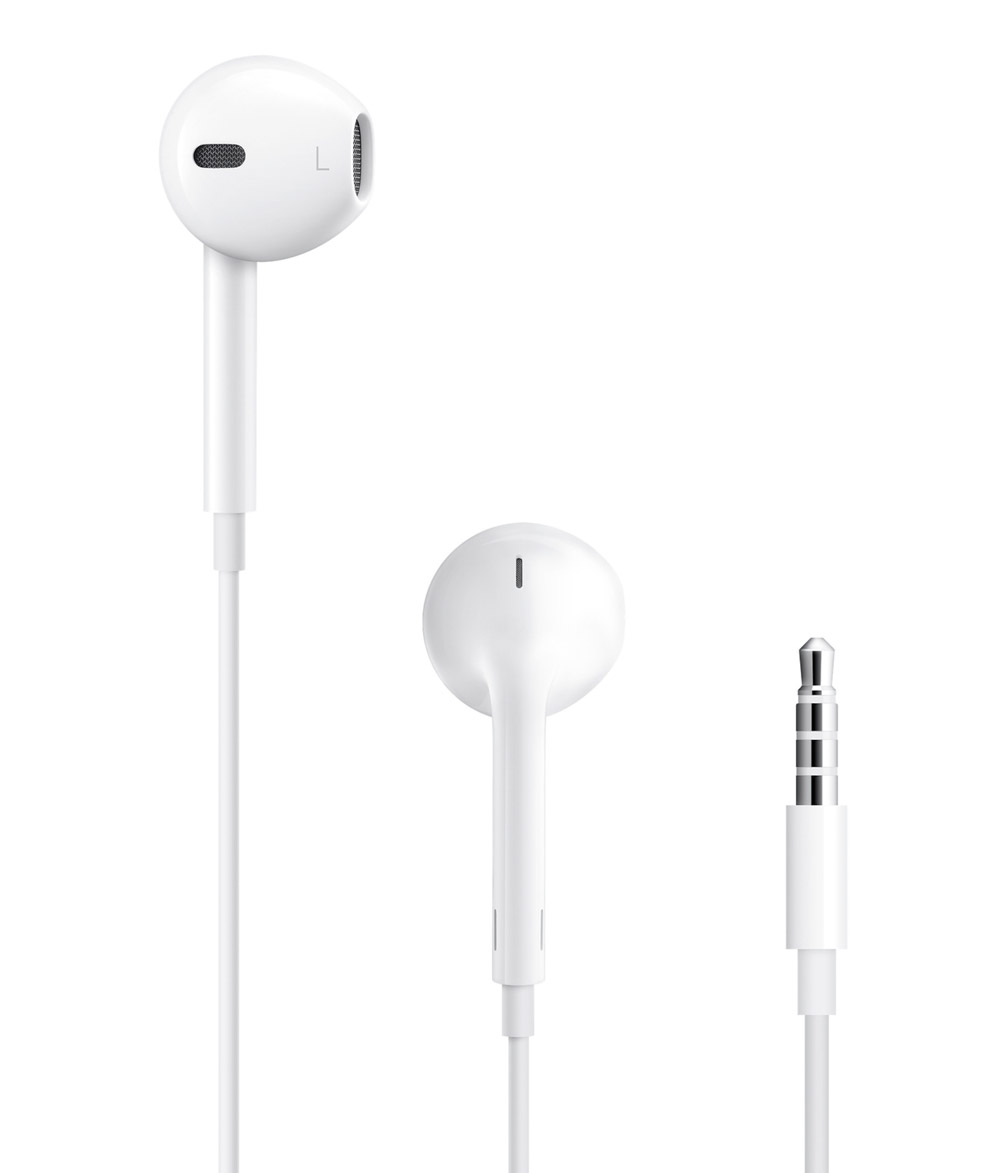
Probably the simplest backup is another set of headphones. The classic Apple headphones are only $25 now. Make sure you get the ones with the 3.5mm jack, and not the lightning cable, (especially if you’re not an Apple person) as that’s only useful for your iPhone. And if you aren’t an Apple person, there are a million other options on Amazon.
However, be warned that these headphones are rife with audio problems such as noisy cables (you’ll need to sit still which sucks), and they should only be used on Zoom. When using them with any other audio recording software they have a horrific background hiss that destroys your audio, but Zoom’s noise removal feature (on by default) actually does a fantastic job of removing it, making them a viable last minute solution. Hopefully, you’ll never need to use them.
#5 Have a slide dedicated to encouraging non-verbal feedback
The non-verbal feedback feature of Zoom is a great way to make your talk more dynamic. But you don’t want to try and explain it in the middle of your talk as it’ll break the flow and screw up the fluidity of your recording.
Instead, consider which aspects of the feature you want to use, and have a slide at the start of your presentation (slide 2 for example) that focuses on this. You can quickly walk people through how it works, and tell them how you’ll be using it throughout.
#6 Have everyone muted by default
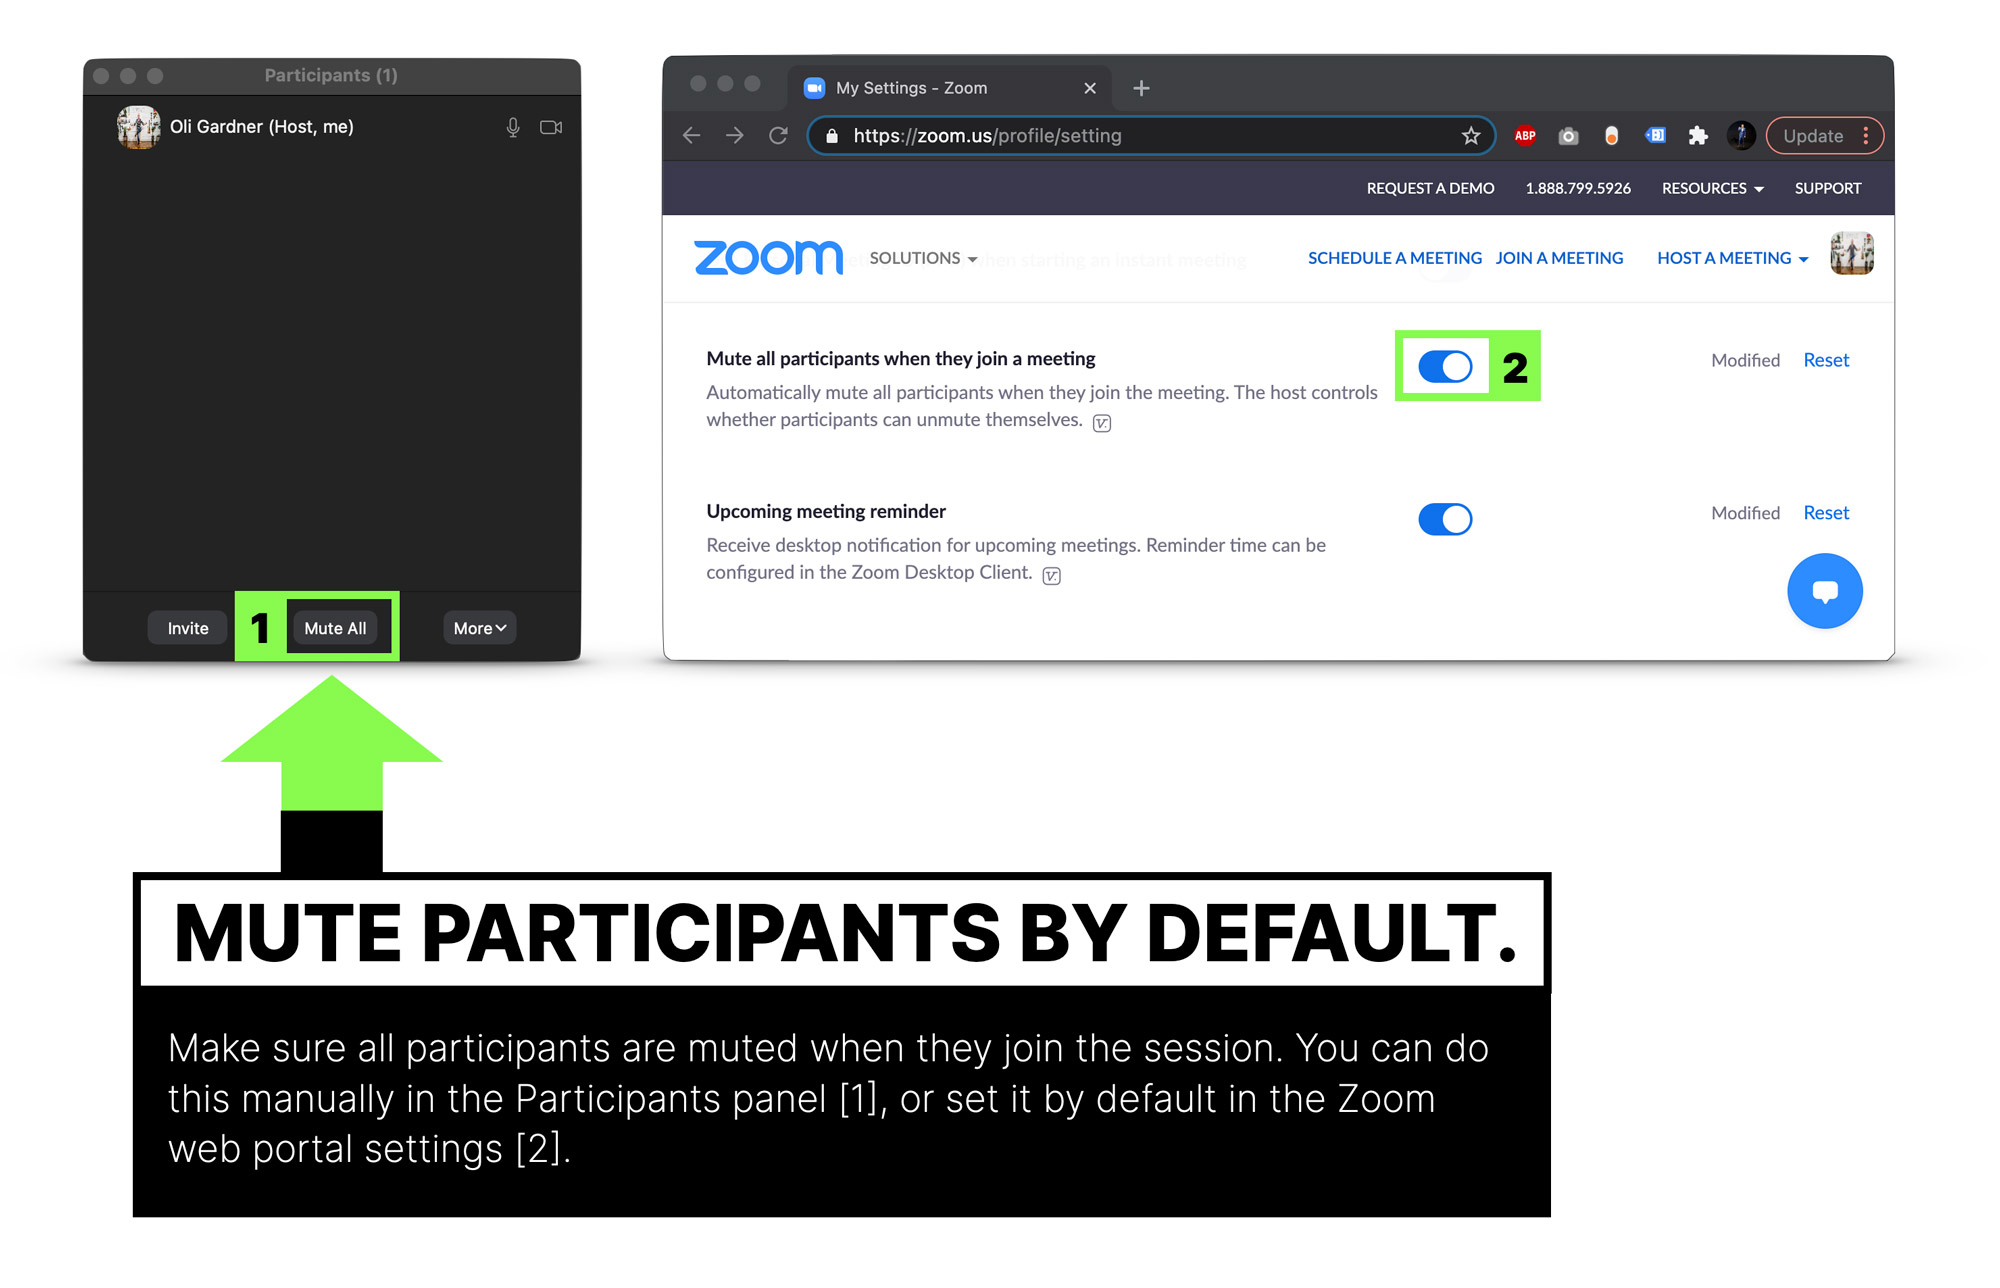
It goes without saying, but I’ll say it anyway. You don’t want attendees, whether it’s 5 or 500, to be chatting before or during your presentation. So this one is simple. Make sure you mute everyone. If you’re using your Personal Meeting ID you might have this already set up.
You can mute everyone in the Participants sidebar, or as a global default setting in the web portal administration settings “Settings > Schedule Meeting > Mute all participants when they join a meeting”.
#7 Wear confidence clothes
Just because you can present in your PJs it doesn’t mean you should present in your PJs. Treat it like an on-stage talk and get ready in your mojo outfit. You’ll gain confidence and look more professional.
Something I like to do when I’m on the road presenting, is lay out my clothes the night before. It helps me get in the right mindset and also saves time the next day when you might be stressing out.
#8 Close all of your other software to prevent your machine slowing down
Take a look at your computer right now and count A) how many different apps are running, and B) how many tabs you have open in your browser.
Here’s a screenshot of mine, for reference.
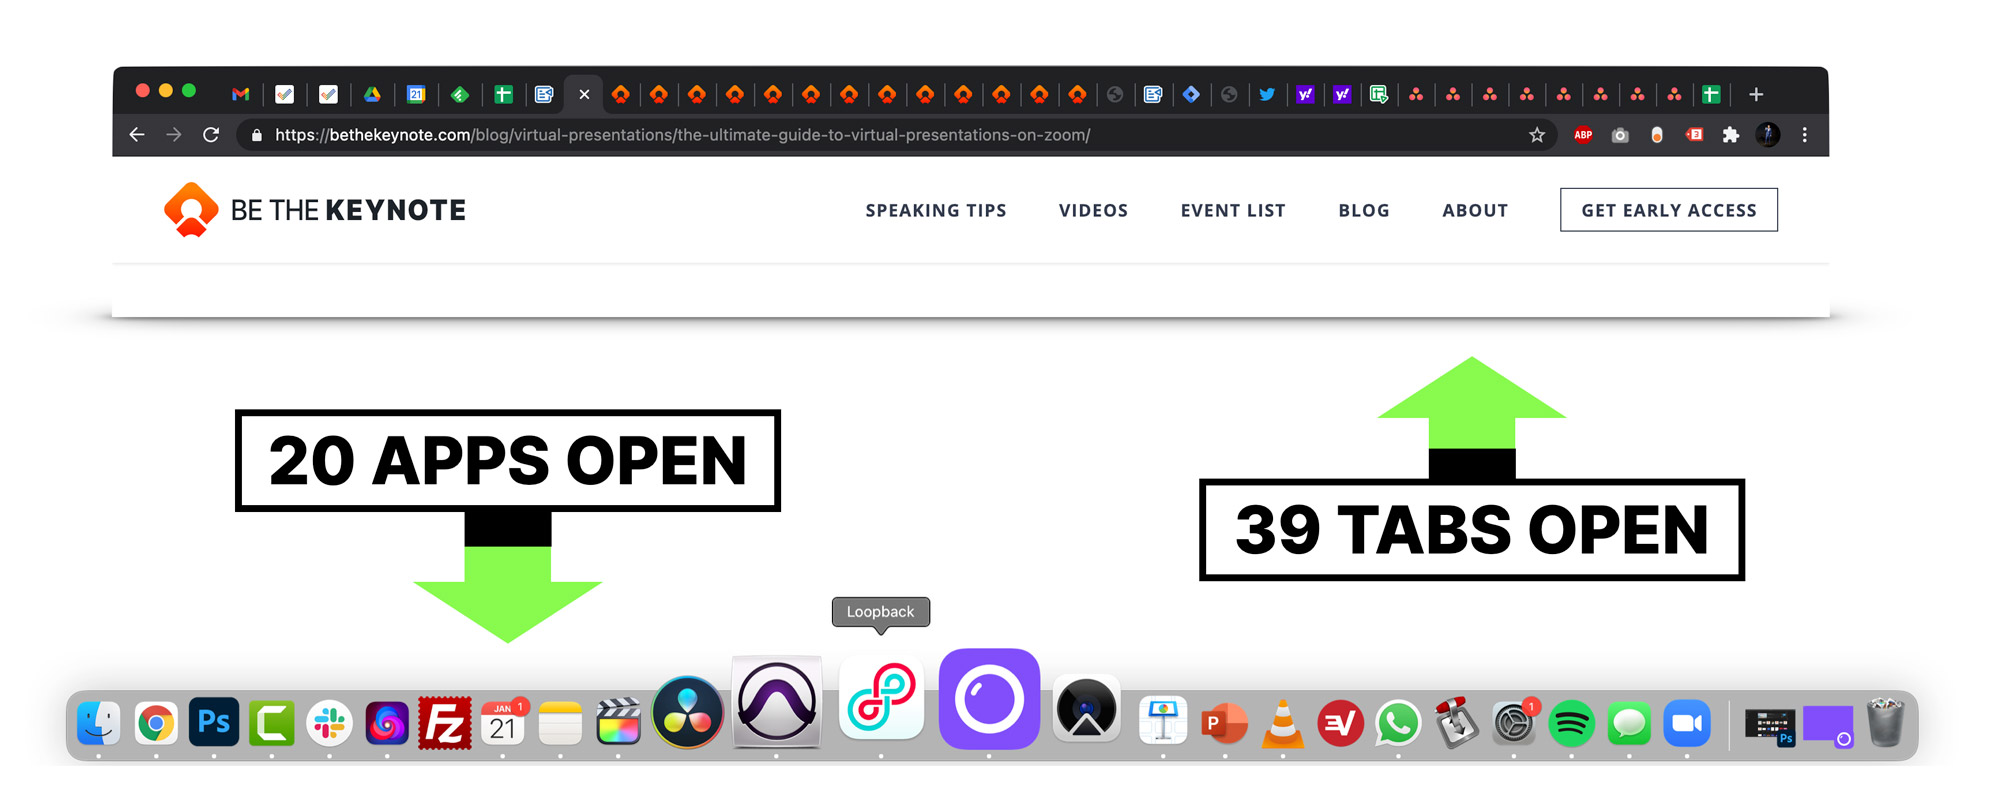
Tabs open in Chrome? 39. Apps open? 20
You need to be concerned about two things, the amount of memory and processing power being hogged by all the apps you have open, and the number of ways you might receive a notification during your talk.
For PCs running Windows 10, there’s a built-in function to silence notifications when presenting . But if you’re a Mac user the settings for this are horrendous (slightly better in Big Sur). Fortunately there’s a free app called Muzzle that silences all of your notifications as soon as you share your screen.
#9 Have two pre-made slides ready for Q&A at the end of your virtual presentation
It’s common for your host to ask questions that the audience has submitted in the chat window (or the Q&A window for Zoom Webinars) at the end of your session. The best way to utilize this opportunity—if you’re still in control of the screen—is to have two slides prepared.
The first slide should simply have Q&A written on it, really big.
The second slide should be a promo slide with a special offer you have.
I like to leave up the Q&A slide until the questions start, then flip it to the promo slide so it can sit there for the next 5-10 minutes. It’s a great way to have it visible for a long period of time without actually having to be salesy in your presentation.
It’s fairly common that an event organizer will ask you if you have something to promote, but if they don’t, ask them if it’s okay that you use a slide at the end like this.
#10 Build a background set to make your virtual presentations look professional
If you spend a lot of time on Zoom, instead of using a Zoom background, start thinking about how you can built a bit of a set where you do your presentations. Not only will it look more professional, but it will fill you with confidence and make you feel like you’re in presentation mode when you’re there.
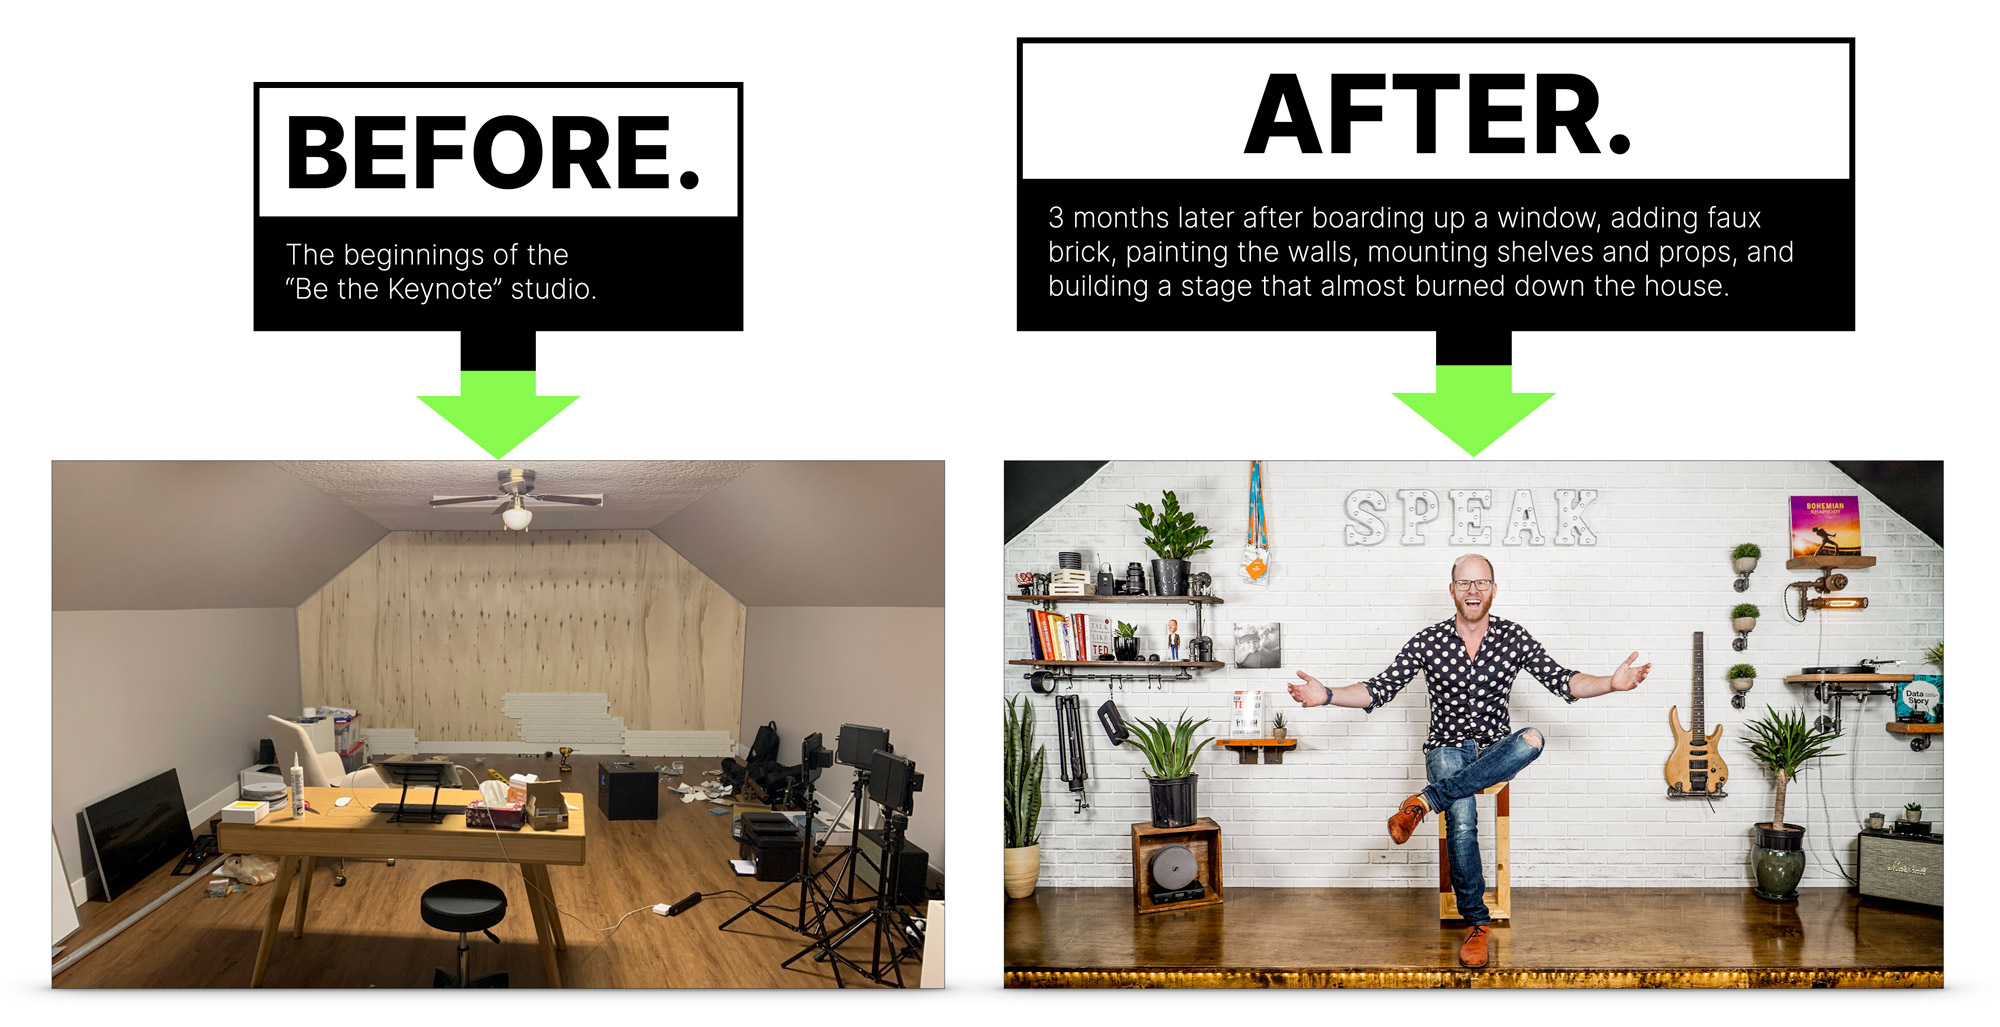
I’m fortunate to have a space for my office/studio, and I’ve seen and felt the difference a well-designed environment makes when I show up to work. It took me months to get it right, so don’t think you have to suddenly have something perfect. Just chip away at it over time, turning on your webcam every day and giving a little thought as to how you can make the space more special. Small shelves with plants or books can work great, and Pinterest is definitely your friend for this type of thing.
Many folks won’t have a dedicated workspace to claim as your “stage”, but I’m pretty sure your significant other won’t complain if you make your home that little bit nicer.
Speaking of “stages”, I actually built a stage in my studio—almost burning down the house in the process —but that’s a story for another time. Like I said, it took months to get to this stage. I keep saying stage.
#11 Reboot your computer the night before your virtual presentation
Restarting your computer can help speed it up a bit, especially if you haven’t done it in ages. Any little performance advantage you can get is valuable for a live presentation. It will help clear out any processes that are stuck or hogging the CPU.
However, it’s best not to do this right before your talk, as you risk it doing some weird software updates that take hours to complete.
#12 Do a test Zoom meeting to check your camera angles and lighting
As Springsteen said in Dancing in the Dark—”I check my look in the mirror, I wanna change my clothes, my hair, my face.”—you should always check how you look on camera before the presentation starts. Adjust the angle of the camera for your most flattering look and the best view of your background, which of course is a well-decorated wall, and not a zoom background of a beach or mountaintop.
Make sure to turn on the lights you’ll be using to light your lovely face, wick away any sweat using blotting wipes, and apply some simple makeup to remove shiny reflections from your head. More details on those techniques in the lighting section .
Here’s the smart part, record your test meeting and play it back to make sure there are no weird things in the background, it’s often easier to analyze a recording as opposed to your webcam view.
#13 Double-check your audio for background noise
At the same time as your camera check, watch your test recording and listen very carefully for any noise in the background. You’ll be surprised at how oblivious you can be to background noise when you’re busy and/or nervous.
Sounds to watch out for:
- Laundry sounds: Depending on where your washer/dryer are it may not be an issue, but the low hum can travel far. Start a Zoom recording, making sure to use which ever audio (mic) input you plan on using, go turn on your washer or dryer or dishwasher, then come back and replay the recording to see if it’s discernible. Crank the volume to make sure. There is NOTHING worse than doing a badass presentation then finding out the recording is ruined by a persistent hum in the background, or the sound of someone’s hoody zip clattering round and round in the dryer.
- Tube lights: If you have any tube lights where you are recording, or even in a nearby room, turn them off. They can be soooo noisy. Then put in the effort to replace them with silent LED tube bulbs when you have time. It does require some rewiring, but it’s not that hard—I did it recently and I made sure to choose bulbs with the same colour temperature as the lights I’ll be using to light me up in the video–more on that in the A/V chapter .
- Ceiling fans: Another subtle and repetitive sound. Turn ’em off unless the resulting heat will make you sweat to the point of scaring the audience.
- Heating: Not all heating is noisy, but many houses in North America use what’s called forced air. It’s noisy. A low hum, yes, but it’s an audio killer.
- Noisy clothes: Your clothes can cause bad scratching sounds—even if you use a shotgun microphone that’s not attached to your clothes—which is an audio killer. What happens is that any loose clothing rubs against you when you gesticulate with your arms. Tighter clothes like a t-shirt are the solution to this. I go into more depth including a comparison video in What to do When Noisy Clothes Ruin Your Audio .
- Noisy shoes: if you’re wearing any kind of heels, they will cause irritating sounds if you shuffle your feet (while presenting standing up, which you should do). The simplest solution is to take them off and present in your socks (or bare feet).
- Analog watches: I’m kidding.
And make sure everyone in the house knows not to bother you while you’re presenting. If you are in a room with a door, hang a sign on it with the time of your event, and say not to disturb you until you take the sign off the door.
Guess what? Not every thing you can do as a virtual presenter is something you should be doing—I’m talking about you, speaker who likes to take a bathroom break while mic’d up, two minutes before the session starts.
Similarly, not every feature of Zoom has a positive impact on the audience or speaker experience. In this short and not-so-sweet chapter I’ll give you some tips about things to avoid so your talks go more smoothly.
#1 Don’t use a free Zoom account for your presentation
If you’re running the show yourself this is an important one. The free Zoom plan allows up to 100 attendees which is great, and more than enough for a small event, however there is also a 40-minute time limit, which would be very embarrassing if you didn’t know that and all of a sudden everyone gets kicked out of your virtual event.
#2 Try to avoid saying “Can you hear me?”
This is a classic intro statement that nervous presenters ask, but it makes you sound unprofessional. Instead, make a subtle change to how you position it, like this:
“Thanks {host name}, let’s get started, and let us know in the chat window if you have any issues hearing my audio.”
#3 Don’t use your laptop’s microphone if your webcam is sitting on an external monitor
When you do this, the laptop will be off to one side and your audio will be really quiet and sound like you’re in a different room.
#4 Don’t use stock photos in your slides
Just as you shouldn’t use a stock photo as the header background on your website, you shouldn’t use them in your presentations. To illustrate my point, it’s way too common for software companies to think it’s cool to use an overhead shot of a laptop and a coffee cup. It’s actually hilarious how prevalent it is. I recommend entering the URL of any image you’re considering using into tineye.com which will tell you how many times it’s been used.
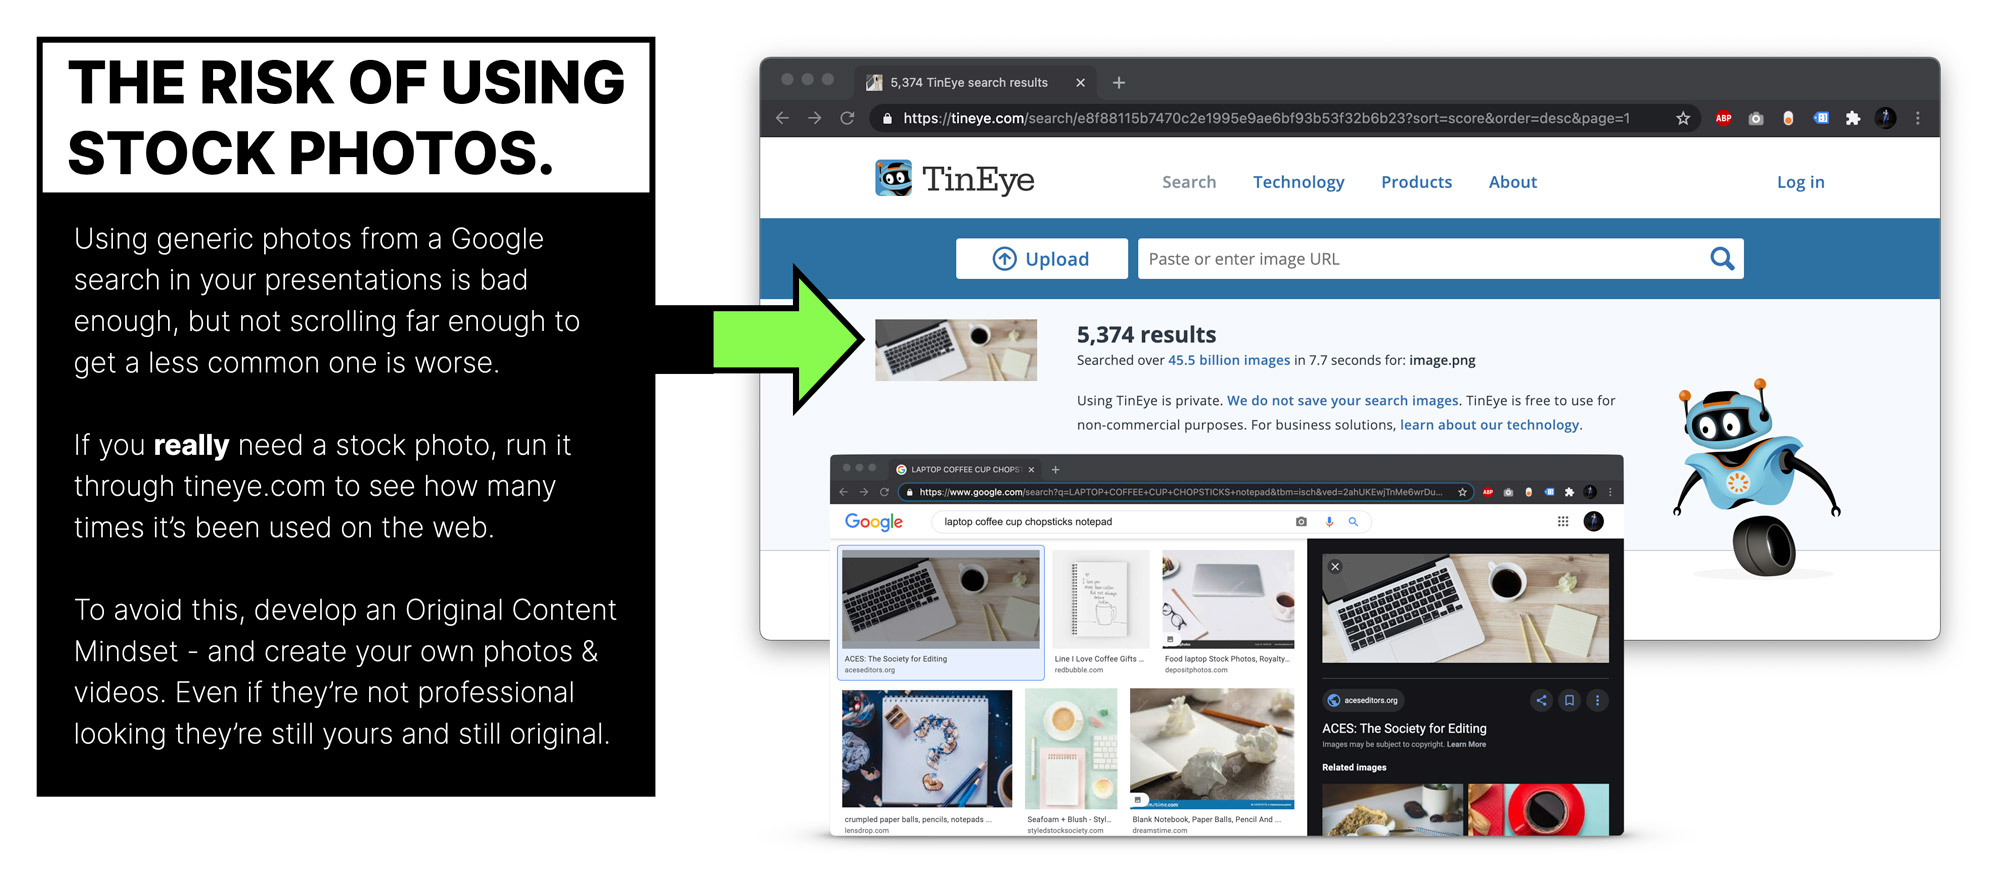
If you absolutely have to use one, try hard to find one that’s not so widely used. Unsplash.com is a good resource for free photography that’s typically got less of a stock feel to it.
But all in all, the best way to avoid using stock photos is to develop an original content mindset (in chapter 6) .
#5 Don’t use a Zoom background. You heard me.
Zoom backgrounds can be fun in meetings, but when you’re presenting it can look unprofessional and can be really distracting. It can also make some of your head/hair disappear and speaking for myself, I need all the hair I can get.
#6 Don’t record the call without permission
This is a big no-no on certain types of call. For a presentation you can make a statement that it’s being recorded, as this is always helpful information for attendees to know (no permission needed) but if it’s a meeting with a client, customer, or coworker, you should be explicit that you are recording and why: “If it’s okay with you I’d like to record the call so I don’t miss any of the details.” This is important when you are a guest in an interview too. Asking for permission will add a level of trust and respect in the eyes of who you are asking – and in the very rare occasion that they say no, be graceful and say okay no worries. Then follow up with,”I may be taking notes throughout so bare with me if I’m scribbling”.
Also be aware, that if you are recording the session, everyone on the other side will see a blinking “recording” signal in the top-left corner, so there’s no creeping allowed.
To recap, remember these rules when it comes to recordings:
- Meetings: Ask for permission, and don’t record if your guest is uncomfortable with it.
- Presentations: Let people know that it’s being recorded and that you will be making it available after. Ideally after some post-production enhancements in chapter 11.
#7 Don’t be the host if you might leave early
This is a nightmare as the other participants are suddenly without a meeting and they might not know why. Then they have to re-coordinate to set up a new meeting, which is always a chore and often involves Slack or text messages or even worse, emails.
Intro Introduction to Virtual Presentations on Zoom
Chapter 1 18 Cool Zoom Features You Should Know About
Chapter 2 12 Things You Should Do in Your Zoom Presentation
Chapter 3 8 Things You Shouldn’t Do in Your Zoom Presentation
Chapter 4 Defining Your Presentation’s Purpose
Chapter 5 How to Define Your Talk’s Structure, Story, & Flow
Chapter 6 41 Slide Design Tips for Virtual Presentations
Chapter 7 6 Ways to Make Eye Contact With an Invisible Audience
Chapter 8 How to do Audience Participation in a Virtual Presentation
Chapter 9 How to Share Content during a Zoom Presentation
Chapter 10 How to Create a Stunning Video and Audio Recording
Chapter 11 Using Post-Production to Add Value to Your Zoom Recording
Chapter 12 How to Use Your Phone as a Beautiful Webcam
Chapter 13 What to Do When Things go Wrong in Your Presentation
Chapter 14 How to Ground Yourself and Get Ready to Present
Chapter 15 Advanced & Creative Zoom Presentation Techniques
Chapter 16 The Difference Between Zoom Meetings and Zoom Webinars
Chapter 17 23 Zoom Settings to Enable or Disable for a Smooth Presentation
Discover Zoom success stories and upcoming events! Explore our Customer Success Forum & Events page.
Everything you need to work together, all in one place.
Connect virtually from anywhere with Zoom Meetings
Collaborate together with Zoom Chat
Call the world with Zoom Phone
Create and brainstorm with Zoom Whiteboard
Rich conversation analytics to improve sales
Send and receive messages and calendar invitations
Collaborate over video without scheduling a meeting
Remove the hassle of traditional scheduling with Zoom Scheduler
Simplify communication and drive engagement with Workvivo
Zoom Spaces
Innovative video solutions for every meeting space.
Bring meeting spaces online with Zoom Rooms
Conference Room Connector links existing rooms to Zoom
Innovative solutions for every space
Zoom Events
Solutions to host impactful virtual and hybrid experiences.
Host hybrid and virtual events with Zoom Events
Elevate your brand with single session events powered by Zoom Sessions
Broadcast at scale with Zoom Webinars
Host and attend classes, group events, and more OnZoom
Zoom Contact Center
An omnichannel cloud solution optimized for video.
Engage customers with Zoom Contact Center
Deliver intelligent support with conversational AI
Optimize contact center agent performance and engagement
Zoom solutions elevate collaboration across vertical use cases.
Enabling exciting new ways to teach, learn, and connect globally
Transforming client engagement and employee experiences
Improving collaboration between agencies, ministries and constituents
Connecting care, collaboration, and medical innovation
Real-time communication, anywhere in the world
Bridging the in-store and online experiences
Expert support and services for all your design, strategy, implementation, event, and hardware needs.
Global Services
Hardware purchase and subscription options
Flexible subscription plans for hardware
Protect certain data at rest with your own encryption keys
Developer Platform
An open platform that allows developers to build Zoom apps and integrations.
Explore thousands of apps that work with or within Zoom
Documentation for building with Zoom's technology using SDKs, APIs, and webhooks
Resources that help developers evaluate & build with our solutions
Post your questions and get help from our developer community
Zoom Partners bring Zoom's communications platform to market through alliance, sales, and service partnerships.
Explore Zoom's technology ecosystem
Find a trusted Partner
Learn about Zoom's Partner Programs
Access marketing & sales resources
Login to the Partner Portal and click 'Learn'
Discover new ways to use Zoom solutions to power your modern workforce.
- Resource Library
- Webinars and Events
- Customer Stories
- Zoom Trust Center
Access expert-led tutorials on Zoom products and features.
- Learning Center
- How-to Videos
Network with other Zoom users, and share your own product and industry insights.
- Zoom Community
- Developer Forum
- Partner Portal
Get documentation on deploying, managing, and using the Zoom platform.
- Customer Support
- Premier Support
- Developer Support
- Premier Developer Support
Download Zoom Client
Keep your Zoom client up to date to access the latest features.
Zoom Virtual Backgrounds
Download hi-res images and animations to elevate your next Zoom meeting.
- Plans & Pricing
- Join by Meeting ID
- Public Event List
- Screen Share Only
- With Video On
- With Video Off
- Phone System
- Mail and Calendar
- Zoom AI Companion
- Revenue Accelerator
- Rooms and Workspaces
- Workspace Reservation
- Events and Webinars
- Contact Center
- Virtual Agent
- Marketplace
- All Industries
- Work Transformation Summit
- Customer Success Events
- Customer Success Forum
- Zoom Status
- Submit Feedback
- Community Terms and Guidelines
- Getting Started
- Community Center
- Happy Rewards
- Social Corner
- Community Champion Program
- Billing & Account Management
- Logitech Spotlight Presentation Pointer Stops Resp...
- Subscribe to RSS Feed
- Mark Topic as New
- Mark Topic as Read
- Float this Topic for Current User
- Printer Friendly Page
- Automatically splitting my recordings in Meetings 2024-03-26
- Using OBS plugin with a different active speaker in Meetings 2022-09-21
- Preventing any interruptions without locking the meeting. in Meetings 2022-05-30
- Zoom Meetings and Logitech Spotlight presenter in Meetings 2022-03-07
Logitech Spotlight Presentation Pointer Stops Responding During Meeting
- Mark as New
- Report Inappropriate Content
2023-05-03 07:25 AM
- All forum topics
- Previous Topic
2023-05-09 10:48 AM - edited 2023-05-09 11:08 AM
2023-05-11 05:59 AM
- Election 2024
- Entertainment
- Newsletters
- Photography
- Personal Finance
- AP Buyline Personal Finance
- Press Releases
- Israel-Hamas War
- Russia-Ukraine War
- Global elections
- Asia Pacific
- Latin America
- Middle East
- March Madness
- AP Top 25 Poll
- Movie reviews
- Book reviews
- Personal finance
- Financial Markets
- Business Highlights
- Financial wellness
- Artificial Intelligence
- Social Media
Easter 2024
Biden leans on his Democratic predecessors as Trump remains isolated from other Republican leaders
FILE - President Barack Obama, flanked by Vice President Joe Biden, left, and former President Bill Clinton, right, pose for a photo with the U.S. World Cup soccer team under the North Portico of the White House in Washington, May 27, 2010. President Joe Biden will share a stage with Barack Obama and Bill Clinton on Thursday in New York as he raises money for his reelection campaign. It’s a one-of-a-kind political extravaganza that will showcase decades of Democratic leadership. (AP Photo/Susan Walsh, File)
FILE - Vice President Joe Biden whispers “This is a big f------ deal,” to President Barack Obama after introducing Obama during the health care bill ceremony in the East Room of the White House in Washington, March 23, 2010. President Joe Biden will share a stage with Barack Obama and Bill Clinton in New York as he raises money for his reelection campaign. Thursday’s event is a one-of-a-kind political extravaganza that will showcase decades of Democratic leadership. (AP Photo/J. Scott Applewhite, File)
FILE - Former President Bill Clinton (L-R), Secretary of State Hillary Clinton, former president George W. Bush and his wife Laura, President Barack Obama and first lady Michelle Obama, Vice President Joseph Biden and his wife Jill, former first lady Rosalynn Carter and former President Jimmy Carter wait for the services to begin at during funeral services for U.S. Senator Edward Kennedy at the Basilica of Our Lady of Perpetual Help in Boston, Massachusetts August 29, 2009. AP Photo/Brian Snyder, Pool, File)
FILE - In this Jan. 12, 2017, file photo President Barack Obama presents Vice President Joe Biden with the Presidential Medal of Freedom during a ceremony in the State Dining Room of the White House in Washington. President Joe Biden will share a stage with Barack Obama and Bill Clinton in New York as he raises money for his reelection campaign. Thursday’s event is a one-of-a-kind political extravaganza that will showcase decades of Democratic leadership. (AP Photo/Susan Walsh, File)
FILE - President Joe Biden speaks on the economy March 19, 2024, in Las Vegas. Former presidents Bill Clinton and Barack Obama will join Biden on Thursday, March 28,, in New York City for a one-of-a-kind Democratic extravaganza that’s expected to expand the party’s already significant cash advantage over Republicans this year. The event will be moderated by Stephen Colbert. (AP Photo/Lucas Peltier, File)
FILE - Former President Barack Obama speaks to the members of the Obama Foundation’s leadership program in Athens, Greece, June 21, 2023. Obama and former President Bill Clinton will join President Joe Biden on Thursday, March 28, 2024, in New York City for a one-of-a-kind Democratic extravaganza that’s expected to expand the party’s already significant cash advantage over Republicans this year. The event will be moderated by Stephen Colbert. (AP Photo/Petros Giannakouris, File)
FILE - Former President Bill Clinton speaks at the Clinton Global Initiative, Sept. 19, 2023 in New York. Clinton and former Presidents Barack Obama will join President Joe Biden on Thursday, March 28, 2024, in New York City for a one-of-a-kind Democratic extravaganza that’s expected to expand the party’s already significant cash advantage over Republicans this year. The event will be moderated by Stephen Colbert. (AP Photo/Julia Nikhinson, File)
FILE - Stephen Colbert attends an event in Los Angeles on March 16, 2019. Former presidents Bill Clinton and Barack Obama will join Biden on Thursday, March 28, in New York City for a one-of-a-kind Democratic extravaganza that’s expected to expand the party’s already significant cash advantage over Republicans this year. The event will be moderated by Colbert. (Photo by Richard Shotwell/Invision/AP, File)
- Copy Link copied

WASHINGTON (AP) — When President Joe Biden needs advice, there are two people he can turn to who know what it’s like to sit in his chair. Sometimes he will invite Barack Obama over to the White House for a meal or he will get on the phone with Bill Clinton.
The three men share decades of history at the pinnacle of American and Democratic leadership, making them an unusual trio in presidential history. Although there has sometimes been friction as their ambitions and agendas have diverged, they have spent years building toward a similar vision for the country.
On Thursday, their partnership will be on display in what has been described as a one-of-a-kind fundraising extravaganza in New York City to help Biden build on his already significant cash advantage in this year’s presidential election. It’s a dramatic show of force intended to rally the Democratic Party faithful to secure a second term for Biden despite his stubbornly low poll numbers and doubts due to his age (81).
“There is everything to be gained by Joe Biden standing next to Bill Clinton and Barack Obama,” said Leon Panetta, who worked in the administrations of both former presidents. “That picture is worth a hell of a lot in politics today.”
The display of solidarity is a sharp contrast to Donald Trump’s isolation from other Republican leaders.
Although Trump has solidified his grip on his party on the way to becoming the presumptive nominee , not even his own former vice president, Mike Pence , is willing to endorse Trump’s bid for another White House term. The only other living Republican president, George W. Bush, is not a supporter, either.
It’s a far different situation with Biden, Obama and Clinton. When they haven’t been campaigning against each other, they’ve been working together.
At one point, all three of them were on a collision course during the Democratic presidential primary in 2008. Biden and Obama sought the nomination, as did Clinton’s wife, Hillary. Obama came out on top, and chose Biden as his vice president and Hillary Clinton as his secretary of state.
As Obama’s two terms were ending and the 2016 election was approaching, he nudged Hillary Clinton to the forefront as his preferred successor and dissuaded Biden from running after Biden’s elder son died of cancer. Clinton lost to Trump, who lost to Biden in 2020. Obama privately helped clear a path for Biden to the Democratic nomination that year.
There have been notable splits between the presidents on key issues. Biden was unsuccessful in persuading Obama not to send more troops to Afghanistan in 2009. U.S. forces remained in the country until 2021, when Biden withdrew them during his first year in office.
The three presidents have often focused on the same goals in a sort of legislative relay race. Clinton failed to significantly expand health care access during his presidency, which ran from 1993 to 2001. Obama picked up the baton when he took office in 2009 and signed the Affordable Care Act into law in 2010.
Biden called the law a “big ... deal” — inserting an infamous expletive in the middle of that thought — and built on it when he began his own term in 2021. He signed legislation that included financial incentives for states to expand Medicaid, prompting North Carolina to take the belated step last year , more than a decade after the Affordable Care Act made it possible.
Between Clinton, Obama and Biden, “they’ve seen the sweep of Democratic history together in ways that not everybody has,” said Gene Sperling, a longtime economic adviser.
Sperling is among the administration officials who have served all three presidents. Another member of those ranks is John Podesta, currently a global climate envoy for Biden who was Clinton’s chief of staff and an environmental adviser to Obama.
Podesta said all three have tried to improve the lives of working Americans.
“Each one of them, when they close the door on the Oval Office, that’s what mattered to them the most,” he said.
But their styles aren’t the same. While Obama was more reserved, Biden and Clinton draw energy from chatting up people on rope lines and forging deep personal relationships.
“Their relaxation is politics,” Podesta said.
Panetta suggested that Biden, broadly unpopular in public polling, should try to pick up a few tips from his Democratic predecessors, both of whom served two terms.
“The fundamental reason they got reelected is that they were able to connect with the American people,” he said. “Joe Biden clearly needs to do that.”
The only living Democratic president who will not be in New York for the fundraiser is 99-year-old Jimmy Carter. A spokeswoman for Carter confirmed that he remains in home hospice care and is not making any public statements.
Carter’s relationship with Biden goes back several decades. When Carter was running for president in 1976 as a little-known former governor of Georgia, Biden took a political risk by becoming the first sitting senator to endorse him.
Fundraisers, even with presidents, are usually small affairs. Dozens or sometimes hundreds of people gather in a wealthy person’s living room or backyard to hear a speech from the candidate and maybe ask a few questions.
This one is in a different league. Thousands of people are expected at Radio City Music Hall to watch Stephen Colbert, the late-night talk show host, moderate a conversation with the three presidents. Celebrity guests — Cynthia Erivo, Mindy Kaling, Queen Latifah, Lizzo, Lea Michele and Ben Platt — will provide more star power.
The cheapest tickets are $225, making it more accessible than most fundraisers. But that’s only the starting point. A photo with all three presidents is $100,000. Access to more intimate receptions will cost $250,000 or $500,000.
Campaign officials have not said how much they expect the event to raise. But they said a fundraiser featuring Biden and Obama in December raised nearly $3 million.
Trump, meanwhile, is also expected to be in the area Thursday, attending the Long Island wake of a New York City police officer who was shot and killed during a traffic stop in Queens.
The Trump campaign, which has struggled to keep pace with Biden’s fundraising, scoffed at Thursday’s event, dismissing it as a sign the president needs to “trot out some retreads like Clinton and Obama,” in the words of spokesman Steven Cheung.
Eric Schultz, a senior adviser to Obama, said the former president “will do all he can” to support Biden and “he looks forward to helping Democrats up and down the ballot make the case to voters this fall.”
“Our strategy will be based on driving impact, especially where and when his voice can help move the needle,” Schultz said.
The relationship between Obama and Biden has been personal as well as political. Obama offered to help Biden pay the family’s medical bills when Biden’s son Beau was struggling with cancer. After Beau’s death in 2015, Obama gave a eulogy at the funeral, where he described his vice president as “my brother.”
“They’re like family to each other,” White House press secretary Karine Jean-Pierre said recently.
___ Associated Press writer Bill Barrow in Atlanta contributed to this report.

Following the presenter's pointer
When a presenter is sharing a screen that is at a higher resolution than yours, you can automatically follow the presenter’s pointer on your desktop client. This is particularly useful when only a portion of the shared screen is visible to you, helping you to stay focused on the important part of the shared screen.
Prerequisites for following the presenter's pointer during screen share
Windows: 5.3.1 (52877.0927) or higher
macOS: 5.3.1 (52877.0927) or higher
Note : The presenter cannot be sharing content from within a Zoom Rooms meeting.
How to follow the presenter's pointer during screen share
Note : You must be viewing the presentation at 100% (original size) or higher for this feature to work.
To change the presentation's zoom ratio:
- Click on View Options .
- Hover your mouse over Zoom Ratio .
- Select a zoom ratio of 100% (or higher) or higher to view the presentation.
To follow the presenter's pointer during screen sharing:
- Start or join a meeting or webinar on a Zoom desktop client.
- When screen sharing begins, the Follow Presenter’s Pointer option is automatically enabled.
- If you manually move the shared content, you see a message that lets you know that the option to follow the presenter’s pointer has been disabled.
- To re-enable following the presenter’s focus, under View Options , choose the option Follow presenter’s pointer .

- Victor Mukhin

Victor M. Mukhin was born in 1946 in the town of Orsk, Russia. In 1970 he graduated the Technological Institute in Leningrad. Victor M. Mukhin was directed to work to the scientific-industrial organization "Neorganika" (Elektrostal, Moscow region) where he is working during 47 years, at present as the head of the laboratory of carbon sorbents. Victor M. Mukhin defended a Ph. D. thesis and a doctoral thesis at the Mendeleev University of Chemical Technology of Russia (in 1979 and 1997 accordingly). Professor of Mendeleev University of Chemical Technology of Russia. Scientific interests: production, investigation and application of active carbons, technological and ecological carbon-adsorptive processes, environmental protection, production of ecologically clean food.
Title : Active carbons as nanoporous materials for solving of environmental problems
Quick links.
- Conference Brochure
- Tentative Program

flexible radio assignment configuration
- Instant AP Discovery Logic
- Modifying the Instant AP Hostname
- Configuring Zone Settings on anInstant AP
- Specifying a Method for Obtaining IP Address
- Configuring External Antenna
- Configuring Radio Profiles
Enabling Flexible Radio
- Dual 5 GHz Radio Mode
- Configuring Uplink VLAN for anInstant AP
- Changing the Instant AP Installation Mode
- Changing USB Port Status
- Master Election and Virtual Controller
- Adding IAP to Network
- Removing IAP from the Network
- Support for BLE Asset Tracking
- IoT Endpoints
- Zigbee-Based IoT
- Aruba Sensor Values
- Reporting Sensor Values
- HanVit Sensors
- SoluM ESL Gateway
- ZF Openmatics Support for ZF BLE Tag Communication
- Intelligent Power Monitoring
- Transmit Power Calculation support
This feature allows the AP to seamlessly switch between modes where the radio resources are either combined in a single 2x2 radio or separated into two 1x1 radios.
You can configure the flexible radio in the following modes:
5 GHz Gigahertz. mode: acts as a single radio operating on 5 GHz Gigahertz. band Band refers to a specified range of frequencies of electromagnetic radiation.
2.4 GHz Gigahertz. mode: acts as a single radio operating on 2.4 GHz Gigahertz. band Band refers to a specified range of frequencies of electromagnetic radiation.
2.4 GHz Gigahertz. and 5 GHz Gigahertz. mode: acts as two radio interfaces, one operating on 5 GHz Gigahertz. band Band refers to a specified range of frequencies of electromagnetic radiation. , and the other on the 2.4 GHz Gigahertz. band Band refers to a specified range of frequencies of electromagnetic radiation. . By default, the flexible radio is set to this mode.
AP-203H , AP-203R , and AP-203RP access points have one radio each, wherein each radio operates on two bands Band refers to a specified range of frequencies of electromagnetic radiation. . When the flexible radio mode is at 2.4 GHz Gigahertz. or 5 GHz Gigahertz. , the radio operates on one band Band refers to a specified range of frequencies of electromagnetic radiation. and the Instant AP broadcasts 16 different SSIDs Service Set Identifier. SSID is a name given to a WLAN and is used by the client to access a WLAN network. . However, when the flexible radio mode is at 2.4 GHz Gigahertz. and 5 GHz Gigahertz. , the radio operates on both the bands Band refers to a specified range of frequencies of electromagnetic radiation. and the Instant AP broadcasts only 8 SSIDs Service Set Identifier. SSID is a name given to a WLAN and is used by the client to access a WLAN network. for each band Band refers to a specified range of frequencies of electromagnetic radiation. , even if more than 8 SSIDs Service Set Identifier. SSID is a name given to a WLAN and is used by the client to access a WLAN network. are configured. The SSIDs Service Set Identifier. SSID is a name given to a WLAN and is used by the client to access a WLAN network. with an index value from 0 to 7 will be broadcasted.
You can configure the Flexible Radio parameter using the WebUI or the CLI Command-Line Interface. A console interface with a command line shell that allows users to execute text input as commands and convert these commands to appropriate functions. :
In the Old WebUI
To configure flexible radio:
1. On the Access Points tab, click the Instant AP to modify.
2. Click the edit link.
3. Click the Flexible Radio tab.
4. Specify the Mode from the drop-down list.
5. Click OK .
6. Reboot the Instant AP .
In the New WebUI
1. Navigate to Configuration > Access Points .
2. Click the Instant AP to edit.
5. Click Save .
6. Reboot the Instant AP
To configure the flexible radio mode:
(Instant AP)# flex-radio-mode <mode>
Was this information helpful? Yes No
Great! Thanks for the feedback
Sorry about that! How can we improve it? Send your comments and suggestions!
404 Not found
Dynamic robot assignment for flexible serial production systems.
Ieee account.
- Change Username/Password
- Update Address
Purchase Details
- Payment Options
- Order History
- View Purchased Documents
Profile Information
- Communications Preferences
- Profession and Education
- Technical Interests
- US & Canada: +1 800 678 4333
- Worldwide: +1 732 981 0060
- Contact & Support
- About IEEE Xplore
- Accessibility
- Terms of Use
- Nondiscrimination Policy
- Privacy & Opting Out of Cookies
A not-for-profit organization, IEEE is the world's largest technical professional organization dedicated to advancing technology for the benefit of humanity. © Copyright 2024 IEEE - All rights reserved. Use of this web site signifies your agreement to the terms and conditions.
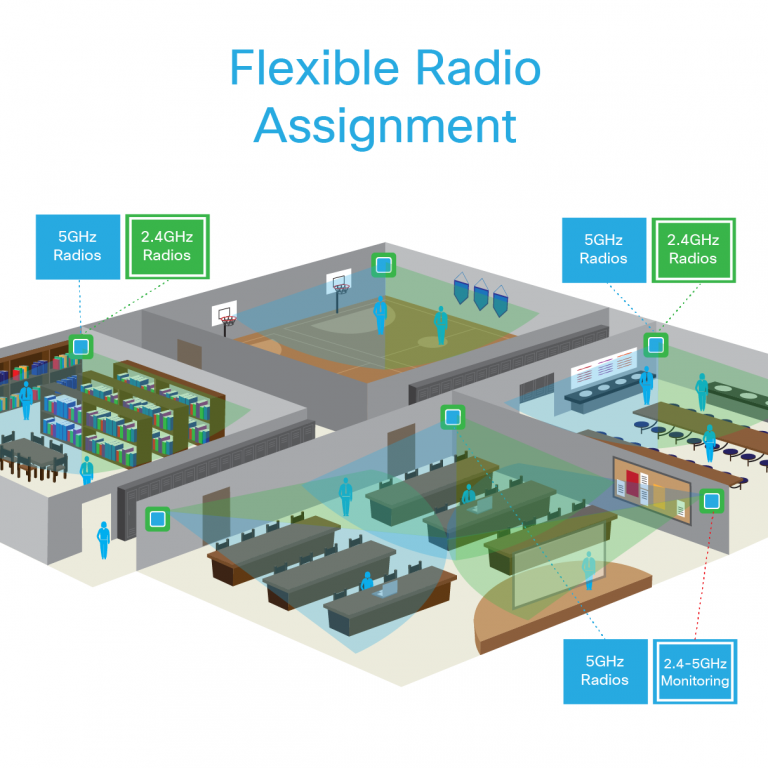
Cisco's Flexible Radio Assignment (FRA) is a new feature introduced in Release 8.2.110.0 to take advantage of the hardware released in the Cisco AP 3800/2800. FRA is a new core algorithm added to RRM to analyze the NDP measurements and manage the hardware used to determine the Role the new Flexible Radio (2.4 GHz, 5 GHz, or Monitor) will play ...
Flexible Radio Assignment is a Cisco innovation designed to provide a better mobile user experience for high-density networks by automatically detecting when a large number of devices are connected to a network. Once the detection is made, Flexible Radio Assignment changes its dual radios in the access point from 2.4 GHz/5 GHz to 5 GHz/5 GHz to ...
Flexible Radio Assignment (FRA) takes advantage of the dual-band radios included in APs like 4800, 3800, 2800 and the new 11AX APs. FRA is a new feature added to the RRM to analyze the NDP measurements, which manages the hardware used to determine the role of the new flexible radio (2.4 GHz, 5 GHz, or Monitor) in your network
The flexible radio is similar to the previous XOR radio used in the Cisco WSSI/WSM modules for the AP 3700, but this new flexible radio module is able to be configured to serve clients in either 2.4-GHz or 5-GHz or serially scan both 2.4-GHz and 5-GHz on the flexible radio while the main 5-GHz radio serves clients. Figure 1.
TheoutputofthiscalculationistheCOF(CoverageOverlapFactor%).CoverageOverlapFactoristhe percentageoftheanalyzedcellthatiscoveredat-67dBmorhigherbyother ...
About Press Copyright Contact us Creators Advertise Developers Terms Privacy Policy & Safety How YouTube works Test new features NFL Sunday Ticket Press Copyright ...
The flexible radio is similar to the previous XOR radio used in the Cisco WSSI/WSM modules for the AP 3700, but this new flexible radio module is able to be configured to serve clients in either 2.4-GHz or 5-GHz or serially scan both 2.4-GHz and 5-GHz on the flexible radio while the main 5-GHz radio serves clients.
CiscoCatalyst9130AXSeries 5-GHzTri-Radio AccessPoints 2.4-GHz4x4anddual5-GHz4x4, or5-GHz4x4and6-GHz4x4 CiscoCatalystWireless9166 5/6-GHzXOR AccessPoints FRAperformsanumberoffunctions.Onthe2.4-GHzand5-GHzXORmodels,FRAestablishestherequired 2.4-GHzcoverage,identifiesredundantradios,andconvertsthemtoeither5-GHzoramonitorrole.For
To configure flexible radio: 1. On the Access Points tab, click the Instant AP to modify. 2. Click the edit link. 3. Click the Flexible Radio tab. 4. Specify the Mode from the drop-down list. 5. Click OK. 6. Reboot the Instant AP. In the New WebUI. To configure flexible radio: 1. Navigate to Configuration > Access Points. 2. Click the Instant ...
Configuration Protocol (DHCP) server, it can be used for Site Survey. Q: What WLANs are supported on the Embedded Wireless Controller on Catalyst ... Flexible Radio Assignment is a feature of the access point hardware, and if the access point supports a feature, the EWC also supports it.
Procedure. Step 1. Choose Configuration > Radio Configurations > RRM > FRA . Step 2. In the Flexible Radio Assignment window, enable FRA status and determine the overlapping 2.4 GHz or 5 GHz coverage for each AP, choose Enabled in the FRA Status field. By default, the FRA status is disabled. Step 3.
The flexible radio is similar to one previous XOR radio used in the Cisco WSSI/WSM product for the AP 3700, but this new flexible radio module is skill to be configures to serve clients in either 2.4-GHz or 5-GHz or serially scan twain 2.4-GHz real 5-GHz on the flexible radio for the main 5-GHz radio serves clients.
Step 1. Choose Configuration > Radio Configurations > RRM > FRA. Step 2. In the Flexible Radio Assignment window, enable FRA status and determine the overlapping 2.4 GHz or 5. GHz coverage for each AP, choose Enabled in the FRA Status field. By default, the FRA status is disabled. Step 3.
This letter aims at modeling and real-time control of a flexible manufacturing system (FMS) that is operated by multi-skilled mobile robots. By introducing the idea of a unique ideal clean configuration and the effective disruption event, the concepts of Opportunity Window (OW) and Permanent Production Loss (PPL) are extended to the FMS. The control considered in this letter is a robot ...
CommandorAction Purpose FRASensitivity:medium(95%) FRAInterval:1Hour(s) APName MACAddress SlotID Current-Band COF% SuggestedMode-----AP00A6.CA36.295A 006b.f09c.8290

IMAGES
VIDEO
COMMENTS
Step 1: Sign into the Zoom web portal right here. Step 2: Then, head over to the Personal panel and click on Settings. Step 3: Click on the Meeting tab and select In Meeting (Basic). Step 4: Look for the Annotation tab and make sure it's toggled ON.
You need to give an online presentation and you want to make sure everyone knows where to look while you're talking. You need a laser pointer! But how can yo...
Click on View Options. Hover your mouse over Zoom Ratio. Select a zoom ratio of 100% (or higher) or higher to view the presentation. To follow the presenter's pointer during screen sharing: Start or join a meeting or webinar on a Zoom desktop client. When screen sharing begins, the Follow Presenter's Pointer option is automatically enabled.
updated April 2020. This guide is designed for virtual presenters, trainers and facilitators who use Zoom Meetings. It includes some of the most commonly used features of Zoom for interactive virtual meetings, presentations and other live online learning sessions. This guide is not a complete comprehensive guide to what Zoom can do.
How To Use the Ray Pointer in Zoom Meeting Properly For Zoom Desktop App Users (Windows and Mac) Using the laser cursor in a Zoom meeting is a really handsome way to highlight things on the video, especially when you're using the Zoom Desktop App for Windows or Mac. Here's how you can activate it: Step 1: Start off by opening the Zoom app ...
Choose View Options from the menu. Hover your mouse over Zoom Ratio. The presentation can be viewed by zooming in at 100% (or higher). During screen sharing, follow the presenter's pointer: Zoom desktop client allows you to start or join a meeting or webinar. By default, the Follow Presenter's Pointer option is enabled when screen sharing ...
This allows you to have the meeting platform controls visible on the screen and it makes editing the slides easier. Since the screen has more pixels, the portion you share in Zoom will still look good to the meeting attendees. On a Mac you can only run Presenter View in full screen mode so you don't have to make the decision.
In this article I am using the Zoom app in Windows 10. The six options are: Share your entire screen/desktop. Share the Slide Show window. Share the editing window with a clean look. Run the Slide Show in a window and share that window. Use Presenter View to show the audience your slides while you see Presenter View.
In PowerPoint, press Alt+F5 to start Presenter View preview at the beginning of your presentation. You will see Presenter View on your screen with the slide, your notes, and what the next slide/build will be. Presenter View takes up the whole screen, so you will not see the controls for your Zoom meeting. Presenter View Preview always starts at ...
Open the PowerPoint file you want to present. Start or join a Zoom meeting. Click Share Screen in the meeting controls. Select your monitor/desktop then click Share . While sharing your screen, switch PowerPoint to slide show mode by clicking the Slide Show tab > From Beginning or From Current Slide.
2. Use Zoom to present. Now that the windows have been separated, you can easily use Zoom to present the slideshow window. While in a meeting, click on the 'Share Screen' button and select the browser window with Google Slides on top. Finally, hit 'Share' to start the screen-sharing session.
Step 3: Share your screen on Zoom. From your Zoom meeting window, click on "Share Screen" and select the window with the Presenter view of your presentation. That's it! You'll now be able to look at the presenter notes on your screen while your audience views the slide open in your Presenter view window.
What To Know Zoom's built-in laser pointer feature is available during screen-sharing sessions after enabling the Annotation settings in the Zoom web portal. For desktop users, enable the laser pointer by dividing your screen, ticking ... What To Recognize In diese guide, I will teach you how to benefit a laser pointer to your Zoom meetings to ...
Kinda. To access the feature (beta at time of writing) click the "Advanced" tab in the "Share Screen" popup, and select "Slides as Virtual Background". This is what it looks like from the attendee's perspective. And yes, you appear twice on the screen. Once on top of your slides, and again beside them.
• Zoom Client for Windows or Mac, Version 4.1.8826.0925 or later • The presenter cannot be sharing content from within a Zoom Rooms meeting. INSTRUCTIONS • Start or join a meeting or webinar on a Zoom desktop client. • When screen sharing begins, the Follow Presenter's Pointer option is automatically enabled.
Logitech Spotlight Presentation Pointer Stops Responding During Meeting. 2023-05-03 07:25 AM. We recently had two seeming unrelated events. The first event (Zoom version unknown) during the set up for the presentation, the Logitech Spotlight would change slides, but the remote viewers on Zoom only saw the original slide.
Popular Searches JSC Mashinostroitelny Zavod Msz Pjsc Public Joint Stock Company Mashinostroitelny Zavod Public Joint-Stock Company Mashinostroitelny Zavod SIC Code 10,109 NAICS Code 21,212 Ticker MOEX: MASZ Show more
5 of 8 |. FILE - President Joe Biden speaks on the economy March 19, 2024, in Las Vegas. Former presidents Bill Clinton and Barack Obama will join Biden on Thursday, March 28,, in New York City for a one-of-a-kind Democratic extravaganza that's expected to expand the party's already significant cash advantage over Republicans this year.
To change the presentation's zoom ratio: Click on View Options. Hover your mouse over Zoom Ratio. Select a zoom ratio of 100% (or higher) or higher to view the presentation. To follow the presenter's pointer during screen sharing: Start or join a meeting or webinar on a Zoom desktop client. When screen sharing begins, the Follow Presenter's ...
Giving control to another meeting participant in Zoom. ... Use annotation tools such as a laser pointer, pen, or highlighter. ... you can use the remote control features of Teams or Zoom to make multi-presenter presentations more seamless for the audience and eliminate the "next slide please" routine from future presentations.
Catalysis Conference is a networking event covering all topics in catalysis, chemistry, chemical engineering and technology during October 19-21, 2017 in Las Vegas, USA. Well noted as well attended meeting among all other annual catalysis conferences 2018, chemical engineering conferences 2018 and chemistry webinars.
Industry: Computing Infrastructure Providers, Data Processing, Web Hosting, and Related Services , Media Streaming Distribution Services, Social Networks, and Other Media Networks and Content Providers , Business Support Services , Data processing and preparation, Web search portals See All Industries Business services, nec See Fewer Industries
presentation designer jobs in London. Sort by: relevance - date. 820 jobs. Compliance Engineer. BSRIA Ltd. North London. £33,000 a year. Full-time +1. 8 hour shift +2. Driving Licence. Compliance: 1 year. United Kingdom. Easily apply: Responsive employer. Liaising with, and presentation of findings to clients and site management.... Today's top 178 Presentation Designer jobs in London ...