

Use the System File Checker tool to repair missing or corrupted system files
If some Windows functions aren't working or Windows crashes, use the System File Checker to scan Windows and restore your files. Though the steps below might look complicated at first glance, just follow them in order, step-by-step, and we’ll try to get you back on track.
Run the System File Checker tool (SFC.exe)
To do this, follow these steps:
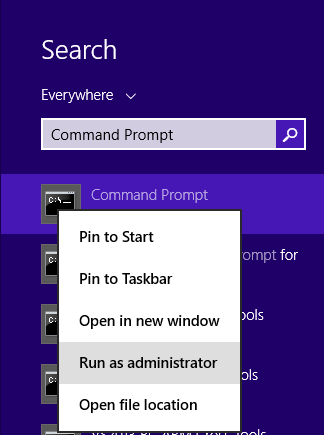
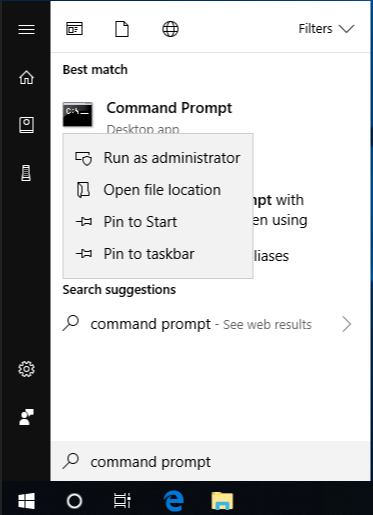
Open an elevated command prompt. To do this, do the following as your appropriate:
If you are running Windows 10, Windows 8.1 or Windows 8, first run the inbox Deployment Image Servicing and Management (DISM) tool prior to running the System File Checker. (If you are running Windows 7 or Windows Vista, skip to Step 3.)
Type the following command, and then press Enter. It may take several minutes for the command operation to be completed.
DISM.exe /Online /Cleanup-image /Restorehealth
Important: When you run this command, DISM uses Windows Update to provide the files that are required to fix corruptions. However, if your Windows Update client is already broken, use a running Windows installation as the repair source, or use a Windows side-by-side folder from a network share or from a removable media, such as the Windows DVD, as the source of the files. To do this, run the following command instead:
DISM.exe /Online /Cleanup-Image /RestoreHealth /Source: C:\RepairSource\Windows /LimitAccess
Note: Replace the C:\RepairSource\Windows placeholder with the location of your repair source. For more information about using the DISM tool to repair Windows, reference Repair a Windows Image .
At the command prompt, type the following command, and then press ENTER:
sfc /scannow
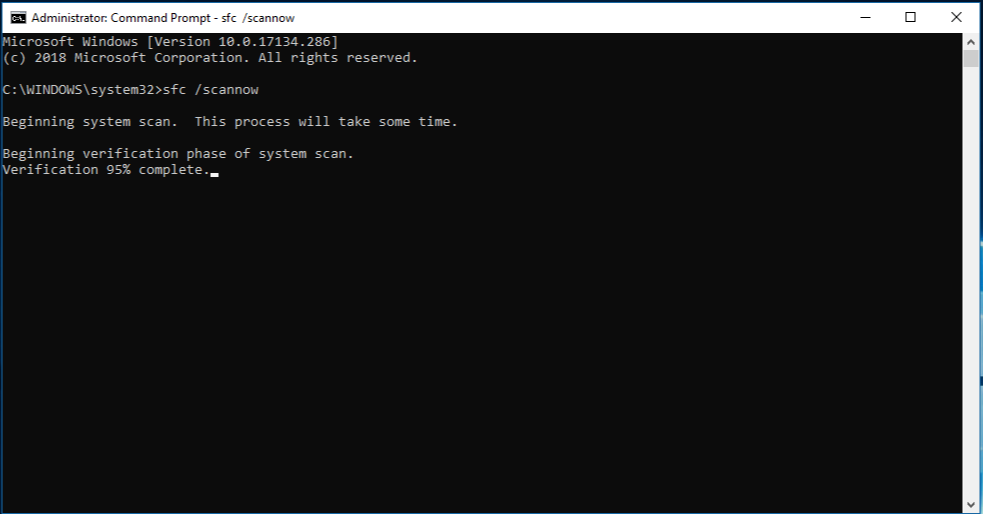
The sfc /scannow command will scan all protected system files, and replace corrupted files with a cached copy that is located in a compressed folder at %WinDir% \System32\dllcache. The %WinDir% placeholder represents the Windows operating system folder. For example, C:\Windows. Note Do not close this Command Prompt window until the verification is 100% complete. The scan results will be shown after this process is finished.
After the process is finished, you may receive one of the following messages:
Windows Resource Protection did not find any integrity violations.
This means that you do not have any missing or corrupted system files.
Windows Resource Protection could not perform the requested operation.
To resolve this problem, perform the System File Checker scan in safe mode , and make sure that the PendingDeletes and PendingRenames folders exist under %WinDir% \WinSxS\Temp.
Windows Resource Protection found corrupt files and successfully repaired them. Details are included in the CBS.Log %WinDir% \Logs\CBS\CBS.log.
To view the detail information about the system file scan and restoration, go to How to view details of the System File Checker process .
Windows Resource Protection found corrupt files but was unable to fix some of them. Details are included in the CBS.Log %WinDir% \Logs\CBS\CBS.log.
To repair the corrupted files manually, view details of the System File Checker process to find the corrupted file, and then manually replace the corrupted file with a known good copy of the file .
Windows 8.1 or Windows 8
Windows 10, Windows 7, or Windows Vista
More Information
How to view details of the system file checker process.
To view the details that included in the CBS.Log file, you can copy the information to the Sfcdetails.txt file by using the Findstr command, and then view the details in the Sfcdetails.txt. To do this, follow these steps:
Open an elevated command prompt as described in the previous step 1.
Note The Sfcdetails.txt file contains details from every time that the System File Checker tool has been run on the computer. The file includes information about files that were not repaired by the System File Checker tool. Verify the date and time entries to determine the problem files that were found the last time that you ran the System File Checker tool.
Open the Sfcdetails.txt file from your desktop.
The Sfcdetails.txt file uses the following format:
Date/Time SFC detail The following sample log file contains an entry for a file that could not be repaired: 2007-01-12 12:10:42, Info CSI 00000008 [SR] Cannot repair member file [l:34{17}]"Accessibility.dll" of Accessibility, Version = 6.0.6000.16386, pA = PROCESSOR_ARCHITECTURE_MSIL (8), Culture neutral, VersionScope neutral, PublicKeyToken = {l:8 b:b03f5f7f11d50a3a}, Type neutral, TypeName neutral, PublicKey neutral in the store, file is missing
How to manually replace a corrupted system file with a known good copy of the file
After you determine which system file was corrupted and could not be repaired through the detail information in the Sfcdetails.txt file, find where the corrupted file located, and then manually replace the corrupted file with a known good copy of the file. To do this, follow these steps: Note You may be able to get a known good copy of the system file from another computer that is running the same version of Windows with your computer. You may perform a System File Checker process on that computer to make sure the system file that you intend to copy is a good copy.
Take administrative ownership of the corrupted system file. To do this, at an elevated command prompt, copy and then paste (or type) the following command, and then press ENTER:
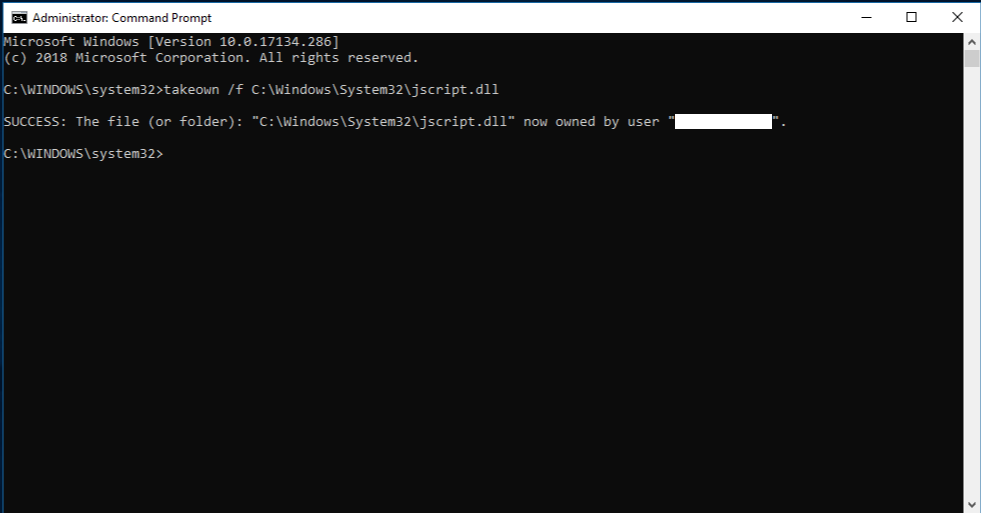
Grant administrators full access to the corrupted system file. To do this, copy and paste (or type) the following command, and then press ENTER:
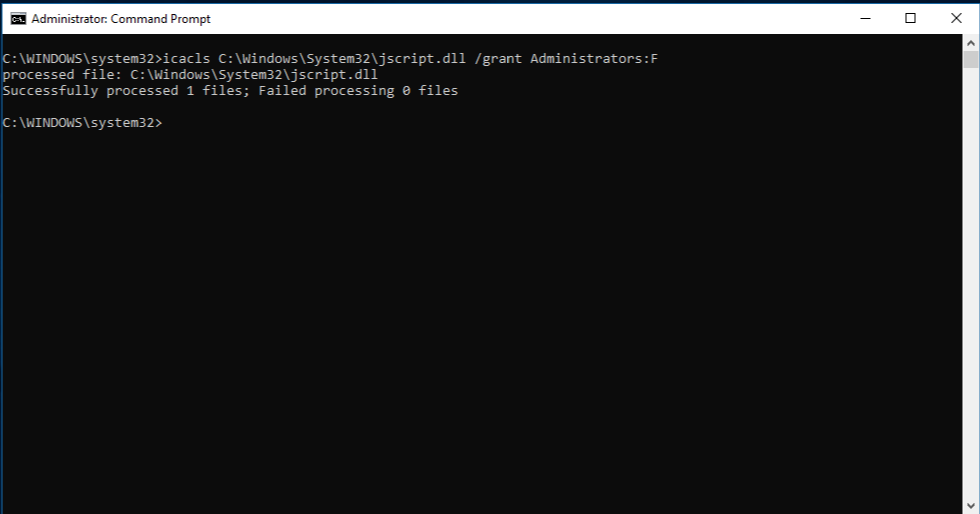
Replace the corrupted system file with a known good copy of the file. To do this, copy and paste (or type) the following command, and then press ENTER:
Copy Source_File Destination Note The Source_File placeholder represents the path and file name of the known good copy of the file on your computer, and the Destination placeholder represents the path and file name of the corrupted file. For example, type copy E:\temp\jscript.dll C:\windows\system32\jscript.dll.
If the steps above don't work, you may need to reinstall Windows. For more info, see Windows 10 recovery options .

Need more help?
Want more options.
Explore subscription benefits, browse training courses, learn how to secure your device, and more.

Microsoft 365 subscription benefits

Microsoft 365 training

Microsoft security

Accessibility center
Communities help you ask and answer questions, give feedback, and hear from experts with rich knowledge.

Ask the Microsoft Community

Microsoft Tech Community

Windows Insiders
Microsoft 365 Insiders
Was this information helpful?
Thank you for your feedback.
- United States
- Netherlands
- New Zealand
- United Kingdom
How to repair Windows 10 (and 11) in 4 steps
When windows 10 gets wonky, try this series of repair techniques — in this order — to attempt to set things right..
Computerworld |

The Windows 10 (or 11) repair drill
Step 1: using dism and sfc for system repair, step 2: try a recent restore point or image backup.
- Step 3: In-place upgrade to current Windows 10 version
- Step 4: Completely reinstall Windows 10
- Picking up the pieces after the repair
- The Windows 11 situation
Sometimes a Windows 10 system starts misbehaving to the point where repair is needed. This often takes the form of worsening performance or stability, and can originate from damage to, loss of, or corruption of Windows system files typically found in the C:\Windows folder hierarchy. When that happens, users would be well advised to break out the following routine to help them set things back to rights.
I initially wrote this story in 2016, but as Windows 10 has evolved over time, some of the steps have changed a bit. I’ve now updated it for the latest versions of Windows 10. That said, most of these approaches also work with Windows 7 and 8 (with slight variations), and the advice here applies almost identically to Windows 11 , which Microsoft is gradually rolling out to Windows 10 users whose hardware can support the new OS via Windows Update from October 2021 into early 2022.
The idea is to first try the initial step in the sequence. If that doesn’t fix what’s broken, advance to the next step. Keep working through the steps in order until you reach the end, and you are bound to fix the vast majority of problems. (The only remaining step at that point would be to replace the system on which the software is running, and that’s outside the scope of this story.)
The amount of time and effort required for each step goes up incrementally. Some steps involve additional work to restore the prior state of your PC more or less back to where it was prior to taking that step. Thus, the most important bit of advice I can dispense for those who must venture beyond Step 1 is this: make a complete backup of your system to provide a source for files and information that might otherwise go missing. Ignore this advice at your own risk.
But first: back it up before you lose it!
Any time you make major changes to a Windows system, such as installing a major application suite like Microsoft Office or performing an OS upgrade or repair, it’s a good idea to begin that process with a complete backup. The important thing is to use a backup tool that creates an image backup of your boot/system drive. That will allow you to rewrite that drive and restore your system to normal operation should anything go wrong with your changes or repairs. See my article “ How to make a Windows 10 or 11 image backup ” for instructions.
Since I wrote the original version of this story, I’ve obtained direct advice from Microsoft that it’s best to run DISM before running the System File Checker, a.k.a. SFC. Hence, I am reversing the order of events for this step. I’ll echo Microsoft and say “Always run DISM first, then SFC second, not vice versa.”
DISM is the Deployment Image Servicing and Management tool. It’s a kind of Swiss Army knife for working with Windows operating system images, both offline and online. DISM can often fix things that SFC can detect but that it cannot itself fix. DISM supports a raft of capabilities with switches and parameters to match, but basic system file repair syntax is reasonably easy (though it often requires multiple passes before it can set things straight).
You must run DISM in an Administrator: Command Prompt window (press the Windows key + X combination and select Command Prompt (Admin) from the resulting pop-up menu) or in an Administrative PowerShell or Windows Terminal session. Here’s some sample syntax (consult the TechNet DISM Technical Reference for all the gory details):
dism /online /cleanup-image /checkhealth
Most of the time when you run this command, the output will find nothing amiss, as shown in Figure 1:
Figure 1: DISM can check the health of any Windows image. Here, it reports all is well on a production PC.
The /checkhealth command simply checks the running image (that’s what /online tells it to do) to see if it can detect any damage or corruption. Because it’s only checking file hashes and signatures, this command completes in under one minute on most machines. The good thing about /checkhealth is that it not only tells you if it finds damage but if that damage is repairable or non-repairable. If it’s repairable, you can proceed to the /restorehealth option (covered in the following paragraphs); if it’s non-repairable, jump to Step 2.
If DISM reports that component store corruption is found and is repairable, you should attempt repairs. That syntax reads:
dism /online /cleanup-image /restorehealth
Even if errors were detected in the preceding step, this command should complete successfully. It replaces corrupt or questionable elements in the Windows Side-by-Side (WinSxS) store, reading from a local copy of your Windows image files.
The /restorehealth command can be tricky to use. Because it can actually repair a Windows image, it needs a source from which to attempt such repairs. You can omit the /source option, but if you do, the command will try to grab its files from Windows Update over the internet. This may or may not work, depending on firewall settings on your network.
A safer bet is to point DISM at a known good source for Windows image components on the local machine (or on your local network). This can be a Windows image ( .wim ) file or a compressed Windows image ( .esd , which is used for electronic software downloads of Windows installations, as the file extension is meant to communicate). You can also point to a separate copy of a WinSXS folder (the usual directory path is C:\Windows\WinSXS ) taken from another PC with similar or identical hardware for which dism ... /checkhealth returns a clean bill of health.
The syntax for image files is where things can get interesting. To point to the install.wim file that shows up in ISO downloads for the Windows 10 installer on a USB flash drive designated L: , for example, you must use the following source specification (which uses the first image it finds inside the .wim file, designated :1 ):
/source:WIM:L:\sources\install.wim:1
To use an ESD file, change the wim items to esd, as shown here:
/source:ESD:L:\sources\install.esd:1
If you run into difficulties getting this to work, try adding the /limitaccess switch to your command strings. This stops DISM from attempting to grab source files from Windows Update, which it will sometimes do even if pointed at a local source. If you just can’t get either of these to work, try a WinSXS folder instead.
Note: the version and language for the /source image must be identical to that for the image to be repaired. This may mean using HeiDoc.net , UUP Dump , or Microsoft’s Media Creation Tool to grab the correct Windows 10 or 11 version/build (see my article “ The best places to find Windows 10 ISOs ” for details on how to use these sources) and creating media or mounting the ISO file to give DISM the right /source from which to work. For Windows 11, check the Windows Insider Preview Downloads page to grab the proper ISO.
Figure 2 shows typical DISM output using /restorehealth :
Figure 2: Even when DISM /checkhealth finds errors, the /restorehealth option is usually successful. (Click image to enlarge it.)
Next, it’s time to run SFC, Microsoft’s System File Checker. To quote TechNet , the system file checker “scans and verifies versions of all protected system files.” It can tell you if it finds anything amiss if you enter SFC /scannow at the command line.
As with DISM, you must run SFC from an Administrator: Command Prompt or an Administrative PowerShell or Windows Terminal session. This command takes 5 to 10 minutes to complete, depending on your PC hardware. Unlike DISM, SFC scans and initiates repairs within a single command.
Figure 3 shows sample output when SFC finds files in need of repair. If this occurs on your PC, repeat the /scannow command until it gives the clear bill of health shown in Figure 4.
Figure 3: If SFC finds questionable files, it will repair them if it can. Here, it succeeds. (Click image to enlarge it.)
Figure 4: Eventually, SFC will report finding no “integrity violations.” You’re done! (Click image to enlarge it.)
In my experience, 80% of all problems will be solved at this point, so the odds are in your favor that you won’t have to keep going. But if DISM can’t fix your Windows image, or SFC can’t or won’t make repairs to your system files, proceed to Step 2.
A restore point is a snapshot of a Windows PC’s OS state from a specific point in time. If enabled, the Windows System Restore capability can create and maintain restore points on your behalf. To see if this is an option on your target machine, type restore point into the Windows 10 search box. The System Properties window should open to the System Protection tab, shown in Figure 5.
Figure 5: Access available restore points using the “System Restore…” button.
To look at restore points, you must work through the System Restore wizard. Click the System Restore... button to launch the wizard, then click the Next button on the first pane of the wizard to see a list of restore points available to you. (If you don’t like what you see, or you don’t see something from before your troubles started on this machine, click the Show more restore points checkbox for a complete list of what’s available to you.) Click the restore point to which you would like to revert.
Figure 6 shows the lone restore point available on my test PC.
Figure 6: For this story, I created a restore point named “Test restore point.”
Because I have only one restore point — I don’t use them much any more, for reasons I’ll explain coming up — I picked that item to show you what appears when you select a restore point in this utility. If you click the Scan for affected programs button it will tell you if any programs or drivers will be affected by rolling back to the restore point you’ve selected. In this case, there’s no impact, as shown in Figure 7. If something were to be affected, it would show up in either the top or bottom list in that results pane.
Figure 7: The current restore point has no impact. But older restore points will provide a list of drivers and programs that need to be reinstalled if you revert to that restore point.
It usually takes between 5 and 15 minutes to revert to a restore point. The amount of additional effort to catch back up to where you left off depends on the number of items that need to be installed or updated, as shown in Figure 7. This can take from minutes to an hour or more depending on size and scope.
All this said, I don’t use Restore Points anymore. I’ve run into occasional issues with failed restores, and I’ve seen plenty of discussion in Microsoft Community and TenForums among other users who’ve had similar problems. My preference is to restore an image built using Macrium Reflect (free or commercial; I use both). It’s faster than System Restore, and I’ve never been unable to restore a valid, integrity-checked Reflect backup. You decide what’s best for you; I use Reflect.
Restoring an image backup is much like reverting to a restore point: choose the image (usually by date and time) to which you’d like to roll back, then initiate the restore procedure. For example, Macrium Reflect offers a “Restore” menu, then allows you to browse stored backup files to pick the one you want in an Explorer-based Open window.
If reverting to a restore point or image backup doesn’t work (or you don’t have either of these), it’s time to move on to Step 3.
- Operating Systems
- Small and Medium Business
Windows power user tips

How to Fix “There Was a Problem Resetting Your PC” on Windows
First make sure it's plugged in
Resetting your PC is supposed to be the ultimate troubleshooting solution that fixes most system malfunctions on Windows. But what happens when your PC won’t reset? You can use other built-in tools to diagnose and fix the problem.
If your PC keeps displaying a “There was a problem resetting your PC” error whenever you try to reinstall Windows, the solutions listed below should resolve the issue.
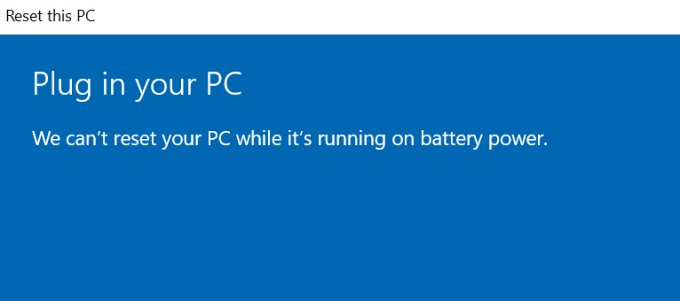
Besides system file corruption, a sudden power outage could also interrupt the PC reset process. That’s because Windows cannot reset your PC on battery power. So Windows can display this error if you accidentally unplug your laptop’s charger while performing a reset.
In this case, we recommend restarting your computer on AC power and trying the “Reset this PC” tool again. If the error message persists, use the troubleshooting steps below.
Workaround: Use the “Fresh Start” Tool
“Fresh Start” is what the “Reset this PC” functionality used to be on older versions of Windows. Microsoft rebranded the “Fresh Start” feature to “Reset this PC” with the launch of the Windows 10 version 2004. Interestingly, you can still access the “Fresh Restart” feature from the Command Prompt.
If you’re unable to reset your PC from the Settings menu, try using the “Fresh Start” tool.
Resetting your computer via Fresh Start will remove installed apps and other third-party components. Windows will also reset some system configurations and preferences to factory defaults. Your personal files, on the other hand, are left untouched.
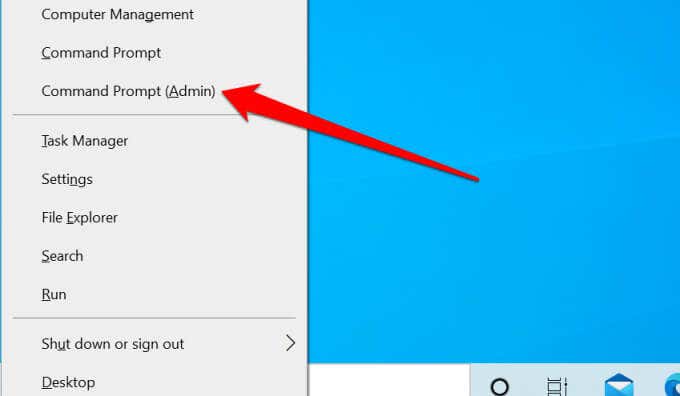
- Right-click the Start Menu icon (or press Windows key + X ) and select Command Prompt (Admin) .
- Paste systemreset.exe -cleanpc in the terminal and press Enter .

- Select Next on the Fresh Start interface to proceed.
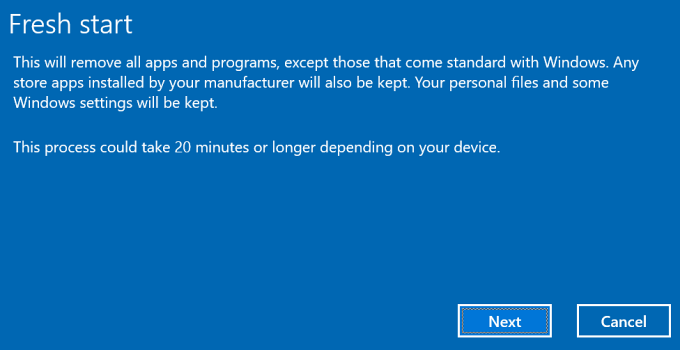
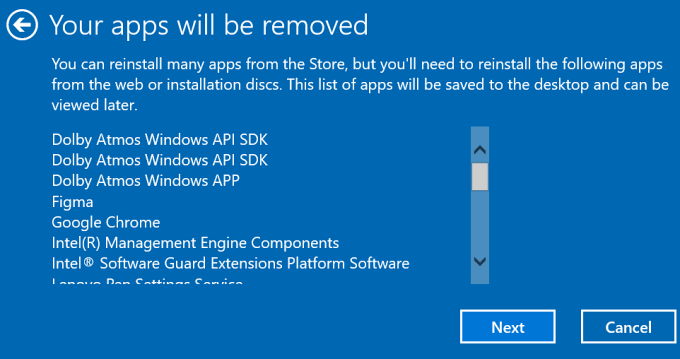
- The Fresh Start tool will display a list of applications that the reset operation will uninstall from your computer. Go through the apps and select Next to proceed.
Windows will create an HTML document (named “Removed Apps”) on the Desktop after the system reset process.
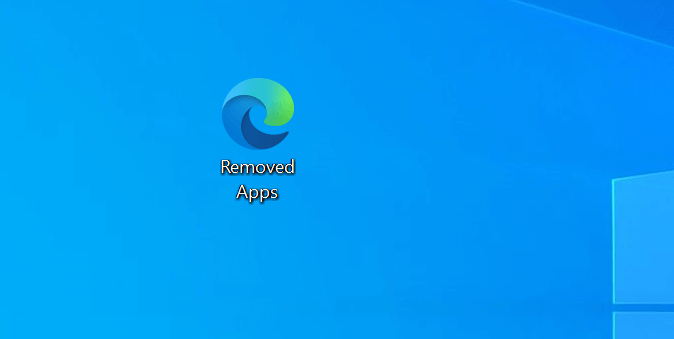
This document also contains the apps removed while resetting your PC, so you know what apps you need to reinstall.
- Select the Start button to reset your PC. It’s important to plug your device into a power source before clicking Start .
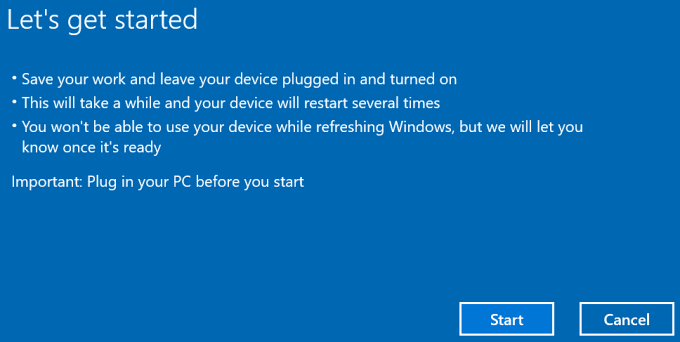
If you’re still unable to reset your PC using Fresh Start, proceed to the next troubleshooting step to check for file system corruption.
Check for System File Corruption
File corruption is another common cause of the “There was a problem resetting your PC” failure for Windows Reset. Run the System File Checker (SFC) tool to find and repair damaged operating system files on your PC.
- Press Windows key + X and select Command Prompt (Admin) on the Quick Access menu.
- Paste or type DISM /Online /Cleanup-Image /RestoreHealth in the terminal window and press Enter .

Note that it’ll take several minutes to run the Deployment Image Servicing and Management (DISM) command. Windows will scan your computer for corruption during the process and replace damaged system files with stable copies obtained from Microsoft’s update servers. Connect your PC to the internet before running the command.
- Paste sfc /scannow in the terminal and press Enter .
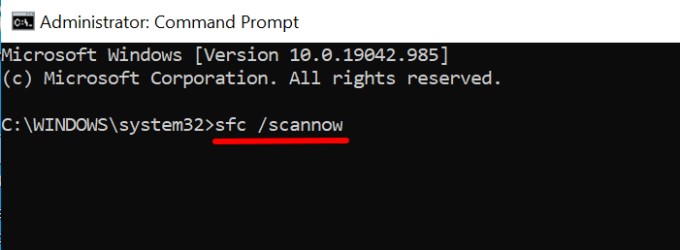
The command above will also trigger the Windows System File Checker (SFC) to scan for missing and corrupt system files. The scan duration may run for minutes or hours — depending on the size of your PC’s storage and the number of files.
- Restart your computer and retry the “Reset this PC” recovery tool.
Re-enable REAgentC.exe
The REAgentC.exe tool powers the Windows Recovery Environment (Windows RE), which in turn powers reset and recovery operations on your PC. If the Windows RE is corrupt or disabled, you might encounter difficulties resetting your computer, performing a system restore, and using other recovery tools.
Follow the steps below to re-enable the Windows Recovery Environment.
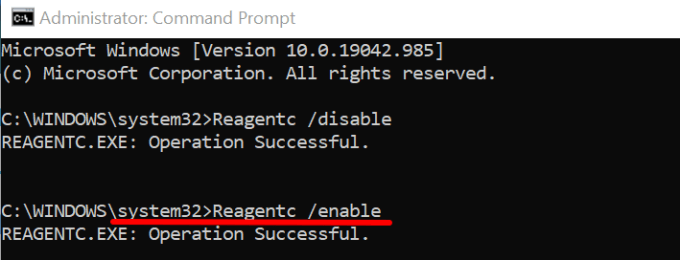
- Paste Reagentc /disable in the terminal and press Enter .

That’ll disable any active recovery image. Proceed to the next step when you get an “Operation Successful” message.
- Afterward, paste Reagentc /enable in the terminal and press Enter .
- Close the Command Prompt window and try resetting your PC again.
Perform a System Restore
If you’re still getting the “There was a problem resetting your PC” error, try reverting your computer to a previous state. But first, you’ll need to have the System Protection feature enabled on your PC . That’ll trigger Windows to create a restore point once every week automatically.
If a malicious program or corrupt registry files are causing the Windows reset failure, performing a system restore might fix this problem.
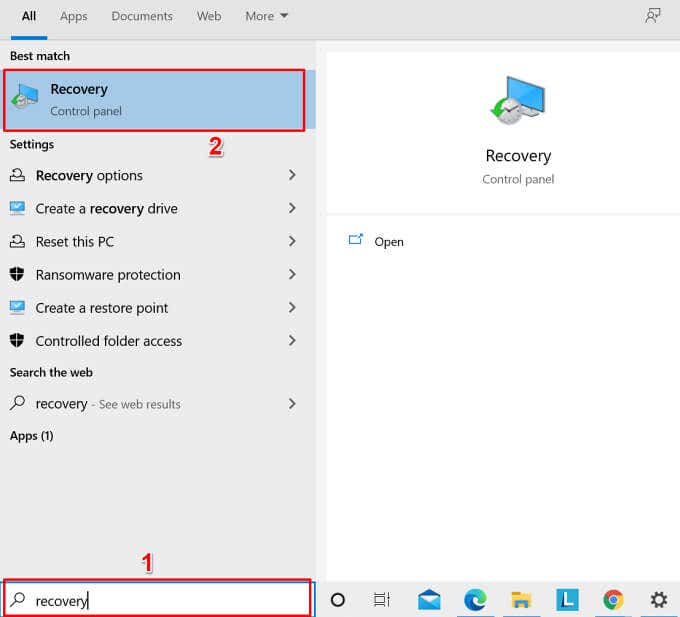
- Type recovery in the Windows Search bar and select the Recovery option in the left pane of the Control Panel.
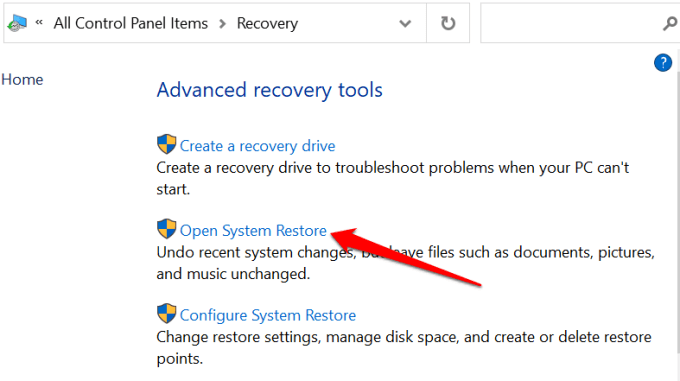
- Select Open System Restore on the Advanced recovery tools page.
- Windows will recommend and preselect the most recent restore point. Select Next to restore the system files and settings in that restore point.
Alternatively, select Choose a different restore point and select Next to choose an older restore point.
- Confirm your selection and select Finish to start the restoration process.
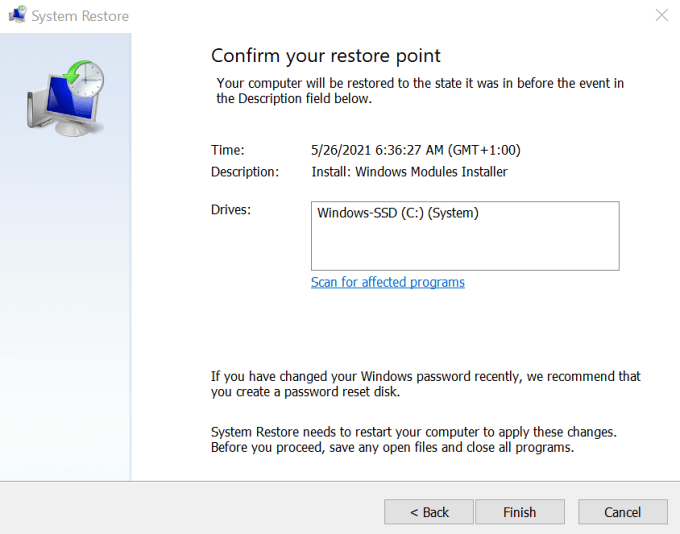
The System Restore tool will restart your computer to apply the changes. Therefore, ensure you close all apps and files, so you don’t lose unsaved data.
Try Other Windows Reset Techniques
If the error continues, consider resetting Windows using a bootable USB drive or Windows installation media. Refer to this tutorial on wiping and reinstalling Windows to learn other ways to reset your PC.
Sodiq has written thousands of tutorials, guides, and explainers over the past 4 years to help people solve problems with Android, iOS, Mac, and Windows devices. He also enjoys reviewing consumer tech products (smartphones, smart home devices, accessories, etc.) and binge-watching comedy series in his spare time. Read Sodiq's Full Bio
Read More Posts:

Leave a Reply
Your email address will not be published. Required fields are marked *
How to Fix Windows 10 with a 30-Minute Repair Install
You can solve many Windows 10 problems with an in-place upgrade reinstall.

Whether you’re trying to fix a BSOD such as a IRQL_NOT_LESS_OR_EQUAL or a CRITICAL_PROCESS_DIED error, serious Windows 10 troubleshooting is like plunging down the rabbit hole in Alice in Wonderland . At some point you may feel like you’ve taken on more than you can handle, you’re in a strange place, and the ultimate outcome is far from certain. That’s why I always keep track of the time I spend on troubleshooting, with a definite exit strategy in mind. Should the weeds get too thick to hack through, or the circumstances become too vexing or dire, that exit strategy will work to solve most problems that require troubleshooting in the first place.
For me – and I would suggest for most readers – the natural time limit on Windows troubleshooting is half an hour (30 minutes). Why? That’s about how long it takes to perform a special-purpose operating system repair that shoots most forms of Windows trouble. Especially if your problem (or problems) are software-related, this repair is quite likely to fix them. Simply put, it replaces ALL of the OS files on a Windows 10 PC but leaves other files, installed applications, and most (but not all) settings and preferences alone.
The In-Place Upgrade Repair Install
It’s little-known and underappreciated, but one can install the same version of a Windows 10 OS onto an existing copy. This uses the Windows installation files in ISO format.
Creating a Windows Install ISO
There are several ways to get a Windows 10 install ISO, but the easiest comes directly from Microsoft ’s download page.
1. Download the Media Creation Tool by navigating to Microsoft’s Download Windows 10 page and clicking the button labeled “Download tool now” under the “Create Windows 10 installation media” heading.

The name of the software tool is MediaCreationTool.exe. I usually rename it to identify the version of Windows 10 it downloads. At any given point in time, the MCT grabs whatever version of Windows 10 is most current – right now that’s 21H1. So I renamed that file MediaCreationTool21H1.exe.
2. Launch the Media Creation Tool . It shows up in a window labeled “Windows 10 Setup” and makes you wait while it gets “a few things ready.”
Stay on the Cutting Edge
Join the experts who read Tom's Hardware for the inside track on enthusiast PC tech news — and have for over 25 years. We'll send breaking news and in-depth reviews of CPUs, GPUs, AI, maker hardware and more straight to your inbox.
3. Approve the license terms when prompted.
4. Select “Create installation media…”
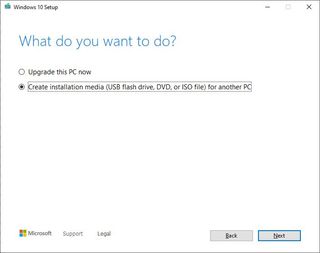
5. Select the language, Edition and Architecture (ex: 64-bit) when prompted.
6. Select ISO file when asked to choose the media you want to output to.
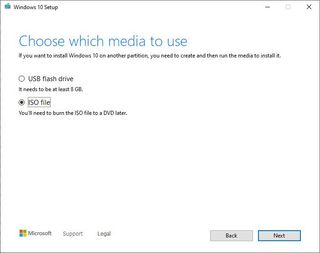
By default this creates a file named Windows.iso; as before I name mine Windows21H1.iso so I can identify the version later on. This process takes a while. On my 2016 vintage i7 Skylake PC, it takes around 5 minutes to download and process the necessary data, and leave the ISO file behind in its designated storage location. After the download is complete, the MCT verifies the file structure (this is included in the 5-minute timeframe). When it’s complete it will show you the full path where the new ISO file now resides, like this:
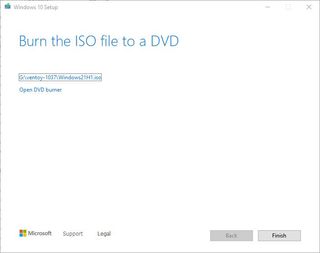
7. Click the “Finish” button and MCT will tidy up after itself and then close (this happens in less than 5 seconds on my PC: YMMV).
Performing the In-place Repair Upgrade Install
Established best practice dictates a bit of preparation before you start this operation. You’ll want to save any work, and close all open applications. If you have external storage devices attached to your PC, you’ll want to “safely remove them” so they can’t impact or interfere with repairs.
If your issues are related to the boot/system drive, many experts think it’s useful to disconnect or dismount all other internal storage devices as well. I’ve never bothered with this when performing this repair on most of my PCs, and it hasn’t affected the outcome as far as I can tell. But if you are dealing with boot or start-up issues, this could be helpful. You’ll need your mouse, monitor and keyboard, though, so please leave all of them attached as usual.
One more thing: before making major system changes (and this maneuver DEFINITELY counts as such) it’s always a good idea to make an image backup of your PC if you don’t have a recent copy. I make one every morning at 9:00 AM as a scheduled task in Macrium Reflect so I don’t usually do this (unless it’s late in the day). Be sure to have a bootable recovery disk handy that can restore your PC in case the OS drive goes south, and know how to use it for that purpose
1. Navigate to your newly-created ISO file in Explorer.
2. Right-click the file and select “Mount” from the resulting pop-up menu (if Mount does not appear, click Open, and then open with File Explorer). Either way, a new virtual device labeled “DVD drive” will appear in Explorer. It should look something like the item labeled DVD Drive (P:) ESD-ISO shown next.

After all this effort, starting the in-place upgrade repair install is dead simple.
3. Double-click the setup-exe file on the mounted ISO. This starts an upgrade to its local version of Windows. It will systematically replace every operating system file (and move the previous version to a Windows.old folder to which you can roll back if you like (Start 🡪 Settings 🡪 Update & Security 🡪 Recovery 🡪 Go back to the previous version of Windows 10/click the “Get Started” button).

Notice that my PC was last updated more than 10 days ago, so it doesn’t have that option (but then, I have this morning’s image backup and my Rescue Media handy).
Once you fire off setup.exe, it’s just like all other Windows upgrades. It starts off with downloading and manipulating a set of files for the new OS version, while the old OS keeps running. Then you’re asked to reboot your PC, after which a Windows Preinstallation Environment, aka WinPE, takes over to handle the rest of the install process, during which at least two more reboots will occur. Eventually, you’ll have a repaired OS at your disposal. Hopefully, the trouble you’ve been trying to shoot will also be cleared away, as if by magic.
What Can’t an In-Place Upgrade Repair Install Fix?
This process takes such a short amount of time to complete, I’ve made it a part of my standard troubleshooting sequence. Unless I’m troubleshooting hardware or device driver issues – which this repair may not fix if it’s driver related, and can’t fix if it’s hardware-caused – I’ve found this repair to be as close to a “silver bullet” for handling pesky or complex Windows problems as it ever gets. And because it doesn’t take too long to give it a try, you won’t be that far behind the curve even if it doesn’t work. My own experience is that this repair handles 90-plus percent of the problems I run into and can’t fix in less than half an hour. Hopefully, your experience will be the same!

Ed Tittel is a long-time IT writer, researcher and consultant, and occasional contributor to Tom’s Hardware. A Windows Insider MVP since 2018, he likes to cover OS-related driver, troubleshooting, and security topics.
New Windows Insider build gets rid of annoying watermark, adds Copilot support for local accounts
How to Add Custom Shortcuts to the Windows 11 or 10 Context Menu
OpenAI and Microsoft reportedly planning $100 billion datacenter project for an AI supercomputer
- Colif Wonders if the iso used has to match that is currently installed as that was the limitation on other repair installs? Reply
- jpe1701 I always have my current version of windows on a flash drive for this. You can also update to the new version of windows this way without using windows update. That's how I update when I'm ready to go to the newest version because my internet connection at home is horrible so I download it somewhere else. Reply
- kiniku Great guide if you can boot into Windows. But then again, if you can, there are plenty of resources and tools that can resolve these problems. Reply
- jessegood Had a corrupt system file stopping the monthly quality updates. 30 minutes back in business. No issues. Reply
kiniku said: Great guide if you can boot into Windows. But then again, if you can, there are plenty of resources and tools that can resolve these problems.
- derekullo If you have a recovery partition you don't even need to download/create an ISO to reset the computer. https://support.microsoft.com/en-us/windows/how-to-refresh-reset-or-restore-your-pc-51391d9a-eb0a-84a7-69e4-c2c1fbceb8dd You can also do a complete reset that erases all of your files and overwrites them many times, takes about 10 hours, as an alternative to using D-BAN. Reply
- Alvar "Miles" Udell Thankfully too the last couple of builds of Windows 10 have been very stable, so the ability to "Refresh My PC" using cloud downloaded copy of the latest build is an option as well. Reply
Admin said: If you spend more than 30 minutes trying to fix a problem in Windows, this could save you a lot of time. How to Fix Windows 10 with a 30-Minute Repair Install : Read more
- Simon_S you lot better puting this on usb flash drive if you can then dont have burn disk or have dvd in your pc;) Reply
- Thanks for help I have been fighting problems with prints spoolers etc and not finding any answer This solved the problem Thanks a lot Reply
- View All 26 Comments
Most Popular
By Mark Tyson March 29, 2024
By Anton Shilov March 29, 2024
By Aaron Klotz March 29, 2024
By Christopher Harper March 29, 2024
By Avram Piltch March 28, 2024
By Les Pounder March 28, 2024
By Jarred Walton March 28, 2024
By Aaron Klotz March 28, 2024
By Christopher Harper March 28, 2024
How to fix Windows Update problems on Windows 10
If Windows Update isn't working or showing an error, then use this guide to troubleshoot and resolve most frequent problems on Windows 10.
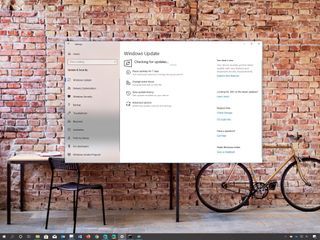
On Windows 10 , Windows Update is an essential component that provides the mechanism to download and install quality updates as well as feature updates to improve the overall performance, integrate new features, and patch security vulnerabilities. However, for different reasons, sometimes, you may experience problems with the feature, such as stuck for a long time scanning and downloading, errors and failures during installation, and many other issues.
Thankfully, if you run into an issue or an error (for example, 0x80070020, 0x80240438, 0xC19001E2, 0x80070424, 0x80242006, 0x8007000E, 0x80D02002, 0x80070070, 0x80096004, 0x80080005, 0x8007000D, or 0x80240034), you can use a number of troubleshooting steps to fix Windows Update on your installation.
In this Windows 10 guide, we'll walk you through several ways to fix common problems with Windows Update on your device.
How to fix Windows Update covering basics
How to fix windows update using troubleshooter, how to fix windows update installing update manually, how to fix windows update repairing installation, how to fix windows update skipping maintenance schedule, how to fix windows update installing latest version, how to fix windows update performing clean installation.
If you're trying to update your device and Windows Update isn't working, you can follow a few necessary steps to resolve the problem, including restarting your computer, checking to make sure that you have a working internet connection, and using the feature to pause updates.
Restarting device
To restart your device, use these steps:
- Open Start .
- Click the Power options menu.
- Click the Restart button.
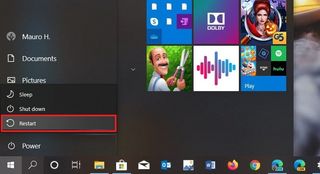
Once you complete the steps, try to update your device again from the Windows Update settings page.
Checking internet connection
Although it might be obvious, but if you're not connected to the internet, you won't be able to download and install updates.
Get the Windows Central Newsletter
All the latest news, reviews, and guides for Windows and Xbox diehards.
To confirm you have an active internet connection, use these steps:
- Search for Command Prompt and click the top result to open the console.
- Type the following command to confirm you have an active internet connection and press Enter : ping google.com In the command, we're pinging Google domain as an example, but you can use other pingable domains or services, such as CloudFlare.com, or Google DNS services (8.8.8.8 or 8.8.4.4).
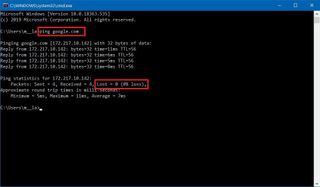
- Confirm you're getting a reply without any packet loss.
Of course, you can always try to open any website with your web browser, but using Command Prompt is a more effective method to confirm network connectivity.
If you can't connect to the internet, then it's probably a problem with your connection, not Windows Update. You can use this comprehensive guide to resolve most common issues connecting to a network.
Pausing updates
Sometimes, if you're dealing with issues downloading updates, pausing and resuming Windows Update can help to fix the problem.
To pause and resume updates on Windows 10, use these steps:
- Open Settings .
- Click on Update & Security .
- Click on Windows Update .
- Click the Pause updates for 7 days button.
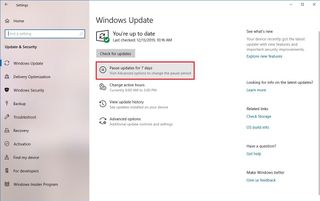
- Restart your device.
- Click the Resume updates button.
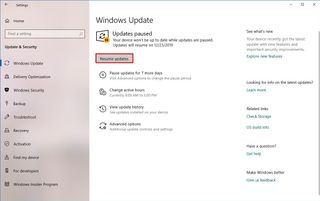
After you complete the steps, try checking for updates again to see if the problem was resolved.
Freeing up space
Usually, the lack of storage can trigger errors trying to updates your device. If you need additional space to install updates, use these steps:
- Click on System .
- Click on Storage .
- Under the "Local Disk C:" section, click the Temporary files section.
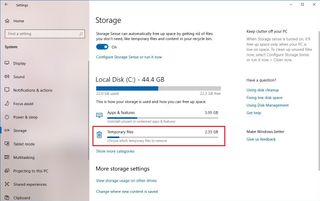
- Select the items that you want to clear to free up space. Quick note: Selecting the Downloads option will clear the files from the "Downloads" folder. If you have important files, clear the option, or copy the files you want to keep to an external drive before proceeding.
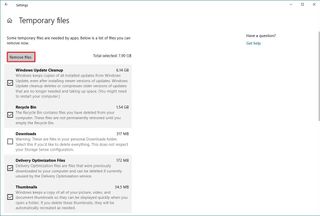
- Click the Remove files button.
Once you complete the steps, you'll have more space to run Windows Update without triggering the no enough space error code.
If you have to reclaim more space, you can check this guide with many more ways to free up space on Windows 10.
Windows 10 comes with a Windows Update troubleshooter tool that can diagnose and resolve common problems with the feature.
To use the troubleshooter to fix problems with Windows Update, use these steps:
- Click on Troubleshoot .
- Under the "Get up and running" section, select the Windows Update option.
- Click the Run the troubleshooter button.
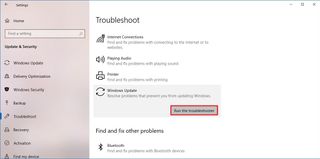
- Click the Close button.
Once you complete the steps, the troubleshooter will diagnose and resolve any issue that it finds, and then you should be able to update again.
Sometimes installing the most recent update manually can help to fix problems with the Windows Update service.
Determining system type
Before you can download the correct update package, you have to confirm whether you're using a 32-bit or 64-bit version of Windows 10.
To determine your device system type, use these steps:
- Click on About .
- Under the "Device specifications" section, determine the system type.
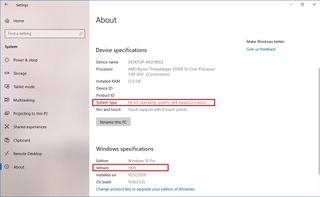
- Under the "Windows specifications" section, determine the version number.
After you complete the steps, you can proceed to download the latest package for your installation.
Downloading updates manually
To download quality updates of Windows 10 manually, use these steps:
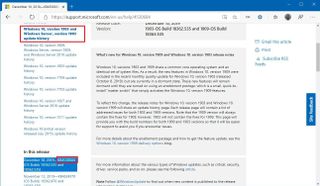
- Open the Windows Update History page .
- Click the version of Windows 10 that matches your installation (for example, version 1909 ) from the left side.
- Confirm the knowledge base number of the latest update — for example, KB4530684 .
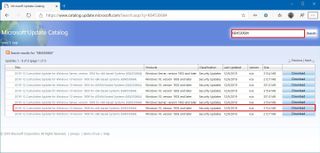
- Open the Microsoft Update Catalog page .
- Search for the KB number — for example, KB4530684 .
- Click the Download button for the version that applies for your installation. For instance, if you're running the 64-bit version, you should click the download button for the "Windows 10 Version 1903 for x64-based Systems" update.
- Click the .msu download link to save the package on your device.
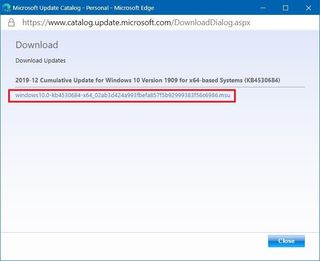
Once you complete the steps, you can proceed to install the update on your computer.
Installing updates manually
To install the latest update that you downloaded manually, use these steps:
- Search for Command Prompt , right-click the top result, and select the Run as administrator option.
- Type the following command to install the update and press Enter : wusa C:\PATH-TO-UPDATE\NAME-OF-UPDATE.msu /quiet /norestart This example installs the update package located in the Downloads folder: wusa C:\Users\m__la\Downloads\windows10.0-kb4530684-x64_02ab3d424a993fbefa857f5b92999383f56c6986.msu /quiet /norestart Quick tip: If the name is too long to type, then type Windows10.0-kb and press the Tab key to complete the name automatically and continue typing the command.
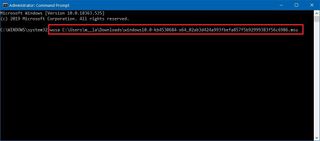
After you complete the steps, the update package will install, but you'll need to restart the device manually to finish applying the changes. If the update applies successfully, there's a good chance that Windows Update will start working again.
If there's a problem with running Windows Update, there is a chance that you may have one or multiple corrupted system files, which you can repair using the System File Checker (SFC) command tool.
To repair the Windows 10 installation to resolve issues with Windows Update, use these steps:
- Type the following command to repair the system image and press Enter : dism /Online /Cleanup-image /Restorehealth
- Type the following command to repair the installation files and press Enter : sfc /scannow
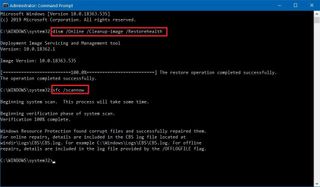
Once you complete the steps, try running Windows Update one more time, and if the problem was a missing or damaged system file, now the update service should start working as always.
Although updates are essential to keep your device running smoothly and secure, sometimes updates can roll out with unknown bugs that may cause problems, including installation issues.
If you suspect that the problem could be the update and not your installation, it's recommended not to install the cumulative update until the next release.
To skip an update release, you have to hide it from your device using these steps:
- Open the Windows Support website .
- Click the Download the "Show or hide updates" troubleshooter package now link to save the troubleshooter on your device.
- Double-click the wsuhowhide.diagcab file.
- Click the Next button.
- Click the Hide updates option.
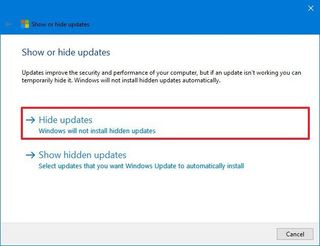
- Select the update causing the problem.
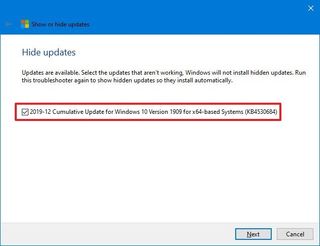
After you complete the steps, the update will no longer be available for your device, resolving any errors trying to install the quality update using Windows Update. However, when a follow-up update becomes available, it'll eventually download and install automatically.
Sometimes if you're running an older version of Windows 10, you can try upgrading to the most recent release to fix many problems with the current installation, including issues with Windows Update. While there are multiple ways to upgrade to the latest version, using the Update Assistant tool is the easiest method.
To upgrade a device to the latest version with the Update Assistant, use these steps:
- Open the Windows 10 download page .
- Click the Update now button.
- Save the Update Assistant installer to your device.
- Double-click the Windows10Upgrade file to launch the assistant.
- Click the Update Now button.
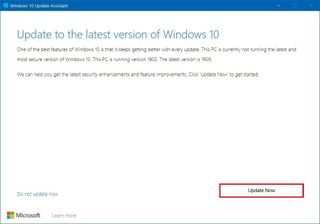
- Click the Restart Now button.
Once you complete the steps, the new version of Windows 10 will hopefully resolve the problem with Windows Update, and it might even improve system performance as well as other issues with the previous release.
If nothing seems to work to resolve the issue with Windows Update, as a last resort, you may want to consider performing a clean installation of Windows 10 to resolve this and other problems.
Creating bootable media
Before you can proceed with the installation of Windows 10, you need to create a USB media to start your device and continue with the installation.
To create a bootable media using the Media Creation Tool, use these steps:
- Click the Download tool now button.
- Save the Media Creation Tool installer to your device.
- Double-click the MediaCreationToolxxxx.exe file to begin the process.
- Click the Accept button to agree to the terms.
- Select the Create install media (USB flash drive, DVD, or ISO file) for another PC option.
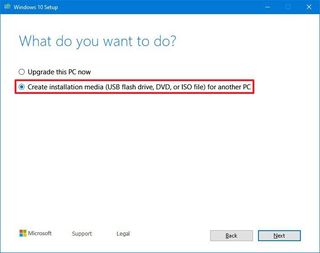
- Select the USB flash drive option.
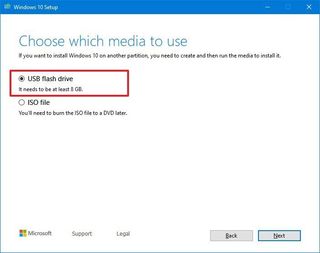
- Click the Next button
- Select the flash drive from the list.
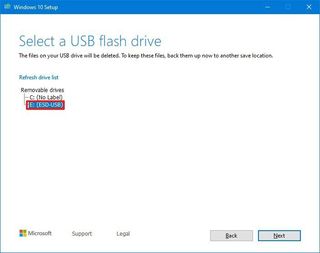
- Click the Finish button.
After you complete the steps, you can proceed with the clean installation of Windows 10.
Installing Windows 10
To do a clean installation of Windows 10, use these steps:
Warning: This is a friendly reminder that this process will erase everything on your computer. It's always recommended to make a temporary full backup of your PC before proceeding.
- Start the computer with the Windows 10 USB media. Quick tip: If you can't boot your device with the bootable media, then you need to change your basic input/output system (BIOS) settings to change the boot order to start the device from USB. Usually, this process requires hitting one of the function keys (F1, F2, F3, F10, or F12), the ESC, or Delete key as soon as you start the computer. The only caveat is that these settings will be different per manufacturer, and even by computer model. So make sure to check your device manufacturer's support website for more specific instructions.
- On prompt, press any key to boot from the device.
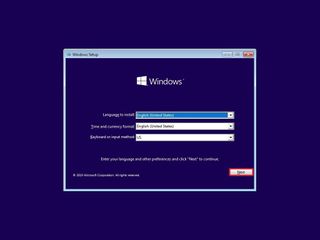
- On the "Windows Setup," click the Next button.
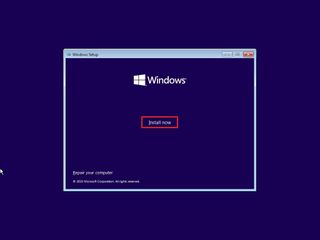
- Click the Install now button.
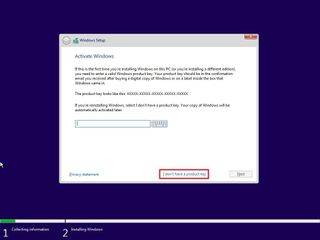
- Click the I don't have a product key option to continue (assuming that your device was already activated).
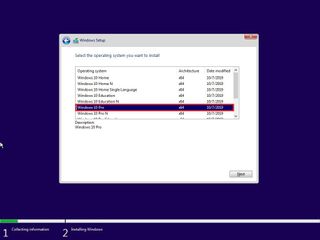
- Select the edition of Windows 10. (This selection must match the version your product key activates.)
- Select the I accept the license terms option to continue.
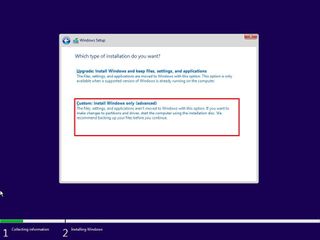
- Click on the Custom: Install Windows only (Advanced) option.
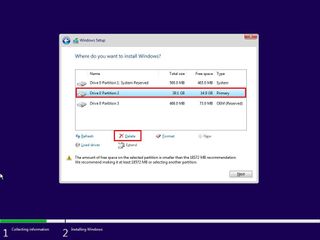
- Select the partition with the current installation (usually "Drive 0"), and click the Delete button. Quick tip: If "Drive 0" has multiple partitions, you have to select and delete each of the partitions to allow the setup to use the entire drive for the new clean installation. Windows 10 will create the required partitions automatically during the process. It's not necessary to delete the partitions on secondary drives.
- Click the Yes button.
- Select the empty drive (Drive 0 Unallocated Space).
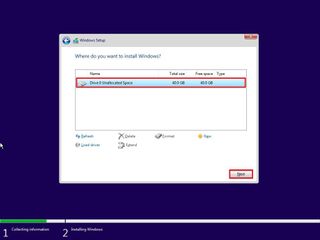
Once you complete the steps, you'll need to continue with the out-of-box experience (OOBE) to configure your device, and after the process, the issue with Windows Update should be resolved as well as other system problems.
If you need assistant performing a clean install of Windows 10, you can use this comprehensive guide .

Mauro Huculak is technical writer for WindowsCentral.com. His primary focus is to write comprehensive how-tos to help users get the most out of Windows 10 and its many related technologies. He has an IT background with professional certifications from Microsoft, Cisco, and CompTIA, and he's a recognized member of the Microsoft MVP community.
- 2 How to create custom screensaver from your favorite images on Windows 11
- 3 Dragon's Dogma 2's first big update patch is here and adds a "New Game" option, but it's late on Xbox
- 4 Dragon's Dogma 2 'Hunt for the Jadeite Orb' quest guide: Location, who to give it to, and all outcomes
- 5 Microsoft says ChatGPT isn't better than Copilot AI; you're just not using it as intended
The Best Free Windows 10 Repair Tools to Fix Any Problem
If you're running into system problems or rogue settings, you should use these free Windows 10 repair tools to fix your PC.
Windows 10 is actively used in around one billion devices, essentially capturing the biggest share of the operating system market. And it's constantly on improvement as well.
It isn't without fault, though. There are still plenty of issues with Windows 10, and the frequent nature of updates and fixes illustrates that perfectly. However, you can attempt to fix the majority of Windows 10 problems using nothing more than a few free tools. Let's take a look.
First, Ensure Your PC Is Updated
Before you start installing these best programs to fix Windows 10 problems, make sure you have done something vital: update your Windows to the latest version . Yes, we just said updates can introduce unexpected issues. But that isn't always the case. More often than not, Windows updates can obliterate a swath of annoying bugs.
Press Win + I to open the Settings panel and head to Update & Security > Windows Update . If there is an update waiting, save your work, bookmark your browser tabs, and hit Restart now .
Aside from updating your system, you should also check out our list of the best computer security and antivirus tools , closing off another common source of issues when using Windows 10 (i.e. malware).
Now, on to the best programs to fix almost any problem in Windows 10.
1. IOBit Driver Booster
Windows 10 tries to handle driver updates, but it isn't perfect. Sometimes it'll leave some essential driver updates behind. So, when a hardware issue strikes, it's always worth checking if you need to update your drivers.
One of the best ways to check the status of your Windows drivers is by using a free driver update tool, and IOBit Driver Booster is one of the best Windows 10 driver update tools, claiming to fix and update over 1,000,000 drivers.
Follow these steps to install and use the tool:
- Download and install Driver Booster, making sure to deselect any additional software offered to you.
- Open Driver Booster. You'll spot three tabs: Outdated, UpToDate, and Action Center . The first two are fairly self-explanatory, containing the lists of your system drivers and their status. The Action Center tab contains download links for other IOBit utilities.
- Select the Outdated tab. You can choose to Update Now using the big red button, or head down the list and update individual drivers as you see fit. You can also choose to ignore specific drivers, roll them back to their previous state, or uninstall them entirely. Driver Booster automatically downloads and applies the drivers to your system, but you may require a system reboot to finish the installation process.
Driver Booster creates a system restore point before updating your drivers, as well as including options for automatic shutdown or reboot after the driver installation process completes---handy for leaving the tool running just before bed!
Download: IOBit Driver Booster (Free, paid version available)
Alternative: Snappy Driver Installer
Snappy Driver Installer (SDI) is a free and open-source driver updater with a vast driver collection for offline use. Microsoft keeps Windows 10 up-to-date, but sometimes your drivers get left behind—and outdated drivers can often cause weird issues.
Head to the Snappy Driver Installer download page. Download and unzip the SDI Lite version, then run the SDI application. Select Download Indexes Only to let SDI to quickly scan your computer to see which drivers need updating or installing (and then marvel at the "grass" theme, and change it if you see fit!).
After SDI scans your system, it offers a list of potential new drivers. Head down the list and select the drivers you want to install (or click Select all in the left-hand option menu), make sure to select Create a new restore point , then select Install. The download and update process can take a while, depending on how many drivers need updating.
Once the download and installation process completes, restart your system.
Download: Snappy Driver Installer (Free)
2. FixWin 10
FixWin 10 isn't just one of the best Windows 10 repair tools, it's portable! You can use FixWin 10 to repair a huge variety of operating system issues.
The program is divided into six neat sections, each representing problems with a specific component (File Explorer, System Tools, etc.). Each section contains at least ten fixes (see the full list on TheWindowsClub site ). Some fixes may require a reboot, but you'll be informed of this when you click the Fix button.
Fixes vary from common irritants, such as the Recycle Bin icon failing to automatically update after emptying, to more advanced fixes like restoring access to the Registry Editor.
The Additional Fixes section contains novel-but-useful tweaks, such as restoring the Sticky Notes delete warning dialog box, while the Troubleshooters section directs you to the relevant Windows 10 troubleshooter tool on your system. The integrated troubleshooters are sometimes the easiest option, at least before delving into the depths of your system.
Download: FixWin 10 (Free)
3. Ultimate Windows Tweaker
Ultimate Windows Tweaker has the same developer as FixWin10 (The Windows Club). This is immediately evident because both programs share the same easy-to-use interface.
Unlike FixWin 10, which addresses Windows 10 issues and lets you fix them, this program enables you to quickly enable, disable, hide, or remove specific features from Windows.
You can make each change listed in this program using the Windows 10 Settings app, the Registry Editor, or the Group Policy Editor. However, Ultimate Windows Tweaker puts all the options within neat sections that list relevant issues, which you can then address quickly.
Click the Create Restore Point button at the bottom left before you start, tick the changes you want to make, then click Apply at the bottom. The Additional section lets you bring back Windows 7's Windows Photo Viewer with one click.
TheWindowsClub offers over 200 Windows 10 tweaks at the click of a button. Modifying your OS has never been easier.
Download: Ultimate Windows Tweaker (Free)
4. Windows Repair
Windows Repair (All in One) is another free and useful Windows 10 repair tool you can use to repair numerous Windows 10 issues. The Windows Repair developer strongly suggests you should boot your PC in Safe Mode for maximum effect. The Windows Repair tool has its own Reboot to Safe Mode button for a quick reboot.
The repairs cover registry permissions, file permissions, Windows Firewall settings, Winsock and DNS cache fixes, Windows Update issues, and much more. The Windows Repair tool guides you through a fixing process that automates the Windows Check Disk (chkdsk) and System File Checker (sfc) utilities.
If the utilities don't fix your Windows issues or errors —and you know what you're doing and understand the risks—you can head to the Repairs tab. Here you have six options. The Open Repairs button opens the repair panel containing the numerous fixes available. The other options are preset to fix specific issues such as malware cleanup, broken file permissions, and Windows Updates.
Download: Windows Repair (Free)
5. Windows Repair Toolbox
Windows 10 is a great operating system, and despite some well-documented irritations, most users seem to enjoy using it. And while we don't necessarily disagree with the often repeated advice of using specialist tools, there's a case to be made for the ease of usability that an all-in-one tool gives.
Because let's be honest, who has the time and money to go out and look up fixes for every other PC problem that pop-ups—especially when an alternative exists.
With Windows Repair Toolbox , you get a complete package of pretty much all the important repair tools you'll need for your PC. When you open up the application, you'll see a host of other tools on the home screen, arranged in separate sections like Hardware, Repairs, Uninstaller , and more.
So, when you have, say, a PC rife with generic Windows 10 errors, you'll have with you a plethora of useful applications to choose from, available in the Repairs section. To use any of these applications, simply click on one, and it'll be downloaded and ready to use.
The tool has other handy features as well. For instance, the Malware Removal tab offers a multitude of malware scan and removal solutions. RKill, Kaspersky, Microsoft, and even Ccleaner—it's all here. There's also a Run Unattended option that lets you run a scan without downloading any specific tool.
All in all, we believe you won't go wrong with this application as your first choice for a free Windows 10 repair tool.
Download: Windows Repair Toolbox (Free)
6. O&O ShutUp10
Windows 10 has privacy issues, and Microsoft knows it. Windows 10 privacy control has improved slightly since its 2015 release, but the core issues of tracking, telemetry, and data gathering remain.
While some users believe this is a necessary evil for the operating system development to continue with lashings of user-data, you don't have to give up your data. Several tools curtail Microsoft and Windows 10 data gathering tendencies, and O&O ShutUp10 is one of them.
The program has nine sections offering various privacy settings, many of which are not directly available in the operating system. ShutUp10 makes turning off the unseen options as simple as flicking the numerous switches.
Most importantly, each option comes with a brief description, so you know what you're turning off and what functionality it might affect. Unfortunately, there are some downsides to turning everything off, so move slowly and check each option out.
O&O ShutUp10 has a handy Apply only recommended settings option, as well as the Recommended and somewhat recommended settings option that goes even further.
Download: O&O ShutUp10 (free)
You can think of DISM++ as a GUI ( Graphical User Interface ) version of DISM (Deployment Image Servicing and Management)—the free Windows command line utility tool that can help you prepare, modify, and repair system images.
So, DISM++ is the tool you turn to when you’re experiencing crashes or errors on your Windows 10, and all the other tools have been unable to help you.
Since the app doesn’t need to use a command line, all you’ve to do after the installation is complete is launch the app and choose the utility you’d like to use.
For example, if you click the Disk Clean-up option, you can choose various clean-up options. From there, you must click on Clean Up to begin the cleaning-up process. You can then remove everything from download history, search history, and error reports, to your cache files.
Download: DISM++ (Free)

How Do You Fix Windows 10 Problems?
These are some of the best programs that will fix (almost) any problem in your Windows 10. Hopefully, though, you found the one that's most relevant to your needs right now. Of course, there are tons of free and paid programs out there that cater to different Windows problems; be it corruption, data loss, or something else.
But, in some cases, no matter how many tools you try, your Windows just won't work as before. For situations like that, we always recommend more potent solutions like Windows Restore or Factory Reset.

- Disk & Data Manager
- Partition Wizard
- Power Data Recovery
- ShadowMaker
- Media Toolkit
- uTube Downloader
- Video Converter
- Download Partition Wizard Free Edition: Download Pro Edition: Try Demo Server Edition: Try Demo
- Resize Partition
How to Fix Windows 10/11 Diagnosing Your PC Error? [10 Ways]
A great many people complain about Windows 10 diagnosing your PC error . Why Windows 10/11 stuck on diagnosing your PC? How to get out of diagnosing your PC loop? Now, let’s explore the answers together with MiniTool Partition Wizard .
Windows 10 Laptop stuck on “Diagnosing your PC”. I've had problems with my laptop for the last around 24 hours, and it's gotten to this screen, but never advanced to the advanced startup blue screen. A bunch of searching hasn't helped me and I don't have money to buy anything, although I have another laptop that is broken (HP Windows 10) if that means anything. https://answers.microsoft.com/en-us/windows/forum/all/laptop-stuck-on-diagnosing-your-pc/685ee7c7-9c02-47a0-ab26-9f6ae1cd6039
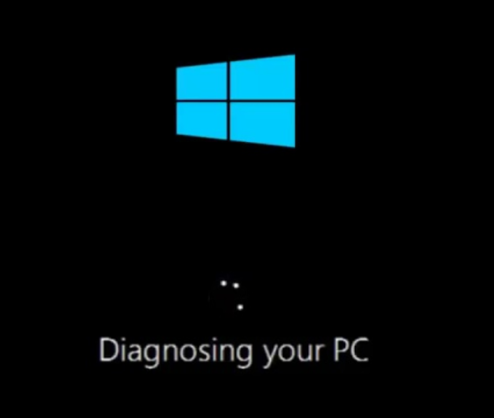
Why Windows 10/11 Stuck on Diagnosing Your PC
What causes the “diagnosing your PC Windows 10/11” error? After investigating extensive user reports, the problem is mainly related to corrupted or damaged system files. In addition, other factors like insufficient disk space, a temporary glitch in the Automatic Repair utility, corrupted BCD files, recently installed updates, or some unknown bugs are also responsible for the “diagnosing your PC stuck” issue.
How to Fix Windows 10/11 Diagnosing Your PC Error
How to fix Windows diagnosing your PC? Here we summarize 10 feasible ways to get out of the “diagnosing your PC loop” error. Let’s try them in order until the error gets fixed.
# 1. Force Reboot Your PC
The first and simplest solution is to hard reboot your PC if Windows 10 diagnosing your PC stuck on the screen. This operation has been proven by many people to be useful. For that:
Step 1. Unplug the power supply from your computer and remove the battery.
Step 2. Wait for several minutes to clear all temporary cache. Then re-plug the power supply and reinstall the battery.
Step 3. Press and hold the Power button until the computer turns on. Once powered on, check if the Windows 10 diagnosing your PC error persists.
# 2. Boot into Safe Mode
Sometimes the “Windows 10 diagnosing your PC” error can be caused by incompatible or outdated device drivers. In this case, we recommend you boot the computer into Safe Mode .
Step 1. Click the Start icon at the bottom left corner press the Power icon, and then click the Restart button with the Shift key pressed.
Step 2. Now, your computer will boot into the Windows Recovery Environment menu. Once here, click on Troubleshoot > Advanced options .
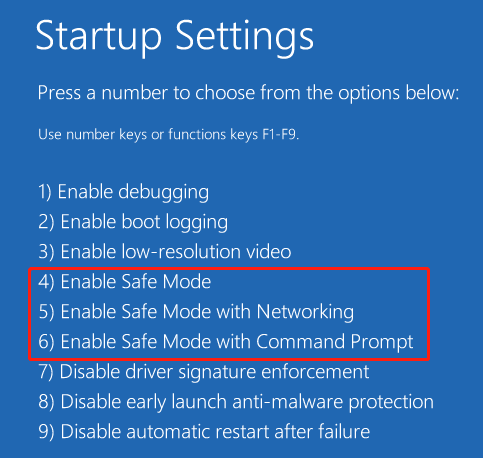
Step 3. In the Advanced options menu, select Startup Settings . Then you will see 3 options to enter Safe Mode. Just press F4 , F5 , or F6 based on your needs. If the error persists in Safe Mode, just move down to other solutions.
# 3. Run Disk Cleanup
If there is not enough space on the system partition, you may encounter the Windows 11 diagnosing your PC error. To free up disk space , you can run Disk Cleanup in Safe Mode.
Step 1. Boot into Safe Mode as we just explained above. Then press the Win + R keys to open the Run dialog box, type cleanmgr , and press Enter to open Disk Cleanup.
Step 2. Select the C drive from the drop-down menu and click on OK .
Step 3. Click Clean up Systems files in the Disk Cleanup window to scan more files.
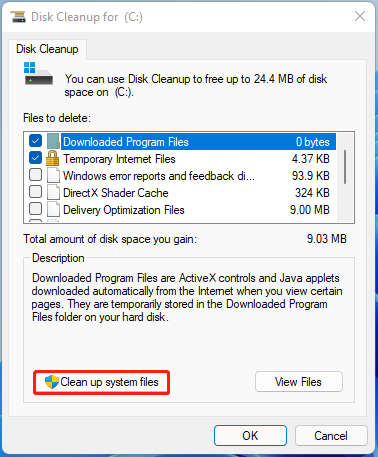
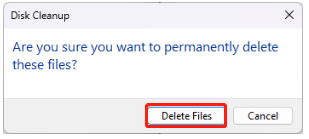
Step 4. Wait for the scan to complete. Select the files that you want to delete and click on OK . Then click on Delete Files to further confirm the cleanup.
Once finished, restart your PC and see if the Windows 11 diagnosing your PC error disappears.
# 4. Extend the System Partition
Another effective way is to extend the system partition. If you don’t want to delete anything or even if the computer can’t boot into Safe Mode normally, MiniTool Partition Wizard can help you extend/resize the partition using bootable media. It’s a professional disk/partition manager that can copy/format/wipe partitions, convert MBR to GPT , rebuild MBR, and migrate OS even when the PC is unbootable.
MiniTool Partition Wizard Demo Click to Download 100% Clean & Safe
Step 1 . Plug the prepared USB into a working computer or insert a USB drive or CD/DVD.
Step 2 . Launch the MiniTool software to access its main interface. Click Bootable Media in the upper right corner and follow the on-screen instructions to create a bootable USB drive .
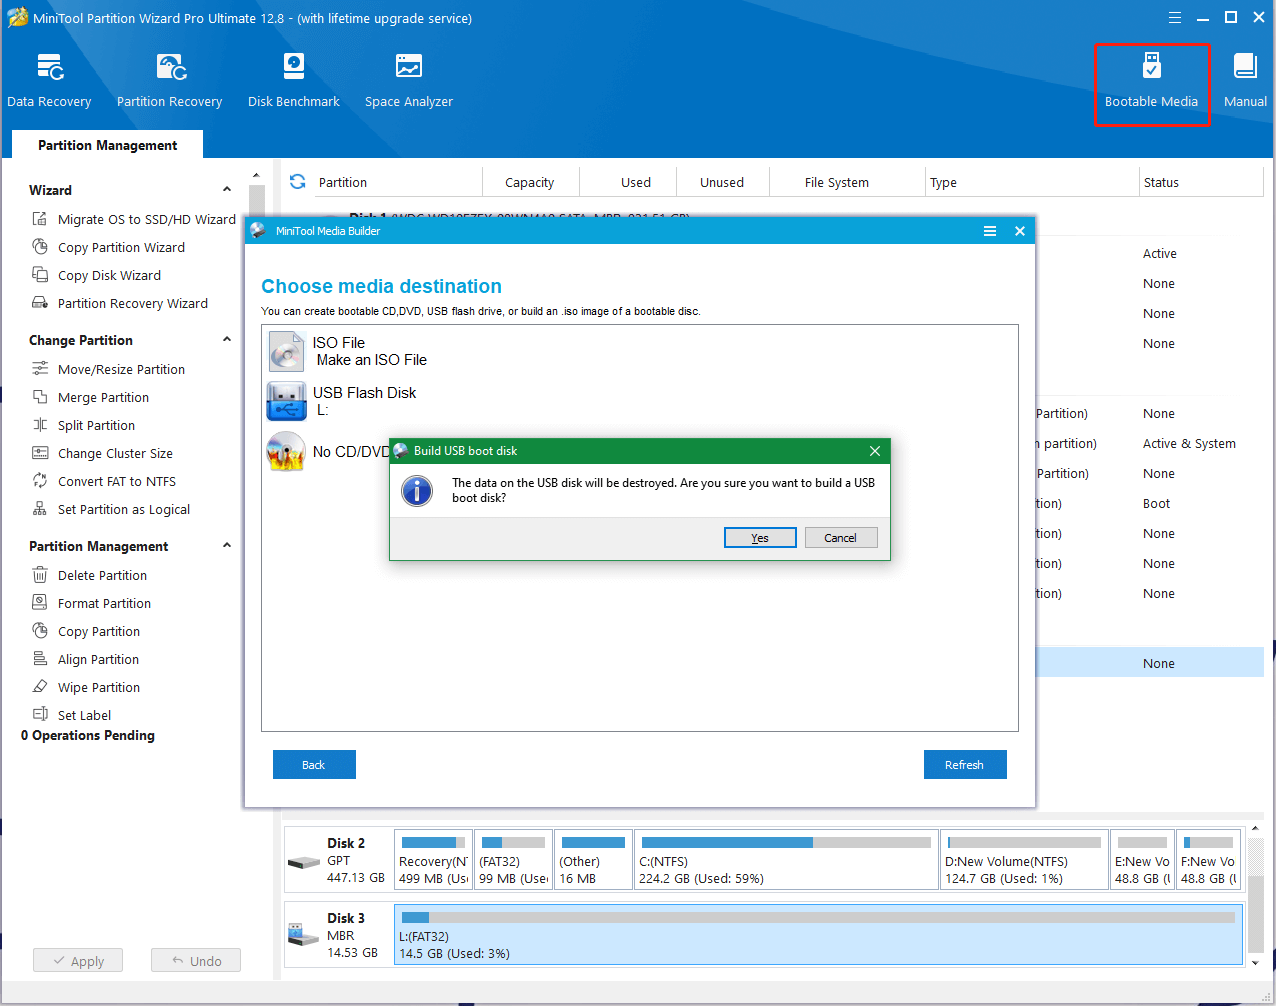
Step 3 . Insert the bootable USB into the original computer, restart your computer, and press F2 or Delete keys to enter BIOS , change boot order , and make your computer boot from the USB drive.
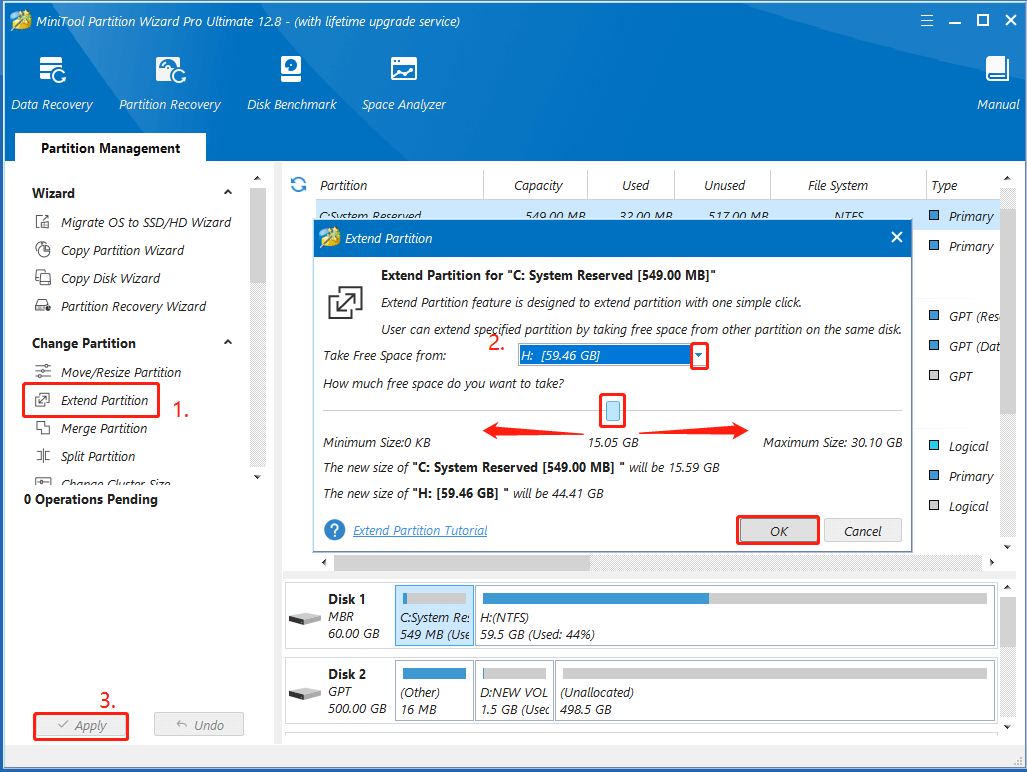
Step 4 . In the main interface of MiniTool Partition Wizard, select the system partition from the disk map and click on Extend Partition from the left pane.
Step 5. Select unallocated space or a partition from the drop-down menu, drag the sliding bar to occupy the space, and click on OK . Then Click on Apply to execute the process
# 5. Repair Your Computer
In addition, you can repair the computer using a Windows installation media . Some users have proven that this method can help fix the Windows 10 diagnosing your PC error. Let’s have a try.
Step 1. Insert the Windows installation disc into your computer and restart it from the disc. Then press any key to boot from the media.
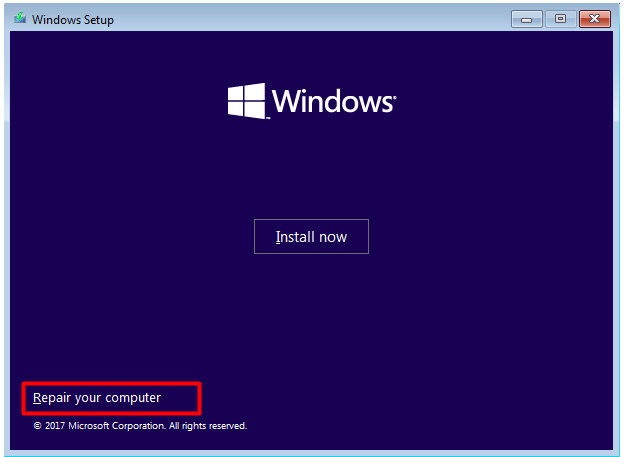
Step 2. Choose the language preference and go on until you arrive at the Install Now screen. Then click on Repair Your Computer to access the Advanced Settings menu.
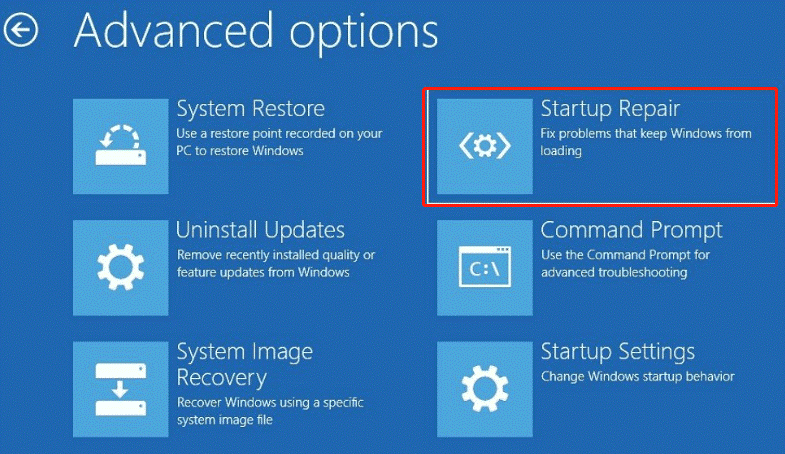
Step 3. Select Troubleshoot and access Advanced Options , and click Startup Repair in order. Then it will automatically repair your system. Wait for the repair to finish and reboot your computer to see if diagnosing your PC Windows 10 error is gone.
# 6. Repair the System Files
If some important system files are corrupted or missing, you may also encounter the Windows 10 diagnosing your PC stuck error. In this case, you can run an SFC scan or DISM in WinRE to repair the system files.
Step 1. Follow Step 1 to Step 4 in Solution 5 to access the Advanced options menu and select Command Prompt .
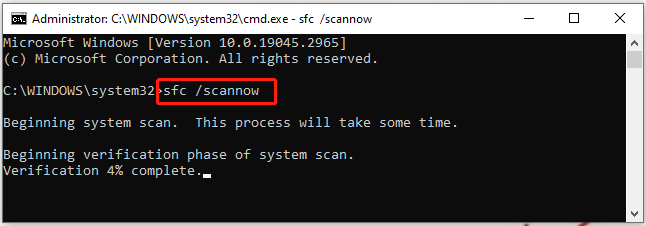
Step 2. In the Command Prompt window, type the sfc /scannow command and hit Enter to repair system files automatically. This process may take you some time to complete. So, please wait patiently.
Step 3. After the scan is complete, restart your computer and re-follow the same steps to come back to the elevated Command Prompt window. Once opened, type the following commands in order and press Enter after each one.
- Dism /Online /Cleanup-Image /CheckHealth
- Dism /Online /Cleanup-Image /ScanHealth
- Dism /Online /Cleanup-Image /RestoreHealth
# 7. Uninstall the Recently Installed Updates
Some users reported that the Windows 10 diagnosing your PC error occurs after installed the latest Windows features and updates. If this scenario also applies to you, follow the steps below to uninstall the update.
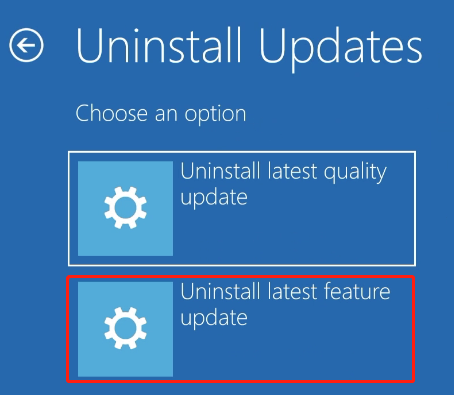
Step 1. Enter WinRE as we explained above and access the Advanced options menu, then select Uninstall Updates .
Step 2. In the Uninstall Updates window, select Uninstall latest feature update , and enter your admin password when prompted. Then wait until your PC finishes the uninstallation and reboot to see if the diagnosing your PC Windows 10 error gets solved.
# 8. Perform a System Restore
If the above method fails to get out of the Windows 10 diagnosing your PC error, you can try performing a system restore from WinRE. This will undo the recent changes you made and revert your system to an earlier state in which your PC works normally. To do this work, follow the quick guide below:
Step 1. Enter WinRE as we explained above and access the Advanced options menu as we showed above, then select System Restore .
Step 2. The System Restores window will pop up immediately, and click Next to continue.
Step 3. In the list of all system restore points, select the Restore point that you prefer and click the Next button. Here you can tick the checkbox next to Show more restore points .
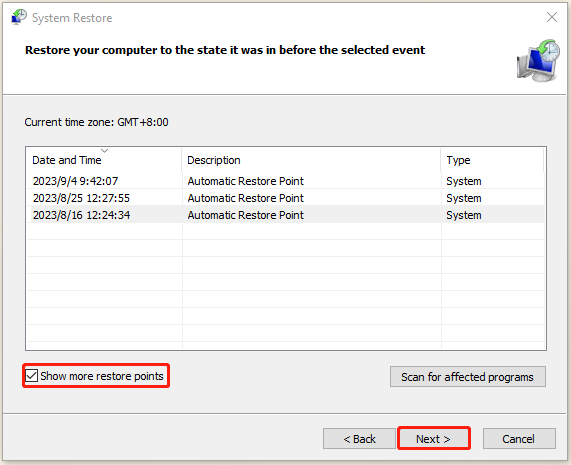
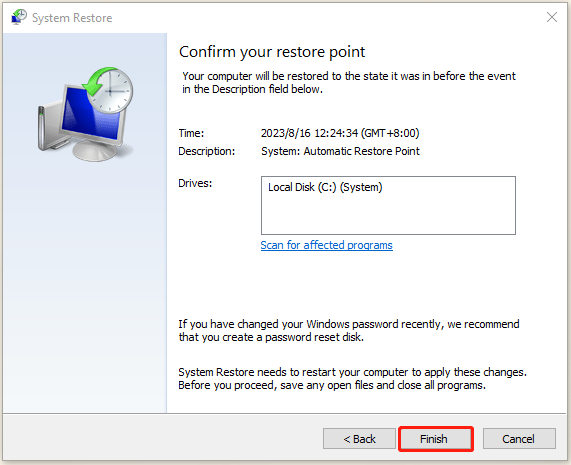
Step 4. Then confirm your restore point by clicking the Finish button. After that, your computer should be restored to an earlier state, and the Windows 10 diagnosing your PC stuck error gets solved.
# 9. Rebuild BCD
The Boot Configuration Data (BCD) is a vital Windows component that contains boot configuration parameters and is used to boot Windows properly. If the BCD data gets corrupted or into chaos, you will encounter the diagnosing your PC Windows 10/11 error. In this case, you’d better follow the steps below to rebuild BCD.
Step 1. Enter WinRE using your Windows installation disc and select Command Prompt in the Advanced options menu.
Step 2. In the elevated Command Prompt window, type the following commands in order and hit Enter after each one.
- bootrec /fixmbr
- bootrec /fixboot
- bootrec /scanos
- bootrec /rebuildbcd
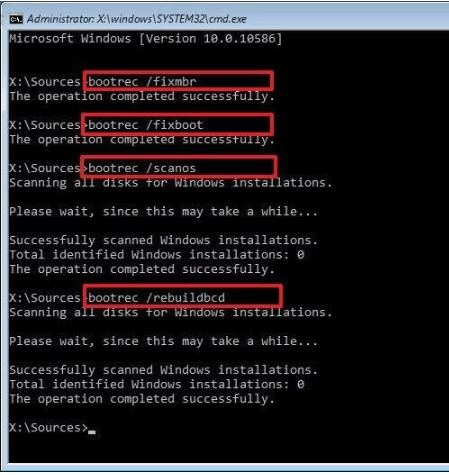
Step 3. When the repair is complete, type exit and press Enter . Then restart your computer and check if the Windows diagnosing your PC error is gone.
# 10. Clean Install Windows 10/11
If none of the above methods can get rid of the “Windows 10/11 stuck on diagnosing your PC” error, you may consider performing a clean installation of Windows 10/11. This method will reset your PC to its factory settings and delete everything on the hard disk, which can help clean the error. Before you do, make sure you have backed up all important data on your computer.
After that, you can refer to the following guides to know more details:
How to Clean Install Windows 11? Here Are 5 Options
How to Reinstall Windows 10 without CD/USB Easily (3 Skills)
It’s so vexing that my laptop was always stuck on diagnosing your PC when starting. Fortunately, this post helped me get rid of the error. It provides 10 effective troubleshooting methods. Click to Tweet
What’s Your Opinion
How to get out of diagnosing your PC loop error on Windows 10/11? We have illustrated 10 feasible fixes in the above. If you have any other solutions to this problem, please share them with us in the following comment zone. Besides, you can contact us via [email protected] if you have any confusion or feedback about MiniTool Partition Wizard.
About The Author
Position: Columnist
User Comments :
- Support Home
- Printer Support
- Computer Support
- Poly Collaboration Devices
- Ink & Toner Cartridges
- Software and Drivers
- Printer Diagonostic Tools
- Computer Diagnostic Tools
- Windows Support
- Print and Scan Doctor
- HP PC Hardware Diagnostics
- Create a new case
- Find an existing case
- Manage contracts and warranties
- Register an account
- MyHPSupport Help
- Security Bulletins
- Support Dashboard
- HP Account benefits
HP PCs - How to reset your computer to factory settings (Windows 11, 10)
Resetting your computer to factory settings might be necessary if the operating system is damaged, the hard drive is corrupted, the computer is infected by a virus, or you are transferring ownership of the computer. HP System Recovery removes all hard drive data and reinstalls the original operating system.
HP Cloud Recovery is available for HP PCs manufactured in 2016 and later. HP Cloud Recovery allows you to download recovery software to a USB flash drive. If your computer is not supported by HP Cloud Recovery, go to HP PCs - Reset the computer for more information.
Preparing for system recovery in Windows
Before performing a system recovery, review the topics that might prevent the need to run a recovery or might help to ensure a successful recovery.
Correct startup or boot issues
Many startup or boot issues are caused by minor problems that are easily corrected. Before recovering your computer, try to determine if other, non-destructive, corrective actions will fix the problem.
For more information, see HP PCs - Computer does not boot or start .
Back up important files
HP recommends that you back up your files on an external drive or CD/DVD on a regular basis. Scheduled backups can help you recover some, if not all, of your information in the event that something happens to the original files on your computer.
Factory resetting your computer destroys all the files on the hard drive . If you did not back up your files before running a factory reset, the computer might display a prompt to make a backup copy of your files before the reset performs any action that erases or deletes files.
For more information on backing up your important files, see HP PCs - Back up your files (Windows 11, 10) .
Complete a Microsoft System Restore
If your computer develops a problem, perform a Microsoft System Restore before performing a system restore.
The Microsoft System Restore function returns the computer to a restore point, which resets all of the settings for the operating system to those settings that existed at the time the restore point was created. No personal data files, such as email, documents, or pictures are lost. For more information on Microsoft System Restore, see HP PCs - Using Microsoft System Restore .
Know which type of recovery to perform
There are several different types of recovery. See the following tables for more information on recovery options.
Perform a system recovery in Windows
Identify the correct recovery tool for your computer and find step-by-step instructions for performing a recovery or reset.
Select a recovery process for Windows
Use one of the following links based on the type of recovery or reset that you want to perform:
Solve common Windows recovery issues
The most common cause of recovery issues is interruption of the process or turning off the computer before the recovery and setup is complete.
For more information, see HP PCs - Reset the computer .
Update your computer after system recovery
After performing a system recovery, HP recommends installing updates through Windows Update.
For more information, see HP PCs - Updating drivers using Windows update (Windows 11, 10) .
Additional support options
Enter a topic to search our knowledge library

How To Fix The An Error Occurred While Troubleshooting Issue On Windows
M icrosoft has equipped Windows with built-in troubleshooting that can help identify and resolve most if not all system issues. These troubleshooters are easy to access and use, making them great for the not-so-tech-savvy Windows user. However, there are instances when a troubleshooter, rather than fixing your problem, runs into an issue itself. One example of such an issue is the "An error occurred while troubleshooting" prompt which pops up when the troubleshooter fails to do its job.
The problem can arise for several reasons. Maybe the services that the troubleshooter relies on are disabled, you don't have a stable internet connection, or your overly protective security program is getting in the way of the troubleshooter's processes. Fortunately, there are some ways to resolve this error and enable the troubleshooters to function again.
You can start by restarting your device, which will fix any temporary bugs or glitches that might be causing the troubleshooter to act up. Additionally, you can try using the troubleshooter as an administrator to bypass the issue. If, however, these basic fixes don't work, there are some advanced solutions you can try.
Read more: Major PC Brands Ranked Worst To Best
Ensure Relevant Services Are Enabled
Troubleshooters in Windows, like other apps and programs, depend upon several relevant system services to function properly. These services allow the troubleshooter to access necessary system information, perform diagnostics, and apply fixes. If the troubleshooter is acting up, there is a good chance that one or more needed services are disabled.
This is why, we recommend you start by enabling all the relevant services. These services include Diagnostic Policy Service (DPS), Diagnostic Service Host (WdiServiceHost), Diagnostic System Host (WdiSystemHost), and Cryptographic service. The Diagnostic Policy Service detects, troubleshoots, and resolves problems with Windows components. The Diagnostic Service Host and Diagnostic System Host run diagnostics and apply fixes to the system. Finally, the Cryptographic service verifies the authenticity and integrity of Windows files and updates. If this service is disabled, the computer might not recognize or trust the necessary files and updates, leading to troubleshooting processes failing to start or finish properly.
To check the status of services:
- Press the Win + R keys together to open Run.
- Type services.msc in Run and press OK.
- Scroll down the following window, and look for the Diagnostic Policy Service (DPS) service.
- Right-click on it and choose Properties.
- Click Start if the service is disabled.
- Expand the option for Startup type and choose Automatic.
- Click Apply > OK to save the changes.
Perform the same steps for the rest of the services we mentioned above and check if that fixes the problem.
Temporarily Disable Your Security Program
If you are using a third-party security program on your computer, the security program may be interfering with the troubleshooter process, resulting in the error.
The easiest way to check if your antivirus is the culprit is by disabling it temporarily and then running the troubleshooter. If the troubleshooter works fine after this, it likely confirms that the security program is the problem. The exact steps for disabling the security program on each device may vary, depending on the program you are using. Typically, you can do this by launching the program, heading over to settings, and looking for the toggle to disable temporarily. Most security programs allow you to choose a time frame to disable the protection.
After selecting a suitable duration, try running the troubleshooter again. If the issue is resolved, consider adding the troubleshooter or the affected Windows components to the security program's whitelist or exceptions list to prevent future interference. This way, you can keep your system protected while also ensuring the smooth operation of Windows troubleshooting processes. Alternatively, you can also consider switching to another top-rated antivirus program that isn't expected to cause issues like these. There are decent free antivirus programs you can consider as well.
Fix Connectivity Problems
Some Windows troubleshooters require an internet connection to in order to function properly. It is typically needed to apply fixes like downloading the latest updates, drivers, or patches from Microsoft servers. For instance, if you have run into an issue, and Microsoft has released an update to address it, the troubleshooter will try to access the Microsoft servers to download the update and resolve the problem.
This is why you must be connected to the internet before you use the troubleshooter. If your device already has an internet connection, we recommend checking if it is stable enough for the troubleshooter to do its job. There are ways to check the speed of your internet connection and improve it. You can also try a different connection and check if that makes any difference. Additionally, restarting your router or modem can often resolve connectivity issues by refreshing your internet signal.
Try An Alternate Way Of Running The Troubleshooter
In Windows, there are multiple ways of running the built-in troubleshooters. An easy way to launch them is via Run dialog. If you are encountering the problem while running the troubleshooter through Run, consider using them via the Settings app or Command Prompt.
To access the troubleshooters in the Settings app, press Win + I keys together or type Settings in the search bar and click Enter. Choose System from the left pane and click Troubleshoot > Other troubleshooters. You should now see all the available troubleshooters listed in the following window. To use one, click on the Run button for it.
You also have the option to run them via Command Prompt:
- Type Command Prompt in the search bar and click Run as administrator.
- Choose Yes in the UAC prompt.
- Now, to run a troubleshooter, enter the msdt.exe command followed by the troubleshooter's specific diagnostic ID. For instance, if you need to use the Windows Update troubleshooter, run the "msdt.exe /id WindowsUpdateDiagnostic" command. Similarly, if you want to run the Power troubleshooter, run the "msdt.exe /id powerdiagnostic" command.
- Press Enter to execute the command.
If the problem was being caused specifically because of running the troubleshooter through Run, you should be able to use it now.
Install The Latest Updates
You might also be facing an issue because your system doesn't have the latest Windows updates. Or, Microsoft might have already released a fix for the issue you are experiencing through its updates. In either case, installing the latest system updates can help fix the problem.
To install the latest system updates:
- Open the Settings app by pressing the Win + I keys together.
- Choose the Windows Update option.
- Click on the Check for updates button. Make sure you have a stable internet connection for this.
- If the system displays an update, install it and then restart your computer.
Upon reboot, you can check if the problem is resolved. In case the issue persists, you might want to contact the Microsoft support team and report the problem there. The specialists can offer additional troubleshooting steps that can help identify the issue and resolve it once and for all.
Read the original article on SlashGear

How-To Geek
How to fix a "location is not available" error on windows 11 or 10.
Unless the folder is deleted or moved, you have ways to access it.
Key Takeaways
- If you can't access a folder, ensure that the folder hasn't been deleted or moved. Go to the actual folder path and see if the folder exists there.
- If the folder is on a network, ensure you're connected to that network. If the folder is on an external drive, make sure the drive is correctly connected to your PC.
- Other troubleshooting methods include restarting Windows Explorer, running an antivirus scan, and using System Restore.
Trying to access a folder but keep getting a “Location is not available” error? Your folder may have been moved or deleted, or there’s another issue preventing you from opening your folder. We’ll show you a variety of ways to get around this problem on your Windows 11 or Windows 10 PC.
The Folder Might Have Been Deleted or Moved
It’s possible the folder you’re trying to access has been deleted or moved. In this case, you can’t access it, and Windows will display an error message.
If you're trying to use a shortcut to a folder, navigate to the actual folder path and see if the folder exists. If you don't find the folder at its original location, look around and see if you can find it. The Windows search function will be very helpful here, especially if you don't know where the folder was originally located.
You should also check the Recycle Bin to if it is there .
Check the External Drive's Connection
If your folder is on an external drive, ensure the drive is correctly connected to your PC. Windows won't be able to read data from an incorrectly or loosely connected drive, and it like won't show up at all . Make sure to try the USB ports on the back of your desktop PC, rather than the ports on the front of the case or on a USB hub.
Try disconnecting and re-connecting the drive to your PC. Then, check if your USB drive (and folder) has reappeared.
Ensure You're Connected to the Network
If your folder is on a network, ensure your PC is connected to that network. This applies whether the network is a local one or the internet.
If your folder is on the internet, make sure your PC has a stable internet connection. You can verify that by opening a web browser and loading a site. If the site fails to load, try troubleshooting your PC’s internet problems . Some basic fixes you can apply are restarting your router , checking your Ethernet cable (if you’re on a wired network), and speaking to your internet service provider (ISP).
If the folder is on a Network-Attached Storage (NAS) drive or a similar device, disconnect and re-connect that device to the network. This helps fix minor network issues with the device. You could try accessing that device from another machine to see if it works. If it's another kind of storage device, check out the manual for that device to see how to troubleshoot connectivity issues with it.
Restart Windows Explorer
Sometimes, Windows Explorer acts up and doesn’t let you perform your file-related tasks. In this case, restarting Windows Explorer will typically fix minor issues.
To restart Windows Explorer, right-click the Start Menu icon and select "Task Manager."
In the "Processes" tab, right-click "Windows Explorer" and select "Restart."
Windows Explorer will close and relaunch. If it faces issues re-opening, force-launch it. To do that in Windows 11's Task Manager, click "Run New Task." In Windows 10's Task Manager, select File > Run New Task. Then, type explorer.exe in the open field and press Enter.
Check if the Drive’s Letter Has Changed
If you're trying to access a folder via a shortcut, and the drive where the actual folder exists has its drive letter changed , you’ll experience issues accessing the folder.
Check the original path of your folder and ensure it still exists there. If you’ve connected a new drive to your PC and this drive uses the same letter as the drive you connected earlier, Windows will try to find the folder on this drive, but the folder won’t be found. This will lead to an error.
Always go to the actual folder path and see if the folder is present there, and if that doesn't work, you can try searching for it using Windows search.
If you manage to locate the folder manually, you can just create a new shortcut or modify the existing one.
Run a Virus Scan
A virus or malware can prevent you from accessing your folders. In this case, run a full virus scan using the built-in Microsoft Defender Antivirus or the antivirus of your choice. This will remove any threats that might be causing the problem.
To do that, open the Start Menu, search for Windows Security , and launch the app.
In Windows Security, select "Virus & Threat Protection" and then "Scan Options." Enable the "Full Scan" option and choose "Scan Now."
Wait while the antivirus finds and removes threats from your PC.
Use System Restore
If you’re trying to access a system folder, it’s possible a change you made to your system has moved that item. In this case, use System Restore to roll back your system changes.
To do that, open the Start Menu, search for Recovery , and select it. Then, click "Open System Restore."
Select "Next," choose the most recent restore point, and click "Next."
Select "Finish" to start restoring your PC.
After restoring the PC, you should have access to your folder.
If you still can't locate your folder, it may have been permanently deleted. You could try running recovery software to get it back, but that is unlikely to work on modern SSDs. The best way to prevent data loss is to make regular backups of your important files and folders .

IMAGES
VIDEO
COMMENTS
Swipe in from the right edge of the screen, and then tap Search.Or, if you are using a mouse, point to the lower-right corner of the screen, and then click Search.Type Command Prompt in the Search box, right-click Command Prompt, and then click Run as administrator.If you are prompted for an administrator password or for a confirmation, type the password, or click Allow.
To do that, open the "Start" menu, find "Command Prompt", and select "Run as Administrator." In the "User Account Control" prompt, choose "Yes." In Command Prompt, type the following command and press Enter. This command stops Windows RE. Start Windows RE by issuing the following command: Try resetting your PC now.
Select Restore Point to fix bug check. To use a Restore Point to fix blue screen problems on Windows 10, use these steps: Click the Advanced Startup option. Quick note: If accessing Advanced ...
Type or paste bootrec /fixboot and press Enter. Type or paste bootrec /rebuildbcd and press Enter. These commands will scan your Windows installation and fix any issues it finds. If the command identifies any Windows installation, type Y or A and press Enter to add the installation to your boot list. Finally, paste shutdown /r in the Command ...
Thinkstock. The Windows 10 (or 11) repair drill. Step 1: Using DISM and SFC for system repair. Step 2: Try a recent restore point or image backup. Step 3: In-place upgrade to current Windows 10 ...
File corruption is another common cause of the "There was a problem resetting your PC" failure for Windows Reset. Run the System File Checker (SFC) tool to find and repair damaged operating system files on your PC. Press Windows key + X and select Command Prompt (Admin) on the Quick Access menu.
Navigate to Control Panel > System and Security > Troubleshoot Common Computer Problems. On Windows 7, click "Find and Fix Problems" instead. You'll see a list of the most common troubleshooters you might need. These aren't the only available troubleshooters. Click "View All" in the sidebar to view a full list of troubleshooters.
1. Navigate to your newly-created ISO file in Explorer. 2. Right-click the file and select "Mount" from the resulting pop-up menu (if Mount does not appear, click Open, and then open with File ...
If none of these methods have worked so far, and you are unable to reset Windows 10 till now, then the last solution that we are left with is to use the Windows Startup Repair feature. To perform this repair, you'll need to have a bootable DVD or USB drive with the Windows 10 installer.
To use Startup Repair to resolve booting problems, use these steps: Click the Troubleshoot button. (Image credit: Mauro Huculak) Click the Advanced options button. (Image credit: Mauro Huculak ...
Like SFC, run the CHKDSK scan from the Command Prompt to fix your machine. Type command prompt in your Start menu search bar, then right-click the best match and select Run as administrator. (Alternatively, press Windows key + X, then select Command Prompt (Admin) from the menu.) Next, type chkdsk /r and press Enter.
Open Settings. Click on Update & Security. Click on Troubleshoot. Under the "Get up and running" section, select the Windows Update option. Click the Run the troubleshooter button. Source: Windows ...
Click the "WINS" tab, then look towards the bottom of the Window. The "Default" setting should work. If NetBIOS is set to "Disabled," go ahead and enable the default setting. However, if "Default" is selected and you're still getting an error, try changing the setting to "Enabled" instead.
Download: Ultimate Windows Tweaker (Free) 4. Windows Repair. Windows Repair (All in One) is another free and useful Windows 10 repair tool you can use to repair numerous Windows 10 issues. The Windows Repair developer strongly suggests you should boot your PC in Safe Mode for maximum effect.
To hard reboot your PC, you can follow the steps below: Turning off the system: Press and Hold the Power Button. Disconnecting Power and Peripherals: Unplug the Power Cable > Remove the battery in case of a laptop > Disconnect all peripherals. Draining excess battery: Press and Hold the Power button for 15 seconds.
The first and simplest solution is to hard reboot your PC if Windows 10 diagnosing your PC stuck on the screen. This operation has been proven by many people to be useful. For that: Step 1. Unplug the power supply from your computer and remove the battery. Step 2. Wait for several minutes to clear all temporary cache.
To open it, just hit Start, type "reliability," and then click the "View reliability history" shortcut. The Reliability Monitor window is arranged by dates with columns at the right representing the most recent days. You can see a history of events for the last few weeks, or you can switch to a weekly view. The column for each day shows events ...
Many startup or boot issues are caused by minor problems that are easily corrected. Before recovering your computer, try to determine if other, non-destructive, corrective actions will fix the problem. For more information, see HP PCs - Computer does not boot or start.
To check the status of services: Press the Win + R keys together to open Run. Type services.msc in Run and press OK. Scroll down the following window, and look for the Diagnostic Policy Service ...
Download Windows Speedup Tool to fix errors and make PC run faster If iCloud is not syncing your files and folders from an iPhone, iPad, iPod touch, or Mac to a Windows PC, this post will help you ...
Check the External Drive's Connection If your folder is on an external drive, ensure the drive is correctly connected to your PC. Windows won't be able to read data from an incorrectly or loosely connected drive, and it like won't show up at all.Make sure to try the USB ports on the back of your desktop PC, rather than the ports on the front of the case or on a USB hub.