
Cloud Storage

Custom Business Email

Video and voice conferencing

Shared Calendars

Word Processing

Spreadsheets
Presentation Builder

Survey builder

Google Workspace
An integrated suit of secure, cloud-native collaboration and productivity apps powered by Google AI.

Tell impactful stories, with Google Slides
Create, present, and collaborate on online presentations in real-time and from any device.
- For my personal use
- For work or my business

Jeffery Clark
T h i s c h a r t h e l p s b r i d g i n g t h e s t o r y !

E s t i m a t e d b u d g e t

Make beautiful presentations, together
Stay in sync in your slides, with easy sharing and real-time editing. Use comments and assign action items to build your ideas together.

Present slideshows with confidence
With easy-to-use presenter view, speaker notes, and live captions, Slides makes presenting your ideas a breeze. You can even present to Google Meet video calls directly from Slides.

Seamlessly connect to your other Google apps
Slides is thoughtfully connected to other Google apps you love, saving you time. Embed charts from Google Sheets or reply to comments directly from Gmail. You can even search the web and Google Drive for relevant content and images directly from Slides.

Extend collaboration and intelligence to PowerPoint files
Easily edit Microsoft PowerPoint presentations online without converting them, and layer on Slides’ enhanced collaborative and assistive features like comments, action items, and Smart Compose.

Work on fresh content
With Slides, everyone’s working on the latest version of a presentation. And with edits automatically saved in version history, it’s easy to track or undo changes.

Make slides faster, with built-in intelligence
Assistive features like Smart Compose and autocorrect help you build slides faster with fewer errors.

Stay productive, even offline
You can access, create, and edit Slides even without an internet connection, helping you stay productive from anywhere.
Security, compliance, and privacy

Secure by default
We use industry-leading security measures to keep your data safe, including advanced malware protections. Slides is also cloud-native, eliminating the need for local files and minimizing risk to your devices.
Encryption in transit and at rest
All files uploaded to Google Drive or created in Slides are encrypted in transit and at rest.
Compliance to support regulatory requirements
Our products, including Slides, regularly undergo independent verification of their security, privacy, and compliance controls .
Private by design
Slides adheres to the same robust privacy commitments and data protections as the rest of Google Cloud’s enterprise services .

You control your data.
We never use your slides content for ad purposes., we never sell your personal information to third parties., find the plan that’s right for you, google slides is a part of google workspace.
Every plan includes

Collaborate from anywhere, on any device
Access, create, and edit your presentations wherever you are — from any mobile device, tablet, or computer — even when offline.

Get a head start with templates
Choose from a variety of presentations, reports, and other professionally-designed templates to kick things off quickly..

Photo Album

Book Report

Visit the Slides Template Gallery for more.
Ready to get started?
- Help Center
- Get started
- Learn by product
- Learn by role & industry
- Hybrid workplace tips
- Gen AI tips
- Productivity tips
- Business tutorials
- Switch from Microsoft & others
- Support & accessibility
- Google Workspace
- Privacy Policy
- Terms of Service
- Submit feedback
- What's new?
- Get started Welcome Get ready to switch What to do on your first day Your first week & beyond Cheat sheets & reference guides Open Google Workspace apps
- Learn by product Calendar Chat Chrome browser Docs Drive Gemini Gmail Meet Sheets Slides Managed teams Mobile & device setup All products
- Learn by role & industry Administrative assistants Digital marketing Finance Healthcare Human resources Law practices Manufacturing Media & entertainment Nonprofits Professional services Project management Research & development Retail Sales & marketing Technical support UX design Visual design Web development
- Hybrid workplace tips Hybrid work training & help Use Meet Companion mode Stay connected when working remotely Work from home Work with remote teams Plan & hold meetings from anywhere Hold large remote events Work with non-Google Workspace users
- Gen AI tips Generative AI training & help Get started with Gemini Gemini cheat sheet Role-specific prompts & use cases Tips for writing prompts for Gemini Gemini usage limits Learn about generative AI
- Productivity tips Set up business meetings Discuss topics with your team Brainstorm with colleagues Improve communication Make video conference calls Create great presentations Create strong proposals Onboard team members Optimize your inbox Analyze data Clean up data Go paperless
- Business tutorials Use generative AI at work Plan & manage a project Plan & hold meetings from anywhere Hold large remote events Stay connected when working remotely Collaborate with decision makers Share a final document Free up storage space Plan a project with external clients Delegate work when you're OOO Get up to speed after time off Additional training resources
- Switch from Microsoft & others Switch from Microsoft Switch from Slack Switch from Zoom, Skype, or Webex Switch from Box, Dropbox, or C:\ drive Switch from HCL Notes
- Support & accessibility Support for users Support for administrators Accessibility Save or customize Learning Center guides
Bring your best ideas to life with Gemini for Google Workspace. Get tips & real-life use cases for using gen AI at work .
Get started with Slides in Google Workspace
Create your first presentation in slides.
On this page
Create or import a presentation, add slides to your presentation.
- Update your presentation
Want advanced Google Workspace features for your business?
Try Google Workspace today!
Create your presentation
- Open the Slides home screen at Google Slides .
You can also create new presentations from the URL https://slides.google.com/create .
Import and convert an existing presentation
Converting your file from another program creates a copy of your original file in a Docs, Sheets, or Slides format. You can then edit the file in your browser.
If you have existing files, you can import and convert them to Docs, Sheets, or Slides.
- Go to Drive .
- Choose the file you want to import from your computer to add it to Drive.
Have a Microsoft file?
If you've already stored Microsoft files in Drive, you can also update them without converting them .
Add a slide with the same layout as the current slide
- On your computer, open a presentation in Google Slides .
Add a slide with a different layout
- Choose a slide.
Add a slide with your organization's branding
- At right, click the template you want to use.
Note: The Templates option appears only if your administrator makes organization-branded slides available.
Update your presentation
Choose a theme and layout.
When you first create a presentation, you can choose a theme for your slides. A theme is a preset group of colors, fonts, background, and layouts. Your presentation's layout is the way your text and images are arranged on a slide.
Change your presentation's theme
- On the right, click the theme you want.
Change the layout of your presentation
- Select a slide.
- At the top, click Layout .
- Choose the layout you want to use.
Arrange slides
Move slide —Drag the slide to a different position in the presentation. To move several slides at once, Ctrl+click multiple slides before dragging them.
Delete slide —Right-click the slide and select Delete .
Duplicate slide —Right-click the slide in the sidebar and select Duplicate slide .
Add pictures, text, speaker notes, and more
Rename your presentation —Click Untitled presentation and enter a new name.
Add videos, shapes, charts, and more —Click Insert to add videos, shapes, charts, slide numbers, and other features to your presentation. You can also move, delete, or re-size these inserted features.
Add speaker notes —Use speaker notes to keep track of your talking points for each slide. In the presentation editor, speaker notes appear beneath the current slide. When you present your slides, your speaker notes show in a separate window.
Google, Google Workspace, and related marks and logos are trademarks of Google LLC. All other company and product names are trademarks of the companies with which they are associated.
Was this helpful?
Learn how to print Learning Center guides, save them as PDFs, or customize them for your organization.
- PRO Courses Guides New Tech Help Pro Expert Videos About wikiHow Pro Upgrade Sign In
- EDIT Edit this Article
- EXPLORE Tech Help Pro About Us Random Article Quizzes Request a New Article Community Dashboard This Or That Game Popular Categories Arts and Entertainment Artwork Books Movies Computers and Electronics Computers Phone Skills Technology Hacks Health Men's Health Mental Health Women's Health Relationships Dating Love Relationship Issues Hobbies and Crafts Crafts Drawing Games Education & Communication Communication Skills Personal Development Studying Personal Care and Style Fashion Hair Care Personal Hygiene Youth Personal Care School Stuff Dating All Categories Arts and Entertainment Finance and Business Home and Garden Relationship Quizzes Cars & Other Vehicles Food and Entertaining Personal Care and Style Sports and Fitness Computers and Electronics Health Pets and Animals Travel Education & Communication Hobbies and Crafts Philosophy and Religion Work World Family Life Holidays and Traditions Relationships Youth
- Browse Articles
- Learn Something New
- Quizzes Hot
- This Or That Game New
- Train Your Brain
- Explore More
- Support wikiHow
- About wikiHow
- Log in / Sign up
- Computers and Electronics
- Website Application Instructions
- Google Applications
How to Create a Presentation Using Google Slides
Last Updated: November 30, 2023
wikiHow is a “wiki,” similar to Wikipedia, which means that many of our articles are co-written by multiple authors. To create this article, 17 people, some anonymous, worked to edit and improve it over time. This article has been viewed 234,457 times. Learn more...
This tutorial will show you how to make a PowerPoint-like presentation using Google Slides. Presentations can be used for school, business, and so much more.

- You can also just type in https://slides.google.com , log in if you haven't already, and will be taken to the Slides page.
- If you don't have a Google account, learn to create one now!

- For more options, hover over the arrow on the right edge of the Google Slides option, where a smaller drop-down menu will appear. From here you can select to create a presentation from a template or a blank slide.

- Be sure to add a title and subtitle by clicking where you are prompted to add text.

- You can also change a pre-existing slide's layout by clicking the layout option on the upper editing bar.

- As you add animations to each element by clicking the blue "+ Select an object to animate", they will begin to pile up. Click on each one to edit it.
- Change the transition from slide to slide by clicking the default "Slide: No transition" at the top of the sidebar. You can choose whether to apply to all slides or just one.
- Preview your animations by clicking Play at the bottom of the sidebar.
- Remove an animation by clicking the small x on its rectangle, and drag each animation up or down to change the order.

Community Q&A
wikiHow Video: How to Create a Presentation Using Google Slides
- If you have a pop-up blocker, make sure to disable it so Slides can work properly. Thanks Helpful 0 Not Helpful 0
- Hover over each tool to see its keyboard shortcut and function. Thanks Helpful 0 Not Helpful 0
- Remember, these are the basic functions- Google Slides contains many more tools that you can work with as you explore the creator. Thanks Helpful 0 Not Helpful 0

You Might Also Like

About This Article
To create a new Google Slides presentation, open a web browser and go to Slides.Google.com. If you want to start from a template, you can choose one from the template gallery. Otherwise, click "Blank" to create a new blank presentation. Your blank presentation starts with a single simple slide with space to enter a title and subtitle. You can personalize this slide, as well as other slides you add, by editing the placeholder text, as well as choosing a slide theme from the panel to the right. To insert another slide, click the "Insert" menu and select "New Slide," or press "Control M" for a quick keyboard shortcut. You'll also find other things you can add to your slide on the Insert menu, including the option to add an image, a text box for typing, videos, shapes, charts, and other features. After adding a new slide, click the "Layout" menu to choose a slide layout—you can give each slide its own layout or reuse the same layout as much as necessary. Edit the placeholder text, and then insert objects from the Insert menu. To move an object, click the arrow in the toolbar, hover the mouse cursor around the object's border line until it turns to a 4-point arrow, and then click and drag it. Each slide you add will have a thumbnail in the left panel—click a slide's thumbnail to open that slide for editing. To see your presentation as a viewer would, click your first slide in the left panel, and then click "Present" at the top corner. Click the Escape key to go back to editing. Google Slides also has some built-in effects you can access from the "Transition" menu—here you can animate a slide's transition into the next slide, as well as animate individual objects. To apply an effect, background, theme, layout, or any other setting to more than one slide at once, select the slides in the left panel by holding down the Control key as you click each thumbnail. Your presentation will automatically save to your Google Drive as you work—type a name for the presentation in the top-left corner so you can easily find the file when you need it. Did this summary help you? Yes No
- Send fan mail to authors
Is this article up to date?

Featured Articles

Trending Articles

Watch Articles

- Terms of Use
- Privacy Policy
- Do Not Sell or Share My Info
- Not Selling Info
Keep up with tech in just 5 minutes a week!
- Generative AI
- Office Suites
- Collaboration Software
- Productivity Software
- Augmented Reality
- Emerging Technology
- Remote Work
- Artificial Intelligence
- Operating Systems
- IT Leadership
- IT Management
- IT Operations
- Cloud Computing
- Computers and Peripherals
- Data Center
- Enterprise Applications
- Vendors and Providers
- United States
- Netherlands
- United Kingdom
- New Zealand
- Newsletters
- Foundry Careers
- Terms of Service
- Privacy Policy
- Cookie Policy
- Copyright Notice
- Member Preferences
- About AdChoices
- E-commerce Affiliate Relationships
- Your California Privacy Rights
Our Network
- Network World
Google Slides cheat sheet: How to get started
How to use Google Slides to create, collaborate on, and lead business presentations.

Need to build a slide presentation for a meeting, training, or other event? Google Slides is an easy-to-use web app that comes with the essential tools and more. It stores your presentations in the cloud with Google Drive. Anyone with a Google account can use Slides and Drive for free, and they’re also included with a Google Workspace (formerly G Suite) subscription for business and enterprise customers. There are Google Sheets mobile apps for Android and iOS, too.
This guide will help you become familiar with the Google Slides web interface and show you how to start a new presentation, upload a Microsoft PowerPoint file to edit in Google Slides, collaborate with others on your presentation, and finally, present it to others.
Create or open a presentation
Log in to your Google or Workspace account. Then:
From Google Slides : At the top of the home page, you’ll see a “Start a new presentation” header, with a row of thumbnails underneath. To start a new, blank presentation, click the Blank thumbnail. To start a new presentation in a template, select one of the thumbnails to the right or click Template gallery toward the upper-right corner, then click any thumbnail on the page that appears.

The Google Slides home page. (Click image to enlarge it.)
Below the “Start a new presentation” area you’ll see a list of presentations that are stored in your Google Drive or shared with you. To open a presentation, click it in this list.
The list of your presentations appears in reverse chronological order starting with the presentation you most recently opened. Clicking the “AZ” icon at the upper right of this list changes the sort order to Last modified by me , Last modified , or in alphabetical order by presentation title. You can also browse to a specific folder by clicking the folder icon next to the “AZ” icon.
From Google Drive : Presentations stored in your Google Drive are listed in the main window of the Drive home page. To see a listing of presentations that others are sharing with you, click Shared with me in the left column. From either list, double-click a presentation to open it in Google Slides.
To start a new, blank presentation, click the New button at the upper-left of the screen and then click Google Slides .
If you want to use a template to start a new presentation, click the New button, then move the cursor over the right arrow next to Google Slides and select From a template . The template gallery for Google Slides will open; click a thumbnail to start a new presentation in that template.

Creating a new presentation from Google Drive.
From Google Slides or Drive: You also can use the search box at the top to find presentations in your Google Drive or shared with you. Enter words or numbers that may be in the presentation you’re looking for.
Upload a PowerPoint presentation to Slides
You can edit a Microsoft PowerPoint presentation in Google Slides, but first you must upload it to Google Drive.
From Google Slides: Click the folder icon ( Open file picker ) that’s above and toward the right corner of your presentations list. On the panel that opens, click the Upload tab. Drag-and-drop your PowerPoint file (.ppt or .pptx) onto this panel, or browse your PC’s drive to select it.
From Google Drive: Click the New button, then File upload , and select the PowerPoint file from your PC’s drive and click Open .
Traditionally, when you uploaded PowerPoint files to Google Drive, they were automatically converted to Slides format. That’s still the case when you upload PowerPoint files via the Google Slides home page .
However, Google now supports the ability to edit Microsoft Office files in their native format. By default, any .pptx files that you upload via Google Drive will remain formatted as PowerPoint documents. You can edit and collaborate on a PowerPoint file right in Slides, with all changes made by you or your collaborators saved directly to the PowerPoint file.
On the Google Slides and Drive home pages, native PowerPoint files will be denoted with an orange “P” icon, and when you open a native PowerPoint file in Sheets, you’ll see a “.PPTX” flag to the right of the document title.

Native PowerPoint files show the PowerPoint icon (top) instead of the Google Slides icon (bottom).
If you’d rather have Google convert PowerPoint files to Slides format automatically when you upload them via Google Drive, click the gear icon in the upper-right corner of the Drive home screen and select Settings from the drop-down menu. In the Settings box next to “Convert uploads,” check the checkbox marked Convert uploaded files to Google Docs editor format .
Work in a presentation
When you open a new or existing presentation, its first slide appears in the main window of Google Slides. Here’s a breakdown of the toolbars, menus, panes, and sidebars that appear around your presentation.
The left pane shows thumbnails of all the slides in your presentation. Click a thumbnail, and the slide it represents will appear in the main window, where you can edit it.

The Google Slides editing interface. (Click image to enlarge it.)
Your presentation’s title appears along the top of the screen. To change it, click anywhere inside the title and start typing.
The menu bar below your presentation’s title has a complete set of tools for working with presentations. These are the main submenus to know:
- File has commands for taking action on the whole presentation, including Print, Rename, and Share.
- Edit lists the standard editing commands such as copy, cut, paste, delete, duplicate, and find and replace.
- View lists several ways that you can view your slides as you design and edit them. This includes arranging them into a grid, previewing them as a slideshow, or zooming in on them. You can also watch the transition effect that takes place between slides when they’re played in a slideshow.
- Insert lets you add several objects to your slides, including charts, diagrams, pictures, tables, and text. You can also add links to YouTube videos or sound or video files that are stored in your Google Drive.
- Format lets you change the look of your slides. Certain functions on this submenu become clickable depending on whether you’ve selected an image or text on a slide, or selected the slide itself.
- Slide is where you can add, delete, or duplicate a slide that you’ve selected. You can also add a preset layout to a slide, change its background or theme color, or add and edit a transition effect that takes place between slides when your presentation is played as a slideshow.
- Arrange lists tools that let you group or reorder objects on a slide in relation to another. For example, you can place an image behind another image or group an image and a block of text together to make them easier to move at once.
- Tools leads to several miscellaneous functions. These include letting you record a voice clip to go with a slide, running a spell checker, and showing you a list of objects in your presentation that are linked to other files.
The toolbar directly above your presentation puts commonly used commands in easy reach. From this toolbar, you can click buttons to add to a slide or change its background, comments, layout, objects (images, lines, shapes, text), text style, theme colors for the whole presentation, transition effects during a slideshow, and more. The buttons on the toolbar change depending on whether you’ve selected image or text on a slide or the slide itself.
Notice that there’s no Save button in the toolbar — or anywhere in Google Slides. That’s because Slides automatically saves any changes you make to your presentation.
Speaker notes: Along the bottom of each slide you’ll see an area marked Click to add speaker notes . Here you can type in brief notes to remind yourself what to do or say when the slide is being shown. Only you will see these notes when you show your presentation to an audience.
Themes sidebar: When you start a new blank presentation, the Themes sidebar opens on the right side of the screen. (You can also open this sidebar at any time by clicking Theme on the toolbar above your presentation.) Themes apply the same fonts, colors, and other design elements to all the slides in a presentation, giving it a consistent look and feel. Click a thumbnail in this sidebar to change your presentation to that theme.
Create and manage slides
Here are the basic things to know about working with slides in a presentation.
Add a new, blank slide to your presentation: Click the + button at the left end of the toolbar above your presentation. Alternatively, if you click the down arrow next to the +, you can choose a layout to use as the basis for a new slide.

Click the down arrow next to the + button in the toolbar to choose a layout for a new slide.
Apply or change a slide’s background: Select the slide’s thumbnail in the left sidebar and click Background on the toolbar above your presentation. On the panel that opens, you can change the slide’s background color or use an image file from your Google Drive, Google Photos account, or PC as the background.
Apply or change a slide’s layout: Select the slide’s thumbnail in the left pane, then click Layout on the toolbar above your presentation. On the panel that opens, select the layout you want to apply to this slide.
Apply or change a slide’s transition: Select the slide’s thumbnail in the left sidebar and click Transition on the toolbar above your presentation. In the Motion sidebar that opens along the right side of the screen, you can apply or change the animated transition effect that is played before this slide.

Choosing a transition style in the Motion pane.
Move a slide to a different spot in the slideshow sequence: Click and hold its thumbnail in the left sidebar, drag it up or down to another place in the sequence, and release it.
Delete a slide: Right-click its thumbnail in the left sidebar and select Delete from the pop-up menu. Alternatively, select its thumbnail and select Edit > Delete from the menu bar or just press the Delete key.
Share and collaborate on a presentation
Presentations are often a group effort, with several team members contributing to and polishing a presentation. In Slides, it’s easy for multiple collaborators to work on a presentation together.
First, you need to share the presentation. When you’re viewing your presentation in Google Slides, click the Share button at the upper-right. Or, from your Google Drive homepage, click to highlight the presentation that you want to share. Then, in the toolbar toward the upper right, click the Share icon (a head-and-shoulders silhouette with a +).
Either way, the “Share” panel will open.

Setting permissions for a file being shared privately.
Share a presentation privately
In the entry box, enter the email addresses (or names of your Google Contacts) of the people with whom you want to share. By default, the people you invite to your presentation can edit it and reshare it with others.
To change access permissions for invitees: Click Editor to the right of the entry box and choose another option from the drop-down menu. Commenter means they can view your spreadsheet and add comments but can’t change it. Viewer means they can view your presentation but can’t edit it or add comments.
To prevent your presentation from being reshared, downloaded, or printed: Click the gear icon at the upper-right of this panel. On the smaller panel that opens, uncheck the boxes by Editors can change permissions and share and Viewers and commenters can see the option to download, print, and copy .
When you’re done setting permissions (and, optionally, typing in a message to your invitees), click Send , and everyone you’ve added will receive an email with a link they can click to access the document.
The shared presentation icon.
A presentation you’ve shared (or that others have shared with you) will have an icon of two silhouetted heads next to it in the presentations list on your Google Sheets and Google Drive home pages.
To limit or change a person’s access to your presentation: With the presentation open in Google Slides, click the Share button at the upper-right. Or, from Google Drive, highlight the presentation and click the Share icon.
The Share panel reopens showing a list of all the people you’ve invited, along with their permission status. Click the down arrow to the right of a person’s name, change their permission level or remove their access entirely, and click Save .

You can change permissions for people you’ve shared a presentation with on an individual basis.
If you have a Google Workspace subscription, another option is to select Give temporary access and, next to Access expires , select a date within one year of the current date. If you set an expiration date for a person that you’ve assigned as Editor, their access will be downgraded to Commenter on the expiration date.
Share a presentation publicly
Most business users will want to share presentations privately with select colleagues or clients, but you do have the option to share a presentation publicly. At the bottom of the Share panel is a “General access” area where you can copy a link to the document. By default, this link is restricted to those you invite to the document. To change it to a public link, click Restricted and select Anyone with the link from the menu that appears.
Click Copy link and the link to your presentation will be copied to your PC’s clipboard. You can share this link by pasting it into a chat message, document, email, forum post, or most other means of online written communication. Anyone who clicks this link will be able to view your presentation online. (Be aware that anyone can copy and reshare this link.)
To allow anyone in the public to comment on or edit your presentation: At the bottom right of the Share panel, click Viewer and select Commenter or Editor from the drop-down menu. Then click the Done button. Now the web link to your presentation will let anyone who clicks it add a comment or edit it.

Sharing a spreadsheet publicly.
To turn off public sharing for your presentation: Bring up the Share panel again. Near the bottom, click Anyone with the link and select Restricted from the menu, then click the Done button.
Note: You can apply both public and private sharing methods to your presentation. For example, you could allow the public to only view your presentation, but allow specific people that you’ve invited to comment on or edit it.
Collaborate on a presentation
The people you’ve shared a spreadsheet with can view or work on it at the same time as you or at other times. Remember that people who have Editor privileges to your presentation can change all aspects of it. Having multiple people making changes to a presentation can get confusing. In most cases, setting everyone to Commenter is the best way to collaborate in Slides: People can attach comments to a slide or to objects in a slide, but their comments won’t alter your presentation’s information or design.
To add a comment to a slide: Right-click its thumbnail in the left sidebar and select Comment from the menu that opens. Alternatively, you can select its thumbnail and select Insert > Comment from the menu bar or click the Add comment button (a speech balloon with a + sign).
A blank comment card with your name on it opens to the right of the slide in the main window. On this card’s entry line, type a brief comment, and when you’re finished, click the Comment button.

Typing in a new comment.
To add a comment to an object on a slide: Right-click the object (a block of text, chart, image, picture, etc.) and select Comment from the menu that opens. Alternatively, you can select the object and select Insert > Comment from the menu bar.
To draw someone’s attention to a comment: As you’re composing the comment, type the @ symbol and begin typing their name, then select the person from the list of suggested Google contacts that appears. They’ll receive an email notifying them of the comment and linking to it.
To read, reply to, or remove a comment: A slide that contains a comment is denoted in the left sidebar with a speech balloon by its thumbnail. Click the slide’s thumbnail to make the slide appear in the main window, and you’ll see all its comment cards on the right.
To reply to a comment, click its card. The card will expand to reveal an entry line where you can add a comment in response.

Replying to a comment.
Clicking the checkmark at the upper right marks the comment card as “resolved” and removes the card from the presentation. Clicking the card’s three-dot icon opens a menu that lets you edit or delete your comment.
To see a list of all comments: Click the Open comment history icon (the speech balloon) to the left of the Slideshow button. A sidebar will open along the right side of the screen; it lists all the comment cards in your presentation. When you click a comment on this list, the view of your presentation in the main window will jump to the cell where the comment is located and open its comment card.

The Comments pane lets you quickly review all comments and jump to specific ones.
For more details about collaborating on your presentation, including what it’s like to collaborate in real time, see “ How to collaborate on a document ” in our Google Drive guide. You can also collaborate on a presentation in Google Chat; that’s covered later in this story.
Recover older versions of a presentation
It’s easy to go too far when making tweaks to a presentation. Fortunately, it’s also easy to roll back to an earlier version of the presentation. Click File > Version history > See version history . This opens a panel on the right that shows a list of older versions of your presentation.

Using Version history to view an earlier version of a presentation. (Click image to enlarge it.)
To view an earlier version of your presentation: Click the date for it in the list. That version of the presentation will then appear in the main window.
To restore an earlier version so it replaces your current presentation: With the version you want to restore showing in the main window, click the yellow Restore this version button at the top of the screen. The restored version will then appear at the top of the version history list.
To give an older version a unique name: Click on its date. You’ll be prompted to type in words to replace the date. (The date and time will then appear in smaller size underneath the new name.)
Give a presentation
When it’s time to play your presentation to an audience, Google Slides has two modes: Slideshow and Presenter view. Slideshow mode essentially shows what your audience will see. Presenter view mode provides additional tools for your eyes only that run alongside Slideshow mode.
Slideshow mode: Click the Slideshow button at the upper-right corner of the screen. Google Slides will expand to full-screen view and show the slide that’s currently in the main window. (If you want to start the slideshow from the first slide in your presentation, click the down arrow to the right of the Slideshow button and select Start from beginning .)

The control bar in Slideshow mode lets you click through the slides, turn on auto-play, use a laser pointer effect, and more. (Click image to enlarge it.)
When you move the on-screen pointer to the lower-left corner of your presentation, a control bar appears. You use this to click forward and back through the slides. Clicking the three-dot icon on the control bar opens a menu with other controls, such as starting auto-play and adjusting how quickly it moves from slide to slide.
On this menu, Turn on the laser pointer turns the mouse pointer into a simulated red laser dot. Captions preferences — available only if you’re using a Chrome browser or Chromebook — lets you turn on real-time, automatic transcribing of your words as you say them (English only) and shows them to your audience as on-screen captions. Open speaker notes takes your presentation out of full screen and opens a separate “Presenter view” window, as described below.
Presenter view mode: Click the down arrow to the right of the Slideshow button and select Presenter view . This shows the presentation in your browser window and launches a separate window that assists you while you’re giving your presentation.

Presenter view lets you (but not your audience) see your speaker notes while presenting. (Click image to enlarge it.)
From the Presenter view window, you can jump to any slide in your presentation, read the speaker notes you wrote for a slide, and control the Q&A feature. There’s also a timer that you can set to remind yourself how much time you’re spending showing a slide — or the entire presentation — to your audience.
Click the AUDIENCE TOOLS tab to use the Q&A feature, which lets you take questions from your audience. To open questions for a slideshow, click the Start new button. A web link appears at the top of your presentation. An audience member watching your presentation on their computer, phone, or tablet can click/tap that link, which will take them to a page where they can type a question for you. You’ll see the question in your Presenter view window, and you can choose whether to show their question to the rest of your audience during the presentation. To close questions for a presentation, turn the switch from ON to OFF .

Audience members can submit questions from their devices, and the presenter can decide whether to display them as part of the slideshow. (Click image to enlarge it.)
Present in Google Meet
Need to give a presentation during a Google Meet video meeting? As long as you’re using a Chromium-based browser (Chrome, Microsoft Edge, Opera, etc.), it’s easy: Toward the upper right of the Google Slides page, click the Google Meet icon. From the panel that opens, select a meeting that’s scheduled on your Google calendar today, start a new meeting, or type/paste in the web link or code that you have for another meeting.

Click the Meet icon to get started presenting to a video meeting.
If you start a new meeting, a sidebar for the meeting will open on the right. At the bottom of the sidebar, click the Present now icon (a box with an up arrow). On the panel that appears, select your presentation and click the Share button, and you’ll be presenting to the meeting.

Choose which tab or window you want to share and click the Share button. (Click image to enlarge it.)
If you join a scheduled meeting, you have two choices: “Join the call” and “Just present this tab.” If you click Join the call , a sidebar for the meeting will open on the right. Follow the same steps as above to present to the meeting. If you click Just present this tab , you’ll go directly to the panel where you select your presentation and click Share , but you won’t have a sidebar where you can follow the main meeting.
To stop sharing your presentation to the meeting, click the Stop sharing button at the top left of your browser window.
For more details about using Google Meet, see our Google Meet cheat sheet .
Download and export a presentation
Google Slides lets you download presentations for use offline. On the top menu, select File > Download and choose a file format. You can save your presentation to your PC as a PowerPoint (.pptx) file or in other formats such as PDF, or as JPG or PNG for an individual slide.
5 tips for working with Google Slides
Now that you’re comfortable working in Google Slides, try these intermediate tips.
Use the Google Slides mobile app
With the exception of the “Version history” tool, the Google Slides app for Android , iPhone , and iPad has many of the same features described in this guide.
When you have a slideshow open, the toolbar at the top of the screen lets you take a variety of actions:
- To present your slides on your phone or tablet, on a Chromecast device, or in a Google Meet meeting, tap the triangle icon.
- To share your presentation with other people, the headshot silhouette. (See “How to share from the Google Drive, Docs, Sheets, and Slides mobile apps” in our Google Drive cheat sheet .)
- To view all the comments in the presentation, tap the Comments icon (a chat balloon) if you see it in the toolbar, or tap the three-dot icon and select View comments from the menu that appears.
- The three-dot menu also lets you see the presentation’s Q&A history, export it, make it available offline, and more.

The Google Slides Android app.
To edit or comment on a slide: Tap the slide, and a menu will appear that lets you add or view comments for that slide or edit it. Tap an element on a slide, such as text or an image, and tools to edit that element will appear.
Any changes you make to your presentation in the mobile app are automatically saved and will appear the next time you open it in the Google Slides web app.
Get suggested slide layouts and content
Click the Explore icon at the lower-right corner of the screen. The Explore sidebar will open along the right side. In most cases, you’ll be presented with thumbnails of suggested layouts that Google Slides has automatically customized for the slide that’s open in the main window. Click the one you want, and it will be applied to the slide.

Use the Explore tool to get suggested layouts (left) and search for images (right).
At the top of the Explore sidebar is a search box. You can type in a word or phrase to find related content on the web or in your Google Drive. Search results appear on separate Web, Images, and Drive tabs in the sidebar. Click a web or Drive result to open it in a new browser tab. On the Images tab, click the + icon on the upper-right corner of an image to insert it onto your slide.
Create custom slide layouts to use as templates
You can design your own slide layouts to use as templates in any future presentation. First, open a new, blank presentation as described above. Then:
- On the menu bar over the blank presentation, select View > Theme builder .
- The main window switches to a layout editor. Toward the left you’ll see a column with the heading THEME on top and LAYOUTS just below that. Click the thumbnail of any layout in the LAYOUTS list. It will appear in the main window.
- You can remove objects that are already in any layout. For example, click on a block of text. A frame appears around the text. Without selecting the text itself, move the pointer to ward an edge of the frame, right-click, and select Delete from the menu that opens.

Creating a custom slide layout. (Click image to enlarge it.)
- Using the formatting toolbar above the slide, you can add new objects to the slide, including images, image placeholders, shapes, lines, and blocks for text. (Tip: enter placeholder words inside the text blocks.) When you click on any object, a frame appears around it. Drag and drop the frame to relocate it on the slide, or drag its edges to change its shape or size. You can also add or change the border and background colors for any object on the slide and/or change the background color for the whole slide.
- When you’re finished designing your layout, click the Rename button above the slide and give the layout a unique name.
- If you want to create another custom layout, click on the thumbnail of another layout under the column LAYOUTS and repeat the above steps starting from #3.
- When you are finished custom-designing all your layouts, click the X toward the upper-right of the slide layout in the main window.
- Along the top of the screen, click anywhere inside Untitled presentation and start typing. Tip: Use a name that indicates this is a template (e.g., “Annual Budget Presentation – Template”).
In the future, you can make new presentations starting from this template, and your custom slide layouts will be available.
- Open the template presentation you created in the steps above. On the menu bar, click File > Make a copy > Entire presentation . On the panel that opens, type in a name for the new presentation you want to create and click the Make a copy button. Google Slides will open this new presentation in a new browser tab.
- On the toolbar above the first slide of your new presentation, click Layout . From the panel of thumbnails that opens, select one of the layouts that you created. It will then be applied to the slide in the main window.
Collaborate on a presentation in Google Chat
An alternative way to collaborate on a presentation is to share it in Google Chat. Other people in your chat can add comments and help make changes to your presentation.
Start in Google Chat . To the left of the box where you type in your chat messages, click the + icon and select Drive file from the menu that opens. A panel will open over the screen listing the files in your Google Drive. Find and click your presentation to highlight it, then click INSERT on the lower-right corner.
You’ll be taken back to the chat message box. Click the blue right-pointing arrow to the right of the box, and a panel will open over the screen designating permissions for the shared presentation. By default, permissions are set to Comment. To change this, click Comment and select View or Edit . You can also allow the people in the chat to share a web link to your presentation with others outside of the chat by selecting Turn link sharing on .

You can share a presentation to individual or group chats in Google Chats. (Click image to enlarge it.)
After you’ve set the permissions, click SEND , and your message will appear in the chat stream with a large thumbnail of your presentation. To open a presentation in the chat, click the thumbnail. The presentation will open inside a large window that’s laid out alongside the right of the chat stream.
This is actually Google Slides running inside the chat window with your presentation loaded in it. Thus, most of the Slides commenting and editing tools are available for you and others in the chat to use on your presentation (if you granted them permission to comment or edit). The user interface is the same, except there’s no menu bar.

Collaborating on a presentation from within a Google Chat. (Click image to enlarge it.)
Use keyboard shortcuts
Save time in Slides by using keyboard shortcuts for common tasks. Below are some of the most useful to know. For more, select Help > Keyboard shortcuts from the top menu when you have a spreadsheet open or press Ctrl + / (Windows, Chrome OS) or ⌘ + / (macOS).
Handy Google Slides keyboard shortcuts
This story was originally published in September 2019 and updated in August 2022.
Related content
100 billion reasons apple is putting up a fight, the best ways to share files between windows pcs, just how good is ai-assisted code generation, windows 11 insider previews: what’s in the latest build, from our editors straight to your inbox.
Howard Wen ( www.howardwen.com ) is a longtime contributor to Computerworld . He specializes in explainer guides, how-tos, and reviews of office applications and productivity tools.
More from this author
Google docs cheat sheet: how to get started, 8 highly useful slack bots for teams, microsoft onedrive cheat sheet, 9 chrome extensions that supercharge google drive, most popular authors.

- Howard Wen Contributing Writer
Show me more
Tech layoffs in 2024: a timeline.

Microsoft unbundles Teams and Office globally to avoid antitrust fight

When the going gets tough, Apple’s Siri goes pro

Sam Bankman-Fried gets 25 years in prison

How to combat social media addiction

How social media companies are addicting adolescents

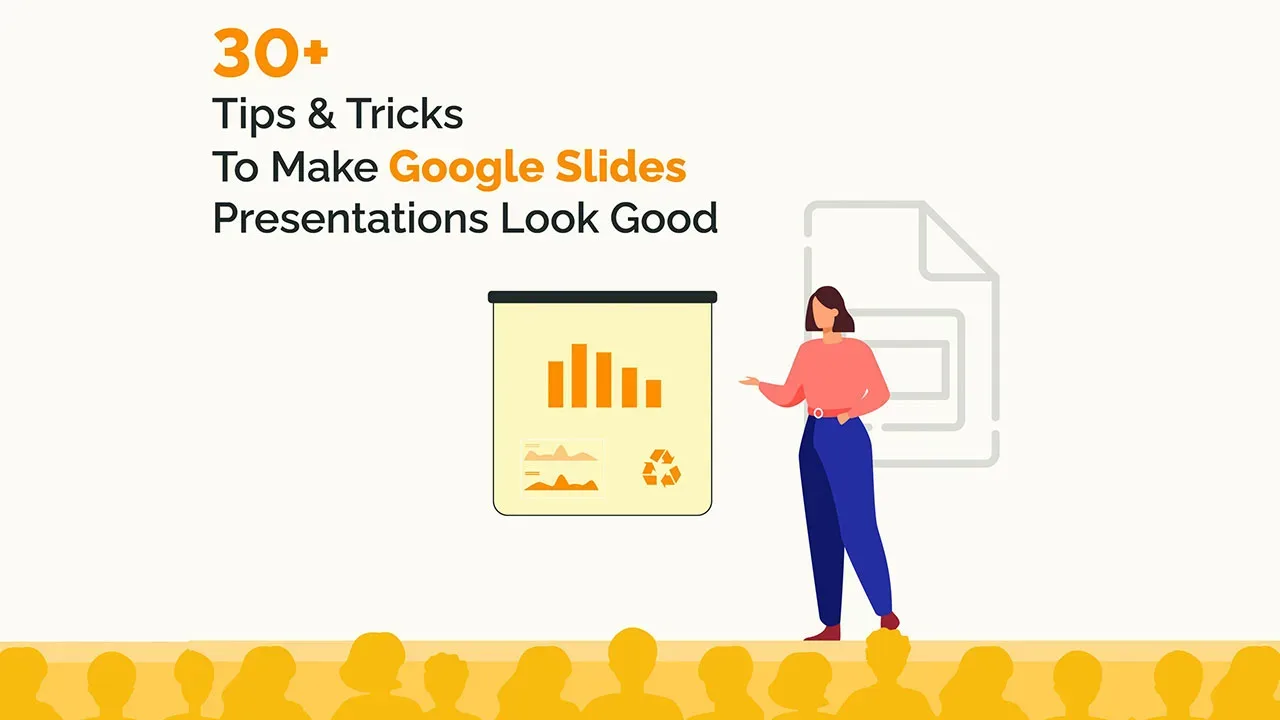
30+ tips and tricks to make Google Slides presentation look good
Let’s face it, it’s no fun to look at a slide with heavy texts and overcrowded images. It leaves the audience bored and disinterested. It’s very important for your Google Slides presentation to look good in order to have your audience on board. You don’t need to be a designer to learn how to make aesthetic google slides. You can make some basic editing and formatting easily in Google Slides presentation to take it to the next level. In this article, we present some amazing hacks to have a killer presentation that leaves the audience in awe.
Be prepared for a bonus at the end!
Use Google Slides layouts wisely
1. customize slide layouts.
Every presentation needs to follow a basic layout which is regular throughout. Google Slides have a set of layout and theme options to choose from. But in case you wish to edit certain elements, you are free to do it. This will make the presentation truly yours. Click here for a complete guide on using layouts any fresher can use.
2. Use pretty backgrounds for Google Slides
Most of the professional presentations contain a lot of jargon-heavy information written in plain texts on plain backgrounds. Instead, include a transparent or mild background to support your text. The background can either be related to the story or just a plain color wall that goes with the text font and the context.
3. Draw attention with dark background
Audience gets tired of looking at bright colors all day. So, using a dark background not only catches their attention, but is also pleasant for the eyes. But remember to use the matte finish or mild colors for text with the dark background.
4. Try black and white theme to look professional
Often, a black and white theme stands out both because of the professionalism it conveys. This keeps your presentation minimal in appearance and adds to the authenticity of your delivery. But you should be careful not to make it look boring.
5. Use the Master Slides tool
Any change you make in the master slide will automatically reflect on all other slides. Customize the master slide first so that you can save time. You can modify backgrounds, rearrange placeholders, or change theme for the whole presentation with Master slides tool.
6. Keep it minimal
Don’t go fancy with the designs and fonts, keep it minimal. Overcrowding the slides with bulky texts and images or vibrant colors is not a good idea. It will distract the audience and make the presentation look unprofessional.
How to make Google Slides look good with Images
1. use shape masks to make creative images.
Using regular shapes like square and rectangle for images can get boring. To make it interesting, give different shapes to the images.
How to use shape masks in Google Slides:
Select the image you want to apply a shape mask on. Crop the image to the size you want. In crop tool, go to Shapes and choose a shape from the drop-down menu.
2. How to import images from the web
Adding relevant and catchy images make your google slides aesthetic. But you may not have the perfect image to go with the slide. In that case, you can directly download the picture from Google without leaving the tab.
How to import Google images into Google Slides:
Go to Insert >> Image >> Search the web >> Type in the name of the image you want. Or, go to Explore section and Google directly from the Slides tab.
3. Reflect your images if it suits the context
This will be a really cool effect, especially for slides with a single important image. Reflecting your images is a creative way to grab the attention with a single slide. But, this is a bit outdated feature, so it’s better to avoid for professional presentations.
How to reflect an image in Google Slides:
Select an image. Go to Format options and tick the box next to Reflection. Use the slider to adjust the size and transparency.
4. Make the image transparent
Another tip is to adjust the transparency of your image rather than adding a plain image. Plus, you can write relevant text on top of a transparent image.
How to make an image transparent in Google Slides:
Right-click on the picture and go to Formats option. Go to Adjustments >> Transparency. Adjust the transparency as per your requirements.
5. Resize and rotate shapes and images
When you import an image from the web, it might not be the right size for your slides. Google Slides allows you to resize and rotate the images and shapes.
To resize a picture, simply select the picture and move the cursor to bring to the desired size. To rotate an image, click the picture and choose Arrange. Then, click Rotate and select the preferred orientation. Avoid these while using images in Google Slides presentation: Though there are a hundred things you can do to your image, overdoing it will beat the point of making your Google Slides presentation look good. Following are some of the things you should avoid so that the slides look professional.
Using blurry or irrelevant pictures. Stretching or cropping the image more than necessary Low resolution images Watermarked images Not adding citations while using a picture you don’t own Crowding the slides with pictures Using reflection or transparency settings in all the images
Make your Google Slides presentation interactive
1. use the interactive q&a tool.
Having a Q&A section at the end helps you clear any doubts your audience might have. You can make it more interesting by using the Q&A tool. The audience don’t have to wait till the end of the presentation, they can type in the question whenever they want.
How to use the Q&A tool:
During your presentation, activate the Q&A feature by clicking on the Q&A tool. Audience sees a weblink where they can submit their questions. You can answer them at the end of the presentation. You can check the past questions by going to Tools >> Q&A history
2. Create a timeline
In many business presentations, you might need to present the progress of a project and timeline is an important part of it. It is easy to understand and remember. This can be used for interactions and discussions with the audience.
How to create timeline in Google Slides:
Go to Insert >> Diagram This shows a list of different types of timeline templates in built with Google Slides. Choose the one you like and edit it for your data.
Color schemes for your Google Slides presentation
1. edit theme colors.
Every Google Slide theme you choose comes with a pre-set color scheme. However, you can customize the theme according to the color you prefer.
Go to Slide >> Edit Theme Choose a color from the drop-down menu. Here’s a guide on choosing the right color for your Google Slides presentation.
2. Use color split
Using two different colors on the same slide is visually appealing. Make sure you use complementary colors like yellow and blue. For example, if you are using a blue background, use orange color for the texts.
3. Create a color overlay
Color overlay is a technique to make transparent shapes appear on your images or text. You can either apply it to the whole slide or a part of it.
Go to Insert >> Shape Choose a shape if you want to overlay only a part of your slide. Place the selected shape on the slide. Click on the shape and go to Fill colors and choose the color you want. Avoid these while choosing colors for your Google Slides presentation: While adding colors in a smart way can grab the audience’s attention, there are certain rules you should stick to while using them. Here is a small list of things to avoid in order to make your Google Slides look good.
Using multiple bold colors in a single slide Using same color for theme and texts Not sticking to your brand colors Using bright colors for reflection of images or texts. Overusing color gradient
Tips for text in Google Slides presentation
1. try different font attributes.
No one is going to read all the text in your presentation. So, you can highlight the parts which you want to stress on. You can make the text bold, italics, or underlined.
2. Research the top text fonts to use in Google Slides
There are a number of text fonts available in Google Slides, but not all of them make it to a professional presentation deck. So, it’s very important to know the most preferred text fonts to use in Google Slides.
Here are the 5 top text fonts:
Open sans Montserrat Cabin Ubuntu Lato
3. Use text box to have neat texts
Texts randomly strewn across the slides can be distracting for your audience. So, use a text box to have the texts placed in a neat way. You can also align your texts to left, right or centered to make it look professional.
4. Add a drop shadow to the text
Another way to make your texts look interesting is to use a drop shadow effect for Google Slides. However, if you lack experience in designing, we suggest you not to use this effect.
How to add drop shadow:
Select the text you want to use drop shadow on. Go to Format and check the box near Drop Shadow. Use the slider to adjust blur, transparency, and angle.
5. Add the technical terms to your personal dictionary
There might be terminologies or names that are specific to your topic, which may come off as spelling errors. In slides, they may appear in red and you may lose your credibility. To remove this, you can add those terms to the personal dictionary.
Go to Tools >> Personal dictionary Add the technical terms. They will no longer be shown as spelling errors. Common mistakes people make in Google Slides text: While the above features can make your text professional and easy to read, most people miss out on the basics.
Omitting indentation Wrong alignment of text on the slide Using very large or very small texts Not proofreading for typos Inadequate spacing between texts or lines.
Include infographics in Google Slides presentation
1. experiment with different types of diagrams.
If you have a lot of data to present, it’s better to present as graphs or charts instead of pulling off large sheets of data. There are different types of graphs you can use like line graph, bar graph, histogram, pie chart, etc. So, use them in your presentation. This adds credibility to your work and presentation.
2. Let your graph speak for itself
This means you must label, highlight or add everything in the graph such that anyone can analyze it. A single graph with right labels and arrows to show the trend can convey the meaning much better than large amount of texts or spreadsheets.
Add animation to make Google Slides presentation attractive
1. add subtle animation effects on texts.
If you have a lot of information to share on a single slide, use animations to delay some texts instead of displaying everything at a time. This works well for bullet points where you can display one point after another.
2. Add a GIF or a meme
One of the main reasons why presentations are boring is the lack of fun element. Adding a GIF or a relatable meme is not only funny, but helps you put the message across easily. It is an effortless attention grabber.
But you have to make sure it gets added as an animated GIF rather than a still image. For this, the following steps will help:
Find the GIF in Google and copy the image address. Go to Google Slides >> Image >> by URL Paste the URL and click Insert. Remember you have to insert the image by URL for it to play.
3. Add trimmed videos in Google Slides
People recollect visuals better than written text. So, if there is a video on YouTube which can explain what you want to convey, use it. But instead of including the full video, you can add only the relevant part by using the embed option.
4. Use transitions for slides
Adding smooth transition effects for individual slides helps in keeping the flow. The most recommended transition effects to use in a professional presentation are dissolve, fade in, slide from the left, fly in from bottom and fly in from left to right.
Go to Insert >> Animation Select a transition from the available options. Apply to a single slide or all slides, as you wish.
Are you terrified by the amount of effort you have to put in researching about fonts, choosing best colors and get the formatting perfect? This can be time-consuming if you designing is not your biggest flex.
Don’t worry! Here’s the good news!!
You can skip all these steps and still have an amazing presentation deck if you use professional templates!
Use Google Slides presentation templates
Making a presentation from the scratch is wasted time and energy which could be spent on crafting the story you want to convey. That’s why we bring to you the best presentation templates to help you tell your story in your unique way. SlideKit has professional templates designed by experts and you can customize it according to your needs. This can be installed as an add-on in Google Slides for free. It ensures consistency of aspects like font, theme, color scheme and layout used throughout the deck.
SlideKit has slides in the business and other professional domains which you can download, edit and use for free. Premium membership gives you access to 3500+ templates over 35+ niches. Using these templates will make your Google Slides presentation stand out. Here are a few tips to make the most out of SlideKit’s professional google slides templates .
1. Customize the templates
The presentation deck you choose will have all the design and infographic elements you need; but you need to customize them according to your data and your preferred color and font. In SlideKit, you can add images, videos, or hyperlinks, and place them wherever you want on the slide. Additionally, you can acquire hyperlinks from other websites to your own which is referred as niche edits .
2. Use niche-specific templates
There are templates available for different domains, so choose the one that fits your industry. Templates are perfect for branding since they come with placeholders for logo, letterhead, contact details and website address. But it’s important to choose the one that is aligned with the industry. SlideKit makes it easier for you by giving you a variety of industry-specific options to choose from. Moreover, incorporating effective SEO strategies , such as optimizing presentation titles, using relevant keywords, and providing quality content, can significantly enhance the online visibility of your Google Slides presentations, making them more accessible to your target audience and boosting overall engagement.
3. Plug in your data to relevant infographics
As mentioned before, including graphs and charts is beneficial for both you and your audience. Depending on the domain, SlideKit offers relevant infographics which can be customized according to your data. You can change the labels, legends, scale and figures, among many other features.
Now you have the best resources and tools to make your Google Slides presentation look compelling.
Happy presenting!
Welcome back, please sign in to continue..

Please sign up to continue.
15 Tips to Make an Amazing Google Slides Presentation Design!
By: Author Shrot Katewa

There are many reasons that people like to use Google Slides. It could be for a school project, work presentation or just to share information with friends and family.
Whatever the reason, one thing is certain: you want your design to look amazing! If you want an easy way to create a great-looking design for your next presentation then this blog post is for you.
In this article, we will go over 15 tips on how to make an amazing design using Google Slides. Whether it’s your first time creating a presentation on Google Slides or if you’re an experienced professional, these tips are sure to help guide you in the right direction!
So, let’s get started!
Note – if you are strapped for time , simply considering outsourcing the presentation design process to a professional! I’d recommend using Fiverr . It is completely hassle-free to set up and start using. Plus, you don’t need to pay anything to hire a professional. You only pay for the slide design! And, you can start with as little as $5 to $10 per slide!
Tips to Make an Amazing Google Slide Presentation Design!
Since this is going to be an action-packed article with a ton of suggestions, let’s just dive right in with the tips!
1. Create a Compeling Narrative Through a Story Arc
A presentation is only as good as the narrative it holds!
If your presentation doesn’t leave “ food for thought ” for your audience, they are less likely to remember your presentation, and even less likely to take any action afterward (which is mostly bad news especially if you are trying to convince your investors to give you more money!)
Presentation design goes hand-in-hand with the content that is going to be used for the presentation. Thus, start with a compelling story.
The best way to create a convincing story for your presentation is to use the “ Story Arc “.
A “ Story Arc ” or a “Narrative Arc” is something that has been successfully used by storytellers and writers for ages. The keyword here is “successfully”!
A powerful narrative can not only help your audience understand the intricacies of the subject of the presentation, but it also makes the presentation engaging and entertaining.
The best way to start working on a story arc is to either look at what is the most important aspect of your presentation and how can it be emphasized in a manner that takes the role of a protagonist?
Another way that I’ve used the story arc in my presentations successfully is to work backward. Think of what is the end outcome that you expect, and try to track things backward in order to achieve the end outcome.
No matter what approach you take, if you are able to fit a story arc in your presentation, you’d be golden!
Finally use stories from your life, or what you experienced while working on a project! I’ve seen this works really well and resonates with the audience. Here’s a quick video on tips for using storytelling in your presentation.
2. One Topic Per Slide
Now that you’ve identified the larger part of what you going to cover in your presentation – in other words, the content, you now need to lay it out on your presentation such that it can be consumed by your audience comfortably!
One of the simplest tips to design a better presentation is to make sure that you don’t cramp all the information in a single slide or 4-5 slides! Make sure that you spread out the presentation on multiple slides so that the audience can absorb all the information, but in short bursts, and then move on to the next topic!
A good rule of thumb for a good design is to try and cover just 1 topic on a slide.
I’ve seen this work plenty of times, and I personally also use this technique for my presentations. Simply divide the content of your presentations first into multiple key sections. Then, divide the sections further into key topics that should be covered within that section.
You can do this activity on a sheet of paper or just on the first slide of the presentation. Once you’re done with this activity, you’ll realize that the outline that you’ve just created also serves as the “Agenda” or the “Table of Contents” slide.
Now, all you’re left to do is fill in the information that needs to go under each topic.
You may be wondering how is this a design tip. Well, when you have just one concept present on a slide, it is not only easier for your audience to consume, but also easier to design. You’ll realize this when designing the presentation and thank me later!
Remember, there will be times when you will not have much to say about a particular topic, your slide will look empty, and you will be tempted to add another topic on the same slide. Don’t fall for that. Instead, use images that accentuate the text or the topic of the slide.
3. Start with a Template (Don’t Design from Scratch!)
This next tip might seem a bit obvious to some.
But, the reality is that quite a lot of people tend to miss out on the fact that you can use presentations that already look good, and just customize the slides for your content!
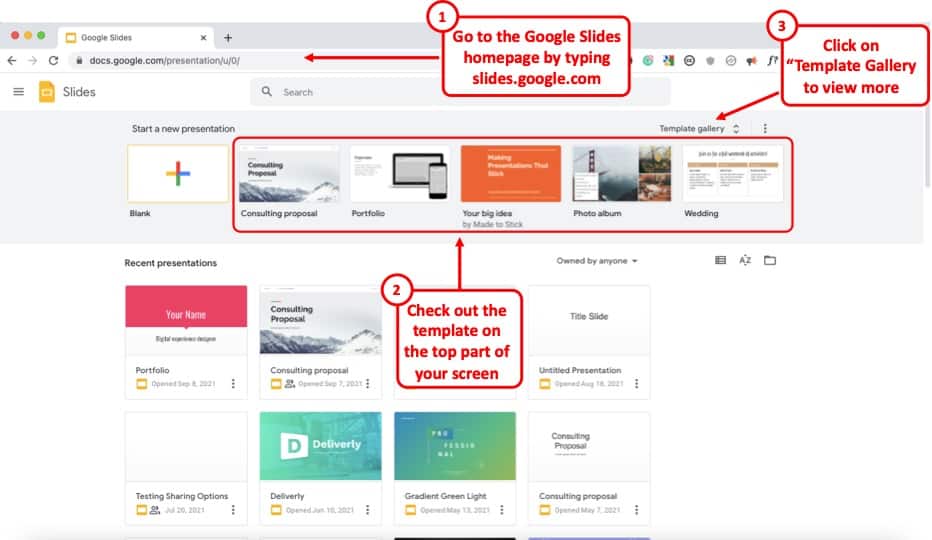
Google Slides already provides you with a number of free templates. Here’s how you can access them –
- First, visit your Google Slides dashboard page.
- Login to your Google Account (if prompted)
- Choose a template from “Start a new presentation” section
- You can also click on “Template Gallery” to view more templates.
The one template that I end up using over and over again is the file name “ Consulting Proposal “. It has got a sleek modern design, a good mix of image slides as well as different text placeholder slide layouts for you to easily edit your presentation.
But, feel free to check out other templates and see which one fits your need the best.
The point here is that if you are not great at designing a presentation, you’d perhaps be better off using a template rather than starting from scratch!
4. Use Fonts the Right Way
When it comes to designing a good presentation on Google Slides (or any application for that matter), fonts do play a key role in how your presentation looks!
Thus, it is important to make sure that you use the fonts correctly when creating your presentation.
Here’s what you need to remember when using fonts for your presentation –
- Use Just One or Two Fonts – Don’t use too many fonts in your presentation. Your presentation design will not look good. Plus, using too many fonts in a presentation shows lack of consistency and professionalism in design.
- Combine Fonts – Ideally, just use one font if you are unsure of which fonts work great together. But, you can also combine fonts to make the content of your presentation standout!
If you do want to go with a two-font option, use the Google Fonts tool to identify the font combination.
Here’s how you can find a good font combination for your presentation –
Step 1 – Visit Googe Fonts and Search for a Font
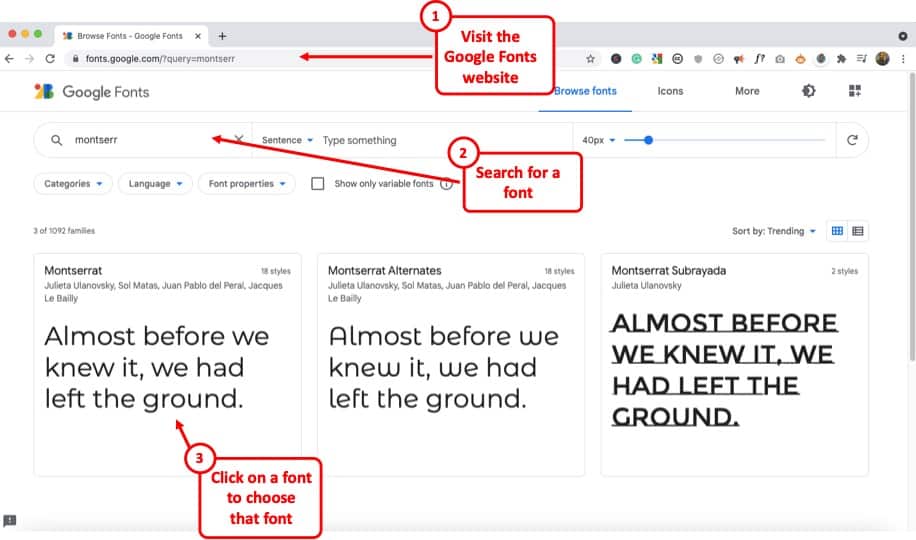
Google Fonts site provides free fonts that are compatible with most modern internet sites and web browsers. Google Fonts are considered the gold standard for sites as these look very modern and are light.
The best thing is – most of them are already available in your Google Slides presentation by default.
So, the first step is to visit the Google Fonts website . Then, search for a font, to begin with. My favorite font is Montserrat . But, you can also go with Lato, Roboto, or Source Sans Pro if you are looking for a Sans Serif Font .
If you are looking for a Serif font , I would recommend using Merriweather .
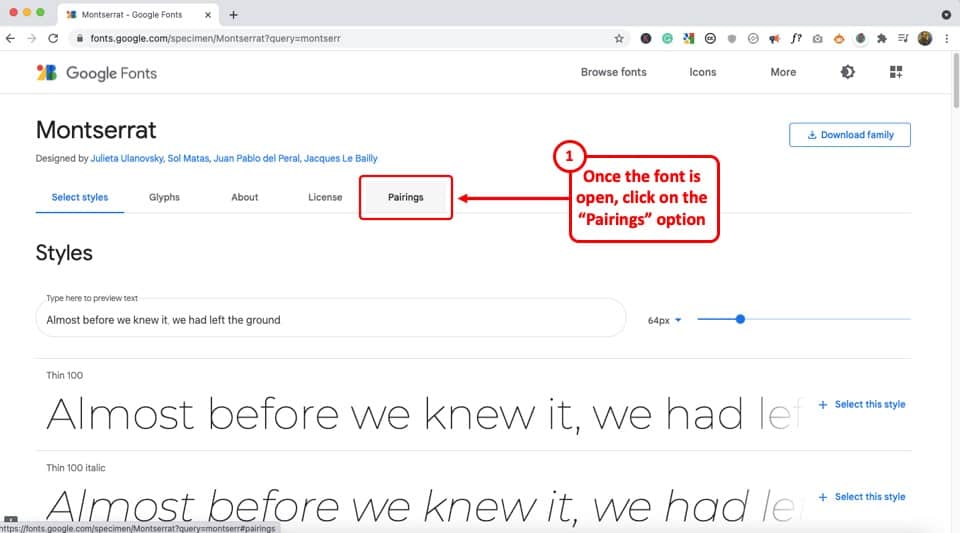
Step 2 – Choose the Font and click “Pairings”
The next step is to choose a font. You can either type one of the fonts that I mentioned in the search bar and click on it once it appears OR you can also simply choose from the list provided below.
Just make sure that you click on the font that you like to open it.
Once the font is open, click on the “Pairings” tab on the top (as shown in the image).
Step 3 – Choose a Font Pair
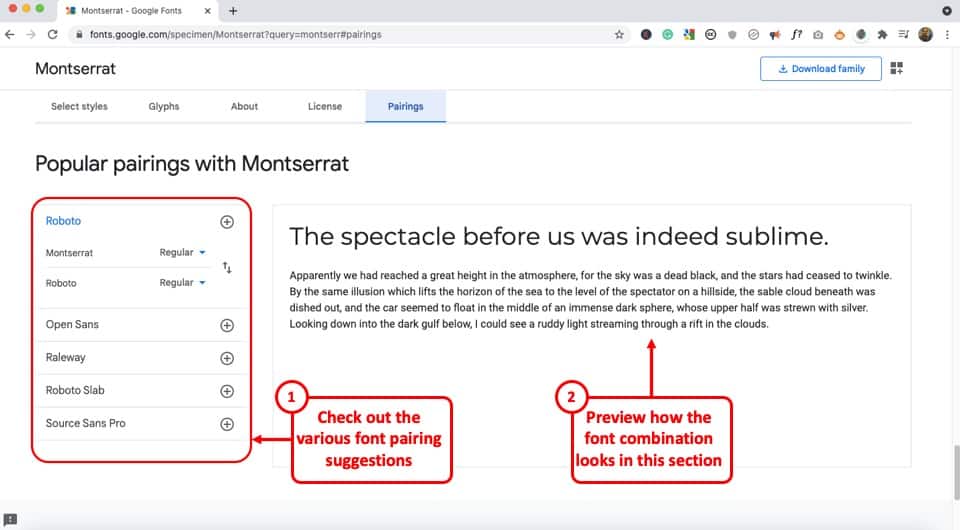
Now simply choose one of the font pairs provided by Google Fonts. You can also click on a font pair to see how it looks on the section on the right.
Play with the options provided and choose the font combination that you like.
Now, simply go back to your Google Slides presentation and change the fonts according to your selection.
5. Choose the Right Color Combination
Just the way fonts are an important part of your Google Slides presentation design, choosing a good color combination can make your presentation look visually appealing, consistent, and professional.
Unfortunately, a lot of struggle with choosing a good color combination. Thus, I highly advise going with a monochromatic color scheme.
A monochromatic color scheme in a presentation provides a variety of color combinations of the same color. This makes your presentation look consistent and professional.
Moreover, using a monochromatic color scheme is a perfect way option for a beginner as it requires the least amount of time and effort to set up!
Check out my other article on using a monochromatic color scheme for presentations to understand the topic in-depth.
Then, also check out how to use the eyedropper tool in Google Slides to implement the color scheme that you end up choosing.
Make sure that you change the color at the theme level in Google Slides instead of changing it on every single slide. This will save you quite a bit of time!
6. Use the Expore Tool to Generate Slide Designs
Once you’ve decided the fonts, color scheme, and theme, and you have the content structured out, you’ve done most of the hard work!
All you are now left to do is create the slide designs. And, to help you with that, make sure that you use the “ Explore Tool ” in Google Slides.
The “Explore” feature in Google Slides generates slide designs based on the content that is already present on the slide. It is a great way to get a slide designed almost instantaneously!
The “Explore” feature in Google Slides works much as the design ideas feature in PowerPoint.
Based on the content on the slide, it will throw a few suggestions on how the content can be laid out on the slide. You can choose the design you like. If not, you can still design your own slide. But, it is definitely worth trying out first. Pretty cool, isn’t it!
I wrote a detailed article on the Explore Feature in Google Slides . Make sure you check out that article to learn where to find this tool and know how to use it!
That said, one thing to keep in mind is that this feature is still an experimental tool . And, while it is getting better with time, I wouldn’t recommend using it with every single slide.
In my experience, I’ve noticed that using the “Explore” feature in Google Slides works best when you want to create a title slide, a section break slide, or just want to get a few ideas on how the slide can be designed.
7. Apply the 3 by 3 Design Rule
The 3 by 3 design rule, otherwise also known as “ the rule of thirds “, is a principle that has been borrowed from photography. But, it is every bit applicable even for slide designs and other design elements!
As per the 3 by 3 design principle, you basically need to divide the visual canvas into 3 equal-sized vertical and horizontal grids with the help of 2 vertical grid lines and 2 horizontal grid lines.
Here’s a video that explains the concept of the rule of thirds for presentations –
Using these grids helps place the content correctly in the grids such that the key message usually aligns with the way our eyes like to see them visually!
The 3 by 3 design principle may seem confusing at first, but once you’ve understood how to use it, you can literally take your presentation design skills a few notches above the rest!
Using 3X3 Grids to Properly Layout Content on your Slides
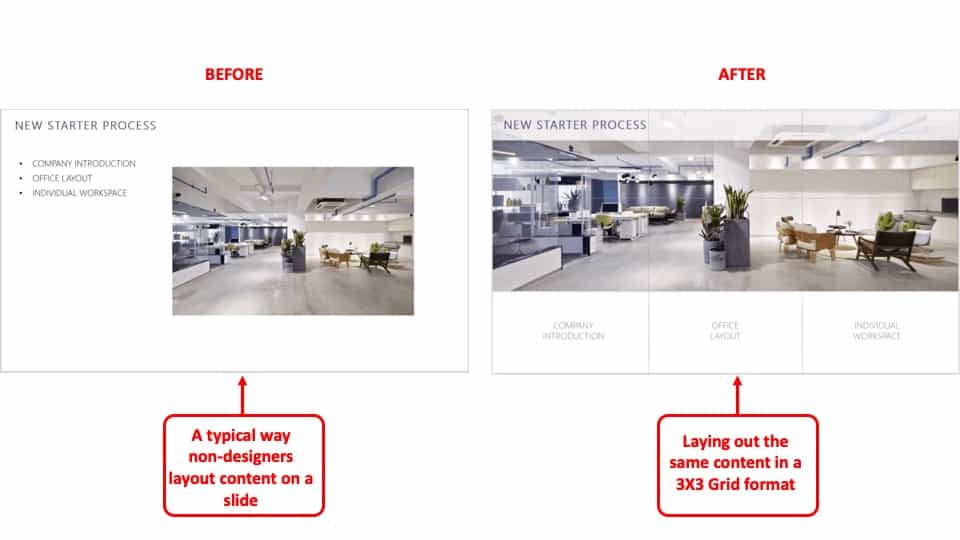
The interesting thing is, you can take the same principle to make it work with elements apart from the images that are present on your slide. And, the results are just amazing!
The picture above shows how most people design their slides (on the left). However, you can literally transform the way your slides look by applying the concept of 3×3 grids to any existing content on the slides! (as shown on the right part of the picture above)
Here’s another video that explains how this concept of 3 by 3 grids can be used to take any existing slides and make them better (if they aren’t properly organized).
8. Use Powerful Images
They say – “An image speaks a thousand words!”. This absolutely holds true when it comes to big impact presentation!
If you recollect any one of the top presentations from Steve Jobs. His presentation was almost always using powerful images with very few words on them.
Using images, as opposed to a lot of text, on your presentation has a few advantages of its own –
- Visual Appeal – Using images makes the slide visually appealing. Think about it – if there aren’t too many objects placed on the slide, the chances of making design related mistakes are also far lower!
- Emotional Connect – Using images creates a subtle emotional connect in the minds of the audience with the topic of the presentation and/or the presenter.
- Audience Focus – When you use text on a presentation, often the audience just reads the text and doens’t want to listen to the presenter. Instead, when using the images, you control the focus of the attention of your audience. Once you have their attention, making a presentation impactful is a lot easier!
- Faster Design Process – In most cases, it is faster to find an image and add it to the presentation rather than think of a way to design a slide to communicate a concept. This is especially true if you have only basic design skills.
If you watch some of the most famous TED or TEDx presentations ( know the difference between TED and TEDx presentations here ), it is quite common to see presenters using high-impact images with text. Ever wonder why is it so?
Well, one of the most important reasons is that you are able to control the attention of the audience!
Now, if you are wondering how to find images for your presentation, keep reading as I’ve got some great recommendations for add-ons later in the article!
9. Keep the Text on the Slide Readable
If using images for most slides is not the way for you, then this section is going to be quite important!
In fact, even if you do plan to use just images on your slides, there may still be a few slides where you will need to have some text. If so, make sure that the text on the slide is readable!
Make sure that you don’t use text that is too small to read.
As a general rule – the further the audience is going to be away from the screen, the larger the size of the text!
Here’s what to remember for the size of the text on the slides –
- Presentation seen on a computer screen – If the presentation that you are designing is going to be seen on a computer screen (either over an email or a zoom call), then make sure that the font size used for the presentation is not less than 16 points .
- Presentation seen on a large screen – If the presentation is going to be delivered in an auditorium, then it is recommended to use a font size no less than 30 points . For the rest of the situations, anything in between should be fine!
Also, make sure that you don’t use too much text on the same slide. Remember – you only need to cover one key topic on one slide.
It is totally okay to just use one word in the middle of the slide, and talk about that topic rather than using text from a complete word document on a slide!
If your audience will have to squint to read what is written, it just creates a bad user experience and they quickly lose interest.
Also, for the above reason, don’t include everything on the slide that you plan to say! If you do so, you may come across as a person who is just reading from the slide! Most importantly, the audience is going to end up reading the text from the slide faster than you speak, and end up losing interest in the presentation!
10. Ditch the Bullet Points (Use Infographics Instead!)
Using bullet points on a presentation is so 1990s! It’s just not the way good presentations are given anymore!
If you want your presentation design to look good, make sure that you get rid of bullet points. Instead, you can either use images, icons, or even infographics!
I’ve written an entire article on how to use infographics in Google Slides where I also talk about SmartArt and charts in Google Slides. Make sure you check out that article!
There are a ton of different ways in which you get infographics for Google Slides. I’ve talked about that also in the same article that I’ve linked above.
Likewise, you can also use icons instead of bullet points. Although adding icons to Google Slides is not an option that is available by default, there are a few ways you can work around this problem. For instance, you can use an add-on like “Flaticon” that provides free icons for Google Slides!
If you are wondering how to create a slide with bullet points and use icons or other methods, here’s a good example of an actual client slide that I redesigned –
As you can see on the image, simply using icons and structuring the text to give proper hierarchy to the information can make all the difference to the design of the slide!
In case you don’t want to use icons, you can also use numbers with circles, and use a similar design instead of just adding bullets to your presentation. If you do so, your presentation will still look good!
11. Avoid Using Just Table or a Graph
The next tip to remember is to avoid using just a table or a graph on a slide. Make sure that you also include a few points that act as key takeaways from the information that you provide.
Using just a table will present a lot of information on a single slide. This will definitely cause an information overload. And, even though your audience may be able to assess what is being presented to them, it is important to either highlight key pieces of information in the table or a graph.
Alternatively, you can also add a couple of lines of text indicating the key learnings from the data set.
Don’t get me wrong, it is important to have data sets on a presentation if you have one! But, just make sure that you also highlight key pieces of information that your audience should pay attention to.
12. Keep Animations and Transitions Subtle
Another design tip that you should keep in mind is the use of animations and transitions in Google Slides.
You want to make sure when using animations in Google Slides , you don’t add any funny movements. Think old school when using animations and transitions in your presentation.
Any additional movement or sudden transitions can distract the attention of the audience from the core topic and the messaging of the presentation.
So, make sure that you keep the use of such animations or transitions to the minimal!
13. Use Professional Google Slides Templates
If you find that the free template doesn’t have enough slide layouts for your presentation or doesn’t really fit the topic of your presentation, you may want to consider using professional templates!
There are a ton of different ways you can get templates for Google Slides. Unfortunately, most of the free options (and even most paid options) have outdated designs!
My personal favorite method for getting amazing Google Slides presentation templates is using Envato Elements .
The best part about using Envato Elements is that not only does it provide you with the best-in-class designs for your templates, but it also provides you with an option to download an unlimited number of presentations! (yes, you hear that right!)
Moreover, the pricing of Envato Elements is also really affordable! All you need to do is click on Envato Elements to visit the website, view the templates, and click on the “ Get Unlimited Downloads ” button on the top.
You will be prompted to sign up and pay a subscription. Just go for a monthly subscription and pay for one month (You can easily remove the payment method and cancel your subscription anytime).
Once you’ve logged in, simply cancel your subscription. Your subscription will be valid until the next date of renewal even if you cancel it.
Now, for the one month that you’ve paid, feel free to download all the templates that you like including templates for Google Slides, and PowerPoint!
14. Use Add-ons for Faster and Better Designs
One of the challenges with Google Slides, as opposed to some of the most reliable presentation design software, is the limited number of features it offers.
I suppose we should not really be complaining about it given that we do get a great presentation design application for free along with several additional advantages with Google Slides ! That said, you do feel the need for a few pro-features that PowerPoint has to offer.
However, one way to fix this problem is to use add-ons with Google Slides!
Using add-ons allows you to use third-party tools and bring additional functionalities to your Google Slides presentation!
Add-ons on Google Slides are easy to add. Simply go to the Google Marketplace, and search for the add-on that you would like to add. Install it, and you are done!
Check out my complete guide on using Add-ons on Google Slides where I not only talk about how to use add-ons in Google Slides, but I also provide you with my personal favorite top 5 recommendations of add-ons that you should be using in Google Slides!
15. Hire a Professional
Well, the last tip is not so much as a tool that you can use on Google Slides. But, it is a great hack to ensure that you create great presentation designs!
Simply hire a professional to do the design work for you! You may be wondering that hiring a presentation professional might be difficult. However, that is not the case.
You can easily find some really good presentation designers on Fiverr , and you can start at as little as $5 to $10 dollars per slide! I’ve personally used freelancers from the site, and although finding a good freelancer may take you 15-20 minutes, you can easily outsource your work and let the designer worry about the rest!
The best part is – you don’t have to pay a single penny to hire a professional. You only pay to get the work done!
There are a ton of other platforms to hire professionals that can design a good presentation for you. However, I have found Fiverr (especially for presentation design work) and Upwork to be the most effective.
A Few Things to Remember When Delivering the Presentation
Once you have created an amazing Google Slides presentation, you are perhaps ready to deliver the presentation. However, I’d like to also share a couple of tips that can be helpful when you plan to give the presentation!
So, here they are –
1. Use a Presentation Remote
It doesn’t matter whether you are giving a presentation in an auditorium or online through Zoom or Microsoft Teams.
Using a presentation remote helps you keep your hands free and allows for free movement and hand gestures. This does help engage with your audience.
Check out my other article on using presentation clickers with Google Slides where I provide you with a few tips and recommendations on which remote you should go with.
2. Use the Q&A Tool in Google Slides
A unique feature that Google Slides provides is the Q&A tool. This is great especially if you are delivering a webinar-style presentation or if you are simply addressing a large gathering.
This tool allows your audience to send questions during the course of your presentation. Then, at the end, you can simply view the questions in the Q&A session and answer them one by one!
It is a great way to deliver an engaging presentation using Google Slides!
Credit to cookie_studio (on Freepik) for the featured image of this article (further edited).
How To Make Google Slides Look Good [Complete 2024 Guide]
- Last updated January 2, 2024
Making a standard presentation is easy, but knowing how to make Google Slides look good is an entirely different challenge. In my guide, I will show you how to make your Google Slides better , both functionally and aesthetically.
Keep reading to learn how to take your Google Slides presentation from good to great !
Table of Contents
1. Choose a Google Slides Theme

Themes ensure your presentation has visually consistent colors, fonts, sizes, and layouts. This goes a long way toward providing a professional and polished appearance, and it’s much easier for the audience to follow along.
- Choose a theme that aligns with the tone and purpose of your presentation.
- Ensure slides have a consistent set of colors, fonts, and layouts.
- Select a visually appealing color scheme and legible font combination.
While you can handpick background color palettes, typefaces, and slide layouts, many of the best Google Slides templates are built into the program! In a blank presentation, you’ll find them on the right-hand side.

Creating Your Own Google Slides Theme
It’s fairly straightforward to create your theme in Slides. Add whatever background color, images, shapes, and page formatting you prefer. Right-click your chosen slide and select “ Add to theme .”

Related : Don’t want to make one from scratch? I’ve got you covered with some of my favorite Google Slides templates at the bottom of this article.
How To Import a Theme to Google Slides
- Create a new presentation or open an existing one.

Note : Importing a theme into your presentation will impact all of your slides. To revert to the previous version, use the “ Undo ” button by pressing the keyboard shortcut Ctrl + Z (on Windows) or use Command + Z (on Mac).
2. Choosing Color Schemes in Slides
A color scheme is one of the first things your audience will see, so it’s one of the most critical elements. Google Slides offers plenty of color options, including gradients (which can be used for almost all the elements, including background, font, and shapes).
Use color theory principles (like complementary colors) to create combinations that stand out for the right reason. Color psychology is also a great way to express emotions or convey messages purposefully:
- Warm colors (e.g., red, orange, yellow) can express warmth, energy, or even a warning.
- Cool colors (e.g., blue, green, purple) can represent relaxation, sophistication, or security.
Use Color to Make Sections Stand Out
Strategically use color to highlight essential elements (e.g., headings, critical data). To guide the audience’s attention:
- Use vibrant shades that contrast the color scheme.
- Assign specific colors to categories, sections, and team members.
Be Mindful of Contrast
Check that the text and background colors have enough contrast for better reading. The most readable combination is dark text on a light backdrop (or vice versa). In charts and graphs, use color to improve focus and understanding.
Note : Avoid colors that can blend together or present difficulties for people with color blindness .
3. Choosing Text and Fonts
Your chosen font portrays information and dramatically improves your presentation’s overall aesthetic. If you’re trying to make a cool presentation on Google Slides, you’ve got a lot to consider!
Use Clear, Legible, and Easy-to-Read Fonts
Avoid overly decorative or ornate fonts because they can hinder readability (especially when projected on a larger screen). Stick to widely available and compatible fonts across devices like Arial, Georgia, or Open Sans.
Ensure Font Sizes, Weights, and Styles Stand out
Headings should stand out; supporting text should be smaller (or less emphasized). This is done to guide the audience’s attention and improve readability.
Note : While they can add visual interest, excessive use of font styles can be distracting and more challenging to read.
Complement Font Pairings
Select a combination of fonts that contrast each other and create visual interest. Consider using online resources or font pairing tools for inspiration. We recommend sticking to a maximum of two to three fonts to prevent visual chaos.
Use Fonts That Align with Branding Guidelines
If your website uses a specific font and color scheme, incorporate them into your presentations to support the organization’s visual identity.
Align Text and Spacing
Align text and leave enough white space for a clean, organized look.
4. How to Add Word Art to Google Slides:
- Select “ Insert ” > “ Word Art ” from the drop-down menu.

- Type your text, then press the “ Enter ” key on your keyboard.

There you have it! Your Word Art will now appear on your selected slide.

Note: If you want to edit the font or color, click the Word Art, and a formatting box will pop up.

5. How To Add Google Slides Transitions
You can ensure seamless transitions from slide to slide with a couple of clicks:

- If you want to apply the selected transition to all slides in your presentation, click “ Apply to All Slides .”
- Any transitions applied to skipped slides won’t play during the preview.
- Click the “ Stop ” button when you’re finished.

Tip : You can configure your presentation to play automatically using Google Slides’ automatic transitions. This removes the need to press the spacebar or click on the screen to trigger the next slide.
How Many Transitions Are Available in Google Slides?
At the time of writing, Google Slides offers seven built-in transitions . There is currently no option to add or download additional transitions.
6. How To Add Animations on Google Slides
Enhance the visual appeal of your slideshow by incorporating animations (i.e., effects that make elements move). They can be applied to almost every object, from images to tables to bullet points. Follow the steps below to add animations to your slides:

- You’ll notice that your selected object’s “ Animation Type ” is set to “ Appear .”

- Fade in : This transition introduces the object by gradually fading it in.

- Fly in from left/right or top/bottom : The object flies into the slide from one side.

- Zoom in : The object starts small and slowly increases in size.
Under “ Animation Type ,” you’ll see the “ Start Condition ” drop-down. Open it to select whether the animation should play upon clicking a slide, with the previous animation, or after the previous animation.

Note: The start conditions “With Previous” and “After Previous” will only work if there is another animated object immediately before your selected object .

- Click on the “ Play ” button to preview your animation(s).
- Click the “ Stop ” button to end the preview and continue working on your slideshow.
Related : Google Slides vs. PowerPoint: Which Program Is Better?
Tips for Using Transitions & Animations
We recommend using these effects sparingly to emphasize essential elements or facilitate the flow of information. Avoid using them solely for decorative purposes.
Pick Subtle and Smooth Transitions
Flashy or distracting effects can overshadow your content. Your goal is to provide a seamless flow between slides. Try a simple fade or slide transition.
Adjust the Timing and Duration
Transitions shouldn’t be too fast or slow. Aim for a natural pace that allows the audience to follow along comfortably.
Highlight Specific Elements Within a Slide
Selectively animating text, images, or charts can emphasize critical points (or reveal information) in a controlled manner. Avoid excessive animation that appears gimmicky or distracting.
Be Consistent
Choose a specific transition style or animation effect — then stick to it. This will help you avoid distractions and inconsistencies.
7. Using Images and Videos

Adding images and videos to slides can greatly enhance visual appeal and engage your audience. Here are some points to consider when choosing an image:
- Choose images that are relevant to your content.
- Use high-quality images that are clear, crisp, and well-composed.
- Use images that evoke emotions or illustrate concepts.
- Strike a balance between text and images on your slides.
- Consider using images as slide backgrounds.
- Adjust transparency or apply overlays to maintain readability.
- Experiment with image formatting options (e.g., cropping, resizing, transparency, brightness).
8. How To Include Infographics in Google Slides

Infographics in a presentation can communicate complex information effectively. Use the drawing feature in Google Slides to make attractive and informative infographics. Keep these points in mind when using infographics:
- Keep your infographics clean and basic.
- Choose from bar charts, pie charts, line graphs, timelines, flowcharts, maps, and diagrams.
- Avoid overwhelming your audience: Use limited details, succinct labeling, and clear graphics.
- Use custom colors, typefaces, and visual styles to reflect your presentation or company identity.
- Highlight the most significant facts or data.
- Make sure infographic details are simple to read and understand.
How Can Poor Design Affect A Presentation?
Your presentation could be significantly impacted if you haven’t learned how to make Google Slides look professional. Here’s why:
Lack of Clarity
Poor aesthetics often make it more difficult for the audience to grasp — or focus on — details. Avoid cluttered or crowded presentations, imprecise typefaces, and insufficient color contrast. Key points might be missed, or the audience may get distracted.
Unprofessionalism
A disorganized presentation might give the appearance of being unprofessional, affecting the presenter’s credibility.
Poor Readability
Small fonts, poor contrast, and ornamental typefaces can strain the eyes and make it difficult to follow a presentation.
Lack of Visual Appeal
A presentation with a dull or unappealing design may fail to catch attention (and make the material less memorable).
9. A Few of My Favorite Google Slides Templates
If you’re not interested in using stock templates (let alone creating your own), I’ve got you covered with these slick presentations:
Ganymede Template

The Ganymede template offers a modern style with bold text for extra impact. Whether you aim to make a lasting impression with your pitch deck — or simply want to use colors that align with your brand — this template suits your needs.
Access Template
Dynamic Business Template

An effective project management report is characterized by clarity, and your color scheme plays a significant role. I love the streamlined theme of this Google Slides template and appreciate that a blank timeline chart, roadmap diagram, and funnel are included for incredible customization.
Frequently Asked Questions
Can you make google slides vertical.
You can make Google Slides vertical by following simple steps:
- Open a new or existing presentation.
- Click the “ File ” button to open a drop-down menu.
- Click the “ Page setup ” option.
- Select the “ Custom ” option and set your desired size (width and height)
- Hit “ Apply ” to save the changes.
Can You Do Hanging Indent in Google Slides?
Yes. There are three methods to do hanging indent in Google Slides:
- The ruler (blur triangle) along the top to position your hanging indent.
- The keyboard Tab key for quick indentation adjustments.
- Select “ Text Fitting ”> “ Indention ” > “ Hanging ” > “ First line indent ” > “ Hanging indent ” to the desired amount.
Are There More Google Slides Templates?
Yes. There are many free Google Slides templates out there. Here are ten additional templates for you to use.
Bottom Line
Any presentation’s goal is to keep the audience’s attention, and you can do that with a balance between aesthetics and practicality.
I hope I’ve helped you learn how to make your Google Slides look good, express your message, and captivate your audience. If you need more assistance, Spreadsheet Point’s premium Google Slides templates can take the pressure off you. When you use the code SSP, you’ll get 50% off !
Get Premium Templates
- How To Download Google Slides [Step-by-Step Guide]
- How To Add Bitmoji to Google Slides
- How To Make Google Slides Play Automatically
Most Popular Posts

How To Highlight Duplicates in Google Sheets

How to Make Multiple Selection in Drop-down Lists in Google Sheets

Google Sheets Currency Conversion: The Easy Method
A 2024 guide to google sheets date picker, related posts.
How to Import Stock Prices into Google Sheets
- April 2, 2024
How to Calculate Age in Google Sheets (2 Easy Methods)
- Sumit Bansal
- February 21, 2024
How to Hide Gridlines in Google Sheets
- February 14, 2024
Excel and Google Sheets Drop Down Lists: Complete Guide
Thanks for visiting! We’re happy to answer your spreadsheet questions. We specialize in formulas for Google Sheets, our own spreadsheet templates, and time-saving Excel tips.
Note that we’re supported by our audience. When you purchase through links on our site, we may earn commission at no extra cost to you.
Like what we do? Share this article!
How-To Geek
How to autoplay and loop a google slides presentation.
Play your presentation without touching a thing.
Quick Links
Set up autoplay and loop when presenting, set up autoplay and loop when publishing to the web.
If you don't want to worry about clicking through your slideshow, you can set up Google Slides to play your presentation automatically. Plus, you can have the slideshow loop, so it starts over at the beginning when it ends.
You might be playing your slideshow at a kiosk, during a conference, or publishing it to the web. These are the ideal times to use AutoPlay and Loop in Google Slides . You can automatically present the show and choose the timing between slides. Then, restart the presentation at the beginning each time it ends.
If you plan to start the slideshow and then let it play, you can set up AutoPlay and Loop , or simply one or the other.
Related: How to Loop a PowerPoint Presentation
Start the presentation by clicking "Slideshow" at the top of Google Slides. You can also use the arrow to pick either "Presenter View" or "Start From Beginning" per your preference.
When the slideshow opens, display the Presenter Toolbar by hovering your cursor over the bottom left corner of the presentation.
Click the three dots on the right of the Presenter Toolbar, then move to AutoPlay. You'll see a pop-out menu that lets you select the advance timing for the slides. You can pick from every second up to every minute.
If you also want to loop the slideshow, select "Loop" at the bottom of the pop-out menu.
When you finish, click "Play" to automatically play your presentation.
To stop the slideshow, simply click on a slide. You can then resume AutoPlay from the Presenter Toolbar by selecting "Play" again.
Maybe you plan to publish your slideshow to the web or embed it on a website rather than play it locally. You can set up AutoPlay and Loop as part of the publish settings.
Related: How to Share a Google Docs, Sheets, or Slides File as a Web Page
Go to File > Publish to the Web in the menu.
Choose either "Link" or "Embed" per your intent. Then use the Auto-Advance Slides drop-down box to choose the timing for the slides. Here again, you can pick from every second up to every minute.
To loop the slideshow, check the box for Restart the Slideshow After the Last Slide.
You can then mark the checkbox for Start Slideshow as Soon as the Player loads if you like, so that the viewer doesn't have to take any action to begin the presentation.
When you finish, click "Publish" and confirm to obtain the link or embed code for the slideshow.
To share a Google Slides presentation that doesn't require you to walk viewers through it, remember these steps to automatically play and loop the slideshow.

Google Slides: How to make a phone-friendly, vertical presentation
W hile your presentation shows up thoroughly on a laptop, TV, monitor, or projector, the default landscape orientation doesn't play well on smartphones. If you plan to give a quick presentation on a smartphone or want to add a touch of novelty to stand out, use the steps below to use vertical orientation in Google Slides.
Apart from enhancing the mobile experience, vertical orientation simplifies the printing process, delivers a better flow of information, and makes your presentation stand out among other horizontal slides.
Although Google offers feature-rich Slides mobile apps on iPhone and Android , vertical orientation is only available on Google Slides for the web.
Use vertical orientation in Google Slides
You shouldn't create and complete a presentation in landscape mode and change the orientation at the end. It may mess up the graphical elements of your presentation. Follow the steps below to use vertical orientation in Google Slides.
- Navigate to Google Slides on the web and open a presentation you want to edit.
- Click File at the top and select Page setup .
- Expand the top menu and find the default options. Standard 4:3 is ideal for viewing your presentation on a tablet. Widescreen 16:9 is suitable for viewing a slide on a TV, projector, or monitor. Widescreen 16:10 is the preferred dimension for viewing a presentation on modern laptops with taller displays.
- None of the default options offer vertical orientation. Select Custom .
- Expand the side menu and select Inches , Centimeters , Points , or Pixels . Let's select Inches .
- Type 9 x 19.5 (preferred for modern smartphone displays) and select Apply . You can also select Pixels and type 1080 x 1920 (common on most Android phones).
- You can check the entire site in a vertical orientation.
Now, you can use Google Slides features to create an ideal presentation.
How to autoplay your Google Slides presentation
Popular portrait orientation dimensions.
Whether you want to create a portrait presentation for printing or smartphones and smaller screens, glance over and memorize some common vertical slide sizes.
- A3: 29.7 x 42 cm
- A4: 21 x 29.7 cm
- US Letter: 8.5 x 11 inches (identical to A4 size)
- US Legal: 8.5 x 14 inches
Try the dimensions below to view a presentation on a smartphone or upload it to a social media network like Instagram, TikTok, or Snapchat.
- iPhone 15 Pro: 1179 x 2556 pixels
- Samsung Galaxy S24 Ultra: 1440 x 3120 pixels
- Google Pixel 8 Pro: 1344 x 2992 pixels
If you don't want to deal with these unusual pixel numbers, use 1080 x 1920 pixels in the page setup menu for vertical slides.
When should you use vertical slides?
Vertical slides come with several benefits. You need to factor in your audience and the context of the presentation. Here are the top reasons for using a vertical orientation in Google Slides.
- Better mobile experience: A vertical orientation makes more sense if you plan to view your presentation on the phone. Scrolling on vertical slides feels more intuitive than tapping them.
- Seamless printing: Since a vertical layout is suitable with most standard paper sizes, you don't need to make any major tweaks to fit the content on paper.
- Ideal for online presentations: Do you plan to share a presentation with your students or attendees over a video conference? Not everyone has a laptop to view your shared presentation. Use a vertical orientation that's more user-friendly for your audience.
- Suitable for social media platforms: Go with a portrait ratio if you want to share a presentation during livestreaming on a social media platform like TikTok or YouTube.
- Novelty factor: Vertical slides add a unique touch to your presentation. When everyone else addresses the audience with the same horizontal slides, a vertical presentation adds a unique touch to your pitch.
Using vertical orientation in a presentation: Our observations
Before you apply a vertical orientation, keep the points below in mind.
- Google Slides doesn't allow you to mix horizontal and vertical slides. The tweak applies to the entire presentation when you change the page setup.
- If you use a Google Slides template, adjust your designs accordingly. Most templates are designed for landscape orientation and don't use flexible elements that automatically fit a vertical slide.
What's the difference between Google Slides templates and themes?
Optimize your presentation for mobile convenience.
Whether you use a horizontal or portrait orientation, your presentation must hit the bull's eye to catch your audience's attention. Instead of creating a presentation from scratch and ending up with a bland one, use one of the top Google Slides templates to speed up the process.

Android Police
How to use gemini to create ai images in google slides.
Create accompanying images for your presentation in seconds
Creating a professional presentation using Google Slides takes time and design skills. While the app provides professional pre-designed templates for business, personal, and school use, adding a picture with Google's Gemini AI is an easy way to add visual flair to your slides. This feature is only available on the desktop version of Google Slides. You can access it on all computers, including affordable Chromebooks , ideal for working remotely on a budget. Here's how to use AI to generate images in Google Slides.
How to access Gemini in Google Slides
AI image generation with Gemini isn't available in Google Slides by default. To access Gemini in Google Slides, you need access to one of the following Google AI programs:
- Gemini Enterprise and Gemini Business add-ons for Google Workspace accounts
- Google One AI Premium for personal accounts
- Google Workspace Labs
All Gemini AI features are only available in English but can be accessed worldwide. Google Workspace Labs is free, but access is limited.
The easiest way to access Gemini in Google Slides is a Google One AI Premium subscription for a personal account. This service is free for two months, after which it costs $20 a month. In addition to all Gemini tools and 2TB of Google One storage, you also get other benefits.
ChatGPT vs. Gemini: Which gives the better answers?
How to use ai to generate images in google slides.
To get started, check that you're signed in to your Google Account, have access to Gemini, and open Google Slides.
- Enter a prompt in the text box on the right of your screen.
- Wait for Gemini to generate four images based on your prompt. The process usually takes no longer than 20 seconds.
The image can now be edited like any image in Google Slides, including cropping, rotating, and adjusting transparency settings . Click View more to generate another four images (this doesn't remove the ones already generated).
Add feedback by clicking the thumbs-up or thumbs-down icon on each image.
Tips for using AI to generate images in Google Slides
Gemini is a handy tool for adding relevant images quickly to Google Slides. Like any AI image generator, it requires specific prompts to generate the image you want.
Use specific details when creating prompts
Use descriptive words to generate the right image. Think of features you can see or feel. Colors, shapes, texture, and lighting are important elements of an image that you can add to your prompt. For example, "red vase with a rough surface on a windowsill in the morning" is a better prompt than "vase on a windowsill."
Add styles to fine-tune the output
Underneath the text box is the Add a style drop-down menu. Selecting an option from this list generates an image in a style such as a watercolor or sketch.
Check previously generated images
Google Slides saves your generated images in the sidebar for your session. Scroll down to see all the images you generated. These disappear when you refresh or close the page.
Generate beautiful presentations in minutes
Gemini's AI image generation and Google Slides' premade templates let you focus on the presentation's content. Gemini does more than generate images. It powers various features across Google's apps. Try these Gemini tips and tricks for translation, document generation, video analysis, and more.
- Data, AI, & Machine Learning
- Managing Technology
- Social Responsibility
- Workplace, Teams, & Culture
- AI & Machine Learning
- Diversity & Inclusion
- Big ideas Research Projects
- Artificial Intelligence and Business Strategy
- Responsible AI
- Future of the Workforce
- Future of Leadership
- All Research Projects
- AI in Action
- Most Popular
- The Truth Behind the Nursing Crisis
- Work/23: The Big Shift
- Coaching for the Future-Forward Leader
- Measuring Culture

The spring 2024 issue’s special report looks at how to take advantage of market opportunities in the digital space, and provides advice on building culture and friendships at work; maximizing the benefits of LLMs, corporate venture capital initiatives, and innovation contests; and scaling automation and digital health platform.
- Past Issues
- Upcoming Events
- Video Archive
- Me, Myself, and AI
- Three Big Points
How to Create Slides That Suit Your Superiors: 11 Tips
When you’re pitching ideas or budgets to execs in your organization, you need to deliver slides that fit those particular people just right. This checklist identifies the key considerations.

- Workplace, Teams, & Culture
- Leadership Skills

Carolyn Geason-Beissel/MIT SMR | Getty Images
I recently interviewed 20 of my customers, all in senior roles at Fortune 100 companies, and asked them their biggest pain point in presenting to higher-ups and even colleagues. What I heard consistently was that it can feel like Goldilocks bouncing from one option to the next, testing to figure out what’s “just right.” Does the audience want deep reports? Sparse slides? Something in between? Like … what?
Teams often come to presentation meetings with vast amounts of backup content just in case an exec wants to take a deep dive on any given point. There’s often a struggle to anticipate every direction attendees might want to go. It’s frustrating, and it’s not efficient.
Get Updates on Transformative Leadership
Evidence-based resources that can help you lead your team more effectively, delivered to your inbox monthly.
Please enter a valid email address
Thank you for signing up
Privacy Policy
There are many ways to build slides. I’m not just talking about crafting them well versus poorly. I’m talking about all of the important decisions regarding how to organize them, how much text to use, when to lean into a chart, the best ways to use bullets and color, and whether to include an appendix with additional information. Before you make your next proposal or request of the executive team, use this list of 11 tips for your next set of slides as a guide.
Four Things You Must Have in Every Exec’s Slides
Before we drill down into the harder aspects, the ones where your executives’ tastes may vary widely, let’s quickly cover four aspects that you can consider the building blocks — the basics you should never proceed without.
Start with an executive summary. Begin the slide deck with a tight executive summary that follows a three-act structure. First, start with stating the current realities. Second, clearly state the problem or opportunity your idea addresses and its potential impact. Third, explain how your recommendation solves the problem or exploits the opportunity and the next steps you’re proposing.
Have a logical organization. The arc of the deck — the package from beginning to end — should make sense. If your audience reads only the headline of every slide, the order should be coherent and make most of the case for you. The content below each slide’s headline must support the statement made in the title. Remove everything that doesn’t support your point; as writers will tell you, you sometimes need to “kill your darlings” when you’re editing.
Begin the slide deck with a tight executive summary that follows a three-act structure.
Make it skimmable. Help your audience to quickly grasp the point without getting bogged down in details. Create a clear visual hierarchy. Guide the reader’s eye through the content: Use bold headings, bullet points, and numbered lists to break down information into digestible pieces. Highlight key takeaways or conclusions in a different color or font size to draw attention to these critical points.
Focus on concise insights. Succinct statements with clear insights are everyone’s jam. Every slide should serve a purpose and contribute directly to the decision-making process. Distill complex information. Don’t use 100 words when 20 words will nail it. If you’re having difficulty trimming, consider using company-approved AI tools to help you take out the fluff.
Five Preferences to Confirm With the Person You Want to Reach
Now we’ll delve into what your particular audience does and does not want. If you haven’t yet, start by asking the person you’re presenting to what they generally prefer. They probably know themselves well but have not been asked to articulate how they like to receive information.
Ask how dense is too dense. Some executives prefer detailed slides with comprehensive data. Others favor a more high-level approach. You’re weighing how to balance informative content with readability, ensuring that slides are not overloaded yet are sufficiently detailed to support decision-making.
Confirm the delivery format and timing. Some execs like information presented to them. Others prefer a pre-read of the material followed by a discussion. I always recommend our tool Slidedocs (I’ve written a free e-book on them), which are visual documents using both words and images. The templates help presenters organize their thoughts into a document for a pre-read or a read-along. They are designed to be skimmable and able to travel through your organization without the help of a presenter.
I’m a huge fan of pre-reads and prefer to use my time in meetings to ask questions and build alignment. If your audience didn’t review your material in advance, ask at the top of the meeting whether they would like you to present it or would prefer to read through it and then discuss it.
Find out how much data visualization they prefer. Charts, graphs, photos, and illustrations often communicate complex data more clearly than words alone. When execs can see what you’re saying, they often can better understand the impact of your idea. Does the exec want to understand exact numbers? Bar charts allow them to move their eyes across a series of specifics. Does the exec want to know the shape of a trend over time? Line charts can show the pattern. (See “Classic Charts Communicate Data Quickly.”) Some prefer charts with annotations that draw attention to what you think is the most important point. Others want to make their own conclusions from the data.
One of my clients, the CEO of a massive commercial real estate company, doesn’t want anything visualized. He prefers numbers, only in a table, and only in two colors — black and red. You might think this is archaic. But the fact that he’s clear to his teams about what he wants takes all the mystery out of how to communicate with him.
When the stakes are high, have a conceptual thinker help with diagrams and concepts. If you don’t have one on your team, and when it’s high stakes, find an internal designer to help you or hire one. You can’t afford to have the baby (your idea) thrown out with the bathwater (terrible slides).
Identify which details need spelling out. How well do the people you’re presenting to know the landscape and function of the company and products you’re talking about? For example, if your engineering team threw a slide into a deck about an issue that requires executive approval, do the execs all speak geek? Or do you need to explain the technology so that they will really understand the ask? Either eliminate internal jargon and acronyms or unpack those bits, especially if your proposal deeply involves expertise outside of the executives’ domain.
Ask whether appendices will be useful. When you’re organizing a presentation, you often troll data, read through complicated reports, and even hire external experts to figure out what’s best for the company. Do your execs want access to that supporting data? You can add a document to the end of the presentation as an appendix to show all of the data and source material. This allows the main content of the slides to remain focused and accessible while still providing comprehensive background information for those who want more.
Two Tips to Improve Your Presentation Skills
Getting materials in place is the biggest step. They will be your best tools for selling your ideas. But there are two extra areas to pay attention to as a presenter: how you handle questions and how you use every experience to improve.
Anticipate questions, and practice your answers. Before you have your meeting, gather a small team to challenge every point you make. Invite colleagues you trust to role-play as “a rapidly inquisitive exec” or “the doubting naysayer exec” so you are prepared to present your idea well. They’re gonna grill you, and practicing will help you remain unruffled when it happens.
Related Articles
Ask for feedback after the presentation. Establish a feedback loop with those you presented to. Ask what worked well and how you can improve. If attendees don’t have the time, find people who have had their ideas funded and talk to them about what they did that worked. Advice and some perspective will help you nail your performance even better next time.
Empathetically understanding your audience members and how they process information, whether it’s executives or peers, sets up your ideas for success. Clarity creates efficiency. When a presentation fits just right, you’ve given your great thinking the best chance of moving through your organization and having maximum impact.
About the Author
Nancy Duarte is CEO of Duarte Inc. , a communication company in the Silicon Valley. She’s the author of six books, including DataStory: Explain Data and Inspire Action Through Story (Ideapress Publishing, 2019).
More Like This
Add a comment cancel reply.
You must sign in to post a comment. First time here? Sign up for a free account : Comment on articles and get access to many more articles.
Top searches
Trending searches

solar eclipse
25 templates

education technology
180 templates

32 templates

28 templates

thanksgiving
38 templates

Create your presentation
Writing tone, number of slides.

AI presentation maker
When lack of inspiration or time constraints are something you’re worried about, it’s a good idea to seek help. Slidesgo comes to the rescue with its latest functionality—the AI presentation maker! With a few clicks, you’ll have wonderful slideshows that suit your own needs . And it’s totally free!

Generate presentations in minutes
We humans make the world move, but we need to sleep, rest and so on. What if there were someone available 24/7 for you? It’s time to get out of your comfort zone and ask the AI presentation maker to give you a hand. The possibilities are endless : you choose the topic, the tone and the style, and the AI will do the rest. Now we’re talking!
Customize your AI-generated presentation online
Alright, your robotic pal has generated a presentation for you. But, for the time being, AIs can’t read minds, so it’s likely that you’ll want to modify the slides. Please do! We didn’t forget about those time constraints you’re facing, so thanks to the editing tools provided by one of our sister projects —shoutouts to Wepik — you can make changes on the fly without resorting to other programs or software. Add text, choose your own colors, rearrange elements, it’s up to you! Oh, and since we are a big family, you’ll be able to access many resources from big names, that is, Freepik and Flaticon . That means having a lot of images and icons at your disposal!

How does it work?
Think of your topic.
First things first, you’ll be talking about something in particular, right? A business meeting, a new medical breakthrough, the weather, your favorite songs, a basketball game, a pink elephant you saw last Sunday—you name it. Just type it out and let the AI know what the topic is.
Choose your preferred style and tone
They say that variety is the spice of life. That’s why we let you choose between different design styles, including doodle, simple, abstract, geometric, and elegant . What about the tone? Several of them: fun, creative, casual, professional, and formal. Each one will give you something unique, so which way of impressing your audience will it be this time? Mix and match!
Make any desired changes
You’ve got freshly generated slides. Oh, you wish they were in a different color? That text box would look better if it were placed on the right side? Run the online editor and use the tools to have the slides exactly your way.
Download the final result for free
Yes, just as envisioned those slides deserve to be on your storage device at once! You can export the presentation in .pdf format and download it for free . Can’t wait to show it to your best friend because you think they will love it? Generate a shareable link!
What is an AI-generated presentation?
It’s exactly “what it says on the cover”. AIs, or artificial intelligences, are in constant evolution, and they are now able to generate presentations in a short time, based on inputs from the user. This technology allows you to get a satisfactory presentation much faster by doing a big chunk of the work.
Can I customize the presentation generated by the AI?
Of course! That’s the point! Slidesgo is all for customization since day one, so you’ll be able to make any changes to presentations generated by the AI. We humans are irreplaceable, after all! Thanks to the online editor, you can do whatever modifications you may need, without having to install any software. Colors, text, images, icons, placement, the final decision concerning all of the elements is up to you.
Can I add my own images?
Absolutely. That’s a basic function, and we made sure to have it available. Would it make sense to have a portfolio template generated by an AI without a single picture of your own work? In any case, we also offer the possibility of asking the AI to generate images for you via prompts. Additionally, you can also check out the integrated gallery of images from Freepik and use them. If making an impression is your goal, you’ll have an easy time!
Is this new functionality free? As in “free of charge”? Do you mean it?
Yes, it is, and we mean it. We even asked our buddies at Wepik, who are the ones hosting this AI presentation maker, and they told us “yup, it’s on the house”.
Are there more presentation designs available?
From time to time, we’ll be adding more designs. The cool thing is that you’ll have at your disposal a lot of content from Freepik and Flaticon when using the AI presentation maker. Oh, and just as a reminder, if you feel like you want to do things yourself and don’t want to rely on an AI, you’re on Slidesgo, the leading website when it comes to presentation templates. We have thousands of them, and counting!.
How can I download my presentation?
The easiest way is to click on “Download” to get your presentation in .pdf format. But there are other options! You can click on “Present” to enter the presenter view and start presenting right away! There’s also the “Share” option, which gives you a shareable link. This way, any friend, relative, colleague—anyone, really—will be able to access your presentation in a moment.
Discover more content
This is just the beginning! Slidesgo has thousands of customizable templates for Google Slides and PowerPoint. Our designers have created them with much care and love, and the variety of topics, themes and styles is, how to put it, immense! We also have a blog, in which we post articles for those who want to find inspiration or need to learn a bit more about Google Slides or PowerPoint. Do you have kids? We’ve got a section dedicated to printable coloring pages! Have a look around and make the most of our site!

Microsoft 365 Life Hacks > Presentations > How to create an educational presentation
How to create an educational presentation
Using presentations can be an effective way to teach lessons and ensure that your audience can retain new facts. With visual aids, video and animated clips, and even interactive quizzes, you can use presentation software like Microsoft PowerPoint to dazzle your students.

The advantages of PowerPoint presentations in education
Students have different learning styles : some are visual learners, who retain images and videos more effectively than speech. Some take to audio and sound more easily. Others prefer to interact with their lessons—which usually refers to holding physical objects but can also be directly related to guessing answers and responding to questions.
Fortunately, PowerPoint’s versatility means that it can appeal to all of these diverse learning styles. You can embed multimedia elements such as videos, audio clips, and interactive graphics, creating a multi-sensory experience. PowerPoint can also be helpful when considering any visual impairments that your audience members may have so that you can present with different forms of media to cater to all learning styles.

Tell your story with captivating presentations
Powerpoint empowers you to develop well-designed content across all your devices
Before diving into PowerPoint, consider the following factors to help your audience retain as much information as possible:
- Define lesson objectives: Set a goal for what kind of lesson you want to impart to your audience. What do you want students to learn? You can answer this question by outlining your lesson objectives and clearly defining your goals, which will also guide the structure and content of your presentation.
- Organize your content: Divide your lesson into key points and organize them into a logical sequence that builds in complexity. Start with basic points or even a review of previous concepts before diving into more intricate or complicated aspects of your lesson. Each point should be presented on a separate slide to maintain clarity and focus.
- Use visuals effectively: Enhance your presentation with relevant visuals such as images, videos, audio clips, or interactive simulations to cater to different learning preferences and keep the presentation engaging. These can convey complex information more efficiently than text alone. At the same time, it can be easy to be carried away by inundating your audience with too many visual elements, so ensuring smooth flow and transitions is key.
- Encourage interaction: Foster active participation by including interactive elements like quizzes, polls, or discussion prompts to prompt student engagement. After you introduce a new concept in your lesson, these interactive elements can reinforce them and make them stick.
- Practice delivery: Public speaking isn’t always easy. One of the most effective ways to sound confident is to practice delivering your presentation before the day of your lesson. Familiarize yourself with the content and also the way that it’s presented: pacing, transitions, and interactive elements. This preparation will boost your confidence, ensure a smooth flow, and help you address any potential challenges during the actual presentation.
Staid lessons can be livened up thanks to the power of presentation! No matter what you’re teaching—the ABCs to a kindergarten class, or nuclear physics to a graduate department—you can check out more tips for effective presenting such as how to create compelling presentation designs , using the 10-20-30 rule for presenting, or discovering the history of PowerPoint .
Get started with Microsoft 365
It’s the Office you know, plus the tools to help you work better together, so you can get more done—anytime, anywhere.
Topics in this article
More articles like this one.

Five tips for choosing the right PowerPoint template
Choose an appropriate PowerPoint template to elevate your presentation’s storytelling. Consider time length, audience and other presentation elements when selecting a template.

How you can use AI to help you make the perfect presentation handouts
Learn how AI can help you organize and create handouts for your next presentation.

How to use AI to help improve your presentations
Your PowerPoint presentations are about to get a boost when you use AI to improve a PowerPoint presentation.

How to password protect your PowerPoint presentations
Learn how to password protect your PowerPoint presentations and secure your valuable files.
Everything you need to achieve more in less time
Get powerful productivity and security apps with Microsoft 365

Explore Other Categories
We've detected unusual activity from your computer network
To continue, please click the box below to let us know you're not a robot.
Why did this happen?
Please make sure your browser supports JavaScript and cookies and that you are not blocking them from loading. For more information you can review our Terms of Service and Cookie Policy .
For inquiries related to this message please contact our support team and provide the reference ID below.
IMAGES
VIDEO
COMMENTS
Learn how to create, present, and collaborate on online presentations with Google Slides. Slides is part of Google Workspace, a suite of cloud-based productivity and collaboration tools.
This Google Slides tutorial for beginners is a complete crash course, taking you by the hand and showing you step by step how to make some amazing and mesmer...
How to Create a Blank Presentation. Now that you have a Google account, it's time to create your first presentation. Head over to Google Slides and place the cursor on the multicolored "+" icon in the bottom-right corner. The + turns into a black pencil icon; click it. Pro Tip: Type.
Rename your presentation—Click Untitled presentation and enter a new name.. Add images—Click Insert Image to add images from your computer, the web, Google Drive, and more. You can also move, delete, or resize images. Add text—Click Insert Text box to add new text boxes. Then, click a text box to enter text. You can move, delete, or re-size text boxes.
How to Use Google SlidesGoogle Slide is a powerful presentation tool from Google to help you create slideshows and presentations.It's part of Google Drive an...
To create a new Google Slides presentation, open a web browser and go to Slides.Google.com. If you want to start from a template, you can choose one from the template gallery. Otherwise, click "Blank" to create a new blank presentation. Your blank presentation starts with a single simple slide with space to enter a title and subtitle.
Open the template presentation you created in the steps above. On the menu bar, click File > Make a copy > Entire presentation. On the panel that opens, type in a name for the new presentation you ...
Use the dropdown menu in the General Access section to control these settings. Tip 10. Make Your Google Slides Look Good - Quickly. You've already seen it earlier in this tutorial, but I can't say it enough: to learn how to make your Google Slides look professional, use a template.
This video will show you how to use Google Slides like a Google App expert!If you found that this video was valuable and would like to support my work, pleas...
Present like a pro, directly from Google Meet. Access all of your Slides and Meet controls in one place, and enjoy smoother high resolution presentations. Premium feature. This feature is available on some Google Workspace and Google Workspace plans.
Use the New > Google Slides > Blank Presentation option to start your new presentation. A new presentation opens: Google Slides will launch a new presentation that's ready for you to design. Of course, if you're using a template as recommended, you'll need to upload it to your Google Drive account.
Go to Insert >> Image >> Search the web >> Type in the name of the image you want. Or, go to Explore section and Google directly from the Slides tab. 3. Reflect your images if it suits the context. This will be a really cool effect, especially for slides with a single important image.
Use the Insert > Audio option to add audio to your Google Slides. If you want to add some soft music to your presentation, you can. In fact, this method of how to make Google Slides look good has nothing to do with visuals! First, click on Insert. From the menu that drops down, click on the Audio option.
Learn how to create a compelling and engaging presentation using Google Slides with these 15 tips. From story arc to fonts, from templates to images, discover how to design a professional and attractive slide deck.
You can make Google Slides vertical by following simple steps: Open a new or existing presentation. Click the " File " button to open a drop-down menu. Click the " Page setup " option. Select the " Custom " option and set your desired size (width and height) Hit " Apply " to save the changes.
Today, I want to show you guys how I make my presentations on Google Slides! I didn't use a template for this video but there are template resources that I'v...
Free online presentation maker. Try our new tool to edit this selection of templates for people that want to let their creativity run free. Create interactive resources easily, quickly and without the need for any software. A really useful tool for teachers and students. Move the content, add images, change colors and fonts or, if you prefer ...
Go to File > Publish to the Web in the menu. Choose either "Link" or "Embed" per your intent. Then use the Auto-Advance Slides drop-down box to choose the timing for the slides. Here again, you can pick from every second up to every minute. To loop the slideshow, check the box for Restart the Slideshow After the Last Slide.
Follow the steps below to use vertical orientation in Google Slides. Navigate to Google Slides on the web and open a presentation you want to edit. Click File at the top and select Page setup ...
How to use AI to generate images in Google Slides. To get started, check that you're signed in to your Google Account, have access to Gemini, and open Google Slides. Click the Create image with ...
0:00 Intro0:22 Creating a presentation00:58 Formating a presentation01:36 Navigating Google Slides02:45 Adding media03:27 Adding animation04:39 Presenting an...
First, start with stating the current realities. Second, clearly state the problem or opportunity your idea addresses and its potential impact. Third, explain how your recommendation solves the problem or exploits the opportunity and the next steps you're proposing. Have a logical organization.
AI presentation maker. When lack of inspiration or time constraints are something you're worried about, it's a good idea to seek help. Slidesgo comes to the rescue with its latest functionality—the AI presentation maker! With a few clicks, you'll have wonderful slideshows that suit your own needs. And it's totally free!
Organize your content: Divide your lesson into key points and organize them into a logical sequence that builds in complexity. Start with basic points or even a review of previous concepts before diving into more intricate or complicated aspects of your lesson. Each point should be presented on a separate slide to maintain clarity and focus.
In this video you will learn about how to export google slide to Microsoft PowerPoint software and how to make a best presentation step by step.Interactive G...
March 26, 2024 at 10:26 AM PDT. Listen. 1:41. Apple Inc. plans to kick off its annual Worldwide Developers Conference on June 10, when the company is expected to unveil its long-anticipated ...
In this tutorial, you will learn how to make interactive Google Slides for your students. This is like a hyperdoc in Google Slides. Include videos, links, im...