

Change the size of your slides
Basic steps.
To change the slide size:
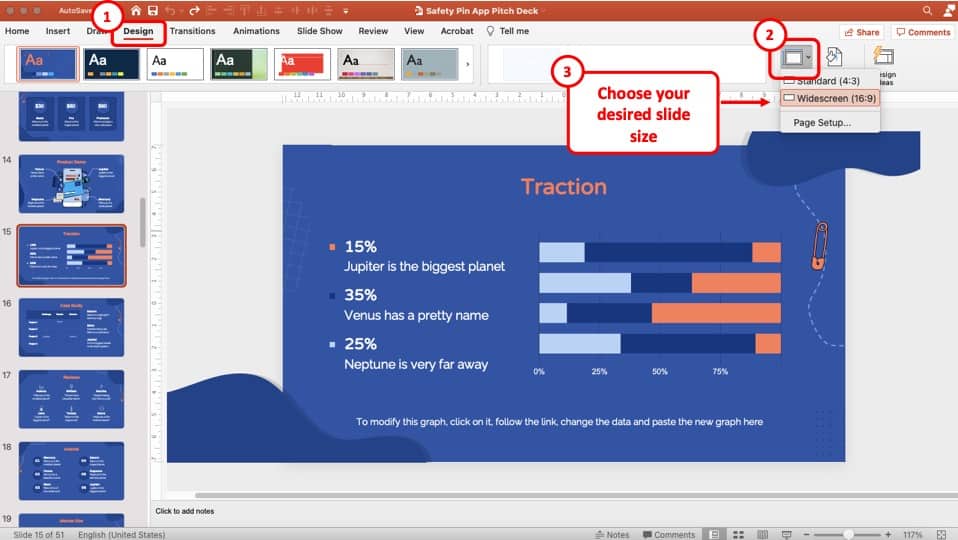
Select the Design tab of the toolbar ribbon.

Select Standard (4:3 aspect ratio) or Widescreen (16:9) or Custom Slide Size .

For more about the predefined sizes (including formats like Overhead, A3, A4, Banner, B4, and B5) or your own custom sizing, click a heading below to expand it and see the details .
Detailed steps
Choose the standard or widescreen slide size.
On the Design tab of the Ribbon, locate Slide Size in the Customize group, near the far right end of the toolbar.

Select Slide Size , and then select either Standard (4:3) or Widescreen (16:9) .

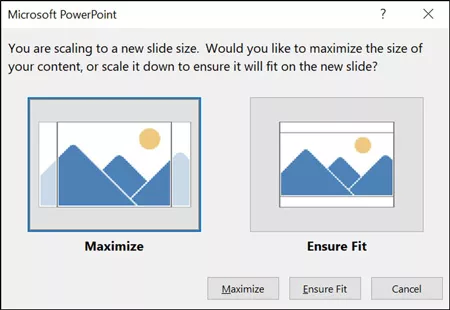
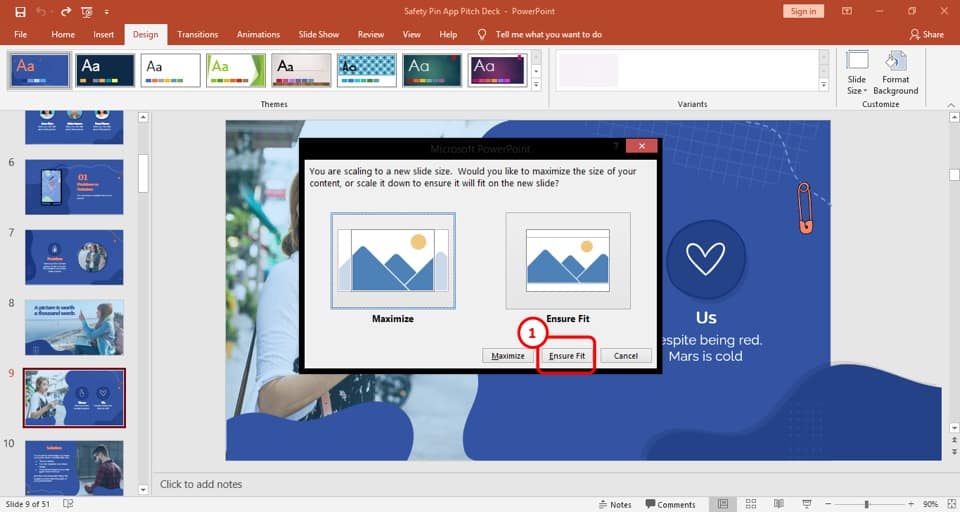
When PowerPoint is unable to automatically scale your content, it prompts you with two options:
Maximize : Select this option to increase the size of your slide content when you are scaling to a larger slide size. Choosing this option could result in your content not fitting on the slide.
Ensure Fit : Select this option to decrease the size of your content when scaling to a smaller slide size. This could make your content appear smaller, but you’ll be able to see all content on your slide.

The 16:9 widescreen setting is the default value for new presentations you create. When you change the slide size for a presentation, the size you choose only applies to that presentation. However, you can make it easy to create a new 4:3 presentation for yourself whenever you want—by defining a custom theme that uses the 4:3 aspect ratio. See the section below named "Make a default size to start from when creating new presentations."
Choose another size, such as A3, B4, or Overhead
Select Slide Size , and then select Custom Slide Size .

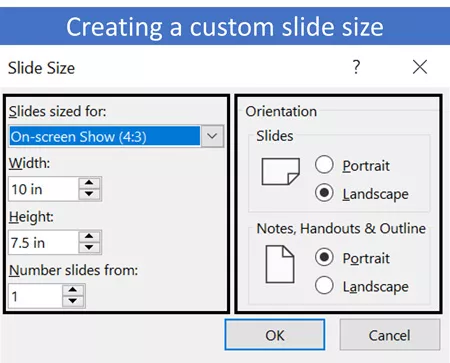
In the Slide Size box, click the down arrow next to Slides sized for and select an option. Their dimensions are listed below:
Overhead provides an aspect ratio very close to the standard 4:3 slide size.
There are two options for 16:9 aspect ratios:
On-screen Show (16:9) sets the slide dimensions to 10 in x 5.625 in.
Widescreen sets it to 13.333 in x 7.5 in.
Both of these options are the same aspect ratio so they will look the same in Normal View , since PowerPoint automatically adjusts the zoom level. Widescreen (13.333 in x 7.5 in.) provides more slide surface area for the content, so that is the best choice for presentations. Widescreen won’t fit on an 8.5" x 11" sheet of paper without you having to scale it down.

Select OK to accept the dimensions and close the Slide Size dialog box.
Choose custom dimensions (in inches, centimeters, or pixels)
The Slide Size dialog box opens.
In the Slide Size dialog box, ensure the orientation is set the way you want it.
In the Height and Width boxes, PowerPoint accepts measurements in inches , centimeters , or pixels . Type a number followed by a space and then the appropriate abbreviation: in , cm , or px .
PowerPoint then converts measurements, if necessary, to the type of unit your operating system uses.
You can change the unit of measure that is shown in PowerPoint dialog boxes if you like.
Make a default size to start from when creating new presentations
This version of PowerPoint has a default size of 16:9 for new presentation, but you can create a different default for yourself.
Start PowerPoint.
On the File tab of the toolbar ribbon, select New . Then double-click the Blank Presentation to create a new, empty presentation.
Then on the Design tab, click Slide Size and choose the size you want for a default.
(If you want a different default slide size than what's listed there, select Custom Slide Size and then choose your size in the Slide Size dialog box, and then click OK .)

Select Save Current Theme .
Give your theme a name that you'll remember easily and click Save . Don't change the folder that the new theme is to be saved in.
On the Design tab, click the More arrow again in the bottom-right corner of the Themes group. You'll see your newly saved theme under a Custom heading.
Right-click that new custom theme under the Custom heading, and then select Set as Default Theme :

Close PowerPoint. Don't save any files if it prompts you.
Open PowerPoint again. On the File tab of the toolbar ribbon, select New .
The custom theme that you just saved is listed at the top left corner, named Default Theme . The thumbnail image looks like a widescreen slide, but in reality, when you create a new presentation based on that theme, the presentation has the aspect ratio that you've defined for this default theme.
The next time you open PowerPoint, you'll see your default theme in the upper-left of the theme gallery. When you select it, all the slides will be the custom size you chose by default.
Sizing applies to all slides in a presentation
PowerPoint isn't able to resize one slide within a presentation. All slides in a presentation are the same size.
If this is a feature you’d like to request, please send us your feedback to help us prioritize new features in future updates. See How do I give feedback on Microsoft 365 for more information.
Orientation applies to all slides in a presentation
PowerPoint isn't able to change the page orientation of certain slides. All slides in a presentation have the same page orientation.
Change the page orientation in PowerPoint between landscape and portrait
Use portrait and landscape slide orientation in the same presentation
Reduce the file size of a picture
On the File menu, select Page Setup .
In the Page Setup dialog box, under Slides sized for , select the predefined size you want, or choose Custom and specify the dimensions you want.

Select Slide Size .

Select Standard (4:3) or Widescreen (16:9) .

PowerPoint may prompt you about scaling your content. Choose one of the following options:
Scale: Select this option to decrease or increase the size of your slide content. When scaling to a smaller slide size, this could make your content appear smaller, but you’ll be able to see all content on your slide.
Don't Scale: Select this option to maintain the size of your slide content. Choosing this option could result in your content not fitting on the slide.

Choose Page Setup from the menu that appears.
Page Setup gives you an assortment of predefined slide/page size options. The options and their dimensions are listed below:
In the Slide Size box, click the down arrow next to Slides sized for and select an option.
Widescreen sets the dimensions to 13.333 in x 7.5 in.

Choose custom dimensions (in inches, centimers, or pixels)
Select Slide Size , and then click Page Setup .

The Page Setup dialog box opens.
In the Width and Height boxes, PowerPoint accepts measurements in inches , centimeters , or pixels . Type a number followed by a space and then the appropriate abbreviation: in (inches) or cm (centimeters) or px (pixels).
PowerPoint then converts the measurements, if necessary, to the unit of measurement your operating system uses.
Make a new slide size the default for new presentations
Select Slide Size , and then select Page Setup .
Follow the steps in the prior section to choose the slide size you want.
On the Design tab, click the More arrow below the standard themes.

Click Save Current Theme at the bottom of the window.

Give your theme a name that you'll remember easily and click Save .
On the Design tab, click the More arrow below the standard themes again. You'll see your newly saved theme under Custom .

Right-click your new custom theme, and then click Set as Default Theme .

The next time you open PowerPoint, you'll see your default theme in the upper-left of the theme gallery. When you select it, all the slides will be the size you chose for your default theme.
Some folks have asked about resizing one slide within a presentation. PowerPoint isn't able to do that. All slides in a presentation are the same size.
Some folks have also asked about changing the page orientation of certain slides. PowerPoint isn't able to do that. All slides in a presentation have the same page orientation.
On the Design tab of the toolbar ribbon, click Slide Size in the Customize group.

Click Standard (4:3) or Widescreen (16:9) .
When PowerPoint for the web is unable to automatically scale your content, it prompts you with two options:

The 16:9 widescreen setting is the default value for new presentations you create. When you change the slide size for a presentation, the size you choose only applies to that presentation.
You can also change the orientation of all the slides in your presentation. See Change the page orientation for instructions.

Choose custom dimensions
In the Width and Height boxes, type a measurement in inches . PowerPoint doesn't accept measurements outside the minimum and maximum shown below:

Need more help?
Want more options.
Explore subscription benefits, browse training courses, learn how to secure your device, and more.

Microsoft 365 subscription benefits

Microsoft 365 training

Microsoft security

Accessibility center
Communities help you ask and answer questions, give feedback, and hear from experts with rich knowledge.

Ask the Microsoft Community

Microsoft Tech Community

Windows Insiders
Microsoft 365 Insiders
Was this information helpful?
Thank you for your feedback.

3 Ways to Resize Your Slides in PowerPoint
Mar 23, 2018 | blog , tutorial

Perhaps one of the bigger pains in PowerPoint is changing your slide size from 4:3 to 16:9 or vice versa. Let’s go through the pros and cons of each method.
The Fast Way

The fastest way to change the slide ratio is to go to the design tab and clicking on slide size . Once you pick the ratio you want to change your presentation to, you’re presented with this option (one in which no one ever remembers on the first try which one they should choose):

Maximize Fit: Think of this as your “ FILL frame proportionally” option from InDesign. The frame is your slide area and the content that fills it is everything you have on the slide. All those things on the slide act as though they’re grouped together for this transformation. Because the slide is filled , some of your content will bleed over to the pasteboard.
Ensure Fit: Think of this as your “ FIT content proportionally” option from InDesign. This is the option that will reduce the size of all of your content so that it all fits on to the slide and doesn’t bleed over to the pasteboard.
Pros: It’s fast.
Cons: If you have logos or images on your master slides OR have filled the background with a picture, when you change sizes, those images will be stretched or squished no matter which option you choose. Also, you still have to reorganize your slides to make the content fit in a nicely designed manner.
The Long Way
This method is the most tedious and requires you to have both the original presentation and the destination files open at the same time. Simply put, you just copy all of the slide content from File A to File B.
With this method, the master slides won’t be stretched or smushed. You’ll still have to rearrange the slide content to look good and, in this case, you will have to redo image background fills.
Pros: You will have the fewest problems with fit and formatting.
Cons: You need two files open and it’s slower. You still have to rearrange your content.
The Third Way
Or the 2.5th (two-and-a-halved?) way. This is how I usually do it. It’s not only good for resizing slides – it’s also good for changing templates. It also only requires you to have only one file open. For this example, I’ll pretend that I’m taking a 4:3 presentation on the Outdated Template and am bringing it into the 16:9 Fresh New Template.
First, create a new presentation based on the 16:9 Fresh New Template. Then, on the Home tab where the New Slide button is, click on the text “New Slide” and you’ll be presented with this dropdown menu:

Way down at the bottom of this fly-out menu is the option “Reuse Slides…” Go ahead and click on that. You’ll then be presented with the Reuse Slides panel on the right:

Click on Browse and find the 4:3 presentation on the Outdated Template. You’ll see something like this:

All you have to do is click on the slides you want to pull into your new presentation. If you want to keep the source formatting for everything on the slide, be sure to check off “keep source formatting” or PowerPoint will apply the new templates styles to the slide contents. Of course, if you’re bringing things into an updated template, you should probably keep it unchecked.
“ But wait! When I look at my slides, they have a stretched out background!”
You’re right. The last step here is to right click on each slide and choose the master slide you want to use from the new template. After you’re all done, check your Master Page view to see if old slide masters came along for the ride and delete them.
Pros: Makes template switching easier. Can be fast.
Cons: You have to change slide layouts from old to new template, which can present it’s own problems. You still might have to move things around. Can be slow.
In the end, you’ll have to decide for yourself which is the best method for the projects you’re working on. And in 99% of all cases, you will have to rearrange your content. But I hope this makes you aware of all of your options and maybe save you a little time in the future.

Great overview of the solutions availble (but not intuitive) to people needing to change sizes!!!
Appreciate the Pros and Cons…!!!

Your third options was definitely the best solution for me! I had originally (intuitively) used the first method, but it defaulted everything to PPT standard fonts and etc. But your Reuse Slides method did the bulk of the work for me.

This has stripped out all the colours. Any reason why

All three ways stretch out my logos and figures going from 4:3 to 16:9. I dont know how to solve it.

thanks a lot you solve my problem

Very helpful information. Thank you! I dont understand why Microsoft doesn’t give an option to change slide size without doing any scaling of content.
Submit a Comment
Your email address will not be published. Required fields are marked *
Post Archive
- October 2020
- February 2018
- November 2017
- November 2000
Critical PowerPoint Shortcuts – Claim Your FREE Training Module and Get Your Time Back!
How to Change Your PowerPoint Slide Size (16:9 vs. 4:3)
- PowerPoint Tutorials
- March 10, 2019
In this tutorial, you’ll learn how to change your slide size in PowerPoint.
That way you can create slides for any situation including on-screen presentations, printed documents, posters, postcards, handouts, etc.
First off, the two most used PowerPoint slide sizes are:
- 16:9 ratio for onscreen presentations and new overhead projectors. This is the default setting for the latest versions of PowerPoint.
- 4:3 ratio for printing slides on standard 8.5 x 11 pieces of paper as handouts.
When starting with a blank PowerPoint presentation, changing your slide size is super easy and straightforward. If not, there are a few issues you’ll need to deal with, each covered below.
That’s why it’s worth figuring out what slide size you need BEFORE you build your presentation. If you later convert your presentation to a different size, it can be painful!
It’s just like the old carpenter saying, “measure twice and cut once.” In PowerPoint, you’ll want to “ask twice (to double confirm the required size) and build once.”
Changing your PowerPoint slide size does not make your PowerPoint presentation larger or smaller. To reduce your PowerPoint file size, you need to learn how to compress a PowerPoint presentation .
Table of Contents
How to change your powerpoint slide size.
By default, new PowerPoint presentations start in the 16:9 slide size format.
This is the NEW standard for most modern overhead projects and monitors and is recommended for most presentations. That said, you can easily change your slide size to something else.

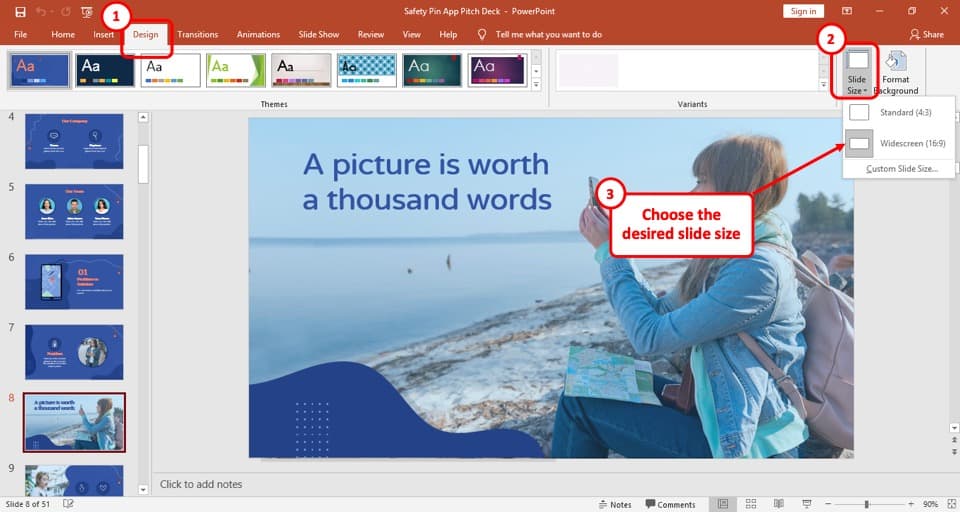
To change your slide size in PowerPoint, simply:
- Navigate to the Design tab
- Open the Slide Size drop down menu
- Select 4:3 , 16:9 or Custom Slide Size (see options below)
When starting with a blank presentation, you are now good to go. You will not have to worry about any of the conversion issues discussed below.
Notice too, how much wider the 16:9 slide size is versus the 4:3 slide size in the picture below. The new size gives you more room for the content on your slides.

When you are converting an existing presentation to a new slide size, you will additionally be given the following prompt:
“You are scaling to a new slide size. Would you like to maximize the size of your content, or scale it down to ensure it will fit on the new slide?
Maximize leaves all your content as is on your slide, even if it no longer fits on the new slide size that you selected.
Ensure Fit scales down your content in proportion to the new slide size you have selected. You will only see this option when moving from a larger slide size to a smaller one.
Custom PowerPoint slide sizes
Choosing Custom for your slide size gives you additional options to work with. Inside the dialog box you can choose your size on the left and your orientation on the right.
On top of that, you can also input your own custom slide size. However, I recommend using one of the preset PowerPoint dimension options.
- On-screen show (4:3)
- Letter Paper (8.5×11 in)
- A3 Paper (297×420 mm)
- B4 (ISO) Paper (250×353 mm)
- B5 (ISO) Paper (176×250 mm)
- 35mm Slides
- On-screen Show (16:9)
- On-screen show (16:10)
For your orientation options on the right-hand side of the dialog box, you can choose between Landscape and Portrait .
In most situations, you will want one of the default settings. Best practice is Landscape for your presentation slides and Portrait for your printed notes, handouts and outlines.

Issues when converting 4:3 to the 16:9 slide size in PowerPoint
When converting an existing 4:3 presentation with content into the 16:9 format, you are not given any conversion options. Instead, PowerPoint simply does the conversion for you, which can create several problems.
There are two issues you will face in the new 16:9 slide size.

The first issue is that all the images on your slide master (including company logos) will be stretched to fit the new, larger slide size.
To fix the stretched images, you will need to fix those images (or reinsert them) on your slide master, as if you were creating a PowerPoint template from scratch.
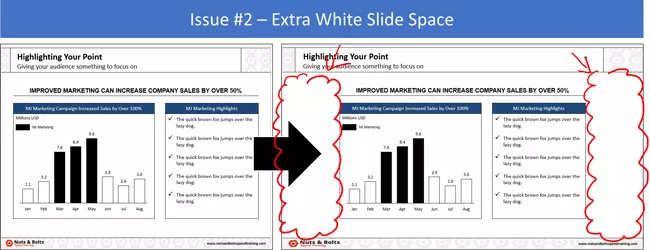
The second issue you will face in the larger 16:9 slide size is that you will have a lot of extra white space on your slides.
While you can leave the space blank, doing so will make your content look weird. Ideally you don’t want a lot of white empty space like that on your slides. Especially since all your font sizes will be so small.
That’s why if you have the time, I recommend resizing your content to fill in the white space. You can do this by either increasing the font size of your content, or adding additional visuals that support your message.
Issues when converting 16:9 to the 4:3 slide size in PowerPoint
When converting an existing 16:9 presentation to the 4:3 slide size, you are given the option to either Maximize or Ensure Fit (both covered below).
1. The Maximize option
This option means that the content on your slides will not be resized to fit the 4:3 slide size. The same is true if you move to any smaller slide size.

Maximize Issue #1: All the images on your slide master (including your company logo) will be distorted.
You might also have issues with other content placeholders, slide backgrounds or anything else that was built on your slide master. For these issues, you’ll first need to navigate to your Slide Master. Once you are there, you either adjust (or rebuild) your PowerPoint template so that everything fits properly.
Maximize Issue #2: Your content will not be scaled down to the smaller slide size. Instead, you’ll have overhanging content as pictured above.
For these kinds of spacing issues, you will need to work through your slides to adjust your content.
One recommendation as you move from the larger 16:9 slide size to 4:3, is to break up your slides. Take the contents from one larger slide and break it into two (or even three) separate slides.
Breaking up your content is preferable to just cramming more content on the smaller slide space. Doing so will make your content easier to read when presented on an overhead projector.
2. The Ensure Fit option
This option means that PowerPoint will scale down your content to fit the smaller slide size based on the size you selected.

Ensure Fit Issue #1: Distorted images, slide backgrounds and anything else that PowerPoint had to automatically resize on your slide master.
To fix these issues, you’ll need to navigate to your slide master and adjust (or rebuild) your template to make everything fit.
Ensure Fit Issue #2: Your content will be scaled down to fit your new slide size, leaving you with a lot of white space. In addition, all your font sizes will be smaller, making them hard to read.
For small content like this, you’ll need to work through your slides and resize your content accordingly. Keep in mind the people at the back of the room too when choosing a new font style and size.
Saving your custom slide size as a PowerPoint theme
If want to use your own custom slide size for all your future PowerPoint presentations, you can save and set it as a PowerPoint theme.
This is a two-step process as discussed below.
1. Save your custom slide size as a theme

To save your custom slide size (and settings) as your own custom PowerPoint theme, simply:
- Open the M ore options
- Click Save Current Theme
- Name your Theme (and don’t change the file location it saves to)
- Click Save
2. Set your custom theme as the default

To set a custom PowerPoint theme as the default for all your future presentations, simply:
- Open the More options
- Right-click your custom theme
- Select Set as Default Presentation
- Close out of PowerPoint (and do not save any presentations if it prompts you)
Once you’ve set your own custom theme as the Default Presentation, it will open every time you start PowerPoint. This saves you from always having to switch your slide sizes.
So that’s how you can change your PowerPoint slide size, either before or after you create your presentation.
And although you are given a lot of flexibility in the slide sizes you can choose from, I recommend using the default slide sizes as used by most people.
It’s also important to remember that switching slide sizes after you have built your presentation can be a total pain. So, to the extent possible, figure out your PowerPoint slide size first before you build out your presentation.
If you enjoyed the depth of this article, you’ll love our PowerPoint training courses and other free resources that you can learn more about here .
🔒 Unlock the PowerPoint Shortcuts Trusted by Industry Leaders KKR, American Express, HSBC, and More!
Join over 114,880 professionals from diverse fields including consulting, investment banking, advertising, marketing, sales, and business development who have supercharged their PowerPoint game with our proven methods.
✅ Customize compelling presentations effortlessly.
✅ Master time-saving techniques for faster deck creation.
✅ Boost your career prospects with top-notch PowerPoint skills.
Get FREE access to the Critical PowerPoint Shortcuts module of our premium training course by entering your name and email below.
DISCLAIMER: PC Users Only!
We respect your privacy and will keep your info safe and confidential.
Related Articles
About the author.

Popular Tutorials
- How to Strikethrough Text (l̶i̶k̶e̶ ̶t̶h̶i̶s̶) in Word, Excel & PowerPoint
- How to Make Animated Fireworks in PowerPoint (Step-by-Step)
- Strikethrough Shortcut (l̶i̶k̶e̶ ̶t̶h̶i̶s̶) for Word, Excel & PowerPoint
- How to Create a Flash Card Memory Game in PowerPoint (Like Jeopardy)
- Keyboard Shortcuts Not Working: Solved
PowerPoint Tutorial Categories
- Strategies & Opinions
- Shortcuts & Hacks
- Presentation Design
- Pictures, Icons, Videos, Etc.
- New Features
- Miscellaneous
- Charts & Data Viz
We help busy professionals save hours and gain peace of mind, with corporate workshops, self-paced courses and tutorials for PowerPoint and Word.
Work With Us
- Corporate Training
- Presentation & Template Design
- Courses & Downloads
- PowerPoint Articles
- Word Articles
- Productivity Resources
Find a Tutorial
- Free Training
- For Businesses
We help busy office workers save hours and gain peace of mind, with tips, training and tutorials for Microsoft PowerPoint and Word.
Master Critical PowerPoint Shortcuts – Secure Your FREE Training Module and Save Valuable Time!
⌛ Master time-saving expert techniques.
🔥 Create powerful presentations.
🚀 Propel your career to new heights.
We value your privacy – we keep your info safe.
Discover PowerPoint Hacks Loved by Industry Giants - KKR, AmEx, HSBC!
Over 114,880 professionals in finance, marketing and sales have revolutionized their PPT skills with our proven methods.
Gain FREE access to a full module of our premium PowerPoint training program – Get started today!
We hate spam too and promise to keep your information safe.
You are currently viewing a placeholder content from Facebook . To access the actual content, click the button below. Please note that doing so will share data with third-party providers.
How to Change Slide Size in PowerPoint? [A Helpful Guide!]
By: Author Shrot Katewa
![How to Change Slide Size in PowerPoint? [A Helpful Guide!]](https://artofpresentations.com/wp-content/uploads/2021/06/Featured-Image-How-to-Change-Slides-Size-in-PowerPoint.jpg "power point resize slide")
Microsoft PowerPoint is a powerful software. You can not only create a standard presentation design, but you can also create documents of various sizes using PowerPoint! However, that requires you to have a good understanding of various slide sizes available in PowerPoint. You may be wondering, how to change the slide size in PowerPoint?
To change the slide size in PowerPoint, click on the “Design” tab. Then, click on “Slide Size”. From the dropdown, choose “Standard” or “Widescreen”. You can also click on “Custom Slide Size” to change the size of the slides in PowerPoint to A3, A4 or a completely custom size.
In this article, I will walk you through the nuances of changing a slide size in PowerPoint. We will go into the steps in detail with pictures so that you get the best understanding of the subject!
So, let’s get started!
A Quick Note Before We Begin – for this article, I will be using one of the presentation templates from Envato Elements . With Envato Elements, you get access to thousands of presentation designs with unlimited downloads so you never run out of options again. Plus, you get free previews so you know exactly what you’re getting before buying! It is also very affordable.
1. How to Change Slide Size in PowerPoint?
Changing the size of your slides in Microsoft PowerPoint is actually a lot easier than you think! All you have to do is go to the ‘Design’ tab from the ribbon, click on the ‘Slide Size’ button at the top right corner of your screen and select the slide size you want.
Below, I’ll be discussing how to change the size of slides in different versions of Microsoft PowerPoint as well as in different device including Mac, iPad and Android:
1a. Change Slide Size in PowerPoint 2016 and 2019
Follow the steps below to change the slide size in Microsoft PowerPoint 2016, PowerPoint 2019 and Office 365:
Step 1: Click on the ‘Design’ tab
At first, click on the ‘Design’ tab, which is the fourth option on your ribbon to get access to the design section of your PowerPoint presentation.
Step 2: Click on ‘Slide Size’ option
Go to the top right of the ‘Design’ tab in the ‘Customize’ section and ‘Left click’ on the ‘Slide Size’ button and a drop-down menu will open.
Step 3: Select the desired slide size from the ‘Slides sized for’ option.
Now, another dialogue box will show up in the middle of your screen. Click on ‘Ensure Fit’ to adjust your slide contents. (we will talk about the difference between the “Maximise” and “Ensure Fit” options later in the article)
If you choose to click on the ‘Custom Slide Size’ option, you may see a different dialogue box first. We will get to that in a moment and I will share with you how to customize the slide sizes in addition to the default options provided by PowerPoint.
1b. How to Change Slide Size in PowerPoint 2010?
The process of changing slide size in Microsoft PowerPoint 2010 is described below:
Step 1: Click on the ‘Design’ tab and go to ‘Page Setup’ option
Click on the ‘Page Setup’ option located in the ‘Page Setup’ section of the ‘Design’ tab. This will open up a new dialogue box.
Step 2: Choose the slide size you want from the drop-down menu after clicking on ‘Slides sized for’.
‘Left click’ on the ‘Slides sized for’ menu to get the options of slide size. Choose your preferred style and then click on the ‘Ok’ button.
1c. How to Change the Slide Size in PowerPoint 2007?
The process of changing slides in Microsoft PowerPoint 2007 is identical to the process in PowerPoint 2010. For reference, here’s how to change the slide size in PowerPoint 2007:
1d. How to Change Slide Size in PowerPoint on Mac
The process of changing slide size in PowerPoint on Mac is described in simple steps below:
Step 1: Click on the ‘File Menu’ and then on ‘Page setup’
Click on the ‘File’ menu which is located in the ‘Quick Access’ toolbar above the ‘Home’ tab and a drop-down menu will appear. Click on the ‘Page Setup’ option from the drop-down menu which will open up another dialogue box.
Step 2: Choose your new slide size from the dialogue box
Click on your preferred slide size and then press the ‘Ok’ button. PowerPoint will prompt you to choose between “Scale” or “Don’t Scale”. This is similar to the Maximise or Ensure Fit options Windows users see.
Go with the “ Scale ” option as this will adjust the sizes of all shapes and text for each slide. You can also choose to go with “Don’t Scale” option and adjust everything manually as per your requirement.
Your slide size will change accordingly.
If you are using Office 365 or later versions of PowerPoint on Mac, you an also find the option to change the slide size from widescreen to standard by click on the Design tab, and then clicking on “Slide Size” as showcased earlier.
1e. How to Change Slide Size in PowerPoint on iPad?
Follow the steps below to change slide size in PowerPoint on iPad:
Step 1: Go to the ‘Home’ menu after opening your PowerPoint Presentation file
At the bottom right corner of the screen, you will find the ‘three dots’ icon, which is the ‘Options’ menu. Tap on the ‘Options’ menu and then select the ‘Home’ option.
Step 2: Change your size after tapping the ‘Slide Size’ option
A ‘Design’ option will now appear on your screen. Tap on it and then tap on the ‘Slide Size’ option. After that, change your slide size to ‘Standard’ or ‘Widescreen.’
1f. How to Change Slide Size in PowerPoint on Android?
Unfortunately, you cannot change the size of your presentation slides using PowerPoint on Android. However, there is another application for Android called ‘ WPS Office ’, which you can use to change the size of your slides from ‘Standard (4:3)’ to ‘Widescreen (16:9).’
Simply open your PowerPoint Presentation using this app and go to the ‘Settings’ option at the bottom left corner. Then scroll rightwards to the ‘Design’ tab, where you will find the ‘ Slide Size’ option. From there, you will be able to select your desired slide size.
2. How to Change Slide Size to A4 in PowerPoint?
To change the slide size of your PowerPoint presentation to A4, follow the steps below:
Step 1: Click on ‘Custom Slide Size’ located in the ‘Design’ tab

Click on the ‘Design’ tab and then from the ‘Slide size’ menu, click on the ‘Custom Slide Size’ button.
Step 2: Choose the ‘A4 Paper (210x297mm)’ option to change the slide size
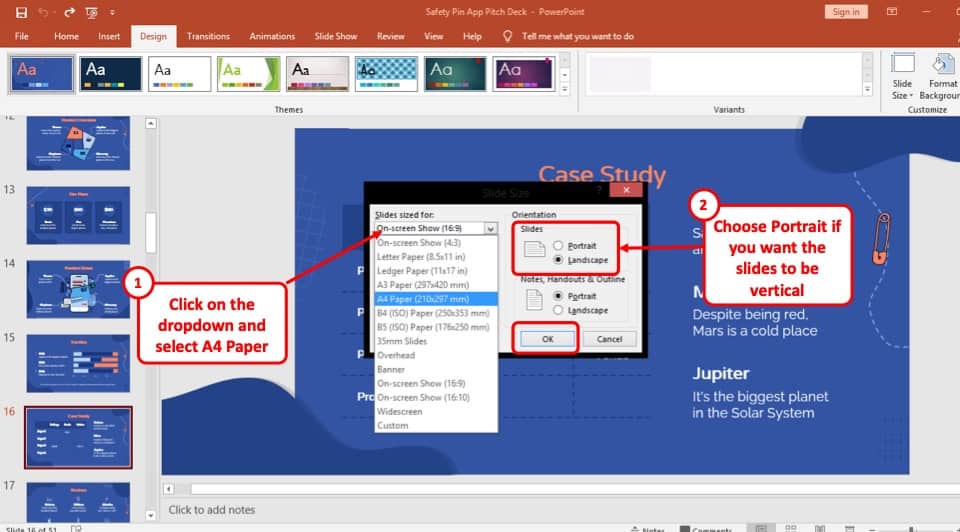
From the pop-up window, click on the ‘Slides sized for’ button and a drop-down menu will show you the different slide sizes available. Now all you have to do is select the ‘A4 Paper (210x297mm)’ size option and hit the ‘ Ok ’ button.
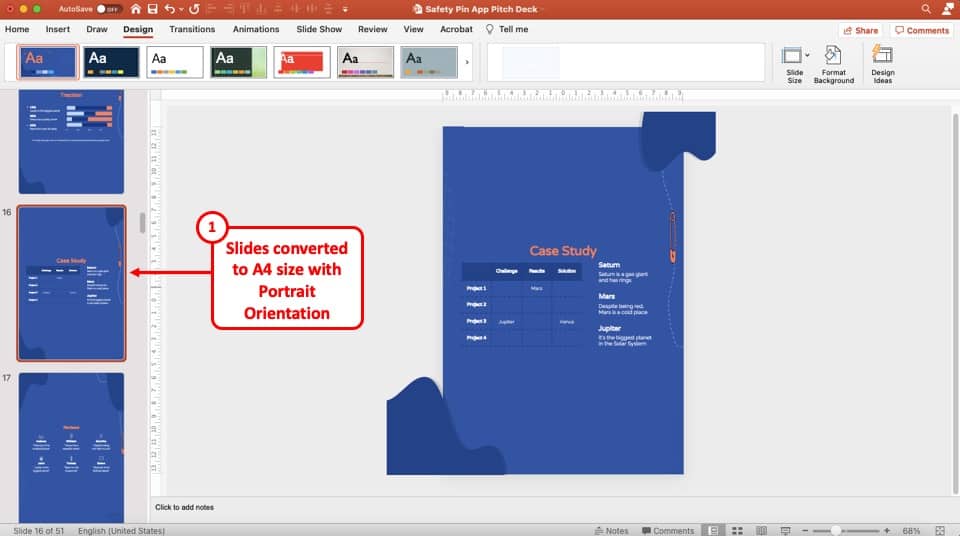
Here’s how the A4 slide size will look in the portrait orientation in PowerPoint.
3. How to Change Slide Size to A3 in PowerPoint?
You can modify the slide size to A3 in Microsoft PowerPoint by following the easy steps below:
Step 1: Selecting the ‘Custom Slide Size’ button to change slide size
At first, click on the ‘Slide Size’ option in the ‘Design’ tab. From the drop-down menu select the ‘Custom Slide Size’ option.
Step 2: Select the ‘A3 Paper’ and Click on OK
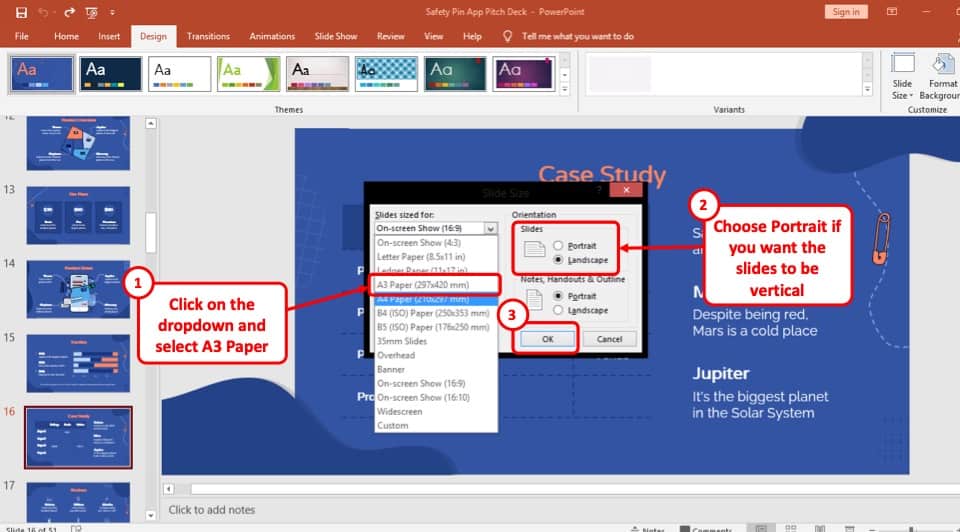
Expand the ‘Slides sized for’ drop-down menu by clicking on it. Then, ‘Left click’ on the ‘A3 Paper (297x420mm)’ paper option. Press the ‘Ok’ button at the bottom right of the pop-up window and then click on the ‘Ensure Fit’ button to resize the content accordingly to the slides.
4. How to Create Custom Slide Size in PowerPoint?
Follow the easy steps described below to create custom slide size in PowerPoint:
Step 1: Selecting ‘Custom Slide Size’ to create a custom size for your presentation

Click on the ‘Slide Size’ option in the ‘Design’ tab. From the drop-down menu select the ‘Custom Slide Size’ option.
Step 2: Input the Height and Width in the dialogue box and click ‘Ok’
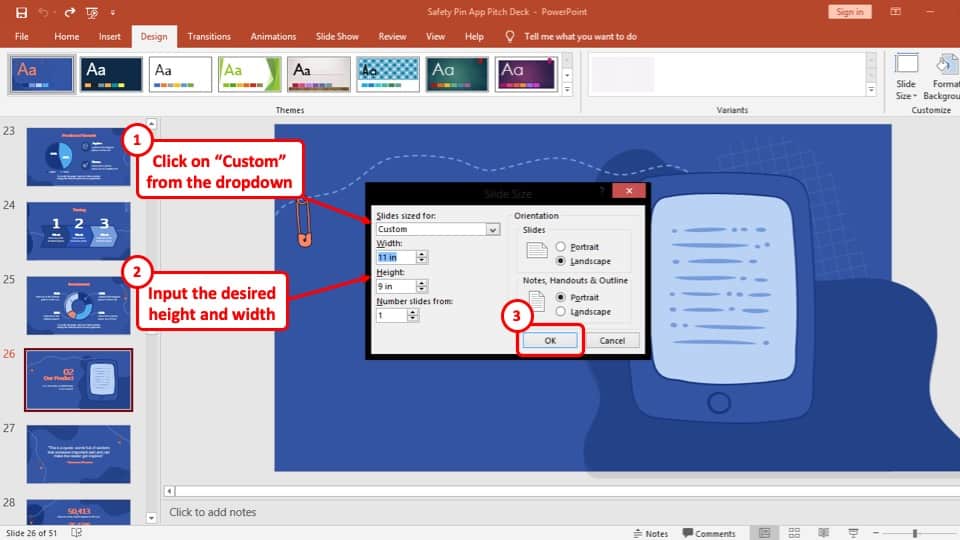
After clicking on the ‘Custom Slide Size’ option, a pop-up window will appear. To input a custom slide size, click on the ‘Slides sized for’ button and from the drop-down menu, select ‘Custom .’
After adding the desired Height and Width for the slide, click on the ‘Ok’ button and then click on the ‘Ensure Fit’ button.
5. How to Change Slide Size from Widescreen to Standard?
To change the slide size from Widescreen to Standard, just follow the steps below:
Step 1: Click on the ‘Design’ tab which is on the top left of your presentation
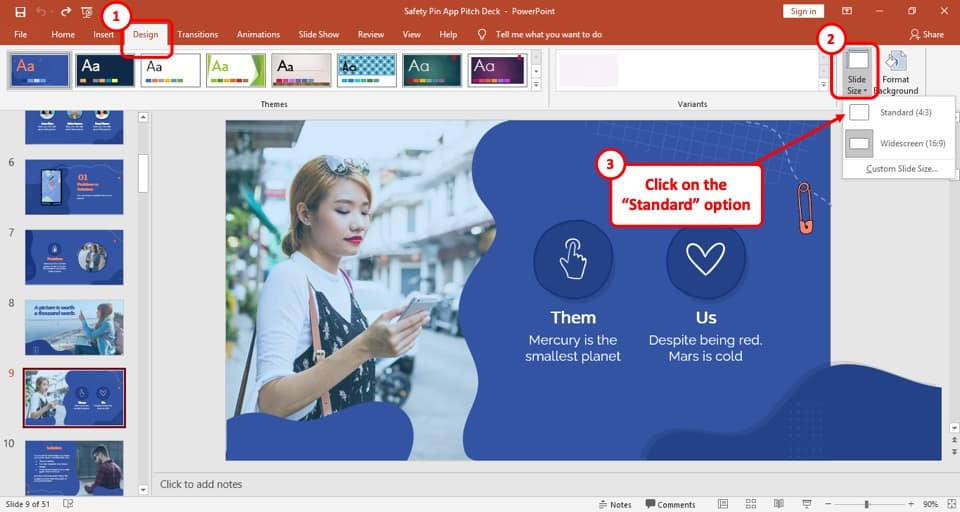
The first step is to go to the ‘Design’ tab which is the fourth tab on the ribbon of your PowerPoint window.
Step 2: Click on ‘Slide Size.’
Click on the ‘Slide Size’ button located in the ‘Customize’ section of the ‘Design’ tab. A drop-down menu will appear once you click on it.
Step 3: Change your slide size from Widescreen to Standard and adjust slide content
The slide size is set to ‘Widescreen 16:9’ by default. To change it, ‘Left click’ on ‘Standard (4:3)’ . This will open up a dialogue box, where you will find the ‘Maximize’ and ‘Ensure Fit’ options.
If you click on the ‘Maximize’ option, your content will not be sized down to fit your slide and images may get distorted. On the other hand, clicking on the ‘Ensure Fit’ option will resize the contents of the down to your preferred size.
6. How to Increase Slide Size in PowerPoint When Printing?
When printing, sometimes PowerPoint just doesn’t print to the edge of the page. Meaning, there is a white bleed (border or margin) when you try to print it or when you try to convert it into a PDF.
You can fix this problem by either increase or adjusting the slide size before printing.
Here’s a video that explains the process in detail –
Although the video is for Mac, you can easily adjust the settings for the slide size for Windows just the same way.
It is important to remember to make sure that you don’t increase the slide size of your entire presentation but only adjust the printing size of the slides.
7. Can You Change Orientation of Just One Slide in PowerPoint?
There is currently no direct way to change the orientation of just one slide in PowerPoint. However, you can circumvent this issue by either creating a hyperlink to an external file or adding a portrait PDF file directly in PowerPoint.
We wrote a detailed article on the exact steps and processes that you need to follow in order to do this. Make sure you read that article on How to Change Orientation of Just One Slide in PowerPoint !
More PowerPoint Related Topics
- How to Use a Presentation Clicker to Deliver Presentations Effectively!
- How to Crop a Picture in PowerPoint? [Complete Step-by-Step Tutorial!]
- How to Give a Presentation on Zoom? A Helpful Resource!
- How to Convert a PowerPoint to PDF? [A Simple Guide!]
- PowerPoint vs Google Slides: Which is Better? [ULTIMATE Test!]
- How to Change Bullet Style in PowerPoint? A Complete Guide
Credit to Diana.grytsku (on Freepik) for the Featured Image of this Article (edited further)
How to change the size of slides in Microsoft PowerPoint to match your customized presentation style or screen size
- You can change the size of a slide in your PowerPoint presentation through the "Design" menu.
- Microsoft PowerPoint allows you to change slide sizes on the Windows PC, Apple MacOS, and web-based apps.
- Visit Business Insider's Tech Reference library for more stories .
When it comes to designing your visual presentation, one size does not fit all.
That's doubly true for PowerPoint presentations, which may be viewed on several platforms and devices. Sometimes PowerPoint's default slide isn't the best option for your project, and the program has a built-in fix for that.
When you create a presentation in Microsoft PowerPoint, you can customize your slides' size and dimension. This allows you to choose a perfect canvass for your content.
Microsoft offers the ability to change the size of your slides on the Windows, Mac, and web-based apps. Here's how to do it.
Check out the products mentioned in this article:
Microsoft office (from $149.99 at best buy), apple macbook pro (from $1,299.00 at apple), acer chromebook 15 (from $179.99 at walmart), how to change slide size in powerpoint for pc.
1. Open an existing PowerPoint file, or start a new presentation.
2. Select "Design" from the top menu bar.
3. Toward the right, click "Slide Size."
4. In the drop-down menu, select Standard, Widescreen, or "Custom Slide Size…"
5. When you're done, click "OK."
How to change slide size in PowerPoint for Mac
1. Create a new presentation, or launch an existing file.
2. Click "Design" from the top-line row of options.
3. Toward the right, you'll see "Slide Size." Click it for a drop-down menu of options.
4. Select the included Standard or Widescreen options, or click "Page Setup…" for a custom size.
5. Choose "OK" when you're done.
How to change slide size in PowerPoint for web
1. Navigate to powerpoint.office.com and sign in to your Microsoft account.
2. Open a new or existing PowerPoint.
3. Select "Design" from the top row of options.
4. Click "Slide Size."
5. Select between Widescreen and Standard, or create custom dimensions with "Custom Slide Size…"
6. If selecting custom, enter the dimensions and then choose whether you want it in landscape or portrait mode.
7. Choose between maximizing your slide size or scaling it to fit the new dimensions.
8. Click "OK."
Related coverage from Tech Reference :
How to download and access microsoft powerpoint on your mac computer, how to add a border to slides in powerpoint, and give your slideshow a sleek design, how to change and format the background of your powerpoint slides to custom designs, how to change your language settings in microsoft powerpoint in 3 different ways, how to copy or duplicate a powerpoint slide and put it anywhere in your slideshow.
Insider Inc. receives a commission when you buy through our links.
Watch: We toured a $7 million NYC apartment that has a slide and zip line, and it's a kid's paradise
- Main content
- Slidesgo School
- PowerPoint Tutorials
How to Change the Slide Size in PowerPoint

Are you tired of presentations that don’t adapt well to the screens used in the venue? That’s mostly due to them not being properly suited for conventional (4:3) or widescreen (16:9) formats.

Before giving your presentation, it’s important to know which type of screen it’s going to be shown on, so you can optimize it as much as possible. However, have in mind that after changing the original aspect ratio of your presentation , any elements and images already included will probably appear scrambled, so you’ll need to readjust them one by one in the slides or even the master slides.
To change the aspect ratio in PowerPoint, click Slide Size, which is in the Customize group on the Design tab, and choose the desired aspect ratio for your presentation.
As with Google Slides, you can set your own slide size by clicking Custom Slide Size…

When scaling the content, PowerPoint asks you to choose between two different options:

- Maximize: With this option, PowerPoint will increase the size of the content when scaling to a greater size. As a result, the content might get redistributed in the slides.
- Ensure Fit : With this option, the size of the content will be reduced when scaling to a smaller size. As a result, the content will be smaller and you might need to scale it up again where needed.
Now your presentation is ready and adapted for the new aspect ratio. If you want to learn more about PowerPoint and/or Google Slides and how to get the most out of them, stay tuned for more Slidesgo School tutorials. For further information on how to change the aspect ratio of your slides in PowerPoint, please refer to this article of the Microsoft Office support page .
Do you find this article useful?
Related tutorials.

How to print PowerPoint notes
Crafting an impactful PowerPoint slideshow and delivering a captivating presentation are distinct skills. The first focuses on designing appealing visuals to convey a clear message, while the second involves employing effective presentation techniques to ensure the audience grasps the idea. The content of this article will help you with the latter part of this process, guiding future presenters on how to print PowerPoint with speaker notes to enhance your presentations success and effectiveness.

Discover Our Online Presentation Software for Free
We have great news for you today! If you’ve been a Slidesgo fan for years (or months, or weeks, or days, or mere hours, we welcome everyone!), you’ll probably know for now that our templates are available mostly in two formats: for use in Google Slides and PowerPoint.Google Slides is a free tool, since you only need a Google account in order to use it. PowerPoint, on the other hand, is part of the Microsoft Office suite, so it’s not a free program, but that didn’t stop it from being one of the most popular options in the world!What if we...

Webinar: Presentation Audit
With more than 15,000 templates released on Slidesgo and a user base composed of millions of people, we estimate that the total number of presentations created adds up to… um, a lot! Our team of professional designers work very hard to provide you with editable slides so that the only thing you need to do is, well, customize the elements to your liking. Starting from any given template, the results may vary a lot depending on the person who edited the contents.Have you ever wondered “Is my presentation good enough?” and wished that an expert on presentations looked at your template...

How to Change Slides Orientation in Google Slides
A change of perspective is always good! Do you want your public to look at your slides in a new way? Changing slides orientation will do the work. In this tutorial you’re going to learn how to go from horizontal slides, to vertical ones (and vice versa!).

How to Change Slide Size or Dimensions in PowerPoint

Change PowerPoint Slide Size (Widescreen, Standard or Custom)
by Avantix Learning Team | Updated September 7, 2023
Applies to: Microsoft ® PowerPoint ® 2016, 2019, 2021 and 365 (Windows)
You can change the slide size or aspect ratio of a PowerPoint presentation in all versions. The default slide size or dimensions in 2013, 2016, 2019, 2021 or 365 is widescreen (16:9 aspect ratio). You can also enter a custom slide size if you prefer (including entering slide size in pixels). The best time to set slide size is when you first set up your PowerPoint presentation before you add any content. If you change the size later in the process, you may have to deal with distorted pictures and you may also need to adjust the position and size of various objects on slides in Normal View and in the slide master(s) and layouts in Slide Master View.
The most common slide sizes or aspect ratios are typically used as follows:
- Widescreen or 16:9 aspect ratio is frequently used for onscreen presentations using a projector, monitor or a widescreen TV. Older projectors used the standard aspect ratio but most new projectors are designed for widescreen.
- Standard or 4:3 aspect ratio is often used if slides are intended to be printed on letter size paper.
Slide size changes affect the entire presentation. You cannot change slide size for single slides.
You should never change slide size just before running a presentation as you may not be satisfied with the results. If you already have a presentation with images and other content, it's also a good idea to change slide size on a copy of the presentation so you can keep the original deck and slide size.
Note: Some Ribbon tabs may appear with slightly different names if you are working with PowerPoint 365 and have a smaller screen or different display settings. Buttons on the Ribbon may appear as icons only and are also affected by screen size and display settings.
Recommended article: How to Reduce the Size of PowerPoint Presentations (10 Ways to Compress Your PowerPoint Decks)
Do you want to learn more about PowerPoint? Check out our virtual classroom or live classroom PowerPoint courses >
Regardless of the version of PowerPoint you use, you should go through your slides after you change slide size to be sure you are satisfied with the results. Be sure to check the slide master(s) and layouts in Slide Master View as well.
Change slide size to widescreen or standard
To change slide size to widescreen or standard size:
- In Normal View, click the Design tab in the Ribbon.
- Click Slide Size in the Customize group. A drop-down menu appears.
- Select Widescreen, Standard or another option from the drop-down menu. A dialog box appears with options to maximize content or scale to fit (this dialog appears only if you are moving from a larger to a smaller slide size).
- Select the desired option.
Slide Size appears on the Design tab in the Ribbon:

The following dialog box appears in PowerPoint to maximize content or scale to fit only when you change slide size to a smaller size (such as widescreen to standard):

If you select Maximize, the slide content will not be resized when you change to the smaller slide size.
If you select Ensure Fit, PowerPoint will scale your content to fit the smaller slide size.
Change slide size to a custom size
You can use custom slide sizes. Simply choose options from the Slides sized for drop-down menu in the dialog box (such as A4 paper size) or enter custom dimensions.
To change slide size to a custom size:
- Choose Custom Slide Size from the drop-down menu. A dialog box appears.
- Select an option from the Slides sized for drop-down menu or enter the desired slide size in the Height and Width boxes.
- A dialog box appears with options to maximize content or scale to fit (this dialog appears only if you are moving from a larger to a smaller slide size).
Note that the measurement system in PowerPoint dialog boxes is based on your system settings. If you would like to change the measurement system, check out our article on How to Change the Measurement System in PowerPoint.
The following dialog box appears when you select Slide Size and then Custom Slide Size:

You can create posters in PowerPoint by entering a custom slide size such as 36 inches wide by 56 inches high or 91.44 cm wide by 142.24 cm high. The maximum slide size in PowerPoint is 56 inches or 142.24 cm. As a best practice, set the slide size before adding content to the poster.
Many PowerPoint users are not aware that you can enter slide size in pixels (simply enter the measurement with px beside the number). This is useful in a number of situations such as using PowerPoint to create social media posts. If you enter slide size in pixels (such as 200px), when you tab to another box or close the dialog box, PowerPoint changes the pixels to the equivalent in the current measurement system.
Deal with issues when changing slide size
When changing slide size in existing presentations with content, 4 common issues occur:
- Pictures may be distorted as PowerPoint tries to adjust images to fit slide size. Images on slides in Normal View will be affected as well as images on the slide master(s) and layouts. If pictures are distorted, you will need to either manually resize each image or delete them and insert them again.
- Objects such as placeholders and shapes that have been created in PowerPoint are not in the position you'd like. You may need to move objects or reset one or more slides (on the Home tab in the Ribbon, click Reset in the Slides group).
- Extra space is created if you change to a larger slide size. You may need to move or resize objects and adjust the slide master(s) or layouts in Slide Master View.
- If you have changed to a smaller slide size, you may need to increase font size for placeholders and text boxes.
Dimension differences between different slide sizes
In PowerPoint 2013 and later versions, widescreen (16:9) format measurements are different and are set to 13.33 inches wide by 7.5 inches high or 33.867 cm wide by 19.05 cm high. This matches the height of the 4:3 format.
Avoid issues when changing slide size
To avoid issues in PowerPoint related to slide size, you should:
- Try to set slide size as a first step after you create a presentation and before you have entered any content. In 2013 and later versions, the default is widescreen (16:9 aspect ratio).
- If you have changed slide size in a presentation with content, review your slides to be sure you are satisfied with the results. You should also check the slide master(s) and layouts in Slide Master View.
- Never change slide size just before running a presentation as you may not be pleased with the results and you won't have time to fix your slide deck.
- If you have created a presentation with content, make a copy of the presentation first and change slide size on the copy.
Keep in mind that widescreen is normally used for on screen presentations and standard is often used for printed presentations.
This article was first published on October 6, 2019 and has been updated for clarity and content.
Subscribe to get more articles like this one
Did you find this article helpful? If you would like to receive new articles, JOIN our email list.
More resources
How to Blur Text on a PowerPoint Slide
How to Get Slide Design Ideas Using PowerPoint Designer
How to Change Picture Brightness or Contrast in PowerPoint
How to Insert Slide Numbers in PowerPoint Presentations (Step-by-Step)
Where to Find Free Images for Your PowerPoint Presentations (10 Great Stock Photo Sites)
Related courses
Microsoft PowerPoint: Intermediate / Advanced
Microsoft PowerPoint: Design for Non-Designers
Microsoft PowerPoint: Animations Bootcamp
Microsoft Excel: Intermediate / Advanced
VIEW MORE COURSES >
Our instructor-led courses are delivered in virtual classroom format or at our downtown Toronto location at 18 King Street East, Suite 1400, Toronto, Ontario, Canada (some in-person classroom courses may also be delivered at an alternate downtown Toronto location). Contact us at [email protected] if you'd like to arrange custom instructor-led virtual classroom or onsite training on a date that's convenient for you.
Copyright 2024 Avantix ® Learning
You may also like

10 Keyboard Shortcuts in PowerPoint's Outline View
The outline has been an integral part of Microsoft PowerPoint for many years. It is dynamically linked to slide placeholders and is organized in a hierarchical way.

How to Change the Thumbnail for a Video in PowerPoint (using the Poster Frame Tool)
If you have inserted a video on a PowerPoint slide, you can display a custom thumbnail (or Poster Frame) for the video during a slide show. The thumbnail will display when you run a PowerPoint slide show and disappears when you start the video. For most videos, the thumbnail that displays is the first frame of the video clip. You can use the Poster Frame command to display a different frame in the video clip or a picture from another source as a thumbnail. A picture thumbnail could be either an image or an icon.

How to Use the Built-in Laser Pointer in PowerPoint (with Shortcuts)
During a PowerPoint slide show, you can change your mouse into a laser pointer to focus attention on a specific area on your slide. You can show or hide the built-in laser pointer using keyboard shortcuts or by using the context menu.
Microsoft, the Microsoft logo, Microsoft Office and related Microsoft applications and logos are registered trademarks of Microsoft Corporation in Canada, US and other countries. All other trademarks are the property of the registered owners.
Avantix Learning |18 King Street East, Suite 1400, Toronto, Ontario, Canada M5C 1C4 | Contact us at [email protected]
Our Courses
Avantix Learning courses are offered online in virtual classroom format or as in-person classroom training. Our hands-on, instructor-led courses are available both as public scheduled courses or on demand as a custom training solution.
All Avantix Learning courses include a comprehensive course manual including tips, tricks and shortcuts as well as sample and exercise files.
VIEW COURSES >
Contact us at [email protected] for more information about any of our courses or to arrange custom training.
Privacy Overview
Pin it on pinterest.
- Print Friendly
How to Change Slide Size in PowerPoint
While most users are accustomed to the standard 16:9 aspect ratio of presentations, you can change the size of slides in PowerPoint.
You might change to accommodate a different screen size – maybe the older 4:3 aspect ratio – or to create a custom file type. The tool even includes a few predefined sizes to make it easy for you.
You’ll ideally want the size of your presentation to match whatever device it will be shown on (which is why it’s worth asking about the resolution of the screen or projector you’ll be using in advance!)
Here’s how to change slide size in PowerPoint in a few quick steps.
2 Million+ PowerPoint Templates, Themes, Graphics + More
Download thousands of PowerPoint templates, and many other design elements, with a monthly Envato Elements membership. It starts at $16 per month, and gives you unlimited access to a growing library of over 2,000,000 presentation templates, fonts, photos, graphics, and more.

Maximus Template

Minimal PPT Templates
Clean & clear.

Ciri Template

Business PPT Templates
Corporate & pro.

Mystify Presentation
Explore PowerPoint Templates
Change Slide Size Between Standard and Widescreen
The two most common sizes for PowerPoint presentations are standard (4:3) and widescreen (16:9) sizes. The standard size has shifted to 16:9 as more computer and projection screens have moved to this size.
Both are presets that exist within the tool.

Open your presentation, click Design in the top menu. Find the Slide Size button and click to see the two sizes. Click the one you want to use.

PowerPoint will give you the option to scale content to the new size.

Note that when you change slide size, it affects all of the slides in the open file. If you scale, that also impacts every slide. Make sure to go through and make sure the design of each still looks as intended before giving the presentation. Some adjustments may be necessary.
Change to Another Standard Size
You can also change the size of PowerPoint slides to match other common sizes, such as A4, banner, or ledger using page setup features.

Open the presentation, click Design in the top menu. Find the Slide Size button and click Page Setup. The current configuration is noted with a check mark.

Pick the size and orientation you want to use from the menu and click OK. You will be prompted to choose whether you want to scale the content up or down here as well.

Change to a Custom Slide Size
You can also use a custom slide size in PowerPoint, making each slide any size you want.

Click custom. Type the desired width and height in the boxes and click OK. You will be asked if you want to scale the content.

When it comes to custom sized slides in PowerPoint, note that not all templates will act the same way when changing size or scaling up or down. Fonts, design elements, and images can sometimes get out of alignment or not quite look the way you want.
While the scale feature is quite helpful, it is important to always go back and check each slide if you change the size after content has already been added to the presentation.
Don’t forget to take a look at our full PowerPoint templates guide , or our collection of the best PowerPoint templates for your next project!
- All-Access Subscriptions
- Business Licensing
- Lightroom Classic
- Photoshop Elements
- Crystal Reports
- Interview Skills
- Resume Skills
- Excel for Lawyers
- Outlook for Lawyers
- QuickBooks for Lawyers
- Word for Lawyers
- Microsoft Office Suite
- Outlook on the Web
- Microsoft Project
- Microsoft Teams
- QuickBooks Online
- QuickBooks Pro
- Video Course Options
- SUBSCRIPTIONS
- Photoshop Elements 2024
- Photoshop Elements 2023
- Photoshop Elements 2022
- Photoshop Elements 2021
- Photoshop Elements 2020
- Photoshop Elements 2019
- Photoshop Elements 2018
- Photoshop Elements 15
- Google Classroom for Teachers
- Google Docs
- Google Drive
- Google Forms
- Google Sheets
- Google Slides
- Mac OS Keyboard Shortcuts
- Excel Formulas and Functions
- Excel Keyboard Shortcuts
- Excel Tables PivotTables and Charts
- Access for Microsoft 365
- Excel for Microsoft 365
- Microsoft Office 365
- Outlook for Microsoft 365
- PowerPoint for Microsoft 365
- Publisher for Microsoft 365
- Word for Microsoft 365
- Access 2021
- Microsoft Office 2021
- Outlook 2021
- PowerPoint 2021
- Publisher 2021
- Access 2019
- Microsoft Office 2019
- Outlook 2019
- PowerPoint 2019
- Publisher 2019
- Access 2016
- Microsoft Office 2016
- OneNote 2016
- Outlook 2016
- PowerPoint 2016
- Publisher 2016
- Microsoft Office 2013
- OneNote 2013
- Outlook 2013
- PowerPoint 2013
- Microsoft Office for iPad
- QuickBooks Pro 2024
- QuickBooks Pro 2023
- QuickBooks Pro 2022
- QuickBooks Pro 2021
- QuickBooks Pro 2020
- QuickBooks Pro 2019
- QuickBooks Pro 2018
- QuickBooks Pro 2017
- QuickBooks Pro 2016
- QuickBooks Pro 2015
- QuickBooks Pro 2014
- Sage 50 Accounting
- Windows 11 and 10 Keyboard Shortcuts
- Chrome OS for Chromebooks
- Word and Excel (Mac) 2022
- Word and Excel (PC/Windows) 2021-2016 and 365
- QuickBooks Desktop (PC/Windows) 2024
- QuickBooks Desktop (PC/Windows) 2023
- QuickBooks Desktop (PC/Windows) 2022-2015
- Windows 11 and 10
- Our History
- Customer Service
- Testimonials
- Lost Password
- Register a Product
- Manage My Account
- Member Login
Try the Complete PowerPoint Course for Free!
Change the size of slides in powerpoint – instructions, how to change the size of slides in powerpoint: video.
This video lesson, titled “ Learn How to Change Slide Size in Microsoft PowerPoint 2019 & 365: A Training Tutorial ,” shows you how to change the size of slides in PowerPoint. This video lesson is from our complete PowerPoint tutorial , titled “ Mastering PowerPoint Made Easy v.2019 and 365 .”
Change the Size of Slides in PowerPoint: Overview
You can easily change the size of slides in PowerPoint. To change the size of slides in PowerPoint, click the “Design” tab in the Ribbon. Then click the “Slide Size” drop-down button in the “Customize” button group. To change the slide size aspect ratio, select either “Standard (4:3)” or “Widescreen (16:9)” from the button’s drop-down menu. Alternatively, to use slides of a custom size or change other slide size properties, select the “Custom Slide Size…” command from the button’s drop-down menu to open the “Slide Size” dialog box.
To select a preset slide size, use the “Slides sized for:” drop-down in the “Slide Size” dialog box to select a preset slide size from the drop-down menu. Alternatively, to manually set the slide width and height, enter your own custom measurements into the “Width:” and “Height:” spinner boxes. To change the starting number for slide numbering, enter the starting number to use into the “Number slides from:” spinner box.

A picture showing how to change the size of slides in PowerPoint by using the “Slide Size” dialog box.
To set the slide orientation, select either the “Portrait” or “Landscape” option button in the “Orientation” section of the “Slide Size” dialog box. To set the orientation of notes, handouts, and the outline view, select either the “Portrait” or “Landscape” option button in the “Notes, Handouts & Outline” section. To apply your desired slide size settings in the “Slide Size” dialog box, click the “OK” button at the bottom of the dialog box.
Instructions on How to Change the Size of Slides in PowerPoint:
- To change the size of slides in PowerPoint , click the “Design” tab in the Ribbon.
- Then click the “Slide Size” drop-down button in the “Customize” button group.
- To change the slide size aspect ratio , select either “Standard (4:3)” or “Widescreen (16:9)” from the button’s drop-down menu.
- Alternatively, to use slides of a custom size or change other slide size properties , select the “Custom Slide Size…” command from the button’s drop-down menu to open the “Slide Size” dialog box.
- To select a preset slide size , use the “Slides sized for:” drop-down in the “Slide Size” dialog box to select a preset slide size from the drop-down menu.
- Alternatively, to manually set the slide width and height , enter your own custom measurements into the “Width:” and “Height:” spinner boxes.
- To change the starting number for slide numbering , enter the starting number to use into the “Number slides from:” spinner box.
- To set the slide orientation , select either the “Portrait” or “Landscape” option button in the “Orientation” section of the “Slide Size” dialog box.
- To set the orientation of notes, handouts, and the outline view , select either the “Portrait” or “Landscape” option button in the “Notes, Handouts & Outline” section.
- To apply your desired slide size settings in the “Slide Size” dialog box , click the “OK” button at the bottom of the dialog box.

About Joseph Brownell

Next Gen Data Learning – Amplify Your Skills

How to Adjust Slide Size in PowerPoint: A Quick & Easy Guide
by Enterprise DNA Experts | PowerPoint

Ever started making a presentation in PowerPoint, only to realize that the slides are too small, or too big?
It’s happened to the best of us.
The good news is, adjusting the slide size in PowerPoint is a simple process that can help you avoid this problem and create presentations that look just right.
To adjust the slide size in PowerPoint, click on the “Design” tab, and then “Slide Size.” You can choose from two standard slide sizes, either “Standard (4:3)” or “Widescreen (16:9).” Additionally, you can also choose a custom slide size by entering the dimensions manually.
In this article, we’ll take you through the steps of adjusting the slide size in your presentation.
You’ll also learn about the various options available for slide size, and why it’s important to choose the right one for your presentation.
Let’s get started!

Table of Contents
What is Slide Size in PowerPoint?
Slide size in PowerPoint refers to the dimensions of a single slide in a presentation. It determines the width and height of the slide and can be customized to fit different screen aspect ratios and output formats.

Aspect Ratio: This is the proportional relationship between the width and height of a slide. The two most common aspect ratios for slides are 4:3 (standard) and 16:9 (widescreen).
Remember, the aspect ratio you choose will depend on the intended display or output format of your presentation.
Output Format: The slide size can be adjusted based on the output format you plan to use. For example, if you’re creating a presentation for a standard projector, you might choose a 4:3 aspect ratio.
On the other hand, if your presentation will be displayed on a widescreen TV or uploaded to an online platform, a 16:9 aspect ratio is typically recommended.
By customizing the slide size, you can ensure that your actual presentation looks its best on various devices and platforms.

2 Ways How to Adjust the Slide Size in PowerPoint
There are two ways to adjust the slide size in your presentation: using the default settings or customizing the size to meet your specific needs.
1. How to Adjust Slide Size Using the Default Settings
If you are using PowerPoint 2013 or later, you can adjust the slide size using the default settings.
Here’s how to do it:
Open your PowerPoint presentation.
Click on the “Design” tab in the Ribbon menu.
In the “Customize” group, click “Slide Size.”

Choose either “Standard (4:3)” or “Widescreen (16:9)” from the drop-down menu.
PowerPoint will adjust the slide size according to your selection.

Note: In PowerPoint 2010 and earlier versions, the “Design” tab is called the “Page Layout” tab. The steps are the same.
Now that you’ve learned how to adjust the slide size using the default settings, let’s move on to customizing the size to fit your specific needs .
2. How to Adjust Slide Size by Customizing It
If you have specific slide dimensions in mind for your presentation slides, you can easily customize the slide size in your presentation.
Follow these steps:
Open your presentation.
In the “Customize” group, click “Slide Size” and then select “Custom Slide Size” or “Page Setup”.

In the “Slide Size” dialog box, you can choose from a list of pre-defined slide sizes, including “On-screen Show,” “Letter Paper,” “A4 Paper,” and more. Alternatively, you can enter custom width and height values in the “Width” and “Height” boxes.
Click “OK” to apply your custom size.

Now that you’ve learned how to adjust the slide size in your presentation, let’s take a look at the different options available for slide size.
Options for Slide Size in PowerPoint
When you’re creating a presentation in PowerPoint, you have a few different options for the slide size . You can choose between the standard size (4:3) and the widescreen size (16:9).
Let’s take a closer look at these options and when you might want to use each one.

1. Standard Size (4:3)
The standard size in PowerPoint is a 4:3 aspect ratio. This means that for every 4 units of width, there are 3 units of height. It’s the traditional size for older television screens and projectors.
The 4:3 aspect ratio provides a more square-shaped slide orientation, which can be beneficial for certain types of content, such as:
Printed handouts
Vertical designs
Content intended for older display systems
Certain templates and design layouts

2. Widescreen Size (16:9)
The widescreen slide size in PowerPoint is a 16:9 aspect ratio. This means that for every 16 units of width, there are 9 units of height. It’s the standard size for most modern high-definition displays, including computer monitors, TVs, and projectors.
The 16:9 aspect ratio provides a more rectangular-shaped slide orientation, which can be beneficial for certain types of content, such as:
Video content
Web-based presentations
Screen sharing
Detailed images
Presentations that need to be compatible with a wide range of devices
Now that you’ve learned about the two main options for slide size for your presentation, let’s discuss why it’s important to choose the right one for your presentation.

Why Choose the Right Slide Size in PowerPoint?
Choosing the right slide size is crucial for creating an effective and professional-looking presentation. The size of your slides not only affects the layout and design but also influences how your content is displayed on different screens and devices.

Here are some key reasons why you should carefully consider your slide sizes:
Optimized content layout: The size of your slides will determine how much content can be displayed at once. A larger slide size, such as widescreen (16:9), allows for more space to work with, enabling you to create visually appealing and uncluttered layouts.
Consistency across devices: By selecting one slide size, you can ensure that your presentation will look consistent and well-proportioned when viewed on various devices , including laptops, projectors, and large displays.

Enhanced readability: Larger slides provide more room for text and images, making it easier for your audience to read and understand your content, even from a distance.
Professional appearance: A carefully chosen slide size demonstrates attention to detail and a commitment to delivering a high-quality presentation. It can also help you stand out as a professional and competent presenter.
Now that you understand the importance of choosing the right slide size for your presentation, let’s review the steps you can take to adjust it in your own PowerPoint presentations.

Final Thoughts
Learning how to adjust the slide size in PowerPoint can significantly enhance the quality of your presentations. By understanding the various options available and making the right choice, you can ensure that your content is well-organized, visually appealing, and consistent across different devices and screens.
So, whether you need a standard 4:3 aspect ratio or a widescreen 16:9 format, PowerPoint makes it easy to customize the slide size to meet your specific needs.
Furthermore, this flexibility allows you to create professional and polished presentations that leave a lasting impression on your audience.

So, the next time you start working on a presentation, remember the importance of slide size and use the knowledge you’ve gained here to make the right choice. Happy presenting!
If you want to learn more about using Powerpoint to enhance the visuals of your data analysis, check out our video below:
Frequently Asked Questions
How can i change the slide size in my powerpoint presentation to a4.
To change the slide size to A4, follow these steps:
In the “Customize” group, click “Slide Size” and then “Custom Slide Size.”
In the “Slide Size” dialog box, select “A4 Paper” from the “Slides sized for” dropdown menu.
Click “OK” to apply the A4 slide size.
What is the standard slide size in PowerPoint?
The standard slide size in your presentation is 10 inches by 7.5 inches, which is a 4:3 aspect ratio. However, with newer versions of PowerPoint, the default slide size is 13.333 inches by 7.5 inches, also a 4:3 aspect ratio.
How do I set custom dimensions for my PowerPoint slides?
To set custom slide dimensions for your PowerPoint slides, follow these steps:
In the “Slide Size” dialog box, enter your desired width and height in the “Width” and “Height” boxes.
Click “OK” to apply the custom slide size.
Repeat steps 1-4 for all the slides or selected slides only. You can then proceed to number slides or otherwise improve your slides.
What is the widescreen size in PowerPoint?
The widescreen size in PowerPoint is a 16:9 aspect ratio. This translates to a slide size of 13.333 inches by 7.5 inches in PowerPoint 2013 and later versions, and 10 inches by 5.625 inches in PowerPoint 2010 and earlier versions.
How do I change the slide size in PowerPoint to 16:9?
To change the slide size in your presentation to 16:9, follow these steps:
In the “Customize” group, click “Slide Size” and then “Widescreen (16:9).”
How do I adjust the aspect ratio of PowerPoint slides?
To adjust the aspect ratio of PowerPoint slides, follow these steps:
In the “Slide Size” dialog box, select your desired aspect ratio from the “Slides sized for” dropdown menu.
Click “OK” to apply the new aspect ratio.

Related Posts

How to Cite Pictures in PowerPoint: Step-by-Step Guide
When creating presentations, one of the most important aspects is to properly credit the sources of any...

How to Make a Picture Transparent in PowerPoint
In today’s digital age, creating professional presentations is an essential skill. And when it comes to...

How to Wrap Text in PowerPoint Text Box: 2 Quick Ways
One of the essential tools for managing text in PowerPoint is the text box. With the help of a text...

How to Make a Logo Transparent in PowerPoint: Quick Guide
A transparent logo can be a powerful tool in your branding arsenal. It allows your logo to seamlessly...

How to Add a Table of Contents in PowerPoint: User Guide
Want to add a table of contents in PowerPoint?Good. You're in the right place. To add a table of...

How to Create a Word Cloud in PowerPoint in 6 Simple Steps
Visual representations like word clouds are a great way to convey your content's key ideas and themes...

Superscript in PowerPoint + Subscript Explained
Are you struggling to effectively communicate chemical equations and mathematical formulas in your...

How To Insert a PDF into PowerPoint: 3 Quick Ways
Frustrated by the struggle to maintain formatting? How can you ensure that your beautifully designed...

How to Add Notes to PowerPoint in 4 Simple Steps
Have you ever found yourself struggling to remember key important points during a PowerPoint...


A better way to change your slide sizes in PowerPoint without breaking it.
- October 6, 2021
- Tips and Ticks
An easy way to change slide sizes in PowerPoint presentations to 4:3 (Standard) or 16:9 (Widescreen) formats without breaking your theme and template or stretching your logos and images.

As with most things related to technology, there is more than one way to skin the cat – or in our case to resize PowerPoint presentations. We are going to discuss both the standard way ( as well as why we don’t recommend it ) and the right way, using our FREE PowerPoint resizing tool.
If you ever changed a presentation to Standard or Widescreen sizes in PowerPoint and thought you would likely agree that the outcome was unpredictable and undesirable.
TLDR: If you want to skip the details and go straight to the instructions on how to use our FREE PowerPoint presentation resizing tool to change slide sizes without breaking your slide content then Click Here .
Why the standard solution does not work:
In short, the standard way to resize your PowerPoint changes and breaks your fonts . Using the PowerPoint resize tool also stretches images , graphics, and logos on your slide and Slide Master Layouts.
The best way to explain what is wrong with this method – is to show you. With your presentation open go to the Design Ribbon and click on the Slide Size drop-down menu and select either the Standard(4:3) or Widescreen(16:9) aspect ratios.
You can pick either ‘Maximize’ – which will cause your content to flow over the edges of the screen or ‘Ensure Fit’ which will create empty gaps on either side of your presentation.
Whichever of the two options you select the result is not going to be what you want. Your slide content probably looks broken, logos might be stretched, the theme’s font has changed to Calibri, your corporate colors might have disappeared and your Master Layout’s placeholders are resized disproportionally.

METHOD 1: The standard way, how to change PowerPoint Slide Sizes in Windows 10 or Mac:
Part 1: before you change your powerpoint slide size.
Step 1: Make sure your presentation is in its original working format.
Step 2: Save your Theme color scheme.
1) Click on the View Ribbon, 2) then the Slide Master button

3) Click on the Colors drop-down menu and then on the 4) Customize Colors… button at the bottom of the list.

At the bottom of the Colors dialog box give your color scheme a name in the Name field – and call it whatever you want but remember the name because we are going to use that after we resize our template. Click on Save.

Step 3: Save your Theme fonts
1) While still on the Slide Master Ribbon click on the Fonts drop-down menu and then on the Customize Fonts… button at the bottom of the list.

2) In the Name field give your Theme Fonts a name that you will use and click on the Save button. 3) Close the Slide Master Ribbon by clicking on the “Close Master View” button.

Part 2: After you change your slide size
Step 4: Resize your PowerPoint presentation
After you close the Slide Master Ribbon the Design Ribbon should be visible again. Click on the Slide Size drop-down menu and select either the Standard(4:3) or Widescreen(16:9) aspect ratios and select the ‘Ensure Fit’ option ( it is easier to move items around than to also have to resize them especially when converting to a larger slide size ).

Step 5: Reselect your Theme color and Theme font
With the Design Ribbon still active click the Variants drop-down menu, then color and select the Color Theme you saved earlier, and then do the same for your fonts.

Step 6a: Fix stretched images – Method 1
Here is a quick hack to fix stretched graphics and images.
1) Right-Click on the stretched image and select “Size and Position” to open the Size and Position Task Pane. You will notice the Scale Height and the Scale Width are different, for example; Scale Height might be 99% and Scale Width might be 74%.
2) All you need to do to fix your image is press the up or down arrow on either the Width or Height and voila, your image is no longer stretched. If that doesn’t work then make sure Lock Aspect Ratio is checked.

Step 6b: Fix stretched images – Method 2
Another way to resize your images is to reset your images. To do this you simply select your image and then from the Picture Format Ribbon select the Reset Picture drop-down menu and select Reset Picture & Size button.

Step 7: Move placeholders, content, and images into their new position.
The last thing to do is move items such as placeholders and images around on your presentation to make them fit better.
METHOD 2: The better way, to change your slide dimensions:
Step 1: Go to our FREE resize tool Go to our FREE PowerPoint resize tool and Upload your PowerPoint file: www.knockoutprezo.com/resize-powerpoint
Step 2: Select a file location and select your PowerPoint document
Step3: Select whether you want to resize to Standard or Widescreen sizes. Once you make your selection the file will upload, convert the PPTX and then then the download will start automatically.
- PowerPoint won’t stretch your images and graphics
- No more missing colors
- Your theme fonts stay as it was ( Header and Body fonts )
- Your layouts stay in their original location which is a lot more predictable and easier to work with.

Step 3: Move placeholders, content, and images into their new position.
More PowerPoint Fixes
If you are interested, we also have two other PowerPoint Fixing tools, they are:
- Replace and fix my PowerPoint fonts – ( Find Out More )
- Change and fix my PowerPoint authoring language across all slides and Master Layouts – ( Find out more )

The DinoFire Wireless Presentation Pointer is top of its class
- Built in Volume Control
- Hyperlink Button
- Switch Windows

Want to learn more about typography and why you should use which fonts?
A clear and focused guidance on how letters, words, and paragraphs should be aligned, spaced, ordered, and shaped.
Full Disclosure: As an Amazon Associate, Knockout Prezo earns from qualifying Amazon purchases.

Just My Type (Audiobook)
A delightfully inquisitive tour that explores the rich history and the subtle powers of fonts.
Full Disclosure: As an Amazon Associate, Knockout Prezo earns from qualifying Amazon purchases.
2 Responses
Unfortunately, the resizing tool did not work for my use case. It simply overlayed a different slide deck formatting, but didn’t change any configurations, which made the deck useless. I like the thought for this tool though, as reformatting slides is a huge pain and time drain.
Do you mind me asking about your feedback about our resize tool. I didn’t quite understand your feedback.
Essentially what the tool does is that it resizes the deck without breaking, stretching etc the presentation assets, HOWEVER the user still needs to adjust the elements of the presentation. Did you go from 16×9 to standard or the other way around? There isn’t a way for the software to tell if you want an element aligning to the left, middle or right of the slide for example.
Leave a Reply Cancel reply
Your email address will not be published. Required fields are marked *
Save my name, email, and website in this browser for the next time I comment.
What our clients have to say
© Copyright Knockout Productions (Pty) Ltd 2019 – 2023
How to change slide size in PowerPoint
Optimize your PowerPoint presentation: Learn how to easily change slide size for a polished display
Sanskar Tiwari
Step 1: Open your PowerPoint presentation

Step 2: Navigate to the "Design" tab

Step 3: Select "Slide Size"

Step 4: Choose a predefined size or customize

Step 5: Confirm your selection

Conclusion:
Frequently asked questions:, will changing slide size affect the content layout of my presentation, can i revert to the original slide size after making changes, will changing slide size affect the quality of images and graphics, are there standard slide sizes recommended for specific presentation formats, related blogs, how to turn powerpoint into notes, how to mirror an image in powerpoint, how to change slide layout in powerpoint, how to unlock powerpoint from editing, how to add a footnote in powerpoint, how to convert canva to powerpoint, how to change the page color or add a background in google docs, how to undo and redo actions in google docs, how to change the font style and size in google docs, stunning presentations in seconds with ai.
Install MagicSlides app now and start creating beautiful presentations. It's free!

~1M Installs, rated 4.5/5 ⭐️ by 424 reviews
How to Change Slide Size in PowerPoint?

Table of Contents
Sometimes, when you often create presentations, you might find yourself in a situation where you need to prepare your slides on one device but present them on another. This can cause your slides to look different depending on the device.
It’s a good idea to learn how to adjust the slide size or aspect ratio in PowerPoint to avoid any issues during your presentation. You’ve put in a lot of effort into your project, from researching to practicing your speech, so it’s frustrating to encounter problems like mismatched slide sizes that could have easily been avoided.
Understanding PowerPoint Slide Dimensions
When you’re putting together a presentation in PowerPoint, one of the main things to think about is picking the right slide dimensions. These dimensions matter because they affect how your content looks on different screens and devices. Let’s talk about the standard aspect ratios.
1. Modern Widescreen (16:9 & 16:10): These are the most popular choices for presentations today. Selecting a 16:9 or 16:10 aspect ratio ensures your slides will fit perfectly on most modern projectors and screens, making them ideal for contemporary presentations.
2. Standard Format (4:3): This traditional aspect ratio might still be relevant for presentations intended for older projectors or screens that are better suited to a square format. Choosing 4:3 can prevent your slides from appearing stretched or distorted on such devices, ensuring your content remains clear and well-organized.
3. Custom Orientation: For situations where standard options don’t meet your specific needs, PowerPoint offers the flexibility of custom orientation. This feature allows you to tailor the slide size to create unique dimensions that perfectly match your unique scenario.
How to Change the Size of a PPT Slide?
Having the right size for your presentation can make all the difference. Luckily, PowerPoint makes it easy to adjust your slides to fit any screen perfectly. Here’s a straightforward guide to resizing your slides:
Step 1: Finding the Design Tab
First, open your presentation and locate the Design tab on the ribbon at the top of the window. This tab holds all the tools you need to customize the look of your slides, including their size.
Step 2: Choosing Your Slide Size
On the Design tab, find the button labeled Slide Size . Clicking this button will open a menu with different size options for your slides:
- Standard (4:3): This is a traditional layout that works well with older projectors and screens.
- Widescreen (16:9): This is the default and most popular option, perfect for modern displays and projectors.
- Widescreen (16:10): This is another widescreen option (used in MacBooks) with a slightly different aspect ratio, also suitable for modern screens.
- Custom Slide Size: If you have specific size requirements, choose this option. It will open a separate window where you can enter your desired width and height for the slides. Click OK to confirm.
Step 3: Adjusting Your Content
Once you change the slide size, PowerPoint might ask you how you want to handle your existing content. This ensures everything fits well within the new dimensions. You’ll typically have two options:
- Maximize: This option enlarges your content to fill the new size, which is useful if you’re switching to a larger slide format.
- Ensure Fit: This option shrinks your content to make sure everything fits on the new slides, ideal for reducing slide size without losing information.
Important Note: PowerPoint doesn’t allow resizing individual slides within a presentation. All slides will have the same dimensions.
Closing Thoughts
Taking a few minutes to adjust your PowerPoint slide size can prevent major headaches down the road. By understanding the common aspect ratios and following these simple steps, you can ensure your presentation looks its best on any screen, leaving a lasting impression on your audience.
Frequently Asked Questions
Can i change the orientation of individual slides.
No, PowerPoint currently doesn’t allow changing the orientation of individual slides within the same presentation.
What happens to my existing content when I change the slide size?
PowerPoint will attempt to scale your content to fit the new size. However, you might need to adjust the layout, text boxes, and images to ensure everything displays correctly.
How do I avoid pixelation when resizing images in PowerPoint?
To avoid pixelation, use high-resolution images, hold Ctrl while resizing to maintain proportions, choose High fidelity image quality (be mindful of file size), or crop the image instead of resizing. For advanced editing, consider using dedicated photo editing software before inserting the image.
What are some things to consider before changing the slide size?
- Compatibility : Ensure your chosen size is compatible with your presentation equipment (projector, screen).
- Content scaling : Consider how well your existing content adapts to the new size without distortion.
- Audience viewing : Choose a size that allows for clear and comfortable viewing for your audience.
Save Time and Effortlessly Create Presentations with SlidesAI

How-To Geek
How to resize powerpoint templates.
Resize your PowerPoint template and save the settings for future use.
Quick Links
Resizing powerpoint templates.
By default, PowerPoint slides use a widescreen format in a 16:9 ratio. If you’d like to change it to the standard format (4:3 ratio), or even create a custom size, PowerPoint provides a quick and painless way to make this happen.
Resizing the slides in PowerPoint will affect the way they appear during the actual presentation and how they appear on the handouts. Go ahead and open up the presentation that we will be resizing and select the “Design” tab.
Next, click the “Slide Size” button.
A menu will appear, allowing you to choose between the “Standard” format (4:3) or the “Widescreen” format (16:9). If you're switching over to the standard format without any other changes, you can select it from the menu, and the changes will take effect. If you want to do a little custom tweaking to tailor the size to your specific needs, then select “Custom Slide Size.”
In the Slide Size window that appears, clicking the box under “Slides sized for” (1) will open a menu with several different options. Choose the one that best matches your needs. Alternatively, you can customize the dimensions of the slides by entering the slide size in the “Width” and “Height” boxes (2). Finally, you can choose the orientation of your slides and handouts by selecting “Portrait” or “Landscape” (4) in the respective section.
Once you’re happy with your setup, click “OK.”
If this is the size you’d like to use for future presentations, then save this theme and select it for your next presentation. Back on the “Design” tab, select the “more” arrow, which you can find at the bottom-right of the “Themes” group.
At the bottom of the menu that appears, select “Save Current Theme.”
Windows Explorer will now appear, prompting you to name and save your theme. Go ahead and rename it, but don’t change the location where it will be saved. Themes saved to this default location are available with a click of your mouse button on PowerPoint's splash screen. Once finished, click “Save.”
Let’s make sure it saved. Go ahead and close out of your current PowerPoint presentation and reopen PowerPoint---this time as a blank presentation. Select “New” in the left pane.
Near the top of the window, select “Custom.”
If saved properly, your theme will appear here.
Selecting your custom theme will open a new presentation with all of your settings saved.
Compress PowerPoint Files
Compress PowerPoint files online for free. Reduce file size of PPT/PPTX/PPTM documents, select the PPT file and click the upload button.
NEW TOOL Free Instagram Video Resizer
Do you like this website? Share it!
Encrypted Connection
Our website uses a secure HTTPS (SSL) connection so you can securely upload your files.
Compress Unlimited Files
Compress as many files you need, there are no limitations on how many files you can compress.
Works via Web Browser
Works on any platform that has a web browser, including Windows, Mac, Linux, iOS, Android.
No Software Installation
You don't need to install any additional software on your computer, our service is 100% cloud-based.
Uploaded Files Are Deleted
All uploaded and compressed files are automatically removed from our servers after a few hours.
Quality is Preserved
We do our best to reduce file size without quality loss and without reducing visual quality.
No Watermark Added
We guarantee you that we don't add any kind of watermark on files compressed with our service.
100% Free for Anyone
You can use our online file compressor for free, please share our website with your friends.
Search for: Search Button
- Share a link to a specific PowerPoint slide
There’s a way to link someone to view a specific slide in a PowerPoint presentaion which is a lot faster than hunting through a big slide deck.
Requirements
Link to this slide, check the share permissions, sharing settings, edit / view only / no download, or there’s another way ….
Providing a direct link to a specific part of your slideshow not only streamlines the process of receiving feedback but also enables them to locate the content you want them to review more efficiently.
PowerPoint simplifies the process with its “Link to This Slide” feature, generating a direct link that opens the file at the specific slide in your presentation.
The presentation has to be saved in cloud storage that the receiver/s can also access it. If the presentation isn’t already saved online, modern Office will help you do that.
Launch PowerPoint presentation stored on your local drive. Next, navigate to the specific slide you wish to share. Then, right-click on the desired slide and a shortcut menu pops up. From this menu, select the option “Link To This Slide” to generate a direct link to the chosen slide within your presentation.

Selecting “Share Link To This Slide,” will prompt you to upload your presentation to OneDrive to allow sharing.

Office just dumps the file into your OneDrive account, you’ll probably want to choose a specific folder instead.
Once the presentation is saved in a cloud location, you can share it or a slide. Do that from PowerPoint on the web or modern PowerPoint for Windows/Mac. Click on the slide in the slide navigator and select the “Link To This Slide” option.

The system generates a direct link that is ready to be shared but before you copy , check what permissions you’re giving to access the presentation and to whom.
Under the link is a short note to indicate the sharing settings for the current link. Click on Settings to change or verify the sharing. Or select the copy option, and you’ll receive a notification confirming that the link has been copied.

For more specific access privileges, go to the Settings option to customize permissions for reviewers or audience. You can choose with whom you want to share your files. This typically involves setting access permissions or sharing settings with user or user groups.
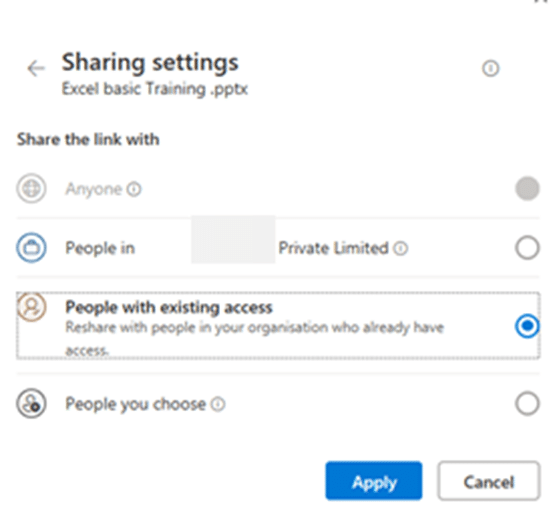
The sharing settings can include any of the following options, depending on the type of account (personal, business etc).
“Anyone With The Link Can Edit.” – permits anyone with access to the link to edit the slide’s content. This functionality facilitates effective collaboration and sharing among teams or groups. Opting for this setting grants editing privileges to anyone possessing the link.
“People in the Organization – accessible by the organization with the privileges to access the link.
“People you choose – selectively available.
Customize the access privileges more from the More Settings option, where you can define specific permissions, such as editing, viewing, and downloading for reviewers or audience.
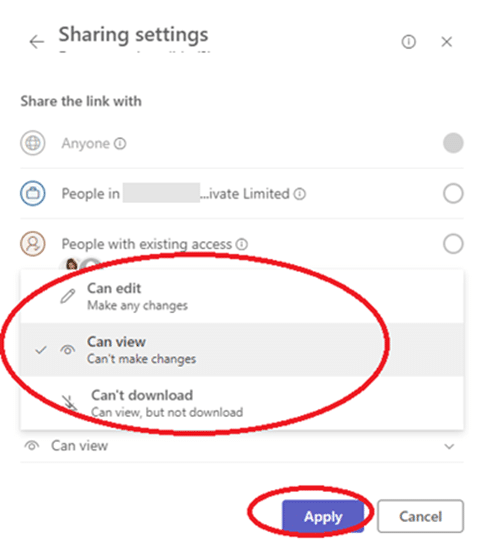
Finalize the process by clicking on the “Apply” button ensuring that the changes take effect according to your preferences.
Once you’ve configured the access privileges and applied the changes, you can proceed to share the link via email to the intended audience. Simply copy the link generated by the sharing feature and paste it into your email or other message.

At risk of stating the obvious, there’s another way to share a single slide with ‘read only’ access.

Take a screen shot of the slide and paste it into an email or message.
Using Designer for more eye-catching PowerPoint slides PowerPoint Cameo puts your video selfie into a slide Reuse slides in PowerPoint, the good and the annoying
About this author

Mayurakshi Mohapatra
Office 2021 - all you need to know . Facts & prices for the new Microsoft Office. Do you need it? Office LTSC is the enterprise licence version of Office 2021.
Office 2024 what's known so far plus educated guesses. Microsoft Office upcoming support end date checklist.
Latest from Office Watch
- Coin 🪙 emoji in Word, Excel, PowerPoint and Outlook
- Translate automatic or manual in Outlook
- Microsoft Mesh makes “magical” online meetings
- Why are Teams and Office divorcing?
- Pivotby – Excel’s new faster PivotTables
- More Excel on the web improvements
- All about editing an incoming Outlook message
- What “Update License” means on Microsoft 365 menus
- Excel’s warning about dates and centuries
- Write Excel formulas fast with free Copilot
- Easter images and icons in Microsoft Office
- Credit Card 💳 symbol in Word, Excel, PowerPoint and Outlook
- Yes, there will be a new version of Microsoft Office
- All about Office 2024 for Windows and Mac (so far)
- In person vs virtual event option coming to Outlook
- Checklists now in Microsoft Word
- Start Grouping in Excel for better looking sheets
- Three more Word features reach the web version
- Web link previews in Word for web

Google Slides: How to create curved text in your presentation
Google Slides offers formatting options to tweak text, photos, videos, and other elements in a presentation. However, it lacks a few important add-ons. For instance, unlike PowerPoint, there isn't a built-in way to curve text in Google Slides. If you want to make your presentation stand out among the rest, use the tricks below to curve text in Google Slides.
Adding curved text is a neat way to elevate your presentation. Still, don't go overboard with curve text in Google Slides. It may create unnecessary distractions and make it hard for your audience to read a slide. Instead, highlight a few headings or text you want to separate from the other paragraphs.
Although Google Slides is available on mobile platforms like iPhone and Android phones , we focus on the web version in the steps below.
Curve text in Google Slides using PowerPoint
There are a couple of ways to curve text in Google Slides. If you have a Microsoft 365 subscription plan, use the PowerPoint desktop app to curve text and copy it into Google Slides. In another trick, you can use a web tool like Canva or InkPx to get the job done. Let's start with PowerPoint.
- Open Microsoft PowerPoint on Windows or Mac.
- Create a new presentation and go to any slide.
- Select Insert at the top and click Text box .
- Resize a text box and enter the text you want to add in Google Slides.
- Expand the text effects icon and click Transform .
- PowerPoint offers several curved text effects. Pick the one you prefer.
- Check your curved text in action. Drag the white dots around the text box to resize it.
- When you're satisfied with the text format, right-click it and select Copy . If you select and copy text, it is pasted as plain text in Google Slides. Copy the entire text box.
- Open a presentation in Google Slides and select a slide where you want to add curve text.
- Right-click the slide and select Paste .
PowerPoint offers dozens of curved text styles. You'll have no trouble finding a style that matches your presentation tone and theme.
How to delete a text box in Google Slides
Use an online tool to curve text in google slides.
PowerPoint requires a paid Microsoft 365 plan. If you don't have a subscription, use the tools below to generate and upload curved text in Google Slides.
Curve text using Canva
Canva is one of the best graphic design tools available. The web app offers several editing tools to create curved text in a design. You can download the image with a transparent background and upload it to Google Slides. Follow the steps below.
- Launch Canva on the web, sign in with your account details, and create a design.
- Select Text from the sidebar and search for curved .
- Pick a curved text style that you want to use. Double-click it to edit the text.
- Use the top menu to tweak text style, color, size, and more.
- When you're done with the changes, click Share at the top and select Download .
- Pick PNG and click the checkmark beside Transparent background . Select Download .
- Open a slide in Google Slides. Click Insert at the top, expand Image , and select Upload from computer .
- Upload your downloaded image and check your curved text in action.
The ability to download an image with a transparent background requires a Canva Pro subscription.
How to add transparency to an image in Google Slides
Curve text using inkpx.
InkPx is a web tool for creating curved text. You can make one and upload it on Google Slides.
- Visit InkPx .
- Pick a curve text style.
- Enter text and pick a color, style, and size. Then, tweak the radius, spacing, and other details.
- Check the preview at the top. Click Download .
- Pick a PNG or JPG image type and save the image.
- Launch a presentation in Google Slides.
- Click Insert , expand Image , and select Upload from computer .
- Select your image and open it in Google Slides.
- Google Slides uploads the image. You can resize it and place it in a relevant position.
Unlike Microsoft PowerPoint and Canva, InkPx is free to download and use. And unlike other web tools, you don't need to create an account to use the service.
Make your presentation stand out
Aside from curve text, there are other ways to make an interesting pitch. However, creating an engaging presentation from scratch can be time-consuming. Check the top Google Slides templates to get started and complete an applaud-worthy presentation in no time.

Android Police
How to add bullet points to a google slides presentation.
Present your slide in an organized manner with bullet points
Google Slides is a feature-packed PowerPoint alternative. The free tool comes with style and formatting add-ons to elevate your presentation in no time. One such option is the ability to insert bullet points to simplify content on your slide. Whether you use Google Slides on the web, an iPhone, an iPad, or an Android phone , here's how to add bullet points to your presentation.
How to add bullet points to Google Slides for the web
We'll start with Google Slides for the web and then move to mobile and tablet apps to add bullet points. Since it's the web version, you can access it from a desktop browser on your Windows PC, Mac, or Chromebook.
1. Visit Google Slides on the web and open a presentation you want to edit.
2. Go to a slide and select the content to convert to a bullet list.
3. Select the Bulleted list icon at the top. You can also use Command + Shift + 8 (Mac) or Ctrl + Shift + 8 (Windows) to add a bullet list.
4. When you enter a bullet list on an empty slide, look for the first bullet point on the text field. Press Enter to add a second item to the list.
5. You can create a mini list beneath the main bullet point. This is an effective way to organize the listicle. To do so, press Enter on the main bullet point (or Return on Mac) and press Tab .
6. Add relevant points and press Enter to expand the secondary bullet list.
Change the bullet point color
By default, Google Slides uses black for bullet points. If it doesn't match your presentation theme, use the steps below to change it.
1. Launch a presentation in Google Slides.
2. Click any bullet point to select the entire list.
3. Click A at the top and change the bullet point color. You can use the same trick to change the bullet point color for the secondary list.
Change the bullet point style in Google Slides
Do the rounded-style bullet points feel repetitive? Use the tricks below to explore and add different bullet point styles for your presentation.
1. Open any slide and select the bullet points.
2. Click Format at the top. Expand Bullets and numbering .
3. Expand List options and select More bullets .
4. In the Insert special characters menu, pick a symbol from different categories, search by keyword, or draw one.
5. Select a relevant symbol and check the live changes.
What's the difference between Google Slides templates and themes?
Add bullet points in google slides for android.
Google also offers a robust Slides app on mobile platforms. It's helpful for making little tweaks on the go.
We use Google Slides for Android in the screenshots below. You can follow the same on Android tablets.
1. Launch Google Slides on your phone and select a presentation. Tap the slide you want to edit.
2. Select Edit slide
3. Tap any text area and select bullet list from the bottom menu.
4. Type your text and tap Enter to expand the list.
Use bullet points in Google Slides for iPhone and iPad
If you use Google Slides on an iPhone or iPad, use the steps below to add bullet points to it. Let's take the iPad as an example.
1. Open Google Slides and select a presentation.
2. Tap a slide and select Edit slide .
3. Select any text area and tap the Bulleted list icon at the top.
4. Tap Return to continue adding items to the list.
5. Tap Return and tap the indent icon next to the bullet point to add a bullet point within a bullet point list.
6. Tap the checkmark in the upper-left corner and you're set to deliver your presentation.
Does Google Slides bullet points work with PowerPoint?
Do you plan to open your Google Slides presentation in Microsoft PowerPoint? Your added bullet points show up exactly as they do on Microsoft's software. There won't be any formatting issues.
Make your presentation crisp and clear
Organizing relevant slide content in easy-to-understand bullet points leaves a positive impression on your audience. While you are at it, turn on autoplay to deliver your presentation effortlessly . If you want inspiration to get started with your upcoming presentation, check our dedicated Google Slides templates list for work, school, and home.
Microsoft Power BI Blog
Power bi april 2024 feature summary.

Welcome to the April 2024 update! Here are a few, select highlights of the many we have for Power BI. There are new updates for line enhancements, supporting folders in workspace, dynamic subscriptions for Power BI and paginated reports.
There is more to explore, please continue to read on.
Fabric Conference Day 1 Keynote is now available!
Did you miss it, or want to hear it again? We are excited to release the FabCon Day 1 Keynote to the Microsoft Fabric YouTube Channel !
If you aren’t already, be sure to subscribe to the Microsoft Fabric Channel! Check out the amazing announcements & demos from Arun, Amir, Wangui, and other awesome presenters. The Day 3 keynotes will be released later this month, and more content will be released regularly moving forward.
Make sure you check out the blog post from Arun, that highlights the announcements from FabCon you can find that here: Announcements from the Microsoft Fabric Community Conference
Earn a free Microsoft Fabric certification exam!
We are thrilled to announce the general availability of Exam DP-600 , which leads to the Microsoft Certified: Fabric Analytics Engineer Associate certification.
Microsoft Fabric’s common analytics platform is built on the instantly familiar Power BI experience , making your transition to Fabric Analytics Engineer easier. With Fabric, you can build on your prior knowledge – whether that is Power BI, SQL, or Python – and master how to enrich data for analytics in the era of AI.
To help you learn quickly and get certified, we created the Fabric Career Hub. We have curated the best free on-demand and live training, exam crams, practice tests and more .
And because the best way to learn is live, we will have free live learning sessions led by the best Microsoft Fabric experts from Apr 16 to May 8, in English and Spanish. Register now at the Learn Together page.
Also, become eligible for a free certification exam by completing the Fabric AI Skills Challenge. But hurry, the challenge only runs from March 19 – April 19 and free certs are first-come, first-served! (limit one per participant, terms and conditions apply).

- Version number: v: 2.128.751.0
- Date published: 4/8/24
- New Visual – 100% Stacked Area Chart
- Line enhancements
- Enhance Q&A with Copilot-generated Linguistic Relationships
Storytelling in PowerPoint – Improved image mode in the Power BI add-in for PowerPoint
Storytelling in powerpoint – continuous slide show auto refresh, storytelling in powerpoint – auto populating the slide title.
- Introducing the Fabric metadata scanning sample app
- Dynamic Subscriptions for Power BI and paginated reports
Supporting Folders in workspace
New “clear barcode” action in the report footer, open power bi items in full screen mode.
- New Visuals in AppSourceKPI MatrixGrowth Rate Chart by DJEENI v1.4Aimplan Comment Visual
Financial Reporting Matrix by Profitbase
Horizon chart by powerviz, drill down scatter pro by zoomcharts, image gallery, horizontal bar chart, multi-pane card 1.1.
New Visual – 100% Stacked Area Chart
Introducing the new 100% Stacked Area Chart, now available in our core visuals gallery. These visuals display the relative percentage of multiple data series in stacked areas, where the total always equals 100%. It’s perfect for showing the proportion of individual series to the whole and how they change over time. Find it in the visual gallery, on-object dialog, or format pane, right next to the Stacked Area Chart. Give it a try and share your feedback with us!
Line enhancements
Take your line charts to the next level with our new line control features.
- Adjust line color transparency under Lines > Colors > Transparency.
- Control the color and transparency of each series by selecting them in the ‘Apply settings to’ dropdown.
- Use Monotone and the new Cardinal smooth type for full control of smooth lines.
- Choose from before, center, and after step lines to align your visual with your story.
Try out these new features and enhance your line charts.

Enhance Q&A with Copilot-generated Linguistic Relationships
Improving your linguistic schema is an important step in making sure that the Q&A visual can understand the wide range of questions people might ask about their data. This is why, back in September , we added a new section into the Q&A setup menu to help you add linguistic relationships to teach Q&A about words which qualify or relate your data.
But we also know that coming up with all the different words people might be using to refer to your data can take time and effort, and we’ve been working on ways to make that process easier for you! In November , we introduced a way for you to quickly generate new synonyms for the names of tables and columns in your model; this month, we’ve introduced the same functionality for linguistic relationships!
When you open a report with a Q&A visual, if you have Copilot enabled and you’ve already added synonyms, you’ll now see a banner prompting you to get relationships with Copilot as well.

Unlike with synonyms, Copilot-generated relationships will not be used to understand natural language inputs until you have approved them, so make sure you accept the ones which work for your model!
Allow Copilot to help interpret Q&A questions.
You can also now use Copilot to improve the Q&A engine’s term recognition when you ask questions! This new feature will trigger when you ask Q&A a question which uses words or phrases which Q&A doesn’t recognize, but which it detects might be referring to data entities like tables or columns. Then, Copilot will also check those unknown words or phrases to see if there is any reasonable match — and, if so, return the answer as a visual as though a suggested synonym had been applied.

This feature is not a replacement for synonyms! In fact, adding synonyms for the entities in your semantic model is even more important to create good matches, as they increase the surface area to check for similarities. It will widen the range of inputs Q&A will recognize, but like a multiplier, it will improve recognition for well-modeled data much better than it will for poorly modeled data.
This feature will be automatically enabled when you choose to get synonyms with Copilot, but you can also turn it on or off manually in the suggestion settings menu in the Synonyms tab in Q&A setup.

We’ve made saving Power BI content as an image simpler and more powerful.
First, we’ve added a new dropdown menu to the add-in’s footer. In that menu, you can choose whether you want to see live data or a snapshot. So now it is much easier to find where to switch between live data and a static image.
Second, for snapshots, you now have two options:
- Public snapshot: Anyone who can view the presentation can view the image.
- Snapshot: Only those who have permission to view the report in Power BI will be able to see the snapshot.
Third, we’ve disabled the default snapshot, so that the slide thumbnail doesn’t show the image by default (this also applies when you copy & paste the slide into an email for example), but only after the add-in is loaded and the required permissions have been checked.
And lastly, we honor this setting also when you open the presentation in PowerPoint for the web. You still cannot change a live view into a snapshot in PowerPoint for the web, but if you or someone else has changed the view to snapshot in the PowerPoint desktop app, this will be respected, and you will see the snapshot also in PowerPoint for the web.
PowerPoint allows you to continuously playback a presentation. This is especially useful when you want to present information in public displays without any human interaction.
If a presentation that is running continuously has slides that include the Power BI add-in, the data in the add-in might become outdated, since the add-in gets the data from Power BI when the slide is loaded, or when the user manually refreshes the data being presented.
With the new automatic refresh in slide show feature, you can set the add-in to automatically pull fresh data from Power BI while the presentation is in slide show mode, ensuring that the presentation will always show the most recent data.

Note that auto refresh only happens in slide show mode and not while you’re editing the presentation.
When you add the Power BI add-in to an empty slide that doesn’t have a title yet, the Power BI add-in is here to help. It offers you suggestions for the slide title based on the content of you add-in. The title can be the report name, the page/visual name, or both. Just select the desired option and hit Add title .
Introducing the Fabric metadata scanning sample app
We’re delighted to announce the availability of the new Fabric metadata scanning app. This sample application builds upon the metadata scanning capabilities of Fabric’s set of Admin REST APIs collectively known as the scanner APIs. This new app can be used as a reference for admins interested in utilizing the Scanner API to catalog and report on all the metadata of their organization’s Fabric items.
The Fabric metadata scanning sample app handles all the steps for calling the scanner API including authentication, parallelism, throttling, and incremental scanning. In addition, it provides a central configuration file which can be easily modified to suit the specific needs of the caller. Currently authentication is supported both by using a service principal and a delegated token.
The app is available as a Microsoft open-source project, and is open for suggestions and improvements here:
https://github.com/microsoft/Fabric-metadata-scanning/
Dynamic Subscriptions for Power BI and paginated reports
We’re pleased to announce that you can now send dynamic per recipient subscriptions to up to 1000 recipients instead of the earlier limit of 50 recipients from the data in the Power BI semantic model. For existing subscriptions, we will automatically send subscriptions up to 1000 recipients if your Power BI semantic model contains that many rows of data. You need to edit the subscription if you don’t want to automatically send subscriptions. Learn more about creating dynamic per recipient subscriptions for Power BI Reports and paginated reports .

This feature will be available in some regions as soon as today, however depending on the geography in which your Power BI tenant is located, it may take up to two weeks to appear.
The Power BI Mobile apps support folders in workspace. So, you can access items that are organized in folders inside of your workspace directly from the mobile app.

Workspace and folders are Fabric entities, which means that you can add items that are not necessarily Power BI items to a workspace. But the Power BI Mobile apps only support a subset of Power BI items. Therefore, only the Power BI item will be accessible when you are browsing the folder content from the app. If a folder contains only non-Power BI items, it will appear empty in the mobile app.
When a field in your model is marked as a barcode, you can use your mobile device camera to scan the barcodes of real objects to filter reports that are built on this model. This feature is extremely useful for retail, where you can scan the barcode on a piece of merchandise to get a report showing data about the item directly in your mobile app (for example, inventory information, product selling data, etc.).
To make it easier and more intuitive to use barcodes and based on feedback we’ve gotten from our users in stores, we’ve added a new button to the report footer that makes it a one-click action to clear any previously scanned barcode from the report’s filter.
Learn more about scanning barcode from the mobile app

We continue to simplify the experience of using the Power BI Mobile apps, always keeping in mind the frontline workers who need quick access to their content. In this monthly update we’ve made it possible to open Power BI items on full screen, so users can view their data at its max.
Opening an item on full screen is supported both for launch items and when using a universal link.
A launch item is a Power BI item (report, page, app, etc.) that the user has selected to automatically open when they open the app. Now, you can also tell the Power BI Mobile app to open this item in full screen mode.
To set a launch item to open in full screen mode, go to Settings > Launch item and enable the Open in full screen toggle.
Using an MDM tool that supports an AppConfig file, mobile device administrators can also configure a launch item to be opened in full screen mode for their users.
You can also add the query parameter? fullscreen =1 to a Power BI item’s link. When you use a link with this parameter on your mobile device, the mobile app will open the item in full screen mode.

Visualizations
New visuals in appsource kpi matrix growth rate chart by djeeni v1.4 aimplan comment visual.
Making financial statements with a proper layout has just become easier with the latest version of the Financial Reporting Matrix.
Users are now able to specify which rows should be classified as cost-rows, which will make it easier to get the conditional formatting of variances correctly:

Selecting a row, and ticking “is cost” will tag the row as cost. This can be used in conditional formatting to make sure that positive variances on expenses are a bad for the result, while a positive variance on an income row is good for the result.
The new version also includes more flexibility in measuring placement and column subtotals.
Measures can be placed either:
- Default (below column headers)
- Above column headers

If you have multiple fields showing on your column headers, you can now decide which of these fields you want a column subtotal for.
This is in addition to the already existing features of the Financial Reporting Matrix:
- Adding custom rows
- Applying company/customer specific themes
- Expand/collapse columns
- Conditionally hide columns
- + much more
Highlighted new features:
- New Format Pane design
- Measure placement – In rows
- Select Column Subtotals
- Row Options
Get the visual from AppSource and find more videos here !
A Horizon Chart is an advanced visual, for time-series data, revealing trends and anomalies. It displays stacked data layers, allowing users to compare multiple categories while maintaining data clarity. Horizon Charts are particularly useful to monitor and analyze complex data over time, making this a valuable visual for data analysis and decision-making.
Key Features:
- Horizon Styles: Choose Natural, Linear, or Step with adjustable scaling.
- Layer: Layer data by range or custom criteria. Display positive and negative values together or separately on top.
- Reference Line : Highlight patterns with X-axis lines and labels.
- Colors: Apply 30+ color palettes and use FX rules for dynamic coloring.
- Ranking: Filter Top/Bottom N values, with “Others”.
- Gridline: Add gridlines to the X and Y axis.
- Custom Tooltip: Add highest, lowest, mean, and median points without additional DAX.
- Themes: Save designs and share seamlessly with JSON files.
Other features included are ranking, annotation, grid view, show condition, and accessibility support.
Business Use Cases: Time-Series Data Comparison, Environmental Monitoring, Anomaly Detection
🔗 Try Horizon Chart for FREE from AppSource
📊 Check out all features of the visual: Demo file
📃 Step-by-step instructions: Documentation
💡 YouTube Video: Video Link
📍 Learn more about visuals: https://powerviz.ai/
✅ Follow Powerviz : https://lnkd.in/gN_9Sa6U

ZoomCharts has just launched the latest addition to their suite of user-friendly custom visuals – Drill Down Scatter PRO . It provides all the features you would expect from a great scatter chart visual, but what sets Scatter PRO apart is the ability to easily drill down . Simply click on a data point and see all the values underneath it.
This way, you can quickly find your answers while also gaining a full understanding of where they come from. Furthermore, the visual’s UI is designed to be smooth and user-friendly for PCs and touch devices , and with cross-chart filtering you can use Scatter PRO to build incredible reports for immersive data exploration.
Main features:
- Drill Down: Create a multi-level hierarchy and drill down with just a click.
- Dynamic formatting : Apply custom marker colors, shapes, or images to each data point directly from data.
- Trendlines: Show a linear or polynomial regression line on the chart.
- Thresholds: Display up to 4 line or area thresholds on each axis.
- Area Shading: Highlight up to 8 custom areas with rectangles or ellipses.
🌐 Learn more about Drill Down Scatter PRO
Documentation | ZoomCharts Website | Follow ZoomCharts on LinkedIn

The Image Gallery is the first visual to be certified by Microsoft that allows for the display of high-quality images and their exportation along with other report content. There is no need to upload images to the Cloud, a CDN, or use any datasets . Simply import your images directly into the visual and share them instantly with your colleagues.
This visual boasts several impressive capabilities:
- Microsoft certification ensures that the visual doesn’t interact with external services , ensuring that your images are securely stored and encrypted within the report, consistent with your report’s sensitivity settings.
- Automatically saves your selected image in preview mode , allowing your colleagues to view the exact image you have highlighted.
- Images can be uploaded or removed exclusively in Edit Mode. Users in View Mode can only view the images.
- The visual is compatible with Power BI’s export functionality to PDF and PowerPoint.

LINK: https://appsource.microsoft.com/en-us/product/power-bi-visuals/pbicraft1694192953706.imagegallery?tab=Overview
A space-saving horizontal bar chart designed with category labels placed inside the bars for clarity
This horizontal bar chart serves as an efficient filter to navigate through your data more effectively, optimizing space by placing the category labels within the bars themselves.
- Adjustable Bar Thickness and Spacing: Offers the flexibility to adjust the thickness of the bars and the spacing between them. This allows for optimal use of space and improves readability, especially when dealing with large datasets.
- Tooltip Details on Hover: Displays detailed information about each category when the user hovers over a bar. This feature provides additional context and insights without cluttering the visual.
- Data-Driven Category Labels: Automatically updates category labels based on the data source. This ensures that the chart remains accurate and up to date, reflecting any changes in the underlying data.
- Support for Hierarchical Data: Allows users to drill down into hierarchical categories within the chart. This functionality enables a more detailed data analysis without leaving the context of the initial visual.
- Export Options: Offers the ability to export the chart as an image or PDF, facilitating easy sharing and reporting outside of Power BI.

Link: https://appsource.microsoft.com/en-us/product/power-bi-visuals/pbicraft1694192953706.horizontalbarchart?tab=Overview
Introducing the “ Trends ” visual for Power BI – your gateway to leveraging Google Trends data for strategic business analysis. This innovative visual tool allows you to compare brand popularity, monitor market trends, and gain insights into consumer search behaviors directly within your Power BI environment.
With Trends visual, you can:
- Analyze the ebb and flow of brand interest over time to identify market opportunities and competitive threats.
- Compare the popularity of products to inform marketing strategies and product development decisions.
- Understand seasonal trends to optimize your marketing campaigns and inventory planning.
Securely integrated and easy to use, “Trends” transforms your Power BI reports into a dynamic analysis tool, offering a comprehensive view of the market landscape. Dive into data-driven decision-making with “Trends” and stay one step ahead in the competitive business environment.

New visual: Multi-pane Card can be used to group and show data in multiple collapsible panes in Power BI reports. It is an alternative to multi-row card visual, but it can combine columns into a few groups and put each group’s data in each pane. It is suitable to show data in detail with a reduced number of report pages.
Screenshot 1 (Show data in 3 groups: Area and Population, GDP and Foreign Exchange Reserves for countries)

Data can be sorted by a specified column and numbers can be converted to a human readable string. You can also set up how many rows that you want to show on the card. Using these features, it will be very easy to show “Top 10 best performing stores” or “Top 10 worst performing stores” for retail businesses.
Screenshot2 (Combined with drilldown choropleth map to show the top 10 richest countries by GDP per capita for each continent and subregion)

You can go to Microsoft AppSource( https://appsource.microsoft.com/en-us/product/power-bi-visuals/mylocsinc1648311649136.tcard )to download and try it.
To learn more on how to use it, please read tutorials ( https://www.mylocs.ca/tutorials.html#multi-pane-card ).
Introducing Copilot pane in Power BI Desktop
Earlier this year, we announced preview of Copilot for all customers with Premium/Fabric capacity in Power BI web . We’re thrilled to share that the same Copilot experience for report creation is now available for preview in Power BI Desktop. With our current preview, users can create reports faster and easier in the Power BI Desktop experience. You can now open the Copilot pane in report view and ask Copilot to:
- Create a report page – Copilot will create an entire report page for you by identifying the tables, fields, measures, and charts that would help you get started.
- Summarize a semantic model – Copilot will help you understand your Power BI semantic model by summarizing the data in your model.
- Suggest a topic – Copilot will suggest topics for your report pages.
Click here to learn more about how to get started.
That is all for this month! Please continue sending us your feedback and do not forget to vote for other features that you would like to see in Power BI! We hope that you enjoy the update! If you installed Power BI Desktop from the Microsoft Store, please leave us a review .
Also, don’t forget to vote on your favorite feature this month on our community website.
As always, keep voting on Ideas to help us determine what to build next. We are looking forward to hearing from you!
- paginated reports
- power bi desktop
- Visualization
IMAGES
VIDEO
COMMENTS
Basic steps. To change the slide size: Select the Design tab of the toolbar ribbon. Select Slide Size near the far right end of the toolbar. Select Standard (4:3 aspect ratio) or Widescreen (16:9) or Custom Slide Size. For more about the predefined sizes (including formats like Overhead, A3, A4, Banner, B4, and B5) or your own custom sizing ...
In the "Customize" section of the "Design" tab, select the "Slide Size" button. This will display the two common slide sizes in a drop-down menu. Click either the "Standard (4:3)" or "Widescreen (16:9)" option to switch all of your PowerPoint slides to that size. Unfortunately, it isn't possible to use multiple slide sizes in a PowerPoint ...
Perhaps one of the bigger pains in PowerPoint is changing your slide size from 4:3 to 16:9 or vice versa. Let's go through the pros and cons of each method. The Fast Way The fastest way to change the slide ratio is to go to the design tab and clicking on slide size. Once you pick […]
That said, you can easily change your slide size to something else. To change your slide size in PowerPoint, simply: Navigate to the Design tab. Open the Slide Size drop down menu. Select 4:3 , 16:9 or Custom Slide Size (see options below) When starting with a blank presentation, you are now good to go.
If you can't see the button, press Customize to reveal it, and then click or tap on Slide Size. This opens a dropdown menu with three available options: Standard (4:3) - click or tap on this option to get slides of 10 x 7.5 inches or 25.4 x 19.05 cm. Widescreen (16:9) - press to get slides of 13.33 x 7.5 inches or 33.867 x 19.05 cm.
To change the slide size in PowerPoint, click on the "Design" tab. Then, click on "Slide Size". From the dropdown, choose "Standard" or "Widescreen". You can also click on "Custom Slide Size" to change the size of the slides in PowerPoint to A3, A4 or a completely custom size. In this article, I will walk you through the ...
How to change slide size in PowerPoint for Mac. 1. Create a new presentation, or launch an existing file. 2. Click "Design" from the top-line row of options. There are a few minor differences ...
To change the aspect ratio in PowerPoint, click Slide Size, which is in the Customize group on the Design tab, and choose the desired aspect ratio for your presentation. As with Google Slides, you can set your own slide size by clicking Custom Slide Size…. When scaling the content, PowerPoint asks you to choose between two different options:
Simply choose options from the Slides sized for drop-down menu in the dialog box (such as A4 paper size) or enter custom dimensions. To change slide size to a custom size: In Normal View, click the Design tab in the Ribbon. Click Slide Size in the Customize group. A drop-down menu appears.
Go to the Design tab. Click Slide Size in the Customize section of the ribbon. Choose Custom Slide Size on Windows or PowerPoint on the web or Page Setup on Mac. Use the Slides sized for a drop ...
Welcome to our comprehensive tutorial on how to change slide size in PowerPoint, designed specifically for beginners. In this step-by-step video guide, we'll...
Learn how to change the default slide sizes or dimensions in PowerPoint so that your presentation looks right on different screens. Here's my entire playlist...
Need to change slide sizes in PPT? In this beginner PowerPoint tutorial, we cover the Page Setup and how to change slide size and orientation in PowerPoint.M...
Open your presentation, click Design in the top menu. Find the Slide Size button and click to see the two sizes. Click the one you want to use. PowerPoint will give you the option to scale content to the new size. Note that when you change slide size, it affects all of the slides in the open file.
To change the size of slides in PowerPoint, click the "Design" tab in the Ribbon. Then click the "Slide Size" drop-down button in the "Customize" button group. To change the slide size aspect ratio, select either "Standard (4:3)" or "Widescreen (16:9)" from the button's drop-down menu.
To change the slide size to A4, follow these steps: Click on the "Design" tab in the Ribbon menu. In the "Customize" group, click "Slide Size" and then "Custom Slide Size.". In the "Slide Size" dialog box, select "A4 Paper" from the "Slides sized for" dropdown menu. Click "OK" to apply the A4 slide size.
Using the PowerPoint resize tool also stretches images, graphics, and logos on your slide and Slide Master Layouts. The best way to explain what is wrong with this method - is to show you. With your presentation open go to the Design Ribbon and click on the Slide Size drop-down menu and select either the Standard(4:3) or Widescreen(16:9 ...
Step 3: Select "Slide Size". Within the "Design" tab, locate the "Slide Size" option on the far right side. Click on it to access the slide size settings.
Step 1: Finding the Design Tab. First, open your presentation and locate the Design tab on the ribbon at the top of the window. This tab holds all the tools you need to customize the look of your slides, including their size. Step 2: Choosing Your Slide Size. On the Design tab, find the button labeled Slide Size.
To change the presentation slide aspect ratio in PowerPoint, click Slide Size, which is in the Customize group on the Design tab, and choose the desired aspect ratio for your presentation. Select the Design tab of the toolbar ribbon. Select Slide Size near the far right end of the toolbar. Select Standard (4:3 aspect ratio) or Widescreen (16:9 ...
In the Slide Size window that appears, clicking the box under "Slides sized for" (1) will open a menu with several different options. Choose the one that best matches your needs. Alternatively, you can customize the dimensions of the slides by entering the slide size in the "Width" and "Height" boxes (2). Finally, you can choose the ...
100% Free for Anyone. You can use our online file compressor for free, please share our website with your friends. Compress PowerPoint files online for free, reduce file size of PPT/PPTX/PPTM documents online, compress Microsoft PowerPoint files online, free PPT compressor. No registration, no watermarks, free to use for anyone.
Next, navigate to the specific slide you wish to share. Then, right-click on the desired slide and a shortcut menu pops up. From this menu, select the option "Link To This Slide" to generate a direct link to the chosen slide within your presentation. Selecting "Share Link To This Slide," will prompt you to upload your presentation to ...
Open Microsoft PowerPoint on Windows or Mac.; Create a new presentation and go to any slide. Select Insert at the top and click Text box.; Resize a text box and enter the text you want to add in ...
3. Select any text area and tap the Bulleted list icon at the top. 4. Tap Return to continue adding items to the list. 5. Tap Return and tap the indent icon next to the bullet point to add a ...
Storytelling in PowerPoint - Auto populating the slide title. When you add the Power BI add-in to an empty slide that doesn't have a title yet, the Power BI add-in is here to help. It offers you suggestions for the slide title based on the content of you add-in. The title can be the report name, the page/visual name, or both.