

How to View Photos as Slideshow on Windows 11
A comprehensive guide to viewing photos as a slideshow on Windows 11 catering to every requirement.

Slideshows are an amusing way to view pictures. Whether it is a collection of your best memories that you might want to showcase at a family gathering or photos of all the exhibits your organization participated in.
Perhaps you wish to play the slide show of your favorite photos as Desktop wallpaper, screensaver, or lock screen. Whatever tickles your pickle, we have discussed all the ways to view photos as a Slideshow in this guide here.
Now there are a couple of ways you can achieve this on your Windows 11 computer using native apps.
1. Set up a Slideshow as Desktop Wallpaper
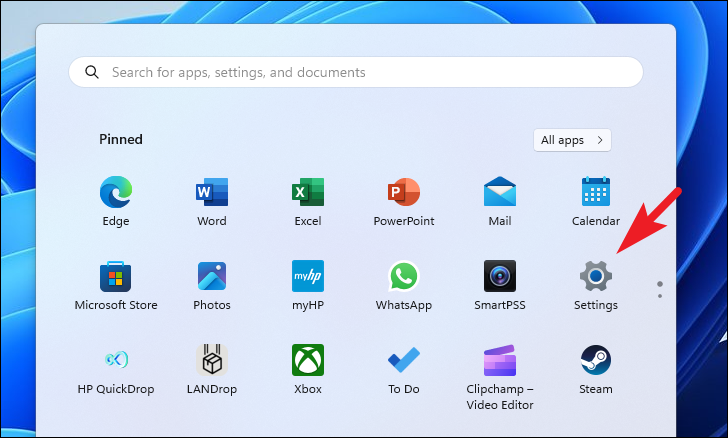
First, head to the Start Menu and click on the 'Settings' tile.
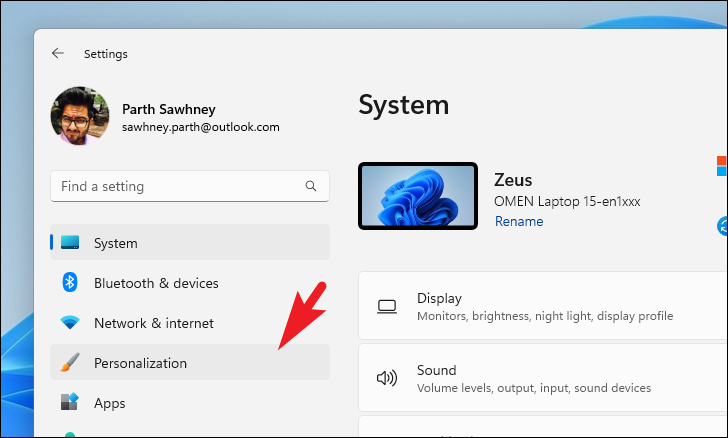
After that, click on the 'Personalization' tab from the left sidebar to proceed.
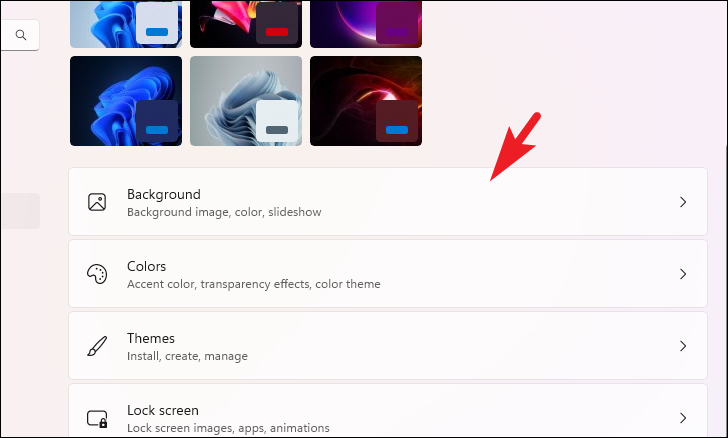
Next, click on the 'Background' tile from the right section of the window to continue.
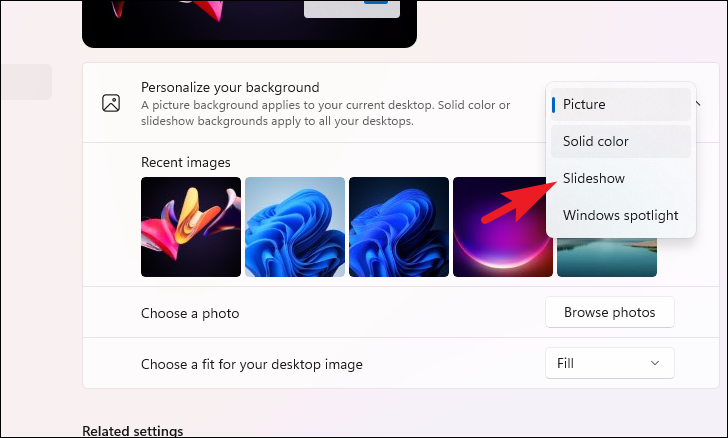
Then, click on the dropdown on the 'Personalize background' tile and select the 'Slideshow' option.
Afterward, click on the 'Browse' button. This will open a File Explorer window on your screen. Locate the folder that comprises the pictures and select it.
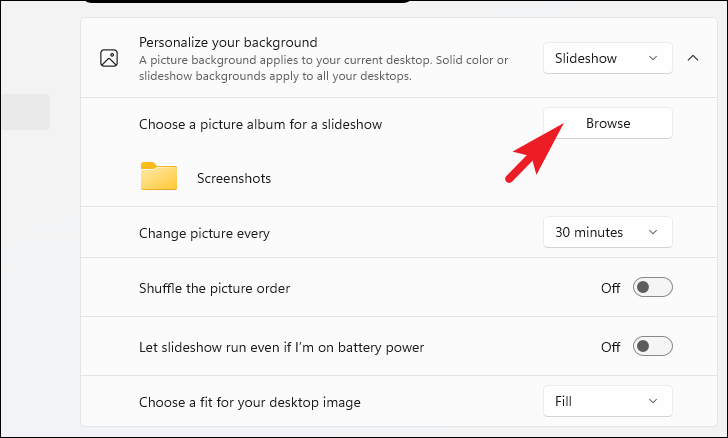
Once you have chosen a folder, select the duration for how frequently the picture should change using the dropdown menu.
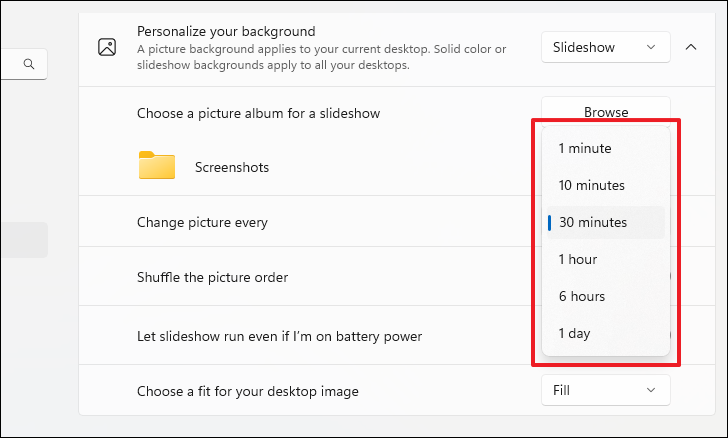
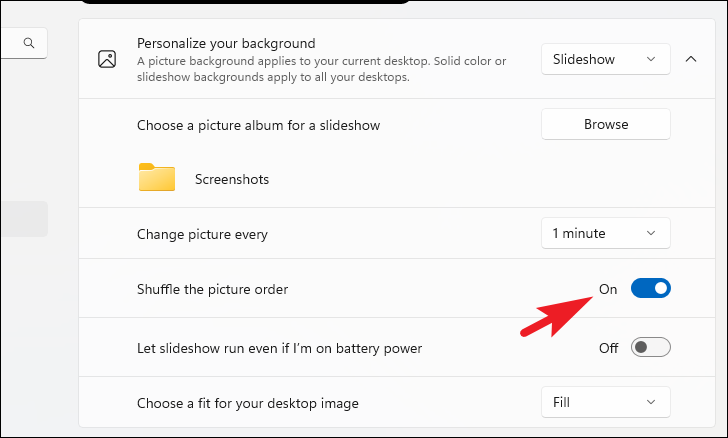
You can also shuffle the picture order by turning on the 'Shuffle the picture order' tile.
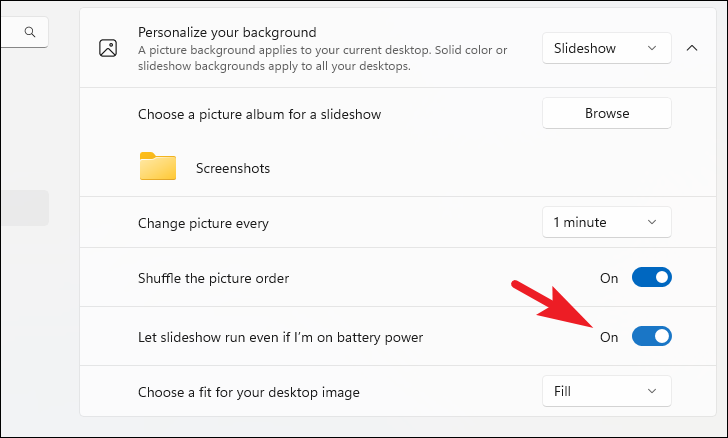
The slideshow will be turned off when you are on battery power by default. To let it run on battery power, turn on the toggle on the respective tile.
2. Set up a Slideshow as Lock Screen
Similar to a Desktop slideshow, you can also set one as the Lock Screen. Again, ensure you have all the pictures under a single folder directory.
First, head to the Settings app from the Start Menu. Then, click on the 'Personalization' tab from the left sidebar.
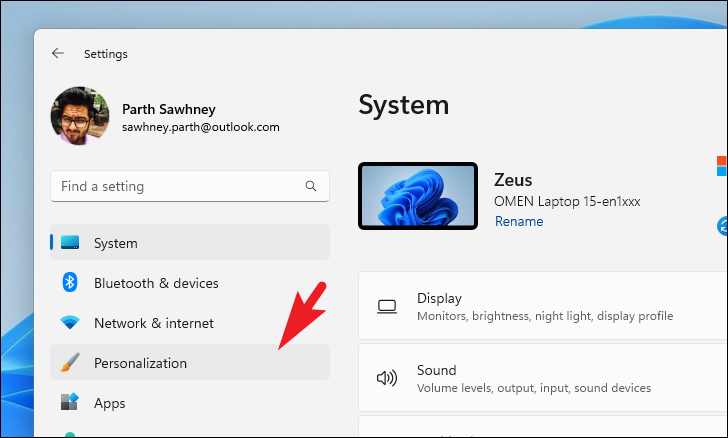
Next, locate and click on the 'Lock Screen' tile to continue.
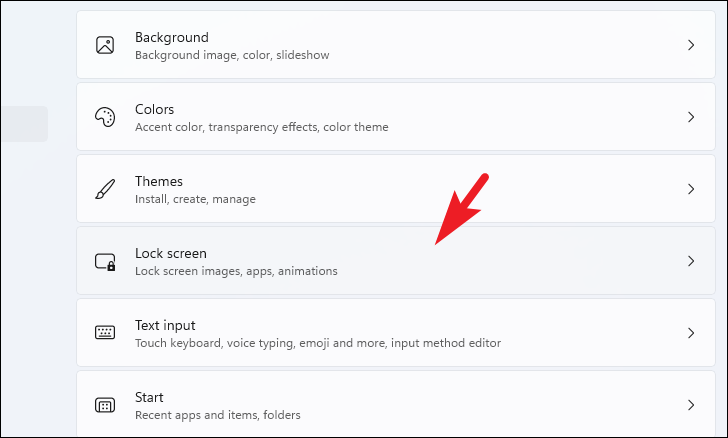
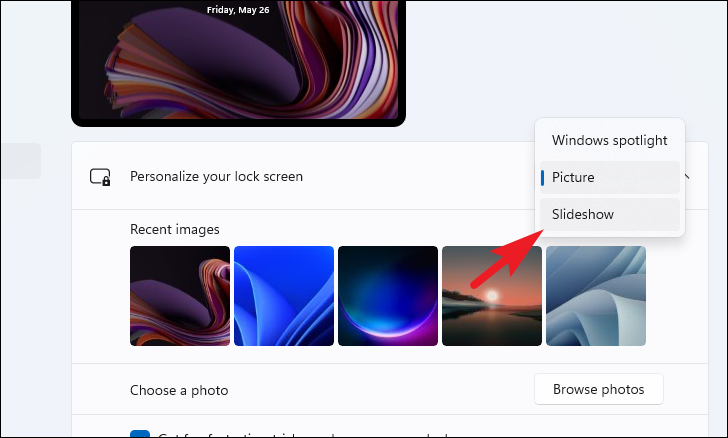
After that, click on the dropdown menu and select the 'Slideshow' option.
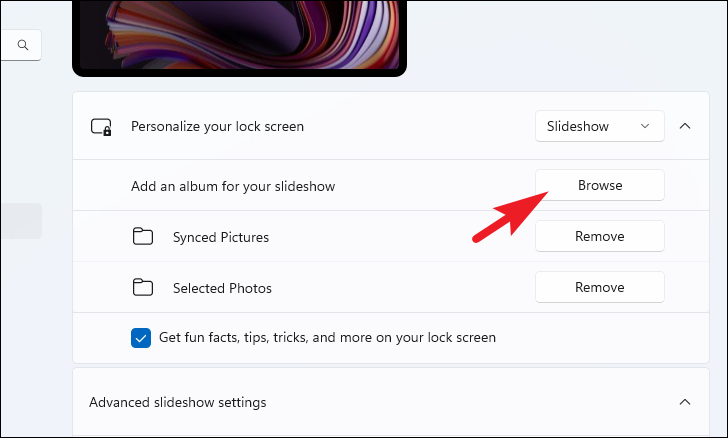
Next, click on the 'Browse' button to proceed. This will open a File Explorer window; use it to select the folder containing photos you wish to play as a slideshow.
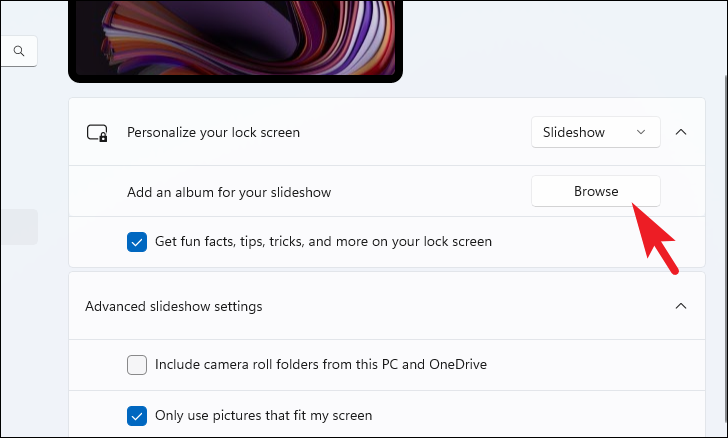
You can also add multiple folders here to include in the slideshow. To do so, again click on the 'Browse' button and select the folder using the File Explorer window that opens.
3. Set up a Slideshow as Screen Saver
Setting up a slideshow as a screensaver is a fairly similar process.
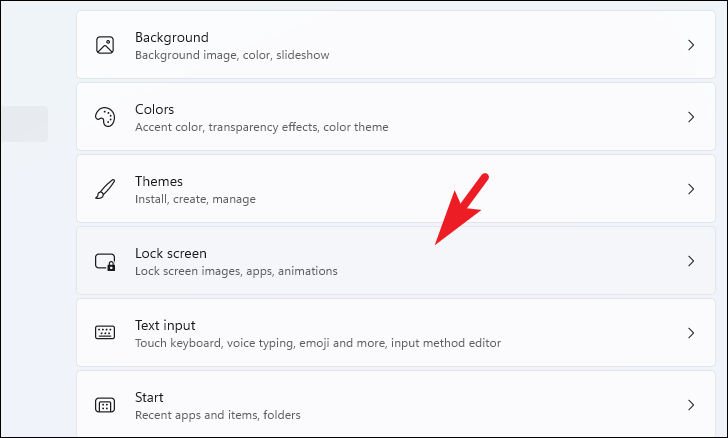
Head to the Settings app and then to the 'Personalization' tab, as shown in the previous sections of this guide. Then, from the right section of the window, click on the 'Lock Screen' tile to proceed.
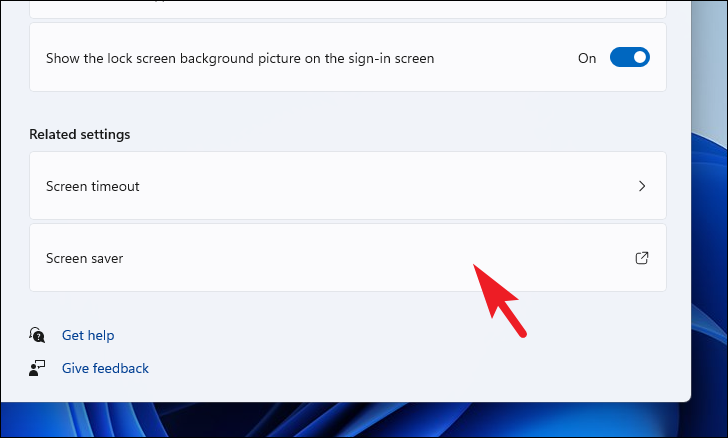
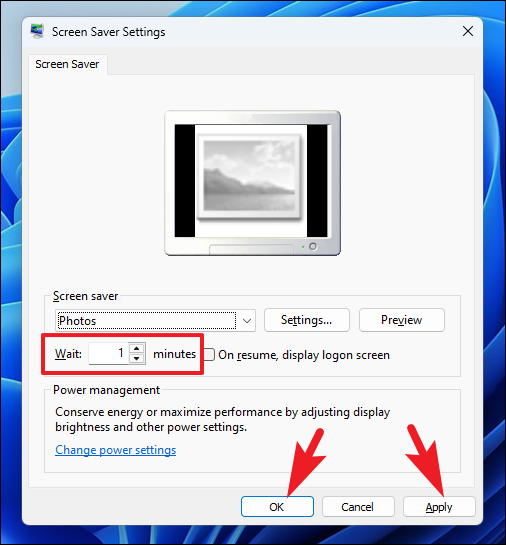
Next, scroll down to the bottom of the page and click on the 'Screen Saver' tile to continue. This will open a separate window on your screen.
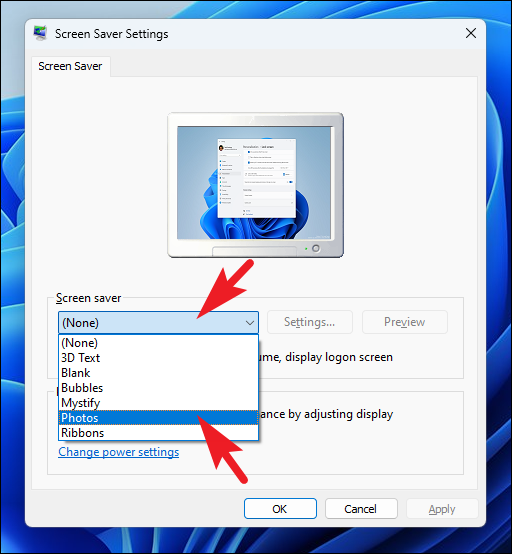
On the separate window, click on the dropdown menu and select the 'Photos' option.
Afterward, click on the 'Settings' button to continue. This will bring a separate window to your screen.
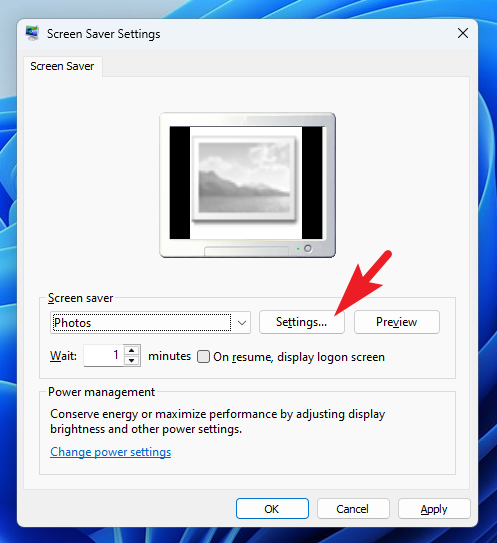
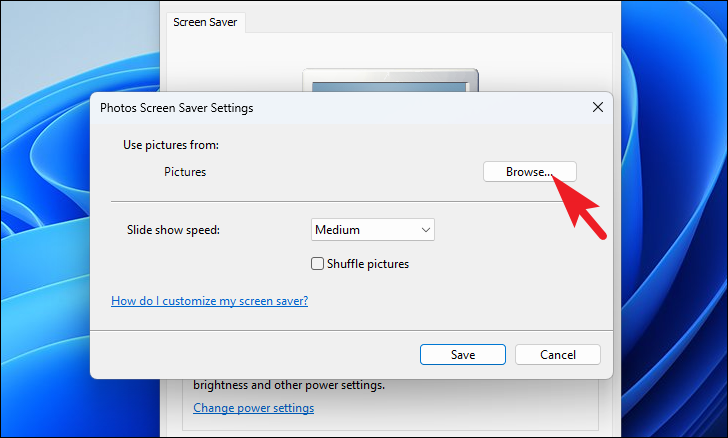
Then, click on the 'Browse' button. It will open an Explorer window; choose the directory that includes all the photos you wish to set as a slideshow.
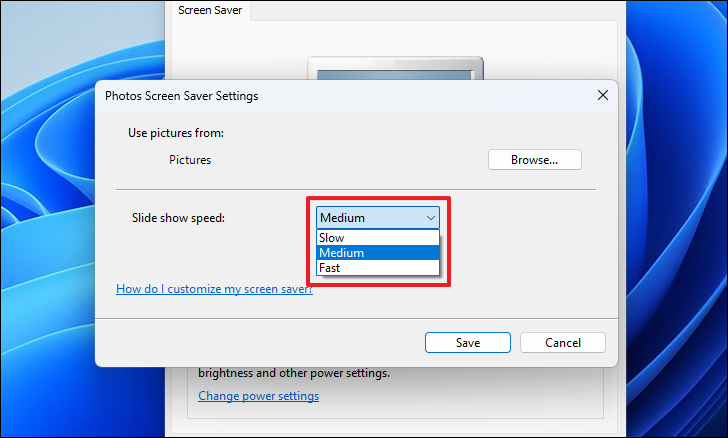
Once selected, you can set the slideshow speed using the dropdown menu. There is no granular control, but you can choose from 'Slow', 'Medium', or 'Fast' options.
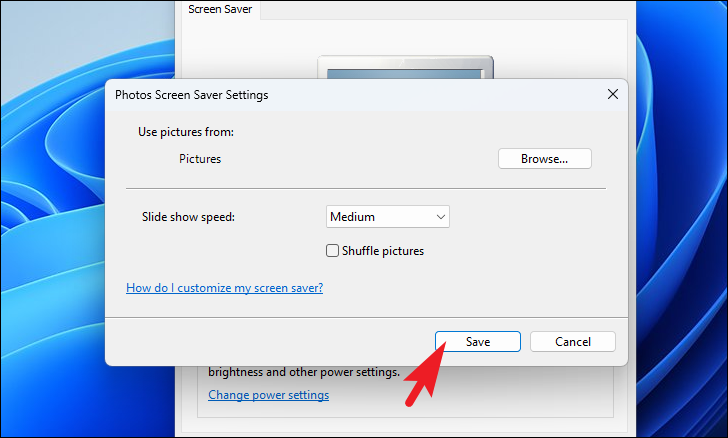
Finally, click the checkbox if you wish to shuffle the picture order. Once all the preferences have been set, click on the 'Save' button.
On the main window, select the wait duration (i.e., the time your PC needs to be inactive for the screen saver to kick in). Then, click on the 'Apply' and 'OK' buttons to apply the changes.
4. Run a Slideshow Using the Photos App
If you have your computer connected to an external screen and wish to display the slideshow of your pictures, the Photos app is your best option.
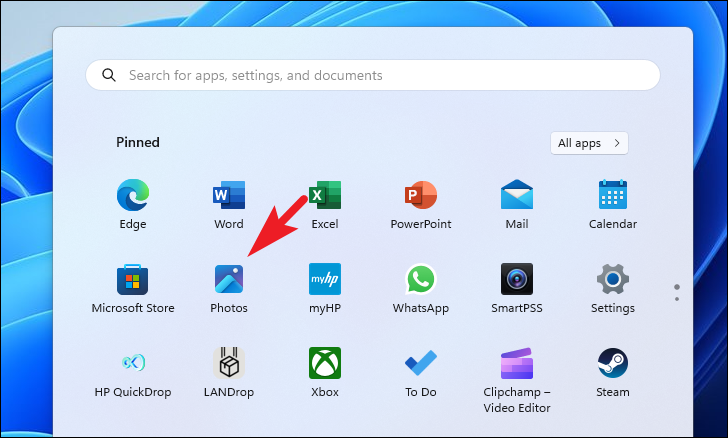
First, head to the Start Menu and type Photos. Then, click on the 'Photos' tile from the search results.
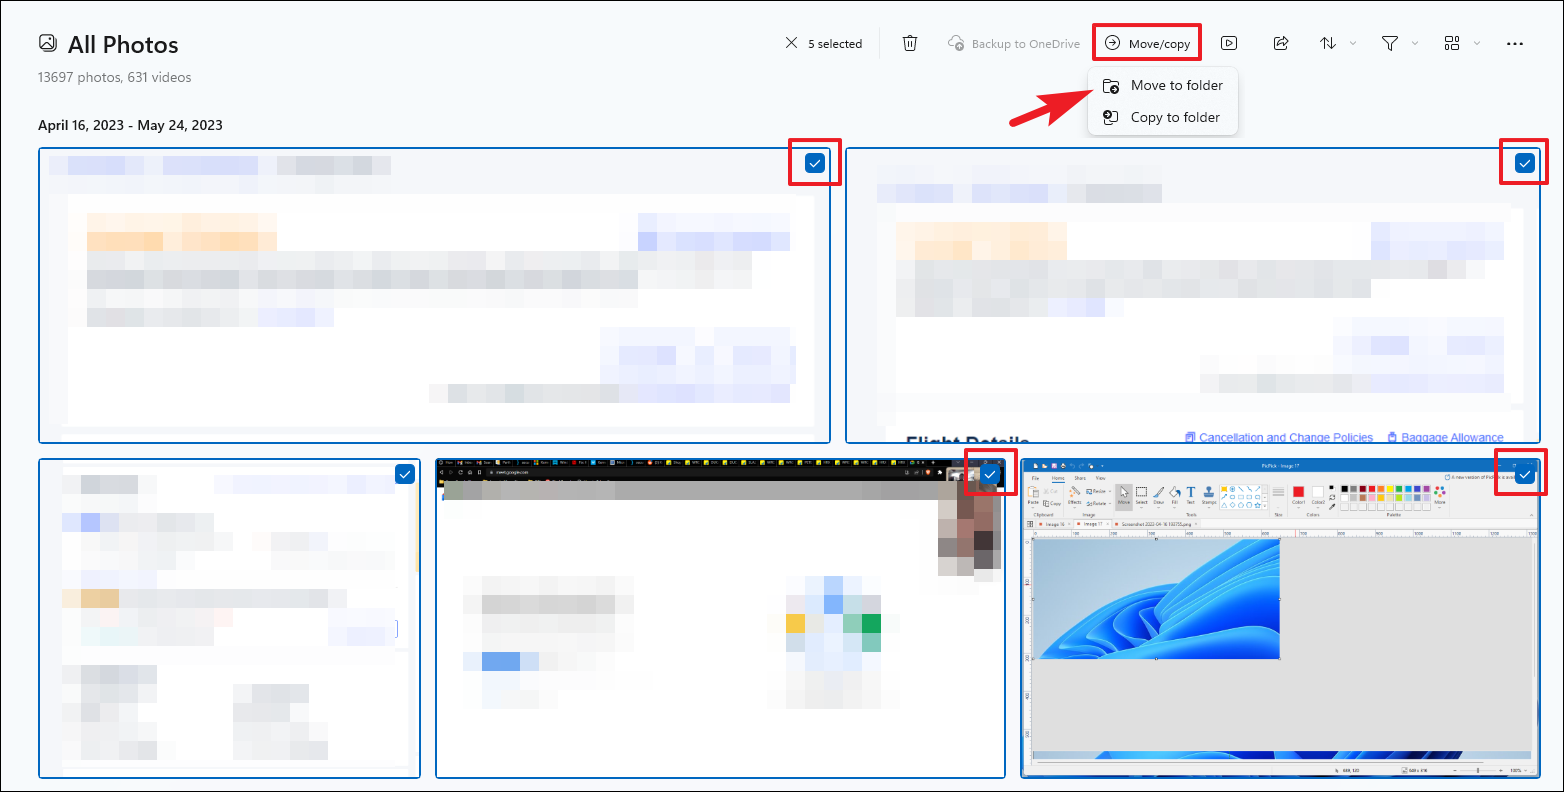
You can either select the pictures and start a slideshow right away; however, if you wish to have the selection handy as you might have to play frequently, you can also create a folder of the selected pictures.
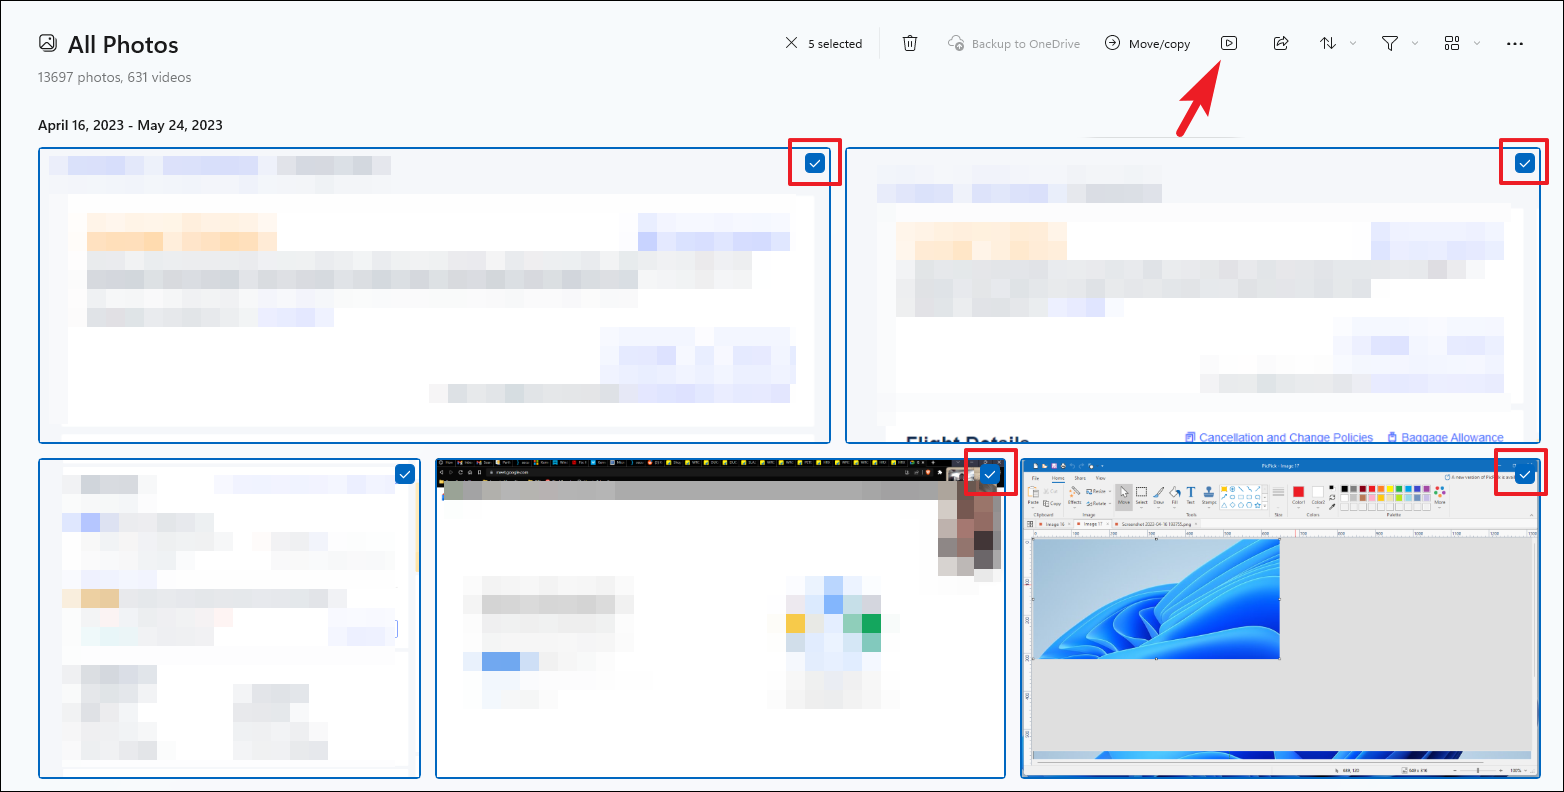
To create a folder , make sure you are on the 'All Photos' tab. Then, select all the pictures that you want to include in your slideshow. Once you have selected all the desired pictures, click on the 'Move/Copy' button in the ribbon menu. Then, select the 'Move to a folder' option. This will open a new window on your screen.
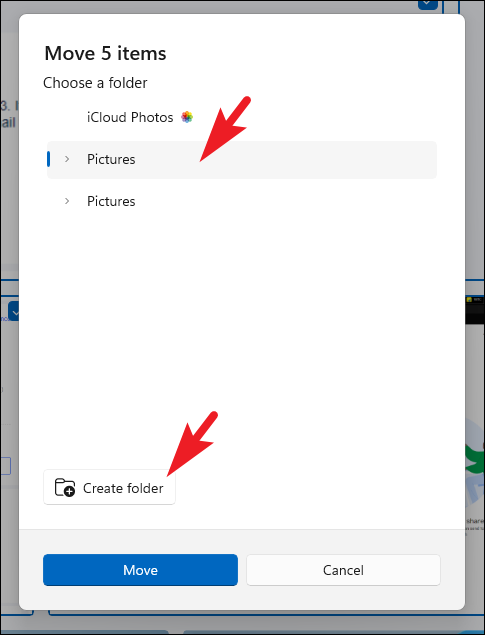
From the overlay window, select the directory of your choice and click on the 'Create Folder' option.
Then, provide an apt name for it and click on 'Create'.
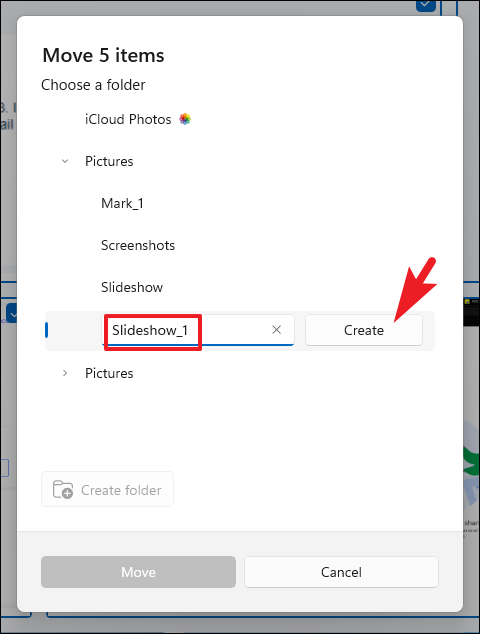
After that, click on 'Move' to move all selected pictures in that folder.
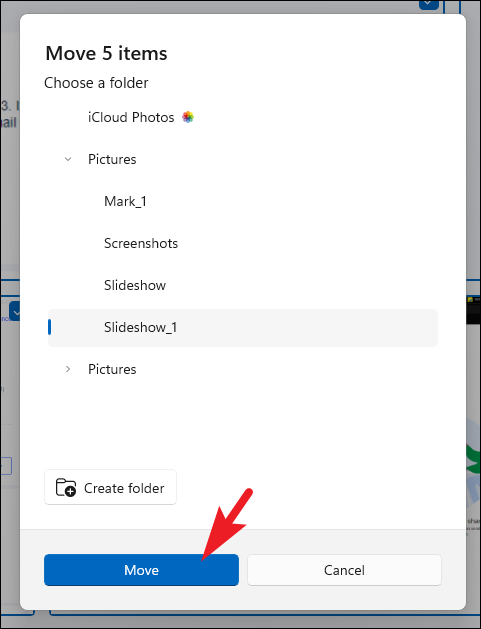
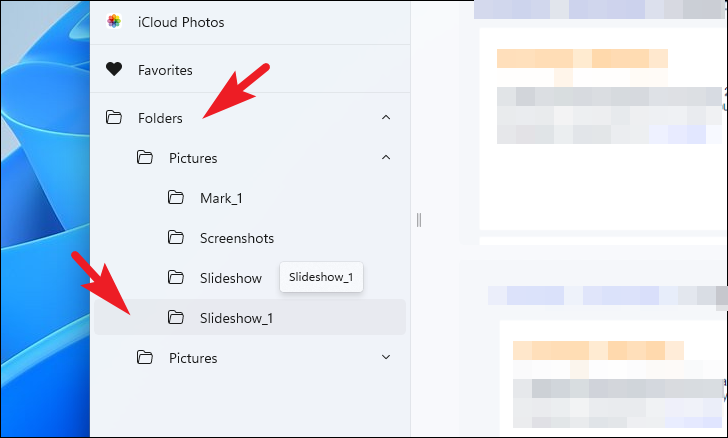
Now, from the main dashboard, navigate to the newly created folder using the left sidebar.
Afterward, click on the 'Start Slideshow' button or press F5 on your keyboard.
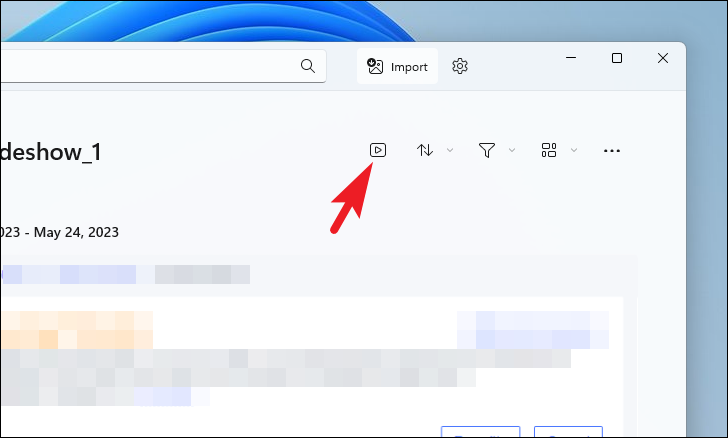
To run a slideshow without creating a folder , select the desired pictures. Then, click on the 'Start slideshow' button in the ribbon menu.]
By default, a slideshow will be played with background music. You can disable it by clicking on the 'Sound' icon from the floating bar. You can also adjust animations, transitions, loops, and music themes by clicking on the 'Music' logo.
5. Set up a Slideshow using Windows Media Player
Surprisingly, Windows Media Player still ships with Windows 11. It can play music, videos, and pictures. All you need to do is have all the pictures that you want to include in your slide show under a single folder.
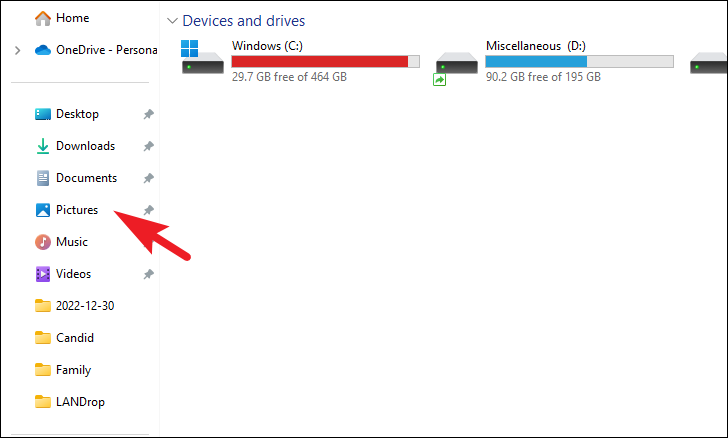
Before you proceed, head to the 'Pictures' directory by heading to File Explorer. If you do not have it pinned, as seen in the screenshot, type or copy+paste the address mentioned below in the address bar and press Enter.
C:\Users\<your username>\Pictures
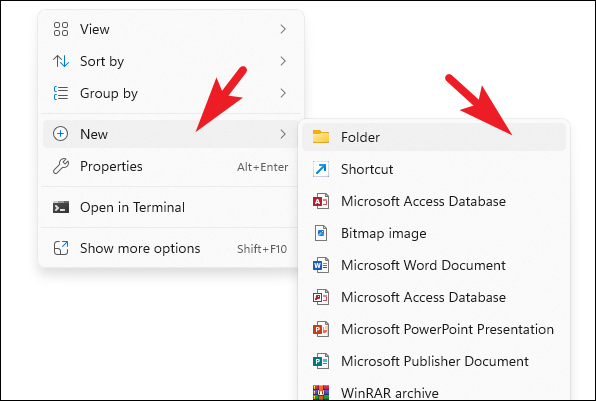
Next, create a new folder here by right-clicking in the right section. Then, hover over the 'New' option and click on the 'Folder' option from the sub-menu. Next, give an apt name to the folder and move all the photos that you wish to have in the slideshow to this directory.
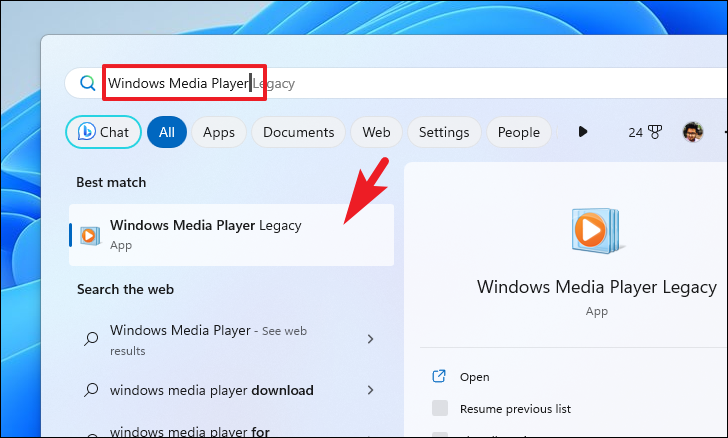
Now, head to the Start Menu and type 'Windows Media Player'. Then, from the search results, click on the 'Windows Media Player Legacy' tile.
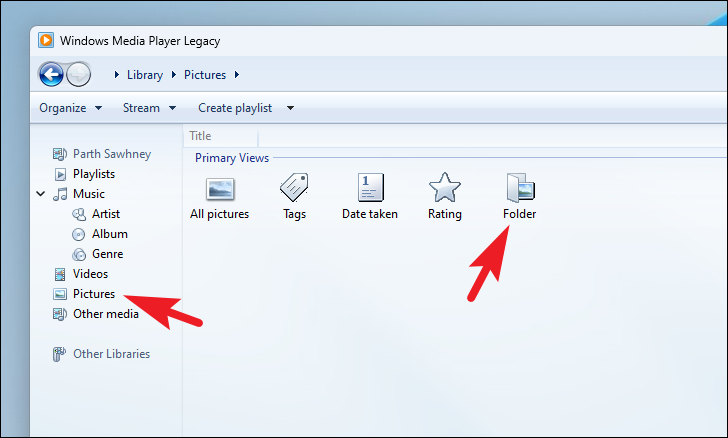
You might be prompted to select settings for the player. Click on the 'Recommended Settings' option to continue. After that, from the main dashboard, click on the 'Pictures' tab on the left sidebar. Next, click on the 'Folder' tile from the right section.
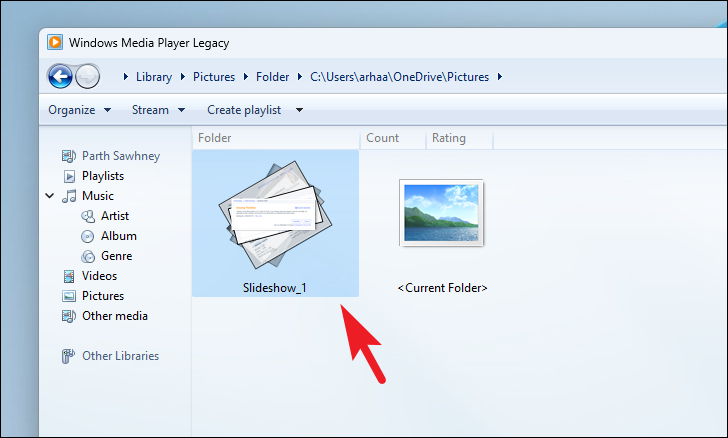
Now, navigate and double-click on the folder that you created earlier in this guide.
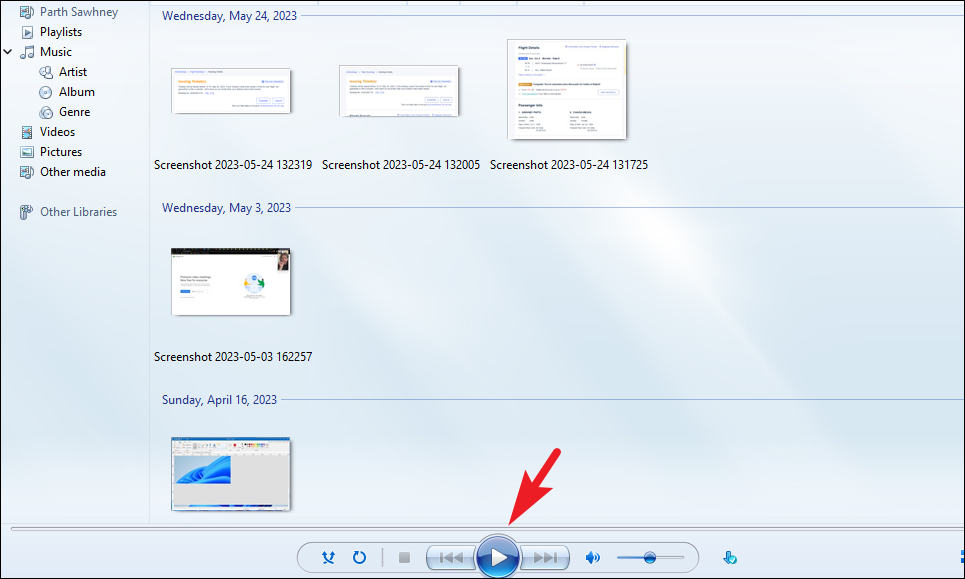
Next, click on the 'Play' button to start the slideshow.
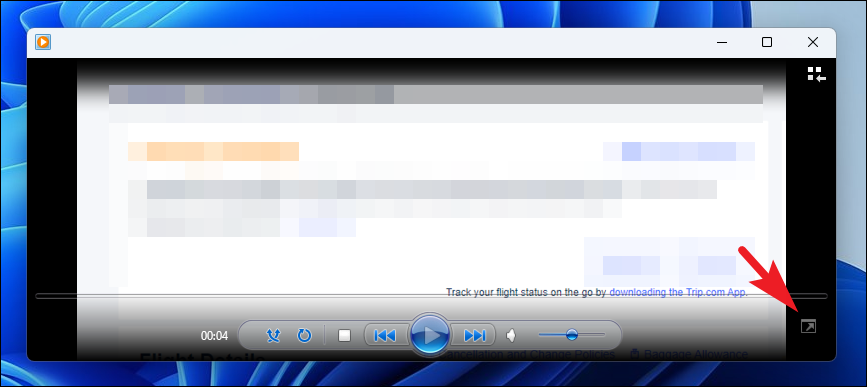
If the slideshow starts in a windowed mode, find and click on the 'Fullscreen' mode in the bottom right corner.
6. Set up a Slideshow using Google Photos
If you do not have access to any of the aforementioned apps, you can still set up a slideshow using Google Photos on your computer's browser.
First, head to photos.google.com using your preferred browser. After that, sign in with your Google account credentials.
Once signed in, if you do not have photos uploaded to your Google account, you will need to upload them from the computer. To do so, click on the 'Upload' button and select pictures using the File Explorer window.
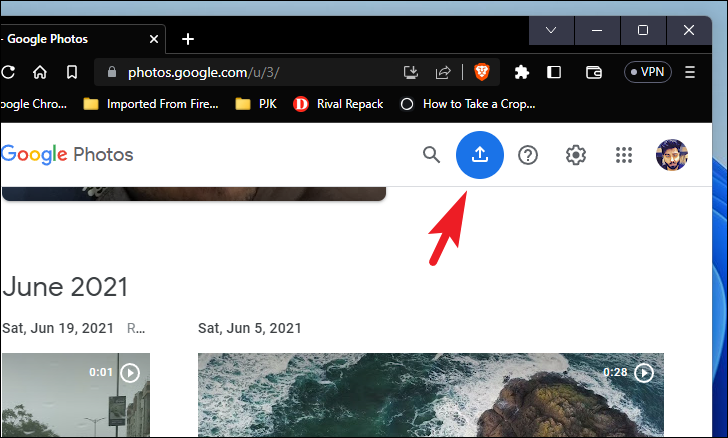
Once you have uploaded the pictures, select them using the tick marks on each thumbnail. After you have selected all the desired pictures, click on the '+' button.
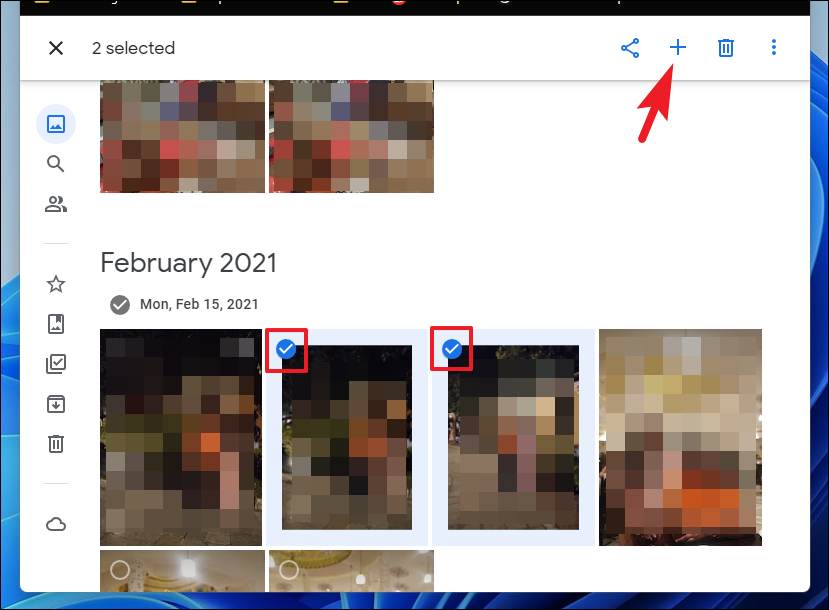
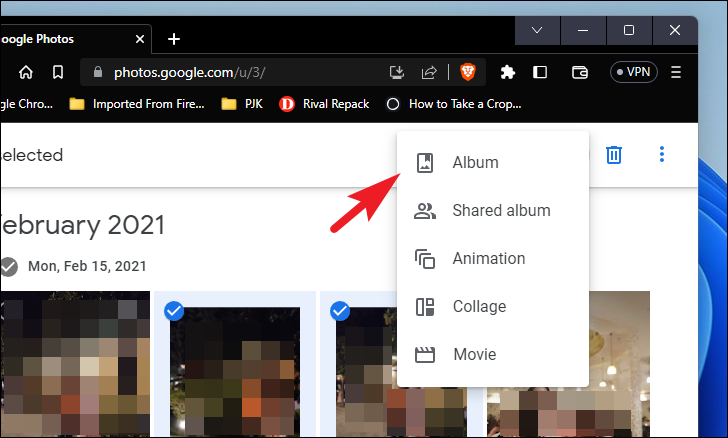
Then select the 'Album' option. This will bring an overlay window to your screen.
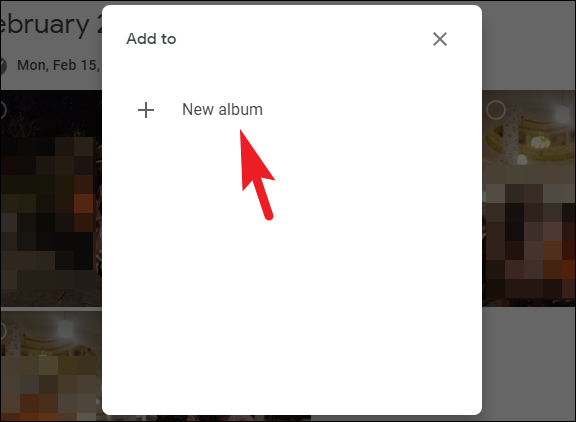
From the overlay window, click on the 'New Album' option.
Then, enter an apt name for the album and click on the 'Done' button to proceed.
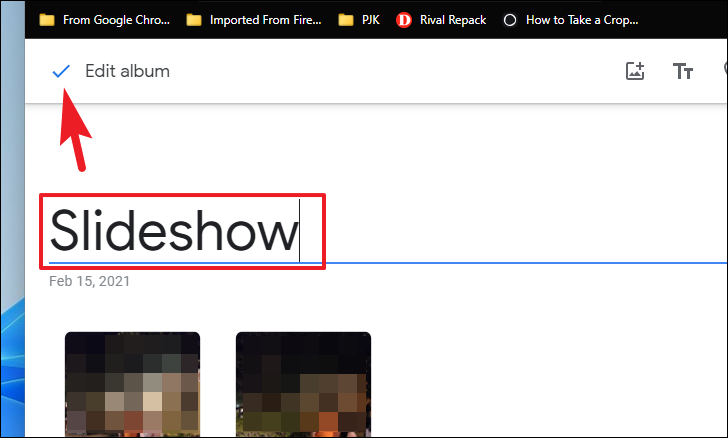
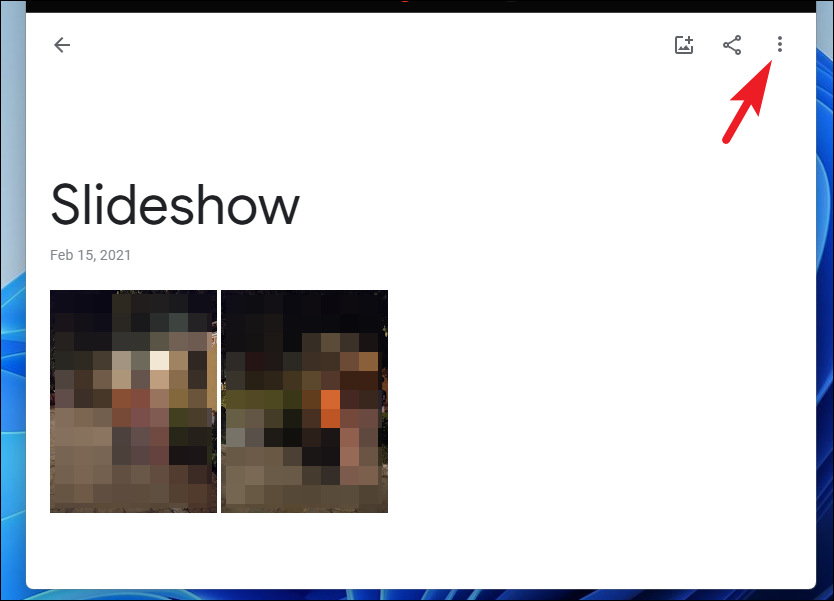
Once the album is created, click on the 'ellipsis' icon.
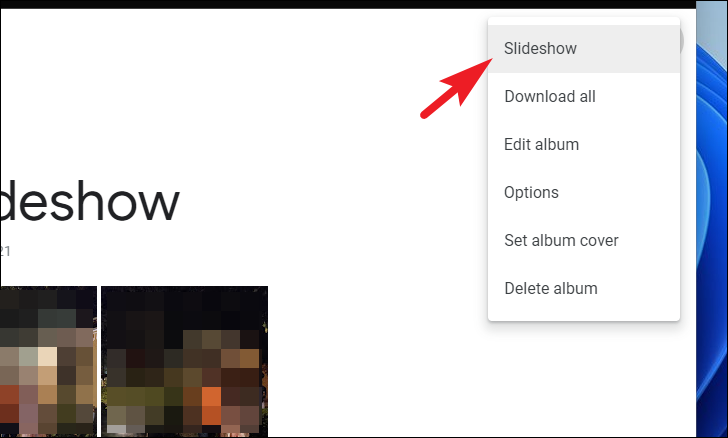
Next, select the 'Slideshow' option. This will play the pictures in a fullscreen slideshow.
Google Photos will then play a slideshow of pictures in full screen.
That's all there is to it, folks! Those are all the ways you can run a slideshow on your Windows 11 computer.

How to Code Using AI

Microsoft Copilot Pro Review: There is a lot of Unrealized Potential

How to Create a Custom Copilot GPT
Get all the latest posts delivered straight to your inbox., member discussion.

How to Fix "AMDRyzenMasterDriverV22 service failed to start" Error in Windows

What is VmmemWSA Process and How to Stop it From Consuming Excess Memory in Windows 11

How to Use Your Phone as a Webcam in Windows 11

How to Open Apps and Websites with Keyboard Shortcuts in Windows 11

How to Install Any Website as an App Using Edge or Chrome on Windows
View Windows 11 Pictures as a Slideshow: A Step-by-Step Guide
Viewing pictures on your Windows 11 computer as a slideshow can be a fun and easy way to relive memories or display your photography. In this article, I’ll guide you through the simple steps to set up a slideshow, so you can sit back and enjoy your photos without having to click through them manually.
Step by Step Tutorial: View Windows 11 Pictures as a Slideshow
Before we dive into the steps, let’s talk about what you’re about to do. Setting up a slideshow in Windows 11 is a piece of cake. You’ll basically be telling your computer to take the reins and show you each photo, one after the other, in a specific folder. Ready? Let’s get started.
Step 1: Open the Photos App
Open the Photos app by clicking on its icon on your taskbar or searching for it in the start menu.
The Photos app is your go-to spot for viewing and organizing your pictures on Windows 11. Once it’s open, you’ll see thumbnails of all your photos.
Step 2: Select Your Photos
Select the photos you want to include in your slideshow by clicking on them. You can select a range of photos by clicking the first one, holding down the Shift key, and clicking the last one.
If you want to pick and choose random photos, hold down the Ctrl key while clicking on each photo you want to include in your slideshow.
Step 3: Click on the Slideshow Button
With your photos selected, click on the Slideshow button in the top-right corner of the app.
The Slideshow button might be a little hard to find at first—it looks like a tiny movie projector. Once you click it, your slideshow will start immediately.
Step 4: Customizing Your Slideshow
While in slideshow mode, right-click to access settings where you can adjust the speed, shuffle pictures, and more.
Customizing your slideshow lets you control how long each photo is displayed and whether your photos appear in a random order. Play around with the settings to find what works best for your viewing pleasure.
Once you’ve completed the steps above, your photos will start to play in a continuous loop. You can hit the Escape key on your keyboard at any time to exit the slideshow.
Tips for a Better Slideshow Experience
- Tip 1: Use high-quality photos for a more visually appealing slideshow.
- Tip 2: Organize your photos into folders beforehand for a more thematic slideshow.
- Tip 3: Check your screen’s power settings to ensure it doesn’t turn off during your slideshow.
- Tip 4: Use the ‘Favorites’ feature in the Photos app to easily find your best pictures.
- Tip 5: Experiment with different slideshow speeds to match the mood of your photo collection.
Frequently Asked Questions
Can i add music to my windows 11 slideshow.
Yes, you can play music in the background using your favorite music player while the slideshow is running.
Just start playing your chosen soundtrack before beginning the slideshow. The music will continue to play as the photos cycle through.
How do I change the order of pictures in my slideshow?
You can shuffle the pictures by right-clicking during the slideshow and selecting ‘Shuffle.’
This feature randomizes the order of your photos, giving your slideshow an element of surprise as you won’t know which photo is coming up next.
Can I view a slideshow on multiple monitors?
Yes, you can extend your slideshow to multiple monitors by adjusting your display settings in Windows 11.
In your display settings, choose the ‘Extend these displays’ option. Then, drag the Photos app window to the second monitor and start your slideshow from there.
How can I make my slideshow loop continuously?
The slideshow feature in Windows 11 loops automatically, so you don’t need to do anything extra.
Once the last photo is shown, the slideshow will loop back to the first photo and continue until you decide to stop it.
Is there a way to edit photos during a slideshow?
No, you cannot edit photos while in slideshow mode. However, you can pause the slideshow, exit, and use the Photos app’s editing tools to make changes.
After you’ve finished editing, you can start the slideshow again from where you left off or from the beginning.
- Open the Photos App
- Select Your Photos
- Click on the Slideshow Button
- Customize Your Slideshow
There you have it! Viewing your photos as a slideshow in Windows 11 is an enjoyable way to showcase your memories or works of art. With this guide, you’ve learned how to easily set up a slideshow and customize it to your preference. Remember, a little preparation goes a long way—organize your pictures, pick your favorites, and get ready for a personal photo exhibition right on your computer screen.
Whether it’s for a family gathering, a professional portfolio, or simply your own enjoyment, Windows 11 makes it easy to view your pictures as a slideshow. So, gather your photos and let the show begin!

Matt Jacobs has been working as an IT consultant for small businesses since receiving his Master’s degree in 2003. While he still does some consulting work, his primary focus now is on creating technology support content for SupportYourTech.com.
His work can be found on many websites and focuses on topics such as Microsoft Office, Apple devices, Android devices, Photoshop, and more.
Share this:
- Click to share on Twitter (Opens in new window)
- Click to share on Facebook (Opens in new window)
Related Posts
- iOS 17 Guide: Adding Photos to Albums on iPhone
- How to Use a Photo from Your iPhone on Echo Show Home Screen
- How to Delete Photo Albums on iPhone 14
- iOS 17: How to Crop Photos on iPhone with Ease
- How to Change a Picture from Portrait to Landscape on iPhone: A Step-By-Step Guide
- iOS 17: How to Unhide Pictures on Your iPhone Easily
- How Big Are Pictures on the iPhone 14: A Comprehensive Guide
- How to Rotate a Picture on iPhone 14: A Step-by-Step Guide
- How to Loop a Powerpoint Office 365 Slideshow
- How to Loop a Slideshow on Powerpoint 2013: Step-by-Step Guide
- How to Delete a Photo Album on the iPhone 5: Step-by-Step Guide
- How to Turn Off Live Photos on an iPhone 7: A Step-by-Step Guide
- How to Hide a Picture on an iPhone 6: A Step-by-Step Guide
- iOS 17: How to Create a Photo Album on an iPhone in Easy Steps
- iOS 17: How to Change Photo Permissions on iPhone
- How to Delete a Picture from a Text Message on iPhone: A Step-by-Step Guide
- iOS 17: How to Recover Deleted Photos from iPhone – A Comprehensive Guide
- How to Hide Photos on iPhone 13
- How to Add a Hyperlink on Google Slides
- How to Stop Tagging Pictures With a Location on iPhone 5: A Step-by-Step Guide
Get Our Free Newsletter
How-to guides and tech deals
You may opt out at any time. Read our Privacy Policy
How to view photos in a slideshow in Windows 11
Windows 11 makes it easy to view a slideshow of your favorite pictures. Here's how to do it.
Quick Links
View photos in a slideshow using the windows 11 photos app, view photos as a desktop slideshow, view photos as a lock screen slideshow, view photos as a slideshow in google photos, make a video slideshow with clipchamp, slideshows can help you relive your favorite memories.
Photos can hold very special memories, and setting up a slideshow is a great way to relive them and look back at great times in your life. There's no shortage of ways to set up a slideshow, and Windows 11 makes it easy to do it in a wide range of ways. Whether you want to actively display your photos or have them shown on the desktop, let's take a look at some of the tools for creating photo slideshows on Windows 11.
If you haven't yet, it's a good idea to put your photos into the same folder. You can store them locally or in a OneDrive folder if you have an internet connection.
If you're actively trying to show off photos in a slideshow, Windows 11 Photos is arguably the best way to do it. This app lets you choose the photos to view, adjust transitions, play music, and more. Here's how to use it:
- Open the Photos app. You can find it in the Start menu.
- Once the slideshow starts, click the Slideshow options button (it looks like a music note) to change the music, transitions, and whether the slideshow should loop after showing all the photos.
- The bar at the top can also be used to pause the slideshow, change the volume, or minimize the slideshow.
- To quit the slideshow, move the mouse over the top right corner of the screen to show the Close button.
If you want photos to constantly display as a slideshow on your desktop background, you have that option, too. This makes it so your favorite pictures are always visible at a moment's notice. Here's how:
- Open the Settings app. You can find it in the Start menu.
- Click Personalization in the menu bar on the left.
- Click the Browse button to find the folder you want to use for your slideshow.
- Click Choose this folder once you have the right one.
Changing the picture every minute may impact the performance of some PCs.
- You can change additional settings like shuffling the picture order or choosing how images should behave to fit the desktop if the aspect ratio doesn't match.
If you'd like to have a slideshow playing on the lock screen when your PC is inactive or see a different picture whenever you turn on your PC, that's also an option:
- Open the Settings app.
- Click Personalization in the left-side menu.
- Click Browse to find a folder to pull pictures from. You can add multiple folders, but only one at a time.
- If you want to remove a folder, click Remove next to its name.
If your photos are stored in Google Photos, you can also view them as a slideshow online. The easiest way to do this is to create an album if you haven't already.
- Open Google Photos in your browser.
- Choose the pictures to upload and click Open .
- Select the photos you uploaded by clicking the checkmark in the top left corner of each one. You can select all photos with the same date using the checkmark next to the date header.
- Click New album to create a new album with your photos.
- Enter a name for the album.
- The slideshow will begin.
If you want to get deeper into it and make a video slideshow you can share with others as a file, you can use Clipchamp to create a video from your photos. Here's how it works:
- Open Clipchamp on your PC. It should be in the Start menu, but you can also use it in your browser.
- If you haven't yet, log in or create an account.
- On the timeline, click and drag the edge of each image to adjust how long it should be in the video.
- Click the space between images to add a transition effect.
- Choose a transition style from the list.
- The Text option on the left lets you add custom text to the slideshow, too.
You can check out our guide to learn more about how to use Clipchamp.
These are some of the many ways you can view your photos as a slideshow in Windows 11 without installing any new apps. Whether it's a simple slideshow or something more elaborate, with music and animation, there are plenty of ways you can look back at your favorite memories. The Windows 11 Photos app has become one of the best ways to do it, though, thanks to all the included animation, transition, and music options.
- All about AI
- Google Bard
- Inflection AI Pi Chatbot
- Anthropic Claude
- Generative AI
- AI Image Generation
- AI Regulation
- AI Research
- Large Language Models (LLM)
- Surface Pro
- Surface Laptop
- Surface Book
- Surface Duo
- Surface Neo
- Surface Studio
- Surface Hub
- Surface Pen
- Surface Headphones
- Surface Earbuds
- About WinBuzzer
- Follow Us: PUSH, Feeds, Social
- Write for Us
- Cookie Policy and Privacy Policy
- Terms of Service
How to Make a Slideshow on Windows 11 and Windows 10
We show you how to make a slideshow from photos in Windows, covering various pieces of in-built software and how to use them.

Table of Contents:
Creating a slideshow on Windows 11 and Windows 10 can be a fun and creative way to compile memories, present information, or share a story through images and music. Both operating systems provide users with intuitive tools that simplify the process, making it accessible even for those without any technical background.
Windows 11 and Windows 10 have several basic internal tools (Settings, Classic Mode, File Explorer, Photo Viewer) that allow for showing an image slideshow both on demand for a set of images or via the desktop wallpaper feature. In this guide, we go from the most basic to the most complex solution available.
The built-in Photos app serves as a powerful tool for crafting slideshows. You can add images from your PC or online sources, arrange them to a storyboard, and customize each slide with text, motion, filters, or 3D effects to add depth and personality to your presentation. Adding music is straightforward, with options for both built-in tracks and custom audio files, allowing for a personalized touch. Once satisfied, you can preview your creation and export it as an MP4 file, ready to be shared or enjoyed personally .
PowerPoint offers a more structured approach, where users can import images into a photo album, arrange them as desired, and then export the collection as a video, complete with customized slide durations and transitions .
Microsoft Clipchamp , the free Windows video editor is another option to create slideshows using a wide array of formatting options and effects that are missing from other more simple approaches.
How to Make a Desktop Wallpaper Slideshow via Settings ( Windows 11 and Windows 10)
This method allows users to easily set up a dynamic desktop background that changes at regular intervals, showcasing a collection of personal photos or images. It's an integrated feature in both Windows 11 and Windows 10, accessible via the Settings app.

How to Make a Desktop Wallpaper Slideshow via Classic Mode ( Windows 10)
This method involves using the classic Control Panel settings to set up a desktop background slideshow, if you prefer the traditional Windows interface and functionalities.

How to Launch a Slideshow via File Explorer (Windows 10)
This method leverages the built-in capabilities of File Explorer in Windows 10, offering a straightforward way to view your images in a full-screen slideshow directly from any folder. It's particularly useful for quickly showcasing photos during presentations or for personal viewing, without the need for additional software or settings adjustments.

How to Make a Slideshow with the Microsoft Photos App (Windows 11 and Windows 10)
The Microsoft Photos app extends beyond mere photo viewing; it includes a feature-rich editor and slideshow maker. This method is ideal for users who wish to create more elaborate slideshows, complete with transitions, music, and effects. It suits both Windows 11 and Windows 10 users looking to compile their photos into captivating stories or presentations, all within a user-friendly interface.

How to Create a Slideshow with Windows Photo Viewer ( Windows 11 and Windows 10)
Although not the default photo viewer in newer versions of Windows, the old Windows Photo Viewer from earlier Windows versions can still be utilized to create a simple slideshow of your images. It's a little more hidden on Microsoft's latest OS, but you can still use it – you just have to enable it first .

How to Create a Slideshow with Clipchamp
Creating a basic slideshow with Clipchamp is an accessible way to showcase your photos in fullscreen, complete with background music and transition effects. Microsoft acquired Clipchamp, a Brisbane-based video editing software start-up, on September 8, 2021 and has integrated the software into Windows as the default video editor, which is also available via the Microsoft Store . Here's a step-by-step guide to help you create an engaging slideshow:

Customize with Filters and Effects To give your slideshow a unique look, experiment with Clipchamp's filters and effects. Apply different filters to your photos to match the mood of your slideshow. You can also add text overlays to introduce your slideshow or to label specific sections .

How to Create a Slideshow with PowerPoint
PowerPoint is highly regarded for creating slideshows due to its intuitive interface, versatility in incorporating multimedia elements, and extensive customization options. It offers a range of animations and transitions to enhance presentations, supports real-time collaboration through Office 365, and ensures compatibility with various formats for easy sharing.

Preview Your Slideshow Preview your slideshow by going to the ‘ Slide Show ‘ tab and clicking ‘ From Beginning ‘ to ensure everything looks and sounds as expected.
Save Your Presentation Save your slideshow by clicking on ‘ File ‘ then ‘ Save As ‘. Choose the desired location and save your presentation.

FAQ – Frequently Asked Questions about Slideshows on Windows
How can i add custom animations or effects to photos in a slideshow on windows 11 and windows 10.
In both Windows 11 and Windows 10, you can use the Photos app to add custom animations to photos in a video project. Select a photo, then explore the ‘ Motion ‘ option for animations, or ‘ 3D effects ‘ for additional effects. Slideshows made with Clipchamp and PowerPoint also allow for custom animations.
Can I schedule a slideshow to run at specific times on Windows 11 and Windows 10?
While native scheduling for slideshows isn't available in Windows 11 or Windows 10, you can use the Task Scheduler to open a photo album in the Photos app at designated times.
How do I optimize a slideshow for a 4K display on Windows 11 and Windows 10?
Use high-resolution images for your slideshow and export at the highest quality setting from the Photos app in both Windows 11 and Windows 10 to ensure clarity on a 4K display.
Is it possible to add voice-overs directly within the Photos app while making a slideshow on Windows 11 and Windows 10?
The Photos app in Windows 11 and Windows 10 doesn't support direct voice-over recording. Record your narration separately, then add the audio file to your slideshow as custom audio. Clipchamp and PowerPoint offer to record and add audio directly from within the software.
Can I integrate PowerPoint slides into a slideshow created with the Photos app on Windows 11 and Windows 10?
To include PowerPoint slides in a Photos app slideshow on Windows 11 and Windows 10, first save your slides as images, then import these images into the Photos app project.
How can I create a slideshow with mixed media (photos and videos) on Windows 11 and Windows 10?
The Photos app on both Windows 11 and Windows 10 allows you to create a video project that includes both photos and video clips, perfect for mixed media slideshows. You can also do this with Clipchamp as it is a fully-fledged video editor and also PowerPoint allows using mixed media, although not in a straightforward way.
Does Clipchamp on Windows 11 utilize AI to automatically select the best parts of photos for a slideshow?
While Clipchamp on Windows 11 offers various editing features, it doesn't automatically select the best parts of photos for slideshows; manual selection and editing are required.
How can I create a panoramic slideshow effect with wide landscape photos on Windows 11 and Windows 10?
In the Photos app video project on Windows 11 and Windows 10, apply a panning effect using the ‘ Motion ‘ feature to create a panoramic effect for wide landscape photos.
Is there a way to batch edit photos before adding them to a slideshow on Windows 11 and Windows 10?
For batch editing photos before creating a slideshow in the Photos app on Windows 11 and Windows 10, use third-party photo editing software.
Can I set a dynamic slideshow as a screensaver on Windows 11 and Windows 10?
Yes, Windows 11 and Windows 10 natively support slideshows as screensavers. Check our other guide here on how to use the screensaver option “ Photos ” for this , where you can use “ Settings ” to define a slideshow.
How do I ensure my slideshow is compatible with non-Windows devices when sharing from Windows 11 and Windows 10?
You can export your slideshow as an MP4 file from the Photos app, Clipchamp or PowerPoint in both Windows 11 and Windows 10 to ensure broad compatibility with various devices and platforms. PowerPoint also supports exporting to other formats such as PDF or HTML which are widely compatible.
Can I use the Photos app to create a slideshow with photos from OneDrive on Windows 11 and Windows 10?
The Photos app in both Windows 11 and Windows 10 can access and include photos stored on OneDrive in your slideshow when signed in with your Microsoft account.
How do I add a watermark or logo to my slideshow on Windows 11 and Windows 10?
The Photos app doesn't support watermarks directly. Watermark images beforehand or use PowerPoint, Clipchamp or other video editing software to add a watermark.
Can I export a slideshow to DVD directly from Windows 11 and Windows 10?
Direct DVD export isn't available in Windows 11 or Windows 10. Export your slideshow as a video and use third-party DVD authoring software to burn it to DVD.
How can I transition from a slideshow back to a presentation seamlessly in a Windows 11 and Windows 10 environment?
Prepare your slideshow and presentation beforehand in both Windows 11 and Windows 10. Use Alt+Tab to switch smoothly between the Photos app or media player and your PowerPoint presentation.
Extra: How to Set a Video as a Live Desktop Wallpaper in Windows
- Create a slideshow
- Desktop Operating Systems
- Microsoft Photos
- Microsoft Windows
- Operating Systems
- Windows 10 Slideshow
Recent News

Instagram’s Threads Experiment with Tinder-Like Features for Content Preference

Microsoft Unveils Improved Forms for Lists in 365 Work and Education...
Subscribe to WinBuzzer on Google News


- Disk & Data Manager
- Partition Wizard
- Power Data Recovery
- ShadowMaker
- Media Toolkit
- uTube Downloader
- Video Converter
- Download Partition Wizard Free Edition: Download Pro Edition: Try Demo Server Edition: Try Demo
- Partition Magic
How to Set up Image Slideshow in Windows 11 with Built-in Tools?
This post from the MiniTool Partition Wizard website introduces how to set up image slideshow in Windows 11 with its built-in tools. If you want to make a slideshow, just follow this tutorial.
Windows 11 is a new operating system provided by Microsoft. It is designed with some built-in tools to create a slideshow. You can even set the slideshow as your desktop or lock screen background. Here are some methods to create a slideshow in Windows 11 and you don’t need to download any third-party programs.
Method 1: Change Background Settings to Set up Image Slideshow in Windows 11
On Windows 11, you can choose a picture album for a slideshow and set it as the desktop background, so you can view your favorite images on the desktop. Here are the detailed steps.
Step 1 : Right-click any empty space on your desktop and select Personalize .
Step 2 : In the pop-up window, select Background .
Step 3 : Double-click Personalize your background to view more settings. Then select Slideshow for the Personalize your background option.
Step 4 : Click the Browse button to select a folder that contains your favorite images.
Step 5 : Click the drop-down menu for the Change picture every option to decide when to change images.
Method 2: Change Screen Saver to Set up Image Slideshow in Windows 11
The screen saver can show slideshows on the screen when you stop using your computer. You can use your favorite pictures as a screen saver. As for how to use the screen saver on Windows 11 , you can refer to our previous post.
Method 3: Use Video Editor to Create A Slideshow in Windows 11
Windows 11 provides a built-in program named Video Editor. It is many used to edit videos and you can also use it to create a slideshow in Windows 11.
Step 1 : Click the Search tool on the taskbar and search for Video Editor . Then open the app.
Step 2 : In Video Editor, click New video project . Then give the project a name and click OK .
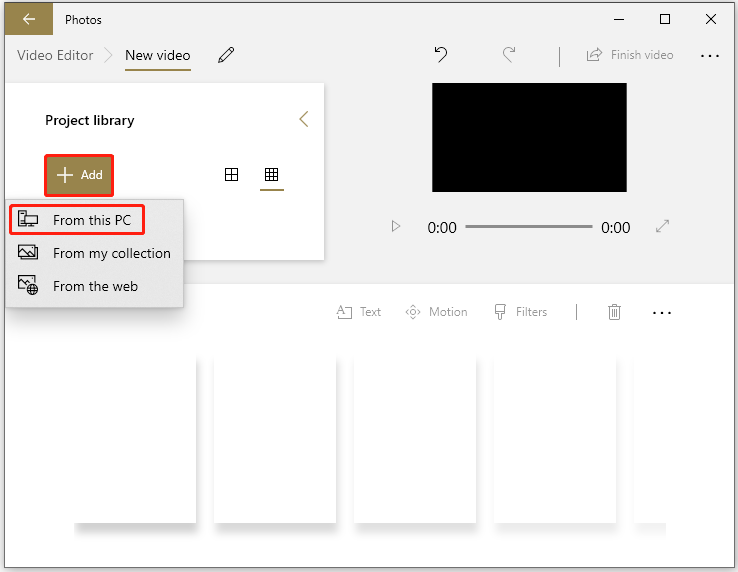
Step 3 : On the left side, click Add and then From this PC to select some images to add to the Project library.
Step 4 : Drag the images from the Project library to the bottom of the Video Editor.
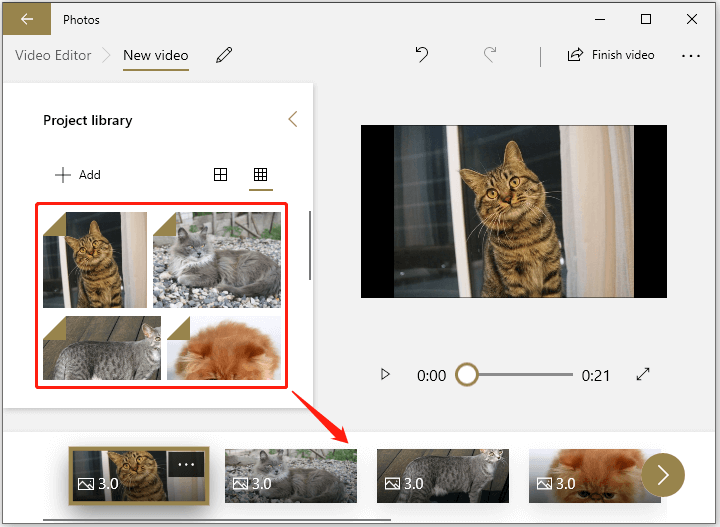
Step 5 : Right-click an image thumbnail on the bottom and select Duration . In the pop-up window, select how long you wish this image appears. Repeat the operation for other images.
Step 6 : Right-click an image and select Edit > Text to add a caption. You can also add Background music and Themes according to your needs.
Step 7 : Click Finish video and export the project.
Method 4: Make A Photo Album in Windows 11 with the Photos App
The Photo app on Windows 11 enables you to view and edit images. It also offers a slideshow feature and you can use it to make a photo album in Windows 11.
Step 1 : Open the Photo app from Windows 11 Search .
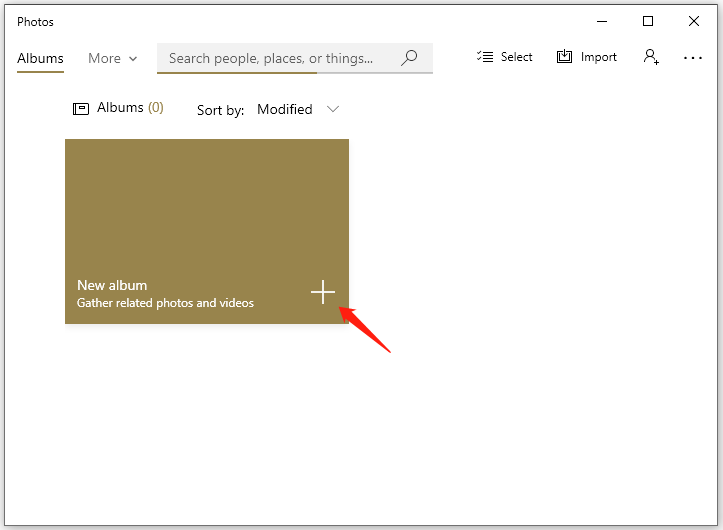
Step 2 : Switch to the Albums tap and click New album .
Step 3 : Check the images you want to use and click the Create button.
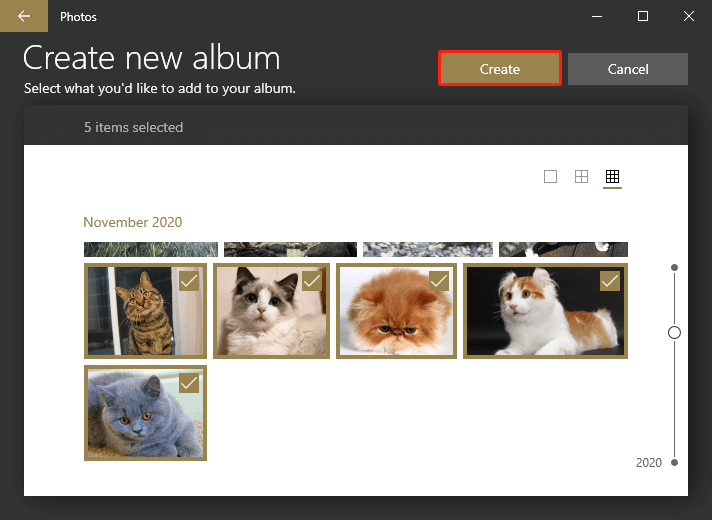
Step 4 : Then the album will display as a slideshow. You can also click the Slideshow feature to view the album.
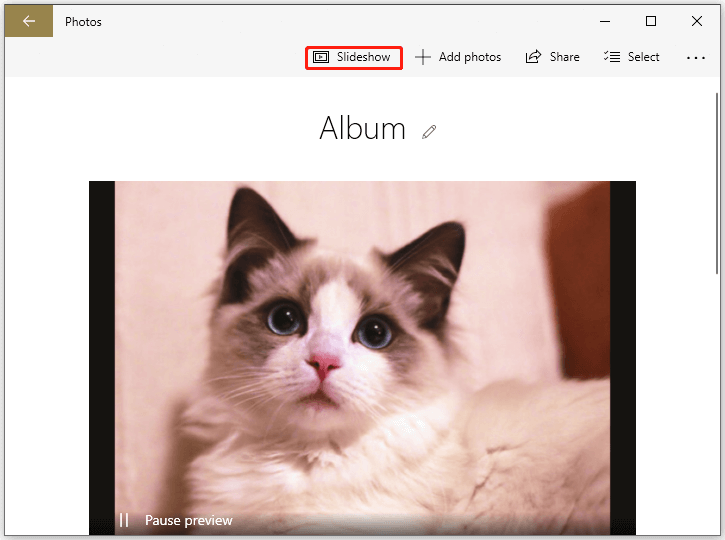
The next time when you open the Photos app, you will be able to see this album on the main interface.
You might also be interested: Windows 10 Slideshow – How to Make a Slideshow on Windows 10?

About The Author
Position: Columnist
User Comments :
The Tech Edvocate
- Advertisement
- Home Page Five (No Sidebar)
- Home Page Four
- Home Page Three
- Home Page Two
- Icons [No Sidebar]
- Left Sidbear Page
- Lynch Educational Consulting
- My Speaking Page
- Newsletter Sign Up Confirmation
- Newsletter Unsubscription
- Page Example
- Privacy Policy
- Protected Content
- Request a Product Review
- Shortcodes Examples
- Terms and Conditions
- The Edvocate
- The Tech Edvocate Product Guide
- Write For Us
- Dr. Lynch’s Personal Website
- The Edvocate Podcast
- Assistive Technology
- Child Development Tech
- Early Childhood & K-12 EdTech
- EdTech Futures
- EdTech News
- EdTech Policy & Reform
- EdTech Startups & Businesses
- Higher Education EdTech
- Online Learning & eLearning
- Parent & Family Tech
- Personalized Learning
- Product Reviews
- Tech Edvocate Awards
- School Ratings
How to Build a House in Skyrim: 10 Steps
How to apply voltaren gel: 10 steps, 3 ways to cancel a babbel subscription, how to install a tonneau cover, how to make a three point turn: 12 steps, 3 ways to insert boric acid suppositories for effective treatment, 3 ways to prevent a dog from defecating in its crate, 8 simple ways to hang a coat rack, 4 ways to download miniclip games, easy ways to dye grey hair black, how to view pictures as a slideshow in windows 11.
Windows 11 has introduced major changes in the way we interact with our computer files and media content. One of the most significant updates is the revamped Photos app, which now has more features and options to view and manage your picture collection. If you want to enjoy your photos as a slideshow with Windows 11, here’s a guide on how to do it.
Firstly, you need to have your pictures ready and stored in your device or OneDrive cloud storage. Open the Photos app by clicking on its icon in the Start menu or searching for it in the taskbar. Once the app opens, click on the ‘Pictures’ tab on the left-hand side panel. This will show all your picture folders and albums that you’ve created or imported.
To play a slideshow with a particular picture folder, select it, and click on the ‘See all’ button at the top. Now you can see all the pictures in that folder on a grid. To enable the slideshow, click on the ‘Slideshow’ button on the top-right corner of the window. Alternatively, you can also press the ‘Ctrl + Enter’ keys on your keyboard to start the slideshow.
The slideshow will begin playing automatically, and each picture will be displayed for a few seconds before transitioning to the next one. You can adjust the slideshow settings by clicking on the ‘Settings’ button on the top-right corner of the window. This will show options to change the duration of each slide, the order of pictures (random or by name), and the slideshow speed (slow, medium or fast).
You can also customize the slideshow frame by clicking on the ‘Customize’ button below the settings. This will show options to add background music, apply filters, adjust the zoom level, and even add captions and animations to your pictures. Once you’re satisfied with the settings, click on the ‘Save’ button to apply them to the slideshow.
If you want to exit the slideshow mode, simply press the ‘Esc’ key on your keyboard or click on the ‘X’ button on the top-right corner of the window. You can also pause or resume the slideshow by clicking on the ‘Pause’ or ‘Play’ buttons on the bottom-left side of the window.
In conclusion, Windows 11 has made it easy and enjoyable to view your pictures as a slideshow with the enhanced Photos app. Whether you want to relive your memories, showcase your artwork or share your favorite photos with friends and family, the slideshow feature is a great way to do it. Try it out and discover new ways to enjoy your pictures with Windows 11.
How to Use WhatsApp Web on Desktop ...
Choosing the best school for your child: ....
Matthew Lynch
Related articles more from author.

My iPhone Won’t Go to the Main Screen

Online Video Teaching And Microlearning Trends

Understanding Institutional Reasons to Move to Cloud

Synchronous Virtual Classroom Learning Management Systems

Enlightening Online Tai Chi Classes You Need To Join Right Now
The Best Mobile Apps to Create a Video from Photos

Contribute to the Windows forum! Click HERE to learn more 💡
March 14, 2024
Contribute to the Windows forum!
Click HERE to learn more 💡
Top Contributors in Windows 11: neilpzz - Kapil Arya MVP - questions_ - Reza Ameri - RAJU.MSC.MATHEMATICS ✅
March 11, 2024
Top Contributors in Windows 11:
neilpzz - Kapil Arya MVP - questions_ - Reza Ameri - RAJU.MSC.MATHEMATICS ✅
- Search the community and support articles
- Search Community member
Ask a new question
Windows 11 Photos app seems no longer to have a slideshow option?
It looks as if Windows 11 has recently updated the Photos app and I cannot find how to run a slideshow. Is this even possible within Photos anymore?
- Subscribe to RSS feed
Report abuse
Replies (44) .
* Please try a lower page number.
* Please enter only numbers.
- Independent Advisor
77 people found this reply helpful
Was this reply helpful? Yes No
Sorry this didn't help.
Great! Thanks for your feedback.
How satisfied are you with this reply?
Thanks for your feedback, it helps us improve the site.
Thanks for your feedback.
Many thanks I have downloaded the old app now.
10 people found this reply helpful
4 people found this reply helpful
Most Windows 11 updates seem to break things. I went in and did a system restore and everything worked fine again.
Do they even test the junk updates that they send?
56 people found this reply helpful
Sorted my problem too, Dave. Many thanks.
3 people found this reply helpful
Legacy Photos doesn't seem to be available in Microsoft Store?
9 people found this reply helpful
It's called Photos Legacy, if you do not put title this way around you will not find it! Just found out.
2 people found this reply helpful
Works perfectly. Thank.
1 person found this reply helpful
Thanks. Typical Microsoft... change and remove functionality just for change's sake. This is why half my machines run Linux now. No IOS for me but then it's the Microsoft move to become more like Apple and IOS that pushes me more and more to Linux or other options.
35 people found this reply helpful
I have downloaded and installed Photos Legacy, so I can now run a slideshow. However, I cannot alter the interval between photos in the slideshow. Is there any way to do this, please? I have tried F11 but this does not work. I have also tried a right click, also settings. Nowhere can I find where to change the interval.
5 people found this reply helpful
Question Info
- Windows apps
- Norsk Bokmål
- Ελληνικά
- Русский
- עברית
- العربية
- ไทย
- 한국어
- 中文(简体)
- 中文(繁體)
- 日本語
How to Use Slideshow and Spot Fix in the Windows 11 Photos App
Windows 11's Photos app is more than just an image viewer. Here's how to use the Slideshow and Spot Fix features.
Microsoft Photos is testing some new experimental features to upgrade the feature set to make it a full-fledged photo viewing and editing app. The primary standout feature is Spot Fix which removes blemishes from photos. Another new addition is the revamped slideshow which now offers cool designs, background music, and some transitions and animations as well.
Wondering how to get these latest features in the Photos app and use them to organize and edit your image collection? Let’s discuss these features and whether they fix the flaws in the Photos app.
What Does the Slideshow Feature Do?
The current Photos app in Windows 11 lacks a slideshow feature. If you want to preview images in full-screen or windowed mode, you need to click the left or right icons in the app to change the image or press the left or right arrow keys. The slideshow feature automates this process but doesn’t just stop there.
While playing the slideshow, you can pick from the newly introduced 25 official music tracks of different categories (Chill, Beat, Energetic, and 3 more) and configure auto-loop for the slideshow. Moreover, you can add animations and transitions to the slideshow.
The updated Photos app also supports the option to switch the slideshow to windowed mode. It means that you can drag and resize the slideshow window and continue running it in one section of your display.
How to Update the Photos App
All the new features are available with the Photos app version number 2023.11050.2013.0 or higher. At the time of writing, this is only available for Windows Insiders. If you're not an Insider, you can still download the Windows 11 Insider ISO without joining the Insider program .
If you are in the Windows Insider program, update your Insider build and manually check for updates in the Photos app or Microsoft Store. You can run this new version of the Photos app in both the Dev and Canary channels .
If you don’t yet see the update for the Photos app, copy the official Microsoft Store link of the app and visit the Store.Rg-adguard website . Paste the link in the search box and select the Fast or Slow option. Click on the tick icon and download the latest Photos app build for Windows Insider. Install the app and then continue to the next section.
How to Use the Slideshow Feature in the Photos App
When you launch the Photos app, you will notice a Start Slideshow icon in the All Photos section next to the filters option. Click on it to begin the slideshow. Alternatively, you can press the F5 key to start the slideshow.
The slideshow will continue playing in the background even if you click on the music icon. You can press the Spacebar or click on the Pause icon to stop it.
By default, the app will apply transitions, music, animation, and a loop to the slideshow. To adjust any of these features, hover on the slideshow and click on the Music icon. Now, you can enable or disable any of the four toggles to add or remove the effect from the slideshow.
By default, you are stuck with a basic zoom-in animation effect, a fade-out transition, and an auto-loop option. The only customizable feature is the background music where you can choose tracks from multiple categories.
If you want to adjust the volume of the slideshow, you can hover on the speaker icon and use the slider bar . It doesn’t affect the system volume settings. Click on the speaker icon or press the M key to mute the slideshow.
If you want to resize the slideshow window, click on the resize icon. Now, snap the window to the left or right side. To close the slideshow click on the Exit Slideshow button in the top-left corner.
What Is the Spot Fix Feature?
Spot fix feature can remove spots or objects from any image. Think of it as an eraser tool that factors in the background color and nearby elements. It deletes the selected spot or object and tries to blend the empty space with the color scheme or pattern of the nearby objects.
So, you don’t need to blur areas in an image before sending it to others. The end result is flawless (in most cases with simple backgrounds). Still, you don’t have to send partially blurred images which sparks more curiosity about what was blurred. A simpler use case is to remove spots from the face.
How to Use the Spot Fix Feature in the Photos App
Double-click on any photo in the app to open it in a new window. Now, press Ctrl + E or click on the Edit icon to switch to the image editing window. Click on the Retouch option to open the Spot Fix tool.
Now, click on the area which you want to remove using the tool. If you want to increase the size of the tool, adjust the size slider present on the right side. You may have to use the spot fix on an area (textured or patterns) multiple times to get it right.
We tried deleting some taskbar icons from an image and the tool worked perfectly. But it also struggled in some areas, where transparency effects were in action. However, with a real-world image of an ice cream cone the tool somewhat struggled to do a convincing spot fix. So, the end result depends on the number of objects, shapes, patterns, and colors in an image.
Another gripe with the Spot Fix feature is that you cannot select an area in an image. You are left with the maximum size of the tool only. The circular size of the tool makes it difficult to tackle the corners of the object you want to remove from the image.
Other Improvements in the Photos App
The app reintroduces the Timeline Scrollbar using which you can quickly view photos added in a particular month or year. Microsoft also added the timeline scrollbar in the Gallery section of the File Explorer which is also in the experimental stage.
Earlier, you could use the Auto Enhance feature to improve image quality after downloading an add-on. Now the feature is already included in the new version of the Photos app thus removing the hassle of downloading an add-on.
If you want to select consecutive photos, hold the Shift key and click on images. It is a faster way to select multiple images without having to click on each one of them. For non-consecutive photo selection, you can use the Ctrl key.
A Much-Needed Overhaul for Photos on Windows 11
Microsoft Photos never captured the interest of users until this update came around. The ability to organize photo collection, add a captivating slideshow, and image editing features make it a competent photo editing app.
How to create custom screensaver from your favorite images on Windows 11
With this simple feature, which you forgot you had on Windows 11, you can turn your monitor into a digital frame.
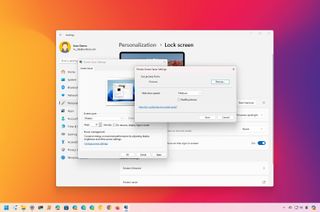
On Windows 11 , you can still enable and configure the Screen Saver feature , not only to protect the screen from burn-ins but also to transform the display into a digital frame.
For example, you can configure the feature to display a collection of personal images, or in the case you're a gamer, you can show screenshots of your favorite games that you may have taken during gameplay.
In this how-to guide , I will outline the steps to enable and configure the legacy Screen Saver feature to show a custom collection of images on the display after a time of inactivity.
Create custom screensaver from image collection on Windows 11
To create a screensaver from custom images on Windows 11, use these steps:
- Open Settings .
- Click on Personalization .
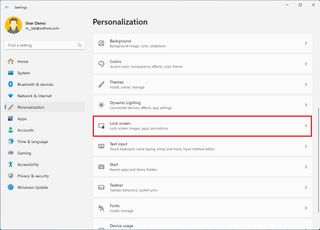
- Click the Lock screen page on the right side.
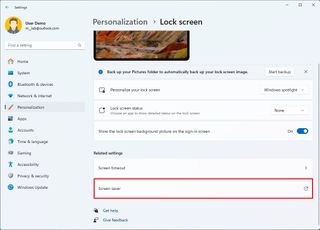
- Click the Screen saver option under the "Related settings" section.
- Select the Photos option from the "Screen saver" drop-down menu.
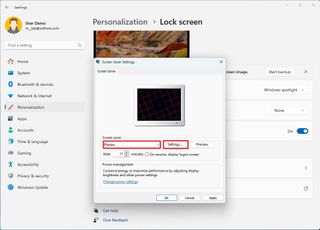
- Choose the speed of the slide.
- (Optional) Check the Shuffle pictures option.
- Click the Pictures button.
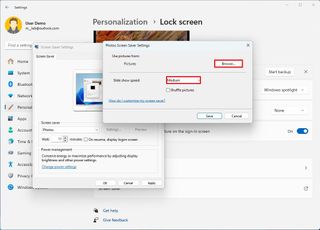
- Click the Browse button.
- Select the folder with the photos or screenshots.
- Click the OK button.
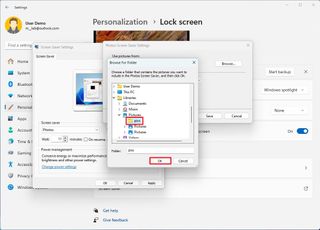
- Click the Save button.
- Select when the screen saver should be after inactivity with the "Wait" setting.
- Click the Apply button.
Once you complete the steps, the screensaver with your images will appear after the specified time of inactivity.
If you want to show gameplay screenshots, you can use the Game Bar experience (Windows key + G) to take screenshots with the Capture feature. Or you can use the Snipping Tool (Windows key + Shift + S) to take screenshots of anything on the screen with the "Full screen" option.
You can use these instructions to take screenshots on Windows 11 .
Get the Windows Central Newsletter
All the latest news, reviews, and guides for Windows and Xbox diehards.
More resources
For more helpful articles, coverage, and answers to common questions about Windows 10 and Windows 11, visit the following resources:
- Windows 11 on Windows Central — All you need to know
- Windows 10 on Windows Central — All you need to know

Mauro Huculak is technical writer for WindowsCentral.com. His primary focus is to write comprehensive how-tos to help users get the most out of Windows 10 and its many related technologies. He has an IT background with professional certifications from Microsoft, Cisco, and CompTIA, and he's a recognized member of the Microsoft MVP community.
- 2 Minecraft's April Fools' joke was so good, people are angry that it isn't real content
- 3 Co-op horror game Content Warning launches on Steam for FREE (but only for 24 hours)
- 4 Helldivers 2 boss says devs may make a critically important Galactic War mechanic easier to understand: "We are talking about making this more clear"
- 5 Hollow Knight: Silksong FAQ — Xbox Game Pass, trailers, and everything you need to know

How to make a slideshow in Windows 11
Hello Tecnobits! I hope you are having a great, technology-filled day. By the way, have you tried How to make a slideshow in Windows 11 ? It's amazing. Greetings!
What programs can I use to make a slideshow in Windows 11?
1. Open PowerPoint: Click the Windows 11 Start button and search for “PowerPoint” in the search bar. Then, click on the PowerPoint icon to open the program. 2. Select a template: Once you've opened PowerPoint, choose a pre-designed template for your presentation or start from scratch. 3. Add slides: Click “Insert” and then “New Slide” to add slides to your presentation. You can choose between different designs and formats. 4. Insert content: Fill each slide with text, images, graphics, tables and other visual or multimedia elements. 5. Customize the layout: Use the layout and formatting tools to customize the appearance of your slides. 6. Save and share your presentation: Once you're done, save your presentation and share it with other users. 7. Use other apps: In addition to PowerPoint, you can use other apps like Google Slides, Keynote, or Prezi to create slideshows in Windows 11. 8. Explore advanced options: If you need more advanced functionality, consider looking for add-ons or extensions to enhance your slideshows in Windows 11.
How can I add transitions to my slideshow in Windows 11?
1. Open your presentation: Start PowerPoint and open the presentation to which you want to add transitions. 2. Select a slide: Click the slide you want to apply a transition to. 3. Access transition options: In the “Transitions” tab, choose the transition effect you prefer. 4. Customize the transition: You can adjust the duration, sound and other options of the transition according to your preferences. 5. Apply the transition: Click “Apply to all” if you want to apply the same transition to all slides, or select each slide individually. 6. Test your presentation: Click “Slide Show” to see what the transitions look like in your presentation. 7. Experiment with different effects: PowerPoint offers a wide variety of transition effects, so explore the options and choose the one that best suits your presentation.
What are the best practices for designing a slideshow in Windows 11?
1. Prioritize readability: Use legible fonts, appropriate text sizes, and contrasting colors to ensure your audience can easily read the information on your slides. 2. Limit the amount of text: Avoid overloading your slides with text. Use bullets, graphs, and other visual elements to communicate information more effectively. 3. Use high-quality images: If you add images to your slides, make sure they are sharp and high resolution to improve the visual quality of your presentation. 4. Keep design consistent: Use a consistent theme or template throughout your presentation to create a uniform visual experience. 5. Practice simplicity: Avoid visual overload and maintain a clean, minimalist design to avoid distracting your audience. 6. Include interactive elements: Consider incorporating interactive elements such as videos, online surveys, or links to additional resources to keep your audience's attention. 7. Test your presentation: Before showing it to your audience, be sure to review each slide for formatting, grammatical, or content errors.
How can I save my slideshow in Windows 11?
1. Click “File”: Once you have finished designing and editing your presentation, click “File” in the top left corner of the screen. 2. Select “Save As”: From the drop-down menu, choose “Save As” to open the save window. 3. Choose file location and name: Select the location where you want to save the presentation, enter a name for the file, and choose the file format (for example, PowerPoint Presentation (.pptx)). 4. Click “Save”: Once you have configured the save options, click “Save” to store your presentation in the specified location. 5. Consider other saving options: In addition to saving your presentation locally, you can consider cloud storage options, such as OneDrive or Google Drive, to access and share your presentation from any device.
How can I present my slideshow in Windows 11?
1. Open your presentation: Start PowerPoint and open the presentation you want to show. 2. Click “Slide Show”: On the “Slide Show” tab, choose the option that best suits your needs, such as “From Start” or “Custom Show.” 3. Navigate your presentation: Use the arrow keys or mouse to move forward or backward between slides during your presentation. 4. Use presentation tools: During your presentation, you can use tools like the laser pointer, presenter notes, and annotation markers to enhance your presentation experience. 5. End the presentation: Once you have shown all the slides, you can end the presentation and return to the PowerPoint interface. 6. Practice before presenting: Before showing your presentation to an audience, practice your presentation to become familiar with the content and presentation tools.
Can I add audio or video to my slideshow in Windows 11?
1. Open your presentation: Start PowerPoint and open the presentation to which you want to add audio or video. 2. Insert an audio or video file: On the “Insert” tab, choose “Audio” or “Video” to select and add a media file from your computer or online. 3. Adjust playback: Set playback options, such as autoplay, loop, start and end of audio or video. 4. Place the media element: Drag and drop the media element onto the corresponding slide and adjust its size and position as necessary. 5. Test playback: Click “Slide Show” to verify that the audio or video plays correctly during the presentation. 6. Consider file size: Consider the size of the audio or video file to avoid performance or compatibility issues when sharing your presentation with other users.
How can I share my slideshow in Windows 11?
1. Use OneDrive:
See you soon, Tecnobits! See you on the next technological adventure. And remember, if you want to learn How to make a slideshow in Windows 11 , do not hesitate to visit our tutorials section. See you around!
You may also be interested in this related content:
- How to disable the touch screen in Windows 11
- How to turn off caps lock in Windows 11
- How to partition an SSD in Windows 11
I am Sebastián Vidal, a computer engineer passionate about technology and DIY. Additionally, I am the creator of tecnobits.com, where I share tutorials to make technology more accessible and understandable for everyone.

How to make Windows 11 look like Windows 10
Quick links, make the taskbar and start menu look like windows 10 with start11, align the taskbar to the left, enable taskbar ungrouping, remove additional windows 11 icons from the taskbar, change the wallpaper, use custom icons and sounds.
Windows 11 is a big shift compared to Windows 10 in terms of design, and that change is especially significant when you consider that Windows 10 was around for six years before Windows 11, so people got very used to how it looks. And while Windows 11 arguably looks much nicer, some people might miss that old look after upgrading.
Thankfully, there are ways bring the Windows 10 look to Windows 11, though you'll probably have to spend a bit of money to get it as close as possible. The best way to do this involves using paid tools, though some tweaks can be done for free.
Windows 11: Everything you need to know
There are a few apps that can be used to change the look of Windows 11's Start menu, but our favorite pick has to go to Start11. This app is developed by Stardock, a company specialized in Windows customization, and it offers a ton of options for making Windows 11 looking like anything you want.
Start11 v2 review: Making the Windows 11 Start menu actually useful
Bring back the windows 10 start menu.
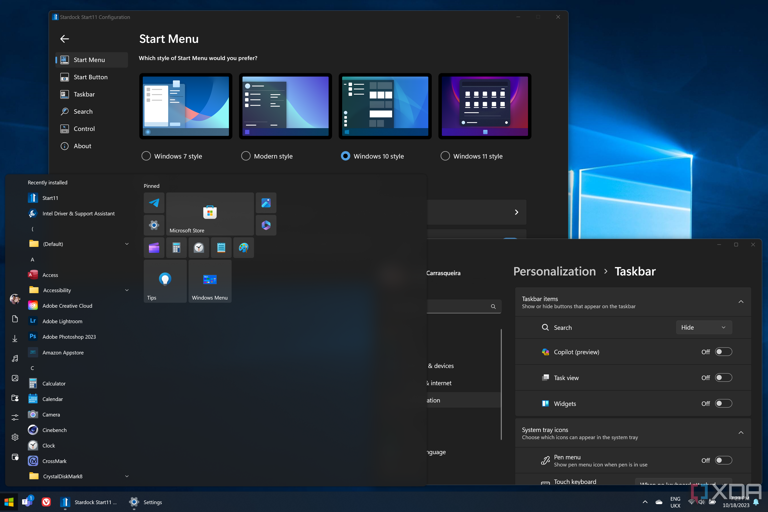
To bring back the Windows 10-style Start menu, start by installing Start11, then follow these steps.
- Launch the Start11 settings.
- Open the Start menu section on the left.
- Choose the Windows 10 style option.
- Make sure the Use Start11 Start menu toggle is enabled near the bottom of the page.
You can apply more customizations, like colors and pinned folders, with the Configure menu option. This is optional, but it can make the experience even more personal to you.
Move the Start menu and taskbar
If you'd like to move the taskbar to the top of your screen like you could on Windows 10, Start11 also makes that possible. It can also move the Start menu icon back to the corner, though this is also possible in Windows 11 normally without spending any money.
- Launch Start11.
- Click the Taskbar tab on the left-side menu.
- Scroll down to the bottom and choose whether you want the taskbar at the bottom or the top of the screen.
- Head to the Start Button tab on the left side.
- In the dropdown menu at the bottom, set the taskbar to be Left aligned .
Bring back the Windows 10 Start icon
Finally, if you want the Start menu icon to look like it did on Windows 10, you can download a custom icon to do just that.
- Download the Windows 10 Start menu icon pack from WinCustomize.
- Extract the files to a folder of your choice.
- Go to the Start Button tab.
- Enable the Use a custom start button image option.
- Click Pick image .
- Browse to find the files you downloaded. You can choose between a large or small icon.
Once you select the file, your Start menu icon will immediately be updated. You now have a taskbar that looks much closer to Windows 10.
With a recent update, Windows 11 made it possible to enable taskbar icon ungrouping natively, but if you enabled the custom taskbar in Start11, you might want to do it through the Start11 app, too. To do this:
- Launch the Start11 settings window
- Go to the Taskbar tab on the left side.
If you aren't using other taskbar enhancements, you can use the settings built into Windows 11 (in the section below) to enable taskbar ungrouping.
- Click Configure enhanced taskbar... .
- Expand the Taskbar button combining button.
- Click the Never combine taskbar buttons to open a dropdown menu and choose your preferred behavior.
- (Optional) If you have multiple monitors, you can also configure the behavior on different monitors.
Start11 gives you a ton more customization options for the taskbar, including color and transparency settings and much more. However, if you don't want to spend money, there are many options to help you change the look of Windows 11, too.
Windows 11 aligns the taskbar icons at the center of the screen by default, but it's actually possible to make it so that it's aligned at the left, just like before. Here's how:
- Right-click an empty area of the taskbar and choose Taskbar settings .
- Expand the Taskbar behaviors box.
- Click the dropdown menu next to Taskbar alignment and choose Left .
The initial release of Windows 11 lacked the ability to ungroup taskbar items, but this feature has been added back in a recent update to version 23H2 . This makes it so different windows of the same app are shown separately on the taskbar. Here's how:
- Expand the Taskbar behaviors box (if you haven't already).
- Click the dropdown menu next to Combine taskbar buttons and hide labels and choose Never or Only when taskbar is full , depending on your preference.
- You can also change this behavior for multiple monitors with the Combine taskbar buttons and hide labels on other taskbars option.
Windows 11 has a lot of pinned icons on the taskbar by default. These include Search, Widgets, Task View, Copilot, and Chat (soon to be removed). You can also disable these easily.
- Click the dropdown menu next to Search (under Taskbar items ) and choose None .
- Change the toggles for the remaining items to Off .
If you want to take an extra step in making Windows 11 look like Windows 10, you can always bring back the Windows 10 hero wallpaper. It's no longer included with Windows, but thankfully, it's easy to find online.
- The light version added later can be found here.
- Open the Settings app.
- Go to Personalization in the menu on the left.
- Choose Background .
- Click the context menu next to Personalize your background and choose Picture .
- Click Browse photos to find the wallpaper you downloaded.
- Choose a fit for the desktop image in case it's not the ideal size.
This last part is the most convoluted and not something we recommend doing unless you really want the look of Windows 10, even when it doesn't affect functionality. If this is the case, though, you can download custom icons for your folders, drives, and more. Similarly, you can download custom sounds, too.
Using custom folder icons
Microsoft doesn't provide Windows 10 icons you can use for your folders, so if you want to use custom ones, you'll need to find your own source. WinAero seems to have some icons similar to Windows 10's final release, which you can find here, but since icons changed a bit over time, you'll need to look around to get the right ones.
Once you have the icons you want, you can follow these steps to change a folder's icon:
- Right-click the folder whose icon you want to change, and choose Properties .
- Switch to the Customize tab at the top.
- Choose the Change icon button near the bottom of the window.
- Click Browse... and select the icon you downloaded.
- Click OK on both windows to confirm your changes.
You'll need to repeat the process for every folder you want to customize. Do note that you won't be able to see previews of a folder's contents by changing to a custom icon. Also, some icons can't be changed.
Using custom desktop icons
Some icons require slightly different steps to customize. If you want to change the look of This PC ,, Network , the Recycle Bin , and your user folder, you can follow these steps instead:
- Go to the Personalization tab on the left-side menu.
- Click the Themes button.
- Choose Desktop icon settings .
- For each of the icons you want to customize, click the icon and then choose Change icon...
- Click Browse... and choose the files you want to use for each option.
Using custom drive icons
Drive icons can't be customized through the methods above, but it's still possible to customize them using the Registry Editor. To do this, follow these steps:
- Find the icon file you want to use, right-click it and choose Copy as path .
- Open the Start menu and search for regedit , then press Enter to open the Registry Editor.
- In Registry Editor, navigate to the following folder (you can also copy the path below and paste it in the address bar). HKEY_LOCAL_MACHINE\SOFTWARE\Microsoft\Windows\CurrentVersion\Explorer\DriveIcons
- Right-click the DriveIcons folder in the sidebar and choose New > Key .
- Name the key after the drive letter you want to customize (say C or D , for example)
- Right-click this new key and once again select New > Key .
- Name this new key DefaultIcon . The folder structure should look like this:
- Select the new key and in the main pane on the right, double-click the (Default) value to edit it.
- In the Value data field, paste the path you copied in step 1. Click OK .
You should see the new icon immediately in File Explorer.
Using custom Windows 10 sounds
Finally, if you also want Windows 11 to sound like Windows 10, you can also change a lot of the system sounds, if you can find alternatives. VSThemes has a Windows 10 sound pack , which is probably the easiest way to do this. Once you have the sound files, follow these steps:
- Extract the files into a folder of your choice. You may need a third-party app like WinRAR.
- Open the Start menu and search for mmsys.cpl to open the Sound properties panel.
- Switch to the Sounds tab.
- One at a time, select each of the events under Windows in the bottom half of the window.
- For each of the items, click the Browse... button at the bottom of the window, and choose the appropriate sound file for each event.
- When you're done, click Save As and give your set of sounds a new name.
Your changes will be applied immediately without the need to reboot. If you download the sounds from the link above, you'll find a registry file and instructions you can use to change all the sounds at once, and you can simply head to the Sound properties panel to change to the new Windows 10 sound scheme.
Some parts of Windows 11 can't really be changed, so you can't get the proper Windows 10 look in its entirety, but these steps should help make Windows 11 feel much more familiar. We definitely recommend Start11 if you're serious about getting as close as possible to the Windows 10 experience, though it's understandable if you're not willing to pay for something like that.
Windows 10 itself still has a couple of years of support left, so you can opt to stay on it for a while longer. However, most laptops these days are optimized for Windows 11, so the tips above should help make the experience a bit better.
How-To Geek
The windows 11 start menu has a new grid layout.
Microsoft is testing an easier way to see all your installed apps in the Start Menu.
While there's a lot to love about the Windows 11 Start Menu, the way Microsoft shows a vertical list of "all apps" isn't ideal. However, the company is finally testing a new way to show apps in the Start Menu, with an expanded grid view in the latest beta build.
First spotted by several people on Reddit in the latest beta Build 22635.3420, Microsoft is experimenting with an option for Windows 11 users to show all apps in a convenient "Grid View," which some may prefer. There are plenty of helpful features in the Start Menu , and this could eventually be one more option for users.
When you open the Windows 11 Start Menu and see your list of pinned apps, then tap "All Apps" near the top right of the Start Menu, it opens a massive, vertically scrolling list of all the apps. And while that interface is clean and easy to see, there's a lot of scrolling involved to get to apps further down the alphabet. Sure, you can tap the first letter of any app on the keyboard to quickly jump down the list, but the new grid view being tested makes things even more accessible.
As shown above from the latest beta, once a user selects the all apps option, the Windows 11 Start Menu expands into something similar to the Microsoft Launcher on Android. From here, you'll see larger and easier-to-find app icons in a 6x6 grid layout.
All your Windows applications are still listed alphabetically, but seeing over 30 apps in the start menu at once is certainly handy. Then, you'll be able to continue scrolling to view the rest. As you can imagine, this makes better use of all the screen real estate, but it's also a big change from what we're used to dealing with.
If Microsoft ends up delivering this new interface for the Start Menu and apps, we're hopeful there's a way for users to toggle between either option. That way, only those who'd like the change can take advantage of it. Microsoft is still testing this layout, meaning it could change or never arrive at all. We'll have to wait and see.
Source: Windows Latest
- Windows 10 PC Apps & Games
- Windows Leaks & Rumor
- Privacy Policy
- Select Theme: Light Dim Dark

Adobe clarifies its Windows apps won’t auto-scan your documents for AI
Windows 11 sneaks in a new “Microsoft Copilot” app to enable…

Microsoft tests a new grid design for Windows 11 Start menu’s…
Windows 11 File Explorer address bar is finally getting drag and…
Windows 11 tests a new widget board layout with a navigation…

Windows 10 KB5035941 out with features (direct download)
Microsoft is adding MSN features to Windows 10 lock screen

Microsoft says uninstalling Copilot in Windows 10 isn’t supported for now
Windows 11’s speech recognition gets axed in six months, but it’ll…
- Windows 11 24H2
- Windows 11 LTSC
- Snapdragon X Elite
- New Outlook
- Get Moment 5
- Windows 11 issues
- Windows 10 issues
- Windows 10 ISO
- Windows 11 ISO
Microsoft tests a new grid design for Windows 11 Start menu’s All apps
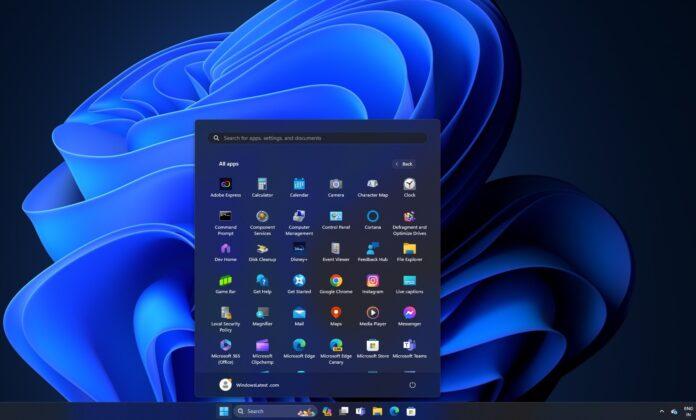
Microsoft is testing a new design for the Windows 11 Start menu that displays apps under “All apps” in a grid layout rather than a vertical layout organized alphabetically. This new design is similar to Windows 10X’s Start menu , and some of you might find it identical to Microsoft Launcher in Android.
With Windows 11, Microsoft dropped live tiles for static icons, as the company wanted the Start menu to be simple. In the stable builds, when you click on “All apps,” you see a list of all the installed apps organized alphabetically, making it easier to find the app you’re looking for.
The rrent Start menu’s All Apps layout is a vertical list of apps, but Microsoft wants to change it to a grid of icons. Microsoft is testing the new design for the Windows 11 Start menu with a grid layout for the “All apps” list, and we were able to test it in the beta Build 22635.3420.
In our tests, we observed that apps are now shown in icons arranged side by side and on top of each other to form a grid.
The good side of this grid layout is that it looks clean and organized and can better use space on the screen. Currently, we have a long vertical list of apps, which requires a lot of scrolling to reach the bottom of the screen. With the new grid layout, you can see more apps at once without having to scroll.
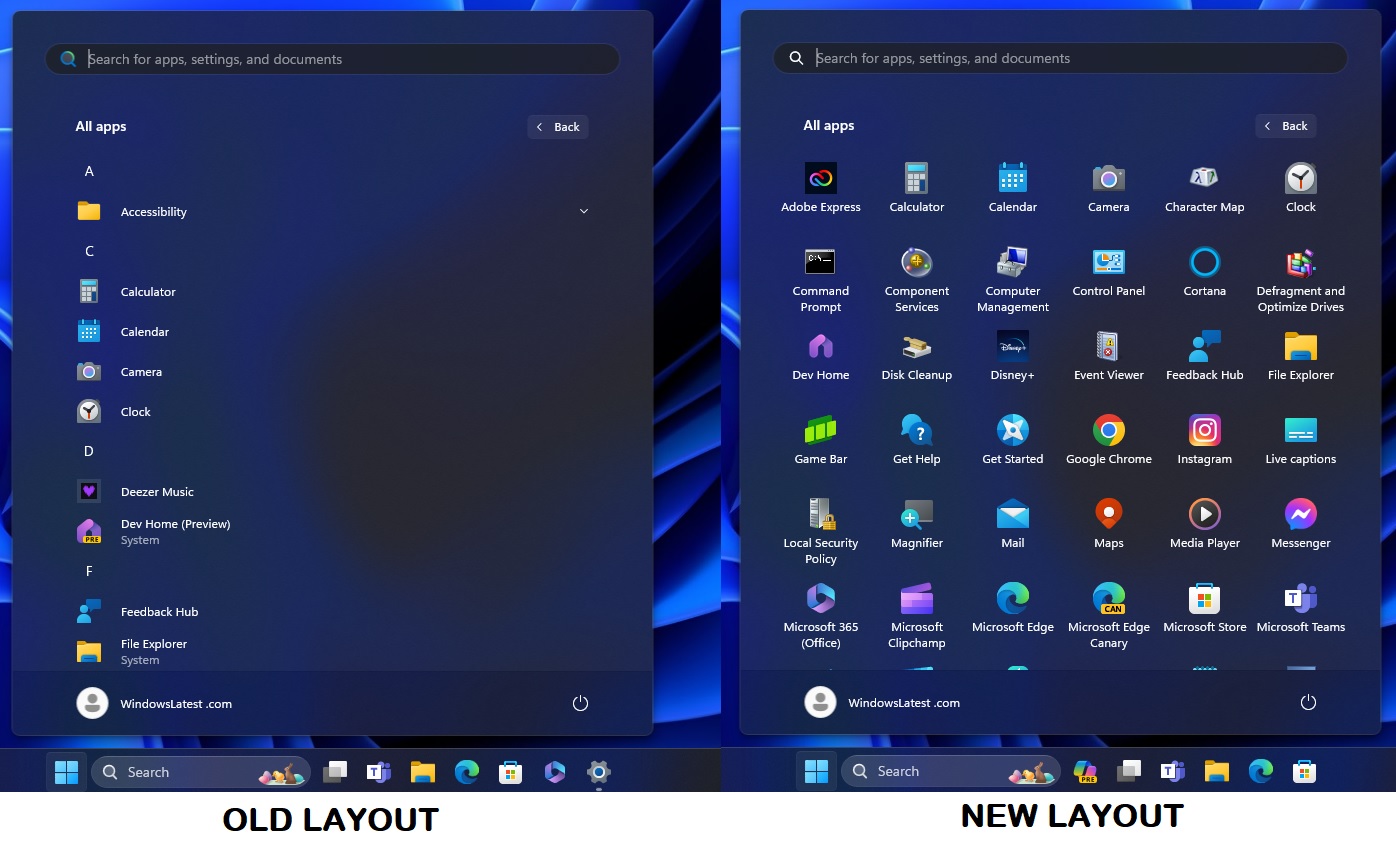
It can also be quicker to find the app you want because the icons are easier to spot.
However, the new Start menu redesign could have some downsides. If you have many apps installed, the screen might look crowded or too busy. Some people might find it difficult to read the app names if there’s a lot going on visually (too many icons when scrolling).
If you’re more comfortable with the existing vertical layout, it might take some time to get used to this new way of finding your apps.
Microsoft is still internally testing the new Start menu
We don’t know if the company will offer a toggle to switch between layouts as it does in Microsoft Launcher for Android. It’s also worth noting the company is still exploring the idea, so it may or may not ship it in the next update.
In addition to the Start menu changes, Microsoft is testing a couple of improvements for the File Explorer as well, including drag and drop in the address bar . The Start menu will likely also get more new features, including Copilot integration.
The endless cycle of Windows releases means that some people will like the change, and some will dislike it.
Do you like the new Start menu design? Let us know in the comments below.
About The Author
Mayank Parmar
Mayank Parmar is an entrepreneur who founded Windows Latest. He is the Editor-in-Chief and has written on various topics in his seven years of career, but he is mostly known for his well-researched work on Microsoft's Windows. His articles and research works have been referred to by CNN, Business Insiders, Forbes, Fortune, CBS Interactive, Microsoft and many others over the years.
RELATED ARTICLES MORE FROM AUTHOR
Windows 11 sneaks in a new “microsoft copilot” app to enable upcoming ai features, windows 11 file explorer address bar is finally getting drag and drop, windows 11 tests a new widget board layout with a navigation pane.
Windows 11 KB5035942 fixes performance (direct download links)

Windows 11 2024 Update spotted in WSUS ahead of Snapdragon X mid-2024 launch
Windows 11’s speech recognition gets axed in six months, but it’ll work on Windows 10

KB5035849 fails with 0xd0000034, but there’s a fix for Windows 10 and Server users
Featured in
- Terms Of Use

COMMENTS
Click the pinned Photos app that's on Windows 11's Start menu. Select the Albums tab. Click New album to select images within Photos to include in your slideshow. You can click the Import > From folder options to select images you can't find within the Photos app. Press the Create button to set up the album.
Learn two options to start a slideshow from a folder in Windows 11 without opening the Photos app. One option is to add a "Slideshow" option to the right-click menu of image files and the other is to bring back the classic ribbon interface.
First, head to the Settings app from the Start Menu. Then, click on the 'Personalization' tab from the left sidebar. Next, locate and click on the 'Lock Screen' tile to continue. After that, click on the dropdown menu and select the 'Slideshow' option. Next, click on the 'Browse' button to proceed.
Viewing your photos as a slideshow in Windows 11 is an enjoyable way to showcase your memories or works of art. With this guide, you've learned how to easily set up a slideshow and customize it to your preference. Remember, a little preparation goes a long way—organize your pictures, pick your favorites, and get ready for a personal photo ...
Click Import media to choose photos to add to your slideshow. Click the + (plus) button next to each image to add it to the video timeline. Alternatively, you can drag and drop them in the order ...
To set to view pictures in a folder as a slide show on your desktop, follow these steps: From the ' Start Menu ' go to ' Settings '. Click On ' Personalization '. On the right, under ...
Here are the basic steps to customize the desktop background image slideshow settings on your Windows 11/10 PC: Open the Settings app. Go to the Personalization tab. Click on the Background option ...
Windows 11 and Windows 10 have several basic internal tools (Settings, Classic Mode, File Explorer, Photo Viewer) that allow for showing an image slideshow both on demand for a set of images or ...
The steps to make a slideshow with music on Windows 11 PC using the Photos app are given below: Open the Photos app. Create a new video project. Add images or photos for your video slideshow in ...
It also offers a slideshow feature and you can use it to make a photo album in Windows 11. Step 1: Open the Photo app from Windows 11 Search. Step 2: Switch to the Albums tap and click New album. Step 3: Check the images you want to use and click the Create button.
To play a slideshow with a particular picture folder, select it, and click on the 'See all' button at the top. Now you can see all the pictures in that folder on a grid. To enable the slideshow, click on the 'Slideshow' button on the top-right corner of the window. Alternatively, you can also press the 'Ctrl + Enter' keys on your ...
They updated to a new version of the Photos app and that is missing some of the options like 'Create a Video' and the 'Slideshow' option. They advise, if you need that functionality, file you are waiting for them to add that to the new app, download and install the Legacy Photos App and set it as the default, it is available on the Microsoft ...
Windows 11 PC's have a built-in slideshow tool that is free and easy to use. It is none other than the Photos app. Through Photos, you can quickly create a slideshow with all your favorite images. 1. Open the Photos app. 2. Upload and s elect the pictures that you want in the slideshow. 3.
This tutorial will show you how to add or remove the Slide show context menu for image files for all users in Windows 10 and Windows 11. You can add Slide show to the context menu of image files to allow you to view selected image files as a slide show. While the slide show is playing, you can right click or press and hold on the slide show to use the available options below.
To view a slideshow of all images, click on the three-dot button at the top right of your Photos app, and select Slideshow from the drop-down menu. This option will start a slideshow of all the pictures you have. Alternatively, when viewing a photo, click on the three-dot button on the photo toolbar and select Slideshow from the drop-down menu.
How to Use the Spot Fix Feature in the Photos App. Double-click on any photo in the app to open it in a new window. Now, press Ctrl + E or click on the Edit icon to switch to the image editing window. Click on the Retouch option to open the Spot Fix tool. Now, click on the area which you want to remove using the tool.
What you need to know. Microsoft has announced a big update for the Photos app on Windows 11. The update adds back the missing spot fix tool, and introduces new slideshow options.
Here's what you need to do: Press Windows key + R to open up a Run dialog box. Next, type 'cmd' and press Ctrl + Shift + Enter to open up an elevated Command Prompt with administrative privileges. Open up an elevated CMD window. At the User Account Control (UAC) prompt, click Yes to grant admin access.
Yes, you can add transition effects to a slideshow in Windows 11 by following these steps: Open the slideshow. Click on Presentation Settings at the bottom of the screen.; Select option Transition effects and choose the effect you want to use.; Preview the slideshow to see what the transition effects look like.
Create a photo slide show that shuffles in Windows 11 without exterior apps
Create custom screensaver from image collection on Windows 11. Open Settings. Click on Personalization. Click the Lock screen page on the right side. Click the Screen saver option under the ...
1. Open PowerPoint: Click the Windows 11 Start button and search Power point in the search bar. Then, click on the PowerPoint icon to open the program. 2. Select a template: Once you've opened PowerPoint, choose a pre-designed template for your presentation or start from scratch. 3.
Download the Windows 10 Start menu icon pack from WinCustomize. Extract the files to a folder of your choice. Launch Start11. Go to the Start Button tab. Enable the Use a custom start button image ...
Windows Latest. As shown above from the latest beta, once a user selects the all apps option, the Windows 11 Start Menu expands into something similar to the Microsoft Launcher on Android. From here, you'll see larger and easier-to-find app icons in a 6x6 grid layout. All your Windows applications are still listed alphabetically, but seeing ...
With Windows 11, Microsoft dropped live tiles for static icons, as the company wanted the Start menu to be simple. In the stable builds, when you click on "All apps," you see a list of all the ...