
7 Ways to Protect PowerPoint Presentation from Editing!
By: Author Shrot Katewa

Isn’t it annoying when you spend hours and hours creating a visually appealing presentation and do all the hard work, only to find out that your colleague or your manager has made changes to the presentation!
Intentional or not, now you’ve got to make the changes to your presentation again; some of which could have been easily avoided if you were able to prevent the presentation file from editing.
Here’s how to protect a PowerPoint presentation file –
- Mark the presentation as “Final”
- Restrict permission to PowerPoint
- Save the presentation as a PowerPoint Show file
- Set a password to modify PowerPoint
- Convert PowerPoint to pictures
- Convert PowerPoint to a PDF
- Convert PowerPoint to a video
There are many applications of knowing how to protect your PowerPoint presentation.
So, in this article, let’s understand the 7 different ways to protect PowerPoint in further detail such that you can ensure that the person you are sharing your presentation with, will not be able to make changes to it.
Let’s get started!
1. How to Protect PowerPoint presentation from Editing?
We shall divide the 7 ways into two groups –
- Prevent PowerPoint file from editing
- Convert PowerPoint to make it uneditable
Prevent PowerPoint File from Editing
There are actually 4 ways in which you can prevent users from editing your PowerPoint presentation.
You can either mark the presentation as final, restrict the presentation by allowing access to specific users, save the presentation as a PPS file or set a password for your presentation.
All the 4 methods and the process to use them are explained elaborately in the following section –
Method 1 – Mark the Presentation as Final
By marking the PowerPoint presentation as final, the PowerPoint file will become “Read-only” .
Although this method doesn’t restrict people from editing your file. However, they will not be able to save changes to the original file. When using this method, PowerPoint will force users to save another copy of the presentation file; thereby protecting your presentation.
This method is especially helpful when you share the presentation over the same network within your organization or even when the presentation is saved on a cloud. It is also helpful when more than one person is working on the same presentation.
It is not a perfect fix, but a quick fix to the problem for sure.
The process of marking your PowerPoint presentation as final is given below –
Step-1: Click on the “File” tab
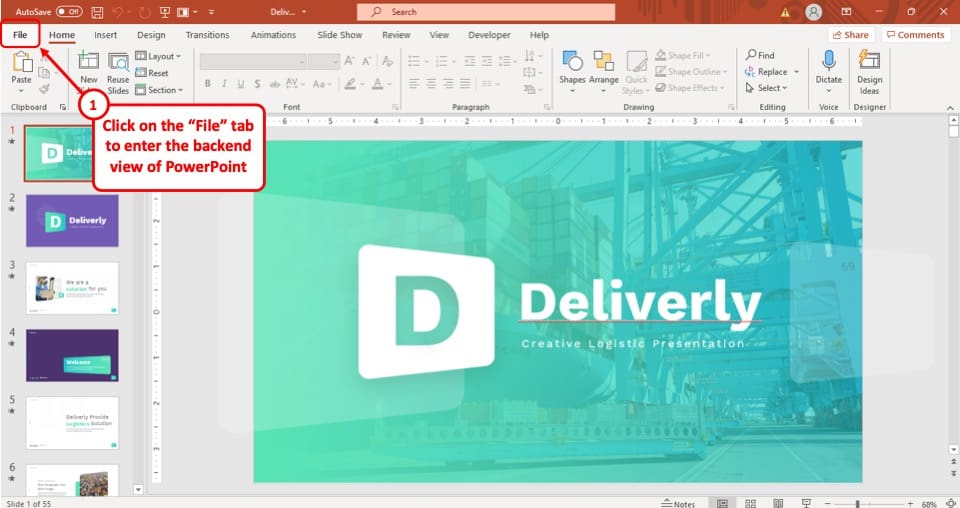
The first step of the process is to click on the “ File ” tab, which is the first option in the ribbon of your PowerPoint presentation. This will take you to the backend view of the PowerPoint.
Step-2: Select the “Info” option
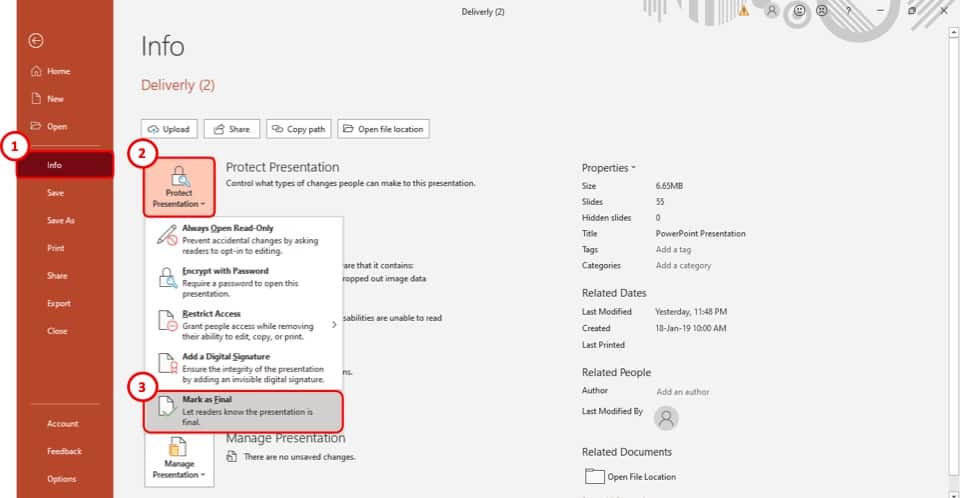
After you have accessed the “ File ” tab, select the “ Info ” option which is the 4 th option in the tab. This will take you to a new page in the “ File ” tab.
Step-3: Select the “Protect Presentation” option
The third step is to select the “ Protect Presentation ” option in the “ Info ” section (as shown in the image in step 2). It is the first of the four boxes on the “ Info ” page.
After you click on the “ Protect Presentation ” option, a drop-down menu will appear on your screen.
Step-4: Click on “Mark as Final”
From the drop-down menu, select the “ Mark as Final ” option. It is located at the very bottom of the dropdown menu (as shown in the image in step 2).
Step-5: Hit the “OK” button
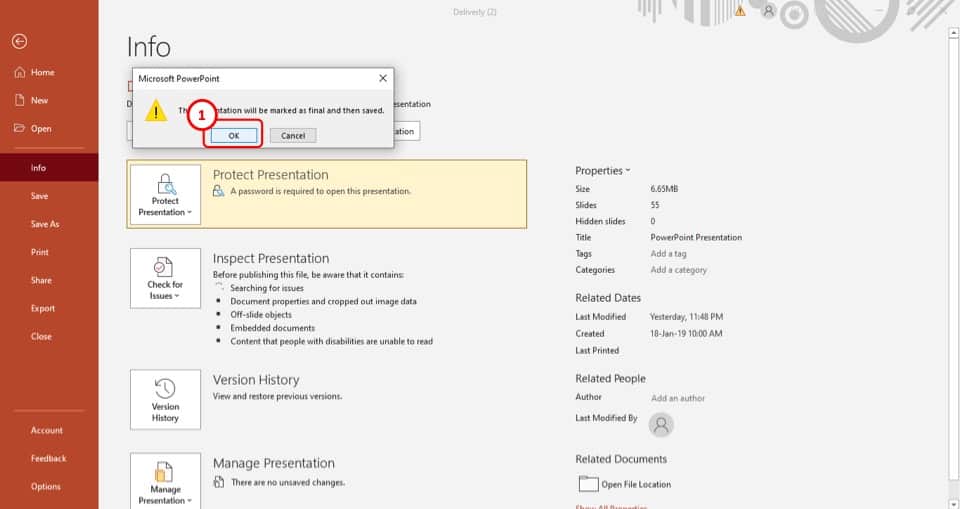
After you click on the “ Mark as Final ” option, a pop-up window will appear on your screen.
Simply click on the “ O K” button and the presentation will be saved as final. Once your presentation is “Saved as Final”, you won’t be able to edit this presentation going forward.
Thus, I recommend that you make this change once you’ve finished your presentation.
Method 2 – Restrict Permission
The next method is to restrict the permissions to edit a PowerPoint presentation.
In my opinion, this is one of the best ways to protect a PowerPoint presentation and to prevent users from editing the PowerPoint file!
By restricting permission, you will be able to allow specific users to access your PowerPoint presentation.
To use this feature in your presentation, follow step-1 through step-3 from the previous section and then follow the easy steps described below.
The first step is to click on the “ File ” tab to enter the backend view of your PowerPoint presentation.
Step-2: Click on the “Info” option
Now, click on the “Info” tab from the options in the left part of your screen.
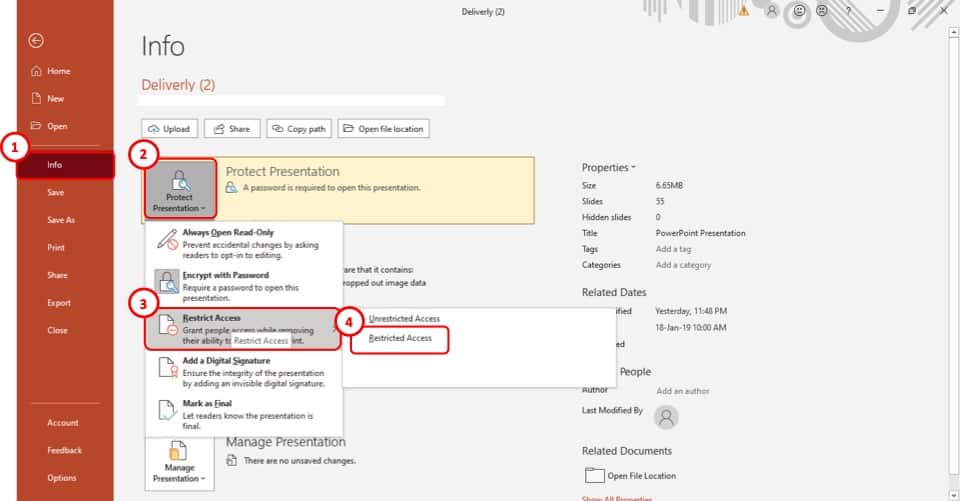
Step-3: Select the “Restricted Access” option
The next step is to select the “ Restrict Access ” option from the drop-down menu of the “ Protect Presentation ” option. It is the 3 rd option in the drop-down menu (as shown in the image in step 2)
Once you click on the “ Restrict Access ” option, another drop-down menu will appear on your screen. Select the “ Restricted Access ” option which is the second option in the menu.
Step-4: Click on the checkbox

After you click on the “ Restricted Access ” option, a pop-up window will appear on your screen.
From the pop-up window, click on the “ Restrict permission to this presentation ” checkbox. It is located at the top of the pop-up window.
Step-5: Add the email address of the users
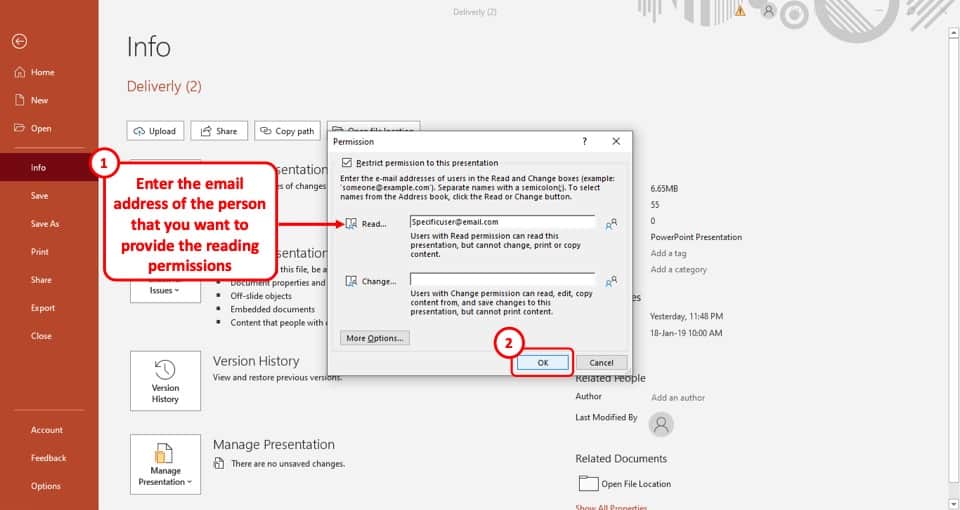
In the final step, all you have to do is type in the email addresses of the users with whom you want to share the presentation, in the “ Read ” option.
This will ensure that the users can only view the presentation file and not edit it. After that just click on the “ OK ” button located in the bottom right of the pop-up window.
Now, only the specified users will get permission to view the PowerPoint presentation.
Method 3 – Save the Presentation as a PPS file
Another method to prevent your PowerPoint presentation from editing and thus protecting it is to save the presentation as a PowerPoint Show file or a PPS file.
Saving a presentation as a PPS or PPSX will open the file directly in the presentation show mode when you open the file. Furthermore, when you exit the presentation show mode, the file will close and the user will not be able to access the content on the slides.
To save the presentation as a PPSX file, simply use the file “ Save As ” option, and choose the “ PPS ” file format from the “ File Format ” option.
I’ve written a detailed article on how to use the PPSX file in PowerPoint . If you need the step-by-step guide for the process, click on the link and check out the article for detailed guidance!
Method 4 – Set a Password to Modify PowerPoint
You can also set a password in order to prevent users from modifying a PowerPoint presentation. This method will prompt a password before opening a presentation.
Although this method will not help if you want to prevent people from editing the file as you will need to provide the password even to view the file. And, once the password is entered, the users will be able to make the changes.
However, this method is super helpful when you want to protect a PowerPoint presentation and prevent it from being access by unintended users.
To set a password to modify your PowerPoint presentation, follow the easy steps given below –
As before, click on the “ File ” tab in PowerPoint. This will open the backend view in PowerPoint from where you can enable additional settings.
Step-2: Select the “Encrypt with Password” option
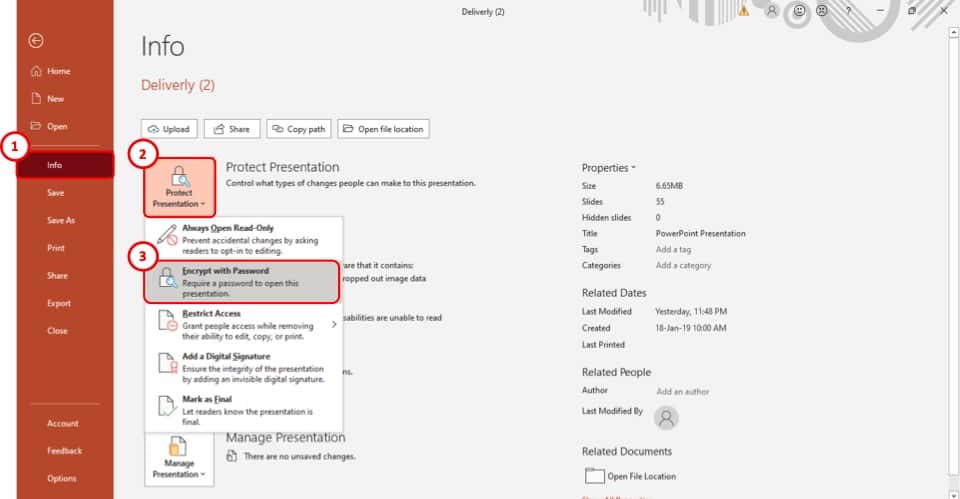
The first step is to select the “ Encrypt with Password ” option from the drop-down menu. It is the 2 nd option on the menu.
Step-3: Enter your preferred password
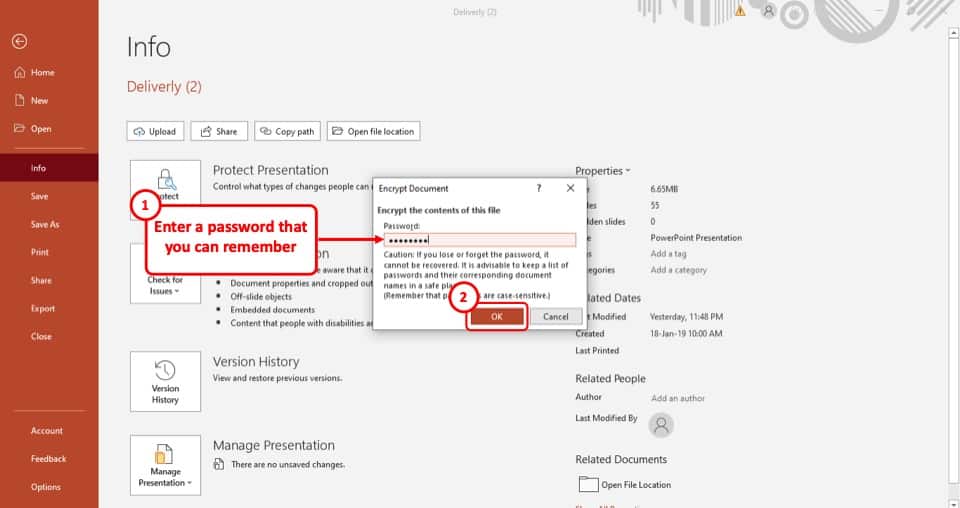
After you select the “ Encrypt with Password ” option, a pop-up window will appear on your screen. In that pop-up window, type in your preferred password in the “ Password ” box. After that, click on the “ Ok ” button.
Once you click on the “ OK ” button, you will be taken to a new page in the pop-up window.
Step-4: Re-enter the password
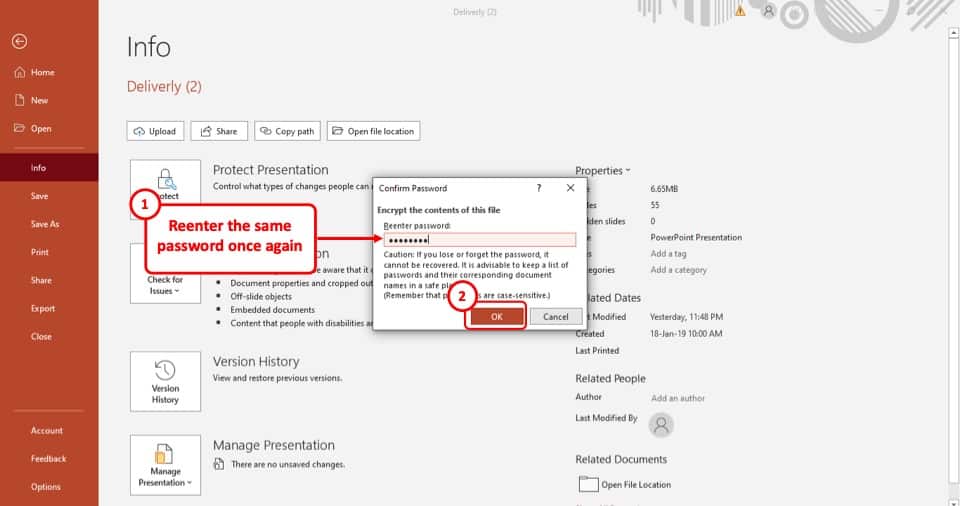
Now, all you have to do is to re-enter the password on this page and then select the “ OK ” button again.
Once done, your PowerPoint presentation will be password protected and users will have to enter the password to access your PowerPoint presentation.
Make PowerPoint Uneditable Permanently?
In the 4 methods described above, you will be able to prevent or protect your PowerPoint presentation file. More importantly, you will be able to share the PowerPoint presentation with the intended users.
However, if sharing a PowerPoint file is not important, there are other ways in which you can protect your presentation and prevent it from being edited further!
Interestingly, the methods described below will allow you to make a copy of your presentation and make it completely uneditable!
There are 3 ways in which you can make your PowerPoint presentation uneditable permanently.
You can either convert the presentation into a picture or convert it into a PDF file or you can convert it into a video. Let’s take a look at the 3 methods below –
Method 1 – Convert PowerPoint to Picture
The first way to protect your PowerPoint presentation is to convert it to pictures.
To convert your PowerPoint presentation as a picture, you will have to use the “ Save As ” option from the “ File ” tab. Simply choose a picture file format from the “ File Type ” options in the “save as” window.
If you need further guidance on how to carry out this process, check out my other article on how to save PowerPoint as an image for full details.
Method 2 – Convert PowerPoint to a PDF
You can also convert your PowerPoint file to a PDF. This is actually one of the most common methods used when you want to prevent your client or colleague from editing the presentation.
The advantage to save PowerPoint as a PDF over saving it as an image is that when you save your PowerPoint presentation as a PDF file, it is saved all the slides in one file just as the case would be in a presentation.
However, when you save a presentation as a Picture, the slides usually get saved as individual images.
Although the process to save a PowerPoint as a PDF is quite similar to that of saving it as an image, but if you are unsure how to do this, check out our other article on how to convert PowerPoint as PDF that details the process in an easy manner!
Method 3 – Convert PowerPoint to a Video
You can also convert your PowerPoint to a Video in order to protect your PowerPoint file!
If you have a lot of animations in your presentation, and you want to retain the animations when you show it to your colleagues or the audience, but you don’t want them to edit the file, then you can convert the presentation to a video format.
This will allow you to retain the animations, and make the presentation uneditable.
Converting a PowerPoint to a video requires you to use the “ Save As ” function. However, there are a few additional things that you may need to keep in mind.
Check out our article on how to convert PowerPoint to Video for a full guide with helpful tips.
2. How to Password Protect a PowerPoint Presentation from Opening?
You can set a password that users will have to enter before they can access your PowerPoint presentation.
The process to password protect a PowerPoint presentation is elaborately explained in method 4 of the previous section of this article. Simply follow the steps explained in the earlier section and you will be able to add a password to your PowerPoint file.
3. How to Remove Password from a PowerPoint Presentation?
The process of removing the password from a PowerPoint file is quite straightforward. However, it is important to know the password in order to change or remove the password protection in PowerPoint.
Let’s take a look at how to remove a password from a protected PowerPoint presentation –
3a. If You Know the Password
If you remember the password to your PowerPoint presentation, open the PowerPoint file, go to the “ Encrypt Presentation ” option in the “Info” section of the “ File ” tab and follow the steps given below.
Step-1: Open the “Encrypt Password” option
The first step is to click on the “ File ” tab. Then, from the backend view, click on the “ Info ” option.
Next, click on the “ Protect Presentation ” option, and from the dropdown, select the “ Encrypt with Password ” option.
Step-2: Clear the Password from the box
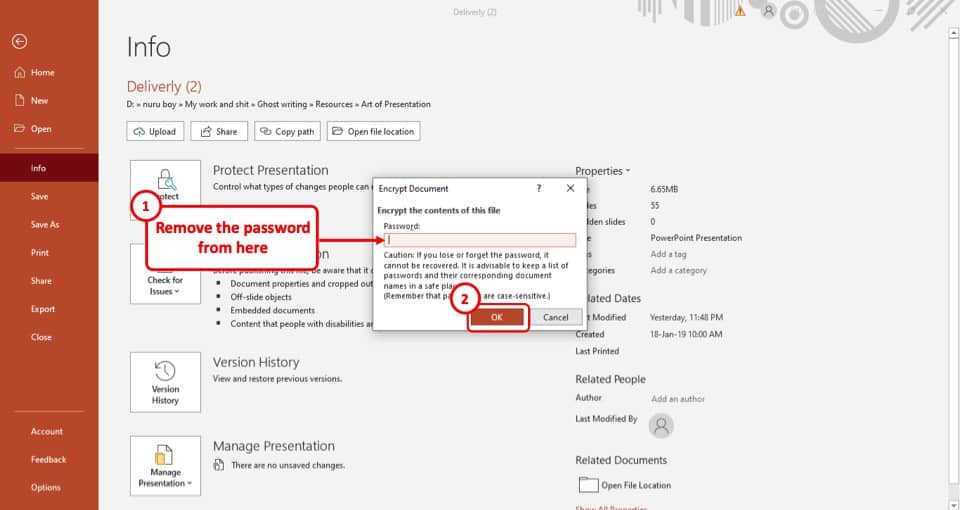
Once you’ve clicked on the “ Encrypt Presentation ” option, clear the password from the “ Password ” box.
After you’ve cleared the password, simply hit the “ OK ” button, located at the bottom right corner of the pop-up window and the password will be removed immediately.
3b. If You Forget the Password
Unfortunately, there is no direct way of removing a password from your PowerPoint file.
To do this, you will have to use third-party software that will unlock the encrypted PowerPoint file for you.
The software that we would recommend is “iSunshare” . It is free to use, and you will be able to unlock more than just PPT files. To download the software from their website, click here .
Credit to cookie_studio (on Freepik) for the featured image of this article (further edited).
- Slide Library
- Slide Library for PowerPoint
- Downloadable slides and shapes
- Slide Library search
- Search Library via shortcut keys
- Slide Library update alerts
- Rename or delete objects
- Share Slide Library
- Save slides or shapes to Slide Library
- Save presentation to Slide Library
- Manage Templates
- View all templates and set default
- Agenda Wizard
- Create Agenda Slides
- Update Agenda Slides
- Agenda Slide Numbering
- Navigate via Agenda
- Table of Contents
- Import Agenda Items
- Save Agenda Format
- Manage Colors
- Color Palette Toolbar
- Customize Color Toolbar
- Apply fill with outline color
- Recolor Charts
- View RGB color values & names
- Theme Color Tints and Shades
- Share Color Palette with team
- Insert Shapes
- Standard PowerPoint shapes
- Callouts / Speech Bubbles
- Hand Drawn Circles
- Harvey Balls
- Create Mini Slides
- Move to Multiple Slides
- Right Facing Centered Triangle
- Status Indicators
- Arrange and Align Shapes
- Select same color or size
- Select shapes by attribute
- Align shapes
- Align to first selected shape
- Choose Align anchor point
- Align using shortcut keys
- Copy paste position multiple shapes
- Straighten Lines
- Swap positions
- Distribute evenly
- Set Horizontal Gaps
- Set Vertical Gaps
- Squeeze or expand gaps
- Remove gaps
- Group Objects by Row
- Group Objects by Column
- Send to back, bring to front
- Send backward, bring forward
- Flip or rotate
- Group, ungroup and regroup
- Edit Shapes
- Same height, same width
- Copy paste position, size
- Resize shapes
- Slice shapes
- Multiply shapes
- Stretch shapes and fill gaps
- Toggle line weight and style
- Change margins toggle
- Chevrons same angle
- Paragraph Styles
- Save Paragraph Styles
- Apply Paragraph Styles
- Use PowerPoint Indent Increase/ Decrease to apply bullet styles
- Reset Paragraph Styles
- Ticks and Crosses bullets
- Paint Formatting
- Advanced Format Painter
- Position & Size Painter
- Table Format Painter
- Style Painter
- Text Format Painter
- Change Shape Painter
- Chart Format Painter
- Angles & Curves Painter
- Animation Painter
- Cycle Accent Colors
- Format Text
- Fit text to textboxes
- Wrap Text Toggle
- Merge Textboxes
- Split Textboxes
- Increase/ Decrease Font size
- Change Text Case
- Color Bold Text
- Delete Text or Replace
- Insert Superscript text
- Format Tables
- Create table from text boxes
- Convert table to text boxes
- Convert text to table
- Insert columns and rows
- Paste Excel data without source formatting
- Paste Excel data into text box tables
- Export Table or Box Table Data to Excel
- Set cell margins
- Express Table layout
- Table stripes
- Autofit columns
- Evenly space columns
- Align shapes over tables
- Harvey Balls for Tables
- Status Indicators for Tables
- Customizable PowerPoint Shortcuts
- Extra PowerPoint shortcuts
- Add PowerPoint shortcuts
- Search shortcut keys
- Reassign PowerPoint shortcuts
- Reset PowerPoint shortcuts
- McKinsey PowerPoint shortcuts
- F4 or Ctrl+Y redo or repeat
- Printable PowerPoint Shortcuts PDF
- How to Print a Custom Shortcuts list
- Search Shortcut Keys
- Searchable PowerPoint Shortcuts list
- Format Toolbar Overview
- Format Toolbar Layout Options
- Lock or Unlock Objects
- Lock objects
- Lock objects to the Slide Master
- Unlock objects
- Proofing Tools
- Check Formatting
- Check Fonts
- Check Template
- Check Slide Layout
- Check Content
- Check Punctuation & Spacing
- Reduce File Size
- Flip Slides
- Set Proofing Language
- Change set language for PowerPoint presentations
- Slide Numbering
- Manage Slide Numbering
- Slide Numbers with totals
- Add words to Slide Numbers
- Change Starting Slide Number
- Skip Slide Numbers on Hidden Slides
- Slide Navigator
- Footers & Footnotes
- Filename Footer
- Enlarge Footnotes
- Refine Slides
- Add summary slide
- Format slide title
- Display No Fly Zone
- Send slide to appendix
- Camouflage mode
- Format Painter
- Set Grayscale
- Format Images
- Compress file size
- Format Charts
- Charts Toolbar
- Config Options
- Customize Settings
- Dark Mode Display
- Review Slides
- Customizable Status Stamps
- Sticky Notes
- Tag slides with filename and page number
- Share Slides
- Email selected slides in PPT or PDF format
- Print selected slides
- Save selected slides
- Slide Library for Teams
- Team Slide Library
- Create multiple Team Slide Libraries
- Synchronize Team Slide Libraries
- Synchronize Team Slide Library to your company Dropbox/ Box/ OneDrive folder
- Updating your Team Slide Library
- Import entire presentation to the Slide Library
- Share Slide Library with a colleague
- Share Custom Settings
- Share Custom Settings with Team
- Getting Started
- Getting started with PPT Productivity add-in for PowerPoint
- Downloadable PowerPoint Elements for Slide Library
- Tutorial - How to Create Custom Paragraph Styles for PowerPoint
- Can I use PPT Productivity on a Mac?
- PPT Productivity Basic Tools Tutorial
- PPT Productivity Plus Tools Tutorial
- New Features
- August 2023 update: Color Toolbar enhancement, new icons and more
- February 2023 update: New Slide Libraries available to download!
- January 2023 Update: Agenda Wizard, Format Painters + More
- How to copy and paste formatting in PowerPoint
- PowerPoint How To
- What are the most popular PowerPoint shortcuts?
- Where are PPT templates stored? Finding templates in PowerPoint
- Pasting data into a PowerPoint table without source formatting?
- Consulting Toolkit
- How to create effective consulting slides using Minto Principles
- Missing the McKinsey PowerPoint Shortcuts?
- Missing the Accenture QPT for PowerPoint?
- Missing the BCG PowerPoint Tools?
- Missing the Bain Toolbox for PowerPoint?
- How to add Stamps or Stickers to PowerPoint slides?
- Looking for a Consulting PowerPoint Toolbar?
- Top 10 PowerPoint Hacks / Shortcuts used by strategy consultants
- PowerPoint Tips
How to protect / lock a PowerPoint presentation?
- September 28, 2020
Unless you protect your PowerPoint document, anyone with access to the .pptx file can open, copy and edit the contents. Here's a guide to how you can protect/ lock your PowerPoint presentations.
This post is part of our hints and tips for standard PowerPoint features. PPT Productivity is a time saving add-in for PowerPoint. If you’d like to boost your productivity in PowerPoint and save time aligning, formatting and reusing slides, visit our homepage and download the PPT Productivity free trial today!
To protect your document, go to the file tab in PowerPoint, select Info, then click ‘Protect Presentation’
In the drop-down menu, you will find 4 or 5 options for protecting presentations in PowerPoint (options available depend on which version of PowerPoint you are running): ‘Always Open Read-Only’, ‘Encrypt with Password’, ‘Restrict Access’, ‘Add a Digital Signature’, ‘Mark as Final’.
Note - This article is about general locking of a PowerPoint presentation. However if you want to lock specific shapes on your PowerPoint slide from being edited – visit PPT Productivity's website to learn more about the PPT Productivity shape locking tool for PowerPoint .

Choose which option best suits your needs:
Always Open Read-Only PowerPoint setting prevents accidental changes by displaying a yellow banner at the top of the PowerPoint presentation indicating that the presentation is read only. The reader will need to opt-in to editing the document by clicking the ‘Edit Anyway’ button

Encrypt with Password PowerPoint setting lets you password protect your PowerPoint presentation. A password will be required to open the document. It’s very important to note that if you forget the password, you will not be able to open the presentation.
If your organization uses Microsoft 365, you also have a Restrict Access option in PowerPoint. The Restrict Access option allows people to view the PowerPoint presentation, but prevents them from editing, copying, or printing. To use the Restrict Access option, you need to have Information Rights Access set up on your machine. Find more information about Information Rights Access .
A digital signature adds unique code to a message which only comes from the digital ID held by the true sender. If you choose Add a Digital Signature in PowerPoint, you will need to have a Digital Signature set up. For more information about Digital Signatures visit the Microsoft Support Page .
Mark as Final PowerPoint setting sets the PowerPoint presentation status to Final. Typing, editing commands and proofing marks are turned off. A yellow banner noting that the document has been marked as final will appear at the top of the presentation. Readers will still be able to Edit the document if they click on the ‘Edit Anyway’ button.

Once you have decided which option is best for your needs, select the relevant option and save your document. Done!

Want to see our tools in action?
Book a personalized demo with our PowerPoint professionals

Download 30 Day Free Trial
Download your 30 day free trial - Microsoft Office for Windows
Related productivity tips

How do I get more icons in PowerPoint?
This hints and tips post gives you an overview of what icons are, why icons in PowerPoint are ...
Can I lock a shape, image or object in PowerPoint? Yes!
With PPT Productivity add-in for PowerPoint you can now lock shapes, images or other objects in ...

Can I unlock a locked shape in PowerPoint? Yes!
How to unlock shapes that have been locked in PowerPoint? Shapes that have been locked in your ...
How-To Geek
Can i stop people from editing my powerpoint presentation.
Your options depend on your version of Office, but you can at least make editing more difficult.
Quick Links
Use the restrict access feature (business and enterprise only), make your presentation read-only or mark it as final, password protect your presentation, save your presentation as an image.
To preserve the integrity of your PowerPoint presentation, you may want to try to prevent others from editing it. Depending on the Office version you have, there are a few things you can do to block editing, or at least make it more difficult.
You can use the Restrict Access feature to protect your PPTX file from edits, but this feature is only available for Microsoft 365 for Business or Enterprise , and the feature must be enabled by your organization's administrator in the Microsoft 365 admin panel . That means if you're using any version below Microsoft 365 for Business, such as Home or Family, then you won't have this feature.
Related: How to Find Out Which Version of Microsoft Office You're Using (and Whether it's 32-bit or 64-bit)
If you are subscribed to a version that supports this feature, and if the admin of your organization has enabled it, you can locate "Restrict Access" under File > Info > Protect Presentation.
You can then set the restriction types and file access expiration dates.
Visit Microsoft's official doc site to learn more about Information Rights Management and how to use this feature.
Making your presentation read-only or marking it as final doesn't actually make your presentation un-editable. What this does is discourage others from making edits. It's also good for preventing accidental edits, as it makes you opt-in before you're able to make any changes to the content.
Related: How to Make a Microsoft PowerPoint Presentation Read-only
To make your presentation read-only, or to mark it as final, open your PPTX file and click the "File" tab.
Next, click "Info" in the left-hand pane.
Now, in the Protect Presentation group, click "Protect Presentation."
Once selected, a drop-down menu will appear. You can choose between these two options to make your presentation read-only:
- Always Open Read-Only: This asks the reader to opt-in to edit the presentation, which prevents accidental edits.
- Mark as Final: This lets the reader know that this is the final version of the presentation.
Selecting either option will prevent the reader from editing the presentation---unless they opt-in to do so by clicking the "Edit Anyway" button in the banner.
While making your presentation read-only serves a purpose, it's a weak form of protection if you want to truly keep others from editing your content.
Related: How to Unlock Read-Only PowerPoint Presentations
PowerPoint has an option that lets you encrypt your presentation and only those with the password can access it. Again, this doesn't fully protect the content within the presentation, but if only those with the password have access, the chances of the presentation being edited are certainly lower.
This password isn't stored anywhere on your local machine. Be sure to store the password somewhere safe. If you forget or lose your password, you won't be able to access the presentation again.
To password protect your presentation, open PowerPoint, click the "File" tab, click "Info" in the left-hand pane, and then click the "Protect Presentation" option.
Next, click "Encrypt with Password" from the menu that appears.
The Encrypt Document window will appear. Enter your password in the Password text box and then click "OK."
Reenter the password and then click "OK" again.
Now anyone who tries to open the presentation will need the password to access it.
This method is more secure than simply making your presentation read-only. However, you're merely preventing people from opening the PPTX file. If they have the password, then they can also edit the presentation's content. Be careful who you share the password with. If you're worried the password may have been exposed , change the password immediately.
Related: How to Check if Your Password Has Been Stolen
If you want to deliver your PPTX file to someone, but don't want them to be able to copy or edit the content (easily, at least), then you can convert the PowerPoint presentation to an image file and send it that way.
Open the PowerPoint presentation, click "File," and then click "Save As" in the left-hand pane.
Browse to the location you would like to save the file and then, in the "Save As" box, choose the image file type you would like to save the presentation as. You can choose between:
- Animated GIF Format (*.gif)
- JPEG File Interchange Format (*.jpg)
- PNG Portable Network Graphics Format (*.png)
- TIFF Tag Image File Format (*.tif)
- Scalable Vector Graphics Format (*.svg)
Related: What's the Difference Between JPG, PNG, and GIF?
Once you save the presentation as an image, you can send it out to the desired recipients.
At the end of the day, there's no solid way to 100% protect your presentation. You can kindly ask recipients not to edit the content, password-protect your presentation so only those you want to have access to it can access it, or convert your presentation to an image or PDF , but even with these measures, if someone wants to edit something, they can always find a way.
Related: How to Save Microsoft PowerPoint Presentations as PDF Files
- Password Recovery Password Refixer Bundle Windows Password Refixer Windows 7 Password Refixer Office Password Refixer Word Password Refixer Excel Password Refixer PowerPoint Password Refixer RAR Password Refixer ZIP Password Refixer PDF Password Refixer Access Password Refixer Outlook Password Refixer SQL Password Refixer WiFi Password Refixer iTunes Password Refixer
- Support Support Center FAQs & Technical Support Download Free Download Center Resources How-to Articles Blog iSumsoft IT Blog
- How to Protect PowerPoint Presentation from Editing and Modifying

Updated: January 11, 2024
If you don't want others to open and modify your PowerPoint presentation, you can lock the presentation. Here, this guide will introduce several ways to protect a presentation file from being copied, edited, and changed by unauthorized others.
- Option 1: Marking as final
- Option 2: Restrict Access
- Option 3: Encrypt with Password
Option 1: Make the presentation read-only
If you want to let people know that a presentation shouldn't be changed, you can use the Mark as Final feature. When a presentation is marked as final, typing, editing, commands, and proofing marks are disabled or turned off and the presentation becomes read-only .
Step 1: Click the File tab to go to Backstage view.
Step 2: From the Info pane, click the Protect Presentation command.
Step 3: In the drop-down menu, choose the option that best suits your needs. select Mark as Final .

Step 4: A dialog box will appear prompting you to save, click OK .

Step 5: Another dialog box will appear, click OK .
When you mark a presentation as final, PowerPoint asks you to save the file. The next time you open it, you will see a yellow MARKED AS FINAL message at the top of the file. If you click Edit Anyway , the presentation will no longer be marked as final.

Option 2: Set Restrict Access to Prevent Others from Editing
If you want to prevent people from editing it, you can use the Restrict Access option:
Step 1: Click on File tab to go to Backstage view.
Step 2: In Info tab, click Protect Document button. And then select Restrict Access option.

Option 3: Set a Password for Modify Presentation
To protect PowerPoint 2010/2013/2016 presentation, use these steps as follows:
Step 1: Click on the File tab, choose Save As option. Select one location you will save this *.pptx file.

Step 2: In the Save As dialog, click the Tools button at the bottom and then select General Options .

Step 3: Type a password in the Password to modify box and click OK . Reenter the password to modify and click OK to confirm. When you return back to the Save As dialog, click Save to save this presentation.

Then the password to modify will lock this PowerPoint 2016 presentation and prevent it from being edited or modified. Keep your password in a safe place. If you lose or forget the password, Microsoft won't help recover it and you have to remove the password with a third-party utility like PowerPoint Protection Refixer .
Related Articles

Latest Articles
- 4 Ways to Encrypt/Password Protect an Email Attachment in Outlook or Gmail
- 3 easy ways to find out what Microsoft Word version you have on Windows
- 8 ways to make a Word Document containing images smaller without losing quality
- How to Repair Excel File Corrupted by Virus
- [Solved] Word Experienced an Error Trying to Open the File Windows 10
- How to Fix "PowerPoint Found a Problem with Content in .PPTX"
Hot Articles
- How to See Saved Passwords in MS Outlook 2016
- How to Remove Red and Green Wavy Underlines in Word Document
- Fix Picture is Blurry When Inserted to Word Document Problem
- How to Activate Microsoft Office for Free
Support Team: support#isumsoft.com(Replace # with @) Sales Team: sales#isumsoft.com(Replace # with @)
- Top Products
- Windows Password Refixer
- iPhone Passcode Refixer
- RAR Password Refixer
- iOS Refixer
Copyright © 2024 iSumsoft Studio All Rights Reserved.
PowerPoint Tips Blog
Helping you with presenting, PowerPoint, and speaking
Protect a PowerPoint file from changes
July 2, 2003 by Ellen Finkelstein 29 Comments
Many people need to protect PowerPoint files from changes. There are several reasons for this:
- To send presentations for review only (but not editing)
- To maintain ownership of the creative content
- For legal reasons (for example, if the content has been approved by legal and financial counsel and may not be changed)
- To provide presentations for others to deliver but not modify
You can choose from a number of techniques, depending on your situation. Sometimes, you need to maintain animation for example; other times, you just need static slides. Here are some methods you can use.
Convert to images in PowerPoint 2003 and 2007
If you don’t have animation, you can convert the entire presentation to images, so that each slide contains an image of the original slide. Of course, people could still remove slides or images, but this method is easy and is often used for review and maintaining creative ownership. It also allows you to protect some slides and not others. This is useful if you want to allow people to change some of the slides. Follow these steps:
- Choose File/Office button> Save As.
- In the Save As dialog box , click the Save as Type drop-down box and choose the JPG or PNG option. You can change the file name if you want or keep the default name.
- Click Save.
- At the dialog box asking if you want to export every slide or the current slide, click Every Slide.
click Every Slide
- Click OK at the dialog box that tells you were the image files were saved. PowerPoint creates a subfolder for them.
dialog box that tells you were the image files were saved
- Create a new presentation. You now need to insert the images, and there’s a shortcut, the Photo Album feature. Choose Insert> Picture> New Photo Album in 2003 or Insert tab> Illustrations group> Photo Album drop-down arrow> New Photo Album in 2007
- In the Photo Album dialog box, click the File/Disk button. Choose the images you created earlier and click Open. (You can press Shift and click the first, then the last image you saved earlier to select them all.)
the Photo Album dialog box
- You’ll return to the Photo Album dialog box. In the Album Layout section, choose the Picture Layout you want. Usually, you’ll choose Fit to Slide or 1 Picture. Click Create.
- PowerPoint inserts one image on each slide and creates a title slide, which you can then delete. Save the presentation.
Convert to images in PowerPoint 2010 and 2013
PowerPoint 2010 and 2013 make this easier. Choose File> Save As. In the Save As dialog box, click the Save as Type drop-down list and choose PowerPoint Picture Presentation (*.pptx). That’s all there is to it!
Convert to PDF
Another commonly-used method is to convert the presentation to PDF format. You lose all animation, but people can’t change any of the slides, or even delete any. Some options:
- Adobe Acrobat
- A free PDF creator (such as PDF995 or PrimoPDF )
- An add-in from Microsoft (for PowerPoint 2007 only). If you use the add-in, you can then choose Office button> Save As> PDF or XPS
- In PowerPoint 2010 and 2013, choose File>Save & Send> Create PDF/XPS Document>Create PDF/XPS.
Convert to SWF, AVI, or another video format
Converting to video saves your animation either by converting it or simply displaying it as a video. There are many video formats. You can use this method to post your presentation on your Web site or YouTube , especially if you include narration. Some options:
- In PowerPoint 2013 and 2013, choose File, Export/Save & Send, Create a Video. PowerPoint 2010 creates a WMF video and 2013 creates an MP4 video.
- A list of software that converts PowerPoint to SWF
- iSpring Free , the best free tool that I know of, converts to SWF
- Video capture, including TechSmith’s Camtasia , SnagIt (in video capture mode). These tools convert to AVI, SWF, MP4 or other formats. There’s a free open source option, CamStudio .
Password protect for editing
PowerPoint 2007 and later allow you to add a password that allows people to open, but not edit, a presentation. This is a great way to allow some people to edit the file, but not others. But note the “gottcha” and the workaround at the end of this section.
Click the Office/button/File> Save As. In the Save As dialog box, choose Tools> General Options.
the Save As dialog box
In the General Options dialog box, enter a password in the Password to Modify text box. Be sure to write this down! Click OK. You’ll need to re-enter the password. Then go ahead and save the file.
When you or others re-open this file, a dialog box appears asking for the password.
password dialog box
The problem with this method is that if people open the 2007 or later file in PowerPoint 2003, the file is no longer protected. However, funnily enough, if you save the file in 97-2003 format (in the Save As dialog box), you can’t edit the file, even in 2003. This workaround may be just what you need. Of course, some features of 2007 and later don’t work in 2003, which may be a problem if you want to give some people the right to edit the file.
Add a digital signature
PowerPoint 2007 and later let you add a digital signature to a file. A digital signature doesn’t prevent changes but lets you know if someone has changed the file, because the process of changing the file invalidates the digital signature. You need to purchase a digital signature service. In PowerPoint 2007, start by choosing Office button> Prepare> Add a Digital Signature. In PowerPoint 2010 and 2013, choose File> Info> Protect Presentation> Add a Digital Signature.
Mark as Final
If you have 2007 or later and don’t need to securely prevent changes, but just want to let people know that a presentation shouldn’t be changed, you can use the Mark as Final feature. In 2007, choose Office button> Prepare> Mark as Final. In 2010 and 2013, choose File> Info>Protect Presentation> Mark as Final. This turns off all typing, editing, and proofing commands. However, someone can go back to the same menu item and turn off the setting, so use this feature when absolute security isn’t necessary.
How do you protect PowerPoint files from changes? Leave a comment!
“101 Tips Every PowerPoint User Should Know” is for everyone who never took a course or read a book about PowerPoint! These tips will fill in the gaps, speed up your work, make presentations easier, and help you get better results. Now updated through PowerPoint 2016 and Office 365. Learn more at http://www.ellenfinkelstein.com/pptblog/101-tips/
Related posts:
- Hyperlink to a specific slide in another presentation, or specific location in another file
- Create a video from photos in PowerPoint
- Add multiple images to an existing presentation
- Colorize a Photo for a Background
29 Leave a Reply
[…] Protect a PowerPoint file from changes: Discover other ways to protect your presentations […]

Hi! I use PowerPoint for Mac 2011 and could not use its protection since I could not connect to the Rights Management Services due to no connection (although my modem is ON). What should I do? Thank you.

I have no idea; perhaps another reader will know how this works on the Mac. Also, Microsoft has a PowerPoint for Mac “Answers” forum. Go to answers.microsoft.com and search for PowerPoint and Mac or more specifically for your issue.

The “Convert to images” method can be as easy as right-clicking on the presentation file and selecting a menu item with PowerPoint Presentation Rasterizer: http://j.mp/pptraster (it is free and open-source). Additionally, it can preserve transition effects between slides. It is only 8 kb and does not require admin rights. (Disclaimer: I am the author of this software)

Thanks! Excellent information and very friendly. keep posting information related to powerpoint presentation, as I am working as a market analyst for a distribution company, which deals in both food and non-food products. I prepare and present monthly presentations.

I don’t leave a lot of remarks, but I looked at a few of the remarks on Protect a PowerPoint file from changes

Hi Ellen, a lot of thanks for your help. It helped me a tons….. I’m very glad that you share this. Gbu..

Thanks so much. I put my PPTs online for students but really don’t want them editable, but to still have all the features of the animations. Your advice is great! I was also thinking of selling some on TeachersPayTeachers.com but didn’t want them editable. This maybe the solution!! Thanks again.

Thank you! This was really helpful information. It worked just as you indicated.

Was looking for protect the ppt from modification on Office 2013. Got help from “Password protect for editing” section..thanks a lot.

I have documents but are read only MS power point (2013). I could not copy and could not save as. Only and only read nothing else. These files are in USB. Any one know about.

thanks for sharing information, very helpful for me

Thank you so much I never knew what that tools button in the save dialog did until today! Your information was every helpful!

Very helpful. Thanks.

Wow, thanks! I could not find this information on Microsoft’s site, so I appreciate you posting it in a format that the search engines can find.

Thanks for so many great tips. I was wondering, is there a way to protect the PowerPoint file from changes, but still leave open the possibility of adding comments? It would really help if people couldn’t just roam around in my presentations, but they may tell slide by slide what changes they would like to see made. Thanks.
For that, I would probably export as PDF and have the people add the comments in Adobe Reader. You might have to show them how.
Thank you so much for answering. I’m going to look at that and see how it works. It’s new for me too.

I created a ppt set of slides, sent it to have it put into a video. It is 10 modules of image slides returned to me? I want to make changes to some content and need to add a slide, but it is in read only, so what can I do to be able to make changes? or what is the easiest way for me to just recreate the whole ppt which is easy part, but want the same photo images which I do not know how to do?

I am trying to save the PowerPoint so that no one is able to edit or copy the images/text in the document. I also have animations that I would like to work. I want the viewers to be able to save the PowerPoint. Is there a way to have the animations work, not allow them to copy/paste images, and also allow them to save the file?

Thanks its helped me a lot
[…] Protect a PowerPoint file from changes – Ellen Finkelstein – Jul 2, 2003. READ LATER – DOWNLOAD THIS POST AS PDF >> CLICK HERE <<. Many people need. Convert to images in PowerPoint 2003 and 2007. […]

Hi, I’m working on a ppt slide with mainly texts on it, but as soon as i save it as pdf the fonts are messed up and the layout is different altogether! pls help
I can’t tell what the problem is without seeing the presentation. Are you using unusual or privately-bought fonts? Try basic fonts and see if they carry over. Again, I’m not sure what would cause the layout to change. I’ve never seen that. Try a simple slide and use one of the layouts without changes and see if it goes to PDF properly. Also try a different method of creating the PDF — you can use File, Export or Print to a PDF Driver. Finally, try from a different computer. With these steps, you’ll start to figure out where the problem … Read more »

I am trying to save my PowerPoint so that slides, images and text cannot be copied. However, I want text boxes available for others to add their own text. How can I do this?
You would have to save the presentation as images and insert text boxes on top. Of course, the images could be copied, but they wouldn’t be editable.

hi,Ellen. I put my PPTs for clientele but really don’t want them editable, but to still have all the features of the animations. I set the open password and permission password with Microsoft PowerPoint. But I can still open it with wps(another office software). How can I do ?
Unfortunately, there’s no easy solution to this question that many people have. But if you can convert it to a video, then your clients will see the animation but not be able to change it. Set the slide timing to give them enough time to understand each slide. You can tell them to pause the video if they need more time.

Thanks for these tutorials. It actually helps to enhance my skills in PowerPoint. I would like to share a site link with you which I usually prefer to learn PowerPoint tutorials. It’s https://www.slideteam.net/blog . Feel free to explore this site.
- Get Great Eclipse Photos with Your Phone
- The Best Noise-Canceling Headphones to Buy
How to Apply Security in PowerPoint Presentations
Prevent your presentations from being viewed or changed by others
- Brock University
In This Article
Jump to a Section
Why Add Security
- Encrypt Your Presentations
- Save as Graphic Images
- Save as PDF
- Mark as Final Feature
What to Know
- Use the encryption feature in PowerPoint. Assign a password by going to Protect Presentation .
- Save the presentation as graphic images or a PDF file to keep the information visible but not easily editable.
- Use the Mark as Final feature to ensure that no further edits are made inadvertently.
This article explains several ways you can apply security in PowerPoint presentations. This information applies to PowerPoint 2019, 2016, 2013, 2010 and PowerPoint for Microsoft 365.
Security in PowerPoint is a concern when your presentation contains sensitive or confidential information or when you don't want anyone making changes to the presentation. Below are some of the methods used to secure presentations to avoid tampering with information or theft of your ideas.
Encrypt Your PowerPoint Presentations
Using the encryption feature in PowerPoint is a way to keep others from accessing your presentation. A password is assigned by you in the creation process of the presentation . The viewer must enter this password in order to open or modify your work.
Secure PowerPoint Slides by Saving as Graphic Images
Saving your completed slides as graphic images ensures that the information remains intact. This method takes a little more work, as you have to first create your slides, save them as pictures, and then reinsert them into new slides.
This method is one you would use if it is imperative that the content remains unchanged, as in the case of confidential financial data being presented to board members.
Save PowerPoint Presentations as a PDF File
Secure your PowerPoint presentation from any edits by saving, or publishing, it in PDF format . This retains all the formatting you applied, even when the viewing computer doesn't have those particular fonts, styles, or themes installed. This is a great option when you need to submit your work for review, but don't want the reader to make any changes.
Mark as Final Feature in PowerPoint
Once your presentation is complete and ready for prime time, use the Mark as Final feature to ensure that no further edits are made inadvertently.
Get the Latest Tech News Delivered Every Day
- How to Insert PDF Files Into PowerPoint Presentations
- Add Hyperlinks to PowerPoint Presentations
- How to Save PowerPoint Presentations as PDF Files
- Converting PowerPoint Presentations to Word Documents
- Tips for Solving Common PowerPoint Problems
- How to Link to Other Slides or Websites in PowerPoint
- How to Make a PowerPoint Presentation
- Print a PowerPoint Handout in PDF Format Without a Date
- Using Design Themes in PowerPoint
- Remove Slide Numbers From PowerPoint Slides
- PowerPoint Master Slide
- How to Use PowerPoint Slide Master Layouts
- How to Merge PowerPoints
- How to Copy a PowerPoint Design Template to Another Presentation
- How to Add an Excel Chart to a PowerPoint Presentation
- How to Do a Voiceover on PowerPoint
Presentation Guru
8 ways to protect your presentation.

Intellectual property can be some of the most valuable assets your business has – and yes, your presentation does come into that. You wouldn’t think twice about protecting any other property you own, so why not it? Erika Rykun from thecopywriter.io shows us how. (Please note that where there are legal implications, the author has based this article on US copyright law – check the rules for your own location for the finer details that relate to your situation.)
Presentations are a crucial part of various industries. Presentations can be used by public speakers, salespeople, marketing teams, startups pitching to investors – to name but a few. If your presentation is comprised of original material ( as it should be) , protecting it as intellectual property is not only your right, it’s a very sensible move.
I’ll give an example. Let’s say you have a public presentation on business marketing strategies, full of original ideas and research. Somebody copies what you’re saying during the presentation, almost word-for-word, into a blog article, because it’s an easy method of beating Google plagiarism detection.
If your presentation is copyrighted, they’ve violated it by creating a transcription of your presentation. Even if they changed up the words and paraphrased bits of what you were saying in the presentation, they’ve created a derivative work , which is also a copyright violation.
Even if your presentation is copyrighted, it’s still your job to protect it against violations. There’s no shortage of people willing to blatantly plagiarise content online, and only very, very rich companies can hire legal teams to scour the web for copyright violations on their behalf.
Protecting your presentation is possible, but how can it be done?
It’s actually really quite simple.
Your presentation is copyrighted at the exact moment you create it, especially if it incorporates tangible things like graphics and logos. A creative work becomes copyrighted the instant it is written down, or fixed in some other tangible form (e.g. a video recording, etc. ). In that case, it’s going to be no different than practicing standard cybersecurity procedures and protecting your data online.
So with that said, protecting your presentation boils down to a matter of security. This is assuming your presentation is made of digital files and only shared with people you choose, because if your presentation is used in public speaking, protecting it is a completely different ballgame. Protecting a public presentation has many nuances under copyright law, which we will look at later in this article, but for now we will focus mainly on the methods of protecting a private presentation, like a slideshow to be shared with business partners. Some are simpler to apply than others. It really is a question of how much protection you want – or need. Some of the methods given may also help to protect a public presentation, such as watermarking images and uploading transcripts of a public speech.
1) Use the copyright symbol
It’s really quite easy to use the copyright symbol , but it’s a little more involved than just copying the © symbol into a document. Check out the link I just gave for a lot more information on the recommended usage of the copyright symbol, and best practices for inserting it.
2) Restrict access in the program settings
In a number of Office programs, there are settings to restrict access to edit the document. Unfortunately, this only protects people from editing the document, not viewing it. A screenshot capture software basically defeats this, right? But if you only want to prevent people from making changes to your presentation, this does the trick.
In Office programs, you can also click the “Mark as Final” button, which will automatically lock the document from edits, but not viewing.
Neither of these are solutions to ensuring a document’s privacy, they will simply protect a document from accidental changes, because users must opt-in to edit the document. If this restriction is bypassed, it’s possible to restore a previous version in File > Browse version history ( in Office 2016 – 2019) .
3) Keep your files on a secure cloud account
A cloud account is a good, safe way of being able to digitally store your files while being able to access them from various devices, as long as you practice strong password security. You’ll want to find a cloud service provider that offers presentation-friendly features, such as link-sharing the presentation while locking it against edits and downloads.
Some good ones to consider are Google Drive , Dropbox , and OneDrive .
4) Keep it on an encrypted drive
If you’re the only person accessing your presentation, keep the files on an encrypted USB drive. This will prevent it from being stolen in any cyber attack on your hard drive storage, and even if you lose the USB drive, it’s encrypted which prevents it from being attached to any new devices without the decryption key. If this sounds like too much to digest, consider checking basic cybersecurity training for a better overall idea of how it all works.
To expand on this, you can set multiple layers of encryption and password-protection, such as encrypting the portable drive, then placing the file behind further layers of password-locked folders. This is starting to sound like spy novel stuff, yeah? Hey, it’s your copyright we’re trying to protect. It’s not like I said keep the USB drive in a glass case surrounded by a wall of security laser beams – but that wouldn’t be a bad idea either.
5) Add a watermark to your presentation
This is such a ‘duh’ step, you were probably wondering when we would mention it. But yes, watermarks can certainly protect any original graphics you use in your presentation, including the slides themselves.
Watermark placement is really tricky though. If it’s too far in the corner, it can easily be cropped out. If it’s over a solid colour or certain types of photos, it can easily be photoshopped out. If you slap a huge, bold watermark over the middle of your presentation, you look like Shutterstock.
Trust me, there are no limits people will go to try and photoshop out the watermarks on Disneyland Photopass, so watermark placement is fairly crucial if you’re seriously trying to protect your original images. In any case, a subtly transparent logo somewhere near the middle isn’t too bad, if it’s transparent enough to not detract from the image or slide, but still counts as a watermark.
6) Obtain a digital signature from Microsoft
This is again assuming you’re working with Microsoft Office products, but don’t worry open-source aficionados, there’s a way to do it in LibreOffice, it’s just a bit trickier and not as automated.
In any case, a digital signature will protect your document by adding a certification that says whether the file is original or a copy and if it has been altered. It’s a step-by-step process and it’s best to consult Office documentation on how to proceed, but it’s a useful feature. It basically proves that a file originated from your programme, which would be the final nail in the coffin of any copyright dispute, to your benefit.
For users of other presentation software not maintained by Microsoft, such as LibreOffice or Google Slides, the processes for digital signature are a little different as far as obtaining add-ons to perform this functionality, but it’s still entirely possible to do. Here is a guide on adding digital signatures in LibreOffice .
7) Upload a transcript of your presentation
If your presentation is part of a public speech, and you don’t want people writing what you say word-for-word, upload your own transcript of the presentation on the web, in plain text format. It’s recommended to do this on your own server, though you could also copy it into the About section on a YouTube video.
If you have a presentation, know that YouTube may automatically add captions (which aren’t 100% accurate) , but they’re technically accurate enough for a dedicated plagiariser to rip the SRT file from the video, then re-organise the captions into paragraphs. By adding your own transcription, it becomes a bit easier to search the web for plagiarism.
When Google indexes your transcription, you can search for quoted bits of the transcript in Google search, and see if anyone basically copy-pasted your entire presentation into a blog article. You do this by searching in quotation marks, which will return any pages that contain the exact words in quotation marks. This won’t help you find derivative (paraphrased) content, but it will help you find word-for-word plagiarism of spoken words.
8) Register your copyright
As mentioned above, creative works are automatically copyrighted the moment they are fixed to tangible media. However, simply owning a copyright does not enable you to bring an infringement action. You must file an application for copyright registration before you can sue someone for copyright infringement.
Registering your copyright before or within 5 years of publication will also establish sufficient evidence in court concerning the validity of your copyright, as well as entitling you to statutory damages and attorney fees in federal court. If your copyright is not registered, you can only sue for actual damages and profits, which are made more difficult to prove without registration.
Without a copyright registration, you can still file DMCA notices and send cease-and-desist letters to copyright infringers, but as far as bringing an actual lawsuit against anyone for copyright infringement, your options will be fairly limited. Always remember that the onus of proving copyright ownership is on the owner, so registering your copyright serves as certifiable proof that you are indeed the copyright holder.
Protecting a public presentation
As I mentioned earlier, protecting a public presentation can be rather more complicated. Here are a couple of situations to show you what I mean:
One example of copyrighted public presentations would be TED conference videos like TED Talks. TED typically owns the copyrights to transcripts and videos of conference talks, not the individual speakers, as part of agreements between the speakers and TED Foundation. But again, these are copyrighted presentations, including the transcripts.
Quoting or using snippets of a TED Talks presentation may be used under the Creative Commons license by non-profit organisations, but not used for commercial / for-profit purposes without express permission from TED Foundation.
“I Have a Dream”
Another example is public speeches, depending on circumstance . It’s a bit nuanced, but generally speaking, a public speech is protected by copyright if it is fixed in a tangible medium , meaning the speaker wrote down their speech before delivering it, or authorised a recording of the speech.
Where this becomes nuanced is whether the speech is being delivered by a government employee ( speeches from U.S. government employees are typically public domain) , and whether the speaker has any reasonable rights to privacy (e.g. was admission charged for the presentation?) .
One example here would be Martin Luther King, Jr.’s famous “I Have a Dream” speech. Dr. King registered his speech with the U.S. Copyright Office, and the copyright is valid until 2038. This is why it’s nearly impossible to find a full, unedited version of the speech on video sites like YouTube. The copyright itself has been challenged several times over the years, but has stood up in every case.
What makes the “I Have a Dream” speech a bit unique in its copyright is that Martin Luther King, Jr. did not register his speech with the copyright office until after he had already delivered the speech. This was an issue because publication does not preclude copyright under the 1909 Copyright Act at the time, and so had MLK registered his speech prior to performing it, there would have been no issues.
However, the courts ruled that his speech was a performance, and not a general publication, an important distinction in copyright prior to the Copyright Act of 1976. This is because a general publication implies dedication to the public, and thus would have rendered the speech to the public domain. But the judge ruled that simply performing a work in public does not render it a “publication”, and because King distributed copies to the press instead of the general public, his speech was a “limited publication” which afforded King statutory protection.
The issue was raised in 1998, after CBS aired over 60% of the “I Have a Dream” speech in a historical documentary series. The Estate of Dr. King brought suit against CBS, and the judge ruling the case found that the speech was “the poster child for general publication”, due to its widespread dissemination and performance, and granted summary judgement to CBS. However, the Estate of Dr. King appealed in the 11th Circuit Court of Appeals, where the judge’s decision was reversed. The 11th Circuit ruled that public performance alone, no matter how widespread, does not render something to the public domain.
As you can see, there is a clear difference between protecting a private presentation intended to be shared with a few individuals, and a public presentation. The former revolves around basic security practices and preventing your presentation files from falling into the wrong hands, while the latter requires diligence in tracking down copyright violations, in which case you may need to consider paying into a copyright monitoring service.
- Latest Posts
Erika Rykun
Latest posts by erika rykun ( see all ).
- 8 Ways to Protect Your Presentation - 20th February 2020
copyright symbol
9th March 2020 at 11:38 am
copyright is must nowadays to protect your content
Kahna Andrus
20th September 2023 at 11:57 pm
Which category do Power Point Presentations fall under a that copyright website? I’ve already registered the text of the speech.. but wanted to upload the video and power point slides. Any advice would be most appreciated..
Your email address will not be published. Required fields are marked *
Follow The Guru

Join our Mailing List
Join our mailing list to get monthly updates and your FREE copy of A Guide for Everyday Business Presentations

The Only PowerPoint Templates You’ll Ever Need
Anyone who has a story to tell follows the same three-act story structure to...
Powerpoint Zoom Summary for interactive presentations – everything you need to know
In this article I’ll be showing you how you can use Powerpoint Zoom to...

How to get over ‘Impostor Syndrome’ when you’re presenting
Everybody with a soul feels like an impostor sometimes. Even really confident and experienced...
Get Rewarded for Opening an Enterprise-Level VDR.
Open an enterprise data room and CapLinked will pick up the tab on a luxury reward of your choice.
CapLinked API
Integrations
Digital Rights Management
FTP Alternative
Secure Document Sharing
Legal Compliance
Document Management
Virtual Data Rooms
Due Diligence Data Room
Bankruptcy and Restructuring
Asset Sales and Purchases

Biotech and Life Sciences
Go beyond outdated help tickets.
CapLinked Blog
Whether you’re dealing with sensitive client info, for-company-eyes-only internal data or a pitch deck that’s just too good to leak, sometimes it pays to protect PowerPoint presentations. Across PC, iOS and Google platforms, you can secure your work with simple password protection, which not only helps shield the presentation from prying eyes, but can also add an extra layer of protection before anyone yourself included can make edits.
Different platforms call for slightly different processes, but the payoff is the same across the tech spectrum: just a little extra peace of mind.
Table of Contents
Password Protect PowerPoint on PC and Mac
To prevent your PowerPoint from being opened or modified without a password on desktop platforms, you’ll follow the same process whether you’re working on Windows or iOS. Per Microsoft, this straightforward security measure works across these versions of PowerPoint:
- PowerPoint for Microsoft 365
- PowerPoint for Microsoft 365 for Mac
- PowerPoint for the web
- PowerPoint 2021
- PowerPoint 2021 for Mac
- PowerPoint 2019
- PowerPoint 2019 for Mac
- PowerPoint 2016
- PowerPoint 2016 for Mac
- PowerPoint 2013
- PowerPoint for Mac 2011
- PowerPoint 2010
After you’ve created a PowerPoint presentation, first select “File,” then click “Info.” Choose “Protect Presentation” from the drop-down menu that appears, then “Encrypt with Password.” Type the password you’d like to use in the Password box, then hit “OK,” and you’re good to go.
Be sure to write down the password before you click “OK” as PowerPoint does not offer password recovery options if you lose the password, you’ll be out of luck. For co-work presentations, only the first person on a shared network to open the PowerPoint file and input the password will be able to edit it. If someone else attempts to open the password-protected PowerPoint presentation simultaneously, they’ll be able to view the file, but not edit it.
Protect a PowerPoint Presentation on Mobile Devices
When you’re working with the latest version of PowerPoint on the go, you’ll secure your presentations at the app level using the built-in features of Microsoft 365 Business Premium . To get started, you’ll need to log in to the Microsoft 365 admin center. Note that you will need admin privileges to implement these security measures.
First head to “Policies,” then choose the “Add policy” option. You’ll be prompted to enter a policy name (make sure it’s straightforward and easily identifiable, like “App Security”). Choose a policy type from the “Policy type” drop-down menu this is where you’ll choose if you’re managing your policy for iOS, Android or Windows.
Now choose “Manage how users access Office files on mobile devices” and toggle the option to require a PIN or fingerprint by which to access Office apps. New options will appear, allowing you to customize not just how you protect PowerPoint presentations, but how you protect your entire Office suite. You can choose to reset the PIN when a login fails a certain number of times, require users to sign in again when Office has been idle for a specific number of minutes, deny access to work files on jailbroken or rooted devices or decide whether or not users can copy content from Office apps into their personal apps.
Finally, you can simply check or uncheck the boxes next to their respective icons to choose which apps will be protected, including Excel , OneDrive , OneNote, Outlook, Word, Skype for Business and of course, PowerPoint. You can also change the “Who will get these settings?” option from the default setting of all users to any security group you’ve previously created, or you can select “Restore default settings” if you no longer wish to use this added layer of security.
A Word on Encryption…
When you enable app security policies on Microsoft 365, you’ll see an additional menu titled “Protect work files when devices are lost or stolen.” Here, you can toggle the setting to encrypt work files on. Whether you want to protect PowerPoint presentations or just about any other type of file, encryption works hand-in-hand with password protection to serve as an absolutely vital security tool. This process scrambles plain text into virtually indecipherable code; only users with a key, such as a password, PIN or fingerprint ID, can unscramble that text. Ideally, even if the file is intercepted, encryption makes it unreadable to bad actors .
Unfortunately, encryption isn’t available everywhere. As PC Mag notes, the widely used Google Drive the cloud-based home to the popular PowerPoint alternative, Google Slides does not offer any sort of native encryption or password protection, potentially leaving the data of more than one billion users vulnerable .
…and How CapLinked Can Help
If you prefer Slides to PowerPoint or simply want a more secure solution that goes beyond adding a password protection to PowerPoint alone, CapLinked’s virtual data room has your back. With fewer than 10 minutes of setup, you can securely manage any type of Microsoft Office file, PDFs and other common file types across all of your teams and workspaces. If you prefer to keep your digital presentations on the cloud, CapLinked also works natively with Google Drive , Dropbox , OneDrive and Box.
Whether you’re working with a .PPTX, spreadsheets or a PDF , everything you share on CapLinked travels via a secure connection, with enterprise-grade security certified by EU-US Privacy Shield, FISMA, HIPAA and others. And even if you’re dealing with regular old business-grade M&As , you’re still covered by military-grade 256-bit encryption, because your data can never be too safe.
Dan is a small business owner and freelance writer based in Dallas, TX. In over a decade of experience, he’s been fortunate to write and collaborate with business-facing brands including The Motley Fool, Chron, Office Depot, Fortune and more.
Microsoft – Password Protection for Presentations in PowerPoint
Microsoft – Set App Protection Settings for Android or iOS Devices
Norton – What Is Encryption, and How Does It Protect Your Data?
PC Mag – How to Encrypt a Document Stored on Google Drive
The Leaders Council of Great Britain and Northern Ireland – Google Drive Has Over One Billion Users
Recent Posts
Healthcare m&a: market trends & opportunities to know for 2024, is a strategic alliance the right structure for your deal, the ins and outs of leveraged buyouts, related articles, choose a better virtual data room.
Or Contact Sales

(888) 799-6849
© 2024 All rights reserved.

- Get started with computers
- Learn Microsoft Office
- Apply for a job
- Improve my work skills
- Design nice-looking docs
- Getting Started
- Smartphones & Tablets
- Typing Tutorial
- Online Learning
- Basic Internet Skills
- Online Safety
- Social Media
- Zoom Basics
- Google Docs
- Google Sheets
- Career Planning
- Resume Writing
- Cover Letters
- Job Search and Networking
- Business Communication
- Entrepreneurship 101
- Careers without College
- Job Hunt for Today
- 3D Printing
- Freelancing 101
- Personal Finance
- Sharing Economy
- Decision-Making
- Graphic Design
- Photography
- Image Editing
- Learning WordPress
- Language Learning
- Critical Thinking
- For Educators
- Translations
- Staff Picks
- English expand_more expand_less
PowerPoint 2013 - Finalizing and Protecting Presentations
Powerpoint 2013 -, finalizing and protecting presentations, powerpoint 2013 finalizing and protecting presentations.

PowerPoint 2013: Finalizing and Protecting Presentations
Lesson 28: finalizing and protecting presentations.
/en/powerpoint2013/reviewing-presentations/content/
Introduction
Before sharing a presentation, you'll want to make sure it doesn't include any information you want to keep private. You may also want to discourage others from editing your file. Fortunately, PowerPoint includes several tools to help finalize and protect your presentation
Optional: Download our practice presentation .
The Document Inspector
Whenever you create or edit a presentation, certain personal information may be added to the file automatically. You can use the Document Inspector to remove this type of information before sharing a presentation with others.
Because some changes may be permanent, it's a good idea to use Save As to create a backup copy of your presentation before using the Document Inspector.
To use the Document Inspector:
- Click the File tab to go to Backstage view .

Protecting your presentation
By default, anyone with access to your presentation will be able to open, copy, and edit its content unless you protect it. There are several ways to protect a presentation, depending on your needs.
To protect your document:
- From the Info pane, click the Protect Presentation command.

Marking a presentation as final will not prevent someone from editing it. If you want to prevent people from editing it, you can use the Restrict Access option instead.
- Open an existing PowerPoint presentation. If you want, you can download our practice presentation .
- Use the Document Inspector to check the presentation. If you're using the example, remove all personal information from the presentation.
- Protect the presentation by marking it as final.
/en/powerpoint2013/modifying-themes/content/
You’re using an older browser version. Update to the latest version of Google Chrome , Safari , Mozilla Firefox , or Microsoft Edge for the best site experience.
- eLearning Blog
- eLearning Basics
- Instructional Design
- Corporate Training
- Course Selling
- Manufacturing
- Products iSpring Suite iSpring Learn
- Use Cases Onboarding Compliance Training Induction Training Product Training Channel Partner Training Sales Training Microlearning Mobile Learning
- Company About Us Case Studies Customers Partnership Course Development Contact Us Academy Blog Webinars Guides
- Community Academy Blog Webinars Guides Experts on iSpring
- Language EN English Français Deutsch Español Italiano Nederlands Português Polski 中文 日本語 العربية Indonesia
- Shopping Cart
Free Online eLearning Conference | May 2nd–3rd
iSPRING DAYS 2024
Seize the human-centric future of learning
How to Protect PowerPoint Presentations – Methods that Really Work

Table of Contents

In the Publish Presentation window, select the My Computer tab and head over to the Protection section .

In the opened window, you can configure the security settings you need.
1. Copyright your PowerPoint slides by adding a watermark
With iSpring Suite, you can watermark your presentation with, for example, your corporate logo or copyright notice like © 2020 John Smith . It’s possible to set the watermark’s transparency and position on the slides. You can also specify a webpage that will open when your viewers click on the watermark. It could be anything from terms of use to your profile page on a social network site.

2. Set a password
This option is pretty straightforward. You create a password and no one can view your presentation without entering it first.

3. Restrict time
You can set a special time period when your audience will be able to view your presentation. For example, you can set up a 2-week interval when your slides will be available.

When you’re finished with the settings, save any changes and publish the slides. By default, the output presentation is saved on your PC. You can then transfer it to a pen drive or CD and distribute it to your learners or colleagues.
Method #2. Make Your Presentation Read-Only
This method won’t prevent your copyrighted PPT slides from being copied and shared, but it will protect them from being modified. The upside is that to lock a presentation from editing you don’t need any third-party services – you can do this right in PowerPoint by using the Mark as Final option. When a presentation is marked as final, other users can read and view it, but can’t make any alterations.
To lock the slides, click the File tab in PowerPoint and choose the Protect Presentation command in the Info pane. In the drop-down menu, select Mark as Final . That will set your presentation in read-only mode.

Method #3. Restrict Permission to Selected Individuals
You can set the restriction to your readers so they can read the presentation but won’t be able to change, print, or copy the content.
As with the previous method, you can do this right in PowerPoint. Simply go to File → Info → Protect Presentation → Restrict Access .

However, to grant people access, you need to connect to the Rights Management Service (RMS). It is integrated into Microsoft Office and is available for faculty and staff. Ask your IT department to help you to enable RMS for your account.
Note: RMS allows employees to share restricted documents only within their company or campus. It won’t be possible to share your presentation with individuals that are not your colleagues or faculty members.
We hope this article gave you insights on ways that you can protect your PowerPoint presentations. If you know of any alternative ways to safeguard the slides, please share your ideas in the comment section.
Useful Resources on PowerPoint
Are you a PowerPoint lover? If so, here are some other helpful articles for you:
- How to Share a PowerPoint Presentation Online
- How to Add Narration to a PowerPoint Presentation
- How to Add YouTube Video Into PPT Presentation
- How to Structure a PowerPoint Presentation
Fast course authoring toolkit
Create online courses and assessments in record time.

Content creator:
Paulina Fox
Passionate about design and tech, Paulina crafts content that helps customers delve deeper into iSpring products.
You might also like this
")
Subscribe to our blog
Stay tuned to get our latest eLearning tips and tricks!
By clicking “Subscribe”, you agree to our Privacy Policy . All emails include an unsubscribe link, so that you can opt-out at any time.
We use cookies to give you the best possible experience on our website and also for analytics and marketing purposes. You can enable or disable optional cookies as desired. See our Cookie Policy for more details.
Manage your cookies
Essential cookies are always on. You can turn off other cookies if you wish.
Essential cookies
Analytics cookies
Social media cookies
Critical PowerPoint Shortcuts – Claim Your FREE Training Module and Get Your Time Back!
Protect Your Presentation (PowerPoint Picture Presentation)
- PowerPoint Tutorials
- Strategies & Opinions
- November 4, 2014
In this article, you will learn two different ways to protect your PowerPoint presentation by converting all your slides into pictures.
For example, your client insists that you send your presentation as a native PowerPoint file so that they can go through it slide by slide in Presentation Mode on their computer.
How do you do this while making sure that the content of your presentation isn’t easily edited or copy/pasted?
The fastest and least complicated way to protect your presentation is to turn all your slides into pictures.
There are two different methods for achieving this:
- A fast method, using the PowerPoint Picture Presentation file format
- A longer (sneakier) method, using the PowerPoint Photo Album command
The advantage of the first method is speed, the advantage of the second method is file size.
The fastest way to pull this off is to save your presentation directly as a PowerPoint Picture Presentation and you’re done!

Notice that the file size for the longer method is almost half the file size of the faster method (based on a deck of 31 slides). As such, if you are emailing a larger deck, the longer method is the way to go.
Below are the tutorials for both methods depending on whether you are looking for speed or file size.
You can also protect your presentation with a password in the Read Only Mode , see our guide here .
Trick #1: The Picture Presentation
You are currently viewing a placeholder content from Youtube . To access the actual content, click the button below. Please note that doing so will share data with third-party providers.
1. Launch the 'Save As' dialog box
Within your PowerPoint presentation, hit F12 on your keyboard, to open the Save As dialog box and select a location on your computer to save your presentation (I’ve selected the desktop below).

2. Select the 'PowerPoint Picture Presentation' option
Within the dialog box, scroll down to PowerPoint Picture Presentation .

3. Name and save your presentation
Rename your PowerPoint presentation, click Save and PowerPoint will go to work. When it’s done, you’ll get a message confirming that presentation has been saved to the location you selected.

Trick #2: The Photo Album Trick
Within your PowerPoint presentation, hit F12 on your keyboard to launch the Save As dialog box.
Select a location that you will remember so that you can later retrieve the pictures (which we will do in the next step). I typically choose my desktop.
2. Select a picture file format
With a location selected, use the Save as type drop down and select a picture file format to save your slides in. I typically choose the PNG file format but JPEG work too.

3. Click 'Save' to export all your slides as pictures
Once you’ve picked your picture file format, select Save , which presents you with a dialog box. Select All Slides on the left.
PowerPoint takes a moment to export all your slides as pictures and create a folder in the file location you chose in step 1 above.

So what just happened?
If you now navigate to the location you exported the slides as pictures to, you should have a folder named after your presentation, with each of your slides saved within it as a picture, named Slide 1 through however many slides you had in your presentation.

4. Open a blank document and insert a 'Photo Album'
Inside your PowerPoint presentation:
- Navigate to the Insert tab
- Select the Photo Album command to launch the photo album dialog box.

5. Navigate to where your pictures are saved
Within the Photo Album dialog box, use the File/Disk command on the left to navigate to where you exported the pictures of your slides to.

6. Select all of your pictures
Once you navigate to where the pictures are saved, select all the pictures within the folder. You can quickly do this by selecting one of the pictures and hitting CTRL + A on your keyboard for the Select All shortcut .

7. Select 'Create'
Once all of the pictures load into the Photo Album dialog box (notice they are all in the correct sequence) select Create .

8. Delete the first slide
Now that your new PowerPoint presentation is created, it has a title slide that says Photo Album . You can choose to keep this slide if you want to do something with it, otherwise select it and hit Delete .

9. Fix the slide dimensions (optional)
If you are using PowerPoint 2013 and you don’t want the widescreen dimensions, navigate to the Design Tab in the ribbon, and select the ‘Slide Size’ command on the far right. Within the drop down, select Standard (4:3) .
For additional details and help with changing your PowerPoint slide size, read our guide here .

10. Select 'Maximize Slide'
You are now presented with a dialog box. Within the dialog box, select Maximize to revert your PowerPoint presentation to the 4:3 slide size.

What do you now have?
The result is that you now have a native PowerPoint presentation, with all of your slides pasted in as pictures that cannot be directly edited. Notice that if you select the slide itself, the Pictures Tools Format Tab opens.

Note: Make sure you make all of your adjustments to your presentation BEFORE you export everything as pictures, like properly adding your slide numbers to your presentation ( see our how to guide here ).
Once your presentation is in this picture format, no one can edit it (including you). Any changes you want to make to your presentation, will have to be made to the original PowerPoint file, and then exported as pictures again.
11. Save your PowerPoint presentation
As a last step, make sure to save a copy of your new PowerPoint presentation. Either hit CTRL + S on your keyboard for Save, or F12 on your keyboard for Save As. Once it’s saved, you can then safely send it to your client without worrying about losing the PowerPoint slideshow functionality OR leaving your content unprotected.
This is a roundabout way to protect your presentation by turning it into a photo album.
Those are two different ways to protect your PowerPoint presentation by converting your slides into pictures. While this maintains the integrity of your content, you do lose all your animations or other special effects you applied to your slides.
I recommend using the PowerPoint Picture Presentation method simply because it is faster. The only downside of this method is it results in a larger overall file size.
If you do not need to present your PowerPoint presentation, an alternative method to protect your presentation is to convert PowerPoint to PDF .
If you enjoyed the depth of this article, you can learn more about our PowerPoint speed training courses and other free resources here .
What’s Next?
Related articles.
- Bar chart trick: Right aligning categories (PPT, Word, and Excel)
- PowerPoint settings: program level vs. presentation level
- Set Up Slide Show: Customize how your PPT presentations run
- What is the Popup Toolbar in PowerPoint?
- Strikethrough Shortcut (l̶i̶k̶e̶ ̶t̶h̶i̶s̶) for Word, Excel & PowerPoint
About The Author

Popular Tutorials
- How to Strikethrough Text (l̶i̶k̶e̶ ̶t̶h̶i̶s̶) in Word, Excel & PowerPoint
- How to Make Animated Fireworks in PowerPoint (Step-by-Step)
- How to Create a Flash Card Memory Game in PowerPoint (Like Jeopardy)
- Keyboard Shortcuts Not Working: Solved
PowerPoint Tutorial Categories
- Shortcuts & Hacks
- Presentation Design
- Pictures, Icons, Videos, Etc.
- New Features
- Miscellaneous
- Charts & Data Viz
We help busy professionals save hours and gain peace of mind, with corporate workshops, self-paced courses and tutorials for PowerPoint and Word.
Work With Us
- Corporate Training
- Presentation & Template Design
- Courses & Downloads
- PowerPoint Articles
- Word Articles
- Productivity Resources
Find a Tutorial
- Free Training
- For Businesses
We help busy office workers save hours and gain peace of mind, with tips, training and tutorials for Microsoft PowerPoint and Word.
Master Critical PowerPoint Shortcuts – Secure Your FREE Training Module and Save Valuable Time!
⌛ Master time-saving expert techniques.
🔥 Create powerful presentations.
🚀 Propel your career to new heights.
We value your privacy – we keep your info safe.
Discover PowerPoint Hacks Loved by Industry Giants - KKR, AmEx, HSBC!
Over 114,880 professionals in finance, marketing and sales have revolutionized their PPT skills with our proven methods.
Gain FREE access to a full module of our premium PowerPoint training program – Get started today!
We hate spam too and promise to keep your information safe.
You are currently viewing a placeholder content from Facebook . To access the actual content, click the button below. Please note that doing so will share data with third-party providers.

Microsoft 365 Life Hacks > Presentations > How to use AI to help improve your presentations
How to use AI to help improve your presentations
Creating and giving a presentation isn’t always easy, especially if you want to deliver a dynamite lecture. However, by harnessing the power of AI tools, you can elevate your presentations and leave a lasting impression on your audience. See how AI can provide valuable insights and enhancements to make your presentations stand out.

How AI can create structure in your presentation
No matter the subject, every great presentation has a narrative. You begin by introducing yourself and why you’re the best person to present this subject. Then, you mention the general outline and key topics before diving into the details: problems, potential solutions, and calls to action. Finally, you end with a conclusion that wraps up your topics and brings your presentation full circle.
Sometimes, this structure can be hard to define. Asking AI to create an outline for a presentation can be a great time-saving shortcut. If you’re starting with a complex research paper or passage, you can directly copy and paste it into the AI chat window, then ask to summarize it. AI can also extract key points for headings, which can create your outline for slide titles.
Use AI to design visually attractive presentations
You don’t need to be a graphic designer to create presentations that are both striking and easy to follow. With AI tools integrated into Microsoft PowerPoint , you can design slides that consider factors like readable fonts, compatible color schemes, the informational hierarchy , and information spacing that won’t overwhelm the audience with too much to see on each slide.
AI image creators can also translate your text into custom visuals: not only can this bring your slides to life, but it can also save you time from searching through image libraries, stock photos, or visual sources from the Internet.

Tell your story with captivating presentations
Powerpoint empowers you to develop well-designed content across all your devices
AI tools that transcribe recordings into presentations
While the visual presentation is one aspect of your project, your speech and delivery are vital. The key to this is practice. Rehearsing your presentation out loud, and especially multiple times before you go onstage, can aid in balancing when to present new points, ensure smooth transitions between slides, time your overall presentation, and help you refine your text so you can sound clearer.
AI can help! Advanced tools can transcribe your spoken words, both in real-time and through prerecorded clips on your computer or mobile device. This not only assists in creating accurate speaker notes but also provides an opportunity to learn how you sound, allowing you to refine and improve your delivery. In PowerPoint, speaker notes are hidden from the audience during a live presentation, and AI integration can generate live notes from the sound of your voice—which makes it easy to practice and familiarize yourself with your content.
AI tools that can summarize, design, and transcribe your presentations can make it easier to engage with your audience confidently. See more presentation tips to enhance your points, such as how to craft a compelling story or how to overcome public speaking anxiety .
Get started with Microsoft 365
It’s the Office you know, plus the tools to help you work better together, so you can get more done—anytime, anywhere.
Topics in this article
More articles like this one.

How to create an educational presentation
Use PowerPoint to create dynamic and engaging presentations that foster effective learning.

Five tips for choosing the right PowerPoint template
Choose an appropriate PowerPoint template to elevate your presentation’s storytelling. Consider time length, audience and other presentation elements when selecting a template.

How you can use AI to help you make the perfect presentation handouts
Learn how AI can help you organize and create handouts for your next presentation.

How to password protect your PowerPoint presentations
Learn how to password protect your PowerPoint presentations and secure your valuable files.
Everything you need to achieve more in less time
Get powerful productivity and security apps with Microsoft 365

Explore Other Categories
- All about AI
- Google Bard
- Inflection AI Pi Chatbot
- Anthropic Claude
- Generative AI
- AI Image Generation
- AI Regulation
- AI Research
- Large Language Models (LLM)
- Surface Pro
- Surface Laptop
- Surface Book
- Surface Duo
- Surface Neo
- Surface Studio
- Surface Hub
- Surface Pen
- Surface Headphones
- Surface Earbuds
- About WinBuzzer
- Follow Us: PUSH, Feeds, Social
- Write for Us
- Cookie Policy and Privacy Policy
- Terms of Service
How to Password Protect Excel, Word, PowerPoint, or PDF Files with Microsoft Office
We show you how to password protect Excel, Word, PowerPoint and PDF files in Microsoft Office so that you can keep your documents private.

Table of Contents:
While most of us already have login passwords on our PC, at times it’s necessary to go one step further. As well as encrypting individual files , you can use Microsoft Office to password protect an Excel file Word Document, PDF, and more. When you password-protect documents with modern versions of Office, they’re typically encrypted. This means that anybody who tries to read them that doesn’t have your password will just see random strings of letters and numbers. This persists even if you send the document to another person. Here we show you how to password protect Excel, Word, PowerPoint or PDF files.
How to Password Protect a Word Document, Excel File, or PowerPoint Presentation
Securing your Microsoft Office documents with a password is a straightforward process. This method is applicable to Word, Excel, and PowerPoint files, providing an extra layer of security by encrypting your documents. Follow the steps below to protect your Office documents. We use Word as an example but the exact same steps also work for other Office files.

How to Create a Password Protected PDF File with Microsoft Office
Creating a password-protected PDF file is slightly different from encrypting a Word, Excel, or PowerPoint document. This method involves converting your Office document into a PDF format and then securing it with a password. Here’s how to do it.

FAQ – Frequently Asked Questions About Password-Protection for Documents
Password-protected documents maintain their encryption when stored on cloud services..
The document remains encrypted on the server, requiring the password upon opening, regardless of the cloud storage used. It’s crucial to use strong passwords and enable two-factor authentication (2FA) for your cloud storage account for additional security. Be aware of the cloud provider’s encryption in transit and at rest protocols to ensure comprehensive protection of your documents.
What should I do if a password-protected document needs to be accessed by multiple people?
For documents requiring access by multiple users, set a shared password communicated through a secure medium, ensuring all parties understand the importance of keeping the password confidential. Alternatively, consider using document management or collaboration platforms that offer granular access controls and permissions, allowing for better management of who can view or edit the document without relying on a single shared password.
Besides password protection, what other security measures should I consider for sensitive documents?
In addition to password protecting sensitive documents, consider using encryption solutions that secure the entire document beyond the application level. For highly sensitive information, employ data loss prevention (DLP) policies, secure access management (like 2FA ), and regularly audit access logs. Awareness and training on security best practices among users who will access the documents are also vital in ensuring comprehensive protection.
Can editing restrictions be set on a password-protected Word document?
Yes, Word allows you to apply editing restrictions that let users open but not modify a document. This is done by navigating to the Review tab, selecting Restrict Editing, and choosing the editing restrictions. This feature can be applied in conjunction with or separate from password protection, offering flexibility in how you secure and share documents. Engaging both protections enhances document security, especially in collaborative environments.
How can I tell if a PDF file is encrypted and password protected without opening it?
Various PDF readers and file management tools provide visual cues or properties details indicating encryption. For example, attempting to open the file in a PDF reader will prompt for a password if encrypted. In file properties or details pane, look for security settings or encryption status. Advanced PDF management tools may offer more detailed insights into the encryption level and specifics of the protection applied. Always ensure your PDF viewer or editor is up-to-date for accurate detection and handling of encrypted files.
In addition to password protection, consider utilizing encryption solutions that secure the entire document beyond the application level. Implement data loss prevention (DLP) policies, engage secure access management practices such as two-factor authentication (2FA) , and regularly audit access logs. It’s also crucial to promote awareness and training on security best practices among users with access to the documents to ensure comprehensive protection.
Yes, Word allows users to set editing restrictions on a document, enabling viewers to open but not modify the content. This feature is accessible via the Review tab by selecting Restrict Editing and then specifying the desired editing restrictions. This functionality can synergize with or operate independently from password protection, thus offering flexibility in document security and sharing practices. Utilizing both protections can significantly enhance document protection, particularly in collaborative environments.
Related: How to Remove Password Protection from a PDF

Related: How to Password Protect Excel Files

Related: How to Lock Cells in Excel to Protect Them from Editing

Related: How to Password-Protect a Folder in Windows 11 and Windows 10

- how to password protect a pdf
- how to password protect an excel file
- Microsoft Excel
- Password Protect a PDF
- Password Protect Word Document
- PDF password
- pdf with password
Recent News

Microsoft Announces Establishment of AI Hub in London, Led by AI...

Microsoft to Power Cloud Software Group’s Future with $1.65 Billion Investment
Subscribe to WinBuzzer on Google News

Password protection for presentations in PowerPoint
A password helps to prevent other people from opening or modifying a presentation.
Caution: When you create a password for a presentation, record the password and keep it in a secure place. If you lose the password, it can't be retrieved and you won't be able open or gain access to the presentation.
Add password protection to a file
Select File > Info .
Select Protect Presentation > Encrypt with Password .
In the Password box, enter the password you'd like to use. Select OK .
PowerPoint prompts you to confirm the password by entering it once more.
Save the file to ensure the password takes effect.
Password protection isn't supported in PowerPoint for ODP (Open Document Presentation) files.
Remove a password from a file
Removing a password from a document is a simple process, but you have to know the original password.
Open the presentation whose password you want to remove.
Clear the password in the Password box, and then click OK .
Co-authoring a password-protected file
If you attempt to open a password-protected file that someone else is currently working on, you'll be able to open it, but you won't be able to edit it. You'll see the file in read-only mode.
Add or remove protection in your document, workbook, or presentation
Require a password to open a presentation
Click File > Passwords .
Under Password to open , select the Encrypt this presentation and require a password to open check box.
In the New password box, type a password.
Note: To create a strong password, use at least seven characters and include a combination of uppercase and lowercase letters, numbers, and non-alphabetic characters such as !,$, #, and %. Do not include your account name or other personal information.
In the Verify box, type the password again, and then click Set Password .
Click OK , and then save your presentation.
Tip: To remove the password, clear the Encrypt this presentation and require a password to open check box, click OK , and then save your presentation.
Require a password to modify a presentation
You can add a password so that only authorized users can modify a presentation. Unauthorized users can still open the presentation and then save it by using a different file name.
Under Password to modify , select the Require a password to modify the presentation check box.
Tip: To remove the password, clear the Require a password to modify the presentation check box, click OK , and then save your presentation.
Change a password to open or modify a presentation
Under Password to open or Password to modify , click Change Password .
In the New password box, type the new password.
To open a password-protected presentation: Enter the password for the file in the box.
Passwords are case-sensitive. Make sure you don't accidentally have Caps Lock turned on.
You can try again if you enter an incorrect password.
The file can't be opened without the password. If you don't know the password, you'll have to check with the person that encrypted the file.
For ODP (Open Document Presentation) files, password protection isn't supported in PowerPoint for the web.

Need more help?
Want more options.
Explore subscription benefits, browse training courses, learn how to secure your device, and more.

Microsoft 365 subscription benefits

Microsoft 365 training

Microsoft security

Accessibility center
Communities help you ask and answer questions, give feedback, and hear from experts with rich knowledge.

Ask the Microsoft Community

Microsoft Tech Community

Windows Insiders
Microsoft 365 Insiders
Was this information helpful?
Thank you for your feedback.
ITLD’s Top 5: Tips for Making PowerPoints Accessible
Apr 5, 2024
When creating a PowerPoint presentation for your students, you want to be proactive in ensuring that your course content is accessible for all. The Accessibility Checker is a valuable resource to rely on not only as you are creating your presentation, but to utilize for suggestions in making the presentations more accessible. By making your PowerPoint presentations accessible, you are optimizing the information for all users. Below are five accessibility considerations to be mindful of when developing your PowerPoint presentation.
1: Establish a logical slide reading order.
When creating a PowerPoint presentation, it is critical to develop the content of each slide in a logical reading order. A screen reader reads the slide’s contents in the order in which they were added to the slide. This may be different from the order in which they appear. When you are developing the contents, you can check their order to assure that the screen reader understands them. For step-by-step instructions on how to check the reading order of your slides, visit Make Slides easier to read by using the Reading Order pane on the Microsoft Support page.
2: Add alternative text to images.
Adding images to PowerPoint is a way to make your presentation more interesting and engaging. However, you want to make sure that your images have alternative text to ensure that individuals with visual disabilities understand the pictures or other graphical content. Alternative (Alt) text is essential for making images accessible to all users, particularly to those who can’t see them. The Accessibility Checker is a great way to locate missing alt text.
3: Use contrasting colors for text and backgrounds.
When developing your PowerPoint presentation, you must use sufficient contrast for them. In your presentation’s design, you want to ensure there is sufficient contrast between the background and the text color schemes, including black and white. As you create your presentation, look for text that is hard to read or differentiate from the background. A stronger contrast between the background and the text makes it more visible for individuals with low vision or colorblindness to read the content. The Accessibility Checker can locate insufficient color contrast.
4: Develop PowerPoints using accessible Master Slides.
Developing a PowerPoint Presentation using a Master Slide has a great benefit. It allows you to create a unique template that is unlike the others. Master Slides control the overall appearance, like the design and formatting. When any changes are made to the Master Slide in the presentation, the changes will be applied to each slide layout. Using a Master Slide can also ensure that you are developing your slides to be accessibility friendly for all users. When developing your Master Slide, keep these suggestions in mind to make the slide accessible:
Default fonts, colors, and sizes
- Use sans serif or similar font styles.
- Remember that color is not the only means of sharing information. Review each slide in your presentation for instances of color-coding. The Grayscale setting can help to search for this. Color is also important for contrast between the text and the background.
- A larger font size makes content more accessible for users. Sans serif fonts sized 20 or greater create a more accessible slide.
Transitions and animations
- Transitions and animations should be used sparingly in a PowerPoint presentation. They can be distracting to viewers and difficult for assistive technologies to use.
- Transitions can be used if they are under 3 seconds long.
- Avoid using endless animations.
- There are no specific guidelines for either transitions or animations. However, be aware of your audience.
- The simpler, the better.
5: Choose media wisely.
When selecting media for PPT Presentations, be sure to choose the media wisely. You want to make sure the videos are accessible to individuals who have a hearing or vision impairment. Remember to include the following in any added media to a PPT Presentation:
- Subtitles: captioning used to translate or transcribe the dialogue of the media from one language to another. This can include alternative audio tracks.
- Closed captions: subtitles of content in the same language. Closed captions will also describe music and sound effects that occur throughout the media.
- Video description: an audio narrated description of the video’s key visual elements. The descriptions are inserted into natural pauses within the program’s dialogue. This is beneficial for those who have a vision impairment.
Additional Resources
Penn State Accessibility
PowerPoint Accessibility Tips (PSU Accessibility)
Make your Power Point presentations accessible to people with disabilities (Microsoft Support)
Suggestions or feedback?
MIT News | Massachusetts Institute of Technology
- Machine learning
- Social justice
- Black holes
- Classes and programs
Departments
- Aeronautics and Astronautics
- Brain and Cognitive Sciences
- Architecture
- Political Science
- Mechanical Engineering
Centers, Labs, & Programs
- Abdul Latif Jameel Poverty Action Lab (J-PAL)
- Picower Institute for Learning and Memory
- Lincoln Laboratory
- School of Architecture + Planning
- School of Engineering
- School of Humanities, Arts, and Social Sciences
- Sloan School of Management
- School of Science
- MIT Schwarzman College of Computing
- Q&A: Tips for viewing the 2024 solar eclipse
Q&A: Tips for viewing the 2024 solar eclipse
Press contact :.

Previous image Next image
On Monday, April 8, the United States will experience a total solar eclipse — a rare astronomical event where the moon passes directly between the sun and the Earth, blocking out the sun’s light almost completely. The last total solar eclipse in the contiguous U.S. was in 2017, and the next one won’t be until 2044.
If the weather cooperates, people across the United States — from northeastern Maine to southwestern Texas — will be able to observe the eclipse using protective eyewear. Those in the path of totality , where the moon entirely covers the sun, will have the best view, but 99% of people in the continental U.S. will be able to see a partial eclipse. Weather permitting, those on the MIT campus and the surrounding area will see 93 percent of the sun covered, with the partial eclipse starting at 2:15 p.m. and reaching its peak around 3:29 p.m. Gatherings are planned at the Kresge Oval and the MIT Museum , and a live NASA stream will be shown in the Building 55 atrium .
Brian Mernoff , manager of the CommLab in the Department of Aeronautics and Astronautics, is an accomplished astrophotographer and science educator. Mernoff is headed to Vermont with his family to experience the totality from the best possible angle — but has offered a few thoughts on how to enjoy the eclipse safely, wherever you are.
Q: What should viewers expect to see and experience with this solar eclipse?
A: When you’re watching TV (the sun) and your toddler, dog, or other large mammal (the moon) blocks your view, you no doubt move over a bit to try to get a partial or full view of the TV. This is exactly how the path of totality works for an eclipse. If you are exactly in line with the moon and sun, it will be completely blocked, but if you start moving away from this path, your view of the sun will start to increase until the moon is not in the way at all.
The closer you are to the path of totality, the more of the sun will be blocked. At MIT, about 93 percent of the sun will be blocked. Those in the area will notice that things around you will get slightly darker, just like when it starts to become overcast. Even so, the sun will remain very bright in the sky and solar glasses will be required to view the entirety of the eclipse. It really goes to show how incredibly bright the sun is!
Within the narrow path of totality, the moon will continue to move across the sun, reaching 100 percent coverage. For this short period of time, you can remove your glasses and see a black disk where the sun should be. Around the disk will be wispy white lines. This is the corona, the outermost part of the sun, which is normally outshone by the sun’s photosphere (surface). Around the edges of the black disk of the moon, right as totality begins and ends, you can also see bright spots around the edges, known as Bailey’s Beads, caused by sunlight shining between mountains and craters on the moon.
But that’s not all! Although you will be tempted to stare up at the sun throughout totality, do not forget to observe the world around you. During totality, it feels like twilight. There is a 360-degree sunset, the temperature changes rapidly, winds change, animals start making different sounds, and shadows start getting weird (look into “shadow bands” if you have a chance).
As soon as totality ends, and you start to see Baily’s Beads again, put your solar glasses back on as it will get very bright again very fast as the moon moves out of the way.
Q: What are the best options for viewing the eclipse safely and to greatest effect?
A: No matter where you are during the eclipse, make sure you have solar glasses. These glasses should be ISO-approved for solar viewing. Do not use glasses with scratches, holes, or other damage.
If you are unable to obtain solar glasses in time, you can safely view the eclipse using a home-made projection method , such as a pinhole camera or even projecting the image of the sun through a colander.
The best view of the eclipse will be from within the path of totality, but even if you are not within it, you should still go outside to experience the partial eclipse. Use the NASA Eclipse Explorer to find the start, maximum, and end times, and then find a nice spot outside — preferably with some shade — put on your glasses, and enjoy the show.
For a closer view of the sun, find a friend that has a telescope with the correct ISO-certified solar filter. This will let you see the photosphere (or chromosphere if it is an H-alpha scope) in a lot more detail. If you do not have access to a telescope, NASA plans to livestream a telescope view throughout the eclipse. [The livestream will be displayed publicly on a large screen in Building 55 at MIT, rain or shine.]
The only time you can look at or image the sun without a filter is during 100 percent totality. As soon as this period is done, glasses and filters must be put back on.
After the eclipse, keep your glasses and filters. You can use them to look at the sun on any day (it took me an embarrassing amount of time to realize that I could use the glasses at any time instead of lugging out a telescope). On a really clear day, you can sometimes see sunspots!
Q: How does eclipse photography work?
A: This year I plan to photograph the eclipse in two ways. The first is using a hydrogen-alpha telescope. This telescope filters out all light except for one wavelength that is given off by hydrogen. Because it blocks out most of the light from the sun’s surface, it allows you to see the turbulent upper atmosphere of the sun, including solar prominences that follow magnetic field lines.
Because this telescope does not allow for imaging during totality as too much light is blocked, I also plan to set up a regular camera with a wide-angle lens to capture the total eclipse with the surrounding environment as context. During the 2017 eclipse, I only captured close-ups of the sun using a regular solar filter and missed the opportunity to capture what was going on around me.
Will it work? That depends on if we get clear skies, and how many pictures of my 1.5-year-old need to be taken (as well as how much chasing needs to be done).
If you would like to take pictures of the eclipse, make sure you protect your camera sensor. The sun can easily damage lenses, sensors, and other components. Here are some examples of solar damaged cameras . The solution is simple, though. If using a camera phone, you can take pictures through an extra pair of solar glasses, or even tape them to the phone. For cameras with larger lenses, you can buy cardboard filters that slide over the front of your camera or even buy ISO-approved solar film and make your own.
Q: Any fun, unique, cool, or interesting science facts about this eclipse to share?
A: If you want to get even more involved with the eclipse, there are many citizen science projects that plan to collect as much data as possible throughout the eclipse.
NASA is planning to run several experiments during the eclipse , and researchers with MIT Haystack Observatory will also be using four different technologies to monitor changes in the upper atmosphere , both locally and across the continent.
If you are interested in learning more about the eclipse, here are two of my favorite videos, one on “ unexpected science from a 0.000001 megapixel home-made telescope ” and one on solar eclipse preparation .
Share this news article on:
Related links.
- Brian Mernoff
- AeroAstro Communication Lab
- Department of Aeronautics and Astronautics
Related Topics
- Space, astronomy and planetary science
- Aeronautical and astronautical engineering
- Earth and atmospheric sciences
- Photography
- Cambridge, Boston and region
- Science communications
Related Articles

MIT Haystack scientists prepare a constellation of instruments to observe the solar eclipse’s effects

Solar eclipse caused bow waves in Earth's atmosphere

Q&A: Richard Binzel on tips for observing the 2017 solar eclipse
Previous item Next item
More MIT News

Has remote work changed how people travel in the U.S?
Read full story →

Physicist Netta Engelhardt is searching black holes for universal truths

MIT community members gather on campus to witness 93 percent totality

Extracting hydrogen from rocks

When an antibiotic fails: MIT scientists are using AI to target “sleeper” bacteria

MIT engineers design flexible “skeletons” for soft, muscle-powered robots
- More news on MIT News homepage →
Massachusetts Institute of Technology 77 Massachusetts Avenue, Cambridge, MA, USA
- Map (opens in new window)
- Events (opens in new window)
- People (opens in new window)
- Careers (opens in new window)
- Accessibility
- Social Media Hub
- MIT on Facebook
- MIT on YouTube
- MIT on Instagram
IMAGES
VIDEO
COMMENTS
Select Protect Presentation, point to Restrict Access, and then select Restricted Access. In the Permission dialog box, select Restrict permission to this presentation, and then select More Options. Under Additional permissions for users, select the This presentation expires on check box, and then enter a date. Select OK twice.
Step-1: Open the "Encrypt Password" option. The first step is to click on the " File " tab. Then, from the backend view, click on the " Info " option. Next, click on the " Protect Presentation " option, and from the dropdown, select the " Encrypt with Password " option. Step-2: Clear the Password from the box.
To protect your document, go to the file tab in PowerPoint, select Info, then click 'Protect Presentation'. In the drop-down menu, you will find 4 or 5 options for protecting presentations in PowerPoint (options available depend on which version of PowerPoint you are running): 'Always Open Read-Only', 'Encrypt with Password ...
To password protect your presentation, open PowerPoint, click the "File" tab, click "Info" in the left-hand pane, and then click the "Protect Presentation" option. Next, click "Encrypt with Password" from the menu that appears. The Encrypt Document window will appear. Enter your password in the Password text box and then click "OK."
Select Protect Presentation, point to Restrict Access, and then select Restricted Access. In the Permission dialog box, select Restrict permission to this presentation, and then select More Options. Under Additional permissions for users, select the This presentation expires on check box, and then enter a date. Select OK twice.
On the PowerPoint ribbon, click on File. Click on File to access the password-protect option in PowerPoint. In the Info section, click on the first option, Protect Presentation. Then choose Encrypt with Password. The steps you need to follow to get to the Encrypt With Password option in PowerPoint. You'll then see the Encrypt Document pop-up ...
In this Microsoft PowerPoint 2021/365 tutorial video, learn how to protect a PowerPoint presentation to avoid unwanted changes.To see the full course that th...
Protecting your presentation. By default, anyone with access to your presentation will be able to open, copy, and edit its content unless you protect it. There are several ways to protect a presentation, depending on your needs. To protect your document: Click the File tab to go to Backstage view. From the Info pane, click the Protect ...
Step 1: Click the File tab to go to Backstage view. Step 2: From the Info pane, click the Protect Presentation command. Step 3: In the drop-down menu, choose the option that best suits your needs. select Mark as Final. Step 4: A dialog box will appear prompting you to save, click OK.
In PowerPoint 2010 and 2013, choose File> Info> Protect Presentation> Add a Digital Signature. Mark as Final. If you have 2007 or later and don't need to securely prevent changes, but just want to let people know that a presentation shouldn't be changed, you can use the Mark as Final feature.
To password protect your PowerPoint presentation using either the Password to Open or Password to Modify options, follow the steps below. 1. Open the PowerPoint presentation you want to password protect. The only way to add a password to a specific presentation is from within the presentation itself. So as a first step, find and open the ...
Assign a password by going to Protect Presentation. Save the presentation as graphic images or a PDF file to keep the information visible but not easily editable. Use the Mark as Final feature to ensure that no further edits are made inadvertently. This article explains several ways you can apply security in PowerPoint presentations.
5) Add a watermark to your presentation. This is such a 'duh' step, you were probably wondering when we would mention it. But yes, watermarks can certainly protect any original graphics you use in your presentation, including the slides themselves. Watermark placement is really tricky though.
After you've created a PowerPoint presentation, first select "File," then click "Info.". Choose "Protect Presentation" from the drop-down menu that appears, then "Encrypt with Password.". Type the password you'd like to use in the Password box, then hit "OK," and you're good to go. Be sure to write down the password ...
From the Info pane, click the Protect Presentation command. In the drop-down menu, choose the option that best suits your needs. ... Open an existing PowerPoint presentation. If you want, you can download our practice presentation. Use the Document Inspector to check the presentation. If you're using the example, remove all personal information ...
Method #3. Restrict Permission to Selected Individuals. You can set the restriction to your readers so they can read the presentation but won't be able to change, print, or copy the content. As with the previous method, you can do this right in PowerPoint. Simply go to File → Info → Protect Presentation → Restrict Access .
Here's how you can use the password protection feature on PowerPoint: Go to File and click on Info. Choose Protect Presentation and then click on Encrypt with Password. Enter a strong password and press OK. Remember that the password is case sensitive, and if you lose it, you will not be able to open the file. So keep the password safe.
Option 3: Restrict Permission by People to Protect PowerPoint Presentation. Yes, you can set the restriction to the readers. Then people with reading permission can read the presentation, but are unable to change, print or copy the content; While the people with change permission can read, edit and copy content as well as save the changes. ...
Inside your PowerPoint presentation: Navigate to the Insert tab. Select the Photo Album command to launch the photo album dialog box. 5. Navigate to where your pictures are saved. Within the Photo Album dialog box, use the File/Disk command on the left to navigate to where you exported the pictures of your slides to.
If you do not want others to copy your PowerPoint presentation content, what can you do? You can learn 4 effective ways to protect a PowerPoint presentation ...
With AI tools integrated into Microsoft PowerPoint, you can design slides that consider factors like readable fonts, compatible color schemes, the informational hierarchy, and information spacing that won't overwhelm the audience with too much to see on each slide. AI image creators can also translate your text into custom visuals: not only ...
Tick 'Encrypt the document with a password'. In the options window, find and tick the checkbox labeled " Encrypt the document with a password ". Click " OK " to move to the next step ...
Select Protect Presentation > Encrypt with Password. In the Password box, enter the password you'd like to use. Select OK. PowerPoint prompts you to confirm the password by entering it once more. Save the file to ensure the password takes effect. Password protection isn't supported in PowerPoint for ODP (Open Document Presentation) files.
4: Develop PowerPoints using accessible Master Slides. Developing a PowerPoint Presentation using a Master Slide has a great benefit. It allows you to create a unique template that is unlike the others. Master Slides control the overall appearance, like the design and formatting. When any changes are made to the Master Slide in the presentation ...
If you would like to take pictures of the eclipse, make sure you protect your camera sensor. The sun can easily damage lenses, sensors, and other components. Here are some examples of solar damaged cameras. The solution is simple, though. If using a camera phone, you can take pictures through an extra pair of solar glasses, or even tape them to ...