
How to Add Section in PowerPoint? [And Why to Use them!]
By: Author Shrot Katewa
![How to Add Section in PowerPoint? [And Why to Use them!]](https://artofpresentations.com/wp-content/uploads/2021/09/Featured-Image-how-to-add-sections-in-PowerPoint-optimized.jpg "powerpoint online new section")
When creating a big presentation (of more than 30 or 40 slides), there are times when you end up looking for a slide that you just created, and it takes you quite some time to locate it! If this happens frequently to you, then you’re perhaps better off adding sections to your PowerPoint presentation!
To add sections in PowerPoint, right-click between any two slides in the slide navigation panel. From the options presented, click on “Add Section”. This will add a section to your PowerPoint presentation.
Adding sections and grouping slides in PowerPoint allows you to stay organized when creating and delivering a presentation. It can come in handy especially when you have a long presentation.
But, what more can you do and how exactly can you benefit from using sections in PowerPoint? Let’s find out!
1. How to Group Slides in PowerPoint?
Let’s first start with the basics once again.
Here’s how it works – to begin with, you need to add sections in your presentation. Then, you’ll want to move the slides around so that the correct slide is present in the correct section! If needed, you can then rename the sections to be on top of things.
We’ll learn how to do all these things in the following sections of the article.
But, let’s start with grouping slides in PowerPoint as this is where the whole process begins.
To group a slide in your PowerPoint presentation, you have to select the “ Add section ” option from the dropdown menu of the slide’s navigation bar as mentioned previously.
Here’s a step-by-step process on how to do it –
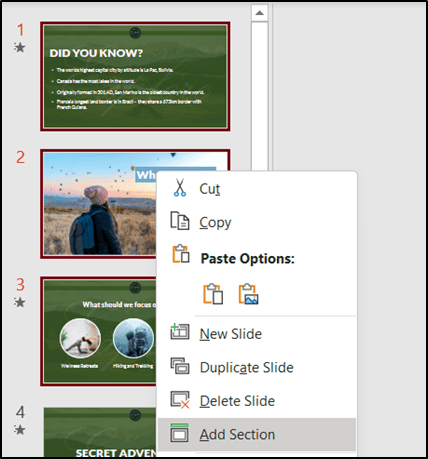
Step-1: “Right-click” on the slide navigation bar
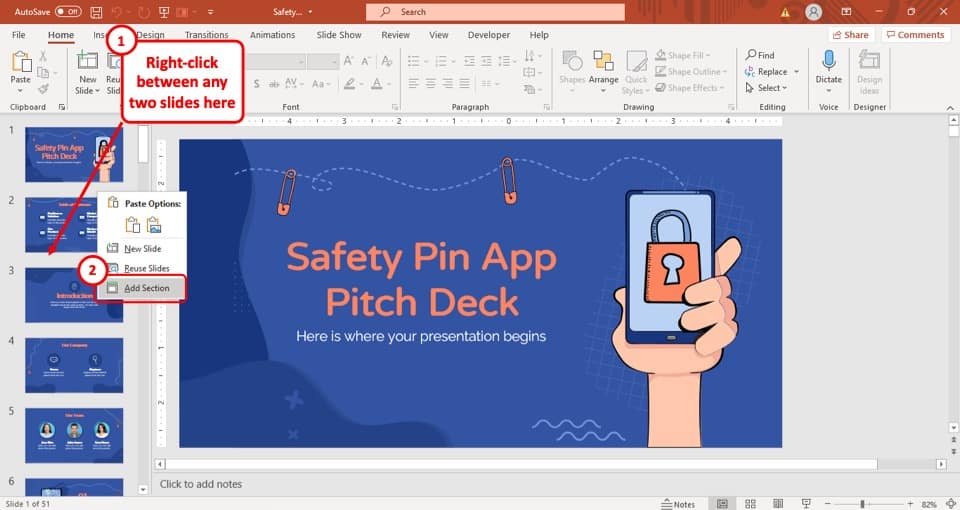
The first step of the process is to “ Right-click ” between any two slides to add a section. Ideally, you should right-click just above the first slide from which you want to group of slides to begin.
When you right-click, you will be presented with a dropdown menu.
Step-2: Click on “Add section”
Now, from the dropdown menu, click on the “ Add sections ” option which is the last option there (as shown in the image in step 1).
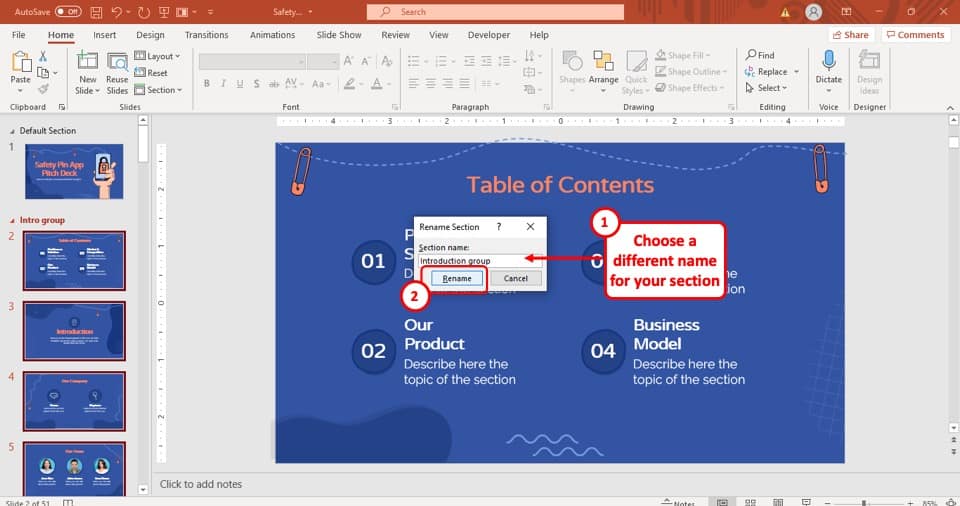
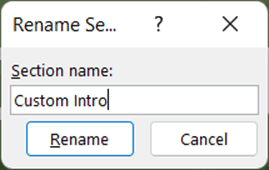
Step-3: Give a name to the section
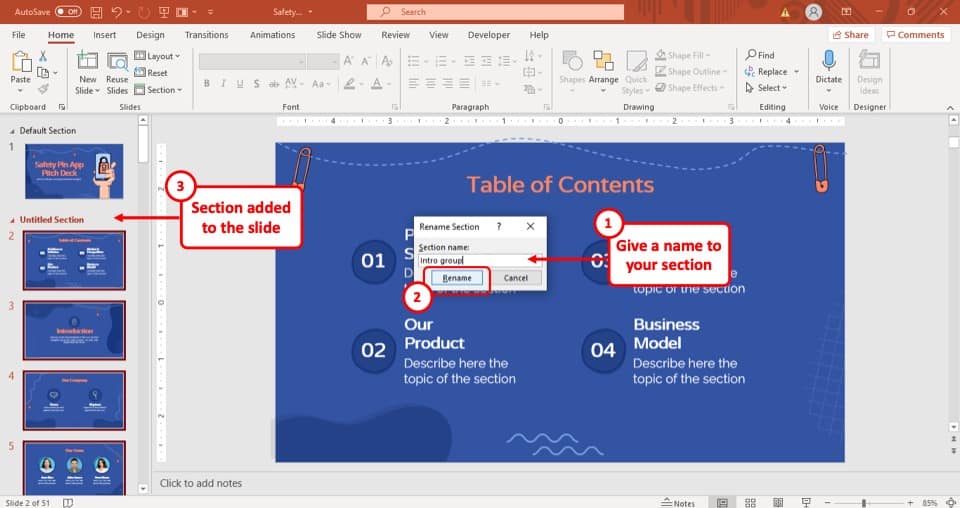
In the pop-up window, give a name to the group and hit the “ Rename ” button. This will group all the slides below the newly added section.
Step-4: Create another group after the last slide
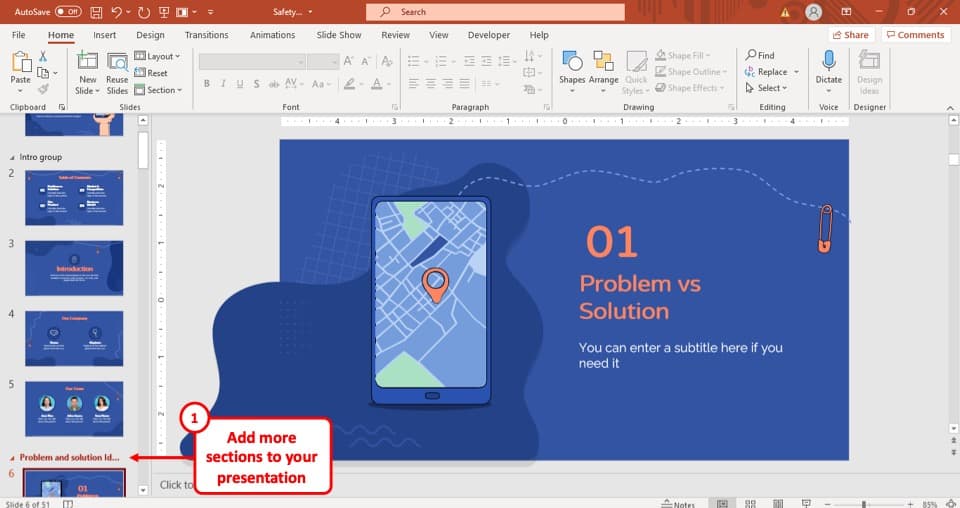
When you add a section above the first slide of the group of slides, it adds all the slides below that section into one group.
To separate one group from another, add another section under the last slide of your group following the same process described above. This will separate the slides in your group from the next group.
2. How to Rename Sections in PowerPoint?
To rename a section in your PowerPoint presentation, you have to select the rename option from the drop-down menu. The easy 3 step process is described below.
Step-1: “Right-click” on the title of the section
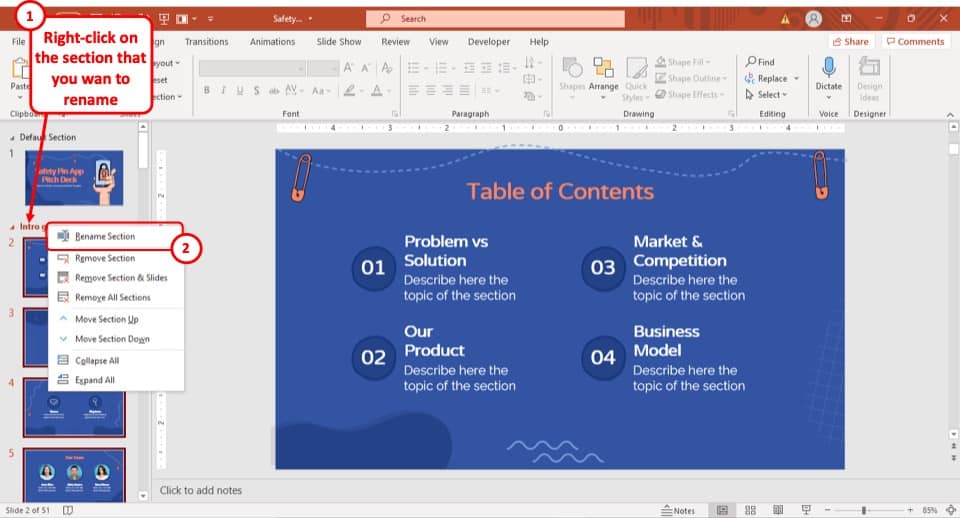
The first step of the process is to “ Right-click ” on the title of the section that you want to rename. This will open a dropdown menu.
Step-2: Click on “Rename section”
In this step, all you have to do is to select the “ Rename section ” option from the dropdown menu. It is the first option in the dropdown menu (as shown in the image in step 1).
Step-3: Rename the slide
After you click on the “ Rename Section ” option, a pop-up window will appear on your screen. Now, rename the section and then hit the “ Rename ” button.
After that, the section will be renamed accordingly.
3. How to Add Slides to a Section in PowerPoint?
There are two ways in which you can add a slide to a group in your PowerPoint presentation. You can either add a new slide in the group or you can move a slide from another group to your preferred group.
Both of these methods are explained in the following section.
3a. Add New Slides to a Section
To add a new slide to a section in your PowerPoint presentation, you have to select the “ New slide ” option from the drop-down menu. The whole process is described step-by-step below.

The first step of the process is to “ Right-click ” on the slide navigation bar, in the location of the sequence of slides where you want the new slide to be added.
For example, if you want to add the slide as the fourth slide in the slide navigation bar, “ Right-click ” just above the existing fourth slide.
Step-2: Select the “New Slide” option
After you right-click on the slide navigation bar, a dropdown menu will appear on your screen. From the dropdown menu, click on the “ New Slide ” option, which is the first option in the menu.
After that, a new slide will be added to your preferred sequence.
3b. Move Slides from Other Sections
You can also move slides from one group to another
Step-1: Select and hold the slide
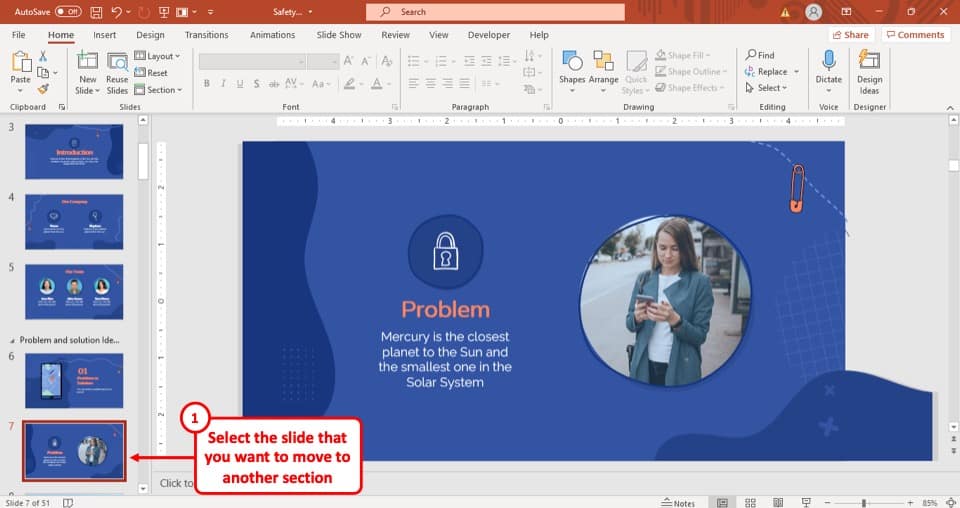
The first step of moving a slide from one group to your preferred group is to select the slide that you want to move and keep holding the “ Left mouse button ”.
This will allow you to move the slide up and down the slide navigation bar.
Step-2: Place the slide in your preferred location
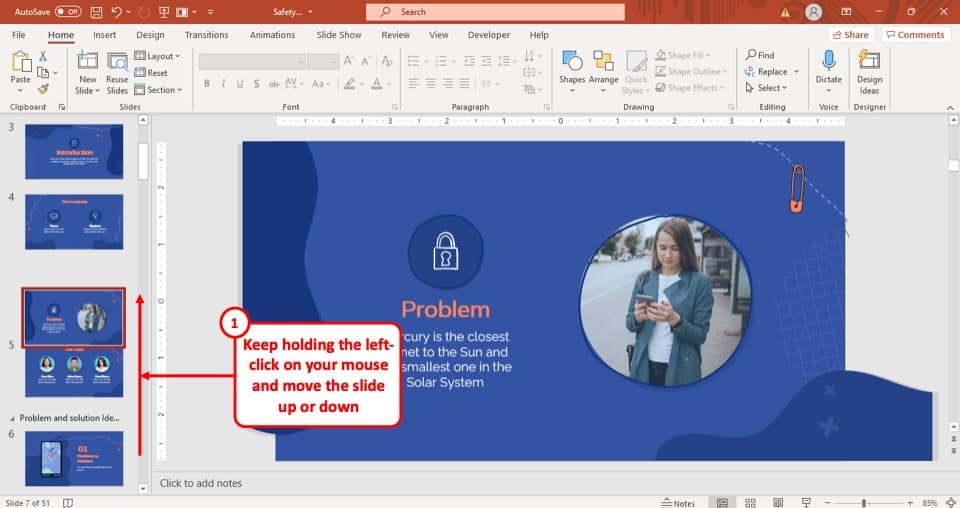
While holding the “ Left mouse button ”, drag the slide from its original position and place it in your preferred location then let go of the “ Left mouse button ”.
This way, the slide from one group will be moved to your preferred group.
4. How to Expand and Collapse Sections in PowerPoint?
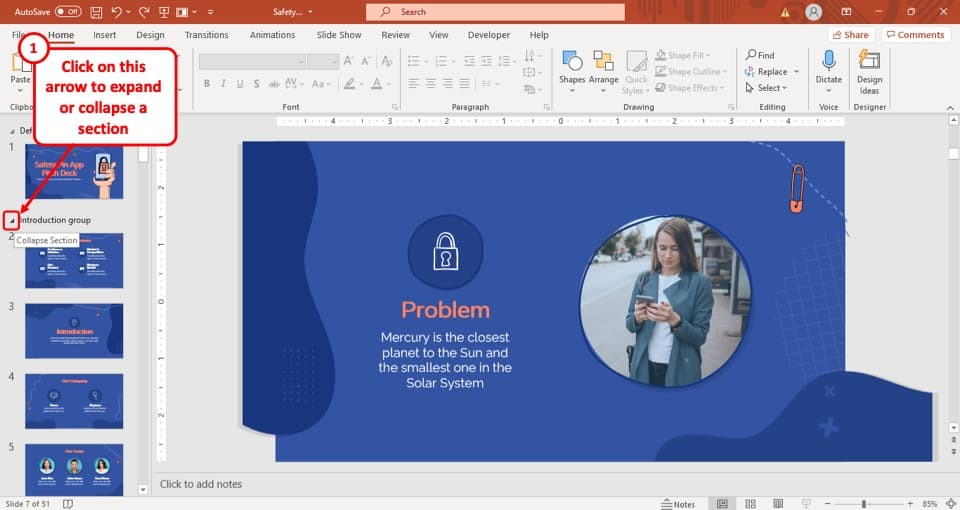
You can also expand and collapse a section or a group of slides in PowerPoint.
To collapse a section in PowerPoint, simply click on the section name or the arrow before the name of the section. This will collapse the section and hide all the slides within the section from the slide navigation panel.
You have to use the same button to expand a section in PowerPoint. If a group is expanded then you will see a triangular arrow pointing downward, located just to the left of the title of the group.
And, if the group is already collapsed, you will be able to expand it using the same button.
4a. How to Expand and Collapse All Sections in PowerPoint?
You can also expand or collapse all sections in PowerPoint in one quick movement! Here’s how to do it –
Step-1: Right-click on any section
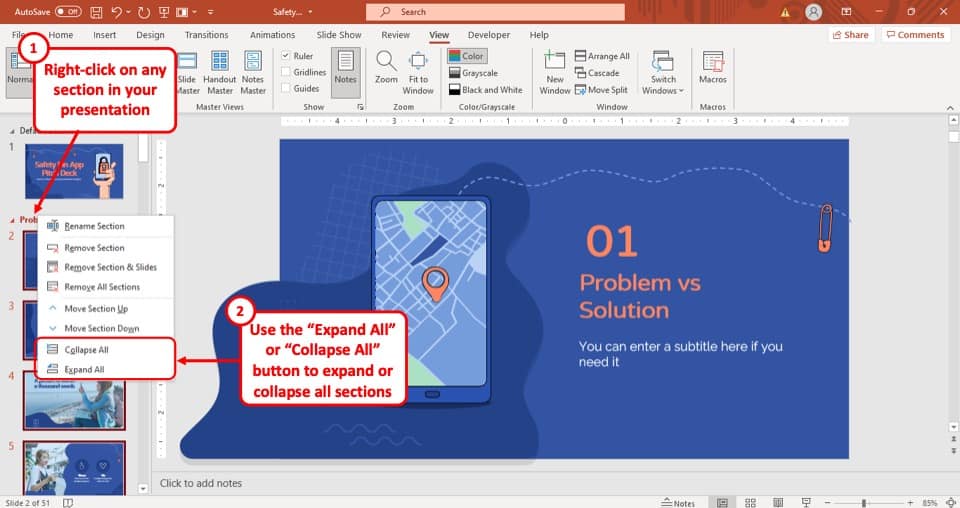
The first step is to right-click on any one of the sections in your PowerPoint presentation. You will be presented with a dropdown menu.
Step-2: Click on the “Expand All” or “Collapse All” options
The next step is to simply click on the “ Collapse All ” option to collapse all the sections in your presentation (as shown in the image in step 1).
You can also click on the “ Expand All ” option to expand all the groups of slides or the sections in your PowerPoint presentation.
Do remember, the “Expand All” option can also be used when only a few sections are in a collapsed state. Using this option then will expand only the collapsed sections.
5. How to Move a Section Up or Down in Slide Thumbnail View?
The process of moving an entire section up or down in the slide thumbnail view is very similar to moving a slide from one group to another. The whole process is described in easy steps below.
Method 1 – Dragging the Sections Up or Down
This method is the easiest when you have all the sections collapsed first.
Step-1: Collapse all the sections
The first step is to collapse all the sections in your presentation as described in the previous section. This will allow you to move a section quickly and easily.
Step-2: Click and hold the title of the section
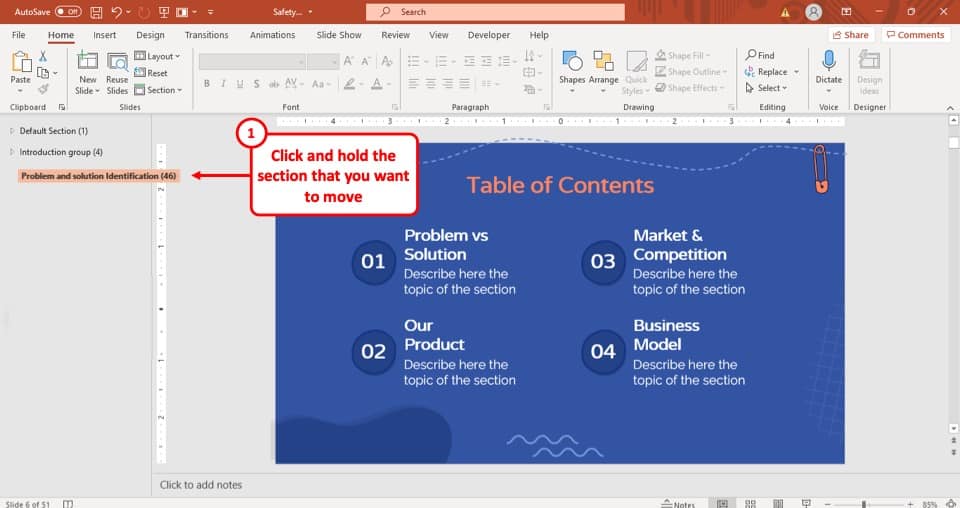
The first step of the process is to select the title of the section and then keep holding the “ Left mouse button ”.
Step-3: Move the section to your preferred sequence
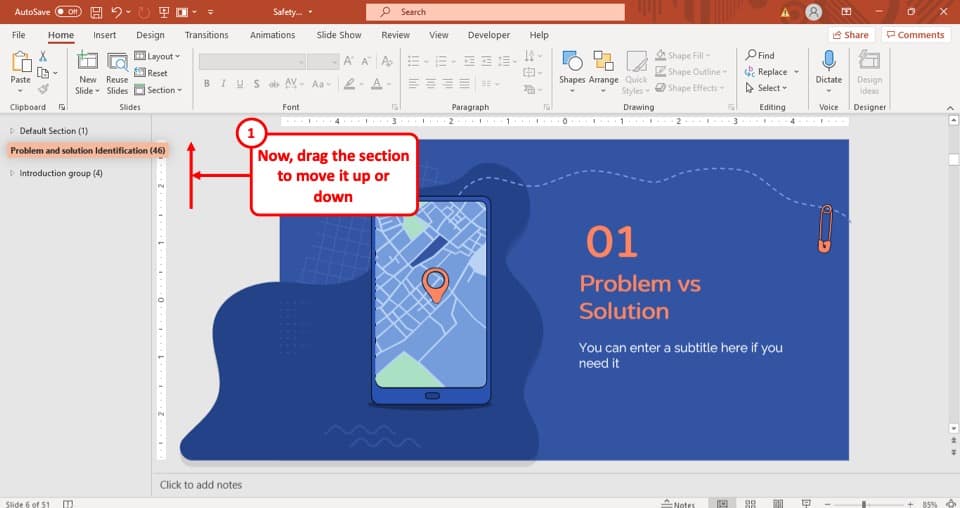
While holding the “ Left mouse button ”, drag the title of the group up or down to the position where you want to move the section.
After that, let go of the “ Left mouse button ” and the entire section will change its position accordingly.
Method 2 – Using the “Right-click” Option
You can also move a complete section using the right-click option. However, it can sometimes be confusing when you have all the slides open.
Nevertheless, here’s what you need to do when moving a section in PowerPoint using this method –
Step-1: Right-click on the section
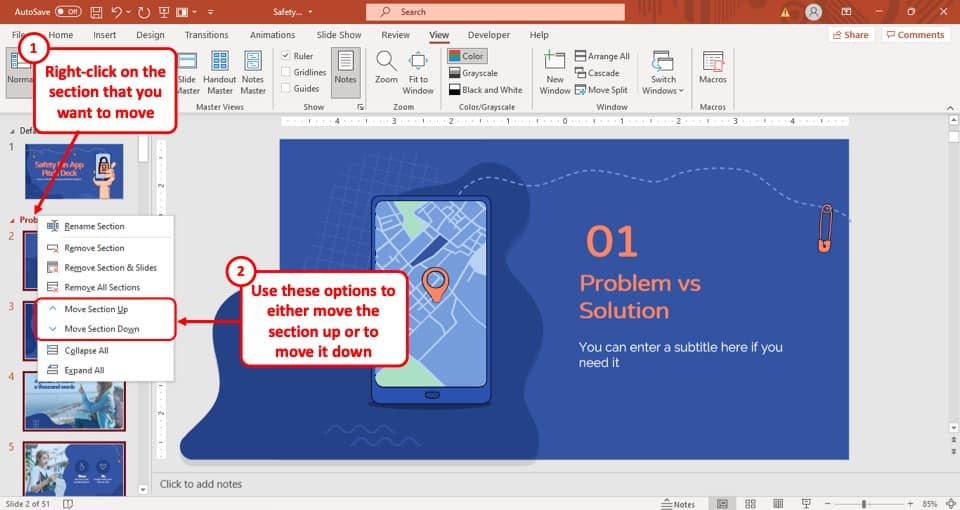
The first step is to “Right-click” on the section that you want to move. A dropdown menu will appear.
Step-2: Move the section
The next step is to simply move the section. You can click on the “ Move Section Up ” to move the section up (as the name suggests).
Likewise, you can also click on the “Move Section Down” option to move the section below the next section.
Repeat the process if you want to move a section up or down multiple steps.
6. How to Delete a Section in PowerPoint?
To delete a section in your PowerPoint presentation, you have to choose the remove section option in PowerPoint.
Here’s how you can remove a section in PowerPoint –
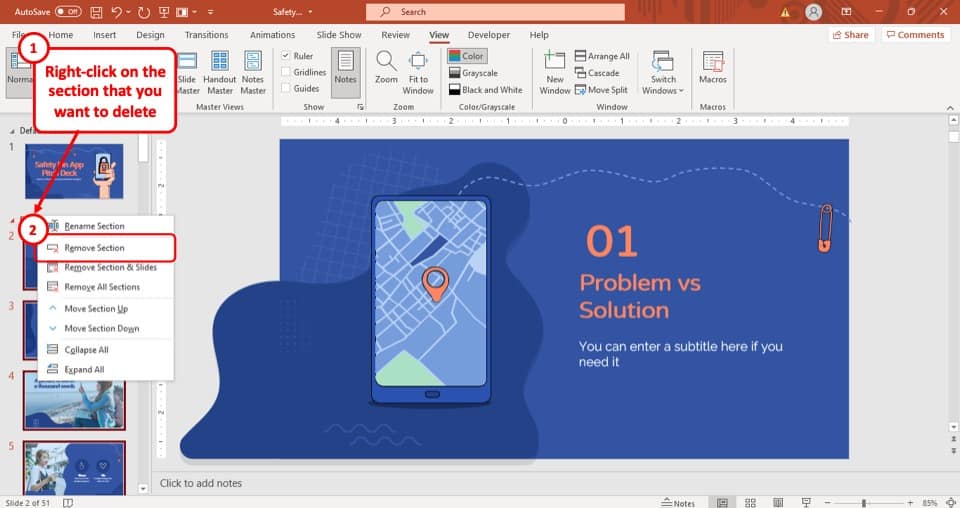
The first step of the process is to “ Right-click ” on the title of the section. This will open a drop-down menu.
Step-2: Click on “Remove section”
After you have opened the drop-down menu, simply click on the “ Remove section ” option, which is the second option of the menu.
After that, the section will be deleted immediately, and the slides in that section will merge with the preceding section.
6a. How to Remove All Sections in PowerPoint?
If you want to get rid of all sections in your presentation, PowerPoint provides you with the option to do that as well. Don’t worry, your slides will not be deleted if you choose to remove all the sections from your PowerPoint presentation!
Here’s how to delete all sections in PowerPoint –
Step-1: Right-click on any one section
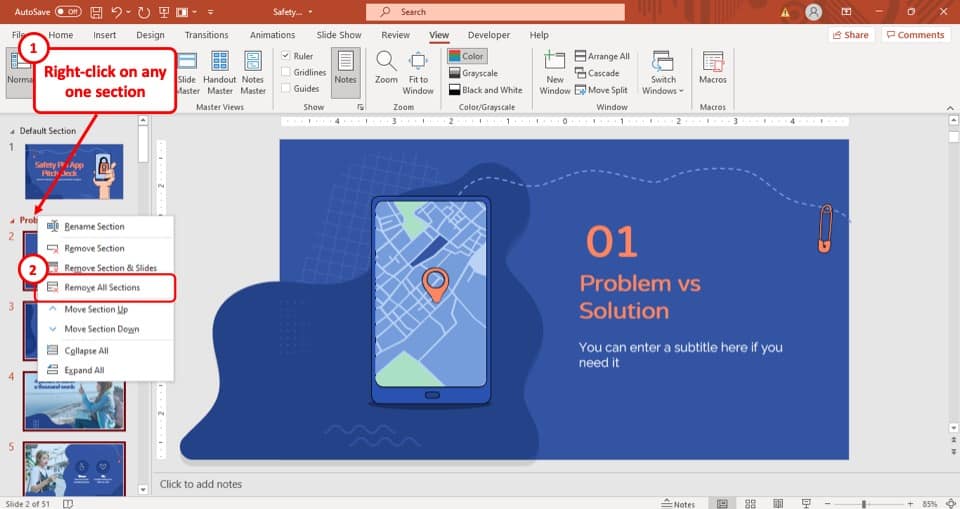
The first step is to right-click on any one section in your PowerPoint presentation. You will be presented with a dropdown menu.
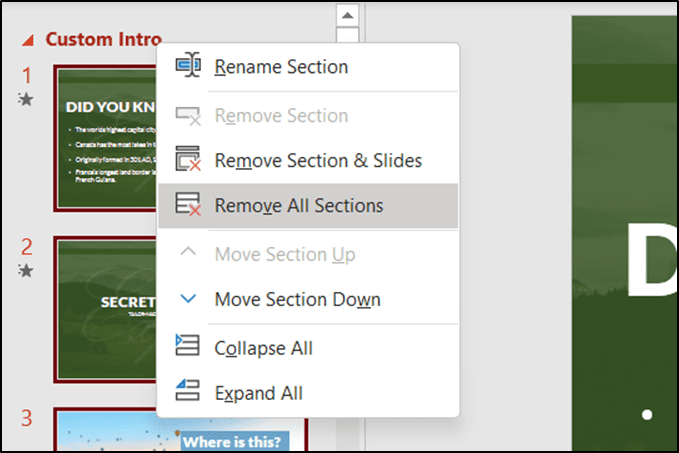
Step-2: Select the “Remove All Sections” option
From the options in the dropdown, simply click on the “ Remove All Sections ” option and this will delete all the sections in your presentation.
As mentioned before, this will not remove any of your slides. It will only remove all the sections.
6b. How to Remove a Section with Slides in PowerPoint?
Using sections comes in really handy especially when you want to delete an entire section from your presentation.
Although deleting a section in PowerPoint doesn’t delete the slides, PowerPoint also provides you with an option to delete a section along with the slides within that section.
Here’s what you need to do –
Step-1: Right-click on the section to delete

As usual, the first step is to select the section that you want to delete and right-click on it. This will open a dropdown menu with options.
Step-2: Select the “Remove Section & Slides” option
From the dropdown, simply click on the “ Remove Section & Slides ” option. This will remove the section along with the slides in that section.
7. Can you Create Sub-Sections in PowerPoint?
Unfortunately, you can’t create a subsection in your PowerPoint presentation.
Although it is quite the obvious upgrade, and many users have been requesting it since the option to add sections was introduced in PowerPoint, you can’t make a subsection in your PowerPoint.
However, to organize your PowerPoint presentation, you can insert a new section and add an underscore (“_”) before the title of the section to identify that it is a subsection.
Credit to cookie_studio (on Freepik) for the featured image of this article (further edited).

How to Use Sections in PowerPoint to Organize Slides

Organize Your PowerPoint Presentation Using Sections
by Avantix Learning Team | Updated June 9, 2021
Applies to: Microsoft ® PowerPoint ® 2013, 2016, 2019 and 365 (Windows)
You can manage a PowerPoint presentation by organizing it into sections. Although you can work with sections in Normal View or Slide Sorter View, it's easier to work with sections in Slide Sorter View. You can insert, name, move, collapse, expand and remove sections in PowerPoint. If you are working with a team on a large presentation, you can assign team members to different sections. In PowerPoint 2019 or 365, you can also use Summary Zoom to create links to different sections.
The Sections command appears on the Home tab in the Ribbon in the Slides group (although you can use the context menu to add and manage sections). Sections created with the Sections command are different from section layouts.
In this article, we'll be using the Slide Sorter to work with sections.
Recommended article : How to Quickly Remove All Animations in PowerPoint
Do you want to learn more about PowerPoint? Check out our virtual classroom or live classroom PowerPoint courses >
Below is a sample presentation organized into sections:

Working with sections in Slide Sorter View
You can work with sections in Slide Sorter View in 3 ways:
- Right-click to access the context menu
- Press Shift + F10 or press the Context key on your keyboard (if available) to access the context menu
- Use Sections on the Home tab in the Ribbon in the Slides group
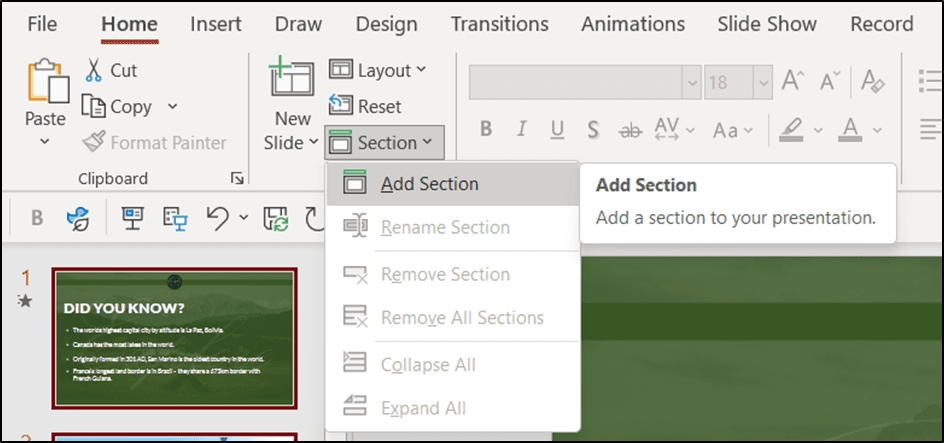
Below is the Sections command on the Home tab in the Ribbon in the Slides group:

Adding a section
To add a section in Slide Sorter View:
- Right-click the slide you want to use as the starting slide in a section or right-click between two slides where you want to add a section. You can also click Sections in the Slides group on the Home tab in the Ribbon or press Shift + F10 or the Context key to access the context menu. A drop-down menu appears.
- Select Add Section. A section marker appears as a bar across the screen. PowerPoint will also create a default section at the beginning of the presentation. A dialog box appears.
- Enter a name for the section and click Rename.
- Repeat to create other sections.
Renaming a section
To rename a section in Slide Sorter View:
- Right-click the section marker (which may be Untitled or have been named). The section marker appears as a bar across the screen. You can also click Sections in the Slides group on the Home tab in the Ribbon or press Shift + F10 or the Context key to access the context menu. A drop-down menu appears.
- Select Rename. A dialog box appears.

Collapsing and expanding sections
To collapse or expand sections, in Slide Sorter View, click the arrow to the left of the section marker to collapse or expand a section.
Moving a section
To move a section in Slide Sorter View:
- Click the arrow to the left of the section marker to collapse the section.
- Drag the section marker up or down to move the section. You can also right-click the section marker and select Move Section Up or Move Section Down (or press Shift + F10 or the Context key to access the context menu).
- Click the arrow to the left of the section marker to expand the section.
Removing a section
To remove a section in Slide Sorter View:
- Right-click the section marker. You can also click Sections in the Slides group on the Home tab in the Ribbon or press Shift + F10 or the Context key to access the context menu. A drop-down menu appears.
- Select Remove Section. A dialog box appears.
- Select Remove Section, Remove Section & Slides or Remove All Sections.
- A dialog box may appear to ask you to confirm the deletion. Click OK.
Sections will also appear in Normal View in the slide thumbnails area on the left.
Subscribe to get more articles like this one
Did you find this article helpful? If you would like to receive new articles, join our email list
More resources
PowerPoint Slide Show Shortcuts (50+ Shortcuts)
How to Print a PowerPoint Presentation with Notes
How to Embed a YouTube Video in PowerPoint
How to Add Audio in PowerPoint Presentations
How to Remove the Background of an Image in PowerPoint (2 Ways)
Related courses
Microsoft PowerPoint: Intermediate / Advanced
Microsoft PowerPoint: Design for Non-Designer s
Microsoft Excel: Intermediate / Advanced
VIEW MORE COURSES >
Our instructor-led courses are delivered in virtual classroom format or at our downtown Toronto location at 18 King Street East, Suite 1400, Toronto, Ontario, Canada (some in-person classroom courses may also be delivered at an alternate downtown Toronto location). Contact us at [email protected] if you'd like to arrange custom instructor-led virtual classroom or onsite training on a date that's convenient for you.
Copyright 2024 Avantix ® Learning
You may also like

How to Insert or Type E with an Accent Mark in PowerPoint (È, É, Ê, Ë, è, é, ê, or ë)
You can insert or type e with an accent mark in PowerPoint using built-in tools or keyboard shortcuts (including Alt code shortcuts). The letter e can be inserted with an accent in both upper or lower case in text boxes or placeholders on slides, the slide master or layouts. The following are common accents in upper or lower case – È, É, Ê, Ë, è, é, ê, or ë.

How to Fade a Picture or Part of a Picture in PowerPoint (Using a Gradient)
You can fade a picture in PowerPoint by drawing a rectangle shape on top of the picture and then filling the rectangle with a gradient from opaque to transparent. This technique is often used to fade an image into the background of a slide. Since the rectangle is placed on top of the image and then text may be placed on top of the rectangle, you may need to reorder the objects.

How to Lock an Image, Shape or Other Object in PowerPoint
You can now lock an image, shape or other object in PowerPoint. Objects can be locked in Normal View or Slide Master View. Only PowerPoint 365 users can lock objects to prevent moving and resizing. This is helpful if you want to select and move other objects on the slide or prevent others from moving or resizing an object. You can lock items using the context menu or the Selection Pane.
Microsoft, the Microsoft logo, Microsoft Office and related Microsoft applications and logos are registered trademarks of Microsoft Corporation in Canada, US and other countries. All other trademarks are the property of the registered owners.
Avantix Learning |18 King Street East, Suite 1400, Toronto, Ontario, Canada M5C 1C4 | Contact us at [email protected]
Our Courses
Avantix Learning courses are offered online in virtual classroom format or as in-person classroom training. Our hands-on, instructor-led courses are available both as public scheduled courses or on demand as a custom training solution.
All Avantix Learning courses include a comprehensive course manual including tips, tricks and shortcuts as well as sample and exercise files.
VIEW COURSES >
Contact us at [email protected] for more information about any of our courses or to arrange custom training.
Privacy Overview
Pin it on pinterest.
- Print Friendly
Home Blog PowerPoint Tutorials How to Add Sections in PowerPoint
How to Add Sections in PowerPoint

PowerPoint sections can help organize a PowerPoint presentation to help you sort out different subtopics. Adding sections to your PowerPoint templates can be handy for quickly creating new outlines and generating organized slide decks. It also makes finding subtopics in a presentation to revisit specific information easily.
How to Add Section in PowerPoint
If you’re wondering how to add a PPT section, go to Home -> Section -> Add Section or right-click between slides and select Add Section .

From the dialog box that appears, add a name for your section and click Rename . This will give a name to your section. You can name various sections according to the topic they cover. For example, one section might introduce the topic, another your team, followed by a section about the project, budget, timeline, etc.

How to Rename, Remove, Collapse, and Expand Sections in PowerPoint
To rename, remove, collapse, or expand sections, select the section and go to Home -> Sections .
Rename Section: This option allows you to rename the section.
Remove Section: You can use this option to remove a specific section.
Remove All Sections: This is a quick way to remove all sections simultaneously.
Collapse All: This option can be used to collapse all sections.
Expand All: All collapsed sections can be expanded using this option.

How to Move Sections in PowerPoint
You can either use drag and drop to move sections or via right-click menu. The latter provides options to move sections up or down. You will find various options in the right-click menu via the Sections menu. Furthermore, you can also select Remove All Sections & Slides at once to start over from scratch.

Final Words
You can group slides in PPT by creating sections in PowerPoint. Now that you know how to create sections in PPT, you can create relevant groups of slides clubbed together to generate more comprehensive presentations that are easier to sort and manage.

Like this article? Please share
Microsoft PowerPoint, PowerPoint Tips Filed under PowerPoint Tutorials
Related Articles

Filed under PowerPoint Tutorials • March 26th, 2024
How to Translate in PowerPoint
Unlock the experience of PowerPoint translation! Learn methods, tools, and expert tips for smooth Spanish conversions. Make your presentations global.

Filed under PowerPoint Tutorials • March 19th, 2024
How to Change Line Spacing in PowerPoint
Adjust text formatting by learning how to change line spacing in PowerPoint. Instructions for paragraph indenting included.

Filed under PowerPoint Tutorials • March 15th, 2024
How to Group in PowerPoint
Organize your slides’ content efficiently by mastering how to group in PowerPoint. 3 different approaches to grouping and ungrouping elements.
Leave a Reply
- April 2024: Great Graphs
- May 2024: Great Graphs in Excel
- October 2024: Report Redesign
- November 2024: Powerful Presentations
- December 2024: Dashboard Design
- March 2025: Simple Spreadsheets
- Self-Paced: Soar Beyond the Dusty Shelf Report
- Chart Templates
- Shirts & Hoodies
Leave a Reply Cancel reply
Your email address will not be published. Required fields are marked *
Save my name, email, and website in this browser for the next time I comment.
How to Organize Your PowerPoint Slides by Adding Sections

Want to organize your PowerPoint slides a little better? There’s a behind-the-scenes trick that I love using in my own presentations: Sections!
In March 2021, I was speaking with GEDIs about dataviz tricks for presentations. (The GEDI program is the Graduate Education Diversity Internship within the American Evaluation Association.)
I was scrolling through my slides, and someone asked how I created these “sections” to organize my content.
Adding sections to PowerPoint has been a gamechanger for me personally. They help me stay organized behind the scenes, which helps my audience, too. An organized presenter = an organized presentation = a happy audience that can learn from us headache-free.
Watch the 7-Minute Tutorial on Sections
I started to write a blog post with screenshots about sections… but that felt impossible. I wanted to show you how sections work, so I recorded you a tutorial.
What’s inside:
- A demo of what sections are
- How to add them
- How I use them to hide topics
- How I use them to re-order topics
What Are PowerPoint Sections?
Sections help us organize our slides into meaningful groups, categories, chunks, buckets, or chapters of a presentation.
In the video, you’ll see what they look like.
Can you spot the words above some of the slides?
Our audience won’t see the sections. They’re for us, the presenters.
How to Add Sections
It’s easy to add new sections to a presentation.
Here’s how:
- I like to be in Slide Sorter view first. (The birds-eye-view of the presentation where you can view all the miniature slides.)
- Decide which slide is going to start the new section. Click on that slide to activate it.
- Right-click and Add Section.
- In the pop-up window, give your section a name. I use names like Introduction, Case Study, Conclusion, etc.
That’s it!!!
How to Use Sections to Hide Topics
I like to keep all my slides for a given workshop within a single file.
While prepping for upcoming talks, I go through the full file – all 900+ slides! – and choose which sections I’ll talk about.
I might cover Sections A, B, and C for one group.
I might cover Sections A, D, and E for another group.
I might add Sections F, G, and H as brand new topics for another group.
(For private trainings, I review the group’s materials ahead of time and hold some planning calls to figure out which sections are going to be the best use of our time together.)
As I’m deciding which sections to include, I simply hide and unhide the slides. In the video, you’ll learn how to hide and unhide slides.
(Yes, you can hide and unhide slides without having any sections. I personally like using sections so I can think about an entire category of slides that should be shown or hidden.)
How to Use Sections to Re-Order Topics
I definitely recommend outlining your presentation in a document or spreadsheet before making all your slides.
Our outlines don’t need to be 100% finished before we make our slides. I almost always make changes along the way.
One common change is re-ordering topics. I might envision covering topics A, B, and C, in that order. But later, as I’m designing the slides, I might decide to cover topics A, C, and B.
In the video, you’ll learn how to drag and drop entire sections to re-order them.
Let me know how you’ve used sections to keep your content organized!
You Might Like
Soar beyond the dusty shelf report, how to make interactive dashboards in excel, powerful presentations.
- First Name *
- Video Tutorials
- Knowledge Base
- Group Licenses
- Why Choose Us?
- Certificates
- PowerPoint Tutorials
PowerPoint Sections: How to Create Sections in PowerPoint to Reorganize Presentations Quickly
In this tutorial, you’ll learn how to use PowerPoint sections, including how to create them, rename them, and use them to rearrange entire segments of the presentation in the Slide Sorter View.
- Tutorial Summary
- Files & Resources
- Premium Course
PowerPoint sections are useful for collapsing and expanding multiple slides, removing multiple slides, and rearranging segments of presentations.
To add a section, press Alt, H, T1 in the PC version of PowerPoint and select “Add Section”:
(This shortcut is Alt, H, T in older, non-365 versions; there is no built-in Mac shortcut for this command, so you must go to the “Home” menu and click on “Section” manually.)

Once you do this, the section name will appear on the left-hand side of the screen on top of the presentation slides in this new section:

You can now collapse and expand all the slides in this section by right-clicking it or going to the “Section” menu with Alt, H, T1:

You can also drag around the section and put it before or after other parts of the presentation:

Sections are useful in this “normal view,” but to use them most effectively , you’ll need to enter the Slide Sorter View (see below).
Video Table of Contents:
0:39: Slide Sorter View
3:42: Sections
9:21: Exercise: Add Sections to the Jazz Slides
14:50: Recap and Summary
[Click the “Files & Resources” tab to get all the PowerPoint files for this lesson.]
The Slide Sorter View and PowerPoint Sections
The default viewing mode in PowerPoint is too limited to use sections effectively because you can only see a few slides on the screen at once.
To use sections more effectively, you should enter the Slide Sorter View with the Alt, W, I shortcut (⌘ + 2 on Mac):

This “Slide Sorter View” removes the main slide edit area and presents only a high-level presentation summary.
You can’t use this view to edit slides, but you can use it to move around normal slides.
To return to the “normal view,” press Alt, W, L on PC or ⌘ + 1 on Mac.
Most shortcuts that work in the normal viewing mode of PowerPoint also work in the Slide Sorter View:
Move to Previous or Next Slide: Arrow Keys (PC / Mac)
Jump to First Slide: Home (PC) / Fn + <– (Mac)
Jump to Last Slide: End (PC) / Fn + –> (Mac)
Select Multiple Slides: Shift + Click (PC / Mac)
Insert Slide: Ctrl + M (PC) / ⌘ + Shift + N (Mac)
Insert Slide and Select Layout: Alt, H, I / N/A on Mac
Delete Slide: Del (PC / Mac)
Duplicate Current Slide: Ctrl + Shift + D (PC) / ⌘ + Shift + D (Mac)
Without even using sections, you can select multiple slides in the Slide Sorter View by pressing Shift and clicking on each one, and you can drag them to any position you want:

Doing this in the normal editing view is much less efficient because you must scroll to select multiple slides.
How to Create Sections in PowerPoint: Best Practices
When you add sections in PowerPoint, you should always start at the end of the presentation and move to the front .
When you add a section, PowerPoint applies it to all the slides after the insertion point – so if you add a section on slide 1, every slide in your presentation will be in that section!
Let’s say that your presentation has 25 slides, and they’re organized like this:
Slides 1 – 10: Introduction
Slides 11 – 14: Market Analysis
Slides 15 – 19: Leadership Team
Slides 20 – 25: Conclusions
If you want to add sections to this presentation, you should open the Slide Sorter View, go to slide 20, and add the “Conclusions” section there with Alt, H, T1, A.
Then, you should move to slide 15 and add the “Leadership Team” section, move to slide 11 and add the “Market Analysis” section, and, finally, move to slide 1 and add the “Introduction” section.
Ideally, each section will start with a normal slide that indicates the section’s title or marks it as the next “part” of the presentation.
We follow this approach in the Jazz Pharmaceuticals slides here:

With these “Section Divider” slides in the normal presentation, it’s easy to enter the Slide Sorter View and use the Alt, H, T1 shortcut to add sections in the right spots:

In the Slide Sorter View, you can also press the Right Mouse Button (RMB) on a Section Name to activate additional commands, such as “Remove Section & Slides” and “Move Section Up/Down”:

These commands can be useful if you start with an existing presentation and remove large parts rather than specific slides.
PowerPoint Section Practice Exercise: How to Add Sections to a Long Presentation
Your practice exercise in this lesson is to take the “Before” version of the Jazz Pharmaceuticals slides , add sections in the right spots, and rearrange the entire presentation so the sections are in the correct numerical order.
The presentation should start with Section 1 and then move to Section 2, 3, and so on, and the last two parts should be Appendix A and Appendix B.
You can start this exercise by entering the Slide Sorter View with Alt, W, I, and jumping to the end of the presentation with the End key (Fn + –> on Mac):

You can then move to slide 48 and press Alt, H, T1, A to add a section and name it “Financial_Projections”:

And then, you can proceed backward to slide 44 and add a section and name for the Appendix B slides.
Next, go to slide 32, add a section, and do the same on slides 28, 23, 14, and 2.
When you’re done, your presentation should look like this in the Slide Sorter View:

Now you need to reorder the presentation.
For this part, you might have to enter the normal viewing/edit mode with Alt, W, L to read the “Section Numbers” on each divider slide.
For your reference, here’s the correct numerical order:
Section 1: Market Update and Summary
Section 2: Review of Jaguar Management Forecasts
Section 3: Jaguar Valuation
Section 4: Potential Strategic Alternatives
Section 5: Process Recommendations
Appendix A: Financial Projection Assumptions
Appendix B: Valuation Data
For this part of the exercise, it’s useful to collapse all the sections with the Alt, H, T1, O shortcut so you can focus on just their order:

Once you’ve done this, you can click on each section name and drag it up or down to put the section in its proper position:

When you’ve finished rearranging all the sections, you can expand everything once again with Alt, H, T1, X, and your presentation should look like this in the Slide Sorter View:

Finally, you’ll need to move the “Table of Contents” slide to the Introduction section.
Currently, it’s at the end of the “Management Forecasts” section, which is incorrect:

Beyond PowerPoint Sections: More Advanced Methods for Organizing Your Presentations
Sections and the Slide Sorter View are very useful for organizing and reordering your presentations, but they only scratch the surface of the proper PowerPoint setup required for investment banking pitch books .
It’s also critical to understand the Slide Master , templates based on custom layouts, and how to use tools such as Drawing Guides, Theme Colors, and “reference shapes” to make your presentations easy to modify.
We cover all that and more in the full PowerPoint Pro course on this site, and we even give you tools and templates for workflow automation, including our full PowerPoint macro package.

About Brian DeChesare
Brian DeChesare is the Founder of Mergers & Inquisitions and Breaking Into Wall Street . In his spare time, he enjoys lifting weights, running, traveling, obsessively watching TV shows, and defeating Sauron.
Files And Resources
Premium Courses
Other biws courses include:.
Perfect Your PowerPoint Skills
The BIWS PowerPoint Pro course gives you everything you need to complete pitch books and presentations in half the time and move straight to the front of the "top tier bonus" line.

Contribute to the Microsoft 365 and Office forum! Click HERE to learn more 💡
March 14, 2024
Contribute to the Microsoft 365 and Office forum!
Click HERE to learn more 💡
Top Contributors in PowerPoint: Steve Rindsberg - Jim_ Gordon - John Korchok ✅
March 11, 2024
Top Contributors in PowerPoint:
Steve Rindsberg - Jim_ Gordon - John Korchok ✅
- Search the community and support articles
- Microsoft 365 and Office
- Search Community member
Ask a new question
Adding Section in PowerPoint Online
I have Office 365 and in the offline App I can add sections in the normal way. Right clicking in the thumbnail pane.
However using the online version on another PC I am unable to add sections. When searching helps it comes up, but clicking on it has no effect.
Is this option not available on the online version? See the image
Report abuse
- Microsoft Agent |
Hi ANO_2323,
Thank you for posting this question in Microsoft Community.
I can't see the image that you had upload.
PowerPoint Online can support add section.
To add sections in PowerPoint for the web switch to Slide Sorter view by clicking the Slide Sorter button The Slide Sorter View button on the status bar at the bottom of the window. Once in Slide Sorter view select the first slide in your new section, right-click on it, and choose Add Section . Give your section a name and press Enter.

Best Regards,
2 people found this reply helpful
Was this reply helpful? Yes No
Sorry this didn't help.
Great! Thanks for your feedback.
How satisfied are you with this reply?
Thanks for your feedback, it helps us improve the site.
Thanks for your feedback.
Replies (1)
Question info.
- For business
- Norsk Bokmål
- Ελληνικά
- Русский
- עברית
- العربية
- ไทย
- 한국어
- 中文(简体)
- 中文(繁體)
- 日本語
- Skill Assessments
- AI Course Builder
- Free Courses
- PowerPoint 2019 Basic
PowerPoint Sections

Start Free Trial
Or log in with:
How to Make Sections in PowerPoint

Sections allow you to group slides together into different categories, which makes it easier to keep a presentation organized.
Add a Section
- Select the slide where the new section will begin.
- Click the Section button on the Home tab.
- Select Add Section .
Right-click the first slide of the section in the Thumbnails pane and select Add Section .
The section is added as Untitled Section.
- Type a name for the section.

The slides are grouped into a new section. When you create your first section, all of the slides after the selected slide are included in the section.
Rename a Section
You can rename an existing section after it's been created.
- With the section heading selected, click the Section button on the Home tab.
- Select Rename Section .

The section is renamed and the new name is displayed in the Thumbnails pane.
Collapse Sections
To more easily see all the sections in your presentation, collapse them down.

All sections are collapsed, hiding the slides behind the section labels.
Remove Sections
If you no longer need a particular section, you can remove it. Removing a section does not remove the slides in that section.
- Select the section you want to remove.

The section is removed, and the slides that were in it move to the section above it.
Remove all of the slides in the section by right-clicking the section heading and selecting Remove Section and Slides .
Move Sections
You can move sections around in the outline, which will move all of the slides in that section at once.

FREE Quick Reference
Free to distribute with our compliments; we hope you will consider our paid training.
- LinkedIn-ready certificate
- Skill assessments
- Bite-sized, interactive lessons
- Saved progress
How-To Geek
How to add section and slide zooms in microsoft powerpoint.
Want more professional transitions for your presentation?
Quick Links
Create a section zoom in powerpoint, create a slide zoom in powerpoint, customize a section or slide zoom.
If you want to move to a different slide or section in your presentation, you can easily add a link on your slide . But by using a Section or Slide Zoom in PowerPoint, you can make that move look professional.
In Microsoft PowerPoint, a Section or Slide Zoom places an image on your slide instead of linked text. In addition, when you click to visit that section or slide, you'll see a nice zoom effect. You can customize the displayed image, duration of the zoom effect, and additional actions.
As of this writing at the beginning of April 2022, you can create a Section or Slide Zoom on Windows with Microsoft 365 and in PowerPoint 2019 or later. For Mac and mobile PowerPoint users, you can play a Zoom, but not create one.
Using sections in PowerPoint is a good way to divide your presentation into separate portions. Whether you use it to organize your slideshow or show only particular sections to certain audiences, sections are handy tools.
Related: How to Organize a Microsoft PowerPoint Slideshow Using Sections
To create a Section Zoom, you'll need your sections set up ahead of time. When you're ready, go to the slide where you want to add the Section Zoom.
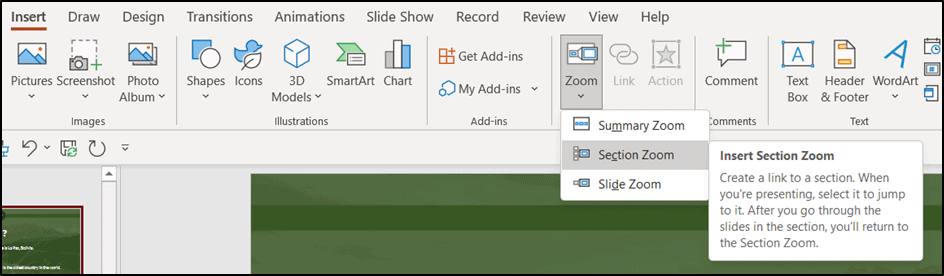
Head to the Insert tab and Links section of the ribbon. Click the Zoom drop-down arrow and pick "Section Zoom."
In the Insert Section Zoom window that appears, check the box next to the section you want to use. You can also include zooms for multiple sections. Click "Insert."
You'll see the Section Zoom pop onto your slide. It's similar in appearance to a static image of the first slide in that section. You can move the zoom by selecting and dragging it or resize it by dragging a corner or edge.
When you present the slideshow, click the Section Zoom. You'll see the zoom effect as you land on the first slide in that section. By default, you'll advance through each slide in the section and return to the zoom. This can be changed as described in the customization options below.
Similar to a Section Zoom in PowerPoint is the Slide Zoom. If you don't use sections in your slideshow or simply want the ability to jump to a certain slide , this is the way to go.
Related: How to Link to Another Slide in the Same PowerPoint Presentation
Go to the slide where you want the Slide Zoom. Then, head to the Insert tab and Links section of the ribbon. Click the Zoom drop-down arrow and pick "Slide Zoom."
In the Insert Slide Zoom window that opens, check the box next to the slide you want to use. You can also include zooms for multiple slides; however, you might consider using a Summary Zoom in this case instead. Click "Insert."
Like the Section Zoom, you'll see the Slide Zoom on your slide where you can drag to move or resize it.
When you present the slideshow, click the Slide Zoom. You'll see the zoom effect as you land on the slide. You'll then advance through the remainder of your slideshow. However, you can return to the zoom if you prefer using a customization option below.
The customization options for Section and Slide Zooms are the same. You can adjust the zoom's actions, change the appearance, or use additional formatting tools .
Zoom Options
Select the Section or Slide Zoom you want to edit. Then, visit the Zoom tab that displays. On the left side, you have the following actions you can adjust in the Zoom Options section.
Change Image : If you prefer to display an image rather than the slide for the zoom, select this option. You can then insert a picture from a file, stock images, online pictures, or from icons.
Return to Zoom : To go back to the zoom on the slide, check this box. For a Section Zoom, you'll return after advancing to the last slide in the section. For a Slide Zoom, you'll return after viewing that particular slide.
Zoom Transition : While the intent of a Section or Slide Zoom is to provide a transition effect, you may prefer to use the feature without that effect. Uncheck the Zoom Transition box to remove the effect.
Duration : If you decide to keep the Zoom Transition , you can use the Duration field to change the length of the effect. Enter a number in seconds or use the arrows to increase or decrease the duration.
Related: How to Use the Morph Transition in PowerPoint
Zoom Tab Tools
Along with the above actions, you can change the zoom style, border, background, alt text, and more. Select the Section or Slide Zoom and use the tools on the Zoom tab.
Zoom Format Options
To change the fill or line, add a shadow or reflection, or scale the zoom, right-click and pick "Zoom Format Options" from the menu. The Format Section/Slide Zoom sidebar opens for you to adjust the formatting.
For a unique way to jump to a particular section or different slide in your PowerPoint presentation, check out the Section and Slide Zoom features.
The Teacher Point
The website is dedicated to PowerPoint Animation Tutorial

How To Use Sections in Microsoft PowerPoint Tutorial
In this tutorial, we will talk about How To Use Sections in Microsoft PowerPoint. It’s a versatile tool for creating visually appealing and engaging presentations. However, as your presentations grow in complexity and length, it can become challenging to maintain an organized structure. This is where PowerPoint Sections come to the rescue. In this comprehensive guide, we’ll explore how to use PowerPoint Sections effectively to manage and organize your slides for maximum efficiency and productivity.
Why Use Sections in PowerPoint?
Sections in PowerPoint offer a simple yet powerful way to divide and conquer your presentations. They bring several benefits to the table:
1. Enhanced Organization
Divide your presentation into logical sections to create a clear structure. Whether it’s an introduction, multiple chapters, or various topics, sections help you keep your content well-organized.
2. Streamlined Navigation
Sections make it easier to navigate through your presentation, particularly when dealing with a large number of slides. You can expand or collapse sections to focus on the relevant content, simplifying the process.
3. Efficient Slide Management
Working with sections allows you to perform actions on specific groups of slides. This includes changing backgrounds, hiding or unhiding slides, altering layouts, and adding transitions – all with just a few clicks.
Creating and Managing Sections
Let’s dive into the practical aspects of creating and managing sections in PowerPoint:
Adding a New Section
- Open your PowerPoint presentation.
- Navigate to the “Home” tab.
- In the “Slides” group, click on the “Section” dropdown.
- Select “Add Section” and give it a name.
Repeat this process for each section you want to create.
Renaming Sections
To rename a section, simply right-click on the section name and choose “Rename Section.” Give it a descriptive name for easy identification.
Organizing Sections
To rearrange your sections, you can drag and drop them to the desired position. Alternatively, right-click on a section and choose “Move Section Up” or “Move Section Down.”
Removing Sections
If a section is no longer needed, right-click on its name and select “Remove Section.” Be cautious, as this action deletes both the section and its associated slides.
Using Sections for Maximum Efficiency
Now that you’ve created and organized your sections, here’s how to leverage them for a smoother workflow:
Applying Commands to Specific Sections
- In the Thumbnail View, select a section by clicking on its name.
- Right-click on a slide within the section.
- You’ll see commands that can be applied to all slides in that section, such as copying, duplicating, deleting, changing backgrounds, or hiding/unhiding slides.
Bulk Editing
Want to change the background color, transition type, or slide layout for all slides in a section? It’s a breeze! Just select the section and apply the desired changes.
Slideshow Customization
During a presentation, you can choose to hide specific sections to focus on specific content. Simply select the section, go to the “Slideshow” tab, and click “Hide Slide.”
Mastering PowerPoint Sections is a game-changer for anyone who frequently works with this presentation software. It brings a new level of control and organization to your slides, ensuring your presentations are polished and professional. Start using sections in your PowerPoint presentations and experience the benefits firsthand.
In our next post, we’ll explore advanced techniques for using PowerPoint transitions to make your presentations more dynamic and engaging.
Stay tuned, and keep creating stunning presentations!
Watch How To Work With PowerPoint Sections Tutorial
Please enable JavaScript
Leave a Reply Cancel reply
You must be logged in to post a comment.
Simon Sez IT
Online software training and video tutorials for Microsoft, Adobe & more
- Get Started
- Access 2021 Beginners
- Access 2021 Advanced
- Access 2019
- Access 2019 Advanced
- Access 2016
- The Accountants Excel Toolkit
- Excel 365 for Beginners
- Data Analytics in Excel
- Excel 2021 Advanced
- Excel 2021 Intermediate
- PowerPoint 365 for Beginners
- Microsoft Word 365
- Microsoft 365
- SharePoint Online: The Essential Guide (2023)
- OneNote Desktop and Windows 10
- OneNote 2016
- Outlook 2021
- Outlook 2019
- Outlook 2016
- Outlook 2013
- Outlook 2010
- Introduction to Power Automate
- Power BI Essentials
- Power BI Training
- Power BI Intermediate
- PowerPoint 2021
- PowerPoint 2019
- PowerPoint 2016
- PowerPoint 2013
- Project 2021 Advanced
- Project 2021 Beginners
- Project for the Web
- Project 2019
- Project 2019 Advanced
- Microsoft Publisher 365
- Publisher 2013
- SharePoint Online (2021)
- SharePoint Foundation 2013
- SharePoint Server 2013
- SharePoint Foundation 2010
- Microsoft Teams (2023 Update)
- Macros and VBA for Beginners
- VBA for Excel
- VBA Intermediate Training
- Microsoft Visio 2019
- Microsoft Visio 2010
- Windows 11 Advanced
- Windows 11 (2023 Update)
- Windows 10 (2020 Update)
- Word 2019 Advanced
- Dreamweaver CC
- Dreamweaver CS6
- Dreamweaver CS5
- Dreamweaver CS4
- Adobe Illustrator CC for Beginners
- Adobe InDesign CC for Beginners
- InDesign CS6
- InDesign CS5
- Adobe Photoshop CC Advanced
- Adobe Photoshop CC Intermediate
- Adobe Photoshop CC for Beginners
- Photoshop CS6
- Photoshop CS5
- Photoshop Elements 2022
- Photoshop Elements 2019
- Photoshop Elements 2018
- Photoshop Elements 15
- Photoshop Elements 14
- QuickBooks Desktop 2023
- QuickBooks Desktop Pro 2022
- QuickBooks Pro 2021
- QuickBooks Online Advanced
- QuickBooks Online
- AngularJS Crash Course
- Bootstrap Framework
- HTML/CSS Crash Course
- HTML5 Essentials
- Java for Beginners
- JavaScript for Beginners
- jQuery Crash Course
- MySQL for Beginners
- PHP for Beginners
- Advanced PHP Programming
- Python Object-Oriented Programming
- Pandas for Beginners
- Introduction to Python
- SQL for Beginners
- SQL Server Integration Services for Beginners
- XML Crash Course
- Alteryx Advanced
- Introduction to Alteryx
- Introduction to Data Visualization and Business Intelligence Principles
- Analytical Methods for Effective Data Analysis
- Introduction to Analytics and Artificial Intelligence
- Financial Risk Management
- Financial Forecasting and Modeling
- Qlik Sense Advanced
- R Programming
- Tableau Desktop Advanced
- Tableau Desktop
- Advanced Agile Scrum
- Agile Scrum Training
- Generative AI and Cybersecurity
- Introduction to ChatGPT
- Artificial Intelligence Intermediate
- Asana for Employees and Managers
- Introduction to Asana
- Effective Communication Tactics for the Modern Workplace
- Introduction to Confluence
- HubSpot CRM for Beginners
- Introduction to Google Drive
- Gmail for Beginners and Pros
- Google Sheets for Beginners
- Getting Started in Jira
- Getting Started in Monday.com
- Cybersecurity Essentials: Stay Safe and Secure Online
- Cybersecurity Awareness Essentials
- Excel Efficiency and Data Management
- Excel Advanced Features and Customization
- Mastering PivotTables
- Microsoft Suite Productivity

How to Add Sections to a PowerPoint Presentation
(Note: S uitable for users of PowerPoint 2016, 2019, 2021, and PowerPoint for Microsoft 365 . )
Divide a PowerPoint presentation up into sections to stay organized and focused.
The Add Sections to a PowerPoint Presentation Explained
PowerPoint presentations can easily get out of control. Before we know it, we have a presentation that contains 50+ slides, and we need to be able to navigate expertly and seamlessly around our presentation. We don’t want to be scrolling through endless linear slides in front of a client, struggling to find the slide they have requested to look at.
Sections can help us with this. We can divide our presentation up into manageable ‘chunks’ or sections. We can give those sections meaningful names. We can collapse up sections that are of no interest and focus on the important sections. We can even create dynamic section zooms to really add the ‘wow’ factor to our presentation.
Sections help us stay organized and get to the right content at the right time.
In this article, we will be working with a presentation with 23 slides.
Add Sections
Slide sorter view, remove sections, to collapse/expand individual sections, collapse/expand all sections, moving sections, section zoom.
Related reads:
How to Wrap Text in PowerPoint
How to Add a Watermark in PowerPoint
How to Add a Hyperlink to a PowerPoint
To create a section, we first need to select all the slides that belong in that section. We want three slides in the first section.
- Click on the first slide.
- Hold down the CTRL key and click on the other slides to select them.
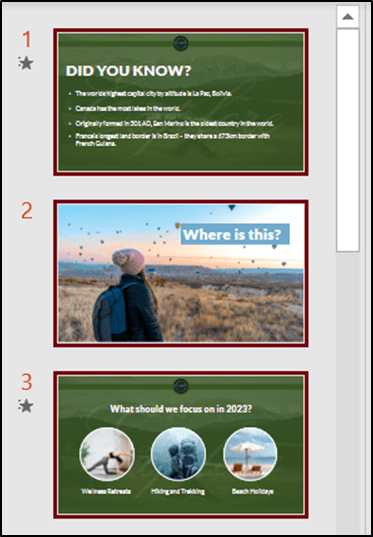
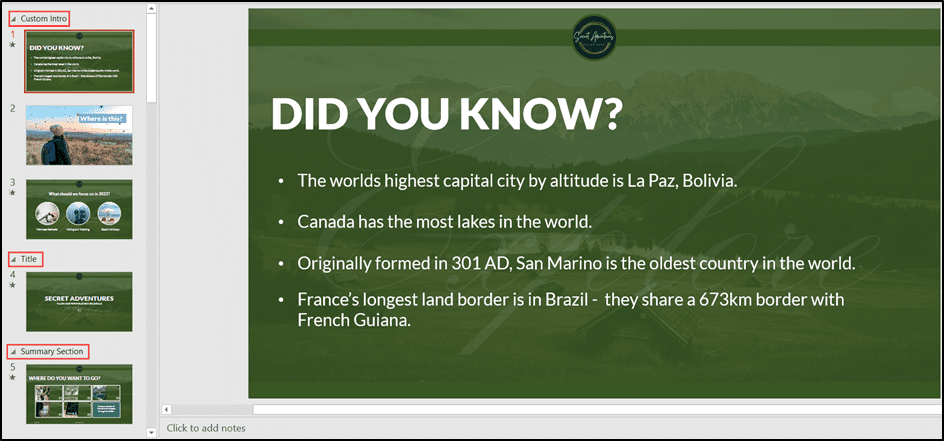
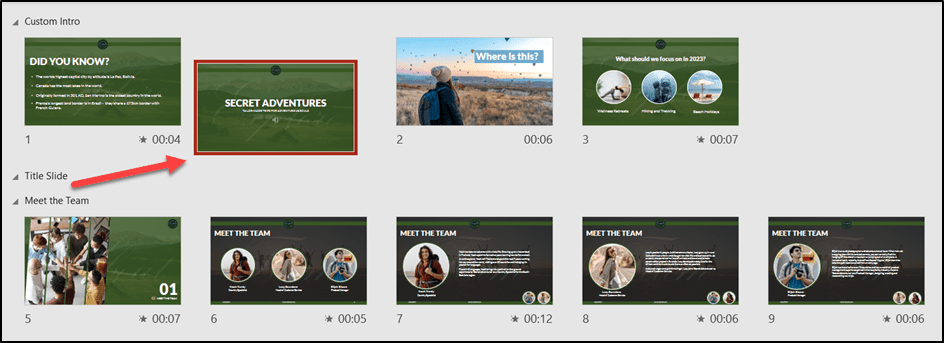
These slides are our custom intro slides. We will have these rotating automatically as people join the presentation to give them something interesting to look at while waiting for the other attendees to arrive.
- Right-click on any of the slides.
- Choose Add Section from the menu.
- Alternatively, from the Home tab, in the Slides group, click the drop-down arrow next to Section .
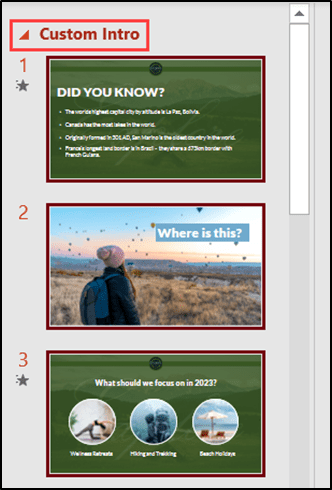
- Type a name for the section.
- Click Rename .
The section is now renamed. Notice the small red arrow next to the new section name. We’ll speak about this a bit later on in this article.
We need to repeat this process throughout the presentation. Select the slides, add a section, and give the section a name.
Sometimes, it is hard to see all slides and sections in our presentation when working in Normal view. Switch to the Slide Sorter view to get a better overview of the layout of the presentation.
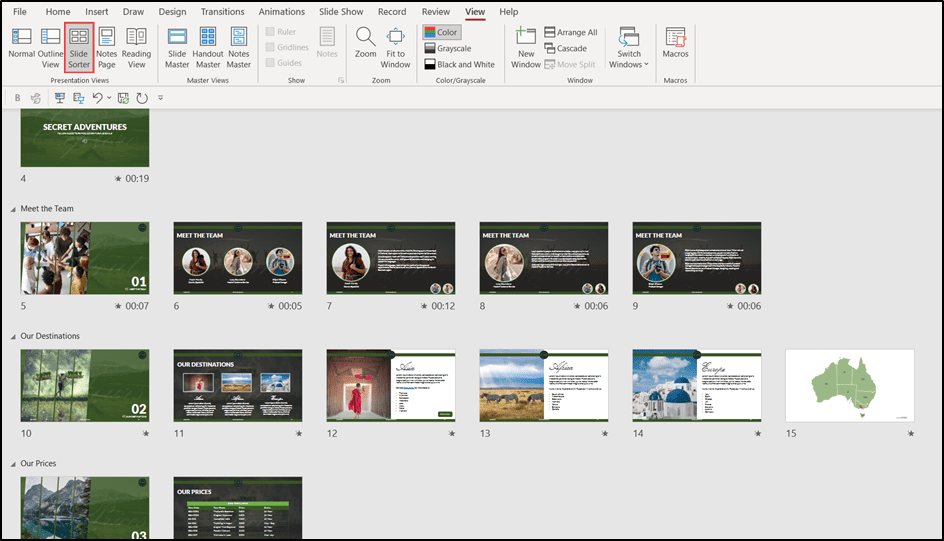
- From the View tab, in the Presentation views group, click Slide Sorter .
This view shows our presentation split into sections.
This is also a great view to use if we need to move slides from one section to another.
- Click on the slide to be moved.
- Drag and drop it to its new location.
Suggested reads:
How to Change PowerPoint Slides to Portrait
How to Change Slide Size in PowerPoint
How to Save PowerPoint as Video
We can remove redundant sections in two ways. We can remove just the section OR the section and all slides contained within that section.
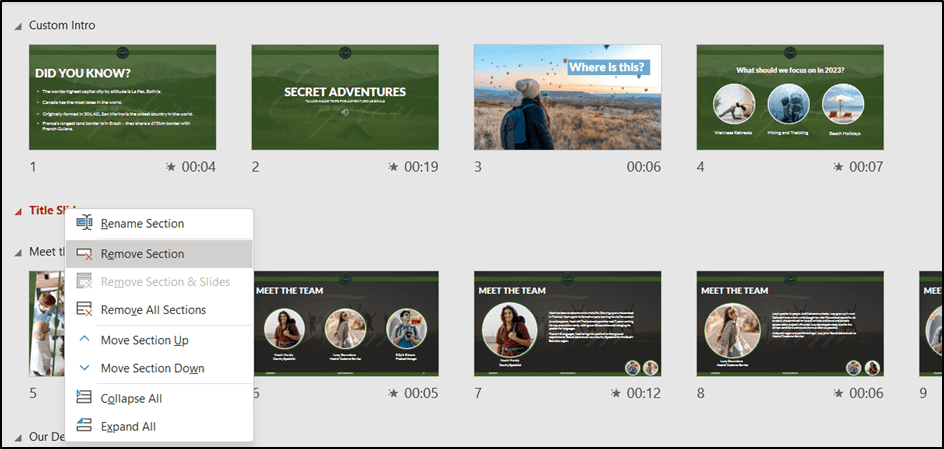
- Right-click on the section name.
- Choose Remove Section to remove the section, but keep any slides.
We can remove sections in the Slide Sorter view or Normal view. The process is exactly the same.
If we want to remove all sections from our presentation but keep the slides, we can select Remove All Sections from the contextual menu.
Collapse and Expand Sections
Earlier in this article, I highlighted the red arrow that appears next to each section. This red arrow is the collapse/expand option.
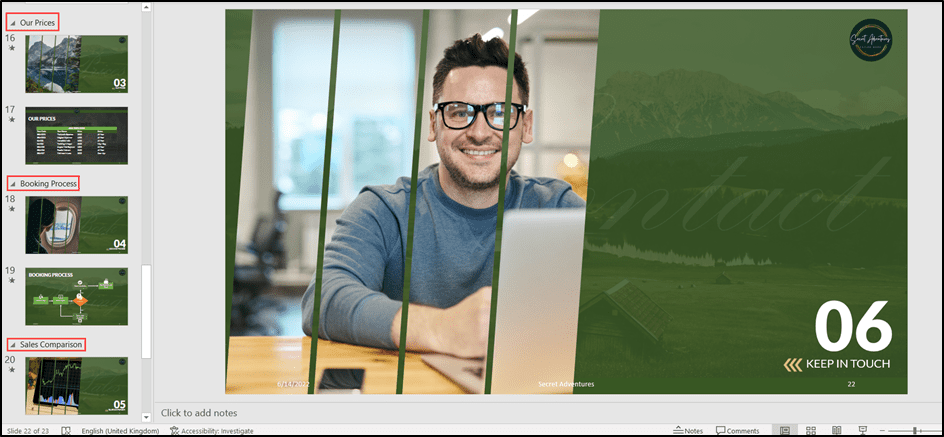
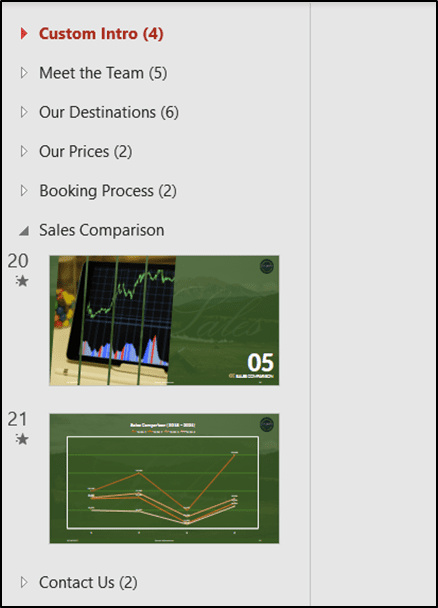
We can collapse or expand each section depending on the sections and slides we want to see. For example, maybe my audience only wants to see the ‘Sales Comparison’ section. I could collapse all the other sections and keep ‘Sales Comparison’ expanded.
This has a couple of advantages. It enables us to focus only on what is of interest to the audience and it prevents the audience from being overwhelmed with unnecessary slides of information.
We can collapse and expand individual sections or collapse and expand all sections.
- Navigate to the section.
- Click the red arrow to expand or collapse.
In this example, I have clicked on the red arrow next to every section except the ‘Sales Comparison’ section.
Notice the number in brackets (parentheses) after the section name. This tells us how many slides are contained within that section.
We can quickly collapse or expand all sections in our presentation.
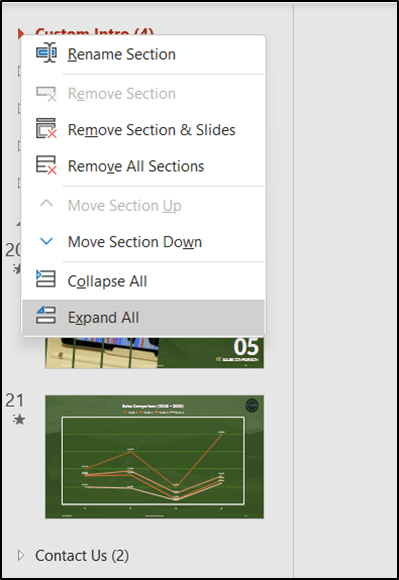
- Right-click on the red arrow next to any section.
- Choose Collapse All or Expand All .
We can move entire sections within our presentation. When we move a section, the section and all the slides contained within that section will move too.
- Choose Move Section Up or Move Section Down .
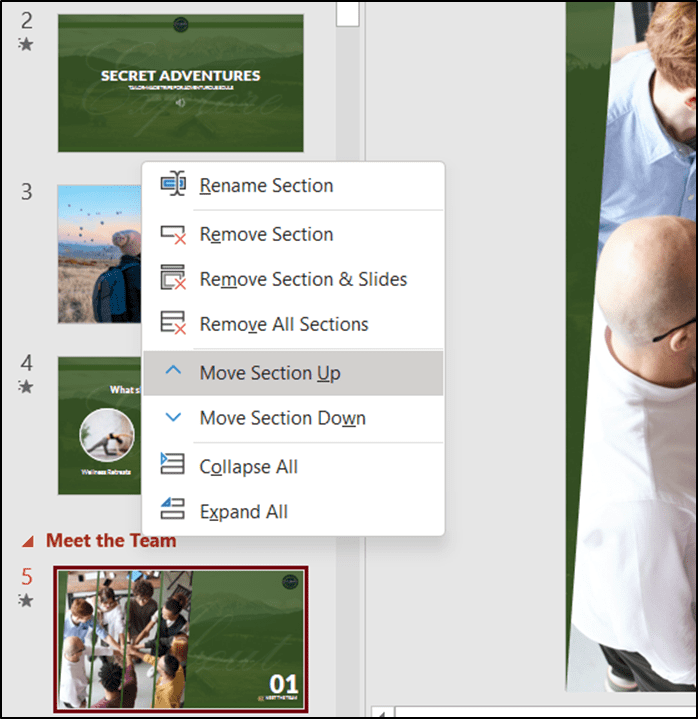
This method will move the section up one or down one. To move a section to a completely different location, drag and drop from the Slide Sorter view or Normal view.
One of the newer features introduced in PowerPoint is Section Zoom. Using section zoom, we can create a really nice zoom-in and zoom-out effect and jump between different sections in our presentation. Section zooms are similar to a table of contents in a document. They allow the presenter or the customer to choose their own route through the presentation.
In order for section zoom to work correctly, we must have a presentation already divided into sections.
- From the Insert tab in the Links group, click the drop-down arrow underneath Zoom .
- Click on Section Zoom .
The Insert Section Zoom window will open. We can see our sections represented by a thumbnail that shows the first slide in the section.
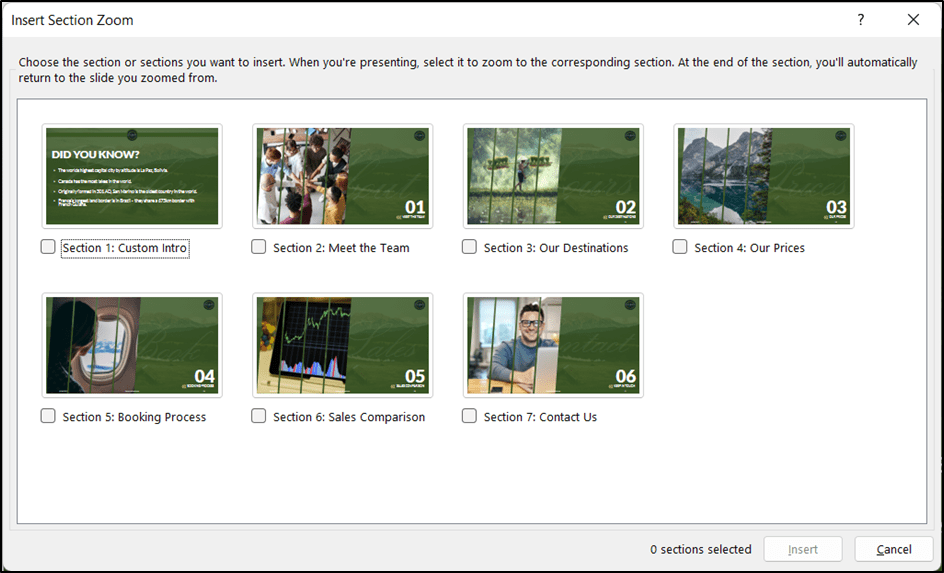
- Select the sections to include in the zoom.
We are going to include all sections except the Custom Intro.
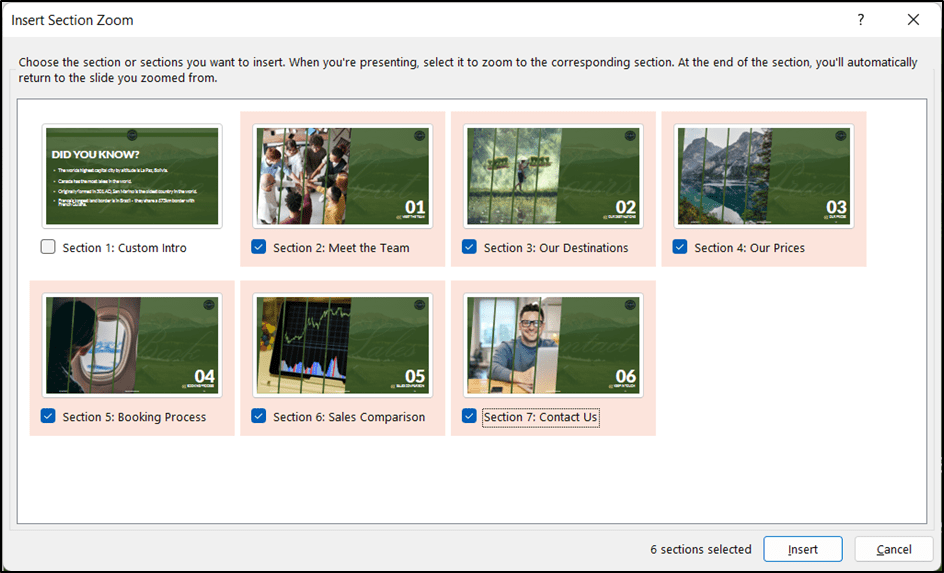
- Click Insert .
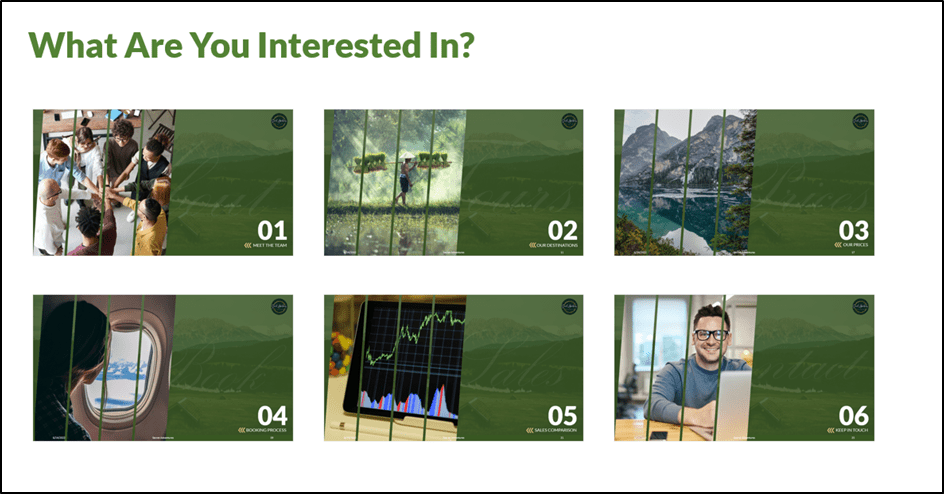
The thumbnails will appear on the slide. Drag and drop to rearrange them.
The presenter or customer can now choose which topic they are interested in.
- Press F5 to run the slide show.
- Click on any thumbnail.
The result is a slick zoom-in effect. When the presenter clicks the mouse, PowerPoint will move on to the next slide in that section. When the section is complete, PowerPoint will zoom back out to the main page.
Section Zooms are highly customizable.
Notice the Zoom contextual ribbon. Using this ribbon, we can change the thumbnail image, apply a zoom style, add a border, add effects, change the height and width, and control how we want the zoom to transition between slides.

How to Insert GIF into PowerPoint
How to Superscript in PowerPoint
How to Add Slide Numbers in PowerPoint
Please visit our free resources center for more high-quality PowerPoint and Microsoft Suite application guides.
Ready to dive deep into PowerPoint? Click here for basic to advanced PowerPoint courses with in-depth training modules.
Simon Sez IT has been teaching PowerPoint and other business software for over ten years. You can access 160+ IT training courses for a low monthly fee.

Deborah Ashby

Deborah Ashby is a TAP Accredited IT Trainer, specializing in the design, delivery, and facilitation of Microsoft courses both online and in the classroom.She has over 11 years of IT Training Experience and 24 years in the IT Industry. To date, she's trained over 10,000 people in the UK and overseas at companies such as HMRC, the Metropolitan Police, Parliament, SKY, Microsoft, Kew Gardens, Norton Rose Fulbright LLP.She's a qualified MOS Master for 2010, 2013, and 2016 editions of Microsoft Office and is COLF and TAP Accredited and a member of The British Learning Institute.
Similar Posts
How to Create a Signature Line in Microsoft Outlook 2013
How to Use the ROUND Function in Excel?
How to Setup a Company File in QuickBooks 2018
How to Remove Tables in Excel? 3 Easy Ways
Shopify Tutorial for Beginners: Get Your Shopify Store Up and Running in 10 Easy Steps
How to Setup a Chart of Accounts in Quickbooks Pro 2012
- Privacy Policy

ADVANCE YOUR CAREER
Gain instant access to 200+ courses. Earn a CERTIFICATE each time you complete a course.
- 202.681.0725
- [email protected]
- Presentation Design
- PowerPoint Training
- Speaker Coaching
- About Kevin
- 5 mins read

Discover how to use PowerPoint’s section tool to make your presentations more organized, better managed, and faster to develop.
Overwhelmed by a slew of slides? Break them into sections! PowerPoint’s section tool (available since PPT 2010) can easily make your presentations more organized, better managed, and faster to develop. Sections let you organize your slides, much like you would use folders to organize your files.
You can use named sections to keep track of groups of slides, or you can assign sections to co-workers to make ownership clear during collaboration. And if you’re starting with a blank slate, sections can even be used to outline the topics in your presentation.
Why Sections in PowerPoint are very useful?
By using sections you can:
- Divide the slides into logical subgroups
- Organize the chapters using meaningful names
- Reorder sections using the drag and drop
- Apply effects in groups (sections), for example the same animation transition to all the slides under a section
- Collapse sections
- Hide all the slides in a given section
- Delete all the slides under a section
The PowerPoint section feature is easy to be used. You can add, edit, remove sections by using the Sections menu in PowerPoint 2010. Typically, sections are added from the Slide Sorter window.
Right click the Slide and choose Add Section option from the context menu.

Now a new section will be added with name “Untitled Section”. Whatever slides you will create, will be categorized under this section. You can start another section in the presentation by the same way.
Once the section is added, right-click its title bar and choose Rename Section.

Specify the new name and click Rename.

That’s it, the particular section will be renamed. Now you can easily create, differentiate and manage your slides within the presentation. Moving groups of slides around is easier than ever when they’re grouped in sections. You can also minimize or maximize groups of sectioned slides too.
This section feature is also good for organizing the content in the edit view and keep an eye in the overall information at once…sort of like an outline.

- add sections in powerpoint 2010 , how to add presentation sections , how to rename presentation sections , PowerPoint 2010 , powerpoint sections , ppt , rename sections in powerpoint 2010 , sections in powerpoint , working with powerpoint slides
Share this:
Powerpoint tips and public speaking ideas, recent post.

8+ #Presentation Skills Every Marketer Needs

Benefits of Presentations featuring Live Demos, Websites, and Activities

Breath and Presentations: Breathing Techniques for Better Presentations

Top Visual Tips for Amazing Web Meetings and Presentations

Top Delivery Tips for Amazing Web-based Meetings and Presentations
Subscribe to kevin's powerpresentations newsletter.
Sign-up for free PowerPoint Tips, PowerPoint Templates, and Presentation Strategies.
Add Power to your Presentations - Free Consultation
Get in touch with kevin to get a quote.

Over 1,000 companies have hired Kevin for presentation help

"Creating concise, effective, limited-length presentations about complex topics is not easy for anyone, but Kevin Lerner brought it home for us. I hired him to help us with our investor deck with a goal of two weeks. He was motivated, timely, skilled, and very positive. Our goal was his goal. Our presentation was ready when we needed it and it made jaws drop. Kevin now IS our presentation team."

"Kevin was a great presenter, helping our team improve their presentations and learn more about PowerPoint. We have held two separate trainings with Kevin for two teams at our company. Everyone learned new things and came away with new ideas to improve their PPT presentations."

"Kevin did a great job of demonstrating his expertise with PowerPoint and other tools which helped me advance my knowledge while also introducing me to new tips and tricks to help create beautiful presentations. If you are looking to improve your PowerPoint skills Kevin is a great person to go to."

"We engaged Kevin to do a Presentation training for our team and he did a great job. He spent time understanding our requirements and the skill level of our team members and created a course which met our expectations and goals. I highly recommend Kevin as a Presentation (PowerPoint) trainer."

"Kevin and I worked together to create a number of strategy-focused PowerPoint reports and presentations while at AARP. Kevin also conducted a series of trainings which improved our team's technical slide making skills. We found Kevin to be a very helpful supporter, with great skills and experience in messaging, graphics, and slide design for all types of corporate presentations!"

"Kevin is a very talented, strategic and creative presentation expert! We worked together for years on many client presentations and proposals and won every single won we pursued. I would highly recommend Kevin!"

"Kevin is amazing! I have never experienced anyone as knowledgeable and experienced as Kevin. He is a Master at PowerPoint and Presentation Skills. Hire him any time you need a professional."

"I originally saw Kevin when he presented to the Pittsburgh HR Association in 2007. Every time I use the Presentation that Kevin re-worked I think of what it was and how he transformed it. Having Kevin work on my presentation was probably some of the best money that I spent. I recommend him without hesitation and assure you you'll be happy with the end result."

202.681.0725 · kevin @ kevinlerner.com
- Create a presentation Article
- Add and format Article
- Design a presentation Article
- Share and collaborate Article
- Give a presentation Article
- Set up your mobile apps Article
- Learn more Article
Create a presentation
Create a presentation in powerpoint for the web.

With PowerPoint for the web running in your web browser, you can:
Create presentations that include images, videos, transitions, and animations.
Get to your presentations from your computer, tablet, or phone.
Share and work with others, wherever they are.
If you're using the desktop version of PowerPoint on a Windows PC, see the PowerPoint Quick Start .
If you're using the desktop version of PowerPoint on a Mac, see Office for Mac Quick Start Guides and PowerPoint for Mac Help .
Create, open, and name a presentation
Go to powerpoint.office.com .

Select New blank presentation , open a Recent file, select one of the themes , or start with a presentation template .
To name the presentation, select the title at the top and type a name.
If you need to rename the presentation, select the title and retype the name.

Add a slide
Select the slide you want your new slide to follow.
Select Home > New Slide .
Select Layout and the you type want from the drop-down.

When working in PowerPoint for the web, your work is saved every few seconds. You can select File > Save a Copy to create a duplicate copy in another location.
Or choose File > Download As to save a copy to your device.

When you're online, AutoSave is always on and saves your changes as you work. If at any time you lose your Internet connection or turn it off, any pending changes will sync as soon as you’re back online.

Need more help?
Want more options.
Explore subscription benefits, browse training courses, learn how to secure your device, and more.

Microsoft 365 subscription benefits

Microsoft 365 training

Microsoft security

Accessibility center
Communities help you ask and answer questions, give feedback, and hear from experts with rich knowledge.

Ask the Microsoft Community

Microsoft Tech Community

Windows Insiders
Microsoft 365 Insiders
Was this information helpful?
Thank you for your feedback.
How to Create Sections in PowerPoint

PowerPoint has become one of the most widely used presentation software in the world, and for good reason. It is a powerful and intuitive tool that lets you create presentations with ease and flexibility. One of the most useful features of PowerPoint is the ability to create sections. This article will cover everything you need to know about creating sections in PowerPoint, from why organizing your presentation matters, to troubleshooting common issues that may arise.
Table of Contents
Why Organizing Your PowerPoint Presentation Matters
When creating a PowerPoint presentation, it is important to think carefully about how you organize the content. A well-organized presentation helps the audience understand the structure of your ideas and the flow of information. This is where sections come in handy. With sections, you can divide your presentation into logical parts, which makes it easier for you and your audience to follow the content. By using sections, you can also quickly navigate between different parts of your presentation, without having to scroll through a long list of slides or sections.
In addition to using sections, it is also important to consider the visual organization of your presentation. This includes using consistent fonts, colors, and layouts throughout the slides. By doing so, you can create a cohesive and professional-looking presentation that is easy on the eyes. Another tip is to use visual aids, such as images, charts, and graphs, to help illustrate your points and break up text-heavy slides. Remember, a well-organized and visually appealing presentation can make all the difference in engaging your audience and effectively conveying your message.
Understanding the Benefits of Sectioning in PowerPoint
Sectioning in PowerPoint offers several benefits. Firstly, it allows you to break your presentation down into manageable parts, making it easier to create and modify your content. Secondly, sections help you keep your content organized and structure your presentation in a logical manner. Additionally, sections make it easier to collaborate with others on the same presentation by dividing the work into different sections. Lastly, sections can help you save time and work more efficiently when editing your presentation.
Another benefit of sectioning in PowerPoint is that it allows you to easily navigate through your presentation during a live presentation. By dividing your presentation into sections, you can quickly jump to the relevant section without having to scroll through the entire presentation. This can help you deliver a more polished and professional presentation, as you can easily access the information you need without any delays or distractions.
How to Use Sections to Improve Navigation in Your Presentation
Using sections to improve navigation in your presentation is easy. To create a section, simply select the slide or slides you want to include in the section, right-click on the selection and choose “Add Section”. You can name the section whatever you like. Once you have created a section, you can easily navigate between them by using the navigation pane on the left-hand side of the screen. The navigation pane will display a list of all the sections in your presentation and allow you to move between them with ease.
Another benefit of using sections in your presentation is that it allows you to organize your content in a logical and meaningful way. By grouping related slides together in a section, you can help your audience better understand the flow and structure of your presentation. Additionally, sections can be collapsed or expanded in the navigation pane, making it easier to focus on specific parts of your presentation and avoid distractions.
Creating Your First Section in PowerPoint: A Step-by-Step Guide
To create your first section in PowerPoint, follow these steps:
- Open PowerPoint and navigate to the slide or slides that you want to include in the section.
- Select the slide or slides by clicking and dragging your cursor over them.
- Right-click on the selected slide or slides and choose “Add Section”.
- Name the section whatever you like.
- You will now see a section header appear in the navigation pane, indicating that a new section has been created.
Sections in PowerPoint are a great way to organize your presentation and make it easier to navigate. You can add as many sections as you need and move slides between them at any time. To move a slide to a different section, simply click and drag it to the desired section header in the navigation pane. You can also collapse and expand sections by clicking on the arrow next to the section header. This can be especially helpful when working with longer presentations with multiple sections.
Tips for Naming and Renaming Sections in PowerPoint
When naming or renaming sections, it is important to choose names that are clear and descriptive. This will make it easier to navigate between sections and understand the content. Additionally, if you have multiple people working on the same presentation, it is a good idea to establish a naming convention that everyone follows to ensure consistency. To rename a section in PowerPoint, simply right-click on the section header in the navigation pane and choose “Rename Section”.
Another important consideration when naming or renaming sections in PowerPoint is to keep the names concise. Long section names can be difficult to read and may not fit properly in the navigation pane, making it harder to navigate between sections. It is also a good idea to avoid using special characters or symbols in section names, as these can cause issues when exporting or sharing the presentation with others. By following these tips, you can create clear and concise section names that make it easy to navigate and understand your presentation.
How to Move Slides Between Sections in PowerPoint
If you need to move a slide from one section to another, simply drag and drop the slide from its current location to the desired section in the navigation pane.
It’s important to note that when you move a slide to a new section, any animations or transitions on that slide will also be moved to the new section. If you have custom animations or transitions that are specific to a certain section, you may need to adjust them after moving the slide.
Additionally, if you have a large number of slides and sections in your PowerPoint presentation, it can be helpful to rearrange the order of your sections. This can make it easier to navigate and organize your presentation, especially if you need to make changes or updates later on.
Rearranging Sections in Your PowerPoint Presentation for Better Flow
If you need to rearrange the order of the sections in your presentation, simply click and drag the section header to the desired location in the navigation pane.
Rearranging the sections in your PowerPoint presentation can greatly improve the flow and organization of your content. Consider grouping related sections together or placing the most important sections at the beginning of your presentation to grab your audience’s attention. Additionally, you can use section breaks to create pauses or transitions between topics. Experiment with different arrangements to find the one that works best for your presentation.
Customizing Section Headers and Footers in PowerPoint
PowerPoint does not allow customization of section headers and footers. However, you can customize the look of your slides to match the rest of your content. This includes adding a date and time stamp to your slides or adding a logo or image to your slides. To do this, simply click on the “Insert” tab and choose the appropriate option.
Using the Slide Sorter or Slides Pane to Manage Your Sections and Slides
The Slide Sorter view or the Slides Pane is a powerful tool that allows you to manage your sections and slides with ease. To access the Slide Sorter view, click on the “View” tab and then click on “Slide Sorter”. The Slide Sorter view will appear and allow you to view and manage all the sections and slides in your presentation.
Saving Time with Keyboard Shortcuts for Sectioning in PowerPoint
While PowerPoint does not have specific keyboard shortcuts for adding sections, renaming sections, or moving slides to different sections, there are many other keyboard shortcuts that can help you work more efficiently. For example, you can use “Ctrl + M” to insert a new slide, “Ctrl + D” to duplicate a slide, or “Ctrl + Arrow Keys” to move a slide up or down in the order.
Troubleshooting Common Issues When Working with Sections in PowerPoint
While sections in PowerPoint are generally easy to work with, there are a few common issues that may arise. For example, if you are having trouble deleting a section, make sure that the section is not the only one in the presentation before attempting to delete it. Another common issue is accidentally moving a slide or section to the wrong location. To avoid this, always double-check your work before making any changes.
Best Practices for Using Sections in Large or Complex Presentations
When working on large or complex presentations, using sections can help you stay organized and ensure that the content flows smoothly. However, it is important to plan your sections carefully and avoid creating too many sections, as this can make your presentation confusing and difficult to navigate. Additionally, if you are collaborating with others on the same presentation, make sure that everyone is on the same page when it comes to how the sections are organized.
How Sectioning Can Help You Collaborate More Effectively on PowerPoint Presentations
Using sections in PowerPoint can also help you collaborate more effectively with others on the same presentation. By dividing the work into different sections, you can assign tasks to different team members and ensure that everyone is working on the same page. Additionally, sections makes it easy to review and edit each other’s work, without having to scroll through a long list of slides or sections.
As you can see, creating sections in PowerPoint is a powerful tool for organizing your presentation and improving navigation. By following the steps outlined in this article, you can begin using sections in your PowerPoint presentations with confidence and start creating presentations that are both visually appealing and easy to navigate.
By humans, for humans - Best rated articles:
Excel report templates: build better reports faster, top 9 power bi dashboard examples, excel waterfall charts: how to create one that doesn't suck, beyond ai - discover our handpicked bi resources.
Explore Zebra BI's expert-selected resources combining technology and insight for practical, in-depth BI strategies.

We’ve been experimenting with AI-generated content, and sometimes it gets carried away. Give us a feedback and help us learn and improve! 🤍
Note: This is an experimental AI-generated article. Your help is welcome. Share your feedback with us and help us improve.

Microsoft 365 Basic now includes ransomware protection for your files and photos at no extra cost.

Use Word, Excel, PowerPoint and more for free on the web
Office is now Microsoft 365
Get the Microsoft 365 mobile app
Start using Microsoft 365 today

Anywhere access
Whether you’re at work or on the go, create your best work on your favorite browser.
Familiar experience
The familiar Microsoft 365 experience you know and trust, so there’s nothing new to learn.
Work with anyone
Share your documents with anyone and work together in real-time.

Word for the web
Craft great-looking resumes, newsletters, and documents while inviting others to review and coauthor in real time. Plus, access free Word templates, formatting tools for APA, MLA, and Chicago style, and add functionality with free add-ins.
Excel for the web
Organize your data in familiar spreadsheets and workbooks, with all changes saved automatically. Create modern visuals that turn numbers into valuable insights. Work together in real time knowing that everyone is on the same page.

PowerPoint for the web
Turn your ideas into compelling presentations using professional-looking templates. Use animations, transitions, photos, and videos to tell one-of-a-kind stories. Co-author team presentations at the same time, from anywhere.
Start now at Microsoft365.com
No installation required. It's free.
Follow Microsoft 365
- Chat with sales
- Contact sales
Available M-F 6 AM to 6 PM PT.
- Apartment Search
- Section 8 Waitlists
- Apartment Waitlists
- How To Apply
- Sign Up for Alerts

Section 8 Waiting List Openings This Week: April 1, 2024
By Nathan Brunet on April 1, 2024 3 minute read

Affordable Housing Online has announced four new Section 8 Housing Choice Voucher waiting list opening this week!
As the largest resource for low-income housing in the United States, Affordable Housing Online makes it easier for renters to find the latest rental opportunities. Housing options nationwide are regularly updated by our team of housing experts using verified sources.
Tip: Applicants do not need to live in the area to apply to most waiting lists.
Jump To: New Waiting Lists This Week Previously Announced Waiting Lists More Affordable Housing Opportunities
New Waiting Lists This Week
New york city, ny mayor eric adams announces section 8 hcv waiting list reopening in 2024.
Announced during New York City's State of the City address by NYC Mayor Eric Adams, the New York City Housing Authority (NYCHA) Section 8 Housing Voucher Waiting List will open on a date to be announced in 2024. NYCHA last accepted Section 8 HCV applications in December, 2009.
Battle Creek, Michigan Section 8 Waiting List
The Battle Creek Housing Commission (BKHC) will accept Section 8 Housing Choice Voucher waiting list applications for Battle Creek from April 1, 2024, until April 5, 2024. This is the first time the waiting list has been open since it closed in April, 2023.
Westchester County, NY Section 8 HCV Waiting List
The White Plains Housing Authority (WPHA) will accept Section 8 Housing Choice Voucher waiting list applications from April 11, 2024 at 8:30 am, until April 12, 2024 at 3:00 pm ET. This is the first time the waiting list has been open since it closed in June, 2019.
Olathe, Kansas Waiting Lists
The Olathe Housing Authority (OHA) will accept Section 8 Housing Choice Voucher, Public Housing, and Parkview Manor waiting list applications from May 13, 2024 at 8:00 am, until May 17, 2024 at 5:00 pm CT. This is the first time the waiting lists have been open since they closed in May, 2023.
Previously Announced Waiting Lists
City of kinston and lenoir county, north carolina section 8 hcv waiting list.
The Kinston Housing Authority (KHA) accepts Section 8 Housing Choice Voucher waiting list applications from March 20, 2024 until April 5, 2024. This is the first time the waiting list has been open since it closed in April, 2023.
Alameda County, California Section 8 Waiting Lists
The Housing Authority of the County of Alameda (HACA) accepts Section 8 Housing Choice Voucher waiting list applications from April 2, 2024 at 8:00 am, until April 5, 2024 at 11:59 pm PT. The HACA will also accept Section 8 Project-Based Voucher waiting list applications for 3 and 4-bedroom Apartments in Emeryville and Union City.
Wausau, WI Section 8 HCV Waiting List
The Wausau Community Development Authority (WCDA) accepts Section 8 Housing Choice Voucher waiting list applications from March 25, 2024 at 8:00 am, until April 12, 2024 at 3:00 pm CT. This is the first time the waiting list has been open since it closed in August, 2022.
Glens Falls, NY Section 8 HCV Waiting List
The Glens Falls Housing Authority (GFHA) is accepting Section 8 Housing Choice Voucher waiting list applications from March 4, 2024 at 9:00 am, until March 8, 2024 at 3:30 pm ET. This is the first time the waiting list has been open since it closed in September, 2020.
Brazos, Burleson, Grimes, Leon, Madison, Robertson, and Washington County, Texas Section 8 Waiting List
The Brazos Valley Council of Governments (BVCOG) is accepting Section 8 Housing Choice Voucher waiting list applications from March 11, 2024 at 9:00 am, until May 31, 2024 at 4:00 pm CT. This is the first time the waiting list has been open since it closed in December, 2022.
Santa Fe, New Mexico Section 8 Waiting List
The Santa Fe Civic Housing Authority (SFCHA) accepts Section 8 Housing Choice Voucher waiting list applications twice a month on Wednesdays from January 10, 2024 at 10:00 am, until December 4, 2024 at 4:00 pm MT.
Chautauqua County, New York Section 8 Waiting List
The Chautauqua Opportunities Inc (COI) is accepting Section 8 Housing Choice Voucher waiting list applications for Chautauqua County from December 20, 2023, until December 27, 2024.
More Affordable Housing Opportunities
Panama city, florida public housing waiting list.
The Panama City Housing Authority (PCHA) will accept Public Housing waiting list applications for 2 and 4-Bedroom apartments from April 10, 2024 at 8:00 am CT, until 200 applications have been received.

New Section 8 Waiting List Openings: March 25, 2024
View Section 8 waiting list openings and updates for the week of March 25th.
New Section 8 Waiting List Openings: March 11, 2024
View Section 8 waiting list openings and updates for the week of March 11th.
Housing options for persons with disabilities.
Izzie Tiffany says:
John Kavanagh linked to company that has raised millions for chain of MMA gyms and online platform
Conor mcgregor’s coach has assisted in the development of exclusive training programmes, says company.
:quality(70)/cloudfront-eu-central-1.images.arcpublishing.com/irishtimes/6RPEKQ3BDGGDS7SVXDAIGRZX5Q.jpg "powerpoint online new section")
John Kavanagh, best known for coaching Conor McGregor, is connected with a company that has raised $6.5m on the NYSE American exchange for small cap stocks, Photograph: Gary Carr/Inpho
John Kavanagh , Conor McGregor ’s coach, is behind a company that has raised $6.5 million (€6 million) on the NYSE American exchange, which lists small cap stocks. The funds are to be used to help develop a chain of MMA gyms with an associated online platform.
New filings to the NYSE American show that the company, Alta Global Group Limited, began trading on the exchange in late March and floated 1.3 million shares at a price of $5.00 each. Its shares closed at $4.18 on Thursday, its first day of trading.
The company, which was originally founded in Australia, said that $2.2 million of the money raised in the initial public offering would go towards growing its customer base in North America, Asia and Europe.
A further $1 million would go towards investing in technology, nearly $700,000 towards paying down some existing debt, while the remainder will be used for general working capital, the prospectus says.
The ways cohabiting couples lose out financially when compared with married people
:quality(70)/cloudfront-eu-central-1.images.arcpublishing.com/irishtimes/O5CPVYH4SNG33KVGMZBA7YKFQA.jpg "powerpoint online new section")
Sun goes down on German economy as recession drags on and government spending is slashed
:quality(70)/cloudfront-eu-central-1.images.arcpublishing.com/irishtimes/OVYKY46GAQSXSUJIYF4LERQI3Q.jpg "powerpoint online new section")
Netflix’s 3 Body Problem ratings show we still live in a chaotic streaming era
:quality(70)/cloudfront-eu-central-1.images.arcpublishing.com/irishtimes/3HBX7Z3QVZAGZJUXMTFHAAFKFA.jpg "powerpoint online new section")
Simon Harris needs to reset policies on labour costs to support small businesses struggling to make ends meet
:quality(70)/cloudfront-eu-central-1.images.arcpublishing.com/irishtimes/5OIHQG7S2VDINDLALO7XGYPO5A.jpg "powerpoint online new section")
Alta Global, which trades under the ticker symbol MMA, began life as a mixed martial arts training company in Australia, before expanding through a number of acquisitions. In its current form it aims to sell an MMA training programme to amateurs and people looking for exercise programmes, both through a network of partner gyms and through its online and social media platforms.
The company notes in its prospectus that “there are currently over 45,597 martial arts and combat sports gyms in the US alone that are expected to generate over $12.6 billion in annual revenue in 2023″.
It has signed up a number of former professional coaches to promote the company and use its training programme, including Mr Kavanagh.
The company says that “Mr Kavanagh has assisted in the development of the training programmes available exclusively on our platform and offers these programmes at his prominent gym, SBG Ireland, in Dublin”, while he also “assisted us in engaging other globally recognised partner gym communities”.
Mr Kavanagh is described in the prospectus as a co-founder of the company, but according to the prospectus he does not hold any executive or board position. The prospectus also does not set out whether Mr Kavanagh has any shares in the company. He is, however, a director of a wholly owned Irish subsidiary called Wimp 2 Warrior (Ireland) Limited. Mr Kavanagh was contacted for comment.
Financial statements included with the prospectus note that it made an operating loss of A$20.5 million (€12.3 million) in 2023 and a loss of A$11.1 million in 2022. It notes in the document that it “may continue to incur net losses in the future”. It had an accumulated deficit to date of A$38.3 million (€23.1 million).
It further states that it expects its “research and development and management and administration expenses will continue to increase and, as a result, we will need additional capital to fund our operations, which we may raise through a combination of equity offerings, debt financings, other third-party funding”.
The company has raised around A$31 million through the sale of shares and loan notes, and that it may need to raise further funds in the future.
Its directors note that the company’s auditors have noted a “substantial doubt related to our ability to continue as a going concern”.
- Sign up for Business push alerts and have the best news, analysis and comment delivered directly to your phone
- Find The Irish Times on WhatsApp and stay up to date
- Our Inside Business podcast is published weekly – Find the latest episode here
IN THIS SECTION
Clanwilliam unveils new app to streamline gp practices, finnish short-term rental start-up bob w eyes irish market, ‘my wife is a fantastic woman, my soulmate and an incredible mother, but our marriage is sexless’, ‘you’re famous, what are you doing here’: the asylum seeker who has gone from somali tv to a bunk bed in citywest, tributes left at queens bar where irish woman sarah mcnally died in alleged knife attack, pathway to top of croagh patrick almost complete after more than three years of work, sharp rise in sexual images generated by primary school pupils, foley warns, latest stories, teachers want to teach, not tick boxes. ai could be key to realising this, south korea says north korea fired missile into its eastern waters, seven aid workers killed in israeli strike in gaza.
:quality(70)/cloudfront-eu-central-1.images.arcpublishing.com/irishtimes/VR3765MFOBH2NMV2QNICYDF67M.png "powerpoint online new section")
- Terms & Conditions
- Privacy Policy
- Cookie Information
- Cookie Settings
- Community Standards
Final Four tickets: Where to get the cheapest seats to UConn-Alabama, NC State-Purdue online
- Updated: Apr. 01, 2024, 1:37 p.m. |
- Published: Apr. 01, 2024, 1:28 p.m.

Alabama forward Nick Pringle (23) celebrates after a win over Clemson in an Elite 8 college basketball game in the NCAA tournament Saturday, March 30, 2024, in Los Angeles. (AP Photo/Ashley Landis) AP Photo/Ashley Landis
- Ben Axelson | [email protected]
The 2024 NCAA Men’s Basketball Tournament culminates this weekend, with Final Four clashes featuring the No. 1 UConn Huskies vs. No. 4 Alabama Crimson Tide, and No. 1 Purdue Boilermakers vs. No. 11 NC State Wolfpack.
Fans can still find tickets to the Final Four and Championship game at State Farm Stadium in Phoenix, Arizona, available online. Better yet, prices starting to sink, according to reports , so now is a great time for fans to score last-minute deals from resellers like SeatGeek , StubHub and VividSeats .
The No. 1 Purdue Boilermakers — who finally ended their 44-year Final Four drought — will kick off the Final Four by becoming the latest team to square off with upset kings, the No. 11 NC State Wolfpack on Saturday April 6. Session 1 will conclude with defending champions and No. 1 overall seed, the UConn Huskies, squaring off with Alabama, with their sights set on becoming the first repeat champion since 2007.
Here’s the Final Four schedule, and the cheapest tickets currently available for every game.
Session 1 tickets (Apr. 6): UConn vs. Alabama, Purdue vs. NC State
VividSeats : Section 452 tickets start $323
SeatGeek : Section 453 tickets start $344
StubHub : Section 452 tickets start $361
Session 2 tickets (Apr. 8): NCAA National Championship
StubHub : Section 453 tickets start $146
VividSeats : Section 453 tickets start $152
SeatGeek : Section 402 tickets start $158
All-session tickets: Admission to Session 1 (Apr. 6) and Session 2 (Apr. 8)
StubHub : Section 403 tickets start $476
VividSeats : Section 435 tickets start $568
SeatGeek : Section 435 tickets start $594
Ticket prices are noted at the time of publishing, and are subject to changes and additional fees.
How much are 2024 NCAA Tournament Final Four tickets?
Ticket prices vary by venue, round, seat location and teams, but at the time of publishing can be found for as low as $146 for the National Championship, and $323 for the semifinals. SeatGeek reports the average ticket price for the games at $940, and the best seats in the house going for upwards of $5,000 per seat.
Get tickets to your favorite team
- New York Yankees tickets: How to buy cheapest Yankee Stadium seats online in 2024
- New York Mets 2024 tickets: How to buy cheapest Citi Field seats online
- March Madness: Cheapest Syracuse basketball tickets for NCAA Women’s Tournament
- Caitlin Clark tickets for March Madness: Where to buy No. 1 Iowa, Albany Regional seats online
- March Madness tickets: How to get cheapest 2024 NCAA Tournament tickets online
Here’s a recent AP college basketball story:
The 2024 version of March Madness has apexed with a trio of streak busters in the desert.
N.C. State is in the Final Four for the first time since Jim Valvano ran around trying to find someone to hug after the 1983 national championship. Purdue and big man Zach Edey will make their first Final Four appearance since Joe Barry Carroll dominated the paint in 1980.
Alabama ? Never been.
An angry pack of Huskies awaits them in the Valley of the Sun.
Dominating on its way to a fifth national championship a year ago, UConn has looked even more unbeatable so far in its run to become the first repeat champion since Florida in 2006-07.
“Our defense is elite. Our offense is elite. We rebound the ball,” UConn coach Dan Hurley said. “These guys play every possession like it’s the end of the world.”
The Huskies have done nothing but end opponents’ hopes through consecutive dominating March runs.
UConn steamrolled its way through the 2023 bracket , winning each game by at least 13 points. That was the best since Indiana in 1981.
These Huskies may be better.
With 7-foot-2 Donovan Clingan in the middle and talent across the roster, UConn won its first four NCAA Tournament games by an average of 27.7 points. The Huskies made Illinois look like a JV team in the Elite Eight, reeling off 30 — yes, 30 — straight points in a 77-52 victory to become the first reigning champion to reach the Final Four since Florida’s consecutive titles.
Knocking off UConn will be a monumental task in Glendale, Arizona, starting with Alabama in the semifinals Saturday.
“His (Hurley’s) formula is working out pretty well,” Alabama coach Nate Oats said. “I’m going to have to figure out that formula myself here soon.”
Oats already has sorted a few things figured out.
The Crimson Tide lost in the Sweet 16 last season, then most of its roster. Oats had three returning players and replaced three assistants who left for head coaching jobs.
Playing fast and letting 3s fly from all over, Alabama led the nation in scoring during the regular season and has kept up the pace in March. Led by heady, gritty point guard Mark Sears, the Crimson Tide scored at least 89 points in three of four NCAA Tournament games, including 109 in the opener against Charleston.
Alabama reached its first Final Four by making 16 3-pointers in an 89-82 win over Clemson in the Elite Eight.
“Guys bought in — we can make this run, other teams have done it,” Oats said. “We have the capability to do it.”
The first national semifinal on Saturday will be big — as in more than 14 feet and 575 pounds of men in the paint.
Purdue has college basketball’s most unstoppable force in Edey.
At 7-4, he didn’t need a ladder to cut down the nets in Detroit and has the skill to go with his size. Edey was the AP national player of the year last year and the front-runner to become the first player to repeat since Virginia’s Ralph Sampson earned it three straight years from 1980-83.
Edey has been nearly unguardable in the NCAA Tournament, becoming the first player since Kareem Abdul-Jabbar (then known as Lew Alcindor) in 1968 to have at least 50 points and 35 rebounds while shooting 65% from the field the first two games of an NCAA Tournament.
Edey topped that with a career-high 40 points and 16 rebounds in a 72-66 win over Tennessee that sent the Boilermakers to the Final Four a year after making history by losing to a No. 16 seed.
“Zach’s got a competitive fight to him. He doesn’t back down,” Purdue coach Matt Painter said. “When you have that elite physical size and you have that competitive spirit with it, with some skill, it’s pretty dangerous. He’s pretty hard to handle.”
So is N.C. State’s DJ Burns Jr.
The 6-9, 275-pounder has a big-sized game and a personality to go with it. He’s the focal point of the Wolfpack offense and opponents have yet to find a way to stop him.
Burns has great footwork, a soft touch and vision to find the open man nearly every time. Combined with the team’s other DJ , Arizona State transfer DJ Horne, N.C. State won five games in five days just to get into the NCAA Tournament and kept rolling into the Final Four as a No. 11 seed.
“DJ Burns has been around for a long time, but his personality, his play has really opened eyes of a lot of folks around the country,” N.C. State coach Kevin Keatts said.
Now the Wolfpack get to play in the game’s biggest spotlight with two other teams who ended long droughts — and a fourth vying for a place in history.
If you purchase a product or register for an account through a link on our site, we may receive compensation. By using this site, you consent to our User Agreement and agree that your clicks, interactions, and personal information may be collected, recorded, and/or stored by us and social media and other third-party partners in accordance with our Privacy Policy.
IMAGES
VIDEO
COMMENTS
Add a section. Right-click between slides and select Add Section. An Untitled Section is added in the thumbnail pane, and the Rename Section dialog box opens. Type a name in the Section name box. Select Rename. To collapse a section, click the triangle next to the section name. The numeral by the section name shows the number of slides in that ...
Step-1: "Right-click" on the slide navigation bar. The first step of the process is to " Right-click " between any two slides to add a section. Ideally, you should right-click just above the first slide from which you want to group of slides to begin. When you right-click, you will be presented with a dropdown menu.
Create a more cohesive presentation by organizing your PowerPoint slides into sections.Add a section1. Right-click between slides and select Add Section.2. T...
Use Sections in PowerPoint on the Web In Microsoft PowerPoint on the web, you can create and use sections. However, you do have limited actions. Create a Section. To create a section, select the View tab and choose "Slide Sorter" at the top. Then, right-click the first slide you want in the section and choose "Add Section" from the shortcut menu.
Here, I demonstrate how to create and use Sections in PowerPoint 365. Sections are very useful time-savers when you have a long slide show with many slides. ...
Right-click the section marker (which may be Untitled or have been named). The section marker appears as a bar across the screen. You can also click Sections in the Slides group on the Home tab in the Ribbon or press Shift + F10 or the Context key to access the context menu. A drop-down menu appears. Select Rename.
If you're wondering how to add a PPT section, go to Home -> Section -> Add Section or right-click between slides and select Add Section. From the dialog box that appears, add a name for your section and click Rename. This will give a name to your section. You can name various sections according to the topic they cover.
It's easy to add new sections to a presentation. Here's how: I like to be in Slide Sorter view first. (The birds-eye-view of the presentation where you can view all the miniature slides.) Decide which slide is going to start the new section. Click on that slide to activate it. Right-click and Add Section.
Learn how to add sections to your PowerPoint presentation to help you organize your slides more effectively. For Office 365 users you'll also learn how to c...
PowerPoint sections are useful for collapsing and expanding multiple slides, removing multiple slides, and rearranging segments of presentations.. To add a section, press Alt, H, T1 in the PC version of PowerPoint and select "Add Section": (This shortcut is Alt, H, T in older, non-365 versions; there is no built-in Mac shortcut for this command, so you must go to the "Home" menu and ...
To add sections in PowerPoint for the web switch to Slide Sorter view by clicking the Slide Sorter button The Slide Sorter View button on the status bar at the bottom of the window. Once in Slide Sorter view select the first slide in your new section, right-click on it, and choose Add Section. Give your section a name and press Enter.
Add a Section. Select the slide where the new section will begin. Click the Section button on the Home tab. Select Add Section. Right-click the first slide of the section in the Thumbnails pane and select Add Section. The section is added as Untitled Section. Type a name for the section. Click Rename . The slides are grouped into a new section.
Click the Zoom drop-down arrow and pick "Section Zoom." In the Insert Section Zoom window that appears, check the box next to the section you want to use. You can also include zooms for multiple sections. Click "Insert." You'll see the Section Zoom pop onto your slide.
Adding a New Section. Open your PowerPoint presentation. Navigate to the "Home" tab. In the "Slides" group, click on the "Section" dropdown. Select "Add Section" and give it a name. Repeat this process for each section you want to create. Renaming Sections. To rename a section, simply right-click on the section name and choose ...
Here's a step-by-step guide to get you started: Open your PowerPoint presentation. Click on the slide where you want to add a section. Go to the Home tab on the ribbon at the top of the screen. Click on the Section button in the Slides group. A dropdown menu will appear - select Add Section.
Choose Add Section from the menu. Alternatively, from the Home tab, in the Slides group, click the drop-down arrow next to Section. Choose Add Section from the menu. Type a name for the section. Click Rename. The section is now renamed. Notice the small red arrow next to the new section name.
Discover how to use PowerPoint's section tool to make your presentations more organized, better managed, and faster to develop. Discover how to use Sections, a little-known PowerPoint feature to make presentation development more efficient and organized. Skip to content. 202.681.0725;
Training: Get up to speed quickly and share and collaborate with others with this PowerPoint get started guide. Related topics. ×. PowerPoint for the web Quick Start ... Select Home > New Slide. Select Layout and the you type want from the drop-down. Save. When working in PowerPoint for the web, your work is saved every few seconds. ...
Use Sections in PowerPoint to help organize and manage your presentation. You can add sections, rename sections, and collapse and expand sections.www.chrisme...
To create your first section in PowerPoint, follow these steps: Open PowerPoint and navigate to the slide or slides that you want to include in the section. Select the slide or slides by clicking and dragging your cursor over them. Right-click on the selected slide or slides and choose "Add Section".
One person. Sharing and real-time collaboration. PowerPoint for the web and PowerPoint desktop app for offline use. Premium templates, fonts, icons, and stickers with thousands of options to choose from. Dictation, voice commands, and transcription. Advanced spelling and grammar, in-app learning tips, use in 20+ languages, and more.
Craft great-looking resumes, newsletters, and documents while inviting others to review and coauthor in real time. Plus, access free Word templates, formatting tools for APA, MLA, and Chicago style, and add functionality with free add-ins.
Affordable Housing Online has announced four new Section 8 Housing Choice Voucher waiting list opening this week! As the largest resource for low-income housing in the United States, Affordable Housing Online makes it easier for renters to find the latest rental opportunities. Housing options nationwide are regularly updated by our team of ...
New filings to the NYSE American show that the company, Alta Global Group Limited, began trading on the exchange in late March and floated 1.3 million shares at a price of $5.00 each.
VividSeats: Section 453 tickets start $152 SeatGeek : Section 402 tickets start $158 All-session tickets: Admission to Session 1 (Apr. 6) and Session 2 (Apr. 8)
See how to quickly create sections to organize your PowerPoint slides using your keyboard shortcuts (plus you can print those sections individually).🚀 UNLOC...
Careful not to be the fool (today). March 2024 was a great month for pages, docs, lists, tasks, and more -- and we ain't foolin'. March 2024 brought some great new offerings: SharePoint: New section backgrounds, Answers in Viva content in Microsoft Search, SharePoint Premium: Enable/disable Unstructured, Structured, and Prebuilt Document Processing, Manage SharePoint Embedded containers ...