
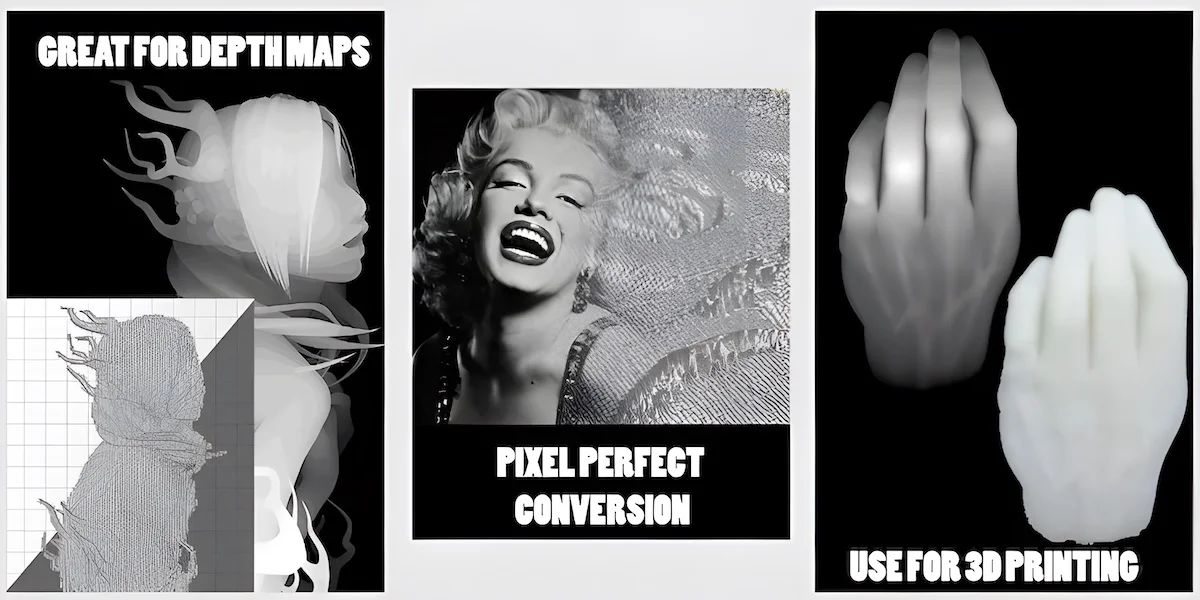
19 Tools to Instantly Convert 2D Images to 3D Ones | 2024 Edition
If you want to convert 2D images into 3D without putting in a lot of effort, dozens of tools are available on the internet for free. Most of them add the binocular disparity depth cue to digital pictures to give the brain a 3D illusion.
We’ve listed some of the best tools that can help you transform your pictures into 3D almost instantly. Since we have kept our focus on lightweight applications, the accuracy and details of the resulting image might not be perfect.
The items in the list are arranged in no particular order, and you won’t find any advanced software like 3dsMax or Photoshop.
Table of Contents
19. LeiaPix Converter
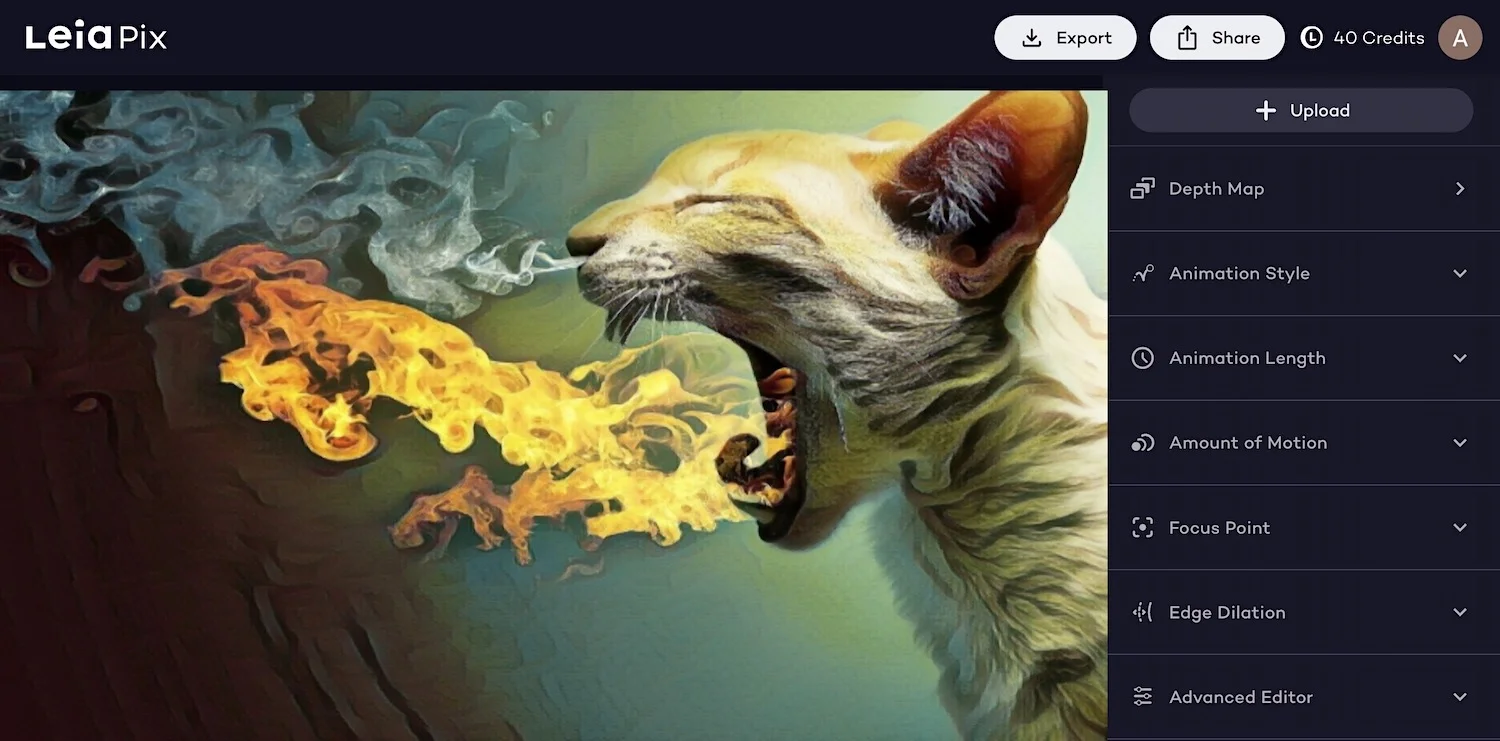
LeiaPix is designed to convert 2D images into compelling 3D representations. It aims to redefine the way we perceive and interact with photos by introducing depth and motion to static pictures.
It employs an advanced AI-generated depth map to transform ordinary images into dynamic visual narratives. The depth map allows you to fine-tune your 3D animations, enhancing the realism and depth of converted images.
- Extremely easy to use
- Adds depth and motion to static pictures
- Produces high-quality 3D images within seconds
- Highly detailed images may not convert as effectively
LeiaPix gives you options to export images in different formats, including Leia Image Format, Depth Map, Side-by-Side 3D, and MP4. As for pricing, all export options are free, with the exception of MP4 file exports, for which a fee of 20 credits is applicable.
18. ConvertImage
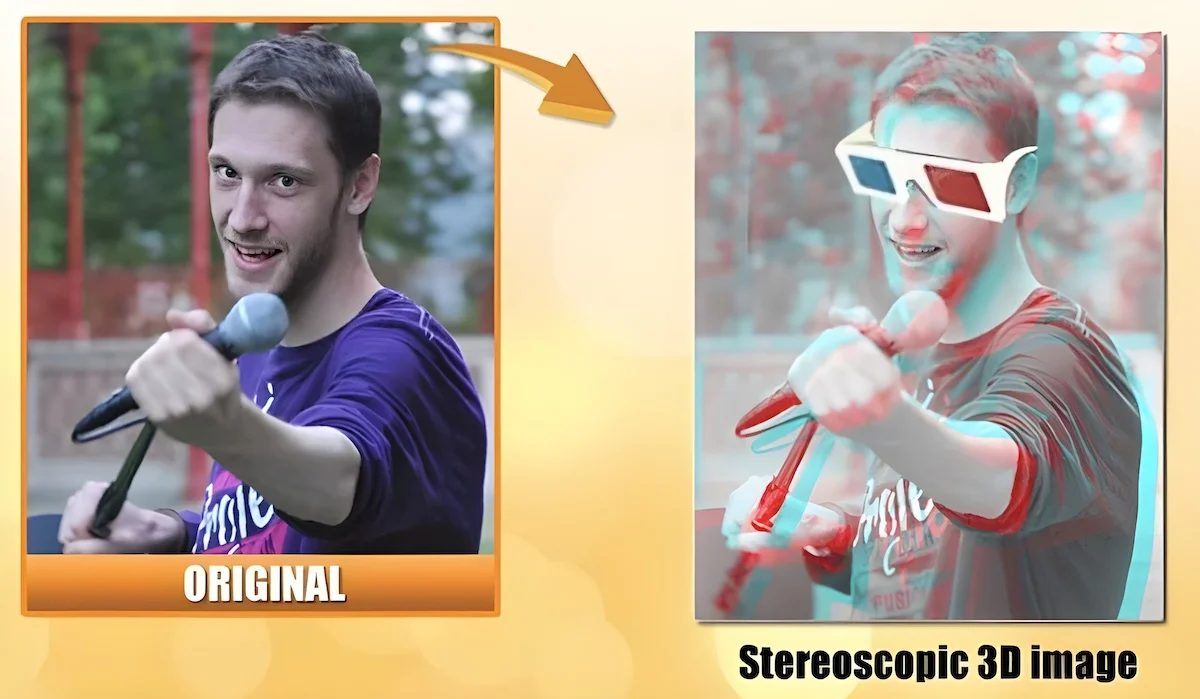
ConvertImage allows you to instantly create a stereoscopic image online. You don’t need to worry about the details or provide any technical parameters; just upload the picture (it supports all popular image formats), and you’re done.
- Produces quality stereoscopic image
- Supports all popular image formats
- All images are deleted from the server 15 minutes after processing
- Doesn’t work perfectly on images with lots of details or text
The tool turns your images into 3D anaglyph stereograms that give you the illusion of depth. To see these stereoscopic pictures, you can use any conventional pair of two-tone glasses.
17. 3D Text Creation Tool by Sculpteo
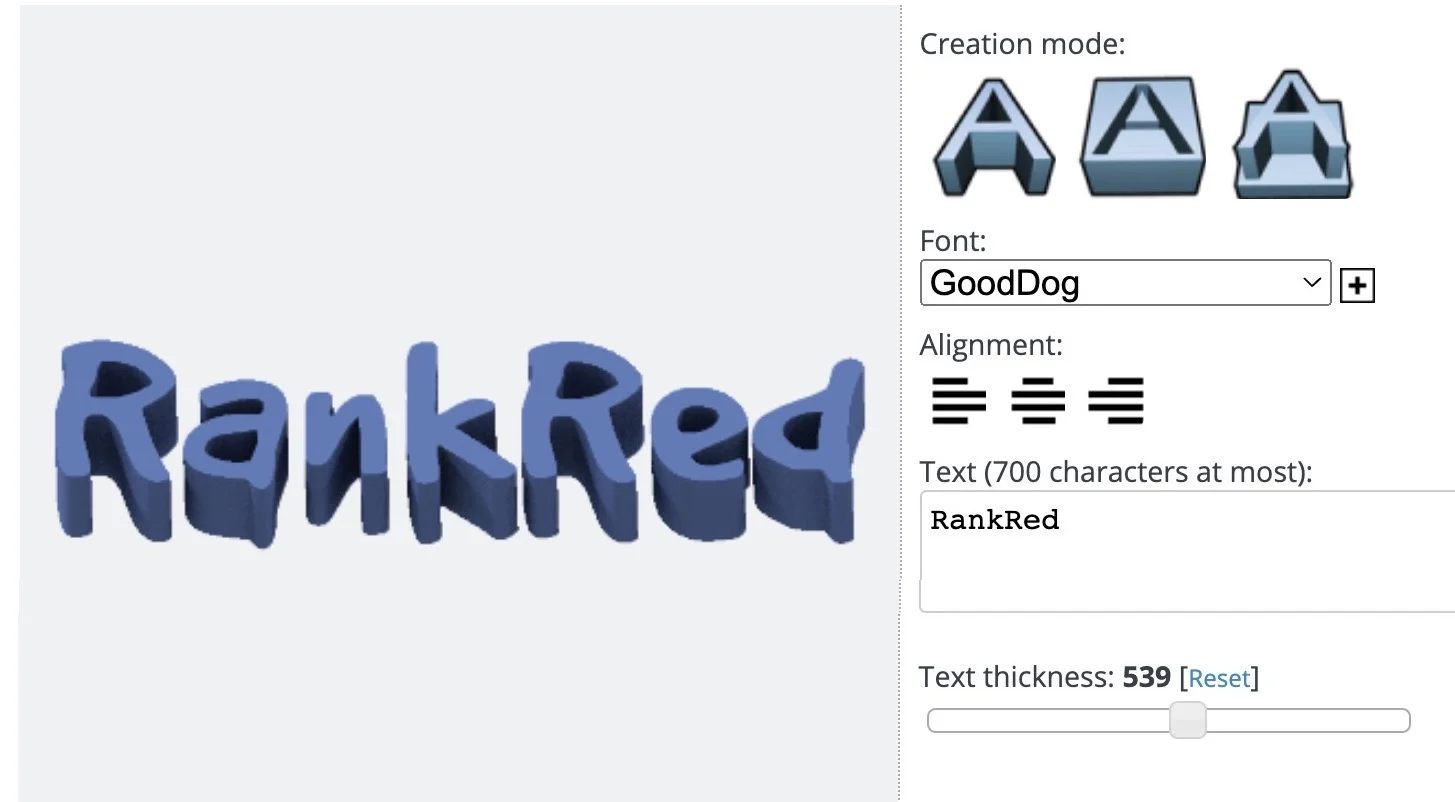
Sculpteo has created a simple web-based tool that allows you to craft stunning 3D typography in just a few clicks. It is suitable for various purposes, whether you are designing a 3D text logo for your business or exploring artistic endeavors.
Just write the text, select a font (or upload your own preferred font), and customize it using the options available (such as background and depth thickness). This tool offers you three creative modes:
- Extruded text — adjust the thickness of the 3D letters
- Inverse extruded text — modify the background thickness
- Engraved text — customize both the background and text thicknesses
- Quick and easy to use
- Offers different creative modes and font options
- Change thickness and background color
- Seamlessly integrates with a 3D printing service
- Font limitations
- Lacks advanced features found in professional 3D tools
Once your 3D text is complete, you have the option to bring it to life through the Sculpteo 3D printing service. However, this service comes with associated costs, which can vary based on the chosen materials and options.
16. 3D Shade
3D Shade helps you transform ordinary pictures into quasi-3D renderings. It uses unique algorithms to calculate color intensities in the image and create false height relief with an accurate perspective.
- Lightweight and easy-to-use application
- Plenty of options to edit images before processing
- Supports full-screen window for an unobstructed view
- Doesn’t support PNG files
- Sometimes, it only renders a portion of the original file
The application comes with a simple interface that contains enough information to tell you how to generate 3D pictures. However, it only works with BMP and JPG image formats.
15. MakeSweet Logo
If you are looking for the easiest way to make 3D logos, this is the perfect tool. MakeSweet logo allows you to customize the color, shading, and view of your creation.
- Perfect for making 3D logos
- Fast and accurate
- Can convert 2D text to 3D pretty well
- Only works with black-and-white images less than 1 MB in size
Since it’s a lightweight, browser-based tool, it works with only black-and-white images and supports PNG and JPEG formats. For best results, try to keep the image dimension less than 1000×1000.
14. Clip Studio Paint
Clip Studio Paint is a sophisticated graphics software that offers specialized features for drawing cartoons and comics. It lets you make full-color comics in 3D and convert ‘tone’ and ‘outline’ into a separate layer by executing “LT conversion of layer.”
- Works great on animation and character art
- Import 3D data made with other software
- Comes with an instruction manual and tool settings guide
- Limited functions are available in the free trial
The tool makes it easy to change tone settings, add corrections to drawing lines, and modify several components to enhance the quality. Thousands of materials are available via Clip Studio Assets, which you can use without paying any additional price.
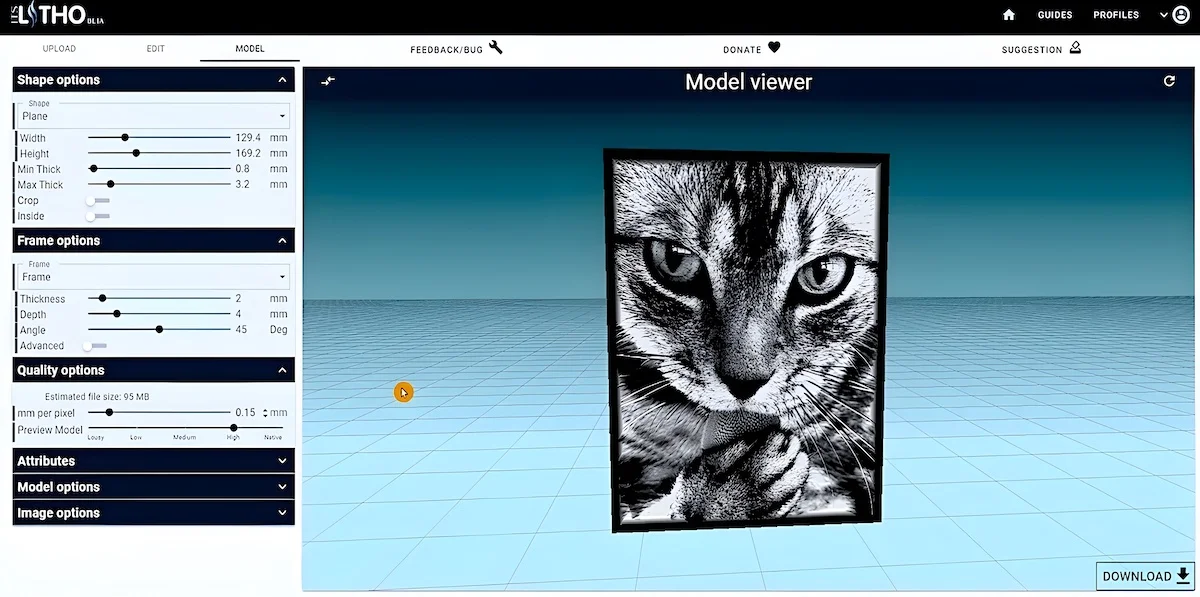
13. Image to Lithophane
A lithophane is a photo ‘carved’ into thin translucent porcelain (ceramic material), whereby a backlight reveals the contents. Although lithophanes haven’t always been 3D printed, humans have been using them since the 1800s.
- The tool works offline
- Offers image, model, and cache settings
- Use the generated models for commercial projects
- Cannot preserve fine details in the picture
This tool allows you to convert any image into a lithophane. You can choose from six different shapes and views (zoom and rotate in any direction) of the model before downloading the final STL file.
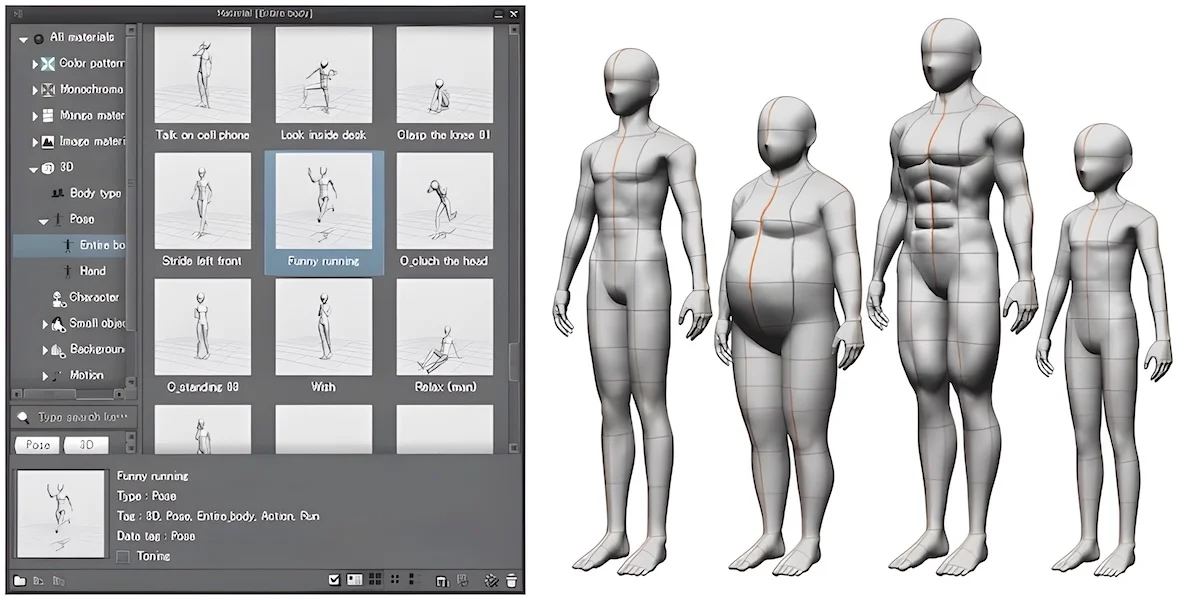
12. Tinkercad
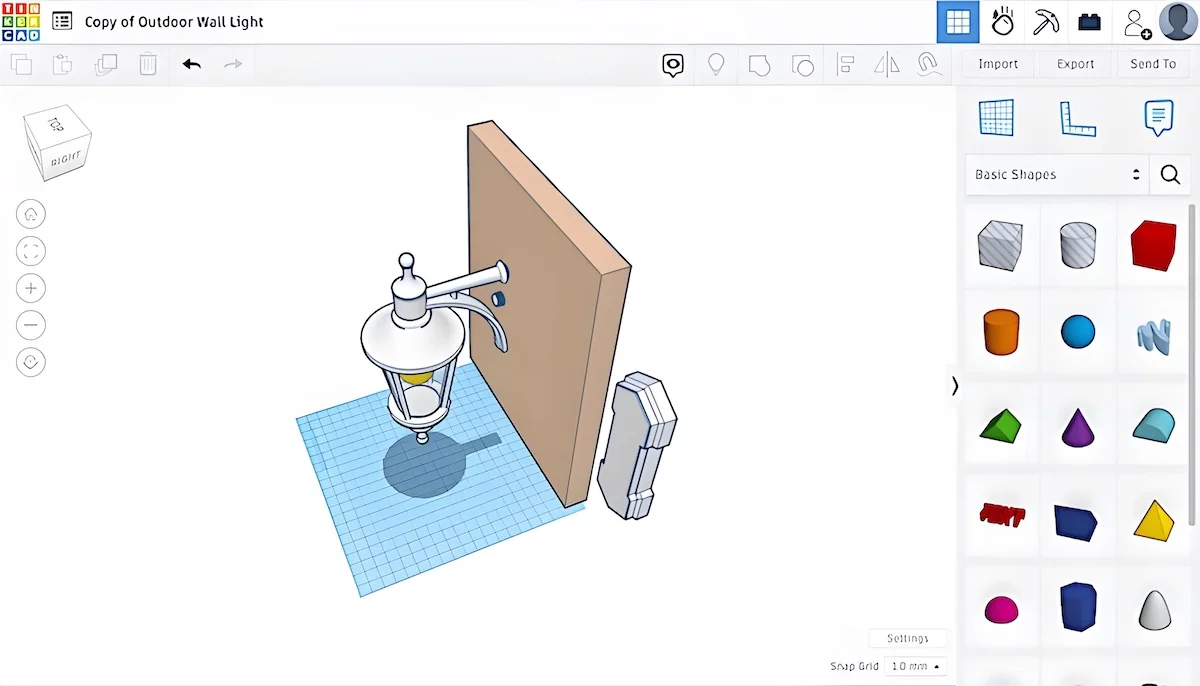
Tinkercad is an online 3D design and modeling tool designed for beginners. It allows you to import 2D photos and convert them to 3D within a few clicks. It offers simple drag-drop functionality and is suitable for basic 3D modeling tasks.
- User-friendly interface
- Built-in library of pre-designed objects and shapes
- Exports design in compatible file formats for printing
- Not suitable for complex designs
- Doesn’t offer realistic material representations or advanced visualizations
DA_BRINK’s Driving Classic Mustang design is a great example of not only what you can create with Tinkercad Codeblocks, but how you can add a little fun animation as well. ️ https://t.co/Vnf7EuBsrk #MadeWithTinkercad #TinkercadCodeblocks #BlockCode pic.twitter.com/NmOdaxOhbW — Tinkercad (@tinkercad) October 13, 2023
While it may have some shortcomings, it serves as a quick platform for students and educators who want to explore the world of 3D design.
ZW3D is a CAD-CAM application for 3D modeling, machining, and mold design. It is specially designed for mechanical engineers to help them optimize their design workflow in Microsoft interface and create efficient models in both 2D and 3D.
- Features intelligent design tools
- Contains more than 80 default post-processors
- Specialized Tools for Mold Design
- Available for both 32-bit and 64-bit system
- Not available for Mac users
This lightweight tool allows you to load BIG models without losing performance. It comes with a new set of algorithms that drive faster panning, rotating, and zooming of your design.
Furthermore, the application demonstrates impressive speed compared to its counterparts. For instance, the process of patterning 4,480 shapes with 98,560 faces can be completed in just one minute.
10. Embossify
Embossify is an online design utility service to transform images (jpeg format) into 3D STL (Stereolithography) files suitable for 3D printing or CNC routing. It tessellates the image file pixel-by-pixel until it generates a complete topographic model of the image brightness.
- Options to specify target width and depth (in millimeters)
- Creates a perfectly enclosed tessellation of rendered 3D mesh
- Low-resolution renderings are available free of cost
- Only supports JPEG images
This tool provides free low-resolution renderings with 108,000 facets. If you require high-resolution rendering for multiple images, they offer cost-effective pricing options.
9. Reliefmod
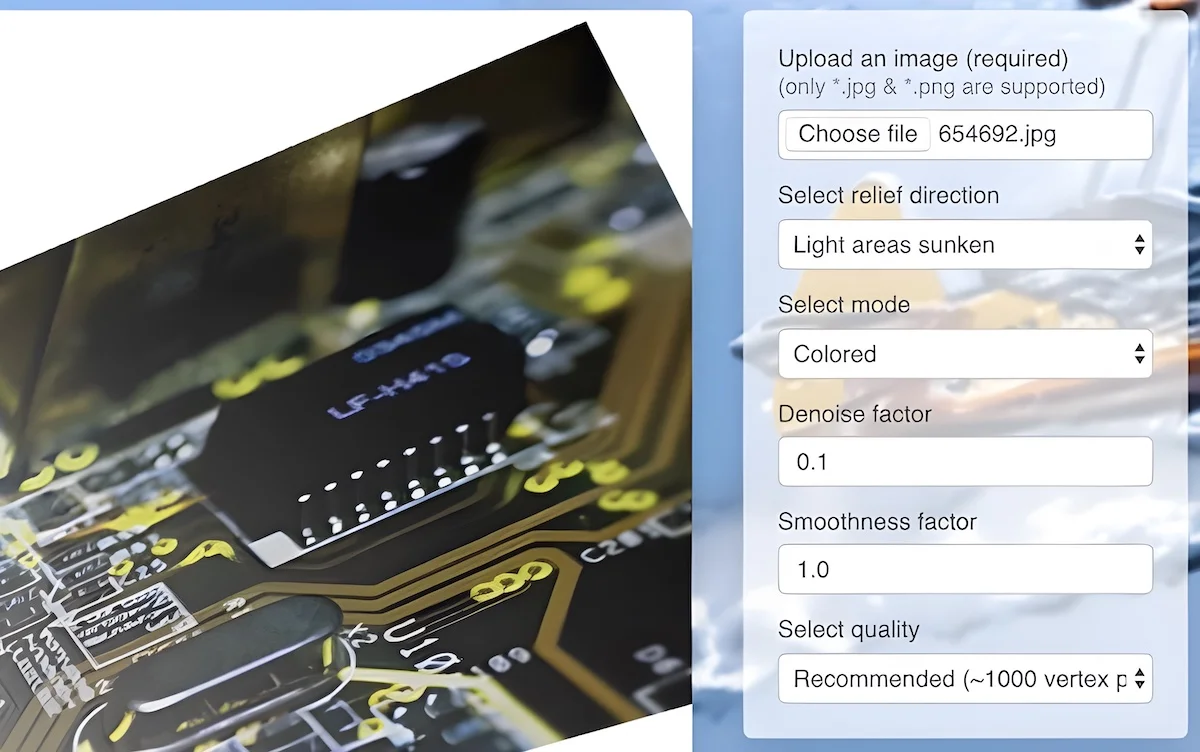
Reliefmod offers an effortless way to create a 3D model from a 2D picture. It’s very similar to Bas Relief, one of the ancient sculpting methods that involve carving out the voids of a picture from a flat surface, leaving behind the artwork that seems to be raised above a solid background.
- Fast and easy to use
- Offers two modes: Monochrome and colored
- Users can specify denoise and smoothness factor
- Dosen’t work well with low-quality pictures
All you need to do is upload an image with minimal shadows and adjust a few parameters like direction, quality, denoise, and smoothness factor.
Once you are satisfied with the appearance of your model, you can turn it into a real object using their manufacturing service. If you choose to proceed, you will get plenty of options to customize the material, color, and size of the 3D model.
8. Smoothie 3D
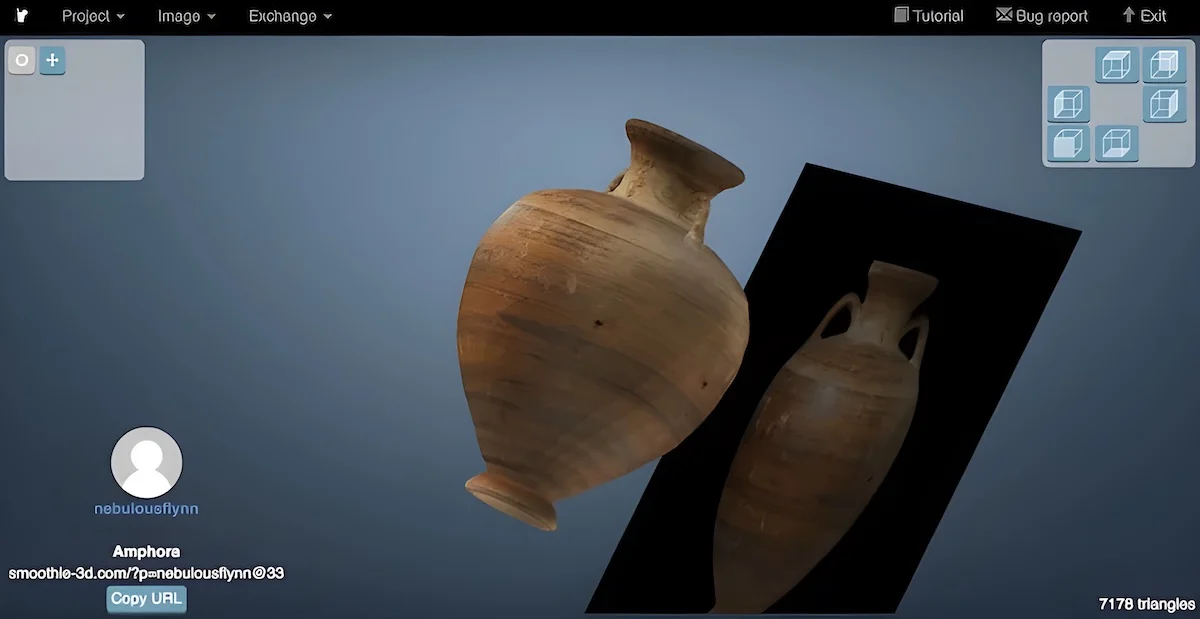
Smoothie makes 3D printing an image as easy as possible. It uses a single photo to generate an online digital model that resembles what you get after scanning or photogrammetry. You have to do a bit of drawing to transform certain parts of the image into textured 3D models.
- Symmetry management system
- Users can subdivide and smooth models
- Exports models to STL, OBJ, VRML
- Users need to register to use it
- Import could fail if the size of the image is too large
Nonetheless, this tool may not be particularly useful for creating highly detailed, asymmetric models. While it doesn’t require any plugins, it’s important to be aware that it might exhibit slower performance on older computer systems.
7. SculptGL
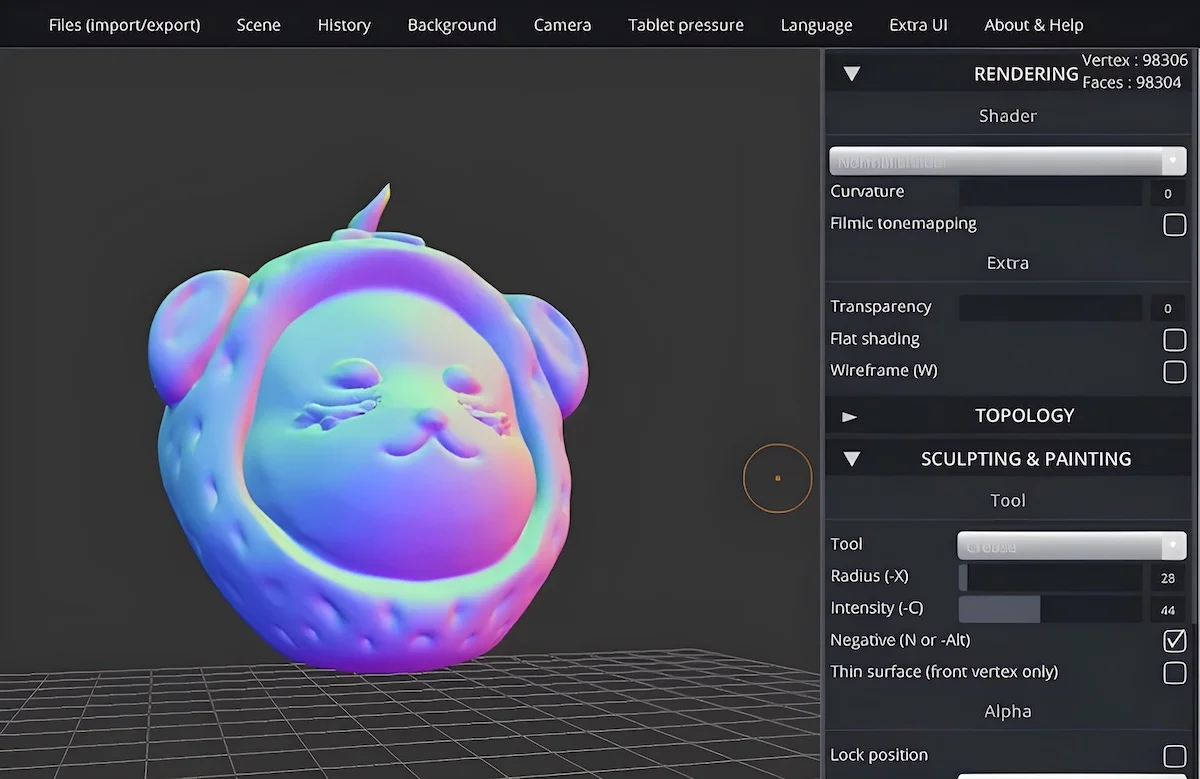
If you want to get a better experience of the 3D sculpting workflow and level up, you should definitely try SculptGL . Despite being a browser-based application, it has hundreds of options to get your feet wet in 3D sculpting.
- Perfect for beginners
- Plenty of options for rendering, topology, sculpting, and painting
- View the complete history of your actions
- Export files as STL, OBJ, PLY, and SGL
My recommendation is to avoid creating a high-resolution mesh right from the beginning; instead, build up detail levels step-by-step. Start with broad brushes to define the silhouette (heads, arms), then switch to large details (fingers) using smaller brushes.
Once you get a good grasp of this, you can add tiny and complex details like scars and wrinkles using finer brushes.
6. 3D Face Reconstruction
In 2017, British researchers revealed an interesting AI-powered tool that turns your face into a 3D model. The AI tool extrapolates a face from one image by feeding it multiple pictures and corresponding 3D models.
- Lightweight and easy to use
- Set (depth) z-axis
- Works well with low-quality images
- Processed image doesn’t look realistic
To develop this, researchers used a simple convolutional neural network that performs direct regression of a volumetric representation of the 3D facial geometry from a single 2D image. If you’re interested in knowing how this whole system works, you can read this paper .
5. ItsLitho
ItsLitho allows you to convert your images into 3D model lithophanes. It is accompanied by an image editor, which plays a crucial role in distinguishing between a good lithophane and an exceptional one.
Using its model creator, you can design 3D model lithophanes in many different ways. Create a shape (or pick from existing ones like spheres, pumpkins, vases, or lamps), add a frame or border, add attributes, and apply filters to give your model a unique look.
- Fast and intuitive
- Various shapes and frame options
- Realistic model preview
- Projects can only be exported as STL files
The platform gives you multiple environment options to preview your project. Try out different light colors and material colors to get a fast glimpse of how your lithophane will look after it is printed.
4. Insight3d
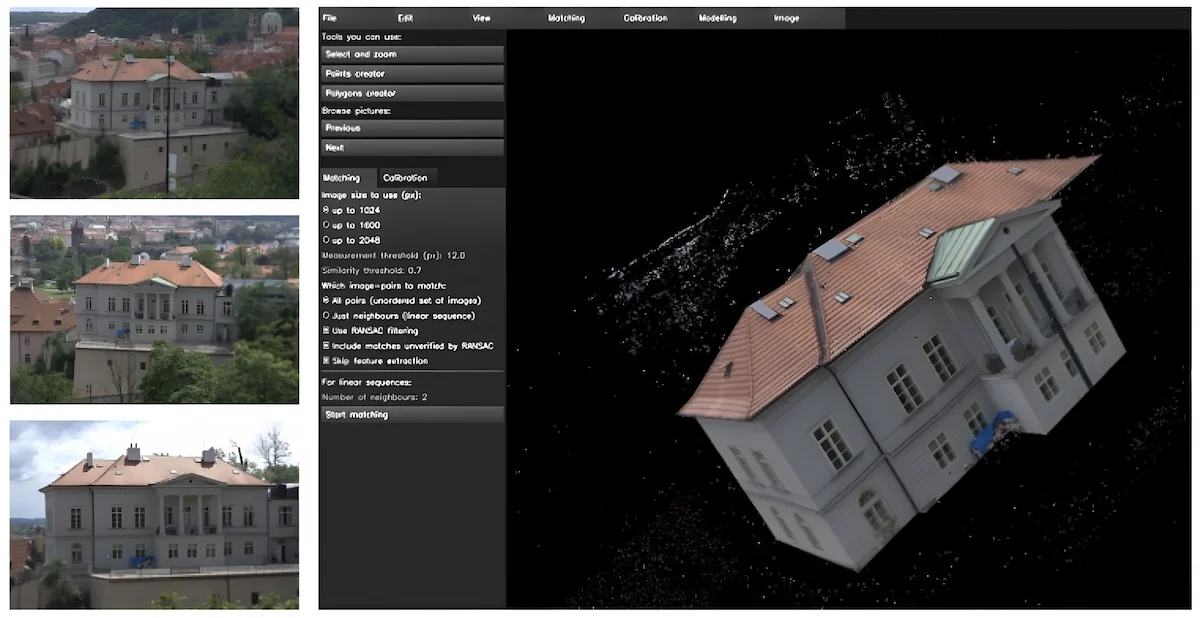
With Insight3D , you can create a 3D model from a series of real scene images. It not only measures the spatial positions but also captures the optical parameters of the camera, in addition to creating a 3D point cloud of the scene. Then, it produces a textured polygonal model, providing a comprehensive 3D representation.
- Generates a textured polygonal model from a series of images
- Helps you work on complex objects
- Export 3D models into several different formats, including VRML
- Doesn’t work with blurry photos or photos of blank walls
This tool won’t let you create a 3D object from scratch but will help you work on more complex models, making it easier and simpler. All you will need is a decent camera. And since it’s old software, it is unlikely to work on a large number of high-resolution pictures.
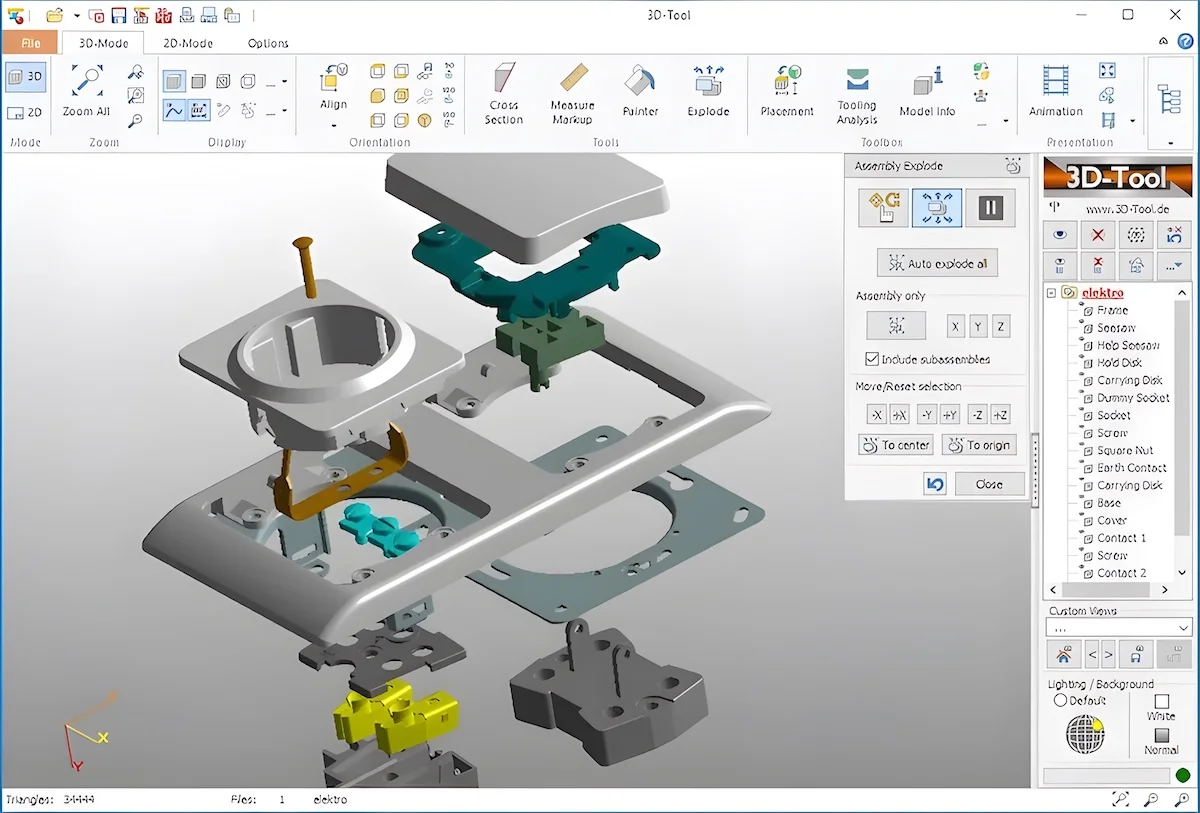
3D-tools helps you analyze complex 3D models without CAD knowledge. It is packed with multiple tools for evaluating designs, including analyses for toolmaking and extensive measuring functions.
- Provides practical tools for the evaluation of 3D designs
- Merge multiple 3D models and 2D drawings
- Both Viewer and Interfaces support 32bit and 64bit
- Combine Custom Views with animations
- Export animations as AVI video
At the push of a button, the tool displays dimensions, surface areas, and volume for each individual part of a model. It can calculate the angle, radius, distance, wall thickness, and clearance – all in three-dimensional space. However, if you are loading a large or complex file, it could take a while.
2. Selva 3D
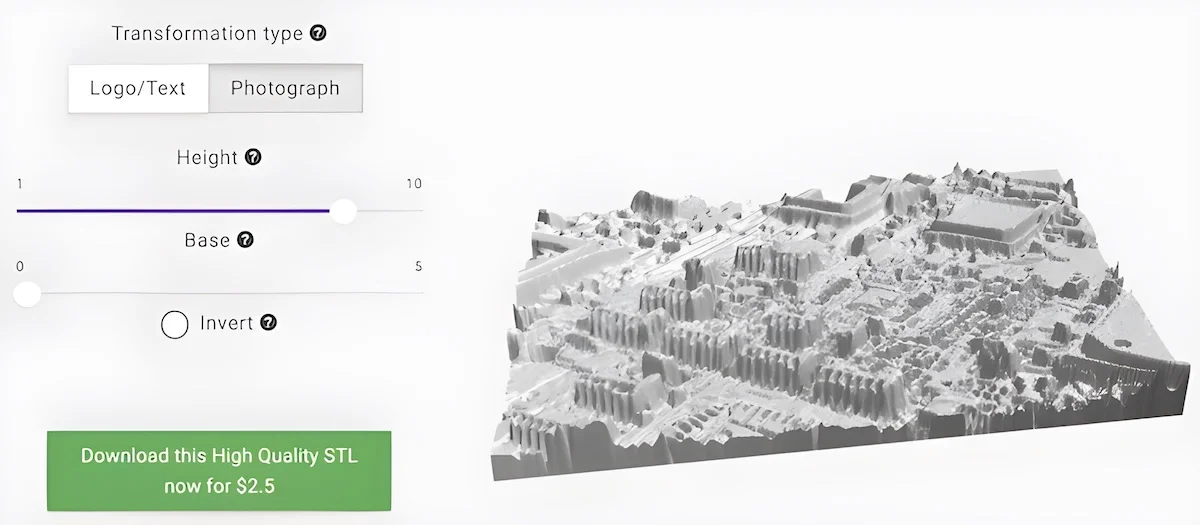
Selva3D is accessible online to generate 3D files directly from images. You can upload any image or logo (including gif format), and it will transform your input into a flat 3D file.
- Easy to use
- Provides two types of transformation: Text and Photograph
- Users can adjust the thickness and brightness of the model
If you’re working on a complicated design, using a high-resolution image is better. In this context, darker colors are typically mapped to black, while lighter colors correspond to white. You can change this setting via a ‘threshold’ controller, which allows you to experiment with the details of your project.
Read: The 14 Best 3D Printing Software
This browser-based CAD software is definitely worth your attention. Vectary is known for its innovative user interface and approach to collaboration. It comes with a library containing everything you need to create an eye-catching visual.
- Users can start with high-quality pre-rendered scenes
- There are tons of realistic and fully textured materials to choose from
- View your design in Augmented Reality
- Documentation is not easy to follow
- Doesn’t work well on Safari
One platform to create, manage, and share. #3D #Collaboration pic.twitter.com/qxrUPPVbCc — VECTARY (@vectary) August 3, 2023
And, of course, you can import or export models from popular services like Sketchfab, Thingiverse, or Google Poly.
Read: 18 Best Photoshop Alternatives (both free and premium)
Frequently Asked Questions
Is 3d modeling hard.
While 3D modeling is relatively easy to learn with enough time, it can be difficult to perfect. It requires knowledge of modeling software, plugins, scripting, as well as mathematics.
Although 3D modeling is a competitive field, it’s a great career path for people who enjoy combining arts and creative ideas with the latest technologies.
Is 2D to 3D conversion the same as 3D modeling?
No. 2D to 3D conversion and 3D modeling are different processes.
What are the common file formats for 3D printing?
There are more than 25 file formats for 3D printing. The most common ones are:
- STL (Standard Triangle Language) describes only the surface geometry of a 3D object without representing its color texture or other typical CAD model attributes
- OBJ (Wavefront Object) can encode smoother surfaces with fewer tiles by using polygons like quadrilaterals or hexagons.
- AMF (Additive Manufacturing File format) has native support for materials, color, lattices, and other metadata.
- 3MF (3D Manufacturing Format) incorporates all relevant model features as well as security and encryption for parts of 3D models.
Read: 44 Best Websites to Download Free STL Files for 3D Printing
What are the best 3D modeling tools for beginners?
If you are a beginner, you can start with:
- Blender supports the entirety of the 3D pipeline, from animation and simulation to compositing and motion tracking.
- Daz Studio is a 3D scene creation and rendering software used to develop detailed images and videos.
- SketchUp is one of the simplest 3D modeling tools on the web that allows you to visualize ideas before turning them into real projects.
- Wings3D can be used to model and texture polygon models.
The best thing about these tools is that they all have free versions as good as paid modeling programs.
Different Types of 2D to 3D Conversion Tools
2D to 3D converter tools come in various forms, catering to different skill levels and purposes. These include
- Professional software tools like Adobe Photoshop and Maya
- User-friendly online converters like Vectary and SculptGL
- Open-source tools like FreeCAD and GIMP
- Mobile applications such as Easy 3D Scan and 3D Creator
- Niche tools DepthAI and Sculptris
Similar Software
13 Best Tools To Convert 2D Videos To 3D
18 Best Animation Software For Beginners
MS Paint for Mac: 10 Similar Sketch Tools

Varun Kumar
I am a professional technology and business research analyst with more than a decade of experience in the field. My main areas of expertise include software technologies, business strategies, competitive analysis, and staying up-to-date with market trends.
I hold a Master's degree in computer science from GGSIPU University. If you'd like to learn more about my latest projects and insights, please don't hesitate to reach out to me via email at [email protected] .
Related articles
14 best wordpress plugins for developers | 2024 edition.

39 Best Websites to Download Free STL Files for 3D Printing | 2024 Edition
Leave a reply cancel reply, 11 comments.
Very helpful knowledge for converting 2D into 3D images or models.
OmniVirt’s 3D photo tool is also an easy way to turn your 2D images into 3D pictures! It takes 5 seconds and you’ll be able to download the creation for free to post to Facebook. Love this tool!
It used to be but now they are only entertaining corporates. Individuals cannot even access to membership.
Hi I’m looking for software to easily convert 2D Images to 3D ones without the need for any special glasses to view them being required. Thanks.
Another option is Atomic Compiler (atomiccompiler.com). Slightly less user friendly but more flexible. There is a blog post on specifically this topic.
How could you make this list and not mention meshroom? baffling.
hi, with this comment, you saved a life! just know it;)
I have bneen trying now for a full day to register to use Selva 3D and get now reaction or confirmation email from their website. The contact email address also contains a domain that is for sale. I think the platform has stopped functioning.
This is a fantastic list! I went out and purchased an extra tool. It has been downloaded, and I am considering purchasing one from this site.
shame their isnt a link for the 3D Face Reconstruction
This is an interesting list of tools that can help me convert my 2D images into 3D ones, which could come in handy for various projects and presentations. Thanks for sharing!
How to convert a 2D image to 3D for printing in 3D

If you have a 3D printer or are interested in this world, you most certainly would have wanted to make a personalized key ring, your company logo…
You probably thought it was a task that required advanced knowledge in 3D design, but today we teach you that converting your 2D image to a printable 3D model is easier than you think.
Throughout this article, we will show you one of the best methods to do this conversion, as well as some tools that, although not mandatory part of the process, can help improve the final quality of the 3D model.
📖 What do you want to read?
2D image to 3D using 3D Builder (Windows)

If you are a 3D printing user or work manipulating 3D objects and you are not familiar with 3D Builder you don’t know what you’re missing. This is a program that comes pre-installed on most PCs with Windows 10, but don’t worry if it is not installed on your computer, as we teach you to download it for free.
Install Microsoft 3D Builder
It’s very simple: you just need to open the Microsoft App Store by pressing the Windows key and typing “store”. Once in the store just type in the search engine “3D Builder” and click on the button that says “Install”.
Once we have installed the program, we will have one of the most powerful and simple 3D software on the market . Although it is not a software for modeling itself, with 3D Builder we will be able to create and edit 3D models from simple 2D images in a very simple way. This method, although it may require the installation of a software, is probably the most complete that we know, since it allows us to play around with several parameters to adjust our 3D model to our needs . If you want us to show you what other wonders you can do with this program just leave a comment indicating your interest.
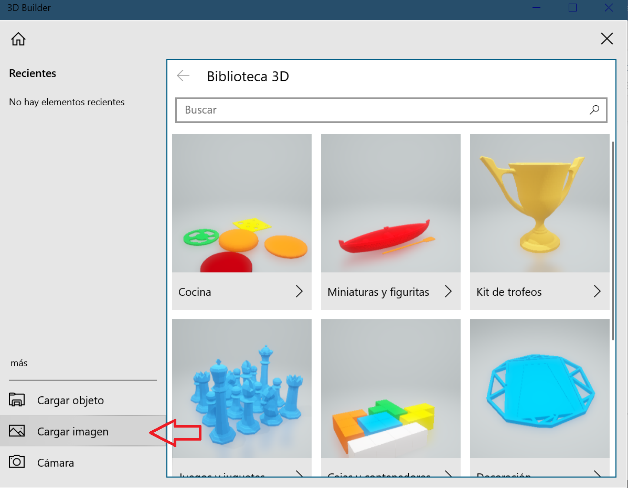
Uploading an image and converting it to 3D
Doing the conversion couldn’t be more intuitive. Start the program and click on the open button indicated in the image:
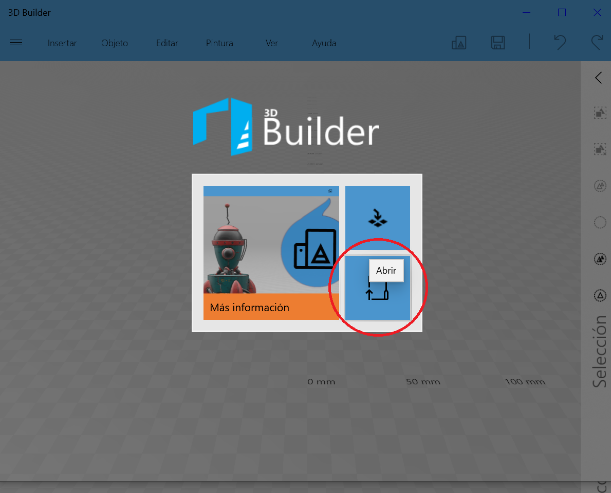
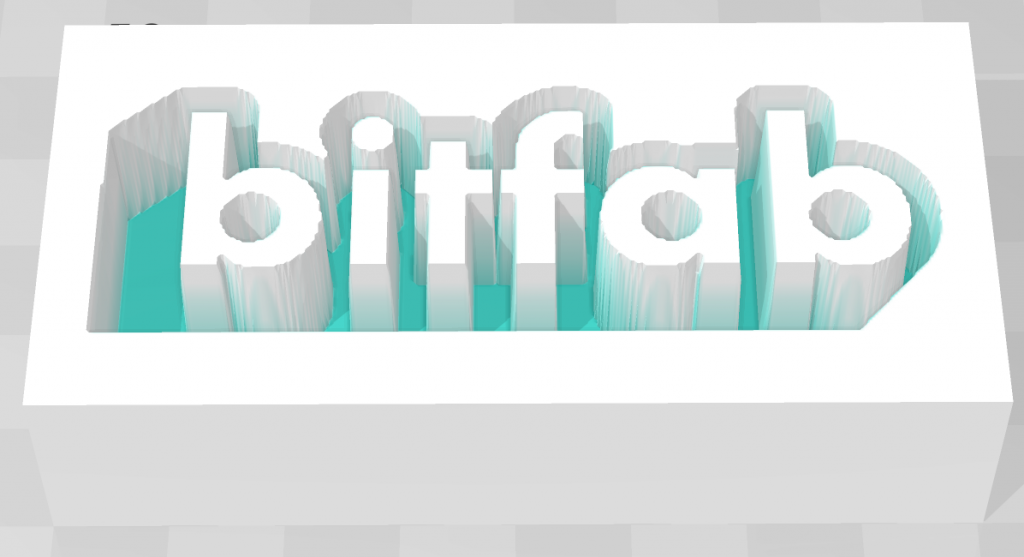
This menu allows us to load both 3D files in almost any format (stl, obj, 3mf…) and images that we want to convert to 3D models. Afterwards, we click on load image, and then we click on our image file. Once loaded, the interface shown in the photo is displayed before us. In it we can see several elements, but there are three that are the most important and the ones we are going to explain to you.
Which conversion method to choose
Conversion method selection: this dropdown list includes 4 different options for converting from 2D to 3D but we will only explain the ones we consider most useful. “Contour” sections the image by searching for borders (abrupt color changes) and generates a 3D model based on this. “Height Map” assigns a different height to each color , creating a staggered 3D model. This mode is especially useful to create models and print them in various colors changing the filament. Please leave a comment if you want us to do a tutorial on this because you’re sure to love it.
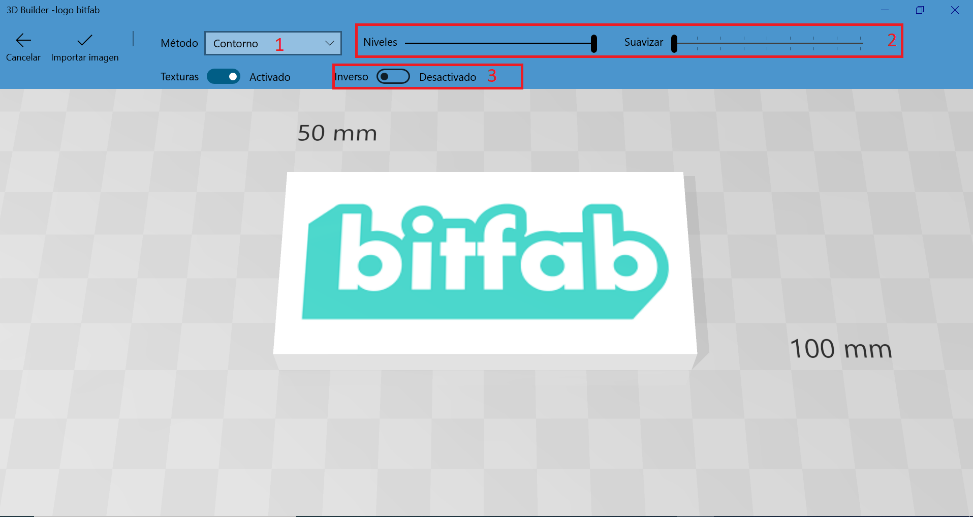
Level selection and smoothing
Selecting levels and smoothing: these sliders allow us to select both the level of detail we want to preserve and the smoothing we want to apply. The ideal thing is to try different settings depending on your image. In general, adding a bit of smoothing helps if our image is low resolution and the 3D model that is generated has noise, or very sharp peaks and edges.
Activation of image inversion: this switch has the function of creating the image negative, since depending on each specific case we will want the highest parts of our 3D model to be the brightest parts of the image or the darkest.
As you can see, the program is very simple, and you just need to play a little with the parameters we have explained. If you have any doubt do not hesitate to ask in the comments section.
Scale your image to the size you want
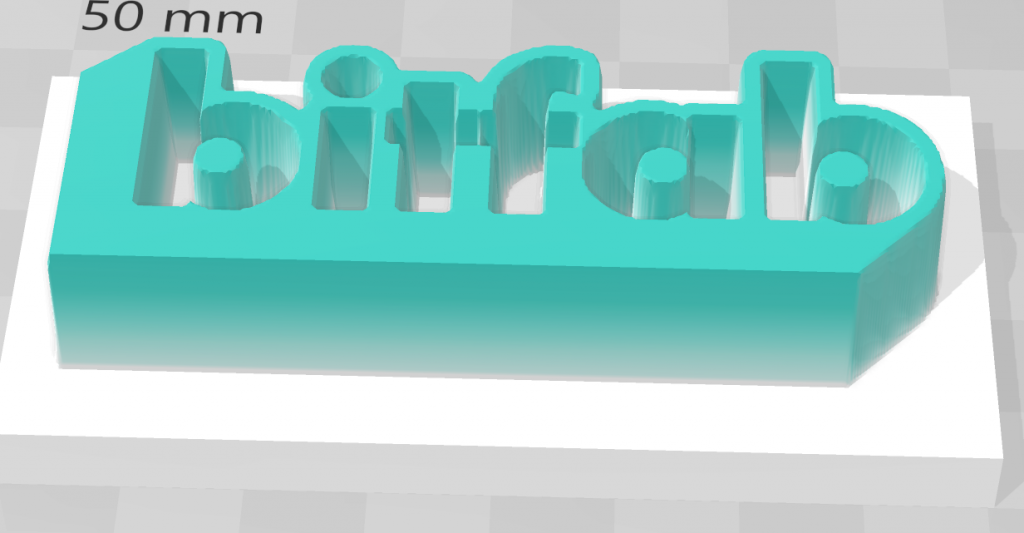
Once we have the 3D model generated, we are going to use this same software to scale it to our liking. In our case, we will select the model generated by the “map of heights ” method since we will print it in two colors by pausing and changing the filament. To scale it we only have to click on the scaling icon in the toolbar at the bottom
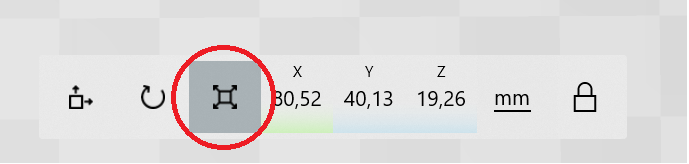
Before changing any dimension we must make sure that the lock on the right is closed. This means that we want to maintain the aspect ratio of our figure, that is, its proportions. If the lock were open when changing one of the dimensions, the rest would not be changed accordingly and we would end up with a deformed figure. Bearing this in mind, we only have to type in the dimensions we want for our 3D model and we would have it done.
Save the image
In order to export our model we only have to press the button with the three parallel lines in the upper left corner and then click on “Save as”. Usually 3D models for 3D printing are in STL format, but it is an old-fashioned format. Almost all your current laminators such as Cura or Simplify3D support other more modern and efficient formats, so we recommend you try the 3mf format. You will see that your file weighs considerably less (even several times less) than if you had saved it in stl, which is a point to bear in mind if you’re like us and save hundreds and hundreds of your favorite 3D models.
Convert an image to 3D online
Do you prefer to convert a 3D image directly from your browser? No need to download any program, because with Selva3D you can upload an image and transform it into 3D in a moment.
Tip: better use a vector image (Windows, Linux and Mac)
On this occasion, we have converted to 3D a simple image with an acceptable resolution, but this is not always the case. Many times, we find that the image we want to convert to a 3D model is in a very poor resolution, or has been converted to an inadequate format or compressed multiple times, resulting in a pixelated and blurred image. In this case it can be very interesting to convert our image, which will usually be a . jpg or . png file, to . svg .
To make it simple, just keep in mind that an svg file is not a bitmap, but a collection of vectors, and, in practice, is an image with infinite resolution, which you can enlarge as much as you want. For this task you can use online converters like this one or our most recommended option, Inkscape (available for Windows, Linux and Mac).
Vector image files are the method used by graphic design professionals and more experienced users to generate 3D files from flat images. The 2D image saves information about the lines and areas of the area and can be extruded to generate the most accurate 3D model possible. It is a technique that is widely used for logos, posters, signs…
Here is an example of how this process can be done in Inkscape and Blender:
Did you like the article?
We’ve seen that there are multiple methods that allow you to convert your 2D image to a 3D model and we’ve shown you the one we like best. Getting good results depends a lot on the starting image, but if this is of good quality we can achieve a very accurate model in just a couple of minutes.
If you want to materialize your 3D design you can use our 3D service to print it online, just ask for a quote:
On the other hand, there are many ways to transform an image into something three-dimensional, such as lithophanies or velocity painting. If this blog has caught your interest, we will certainly do tutorials on these cool topics if you let us know.
Have you already converted your first image to a 3D model? Leave us a comment sharing your experience!
2 thoughts on “How to convert a 2D image to 3D for printing in 3D”
If I give you 2D pictures (multiple angles as you wanted), can you convert that in to a 3D model and print it out like a sculpture? I also want to know how big of size can you produce.
We have to do the photographs ourselves since they require a certain quality and our experience in focusing on the most important views of the part in order to get a perfect 3D scan. We usually work by going to our customer location or having the parts sent to us.
Currently we print parts up to 40x30x30cm in one piece and bigger parts split in several prints.
Leave a Comment Cancel reply
Your step-by-step guide to turning 2D pictures into 3D models using Paint 3D

- Share on Facebook (opens new window)
- Share on Twitter (opens new window)
- Share on LinkedIn (opens new window)
The next update of Windows 10, the Fall Creators Update, will be available worldwide from October 17 . As part of the update, Microsoft is evolving the photos experience to let people tell their story like never before using photos, videos, and 3D effects. There are also enhancements in gaming, security and accessibility.
There are also immersive new experiences made possible by Windows Mixed Reality . With Mixed Reality Viewer, you can see 3D objects – either from the Remix3D.com community or your own creation from Paint 3D – mixed into your actual surroundings through your PC’s camera. Here is a basic guide to turning your 2D pictures into 3D images:
Trace the outline of your drawing using the 3D Doodle tool
Advanced tip – Do a separate trace for each segment (eg arms, legs, tentacles etc) to give it more flexibility
Place all the pieces to make sure the are in the correct position, rotation and depth.
Advanced tip – use rotation to give more shape to your model rather than leaving everything flat
Colour in your model using the “Art Tools” exactly as you would in 2D
Advanced tip – Use the watercolor brush on a low opacity to blend colours together
Use “Magic Select” and “Stickers” to place parts of your 2D drawing onto your 3D model
Advanced tip – Use the “Add” and “Remove” buttons to refine your selection
Search Remix3D for useful models from the community.
Advanced tip – Why not find some accessories for your model (hats, glasses, vehicles etc)
Share your glorious creation to Remix3D for the world to admire.
Advanced tip – Don’t forget to tag your model so others can find it easily
Tags: 2D , 3D , microsoft , paint , Windows
Related Posts
12% more breast cancers detected with potential workload savings of 30% in the UK’s first prospective evaluation of breast screening AI
87% of UK organisations are vulnerable to cyberattacks in the age of AI, research reveals
Microsoft Copilot for Security: Coming soon to general availability with new capabilities
How global law firm Clifford Chance is innovating with generative AI and Copilot for Microsoft 365
3 big AI trends to watch in 2024
- Check us out on RSS
Share this page:


How to create art using 3D art maker, Adobe Substance 3D.
Give your art that extra dimension—namely, 3D. Create lifelike 3D images and renders of anything you can imagine with the power of the Adobe Substance 3D apps.
What is 3D art?
3D art is the perfect blend of technical skills and artistic creativity. 3D artists use software to mimic the real world in all three dimensions. This process typically begins with sculpting or modeling a 3D asset. Artists give life to a model through texturing and adding materials to its surface. Entire characters, environments, and scenes can be built this way, then rendered in animations or still images.
How to create 3D art with Adobe.
Step 1: install substance 3d apps on your device..
Your next 3D creation starts by accessing the right tools for the job. Subscribe today and give Adobe Substance 3D a free trial for 30 days.
Step 2: Create a new project in Substance 3D Modeler or choose a model from the Substance 3D Assets library.
The Adobe Substance 3D Assets library has thousands of models, light and materials to help you get started. Using a premade asset curated by professional 3D artists is as easy as downloading, importing, then creating. Sometimes, you might need something more specific for your goals, and that’s where Substance 3D Modeler can help. With Modeler, you can sculpt 3D objects with digital clay for a natural feeling, hands-on approach to 3D creation.
Step 3: Texture and add materials to your model in Substance 3D Painter.
Once you have the right model, give it life and color. In 3D, this process is known as texturing. You can also use an asset called a material to quickly apply image data to the surface to your model. Substance 3D Painter is an excellent way to accomplish this. Import your model into Painter and get started. With Substance 3D Painter, any 3D object can become a canvas.
Step 4: Stage and render your model in Substance 3D Stager with studio perfect lighting.
Substance 3D Stager is like an in-house photography studio. It’s the perfect way to stage and render the final image of your creation. You don’t need to be a pro at studio lighting because Stager has tons of already included lighting options you can add to your scene. You can position models, add decals and materials, and build your scene. Choose the perfect camera angle, and when you’re ready Stager will render your scene.

Images by Pablo Muñoz Gómez.

Create and share your own 3D art with Substance 3D.
Now that you’ve experienced the power of Substance 3D apps, you are well on your way to creating even more amazing 3D projects. As you continue to master the technical tools, your abilities to reimagine reality with 3D will only grow from here.
Frequently Asked Questions
The beauty of 3D is that anything is possible. As a beginner, it is a good idea to start with objects that use basic shapes. No matter what you’re creating, blocking out the simple shapes that make up the whole is a great way to begin.
It is possible to convert 2D images into 3D assets. As a part of the Substance 3D collection, you can use Adobe Substance 3D Sampler to convert images into objects, materials, and lights. You can also apply 2D images onto the surface of any 3D object in Substance 3D Painter and Stager using the decal mode feature.
If you have a series of images featuring all sides of an object you can automatically convert it into a 3D model using Adobe Substance 3D Sampler. Otherwise, you can use the image as a reference while sculpting the object from scratch in Substance 3D Modeler.
stickypromobar
Adobe Substance 3D
Model, texture, and render 3D assets and scenes.
Try Substance 3D Sampler
Language Navigation
- Oct 19, 2023
3D Characters from 2D Art: Your Complete Guide

Introduction
In a world that's becoming increasingly digital, the art of creating 3D characters from 2D designs has gained immense significance. Whether you're a game developer, an animator, or simply a creative artist looking to bring your characters to life, understanding the art of 3D character design is a valuable skill.
In this comprehensive guide, we'll delve into the fascinating realm of 3D character design . We'll explore the tools and techniques needed to make your 2D characters leap off the page and into the three-dimensional world. But before we dive into the nitty-gritty details, let's take a moment to understand what 3D character design is and why it matters.
Understanding the Basics of 3D Character Design
Imagine taking your favorite 2D character drawing and giving it depth, volume, and the ability to move and interact with its environment. That's the magic of 3D character design. It's the process of transforming a two-dimensional image into a three-dimensional model that can be animated, rendered, and brought to life.
Advantages of 3D Character Design
Before we embark on this creative journey, let's explore why 3D character design is so important and how it differs from traditional 2D drawings.
Realism and Depth : 3D characters have a depth and realism that's hard to achieve with 2D drawings alone. They can be viewed from multiple angles, casting shadows and interacting with their surroundings.
Versatility : 3D characters can be used in various media, including video games, movies, advertisements, and even virtual reality. Their adaptability makes them indispensable in today's digital age.
Interactivity : Unlike static 2D images, 3D characters can be rigged and animated, allowing them to move, emote, and perform actions, adding a whole new dimension to storytelling.
Tools of the Trade
To embark on your journey into 3D character design , you'll need the right tools. Software packages like Blender, Maya, ZBrush, and 3ds Max are the industry standards for creating 3D characters. These powerful tools provide a range of features for modeling, sculpting, texturing, and animating your characters.
But software is just the beginning. You'll also need a good understanding of fundamental artistic concepts like anatomy, proportion, and perspective. These skills will serve as the foundation for your 3D character designs.
Notable Examples
Before we proceed, let's draw inspiration from a few notable examples of 3D character design in popular media:
Pixar's Beloved Characters : Think of Woody and Buzz Lightyear from "Toy Story" or the lovable characters from "Finding Nemo." Pixar's mastery of 3D character design has set the bar high for character animation.
Video Game Heroes : Iconic characters like Lara Croft from "Tomb Raider" or Mario from "Super Mario" have become cultural icons, thanks to their 3D representations in video games.
Avatar: Pushing Boundaries : James Cameron's "Avatar" pushed the boundaries of 3D character design and animation , creating a breathtakingly immersive world filled with realistic 3D characters.
quick links :
Converting 2d to 3d: the transformation process, the magic of turning 2d images into 3d models, bringing realism to your 3d character.
Now that we understand the importance and allure of 3D character design, it's time to answer a fundamental question: How do you make a 2D design look 3D? The transformation from a flat drawing to a three-dimensional model is a fascinating journey that involves various creative and technical steps.
Step 1: Understanding Perspective and Depth
The key to making a 2D design appear three-dimensional lies in mastering perspective and depth. In a 2D drawing, objects are represented on a flat surface, making them inherently lacking in depth. In 3D design, however, we mimic the way objects appear in the real world, with depth, volume, and dimension.
Key Concepts:
Perspective : Understand one-point, two-point, and three-point perspective. This helps you create the illusion of depth by representing objects as they would appear in three-dimensional space.
Foreshortening : Learn how to foreshorten objects to create the impression that they are receding into the distance. This technique is especially crucial when working on character limbs and extremities.
Step 2: Choosing the Right Software
To convert your 2D drawings into 3D models, you'll need 3D modeling software. While there are many options available, let's focus on a few industry-standard choices:
Blender : An open-source and versatile 3D modeling tool suitable for beginners and professionals alike.
Maya : Widely used in the entertainment industry for character modeling, rigging, and animation.
ZBrush : Ideal for digital sculpting and creating intricate details on characters.
3ds Max : Known for its modeling and rendering capabilities, it's often used in architectural and product design as well.
Step 3: The Modeling Process
Now that you've chosen your software, it's time to start the modeling process. Here's a simplified overview:
Blocking In : Begin by creating a basic shape that represents the form of your character. Think of it as sculpting with virtual clay.
Refining : Refine the shape, adding more details and contours to make it resemble your 2D design closely. Pay attention to anatomical correctness if realism is your goal.
Step 4: Sculpting for Detail
If you want your 3D character to be highly detailed, digital sculpting is an essential skill. Software like ZBrush is specifically designed for this purpose. Sculpting allows you to create intricate features such as facial expressions, wrinkles, and clothing folds.
Step 5: Texturing
Texturing is a vital step in the 3D modeling process, where textures are applied to enhance the visual appeal of your model by adding color, depth, and surface properties. This phase may include the application of painted textures or the utilization of image-based textures, providing a more realistic and detailed appearance to the 3D model. Texturing not only brings vibrant colors to the surfaces but also contributes to the overall visual richness, ensuring a more immersive and engaging experience for viewers. It's an artistic process that plays a crucial role in bringing your 3D creations to life.

In this section, we'll explore the intriguing question: "Is it possible to turn a 2D image into a 3D model?" The answer is a resounding yes, and we'll delve into the creative and technical processes that make this transformation possible.
Raster to 3D: The Process Unveiled
Step 1: Choosing the Right Image
The first step in converting a 2D image into a 3D model is selecting the right source image. Ideally, you'll want a high-resolution image that captures your character or subject from multiple angles. This provides valuable visual information for the 3D modeling process.
Step 2: Image Tracing and Reference
Many 3D modeling software packages offer image tracing functionality. This allows you to import your 2D image and use it as a reference while creating the 3D model. You can trace the contours, outlines, and major features of your character directly onto the 3D workspace.
Step 3: Extrusion and Sculpting
Once you have the basic outline traced, you can start the extrusion process. Extrusion involves pulling or pushing parts of the flat image into the third dimension. It's like giving thickness to a piece of paper cutout. You can use sculpting tools to refine the shape and add details.
Step 4: Creating Depth and Texture
Adding depth and texture is crucial to making your 3D model resemble the 2D image closely. Pay attention to fine details like facial features, clothing folds, and surface textures. This is where your artistic skills come into play, as you aim to capture the essence of your character.
Challenges and Limitations
While turning 2D images into 3D models is indeed possible, it's essential to be aware of the challenges and limitations:
Quality of Source Image : The quality of your 3D model heavily depends on the quality of the source image. Low-resolution images may result in less detailed 3D models.
Artistic Interpretation : Converting 2D images to 3D involves artistic interpretation. You may need to make decisions about details that aren't present in the source image.
Complexity : Highly detailed or intricate 2D images can be challenging to convert accurately, especially for beginners.
Originality : While this method is valuable for recreating existing 2D art in 3D, creating entirely original 3D characters often requires starting from scratch.
Tips and Tricks
To achieve the best results when turning 2D images into 3D models:
Use High-Quality Images : Start with the best-quality source images you can find to ensure accuracy and detail.
Experiment and Practice : Don't be discouraged if your first attempts don't match your expectations. 3D modeling is a skill that improves with practice.
Study Anatomy : Understanding human and creature anatomy is vital for realistic character design.
Master Texturing : Learning to apply textures effectively can greatly enhance the realism of your 3D models.
In this section, we'll explore the art of making your 3D characters appear truly realistic. Answering the question, "How to make a realistic 3D character ?" is a fascinating journey that involves attention to detail, anatomy, texturing, lighting, and more.
Anatomy Matters
One of the fundamental aspects of creating realistic 3D characters is understanding anatomy. Whether you're designing humans, animals, or fantastical creatures, a solid grasp of anatomy is crucial. Here are some tips to consider:
Reference Materials : Use anatomical reference materials, such as books, photos, or 3D scans, to ensure accuracy in your character's anatomy.
Proportion : Pay close attention to proportions. Realistic characters should have properly sized body parts and features.
Study Movement : Observe how real-life subjects move. Understanding how joints work and how muscles contract during motion helps create believable animations.
Texturing for Realism
Texturing is a pivotal step in achieving realism. It involves adding textures, materials, and surface details to your 3D model. Here's how to go about it:
PBR Workflow : Consider using a Physically-Based Rendering (PBR) workflow. PBR materials mimic how light interacts with different surfaces, making your character look more realistic.

High-Resolution Textures : Use high-resolution texture maps for skin, clothing, and accessories. These maps contain detailed information about color, surface roughness, and normal information.

UV Mapping : Properly unwrap and map the UVs of your 3D model to ensure textures are applied accurately.

Mastering Lighting and Rendering
Realistic lighting plays a crucial role in bringing your 3D character to life. Consider these aspects:
Global Illumination : Utilize global illumination techniques to simulate how light bounces off surfaces, creating soft shadows and realistic lighting conditions.
HDR Lighting : High Dynamic Range (HDR) lighting provides a wide range of lighting intensities, contributing to more lifelike and dynamic scenes.
Depth of Field : Incorporate depth of field effects in your renders to simulate real-world camera focus, adding depth and realism to your scenes.
Post-Processing : Use post-processing techniques to enhance your renders. This includes color correction, depth-based effects, and adding a touch of cinematic flair.
Character Rigging and Animation
To make your realistic 3D character truly come alive, consider character rigging and animation:
Rigging : Rigging involves creating a skeleton for your character, complete with joints and controls. A well-rigged character can move realistically, enhancing its lifelike appearance.

Animation : Skillful animation brings emotions, expressions, and actions to your character. Consider hiring or collaborating with an experienced animator if animation isn't your strong suit.
Detail-Oriented Approach
Realism often lies in the details. Pay attention to small, subtle elements like facial expressions, clothing wrinkles, and hair dynamics. These details can elevate your character from being merely realistic to convincingly lifelike.
In this comprehensive guide, we've ventured into the exciting world of 3D character design from 2D drawings. From understanding the basics to turning 2D images into 3D models and bringing realism to your creations, we've explored the creative and technical aspects of this art form.
Throughout our journey, we've answered essential questions:
"How do you make a 2D design look 3D?"
"How to convert a 2D drawing into a 3D model?"
"How to make a realistic 3D character?"
We've discovered that 3D character design is a multifaceted discipline that combines artistry, technical skill, and attention to detail. It's the fusion of imagination and technology, where your creativity can come to life in the form of lifelike characters.
Remember, mastering 3D character design takes time and practice. Whether you aspire to create characters for video games, movies, or your personal artistic endeavors, the journey is as rewarding as the destination. Every character you bring to life is a testament to your artistic vision and technical prowess.
As you continue to explore the world of 3D character design, don't forget to showcase your work proudly. Create a portfolio that reflects your skills, network with fellow artists, and seek out opportunities to collaborate and grow.
In our case studies, we've highlighted the exceptional work of the 3D Studio at Whizzy Studios . Their projects serve as a testament to what can be achieved in the realm of 3D character design. Remember that the path to success in this field involves continuous learning, innovation, and a passion for pushing the boundaries of what's possible.
So, whether you're an aspiring artist or an industry professional, take the knowledge you've gained from this guide and embark on your own creative journey. The world of 3D character design is waiting for your unique characters to come to life, adding depth and dimension to stories and experiences across various media.
Thank you for joining us on this creative exploration. We look forward to seeing your remarkable 3D character designs in the future.
Recent Posts
Why Hiring a Dedicated 3D Animator Can Take Your Project to the Next Level
Creating Engaging Characters for Kids: A Guide to Character Design in Children's Book Illustration
How to Choose the Perfect Illustrator for Your Children's Book Project
You can now generate any object from text to 3D with Alpha3D AI Model Generator. Give it a try for free >>

- AI 3D Model Generator
- Get started now
Transform text and 2D images into 3D models
It’s not magic, it’s generative AI
Featured in

Create 3D models in minutes. Up to 100x cheaper.
Creating 3D models for augmented reality (AR) is notoriously costly, laborious, and time-consuming.
Alpha3D is a generative AI-powered platform that makes it faster, cheaper, and easier for users to automatically convert text or 2D images of real-world objects into 3D models.

Generate 3D models from 2D images or text in minutes
You don’t need to be a designer to create 3D content.
Alpha3D’ s simple and user-friendly interface lets you transform 2D images or text into 3D digital assets in just a few clicks:
- Upload a 2D image of a real-life object or use text prompts as input
- Alpha3D will automatically transform your input into a 3D model
- Download and use your 3D model on any 3D, AR, VR, or metaverse platform
We work with some of the most innovative companies
How Alpha3D AI 3D Model Generator works
Pick your method for transforming your 2D images into 3D assets

Text to 3D model generation
Generate 3D models from text prompts in minutes. You can download the model in glb format and use it immediately in any 3D design tool or XR environment.
2D image to 3D model generation
Generate 3D models from single shot 2D images in minutes. You can download the model in glb format and use it immediately in any 3D design tool or XR environment.
Please note, this AI model is currently trained on two object categories: shoes and furniture.

Clients about us

Alexis Moulard
Alpha3D makes 3D model creation such a breeze. I don’t know much about 3D modeling but with Alpha3D’s light-touch plug-and-play solution, I don’t have to . We just send Alpha3D flat 2D images and receive high-quality, ready-to-use 3D assets. Alpha3D is the one-stop shop for creating immersive experiences at scale.

Mike Charalambous
Alpha3D has been a key strategic partner for Threedium. Their ability to rapidly turn images into 3D assets helps us scale asset creation for all our major enterprise users. We aim to be working closely with Alpha3D for years to come to further push boundaries in asset creation and support them in introducing the best AI tech in turning 2D images into hyper-realistic 3D assets.

Sergey Arkhangelskiy
Alpha3D allows us to generate high-quality and accurate 3D models in a short amount of time, helping us speed up our processes significantly. The user-friendly interface is easy to navigate for anyone on our team. Overall, we found Alpha3D to be extremely valuable and would recommend it to anyone who needs to generate high-quality 3D content at scale.
Why Alpha3D
Create 3D content automatically at scale without any physical scanning or a team of 3D designers, to speed up processes and go to market faster.
Up to 100x cheaper
Alpha3D is a budget-friendly solution for creating 3D content. Save up to 100 times on manual labor and other costly resources per model, compared to traditional 3D creation methods.
No 3D modeling expertise needed
You don’t need to be a designer to create 3D content. Alpha3D makes it easy for anyone to transform text or 2D images into 3D digital assets.
- PRO Courses Guides New Tech Help Pro Expert Videos About wikiHow Pro Upgrade Sign In
- EDIT Edit this Article
- EXPLORE Tech Help Pro About Us Random Article Quizzes Request a New Article Community Dashboard This Or That Game Popular Categories Arts and Entertainment Artwork Books Movies Computers and Electronics Computers Phone Skills Technology Hacks Health Men's Health Mental Health Women's Health Relationships Dating Love Relationship Issues Hobbies and Crafts Crafts Drawing Games Education & Communication Communication Skills Personal Development Studying Personal Care and Style Fashion Hair Care Personal Hygiene Youth Personal Care School Stuff Dating All Categories Arts and Entertainment Finance and Business Home and Garden Relationship Quizzes Cars & Other Vehicles Food and Entertaining Personal Care and Style Sports and Fitness Computers and Electronics Health Pets and Animals Travel Education & Communication Hobbies and Crafts Philosophy and Religion Work World Family Life Holidays and Traditions Relationships Youth
- Browse Articles
- Learn Something New
- Quizzes Hot
- This Or That Game New
- Train Your Brain
- Explore More
- Support wikiHow
- About wikiHow
- Log in / Sign up
- Computers and Electronics
How to Turn a 2D Image Into 3D Using Blender
Last Updated: May 23, 2023 Fact Checked
This article was co-authored by wikiHow staff writer, Travis Boylls . Travis Boylls is a Technology Writer and Editor for wikiHow. Travis has experience writing technology-related articles, providing software customer service, and in graphic design. He specializes in Windows, macOS, Android, iOS, and Linux platforms. He studied graphic design at Pikes Peak Community College. This article has been fact-checked, ensuring the accuracy of any cited facts and confirming the authority of its sources. This article has been viewed 292,423 times. Learn more...
Simple 2D images, such as a logo, can easily be converted into 3D images in Blender 3D. The easiest way to do this is to first convert the image into a vector image using a vector graphics editor such as Adobe Illustrator, or Inkscape. This wikiHow teaches you how to convert an image into a vector image, and then convert the vector image into a 3D mesh using Blender 3D.
Converting an Image to SVG using Adobe Illustrator

- Adobe Illustrator requires a subscription to Creative Cloud to download and use. You can sign up for a free trial at adobe.com or you can use Inkscape , which is a free alternative to Adobe Illustrator.

- Click File in the menu bar at the top.
- Click New .
- Type a name for the project next to "Name:"

- Click File in the menu bar at the top of the page.
- Click Place .
- Select the image you want to place.

- Click Object .
- Click Live Trace .
- Click Tracing Options .

- In Color mode, you can use the box next to "Max Color" to select the maximum number of colors the image will create. Ideally, the image shouldn't have more than 2 or 3 colors.

- If the edges of the image still don't quite match the original, you can try decreasing the options for "Path Fitting", "Minimum Area", and "Corner Angles."

- Click Object in the menu at the top.
- Click Live Trace
- Click Expand .

- Click Save As .
- Type a name for the image next to "File Name".
- Use the drop-down menu next to "Save as Type" to select SVG .
Converting an Image to SVG Using Inkscape

- You can download Inkscape for free here .

- Click File .
- Click Import
- Select the image you want to convert into SVG.
- Click Open .

- Click Path .
- Click Trace Bitmap .

- Edge Cutoff: This option uses the shade of a pixel to determine if it should be traced as part of the shape. Use the threshold box next to this option to increase the threshold to include more shades. The image output will be in black and white.
- Edge Detection: This option uses the brightness of the pixels to determine if they should be part of the shape. Use the threshold box next to this option to increase the threshold to include more brighter shades in the image. The image output will be in black and white.
- Color quantization: This option uses colors to determine the shape. Use the number of colors option to specify how many colors should be included in the shape. The output will be a black and white image.
- Brightness Steps: This option produces multiple shapes based on the brightness of the pixels.
- Colors: This option produces multiple shapes based on color.
- Greyscale: This option is similar to color, but outputs shapes in shades of grey instead of color.

- Suppress Speckles: Check this option to ignore small spots in the image. Use the box next to "Size" to specify the size in pixels of the spots that should be ignored.
- Smooth Corners: Check this option to smooth out sharp corners. Use the box next to "Threshold" to specify how sharp the corners that are to be smoothed out should be.
- Optimize Paths: Check this option to produce a shape using the smallest amount of bezier curves possible.

- At this point, you may notice the traced object doesn't look quite right. If so, just delete it and adjust the Trace Bitmap settings to create a new object.

- Click Save .
Converting an SVG to a 3D Mesh In Blender 3D

- Blender 3D is a free 3D animation and editing suite. You can download Blender 3D from blender.org

- Click View in the upper-left corner of the 3D viewport.
- Click Viewpoint .
- Click Top .

- Click Import .
- Click Scalable Vector Graphic (.svg) .
- Select the SVG file you want to import.
- Click Import SVG in the lower-left corner.

- You can also press G on your keyboard and drag your mouse to move an object.

- You can also press S on your keyboard and drag the mouse to change the size of an object.
- You may need to move the object back to the center when you are finished.

- Click and drag a box around the SVG to select it.

- Click Convert to .
- Click Mesh from Curve/Meta/Surf/Text .

- Click View at the top of the 3D viewport.
- Click Viewport .
- Click Front , Back , Right or Left .

- Click Mesh at the top of the 3D viewport.
- Click Extrude .
- Click Extrude faces .
- Drag the mouse to the desired height.

- Base color: Click the colored box next to Base color and then use the color wheel under the "RGB" tab to select the base color of the object.
- Metallic: Use the slider bar next to "Metallic" to adjust the reflective (mirror) properties of the object.
- Specular: Use the slider bar next to "Specular" to adjust how intense the reflective properties of the object are.
- Roughness: Use the slider bar next to "Roughness" to adjust how rough or smooth the reflective properties of the object are.

- Type a name for the blender file in the field at the bottom of the window.
Community Q&A
- Add a texture to your object to make it look more interesting. Thanks Helpful 0 Not Helpful 0
- In addition to extruding the faces of your objects, you can also bevel them to give them a more rounded look. Thanks Helpful 0 Not Helpful 0

Things You'll Need
- A simple flat image.
- Inkscape or Adobe Illustrator.
- Blender 3D.
You Might Also Like

- ↑ https://www.adobe.com/express/feature/image/convert/svg
- ↑ https://helpx.adobe.com/illustrator/using/image-trace.html
- ↑ https://inkscape.org/doc/tutorials/tracing/tutorial-tracing.html
About This Article

1. Import a simple 2D image in Adobe Illustrator or Inkscape. 2. Use Live Trace or Bitmap Trace to convert the image into a vector graphic. 3. Save the vector graphic in SVG format. 4. Open Blender 3D. 5. Import the SVG file into Blender 3D. 6. Select the SVG curves and convert them to a mesh. 7. Select the Mesh and switch to Edit Mode. 8. Extrude the faces of the mesh. 9. Switch back to object mode and apply material properties to the mesh. 10. Save your work. Did this summary help you? Yes No
- Send fan mail to authors
Is this article up to date?

Featured Articles

Trending Articles

Watch Articles

- Terms of Use
- Privacy Policy
- Do Not Sell or Share My Info
- Not Selling Info
wikiHow Tech Help Pro:
Level up your tech skills and stay ahead of the curve
- Is a New iPad Pro Coming Soon?
- Get It Now: Spring Tech Deals at Amazon
How to Turn a 2D Image or Logo Into a 3D Model
Using powerful free programs Inkscape and Autodesk Fusion 360
:max_bytes(150000):strip_icc():format(webp)/TJMcCue-d2fb065c270d42ef8758ac4804e1aa46.jpg "how to make 2d art into 3d")
- Guide To Buying a New Printer
- The Quick Guide to Webcams
- Keyboards & Mice
- Raspberry Pi
What to Know
- Create an SVG file in Inkscape: Select an image file, select Path > Trace Bitmap , set parameters, then save the traced image.
- Then, import the SVG file into Autodesk Fusion 360. Open Autodesk Fusion 360, select Create , choose Create Sketch , and click the plane.
- Go to Insert > Insert SVG > Select SVG file , open your SGV file, select OK > Finish Sketch > Create > Extrude , and follow the prompts.
This article explains how to use Inkscape to turn a JPEG or another image into SVG format and then import it into CAD software, such as the free Autodesk Fusion 360.
The Process of Turning 2D Images Into 3D Models
The first part of this process involves turning a JPEG image, or an image in another file format, into the SVG (Scalable Vector Graphics) format. This type of file is also known as a vector image . A vector image is a 2D geometric representation of a picture.
After you create the SVG file, import it into CAD software, where it automatically becomes a sketch. This process eliminates the need for detailed tracing.
The image should have clearly defined edges and lots of solid colors. A good high-resolution photo, simple sketches, or tattoo-like images work well.
You can also use this method to work with more complex images. However, you need some intermediate knowledge of Inkscape.
Create an SVG File With Inkscape
The first step in turning a 2D image into a 3D model is to create an SVG file. To follow along with this tutorial, download and work with a copy of the Inkscape logo as an example.
Download the Inkscape logo and save the image to your computer.
Download Inkscape from the Inkscape website, then open the application.
Inkscape is available for Windows , macOS , and Linux .
Select File > Import .
Select the Inkscape logo you saved, then select OK .
The Inkscape logo is now in the Inkscape application, ready to be modified.
Select the Lock icon so that width and height will be changed proportionally.
Make sure units are set to mm (millimeters) or in (inches), and then change the image size to whatever works for your printer.
Select the image and then select Path > Trace Bitmap .
Set optimal parameters for the trace. For this simple black-and-white image, select Edge Detection , then select Update . Leave the other default settings.
These settings depend on the complexity of the image. Experiment with the settings and learn what each setting does. Be sure to try other images, as well.
A trace of the image appears in the window. Select OK .
Try different settings, then select Update to see the effect.
Drag the original image away from the work area and select Delete , leaving behind only the traced image.
Go to File > Save and save the image as an SVG file.
Import the Image Into CAD Software
The next part of the process of turning a 2D image into a 3D model involves importing the SVG file you created into CAD software. Use any CAD software you're comfortable with. This tutorial uses Autodesk Fusion 360 , which is free for personal use. You'll need a free Autodesk account to get started.
Open Autodesk Fusion 360, select the Create button, then choose Create Sketch to start a new sketch.
Select a plane on the workspace.
Select the Insert button on the menu bar, then select Insert SVG .
In the Insert SVG toolbox window, choose the Select SVG file button.
Find the SVG file you created earlier, then select Open .
Select OK on the Insert SVG tool window to insert the drawing into the sketch.
Choose Finish Sketch from the Sketch Palette.
You now have a trace of the image in a 3D CAD sketch without having to do any time-consuming, manual tracing.
From the ribbon menu, select Create > Extrude .
Select the profile you want to plot.
Enter an extrusion height, such as .2 mm, and then select OK to complete the extrusion process.
For extrusion height, refer to your printer's default printing height.
Right-click the top-level object in your Fusion document from the menu on the left, and then select Save as STL .
In the confirmation dialog box, select OK .
Choose a save location, and then select Save .
You've created a 3D model from a 2D image with the help of the free tools Inkscape and Autodesk Fusion 360.
Multiple-colored SVGs are more interesting. Save an SVG file with multiple layers of sketches, with a sketch for each color.
The techniques described in this article are courtesy of expert 3D modeler James Alday of ImmersedN3D . This method works best with simple sketches or images. For more complex images, you'll need some intermediate knowledge of Inkscape not covered in this tutorial.
Get the Latest Tech News Delivered Every Day
- Top 4 Free CAD Programs for 2024
- How to Insert & Paint 3D Models in Paint 3D
- What Is a DWG File?
- How to Use Image Trace in Adobe Illustrator CC
- Turn a 2D Drawing Into 3D Art in Paint 3D
- What's the Best Software for Logo Design?
- What Is an IGS File?
- What Is an STP File?
- How to Create a 3D Bump Map Using Photoshop
- The 13 Best Free PDF Editors (March 2024)
- 11 Best Free Photo Editors
- What Is an X_T File?
- The 13 Best iPad Drawing Apps of 2024
- Top 3D Printer Apps for Desktop and Mobile Users
- What Is an RVT File?
- Using Inkscape to Make Templates for Cutting Machines
How to Turn a 2D Shape into 3D in Paint 3D
When building projects in Paint 3D, I often find myself wishing I could turn a simple 2D doodle into a 3D object. There’s no direct way to do this, at least not yet, but there is a hack that allows you to cobble together something resembling a workaround. Granted, it only works for simple shapes and doodles (unless you’re a talented artist with a lot of time), but if you have a stylus (or a steady finger), there is a way to turn your 2D shape 3D by tracing your initial creation.

1. Open Paint 3D and click New to start a new project.

2. Draw a shape, or doodle . Alternatively, you can add one to the project by dragging the file in from a separate window.

3. Click the 3D shapes icon in the menu bar.

4. If you want to match the color, click on the eyedropper tool and touch the color you’d like to match in the 2D doodle.

5. Click the shape you’d like to replicate from the sidebar . Since our emoji face is a circle, we’re going to select the 3D sphere, but you can also choose one of the 3D doodle options below and trace the shape with a finger or stylus (if you have a touchscreen device) or your mouse.

6. Click the 2D shape on the artboard to place it, and drag to resize it until it’s similar to the 2D shape or doodle. Hold the shift button while dragging to resize all sides equally.
Stay in the know with Laptop Mag
Get our in-depth reviews, helpful tips, great deals, and the biggest news stories delivered to your inbox.

7. Select the 2D object by clicking outside the shape and dragging the box over it .

8. Choose Make 3D from the sidebar .

9. Click Make Sticker from the sidebar .

10. Drag the sticker on to the 3D shape . From here, you’ll just need to resize and reposition until it fits the shape.

- How to Crop the Background Out of an Image in Paint 3D
- How to Remove Paint 3D from Windows 10
- How to Create a 3D Shape in Paint 3D
How to see your Spotify Wrapped 2023 and share your most-played songs
Prime Big Deal Days arrives early with this free Amazon Music Unlimited offer
What is an AI PC? Intel revealed Microsoft's requirements for next-gen laptops
Most Popular
By Momo Tabari 26 March 2024
By Rael Hornby 26 March 2024
By Sean Riley 26 March 2024
By Sarah Chaney 26 March 2024
By Hilda Scott 25 March 2024
By Momo Tabari 25 March 2024
By Rael Hornby 25 March 2024
By Sarah Chaney 25 March 2024
By Hilda Scott 22 March 2024
By Sarah Chaney 22 March 2024
- 2 What is an AI PC? Intel revealed Microsoft's requirements for next-gen laptops
- 3 Exclusive: iDrive Backup adds affordable Google cloud backup — $20 for 10TB!
- 4 iPhone users beware: 'Reset password' phishing attacks on the rise
- 5 Wow! Alienware 34 curved QD-OLED gaming monitor gets $200 price cut in Dell TechFest sale
Game-ready on-demand 3D assets
Kaedim's machine learning and in-house art team combine to deliver production-quality assets in minutes.

The world's best game studios ship 10x faster with Kaedim

How Kaedim works

Upload an image or description
Submit an image or description of the model you need

Kaedim's AI generates your model
Kaedim's pipeline kicks off, creating a model based on your inputs

Artist review and refinement
A Kaedim artist reviews the output and refines it for optimal quality using in-house tools

Download your model minutes later
Minutes later, you're notified the model is complete and ready for download
Models Generated
Artist Hours Saved
Saving game studios time and money
The only 3d marketplace that lets you generate on the spot.
Choose from a diverse selection of 10,000 assets. We guarantee that all models are 100% ready to use. No n-gons and broken meshes.
- Over 10,000 assets
- Easy to edit
Production-ready models
Kaedim is optimized for usable, production-ready 3D assets. We've worked closely with 3D artists to ensure outputs are up to industry standards.

Proud to work with leaders in both gaming and AI
Kaedim is backed by the best in games and AI. Together we're transforming 3D content creation pipelines for games and beyond.

Join the hundreds of studios creating 3D assets on-demand with Kaedim

Kaedim saves us 20x over a traditional pipeline... [it] allows us to build a 20x bigger world in 3D. ”
Little Buffalo Studios

“The 'Image to 3D' feature was a game-changer , transforming weeks-long processes into mere hours.”
Mathew McGrane
Chief Design Officer, Elora

“ [Our] workflow is much much faster , allowing us to make larger, more complex scenes...”
James Finlay
Founder & Creative Director, Myth Studio
" Kaedim has made going 3D possible for me when I didn't know where to start! Not only am I generating awesome outputs, but I'm also learning 3D techniques as I go along. I can't imagine life without it. "
" Quite amazed at these results, given the source images aren't ideal. Only needed a few edits and it was ready to go. "
Blue Sky Studios
Technical Director
" Our 3D artist is doing work that would have taken 3 hours in 10 minutes. Getting game ready assets of complex models in the amount of time it takes to enjoy a sandwich! "
Boom Interactive
" We're building a creativity game for kids based on Kaedim's technology, and it quite simply wouldn't have been possible before Kaedim. "
" Super impressed by this. I am not a 3D modeler nor an artist and I have no idea how you guys possibly created this. It's such an incredible tool. "
" This tool is amazing, I can't believe how perfect the models come out! Massive props to the team who worked on the ML model and setup the neural network, I've done quite a bit with AI but never got close to something like this! "
" I love how it's broken up into separate objects to make it super easy to colour in Blender! So impressive to get this from just one quick sketch it's going to save so much time making 3D assets for my games. "
Need more out of Kaedim?
Let's talk enterprise..
- Advanced Security
- Tailored Integrations
- Bespoke Styles
Custom features and integrations
Custom pricing, personalized support and training, accelerate your 3d team.
Escape the headache of building every game asset from scratch. Kaedim lets your team focus on what they do best.

3D objects from 2D images
Production-ready models in minutes.

Scale your team instantly
Plugins for your favorite tools.

Documentation
Case Studies
Privacy Policy
© 2023 Kaedim Inc. All rights reserved.
This Tool Can Turn 2D Pixel Art Into 3D Models
3D modeling has a steep learning curve, and KenShape hopes to flatten it somewhat.
The internet is populated with so many incredible digital artists. Some of them are lucky enough to be involved in video game development, as asset artists.
Kenney Vleugels, known to most online as simply "Kenney", is an asset artist from the Netherlands that has been creating free-to-use video game assets for game developers everywhere for over a decade now.
While that's an incredible feat in it of itself, he just might have outdone himself with his newest release.
From 2D to 3D With a Few Clicks
On Wednesday, game asset artist Kenney Vleugels released KenShape, a new tool that turns your 2D pixel art into 3D models.
Download: Kenshape for Windows, Linux ($3.99)
It's as easy and groundbreaking as it sounds: you first create your 2D pixel artwork, then you set the depth for each pixel. KenShape will then generate an extruded 3D model based on your settings.
Never made pixel art before? Check out our ultimate beginner's guide to creating pixel art .
Vleugels took to Twitter in January with a video of a quick prototype of a new tool he was working on. At the time, he considered scrapping the idea—unsure if anyone would find it useful. To his delightful surprise, he was instead met with overwhelmingly positive reactions, and thus decided to continue development.
How KenShape Came to Be
In an interview with MUO, Vleugels revealed that he conceptualized KenShape while thinking about his usual creative process.
"When creating game assets I often start with simple geometric shapes and mold them into the objects they're supposed to represent. I felt like the initial stage of this would be something that anyone can do and [so I] started working on some prototypes," he explained.
Vleugels' first few prototypes were similar to other existing 3D modeling software , but he ultimately decided to take a step back and turn KenShape into something simpler for users that struggle with the third dimension.
When asked if KenShape will see any new features, Vleugels confirmed that he was already working on the most requested features, as well as some basic functionalities that the tool is currently missing:
"I'd like to improve accessibility and make sure everyone understands the software without any prior knowledge of 3D modeling or game development in general. I also want to expand on the exporting formats so people in other industries can use the software to their advantage."
Vleugels continued to explain that 3D file formats are "a mess," causing him the most trouble during development more than anything else. He said that before the addition of more exporting formats, KenShape is more likely to see support for 4K screens, or better yet: an undo/redo button.
3D Modeling Made Easy With KenShape
3D modeling is a lot harder than it looks. You may think that the jump from 2D to 3D is simply a matter of adding one more dimension, but more difficulties that come with that than most people will realize.
The game development community (especially indie developers) should be thrilled that we now have KenShape—a 3D modelling tool that makes asset creation a piece of cake. Of course, its initial release is fairly limited, but if development continues as planned, more folks are sure to pay attention.
Convert 2D PNG/JPG Images to 3D STL Mesh files!
Use our free and fast online tool to convert your PNG and JPG 2D heightmap images or logo into 3D STL (Standard Triangle Language) mesh/model files suitable for printing with a 3D printer , CNC machining or for loading into your favourite 3D editing package.
Click on the " Upload a file " button above to begin. Your PNG/JPG image/ heightmap should fit within 800 x 800 pixels , if it is larger than this the image will be resized to fit within this size. Once you submit your image it will be processed as quickly as possible. More complicated images may take longer than others so please be patient. For more information about how your image is converted into the final 3D model please see the section below How Does it Work? .
How to Convert your JPG or PNG to STL Online?
Here are three simple steps to create an STL file from a JPG or PNG file.
Upload a JPG or PNG
Click the "Upload a File" button and select an image file (PNG or JPG) to upload. The maximum file size is 100MB.
Select your Options
Set the dimensions and other options, and click the "Convert to STL" button to convert your JPG or PNG to STL.
Download your STL
Click the download link once completed to receive your STL file.
Frequently Asked Questions
How can i convert my png file to stl.
First click the "Upload..." button, select your PNG file to upload. Select any configuration options. When the PNG to STL conversion has completed, you can download your STL file straight away.
How long does it take to convert my PNG to STL?
We aim to process all PNG to STL conversions as quickly as possible, this usually takes around 5 seconds but can be more for larger more complex files so please be patient.
How accurate is the PNG to STL conversion?
We aim to create the most accurate conversions with our tools. Our tools are under constant development with new features and improvements being added every week.
Is it safe to convert my PNG to STL on ImageToStl.com?
Yes, of course! We do not store the PNG file you submit to us. The resulting STL file, once created is deleted 15 minutes after upload and the download link will expire after this time.
Can I convert PNG to STL on Windows, Linux, Android, iOS or Mac OS?
Yes! Our PNG to STL tool will run on any system with a modern web browser. No specialist software is needed to run any of our conversion tools.
What if I am using an Ad Blocker, will that affect things?
Yes. Although you can use an Ad Blocker, if you like our PNG conversion tool please consider white-listing our site. When an Ad Blocker is enabled there are some conversion limits on some of our tools and processing/conversion times will be longer.
What is the maximum PNG image resolution I can upload?
The PNG image you upload can be any size, however our tool will resize it to a maximum of 800x800 pixels for normal users and for premium subscription holders this is increased to a maximum of 1200x1200 pixels.
What STL formats can I convert to?
Our tool will save all STL files in binary format. Optionally, our tool will allow you to save to the non-standard color STL format.
How Does it Work?
Standard mode (heightmap).
The process is simple: After converting your image to greyscale, in Standard mode, our tool examines your 2D PNG or JPG ( heightmap ) image and based on the brightness of each pixel, will create a corresponding "3D" pixel where the height of the pixel is determined by the pixel luminosity. A black pixel will have a height of 0mm and not be included in the final 3D generated model, however a white pixel will have a height that you specify once your image is uploaded.
When using the Extrude Color mode the tool works in the same way as the Standard mode however the way the tool interprets the pixel color information changes and also the final generated model will contain the color data overlayed onto the model. Please see our Generate Full Color 3D Heightmap Models From Images article which explains this process in more detail.
Extrude Mode
In Extrude mode our tool traces around the edges found in your image and creates simple but clean 3D models from the image, great for simple images. The Extrude Color mode also creates clean 3D models however instead of varying the model height based on the pixel brightness, the pixel color is used directly in the final model to provide color.

The 3D STL file created by our tool can be printed with a 3D printer or if you would like to process the model further, it can be loaded into most 3D mesh editing packages such as Blender etc. For 3D videogame/application developers this is a useful tool for creating 3D mesh files from heightmap images for use in your games and other 3D applications.
LATEST NEWS

LATEST TUTORIALS

© 2024 ImageToStl. Convert your PNG and JPG Files to 3D STL files.
Tech Tip: Turning Your 2D Drawings into 3D
If you started your design career on a 2D CAD platform, then chances are you have hundreds (if not thousands) of DWG files. Most of these may be obsolete, from products you stopped making years ago, but some may still be relevant today and you may want to reuse them in your 3D designs.
It’s definitely a worthwhile exercise to recreate your most frequently used 2D drawings in 3D, so you can reuse them, check that they fit correctly, make modifications quickly and calculate accurate assembly mass properties – not to mention many other beneficial uses.
In the video above, I have taken a basic 2D drawing and converted it to 3D in a few simple steps in Onshape. If you have a lot of prismatic parts to convert, you can apply this technique yourself. For more complex parts, you could use this technique to get you started or get you 20-to-80% there, before having to make a few final additions to complete your design.
If you have a common set of 2D parts that you use regularly, then you should convert them now. Otherwise, you should wait until you need them so that you don’t waste time remodeling parts that you may never use again. Alternatively, there are many bureaus that offer 2D-to-3D model conversion, but it can be costly – and again, you may pay to have some models created that you may never use.
Another advantage of converting old 2D drawings, especially those that you are very familiar with, is that it’s a great way to learn 3D modeling. And if you get stuck, you can always check out our numerous CAD tutorials or ask questions in the Onshape Forums .
Suggested Content
Level Up Your Art: How to Make 2D Look 3D
Have you ever wondered how to make a 2D image look 3D? It’s a common question among graphic designers, artists, and photographers who want to add depth and dimension to their work. Fortunately, there are several techniques and tools available that can help you achieve this effect.
One of the simplest ways to make a 2D image look 3D is to use software like Photoshop or Paint 3D. These programs allow you to apply various effects and filters to your images, such as 3D rotation, layer stacking, and perspective distortion. By experimenting with these tools, you can create the illusion of depth and dimension in your 2D images. Another option is to use specialized 2D to 3D conversion software. These programs analyze your 2D images and automatically generate a 3D model based on the visual data. While this approach can be more complex and time-consuming, it can also produce more realistic and accurate 3D images.
Table of Contents
Understanding 2D and 3D
What is 2d.
2D stands for two-dimensional. In the world of graphics, 2D refers to flat images that have only two dimensions: length and width. These images are often used in print media, such as newspapers, magazines, and books. Examples of 2D shapes include circles, triangles, squares, rectangles, pentagons, and hexagons.
In 2D art, artists use techniques like shading, perspective, and color to create the illusion of depth and dimension. However, these techniques only create the appearance of depth, and the images remain flat.
What is 3D?
3D stands for three-dimensional. In the world of graphics, 3D refers to objects that have three dimensions: length, width, and height. These objects are often used in computer graphics, video games, and movies. Examples of 3D objects include spheres, cubes, pyramids, and cylinders.
In 3D art, artists use software to create virtual objects that can be viewed from any angle. These objects can be rotated, scaled, and moved in three-dimensional space. By using lighting, texture, and shading, artists can create the illusion of depth and dimension.
The key difference between 2D and 3D is the presence of depth. 2D images are flat and lack depth, while 3D objects have depth and can be viewed from different angles. Understanding the difference between 2D and 3D is important when trying to create the illusion of depth in 2D art.
Creating Depth in 2D
When working with 2D images, it can be challenging to create a sense of depth and dimensionality. However, there are several techniques you can use to make your 2D images look more 3D. In this section, we will explore three methods for creating depth in 2D: adding shadows, using overlapping shapes, and using perspective.
Adding Shadows
One of the easiest ways to create depth in a 2D image is to add shadows. Shadows can help give the illusion of depth by creating the impression that objects are casting shadows on one another. To add shadows to your 2D images, you can use a variety of techniques, including drop shadows, inner shadows, and layer blending modes.
Using Overlapping Shapes
Another effective way to create depth in a 2D image is to use overlapping shapes. Overlapping shapes can help create the illusion that objects are in front of or behind one another, giving the image a sense of depth. When using overlapping shapes, it is important to consider the placement and size of each shape carefully to ensure that the image looks natural and believable.
Using Perspective
Finally, using perspective is another powerful way to create depth in a 2D image. Perspective is the way that objects appear to get smaller as they get further away from the viewer. By using perspective, you can create the illusion that objects are receding into the distance, giving your image a sense of depth and dimensionality.
To use perspective in your 2D images, you can use a variety of techniques, including vanishing points, horizon lines, and foreshortening. By carefully considering the placement and size of objects in your image, you can create a compelling and believable sense of depth.
In conclusion, creating depth in a 2D image is an essential skill for any artist or designer. By using techniques like adding shadows, using overlapping shapes, and using perspective, you can create images that look more three-dimensional and engaging. With practice and experimentation, you can master these techniques and take your 2D images to the next level.
Color and Lighting
Creating the illusion of depth in 2D artwork requires a combination of techniques, including the use of color and lighting. These elements work together to create the illusion of three-dimensional space on a two-dimensional surface. Here are some tips for using color and lighting to make your 2D art look more three-dimensional.
Using Light and Shadow
One of the most effective ways to create the illusion of depth is through the use of light and shadow. By adding shadows to your artwork, you can create the impression of objects casting shadows on other objects. This can help to create a sense of depth and volume.
When using light and shadow, it’s important to consider the direction of the light source. Light sources can come from any direction, but it’s important to be consistent with the direction of the light throughout your artwork. This will help to create a more convincing sense of space.
Using Color Gradients
Another way to create the illusion of depth is through the use of color gradients. By using gradients, you can create the impression of objects appearing to recede into the background or coming forward in the foreground.
To create a gradient, choose two colors and blend them together gradually. This can be done using a gradient tool in your art software or by manually blending the colors together. By using lighter colors in the foreground and darker colors in the background, you can create the impression of depth and volume.
Using Highlights
Finally, highlights can be used to create the impression of shiny or reflective surfaces. By adding highlights to certain areas of your artwork, you can create the impression of light reflecting off of surfaces.
When adding highlights, it’s important to consider the direction of the light source. Highlights should be added to areas that would naturally catch the light, such as the tops of objects or the edges of surfaces.
By using a combination of light and shadow, color gradients, and highlights, you can create the illusion of depth and volume in your 2D artwork. Experiment with these techniques to find the right balance for your artwork and create a more convincing sense of space.
Textures and Patterns
Textures and patterns are essential elements in creating the illusion of depth and dimension in 2D objects. By adding texture and patterns to your designs, you can create a more realistic and visually appealing 3D effect.
Adding Texture to 2D Objects
One way to add texture to your 2D objects is by using a variety of brush strokes and techniques. This can be achieved by using different brush types, such as a dry brush or a sponge brush, to create a textured effect on your design. You can also experiment with different brush sizes and opacity levels to create a more realistic texture.
Another way to add texture is by using photographs or scanned textures. You can import these textures into your design software and apply them to your 2D objects. Be sure to adjust the scale and opacity of the texture to achieve the desired effect.
Using Patterns to Create Depth
Patterns can also be used to create the illusion of depth in your 2D designs. By using patterns with varying sizes and shapes, you can create a sense of depth and dimensionality. For example, you can use a repeating pattern of circles, gradually increasing in size, to create the effect of a sphere.
You can also use patterns to create the illusion of light and shadow. By using patterns with varying levels of transparency, you can create the effect of light passing through an object, or the cast shadow of an object.
In conclusion, by incorporating textures and patterns into your 2D designs, you can create a more realistic and visually appealing 3D effect. Experiment with different techniques and tools to find the best approach for your specific design needs.
Final Touches
Once you have created your 2D graphics and transformed them into 3D, it’s time to add the final touches that will make your images look more realistic and visually appealing. Here are some techniques you can use to give your 2D graphics a 3D look.
Adding Details
Adding details is an essential part of making your 2D graphics look 3D. You can add details such as textures, shadows, highlights, and reflections to give your graphics a more realistic look. Textures can be added to surfaces to make them look more like real-world materials. Shadows can be added to create depth and dimension. Highlights and reflections can be added to make surfaces look shiny and reflective.
Using Blur and Focus
Using blur and focus can help make your 2D graphics look more 3D. You can use blur to create depth of field, which is the effect of having some parts of the image in focus and others out of focus. This can be used to simulate the way our eyes focus on objects in the real world. You can also use focus to draw attention to specific parts of the image. By blurring the background and keeping the foreground in focus, you can make the foreground stand out more.
Adding Lighting
Lighting is crucial for creating a 3D look in your 2D graphics. You can add lighting to create shadows and highlights, which can give your graphics a more realistic look. You can also use lighting to create a sense of depth and dimension. By adding light sources from different angles, you can create shadows that make objects look like they are popping out of the screen.
In conclusion, adding details, using blur and focus, and adding lighting are all effective techniques for making your 2D graphics look more 3D. By using these techniques, you can create graphics that look more realistic and visually appealing.
Related posts:
- How Much for a 3D Printer: A Pricing Guide for Beginners
- How to Use Crest 3D White Strips: A Step-by-Step Guide
- What Can You Make with a 3D Printer: A Comprehensive Guide
- Create Stunning 3D Models: A Step-by-Step Guide
Recent Posts

- 3D Guides 1,766
- Components 4
- Electronics 20
There’s no content to show here yet.
Bring 3D tools into your 2D art
Learn how to incorporate 3D posing software into your 2D painting process, helping you to save time without losing your edge.

People often lament that the 'magic' of the entertainment industry, a market in which comics reside fairly perilously, dissipates when you become aware of how it is achieved. Indeed, drawing professionally is a bit like being a magician: it's an instantly impressive skill; it takes years of solitary, thankless toil to master; and it often requires you to pull something out of your arse at a moment's notice. And yes, when the mechanics are exposed, it often seems considerably less supernatural – but, just like magic, the end result relies entirely on the deftness of its performer. Management of resources is simply part of the craft, not a way of cheating.
3D posing software is often similarly mislabelled as cheating. The knowledge that it's been used shatters the illusion that everything on the page has come purely from the imagination: the inference being that, so long as they had the same software, anyone could achieve the same results. Not so. The use of a mechanical technique in art only becomes an issue if the artist's lack of skill betrays it. It all comes down to the performer.
With that in mind, let's look at some of the ways to make the most of today's advanced creative resources, without giving away the prestige.
Download the accompanying resources here .
01. Getting to know the software

I use Daz 3D to compose my scenes and there are a lot of time-saving techniques that eluded me when I started out, so I'd advise familiarising yourself with the basics. Looking for answers to problems on a case-by-case basis usually works, but there are always shortcuts you would never even think to look for. A few online instructional videos, a bit of a play around to get a sense of the UI, and you should be good to go.
02. Kitbashing elements

One thing you may notice when using posing software to create scenes is that the assets available for purchase rarely fit your script requirements perfectly. Even Daz 3D's many costumes, props and sets won't cover every scenario, because the way a scene plays out often requires specific topography or architecture.
So, rather than building custom geometry in a modelling program, I try to find elements that resemble what I need and then cobble them together. My 3D scenes are just a starting point, so details don't always have to be perfect.
03. Balanced directing

It can be tempting, with the ability to manipulate the camera at will, to make every panel wild and unusual. This tends to lead to images that look good on their own, but are almost unreadable as a story. Dramatic shots work well for dramatic moments, but without the ballast of conventional visual storytelling, they lose any impact or meaning. Old-fashioned, proscenium-style storytelling still has its place, and subtle variations on this will usually serve better than going all out with your compositions.
04. Negative space

Even though I'm able to create complex backgrounds, the power of negative space can't be overstated. Negative space is basically just any space that's fairly free of detail. As such, it directs the reader's eye to anything that interrupts that space, and is usually found either around or adjacent to the image's key elements.
05. Challenging composition

Sometimes I have to juggle a lot of elements in one relatively small panel. 3D posing can help find compositions that balance all the essential information, without scenes seeming crammed and unnatural. I also usually move elements of my environments around a little, to make for a better image. If Canaletto could tweak the architectural topography of Venice, it's probably okay for me to shift a pipe in a fictional basement.
06. Creative lighting

The rendering of virtual lighting in posing software also affords opportunities for interesting use of shadow. They can be manipulated to create symbolic shapes, suggest foreboding or even dictate composition. When overused this can become visually frustrating and bring the reader out of the story. However, if exercised with care it can enhance a dramatic scene. When lighting the figure though, I have to be careful that I don't give myself a tricky drawing exercise when I get to the pencilling stage. Drawing figures in complex lighting can be a supreme test of anatomical understanding.
07. Changing lenses

Just as a filmmaker would change lens sizes for a wide-shot or an extreme close-up, I change mine for different panels. The camera options in Daz 3D enable me to do this pretty easily with a Frame Width slider. It can help create natural-looking establishing shots, spacious vistas or claustrophobic interiors. I can also use it to create a sense of unease or oddness.
08. Crowd control

Drawing group shots can be pretty unforgiving. In one panel, I may have to figure out proportions and anatomy for over a dozen characters, and I can find myself getting tired or, even worse, losing time. Throw in an unusual camera angle, and all the foreshortening complications that demands, and things start to look a bit bleak.
Using 3D to compose these types of panels can help take some of the pressure off, enabling me to focus on the visible details, rather than struggling with whole forms that will be partially obscured.
09. Formalising layouts

The fact that I'm composing my panels independently of one another can, if I'm not careful, have a detrimental effect on my overall page. It's often helpful to start with a strong, thumbnail sketch of the full page so that the principles of composition and leading-the-eye can be observed, even when dealing with one panel alone. This is one of the biggest pitfalls of working in 3D, so I try to stay as mindful of it as possible. Many's the time I've lovingly crafted a panel composition, only to find that it doesn't quite fit with the others.
10. Visual consistency
Given that the end result will always involve some level of drawing, it's important for me to be able to keep all the elements looking like they belong together. Since I'm using realistic models, I need to strive for verisimilitude in the drawing. Equally, those elements that aren't drafted from scratch must at least have the appearance of a drawing. To this end, I ink everything by hand on Bristol Board. This way, my computer-aided elements don't jar stylistically with those I've rendered independently.
11. From 3D render to 2D drawing

Render in 3D Here's my exported render for a panel. My elements are arranged exactly how I would like and I've lit the figures in such a way as to emphasise all the important information and convey drama, but ultimately the scene looks very much like a slick CG render. Other than the composition and lighting choices, there is nothing particularly special about it.

Knock back the CG I apply a Stamp filter to the image in background with a couple of different Darkness settings, each on a separate layer. This gives me some idea where my basic forms and areas of shadow will be. The filter will be enough for more geometrically straightforward background and prop elements, but everything even vaguely organic-looking must be drawn in by hand.

Ink over the line art I then print out the composite of the digital elements and practical pencil drawing in blueline, and ink it all by hand. At this stage I can make decisions about how much background detail I want to preserve, how best to render it and what elements I need to clarify.
12. Retaining depth

Two-dimensional visuals are inherently flat – so, to give my visuals a sense of dimension, I have to compensate for this in my art. It helps to think of things in terms of three distinct planes: foreground, middle-ground and background.
To distinguish each from the others, I'll usually make one predominantly white, one mostly black and one a fairly even balance of the two. The middle ground will usually contain the primary focus of the scene and so will usually require the most detail. This usually ends up being the plane with the greatest balance of tones, the other two serving to frame it by utilising negative space.
13. Economising on detail to save time

It's easy to get lulled into a false sense of security with posing software. Often I'll get to the inking stage and realise that my background is full of laborious details that now have to be carefully delineated by hand.
Owing to the fact that not everything has been drawn that way to begin with, I've frequently lost any sense of how long an image will take to render. So I now try to think as carefully as possible about how much I will really have time to ink. I also try to build in areas of solid black to help create a balanced page.
14. Draw on your traditional skills

Of all the tools at my disposal, none is more valuable than my fundamental knowledge of how to draw . It represents every aspect of my visual understanding. It's the arbiter in deciding which resources will help me most and my safety net whenever other resources fail me. It distinguishes me from those who use a similar process and enables me to communicate visually with fluency and attractiveness. It requires regular cultivation and is the product of decades of application. Without it, I would have no career. And wouldn't that be dreadful?
15. Mark-making for storytelling

Occasionally, particularly with shadowy panels that only involve backgrounds and props, I'll find that I've achieved a near-complete image with Daz 3D and Photoshop CC . In these instances, however, the lack of anything remotely organic can lead to a static-looking panel.
Thankfully, there's always something that can be done at the drawing board to help. Here, I've used some white spots to suggest falling debris, illuminated by the lights of a crashed ship. As well as livening up the image a little, this tells the viewer that the crash was recent, as well as lending a sense of environmental context and mood.
16. Incorporating other forms of reference

Daz 3D can be great for dealing with issues of complex foreshortening or composition, but the niceties of anatomy, hair, drapery and countless other elements may require an alternative.
Photo reference and anatomy books can help nail those nuances, and basic modelling programs such as SketchUp can help build custom elements quickly (although these will have to be exported separately, because they won't be compatible with most posing software). Some comic artists even mould models of recurring elements out of clay to use as live reference.
This article originally appeared in ImagineFX issue 139; buy it here !
Thank you for reading 5 articles this month* Join now for unlimited access
Enjoy your first month for just £1 / $1 / €1
*Read 5 free articles per month without a subscription
Join now for unlimited access
Try first month for just £1 / $1 / €1
Get the Creative Bloq Newsletter
Daily design news, reviews, how-tos and more, as picked by the editors.
Related articles

IMAGES
VIDEO
COMMENTS
On the right side of the screen are the two buttons we will use: Click on "Import" to bring up the Import box: Notice that one of the three formats supported is SVG, perfect for our needs. Click "Choose a file" and choose the SVG file you want to convert from flat to thick. Click Import to finish the process.
Select Canvas at the top. Drag the boxes surrounding the canvas, or manually adjust the width/height values on the right, to ensure that the canvas can support not only the 2D image but also the 3D model. Doing this makes it much easier to sample the picture so that you can apply the same colors and shapes to the 3D model.
Tinkercad is an online 3D design and modeling tool designed for beginners. It allows you to import 2D photos and convert them to 3D within a few clicks. It offers simple drag-drop functionality and is suitable for basic 3D modeling tasks. Pros. User-friendly interface. Built-in library of pre-designed objects and shapes.
Meshy is a 3D AI toolkit that enables users to effortlessly transform text or 2D images into 3D assets. Unleash your creativity with Meshy - the future of 3D content creation. ... Our AI texturing tool allows artists to choose either text prompt or 2D concept art, as well as an untextured model as input. AI will do the automatic texturing for ...
Start the program and click on the open button indicated in the image: Uploading an image into Microsoft 3D Builder to transform it into 3D. This menu allows us to load both 3D files in almost any format (stl, obj, 3mf…) and images that we want to convert to 3D models. Afterwards, we click on load image, and then we click on our image file.
Start your free trial at https://squarespace.com/marcobucci and use code MARCOBUCCI to get 10% off your first purchase!Use basic 3D modeling and texturing te...
Here is a basic guide to turning your 2D pictures into 3D images: STEP 1. Trace the outline of your drawing using the 3D Doodle tool. Advanced tip - Do a separate trace for each segment (eg arms, legs, tentacles etc) to give it more flexibility STEP 2. Place all the pieces to make sure the are in the correct position, rotation and depth.
Turn 2D Image into 3D in 15 Minutes Easy with Blender. Today, we will convert a 2D image into a 3D model using Blender 3.3.1 in this easy beginner friendly t...
Turn 2D illustrations into 3D art. By Nicola Strada. ( Computer Arts ) published 18 September 2018. Add a new dimension to your illustrations using ZBrush. My journey into making 3D art started a couple of years ago when my brother told me to try ZBrush. Since then I've got to know amazing people and talented artists to learn from and to ...
Step 3: Texture and add materials to your model in Substance 3D Painter. Once you have the right model, give it life and color. In 3D, this process is known as texturing. You can also use an asset called a material to quickly apply image data to the surface to your model. Substance 3D Painter is an excellent way to accomplish this.
Step 4: Creating Depth and Texture. Adding depth and texture is crucial to making your 3D model resemble the 2D image closely. Pay attention to fine details like facial features, clothing folds, and surface textures. This is where your artistic skills come into play, as you aim to capture the essence of your character.
🎁 Download the FREE project files here!https://som.bz/3XR4VWnTurn your 2D art into 3D! Learn how easy it is to turn 2D vector art into 3D character designs...
Create 3D models in minutes. Up to 100x cheaper. Creating 3D models for augmented reality (AR) is notoriously costly, laborious, and time-consuming. Alpha3D is a generative AI-powered platform that makes it faster, cheaper, and easier for users to automatically convert text or 2D images of real-world objects into 3D models.
The dimensions of the project do not matter. You can also create a new file using the following steps: Click File in the menu bar at the top. Click New. Type a name for the project next to "Name:" Click Ok. 3. Place the image you want to convert to an SVG.
Create an SVG File With Inkscape. The first step in turning a 2D image into a 3D model is to create an SVG file. To follow along with this tutorial, download and work with a copy of the Inkscape logo as an example. Download the Inkscape logo and save the image to your computer. Download Inkscape from the Inkscape website, then open the application.
From 2D concept to 3D: creating a stylized character. by Maruf Nasir. on 16th November 2020. -. -. 3D character artist Maruf Nasir takes Varun Nair's "Stoner" character concept and turns it into 3D, with ZBrush, Marvelous Designer, Substance Painter, Maya, and Arnold…. Time.
7. Select the 2D object by clicking outside the shape and dragging the box over it. 8. Choose Make 3D from the sidebar. 9. Click Make Sticker from the sidebar. 10. Drag the sticker on to the 3D ...
Join the hundreds of studios creating 3D assets on-demand with Kaedim. Kaedim saves us 20x over a traditional pipeline... [it] allows us to build a 20x bigger world in 3D. Little Buffalo Studios. Read the case study. "The 'Image to 3D' feature was a game-changer, transforming weeks-long processes into mere hours.". Mathew McGrane.
On Wednesday, game asset artist Kenney Vleugels released KenShape, a new tool that turns your 2D pixel art into 3D models. Download: Kenshape for Windows, Linux ($3.99) It's as easy and groundbreaking as it sounds: you first create your 2D pixel artwork, then you set the depth for each pixel. KenShape will then generate an extruded 3D model ...
Use our free and fast online tool to convert your PNG and JPG 2D heightmap images or logo into 3D STL (Standard Triangle Language) mesh/model files suitable for printing with a 3D printer, CNC machining or for loading into your favourite 3D editing package. Upload. Library. Upload a File. Click on the " Upload a file " button above to begin.
It's definitely a worthwhile exercise to recreate your most frequently used 2D drawings in 3D, so you can reuse them, check that they fit correctly, make modifications quickly and calculate accurate assembly mass properties - not to mention many other beneficial uses. In the video above, I have taken a basic 2D drawing and converted it to ...
One of the simplest ways to make a 2D image look 3D is to use software like Photoshop or Paint 3D. These programs allow you to apply various effects and filters to your images, such as 3D rotation, layer stacking, and perspective distortion. By experimenting with these tools, you can create the illusion of depth and dimension in your 2D images.
Bring 3D tools into your 2D art. Learn how to incorporate 3D posing software into your 2D painting process, helping you to save time without losing your edge. People often lament that the 'magic' of the entertainment industry, a market in which comics reside fairly perilously, dissipates when you become aware of how it is achieved.