- PRO Courses Guides New Tech Help Pro Expert Videos About wikiHow Pro Upgrade Sign In
- EDIT Edit this Article
- EXPLORE Tech Help Pro About Us Random Article Quizzes Request a New Article Community Dashboard This Or That Game Popular Categories Arts and Entertainment Artwork Books Movies Computers and Electronics Computers Phone Skills Technology Hacks Health Men's Health Mental Health Women's Health Relationships Dating Love Relationship Issues Hobbies and Crafts Crafts Drawing Games Education & Communication Communication Skills Personal Development Studying Personal Care and Style Fashion Hair Care Personal Hygiene Youth Personal Care School Stuff Dating All Categories Arts and Entertainment Finance and Business Home and Garden Relationship Quizzes Cars & Other Vehicles Food and Entertaining Personal Care and Style Sports and Fitness Computers and Electronics Health Pets and Animals Travel Education & Communication Hobbies and Crafts Philosophy and Religion Work World Family Life Holidays and Traditions Relationships Youth
- Browse Articles
- Learn Something New
- Quizzes Hot
- This Or That Game New
- Train Your Brain
- Explore More
- Support wikiHow
- About wikiHow
- Log in / Sign up
- Computers and Electronics
- Social Media
- Social Networking Services

How to Post a PowerPoint Presentation to Facebook
Last Updated: June 18, 2022 Fact Checked
This article was co-authored by wikiHow staff writer, Travis Boylls . Travis Boylls is a Technology Writer and Editor for wikiHow. Travis has experience writing technology-related articles, providing software customer service, and in graphic design. He specializes in Windows, macOS, Android, iOS, and Linux platforms. He studied graphic design at Pikes Peak Community College. This article has been fact-checked, ensuring the accuracy of any cited facts and confirming the authority of its sources. This article has been viewed 261,331 times. Learn more...
Do you want to share a PowerPoint presentation with your Facebook friends? You can easily add your PowerPoint to Facebook by saving it as a video file. Once converted, you can post a video version of the slideshow to your News Feed. This wikiHow article will walk you through converting your presentation to a video file in Microsoft PowerPoint, and teach you how to share the converted presentation on Facebook.
Using Windows

- Click the Slideshow tab at the top of the page.
- Click the slide you want to start recording from.
- Click Record Slideshow in the panel at the top.
- Click the Record button in the upper-left corner to start recording.
- Add your narration for the current slide.
- Click the Stop button in the upper-right corner.
- Click the arrow to the right of the slide to move on to the next slide.
- Click the Record button again.
- Add your narration for the slide.
- Click the Stop button.
- Continue until your slideshow is completed.

- Click the File tab at the top of the page.
- Click Export in the menu bar to the left.
- Click Create a video
- Use the first drop-down menu to select the video quality ("HD" is recommended).
- Use the second drop-down menu to select if you want to use pre-recorded narrations.
- Use the drop-down menu next to "Seconds spent on each slide" to select how many seconds each slide should be.
- Click Create video .
- Enter a file name for the video file next to "File name."
- Use the drop-down menu next to "Save as Type" to select "MPEG-4 Video".
- Click Save and allow a few minutes for it to finish processing.

- Right-click the video file of your PowerPoint presentation.
- Select Properties from pop-up menu.
- Click the General tab in the properties dialogue box.
- Verify that the file size is not more than 10 GB MB.
- Click the Details tab.
- Check the time next to "Length" to make sure it is no longer than 4 hours.
- Check to make sure that the frame width and frame height do not exceed 1080 pixels.

- If you are not logged in automatically, you may need to enter your email address, phone number, and password to log in.

- If you are not able to upload videos, you may need to set your browser to allow pop-ups

- Alternatively, you can drag and drop the video file into the large box that says "Add Photos/Videos."

- Additionally if you want to add a caption to your post, write it in the box that says "What's on your mind?".
Using a Mac

- Click the File in the menu bar at the top of your Mac desktop (not at the top of PowerPoint).
- Click Export .
- Enter a name for the PowerPoint file next to "Export as:",
- Click the drop-down menu next to "File Format."
- Select ".MP4" format.

- Select Get Info from pop-up menu.
- Check that the file size is not larger than 10 GB under the "General" heading.
- Check that the dimensions do not exceed 1080 pixels below the "More Info" heading.
- Check that the duration is not greater than 240 seconds or 4 hours.

Community Q&A
You Might Also Like

- ↑ https://support.microsoft.com/en-us/office/save-a-presentation-as-a-video%E2%80%8B-in-powerpoint-ba919059-523d-40a8-b99c-08d18996c09d
- ↑ https://www.facebook.com/formedia/tools/video
- ↑ https://www.youtube.com/watch?v=Tu-opURJ2FA
About This Article

- Send fan mail to authors
Is this article up to date?

Featured Articles

Trending Articles

Watch Articles

- Terms of Use
- Privacy Policy
- Do Not Sell or Share My Info
- Not Selling Info
wikiHow Tech Help Pro:
Level up your tech skills and stay ahead of the curve

Post a presentation to Facebook, Twitter, or other social network
To share your PowerPoint presentation with your friends or the community on a social network, you first need to make a connection between the social network and OneDrive. Set up a connection to each of your social networks and then you can post all you want. Here’s how:
Sign in to OneDrive and open the file you want to post.
Click the Share tab.
Under Share , click Post to , click add services , and then pick a social network to connect to.

Note: If you don’t see the social network you want in the list, click Find more services and follow the online instructions to add it.
Click Connect .

Allow your OneDrive and social network accounts to connect with one another.
Note: Each social network requires that you authorize the connection. To change the connection permissions at any time, see Change or remove a connection to a social network below.
When you‘re ready to share your presentation
Under Share , click Post to .

Type a message about the presentation you’re posting.
Allow people (who sign in to OneDrive) to edit your posted presentation by checking Recipients can edit .
Click Post .

Change or remove a connection to a social network
If you have set up a connection between OneDrive and a social network such as Facebook, Twitter, LinkedIn, or others, you can remove that connection at any time.
Sign in to OneDrive , right-click the presentation file, and then click Sharing .

Click Post to .
Click Add services , and then click Manage my services .

Click Edit below the social network you want to change, for example Facebook.

Click Remove this connection completely , and then click Remove .

Need more help?
Want more options.
Explore subscription benefits, browse training courses, learn how to secure your device, and more.

Microsoft 365 subscription benefits

Microsoft 365 training

Microsoft security

Accessibility center
Communities help you ask and answer questions, give feedback, and hear from experts with rich knowledge.

Ask the Microsoft Community

Microsoft Tech Community

Windows Insiders
Microsoft 365 Insiders
Was this information helpful?
Thank you for your feedback.
Home » Slideshow maker » How to Share your PowerPoint Slideshow via Facebook
How to Share your PowerPoint Slideshow via Facebook
- Posted on November 2, 2023
- / Under Slideshow maker
- / With 0 Comments
Facebook is a popular social media platform that allows you to connect with friends, colleagues, and a wider audience. Visual Paradigm, a powerful modeling and design tool, enables you to easily create captivating PowerPoint slideshows. By combining the features of Visual Paradigm and the reach of Facebook, you can share your presentations and engage your audience directly on the platform.
This guide will walk you through the steps to export your slideshow from Visual Paradigm and seamlessly share it on Facebook, enabling others to view and interact with your content. Let’s get started and make your presentations shine on the Facebook stage!
Log in to workspace and select slideshows
To begin, log in to your Visual Paradigm Online workspace using your credentials. Once logged in, navigate to the main dashboard. From there, locate and select the “Slideshows” option. This will take you to the Slideshows section, where you can manage and access all your saved slideshows.

Click on share button
Once you have selected the desired slideshow in Visual Paradigm Online, locate the “Share” button associated with that particular slideshow. Click on the “Share” button, and a menu of sharing options will appear. Look for the Facebook icon among the available sharing options and click on it. This will initiate the process of sharing your slideshow directly to Facebook, allowing you to reach and engage with your audience on the social media platform.

Share the slideshow via Facebook
After clicking on the Facebook icon from the sharing options in Visual Paradigm Online, a new window will pop out, connecting you to Facebook. In this window, you will have the opportunity to create a new post that includes your slideshow.

The slideshow will be automatically attached to the post, and you can edit the post’s content to add a caption, tags, or any other additional information you want to share with your Facebook audience. Take your time to customize the post according to your preferences, and once you are satisfied with the content, you can proceed to publish it on your Facebook profile or page.

- What’s New
- Infographics
- Terms of Service
- Privacy Policy
- Security Overview
- Report Abuse
- Trending Categories

- Selected Reading
- UPSC IAS Exams Notes
- Developer's Best Practices
- Questions and Answers
- Effective Resume Writing
- HR Interview Questions
- Computer Glossary
Share Powerpoint Presentation through Facebook
Using Microsoft’s PowerPoint software, people create new presentation for marketing, office, or college purpose, there are number of ways to share those presentations with others. Although, people can use these presentation as a slideshow for next business meeting, and collage guy or office people can use it to present their project at college or office. People can significantly increase number of eyes to see it by sharing it on a social media site such as Facebook. Using social media site Facebook, people can share slideshows, digital resumes and other PowerPoint presentations. This is quite simple to achieve by first converting PowerPoint presentations (.ppt) file to a video file. PowerPoint presentations file can be saved in “.wmv” (Windows Media Video) file format. Facebook supports this file format, and using this file format user can directly upload file to Facebook.
This article provides detail explanation on,
How to convert a PowerPoint presentations (.ppt) file to a video file using Microsoft PowerPoint
How to upload the converted presentation video file to personal Facebook account
In Windows Operating System
Method 1 − upload powerpoint to facebook as video.
Choose and open the PowerPoint presentation that user likes to upload on Facebook.

Convert .ppt file format to .wmv file format (Save the PowerPoint presentations file as a Windows Media Video file). To do this conversion,
From the standard toolbar, click on the File tab → Save As.
In the Save As dialog box, user can change the “File name” or can keep the same how as it was earlier. The “Save as Type” dropdown menu facilitates users to convert “.ppt” file to “.wmv” file format, from “Save as Type” dropdown menu select Windows Media Video. This conversion may take several minutes to complete.

Make sure that the video file size should not exceed the maximum file size supported by Facebook, to check the file size of .wmv file,
Right click on .wmv file to select properties from context menu
In properties dialog box, click on the general tab to view the size of the file in megabits (MB). Check that the file size should not exceed the maximum file size (1, 024 MB).

Ensure that the video should be too long, to check that,
Open, the created .wmv file in any Windows media player application, to check the exact length of the video file
Make sure that the file should not run more than 20 minutes

Choose web browser to permit pop-ups from Facebook,
In IE, click on Tools → Options → Privacy tab from Internet Options dialogue box and then click on Settings in the Pop-Up Blocker menu. Enter http://www.facebook.com/ in the field labeled address of website, press enter and click the close button. An exception for Facebook has been added to IE.
In Mozilla Firefox, click on Tools → Options → contents option → exceptions button. Enter http://www.facebook.com/ into the field labeled address of website and click OK. An exception for Facebook has been added to Firefox.

Open Facebook account using username and password. Click on the “Add Photos/Video” option to open video upload dialogue box, facilitates users to share their favourite photos and video with Facebook friends.

Once user click on “Add Photos/Video, it opens “Upload Photos/Video”, after clicking on “Upload Photos/Video” it opens File Uploader to upload Photos/Videos file, choose the file that user wants to upload and click on open. This process will load Photos/Video from the hard drive to Facebook.

Terms and condition at the time of upload process,
The Terms of Agreement window will appear, read the Terms of Agreement and click the “I Agree” button to begin the upload process.
Depends on the size of the video and your Internet connection speed, the upload process may take several minutes to complete.
The process will successfully upload the PowerPoint presentation file to Facebook.
Method 2 − Upload using SlideShare app on Facebook
Before implementing this method, just go to the slideshare.net, create an account to read the information, because without knowing about SlideShare app, user cannot upload PPT to Facebook using SlideShare app.
After reading about SlideShare app, go to Facebook, login to the account using Username and Password and search for Slideshare, get it and add it to the application section. This process will display the SlideShare page on Facebook with “sync SlideShare.net Account” option. Combine both account (Facebook account and SlideShare account).

One all above process successfully done, click on the “Upload” button to upload PowerPoint to Facebook. After uploading PPT into “My Slidespace” section, click on the “Post to Wall” option.
This process will also upload the PowerPoint presentation file to Facebook, but sometime it erases animations, transitions, music and video clips.
Method 3 − Using Google Docs
Google Docs is one of best web app to upload and edit the presentation file in the cloud, does not requires any other software to support Google Docs in its upload process.
Just login to Google Docs and upload the PowerPoint file on it. To do this, click on the “Share” tab on the top right of the main page and choose “Share”, this will facilitate users to see the PowerPoint or the chosen persons.

Next, click on “Publish/Embed” to visualize the presentation available to everybody on the web and Google Docs offers the embed code that can be used on the blog, take that URL and post it on Facebook so that everybody can see the PowerPoint presentation.
The above 3 awesome methods explains that how to share the PowerPoint presentations on Facebook with ease in less time.

I love programming (: That's all I know
Related Articles
- Tips for Using PowerPoint Presentation More Efficiently
- How to add and remove encryption for MS Powerpoint Presentation?
- Edit, Facebook Look Back Video to Share Stuffs
- PowerPoint Alternatives
- Running the collection using Newman through share link in Postman
- What is Presentation Layer?
- Diagrammatic Presentation Of Data
- What is a presentation layer?
- How to create powerpoint files using Python
- Difference between Microsoft PowerPoint and Apple Keynote
- The Presentation Layer of OSI Model
- The best presentation tools for business
- Explain the functions of Presentation Layer.
- Antigen Presentation: A Vital Immune Process
- Impression Management and Self-Presentation Online
Kickstart Your Career
Get certified by completing the course
How to Link PowerPoint to Facebook
- Small Business
- Finances & Taxes
- Open a Business Account
- ')" data-event="social share" data-info="Pinterest" aria-label="Share on Pinterest">
- ')" data-event="social share" data-info="Reddit" aria-label="Share on Reddit">
- ')" data-event="social share" data-info="Flipboard" aria-label="Share on Flipboard">
How to Block Someone From Commenting on Facebook
How to upload private videos online, how to remove pictures & posts from your own facebook page.
- How to Embed YouTube Videos on Facebook Pages
- How to Make a Public Video Link in Facebook
Once you've created a new presentation using Microsoft's PowerPoint software, you have a myriad of ways to share it with others. While you could simply use it as a slideshow presentation at your next business meeting, you could greatly increase the number of eyes that see it by sharing it on a social media site such as Facebook. This is quite simple to accomplish by first saving your PowerPoint presentation as a video file. PowerPoint presentations can be saved in the Windows Media Video -- or ".wmv" -- file format, which is supported for direct upload to Facebook.
Open the PowerPoint presentation that you want to share.
Select the File tab and then click "Save As."
Give the file a name in the File name box, click "Windows Media Video" from the "Save as Type" dropdown list and then click "Save." Your PowerPoint presentation is now saved as a video file.
Log in to your Facebook account with your username and password.
Click "Add Photo/Video" from the selections near the top of your Home or Profile page and then click "Upload Photo/Video" from the box that appears.
Click "Choose File" and then locate the .wmv file you created in PowerPoint from the files and folders on your computer. After you've located it, click "Open" to begin its upload to Facebook.
Wait for the video thumbnail to appear in the video upload box at the top of your Facebook window. Type in a description if you want in the "Say something about this" box. You can also choose a specific group to share with by clicking the globe icon with the arrow next to it in the lower right of the post; alternatively, you can just leave the globe alone and post the video as public.
Click "Post" and your PowerPoint presentation is now available for your friends to see on Facebook.
- Facebook: What Formats of Video Files Can I Upload?
- Microsoft Office: Open or Save a Presentation in a Different File Format
Nicole Vulcan has been a journalist since 1997, covering parenting and fitness for The Oregonian, careers for CareerAddict, and travel, gardening and fitness for Black Hills Woman and other publications. Vulcan holds a Bachelor of Arts in English and journalism from the University of Minnesota. She's also a lifelong athlete and is pursuing certification as a personal trainer.
Related Articles
How can i put youtube videos on my facebook group, how to post mp3s on a facebook wall, sharing a blog post from blogspot on facebook, how to add a comment to youtube, how to see your uploaded video on facebook, how to put mpeg on facebook, is there a way to make your activity on youtube private, how to hide an image on facebook, how to format a facebook status, most popular.
- 1 How Can I Put YouTube Videos on My Facebook Group?
- 2 How to Post MP3s on a Facebook Wall
- 3 Sharing a Blog Post From Blogspot on Facebook
- 4 How to Add a Comment to YouTube
- Computers and Electronics
- Social Media
- Social Networking Services
How to Add a Powerpoint to Facebook
Last Updated: March 28, 2019
wikiHow is a “wiki,” similar to Wikipedia, which means that many of our articles are co-written by multiple authors. To create this article, 9 people, some anonymous, worked to edit and improve it over time. This article has been viewed 232,972 times. Learn more...
In order to share slideshows, digital resumes and other PowerPoint presentations with Facebook contacts, the file must first be converted from a ppt. file to a video file. Once converted, a video copy of the presentation can be uploaded to a Facebook profile. This article provides detailed instructions on how to convert a presentation to a video file using Microsoft PowerPoint, and how to add the converted presentation to a personal Facebook account.
Method 1 Method 1 of 2: via a Windows Operating System
- Click the File tab on the standard toolbar and select Save As.
- Enter a name for the PowerPoint file and, in the Save as Type menu, select Windows Media Video. Depending on the length of the video copy of your PowerPoint presentation, the amount of effects and transitions used, and the system processor, the conversion may take several minutes to complete.
- Right-click the file and select properties from the pull-down menu.
- Click the general tab in the properties dialogue box to view the size of the file in megabits. Verify that the file size is not more than 1,024 MB.
- Open the video copy of your PowerPoint presentation in any media player application.
- Click the file tab on the menu bar and select Properties from the file menu. Click the Details tab to view the exact length of the video file, making sure it does not exceed a run time of 20 minutes.
- For Internet Explorer, click the Tools icon located in the far right corner of the browser window, next to the Home and Favorites icons. Select Internet Options from the pull-down menu. Click the Privacy tab in the Internet Options dialogue box and click the Settings button in the Pop-Up Blocker menu. Enter https://www.facebook.com/ in the field labeled Address Of Website To Allow, press enter and click the close button. An exception for Facebook has been added to Internet Explorer.
- For Firefox, click the Tools tab in the menu bar and select Options from the pull-down menu. Click the contents option from the menu in the Options dialogue box, then click the exceptions button. Enter https://www.facebook.com/ into the field labeled Address Of Website and click OK. An exception for Facebook has been added to Firefox.
- For Google Chrome, click the image of a wrench located in the upper-right corner of the browser window to access the browser options. Click Under The Hood located in the panel on the left. Click the Current settings button at the top of the page and click the manage exceptions button in the pop-ups menu. Type "Facebook" into the empty field labeled Pattern and click enter. An exception for Facebook pop-ups has been added in Google Chrome.
- The Terms of Agreement window will open. Read the Terms of Agreement and click the "I Agree" button to begin the upload process.
- Depending on the size of the video and your Internet connection speed, the upload process may take several minutes to complete. The video copy or your PowerPoint presentation is complete.
Method 2 Method 2 of 2: via a Mac Operating System
- Make sure that the file size is not too large.
- Confirm that the length of the video fits the parameters designated by Facebook.
Community Q&A
You might also like.
- http://office.microsoft.com/en-gb/powerpoint-help/turn-your-presentation-into-a-video-HA010336763.aspx
- https://www.facebook.com/help/?page=833
About This Article
Featured articles, trending articles, watch articles.
- About wikiHow
- Terms of Use
- Privacy Policy
- Fotophire (Photo Editing Toolkit)
- UniConverter (Video Converter Ultimate)
- DVD Creator
- DVD Slideshow Builder Deluxe
- Orgcharting
- Edraw Project
- dr.fone Toolkit
- Restore Social App
- Android Lock Screen Removal
- iPhone Unlock
- iOS System Recovery
- MobileTrans

Learn More About Wondershare Products
Other users also liked.
How to Share PowerPoint on Facebook
Have some gorgeous PowerPoint that you like to share on Facebook? Wow, that's cool! But "how" could be the problem you need to solve. In the past, you might know that only videos can be uploaded to Facebook for sharing. But actually, PPT files can be shared on Facebook. There are two basic ways you can adopt to upload PPT to Facebook. One is via the app in Facebook name as Slideshare. And another is converting PPT to Facebook friendly videos. Let's take a look at the two ways carefully.
Via App SlideShare on Facebook
Before you try this method, you should go to slideshare.net, signup an account. Without the account information, you cannot upload PPT to Facebook via the app, SlideShare, at all.
Login Facebook and search for Slideshare. After you find the application, add it to your application section. After that you could see the SlideShare page appears on Facebook. Then it displays the "sync SlideShare.net Account" option. All you need is click it combine your Facebook account with the SlideShare account.
After that, you could click the "Upload" button to upload your PowerPoint to Facebook. When the process is over, the PPT is in the "My Slidespace" section. Then you can click the "Post to Wall" option.
I have to say this method is not so good, because these well-prepared PowerPoint slides are displayed like pictures. The animation and other effects just are lost.
Convert PPT to video
You must know that it is very easy to upload video to Facebook. This method just has followed the logic. Before you begin, you should download and install the app, PPT2Video Pro, we're going to use. Ok, just let's start.

Launch PPT2Video Pro and click "Create Video Files", then follow the steps below.
Step 1. Click "Add"button to import your PowerPoint to the app and press "Next".
Step 2. On the "settings" interface, in the format drop-down list, choose "Facebook video" in the category of "Online Video". Then click "Next".
Step 3. Set the folder to save the target video and hit "Start".
Bingo! Just in a few second, you could see the target videos. The music and annotations in the PPT are fully preserved. Then you can login your Facebook and share the PPT on Facebook.
Related Articles
- How to Convert PowerPoint (PPT) to MPEG Video
Recommended
Wondershare MobileGo

One-stop solution lets you manage your entire mobile lifestyle convenient.
Wondershare Data Recovery

Recover files in 550+ formats from your computer storage quickly, safely and completely.
Hot Articles

Related Channels
They're downloading

- Data Recovery
(Recover lost files)

Dec 23,2015 17:09 pm / Posted by Emily Xiao to Tips
Product-related questions? Speak directly to our Support Team >>
- Flash Drive
- Transfer to iPhone
- Download Music
- Volume License
Technology simplified
More>>
- Products PPT2DVD Pro PPT2DVD Lite PPT2Video Pro PPT2Flash More Products
- Downloads Free Trial DVD Menu Themes PPT Templates Download FAQs
- Purchase Wondershare Mall Order FAQs License Study
- Support Keycode Retrieval Product FAQs Technical Support Upgrade Center
- Community Learning Center Member Forum Newsletter
- Company About Us Contact Us Case Study
Home > Learning Center > Articles > Two Ways to Share PowerPoint on Facebook
Two Ways to Share PowerPoint on Facebook
Facebook is a social networking site which is enormously popular. It can be used both for keeping tabs on friends, and as a highly effective business tool for marketing and connecting with customers. For individuals, funny presentations or photo slideshows are usually made with PowerPoint. When it comes to business, PowerPoint is frequently used for creating company profiles, product brochures or service advertisements.
For the wide spread of these PowerPoint files, upload the PowerPoint Presentation to Facebook seems like a good idea. So, how can we share these PowerPoint files on Facebook to let more people enjoy the fun or promote your business better? Here I would like to introduce two effective ways for you.
Solution 1: Use the Slideshare Application on Facebook
Facebook doesn’t support uploading and sharing PowerPoint files directly yet. But with this Slideshare application on Facebook, you can share the presentation easily.
Step1: Login Facebook with your account. Search “slideshare”, and add it in your application area. After you finish adding it, you will be able to see the SlideShare page appears on Facebook.
Step2: If you already have a SlideShare account, click Sync SlideShare.net Account. By doing this, the application will connect Facebook with your slideshare account. And then you will be able to see the presentations you uploaded to slideshare.
Step3: Click Upload to upload your PowerPoint files. After the uploading process is over, you can find the presentation in My Slidespace area. Click on the thumbnail of it, and you will be able to share and post it in your wall. Your friends can then view the presentation directly from Facebook, and post comments or likes.
Disadvantage: The animations, transitions, sounds and video clips in your presentation will not be retained. The PowerPoint file will be played just like a series of static pictures. If you want all the features you have added to PowerPoint presentation to be kept, you may use the second solution.
Solution 2: Share PowerPoint File as Video on Facebook
As we know, we can upload a video to Facebook directly. So, if we can transfer PowerPoint file to a video, sharing PowerPoint on Facebook will be no longer difficult. This PowerPoint to video converter is recommended for doing this: Wondershare PPT2Video Pro .
First, import PowerPoint files to this program. After that, choose the output video format as AVI, FLV, MPEG, MOV or WMV that Facebook supports. Finally click Start, and your presentations will be automatically converted to a Facebook compatible video with all elements retained. You can then upload the video to Facebook with your account directly.
With the two methods above, you can now share your PowerPoint files on Facebook easily. Have fun and make the most of it.
Related Articles:
- How to View PowerPoint Presentations in Windows Media Player
- PPTX to iPod Converter - Share Your PowerPoint Anywhere
- PowerPoint to iPad - 4 Approaches to Play PowerPoint on iPad
Recommended Product
Only $99.95 Buy Now
- PowerPoint to DVD
- PowerPoint to Video
- PowerPoint to AVI
- PowerPoint to iPod
- PowerPoint to WMV
- PowerPoint to PSP
- PowerPoint to MP4
- PowerPoint to BlackBerry
- PowerPoint to YouTube
- PowerPoint to iPhone
- PowerPoint to Zune
- Convert PowerPoint to dvd
- PowerPoint to Apple TV
Free PowerPoint Templates
Europe entity: EURO INTLCHOICE TECH. LTD
Europe entity address: Leontiou A, 167 HAWAII KAMELIA COURT,1ST FLOOR, FLAT/OFFICE 12 3022,LIMASSOL, CYPRUS
Wondershare Sites: Training and Presentation Tools | Quiz Creator
How to Integrate Social Media Platforms (Facebook, Twitter, Instagram, LinkedIn) Into PowerPoint

In today’s digital age, social media has become an integral part of our personal and professional lives. It allows us to connect with others, share content, and engage in meaningful conversations. With the rise of social media platforms such as Facebook, Twitter, Instagram, and LinkedIn, it is important to leverage their power and incorporate them into our everyday tools, including PowerPoint presentations.
Table of Contents
Why Integrate Social Media Platforms Into PowerPoint?
Before we dive into the world of integrating social media platforms into PowerPoint, let’s understand why it is essential to do so. By integrating social media into your presentations, you are taking advantage of the vast reach and engagement potential of these platforms. This enables you to interact with your audience in real-time, promote your brand, share updates, and stimulate conversation.
Furthermore, incorporating social media into PowerPoint presentations adds an element of interactivity and multimedia, making your presentations more engaging and dynamic. It allows you to seamlessly integrate live feeds, videos, and other interactive content, enhancing the overall impact of your presentations.
Benefits of Integrating Social Media Platforms Into PowerPoint Presentations
Now that we understand the importance of integrating social media platforms into PowerPoint, let’s explore the various benefits it offers:
- Increased engagement: By incorporating social media feeds and interactive elements, you can actively engage your audience, encouraging participation and conversation.
- Real-time updates: Social media integration enables you to showcase live updates from your social media accounts directly within your PowerPoint slides, keeping your audience up to date with the latest developments.
- Enhanced visual appeal: By integrating social media content, you can add visual interest and variety to your presentations, making them more visually appealing and memorable.
- Broadened reach: When you integrate social media platforms into PowerPoint, you have the opportunity to extend your message and content beyond the confines of the presentation room, allowing your audience to share and engage with your content long after the presentation ends.
Step-by-Step Guide to Integrating Facebook into PowerPoint
Now, let’s delve into the specifics of integrating individual social media platforms into PowerPoint. We’ll start with the ever-popular Facebook. Here is a step-by-step guide to seamlessly integrating Facebook into your PowerPoint presentations:
- Step one: Open your PowerPoint presentation and navigate to the slide where you want to integrate Facebook content.
- Step two: Access the “Insert” tab in the PowerPoint ribbon and click on the “Web Page” option.
- Step three: In the dialog box that appears, enter the URL of the Facebook page or post you want to embed.
- Step four: Select the “Display as Icon” checkbox if you prefer to have a Facebook icon displayed on your slide instead of the actual content.
- Step five: Adjust the size and position of the embedded Facebook content as desired.
- Step six: Save your PowerPoint presentation and test the embedded Facebook content by entering presentation mode.
By following these steps, you can seamlessly integrate Facebook content, such as posts, videos, or live streams, into your PowerPoint presentations, adding a new dimension to your slides.
Top Tips for Incorporating Twitter into PowerPoint Presentations
Twitter is another powerful social media platform that can be effectively integrated into your PowerPoint presentations. Here are some top tips for incorporating Twitter into your slides:
- Hashtag display: Include a live Twitter feed displaying relevant hashtags related to your topic or event to encourage audience participation and interactive discussions.
- Tweet quotes: Showcase impactful tweets from industry influencers or thought leaders within your presentation to add credibility and diverse perspectives.
- Embed tweets: Incorporate specific tweets or Twitter threads directly into your slides to provide real-time examples and evidence to support your points.
- Integration with polls and surveys: Utilize Twitter’s polling feature to gather audience opinions and display the results in real-time within your presentation.
By leveraging these tips, you can unlock the full potential of Twitter and create impactful PowerPoint presentations that actively involve your audience and foster engagement.
Enhancing PowerPoint with Instagram Feeds: A Comprehensive Guide
Instagram, with its visually captivating content, offers unique integration possibilities for your PowerPoint presentations. Here’s a comprehensive guide to enhancing your slides with Instagram:
- Embedding Instagram posts: Incorporate specific Instagram posts or user-generated content directly into your slides to showcase engaging visuals and authentic social proof.
- Live Instagram feeds: Integrate real-time Instagram feeds displaying your brand or event hashtag to encourage audience participation and amplify the reach of your presentation.
- Creating Instagram-inspired slides: Channel the aesthetic of Instagram within your presentation design by using vibrant colors, filters, and square-shaped visuals.
By leveraging the inherent visual appeal of Instagram, you can elevate the aesthetic quality of your PowerPoint presentation and create a visually stunning experience for your audience.
Leveraging LinkedIn in PowerPoint: Best Practices and Techniques
LinkedIn, the professional networking platform, offers unique opportunities to connect with your audience on a professional level. Here are some best practices and techniques for leveraging LinkedIn in PowerPoint:
- Showcasing professional achievements: Include LinkedIn recommendations, endorsements, or certifications relevant to your topic to establish credibility and create trust with your audience.
- Displaying company profiles: Showcase company profiles from LinkedIn to highlight your organization’s expertise, achievements, and industry recognition.
- Integrating LinkedIn SlideShare content: Embed SlideShare presentations or documents hosted on LinkedIn directly into your PowerPoint slides for easy access and enhanced sharing capabilities.
By strategically leveraging LinkedIn within your PowerPoint presentations, you can position yourself and your organization as industry experts and strengthen your professional connections.
Creative Ways to Integrate Multiple Social Media Platforms Into a Single PowerPoint Slide
If you want to take your social media integration to the next level, consider incorporating multiple platforms into a single PowerPoint slide. Here are some creative ways to achieve this:
- Live social media mosaic: Create a dynamic visual using live feeds from various social media platforms arranged in a mosaic-like pattern.
- Interactive social media hub: Design a slide featuring interactive buttons or tabs that allow your audience to navigate between different social media platforms and explore engaging content.
- Real-time updates dashboard: Display a comprehensive dashboard showcasing live updates from different social media platforms, giving your audience a real-time snapshot of your digital presence.
By utilizing these creative techniques, you can create visually striking slides that showcase a multitude of social media platforms and captivate your audience’s attention.
Tools and Plugins for Seamlessly Integrating Social Media Platforms into PowerPoint
While PowerPoint provides some built-in functionality for integrating social media platforms, there are also several third-party tools and plugins available that can enhance and simplify the process. Here are some popular tools:
- LiveSlides: This plugin enables you to embed live web content, including social media feeds, directly into your PowerPoint slides.
- SlideShare: LinkedIn-owned SlideShare offers an easy way to share and embed PowerPoint presentations, complete with social media integration.
- Twitter Visualizations: Tools like TweetBeam or TAGS Explorer allow you to visualize live Twitter feeds and hashtags, which can be integrated into your PowerPoint slides.
By leveraging these tools, you can streamline the process of integrating social media platforms into your PowerPoint presentations and create more impactful slides with ease.
How to Embed Live Facebook, Twitter, Instagram, and LinkedIn Feeds in PowerPoint
If you want to go beyond static content and display live social media feeds directly within your PowerPoint presentations, here’s how you can do it:
- Step one: Use a third-party tool or plugin that specializes in embedding live social media feeds.
- Step two: Connect your social media accounts to the tool or plugin and configure the settings according to your preferences.
- Step three: Once you have set up the feeds, select the desired layout and design options.
- Step four: Generate an embed code provided by the tool or plugin.
- Step five: In PowerPoint, navigate to the slide where you want to embed the live social media feed and access the “Insert” tab.
- Step six: Click on the “Web Page” option and paste the embed code into the dialog box.
- Step seven: Adjust the size and position of the embedded live social media feed as necessary.
- Step eight: Save your PowerPoint presentation and test the embedded feed by entering presentation mode.
By following these steps, you can display real-time Facebook, Twitter, Instagram, and LinkedIn feeds directly within your PowerPoint presentations, keeping your audience engaged and informed.
Best Practices for Designing Engaging Social Media Slides in PowerPoint
Now that you have learned how to integrate social media platforms into PowerPoint, let’s explore some best practices for designing engaging social media slides:
- Consistent branding: Ensure your social media slides align with your overall presentation design and brand guidelines, creating a cohesive visual experience for your audience.
- Legible font sizes and colors: Use font sizes and colors that are easily readable, even from a distance, ensuring your audience can effortlessly follow the content on your social media slides.
- Consider visual hierarchy: Arrange your social media content in a logical order, prioritizing key information and keeping the design visually balanced.
- Engaging visuals: Incorporate eye-catching images, videos, and infographics into your social media slides to capture your audience’s attention and support your key messages.
- Minimal text: Avoid overcrowding your social media slides with excessive text. Instead, focus on utilizing concise phrases and bullet points to convey your message effectively.
By following these best practices, you can create visually appealing and engaging social media slides that effectively communicate your message and captivate your audience.
How to Add Social Media Icons and Links to Your PowerPoint Presentation
If you want to include social media icons and links in your PowerPoint presentation, follow these simple steps:
- Step one: Find high-quality social media icons that represent the platforms you want to include (e.g., Facebook, Twitter, Instagram, LinkedIn).
- Step two: Save the icons to your computer or cloud storage service.
- Step three: In PowerPoint, navigate to the slide where you want to add the social media icons.
- Step four: Access the “Insert” tab and click on the “Picture” option.
- Step five: Select the social media icon file from your computer or cloud storage and insert it onto the slide.
- Step six: Resize and position the social media icons as desired.
- Step seven: Right-click on each icon and select the “Hyperlink” option.
- Step eight: Enter the respective social media URL in the hyperlink dialog box for each icon.
- Step nine: Save your PowerPoint presentation and test the social media icons by clicking on them in presentation mode.
By following these steps, you can easily add social media icons and links to your PowerPoint presentation, allowing your audience to connect with you on various platforms and further engage with your content.
Using Social Media Data in PowerPoint: Strategies for Visualizing Analytics
Integrating social media data into your PowerPoint presentations can provide valuable insights and add credibility to your content. Here are some strategies for visualizing social media analytics in PowerPoint:
- Data-driven charts and graphs: Use visual elements such as bar charts, line graphs, and pie charts to display social media metrics such as follower growth, engagement rates, or post reach.
- Heatmaps and word clouds: Visualize sentiment analysis or trending topics using heatmaps or word clouds to make complex social media data more digestible and visually appealing.
- Comparison tables: Compare performance metrics of different social media platforms, campaigns, or time periods using tables to showcase key findings and trends.
By effectively visualizing social media data in your PowerPoint presentations, you can present compelling insights and make data-driven decisions that drive social media success.
Exploring Advanced Techniques: Embedding YouTube Videos Within Your PowerPoint Presentation
While social media platforms play a significant role in PowerPoint presentations, let’s not forget about the power of video. YouTube, with its massive library of content, can be seamlessly integrated into your slides. Here’s how you can embed YouTube videos in PowerPoint:
- Step one: Open your PowerPoint presentation and navigate to the slide where you want to embed the YouTube video.
- Step two: Access the “Insert” tab in the PowerPoint ribbon and click on the “Video” option.
- Step three: Select the “Online Video” option and enter the URL of the YouTube video you want to embed.
By humans, for humans - Best rated articles:
Excel report templates: build better reports faster, top 9 power bi dashboard examples, excel waterfall charts: how to create one that doesn't suck, beyond ai - discover our handpicked bi resources.
Explore Zebra BI's expert-selected resources combining technology and insight for practical, in-depth BI strategies.

We’ve been experimenting with AI-generated content, and sometimes it gets carried away. Give us a feedback and help us learn and improve! 🤍
Note: This is an experimental AI-generated article. Your help is welcome. Share your feedback with us and help us improve.


- Services Enterprise Services Finance Human Resource Marketing
- Middle East
Editor's Picks
- Entrepreneurship
- Food & Drinks
- Travel & Vacation
- Beauty & Fashion
- Education & Books
- Health & Science
- Home & Family
- Miscellaneous

3 Ways to Publish Your PowerPoint Presentations to Facebook
Ban kill moon.
Method 1: Slideshare application
Facebook has an application called “ Slideshare ” which allows you to upload PowerPoint Facebook directly, but the animations, transitions, music and video clips will be removed. Login Facebook , and search "Slideshare", and add it in your application area. Click " Upload " to upload your PowerPoint to Facebook. Then share and post it on the wall so that your friends will watch it.
Method 2: Google Docs
You may have heard that Google Docs enables you to create, view and edit your presentation in the cloud, which means you don’t have to install any software on your computer. With Internet connection to Google Docs, you can handle these works anywhere you can. Google Docs also allow you to upload and share your presentations made in Microsoft PowerPoint.
Sign in (or sign up) to Google Docs ; click on “ Files ” → “ Upload ”, locate the file you want to upload, remember to check “ Convert documents, presentations, spreadsheets, and drawings to the corresponding Google Docs formats ” box and click on “ Start Upload ” button to upload your PowerPoint file to Google Docs.
Click the triangle button of the “ Share ” tab on the top right of the main page → choose “Share” so you can set the PowerPoint to be viewed by yourself or the selected people.
Now, pay attention, click “ Publish/Embed ” to make the presentation available to anyone on the Internet and Google Docs will offer you the embed code for you to use on your blog. Copy the URL and publish on Facebook so that people can view your PowerPoint presentation.
Method 3: Save PowerPoint as video for Facebook
Why save PowerPoint as video? It is the only way for now to preserve all the original PowerPoint elements and effects after publishing on Facebook. Moyea PPT to Video Converter makes it easy to convert PPT, PPS, PPTX, PPSX, etc. to popular video formats in 3 steps.
First, add PowerPoint to this program.
Then, choose the output video format as AVI, FLV, MPEG, MOV or WMV that Facebook supports.
Finally, convert the PowerPoint to Facebook video conversion with all elements retained.
Then, you can then upload the video to Facebook directly.
With these 3 methods, there should be no problem for you to publish your PowerPoint presentations on Facebook.

Blogs.siliconindia.com
Latest postings blogs by this author
More from technology blogs.
- Search the community and support articles
- Microsoft 365 and Office
- Search Community member
Ask a new question
Is there a way to upload Power Point to FaceBook & Instagram. If so how?
Report abuse.
- Microsoft Agent |
Hi Charles,
You can refer to this article to add a PowerPoint to Facebook.
How to add a PowerPoint to Facebook.
Meanwhile, you can refer to Making Instagram video with Powerpoint to know about how to create a PowerPoint file and upload it to Instagram.
Disclaimer : Microsoft provides no assurances and/or warranties, implied or otherwise, and is not responsible for the information you receive from the third-party linked sites or any support related to technology.
1 person found this reply helpful
Was this reply helpful? Yes No
Sorry this didn't help.
Great! Thanks for your feedback.
How satisfied are you with this reply?
Thanks for your feedback, it helps us improve the site.
Thanks for your feedback.
Replies (1)
Question info.
- Norsk Bokmål
- Ελληνικά
- Русский
- עברית
- العربية
- ไทย
- 한국어
- 中文(简体)
- 中文(繁體)
- 日本語
Not logged in
- Recent changes
- Random page
- From WikiHow
Add a Powerpoint to Facebook
In order to share slideshows, digital resumes and other PowerPoint presentations with Facebook contacts, the file must first be converted from a ppt. file to a video file. Once converted, a video copy of the presentation can be uploaded to a Facebook profile. This article provides detailed instructions on how to convert a presentation to a video file using Microsoft PowerPoint, and how to add the converted presentation to a personal Facebook account.
- 1.1 via a Windows Operating System
- 1.2 via a Mac Operating System
- 2 Related Articles
- 3 Sources and Citations
via a Windows Operating System
- Open the PowerPoint presentation that you would like to upload.
- Click the File tab on the standard toolbar and select Save As.
- Enter a name for the PowerPoint file and, in the Save as Type menu, select Windows Media Video. Depending on the length of the video copy of your PowerPoint presentation, the amount of effects and transitions used, and the system processor, the conversion may take several minutes to complete.
- Right-click the file and select properties from the pull-down menu.
- Click the general tab in the properties dialogue box to view the size of the file in megabits. Verify that the file size is not more than 1,024 MB.
- Open the video copy of your PowerPoint presentation in any media player application.
- Click the file tab on the menu bar and select Properties from the file menu. Click the Details tab to view the exact length of the video file, making sure it does not exceed a run time of 20 minutes.
- For Internet Explorer, click the Tools icon located in the far right corner of the browser window, next to the Home and Favorites icons. Select Internet Options from the pull-down menu. Click the Privacy tab in the Internet Options dialogue box and click the Settings button in the Pop-Up Blocker menu. Enter https://www.facebook.com/ in the field labeled Address Of Website To Allow, press enter and click the close button. An exception for Facebook has been added to Internet Explorer.
- For Firefox, click the Tools tab in the menu bar and select Options from the pull-down menu. Click the contents option from the menu in the Options dialogue box, then click the exceptions button. Enter https://www.facebook.com/ into the field labeled Address Of Website and click OK. An exception for Facebook has been added to Firefox.
- For Google Chrome, click the image of a wrench located in the upper-right corner of the browser window to access the browser options. Click Under The Hood located in the panel on the left. Click the Current settings button at the top of the page and click the manage exceptions button in the pop-ups menu. Type "Facebook" into the empty field labeled Pattern and click enter. An exception for Facebook pop-ups has been added in Google Chrome.
- Log in to Facebook using your username and password.
- Click on the Video option in the Share menu and select the option to "Upload a video to your hard drive" to begin the download process. The video upload dialogue box will open.
- The Terms of Agreement window will open. Read the Terms of Agreement and click the "I Agree" button to begin the upload process.
- Depending on the size of the video and your Internet connection speed, the upload process may take several minutes to complete. The video copy or your PowerPoint presentation is complete.
via a Mac Operating System
- Open up PowerPoint for your Mac and select your video.
- Choose "Make Movie" from your file menu.
- Make sure that the file size is not too large.
- Confirm that the length of the video fits the parameters designated by Facebook.
- Log in to Facebook using your account information.
- Click onto the "Upload Photos/Video" tab above your status bar.
- Select the PowerPoint video that you would like to upload and click "Open."
- Once the file has transferred, write any comments you would like to appear in the caption box.
- Click the "Share" button.
Related Articles
- Post a YouTube Video on Facebook
- Disable Facebook Places
- Add Facebook Like to Blogger
- Remove a Facebook Connection
Sources and Citations
- http://office.microsoft.com/en-gb/powerpoint-help/turn-your-presentation-into-a-video-HA010336763.aspx
- https://www.facebook.com/help/?page=833
- Use Facebook for Business Networking
- Unlike a Facebook Page (Using Facebook Like Button)
- Buy a Used Car on Facebook Marketplace
- Post on Facebook Messenger from Your Camera Roll on Android
- Turn Off Audio of a Facebook Story on Android
- Use the Facebook Camera on Android
- Send Direct Images on Facebook on Android
- Turn Off Audio of a Facebook Story on iPhone or iPad
- Find a User's Email Address on Facebook on iPhone or iPad
- Opt Out of Sharing Your Account Info with Facebook on WhatsApp on Android
What links here
- Add Animation Effects in Microsoft PowerPoint
- Blog on Facebook
You may like
- This page was last modified on 11 October 2022, at 11:02.
- Content is available under Creative Commons Attribution-NonCommercial-NoDerivs 2.5 License unless otherwise noted.
- Privacy policy
- About Kipkis
- Disclaimers
- Mobile view
Search for: Search Button
- Share a link to a specific PowerPoint slide
There’s a way to link someone to view a specific slide in a PowerPoint presentaion which is a lot faster than hunting through a big slide deck.
Requirements
Link to this slide, check the share permissions, sharing settings, edit / view only / no download, or there’s another way ….
Providing a direct link to a specific part of your slideshow not only streamlines the process of receiving feedback but also enables them to locate the content you want them to review more efficiently.
PowerPoint simplifies the process with its “Link to This Slide” feature, generating a direct link that opens the file at the specific slide in your presentation.
The presentation has to be saved in cloud storage that the receiver/s can also access it. If the presentation isn’t already saved online, modern Office will help you do that.
Launch PowerPoint presentation stored on your local drive. Next, navigate to the specific slide you wish to share. Then, right-click on the desired slide and a shortcut menu pops up. From this menu, select the option “Link To This Slide” to generate a direct link to the chosen slide within your presentation.

Selecting “Share Link To This Slide,” will prompt you to upload your presentation to OneDrive to allow sharing.

Office just dumps the file into your OneDrive account, you’ll probably want to choose a specific folder instead.
Once the presentation is saved in a cloud location, you can share it or a slide. Do that from PowerPoint on the web or modern PowerPoint for Windows/Mac. Click on the slide in the slide navigator and select the “Link To This Slide” option.

The system generates a direct link that is ready to be shared but before you copy , check what permissions you’re giving to access the presentation and to whom.
Under the link is a short note to indicate the sharing settings for the current link. Click on Settings to change or verify the sharing. Or select the copy option, and you’ll receive a notification confirming that the link has been copied.

For more specific access privileges, go to the Settings option to customize permissions for reviewers or audience. You can choose with whom you want to share your files. This typically involves setting access permissions or sharing settings with user or user groups.
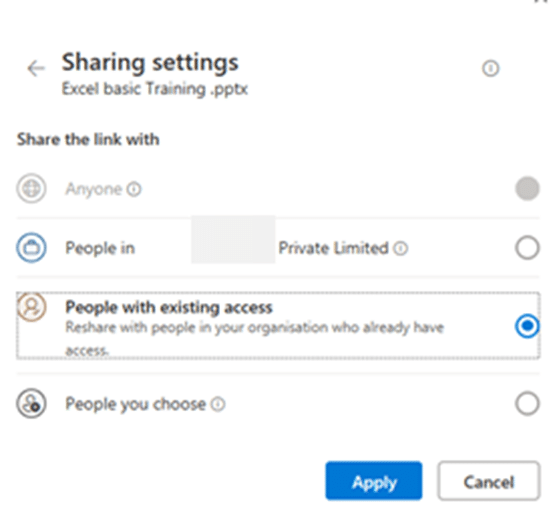
The sharing settings can include any of the following options, depending on the type of account (personal, business etc).
“Anyone With The Link Can Edit.” – permits anyone with access to the link to edit the slide’s content. This functionality facilitates effective collaboration and sharing among teams or groups. Opting for this setting grants editing privileges to anyone possessing the link.
“People in the Organization – accessible by the organization with the privileges to access the link.
“People you choose – selectively available.
Customize the access privileges more from the More Settings option, where you can define specific permissions, such as editing, viewing, and downloading for reviewers or audience.
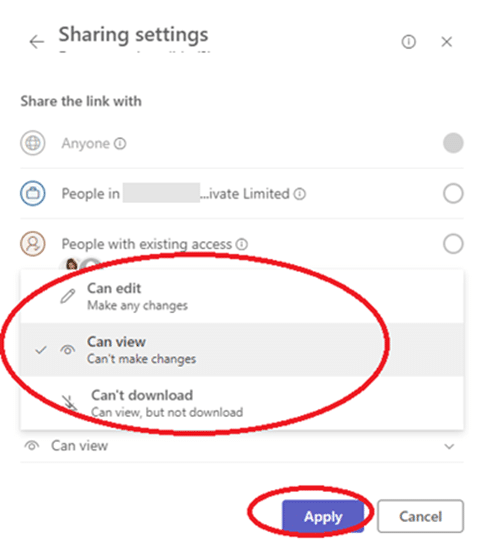
Finalize the process by clicking on the “Apply” button ensuring that the changes take effect according to your preferences.
Once you’ve configured the access privileges and applied the changes, you can proceed to share the link via email to the intended audience. Simply copy the link generated by the sharing feature and paste it into your email or other message.

At risk of stating the obvious, there’s another way to share a single slide with ‘read only’ access.

Take a screen shot of the slide and paste it into an email or message.
Using Designer for more eye-catching PowerPoint slides PowerPoint Cameo puts your video selfie into a slide Reuse slides in PowerPoint, the good and the annoying
About this author

Mayurakshi Mohapatra
Office 2021 - all you need to know . Facts & prices for the new Microsoft Office. Do you need it? Office LTSC is the enterprise licence version of Office 2021.
Office 2024 what's known so far plus educated guesses. Microsoft Office upcoming support end date checklist.
Latest from Office Watch
- Translate automatic or manual in Outlook
- Microsoft Mesh makes “magical” online meetings
- Why are Teams and Office divorcing?
- Pivotby – Excel’s new faster PivotTables
- More Excel on the web improvements
- All about editing an incoming Outlook message
- What “Update License” means on Microsoft 365 menus
- Excel’s warning about dates and centuries
- Write Excel formulas fast with free Copilot
- Easter images and icons in Microsoft Office
- Credit Card 💳 symbol in Word, Excel, PowerPoint and Outlook
- Yes, there will be a new version of Microsoft Office
- All about Office 2024 for Windows and Mac (so far)
- In person vs virtual event option coming to Outlook
- Checklists now in Microsoft Word
- Start Grouping in Excel for better looking sheets
- Three more Word features reach the web version
- Web link previews in Word for web
- Turn Excel into an AI / LLM wonder
Discover Zoom success stories and upcoming events! Explore our Customer Success Forum & Events page.
Empowering you to increase productivity, improve team effectiveness, and enhance skills.
Communication
Productivity, apps & integration, employee engagement, business services, customer care, developer tools.
- Financial Services
- Manufacturing
- Small and Midsize businesses
- IT Professionals
- Customer Experience
- Sales and Revenue
- Marketing and Events
- Meeting SDK
- App Marketplace
- Developer Solutions
- Partner Solutions
- Find a Partner
- Become a Partner
- Partner Portal
- Partner Learning Center
- Resource Library
- Webinars & Events
- Customer Stories
- Zoom Trust Center
- Zoom Community
- Learning Center
- How-to Videos
- Global services
- Hardware options
- Customer Managed Key
- Customer Support
- Premier Support
- Developer Support
- Premier Developer Support
Download the Zoom app
Keep your Zoom app up to date to access the latest features.
Zoom Virtual Backgrounds
Download hi-res images and animations to elevate your next Zoom meeting.
- Plans & Pricing
- Join by Meeting ID
- Public Event List
- Screen Share Only
- With Video On
- With Video Off
AI Companion
- Phone System
- Mail & Calendar
- Marketplace
- Rooms and Workspaces
- Workspace Reservation
- Contact Center
- Virtual Agent
- Revenue Accelerator
- Events and Webinars
- Work Transformation Summit
- Customer Success Events
- Customer Success Forum
- Zoom Status
- Submit Feedback
- Community Terms and Guidelines
- Getting Started
- Community Center
- Happy Rewards
- Social Corner
- Community Champion Program
- Billing & Account Management
- Re: Uploading a recorded powerpoint presentation
- Subscribe to RSS Feed
- Mark Topic as New
- Mark Topic as Read
- Float this Topic for Current User
- Printer Friendly Page
- PowerPoint presentation in Team Chat 2024-03-31
- Can't find the "give remote control" option since latest update in Meetings 2024-03-23
- Powerpoint with webcam overlay it works but not reproduced in the recording where the image is next in Meetings 2024-03-18
- Ghost/virtual monitor with screen share - effect on resolution? in Events and Webinars 2024-03-12
- I need to present a slideshow to two separate groups at the same time. in Meetings 2024-03-11
Uploading a recorded powerpoint presentation
- Mark as New
- Report Inappropriate Content
2022-04-13 09:16 PM
- All forum topics
- Previous Topic

2022-04-14 12:59 AM
2024-04-05 08:42 AM
PowerPoint: How to Add Audio to Powerpoint on Windows 10 and Mac
Last Updated Thursday, August 31, 2023, at 5:00 am
Known Issue (August 14, 2023):
Some Windows 11 users are experiencing issues with PowerPoint exports when they are turned into .mp4 files. Visuals within the exported PowerPoint are appearing as flipped, or upside down. We are working with Microsoft to find a solution.
As a workaround, please convert the file as a .WMV file option and save it in My Media. The following are directions on how to convert a PowerPoint Presentation with audio to a .WMV file . For more support or to help troubleshoot issues, please reach out to the LTS Help Desk at [email protected] .
Microsoft PowerPoint offers features to record audio narration and export it as a video. PowerPoint records audio slide-by-slide rather than in one continuous file, allowing creators to easily re-record a slide if they make a mistake or need to change something later. Exporting as a video and uploading to Kaltura or Canvas for streaming is advantageous since it standardizes file types, doesn't require a download to view, is in a format that can be captioned, and allows viewers to navigate more efficiently.
A recent update has made the process comparable on a Mac, but the specifics vary. Windows 10 instructions follow; Mac users can click the link below to jump to the appropriate instructions.
- Instructions for Mac users
Windows 10 Instructions:
The following instructions explain how to add audio to your PowerPoint presentation on Windows 10 and export that PowerPoint as an MP4. The text instructions cover the same information as the embedded video below.
NOTE: If you have an older version of PowerPoint, you may need to update it to access the features described below. If you do not have PowerPoint, you can download it and other Microsoft Office products for free by going to office365.uwec.edu. If you have questions about updating or installing PowerPoint, contact the LTS Help Desk at [email protected] or 715-836-5711.
- Design your PowerPoint TIP: Use images and limit text to better engage viewers/listeners.
- Click Record Slide Show NOTE: Audio may start recording automatically if you have an older version of PowerPoint. It will still work, but this version offers reduced functionality.
- Record narration and avoid reading text on the slide out loud to viewers. Click the blue Replay button to listen to the recorded audio and ensure it was recording.
- Press [Escape] or the ‘X’ button located in the top right of the screen when the audio recordings are finished. You will see a speaker icon on slides that have audio.
- Select Export (steps 10-14 are shown in screenshot below).
- Select Create a Video .
- Optional: Select Full HD (1080p) for the video quality; it is unlikely a higher quality is needed.
- Select Use Recorded Timings and Narrations.
- Follow prompt/pop-up window to save the video in a memorable location.
- How to upload and share with Kaltura (Instructors should use Kaltura. Students will need to use it if the file is over 500 MB, which a PowerPoint probably won't be and they can use Canvas.)
- How to upload and share in a Canvas assignment (students)
- How to upload and share in a Canvas discussion (students) - the instructions refer to the "rich content editor" which is just the features in the top of the discussion post reply.
Elaboration on the Recording Features:
- Timing Feature – there is a rolling time feature for the individual slide and the overall presentation. Allows the speaker/presenter to monitor how long they are talking.
- Microphone Feature - Click on Settings and select Microphone and then the specific device to set up before recording.
- Replay Feature - Use to check that the audio is recording properly before starting additional slides.
- Clear Feature - Select Clear to delete/re-record audio.
- Don’t set the camera to record - Make sure this button has a diagonal slash through it to avoid the problem.
Mac Instructions:
The following instructions will teach you how to add audio to your PowerPoint presentation on a Mac and export that PowerPoint as an MP4. The text instructions cover the same information as the video embedded below.
NOTE: It is essential to have the Office 365 version of PowerPoint or you will not be able to save your PowerPoint as a video. If necessary, you can download it and other Microsoft Office products for free by going to office365.uwec.edu. If you have questions about updating or installing PowerPoint, contact the LTS Help Desk at [email protected] or 715-836-5711.
- TIP: Use images and limit text to better engage viewers/listeners.
- Click Record Slide Show
- TIP: Before you begin recording your full presentation, do a practice recording to verify your microphone and other settings are correct.
- NOTE: Avoid reading the text written directly on the slide; use the slide to elaborate on the material being presented.
- Stop speaking for a second to prevent the audio from cutting out as slides change. Resume speaking when the time starts moving again under the Current slide timing feature to the left of the recording button.
- Click Stop or Pause at the top of the screen and then End Show in the top left corner when all the audio recordings have been finished.
- Check the audio by clicking on Play from Start under the Slide Show tab or the presenter mode icon at the bottom of the screen.
- Edit the name of the file and where you would like to save the video following PowerPoint's prompts.
- Click Export
- Upload your mp4 video to Kaltura or Canvas to share it:
- How to upload and share to My Media (Instructors should use My Media. Students will need to use it if the file is over 500 MB, which a PowerPoint probably won't be and they can use Canvas.)
- How to upload and share in a Canvas discussion (students) - the instructions refer to the "rich content editor" which is the tool at the top of the discussion post reply.
Additional Video Tool Options
For more information about recording options available, click here to view a comparison of each tool's features.
VIDEO
COMMENTS
Download Article. 1. Open the PowerPoint presentation that you would like to upload. You can either click the ".ppt" or ".pptx" file in PowerPoint, or open PowerPoint and click Open in the menu to the left. Then you can either click a recent document below Recent, or click Browse to browse to a file on your PC. 2.
Click Post to. Click Add services, and then click Manage my services. Click Edit below the social network you want to change, for example Facebook. Click Remove this connection completely, and then click Remove. Post your presentation from OneDrive (formerly SkyDrive) to Facebook, Twitter, LinkedIn, or another social network.
#slideshow #powerpoint #presentation Are you looking for a convenient way to share your PowerPoint slideshow with a wider audience? With VP Online Slideshow,...
Click on share button. Once you have selected the desired slideshow in Visual Paradigm Online, locate the "Share" button associated with that particular slideshow. Click on the "Share" button, and a menu of sharing options will appear. Look for the Facebook icon among the available sharing options and click on it.
This process will display the SlideShare page on Facebook with "sync SlideShare.net Account" option. Combine both account (Facebook account and SlideShare account). One all above process successfully done, click on the "Upload" button to upload PowerPoint to Facebook. After uploading PPT into "My Slidespace" section, click on the ...
About Press Copyright Contact us Creators Advertise Developers Terms Privacy Policy & Safety How YouTube works Test new features NFL Sunday Ticket Press Copyright ...
8. Share your PowerPoint presentation on social media. If you want to get the most number of people to watch your PPT, then sharing it on social media is the way to go. There are a lot of social media channels out there - Facebook, Instagram, Snapchat, Twitter, Pinterest, to name a few.
6. Click "Choose File" and then locate the .wmv file you created in PowerPoint from the files and folders on your computer. After you've located it, click "Open" to begin its upload to Facebook.
Another problem lies in the front before you upload PowerPoint to Facebook, the format incompatibility. Keep on reading and the following method will help you to share your PowerPoint slideshow on Facebook freely. There used to be a Slideshare app for Facebook users to upload PowerPoint to Facebook wall directly, but it doesn't work now.
Method 1via a Windows Operating System. 1. Open the PowerPoint presentation that you would like to upload. 2. Save the PowerPoint presentation as a Windows Media Video file. Click the File tab on the standard toolbar and select Save As. Enter a name for the PowerPoint file and, in the Save as Type menu, select Windows Media Video.
http://www.dvd-ppt-slideshow.com/blog/how-to-upload-powerpoint-presentation-to-facebook/. This video will show you how to upload PowerPoint to Facebook with ...
Ok, just let's start. Launch PPT2Video Pro and click "Create Video Files", then follow the steps below. Step 1. Click "Add"button to import your PowerPoint to the app and press "Next". Step 2. On the "settings" interface, in the format drop-down list, choose "Facebook video" in the category of "Online Video". Then click "Next".
For individuals, funny presentations or photo slideshows are usually made with PowerPoint. When it comes to business, PowerPoint is frequently used for creating company profiles, product brochures or service advertisements. For the wide spread of these PowerPoint files, upload the PowerPoint Presentation to Facebook seems like a good idea.
Here is a step-by-step guide to seamlessly integrating Facebook into your PowerPoint presentations: Step one: Open your PowerPoint presentation and navigate to the slide where you want to integrate Facebook content. Step two: Access the "Insert" tab in the PowerPoint ribbon and click on the "Web Page" option.
Facebook has an application called "Slideshare" which allows you to upload PowerPoint Facebook directly, but the animations, transitions, music and video clips will be removed. Login Facebook, and search "Slideshare", and add it in your application area. Click "Upload" to upload your PowerPoint to Facebook. Then share and post it on the ...
If you upgrade the PowerPoint 2010, you can save the presentation as a WMV video where all animations, music, any video inside the pres, etc. performs beautifully.
Hi Charles, You can refer to this article to add a PowerPoint to Facebook. How to add a PowerPoint to Facebook. Meanwhile, you can refer to Making Instagram video with Powerpoint to know about how to create a PowerPoint file and upload it to Instagram. Disclaimer: Microsoft provides no assurances and/or warranties, implied or otherwise, and is ...
In order to share slideshows, digital resumes and other PowerPoint presentations with Facebook contacts, the file must first be converted from a ppt. file to a video file. Once converted, a video copy of the presentation can be uploaded to a Facebook profile. This article provides detailed instructions on how to convert a presentation to a video file using Microsoft PowerPoint, and how to add ...
Step 1: Log in to the Facebook. Step 2: Click Add Photos/Video to navigate to where your video is saved. Step 3: Select the converted PPT and upload it to the Facebook. A few seconds later, you will see your converted PPT on Facebook page and it can be watched and enjoyed by your friends.
When you create a story on Facebook, you can share photos, videos and posts that will only be visible for 2...
Next, navigate to the specific slide you wish to share. Then, right-click on the desired slide and a shortcut menu pops up. From this menu, select the option "Link To This Slide" to generate a direct link to the chosen slide within your presentation. Selecting "Share Link To This Slide," will prompt you to upload your presentation to ...
Upload PowerPoint Presentation to Facebook Dear viewers! I am M.A. AHAD from "Master Learning Center" YouTube channel. Today I have brought for you MS PowerP...
Videos are the best way to spice up your PowerPoint presentation and make your audience pay attention. In this snappy Biteable tutorial, we'll show you how to add a video to your PowerPoint in seconds and make your presentation jaw-dropping. See less.
2022-04-13 09:16 PM. I recorded a Powerpoint presentation but I cannot upload it to my school's website. Does anyone have any suggestions. This is due in one hour and forty five minutes.. 2022-04-14 12:59 AM. To be very honest with you, I donot understand the context of this problem. Zoom does not have an option to upload files.
This video shows how to easily transfer powerpoint file to facebook. How to convert powerpoint file to image again. So enjoy the video.thanks watch my video....
Microsoft Copilot AI is a new tool that makes the way you create PowerPoint presentations even easier. By harnessing the power of artificial intelligence, Copilot AI becomes your intelligent ...
Click the Slide Show tab. NOTE: Do not add audio under Insert and Record Audio; this method will not allow you to save your PowerPoint as a video since it does not synchronize timings to automatically move the slides with the audio. Click Record Slide Show. Review the narration setup and navigation before recording.